
The Windows Registry is a hierarchical database for storing many kinds of system and application settings. Prior to the Registry, .ini files in the form of text files were commonly used for storing these settings. However, these files were unable to meet all the requirements of a modern application. Especially in multi-user scenarios the .ini files were nearly useless.
On the other hand, the Windows Registry uses one logical repository that is able to store user-specific settings. According to Microsoft, there are several advantages over the obsolete .ini files like faster parsing, backup or restoration.
Structure of the Registry
The Registry is based on the two basic elements, keys and values and the entire structure is a tree with several root elements that slightly differ depending on the version of Windows you are currently using. The keys are container objects very similar to folders that can contain other keys or values. The values can be a string, binary, or DWORD depending on the scenario.
The most common root element structure is as follows:
Figure 1: root elements structure
HKEY_CLASSES_ROOT
This root element holds the information about registered (installed) applications and associated file extensions. For example, Windows is able to open the .pdf extension with Acrobat Reader because of the settings in this key. It is not advised to alter these keys manually and the Folder Options in the Windows Explorer should be used instead.
HKEY_CURRENT_USER
This root element represents the currently logged-in user and their specific settings. It is a link to a subkey of HKEY_USERS that corresponds to the current user. It cannot be edited.
HKEY_LOCAL_MACHINE
This root element contains five subkeys (hardware, security accounts manager, security, software, system) that are used for storing many kinds of settings used by the operating system. Hardware, security and security accounts manager subkeys can’t be edited. It is not advised to manully alter the rest as it might result in a system crash.
HKEY_USERS
This root element holds all the user profiles used on the machine. Even though it can be edited, you should be very cautious when doing so.
HKEY_CURRENT_CONFIG
This root element contains read-only settings about the available hardware settings. These settings are not permanently stored on disk, but generated at the boot time and updated at runtime.
Windows Registry and C#
When it comes to using the Registry programmatically, we can easily store, retrieve and remove the settings in code using C#. Basically, the Registry and RegistryKey classes from the Microsoft.Win32 namespace are all we need to communicate with it.
Registry class
This class is a gate keeper and allows us to access the root elements. It provides RegistryKey objects of the root keys and several static methods to access key/value pairs.
RegistryKey class
An instance of this class represents a key-level node in the Registry.
Storing data in the Registry
In order to store any data in the Registry, we need to access a subkey of one of the predefined root elements. This is done by calling the static CreateSubKey method of the Registry class that will return the RegistryKey object we can manipulate it with.
Afterwards, we can store as many values in the subkey as we want by calling the SetValue method that takes the 2 arguments, name as a string and value as an object.
- RegistryKey key = Registry.CurrentUser.CreateSubKey(@«SOFTWARE\OurSettings»);
- key.SetValue(«Setting1», «This is our setting 1»);
- key.SetValue(«Setting2», «This is our setting 2»);
- key.Close();
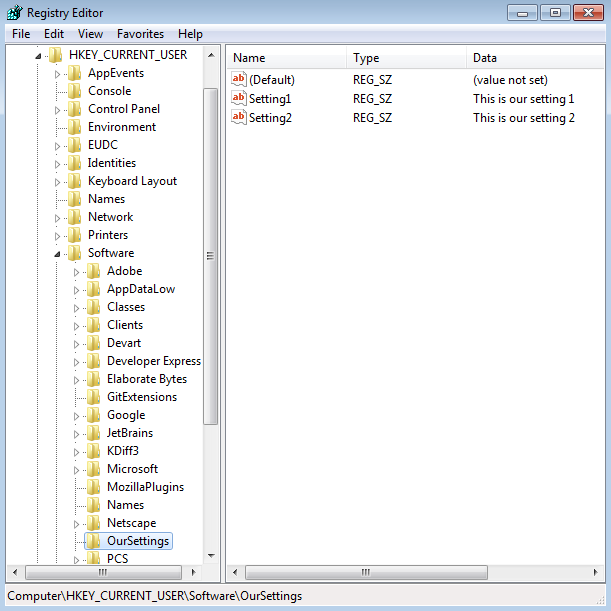
Figure 2: storing data in the Registry
Note: There is no need to check whether the subkey already exists or not. The CreateSubKey method creates it or opens the existing one.
Retrieving data from the Registry
To retrieve any data from the Registry, the static OpenSubKey method of the Registry class is used that returns a RegistryKey instance of the given subkey. If the object is not null (in case the given subkey doesn’t exist), we can start retrieving the values by calling the GetValue method that takes just one argument, the key name.
- RegistryKey key = Registry.CurrentUser.OpenSubKey(@«SOFTWARE\OurSettings»);
- if (key != null)
- {
- Console.WriteLine(key.GetValue(«Setting1»));
- Console.WriteLine(key.GetValue(«Setting2»));
- key.Close();
- }
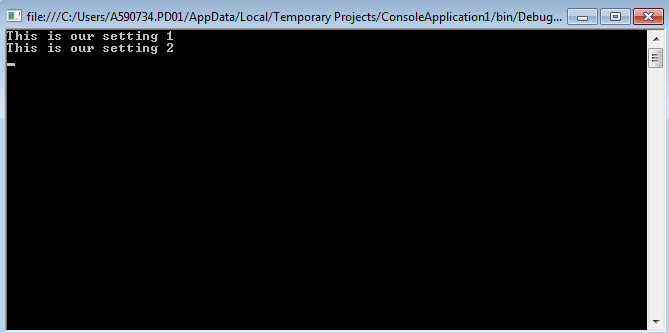
Figure 3: console output of retrieved settings
Using Windows Registry in a real example
In the following example, we will use the Registry for storing some user-specific settings. More specifically, we will store the size of the application’s window and retrieve it the next time the application starts. Because we use the CurrentUser subkey, we will allow every user to have his own window size based on his preferences (in this case the size of the window when the application was closed).
First, we need to store the settings. We will do so in the form’s Closing event since it best suits our needs.
- private void WinRegForm_FormClosing(object sender, FormClosingEventArgs e)
- {
- RegistryKey key = Registry.CurrentUser.CreateSubKey(@«SOFTWARE\WinRegistry»);
- key.SetValue(«Width», this.Width);
- key.SetValue(«Height», this.Height);
- key.Close();
- }
The next step is to retrieve the stored values when the application starts. For this purpose, we use the form’s Load event.
- private void WinRegForm_Load(object sender, EventArgs e)
- {
- RegistryKey key = Registry.CurrentUser.OpenSubKey(@«SOFTWARE\WinRegistry»);
- if (key != null)
- {
- int width = int.Parse(key.GetValue(«Width»).ToString());
- int height = int.Parse(key.GetValue(«Height»).ToString());
- this.Size = new Size(width, height);
- }
- }
And here is the result:
Figure 4: form after first start
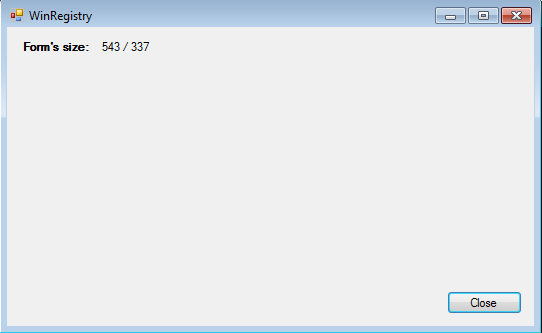
Figure 5: form after resize before closing
Figure 6: form after next start — the size was correctly saved and loaded
Note: The entire source code is available for download.
As you can see, using the Windows Registry in C# is straightforward, thus it can be easily used in your own projects for whatever reason.
I hope you enjoyed the reading and comments are more than welcome.
Работа с реестром. Класс Registry
Последнее обновление: 31.10.2015
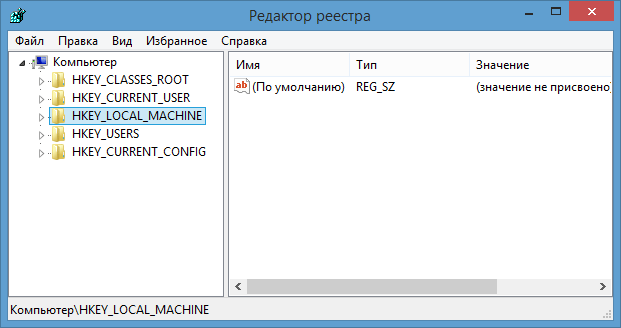
Ключевым местом для хранения конфигурационных настроек в ОС Windows является реестр. Для просмотра реестра мы можем воспользоваться утилитой
regedit. При запуске данная утилита отображает в графическом окне в древовидном виде все содержимое реестра:
Реестр хранит набор ключей, у которых имеется определенное значение. Ключи также могут содержать другие ключи.
Всего имеется пять ключей верхнего уровня, предназначенных для хранения различной информации:
-
HKEY_CLASSES_ROOT: хранит информацию об используемых в ос файлах, какие программы открывают тот или иной тип файлов, а также информацию
о компонентах COM -
HKEY_CURRENT_USER: хранит настройки для текущего пользователя в системе
-
HKEY_LOCAL_MACHINE: хранит информацию обо всех установленных программах
-
HKEY_USERS: хранит настройки для всех пользователей
-
HKEY_CURRENT_CONFIG: хранит информацию о конфигурации установленного оборудования
-
HKEY_DYN_DATA: хранит различные текущие данные
-
HKEY_PERFORMANCE_DATA: хранит информацию о производительности приложений
Для управления регистром в пространстве имен Microsoft.Win32 имеются два класса: Registry и RegistryKey.
Класс Registry позволяет получить доступ к ключам верхнего уровня реестра. А класс RegistryKey представляет отдельный ключ реестра.
При использовании этих классов необходимо учитывать древовидную иерархическую структуру реестра. Так получение ключа верхнего уровня
HKEY_LOCAL_MACHINE, который содержит информацию об установленном на локальной машине программном обеспечении, происходит следующим образом:
RegistryKey localMachineKey = Registry.LocalMachine;
Класс Registry содержит еще ряд статических свойств, каждое из которых представляет соответствующий ключ верхнего уровня:
-
Registry.ClassesRoot -
Registry.CurrentConfig -
Registry.CurrentUser -
Registry.DynData -
Registry.Users -
Registry.PerformanceData
Для управления ключами в реестре класс RegistryKey определяет ряд свойств и методов. Основные из них:
-
Name: возвращает имя ключа реестра -
Close(): закрывает ключ -
CreateSubKey(): создает вложенный ключ, если он не существует -
DeleteSubKey(): удаляет вложенный ключ -
DeleteValue(): удаляет значение ключа -
GetSubKeyNames(): возвращает коллекцию имен вложенных ключей -
GetValue(): возвращает значение ключа -
OpenSubKey(): открывает вложенный ключ -
SetValue(): устанавливает значение ключа
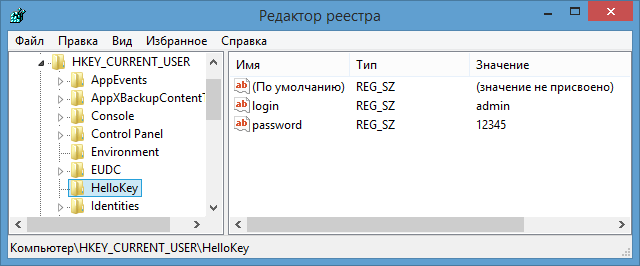
Создадим свой ключ в реестре:
RegistryKey currentUserKey = Registry.CurrentUser;
RegistryKey helloKey= currentUserKey.CreateSubKey("HelloKey");
helloKey.SetValue("login", "admin");
helloKey.SetValue("password", "12345");
helloKey.Close();
После этого в реестре мы сможем увидеть добавленный ключ и два его значения:
Создадим в ранее созданном ключе вложенный ключ:
RegistryKey currentUserKey = Registry.CurrentUser;
RegistryKey helloKey= currentUserKey.OpenSubKey("HelloKey", true);
RegistryKey subHelloKey = helloKey.CreateSubKey("SubHelloKey");
subHelloKey.SetValue("val", "23");
subHelloKey.Close();
helloKey.Close();
Значение true в вызове OpenSubKey("HelloKey", true); позволяет открывать ключ с возможностью записи в него.
Считаем сохраненные в реестре значения:
RegistryKey currentUserKey = Registry.CurrentUser;
RegistryKey helloKey= currentUserKey.OpenSubKey("HelloKey");

string login = helloKey.GetValue("login").ToString();
string password = helloKey.GetValue("password").ToString();
helloKey.Close();

Console.WriteLine(login);
Console.WriteLine(password);
И в конце удалим значения из ключа и сам ключ из реестра:
RegistryKey currentUserKey = Registry.CurrentUser;
RegistryKey helloKey= currentUserKey.OpenSubKey("HelloKey", true);
// удаляем вложенный ключ
helloKey.DeleteSubKey("SubHelloKey");
// удаляем значение из ключа
helloKey.DeleteValue("login");
helloKey.Close();
// удаляем сам ключ
currentUserKey.DeleteSubKey("HelloKey");
An useful simple class to read, write, delete values from registry with C#.
- Download source file — 1.47 Kb
Introduction
I’ve done a little update, now this class provides six functions:
Readto read a registry key.Writeto write into a registry key.DeleteKeyto delete a registry key.DeleteSubKeyTreeto delete a sub key and any child.SubKeyCountto retrieve the count of subkeys at the current key.ValueCountto retrieve the count of values in the key.
and three properties:
ShowErrorto show or hide error messages (default =false).SubKeyto set the subkey value (default = «SOFTWARE\\» +Application.ProductName).BaseRegistryKeyto set the base registry key value (default =Registry.LocalMachine).
Source code
Importing other namespaces…
using System;

using Microsoft.Win32;

using System.Windows.Forms;
Read function
- input: the key name (
string) - output: value of the key (
string)
public string Read(string KeyName)
{

    RegistryKey rk = baseRegistryKey ;

    RegistryKey sk1 = rk.OpenSubKey(subKey);

    if ( sk1 == null )
    {
        return null;
    }
    else
    {
        try
        {


            return (string)sk1.GetValue(KeyName.ToUpper());
        }
        catch (Exception e)
        {

            ShowErrorMessage(e, "Reading registry " + KeyName.ToUpper());
            return null;
        }
    }
}
Write function
- input: the key name (
string) and its value (object) - output:
trueif OK orfalseif error
public bool Write(string KeyName, object Value)
{
    try
    {

        RegistryKey rk = baseRegistryKey ;


        RegistryKey sk1 = rk.CreateSubKey(subKey);

        sk1.SetValue(KeyName.ToUpper(), Value);

        return true;
    }
    catch (Exception e)
    {

        ShowErrorMessage(e, "Writing registry " + KeyName.ToUpper());
        return false;
    }
}
DeleteKey function
- input: the key name (
string) - output:
trueif OK orfalseif error
public bool DeleteKey(string KeyName)
{
    try
    {

        RegistryKey rk = baseRegistryKey ;
        RegistryKey sk1 = rk.CreateSubKey(subKey);

        if ( sk1 == null )
            return true;
        else
            sk1.DeleteValue(KeyName);

        return true;
    }
    catch (Exception e)
    {

        ShowErrorMessage(e, "Deleting SubKey " + subKey);
        return false;
    }
}
DeleteSubKeyTree function
- input:
void - output:
trueif OK orfalseif error
public bool DeleteSubKeyTree()
{
    try
    {

        RegistryKey rk = baseRegistryKey ;
        RegistryKey sk1 = rk.OpenSubKey(subKey);

        if ( sk1 != null )
            rk.DeleteSubKeyTree(subKey);

        return true;
    }
    catch (Exception e)
    {

        ShowErrorMessage(e, "Deleting SubKey " + subKey);
        return false;
    }
}
SubKeyCount function
- input:
void - output: number of subkeys at the current key
public int SubKeyCount()
{
    try
    {

        RegistryKey rk = baseRegistryKey ;
        RegistryKey sk1 = rk.OpenSubKey(subKey);

        if ( sk1 != null )
            return sk1.SubKeyCount;
        else
            return 0;
    }
    catch (Exception e)
    {

        ShowErrorMessage(e, "Retriving subkeys of " + subKey);
        return 0;
    }
}
ValueCount function
- input:
void - output: number of values in the key
public int ValueCount()
{
    try
    {

        RegistryKey rk = baseRegistryKey ;
        RegistryKey sk1 = rk.OpenSubKey(subKey);

        if ( sk1 != null )
            return sk1.ValueCount;
        else
            return 0;
    }
    catch (Exception e)
    {

        ShowErrorMessage(e, "Retriving keys of " + subKey);
        return 0;
    }
}
ShowErrorMessage function
This is a private function to show the error message if the property showError = true.
private void ShowErrorMessage(Exception e, string Title)
{
    if (showError == true)
        MessageBox.Show(e.Message,
                Title
                ,MessageBoxButtons.OK
                ,MessageBoxIcon.Error);
}
Using the code
First of all, you have to import its namespace:
using Utility.ModifyRegistry;
and to instantiate your class:
ModifyRegistry myRegistry = new ModifyRegistry();
The three properties have already their default values. However, you can modify them:
| property | default value | example |
ShowError |
false |
myRegistry.ShowError = true; |
BaseRegistryKey |
Registry.LocalMachine |
myRegistry.BaseRegistryKey = Registry.CurrentUser; |
SubKey |
«SOFTWARE\\» + Application.ProductName |
myRegistry.SubKey = "SOFTWARE\\MYPROGRAM\\MYSUBKEY"; |
OK, now you can read, write, and delete from your registry.
To read:
myRegistry.Read("MY_KEY");
Note: if MY_KEY doesn’t exist, the Read function will return null.
To write:
myRegistry.Write("MY_KEY", "MY_VALUE");
Note: if the SubKey doesn’t exist, it will be automatically created.
To delete a single key:
myRegistry.DeleteKey("MY_KEY");
Note: also if the MY_KEY doesn’t exist, this function will return TRUE.
To delete the subkey tree:
myRegistry.DeleteSubKeyTree();
Note: this code will delete the SubKey and all its children.
To retrieve the count of subkeys at the current key:
myRegistry.SubKeyCount();
To retrieve the count of values in the key:
myRegistry.ValueCount();
Example
The following code is an example from my in progress RTF file editor program. This code retrieves the «Recent files» list from registry:
[...]
ModifyRegistry myRegistry = new ModifyRegistry();
myRegistry.SubKey = "SOFTWARE\\RTF_SHARP_EDIT\\RECENTFILES";
myRegistry.ShowError = true;
int numberValues = myRegistry.ValueCount();

for (int i = 0; i < numberValues; i++)
{
    arrayRecentFiles[i] = myRegistry.Read(i.ToString());
    [...]
and this code writes the «Recent files» list into registry:
ModifyRegistry myRegistry = new ModifyRegistry();
myRegistry.SubKey = "SOFTWARE\\RTF_SHARP_EDIT\\RECENTFILES";
myRegistry.ShowError = true;
myRegistry.DeleteSubKeyTree();
for (int i = 0; i < 8 ; i++)
{
    if (arrayRecentFiles[i] == null)
        break;
    myRegistry.Write(i.ToString(), arrayRecentFiles[i]);
}
Conclusion
The .NET framework has a lot of functions to read and modify the registry, my class is only a start point. I hope this helps!
Всем привет! Моя недавняя тема по созданию простейшей игры на C# получила относительную для этого раздела популярность. Я давно хотел ее продолжить, но что-то никак не доходили руки . Во второй части создания этого «чудо» проекта я покажу, как сохранять всю информацию в реестр и воспроизводить ее от-туда (до этого хотел показать создание многопользовательской игры, посредствам передачи сокетов, но подумал отложить это идею до лучших времен).
Показывать, как размещать элементы на форме (как передвинуть кнопки и добавить menuStrip), я не буду, так как эта информация не пригодится почти никому (я полагаю, что большая часть, читающая данную тему понимает, как добавить элемент на форму) и займет достаточно много места в самой статье.
Первым делом создадим переменную, в которой будет храниться история побед. Формат записи: 0/1/2, где 0 — ничья, 1 — победа Х, а 2 — победа 0, / — разделитель
string WinsReg = "";
Далее, будем добавлять один символ в WinsReg после победы одной из сторон или ничьи
WinsReg += "/2";
Добавим сразу после
Посмотреть вложение 44028
Аналогично делаем с крестиками (+=»/1″) и ничьей (+=»/0″).
Отлично, теперь нужно создать класс для работы с реестром и начинать работу с ним. Я назвал класс Memory, вы можете придумать что-то более оригинальное.
Для начала, подключим класс для работы с самим реестром системы using Microsoft.Win32; и напишем нужные для нас функции.
static string regKeyName = "Software\\Yougame.biz\\TicTacToe";
public static string WinsKey = "";
Чтобы было меньше кода, я создал переменную regKeyName, в которой будет храниться «путь» к нашему ключу в реестре.
WinsKey нужен для загрузки побед в WinsReg из нашей первой формы. Были и другие идеи, но эта оказалась наиболее простой и красивой (но это не точно ).
Теперь, создадим функцию записи значений в реестр (также она создает ключ по нашему «пути»)
public static void WriteMemory(string Wins) // Публичная функция записи переменных в реестр
        {
            // Wins - переменная со статистикой побед. Записывать их мы будем в формате 1/2/1/1/2/0, где 0 - ничья, 1 - крестики, 2 - нолики, а / - разделитель

            RegistryKey rk = null; // Создаем переменную класса RegistryKey для работы с ключами реестра

            try // try (с англ. "пытаться") - пробуем занести переменные в реестр
            {
                rk = Registry.CurrentUser.CreateSubKey(regKeyName); // Создаем ключ в реестре по пути, указанном в regKeyName
                if (rk == null) return; // Если создание ключа не удалось (по каким-либо причинам закрыт доступ к реестру), то rk остается равным null (нулю)
                rk.SetValue("Wins", Wins); // Создаем еще один ключ из переменной Wins
            }

            finally // Цикл, выполняющийся при ошибке/при успешном выполнении try(), т.е. всегда
            {
                if (rk != null) rk.Close(); // Если программа создала новый ключ (rk получит доступ к реестру и создаст коюч из regKeyName), закрываем поток
            }
        }
Теперь, написав Memory.WriteMemory("Irval") в любой (почти) части кода из Form1.cs, мы получим это (
), но то, что мы получили никак не касается «Крестиков-ноликов», поэтому нужно это удалить .
После создания функции записи в реестр, нужно также создать функцию чтения реестра
public static void ReadMemory() // Функция чтение реестра
        {
            RegistryKey rk = null; // Повторно создаем переменную класса для работы с ключами

            try
            {
                rk = Registry.CurrentUser.CreateSubKey(regKeyName); // Создаем новый ключ

                if (rk != null) // Если создание ключа удалось, то выполняем следующие действия
                {
                    WinsKey = (string)rk.GetValue("Wins"); // Записываем информацию в переменную Wins
                }
            }
            finally
            {
                if (rk != null) rk.Close(); // Закрываем поток
            }
        }
Теперь, написав Memory.ReadMemory() там же, где мы писали вызов функции WriteMemory(), мы изменим значения переменной WinsKey на «Irval», так как программа считала значение с реестра. Поздравляю, этот код тоже нужно стирать .
Осталось только использовать наши функции из класса Memory в главном файле — Form1.cs
Запихиваем это в обработчик загрузки формы (Form1_Load())
// Обновляем  Wins
            Memory.ReadMemory();
            WinsReg = Memory.WinsKey;

            if (WinsReg == null)
                Memory.WriteMemory(""); // Создаем ключ в реестре с победами, если его нет или он был удален

            Memory.ReadMemory();
            WinsReg = Memory.WinsKey; // Повторно задаем значения WinsReg. Можно было сделать иначе, например создать функцию обновления, но я посчитал это лишним
Дальнейший код я хотел расписать более подробно в самой статье, но из-за ограничения на повторяющиеся BB-коды, я запихну все в один элемент
private void Form1_FormClosing(object sender, FormClosingEventArgs e) // Обработчик события выхода из формы. Возникает до того, как форма была закрыта
        {
            Memory.WriteMemory(WinsReg); // Записываем значение WinsReg в реестр
        }

        private void ВыходToolStripMenuItem_Click(object sender, EventArgs e) // Событие нажатия на "Выход" из нашего ToolStrip
        {
            this.Close(); // Закрываем форму
        }

        private void СтатистикаToolStripMenuItem_Click(object sender, EventArgs e) // Событие нажатия на "Статистику" из ToolStrip на форме
        {
            String[] AllWins = WinsReg.Split(new char[] { '/' }, StringSplitOptions.None); // Массив с победами. Он понадобится для подсчета выигрышей каждой стороны
            int[] EachWins = { 0, 0, 0 }; // Итоговый массив побед
            for (int i = 0; i < AllWins.Length; i++) // Перебираем все элементы массива AllWins. Можно было использовать foreach
            {
                switch(AllWins[i]) // switch для каждого из трех значений элемента из AllWins
                {
                    case "0": // 0 значение - ничья
                        {
                            EachWins[0]++; // Прибавляем 1 к ничьим
                            break; // Выход из switch
                        }
                    case "1": // 1 значение - победа крестиков
                        {
                            EachWins[1]++; // Прибавляем 1 к крестикам
                            break;
                        }
                    case "2": // 2 значение - победа ноликов
                        {
                            EachWins[2]++; // Прибавляем 1 к ноликам
                            break;
                        }
                }
            }

            // Объявление переменных с процентом побед
            decimal Wx = 0;
            decimal Wo = 0;
            decimal Draw = 0;

            if (EachWins[0] + EachWins[1] + EachWins[2] != 0)  // Если произойдет попытка деления на ноль
            {
                //Подсчет процентов побед
                Wx = (Int32)(EachWins[1] / ((EachWins[0] + EachWins[1] + EachWins[2]) / 100M));
                Wo = (Int32)(EachWins[2] / ((EachWins[0] + EachWins[1] + EachWins[2]) / 100M));
                Draw = (Int32)(EachWins[0] / ((EachWins[0] + EachWins[1] + EachWins[2]) / 100M));
            }

            MessageBox.Show("Побед крестиков: " + EachWins[1] + " (" + Wx + "%)" + "\n" + "Побед ноликов: " + EachWins[2] + " (" + Wo + "%)" + "\n" + "Ничьих: " + EachWins[0] + " (" + Draw + "%)", "Статистика", MessageBoxButtons.OK); // Выводим MessageBox со статистикой побед


        private void СбросToolStripMenuItem_Click(object sender, EventArgs e) // Событие нажатия на кнопку сброса из ToolStrip
        {
            WinsReg = ""; // Сбрасываем переменную WinReg. При закрытии формы, ее значение занесется в реестр
            MessageBox.Show("Статистика была обнулена!", "Статистика", MessageBoxButtons.OK); // Вывод сообщения о сбросе статистики
        }
Обработчики событий этих элементов вы найдете сами, надеюсь, что вы не глупые
А вот и итоговый скриншот нашей игры:
Посмотреть вложение 44030
Также можно добавить запрос на запуск с правами администратора. Для этого, добавьте в Program.cs следующий код:
Если же у вас есть пожелания к новым урокам или я допустил ошибку в коде/в оформлении гайда, прошу отписать мне в лс или же в саму тему.
Готовый исходник игры с дополнительными пояснениями:
Готовая игра:
VT на игру:
In this article, we will learn what Windows Registry is, how we can work with it in .NET Core, and how we can read and write Windows Registry in C#. After that, we will explore some advanced use cases of the Windows Registry.
To download the source code for this article, you can visit our GitHub repository.
Let’s start.
What Is the Windows Registry and How We Can Use It
The Windows Registry is a hierarchical database for the Microsoft Windows operating system that stores different information for the Windows operating system and installed software and hardware. This information can be settings, options, or any other value we want to persist.
Support Code Maze on Patreon to get rid of ads and get the best discounts on our products!
Before the introduction of the Windows Registry, we used simple .INI files to store that information in a text or binary format. The Windows Registry provides many improvements over .INI files:
- name/value interface
- user-specific settings in multi-user environment
- different data types, not only strings
- security
- safe access from multiple threads
- remote management
Windows Registry Structure
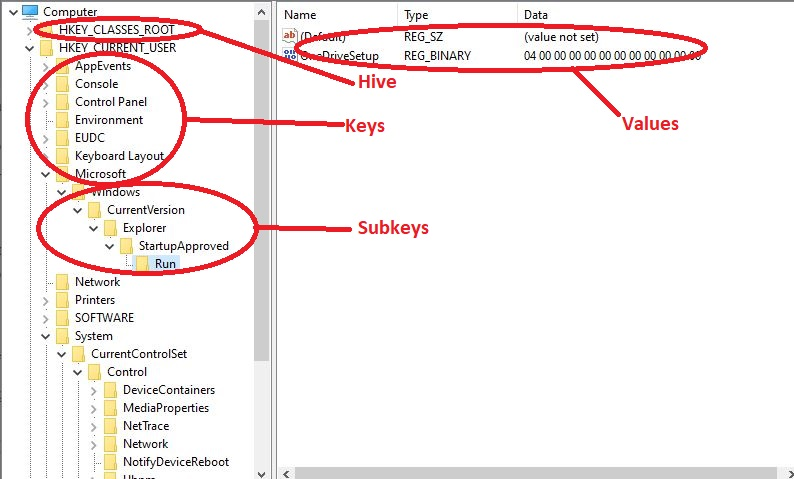
The Windows Registry utilizes a tree structure for its data. A node in a tree is called a key. The key can contain subkeys or data entries in the name/value format. Furthermore, we can consider Windows Registry a name/value database. An additional view of the Windows Registry is a directory view. Basically, the key represents the directory, and the directory’s content is subdirectories/subkeys or files/name-value pairs.
The Windows Registry comes with a set of predefined keys. An application can use handles to access those keys. The predefined keys are always open and serve as entry points to the registry. The different versions of Windows can have a different set of predefined keys. We also call those keys root elements, root keys, or base keys. Here are some of the most common:
| Handle to the base key | Description |
|---|---|
| HKEY_CLASSES_ROOT | It contains file name extension associations and COM class registration data. |
| HKEY_CURRENT_CONFIG | It contains information about the current and standard hardware configuration differences. |
| HKEY_CURRENT_USER | It contains data related to the current user (settings, data about applications, environment variables, etc.). |
| HKEY_CURRENT_USER_LOCAL_SETTINGS | It contains the current user’s data that are local to the machine. |
| HKEY_LOCAL_MACHINE | It contains the data about the physical state of the computer. |
To learn more about the predefined keys, please read about predefined keys.
Windows Registry Key Values
The values of the Windows registry keys can be of different types:
| Data type | Description |
|---|---|
| REG_BINARY | Any data in binary form. |
| REG_DWORD | A 32-bit number. |
| REG_DWORD_LITTLE_ENDIAN | A 32-bit number in little-endian format. |
| REG_DWORD_BIG_ENDIAN | A 32-bit number in big-endian format. |
| REG_EXPAND_SZ | Null-terminated string with unexpanded references to the environment variables (for example, «%PATH%»). |
| REG_LINK | Unicode symbolic link. |
| REG_MULTI_SZ | Array of null-terminated strings. |
| REG_NONE | Value type is not defined. |
| REG_RESOURCE_LIST | Resource list for device driver. |
| REG_SZ | Null-terminated string. |
When the operating system starts or a new user logs in, the new set of registry keys is loaded into memory. This set depends on the user profile, configuration, and settings. The first key in this set is called a hive or a base key. Users can’t create, edit, or delete hives.
Open the Windows Registry
DISCLAIMER! We’ll demonstrate how to open and look at the Windows Registry. Later on, we’ll also make some programmatic changes to the Windows Registry. The reader accepts sole responsibility for all inadvertent changes made to their system and possible problems caused by modifying or deleting registry keys manually or running the demo application. It is strongly recommended to create a Windows Registry backup before making any changes.
We can open the Windows Registry in two ways:
- Type regedit in the search box on the taskbar, and select the Registry Editor application.
- Right-click the Windows Start button, select Run, type regedit in the box, and press OK.
The Windows Registry on the user’s computer may look slightly different, but the following picture shows its basic structure:
Working With Windows Registry in .NET Core
In .NET, we can access the Windows Registry by using the Microsoft.Win32 namespace:
using Microsoft.Win32;
The Registry and RegistryKey classes are the main classes for interacting with the Windows Registry.
The Registry Class
The Registry class provides access to the root keys. Besides that, it implements static methods to read or write key/value pairs. For example, we can print the name of the HKEY_CURRENT_USER:
public static string GetCurrentUserRootKeyName()
{
    var registryKey = Registry.CurrentUser;
    return registryKey.Name;
}
In the above method, we notice compiler warnings:
This call site is reachable on all platforms. 'RegistryKey.Name' is only supported on: 'windows'.
This call site is reachable on all platforms. 'Registry.CurrentUser' is only supported on: 'windows'.
The Windows Registry is a Windows-specific feature that doesn’t exist on other operating systems.
However, .NET Core is a cross-platform framework. Because of this, the compiler warns us that this code won’t execute outside of a Windows environment. It is a good practice to check the environment in which the application is running and execute this part of the code accordingly:
public static string GetCurrentUserRootKeyNameWithPlatformCheck()
{
    if (!OperatingSystem.IsWindows())
    {
        return "Unsupported platform";
    }

    return Registry.CurrentUser.Name;
}
The RegistryKey Class
The RegistryKey class encapsulates the key-level node in the Windows Registry. It provides the methods for working with the key and its name/value pairs, inspecting certain properties of the registry key, and getting or setting access control over it. For example, we can count the number of subkeys in the specific key:
public static int GetCurrentUserRootKeySubkeyCount()
{
    if (!OperatingSystem.IsWindows())
    {
        return -1;
    }

    return Registry.CurrentUser.SubKeyCount;
}
We’ll explore other methods and properties of the RegistryKey class in the following sections.
The Windows Registry’s Typical Use Cases
The most common use cases of the Windows Registry include the following:
- System settings – configuration and behavior of Windows itself
- Hardware configuration – device drivers and hardware settings
- Software configuration – preferences, license information, window size and position, and other application-specific data
- User profiles – user-specific configurations and settings that allow users to have personalized interfaces
- Security settings – security and group policies, user account settings
- File associations – file type-specific settings that allow applications to open files with particular extensions
- Startup configuration – information about programs that should start automatically with Windows
The Registry class implements only simple reading and writing of values from the Windows Registry. Besides access to base keys, it implements only two methods to work with Windows Registry.
The RegistryKey class represents the registry’s key node. It implements all supported methods and properties of the Windows Registry keys.
In the following code snippets, we’ll use a few constants:
private const string CodeMazeRegistryDemoSubKey = "CodeMazeRegistryDemoSubKey";
private const string CodeMazeRegistryDemoName = "CodeMazeRegistryDemoName";
public const string CodeMazeRegistryDemoValue = "CodeMazeRegistryDemoValue";
The CodeMazeRegistryDemoSubKey is the name of the subkey we’ll work with and the CodeMazeRegistryDemoName is the name of the value in the key. Finally, the CodeMazeRegistryDemoValue is the value we’ll write to the name/value pair. As an illustration, we will use Registry.CurrentUser (HKEY_CURRENT_USER) base key.
Read and Write Windows Registry Using Registry Class
The Registry class implements GetValue() and SetValue() static methods. Let’s see how we can use them:
public static string ReadAndWriteRegistryValueUsingRegistryClass()
{
    if (!OperatingSystem.IsWindows())
    {
        return string.Empty;
    }

    var subKeyToWrite = Path.Combine(Registry.CurrentUser.Name, CodeMazeRegistryDemoSubKey);

    Registry.SetValue(subKeyToWrite, CodeMazeRegistryDemoName, CodeMazeRegistryDemoValue);
    var writtenValue = Registry.GetValue(subKeyToWrite, CodeMazeRegistryDemoName, string.Empty);

    Registry.CurrentUser.DeleteSubKey(CodeMazeRegistryDemoSubKey);

    return writtenValue?.ToString() ?? string.Empty;
}
The SetValue() method has three parameters: the full path to the subkey, the name, and the value it will write to the registry. If the subkey doesn’t exist, it will be created. If the key doesn’t exist, it will be created. Otherwise, the method writes the name and value to the specified key.
The SetValue() method has one additional overload, allowing to specify the value’s data type. The method opens and closes the key automatically when writing the value to it.
Identically to the SetValue()method, the GetValue() also has three parameters: the full path to the subkey, the name, and the default value that will be returned if the name doesn’t exist. The method will return null if it can’t find the subkey and return the default value if the name doesn’t exist. The return value is of the object type, and we must cast it or convert it to the appropriate type.
Each registry key contains one default, unnamed value, which the GetValue() method returns if the name doesn’t exist in this key. We can use null or string.Empty in the SetValue() method for a name argument if we want to set the value to the default name.

Finally, we call the RegistryKey class’s DeleteSubKey() method to delete our created key:
Registry.CurrentUser.DeleteSubKey(CodeMazeRegistryDemoSubKey);
Read and Write Windows Registry Using RegistryKey Class
As mentioned previously, the RegistryKey class represents a node in the Windows Registry. It implements various methods for working with the registry keys:
public static string ReadAndWriteRegistryValueUsingRegistryKeyClass()
{
    if (!OperatingSystem.IsWindows())
    {
        return string.Empty;
    }

    var baseKey = Registry.CurrentUser;

    using var subKey = baseKey.OpenSubKey(CodeMazeRegistryDemoSubKey, true) ??
                       baseKey.CreateSubKey(CodeMazeRegistryDemoSubKey);

    subKey?.SetValue(CodeMazeRegistryDemoName, CodeMazeRegistryDemoValue);
    var writtenValue = subKey?.GetValue(CodeMazeRegistryDemoName);
    subKey?.DeleteValue(CodeMazeRegistryDemoName);

    baseKey.DeleteSubKey(CodeMazeRegistryDemoSubKey);

    return writtenValue?.ToString() ?? string.Empty;
}
We open the subkey with the OpenSubKey() method. This method has five overloads, dealing with access control in different ways. For our example, we use the overload OpenSubKey(string, bool), with which we can open the subkey with write access. If we omit this parameter, the key opens only with read access, and the SetValue() method throws an exception. If the specified key doesn’t exist, the method returns null.
In our case, the key will always be null, as a result of deleting it with the DeleteSubKey() method at the end of the ReadAndWriteRegistryValueUsingRegistryKeyClass() method. On the other hand, if we comment out the call to the DeleteSubKey() method and rerun the application, the key will exist.
In the following line, we create the key with the call to the CreateSubKey() method. This method will open the key with write access. It has seven overloads that allow us to create the key with different access controls and options.
With the call to the RegistryKey class’s SetValue() method, we write the name/value pair to the key. If the name already exists, the value is updated. The method’s parameters are the name and the values, as the registry key path is already encapsulated in the subKey variable.
The GetValue() method reads the value under the specified name. In addition to that, we call the DeleteValue() method next. It deletes the value with the specified name. However, this step is technically unnecessary, as we later delete the entire subkey by calling the DeleteSubKey() method.
Finally, we return the value as a string. It is worth noting that the RegistryKey class also has a ToString() method that will return the name of the key as a string.
Disposing of the RegistryKey class
The RegistryKey class implements the IDisposable interface. Here, we wrap it in the using statement, implying that the Dispose() method will be called automatically.
Alternatively, if we don’t use the using statement, we can call the Dispose() method directly, which consequently closes the key, the same as a direct call to the Close() method. The call to the Close() method will write the key to the disk, and no further writes are possible.
Similarly, we can call the Flush() method if we want to be sure that key changes are written on the disk, but in typical cases, this is unnecessary, as the registry changes are stored automatically.
Advanced Use of Windows Registry
The RegistryKey class implements methods for more advanced work with the Windows Registry. Let’s look at some of them.
Enumerating Keys and Values
We can get an array of all subkeys for the particular key by calling the GetSubKeyNames() method:
public static string[] GetSubKeyNames()
{
    if (!OperatingSystem.IsWindows())
    {
        return Array.Empty<string>();
    }

    using var subKey = Registry.CurrentUser.CreateSubKey(CodeMazeRegistryDemoSubKey);
    subKey?.CreateSubKey("SubKey1");
    subKey?.CreateSubKey("SubKey2");

    var subKeyNames = subKey?.GetSubKeyNames();
    Registry.CurrentUser.DeleteSubKeyTree(CodeMazeRegistryDemoSubKey);

    return subKeyNames ?? Array.Empty<string>();
}
Apart from this, we can get an array of all value names by calling the GetValueNames() method:
public static string[] GetValueNames()
{
    if (!OperatingSystem.IsWindows())
    {
        return Array.Empty<string>();
    }

    using var subKey = Registry.CurrentUser.CreateSubKey(CodeMazeRegistryDemoSubKey);
    using var subKey1 = subKey?.CreateSubKey("SubKey1");
    subKey1?.SetValue("Name1", "Value1");
    subKey1?.SetValue("Name2", "Value2");

    var subKeyNames = subKey1?.GetValueNames();
    Registry.CurrentUser.DeleteSubKeyTree(CodeMazeRegistryDemoSubKey);

    return subKeyNames ?? Array.Empty<string>();
}
Get the Data Type of the Registry Key Value
The RegistryKey class implements the GetValueKind() method. It returns the data type of the specified value name:
public static string GetValueKind()
{
    if (!OperatingSystem.IsWindows())
    {
        return string.Empty;
    }

    using var subKey = Registry.CurrentUser.CreateSubKey(CodeMazeRegistryDemoSubKey);
    using var subKey1 = subKey?.CreateSubKey("SubKey1");
    subKey1?.SetValue("Name1", "Value1");

    var valueKind = subKey1?.GetValueKind("Name1");
    Registry.CurrentUser.DeleteSubKeyTree(CodeMazeRegistryDemoSubKey);

    return valueKind.ToString() ?? string.Empty;
}
The GetValueKind() method will return the member of the RegistryValueKind enumeration defined in the Microsoft.Win32 namespace.
The Registry Key Access Permissions
The CreateSubKey() and OpenSubKey() methods implement various overloads that accept parameters to finely control the access rights to the registry key.
With the RegistryKeyPermissionCheck enumeration, we can enforce the security checks when opening the key and accessing its values. Furthermore, with the RegistryRights enumeration, we can achieve fine-grained access control of the registry key:
public static bool SetRegistryKeyAccessPermissions()
{
    if (!OperatingSystem.IsWindows())
    {
        return false;
    }

    var user = Path.Combine(Environment.UserDomainName, Environment.UserName);
    var registrySecurity = new RegistrySecurity();

    var accessRule = new RegistryAccessRule(user,
        RegistryRights.ReadKey | RegistryRights.WriteKey,
        InheritanceFlags.None,
        PropagationFlags.None,
        AccessControlType.Allow);

    registrySecurity.AddAccessRule(accessRule);

    using var subKey = Registry.CurrentUser.CreateSubKey(CodeMazeRegistryDemoSubKey,
        RegistryKeyPermissionCheck.Default, registrySecurity);

    if (subKey == null)
    {
        return false;
    }

    var isAdded = false;
    var accessControl = subKey.GetAccessControl();
    var accessRules = accessControl.GetAccessRules(true, true, typeof(NTAccount));
    foreach (RegistryAccessRule rule in accessRules)
    {
        if (rule.IdentityReference.Value == user)
        {
            isAdded = true;
            break;
        }
    }
    Registry.CurrentUser.DeleteSubKeyTree(CodeMazeRegistryDemoSubKey);

    return isAdded;
}
In our example, we create the subkey by supplying the permission check and the registry security arguments. The permission check has a default value, meaning the security check is inherited from the parent. Besides the permission check, the RegistrySecurity class allows us to add registry access rules. As an illustration, we define that the user can read and write the key by specifying the desired RegistryRights with the bitwise OR operator (|).
The GetAccesControl() method returns the registry security definition of the key, and through it, we can enumerate all defined rules. After that, we check if our rule is applied to the key.
Using the related SetAccessControl() method, we can set and/or modify the security definition of the key (assuming we have the appropriate security access to change security rights).
Read and Write a Remote Windows Registry
The RegistryKey class implements the static OpenRemoteBaseKey() method. With it, we open the base key on a machine to which we have a remote network connection:
public static bool OpenRemoteBaseKey(string machineName)
{
    if (!OperatingSystem.IsWindows())
    {
        return false;
    }

    try
    {
        var remoteBaseKey = RegistryKey.OpenRemoteBaseKey(RegistryHive.CurrentUser, machineName);
        return true;
    }
    catch
    {
        return false;
    }
}
The Remote Registry Windows Service on the remote machine must be enabled to access the remote registry, and, of course, we must have administrative rights on the remote machine.
Conclusion
The Windows Registry is a central, structured place for applications, the operating system, and hardware to store different types of values necessary for their proper functioning. As a result, it represents the very welcome evolution of .INI files and enables much richer capabilities and features.
The Windows Registry is specific to the Windows operating system, and therefore we should verify in our code that it exists and we can access it.
The Registry and RegistryClass classes provide code-level access which allows us to read and write Windows Registry entries. They also provide a means for more advanced operations such as fine-control of access rights, along with accessing the registry on remote machines.
Liked it? Take a second to support Code Maze on Patreon and get the ad free reading experience!