
Содержание
- Переменные среды
- Классификация переменных среды
- Использование переменных в пакетных файлах
- Как задать свои переменные
- Команда SET
- Изменение переменных среды и добавление собственных переменных
- Утилита setenv
- Импорт параметров в реестр
- Резюме
- Терминология
- Как установить переменные пользовательской среды в Windows Server 2008 R2 как обычный пользователь?
- Переменные среды в Windows: использование, список и таблицы
- Пример использования переменной среды Windows
- Как посмотреть переменные среды Windows 10
- Доступ к переменным средам из реестра Windows
- Как посмотреть все переменные среды в командной строке
- Открытие списка переменных среды в Windows PowerShell
- Создание переменной среды в Windows
- Список переменных среды Windows в таблице
- Выводы статьи
- Переменные среды windows server 2008 r2
- Ответы (8)
- Системная переменная среды не обработаны правильно в Windows Server 2008 SP2
- Симптомы
- Решение
- Сведения об исправлении
- Предварительные условия
- Сведения о реестре
- Необходимость перезагрузки
- Сведения о замене исправлений
Переменные среды
Классификация переменных среды
| Переменная | Тип | Описание |
| %SYSTEMDRIVE% | Системная | Возвращает имя диска, содержащего корневой каталог операционной системы Windows XP/2003 (т. е. системный корневой каталог). |
| %SYSTEMROOT%, %WINDIR% | Системная | Возвращает размещение корневого каталога операционной системы Windows XP/2003 |
| %PATH% | Системная | Указывает путь поиска для исполняемых файлов. |
| %PROGRAMFILES% | Системная | Указывает путь к каталогу установки программ (Program Files) |
| %COMMONPROGRAMFILES% | Системная | Указывает путь к общему каталогу программ (Program Files\Common Files). |
| %TEMP% и %TMP% | Системная и пользовательская | Возвращает временные папки, по умолчанию используемые приложениями, которые доступны пользователям, выполнившим вход в систему. Некоторые приложения требуют переменную TEMP, другие — переменную TMP. |
| %USERPROFILE% | Локальная | Возвращает размещение профиля для текущего пользователя. |
| %ALLUSERSPROFILE% | Локальная | Возвращает размещение профиля «All Users». |
| %CD% | Локальная | Возвращает путь к текущей папке. |
| %APPDATA% | Локальная | Возвращает используемое по умолчанию размещение данных приложений. |
Использование переменных в пакетных файлах
Начнем с простенького примера:
DEL /F /Q «%AllUsersProfile%\Главное меню\Активация Windows.lnk»
DEL /F /Q «%AllUsersProfile%\Главное меню\WindowsUpdate.lnk» DEL /F /Q «%systemroot%\system32\*.scr»
Во всех командах я специально использовал «кавычки» – это не случайно. Весь путь, включая переменные, надо заключать в кавычки, если вы используете пути, содержащие пробелы. Даже если сама переменная кавычек не содержит, после ее разбора системой в пути могут появится пробелы (например, %ProgramFiles% в C:\Program Files). В любом случае кавычки лучше использовать – это является хорошим тоном оформления командных файлов.
Как задать свои переменные
Команда SET
Чтобы добавить переменную, введите в командной строке:
Чтобы отобразить переменную, введите в командной строке:
Чтобы удалить переменную, введите в командной строке:
Эти переменные могут быть созданы, к примеру, для любых путей, надо лишь задать или найти алгоритм присвоения переменной в каждой частной ситуации, пользуясь готовыми примерами или создавая свои на их основе. Как правило, такие переменные создаются в текущей сессии командными файлами с помощью некоторых операторов.
Пример назначения переменных в файле RunOnceEx.cmd, импортирующем параметры в реестр
@echo off
SET KEY=HKLM\SOFTWARE\Microsoft\Windows\CurrentVersion\RunOnceEx
SET i=100
REG ADD %KEY% /V TITLE /D «Installing Applications» /f
REG ADD %KEY%\%i% /VE /D «WinRar 3.51» /f
REG ADD %KEY%\%i% /V 1 /D «%systemdrive%\install\Software\WinRar.exe /s» /f
REG ADD %KEY%\%i% /V 2 /D «REGEDIT /S %systemdrive%\install\Software\rar_set.reg /s» /f
SET /A i+=1
REG ADD %KEY%\%i% /V 1 /D «%systemdrive%\install\Software\WinRar.exe /s» /f
на самом деле отработает так
REG ADD HKLM\SOFTWARE\Microsoft\Windows\CurrentVersion\RunOnceEx\100 /V 1 /D «C:\install\Software\WinRar.exe /s» /f
Обратите внимание, что во фрагменте файла также используется системная переменная %systemdrive%, которая соответствует букве системного диска.
Пример назначения переменных в командном файле, устанавливающем приложение с CD:
for %%i in (C D E F G H I J K L M N O P Q R S T U V W X Y Z) do if exist %%i:\WIN51 set CDROM=%%i:
start /wait “%CDROM%\INSTALL\DVDTools\NBRom\Nero.exe”
В этом примере для всех перечисленных дисков происходит поиск определенного файла (WIN51). В случае его обнаружения на одном из дисков, последнему присваивается переменная %CDROM%, а далее уже происходит установка программного обеспечения с использованием пути, заданного созданной переменной.
Изменение переменных среды и добавление собственных переменных
Утилита setenv
Утилита работает из командной строки (сайт, загрузить). Работать с утилитой очень просто ( setenv /? ).
Допустим, если нужно получить переменную %temp% еще на стадии установки, то можно это проделать из cmdlines.txt, например:
Импорт параметров в реестр
Если же пойти путем внесения изменений в реестр после первого входа в систему, то переменные начнут «работать» только после перезагрузки или завершения пользовательского сеанса. Конечно, в процессе автоустановки можно импортировать желаемые параметры на Т-12 (см. статью Твики реестра) и обойти данную проблему. Если же вы не собираетесь использовать назначенную переменную в текущем пользовательском сеансе, то импорт в реестр вас тоже может устроить. Процесс импорта REG-файлов описывать повторно не буду, а рассмотрю команду REG ADD на конкретном примере.
Допустим, вы заинтересованы иметь в системе переменную %CDROM% на постоянной основе и установить ее в процессе установки приложений с CD. Следуя коду, приведенному выше, нужно после определения переменной назначить ее системной.
for %%i in (C D E F G H I J K L M N O P Q R S T U V W X Y Z) do if exist %%i:\WIN51 set CDROM=%%i:
REG ADD «HKEY_LOCAL_MACHINE\SYSTEM\CurrentControlSet\Control\Session Manager\Environment» /v cdrom /d %CDROM% /f
После нахождения файла WIN51 диску, на котором он был найден, присваивается локальная переменная %CDROM%, которая тут же и назначается в виде постоянной системной переменной посредством импорта в реестр. Этот метод предложил в одной из тем на конференции Oszone Sanja Alone. Заодно вы узнали. где в реестре хранятся настройки системных переменных. Настройки пользовательских переменных хранятся в HKCU\Environment. Пути, возвращаемые переменными %PROGRAMFILES% и %COMMONPROGRAMFILES%, можно посмотреть в параметрах ProgramFilesDir и CommonFilesDir в HKLM\SOFTWARE\Microsoft\Windows\CurrentVersion, но менять их там не следует. Каталоги установки программ (отличные от %SystemDrive%\Program Files) нужно конфигурировать через файл ответов.
Резюме
Терминология
Командная оболочка — это отдельный программный продукт, который обеспечивает прямую связь между пользователем и операционной системой. Текстовый пользовательский интерфейс командной строки предоставляет среду, в которой выполняются приложения и служебные программы с текстовым интерфейсом.
Командная сессия может инициироваться как запуском cmd.exe, так и запуском пакетного файла. Иными словами создается текущая командная оболочка. Соответственно выход из этой оболочки (к примеру, окончание работы пакетного файла) завершает командную сессию. К тексту ^
Пользовательский сеанс (пользовательская сессия) начинается с момента входа пользователя в систему (log on) и завершается при выходе (log off). К тексту ^
Источник
Как установить переменные пользовательской среды в Windows Server 2008 R2 как обычный пользователь?
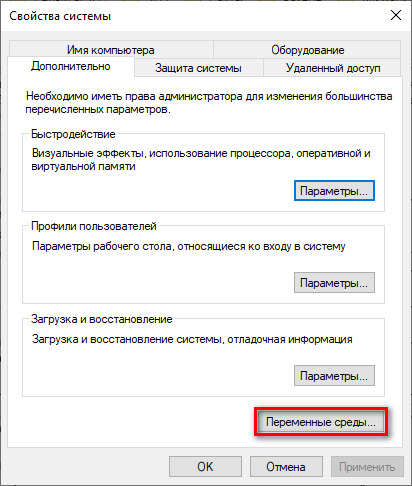
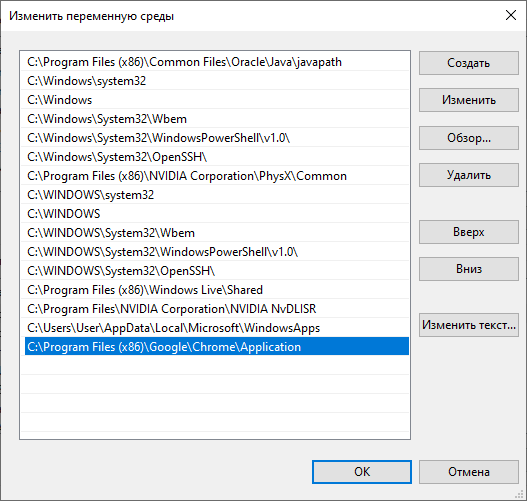
В более старых версиях Windows он просто открыл панель управления, выберите системный апплет, перейдите на вкладку «Дополнительно», а затем нажмите кнопку «Переменные среды». Как обычный пользователь, вы можете редактировать «Пользовательские переменные», но не «Системные переменные».
В Windows Server 2008 R2, если я пытаюсь использовать параметр «Дополнительные параметры системы» в апплете «Система», он запрашивает пароль администратора.
Вы также можете использовать эту прямую командную строку для открытия расширенных свойств системы:
Затем перейдите к вкладке «Дополнительно» → «Переменные среды»
ОК, я нашел его. Арг, упражнение в расстройстве. Они оставили путь прохождения старого окна, чтобы изменить переменные среды там, но ограниченный доступ только к администраторам. Как обычный пользователь, если вы хотите его изменить, вам нужно пройти через другой набор параметров, чтобы добраться до того же окна фрегата.
Панель управления → Учетные записи пользователей → Учетные записи пользователей → Измените мои переменные среды.
В разделе «Пуск» введите «окружение» в поле поиска. В этом списке будет указана возможность изменения системных переменных непосредственно в меню «Пуск».
В командной строке:
Теперь вы можете установить переменные среды пользователя.
Я создал на рабочем столе папку godmode. просто создайте новую папку на рабочем столе и назовите ее GodMode. он назовет папку как godmode и заполнит контент различными параметрами конфигурации, вы можете просто ввести ENVIRO в поиске, чтобы найти соответствующий параметр конфигурации, открыть его и открыть sysdm.cpl на вкладке «Дополнительно», вы можете изменить переменные среды оттуда.
1) Запускает графический редактор для переменных среды пользователя. Он делает именно то, что хотел сделать OP, и не запрашивает учетные данные администратора.
(бонус: это работает от Windows Vista до Windows 10 для настольных компьютеров и от Windows Server 2008 до Server 2016. Это не работает в Windows NT, 2000, XP и 2003. Однако в старых системах вы можете использовать sysdm.cpl без «EditEnvironmentVariables», затем перейдите на вкладку «Дополнительно» и нажмите кнопку «Переменные среды».)
2) Используйте команду SETX из командной строки. Это похоже на команду set, но обновляет среду, которая хранится в реестре. К сожалению, SETX не так прост в использовании, как встроенная команда SET. Там нет способа перечислить переменные, например. Таким образом, невозможно сделать что-то, например, добавить папку в пользовательскую переменную PATH. В то время как SET будет отображать переменные, вы не знаете, какие из них являются пользовательскими или системными переменными, а отображаемый PATH является комбинацией обоих.
3) Используйте regedit и перейдите к HKEY_CURRENT_USER\Environment
Помните, что изменения в пользовательской среде не сразу распространяются на все процессы, запущенные в данный момент для этого пользователя. Вы можете увидеть это в командной строке, где ваши изменения не будут видны, если вы используете SET. Например
Это должно показать все переменные, имена которых начинаются с букв «st». Если их нет, отображается » Environment variable st not defined «. Выйдите из командной строки и запустите другую. Попробуйте set st раз, и вы увидите
Чтобы удалить переменную stackoverflow, используйте
Он ответит » SUCCESS: Specified value was saved. «, что выглядит странно, если вы хотите удалить переменную. Однако если вы запустите новую командную строку, то set st покажет, что нет переменных, начинающихся с букв «st»
Источник
Переменные среды в Windows: использование, список и таблицы
Переменная среды (environment variable) — текстовая короткая ссылка на элемент операционной системы Windows, предназначенная для получения быстрого доступа к объекту системы, или к данным о каталогах и конфигурации компьютера. Переменная среды (переменная окружения) позволяет быстро перейти к нужному месту на компьютере, без использования имени пользователя или полного пути к объекту.
Переменные окружения Windows используются в командной строке, в диалоговом окне «Выполнить» и адресной строке Проводника. Переменная среды может содержать информацию о настройках системы или данные о текущем пользователе компьютера.
Переменные среды Windows делятся на два вида:
Чаще всего переменные среды используются как путь к дискам, файлам или параметрам системы. Использование переменной среды позволяет быстро перейти к нужной директории операционной системы, без ввода полного пути, например, без ввода имени пользователя.
Переменные окружения часто используются при написании скриптов, или при работе в командной строке. Короткие переменные можно использовать вместо полного пути до файла или папки, например, при создании ярлыков, при вводе пути к объекту.
Пример использования переменной среды Windows
Рассмотрим следующий пример: пользователю нужно открыть системную папку «AppData», в которой находятся различные данные программ, установленных в операционную систему Windows. Скрытая папка «AppData» находится в профиле пользователя, обычно на диске «C:». Данные приложений расположены по пути:
Чтобы получить доступ к этой папке нужно выполнить несколько последовательных действий: открыть Проводник, включить в Windows отображение скрытых папок и файлов, а затем пройти по всему пути до нужной папки.
При помощи переменной «%APPDATA%» (переменная используется без кавычек) можно сразу открыть нужную директорию в системе, без ввода имени пользователя, включения отображения скрытых папок, ввода полного пути. Это экономит много времени.
Чтобы открыть нужный каталог достаточно лишь ввести «%APPDATA%» в поле поиска Windows, в адресную строку Проводника или в диалоговое окно «Выполнить», а затем нажать на клавишу «Enter».
Переменные среды Виндовс заключены в специальный оператор «%», который находится с двух сторон названия переменной. Это необходимо, чтобы система могла обработать запрос.
Пользователь может самостоятельно создавать переменные среды или изменять существующие. В статье мы рассмотрим несколько способов просмотра переменных среды и самостоятельное создание переменной. В руководстве вы найдете таблицу со списком переменных, применяемых в операционных системах Windows 10, Windows 8.1, Windows 8, Windows 7.
Как посмотреть переменные среды Windows 10
Сейчас мы посмотрим, как получить доступ к переменным средам в операционной системе Windows 10. В других версиях Windows необходимо выполнить аналогичные действия.
Чтобы посмотреть переменные окружения Windows 10, выполните следующее:
Доступ к переменным средам из реестра Windows
Есть возможность получить доступ к переменным средам из системного реестра Windows. Пользователю нужно будет открыть редактор реестра, а затем пройти по пути до определенной ветки.
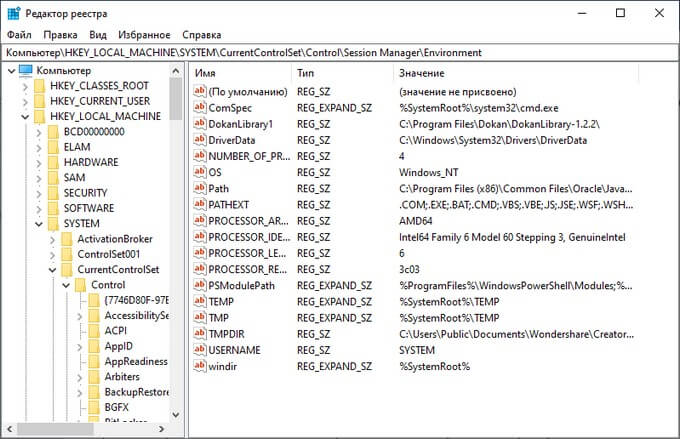
Системные переменные среды находятся по следующему пути:
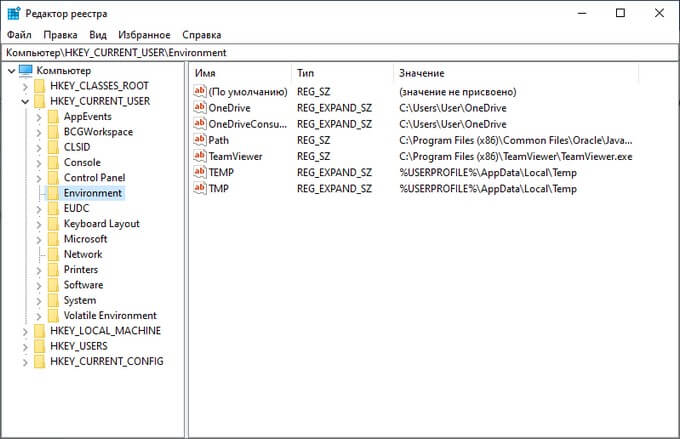
Переменные среды локального пользователя расположены в следующей ветке реестра:
Вы можете создать в редакторе реестра новые переменные или изменить существующие.
Как посмотреть все переменные среды в командной строке
Пользователь может получить список переменных среды при помощи системного инструмента — командной строки Windows.
В cmd переменные среды открываются следующим образом:
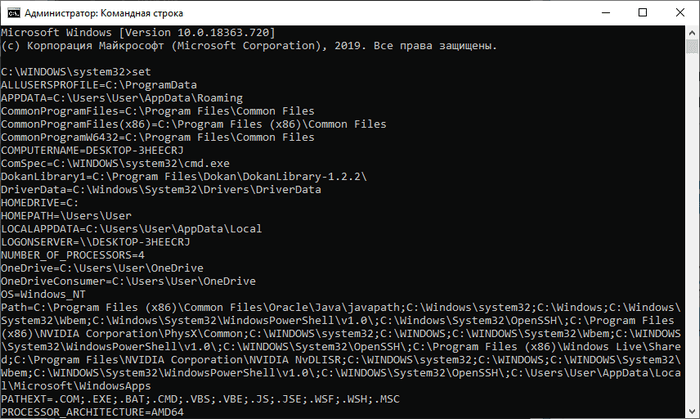
Для получения списка переменных в виде текстового файла, выполните в командной строке команду:
После выполнения этой команды, на Локальном диске «C:» появится текстовый файл с именем «Variables» (имя можно использовать любое), в котором находится список переменных среды Windows.
На моем компьютере файл имеет следующее содержание:
Открытие списка переменных среды в Windows PowerShell
Открытие списка переменных среды возможно при помощи системного средства Windows PowerShell.
Выполните следующие действия:
Создание переменной среды в Windows
Пользователь может самостоятельно создать новую переменную для открытия директорий на компьютере, или для запуска программ.
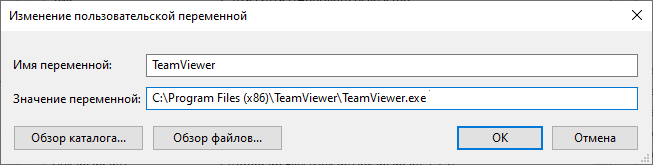
На этом примере я создам отдельную переменную среды для запуска программы TeamViewer.
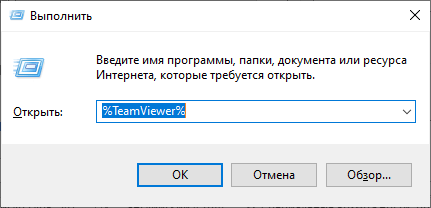
Подобным способом, после ввода переменной в адресную строку Проводника, выполняется запуск программы или открытие директории на ПК.
Переменная среды пути «Path» содержит список директорий на компьютере, в которых система должна искать исполняемые файлы. Переменная среды пути «PATH» не добавляется к исполняемым файлам, а только к директориям, где находятся данные файлы.
При необходимости, пользователь может удалить ненужную переменную из операционной системы Windows.
Список переменных среды Windows в таблице
Для удобства посетителей сайта я собрал в общую таблицу переменные, их описание и значения в операционной системе Windows. В подавляющем большинстве случаев, системная папка расположена на диске «C:», поэтому пути в значениях даны для этого диска.
Выводы статьи
Переменные окружения Windows позволяют пользователю экономить время во время работы на компьютере. Переменными средами Windows могут пользоваться обычные пользователи или системные администраторы для быстрого доступа к объектам операционной системы, чтобы открыть нужную директорию на компьютере, или запустить программу.
Источник
Переменные среды windows server 2008 r2
239458 просмотра
8 ответа
В старых версиях Windows это было просто открыть панель управления, выбрать апплет System, выбрать вкладку Advanced и нажать кнопку переменных среды. Как обычный пользователь, вы можете редактировать «Пользовательские переменные», но не «Системные переменные».
В Windows Server 2008 R2, если я пытаюсь включить параметр «Дополнительные параметры системы» в системном апплете, он запрашивает пароль администратора.
Источник Размещён: 13.07.2019 08:28
Ответы (8)
82 плюса
Вы также можете использовать эту прямую командную строку, чтобы открыть дополнительные свойства системы:
64 плюса
ОК, я нашел это. Арг, упражнение в разочаровании. Они оставили старый путь обхода меню окна для изменения переменных среды, но ограниченный доступ только для администраторов. Как обычный пользователь, если вы хотите изменить его, вам нужно пройти через другой набор опций, чтобы попасть в то же самое чертово окно.
Автор: likm Размещён: 29.09.2009 02:53
21 плюса
5 плюса
В поле «Пуск» введите «среда» в поле поиска. Это перечислит возможность изменить системные переменные непосредственно в меню «Пуск».
Автор: h0r41i0 Размещён: 09.05.2011 09:46
3 плюса
Это можно сделать из командной строки с помощью SETX команды. Например, чтобы переместить ваши временные файлы на другой диск:
Автор: TimT Размещён: 31.05.2013 01:59
2 плюса
В командной строке:
Теперь вы можете установить переменные среды пользователя.
2 плюса
Я создал папку Godmode на рабочем столе. просто создайте новую папку на рабочем столе и назовите ее GodMode. она назовет папку как godmode и заполнит содержимое различными параметрами конфигурации, затем вы можете просто ввести ENVIRO в поиске чтобы найти соответствующий параметр конфигурации, откройте его, и он откроет sysdm.cpl на вкладке «Дополнительно», вы можете изменить переменные среды оттуда.
0 плюса
1) Запускает графический редактор для переменных среды пользователя. Он делает именно то, что хотел сделать OP, и не запрашивает учетные данные администратора.
2) Используйте команду SETX из командной строки. Это похоже на команду set, но обновляет среду, которая хранится в реестре. К сожалению, SETX не так прост в использовании, как встроенная команда SET. Нет способа перечислить переменные, например. Таким образом, невозможно сделать что-то, например, добавить папку в переменную PATH пользователя. Хотя SET будет отображать переменные, вы не знаете, какие из них являются пользовательскими или системными переменными, а отображаемая переменная PATH является комбинацией обоих.
3) Используйте regedit и перейдите к HKEY_CURRENT_USER \ Environment
Имейте в виду, что изменения в среде пользователя не сразу распространяются на все процессы, запущенные в данный момент для этого пользователя. Вы можете увидеть это в командной строке, где ваши изменения не будут видны, если вы используете SET. Например
Это должно показать все переменные, имена которых начинаются с букв «st». Если их нет, отображается « Environment variable st not defined ». Выйдите из командной строки и запустите другую. Попробуйте еще set st раз, и вы увидите
Чтобы удалить переменную stackoverflow, используйте
Он ответит » SUCCESS: Specified value was saved. «, что выглядит странно, если вы хотите удалить переменную. Тем не менее, если вы запустите новую командную строку, то set st покажет, что нет переменных, начинающихся с букв «st»
Источник
Системная переменная среды не обработаны правильно в Windows Server 2008 SP2
Симптомы
Рассмотрим следующий сценарий:
Использовать учетную запись пользователя (учетная запись пользователя A) войти в систему на компьютере под управлением Windows Server 2008 SP2.
Создать системную переменную среды, которая относится к переменной среды COMPUTERNAME. Например можно создать переменную среды, выполните следующие действия:
На вкладке Дополнительно нажмите кнопку Переменные среды.
Создать новую переменную с помощью имени «образец» и значение переменной «% computername %».
Нажмите сочетание клавиш Ctrl + Alt + Del, чтобы переключиться на другую учетную запись пользователя на компьютере.
Переключиться обратно к учетной записи пользователя а.
В этом случае переменную среды не обработаны правильно. В частности команда неожиданно возвращает следующее сообщение:
Предполагается, что команда должна вернуть имя компьютера.
Решение
Сведения об исправлении
Существует исправление от корпорации Майкрософт. Однако данное исправление предназначено для устранения только проблемы, описанной в этой статье. Применяйте это исправление только в тех случаях, когда наблюдается проблема, описанная в данной статье. Это исправление может проходить дополнительное тестирование. Таким образом если вы не подвержены серьезно этой проблеме, рекомендуется дождаться следующего пакета обновления, содержащего это исправление.
Если исправление доступно для скачивания, имеется раздел «Пакет исправлений доступен для скачивания» в верхней части этой статьи базы знаний. Если этот раздел не отображается, обратитесь в службу поддержки для получения исправления.
Примечание. Если наблюдаются другие проблемы или необходимо устранить неполадки, вам может понадобиться создать отдельный запрос на обслуживание. Стандартная оплата за поддержку будет взиматься только за дополнительные вопросы и проблемы, которые не соответствуют требованиям конкретного исправления. Для получения полного списка телефонов поддержки и обслуживания клиентов корпорации Майкрософт, или для создания отдельного запроса на обслуживание, посетите следующий веб-сайт Майкрософт:
Примечание. В форме «Пакет исправлений доступен для скачивания» отображаются языки, для которых доступно исправление. Если нужный язык не отображается, значит исправление для данного языка отсутствует.
Предварительные условия
Для установки этого исправления необходимо наличие Windows Server 2008 SP2.
Дополнительные сведения о том, как получить пакет обновления для Windows Server 2008, щелкните следующий номер статьи базы знаний Майкрософт:
Как получить последний пакет обновления для Windows Server 2008
Сведения о реестре
Для установки этого исправления нет необходимости вносить изменения в реестр.
Необходимость перезагрузки
После установки исправления компьютер необходимо перезагрузить.
Сведения о замене исправлений
Это исправление не заменяет ранее выпущенные исправления.
Источник
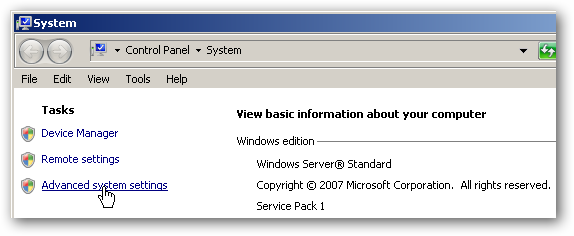
One of our tech bods was asking how to find the System Variables in Server 2008 R2. They had previously been using Server 2003 and, although the location hasn’t really changed, it can be a bit tricky to find it. So to help others here is an elaborate diagram

i.e. Control Panel>System Properties>Advanced System Settings link>Advanced tab>Environment Variables button>Scroll down the System Variables section to find Path
I’m glad to say, R2 also lets you simply type in “Path” to the Start Menu to bring up the same end target. Now that’s progress!
Published by thommck
Trying to show people that computers are supposed to make things EASIER
View all posts by thommck
Published
Sign in to your How-To Geek account
Quick Links
-
Creating a Custom System Environment Variable
-
Using the Custom Environment Variable
Any system administrator who spends a good bit of time in the command prompt or batch scripts is probably well aware of built in environment variables Windows offers (i.e. Path, WinDir, ProgramFiles, UserProfile, etc.). If you find yourself using a particular value over and over, wouldn’t it be great if you had your own variable which you can use the same way as the built in values?
With a few clicks, you can create and maintain you own environment variables which are both global on the system and survive reboots.
Creating a Custom System Environment Variable
Creating a new global system variable is quite simple and is one of those features hiding in plain sight. Please note the screenshots are for Windows Server 2008, however the process for most versions of Windows is almost identical with only a few of the screens different.
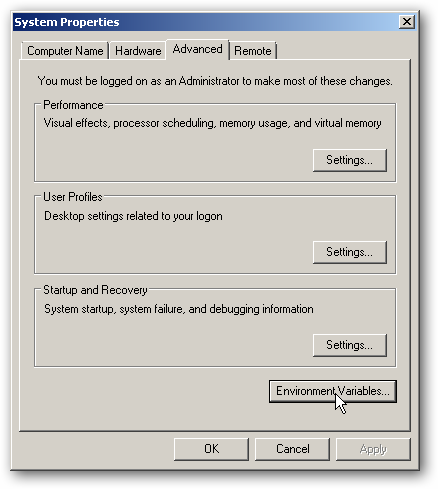
In the Control Panel, open the System option (alternately, you can right-click on My Computer and select Properties). Select the «Advanced system settings» link.
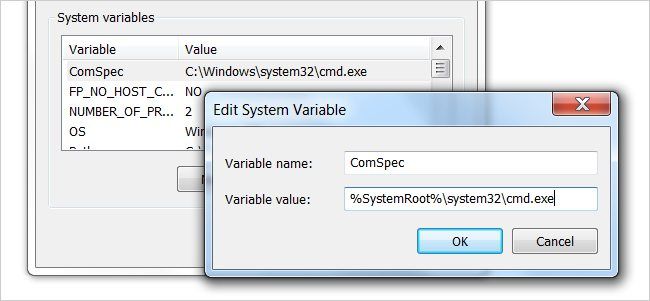
In the System Properties dialog, click «Environment Variables».
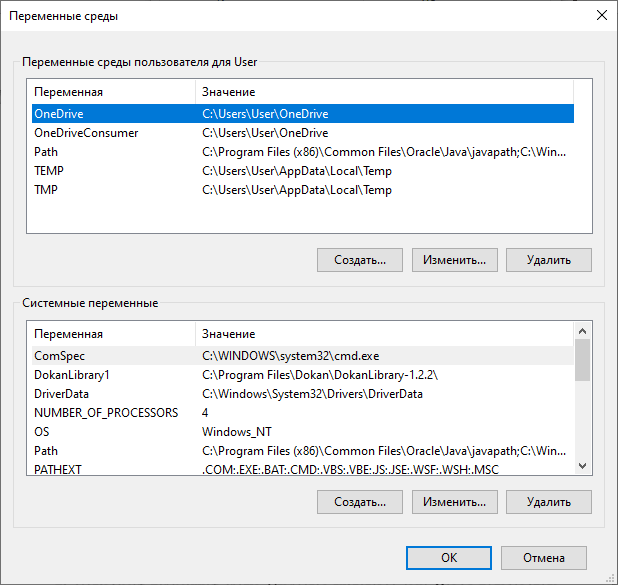
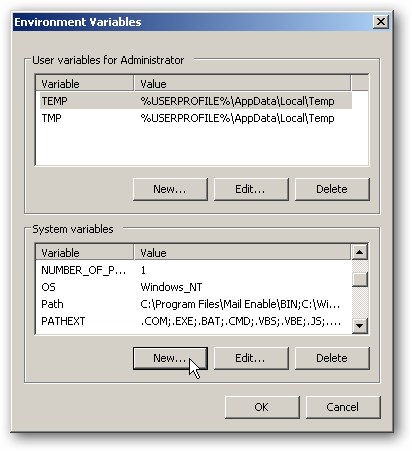
In the Environment Variables dialog, click the New button underneath the «System variables» section.
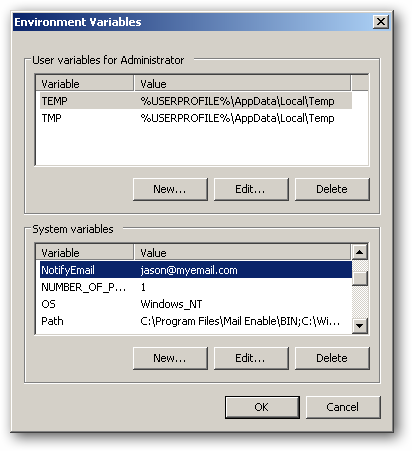
Enter the name of your new variable as well the value and click OK.
You should now see your new variable listed under the «System variables» section. Click OK to apply the changes.
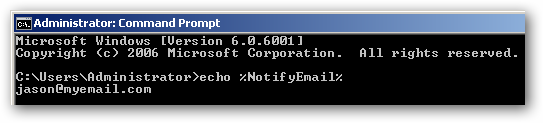
You can now access your new system environment variable like you would any other. You can use it from the command line or batch scripts without having to define it.
Using the Custom Environment Variable
As stated above, your custom environment variable is no different than any other system variable as you can reference it from the command line and inside of scripts. For a quick example, consider this batch script:
@ECHO OFF
TITLE Global Environment Variable Test
ECHO.
ECHO System NotifyEmail value
ECHO NotifyEmail = %NotifyEmail%
ECHO.
SETLOCAL
ECHO Overriding global variable in this script…
SET NotifyEmail=jfaulkner@otheremail.com
ECHO NotifyEmail = %NotifyEmail%
ECHO.
ECHO Exiting override script…
ENDLOCAL
ECHO.
ECHO System NotifyEmail value
ECHO NotifyEmail = %NotifyEmail%
ECHO.
ECHO.
ECHO.
PAUSE
When executed, the output is exactly what you would expect:
Usage Ideas
The real power of custom environment variables enters when you use them in your scripts. In our example, we set a variable called «NotifyEmail» which we could reference in any number of scripts without having to hard code the value. So in the event we need to change the email address, we simply update the system variable and the impacted scripts will use this new value without us having to update each script individually.
This is not only a time saver, but also protects against the situation where you forget to update a particular script and a «dead» value is being used. Additionally, in the event you need to override a system variable in a particular script, you can see in our example above this is fully supported.
Here are some ideas where you could apply system variables in place of local scope variables:
- Email addresses (like in our example)
- Backup folder locations
- URL and FTP sites
- Metric and threshold values
Another great feature about using system variables is you have a single place where you can edit or view your variable values. Simply put, you could potentially apply updates to multiple scripts by editing the environment variables in a single location.
Environment variables are not often seen directly when using Windows. However there are cases, especially when using the command line, that setting and updating environment variables is a necessity. In this series we talk about the various approaches we can take to set them. In this article we look at how to interface with environment variables using the Command Prompt and Windows PowerShell. We also note where in the registry the environment variables are set, if you needed to access them in such a fashion.
Print environment variables
You can use environment variables in the values of other environment variables. It is then helpful to be able to see what environment variables are set already. This is how you do it:
Command Prompt
List all environment variables
Command Prompt — C:\>
Output
1
2
3
4
5
6


ALLUSERSPROFILE=C:\ProgramData
APPDATA=C:\Users\user\AppData\Roaming
.
.
.
windir=C:\Windows
Print a particular environment variable:
Command Prompt — C:\>
Output
Windows PowerShell
List all environment variables
Windows PowerShell — PS C:\>
Output
1
2
3
4
5
6
7
8
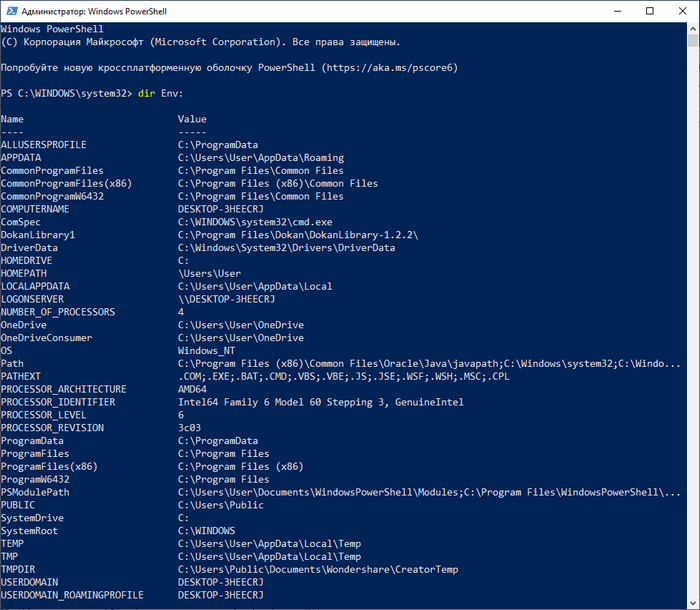
Name Value
---- -----
ALLUSERSPROFILE C:\ProgramData
APPDATA C:\Users\user\AppData\Roaming
.
.
.
windir C:\Windows
Print a particular environment variable:
Windows PowerShell — PS C:\>
Output
Set Environment Variables
To set persistent environment variables at the command line, we will use setx.exe. It became part of Windows as of Vista/Windows Server 2008. Prior to that, it was part of the Windows Resource Kit. If you need the Windows Resource Kit, see Resources at the bottom of the page.
setx.exe does not set the environment variable in the current command prompt, but it will be available in subsequent command prompts.
User Variables
Command Prompt — C:\>
1


setx EC2_CERT "%USERPROFILE%\aws\cert.pem"
Open a new command prompt.
Command Prompt — C:\>
Output
1


C:\Users\user\aws\cert.pem
System Variables
To edit the system variables, you’ll need an administrative command prompt. See HowTo: Open an Administrator Command Prompt in Windows to see how.
Command Prompt — C:\>
1


setx EC2_HOME "%APPDATA%\aws\ec2-api-tools" /M
Warning This method is recommended for experienced users only.
The location of the user variables in the registry is: HKEY_CURRENT_USER\. The location of the system variables in the registry is: HKEY_LOCAL_MACHINE\.
When setting environment variables through the registry, they will not recognized immediately. One option is to log out and back in again. However, we can avoid logging out if we send a WM_SETTINGCHANGE message, which is just another line when doing this programatically, however if doing this on the command line it is not as straightforward.
One way is to get this message issued is to open the environment variables in the GUI, like we do in HowTo: Set an Environment Variable in Windows — GUI; we do not need to change anything, just open the Environment Variables window where we can see the environment variables, then hit OK.
Another way to get the message issued is to use setx, this allows everything to be done on the command line, however requires setting at least one environment variable with setx.
Printing Environment Variables
With Windows XP, the reg tool allows for accessing the registry from the command line. We can use this to look at the environment variables. This will work the same way in the command prompt or in powershell. This technique will also show the unexpanded environment variables, unlike the approaches shown for the command prompt and for powershell.
First we’ll show the user variables:
Command Prompt — C:\>
1


reg query HKEY_CURRENT_USER\Environment
Output
1
2
3


HKEY_CURRENT_USER\Environment
    TEMP    REG_EXPAND_SZ    %USERPROFILE%\AppData\Local\Temp
    TMP    REG_EXPAND_SZ    %USERPROFILE%\AppData\Local\Temp
We can show a specific environment variable by adding /v then the name, in this case we’ll do TEMP:
Command Prompt — C:\>
1


reg query HKEY_CURRENT_USER\Environment /v TEMP
Output
1
2


HKEY_CURRENT_USER\Environment
    TEMP    REG_EXPAND_SZ    %USERPROFILE%\AppData\Local\Temp
Now we’ll list the system environment variables:
Command Prompt — C:\>
1


reg query "HKEY_LOCAL_MACHINE\SYSTEM\CurrentControlSet\Control\Session Manager\Environment"
Output
1
2
3
4
5
6
7
8
9
10
11
12
13
14
15
16


HKEY_LOCAL_MACHINE\SYSTEM\CurrentControlSet\Control\Session Manager\Environment
    ComSpec    REG_EXPAND_SZ    %SystemRoot%\system32\cmd.exe
    FP_NO_HOST_CHECK    REG_SZ    NO
    NUMBER_OF_PROCESSORS    REG_SZ    8
    OS    REG_SZ    Windows_NT
    Path    REG_EXPAND_SZ    C:\ProgramData\Oracle\Java\javapath;C:\WINDOWS\system32;C:\WINDOWS;C:\WINDOWS\System32\Wbem;C:\WINDOWS\System32\WindowsPowerShell\v1.0\;%SystemRoot%\system32;%SystemRoot%;%SystemRoot%\System32\Wbem;%SYSTEMROOT%\System32\WindowsPowerShell\v1.0\
    PATHEXT    REG_SZ    .COM;.EXE;.BAT;.CMD;.VBS;.VBE;.JS;.JSE;.WSF;.WSH;.MSC
    PROCESSOR_ARCHITECTURE    REG_SZ    AMD64
    PROCESSOR_IDENTIFIER    REG_SZ    Intel64 Family 6 Model 60 Stepping 3, GenuineIntel
    PROCESSOR_LEVEL    REG_SZ    6
    PROCESSOR_REVISION    REG_SZ    3c03
    PSModulePath    REG_EXPAND_SZ    %SystemRoot%\system32\WindowsPowerShell\v1.0\Modules\;C:\Program Files\Intel\
    TEMP    REG_EXPAND_SZ    %SystemRoot%\TEMP
    TMP    REG_EXPAND_SZ    %SystemRoot%\TEMP
    USERNAME    REG_SZ    SYSTEM
    windir    REG_EXPAND_SZ    %SystemRoot%
And same as with the user variables we can query a specific variable.
Command Prompt — C:\>
1


reg query "HKEY_LOCAL_MACHINE\SYSTEM\CurrentControlSet\Control\Session Manager\Environment" /v PATH
Output
1
2


HKEY_LOCAL_MACHINE\SYSTEM\CurrentControlSet\Control\Session Manager\Environment
    PATH    REG_EXPAND_SZ    C:\ProgramData\Oracle\Java\javapath;C:\WINDOWS\system32;C:\WINDOWS;C:\WINDOWS\System32\Wbem;C:\WINDOWS\System32\WindowsPowerShell\v1.0\;%SystemRoot%\system32;%SystemRoot%;%SystemRoot%\System32\Wbem;%SYSTEMROOT%\System32\WindowsPowerShell\v1.0\
Unsetting a Variable
When setting environment variables on the command line, setx should be used because then the environment variables will be propagated appropriately. However one notable thing setx doesn’t do is unset environment variables. The reg tool can take care of that, however another setx command should be run afterwards to propagate the environment variables.
The layout for deleting a user variable is: reg delete HKEY_CURRENT_USER\. If /f had been left off, we would have been prompted: Delete the registry value EXAMPLE (Yes/No)?. For this example we’ll delete the user variable USER_EXAMPLE:
Command Prompt — C:\>
1


reg delete HKEY_CURRENT_USER\Environment /v USER_EXAMPLE /f
Output
1


The operation completed successfully.
Deleting a system variable requires administrator privileges. See HowTo: Open an Administrator Command Prompt in Windows to see how to do this.
The layout for deleting a system variable is: reg delete "HKEY_LOCAL_MACHINE\. For this example we’ll delete the system variable SYSTEM_EXAMPLE:
Command Prompt — C:\>
1


reg delete "HKEY_LOCAL_MACHINE\SYSTEM\CurrentControlSet\Control\Session Manager\Environment" /v SYSTEM_EXAMPLE /f
If this was run as a normal user you’ll get:
Output
1


ERROR: Access is denied.
But run in an administrator shell will give us:
Output
1


The operation completed successfully.
Finally we’ll have to run a setx command to propagate the environment variables. If there were other variables to set, we could just do that now. However if we were just interested in unsetting variables, we will need to have one variable left behind. In this case we’ll set a user variable named throwaway with a value of trash
Command Prompt — C:\>
Output
1


SUCCESS: Specified value was saved.
Resources
- Windows XP Service Pack 2 Support Tools
- Windows Server 2003 Resource Kit Tools
- Reg — Edit Registry | Windows CMD | SS64.com
- Reg — Microsoft TechNet
- Registry Value Types (Windows) — Microsoft Windows Dev Center
- How to propagate environment variables to the system — Microsoft Support
- WM_SETTINGCHANGE message (Windows) — Microsoft Windows Dev Center
- Environment Variables (Windows) — Microsoft Windows Dev Center
Windows Server 2003 Resource Kit Tools will also work with Windows XP and Windows XP SP1; use Windows XP Service Pack 2 Support Tools with Windows XP SP2. Neither download is supported on 64-bit version.
Parts in this series
- HowTo: Set an Environment Variable in Windows
- HowTo: Set an Environment Variable in Windows — GUI
- HowTo: Set an Environment Variable in Windows — Command Line and Registry
- Environment variables are global system variables that are available to all users and programs running on the system. They store system-wide and user-specific values.
- You can view and manage environment variables from Settings > System > About > Advanced system settings > Environment Variables.
- To view all environment variables in Command Prompt, run “set“, or run “Get-ChildItem Env: | Sort Name” in PowerShell.
Most operating systems have environment variables, including Windows, MacOS, and Linux. Just like in a programming language, environment variables can be called upon to use their values that can store a number, a location, or any other value defined.
The environment variables were introduced with Windows 95, and have since gone through many iterations with every Windows release. These can be used to access certain directories quickly, rather than enter the complete paths.
Environment variables can be edited and manipulated, or you can even add new ones. In this article, we discuss the many different Windows environment variables, what they do, and all that you need to know about them.
This guide applies to all versions of Windows, including Windows XP, Windows Vista, Windows 7, Windows 8, Windows 10, and Windows 11.
Table of Contents
What are Environment Variables
Environment variables are variables that can be used across your system. Just like in programming, variables contain a value that can be changed or called when needed. Environment variables are the same but can be used across the entire scope.
You can use environment variables in Windows to store frequently used locations, so you don’t have to type them out each time, or temporarily change the way a program behaves. Environment variables are normally used in scripts or programs/apps.
For example, you can create an environment variable called TEMP that points to a different folder than the default TEMP folder Windows uses. Then, when a program needs to store temporary files, it will use the TEMP folder you specified instead of the default one.
Tip: If you are using Linux or MacOS, the environment variables can be set in the .bashrc or .profile files.
There are 3 types/scopes of environment variables in the hierarchy:
- Machine
- User
- Process
At the top, you have machine or system environment variables. These can be used across the entire system, and used for global variables, meaning changing the system variables will affect all users of the computer. Then there are user environment variables. This is defined individually for each user account and is limited to that account only and only affects the user currently logged in.
Then you have the process variables which are only limited to the processes and cannot be edited or created. The end-user does not see or have anything to do with the process variables.
Furthermore, each of these scopes has different types of variables, which are as follows:
- PATH: This variable stores a list of directories where your OS searches for executable programs. It’s crucial to run commands and launch applications from the command prompt and Run dialog.
- JAVA_HOME: This variable points to the installation directory of your Java Development Kit (JDK), a necessity for Java development and running Java applications.
- CLASSPATH: This variable tells your Java Virtual Machine (JVM) where to find user-defined classes and libraries, ensuring your Java code can access the necessary resources.
Please note that environment variables in Windows are not case-sensitive and are only written in upper case to distinguish between the variable name and the value.
Additionally, if there is an environment variable of the same name in more than one scope, then the variable in the lower scope will supersede the value of the one higher in the hierarchy.
For example, the common environment variable “TEMP” is available in all scopes with the following values:
- Machine: C:\Windows\Temp
- User: C:\Users\[Username]\AppData\Local\Temp
- Process: C:\Users\[Username]\AppData\Local\Temp
Hence, using the “Temp” variable will call for the value set for the process scope. If there is no variable by the name “Temp” in this scope, then it will use the value for the user scope, and so on.
You can use these variables to access a path quickly. For example, typing in “%HOMEPATH%” in the Run Command box will open the user’s home directory.
You can also edit this variable to include a sub-directory of the path, like opening the user account’s desktop by typing in “%HOMEPATH%\Desktop%”.
What are Environment Variable Scopes
As we mentioned earlier, there are 3 scopes for environment variables: Machine/System, user, and process. These scopes define the limitations of the variables and where they can be used.
Below you’ll find a more detailed explanation of the different types of environment variable scopes.
System/Machine
The environment variables defined inside this scope can be used by anyone on the system. These types of variables are associated with the running instance of Windows. Any user account can read these, set, change, or delete them, provided they have administrative rights.
User
The environment variables defined within this scope are only user-specific and might be different for each user account. This is associated with the current user. User variables overwrite machine-scoped variables with the same name.
Process
Environment variables in this scope are a combination of machine and user scopes in addition to some dynamically created variables by the Windows OS.
Now that you know what environment variables are and how they work, let us see which variables are available in a Windows OS.
Here is a list of the process variables which are available in this scope:
- ALLUSERSPROFILE
- APPDATA
- COMPUTERNAME
- HOMEDRIVE
- HOMEPATH
- LOCALAPPDATA
- LOGONSERVER
- PROMPT
- PUBLIC
- SESSION
- SystemDrive
- SystemRoot
- USERDNSDOMAIN
- USERDOMAIN
- USERDOMAIN_ROAMINGPROFILE
- USERNAME
- USERPROFILE
Complete list of Windows Environment Variables
Below is a complete list of the environment variables that you will find inside the Windows operating system by default:

| Variable Name | Value |
|---|---|
| %ALLUSERSPROFILE% | C:\ProgramData |
| %APPDATA% | C:\Users\{username}\AppData\Roaming |
| %COMMONPROGRAMFILES% | C:\Program Files\Common Files |
| %COMMONPROGRAMFILES(x86)% | C:\Program Files (x86)\Common Files |
| %CommonProgramW6432% | C:\Program Files\Common Files |
| %COMSPEC% | C:\Windows\System32\cmd.exe |
| %HOMEDRIVE% | C:\ |
| %HOMEPATH% | C:\Users\{username} |
| %LOCALAPPDATA% | C:\Users\{username}\AppData\Local |
| %LOGONSERVER% | \\{domain_logon_server} |
| %PATH% | C:\Windows\system32;C:\Windows;C:\Windows\System32\Wbem |
| %PathExt% | .com;.exe;.bat;.cmd;.vbs;.vbe;.js;.jse;.wsf;.wsh;.msc |
| %PROGRAMDATA% | C:\ProgramData |
| %PROGRAMFILES% | C:\Program Files |
| %ProgramW6432% | C:\Program Files |
| %PROGRAMFILES(X86)% | C:\Program Files (x86) |
| %PROMPT% | $P$G |
| %SystemDrive% | C: |
| %SystemRoot% | C:\Windows |
| %TEMP% | C:\Users\{username}\AppData\Local\Temp |
| %TMP% | C:\Users\{username}\AppData\Local\Temp |
| %USERDOMAIN% | Userdomain associated with the current user. |
| %USERDOMAIN_ROAMINGPROFILE% | Userdomain associated with roaming profile. |
| %USERNAME% | {username} |
| %USERPROFILE% | C:\Users\{username} |
| %WINDIR% | C:\Windows |
| %PUBLIC% | C:\Users\Public |
| %PSModulePath% | %SystemRoot%\system32\WindowsPowerShell\v1.0\Modules\ |
| %OneDrive% | C:\Users\{username}\OneDrive |
| %DriverData% | C:\Windows\System32\Drivers\DriverData |
| %CD% | Outputs current directory path. (Command Prompt.) |
| %CMDCMDLINE% | Outputs command line used to launch current Command Prompt session. (Command Prompt.) |
| %CMDEXTVERSION% | Outputs the number of current command processor extensions. (Command Prompt.) |
| %COMPUTERNAME% | Outputs the system name. |
| %DATE% | Outputs current date. (Command Prompt.) |
| %TIME% | Outputs time. (Command Prompt.) |
| %ERRORLEVEL% | Outputs the number of defining exit status of the previous command. (Command Prompt.) |
| %PROCESSOR_IDENTIFIER% | Outputs processor identifier. |
| %PROCESSOR_LEVEL% | Outputs processor level. |
| %PROCESSOR_REVISION% | Outputs processor revision. |
| %NUMBER_OF_PROCESSORS% | Outputs the number of physical and virtual cores. |
| %RANDOM% | Outputs random numbers from 0 through 32767. |
| %OS% | Windows_NT |
Where are Environment Variables Stored
The environment variables are stored in 2 places in the Windows Registry; one for the system and one for individual users.
The system environment variables are stored at the following location:
Computer\HKEY_LOCAL_MACHINE\SYSTEM\CurrentControlSet\Control\Session Manager\Environment

The user environment variables are stored at the following location:
Computer\HKEY_CURRENT_USER\Environment

You can also export the “Environment” key using its context menu to import the environment variables on another Windows computer, or vice versa.
Now that you know where they are stored, you may have a look at them. However, it is strongly recommended that you do not add or change environment variables using the Windows Registry. This is because any running processes will not see variable changes in the registry. Processes only see the registry variables and values that are present when the process was started unless Windows notifies them that there has been a change.
If you want to add or make changes to the environment variables, keep reading this post.
How to View/Access Windows Environment Variables
You can view and access Windows environment variables in multiple ways. Pick the method you like best from below.
View Environment Variables from Settings App
Follow these steps to access the environment variables using the Settings app:
-
Navigate to the following:
Settings app >> System >> About
-
Now click Device Specifications to expand it.

Expand Device Specifications -
Now click Advanced system settings under Related links.
Open Advanced system settings -
From the pop-up System Properties window, switch to the Advanced tab, and then click Environment Variables.
Open Environment Variables -
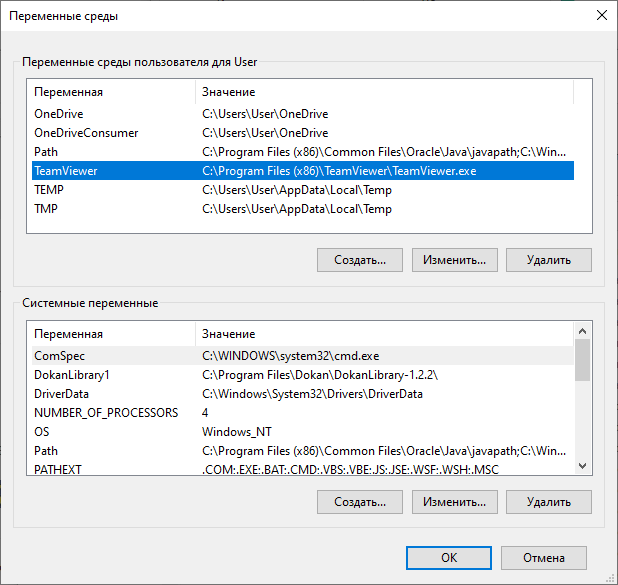
The Environment Variables window will now open. Here, you can see the user variables at the top and the system/machine variables at the bottom.
Environment Variables window


View Environment Variables from Command Line
If you want to access the environment variables using the Command Line, here is how:
-
Run the following cmdlet in either the Command Prompt, Windows PowerShell, or the Run Command box to open the System Properties applet.
sysdm.cplOpen System Properties applet -
From the pop-up System Properties window, switch to the Advanced tab, and then click Environment Variables.

Open Environment Variables -
The Environment Variables window will now open. Here, you can see the user variables at the top and the system/machine variables at the bottom.

Environment Variables window


List Environment Variables in PowerShell
Alternative to the methods discussed above, you can also list the environment variables in PowerShell using a simple cmdlet.
Run the following command in an elevated PowerShell instance and it will display all of the environment variables on your computer:
Get-ChildItem Env: | Sort Name
List Environment Variables in Command Prompt
You can also view the list of environment variables in the Command Prompt with the following basic command:
setThis command will list down all environment variables on your computer.

View Value for Environment Variable using Command Prompt
If you access the environment variable using any of the given methods above, then you can see their values as well. Another method to view the value of an environment variable is through the Command Prompt.
Simply type in “echo” followed by the environment variable name in the “%” sign in an elevated Command Prompt and you will then see its value(s), as in this image:

How to Create and Set/Edit Environment Variables in Windows
From System Properties
You may need to create a new environment variable or modify an existing one in the Windows OS to be used for programming purposes or to use Java. Whatever the reason, follow these steps to create a new environment variable using the GUI:
-
Access the Environment Variables window using one of the given methods above. In this window, click New either under user variables or system variables, depending on which scope you want to create the variable in.
Create a new variable -
In the popup window, set a name for the variable and then enter its value. Once done, click OK.

Enter details for variable -
Back in the Environment Variable window, click OK again to save the changes.


The variable will now be created, and you can now use it in your code, or access the folder by concatenating a “%” sign on the front and back of it.
From Command Prompt
You can also create a new environment variable using the Command Prompt, and define its value(s). You can create both a temporary variable that only lasts until the instance is closed or the system is rebooted, or a permanent variable that will always remain unless explicitly deleted.
Once you create the variable, you can access it immediately. There’s no need to restart the computer for the changes to take effect.
Note: These methods create a user environment variable and not a system variable.
Temporary Environment Variable
Use the following cmdlet in an elevated Command Prompt to create a temporary variable while replacing [VariableName] with a custom name for the variable, and [Value] with the value that you want to define for the variable, which can be a string or a number.
Set [VariableName]=[Value]
Permanent Environment Variable
If you want to create a permanent environment variable, then use this cmdlet instead:
Setx [VariableName] "[Value]"
Using third-party software
You can also manage environment variables using third-party tools and utilities. Here are a few that can be used with great convenience.
Rapid Environment Editor

Rapid Environment Editor (REE) provides a very user-friendly way of editing environment variables. It lists the system variables in the left pane and the user variables in the right pane, while the bottom pane will give details about the selected variable.
The best thing about REE is that it will also highlight a variable if its value has some errors. You can also back up the environment variable configuration from the file menu. Rapid Environment Editor comes with an installable program, as well as a portable one. If you are using the portable REE in Windows 7 or Windows 8, you will need to run the executable in the administrative mode so that it can make changes to the system configuration.
PathMan

PathMan is a very simple portable program, which will only edit the PATH environment variable. Since PATH is a variable that needs to be edited frequently, PathMan can help edit the Path environment variable directly from the USB drive.
Eveditor

Eveditor comes with an elegant and very user-friendly graphical user interface that resembles the look and feel of Windows Explorer. You can choose from a user variable or system variable from the pane on the left. The selection will be displayed on the right-hand pane. The details of the selected environment variable will be displayed in the bottom pane.
You can edit the selected variable, and upon clicking the “Set” button, the variable will be saved. Please note that you will need to run Eveditor with administrative privileges to save the environment variables successfully.
How to Delete an Environment Variable in Windows
If you no longer need an environment variable, you can simply delete it.
One concern while deleting a variable is whether it is safe. The answer is both yes and no. Nothing happens when an environment variable is deleted, except that the apps, program, and other elements no longer know where to look for an item when it is called upon. Other than that, it has no impact on the system’s performance.
That said, we still think that you should be extremely careful when deleting a variable. If you still wish to continue to remove an environment variable, follow these steps:
Note: You should create a system restore point before proceeding so that your system can be reverted to previous settings in case things do not go as planned.
-
Access the Environment Variables window using one of the given methods above.
-
In the Environment Variables window, click on the variable that you want to remove and click Delete under the same section.
Delete environment variable -
Now click OK to save the changes.

The variable will now be removed from your PC.
Alternatively, you can use the Command Prompt to unset an environment variable. Simply use the set command discussed above to empty the string. Here is an example:
set [VariableName]=Leaving the command blank after “=” will set the string to empty. The environment variable will exist but will be of no use.
How to Edit an Environment Variable in Windows
You can also edit an environment variable. Its name can be changed as well as its value. However, it is recommended that you do not edit the default Windows environment variables, or else the apps and programs using those variables might no longer work.
That said, the “PATH” variable stores several paths to directories for executable files. You can safely add more directory paths to this variable without causing an issue.
Follow these steps to edit an environment variable in Windows:
-
Access the Environment Variables window using one of the given methods above.
-
Here, click on the variable that you want to edit and then click Edit under the same section.
Edit an environment variable -
From the Edit popup, make the changes you want to the name or the value of the variable, and then click OK.
Edit variable details -
Back on the Environment Variables window, click OK to save the changes.


What is the PATH Environment Variable
Earlier in this post, we mentioned the PATH environment variable. The PATH variable is perhaps the most-used variable out of the lot.
The PATH variable stores multiple entries (or values). Those values specify the directories in which the executable programs are located on the system so that they can be started without knowing and typing the whole path to the file on the command line.
How to Manage Environment Variables using PowerShell Env
The PowerShell has a virtual drive known as the “PS Drive.” It is a data store location that you can access like a file system drive in Windows PowerShell. Using this drive, we can manage different aspects of the environment variables. A PS drive allows you to treat environment variables as if they are a file system through the Env: drive.
Below you’ll find the guidelines to perform different variables-related tasks using the Env: drive.
To begin, you must first switch to the ENv: drive. To do that, type in the following in the PowerShell window.
cd Env:
To get the complete list of environment variables and their values, use the following cmdlet:
Get-Item -Path Env:
You can also create new environment variables from the Env: drive by using this cmdlet. Replace [VarableName] with a name for the variable, and [Value] with the value you want to set for the variable.
NewItem -Path Env:\[VariableName] -Value [Value]
To set the value of an existing variable, use this cmdlet:
Set-Item -Path Env:[VariableName] -Value "[Value]"
To delete an environment variable from the Env: drive, use this cmdlet:
Remove-Item -Path Env:\[VariableName]
Frequently Asked Questions (FAQs)
Is it safe to delete an environment variable?
The answer is both yes and no. Although deleting a default OS environment variable will have no performance repercussions, any apps or programs using that variable will no longer be able to look for the executables in the specified directories, or you won’t be able to use the shortcuts anywhere in the system to run an executable.
What does the PATH environment variable do?
The PATH environment variable can store multiple path values for different executable files. When an executable file is called, like “CMD,” the PATH variable tells it where to look for the cmd.exe file.