
Используемый в Windows 7 Microsoft Speech Platform 11 не будет работать в Windows 8, Windows 10 и старше, поэтому применяются другие решения
PowerShell скрипт синтеза речи с использованием SpeechSynthesizer
Компоненты синтеза речи System.Speech.Synthesis доступны в составе .NET, эта библиотека обычно уже установлена на компьютере.
Например, если запрограммировать голосовое уведомление о входящем электронном письме, то уведомление будет более информативным, если будет содержать имя отправителя и тему письма. Пример использования – озвучивание входящих смс сообщений, когда скрипт зачитывает содержание входящего смс, считанного программой nhsms.
Этот сценарий PowerShell работает в Windows 8 и Windows 10, он создаёт объект SpeechSynthesizer и с его помощью выбирая соответствующий голос, проговаривает русский или английский текст:
Add-Type -AssemblyName System.speech $speech = New-Object System.Speech.Synthesis.SpeechSynthesizer $speech.SelectVoice('Microsoft Irina Desktop') $speech.speak('Здравствуйте! Меня зовут Ирина.') $speech.SelectVoice('Microsoft Zira Desktop') $speech.speak('Hello! My name is Zira.')В Windows 10 Рус предустановлены два голоса:
- Microsoft Irina Desktop – Ирина, русский женский голос, используется по умолчанию (необязательно его выбирать, если произносится русский текст). Если подсунуть Ирине английский текст, она произнесёт их как латиницу.
- Microsoft Zira Desktop – Zira, английский женский. Необходимо выбирать его вызовом SelectVoice. Zira не говорит по-русски совсем – если дать ей русский текст, не будет никакого звука.
Пример выше выбирает язык и произносит заданную фразу на этом языке – поэтому в скриптах можно реализовать синтез речи как на русском, так и на английском языке.
Запуск PowerShell скрипта вручную
Для воспроизведения голосового сообщения необходимо сохранить текст сценария в файле с расширением .ps1, например, tts_test.ps1, а затем выполнить его, например, из проводника Windows контекстной командой Выполнить с помощью PowerShell.
Запуск PowerShell скрипта из командной строки или bat файла
Гораздо интереснее запускать этот скрипт из командного файла. Для этого необходимо задать обход политик выполнения параметром -executionpolicy:
@echo off powershell -executionpolicy bypass -file tts_test.ps1Если же попытаться запустить, просто указав файл:
powershell -file tts_test.ps1то скрипт не будет выполнен из-за нарушения политики запуска с таким сообщение об ошибке:
Невозможно загрузить файл C:\Users\user\Downloads\0201\tts_test.ps1, так как вы
полнение сценариев отключено в этой системе. Для получения дополнительных сведе
ний см. about_Execution_Policies по адресу http://go.microsoft.com/fwlink/?Link
ID=135170.
+ CategoryInfo : Ошибка безопасности: (:) [], ParentContainsError
RecordException
+ FullyQualifiedErrorId : UnauthorizedAccessПоэтому при появлении этой ошибки используйте
-executionpolicy bypass.Другие примеры синтезирования речи
Этот PowerShell скрипт зачитывает текст, переданный через командную строку:
if ( $args.count -eq 0 ) { Write-Host 'No text' exit } $text = $args[ 0 ] for ( $i = 1; $i -lt $args.count; $i++ ) { $text = $text + ' ' + $args[ $i ] } #Write-Host $text Add-Type -AssemblyName System.speech $speech = New-Object System.Speech.Synthesis.SpeechSynthesizer $speech.SelectVoice('Microsoft Irina Desktop') $speech.speak($text)В bat файле можно передать в скрипт любую строку:
@echo off powershell -executionpolicy bypass -file tts.ps1 %username%, добро пожаловать!или
@echo off powershell -executionpolicy bypass -file tts.ps1 Резервное копирование выполнено успешно!WSH JScript скрипт синтеза речи с использованием SAPI.SpVoice
Другой вариант использует компонент SAPI.SpVoice для озвучивания текста, например:
var spvoice = WScript.CreateObject("SAPI.SpVoice"); spvoice.Speak("Привет, мир!");Изменяя значение свойства Rate, можно управлять скоростью воспроизведения, при этом значение -10 означает самую медленную скорость речи, значение 10 — самую быструю скорость речи, а значение по умолчанию — 0. На мой взгляд, оптимальная скорость речи получается при значении Rate 1 или 2. Этот пример показывает, как скрипт воспроизводит весь текст заданный в командной строке:
var spvoice = WScript.CreateObject("SAPI.SpVoice"); var text = WScript.Arguments.Unnamed(0); spvoice.Rate = 1; spvoice.Speak(text);Запуск JScript скрипта из командной строки или bat
Скрипт можно выполнить через cscript или wscript:
cscript //nologo speak.js "Резервное копирование выполнено успешно"Демонстрация bat файла синтеза речи
Файлы для загрузки
Описанные PowerShell и bat файлы синтеза речи доступны для скачивания с
Яндекс.Диска.Также можно скачать все скрипты и bat файлы в одной папке Яндекс.Диска
Узнать больше
Класс SpeechSynthesizer
SpVoice Interface (SAPI 5.3)
В постоянно меняющемся цифровом мире возможность преобразования текста в речь становится все более ценной. Для пользователей Windows 7 доступен ряд бесплатных…
В постоянно меняющемся цифровом мире возможность преобразования текста в речь становится все более ценной. Для пользователей Windows 7 доступен ряд бесплатных решений для синтеза речи (TTS), предлагающих множество функций для улучшения вашего опыта.
Что такое синтез речи?
Технология синтеза речи (TTS) преобразует написанный текст в произнесенные слова. Это новшество становится все более важным в нашем цифровом мире, помогая в различных задачах, от чтения веб-страниц до преобразования документов в аудиофайлы. TTS особенно полезен для людей с нарушениями зрения или обучаемости.
Можно ли скачать синтез речи для Windows 7?
Да, вы можете скачать и установить программное обеспечение TTS на Windows 7. Хотя в более новых версиях, таких как Windows 10 и 11, больше интегрированных функций TTS, Windows 7 все еще поддерживает различные программы TTS. Эти программы могут читать вслух текстовые файлы, веб-страницы и даже преобразовывать текст в аудиоформаты, такие как mp3 или wav, что делает их универсальными инструментами для пользователей ПК с Windows.
Можно ли использовать синтез речи Windows 7 как изменитель голоса?
Возможности TTS в Windows 7 в основном сосредоточены на чтении текста естественными голосами. Хотя он не предлагает обширных функций изменения голоса, некоторые сторонние программы TTS предоставляют возможности настройки, позволяя пользователям изменять голоса и даже использовать программное обеспечение в творческих целях, таких как изменение голоса.
Лучшие бесплатные программы TTS для Windows 7
- Balabolka: Универсальная программа, поддерживающая различные форматы документов, включая TXT, EPUB и HTML. Она предлагает настройку голосов и может сохранять чтение в различных аудиоформатах.
- NaturalReader: Известна своими естественно звучащими голосами, эта программа может читать широкий спектр типов файлов и веб-страниц.
- Speech Application Programming Interface (SAPI) TTS Engines: SAPI от Microsoft предоставляет основу для синтеза и распознавания речи. Она может использоваться для разработки пользовательских приложений TTS.
- Бесплатные программы TTS: Существует множество бесплатных инструментов TTS, предлагающих базовые функции чтения вслух для текстовых файлов и веб-страниц.
Пошаговые инструкции для легкой установки
- Выберите программу TTS: Определите, какое программное обеспечение TTS подходит вам. Учитывайте такие факторы, как поддерживаемые форматы файлов, языковые опции и функции настройки.
- Скачайте программное обеспечение: Посетите официальный сайт выбранного программного обеспечения TTS. Убедитесь, что вы скачали последнюю версию, совместимую с Windows 7.
- Запустите установщик: После загрузки нажмите на файл установщика. Следуйте инструкциям на экране. Рекомендуется отключить антивирусное программное обеспечение во время установки, чтобы избежать конфликтов.
- Настройте параметры: После установки изучите настройки для настройки голосов, скорости и других предпочтений.
- Начните использовать инструмент TTS: Откройте текстовые файлы, документы или веб-страницы и используйте инструмент TTS для чтения текста вслух или его преобразования в аудиофайл.
Помните, что, хотя бесплатное программное обеспечение TTS является отличным ресурсом, важно загружать его из надежных источников, чтобы обеспечить безопасность вашей операционной системы Windows 7.
Speechify Text to Speech
Стоимость: Бесплатно для пробного использования
Speechify Text to Speech — это революционный инструмент, который изменил способ потребления текстового контента. Используя передовые технологии синтеза речи, Speechify преобразует написанный текст в реалистично звучащие слова, что делает его невероятно полезным для людей с нарушениями чтения, проблемами зрения или просто для тех, кто предпочитает аудиальное обучение. Его адаптивные возможности обеспечивают бесшовную интеграцию с широким спектром устройств и платформ, предлагая пользователям гибкость прослушивания на ходу.
Топ-5 функций Speechify TTS:
Высококачественные голоса: Speechify предлагает разнообразие высококачественных, реалистично звучащих голосов на нескольких языках. Это обеспечивает пользователям естественное восприятие, облегчая понимание и взаимодействие с контентом.
Бесшовная интеграция: Speechify может интегрироваться с различными платформами и устройствами, включая веб-браузеры, смартфоны и многое другое. Это означает, что пользователи могут легко преобразовывать текст с веб-сайтов, электронных писем, PDF и других источников в речь почти мгновенно.
Контроль скорости: Пользователи могут регулировать скорость воспроизведения по своему усмотрению, что позволяет либо быстро просматривать контент, либо углубляться в него медленно.
Прослушивание офлайн: Одна из важных функций Speechify — возможность сохранять и слушать преобразованный текст офлайн, обеспечивая доступ к контенту даже без подключения к интернету.
Подсветка текста: Во время озвучивания текста, Speechify подсвечивает соответствующий фрагмент, позволяя пользователям визуально отслеживать произносимый контент. Это одновременное визуальное и аудиальное восприятие может улучшить понимание и запоминание для многих пользователей.
Часто задаваемые вопросы
Как установить TTS-голоса на Windows 7?
В Windows 7 перейдите в Панель управления, выберите ‘Специальные возможности’, затем ‘Распознавание речи’. В разделе ‘Текст в речь’ вы можете установить дополнительные голоса через Microsoft или стороннее ПО TTS.
Есть ли в Windows 7 функция преобразования речи в текст?
Да, в Windows 7 есть функция распознавания речи, которая позволяет преобразовывать произнесенные слова в текст, но она в основном ориентирована на команды и управление, а не на диктовку.
Существует ли бесплатное приложение для преобразования текста в речь для ПК?
Да, существует несколько бесплатных приложений для преобразования текста в речь для ПК, таких как Balabolka и NaturalReader. Эти приложения предлагают естественно звучащие голоса и поддерживают различные форматы документов.
Какой голос по умолчанию используется для преобразования текста в речь в Windows 7?
Голос по умолчанию для преобразования текста в речь в Windows 7 — это Microsoft Anna, женский голос, разработанный для стандартного английского языка.
Как настроить преобразование текста в речь на Windows 7?
Чтобы настроить преобразование текста в речь на Windows 7, перейдите в Панель управления, выберите ‘Специальные возможности’, затем ‘Распознавание речи’, и выберите ‘Текст в речь’, чтобы настроить параметры, такие как выбор голоса и скорость речи.
Какие существуют бесплатные голоса для преобразования текста в речь?
Бесплатные голоса для преобразования текста в речь включают встроенные голоса Microsoft и голоса из бесплатного ПО, такого как Balabolka и NaturalReader, которые предлагают разнообразие естественно звучащих голосов на разных языках.
Можно ли использовать преобразование текста в речь Windows 7 как изменитель голоса?
TTS в Windows 7 не предназначен для изменения голоса в реальном времени, но вы можете преобразовывать текст в речь с различными голосами и использовать эти аудиофайлы творчески.
Как изменить язык по умолчанию в Windows 7?
Чтобы изменить язык по умолчанию, перейдите в Панель управления, выберите ‘Регион и язык’, и выберите нужный язык на вкладке ‘Клавиатуры и языки’.
Можно ли скачать преобразование текста в речь для Windows 7?
Да, вы можете скачать различные программы для преобразования текста в речь для Windows 7, такие как Balabolka и NaturalReader. Они доступны для бесплатного скачивания и поддерживают множество текстовых и аудиоформатов.
Windows 10 comes with two default voices installed to be used with the text-to-speech engines. These two voices (namely Microsoft Zira and Microsoft David) that come pre-installed in Windows 10 are to be used with both apps and desktop applications. In case you are installing a third party voice pack for TTS then most probably it will be available for the desktop applications only. Here is how you can install third party TTS voices, set them as default and use them in Windows desktop applications:
Download and install TTS Voice Packs in Windows 10
One of the sources for downloading free Microsoft and LTS TTS voices is Zero2000. You can also purchase very high quality TTS voices for Windows from companies like Ivona, Cepstral or CereProc. But if you want to try out these high quality voices in Windows 10, then you can also download the 30-day trial versions too. You can download these various packs from http://visionaid.com/phpincludes/en/support/voices/voices.php where you will find voice packs from Ivona and Nuance (no longer work in Windows 10).
Installation of these packs is usually very simple. All you have to do is launch and go through the setup installer package and it will automatically install all the voices included in the package in your Windows 10 PC.

Testing VisionAid Voices Packs in Windows 10
If you have downloaded the speech packs from VisionAid website (link above), then the setup package installs some extra tools in your PC. You can open the Start Menu icon and search for Speech Test to find a small speech testing tool. The other tool installed is for managing the installed voice licenses on your PC.
The Speech Test tool can be used to check the proper installation of these voices in your PC. You can select one of the installed voices from the drop-down list, then type something in the text box and click on the Speak button. There are some other options for this tool like speak punctuation and parsing XML files.

Setting a Default Voice for TTS in Windows 10
Some voices in Windows 10 are only meant for apps, and some for only desktop applications, while others can be used both for apps and traditional desktop applications. Most of the third party voices are designed to be used with the desktop applications. In order to use them, you have open Control Panel and choose the default voice.
You can press the Win+X and select Control Panel from the menu. In the Control Panel, search for “speech” and then click on the Change text to speech settings. In the window that opens, you can choose a default voice from Voice Selection list-box and then finally click on OK button.
Note: Not all voice packs installed may show up in these settings depending on the API used by them. Even the same voice pack may use different API for different versions of the voice packs. For using them, use specific apps like TTSReader mentioned below.

Using the Newly Installed Voice in Desktop Application
For using the newly installed voices in Windows 10 requires you to either use a Windows app that you can download from the official Microsoft apps store or a desktop application like TTSReader that you can download from http://www.softpedia.com/get/Office-tools/Other-Office-Tools/TTSReader.shtml.
TTSReader is a free application and can read all the text that you have copied to the clipboard automatically. In the application, you can choose one of the available TTS voices and control its speech, volume and pitch. TTSReader can also save the speech output to an MP3 or WAV audio file.

Conclusion: If you are not happy with the default Microsoft Zira and Microsoft David TTS voices available in Windows 10, then you can get third party TTS voices for free or buy them online. Using the third party TTS voices in Windows 10 is a breeze if you know what type of voice packs you have installed.
On Windows 10, Speech Recognition is an easy-to-use experience that allows you to control your computer entirely with voice commands.
Anyone can set up and use this feature to navigate, launch applications, dictate text, and perform a slew of other tasks. However, Speech Recognition was primarily designed to help people with disabilities who can’t use a mouse or keyboard.
In this Windows 10 guide, we walk you through the steps to configure and start using Speech Recognition to control your computer only with voice.
- How to configure Speech Recognition on Windows 10
- How to train Speech Recognition to improve accuracy
- How to change Speech Recognition settings
- How to use Speech Recognition on Windows 10
How to configure Speech Recognition on Windows 10
To set up Speech Recognition on your device, use these steps:
- Open Control Panel.
- Click on Ease of Access.
- Click on Speech Recognition.
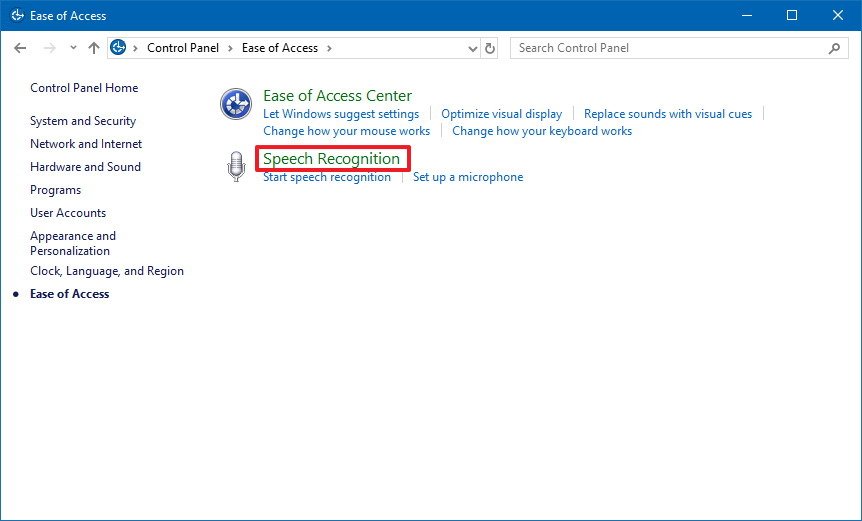
- Click the Start Speech Recognition link.
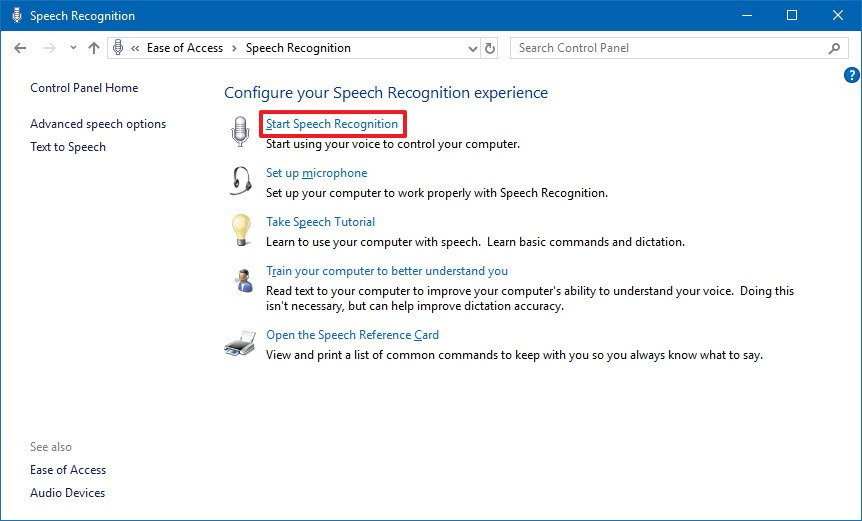
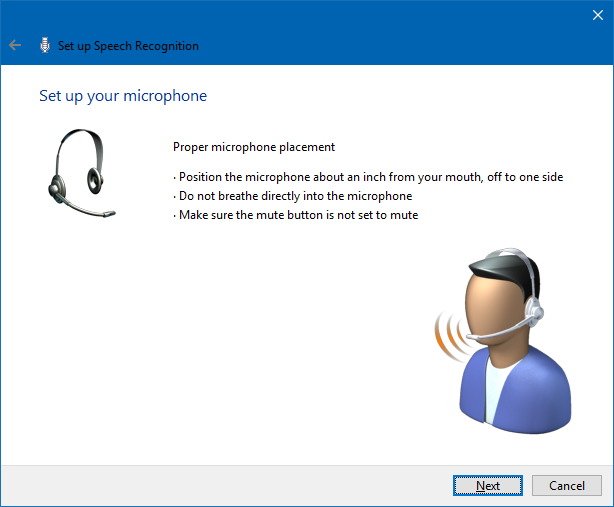
- In the «Set up Speech Recognition» page, click Next.
- Select the type of microphone you’ll be using.Note: Desktop microphones are not ideal, and Microsoft recommends headset microphones or microphone arrays.
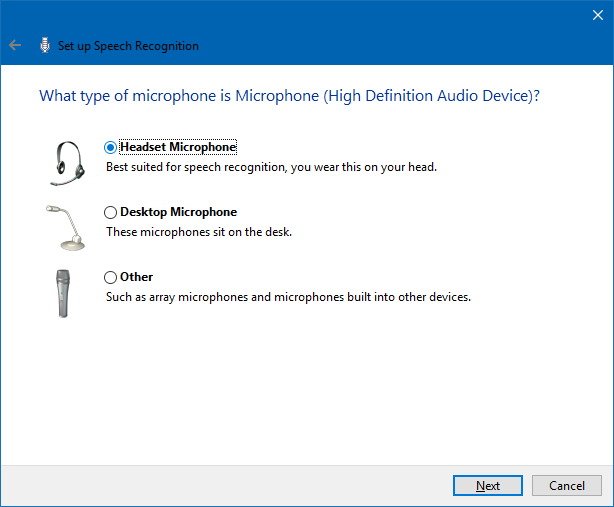
- Click Next.
- Click Next again.
- Read the text aloud to ensure the feature can hear you.
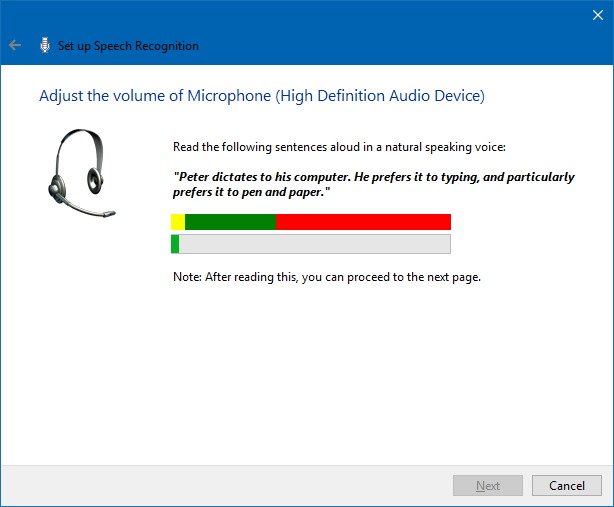
- Click Next.
- Click Next again.
- Speech Recognition can access your documents and emails to improve its accuracy based on the words you use. Select the Enable document review option, or select Disable document review if you have privacy concerns.
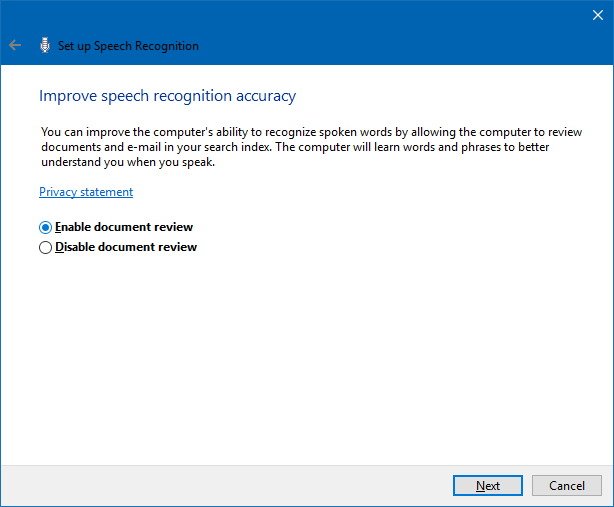
- Click Next.
- Pick an activation mode:
- Use manual activation mode — Speech Recognition turns off the «Stop Listening» command. To turn it back on, you’ll need to click the microphone button or use the Ctrl + Windows key shortcut.
- Use voice activation mode — Speech Recognition goes into sleep mode when not in use, and you’ll need to invoke the «Start Listening» voice command to turn it back on.

- Click Next.
- If you’re not familiar with the commands, click the View Reference Sheet button to learn more about the voice commands you can use.
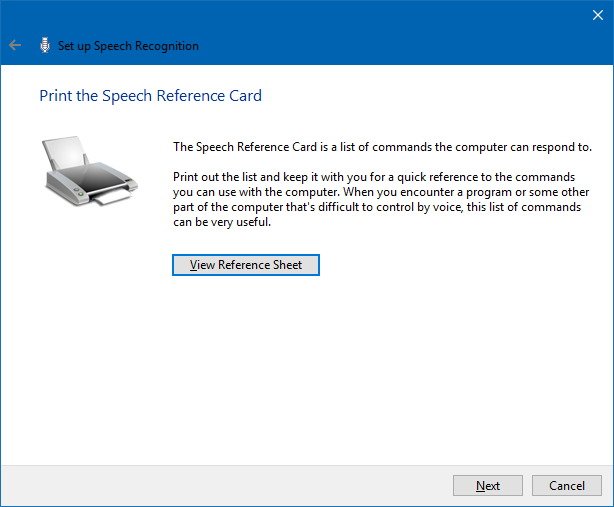
- Click Next.
- Select whether you want this feature to start automatically at startup.
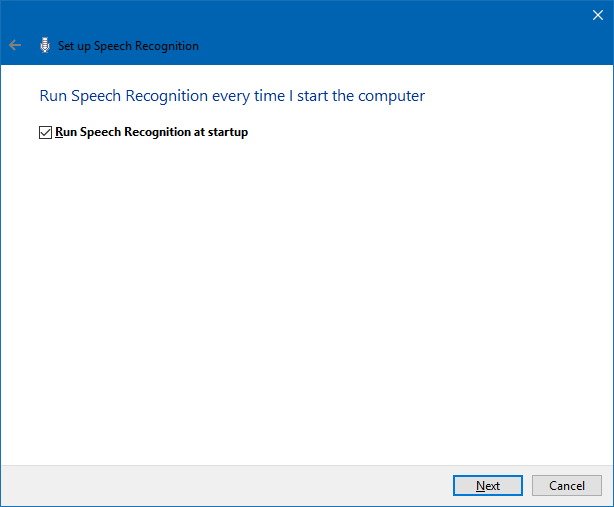
- Click Next.
- Click the Start tutorial button to access the Microsoft video tutorial about this feature, or click the Skip tutorial button to complete the setup.
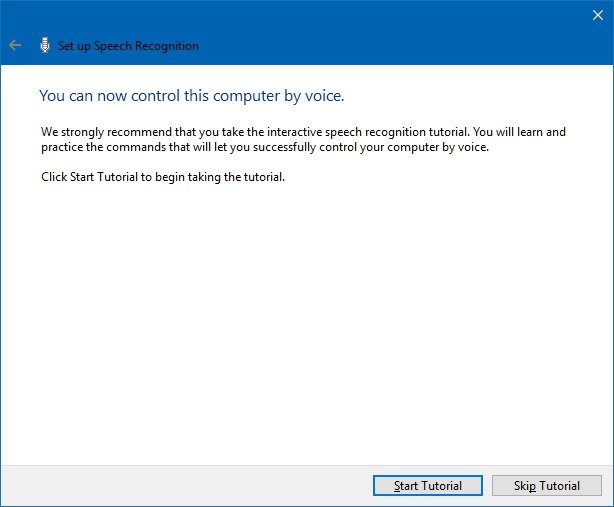
Once you complete these steps, you can start using the feature with voice commands, and the controls will appear at the top of the screen.
Quick Tip: You can drag and dock the Speech Recognition interface anywhere on the screen.
How to train Speech Recognition to improve accuracy
After the initial setup, we recommend training Speech Recognition to improve its accuracy and to prevent the «What was that?» message as much as possible.
All the latest news, reviews, and guides for Windows and Xbox diehards.
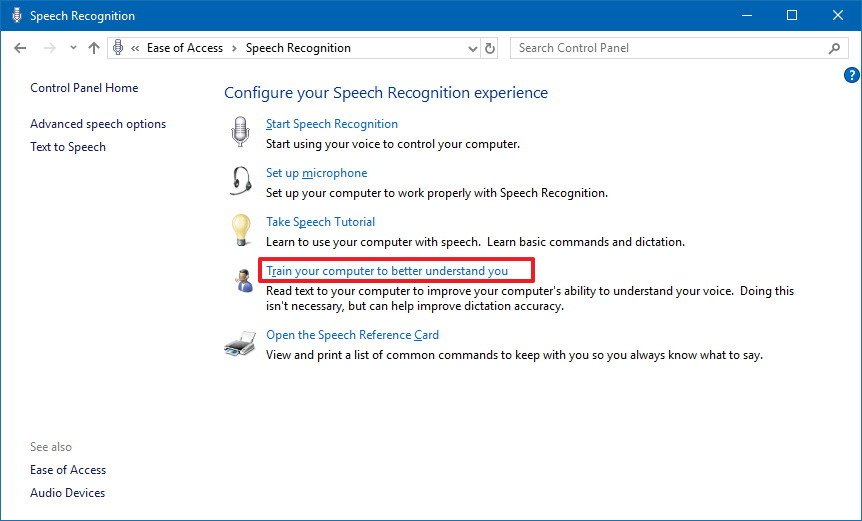
- Open Control Panel.
- Click on Ease of Access.
- Click on Speech Recognition.
- Click the Train your computer to better understand you link.
- Click Next to continue with the training as directed by the application.
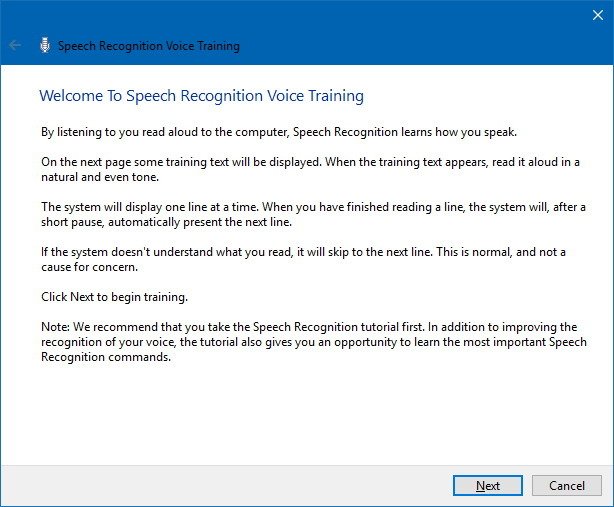
After completing the training, Speech Recognition should have a better understanding of your voice to provide an improved experience.
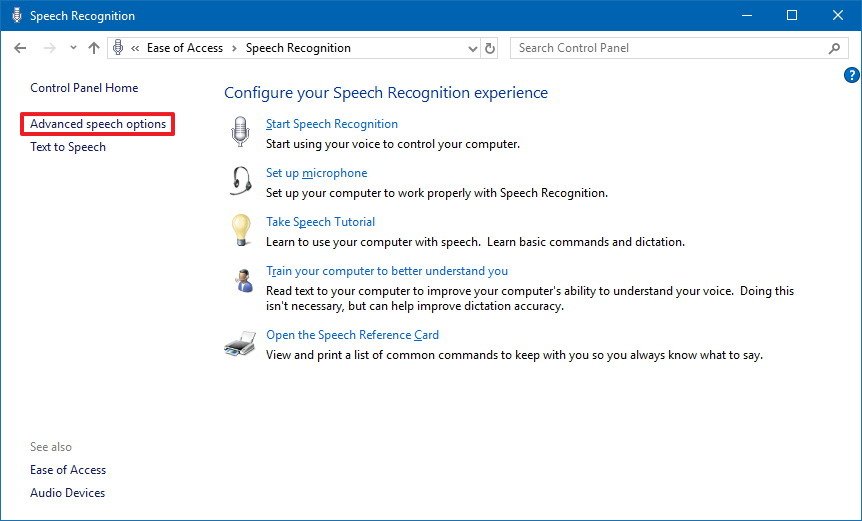
How to change Speech Recognition settings
If you need to change the Speech Recognition settings, use these steps:
- Open Control Panel.
- Click on Ease of Access.
- Click on Speech Recognition.
- Click the Advanced speech options link in the left pane.
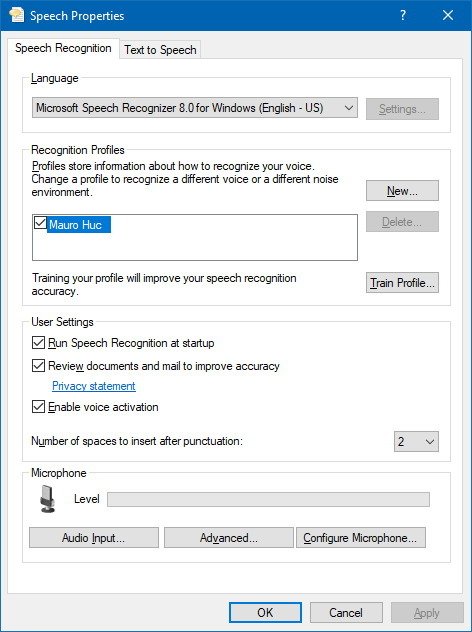
Inside «Speech Properties,» in the Speech Recognition tab, you can customize various aspects of the experience, including:
- Language.
- Recognition profiles.
- User settings.
- Microphone.
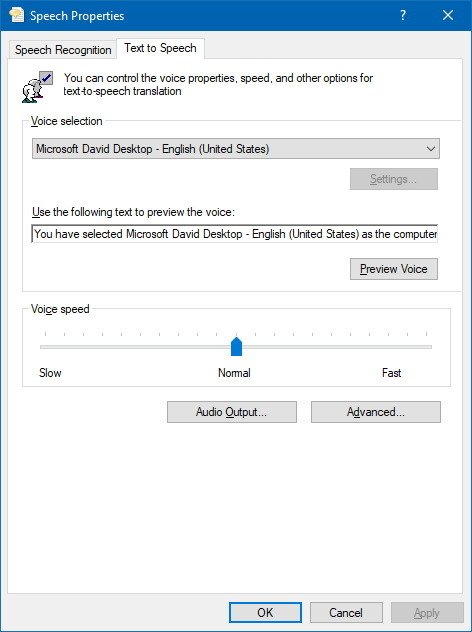
In the Text to Speech tab, you can control voice settings, including:
- Voice selection.
- Voice speed.
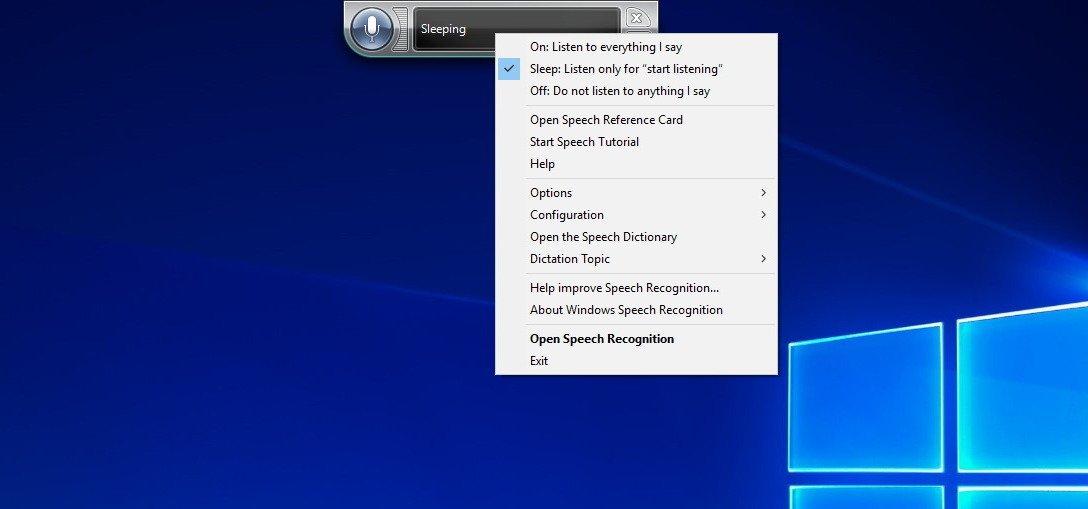
Additionally, you can always right-click the experience interface to open a context menu to access all the different features and settings you can use with Speech Recognition.
How to use Speech Recognition on Windows 10
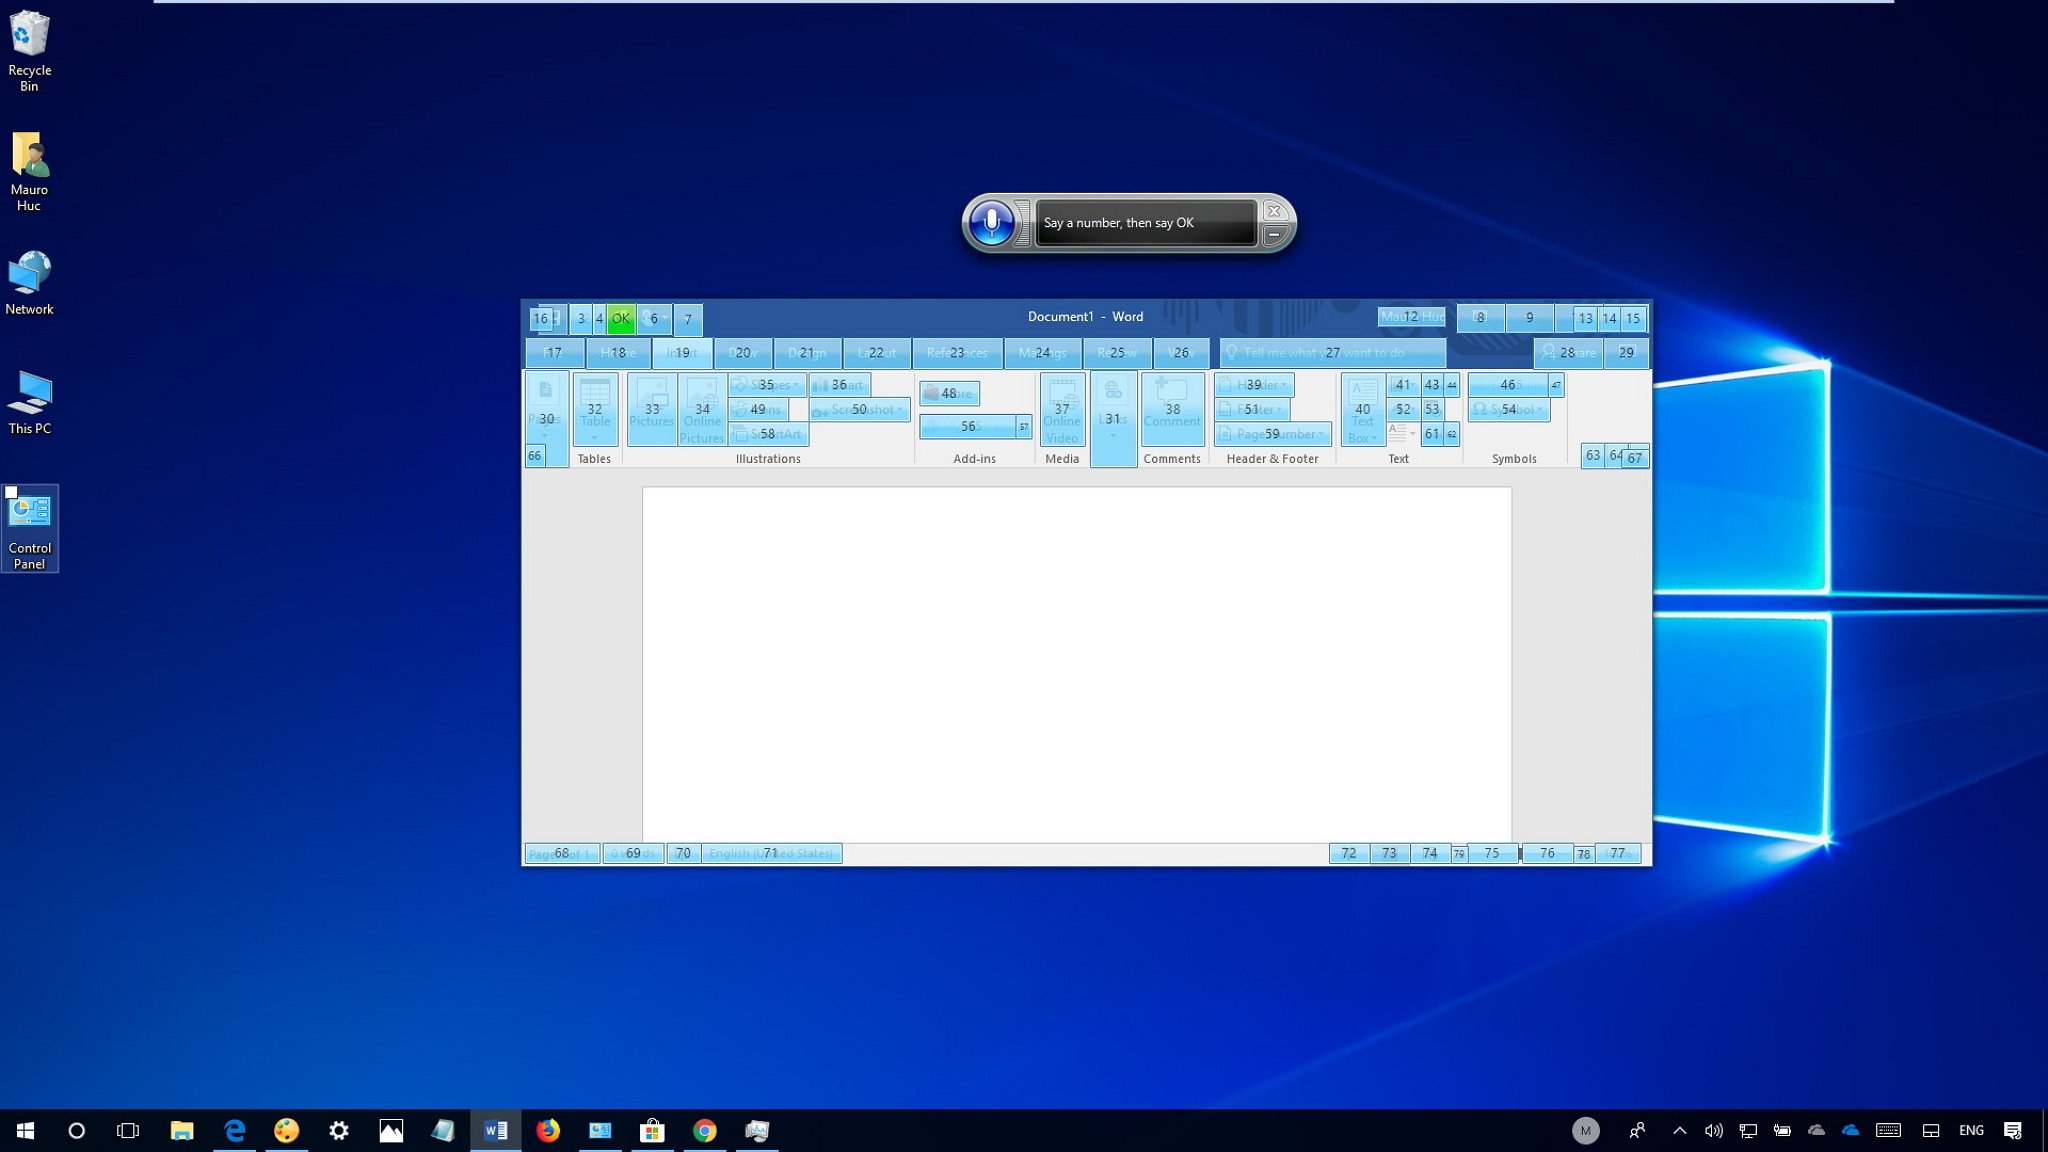
While there is a small learning curve, Speech Recognition uses clear and easy-to-remember commands. For example, using the «Start» command opens the Start menu, while saying «Show Desktop» will minimize everything on the screen.
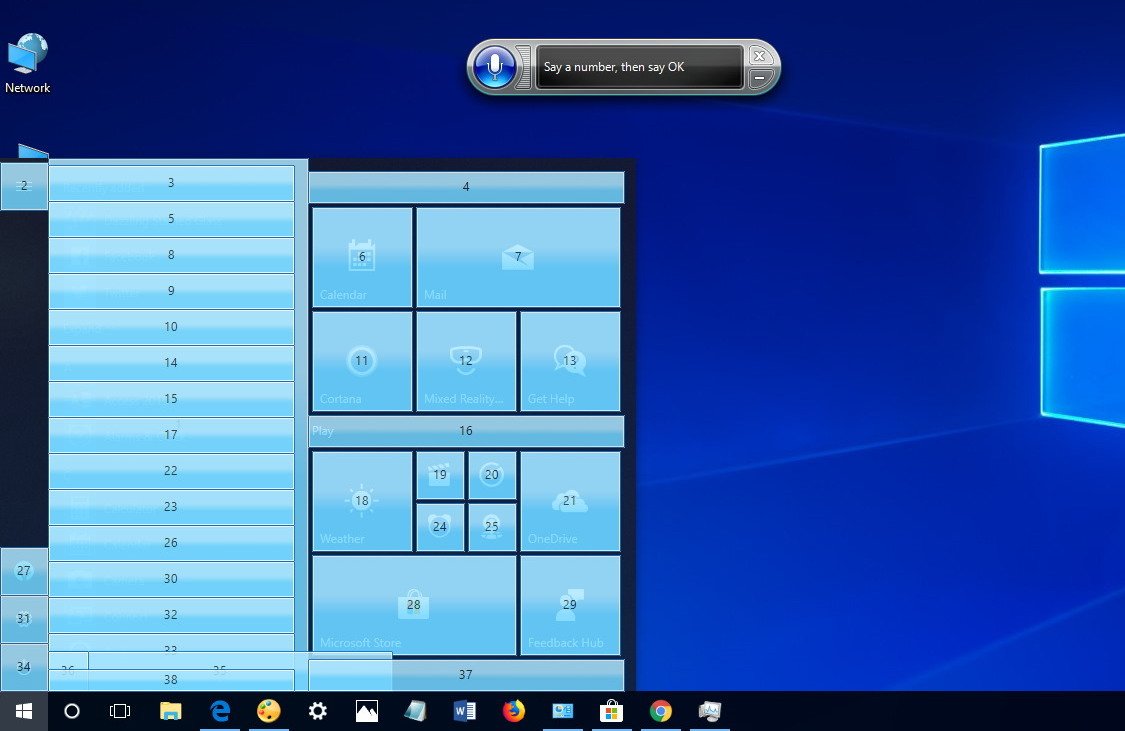
If Speech Recognition is having difficulties understanding your voice, you can always use the Show numbers command as everything on the screen has a number. Then say the number and speak OK to execute the command.
Here are some common tasks that will get you started with Speech Recognition:
Starting Speech Recognition
To launch the experience, just open the Start menu, search for Windows Speech Recognition, and select the top result.
Turning on and off
To start using the feature, click the microphone button or say Start listening depending on your configuration.
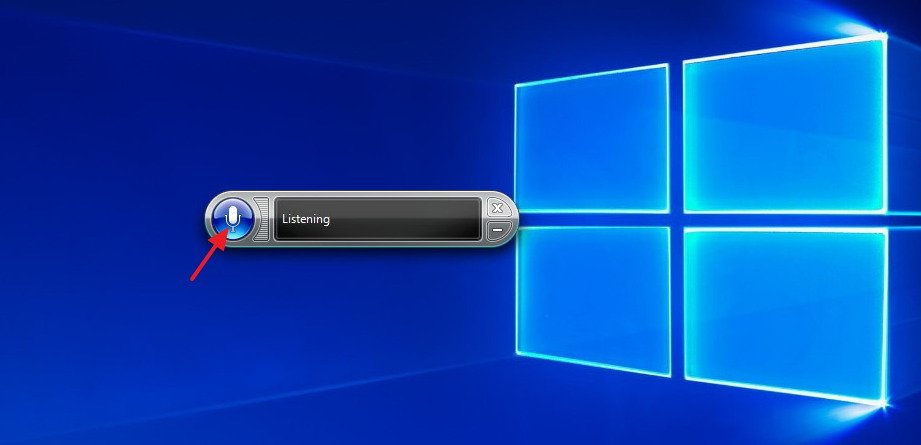
In the same way, you can turn it off by saying Stop listening or clicking the microphone button.
Using commands
Some of the most frequent commands you’ll use include:
- Open — Launches an app when saying «Open» followed by the name of the app. For example, «Open Mail,» or «Open Firefox.»
- Switch to — Jumps to another running app when saying «Switch to» followed by the name of the app. For example, «Switch to Microsoft Edge.»
- Control window in focus — You can use the commands «Minimize,» «Maximize,» and «Restore» to control an active window.
- Scroll — Allows you to scroll in a page. Simply use the command «Scroll down» or «Scroll up,» «Scroll left» or «Scroll right.» It’s also possible to specify long scrolls. For example, you can try: «Scroll down two pages.»
- Close app — Terminates an application by saying «Close» followed by the name of the running application. For example, «Close Word.»
- Clicks — Inside an application, you can use the «Click» command followed by the name of the element to perform a click. For example, in Word, you can say «Click Layout,» and Speech Recognition will open the Layout tab. In the same way, you can use «Double-click» or «Right-click» commands to perform those actions.
- Press — This command lets you execute shortcuts. For example, you can say «Press Windows A» to open Action Center.
Using dictation
Speech Recognition also includes the ability to convert voice into text using the dictation functionality, and it works automatically.
If you need to dictate text, open the application (making sure the feature is in listening mode) and start dictating. However, remember that you’ll have to say each punctuation mark and special character.
For example, if you want to insert the «Good morning, where do you like to go today?» sentence, you’ll need to speak, «Open quote good morning comma where do you like to go today question mark close quote.»
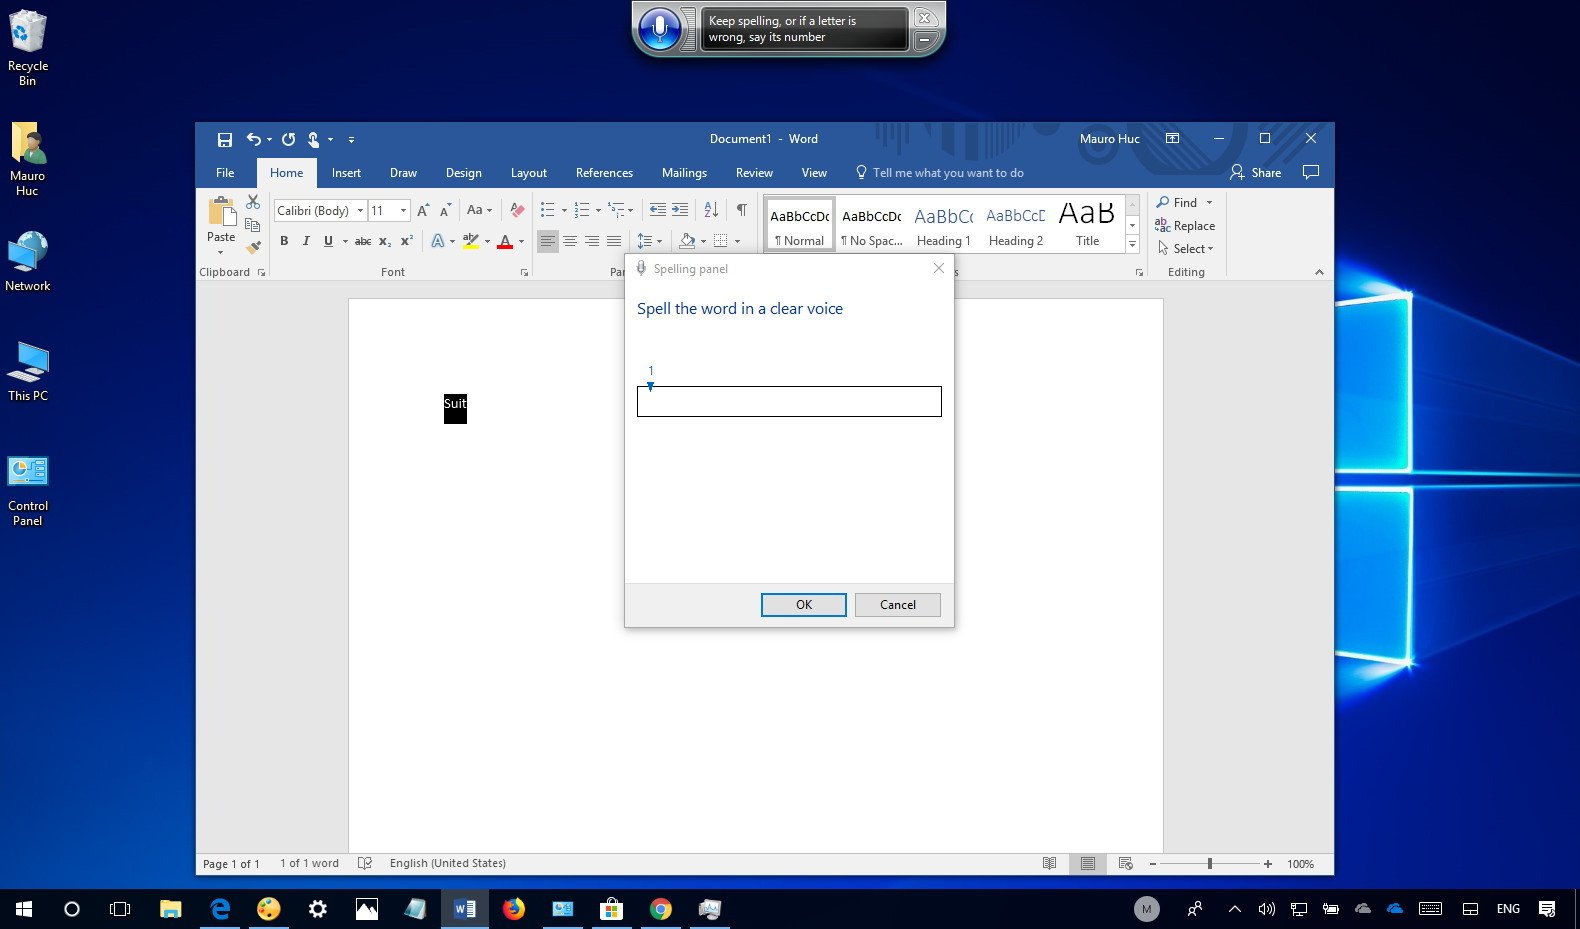
In the case that you need to correct some text that wasn’t recognized accurately, use the «Correct» command followed by the text you want to change. For example, if you meant to write «suite» and the feature recognized it as «suit,» you can say «Correct suit,» select the suggestion using the correction panel or say «Spell it» to speak the correct text, and then say «OK».
Wrapping things up
Although Speech Recognition doesn’t offer a conversational experience like a personal assistant, it’s still a powerful tool for anyone who needs to control their device entirely using only voice.
Cortana also provides the ability to control a device with voice, but it’s limited to a specific set of input commands, and it’s not possible to control everything that appears on the screen.
However, that doesn’t mean that you can’t get the best of both worlds. Speech Recognition runs independently of Cortana, which means that you can use the Microsoft’s digital assistant for certain tasks and Speech Recognition to navigate and execute other commands.
It’s worth noting that this speech recognition isn’t available in every language. Supported languages include English (U.S. and UK), French, German, Japanese, Mandarin (Chinese Simplified and Chinese Traditional), and Spanish.
While this guide is focused on Windows 10, Speech Recognition has been around for a long time, so you can refer to it even if you’re using Windows 8.1 or Windows 7.
More Windows 10 resources
For more helpful articles, coverage, and answers to common questions about Windows 10, visit the following resources:
- Windows 10 on Windows Central – All you need to know
- Windows 10 help, tips, and tricks
- Windows 10 forums on Windows Central
Mauro Huculak has been a Windows How-To Expert contributor for WindowsCentral.com for nearly a decade and has over 15 years of experience writing comprehensive guides. He also has an IT background and has achieved different professional certifications from Microsoft, Cisco, VMware, and CompTIA. He has been recognized as a Microsoft MVP for many years.