
Ошибка VIDEO_MEMORY_MANAGEMENT_INTERNAL считается критической проблемой управления памятью, которая также приводит к появлению «Синего экрана смерти». Это может быть связано с обновлением драйверов дисплея или с несовместимостью некоторых приложений. В частности, она появляется в результате проблем с производительностью и приводит к сбоям и зависаниям системы.
Такая ситуация может произойти в результате заражения Windows вредоносным ПО, повреждения системных файлов или из-за конфликтующих программ. Кроме того, ошибка может появиться из-за отсутствия данных из библиотеки DLL или проблем управления видеопамятью. В некоторых случаях сообщение VIDEO_MEMORY_MANAGEMENT_INTERNAL появляется при запуске определённых программ или игр. Так или иначе, каждая из причин появления ошибки решаема. Ниже приведены методы по её устранению.
Решение 1: проверьте компьютер на наличие вирусов
В результате заражения ПК вредоносными программами, файлы системы могут быть повреждены, в том числе важные данные реестра Windows. Поэтому первым, и самым очевидным решением будет — проверить компьютер на наличие вирусов. Это можно сделать как встроенным Защитником Windows, так и специальным ПО.
Стоит отметить, что разработчики антивирусных программ на своих сайтах предоставляют бесплатно пробные версии своих продуктов, а также различные утилиты, исправляющие самые разные ошибки. Поэтому, в случае отсутствия такого обеспечения на компьютере можно воспользоваться бесплатными решениями. Что касается Защитника Windows, то найти его и применить можно по следующему пути:
- Нажмите правой кнопкой мыши на значок Windows (в левом нижнем углу).
- Перейдите в раздел Панель управления и выберите Защитник Windows.
- Обновите защитник, если это необходимо.
- Далее выберите Полная проверка и запустите процесс.
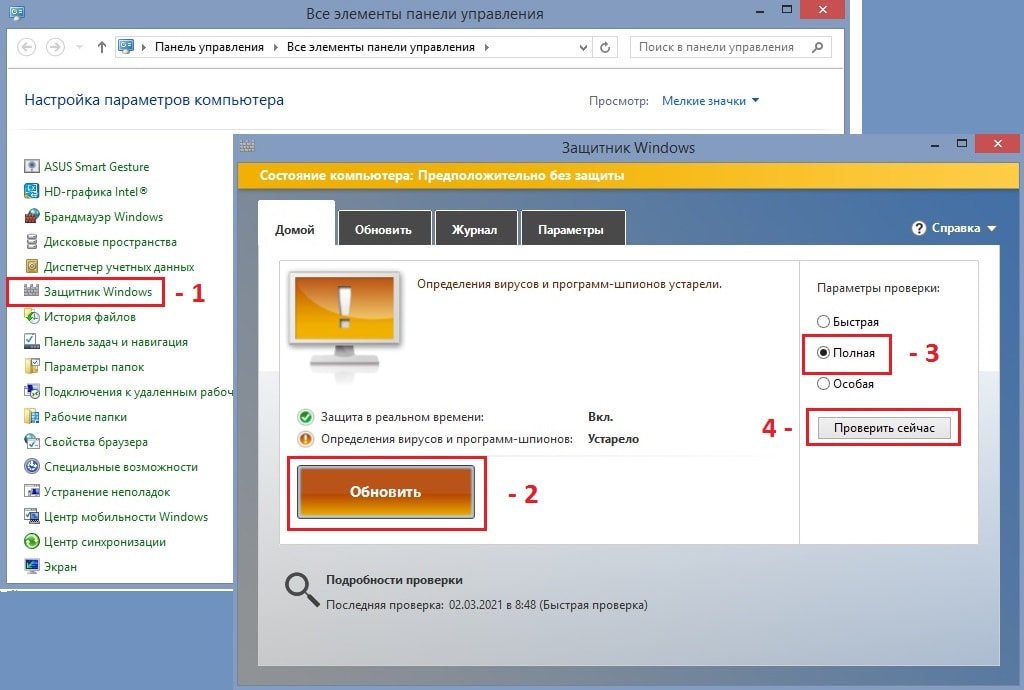
Полная проверка может занять продолжительное время, но это даст уверенность, что на компьютере нет вирусов, либо они будут найдены и удалены.
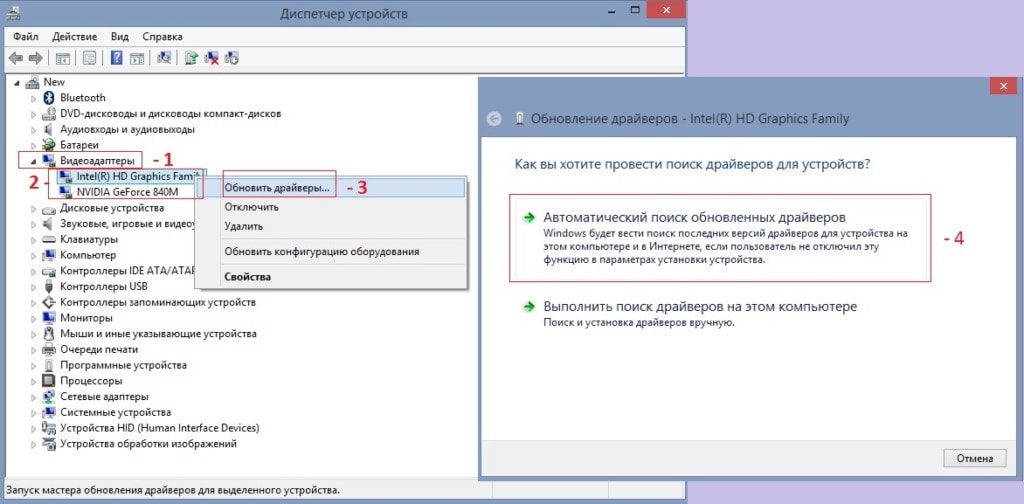
Решение 2: обновите драйверы дисплея
Как происходит процедура обновления:
- Щёлкните правой кнопкой мыши на значок Windows и найдите Диспетчер устройств.
- Разверните раздел Видеоадаптеры.
- Выберите конкретный драйвер, и щёлкните по нему ПКМ.
- Нажмите Обновить драйвер;
- Примените Автоматический поиск обновлённых драйверов.
- Дождитесь завершения и установки программного обеспечения, а затем перезагрузите компьютер.
Решение 3: запуск программы в режиме совместимости
В некоторых случаях ошибка VIDEO_MEMORY_MANAGEMENT_INTERNAL появляется после установки и запуска определённых программ или игр. Поэтому одним из решений является включение такого приложения в режиме совместимости.
- Нажмите ПКМ по ярлыку проблемной программы и выберите Свойства
- Перейдите во вкладку Совместимость.
- Поставьте флажок «Запустить программу в режиме совместимости».
- Выберите другую версию Windows, например, 8 или 7.
- Нажмите Применить и ОК.
Решение 4: запустите средство проверки системных файлов
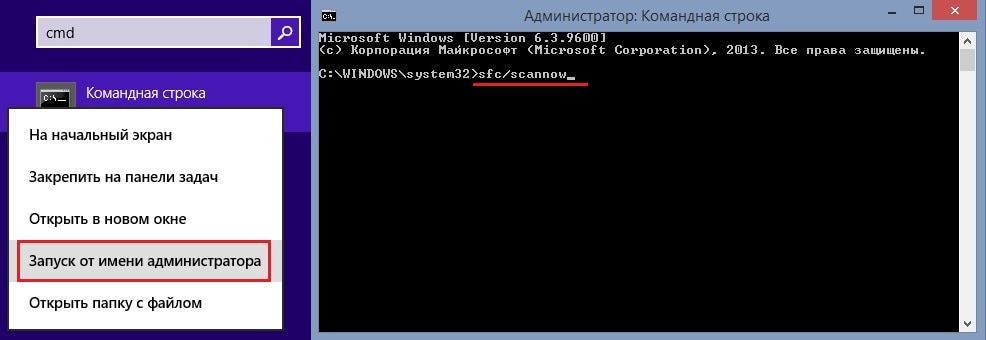
Как это сделать:
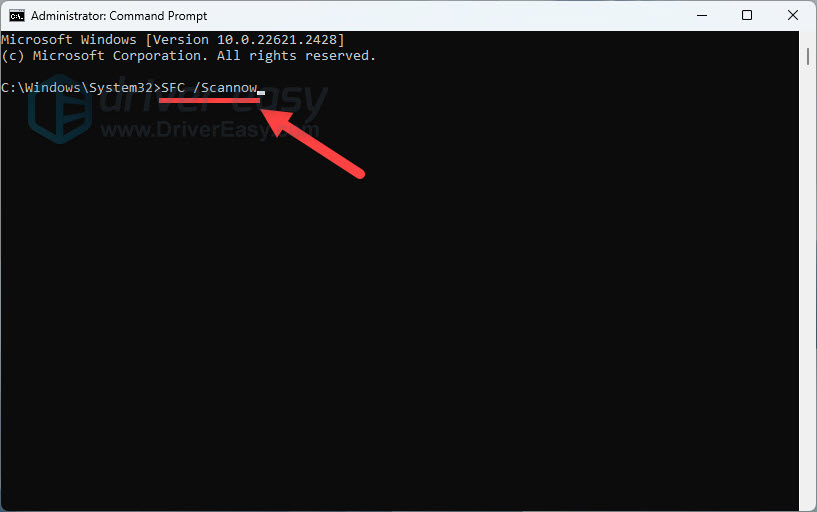
- Введите cmd в поиске Windows.
- Щелкните ПКМ по результату «Командная строка» и выберите Запуск от имени администратора.
- В открывшемся окне введите sfc/scannow и нажмите Enter.
- Дождитесь, пока Windows просканирует и восстановит все повреждённые системные файлы.
Getting a BSOD error with the stop code: VIDEO_MEMORY_MANAGEMENT_INTERNAL? You’re not alone. It’s one of the common blue screen errors that many Windows users may encounter. The good news is there are a few fixes available. Read on and find out what they are…
Why am I getting this error?
VIDEO_MEMORY_MANAGEMENT_INTERNAL error (code: 0x0000010E) can be triggered under many circumstances. Some possible causes include corrupt system files, a problematic graphics card driver, and defective RAM.
Try these fixes…
You don’t have to try them all, just work your way down the list until you find the one that does the trick!
- Update your graphics driver
- Repair corrupted system files
- Uninstall Windows Updates in Safe Mode
- Test your RAM
- Reinstall Windows
Fix 1: Update Your graphics card driver
According to Microsoft, the VIDEO_MEMORY_MANAGEMENT_INTERNAL BSOD error “is usually caused by a video driver behaving improperly”, so you can check if your graphics driver is faulty or outdated.
There are two ways to keep your graphics card driver up-to-date.
One is to manually update it via Device Manager. If Device Manager fails to detect the latest available update for you, you can also search on the manufacturer’s website. Be sure to choose only the driver that is compatible with your Windows version.
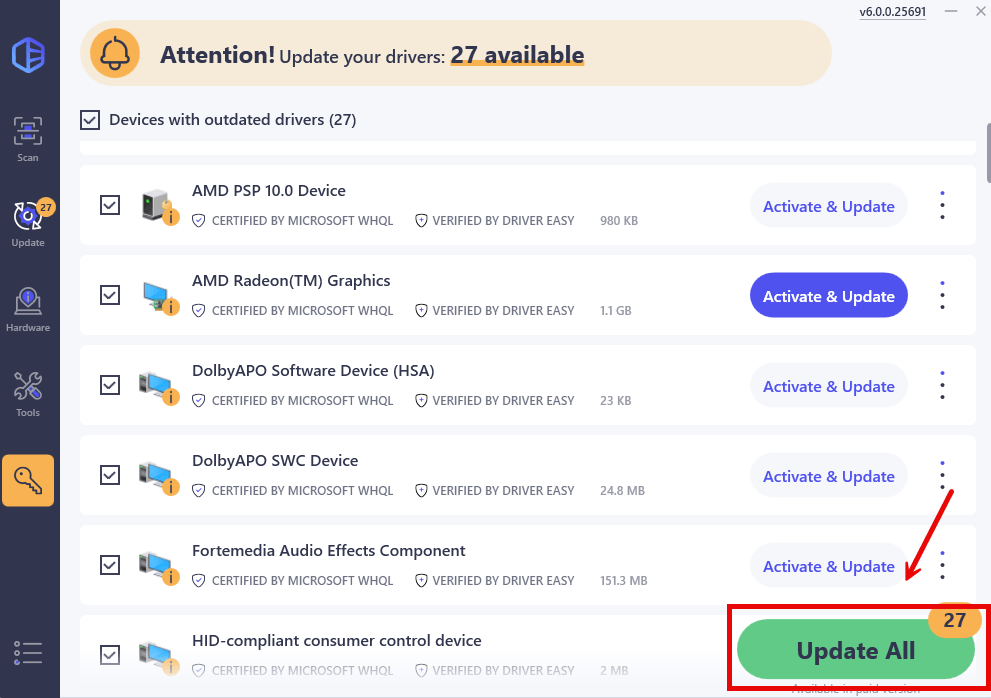
Automatic driver update – If you don’t have the time, patience, or computer skills to update your driver manually, you can, instead, do it automatically with Driver Easy. Driver Easy will automatically recognize your system and find the correct driver for your exact graphics card and your Windows version, then it will download and install it correctly:
- Download and install Driver Easy.
- Run Driver Easy and click the Scan Now button. Driver Easy will then scan your computer and detect any problem drivers.

- Click Update All to automatically download and install the correct version of all the drivers that are missing or out of date on your system.
(This requires the Pro version which comes with full support and a 30-day money-back guarantee. You’ll be prompted to upgrade when you click Update All. If you’re not ready to buy the Pro version, Driver Easy offers a 7-day free trial which includes access to all the Pro features such as high-speed download and one-click install. You won’t be charged anything until your 7-day trial has ended.)

- Restart your computer for the changes to take effect.

The Pro version of Driver Easy comes with full technical support. If you need assistance, please contact Driver Easy’s support team at support@drivereasy.com.
If updating the graphics card driver doesn’t fix the Video Memory Management Internal blue screen of death error, try the next fix.
Fix 2: Repair corrupted system files
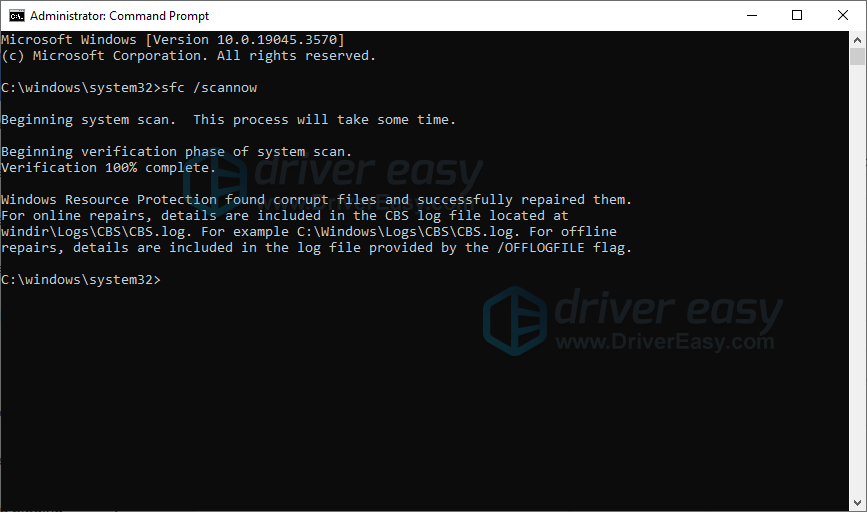
Sometimes this error can result from missing or broken system files. To scan and restore the corrupted system files, you can try the System File Checker tool first (sfc /scannow). This tool is handy in locating the problem, but in most cases, manual repair is required.
Here’s how to run SFC scan:
- On your keyboard, press the Windows Logo key

, type in command prompt, and select Run as administrator. (If Windows prompts for permission, click OK to continue.)

- Type in SFC /Scannow, and then press Enter.

- It’ll take some time for the SFC to repair the corrupted system files if it detects any.

- When the process is completed, reboot your computer and test if the issue still exists.

Fix 3: Uninstall Windows Updates in Safe Mode
Windows Updates can occasionally trigger random issues in software drivers. You can try to enter Safe Mode and uninstall the most recent updates:
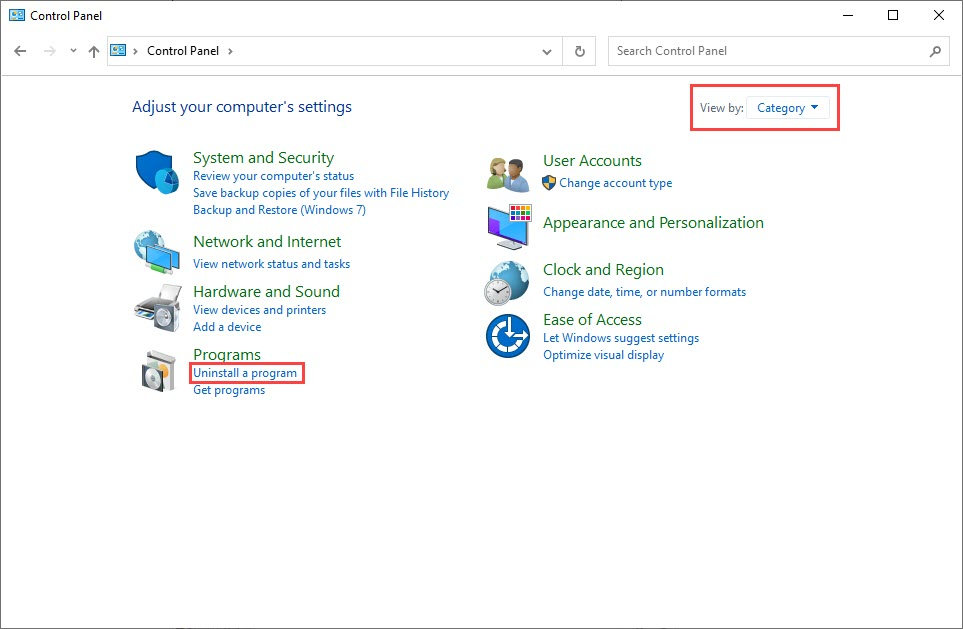
- Boot into Safe Mode. Press the Windows logo key and R on your keyboard to invoke the Run box.
- Type control panel, then click OK.
- Select View by: Category, then click Uninstall a program.

- Click View installed updates.
- Select the problematic update, then click Uninstall.
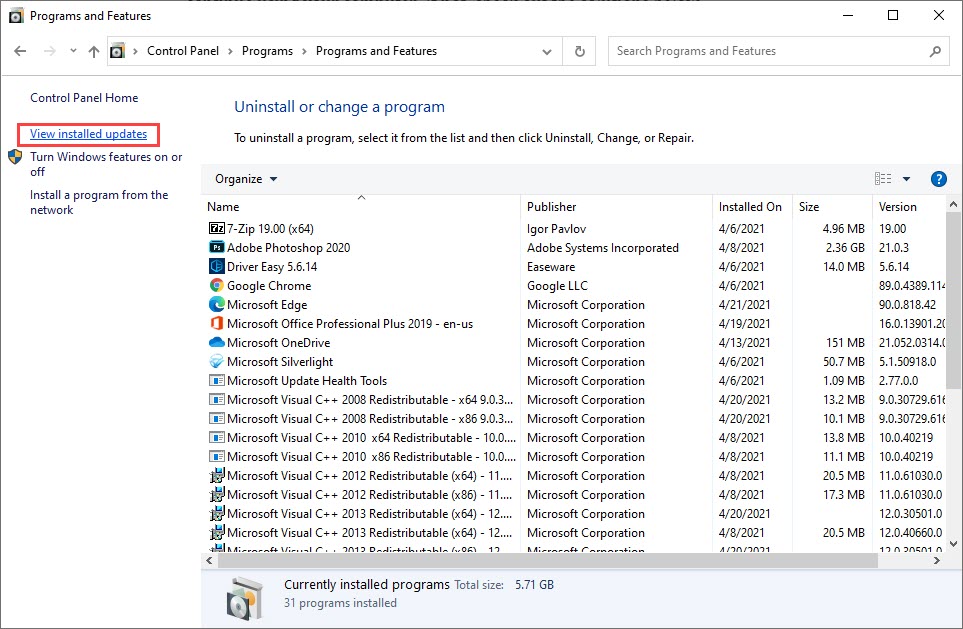
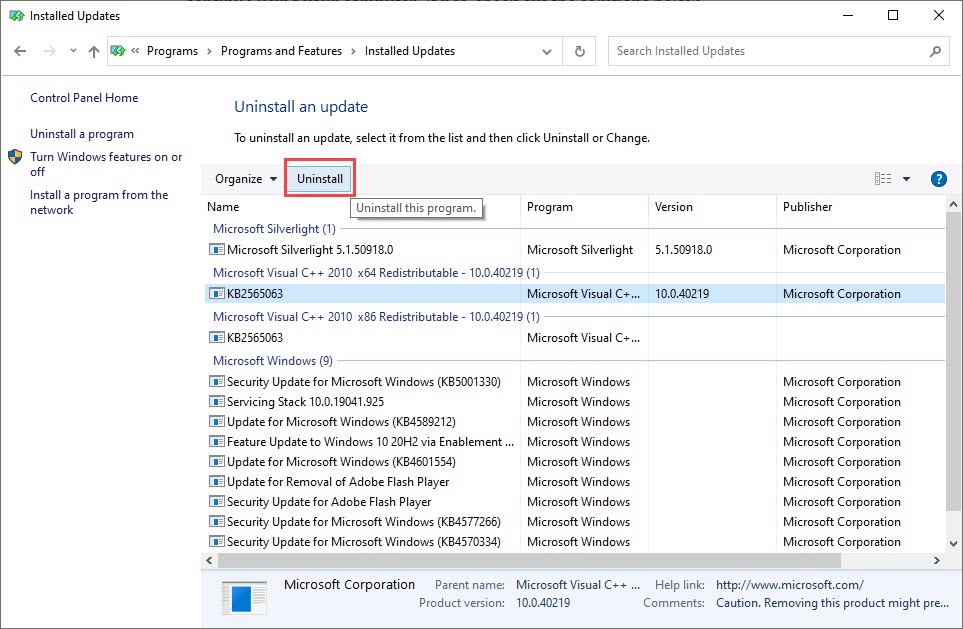
To identify the problematic updates, look for recent Windows updates or those related to graphics cards drivers.
Restart your PC and check if the Video Memory Management Internal problem persists. If so, please move on.
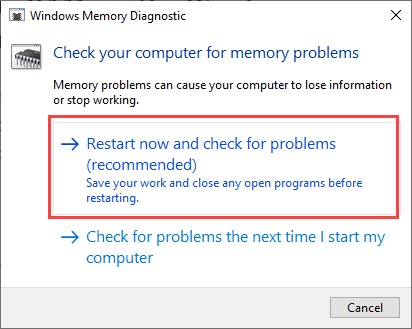
Fix 4: Test your RAM
Faulty RAM could also trigger this error, but things can be a little tricky if it’s the root cause. You can use the Windows Memory Diagnostic tool as the following instructions:
- Press the Windows logo key and R on your keyboard to invoke the Run box.
- Type mdsched.exe, then click OK.
- Click Restart now and check for problems (recommended).
IMPORTANT: Make sure to save all your work before restarting.
- Windows will run diagnosis automatically, which can take a few minutes. When it’s finished, your PC will reboot.
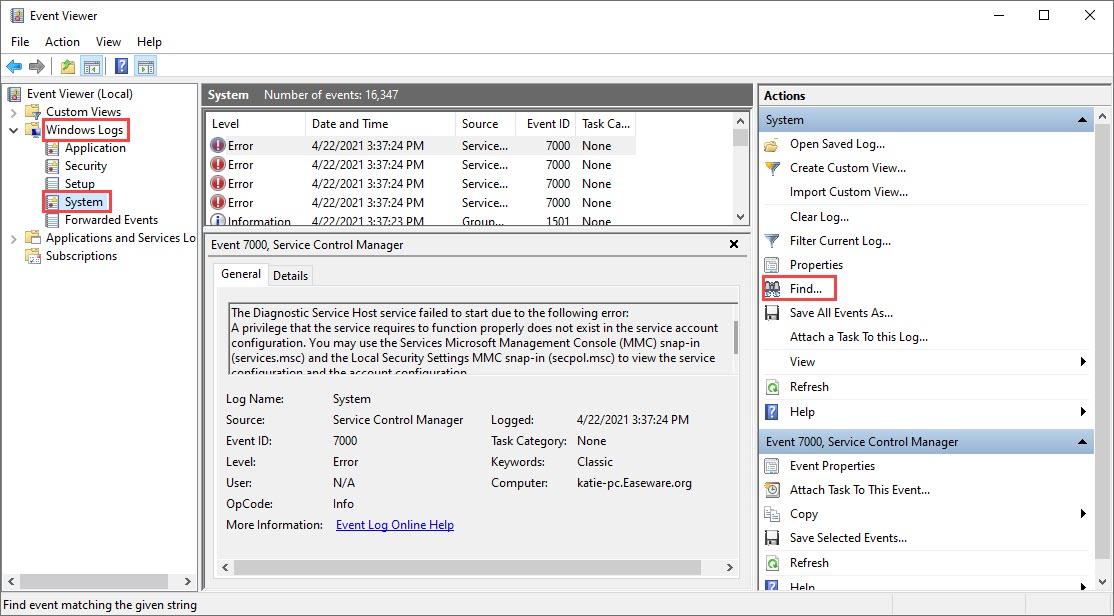
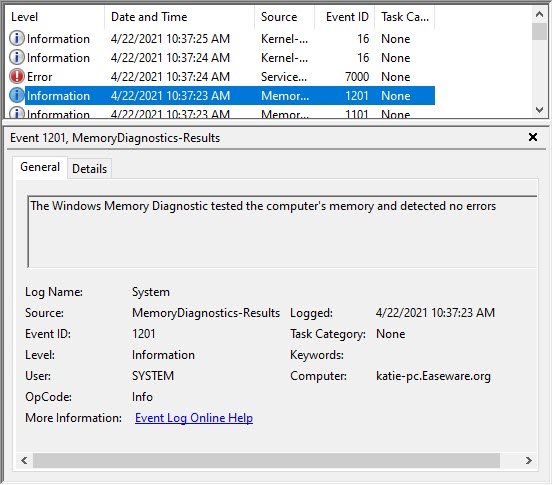
- The results will be shown on your desktop. If you don’t see any notification, right-click the Start menu then click Event Viewer.
(Windows 7 users: Click Start >> Control Panel >> Administrative Tools >> Event Viewer.) - Click Windows Logs >> System >> Find.

- Type memory diagnostic, then click Find Next.

- If you see “no errors”, it means your RAM is functioning well and did not cause the BSOD error. Try other solutions to solve your problem.

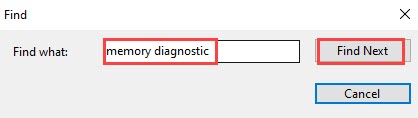
Here comes the tricky part…
If you do see an error, you may consider replacing your RAM. Even though it may not be the cause of your BSOD error, it WILL probably cause your PC to crash at some point.
Check if your device is still under warranty or consult your machine’s manufacturer for assistance.
Fix 5: Reinstall Windows
At this point, when none of the previous methods are proven effective for the Video Memory Management Internal blue screen of death error on your computer, you may need to consider a system restore, which reverts your computer to its last healthy stage. If you’re not sure how to do it, here’s a post for your reference: Repair Your Computer in Windows 10 Automatically
But if your system doesn’t have a restore point saved before the Video Memory Management Internal blue screen of death error, you may need to consider a computer refresh or a reset instead, which will usually wipe out your system files. To do so, here’s a post with detailed instructions: Windows 10 Refresh & Reset Easily. Please do this only when you’re sure what you’re doing, otherwise, you’ll face with important data loss.
Hopefully this article helps! Please feel free to leave a comment if you have any questions.
15
15 people found this helpful
,
If you computer crashes with blue screen error «VIDEO MEMORY MANAGEMENT INTERNAL» and then restarts, continue below to fix the problem.
The error «Stop code: VIDEO MEMORY MANAGEMENT INTERNAL», is usually caused by GPU drivers and in some other cases due to GPU overclocking or corrupted system files. To resolve to problem, read the instructions below.

How to FIX: BSOD ‘VIDEO MEMORY MANAGEMENT INTERNAL’ on Windows 10/11.*
* Important: Before you troubleshoot the reported problem using the methods below, remove any CPU or GPU overclocking as this may be the cause of the problem.
Method 1. Reinstall Graphics drivers.
The first method for solving the «VIDEO MEMORY MANAGEMENT INTERNAL» blue screen error, is to remove and re-install the drivers for your graphics adapter.
1. Press Windows + R keys to open the run command box.
2. Type: devmgmt.msc & click OK to open the Device Manager.

3. In Device Manager, double-click to expand the Display Adapters.
4. Right-click on the installed display adapter(s) and select Uninstall device. *
* Note: For laptops with two display adapters uninstall both the display adapters.

5. At the next window, check the option «Delete the driver software for this device» and then click Uninstall to completely remove the display drivers.

6. Restart your PC and go to Windows Update & Check for Updates. Then, let Windows to download and reinstall the display drivers and then check if the problem is fixed.
* Note: If Windows doesn’t automatically find the drivers, download and install them from the graphics adapter manufacturer’s website.
- NVIDIA drivers
- AMD drivers
- Intel drivers
Method 2. Reinstall an Oldest Video Driver.
If you start receiving the error «VIDEO MEMORY MANAGEMENT INTERNAL» after updating the graphics drivers, then proceed to install an earlier version of your graphics card driver.
Step 1. Uninstall Display Adapter Software.
1. Navigate to Control Panel and open Programs and features, or..
1. Press simultaneously the Windows + R keys to open the run command box.
2. Type: appwiz.cpl and click OK.

2. In Programs and Features, uninstall all the software from your graphics adapter.

3. When the uninstallation is complete, restart your PC.
Step 2. Install a Previous version of the Display driver.
After restart, navigate to GPU manufacturer’s support site and download and oldest driver for your Graphics card. To do that:
For NVIDIA based GPU’s.
-
-
- Go to NVIDIA advanced driver search page and search for the corresponding driver for your display adapter.
- In the search results page download a previous driver version.
- Install the driver you downloaded and restart your computer.
-
For AMD based GPU’s.
-
- Go to AMD (ATI) Driver Download and search for the corresponding driver for your display adapter.
- In the search results page, press the Previous Drivers and Software link at the right.
- Install the driver you downloaded and restart your computer.
Method 3. Disable Onboard Graphics Card. *
* Note: This method works only for laptops with two Display Adapters.
Some users reported that the bsod error «VIDEO MEMORY MANAGEMENT INTERNA» Lis resolved after disabling the onboard graphics adapter. For example, if you own a laptop with an Intel and an NVIDIA (or an AMD) display adapter, proceed and disable the onboard INTEL graphic adapter in device manager, with the instructions below:
1. Press Windows + R keys to open the run command box.
2. Type: devmgmt.msc & click OK to open the Device Manager.
3. In Device Manager, double-click to expand the Display Adapters.
4. Right click on the Intel Display adapter and select Disable.

Method 4. FIX the Explorer Crash issue by Repairing Windows System Files.
Another method to fix blue screen problems, is to repair the Windows system using the below instructions.
1. Open Command Prompt as Administrator. To do that:
1. Press the Windows + R keys to open the ‘Run’ command box
2. Type CMD and then press CTRL + SHIFT + ENTER.

2. In command prompt give the following dism command and press Enter:
- DISM.exe /Online /Cleanup-image /Restorehealth

3. When the DISM operation is completed, type the following command and hit Enter:
- sfc /scannow

4. Now wait until the System File Checker repairs the Windows System Files.
5. When this done, restart your computer and check if the problem is fixed.
Method 5. Perform a Windows 10 Repair.
If after following the above methods your system keeps crashing, try to repair Windows by using the instructions mentioned in this article: How to repair-upgrade Windows 10.
Method 6. Clean Install Windows.
If none of the above method helped to fix the mentioned issue, your last option is to perform a clean installation of Windows.
* Note: Some users reported the «VIDEO MEMORY MANAGEMENT INTERNAL» error is gone after installing Windows to a new SSD drive.
* Important: The clean installation of Windows, means that all your files and settings will be lost during the installation process. So, proceed and backup all your important files and settings to another storage media (e.g. to an external USB drive) before you continue to clean install Windows.
To perform a clean installation of Windows (after backing up your files), follow the instructions on the following guides, according your Operating System:
- How to clean install Windows 10.
- How to clean install Windows 11.
That’s all folks! Did it work for you?
Please leave a comment in the comment section below or even better: like and share this blog post in the social networks to help spread the word about this solution.
If this article was useful for you, please consider supporting us by making a donation. Even $1 can a make a huge difference for us.
- Author
- Recent Posts
Konstantinos is the founder and administrator of Repairwin.com. Since 1995 he works and provides IT support as a computer and network expert to individuals and large companies. He is specialized in solving problems related to Windows or other Microsoft products (Windows Server, Office, Microsoft 365, etc.).
Are you getting a blue screen error with the “VIDEO_MEMORY_MANAGEMENT_INTERNAL” stop code? Don’t worry, it is a common BSOD error that numerous Windows PC users encounter. And, the good news is that various solutions are available to solve this issue. Read the entire article for the details!
Just imagine, you’re working on an important project, and you’re just about to complete the task, but your PC abruptly shuts down. You restart it and receive nothing except a video memory management internal blue screen error message. You do not have an idea what occurred and no additional information but a value 0x0000010E that displays on your computer screen along with the error message.
This is really frustrating, especially when you have no clue how to solve this problem. Therefore, we have prepared this handy guide providing you with the most workable solutions for this BSOD error. Not only this but here you will also learn what this error exactly means and what are the causes of this blue screen error.
What is Video Memory Management Internal Error?
The VIDEO_MEMORY_MANAGEMENT_INTERNAL is a blue screen of death error which means that your computer has some issues because your video memory manager has undergone a situation from which it’s almost impossible to recover. Because of this BSOD error, you can encounter frequent system crashes, slower performance than usual, or even hardware malfunction.
What Causes Video Memory Management Internal in Windows 10, 11?
Following are some most common causes of stop code video memory management internal error in Windows 11, 10.
- Outdated, broken, or missing graphics card drivers.
- Damaged or corrupted system files.
- Hardware issues.
- Increased or unstable clock speeds.
Fixes for VIDEO_MEMORY_MANAGEMENT_INTERNAL Error in Windows 10, 11
According to the numerous Windows PC users, listed below are a few tried and tested solutions to solve stop code video memory management internal error in Windows 10, 11. However, you do not need to try them all, simply work your way down until you find the best trick. Now, without further ado, let’s get started!
Fix 1: Restart your Computer
If your PC is displaying the video_memory_management_internal BSOD error, then try shutting down it and then restarting it. Many times, a simple restart could help you diagnose the problem. In case, if it does not work, we recommend you boot your system in safe mode. Safe mode lets your computer start with only a few necessary programs and assists you in finding the exact source behind the problem. Unfortunately, if this also doesn’t work for you then you can use other solutions mentioned below to bypass the problem.
Also Read: [FIXED] UNEXPECTED KERNEL MODE TRAP Error in Windows 10, 11(BSOD)
Fix 2: Update your Graphics Drivers
Most of the time, outdated, incompatible, or corrupted graphics card drivers are responsible for the BSOD errors. So, it is possible to encounter blue screen video memory management internal error due to outdated graphics drivers. If that is the case, then you should update your graphics card drivers to solve the error.
You can do it either manually from the official website of the graphics card manufacturers or automatically using the best driver updating software like Win Riser Driver Updater. Manufacturers keep releasing the latest driver updates for their products. Undoubtedly, it is the safest way to get driver updates, but the process is a bit time-consuming and error-prone, especially for newbies since it requires expertise in a technical niche. So, if you are a newbie, there might be chances of installing incorrect drivers. Therefore, we recommend automatically updating drivers with all-in-one solutions like Win Riser Driver Updater.
Win Riser is one of the most popular and robust driver updating tools currently available. The software automatically detects your system, thoroughly scans it for outdated drivers, and replaces them with the necessary drivers. Not only a driver updating tool, but Win Riser is a one-stop shop for all your Windows performance and security issues. Moreover, it comes with a built-in malware detection and removal utility tool.
Follow the instructions below to automatically download and install the latest graphics drivers as well as other device drivers on your Windows 10, 11 PC.
Step 1: Download and install Win Riser Driver Updater from the button provided below.
Step 2: After installation, launch Win Riser and scan your device for outdated, broken, or corrupted drivers.
Step 3: Wait for the scanning to be completed. Check the scan results and click on the Fix Issues Now option to install the latest PC driver updates. This will install all the latest versions of PC drivers in one click including graphics drivers.

Step 4: Lastly, restart your PC to apply new drivers.
After installing the latest graphics drivers, check to see if the video memory management internal BSOD error is solved. If not, proceed to another solution.
Fix 3: Run SFC Scan
SFC aka System File Checker is a built-in tool in Windows OS that scans your PC for damaged or corrupted system files & replaces them with the correct ones. Running SFC helps you fix video memory management internal blue screen error on Windows 10, 11. Here is how to do that:
Step 1: Open Command Prompt with the administrator’s privileges.
Step 2: In the Command Prompt (Admin) window, enter SFC/scannow and press the Enter key from your keyboard.
Step 3: Now, the system scanning process will be started. Wait for the process to be completed.
Once it’s done, check the results. If there are no other instructions to comply with, simply close the program and check to see if the blue screen video memory management internal error persists.
Also Read: How to Fix Kernel Data Inpage Error in Windows 10,11
Fix 4: Reset your Computer
None of the above solutions worked? Don’t panic, you can try our last resort i.e., resetting Windows. Resetting your PC will enable Windows to restore its original state, and default settings, which might be responsible for the Video memory management internal blue screen error. However, before proceeding with the method, we recommend creating a backup of your data so you can later restore all your crucial data. Now, follow the steps below to reset your PC:
Step 1: On your keyboard, press the Win Logo + I keys together to open the Windows Settings app.
Step 2: Locate and click on the Update & Security option.

Step 3: Choose the Recovery option from the left panel. And, then click on the Reset PC option available under Reset this PC on the right.
Step 4: If necessary, provide the administrator’s credentials.
Step 5: After that, choose the Remove Everything option to proceed.
Step 6: Next, select the Local reinstall option.
Step 7: Check the current settings, and if you are okay with the settings, click on the Next option. If not, then click on the Change Settings option to tweak settings.
Step 8: After changing the settings, click on Confirm, and restart your system.
This will reset your PC to the default settings which definitely help you solve the problem.
How to Fix Video Memory Management Internal BSOD Error in Windows 10, 11: Explained
The aforementioned are some of the most potential solutions to fix the VIDEO_MEMORY_MANAGEMENT_INTERNAL blue screen error on Windows 11, 10. Hopefully, these troubleshooting tips will help you solve this BSOD error on the Windows operating system.
Also Read: MACHINE CHECK EXCEPTION BSOD in Windows 10 [SOLVED]
Do you have any questions regarding this blue screen error? If yes, then feel free to drop us a comment in the box below. Was this guide helpful? Do you want to receive daily tech updates? If yes, then you can subscribe to our Newsletter, additionally, you can follow us on Facebook, Twitter, Instagram & Pinterest so you never miss any tech trend.
You might have come across the BSOD error where the system gets crashed up with a message for restarting your computer. Today, we will deal with one such common issue VIDEO_MEMORY_MANAGEMENT_INTERNAL along with a bug check value of 0x0000010E. When there is an intensive problem in the system, a blue-colored prompt shows up on the screen. To slow down the consequences of these damages, the PC restarts itself randomly which leads to the ceasing of many operations.
The aforementioned stop code is an interpretation of the infinite spinning of a thread in a device. The malfunctioning of the graphics card or its driver is the main reason for the appearance of this Blue Screen of Death. Moreover, the absence of system resources, as well as the presence of outdated drivers, are also responsible for this issue. Furthermore, less disk space, issues of memory, and bad sector in the hard disk, also lead to the BSOD error.
VIDEO_MEMORY_MANAGEMENT_INTERNAL in Windows 10 Solutions
Here is how to fix VIDEO_MEMORY_MANAGEMENT_INTERNAL in Windows 10 –
1] Update the corrupted Drivers with Device Manager
Whenever you are going to face a BSOD error then the main reason behind this is the use of obsolete and faulty device drivers. Thus, you must follow a series of systematic steps to update them with the help of Device Manager. Moreover, as we already mentioned earlier faulty drivers are one of the main causes of VIDEO_MEMORY_MANAGEMENT_INTERNAL. Follow the steps as discussed below to check and resolve any such situations –
- Right-click on the Start button and select Device Manager located on the upper part of the list.
- Search for the devices having exclamation mark beside them
- As soon as you get it, just double click on them.
- Right-click on each of them and choose the Update driver option to start the process.
- Your computer will display two options; select Search automatically for drivers.
- Restart your computer to make the changes effective.
2] Repair Windows System Files Using SFC Tool
The corrupted and missing system resources are one of the possible reasons behind the occurrence of VIDEO_MEMORY_MANAGEMENT_INTERNAL error. System File Checker utility can be a much helpful way to recover and correct the corrupted DLL files. The tool is executed in an Elevated Command Prompt which automatically attempts to resolve the problems. Follow the guidelines to access the utility –
- Access the Taskbar Search by pressing Win + Q keys.
- Type cmd in the vacant text area. Once you get the Command Prompt in the result, go to the right side and choose Run as administrator.
- When UAC asks for permission, select Yes.
- You will get a black window, type
sfc / scannowand press the Enter key. - The utility will detect and fix the issues all by itself.
- As the process may take a while, don’t close the system and wait until the scan gets over.
- Reboot the device and upon startup, check for the error and the stop code.
3] Use Window Security to scan full PC
Malware and Viruses are some of the worst enemies in this tech developing world. We are not at all secure as they are present everywhere on the Internet. Whenever you are clicking on some suspicious link or going on a malicious site, they enter into the computer. The slowdown of the PC deteriorates the system resources and loses DLL files, resulting in the initiation of VIDEO_MEMORY_MANAGEMENT_INTERNAL error. Windows Security is one of the well-known security software provided by Microsoft. This application is very much handy in dealing with a virus and to get rid of them. Follow the process as listed below –
- Click the Windows Security system tray icon to quickly access the app.
- Go to Virus & threat protection category.
- Click Scan options link on the right pane.
- Choose the Full Scan option and hit the Scan now button to initiate the scanning process. This may take hours of time as every corner of the system will be scanned.
- Once it reports you about the scan, take necessary action and immediately get rid of the threats.
4] Get all possible Windows Updates
There is a much higher chance for an outdated Operating System to get harmed by issues like BSOD error. All cumulative update released by Microsoft regularly consists of fixes of problems and bugs. Downloading and installing them will make the system strong and much more secure from the VIDEO_MEMORY_MANAGEMENT_INTERNAL issue. This is possible through the Windows Settings app and is automatic. Just disable Metered Connection if you are using a mobile hotspot. Our recommendation is to use high-speed internet to decrease the consumption of time. Once ready, go through the steps as stated below –
- Press the Win logo and I key to launch the Settings program.
- Choose the Update and Security icon.
- Move to the right of Windows Update on the following result.
- Click on Check for updates button.
- The system will initiate the process of exploring updates for your OS.
- As soon as the searching process will get over, all the updates will be displayed on the screen.
- Click the Download button and then follow the installation guidelines to finish the process.
5] Use Deployment Image Servicing and Management (DISM) tool
The corruption of Windows Image files is one of the reasons which results in a VIDEO_MEMORY_MANAGEMENT_INTERNAL error. Thus, it is important that we should solve this problem and to defend it, we have the DISM tool. This application can only be executed in an Elevated Command Prompt so go through the steps as stated below –
- Invoke the taskbar by pressing the Windows and S key together.
- Write cmd.exe in the vacant space.
- As soon as the result flashes up right-click on it and choose Run as administrator from the context menu.
- Click on the Yes option if the UAC prompt up.
- Write the given code and press Enter key –
DISM.exe / Online / Cleanup-image / Restorehealth
Note – Generally the process gets stuck at 20 percent. If you are experiencing the same thing, you need not take stress about it as it’s a normal process.
- After the scan gets over, restart the system and see for the error.
6] Run Blue Screen Troubleshooter to fix VIDEO_MEMORY_MANAGEMENT_INTERNAL
Windows 10 is featured with the Blue Screen Troubleshooter which is an inbuilt software to solve any BSOD error on the computer. This application can easily catch a problem linked with VIDEO_MEMORY_MANAGEMENT_INTERNAL and can fix it as well. Follow the steps as given below to use this tool –
- Right-click on the Start menu and choose Settings.
- Click the Update and Security section from the consecutive page.
- Choose Troubleshoot from the left side and switch to the corresponding right.
- Use your mouse to scroll and find the Blue Screen option.
- As soon as you get that just select Run the troubleshooter from the extended area.
Running the tool properly will help you to fix Windows 10 BSOD error code VIDEO_MEMORY_MANAGEMENT_INTERNAL automatically.
7] Boot the OS of your system to safe mode
To defend and tackle issues related to Windows 10, one of the best and simple way is Booting in Safe Mode. Basically, this is the special Startup technique where Windows get loaded up with only the basic root applications. If your issue is getting generated from some advanced settings or any other additional apps, VIDEO_MEMORY_MANAGEMENT_INTERNAL BSOD may get disappeared while booting into the Safe Mode. Go through the guidelines below to utilize the tool –
- Open up Windows Settings by pressing Win and I key together.
- Select Update and Security.
- Choose Recovery and go to the right side.
- Select the Restart now button present below the Advanced startup area.
- The Windows will restart itself and will ask you to choose the next step. From the Startup Screen select Troubleshoot.
- Choose Advanced Options in the Troubleshoot menu and subsequently on Startup Settings.
- During this phase, you will be informed that your machine can be restarted using additional settings i.e. Enable Safe Mode. Select Restart.
- Select “Enable Safe Mode” by choosing F4.
The operating system will get initiated with default services and apps. If the error appears again then it will be very sure that either a problem in the Hardware or a third party application is the real culprit.
8] Remove the Faulty Windows update files
Microsoft rolls out cumulative updates for Windows quite frequently which consists generally of bug fixes and updated features. The team wants its users to get these updates downloaded into their computers using the Settings application. There are very fewer chances of facing trouble in the midway of the installation process but if the process terminates abnormally then one can have a VIDEO_MEMORY_MANAGEMENT_INTERNAL BSOD issue in the system. Files that will be creating problem needs to be eliminated as soon as possible. Go through the steps to do so –
- Go to the Action Center and click All Settings.
- Choose the Update and Security section.
- Windows Update page will open up.
- Click the link of View update history from the adjacent right.
- Select Uninstall updates.
- Right-click the recently installed update and choose Uninstall. Go through the directions on the screen to remove the update files.
9] Reconnect the External Hardware Devices
It is seen that most often the VIDEO_MEMORY_MANAGEMENT_INTERNAL occurs after connecting an additional hard drive with the computer. In such a case, one needs to remove it and then connect it again. Go through the guidelines as provided below –
- Remove all the plugged-in accessories from the computer and then Restart Windows 10 PC.
- When the OS has loaded itself successfully, connect the external devices to the computer and then check for the error VIDEO_MEMORY_MANAGEMENT_INTERNAL.
- After this, get the updated drivers for that specific hardware from the manufacturer website and then install them.
10] Uninstall the program that causes VIDEO_MEMORY_MANAGEMENT_INTERNAL issue
In some cases having different applications that carry out the same task creates some conflicts which lead to VIDEO_MEMORY_MANAGEMENT_INTERNAL in the computer. This makes crashes in the framework prompting a failing PC. You can defend your system from this by uninstalling some extra applications. Follow the steps to do it –
- Press the Windows key and select the cog icon to access Settings.
- Choose the category specified as Apps.
- Move to the right pane on the following page and search for the program that might lead to VIDEO_MEMORY_MANAGEMENT_INTERNAL or the one that you have installed recently.
- When you get it, select and click the Uninstall option from the extended pane.
- Click on the Uninstall option from a small pop-up window to confirm the process.
11] Get rid of 3rd party antivirus software to solve VIDEO_MEMORY_MANAGEMENT_INTERNAL
Earlier, we used to suggest several 3rd party antivirus software to secure the PC from bugs. Using such tools often creates a mess in the operating system which might further lead to VIDEO_MEMORY_MANAGEMENT_INTERNAL. Thus, it is better to uninstall these programs if you are using them by going through the steps below –
- Right-click on the Start icon and choose Run.
- Write appwiz.cpl in the vacant space and choose OK.
- Search for the 3rd party anti-malware application on the Programs and Features from the list provided.
- Select on the Uninstall button from the top menu.
- Follow the app’s instructions to remove it from the PC.
- Reboot the device to completely get rid of all elements of the antivirus software.
12] Run CHKDSK utility to fix VIDEO_MEMORY_MANAGEMENT_INTERNAL
Due to long term use, bad sectors are generated in a Hard Disk that eventually results in VIDEO_MEMORY_MANAGEMENT_INTERNAL. You can tackle this problem using an appropriate command in Elevated Command Prompt. Go through the guidelines as stated below –
- Click on Start and type cmd.exe.
- When the results show an option for Command Prompt, right-click on it.
- Choose Run as administrator from the context menu.
- Select the Yes button if the UAC is displayed on the screen.
- Write the command in the following format –
chkdsk [Drive:] [parameters] - Using the above syntax, the system will show you only the status of the disk but will not solve any existing issues.
- Thus, we need to write the command in the following way – /f /r /x
“f” will make the utility to settle the found issues from the volume.
“r” will search for poor sectors in the Hard Disk.
“x” will dismount the whole volume before beginning the process.
Thus, the command will look like – chkdsk C: /f /r /x
Important – Here the OS is installed in C: drive. If you have used other drivers to carry out the same job then replace C: with D:, E: etc.
13] Use Disk Cleanup utility to clear all junk from your PC
With the execution of every task, junk files are created continuously inside the computer and get stored in the disk storage. These data are useless for the system, thus it is important to delete them. Additionally, they keep on piling up into the PC and with time they take up a large space in the drive. Hence, Hard disk works in low space which affects its performance and results in a VIDEO_MEMORY_MANAGEMENT_INTERNAL. However, we can delete these using the tool named as Disk Cleanup. Check the instructions as shown below –
- Press the Windows key from the keyboard and type in cleanmgr.
- Select the Disk Cleanup desktop app from the results.
- You will get a wizard that will pop up asking for a preferable drive.
- Select C: from the dropdown menu and press Enter key
- The Disk Cleanup utility will get initiated by figuring out the amount of space it can recover in the C: drive and appear in a window.
- Click on the Cleanup system files button present at the bottom of the window.
- A pop up will appear again on the screen asking to select the drive.
- Select C: from the dropdown menu and press Enter key from the keyboard.
- When the Disk Cleanup for (C:) comes into the display, check all boxes except Downloads
- Click on OK to initiate the cleanup process in the system.
14] Resolve the issue linked with RAM
A defective, unreliable, and wrong allocation of RAM (Random Access Memory) may result in the VIDEO_MEMORY_MANAGEMENT_INTERNAL issue in Windows 10. Thus, a perfect solution is mandatory to rectify these problems. Scanning the RAM issues is a bit complex but the Memory Diagnostic tool works excellently to resolve the problematic sectors. Go through the steps as discussed below-
- The very first thing that you need to ensure is that you close and save all the on-progress applications in your system.
- Press the Windows and S key simultaneously to enable the Taskbar Search to appear on the screen.
- Write Windows Memory Diagnostic in the allowed field and choose it from the list as prompted.
- Choose Restart now and check for problems (recommended) from the wizard.
- As soon as the system will start, it will scan all the memory troubles.
- When the process will reach 100 percent, Windows will automatically restart itself.
- Once it will get started again, you will be seeing a list in the notification area of the taskbar.
15] Utilize Previous System Restore Point
Whenever some changes take place inside the computer, the Windows Registry files are also affected. If something goes wrong while uninstalling or installing a registry file then it may cause VIDEO_MEMORY_MANAGEMENT_INTERNAL. One of the best ways to get rid of this issue is to revert all these changes and this can only be possible using System Restore.
- Invoke the Run dialog box by pressing Win and R keys simultaneously from the keyboard.
- Write ‘rstrui’ and press Enter key.
- This will open up System Restore wizard on the screen.
- Select the Next option to make the system reveal the Restore points.
- Click the Show more restore points option to see further of time and date.
- Choose the first row showing the latest point you have created on the device.
- Select the Next option.
- At last, select Finish to start the complete restoration procedure.
16] Disabling of Auto Restart feature
In the case of BSOD error, the shutdown of the system is a common experience by many users. But if this process is taking place for a majority of the time then you need to note that your computer has gone into some critical issues like VIDEO_MEMORY_MANAGEMENT_INTERNAL. If you are facing this issue too often then keep reading below to stop it.
- To get the taskbar search bar press Windows and S key in one go.
- Write Control in the search bar and then press Enter.
- Change its view to either large or small icon, search for System applet and then click on it.
- Choose Advanced System Settings from the left column.
- Go to the Advanced tab as soon as a wizard comes up on the screen.
- Under Startup and Recovery section click Settings.
- Unmark the box of Automatically restart from System failure.
- Select the OK button to get ahead.
<
17] Carry out a complete installation to fix VIDEO_MEMORY_MANAGEMENT_INTERNAL
Hopefully, you will solve the VIDEO_MEMORY_MANAGEMENT_INTERNAL using the above techniques. In case you are not able to solve it, you can just go for a clean installation of Windows 10. This method is going to make your system get rid of all kinds of bugs and error and thus there will be no further issues.
We recommend you to save all your important files and data at a safer place as Backup. Since this resolution requires professional skills, you might need someone to guide you.
Methods:
1] Update the corrupted Drivers with Device Manager
2] Repair Windows System Files Using SFC Tool
3] Use Window Security to scan full PC
4] Get all possible Windows Updates
5] Use Deployment Image Servicing and Management (DISM) tool
6] Run Blue Screen Troubleshooter
7] Boot the OS of your system to safe mode
8] Remove the Faulty Windows update files
9] Reconnect the External Hardware Devices
10] Uninstall the program that causes issue
11] Get rid of 3rd party antivirus software
12] Run CHKDSK utility
13] Use Disk Cleanup utility to clear all junk from your PC
14] Resolve the issue linked with RAM
15] Utilize Previous System Restore Point
16] Disabling of Auto Restart feature
17] Carry out a complete installation
That’s all!!