
Не так давно состоялся релиз операционной системы Windows 11 версии 24H2, но уже существует множество проблем, с которыми сталкиваются пользователи. Некоторые из этих проблем, связанные с подключением к интернету и сети, нерабочий Wi-Fi, и синий экран смерти windows 11. Согласно отчетам, Windows 11 24H2 имеет проблемы с получением IP-адреса на некотором оборудовании. Это приводит к назначению IP-адреса начинающегося с 169 вместо подлинного адреса от маршрутизатора или DHCP-сервера. Это препятствует подключению устройства через Ethernet или Wi-Fi и лишает пользователей доступа к интернету.
Пользователь сообщил о том, что не удалось устранить проблему после обновления сетевых драйверов, прошивки и сброса настроек сети. Некоторые обнаружили, что задачу можно выполнить вручную, настроив статический IP-адрес, что указывает на возможные проблемы с DHCP.
Наблюдаются случаи, когда сетевые адаптеры в Панели управления отображаются отключенными, хотя они активны в Диспетчере устройств. При попытке включить сетевые адаптеры они снова отключаются. Также некоторые пользователи не видят значка Wi-Fi в системном трее.
Некоторые пользователи связывают проблему с WinHTTPAutoProxySvc и предлагают удалить зависимость от этой службы в реестре по адресу HKEY_LOCAL_MACHINE\SYSTEM\CurrentControlSet\Services\WcmSvc.
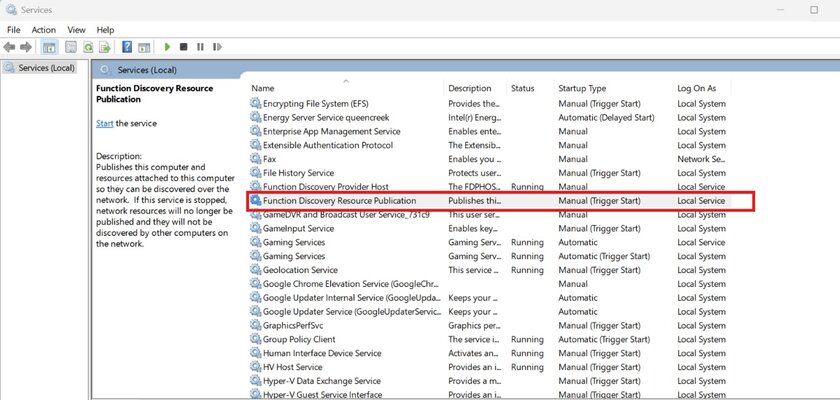
Другая проблема Windows 11 24H2 заключается в невозможности доступа к общим папкам из-за проблем с FDResPub настройкой запуска службы вручную с Manual (Trigger Start) на Automatic может быть решением.
Cиний экран смерти windows 11
Cиний экран смерти windows 11
По словам пользователей, проблема может происходить на компьютерах с материнскими платами Z890. Когда используются процессоры серии Core Ultra 200S и интегрированная графика Xe-LPG. Некоторые специалисты считают, что проблема возникает из-за несовместимости между дискретной и интегрированной графикой, что приводит к ошибке BSOD.
Для ее устранения можно выполнить следующие действия: перезагрузить систему и войти в BIOS. Далее в разделе «Дополнительно» выбрать «Внутреннюю графику» и установить значение «Отключено». Сохранить изменения в BIOS и снова перезапустить систему. Убрать синий экрана смерти windows 11 поможет официальный сайт компании ASUS. Находим обновление прошивки для материнской платы (необходимо удостовериться, что это версия 08xx или более поздняя).
Если у Вас не получилось самостоятельно решить данные проблемы, Вы можете обратиться к нашим специалистам по адресу г. Самара, ул. Ново-вокзальная 116, оф. 207
Фразы для поиcка данной статьи:
синий экран смерти windows 11, нерабочий Wi-Fi, WinHTTPAutoProxySvc, сетевые адаптеры снова отключаются, проблема Windows 11 24H2.
Релиз операционной системы Windows 11 версии 24H2 состоялся не так уж и давно, однако, уже сейчас известно о большом количестве проблем, с которыми сталкиваются пользователи ОС. О некоторых (более распространённых) рассказали авторы тематического ресурса Windows Latest.
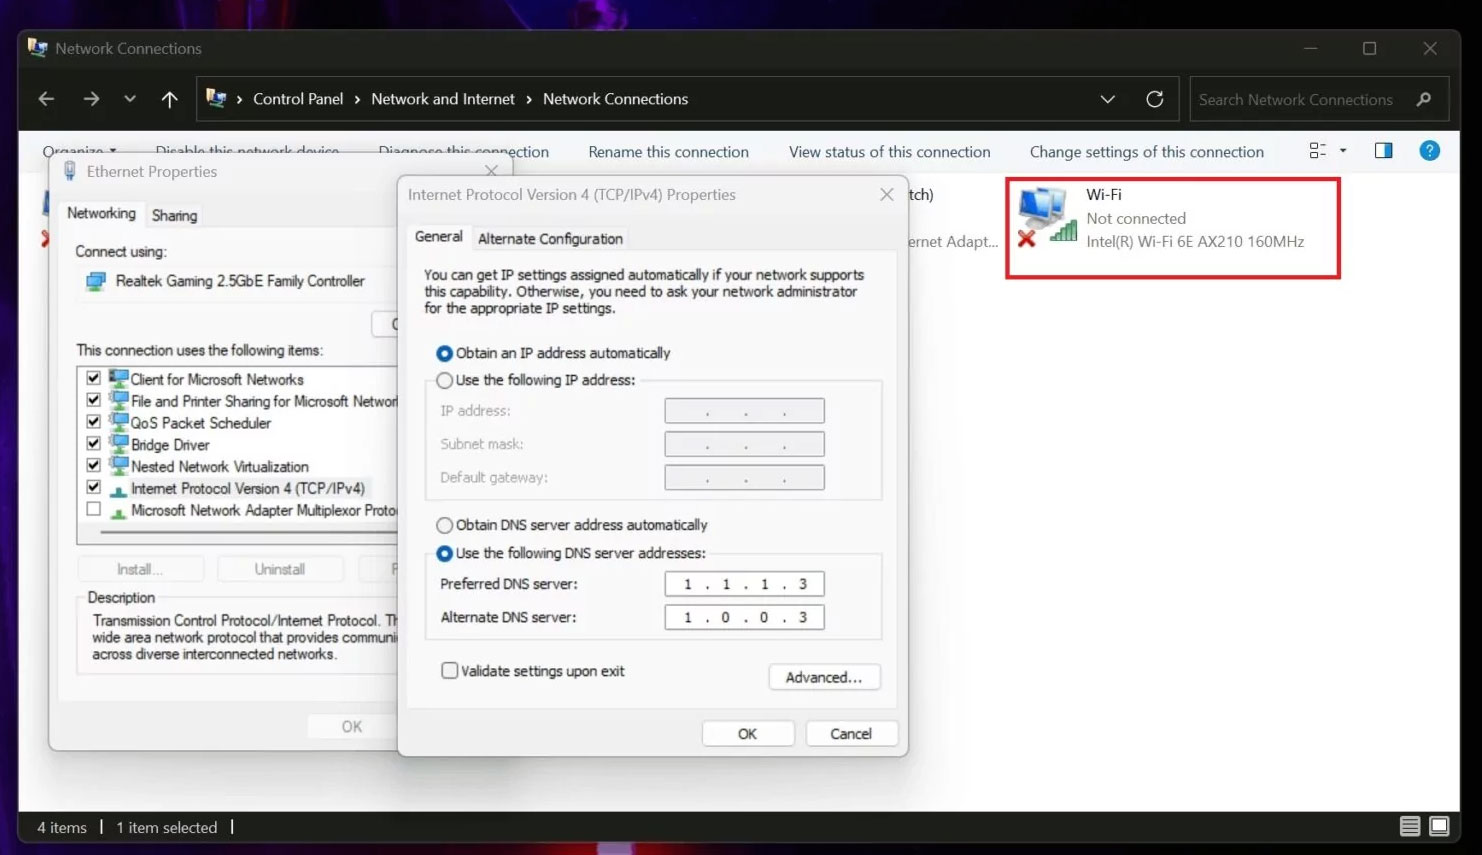
Согласно существующим отчётам, Windows 11 24H2 испытывает проблемы с подключением к интернету и сети на некотором оборудовании. Вместо получения настоящего IP-адреса от маршрутизатора или DHCP-сервера, Windows 11 24H2 автоматически назначает IP-адрес, начинающийся с 169. В результате устройство не может получить IP-адрес и не может подключиться через Ethernet или Wi-Fi, оставляет пользователей без доступа к глобальной сети.
Один из пользователей сообщил, что попытался обновить сетевые драйверы и прошивку, а также сбросить настройки сети, но ни один из этих методов не дал положительного результата. Некоторые обнаружили, проблема решается ручной настройкой статического IP-адреса. Это указывает на потенциальную проблему со службой DHCP (протокол динамической конфигурации хоста).
Сообщается о случаях, когда сетевые адаптеры отображаются отключенными в сетевых настройках Панели управления, даже если в «Диспетчере устройств» они включены. Когда пользователи пытаются включить сетевые адаптеры, они автоматически отключаются. Иногда в системном трее нельзя обнаружить иконку подключения по Wi-Fi.
Несколько пользователей обнаружили, что проблема может быть связана со службой автообнаружения WinHTTP Web Proxy (WinHTTPAutoProxySvc). Эта служба была отключена после установки свежей версии ОС. Если через реестр удалить зависимость от этой службы, подключение к сети можно восстановить. Отредактировать соответствующий ключ можно по следующему адресу: HKEY_LOCAL_MACHINE\SYSTEM\CurrentControlSet\Services\WcmSvc.
Ещё одна проблема Windows 11 24H2 — невозможность получить доступ к общим папкам. Пользователи, либо не видят свой ПК в списке сетей, либо не видят другие устройства. Эта проблема может быть связана с функцией Discovery Resource Publication (FDResPub), которая позволяет системе оставаться видимой в сети. В некоторых случаях служба FDResPub не запускается автоматически, как должна. Изменение типа запуска с «Manual (Trigger Start)» на «Automatic» в некоторых случаях решает данную проблему.
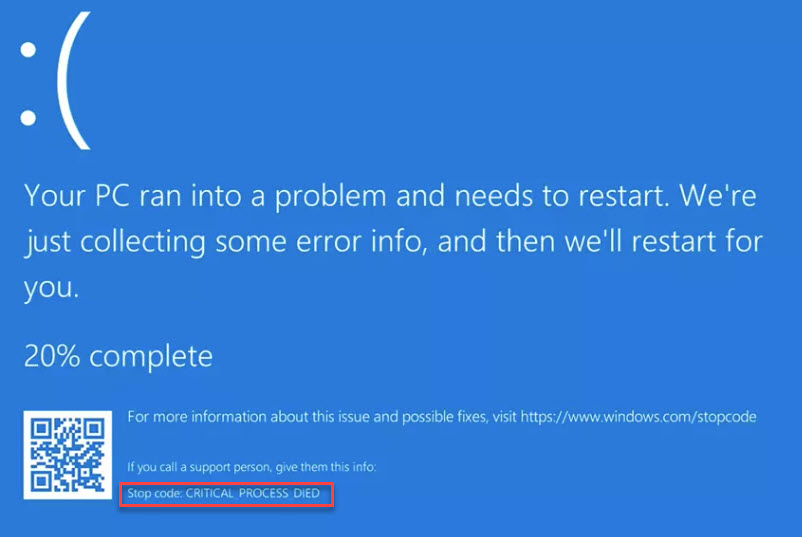
Конечно, нельзя обойти стороной и проблему «синего экрана смерти». Как пишут пользователи в сети, он может возникать на устройствах с материнскими платами Z890, когда используются процессор серии Core Ultra 200S и интегрированная графика Xe-LPG. По мнению некоторых специалистов, возникает проблема совместимости между дискретным и интегрированным графическими процессорами, из-за чего и возникает ошибка BSOD. Для её решения можно выполнить следующие шаги:
- перезапустить систему и войти в BIOS;
- перейти в раздел «Дополнительно», выбрать «Внутренняя графика» и установить значение «Отключено»;
- сохранить настройки BIOS и вновь перезагрузить систему.
Также некоторые рекомендуют зайти на официальный сайт компании ASUS и поискать обновление прошивки для установленной материнской платы (важно убедиться, что это версия 08xx или новее).
Информация носит ознакомительный характер. Администрация ресурса не рекомендует использовать методы, описанные в данном материале.
Источник
Have you ever been working on something, only for your screen to suddenly go blue and show the dreaded Blue Screen of Death (BSOD)? Running into a blue screen can be frustrating, especially when you’re not sure what’s causing it or how to fix it.
But don’t panic—BSODs are more common than you think, and they’re usually fixable. In this guide, we’ll walk you through 8 methods to fix Windows 11 BSODs and get the system back on track asap. Read on…
Prep steps: Identify error Code & enter Safe Mode
Step 1. Identify the Error Code

When a BSOD occurs, Windows typically displays a stop code or error message. These codes can give you a clue as to what caused the crash, whether it’s related to a system file, hardware, or driver issue. Since many BSOD errors share common causes, the solutions to these issues often overlap. With that in mind, we’ve gathered the most effective solutions here to help you resolve blue screen problems in Windows 11.
If you’re looking for a more targeted fix for a stop code, try checking out BSOD in our KnowledgeBase.
Step 2: Boot into Safe Mode with Internet
If your system is stuck on a BSOD, booting into Safe Mode with Networking can help you troubleshoot and resolve issues. In this mode, Windows loads only essential drivers and system files, while keeping internet access available for additional troubleshooting.
To enter Safe Mode with Networking in Windows 11:
- In the blue screen, press and hold the Power button until your system shuts down completely.
- Press the Power button to turn your PC on. As soon as Windows begins to load, immediately force shut it down again by holding down the power button.
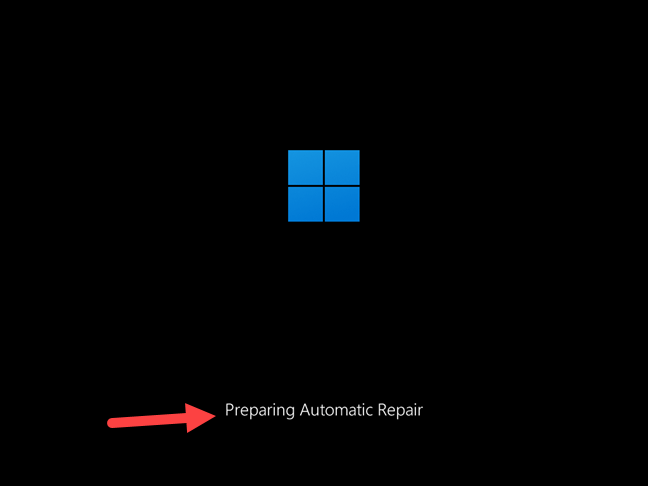
- Repeat this process 2–3 times until Windows 11 starts Preparing Automatic Repair.

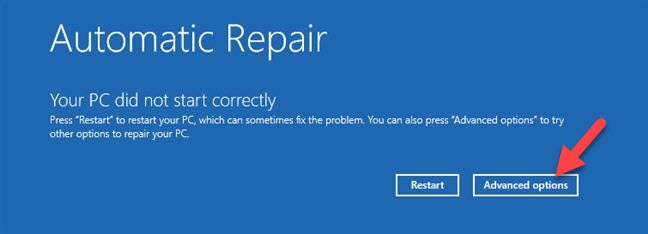
- After diagnosing your PC, it will load the Automatic Repair screen. From there, click on the Advanced Options button to access further recovery options

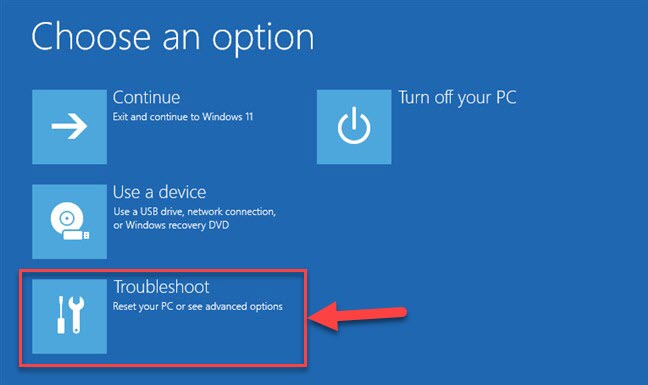
- In the Choose an Option screen, select Troubleshoot.

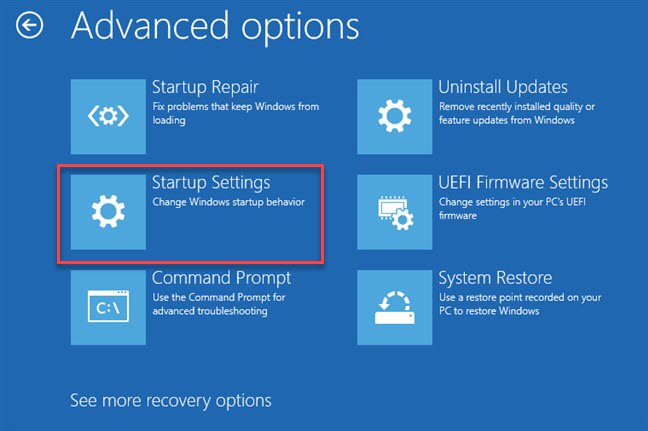
- On the Troubleshoot screen, click Advanced options.

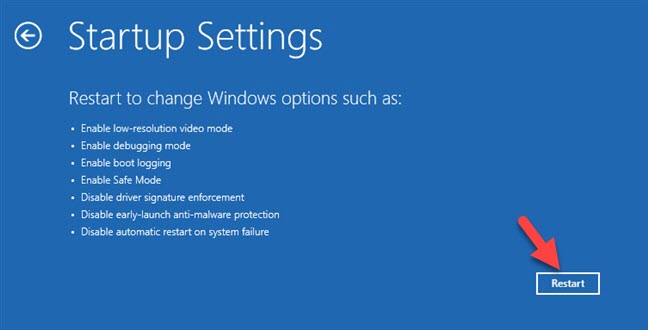
- Click Startup Settings.
(Alternatively, if you don’t have this option on the screen, click the See more recovery options link at the bottom. Then, click Startup Settings.)
- Click Restart.

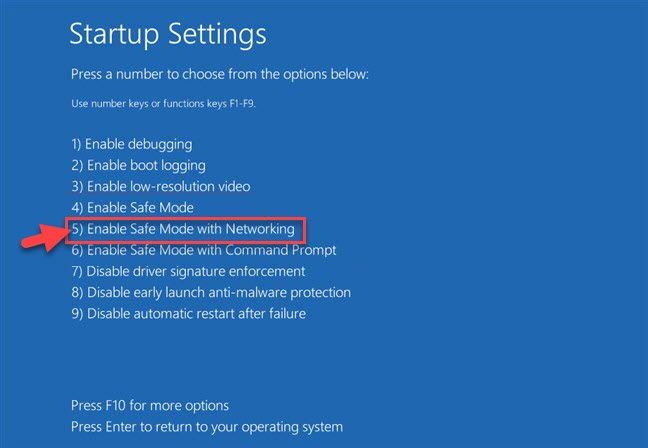
- Once your PC restarts again, you’ll see a list of options. Press 5 or F5 to boot into Safe Mode with Networking.


Once you’re in Safe Mode with Networking, you’re in a clean environment with minimal distractions. From here, you can start working on fixing your BSOD issue.
8 effective solutions for Windows 11
Here are the 8 most effective methods for fixing Windows 11 BSOD problems. Just go through them in order until you find one that solves it.
- Update your device drivers
- Install Windows updates
- Run System File Checker (SFC) and DISM
- Check for disk errors
- Disable or uninstall recent software or hardware
- Run memory diagnostics
- Perform a System Restore
- Reset Windows
Fix 1: Update your device drivers
Drivers are crucial pieces of software that allow your hardware to communicate with your operating system. If a driver is missing, corrupt, or out of date, it can cause system instability, crashes, and ultimately the dreaded BSOD.
While you can download and install the latest drivers manually from the manufacturer’s website, it can be tricky, especially if you’re unsure which drivers need updating or how to find the right ones. If you don’t have the time, energy, or confidence for this, you can update your drivers automatically with Driver Easy.
Driver Easy is an easy-to-use driver updater tool that automatically scans your system for outdated or missing drivers, then installs the latest versions with just a few clicks. You don’t need to worry about downloading the wrong drivers or making installation mistakes. Driver Easy takes care of it all.
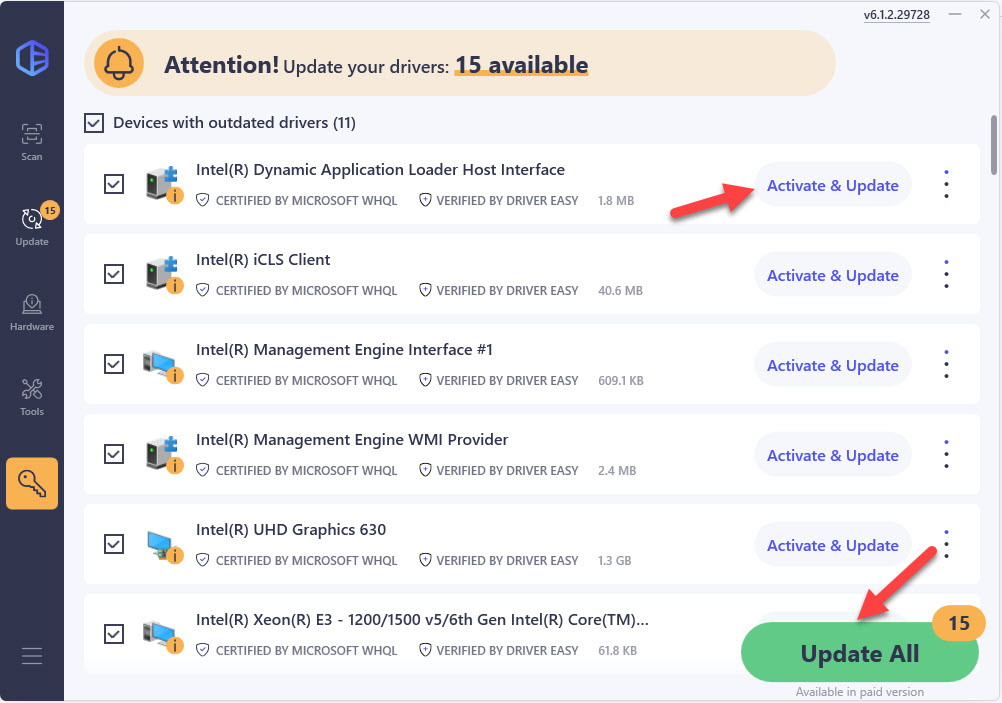
- Download and install Driver Easy.
- Run Driver Easy and click the Scan Now button. Driver Easy will then scan your computer and detect any problem drivers.

- Click Update All to download and install the latest driver versions for your computer (This requires the Pro version).
Alternatively, click Activate & Update next to a flagged device to start a 7-day free trial. With this trial, you’ll have full access to Pro features, including high-speed driver downloads, one-click installation, and automatic updates for missing or outdated drivers, all at no cost until the trial period ends.

- Restart your computer for the changes to take effect.
- Check to see if the blue screen of death issue has been mitigated. If yes, then congrats! But if the issue persists, please move on to Fix 2, below.

Fix 2: Install Windows updates
Many BSODs in Windows 11 are caused by outdated system files or unresolved bugs. When your system isn’t up-to-date, it can encounter compatibility issues or fail to fix known problems that may lead to a blue screen. Installing the latest Windows updates helps ensure your system has the most current patches and potentially prevents crashes like the BSOD.
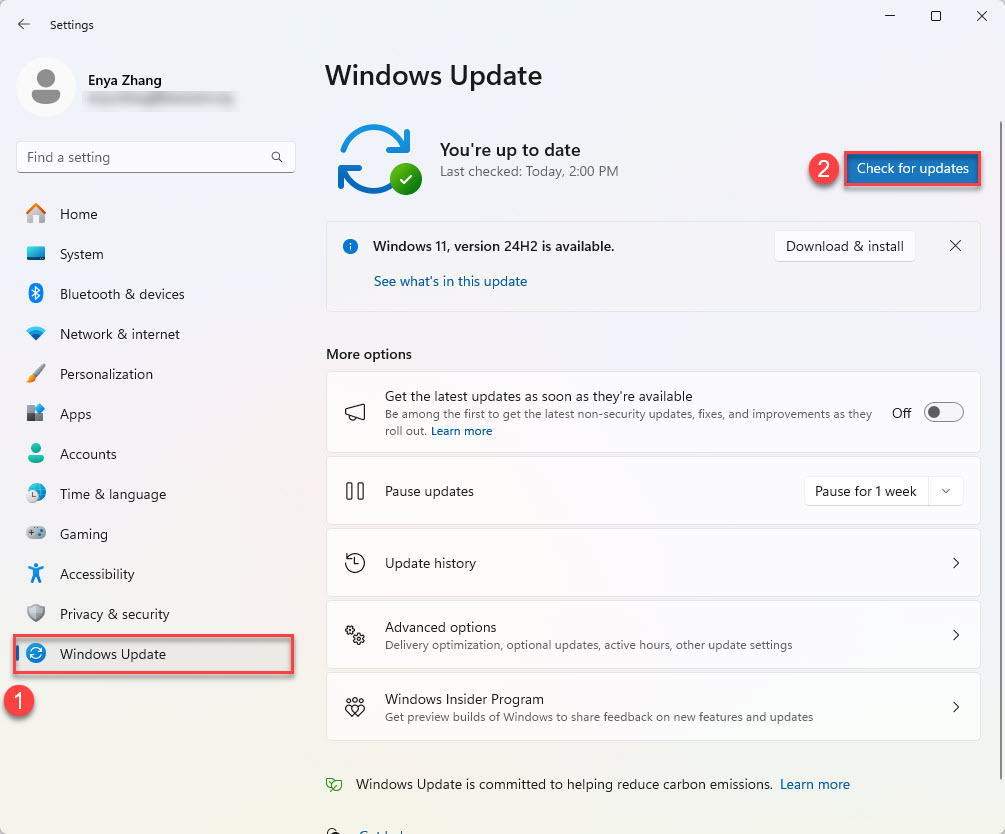
- On your keyboard, press the Windows logo key and I at the same time to open the Settings window.
- Click Windows Update > Check for updates.

- Wait a short while as Windows searches for available updates. If updates are available, click to download and install them. If no updates are found, please skip to Fix 3.
- Once installed, restart your PC to apply the changes.
- Check to see if the Windows 11 BSOD issue has been resolved. If yes, then great! If it’s no joy, please continue Fix 3, below.
Fix 3: Run System File Checker (SFC) and DISM
System files are essential for the proper functioning of your operating system, and if they’re damaged or lost, it can lead to crashes, errors, or even a BSOD. Luckily, Windows provides built-in tools to fix these issues: the System File Checker (SFC) and Deployment Imaging Service and Management (DISM) tools.
SFC scans for corrupt or missing system files and repairs them, while DISM can fix deeper system issues that may not be addressed by SFC alone. Running both of these tools is an excellent way to check the integrity of your system files and repair them if necessary.
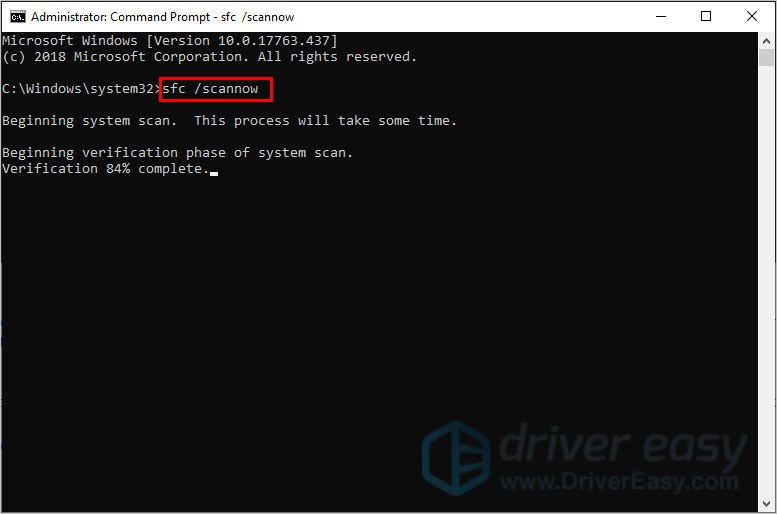
How to run SFC:
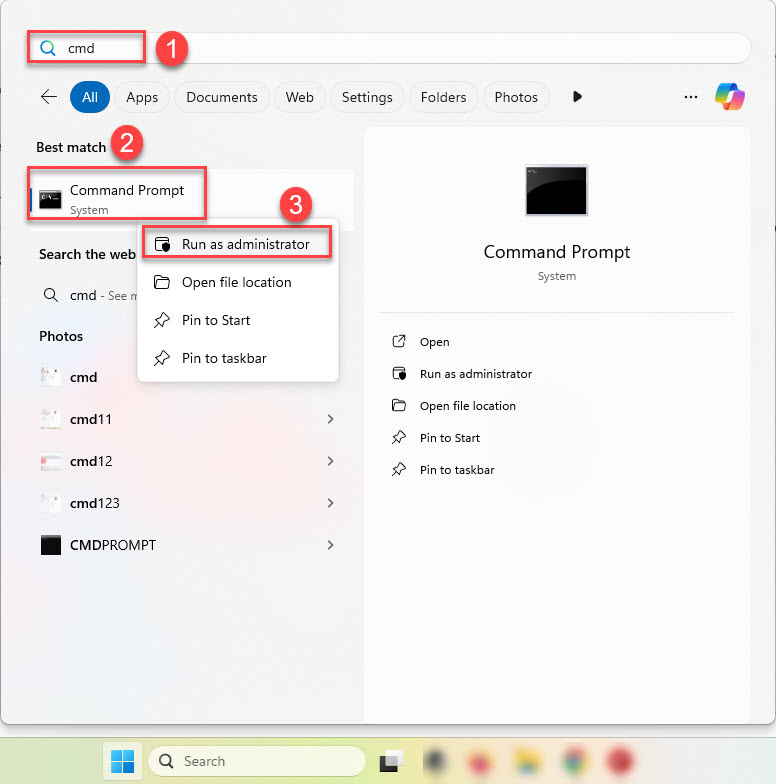
- On your keyboard, press the Windows logo key and type cmd. Then right-click Command Prompt from the results and select Run as administrator.

- Type (or copy-paste) sfc /scannow and press Enter. Then wait for the verification is 100% complete.

- Restart your computer.
- Check if you computer works properly.
If the result indicates there are broken files but SFC can’t fix it, you can run DISM commands for deeper examination and repair.
How to use the DISM tool:
1) On your keyboard, press the Windows logo key and type cmd. Then right-click Command Prompt from the results and select Run as administrator.
3) When you receive a user account control prompt, click Yes.
4) At the command prompt, type the following command and press Enter on your keyboard.
DISM.exe /Online /Cleanup-image /Restorehealth

Note: Do not close this Command Prompt window until the verification is 100% complete.
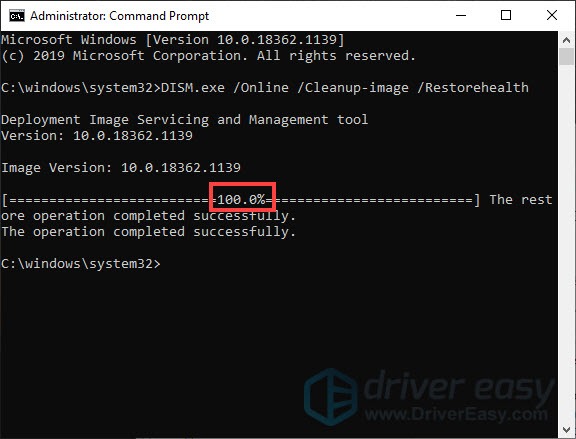
Once it’s finished, close the window and restart your computer. Then check to see if your computer works properly. If the blue screen of death issue still occurs, you should try Fix 4, below.
Fix 4: Check for disk errors
Hard drive issues, such as bad sectors or corrupted files, can also lead to BSODs in Windows 11. If your system is having trouble reading or writing data to the disk, this can cause errors and crashes. Running a disk check can help identify and fix potential issues with your hard drive or SSD, reducing the chances of a BSOD.
Windows has a built-in tool called Check Disk (CHKDSK) that scans and repairs file system errors and bad sectors on your disk.
- On your keyboard, press the Windows logo key and type cmd. Then right-click Command Prompt from the results and select Run as administrator.
- In the Command Prompt window, type (or copy & paste)
chkdsk /f /rand press Enter:- /f tells the tool to fix any errors it finds.
- /r instructs it to locate bad sectors and recover readable information.
- You’ll be prompted to schedule the scan for the next restart if the drive is in use. Type Y and press Enter.
- Restart your computer. CHKDSK will run and attempt to fix any disk-related issues.
- Once the process is complete, Windows will restart, and you can check to see if the BSOD issue has been resolved.
If your computer still experiences BSODs after running CHKDSK, proceed to Fix 5 below.
Fix 5: Uninstall recent software or hardware
Newly installed software or hardware could be a potential cause of your BSOD in Windows 11. Incompatibilities, faulty installations, or even conflicts with existing programs can trigger crashes and system instability.
If you suspect that recently added software or hardware is the culprit, here’s how you can uninstall them to test if the issue is resolved.
How to uninstall recently installed software:
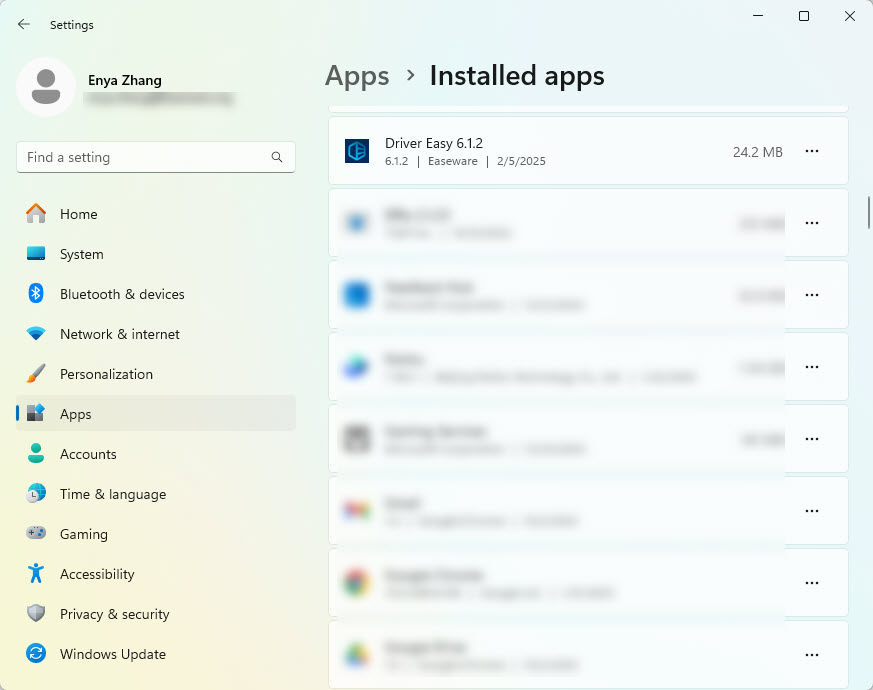
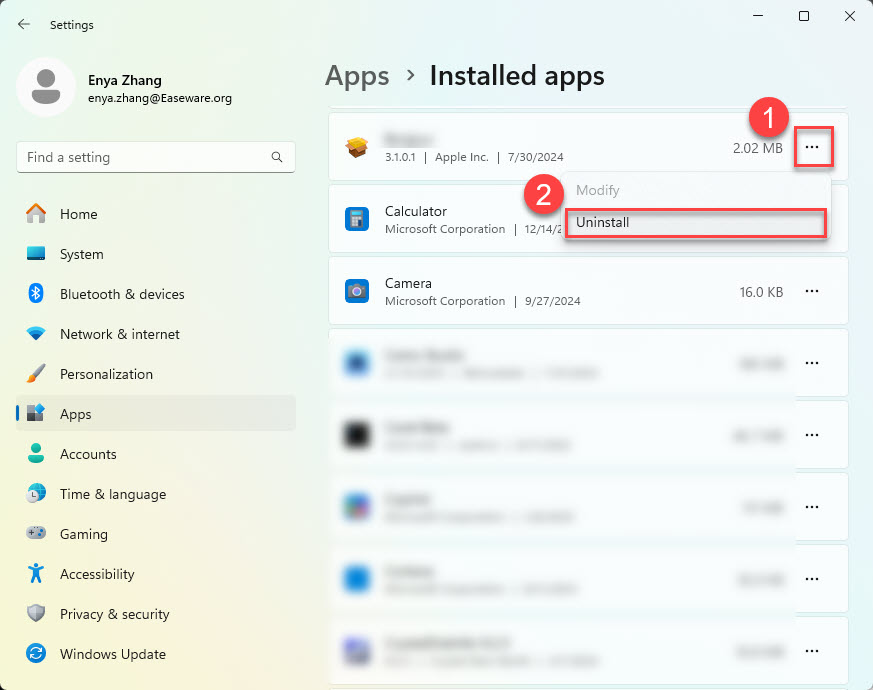
- On your keyboard, press the Windows logo key and I at the same time to open Settings.
- Navigate to Apps > Installed Apps.

- Click on the suspected software and select Uninstall.
- Click Uninstall to confirm, then follow the on-screen prompts to complete the process.
- Restart your computer and check if the BSOD issue persists.
Uninstall recently added hardware:
- On your keyboard, press the Windows logo key and X at the same time and select Device Manager.
- Look through the list for recently installed hardware (such as printers, external drives, or USB devices). Then right-click the hardware and choose Uninstall device. If the issue is resolved after disabling the hardware, it’s likely the source of the BSOD.
- Restart your computer and see if the BSOD problem goes away.
If you no longer experience BSODs after uninstalling the recent software or hardware, that’s your likely fix! However, if the issue persists, it’s probably not related to the recent software or hardware you uninstalled. In this case, you may want to try reinstalling the software or hardware and continue with Fix 6, below.
Fix 6: Run memory diagnostics
If your computer’s RAM (Random Access Memory) is faulty or has errors, it can cause system instability, leading to frequent crashes and BSODs. Memory issues can sometimes be tricky to identify, and so running a memory diagnostic test can help pinpoint any issues with your RAM and fix potential errors.
Windows has a built-in tool called Windows Memory Diagnostic that checks for problems with your memory.
How to run Memory Diagnostics:
- On your keyboard, press the Windows logo key and R at the same time to open the Run dialog box. Then, type mdsched.exe and press Enter.
- Choose Restart now and check for problems to immediately begin the test.
(Alternatively, you can select Check for problems the next time I start my computer to schedule the test to run the next time you restart your PC)
Your PC will restart, and the memory diagnostic will begin. The test will automatically scan your RAM for errors, which may take a few minutes. Once it’s complete, Windows will notify you of the results:
- If the diagnostic finds issues with your memory, it may be necessary to replace the faulty RAM or seek professional repair.
- If no problems are found, it’s likely that memory isn’t the cause of your BSOD, and you can proceed to Fix 7, below.
Fix 7: Perform a System Restore
Sometimes, BSODs can arise from recent changes to your system, such as new software installations, updates, or driver changes. If your system was stable before these changes, performing a System Restore can help revert your PC to a previous state, potentially resolving the blue screen error.
How to perform a System Restore:
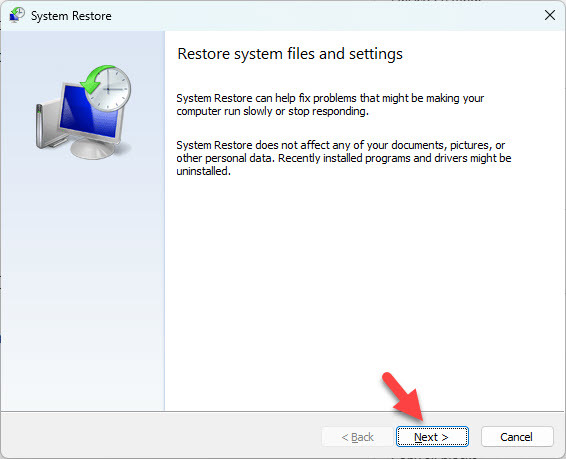
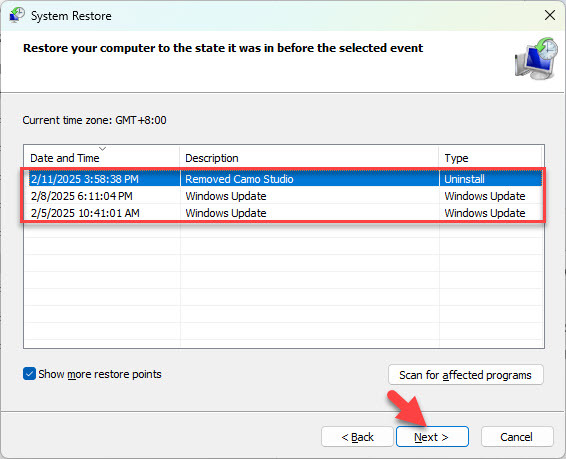
- On your keyboard, press the Windows logo key and R, type rstrui and press Enter to open the System Restore tool.
- In the System Restore window, click Next >.

- You will see a list of available restore points. Select one from before the BSOD issues began and click Next >.
- Your system will restart, and System Restore will attempt to revert your computer to the selected restore point.
If the system restore successfully fixes the BSOD issue, great! If you still encounter the BSOD after the restore, this indicates that the problem might not be linked to recent system changes. You may want to try Fix 8 for further troubleshooting.
Fix 8: Reset Windows
If you’ve tried all other fixes and your BSOD issue persists, resetting Windows can be an effective, albeit more drastic, solution. It essentially restores your system to a fresh state, which can resolve deep system issues that other methods haven’t been able to fix.
Before You Begin:
- Back up your files: While you can choose to keep your personal files during the reset, it’s always a good idea to back up your important data beforehand, just in case something goes wrong.
- Prepare to reinstall programs: If you select the option to remove everything, all your apps and programs will be deleted, so make sure you have installation files or a list of your software for reinstallation.
- Driver and update check: After the reset, you may need to reinstall drivers and perform Windows updates to ensure everything runs smoothly.
How to Reset Windows:
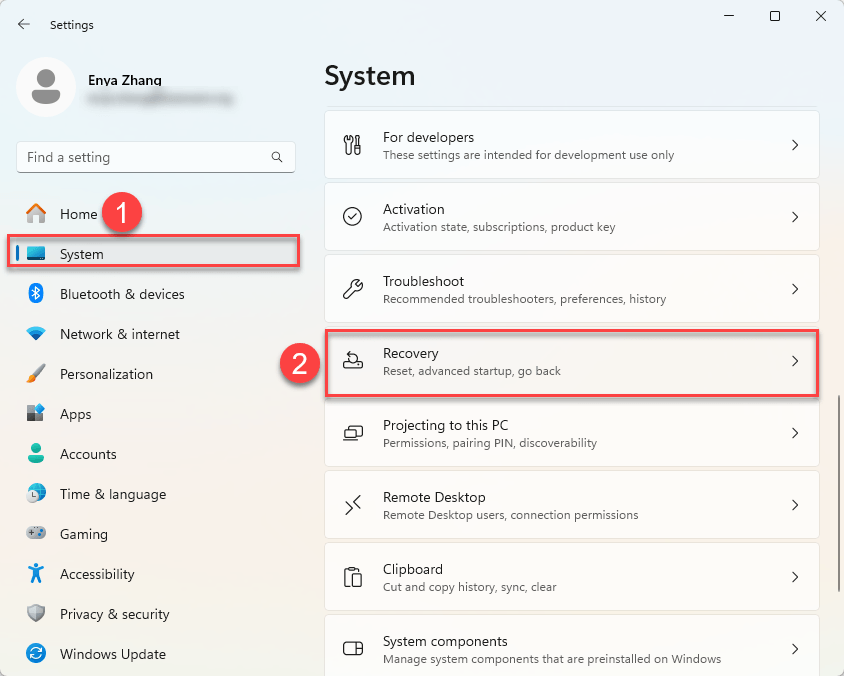
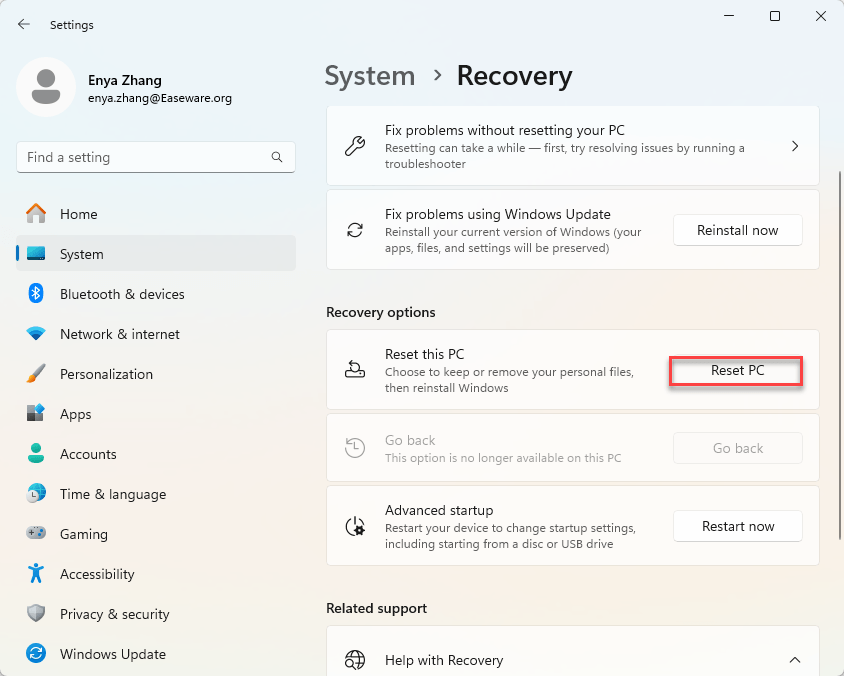
- Press the Windows logo key and I at the same time to open the Settings menu.
- Go to System > Recovery.

- Under Reset this PC, click Reset PC.
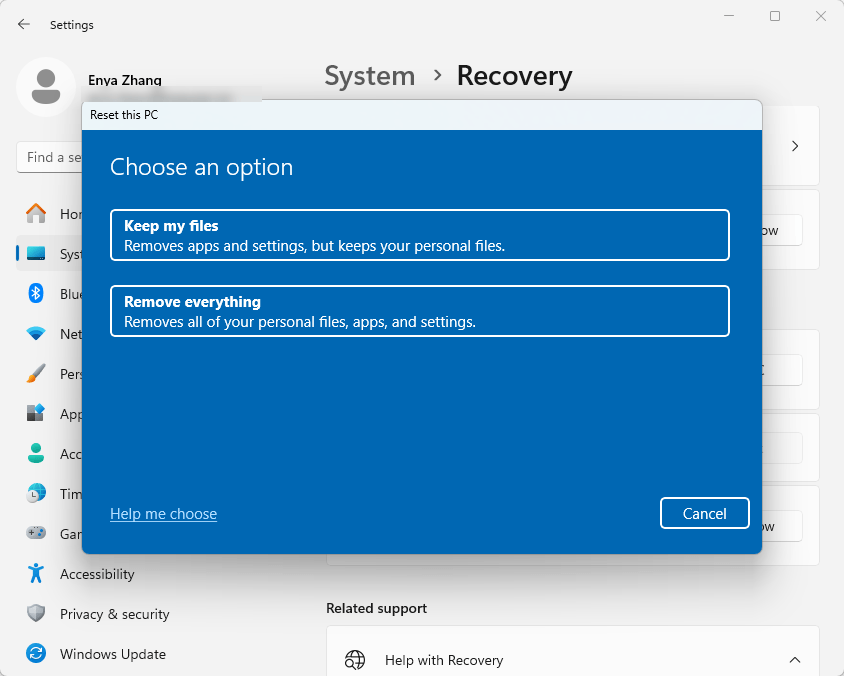
- Choose Keep my files (recommended to preserve personal files) or Remove everything (for a full reset and fresh start).
- Keep my files: Windows will reinstall itself but retain your personal data. Any installed apps or settings will be removed, so you’ll need to reinstall your programs afterward.
- Remove everything: This will delete all your personal files, apps, and settings. It’s like starting with a brand new system.
- Follow the on-screen instructions to start the reset process. It may take some time, depending on your system’s performance and the option you’ve selected.
Once complete, restart to see if the BSOD in Windows 11 issues have been fixed.
Dealing with a Blue Screen of Death in Windows 11 can be frustrating, but as we’ve outlined, there are several methods available to help you get your system back on track.
However, if you’ve tried everything and the issue persists, don’t hesitate to seek professional support to ensure your hardware is functioning properly.
-
#1
Hi, after many attempts, and grueling hours, sleepless nights always and days (w/ burn in), the problem was simple but hard to find (solution was to unplug the ethernet), I finally got to update Windows 10 Pro to Windows 11 Pro for future proofing but as soon I plug in the Cat5e cable to connect to the internet and update things, Windows 11 immediately goes into BSOD. On Windows 10 Pro 64-bit, it’s all good.
It’s a catch-22, if I need to update things using Windows Update so it’s stable but if I get into the internet it crashes. Of all the parts and problem it was the less likely LAN (most likely the drivers for Windows 11. If you plug in the ethernet when it fresh install Windows 11 or upgrade from Windows 10, it crashes (I unplugged it so it can upgrade Windows 10).
I disabled the LAN in the BIOS for now (the board is an Asrock G41C-GS GA / Rev. 1.02
I could download and update it manually but what driver or file must I download and instuall manuallly to update Windows 11?
When I upgraded to Windows 11 it didn’t have this problem, it’s the new 22H2 Windows 11 Pro it seems.
The LAN controller or chips seems to be:
Realtek PCIE x1 Gigabit LAN RTL8111DL
Thank you.
Last edited:
-
#2
Update by God’s amazing grace (that was grueling a month of hardwork and sleepless nights):
it’s fixed now, I found the driver for the Realtek network card and for good measure I installed it in safe mode.
-
#3
Hello, could you help me?
I have the same problem after upgrade to Win11 with connecting the Ethernet cable, how did you match the driver and where did you find it?
You used the device menager path?
Properties\ Details \Hardware Ids = PCI\VEN_10EC&DEV_8168&SUBSYS_76811462&REV_06 ?
-
#4
Hi, I’ve forgotten this (I didn’t even know I had this problem, until now). After looking at my motherboard’s manual to see what was the model and brand of the ethernet network, with the Google search, I remember just right clicking to open to a new tab (kind of «seek and you shall find» even if it was a grueling search), a lot of the links that seems to have a download for my driver (I always check the files with anti-virus), the links that seem to be promising, until I found the Windows 11 driver for my quite an old networking hardware (I think it might have a Windows 10 driver as well, since most Windows 10 will work with Windows 11).
I think I downloaded the ethernet drivers that looked promising for Bothe Windows 10 and 11 (it may have been a lot from different websites) from the iMac and then put it on a flash drive and then installed it on the PC in Safe Mode and used the Device Manager to manually install it.
Thanks. Happy Easter.
-
#5
I found a simple fix for this issue, no searching for drivers, or trial and error playing driver roulette, or anything. Just use a USB Ethernet Adapter. Quick, simple and blazing fast.
I also had this problem with an older HP, as soon as I installed Win11 and was stumped when I realized the BSOD was caused by the Ethernet cable. I appreciate the OP posting about this issue because it told me I was not alone, and what the basic problem was. Unfortunately the OP didn’t provide a fix or any helpful info, and left us on our own.
I had an inexpensive USB Ethernet Adapter dongle on hand so I decided to try it. I’m happy to report Win11 is fine using the USB Ethernet Adapter. No issues whatsoever.
Hope others will find this helpful.
-
#6
I found a simple fix for this issue, no searching for drivers, or trial and error playing driver roulette, or anything. Just use a USB Ethernet Adapter. Quick, simple and blazing fast.
I also had this problem with an older HP, as soon as I installed Win11 and was stumped when I realized the BSOD was caused by the Ethernet cable. I appreciate the OP posting about this issue because it told me I was not alone, and what the basic problem was. Unfortunately the OP didn’t provide a fix or any helpful info, and left us on our own.
I had an inexpensive USB Ethernet Adapter dongle on hand so I decided to try it. I’m happy to report Win11 is fine using the USB Ethernet Adapter. No issues whatsoever.
Hope others will find this helpful.
Thanks. I remember solving this issue last year but I forgot how I did it. I have another Windows 11 installation anyway.
If I have time I’ll try Windows 11 again on this Windows to Go attempt. I think I may have installed Windows 10 first (or maybe even earlier, Windows 8.1) and then that installed the drivers through Windows Update and then I believe I installedd Windows 11 over that, using the installer that can be used while you’re booted to Windows 10 (not a USB installer). Thanks again.