
Locked
1 Correct answer
Community Beginner
,
Oct 22, 2023
Oct 22, 2023
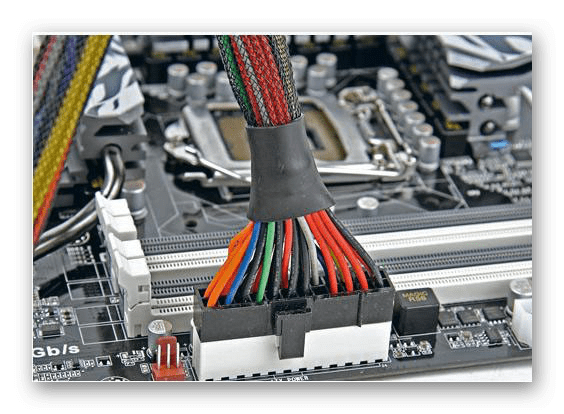
Just as a final update……a change of motherboard fixed this issue. The failed motherboard (ASRock) is only six months old, so it’s going to be returned for a refund.
Very odd that I got random BSoD every few days for normal usage, but Photoshop would BSoD every time at startup. I assume there is circuitry on the motherboard where only Photoshop and a few other apps dare venture! Thanks for the help along the way.
12
Replies
12
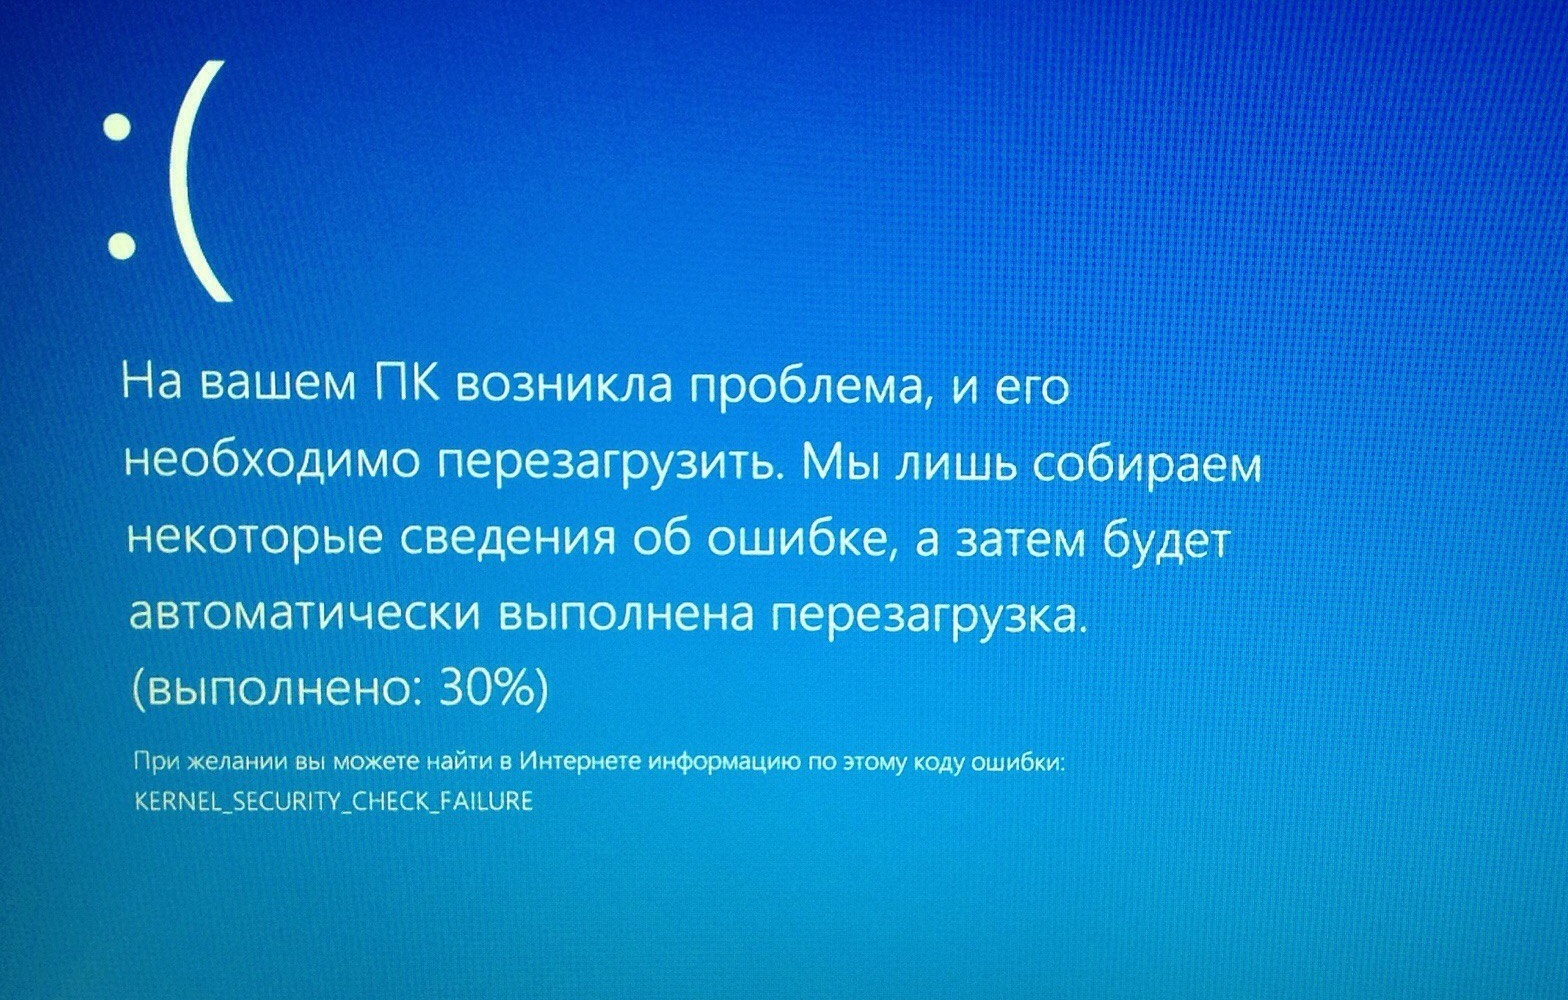
Как только включаю фотошоп, windows выдает синий экран с ошибкой «KERNEL_SECURITY_CHECK_FAILURE». Во всех остальных программах все нормально. Только переустановил винду, хотя и до переустановки винды была похожая ошибка во время запуска именно фотошопа, неважно какого, будь то CS5 или CS6… Странно что после переустановки винды ничего не изменилось.
-
Вопрос задан
-
1833 просмотра
What is ‘Photoshop causing blue screen’ issue in Windows 10/11?
In this article, we are going to discuss on How to fix Blue Screen while using Photoshop, Photoshop causing blue screen in Windows 10/11. You are provided with easy steps/methods to resolve the issue. Let’s starts the discussion.
‘Blue Screen while using Photoshop’ issue:
Photoshop is one of most popular image editing tools for Windows 10/11 OS based devices. It offers many impressive and advanced features with ease of use to boot. You can use this tool to make photo impressive and attractive. However, several users reported they faced Photoshop causing blue screen issue on their Windows 10/11 computer, when they launch and use Photoshop app. This issue indicates Photoshop app prevents you from working on Windows computer comfortably for some reasons.
One possible reason behind the issue can be the lack of sufficient resources in Windows computer means some process or processes/programs are running in your computer like Photoshop, is consuming a lot of resources in your computer. It means your computer doesn’t have enough memory or processor resources to use Photoshop app and that’s why you are facing the issue while launching and running Photoshop app.
The possible reasons behind the issue can be the corrupted/outdated graphics card driver, incorrect graphics card configured for Photoshop, corruption in system memory or RAM, corruption in Windows computer, issue with Photoshop app itself, and other issues. If you are facing the same issue and searching for ways to fix, then you are in right-place for the solution. Let’s go for the solution.
How to fix Blue Screen while using Photoshop issue in Windows 10/11?
Method 1: Fix Photoshop causing blue screen issue with ‘PC Repair Tool’
‘PC Repair Tool’ is quick & easy ways to find and fix BSOD errors, DLL errors, EXE errors, problems with programs/applications, malware or viruses infections in computer, system files or registry issues, and other system issues with just few clicks.
Method 2: Fix Photoshop causing blue screen issue using Registry Editor
Step 1: Open ‘Registry Editor’ app in Windows PC via Windows Search Box and go to following path in left pane.
HKEY_CURRENT_USERSOFTWAREAdobePhotoshop120.0
Step 2: Once you are in correct path, right-click on empty space in right-pane, and select ‘New > DWORD (32-bit) Value’, and name the registry value to ‘OverridePhysicalMemoryMB’
Step 3: Double-click on ‘OverridePhysicalMemoryMB’ to edit, enter the amount of RAM that you have like:
- 4096 for 4 GB
- 8192 for 8 GB
- 16384 for 16 GB
- 24576 for 24 GB
Step 4: Once executed, click ‘OK’ to save the changes and restart your computer and check if the issue is resolved.
Method 3: Update graphics card driver
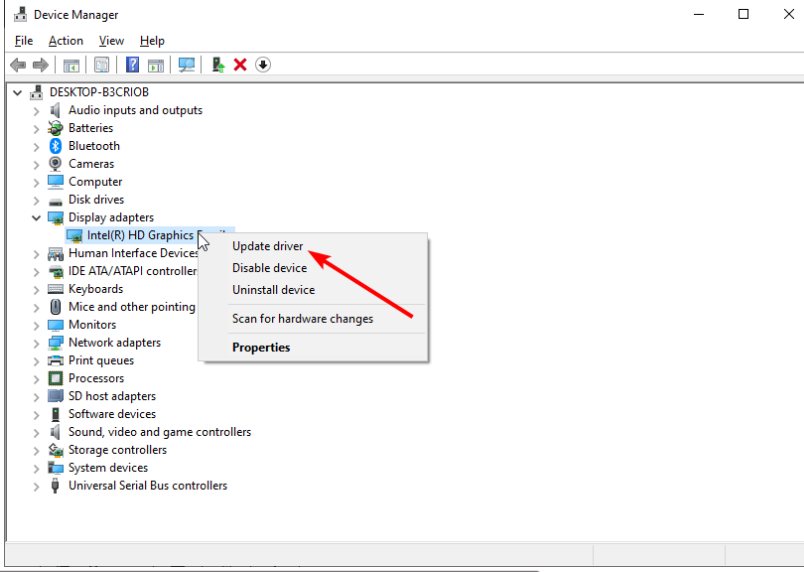
Updating graphics card driver to latest & compatible version can resolve the issue.
Step 1: Open ‘Device Manager’ app in Windows PC via Windows Search Box and expand ‘Display Adapters’ category
Step 2: Right-click on your graphics card driver and select ‘Update Driver’, and follow on-screen instructions to finish updating. Once done, restart your computer and check if the issue is resolved.
Download or reinstall graphic card driver update in Windows PC [Automatically]
You can also try to update all Windows drivers including graphics card driver update using Automatic Driver Update Tool. You can get this tool through button/link below.
Method 4: Install Creative Cloud Application Manager
If you are facing this issue while installing Photoshop app in your computer, then chances the issue with Application Manager could be a reason. You can try installing Creative Cloud App Manager in computer to fix the issue, and then check if it works for you.
Method 5: Reinstall Microsoft C++ 2010 Redistributable Package
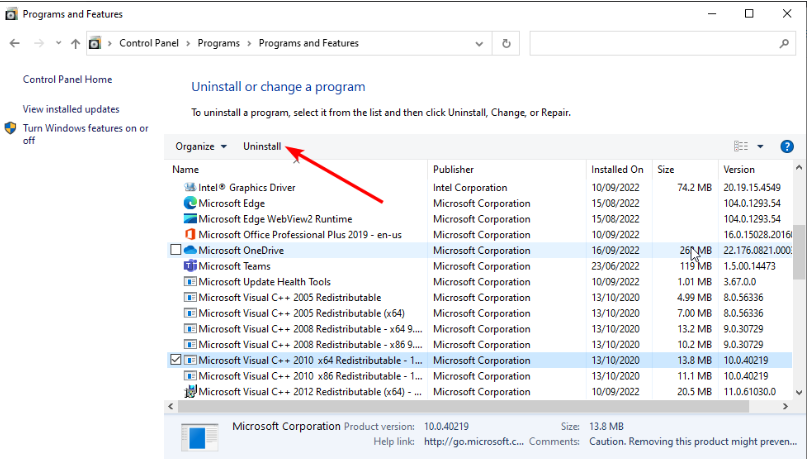
You can also try to fix the issue is to reinstall Microsoft Visual C++ Redistributable Package in computer.
Step 1: Open ‘Control Panel’ app in Windows PC via Windows Search Box and go to ‘Uninstall a Program > Programs & Features’
Step 2: Find and right-click on Microsoft Visual C++ Redistributable Package installed, and select ‘Uninstall’ to uninstall it and then restart your computer.
Step 3: After restart, download and install the Microsoft Visual C++ Redistributable package in computer of both 32-bit and 64-bit version, and once installed, check if the issue is resolved.
Method 6: Reset Photoshop app preferences
One possible way to fix the issue is to reset app preferences of Photoshop app in computer.
Step 1: Open ‘Photoshop’ app and press ‘ALT + CTRL + SHIFT’ keys on keyboard
Step 2: This will reset Photoshop app preferences. In the confirmation dialog box, click ‘yes’ to proceed and once finished, check if it works for you.
Method 7: Fix Blue Screen while using Photoshop issue using Command Prompt
Step 1: Type ‘cmd’ in Windows Search Box and press ‘CTRL + SHIFT + ENTER’ keys on keyboard to open ‘Command Prompt as Administrator’
Step 2: Type the following commands and hit ‘Enter’ key to execute.
reg add HKEY_CURRENT_USERSoftwareMicrosoftWindowsCurrentVersionPen /v LegacyPenInteractionModel /t REG_DWORD /d 1 /f
Step 3: Once executed, restart your computer and check if the issue is resolved.
Method 8: Uninstall the problematic Windows update
You can fix the issue by uninstalling the problematic Windows update in computer.
Step 1: Open ‘Settings’ app in Windows PC via Windows Search Box and go to ‘Update and Security > Windows Update > View Update History > Uninstall Updates’
Step 2: Find and right-click on recently installed Windows update or problematic Windows update, and select ‘Uninstall’ to uninstall it. After that, restart your computer and check if the issue is resolved.
Method 9: Uninstall problematic software
Another way to fix the issue is to uninstall the problematic application in computer.
Step 1: Open ‘Settings’ app in Windows PC via Windows Search Box and go to ‘Apps > Apps & Features’
Step 2: Find and select the problematic application, and click ‘Uninstall’ to uninstall it, and then restart your computer, and check if it works for you.
Conclusion
I hope this post helped you on How to fix Blue Screen while using Photoshop, Photoshop causing blue screen issue in Windows 10/11. You can read & follow our instructions to do so. That’s all. For suggestions or queries, please write on comment box below.
Can’t figure out why Adobe Photoshop keeps crashing on your Windows PC?
Whether you’re doing creative or professional work, Adobe Photoshop is the best tool to tweak photos and create graphic designs. It simply offers the best tools for manipulating images and features layers.
Although Adobe Photoshop has been around for decades, it’s not close to perfect, just like any app or program.
If you’re a regular user, you probably know that Adobe Photoshop has its own share of issues.
One of the most common problems with Photoshop is that it keeps crashing unexpectedly on Windows. This can be very annoying, especially if you’re making a lot of progress with your project and haven’t saved it.
Usually, corrupted system or application files are the culprit for random crashes in Adobe Photoshop. However, it can also be due to outdated software and third-party apps.
Today, we’ll show you what to do if Adobe Photoshop keeps crashing on Windows.
1. Restart Your Computer.
If an application keeps crashing on your computer, the first thing you can do is restart your system. This should ensure that Photoshop’s resources are correctly loaded, and there are no temporary errors on your system.
Check out the steps below to restart your PC:
- On your computer, click on the Windows icon in the Taskbar to open the Start Menu.
- After that, go to the Power Options tab.
- Finally, click on Restart to reboot your system.
After restarting your computer, relaunch Adobe Photoshop and observe if it will still crash.
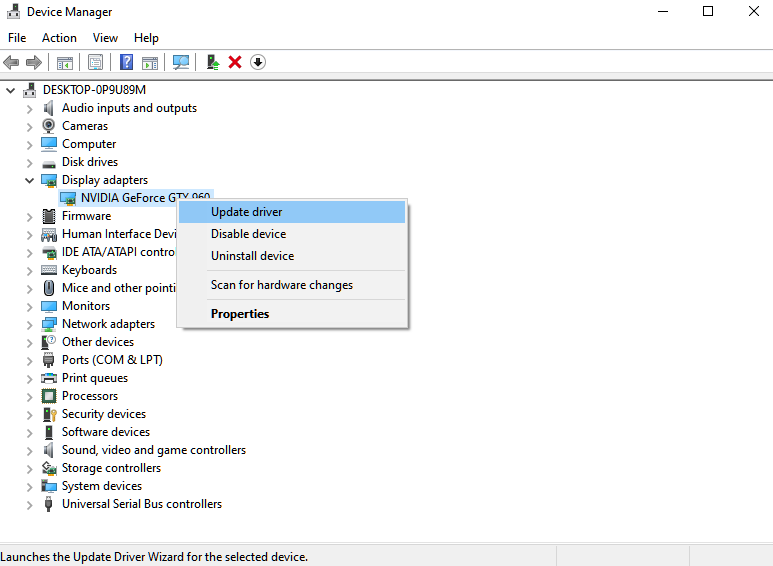
2. Update Your Graphics Drivers.
Corrupted or broken display drivers are one of the most common reasons why Adobe Photoshop keeps crashing on Windows. When you perform heavy workloads on Photoshop, it uses your graphics card to optimize its performance.
If your graphics drivers are outdated or corrupted, it can cause issues with Photoshop.
Follow the guide below to update your display drivers:
- On your keyboard, press the Windows + X keys to open the Quick Menu.
- Next, click on Device Manager.
- Expand the Display Adapters tab and right-click on your video card.
- Finally, choose Update Driver and follow the prompts.
Restart your computer after updating your drivers. Go back to Adobe Photoshop and check if the problem is solved.
3. Close Unnecessary Programs.
Adobe Photoshop can take up a lot of resources once you start adding layers to your project. If your system runs out of memory, Photoshop might crash.
To avoid this, we suggest closing unnecessary programs on your computer.
- On your keyboard, press CTRL + SHIFT + ESC to open the Task Manager.
- Now, go to the Processes tab and click on Memory. This should sort your programs based on your RAM usage.
- Finally, identify the apps you’re not using and close them.
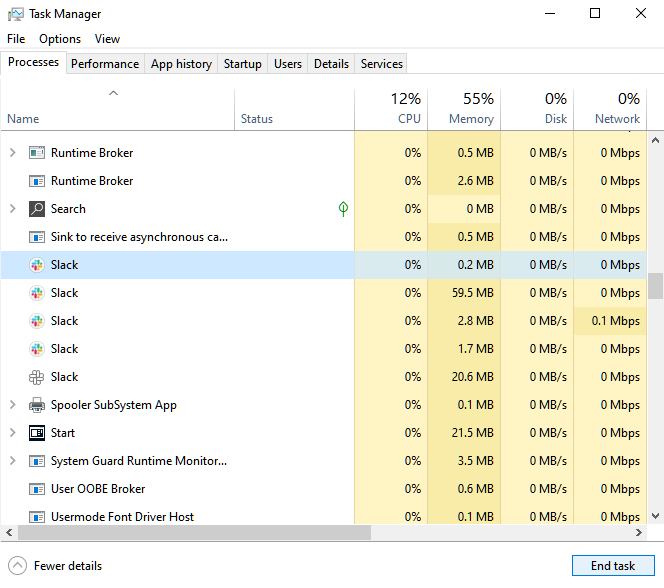
Once done, go back to your project and check if Adobe Photoshop still crashes.
4. Reset Your Photoshop Preferences.
You might have played around with your Photoshop preferences and made some changes that caused it to crash. Now, if you’re going to find the problematic configuration, it will take you agest it figure it out.
To speed things up, we suggest resetting your preferences to roll back the changes.
Here’s what you need to do:
- On your computer, launch Adobe Photoshop and press the CTRL + K keys to open Preferences.
- Now, go to the General tab and click on Reset Preferences on Quit.
- Finally, restart Adobe Photoshop to apply the changes.
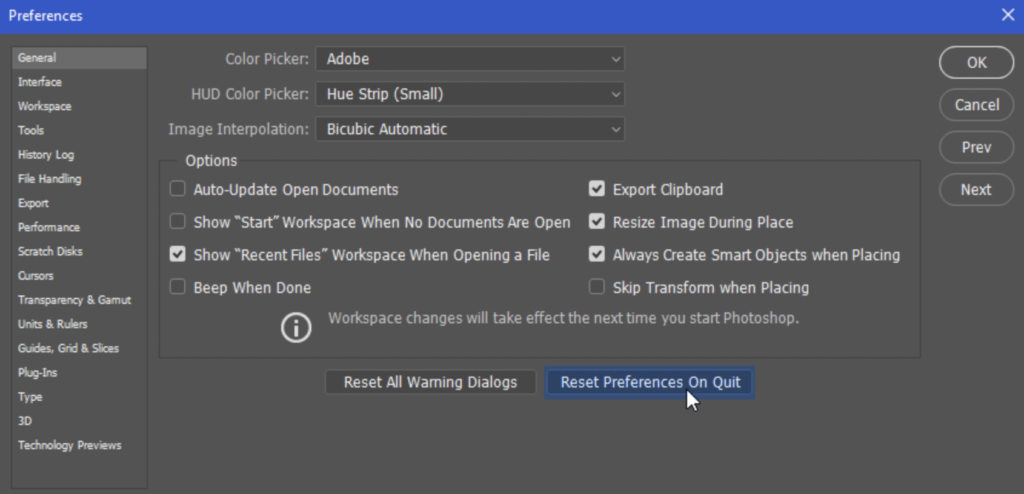
Restart Photoshop afterward and observe if it will still crash.
5. Update Windows.
If you’re using a new version of Adobe Photoshop, it’s possible that your operating system is not compatible with it. To rule this out, update your OS to the latest version possible. This should also patch bugs and glitches on your computer.
Check out the guide below to update Windows:
- First, press the Windows + I keys on your keyboard to open Windows Settings.
- After that, click on Windows Update on the side menu.
- Lastly, choose Download & Install if there’s a new version available.
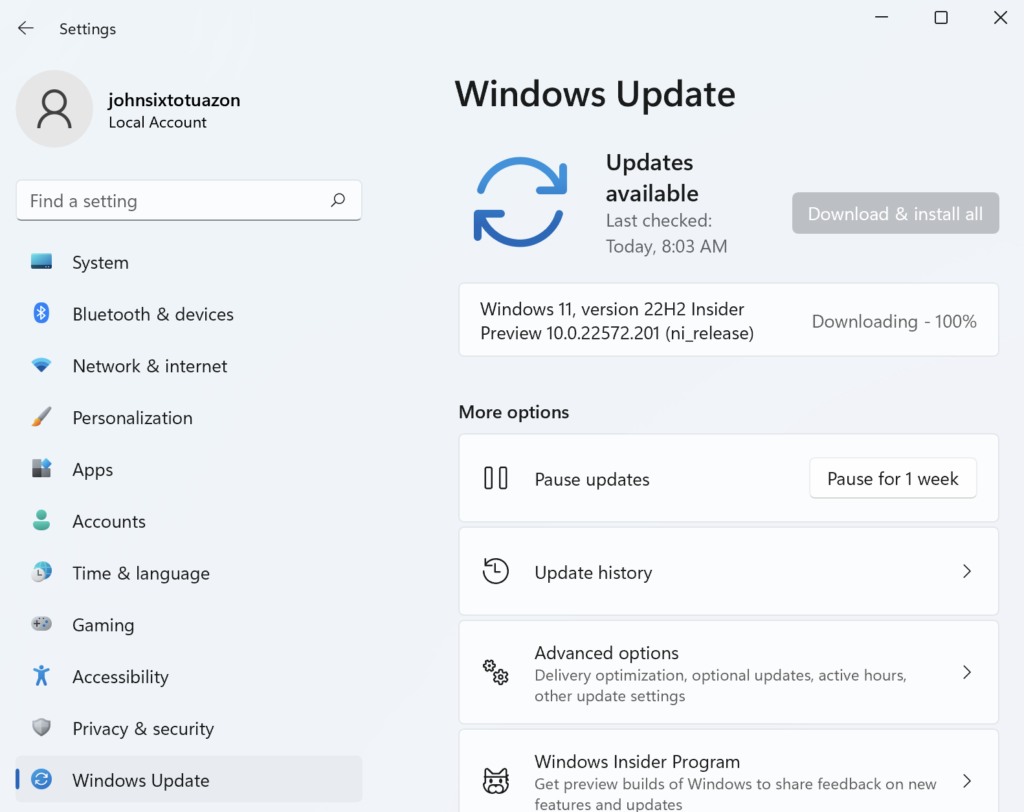
Go back to Photoshop after the update to check if the problem is solved.
6. Update Adobe Photoshop.
The version of Adobe Photoshop you’re using might have an issue that causes it to crash when you access a feature or perform an action. To rule this out, check if there are available updates for Adobe Photoshop.
See the guide below to update Photoshop:
- On your computer, launch Adobe Photoshop.
- Next, click on Help.
- Finally, choose the Updates tab and follow the prompts.
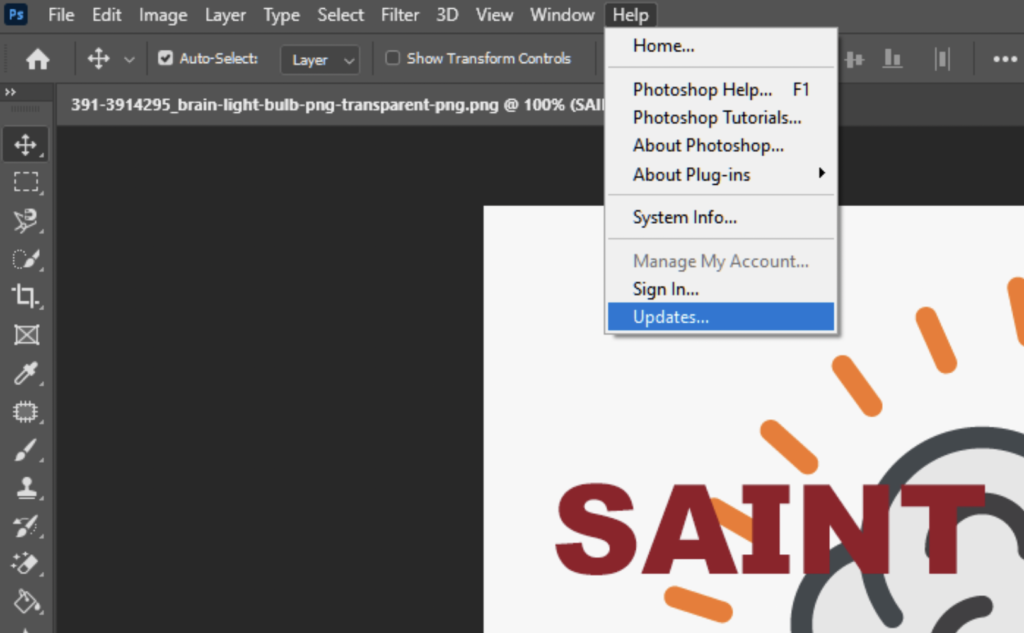
After updating the app, restart your computer to apply the changes. Use Adobe Photoshop as you would and observe if it will crash.
7. Scan for Corrupted System Files.
You can use Windows’ built-in tool to scan your drive for broken and missing system files. Some of your system’s resources may have gotten corrupted, which causes issues with Adobe Photoshop.
Follow the steps below to run an SFC scan:
- On your keyboard, press the Windows + X keys to open the Quick Menu.
- Next, click on Command Prompt (Admin).
- Finally, type ‘sfc /scannow’ and hit Enter.
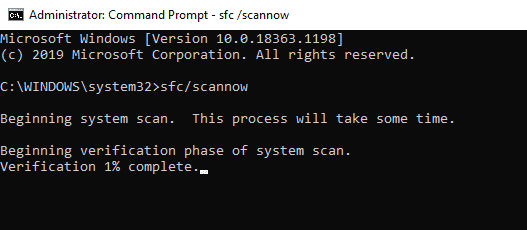
Wait for the scan to finish and restart your system.
8. Reinstall Adobe Photoshop.
If none of the solutions worked, we suggest reinstalling Adobe Photoshop on your computer. This should ensure that you have the latest version of the software and there are no corrupted installation files on your system.
Here’s how you can uninstall Adobe Photoshop:
- First, open the Control Panel and click on Uninstall a Program.
- Now, locate Adobe Photoshop from the list.
- Lastly, right-click on the app and choose Uninstall.
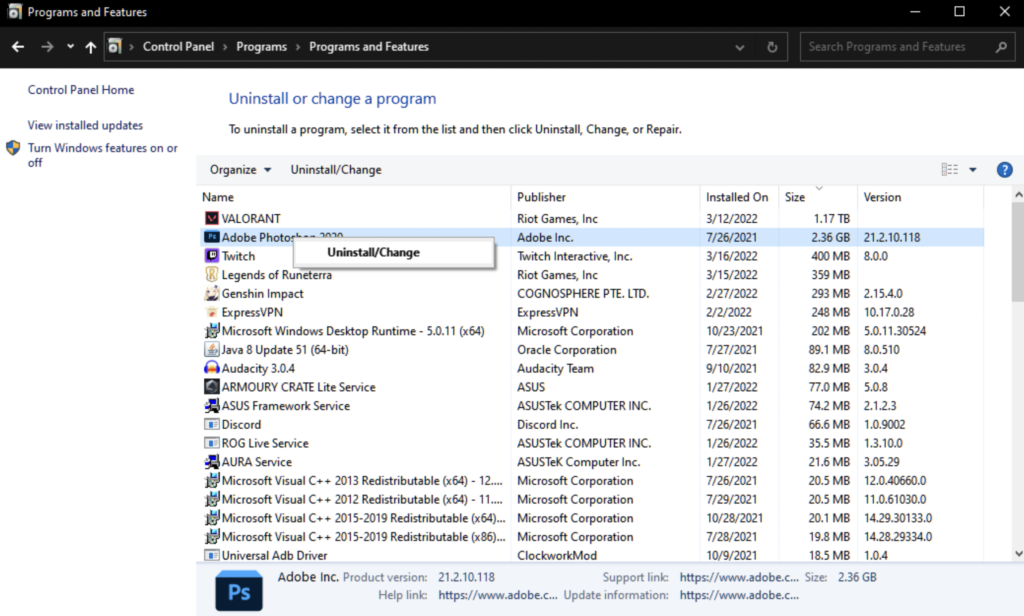
Go to Adobe’s website afterward to download the latest installer.
That ends our guide for fixing Adobe Photoshop if it keeps crashing on Windows. If you have questions, drop a comment below, and we’ll do our best to answer them.
If this guide helped you, please share it. 🙂
-
John is a staff writer at Saint and comes from a SAP ABAP development background. He has a Bachelors in IT and has been writing since 2018, with over 500 posts published. He loves to build PCs and has a deep curiosity in understanding how different components and configurations work. John spends hundreds of hours at a time, researching and testing the software and apps, before he proceeds to write about it. LinkedIn
X (Twitter)
Website
View all posts
Все способы:
- Способ 1: Ограничение частоты процессора
- Способ 2: Отключение дополнительных накопителей
- Способ 3: Подключение флешки в другой порт компьютера
- Способ 4: Повторное создание загрузочной флешки
- Способ 5: Обновление / восстановление BIOS
- Способ 6: Проверка оперативной памяти компьютера
- Способ 7: Извлечение планки оперативной памяти
- Способ 8: Отключение дискретной видеокарты
- Способ 9: Замена блока питания
- Вопросы и ответы: 0
Способ 1: Ограничение частоты процессора
Если во время инсталляции операционной системы появляется синий экран с ошибкой, причиной этому может стать увеличенная частота процессора компьютера. Происходит это вследствие намеренного разгона комплектующих пользователем, соответственно, чтобы устранить неполадку, необходимо вручную снизить тактовую частоту через интерфейс операционной системы или BIOS. О том, как это сделать, написано в другой статье на нашем сайте.
Подробнее: Как понизить тактовую частоту процессора
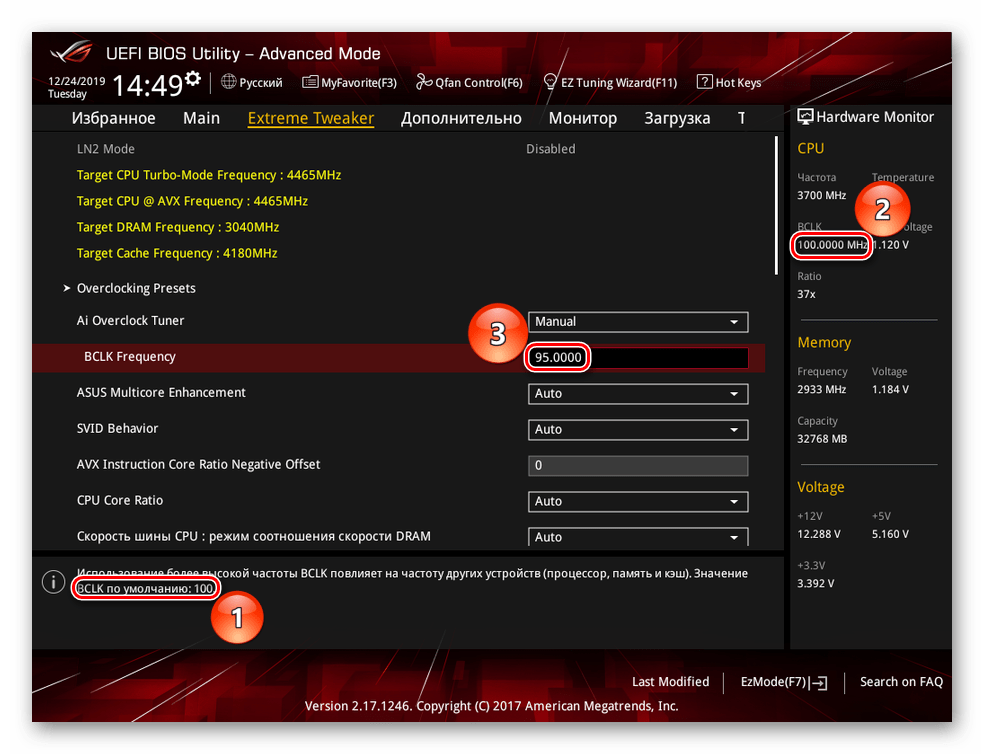
Если доступа к рабочему столу Windows 10 у вас нет, а в BIOS вы не нашли нужной опции, тогда можно попробовать выполнить поставленную задачу путем сброса настроек утилиты ввода и вывода к изначальным. Эта тема отдельной статьи, размещенной на нашем сайте. Можете ознакомиться с ней, перейдя по ссылке ниже.
Подробнее: Что такое Restore Defaults в BIOS

Способ 2: Отключение дополнительных накопителей
Зачастую на появление синего экрана во время установки Windows 10 влияет какое-то неисправно работающее комплектующее компьютера, одним из которых может быть жесткий диск или твердотельный накопитель, не предназначенные для установки на них ОС. Чтобы исключить их негативное воздействие, все дополнительные устройства рекомендуется отключить. Сделать это можно непосредственно через рабочий стол операционной системы, если у вас остался доступ к нему. Воспользуйтесь ссылкой ниже, чтобы перейти на тематическую статью на нашем сайте.
Подробнее: Как отключить жесткий диск в Windows 10
Если до появления ошибки вы успели удалить операционную систему во время инсталляции Windows 10, тогда выполнить поставленную задачу можно через утилиту ввода и вывода. О том, как это сделать, рассказывается в другой статье на нашем сайте.
Подробнее: Как отключить жесткий диск в BIOS

Примечание! Также можете физически извлечь дополнительные накопители из ноутбука или системного блока компьютера, оставив только тот, на который будет производиться установка Windows 10. Но это рекомендуется делать только в том случае, если вы ранее имели опыт отключения/подключения комплектующих, иначе лучше обратиться за помощью в сервисный центр.
Способ 3: Подключение флешки в другой порт компьютера
Иногда для устранения синего экрана с ошибкой достаточно переставить загрузочную флешку в другой USB-порт ПК, притом рекомендуется, чтобы его версия была 2.0. На большинстве устройств он имеет черный или белый цвет, в то время как версия 3.0 — синий. Но за более точными сведениями обратитесь к документации компьютера, идущей в комплекте при покупке.
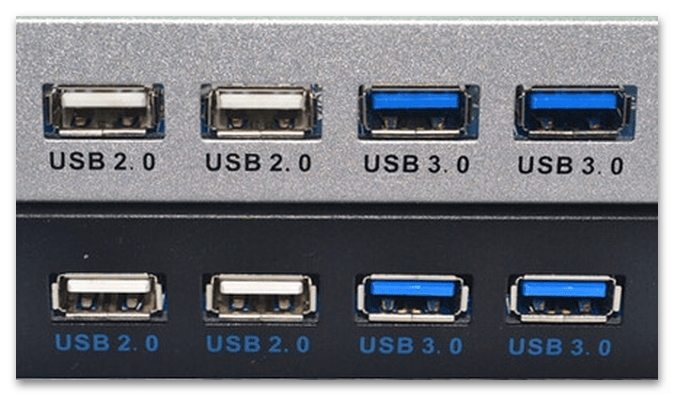
После того как флешка будет переставлена в другой разъем, повторно запустите инсталляцию Windows 10 и проверьте наличие ошибки.
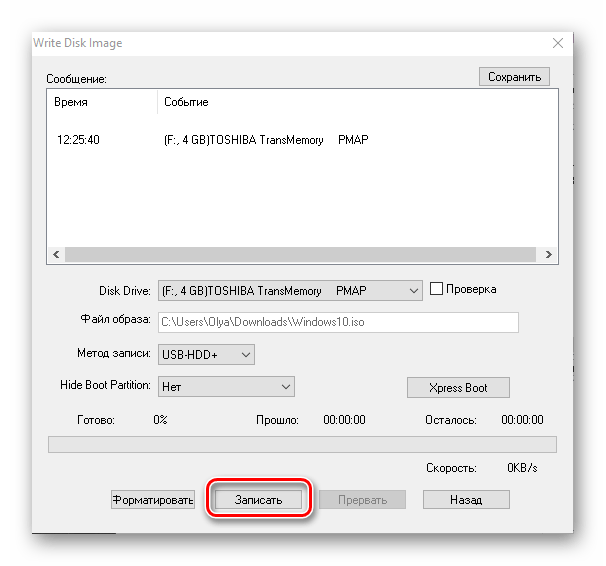
Способ 4: Повторное создание загрузочной флешки
Синий экран во время установки Windows 10 может появиться из-за некорректно записанного на флешку образа инсталлятора. Происходит это по двум причинам: сбои в работе программы для записи или повреждение исходного образа установщика. В любом случае рекомендуется пересоздать загрузочную флешку, воспользовавшись другой программой и повторно скачанным образом Windows 10. Загружать его следует с официального сайта Microsoft, так вы получите исправно работающую софт без вирусов.
Если вы не знаете, как пользоваться другим программным обеспечением для создания загрузочных накопителей, обратитесь за помощью к тематической статье на нашем сайте. В ней автор подробно раскрывает эту тему на примере четырех различных приложений.
Подробнее: Как создать загрузочную флешку с Windows 10
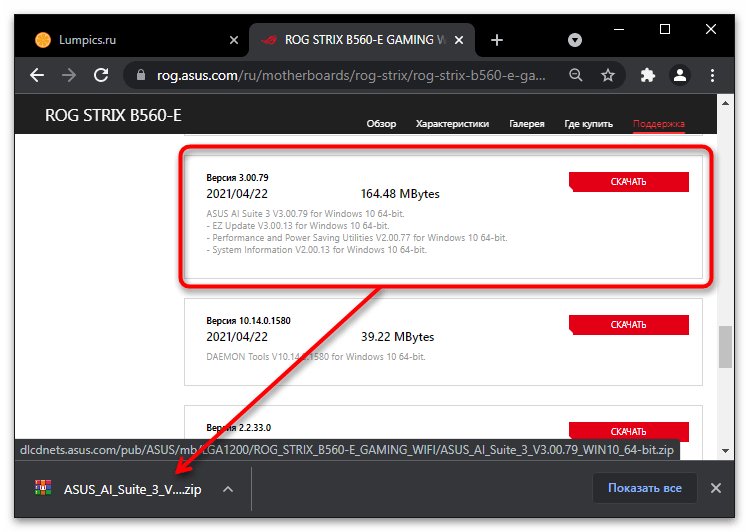
Способ 5: Обновление / восстановление BIOS
На появление синего экрана при установке Windows 10 может влиять устаревшая или поврежденная версия BIOS. В такой ситуации поможет его восстановление или обновление.
Произвести апдейт можно через интерфейс рабочего стола операционной системы или непосредственно в BIOS. На нашем сайте есть материал, в котором рассказывается об этом на примере материнской платы фирмы ASUS, но содержащаяся там информация будет полезна и для других производителей.
Подробнее: Как обновить BIOS на материнской плате ASUS
Если обновить BIOS у вас не получилось или в процессе этого вы его повредили, тогда следует попробовать произвести процедуру восстановления. Это можно легко сделать через специальные программы, но понадобится доступ к рабочему столу операционной системы. Некоторые модели ноутбуков оснащены специальной функцией восстановления BIOS посредством нажатия горячей клавиши при включении. В крайнем случае вам потребуется воспользоваться устройством под названием программатор. Об этом всем рассказывается в другой статье на нашем сайте.
Подробнее: Как восстановить BIOS на компьютере

Если ни один из перечисленных вариантов выполнения поставленной задачи вам не подходит и программатора у вас нет, обратитесь за помощью к специалисту в сервисный центр.
Способ 6: Проверка оперативной памяти компьютера
На появление синего экрана во время установки Windows 10 могут влиять проблемы с оперативной памятью. Чтобы узнать, так ли это, необходимо воспользоваться специализированным программным обеспечением для диагностики компьютерных комплектующих. Большая их часть требует доступа к рабочему столу операционной системы, но при надобности можно воспользоваться портативными утилитами, запускающимися с флешки. Развернуто об этом вы узнаете в другой статье на нашем сайте.
Подробнее: Проверка оперативной памяти в Windows 10
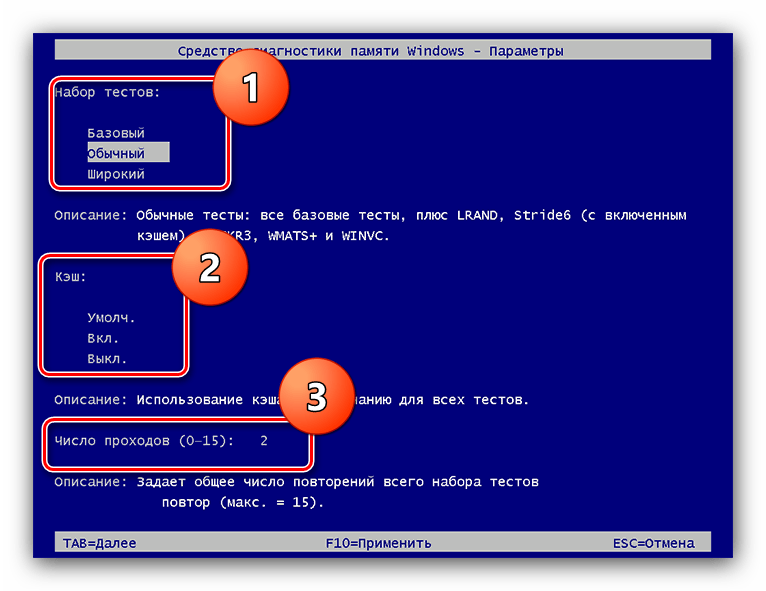
Если по итогу проверки будут обнаружены ошибки, значит, проблема действительно заключается в оперативной памяти. В таком случае ее надо заменить на исправную.
Способ 7: Извлечение планки оперативной памяти
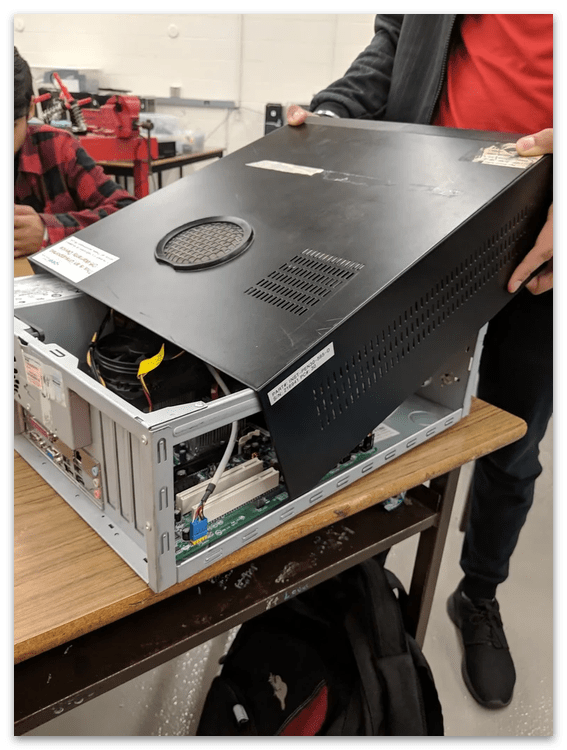
Есть вероятность, что ошибка появляется лишь из-за одной неисправно работающей планки оперативной памяти, и тогда устранить рассматриваемую неисправность можно путем ее отключения. Вам потребуется разобрать системный блок компьютера или корпус ноутбука, чтобы получить доступ к комплектующим. Для этого можете воспользоваться подготовленной нашим автором инструкцией, перейдя по нужной ссылке ниже. Но процедуру все равно не рекомендуется делать без должных навыков. Если их нет, рекомендуется прибегнуть к помощи квалифицированных людей.
Подробнее: Как разобрать компьютер / ноутбук
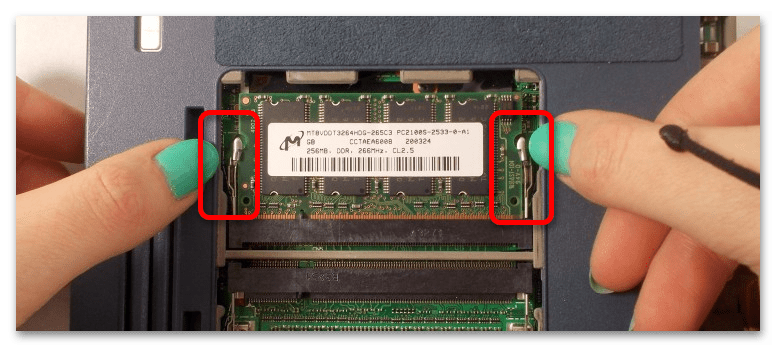
После того как доступ к планкам оперативной памяти будет открыт, извлеките одну из них. Для этого надавите одновременно на два рычага, расположенных по обеим сторонам чипа.

Если вам необходимо извлечь оперативную память в ноутбуке, для этого ослабьте зажимы по бокам. Как только планка чипа поднимется, аккуратно извлеките ее.
После этого соберите компьютер или ноутбук и попробуйте повторно произвести инсталляцию операционной системы. При повторном появлении ошибки выключите устройство, разберите его и извлеките другую планку оперативной памяти, заменив ее той, что достали до этого.
Продолжайте так делать до тех пор, пока не будут проверены все планки оперативного запоминающего устройства.
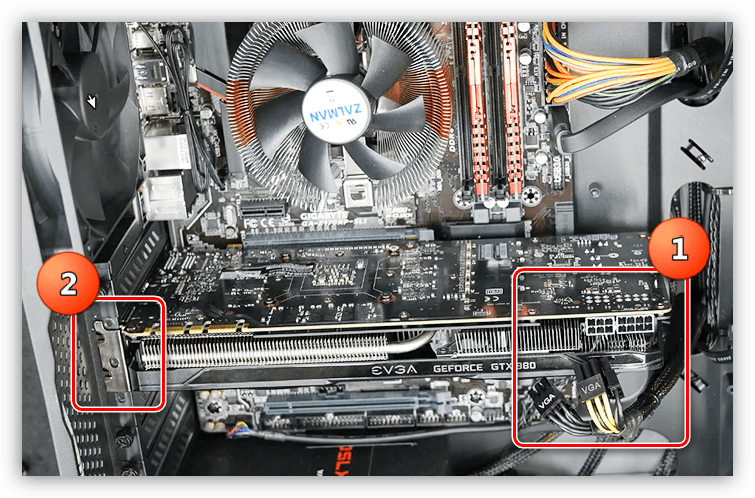
Способ 8: Отключение дискретной видеокарты
Наряду с процессором и оперативной памятью, на появление синего экрана во время установки операционной системы может влиять неисправно работающая дискретная видеокарта. Убедиться в этом можно, опять же, путем ее отключения. Но сделать это удастся только в том случае, если в ваш процессор интегрирована встроенная видеопамять, иначе ПК просто не запустится.
Чтобы отключить дискретную видеокарту, потребуется разобрать компьютер и извлечь из пазов комплектующее. Весь этот процесс детально описан в другом материале на нашем сайте.
Подробнее: Извлечение дискретной видеокарты
Не производите отключение без опыта и уверенности в том, что вы делаете, — это может повлечь за собой полную поломку компьютера или ноутбука.
Способ 9: Замена блока питания
Если ни один из вышеописанных способов устранения проблемы вам не помог, есть вероятность, что причина заключается в неисправно работающем блоке питания, даже если на первый взгляд кажется, что с ним все в порядке. Есть два варианта: комплектующее не обладает достаточной мощностью или оно вышло из строя. Первый случай часто встречается после установки новой видеокарты или процессора с повышенным потреблением электроэнергии.
Несмотря на причину выхода из строя блока питания, первостепенно необходимо проверить его работоспособность. Сделать это можно как с помощью специализированного программного обеспечения, так и путем использования специальных инструментов. На эту тему у нас написана отдельная статья на сайте.
Подробнее: Как проверить работоспособность блока питания
Если блок питания работает исправно, ошибка может быть вызвана его недостаточной мощностью для обеспечения электроэнергией комплектующих ПК. Чтобы это выяснить, следует произвести расчет. На эту тему у нас на сайте написана другая статья, при надобности ознакомьтесь с ней.
Подробнее: Как узнать, сколько ватт потребляет компьютер

Если по итогу вы выяснили, что синий экран при инсталляции Windows 10 появляется из-за блока питания, тогда его придется заменить, приобретя новый достаточной мощности и установив в системный блок вместо старого. Сделать это можно самостоятельно, не обращаясь в сервисный центр, но прежде лучше ознакомиться с соответствующей инструкцией на нашем сайте.
Подробнее:
Подключение блока питания к компьютеру
Наша группа в TelegramПолезные советы и помощь