
Last modified: Jan 12, 2025 12:29 AM
14
4328
Last modified Jan 12, 2025 12:29 AM
If you’re experiencing difficulty connecting your iPhone to your PC, there are a few steps you can take to troubleshoot the issue:
- Assuming you have Windows 10. Download and use iTunes for Windows 10. With iTunes for Windows 10, you can manage your entire media collection in one place. Download and use iTunes for Windows 10
- Check the USB cable and ports: Ensure that you’re using a certified Lightning to USB cable and try connecting it to different USB ports on your PC. Also, check for any physical damage or debris in the ports that may be preventing a proper connection. Use genuine cable —> Identify counterfeit or uncertified Lightning connector accessories …
- Disconnect all other USB devices from your computer, except for your keyboard and mouse. —> Resolve USB-related alerts in iTunes/Finder — Apple Support
- Search for accessories that have completed MFi certification. Once an accessory has completed MFi certification requirements and is reported to Apple as sold/distributed, it will be searchable in our public database of authorized Lightning, headset, charging, iAP-enabled, and Find My network-enabled accessories.
- Learn how to identify counterfeit or uncertified Lightning-based accessories.
- Restart your iPhone and PC: Sometimes, restarting your devices can resolve temporary connection issues. Restart both your iPhone and your PC, and then try connecting them again.
- Restart the device. That’s it.
- Still not solved —> Force restart iPhone — Apple Support
- Make sure that your iPhone is running the latest software versions. On your iPhone, go to Settings > General > Software Update
- Update Over-the-Air (OTA) —> Update your iPhone or iPad — Apple Support (IN)
- Update using iTunes/Finder —> Update your iPhone, iPad, or iPod touch — Apple Support (IN)
- When connecting your iPhone to your PC for the first time, you may need to trust the computer on your iPhone. Unlock your iPhone and check for any prompts asking you to trust the connected computer. Confirm the trust request on your iPhone. About the “Trust This Computer” alert message on your …
- Try a different port, cable, or computer. The issue could be related to your computer, its USB port, or the USB cable connecting it to your device. If possible, try a different computer, USB port, or USB cable. Also, check for any debris in the charging port on the bottom of your iPhone or iPad. —> If your computer doesn’t recognize your iPhone, iPad, or iPod …
- Reset your iPhone’s settings: If the issue persists, you can try resetting your iPhone’s settings. Go to Settings > General > Transfer & Reset > Reset > Reset All Settings. This will not erase your data but will reset your settings to their default values. After the reset, attempt to connect your iPhone to your PC again. Return iPhone settings to their defaults — Apple Support (IN)
- If unable to connect —> If iTunes doesn’t recognize your iPhone, iPad, or iPod — Apple Support
- For your Windows PC —> Troubleshooting issues with iTunes for Windows — Apple Community
- Sometimes, third-party security software or firewalls can interfere with the connection between your iPhone and PC. Temporarily disable any security software or firewalls and see if that resolves the issue.
- Put your device in recovery mode and set it up again … Keep your device connected and wait until the Connect to computer screen appears: iPhone …If you can’t update or restore your iPhone or iPod touch
If you are experiencing an issue not listed here, contact support as they can provide specific troubleshooting steps based on your situation.
You can do the following using iTunes :
- Following this process is the only way out if your iPhone is disabled. The steps given in this link will help you reset the passcode -> If you forgot the passcode for your iPhone, iPad, or iPod touch, or your …
- Note: If you have forgotten the Screen Time Passcode then restoring your device from a backup after the passcode reset will return the Passcode back to your device. So, please do not restore from a backup.
- See how to —> Sync your iPhone, iPad, or iPod using iTunes on your computer …
- Learn how to—> Update your iPhone, iPad, or iPod touch — Apple Support
- Here is the process to —> Backup on iTunes.
- Microsoft support says (iTunes not required for Import) —> Import photos and videos from an iPhone to a PC
- In the iTunes app on your PC, choose Account > Sign In > Set up and view an iTunes Store account on PC — Apple Support
- Organize and play your music and video · Play or download unlimited songs with Apple Music (with a paid subscription) · Find music, movies, TV shows, and audiobooks—> What is iTunes on PC?
- In the iTunes app on your PC, choose Account > Sign In, then sign in with your Apple ID. If you don’t have an Apple ID, you can create one during setup. Choose Music from the pop-up menu at the top left, then click For You. Click Try it Now, then follow the onscreen instructions. Subscribe to Apple Music using iTunes on a PC
use the arrow keys to navigate through the pivots and tab to focus on focusable content inside a pivot section
- For Android users
- For iOS users
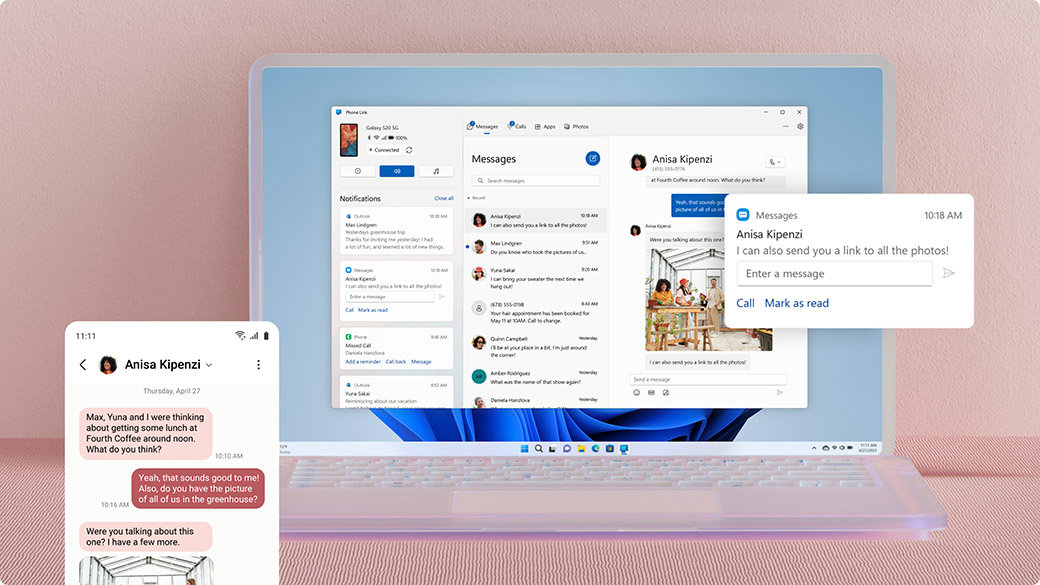
Keep up with your chats
Now there’s no need to unlock your phone. Microsoft Phone Link enables you to read texts and respond directly from your PC.

Take and make the call
Review your call history, search contacts, or dial to make calls—from your Windows computer.
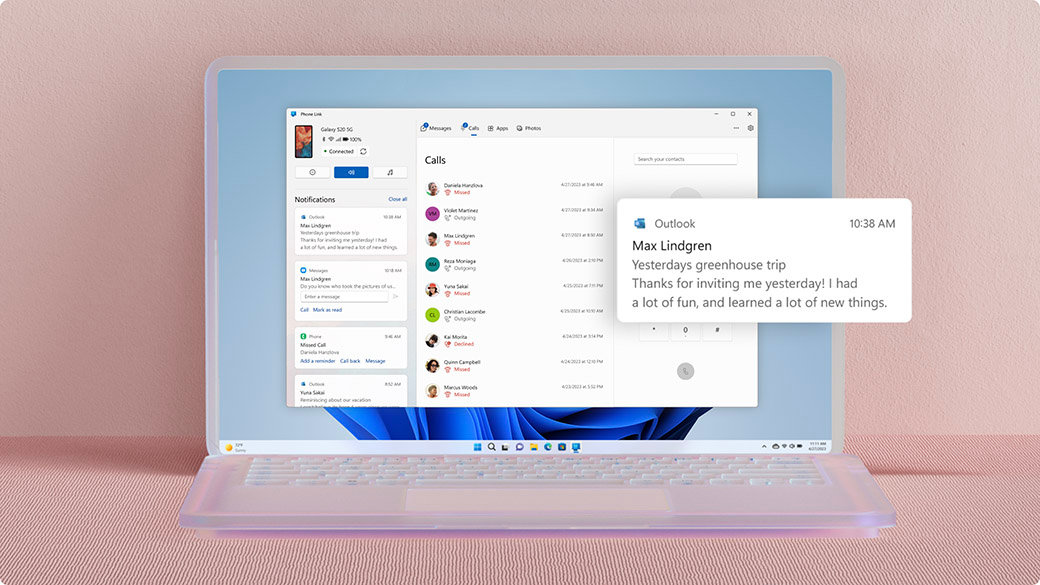
Stay on top of your notifications
Check, pin, and dismiss notifications. Microsoft Phone Link lets you customize banner alerts to your preferences.
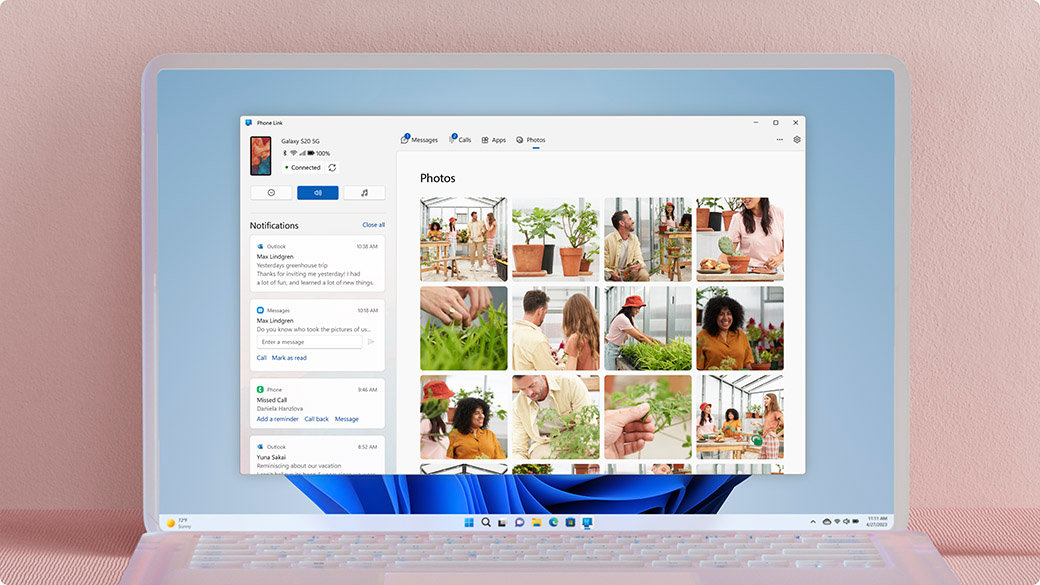
Share your Android’s photos
View the last 2,000 images from your camera roll, and drag and drop or copy and paste them into other apps.
Galaxy Book3 Ultra
This Galaxy Book3 Ultra easily goes wherever you go. This portable and thin profile unfolds to reveal a wide workspace, complete with a narrow bezel to maximize the screen-to-body ratio.1
Galaxy Book3 Pro 360
Galaxy Book3 Pro 360 5G features built-in, industry-leading 5G wireless technology so you can stay connected anywhere, even off the grid without Wi-Fi.2

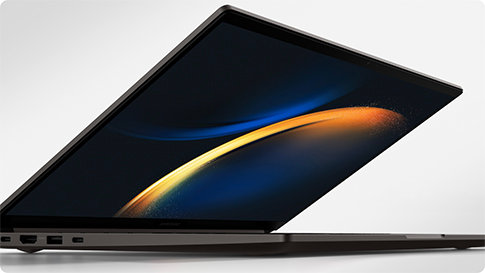
Galaxy Book3 Pro
Introducing Galaxy Book3 Pro. The thinnest and lightest laptop in the Galaxy Book range with smartphone-like mobility.3

Discover the all-new Samsung Galaxy series
Ultra slim and premium look designed to give you the freedom to move with its leading chipset performance, expandable storage, and enhanced continuity.
Microsoft Phone Link replaces the Your Phone Companion app and allows you to filter your notifications, receive calls, and use your mobile apps on your PC.4 5 6 7 With an updated design for Windows 11, Phone Link is reaching customers around the world.
The Phone Link experience will come preinstalled on your PC with Windows 10 or Windows 11, simply search “Phone Link” in Start menu. If you are on Windows 10 and cannot find Phone Link, you may need to update to a later version of Windows 10 or download Phone Link directly from the Microsoft Store.
From your PC, you can connect to Android and select Samsung and HONOR devices with these two apps:
- Link to Windows (LTW) app for most Android devices.
- Link to Windows (LTW) app preinstalled on select Samsung and HONOR phones.
- You’ll see the name Link to Windows in the Google Play Store and in the Galaxy Store. In the Microsoft Store, you’ll see Phone Link. This link between your device and PC gives you instant access to everything you love. Read and reply to messages with ease, view recent photos from your Android device, use your favorite mobile apps6, make and receive calls, and manage your Android device’s notifications right on your PC.4 5
- Phone Link requires the following to work:
- A PC running Windows 10 May 2019 Update or later.
- If you’re currently running the May 2019 Update, you will need to install the Phone Link app from the Microsoft Store. Any Windows version after the May 2019 Update will have the app preinstalled.
- An Android device running Android 7.0 (Nougat) or above.
- A PC running Windows 10 May 2019 Update or later.
You’ll find Phone Link preinstalled if you have the Windows 10 October 2019 Update or later. When you open the app, you’ll be guided through a few extra steps you’ll need to take to finish setting things up.
Phone Link connects to your Android phone via Wi-Fi, mobile data network, or instant hotspot8 9. For easy connection over Wi-Fi, make sure to have both your PC and Android device nearby, turned on, and connected to the same network. You’ll be able access its functionalities from your PC as long as both devices are online. You’ll need to download the Link to Windows app for most Android devices. You can find this at the Google Play Store.
If you have select Samsung or HONOR phones, you may already have the Link to Windows app preinstalled. If not, you can find the app from the Google Play Store or Galaxy Store.
If you start from your Windows PC:
- In the search box on the taskbar, type Phone Link, and then select Phone Link app from the results.
- Select Android.
- You’ll be asked to sign into your Microsoft account (you’ll need to be signed into the same Microsoft account on both your Android device and PC in order to link your devices.)
- Once you’re signed in, you’ll be prompted to install or open the companion app on your Android device. To do this, open a web browser on your Android device and then enter the link that’s displayed on your PC (aka.ms/yourpc).
- Sign into the companion app with the same Microsoft account that you’re signed in to on your PC. The app will then open to a screen that displays a QR code for you to scan—we’ll come back to that.
- Once you’ve signed in, go back to your PC and select the I have the Link to Windows app installed on my phone check box. Then select the Pair with QR code button.
Note: If you’d like to pair your device without using a QR code, select the Pair manually button on your PC instead. On your Android device, you’ll be prompted to enter the code displayed on your PC.
- A QR code will appear on your PC screen. On your Android device, the companion app should be open to a screen with a camera on it. Use this screen to scan the QR code that’s displayed on your PC.
- Once your devices are linked, your Android device will prompt you for several device permissions. These permissions help you access content from your phone on your PC.
If you start from your Android device:
- Open a browser on your Android device, type aka.ms/yourpc in the browser, and then download the Link to Windows app. For select Samsung devices.
- You’ll be prompted to open Link to Windows instead, which is preinstalled on your Android device.
- Sign into the companion app with the same Microsoft account you’re signed into on your PC (you need to be signed in with your Microsoft account on your PC in order to link your devices even though you’re starting from your phone).
- After signing in, you’ll be prompted to scan a QR code that’s displayed on your PC. To get to it, on your PC, open a browser to aka.ms/linkphone.
- Use the companion app’s camera to scan the QR code that’s displayed on your PC with your Android device to link your devices.
- You’ll be asked for a series of device permissions to allow you to access content from your phone and on your PC.
If you encounter issues installing the app, troubleshoot them here.
You can use Phone Link to complete convenient smartphone tasks from your Windows PC, such as:
- Make and take phone calls on cellular networks (this will require your phone to be paired to your PC).4 5 8 9
- View your photo gallery (up to your most recent 2,000 pictures and screenshots from your camera roll and screenshots folder).4 5
- Write and reply to SMS text messages, send photos, emojis, GIFs, and media content.4 5
- Message history and group chats.4 5
- Your phone’s contact list when you search for names or phone numbers.4 5
- View, dismiss, pin, or clear all notifications. (You can also manage which apps have notification privileges).4 5
- Put your phone into “Do Not Disturb” mode.4 5
- Mute your phone if sound is playing from it.4 5
- Play, pause, and skip songs that are “now playing” (like if you have Spotify or another music player open on your phone).4 5
- See battery percentage, if Bluetooth is on, current Wi-Fi network connectivity, current mobile data network and strength.4 5 8 9
Sometimes your phone needs to charge more before you go out. Phone Link enables you to still use it with your PC while it’s plugged in and by the outlet. Or perhaps you’re in a meeting and having your phone out will look unprofessional. Phone Link will give you a heads up of any important calls you need to take or texts you need to see.
Phone Link gives you the added versatility of being able to access and transfer information from an extra device. Instead of looking away from your screen and pulling out your phone to see notifications, it’s a notification on your PC, increasing the chances your attention stays focused on what you need to do.
In addition to browsing, you can also drag and drop them from Phone Link into open message windows or PowerPoint presentations. You can save them to any folder on your PC or your OneDrive for backing up. You can share the files to your contacts and you can delete them.4 5
Simply go to Settings > My Devices in Phone Link on your PC and remove your linked device from the list. You can relink at any time. When pairing is removed, your personal content does not remain anywhere on your PC.
Go to Settings > Features in Phone Link on your PC. It’s there you can customize options like which apps can send notifications to you. Removing permissions for a feature will also disable the feature.
If you have Windows 11, Phone Link will come preinstalled.
If you have Windows 10, it must run Windows 10, May 2019 Update at the least.
Your phone must be running Android 8.0 (Oreo) or later. To guarantee optimal compatibility and performance, we strongly recommend using Android 10 (Q) or newer.
Phone Link help & learning
Troubleshoot issues, receive tech support, and learn how to get the most out of device syncing.
Meet Windows 11
Faster, more powerful, and more intuitive. That’s Windows 11. Discover how you can unlock greater productivity and creativity with Windows 11. Devices with Windows 11 also have the Phone Link app preinstalled.
Tips & tricks
Android users with Windows 10 and 11 can use Phone Link. Customize individual app settings to get the most out of your devices.
-
1
Color availability may vary depending on country. -
2
Requires optimal 5G connection. 5G services are only supported in 5G network enabled locations. Actual speed may vary depending on country, carrier, and user environment. -
3
US Military Standard compliant (MIL-STD-810G). -
4
To experience the full functionality, mobile phones must be running Android 7.0 or later. -
5
Microsoft Phone Link and PC both need a Wi-Fi connection, or you can give permission for the app to use your mobile data. -
6
Apps is available on Android devices in select markets running Android 9.0 or greater that have Link to Windows installed and for Surface Duo 2 running Android 11.0 or greater. -
7
Recent apps is available on select Android devices running Android 9.0 or greater with OneUI 3.1.1. or higher. -
8
Requires Samsung device with One UI 4.1.1+ and SIM card with hotspot capable plan. PC must have both Wi-Fi and Bluetooth adapters. -
9
Requires Windows 11, version 22H2 Build 22621 and higher, Phone Link desktop app in version v1.22082.111.0 or greater, and Link To Windows phone app (preinstalled on Samsung devices) in version v1.22082.142.0 or greater.
You have files on your Windows 10 computer and other files on your iOS device. Want to make sure you have the same ones available on both, and make sure both collections are always up to date? Easy! Once you set up synchronization between Windows and your iPhone, iPad, or iPod, you can add music, photos and other files on either end without worry. Sync can happen seamlessly in the background with the bare minimum of effort. Just follow these easy steps to set it up, and you’ll be good to go.
- How to install iTunes 12 on Windows 10
- How to sync over Lightning or 30-pin USB cable
- How to enable Wi-Fi syncing in iTunes 12 for Windows 10
- How to sync with iCloud
How to install iTunes 12 on Windows 10

You’ll need Apple’s iTunes on your computer to get started with synchronizing between devices.
- How to install iTunes 12 on Windows 10
How to sync over Lightning or 30-pin USB cable
You can sync your iPhone, iPad, or iPod touch to Windows 10 by plugging in the USB to Lightning (or 30-pin Dock) cable. You can also set up Wi-Fi sync, so data will transfer whenever you’re connected to the same network.
- Launch iTunes from your desktop, Start menu, or taskbar.
- Connect your iPhone, iPad or iPod to your computer with your Lightning to USB or 30-pin USB cable.
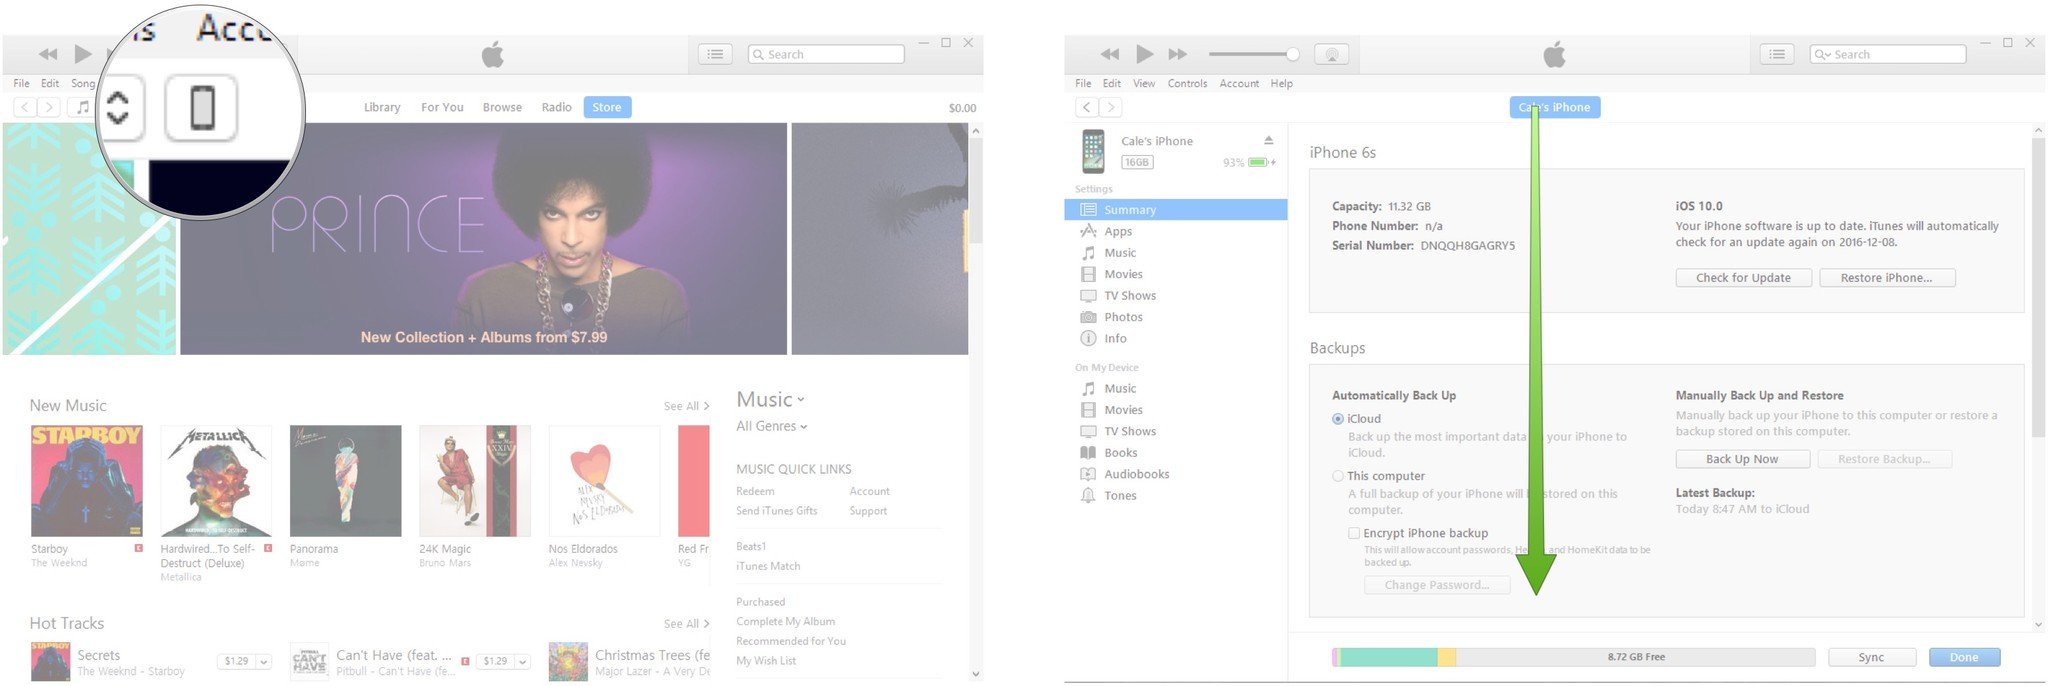
- Click the device button — it looks like a small iPhone and it is located near the top-left of the window.
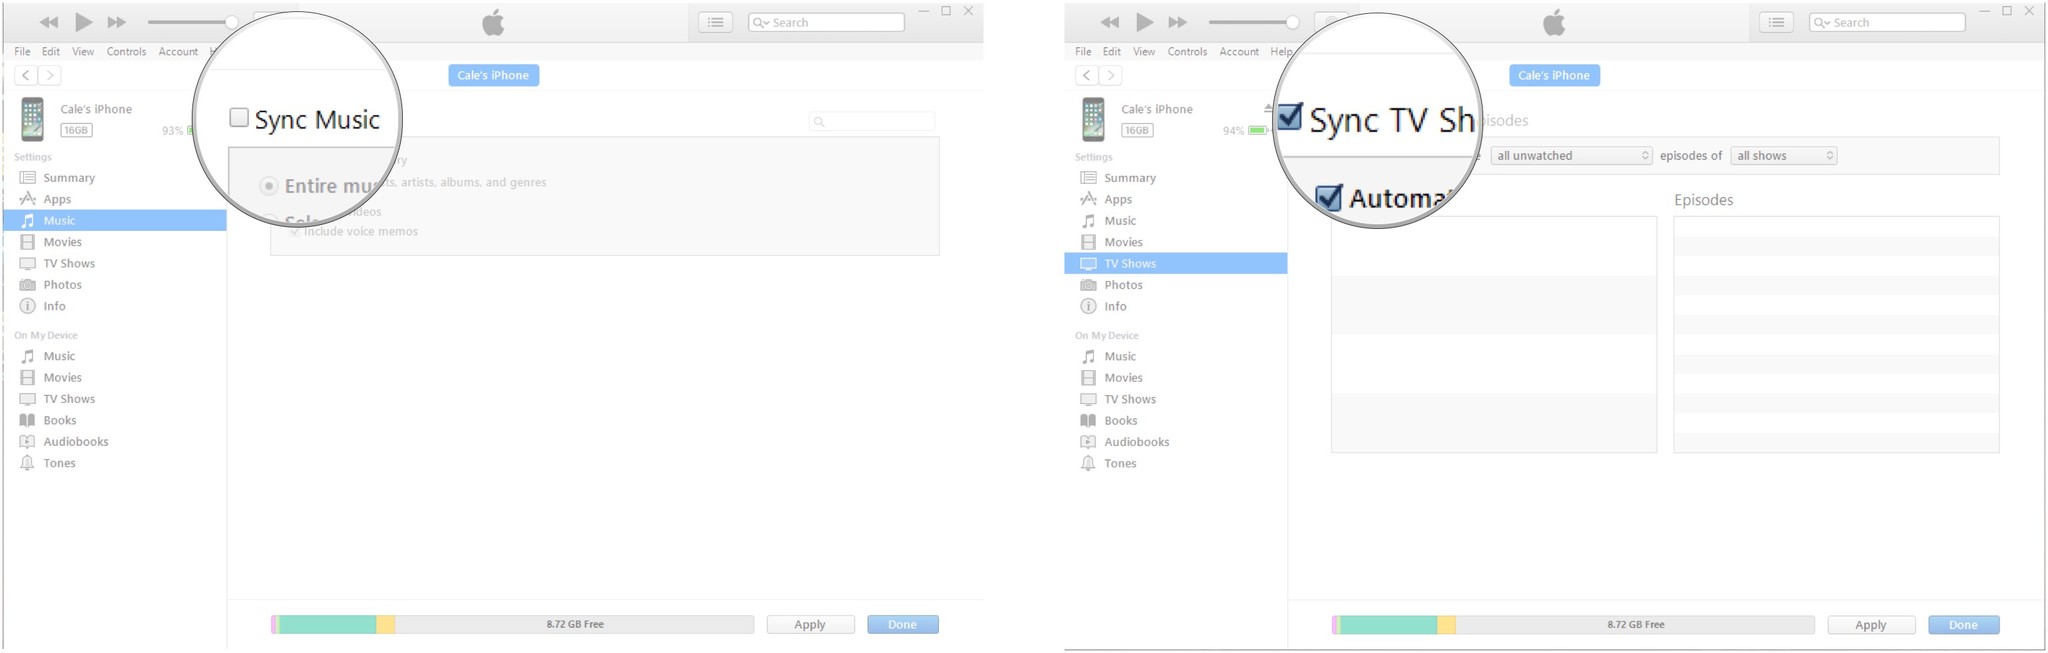
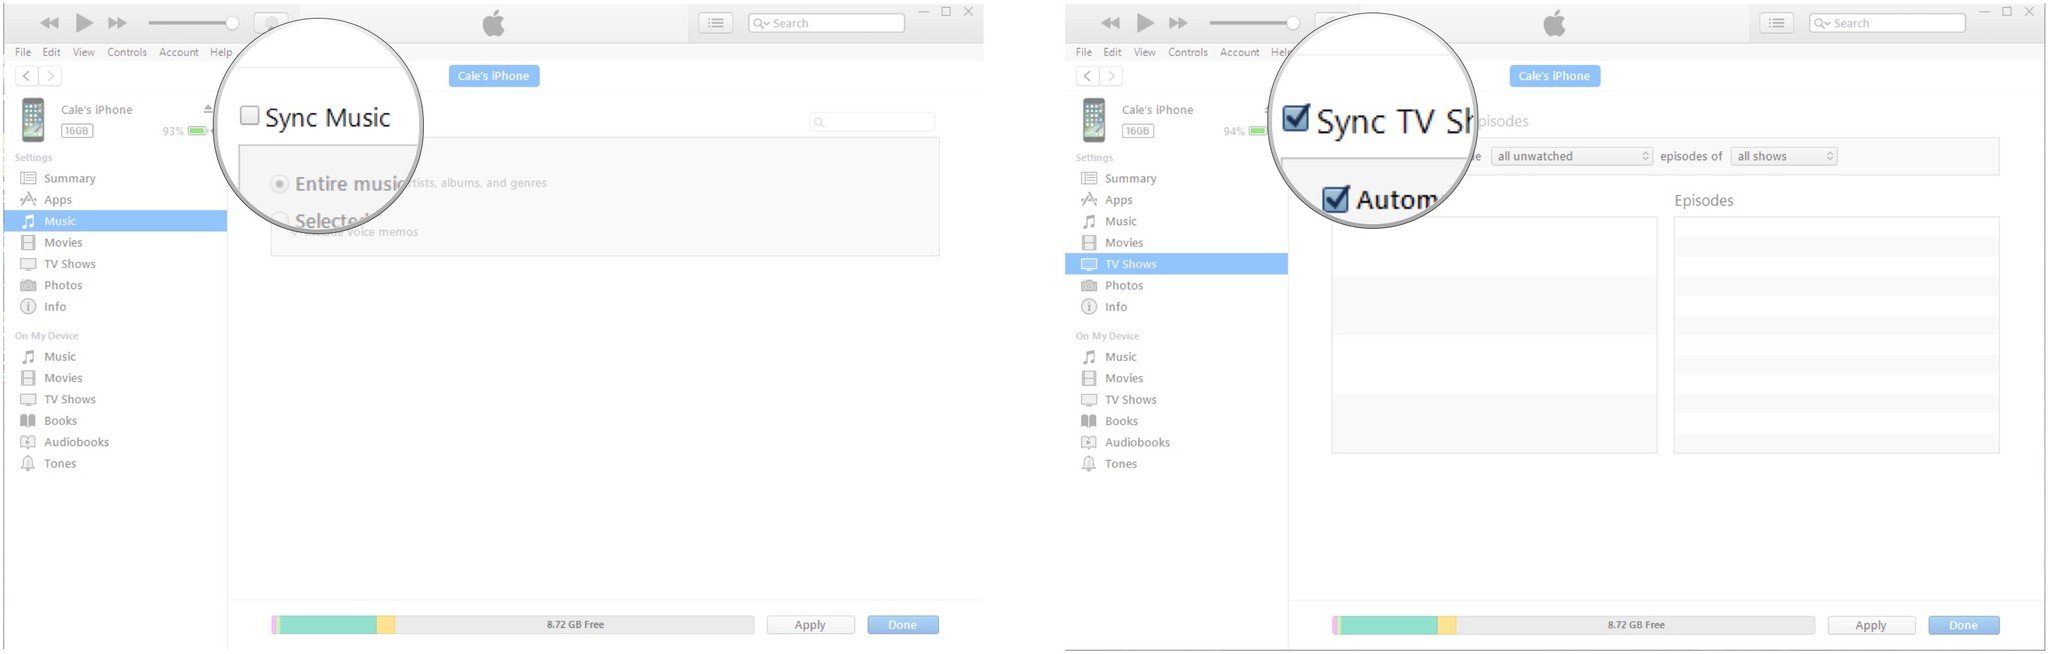
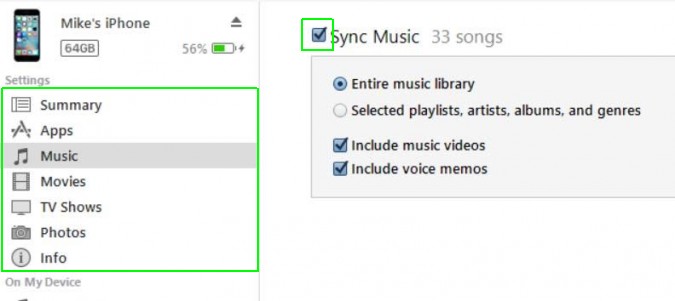
- Click Music in the left-side menu.
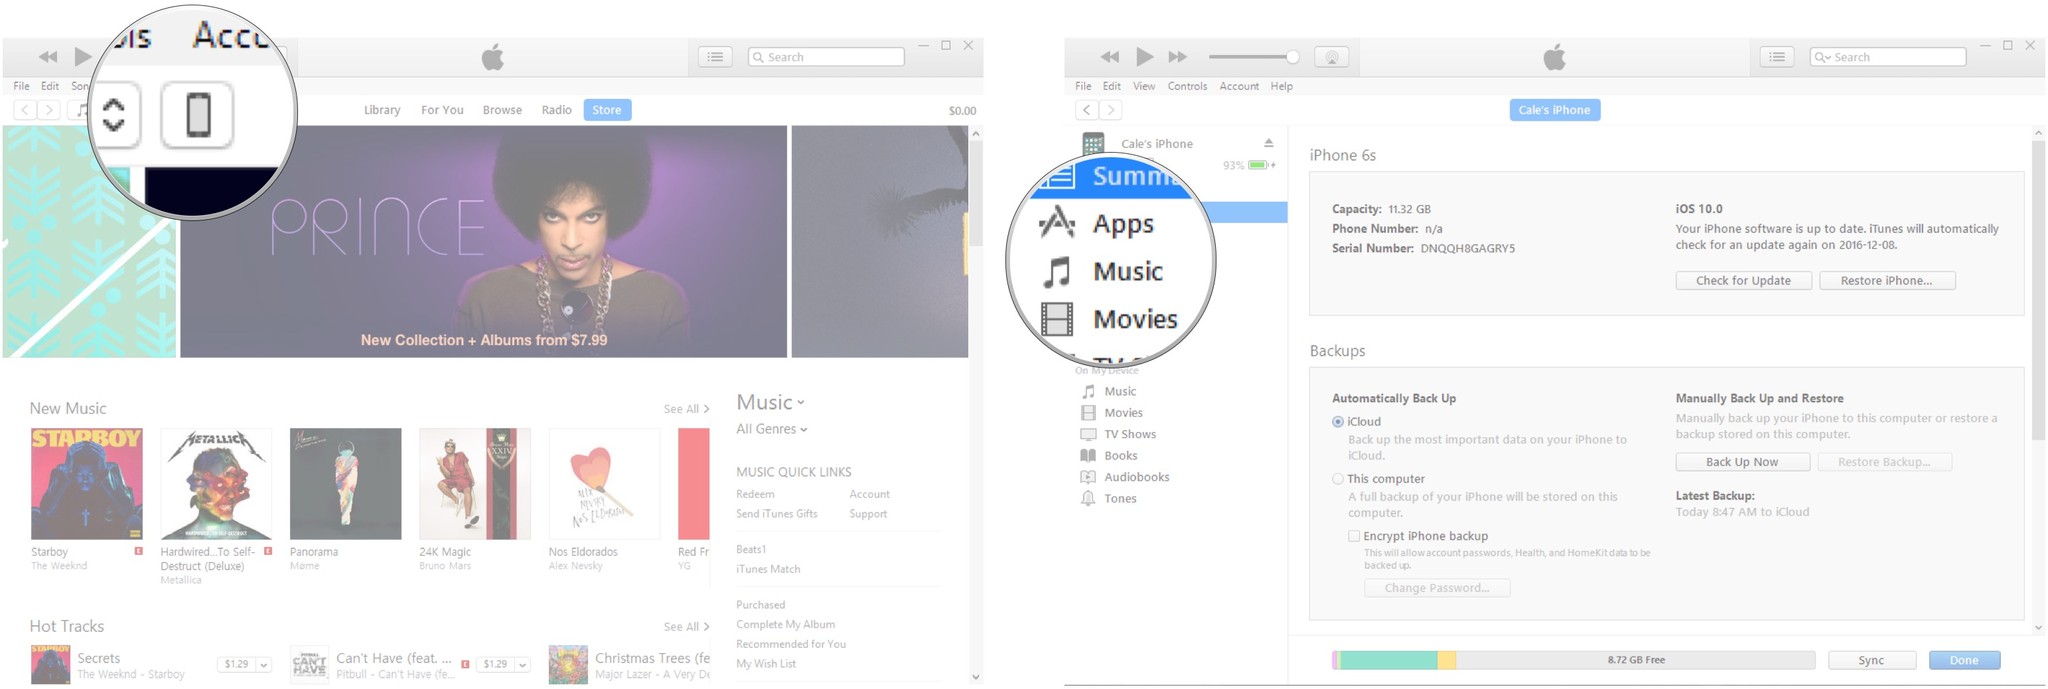
- Click the checkbox next to Sync Music so that a checkmark appears. This will ensure your music is synced. If you don’t want to sync music, leave the box unchecked.
- Repeat the process for Movies, TV Shows, and Photos.
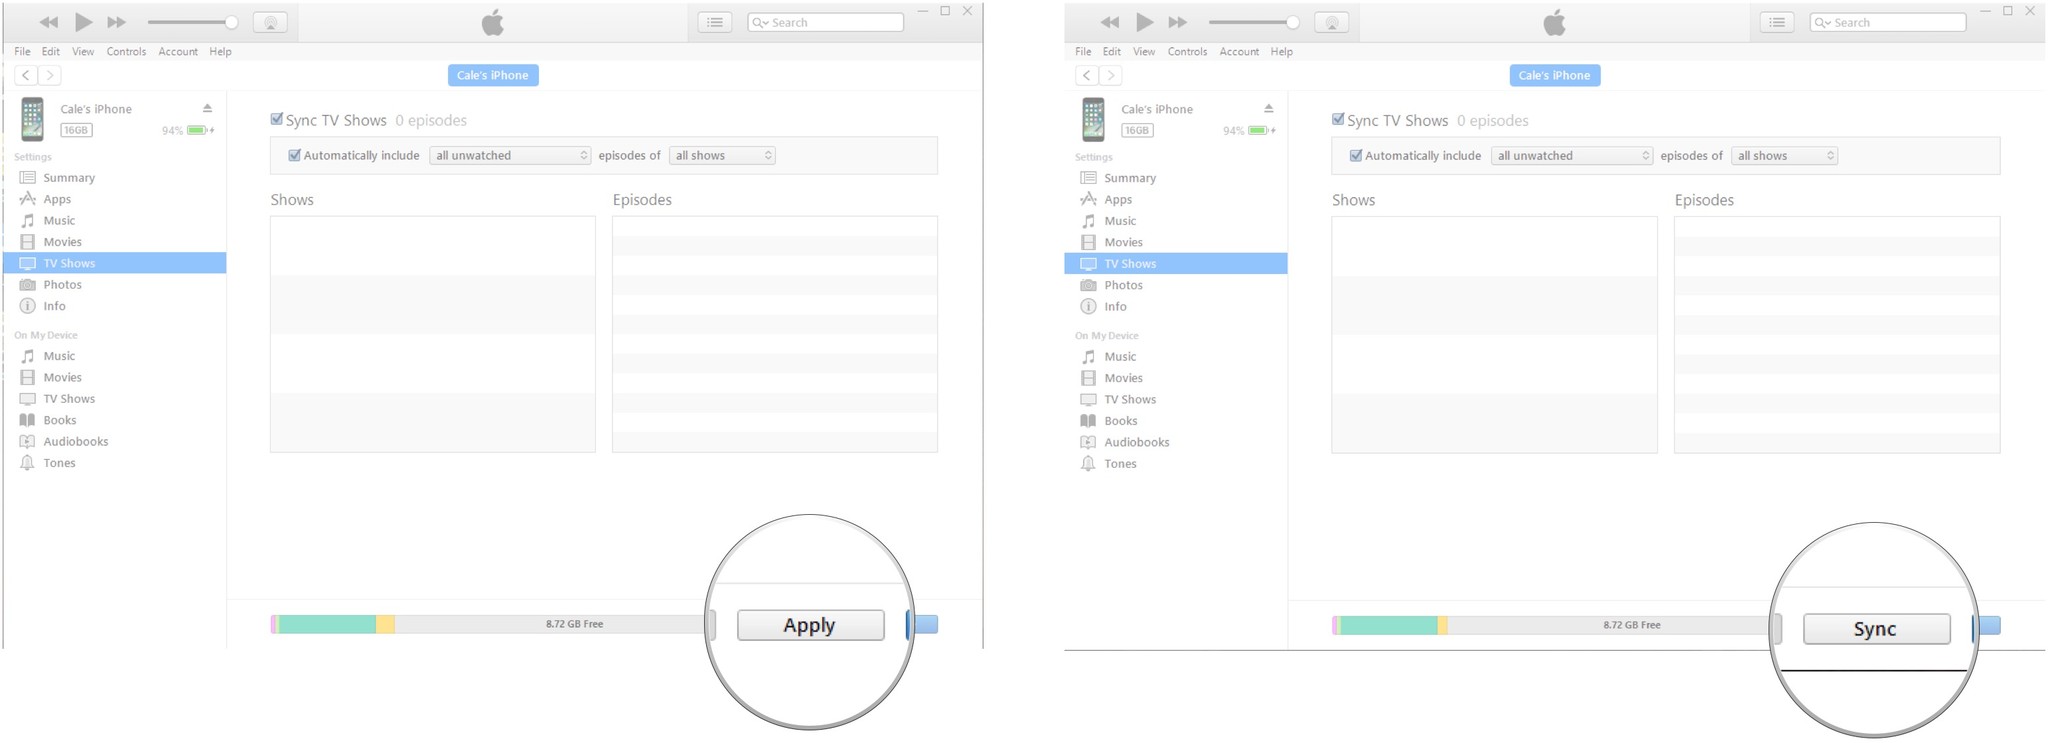
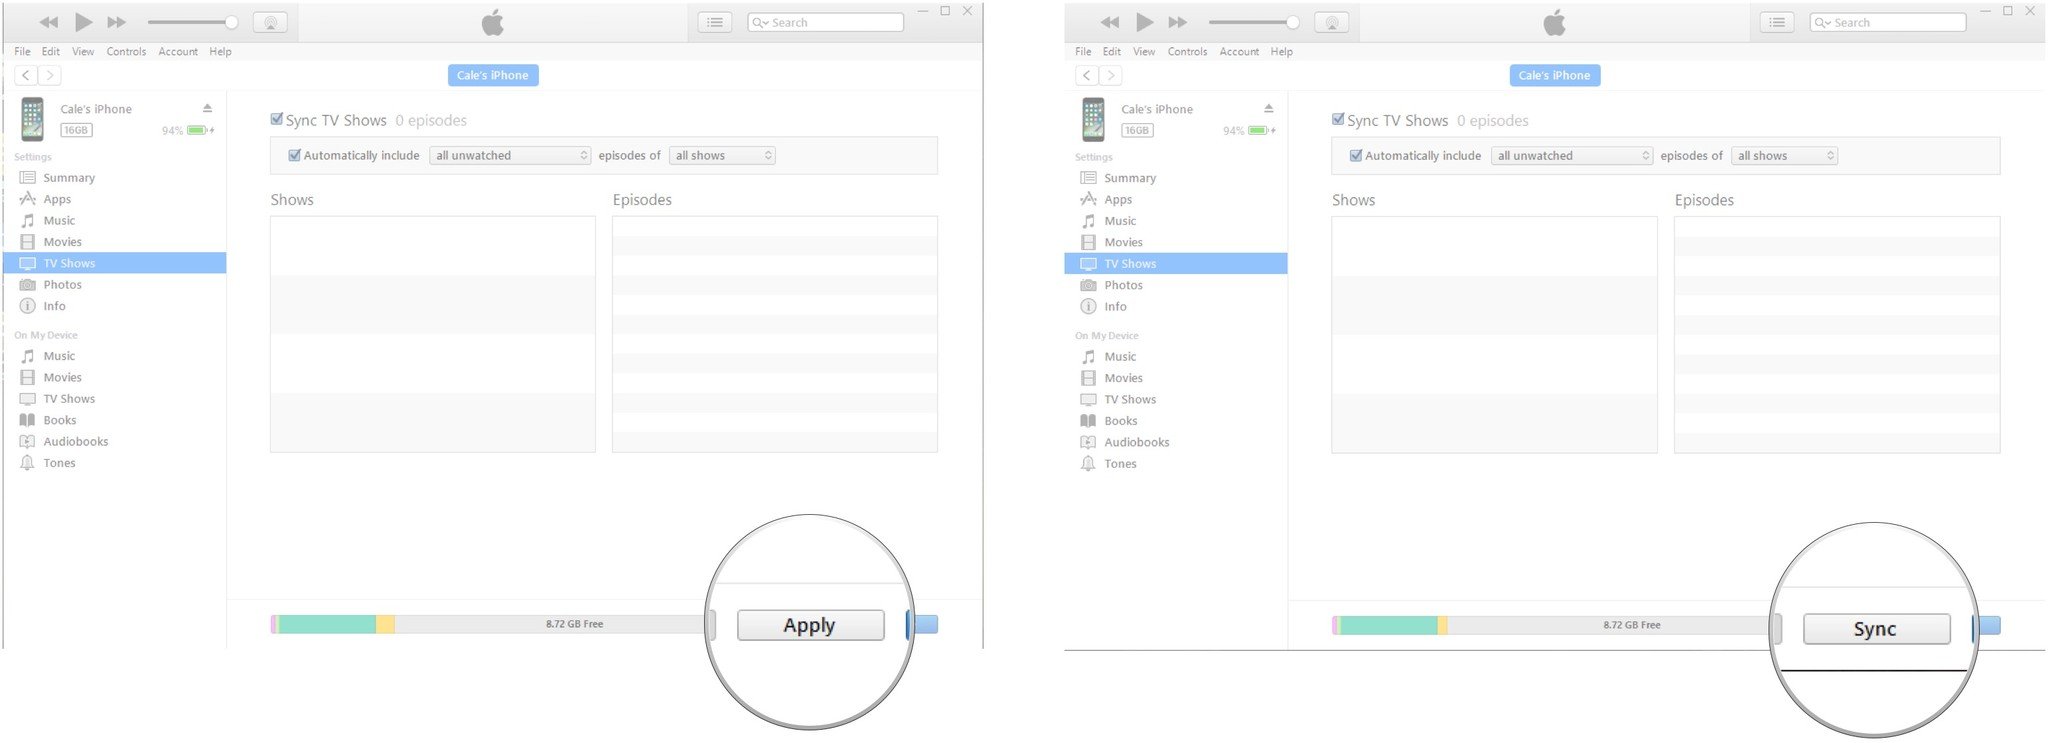
- Click Apply.
- Click Sync.
How to enable Wi-Fi syncing in iTunes 12 for Windows 10
Wired sync is faster and you can watch it happen, but Wi-Fi sync is much more convenient and you don’t even have to remember to start it.
- Launch iTunes from your desktop, Start menu, or taskbar.
- Connect your iPhone, iPad or iPod to your computer with your Lightning to USB or 30-pin USB cable.
- Click the device button — it looks like a small iPhone and it is located near the top-left of the window.
- Scroll down to the bottom of the page.
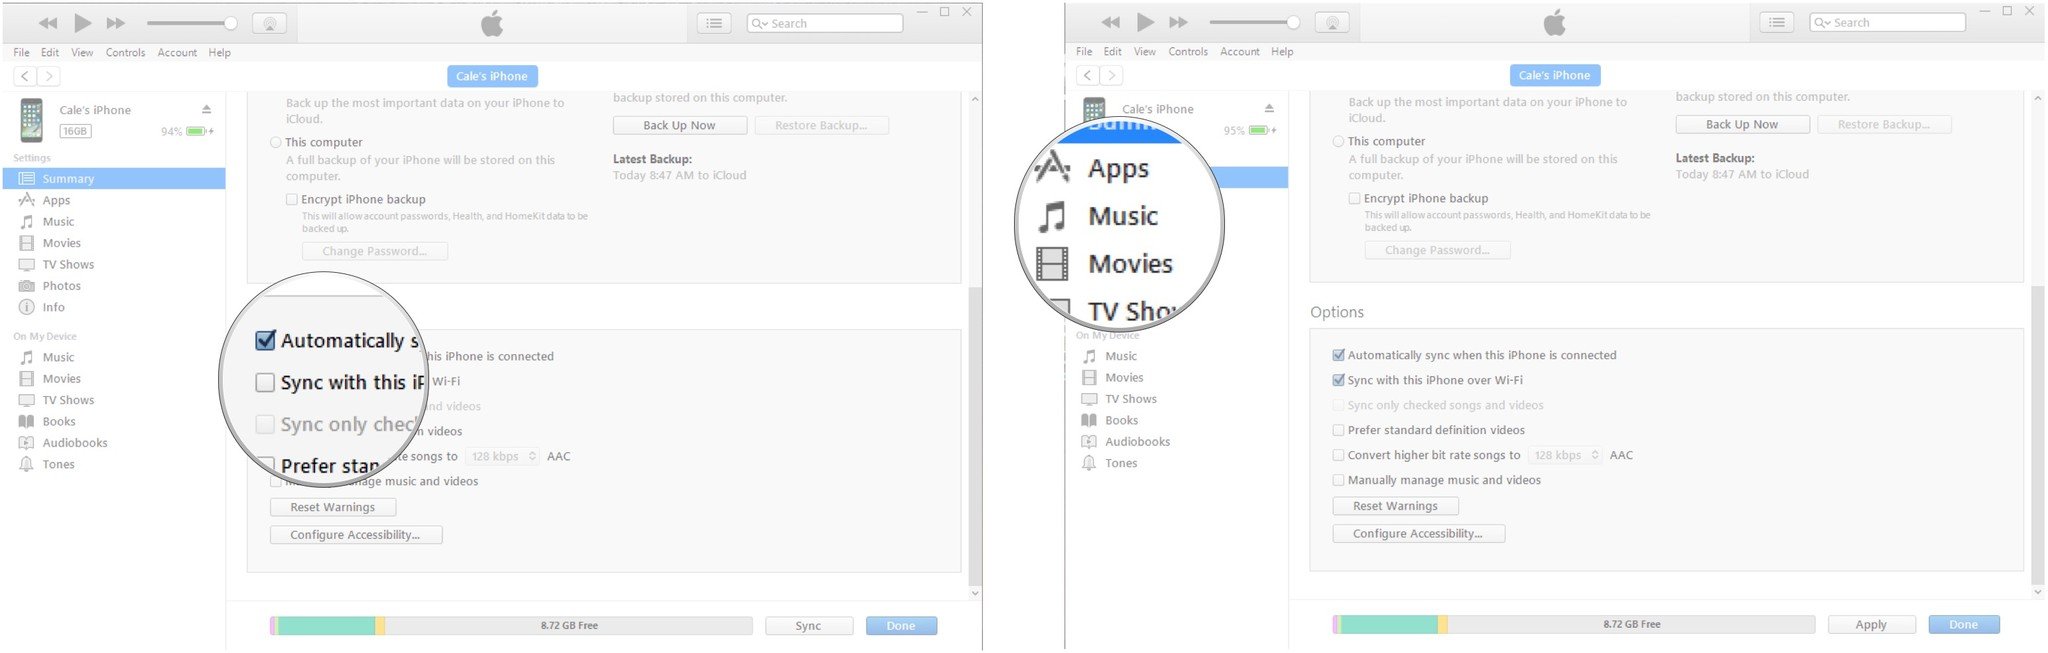
- Click the checkbox next to Sync with this iPhone over Wi-Fi.
- Click Music in the left-side menu.
- Click the checkbox next to Sync Music so that a checkmark appears. This will ensure your music is synced. If you don’t want to sync music, leave the box unchecked.
- Repeat the process for Movies, TV Shows, and Photos.
- Click Apply.
- Click Sync.
How to sync with iCloud
iCloud lets you backup and sync your iPhone, iPod touch, or iPad to Apple’s servers. No iTunes or PC required. The amount of space available for free, however, is limited. You can pay for more if you choose to, and this method has the added bonus of being able to access your files anywhere via the iCloud website if you lose your iPhone.
- Launch your favorite web browser from the Start menu, taskbar, or desktop.
- Navigate to www.support.apple.com/en-ca/HT204283.
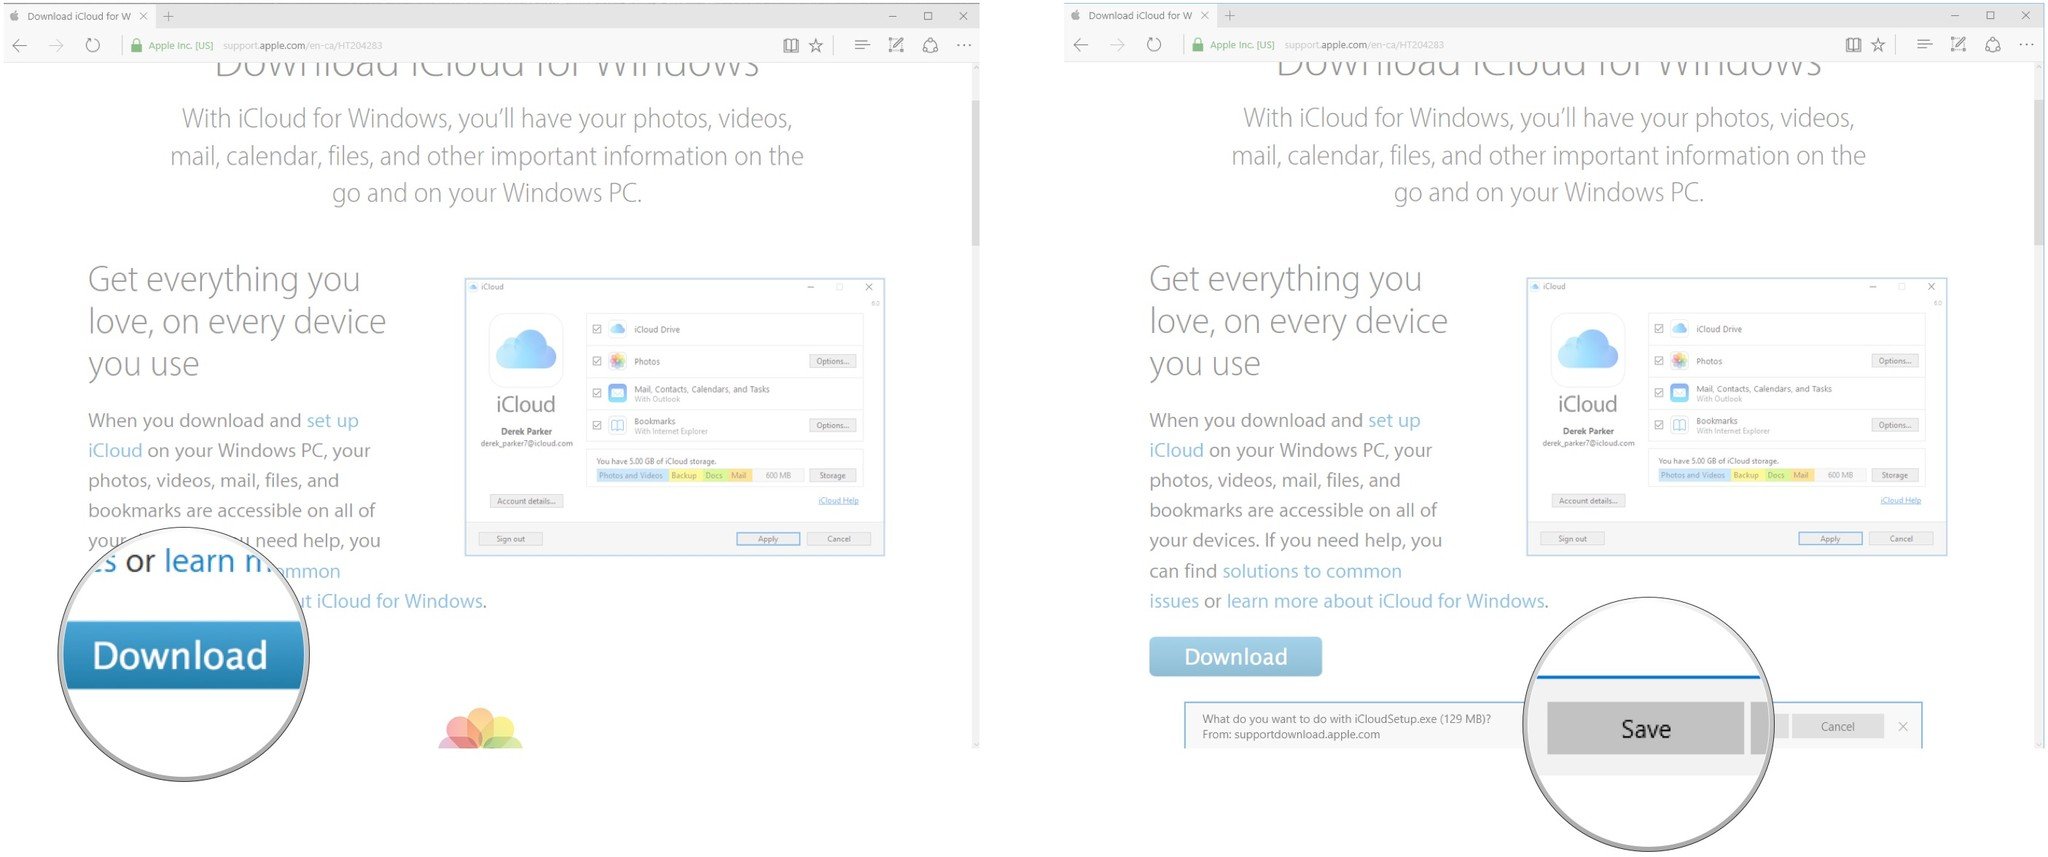
- Click Download. You might have to scroll down a bit to find it.
- Click Save.
- Click Run when the download his finished.
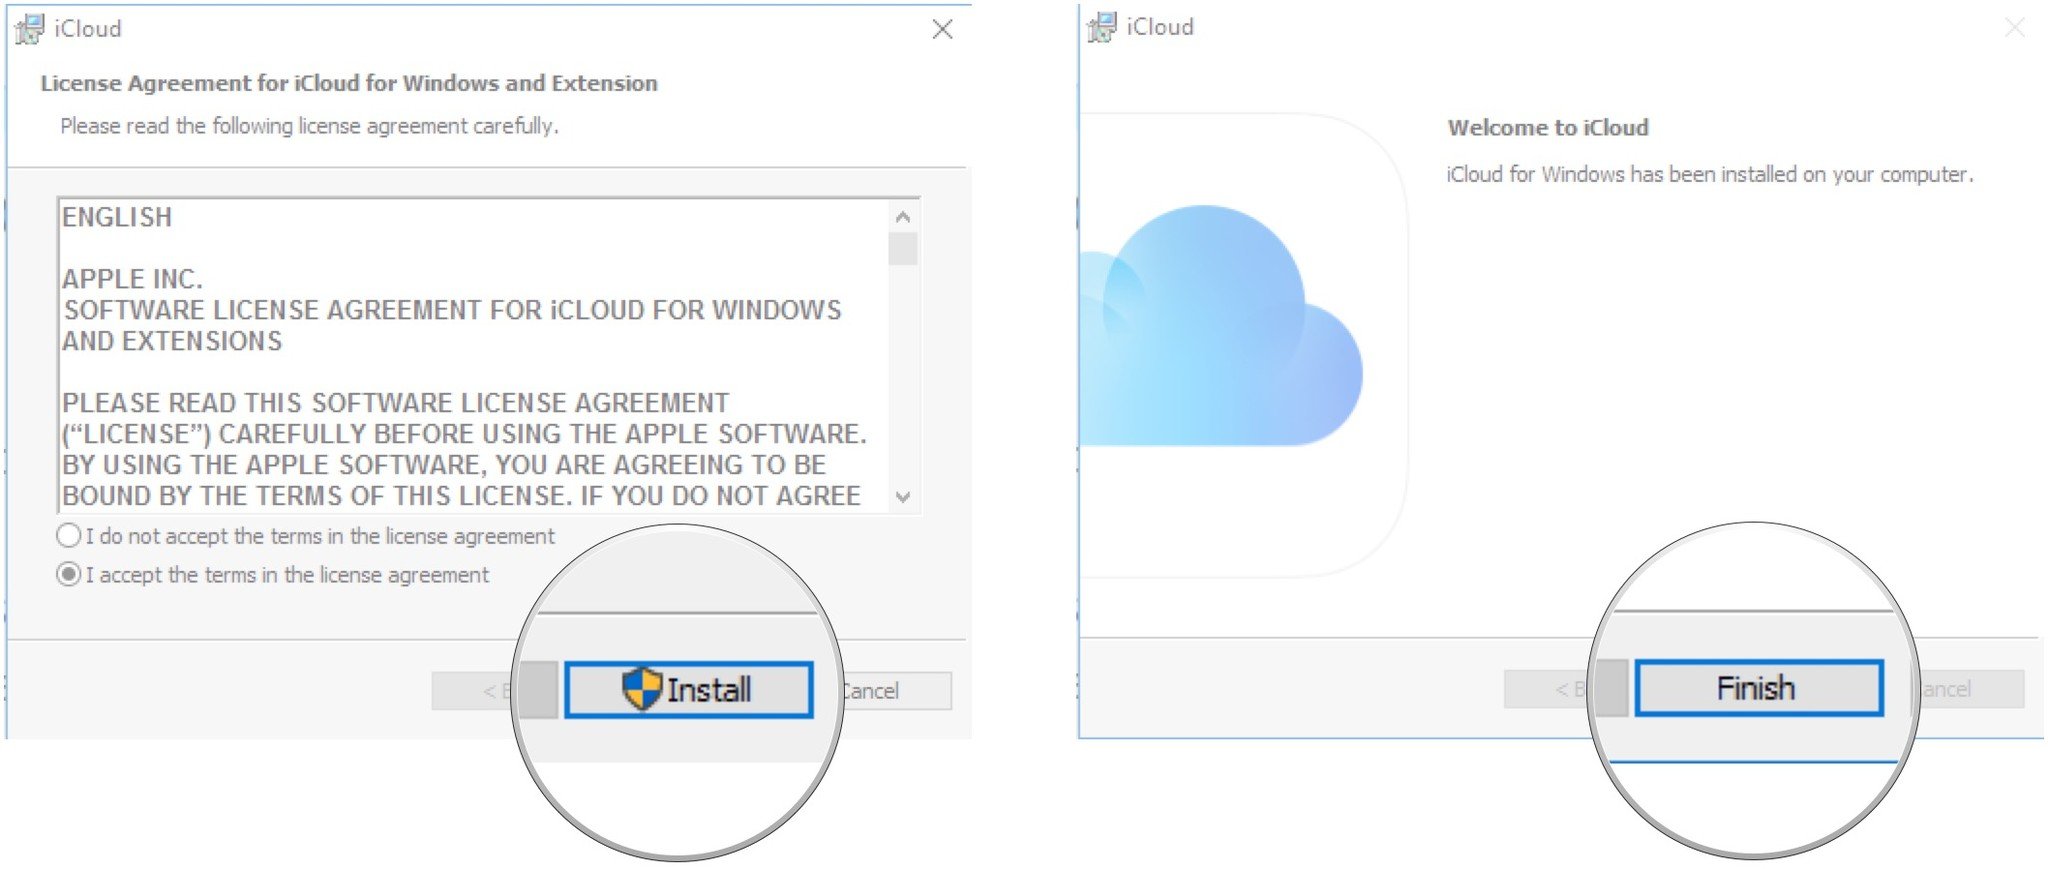
- Click I accept the terms….
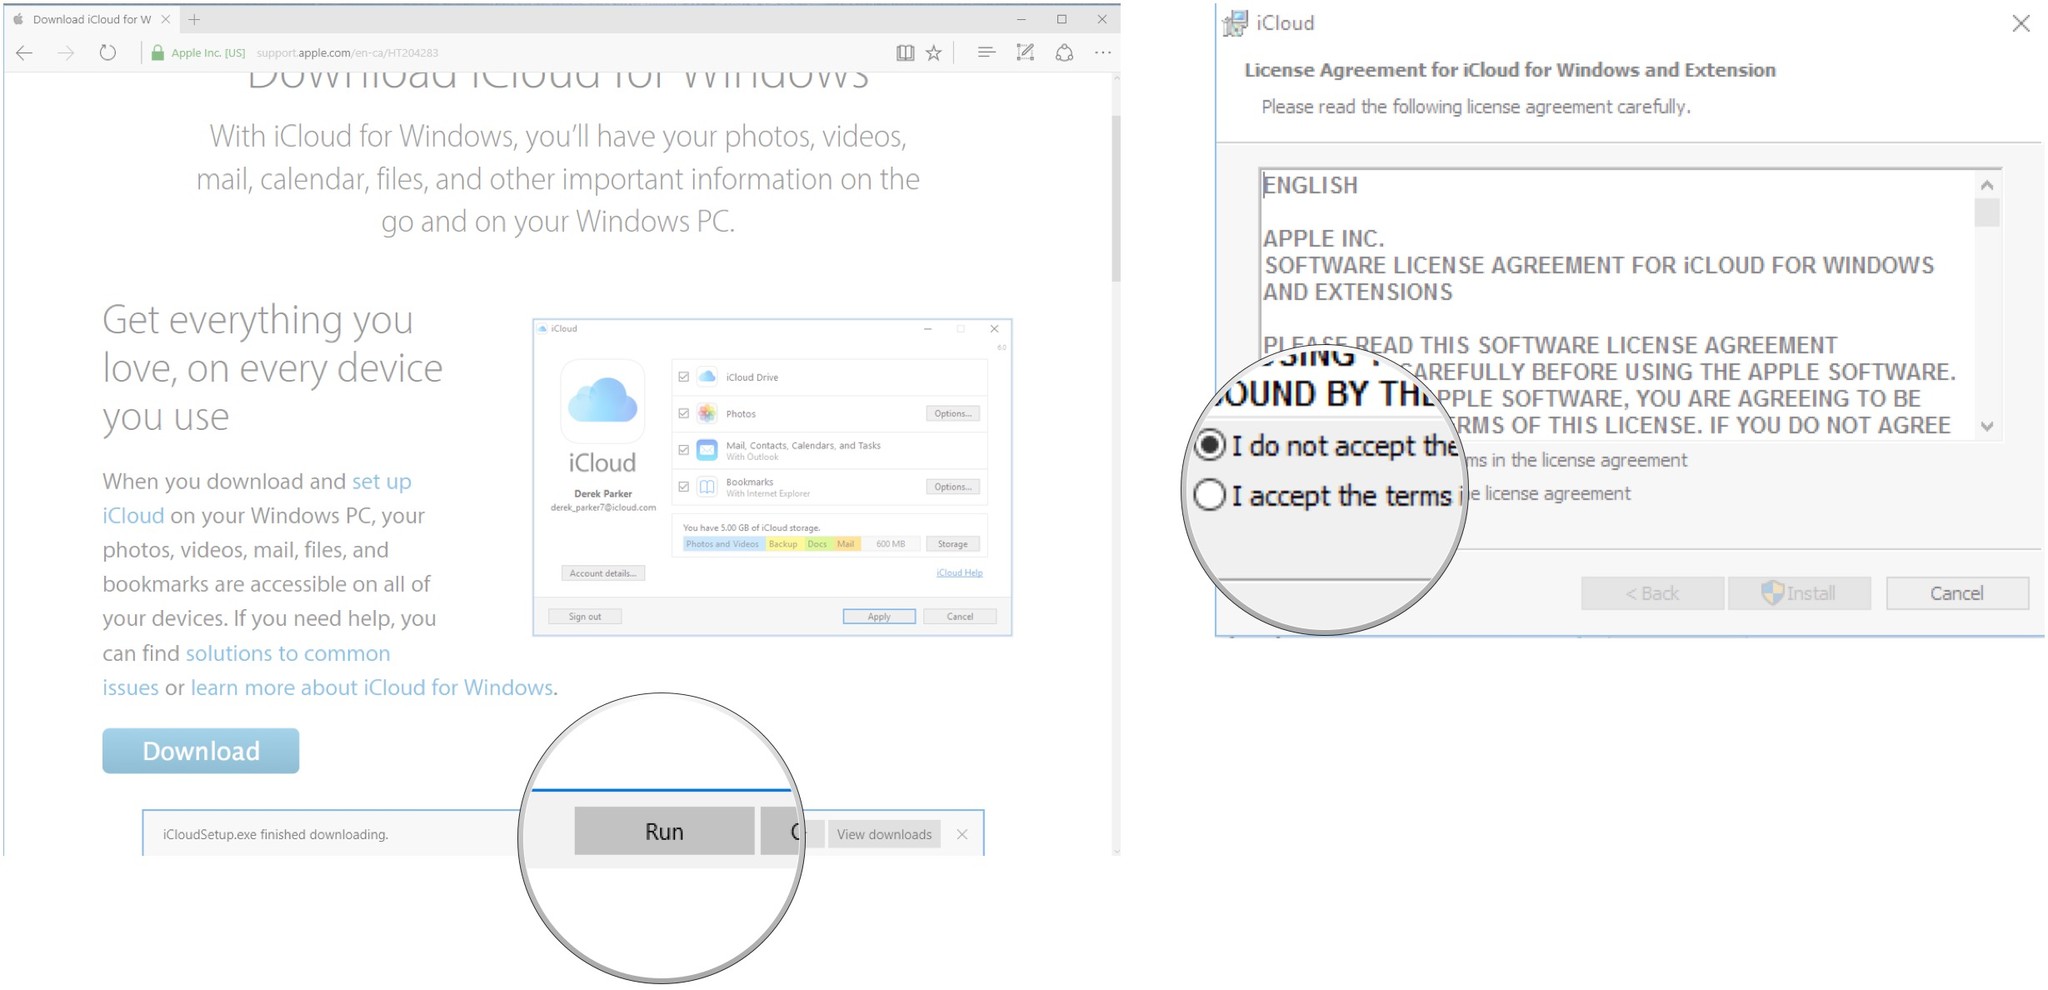
- Click Install.
- Click Finish. Your computer will restart and, upon restart, the iCloud window will automatically appear.
- Type your Apple ID.
- Type your password.
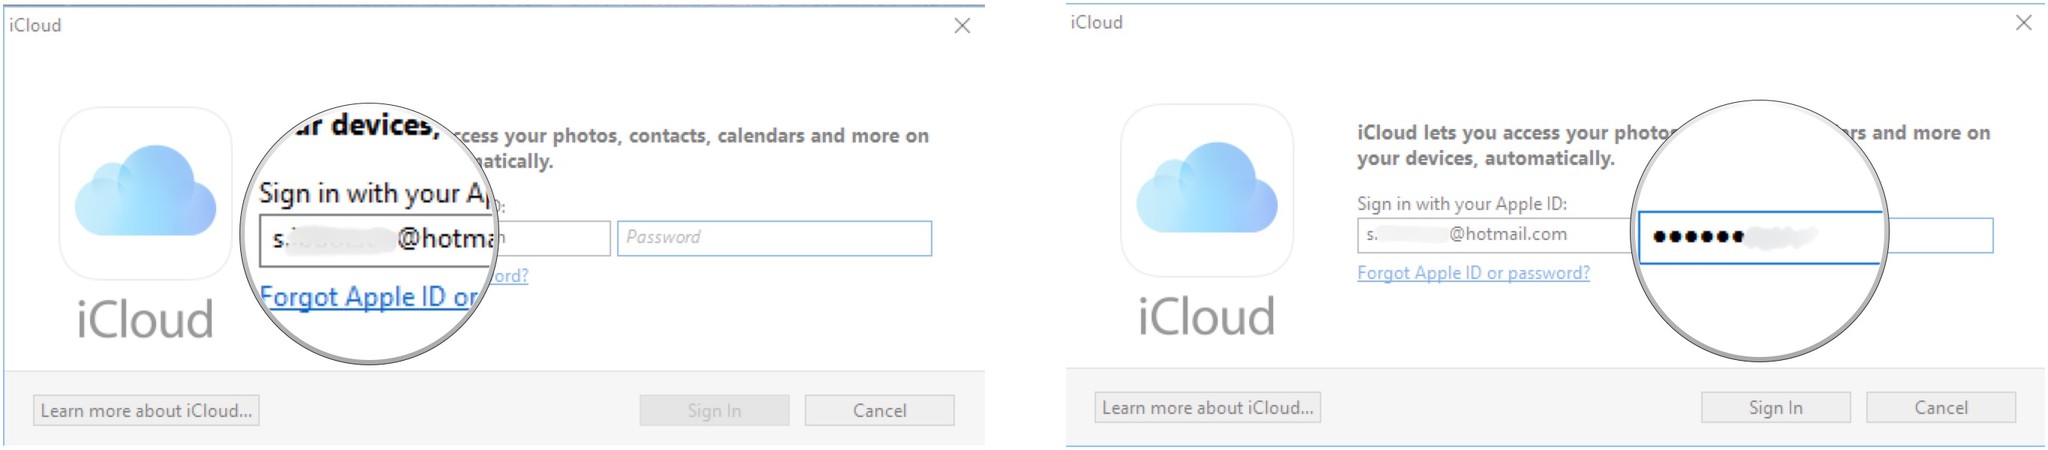
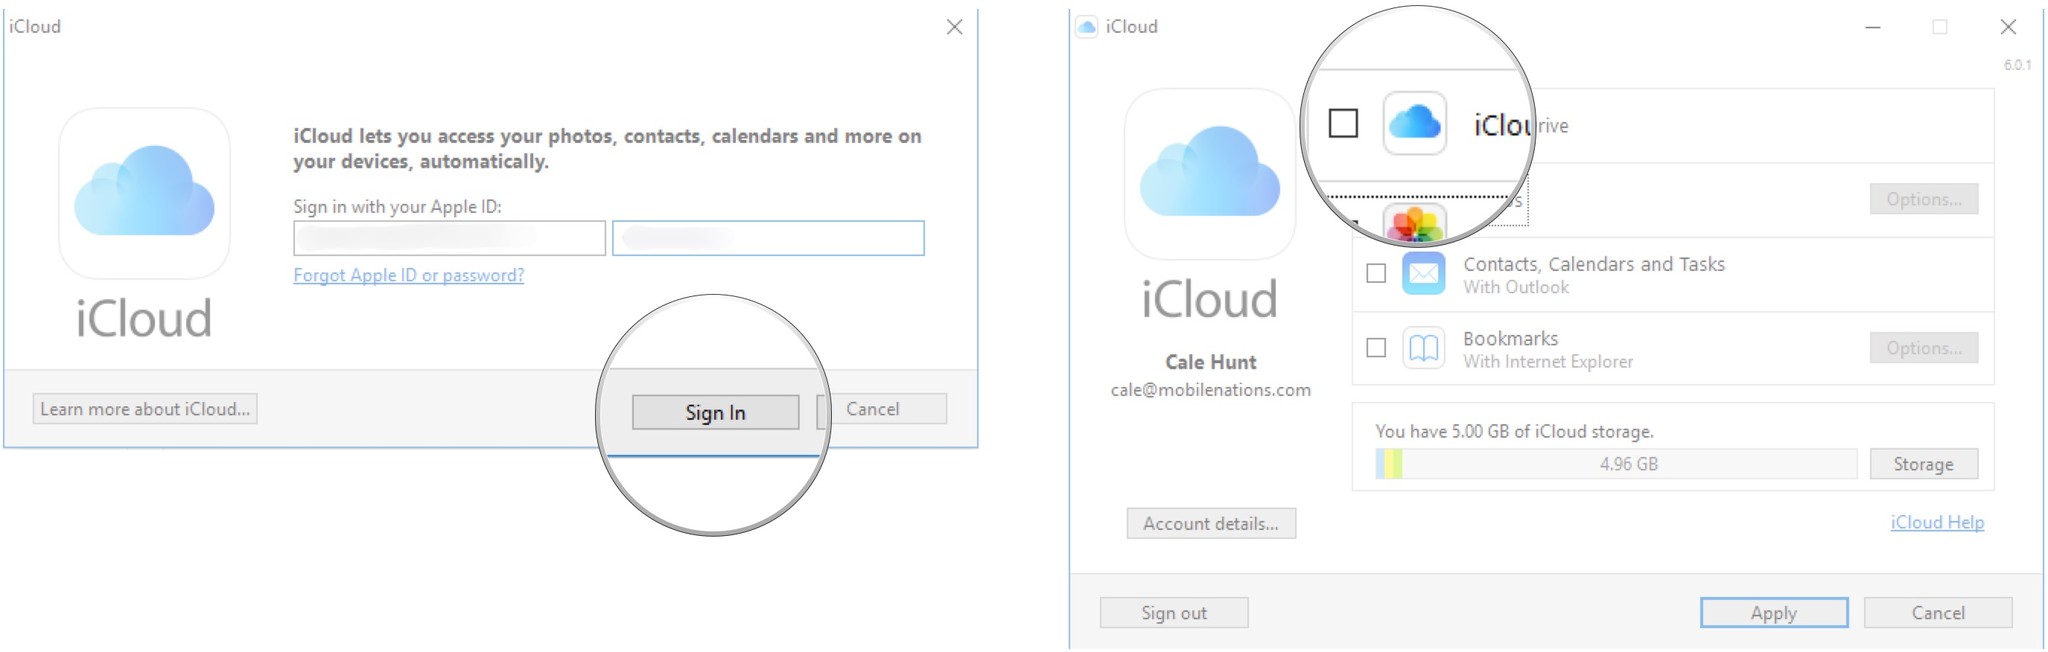
- Click Sign In.
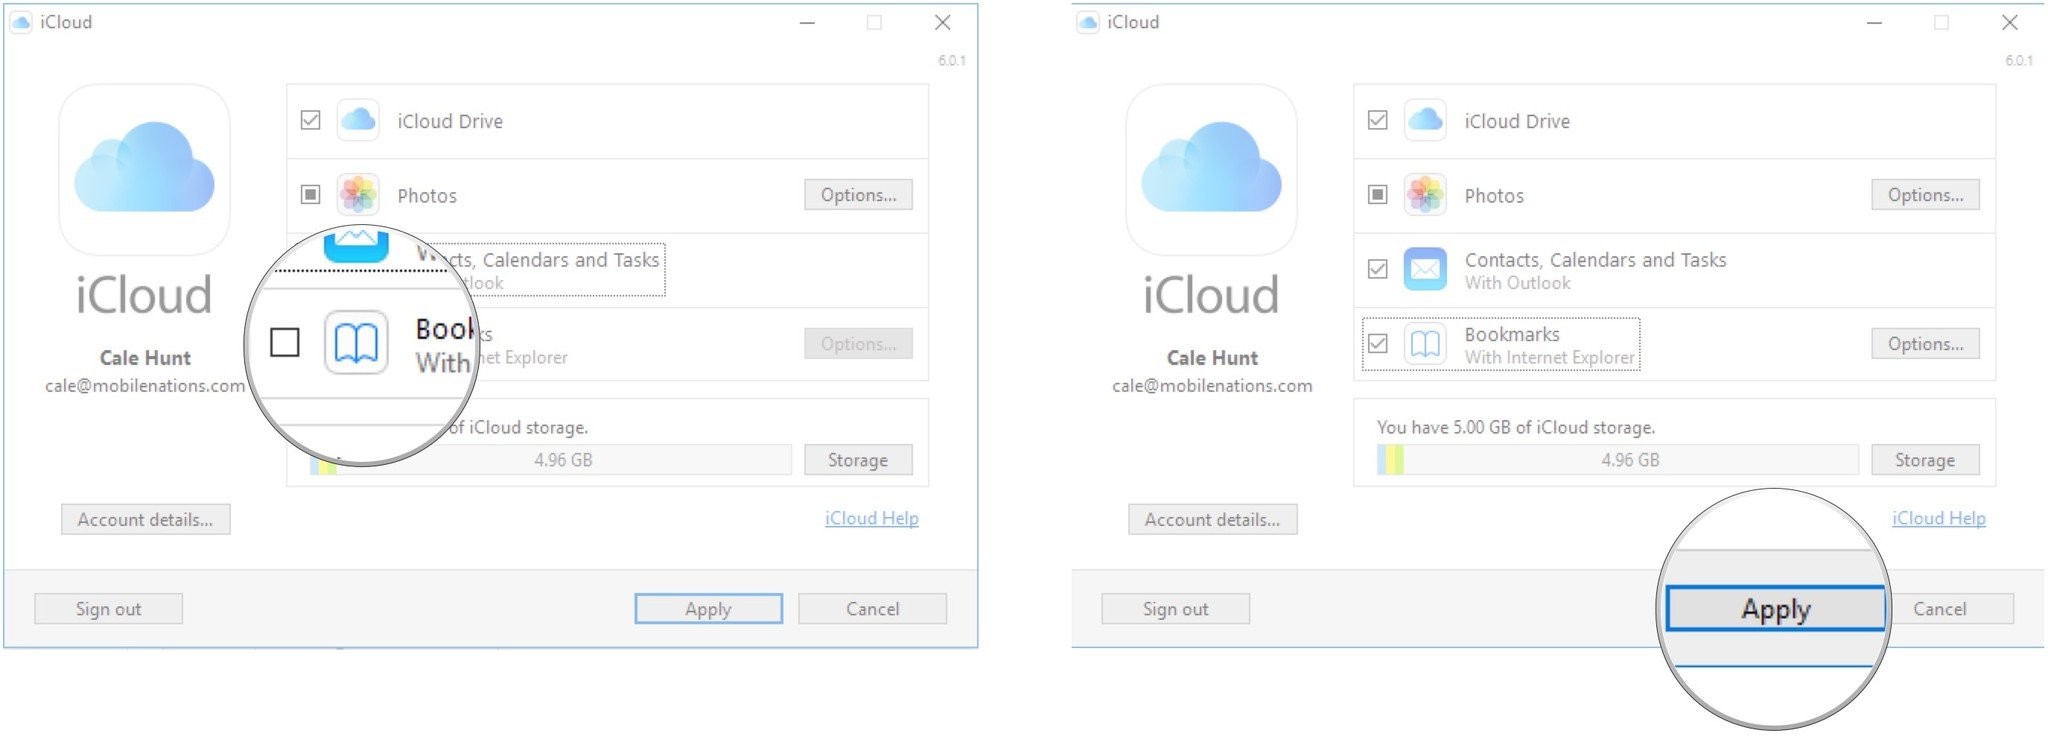
- Click the checkbox next to iCloud Drive so that a checkmark appears.
- Click the checkbox next to Photos so that a checkmark appears.
- Click the checkbox next to Contacts, Calendars, and Tasks so that a checkmark appears.
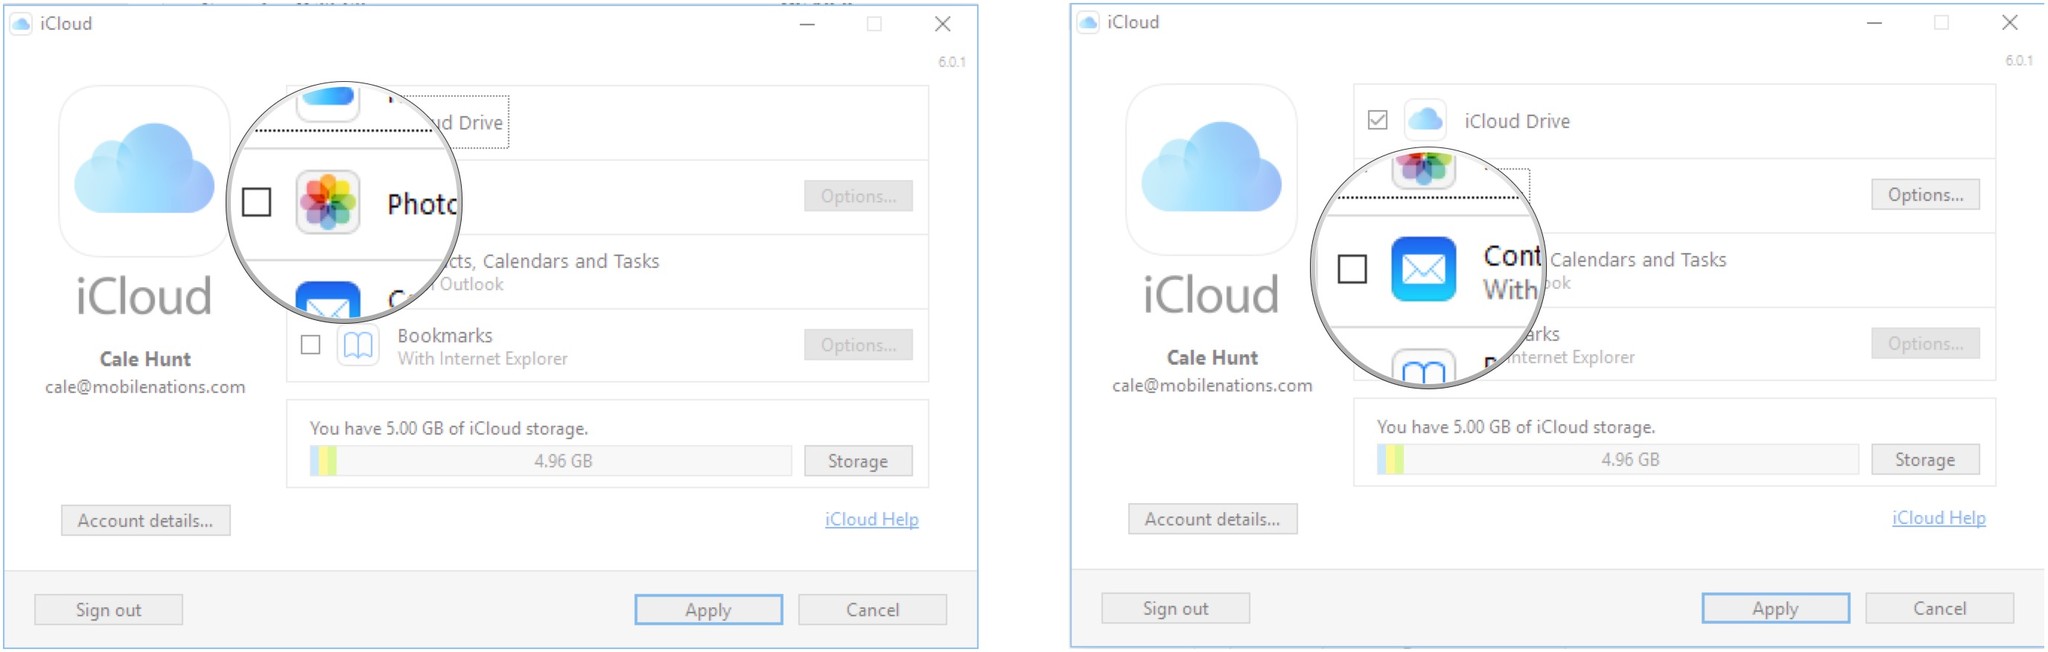
- Click the checkbox next to Bookmarks so that a checkmark appears.
- Click Apply.
Wrapping up
Do you have a sync going between your iPhone or iPad and your Windows 10 PC? Let us know in the comments section below!
- More iTunes help
- More Windows 10 help
This article was originally published on August 12, 2015. It was updated in December 2016 with the following changes: screenshots and steps updated to reflect changes in iTunes user interface.
iMore offers spot-on advice and guidance from our team of experts, with decades of Apple device experience to lean on. Learn more with iMore!
Editor-at-very-large at Mobile Nations, gamer, giant.
Just because iPhones play better with MacBooks doesn’t meant that they can’t work with Windows 10 laptops. Syncing your data requires a little more know-how on Windows 10 (as opposed to macOS’ plug-and-play syncing, or how you can just drag and drop files with Android on Windows 10), but with a couple clicks and a little patience, you’ll have everything up to date.
Copying to an iPhone
Syncing music, photos, movies and TV shows means getting comfortable with iTunes. If you’re already using it, you’re good to go. If you’re not, you can download that here and import your music by going to File > Add Folder to Library to move your current music into iTunes. Once you’re ready to sync, follow these steps.
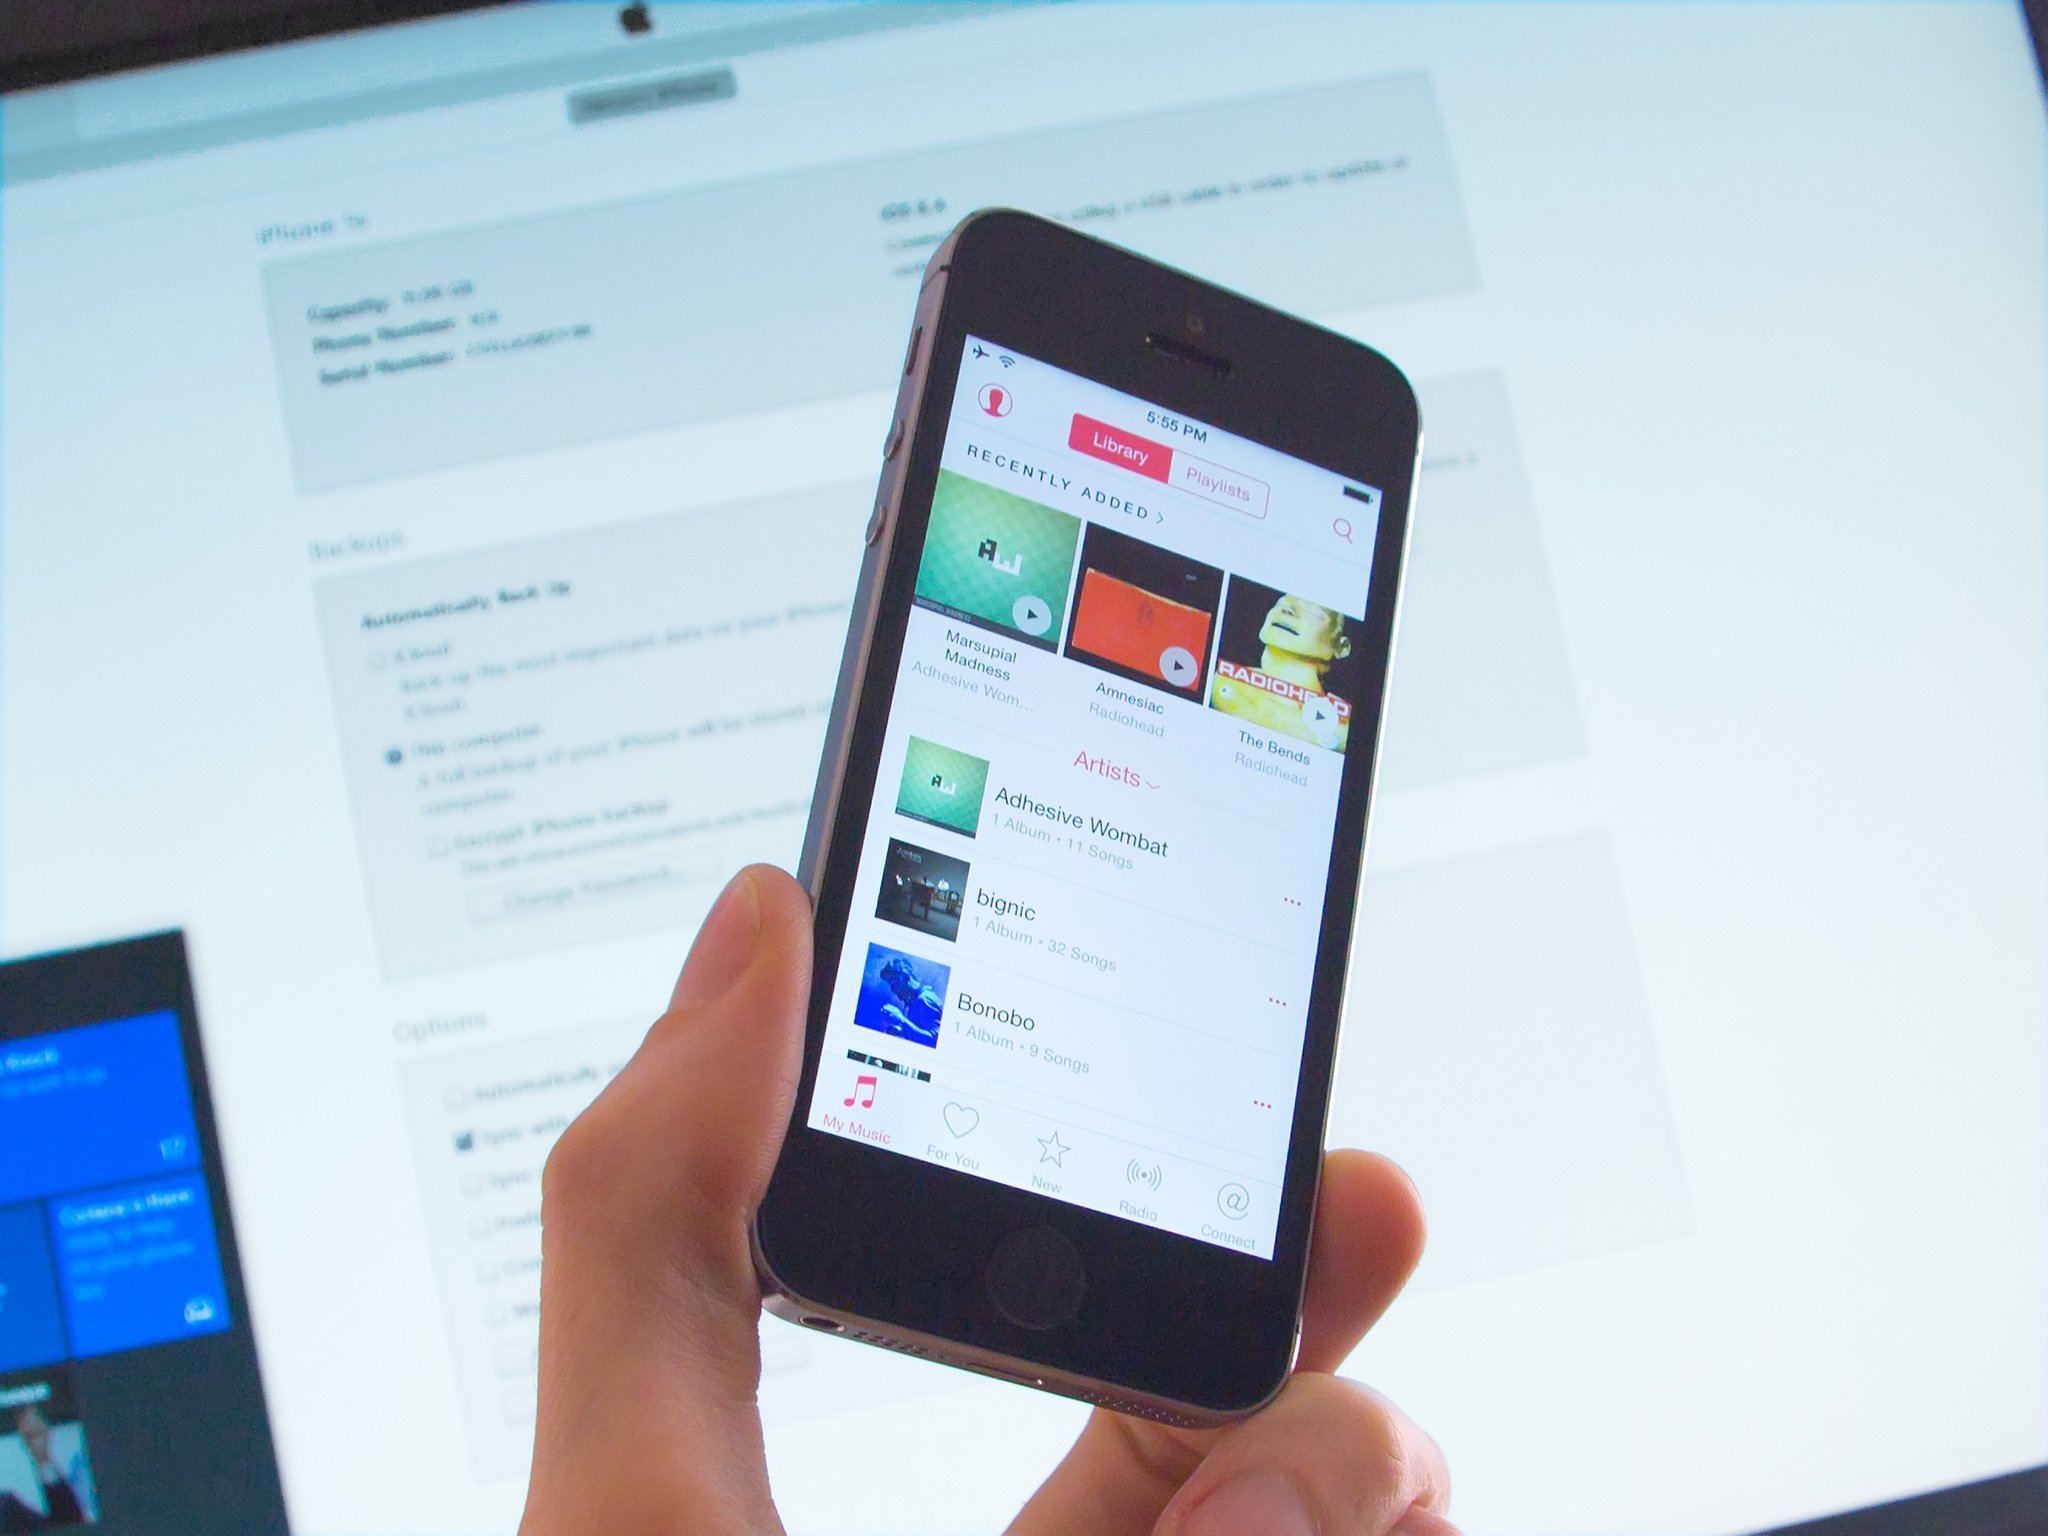
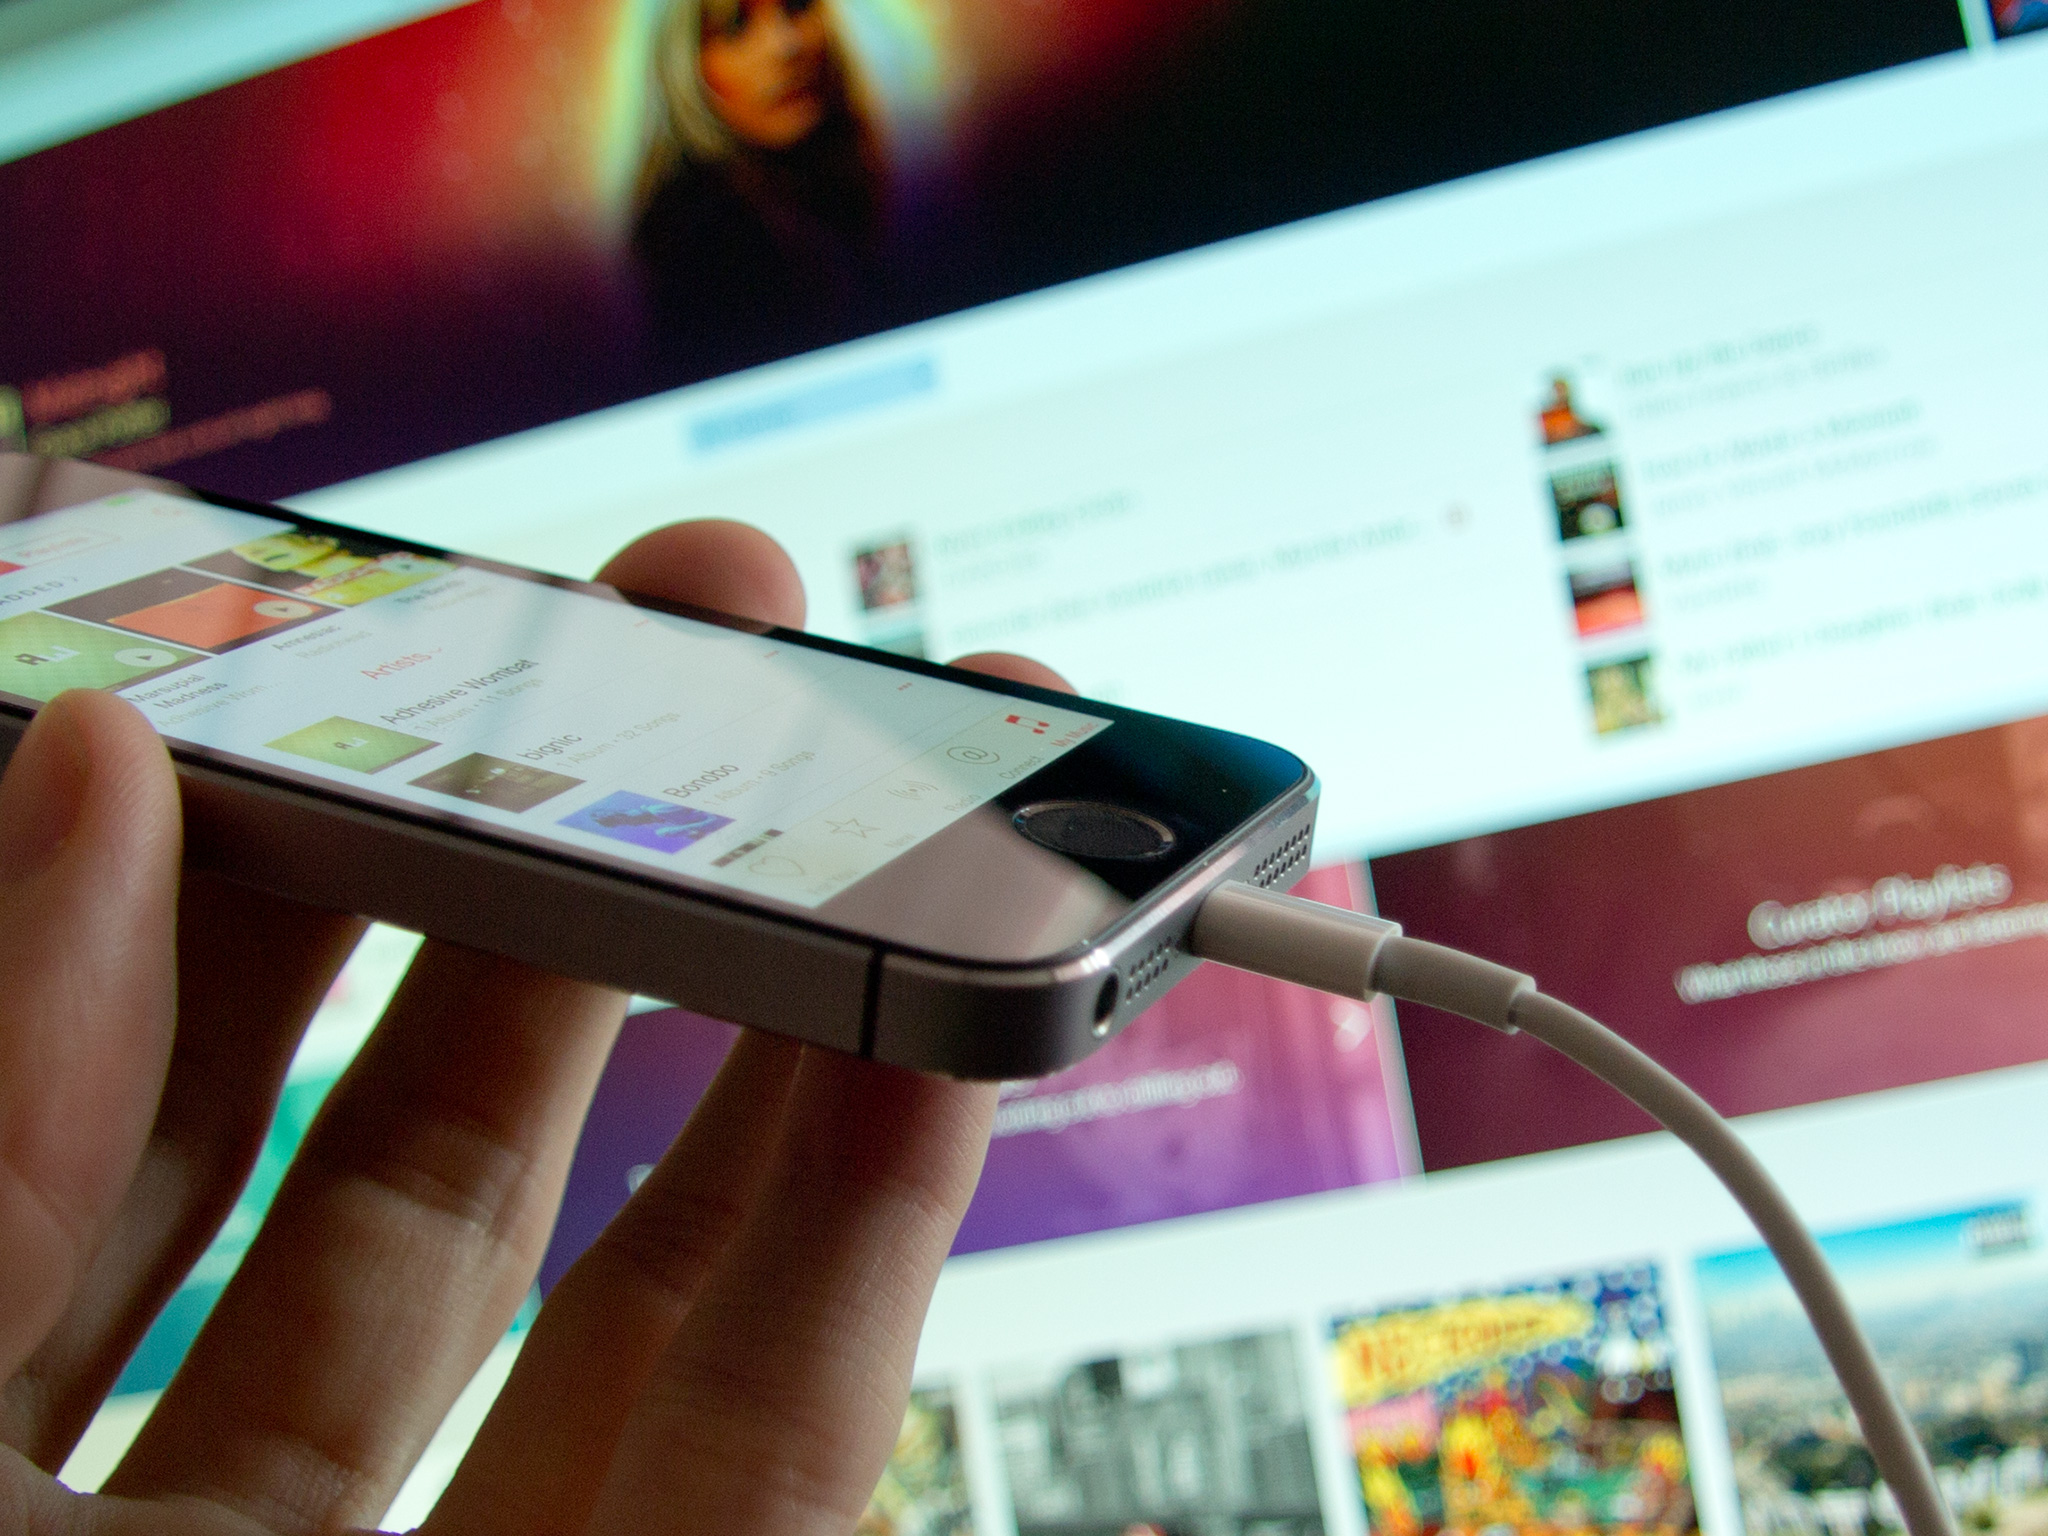
1. Connect your iPhone to your laptop with a Lightning cable.
2. Click Continue when asked if the computer can have access to the phone.
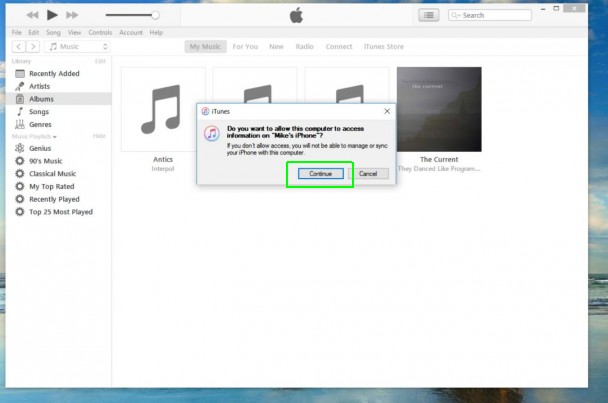
3. Click the phone icon in the top bar.
4. Click Sync.
Sign up to receive The Snapshot, a free special dispatch from Laptop Mag, in your inbox.

This should sync the two devices. If it doesn’t, go to the sidebar and enable the Sync checkboxes under Music, Apps, Movies, TV Shows and Photos and click Sync again.
Depending on how much data you’re syncing, this may take awhile. Get a drink or a snack and come back later.
5. Check your photos, music, apps and videos to confirm that they arrived on the phone from Windows 10.
MORE: How to Use Windows 10
Copying From an iPhone
This is where things get tricky. In an attempt to avoid piracy, syncing from an iPhone isn’t as easy and sending data to it. Luckily, there are some workarounds.
- Music and Movies: This keeps you stuck in Apple’s wheelhouse. Though you can move non-iTunes media files to your phone from your PC, you can’t send them from the handset to the computer. However if you buy media from iTunes on your iPhone, you can get it on your desktop via the cloud. As long as you maintain one Apple ID, you’ll be able to download all your songs and movies again from iTunes on your PC at no extra cost.
- Photos: To learn how to import photos from an iPhone to Windows 10, see our guide here.
Files: The cloud is your friend for syncing files. While I personally use Dropbox, you can also use iCloud.
Here’s our guide to using iCloud on Windows. It’s great for users who like Apple’s software, including Pages, Numbers and Keynote.

If you’re a Dropbox user, you can use the iPhone app and desktop app to view files or photos on either device. If you’re a Google user, you can use Sheets, Slides and Docs.
- Chromebooks vs. Windows 10 Laptops: What Should You Buy?
- Meet macOS Sierra: 8 Best Features
- How to Back Up Files with File History in Windows 10
Andrew is a contributing writer at Laptop Mag. His main focus lies in helpful how-to guides and laptop reviews, including Asus, Microsoft Surface, Samsung Chromebook, and Dell. He has also dabbled in peripherals, including webcams and docking stations. His work has also appeared in Tom’s Hardware, Tom’s Guide, PCMag, Kotaku, and Complex. He fondly remembers his first computer: a Gateway that still lives in a spare room in his parents’ home, albeit without an internet connection. When he’s not writing about tech, you can find him playing video games, checking social media and waiting for the next Marvel movie.
One of the core benefits of linking your iPhone to your Windows 10 PC is that you can send webpages from your iPhone to PC so that you can pick up where you left off with ease.
Starting with the Fall Creators Update, Windows 10 allows you to view web pages on PC that you were viewing on your iPhone and Android. In simple words, you can now share webpages from your iPhone and Android phones to Windows 10.

All you need to do is install Continue on PC app on your iPhone or Android phone and sign-in with a Microsoft account. Remember that you need to use the same Microsoft account to sign in on both your iPhone and Windows 10 PC to be able to share webpages.
This is how it works. Once you install and sign-in to Continue on PC app using the same Microsoft account that you use to sign-in to your Windows 10 PC, open a webpage in Safari or any other web browser. Tap the Share icon, tap Continue on PC app in the list, tap Continue now to immediately open the webpage in your default web browser on your PC. If you tap Continue later option, the webpage will appear in the Action Center. You can click on the webpage link in the Action Center at any time to open it.
IMPORTANT: Your PC must be running Windows 10 Fall Creators Update or above version to use this feature. So, make sure that you have Windows 10 Fall Creators Update before proceeding further.
Complete the given below directions to link your iPhone to Windows 10 PC.
Step 1: Open the Settings app. Navigate to Phone.

Step 2: Click Add a phone button.

Step 3: In the resulting Link your phone and PC page, select your country code and then type your mobile number. Click Send button.

Step 4: You will now receive a text message on your phone with a link to install a Microsoft app called Continue on PC. Click on the link in the text message to open the App Store page of Continue on PC app. If you see a confirmation message, click Yes button to open the Store page of Continue on PC app.

Step 5: Click the Get button to install the app on your iPhone.

Step 6: Now that you have installed the Continue on PC app on your iPhone, open any webpage in Safari or any other browser, tap the Share icon, tap More, turn on Continue on PC (refer to the picture below) to add it to the list of apps that can be used to share webpages. This is a one-time exercise, and you won’t need to this in future.


Step 7: Finally, to open the webpage that you are currently viewing on your iPhone on your Windows 10 PC, simply tap the Share icon, tap Continue on PC, and tap Continue now, and sign with the same Microsoft account that you are using on Windows 10 PC (sign in required first time only).


Note that if you are using the same Microsoft account to sign-in to multiple PCs, you might see the following page where you need to select the PC to which you want to send the webpage.

The webpage will be automatically opened on your Windows 10 PC.