
It is always a best practice to backup important data regularly, or preferably in real-time, to prevent data loss due to unforeseen circumstances such as hard disk failure. One of the best methods to backup your files locally is by syncing the files between two folders in two different drives.
In that way, if one of the drives fails, you would have a complete backup on the other. This short tutorial will show you how to sync files between two folders in Windows 11 or Windows 10 easily using a free tool called DSyncronize.
Tip: If you want to quickly sync your files as a backup measure without much hassle, we recommend to just use a cloud storage syncing solution such as Dropbox, Google Drive or OneDrive.
However, most of these cloud storage services are free for only the first few gigabytes of cloud storage. Once you reached the free limit, you will have to pay a fee in the form of subscription for more storage size. Well, if you have a rather huge folder you want to sync and don’t feel like paying, use the method below to sync files between two folders locally instead.
Sync files between two folders or computers using DSynchronize
Synchronizing files between folders on different drives or multiple computers in the same network isn’t an easy task to accomplish. There is currently no built-in tool in Windows 11/10 that is able to achieve this. We will have to rely on a third party software to help us in this matter.
Among all the free file syncing software, we recommend DSynchronize because of its extremely easy to use and user friendly interface (unlike many others which have rather complicated and difficult GUI).
First, download DSynchronize from its official website.
http://dimio.altervista.org/eng/#DSynchronize
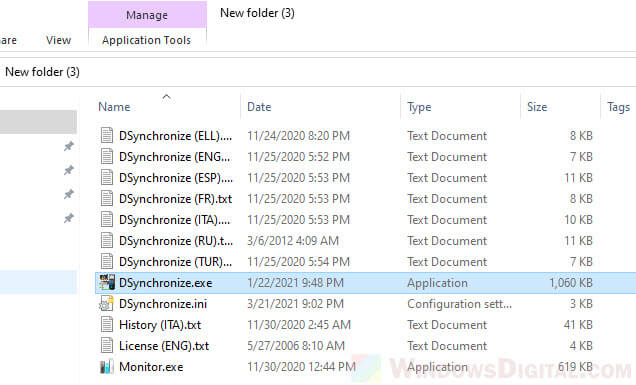
Since it’s a portable software, you don’t need to install anything. Just unzip the downloaded zip file onto a folder and launch the DSynchronize.exe (recommended to run as administrator to prevent insufficient privileges issue) from the extracted folder to start using the software.
How to sync files between two folders from different drives
Assuming you want to sync files between two folders on two different drives, here’s how to quickly do it in DSynchronize.
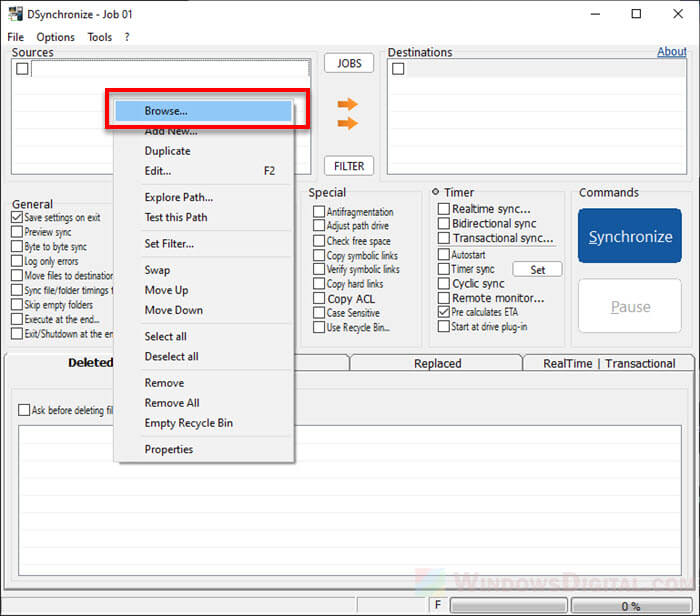
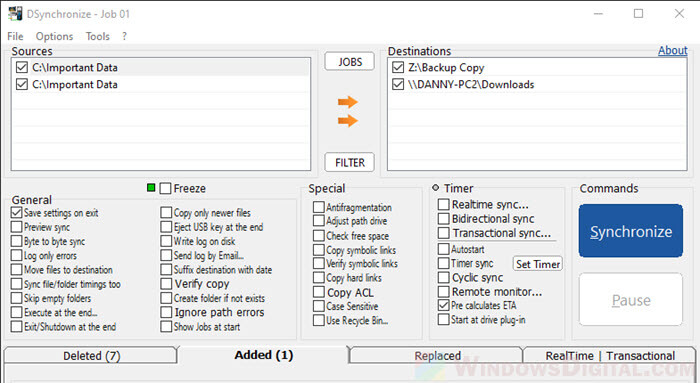
In the DSynchronize window, add a source by right-clicking anywhere in the Sources area, then select Browse. Browse to the folder which you want to sync (the folder that contains the important files you want to backup), and then click OK to add the folder as the source.
Next, right-click anywhere in the Destinations box, then select Browse. Browse to the folder where you want to sync your source files to (the location where you want to copy your files over to). Click OK to add the folder as the destination.
Note: Make sure the destination folder is empty, otherwise anything in it will be deleted if the source folder doesn’t have those files.
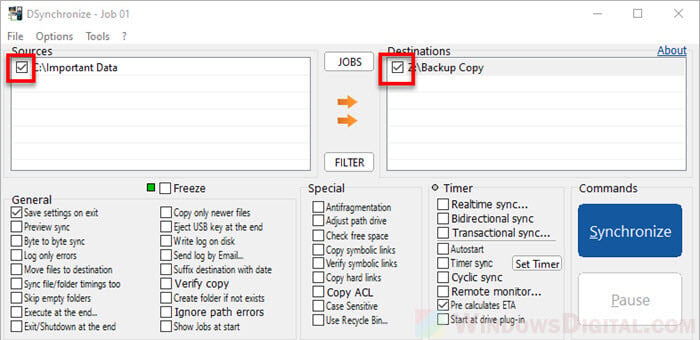
Click to check the checkboxes of the source(s) and destination(s) folders you’ve added.
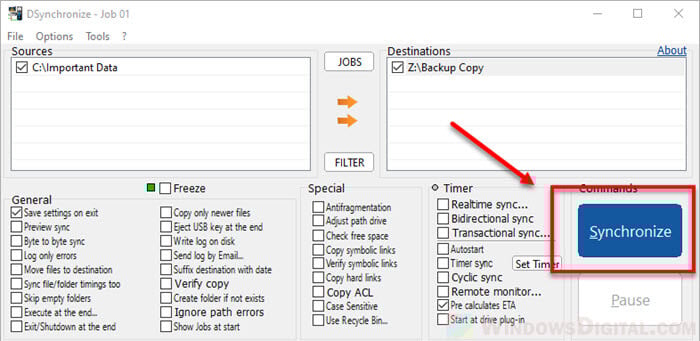
To begin syncing the files between the two folders now, click on the Synchronize button.
Sync files between two computers in Windows 11/10
To sync files between two computers using DSynchronize:
- Make sure both computers are connected to the same local network.
- Turn on Network Discovery and File sharing in Windows 11 or Windows 10 on both computers.
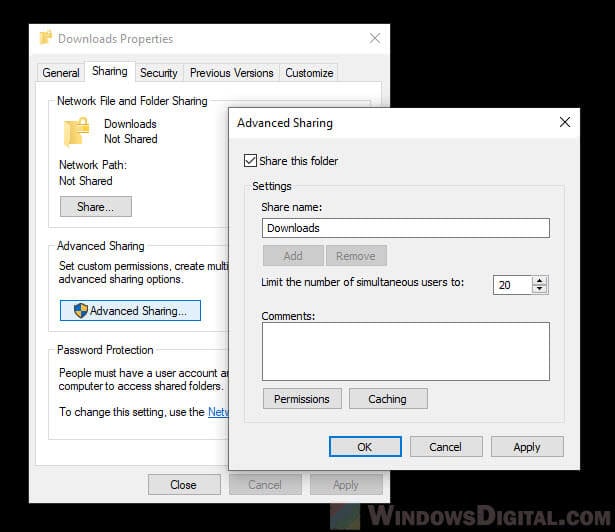
- Create a folder on the destination computer and and share the folder by right-clicking the folder > Properties > Sharing > Advanced Sharing > Share this folder, so that the source computer can see the folder from the Network directory.
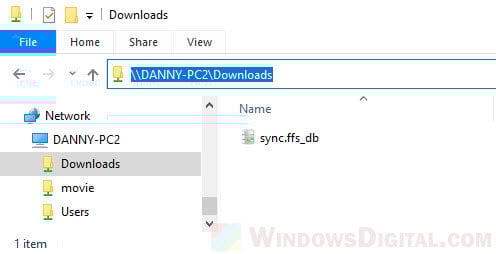
Once you’ve done all of the above, in the File Explorer, browse to the destination network folder. Copy the full path of the network folder by clicking on the path address bar while in the network folder and press CTRL + S keys to copy the entire path.
Now, in DSynchronize, manually add the destination folder by double-clicking on the empty area in the Destinations box, then paste (or manually enter) the full path of the network folder you’ve copied earlier.
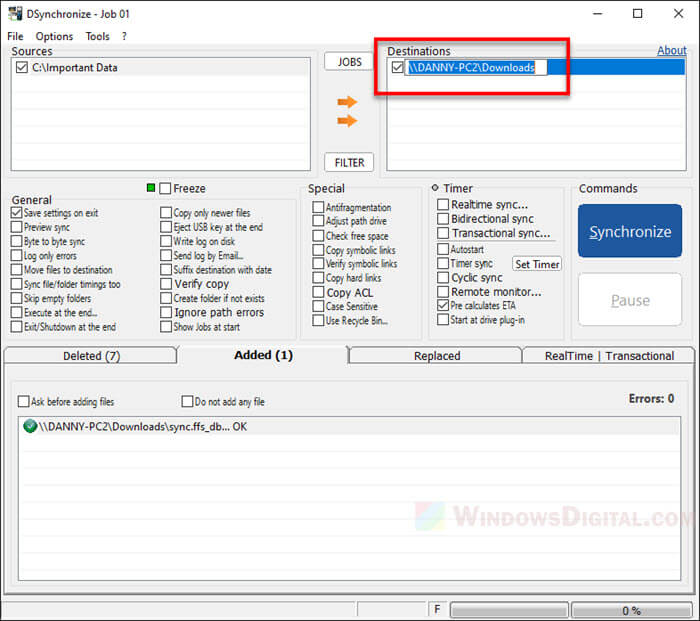
Click on the Synchronize button to begin syncing the files between the two folders from two different computers.
You can repeat the steps to add multiple destinations to sync folders across multiple computers in Windows 11/10.
How to allow automatic real time syncing in DSynchronize
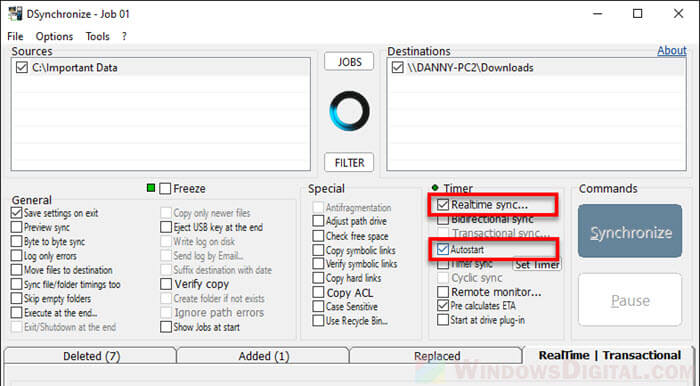
To set up automatic real time sync, enable the “Realtime sync” checkbox in DSynchronize. From now onward, whenever you make changes from either folder, it will be synced immediately in real time.
To allow DSynchronize to sync the files as soon as you startup your computer, enable the “Autostart” option in DSynchronize. When both “Realtime sync” and “Autostart” options are enabled, DSynchronize will be automatically launched upon startup of your PC and will begin real time sync immediately.
How to sync files between multiple sources or destinations
DSynchronize takes each line of source to destination as one syncing job. You can set multiple sources or destinations by adding more folders to them.
For example, to sync a single source to multiple destinations, add a new line with the same source but to a different destination. The screenshot below is an example of syncing files from a single source folder to two different destinations, so that I can have two backup copies on two different locations.
Be sure to also check out other optional configurations under “General” and “Special” which you may find useful at some point of time later as you use the software.
Applies ToOneDrive для бизнеса SharePoint Server по подписке SharePoint Server 2019 SharePoint в Microsoft 365 OneDrive (для работы или учебы) OneDrive (для дома или персональный) OneDrive для Windows
При синхронизации OneDrive или библиотеки SharePoint с устройством синхронизированные файлы доступны для работы в проводник.
Каждый раз, когда вы открываете файл на основе OneDrive или SharePoint из проводник, а затем сохраняете его, изменения автоматически синхронизируются обратно в облако.
По умолчанию синхронизированные файлы доступны для работы при подключении к Интернету, но они не занимают место на вашем устройстве.
Вы можете легко изменить состояние файла, чтобы работать с ним даже в автономном режиме. (Дополнительные сведения см. в разделе Что означают значки состояния в проводник ниже.)
Где найти синхронизированные файлы в проводник
После синхронизации в области навигации проводник слева есть папки верхнего уровня для любой библиотеки SharePoint или OneDrive, которую вы синхронизировали:

-
Файлы OneDrive отображаются под папкой со значком облака OneDrive на передней панели. Если вы используете несколько учетных записей OneDrive, ваши личные файлы отображаются в папке со значком Облака OneDrive затем [Имя_вашего] — Личное (OneDrive — Личное в Win10 и macOS), а ваши рабочие или учебные файлы отображаются под папкой со значком Облака OneDrive затем [Имя_вашего] — Имя организации (OneDrive — [Имя_организации] в Win10 и macOS).
-
Файлы SharePoint отображаются в папке с именем вашей организации (например, «Contoso» на изображении выше) со значком «Синхронизированные файлы SharePoint» в передней части экрана.
Перемещение или копирование синхронизированного файла в проводник
-
В проводник выберите файл, который нужно переместить или скопировать.
-
Нажмите клавиши CTRL+C (для копирования) или CTRL+X (чтобы вырезать, чтобы можно было переместить файл).
-
В проводник перейдите в папку, в которую нужно поместить файл.
-
Выберите папку и нажмите клавиши CTRL+V.
Изменения вносятся как в файловой системе устройства, так и в синхронизированной библиотеке OneDrive или SharePoint.
Отправка файла в OneDrive или SharePoint с помощью Обозреватель
Вы можете добавить файл в OneDrive или SharePoint, вставив его в папку, как описано в разделе Перемещение или копирование выше.
Вы также можете перетащить файл в синхронизированную папку в проводник. Перетащите значок файла поверх папки, в которую вы хотите его добавить, а затем отпустите кнопку мыши.
При добавлении файла в синхронизированную папку с помощью любого из методов он синхронизируется с облачным хранилищем и становится доступным для вас в OneDrive или SharePoint на всех ваших устройствах.
Откройте файл с помощью проводник
Чтобы открыть синхронизированный файл из проводник, просто выберите его и нажмите клавишу ВВОД или дважды щелкните его.
Удаление файла с помощью проводника
Чтобы удалить файл, просто выберите его и нажмите клавишу Delete.
Что происходит при удалении синхронизированного файла?
При удалении синхронизированного файла с устройства он удаляется со всех устройств и из облака. Но вы можете восстановить такие удаленные файлы и папки, перейдя в веб-браузере в корзину в OneDrive или библиотеке SharePoint. Выберите файл, а затем щелкните Восстановить.
Если вы удалили синхронизированный файл, скачанный на устройство, после удаления он также будет находиться в корзине устройства .
Как долго файлы остаются в корзине?
-
В Личном oneDrive (при входе с учетной записью Майкрософт) удаленные файлы остаются в корзине до 30 дней.
-
В OneDrive для работы или учебы или вSharePoint в Microsoft 365 (при входе с помощью рабочей или учебной учетной записи) удаленные файлы остаются в корзине до 93 дней.
Удаление синхронизации
Если вы не хотите синхронизировать все папки с компьютером, вы можете удалить связь с учетной записью с помощью параметров синхронизации OneDrive. Если вы хотите выбрать только определенные папки, которые хотите синхронизировать или отменить синхронизацию, см. в разделе Выбор папок для синхронизации с компьютером .
(При отмене синхронизации файлы удаляются из проводник, но они по-прежнему доступны в облаке. Доступ к ним можно получить с помощью веб-браузера, чтобы перейти в OneDrive или библиотеку SharePoint.)
Что означают значки «состояния» в проводник
При просмотре папки OneDrive или SharePoint в проводник состояние каждого файла отображается значком.
Эта возможность называется «Файлы по запросу» — синхронизированные файлы доступны в файловой системе, когда они вам нужны, но они не занимают место на вашем устройстве, если вы этого не хотите.
|
Значок |
Значение |
|---|---|
|
Значок синего облака указывает, что файл доступен только в Интернете. Файлы только в Интернете не занимают место на компьютере. Рядом с ними в проводнике отображается значок облака, а сам файл не скачивается на устройство до его открытия. Такие файлы невозможно открыть, если устройство не подключено к Интернету. |
|
|
При открытии файла, доступного только через Интернет, он скачивается на устройство и становится файлом, доступным локально. Такой файл можно открыть в любое время, даже без доступа к Интернету. Если вам требуется освободить место, можно снова сделать файл доступным только через Интернет. Просто щелкните файл правой кнопкой мыши и выберите освободить место. |
|
|
Только файлы, которые вы помечаете как Всегда держать на этом устройстве, имеют зеленый кружок с белой проверка меткой. Эти всегда доступные файлы были загружены на устройство и занимают место, но они всегда доступны для вас, даже если вы находитесь в автономном режиме. |
|
|
Синхронизация между устройством и облачным хранилищем ожидается. |
Дополнительные сведения о файлах OneDrive по запросу.
См. также
Я получаю сообщение «Диск заполнен» в OneDrive
Что делать, если в OneDrive появляется сообщение о том, что хранилище заполнено?
Хранилище файлов в Teams
Нужна дополнительная помощь?
Нужны дополнительные параметры?
Изучите преимущества подписки, просмотрите учебные курсы, узнайте, как защитить свое устройство и т. д.
🙇♂️»Hi all,I am trying to find a piece of software that can perfectly sync a folder across two drives, like a mirror. Just like how cloud backup programs, like Drive for Desktop work, but to a local drive. My goal is to avoid manually dragging files to my backup drive, rewriting the entire folder, or remembering what changes I made.»
A PC contains critical information like financial records, educational milestones, business data, family videos, music files, etc. You can’t afford to lose this data due to malicious malware or virus attacks. To avoid this, you must create a backup via an external drive or cloud storage. The easiest way to do this is to sync folders between drives. In this blog, we will share 3 ways to sync files and folders between drives on Windows 7/8/10/11. Stay tuned.
When You Need to Sync Folders Between Drives
There can be some situations when you need to sync folders between drives.
- 1️⃣The primary motivation is data safety. By syncing folders between internal and external drives or cloud storage, you can create a backup to avoid risk.
- 2️⃣The second reason is data sharing. If you back up your data on cloud storage like One Drive, you can share it with others with a single link. Your team members or acquaintances can download it from the link.
- 3️⃣The third reason is to avoid manual copy/paste. Although you can save a file in multiple locations, that doesn’t solve the problem. If you make any edits to the source file, they won’t reflect on the backup, so you can’t keep on copying the files again and again. With the Sync folder, all changes will update on the backup drive without any manual entries.
For the above reasons, we recommend that every PC user learn how to sync folders between drives. In this blog, we will share 3 methods, complete with complete steps and pictorial references.
Best Free Tool to Sync Folders Between Drives on Windows
The best and easiest way to sync folders on Windows is to use the EaseUS Todo Backup Free. The software specializes in quick and safe data storage. It can save sync folders to external hard drives, local drives, networks, NAS, and cloud service. It also comes with many advanced file sync features, including:
- One-way sync and two-way sync
- Incremental sync to sync only changed files and folders
- Scheduled sync, set an automatic file sync task based on hourly, daily, weekly, monthly, or in real-time
- Sync files between desktop and laptop
- Sync files to external hard drive without any hassle
EaseUS Todo Backup Free offers one-click backup with instant recovery. You can also perform disk imagining and disc cloning with ease. You can choose multi-path storage encrypted with password options for backup. In short, it is the most well-rounded data backup tool available today. Download and use this file sync tool for free to sync folders between drives on Windows.
Follow this simple guide to sync folders between drives with EaseUS Todo backup. Note that while choosing the source and target location, remember to select different hard drives respectively.
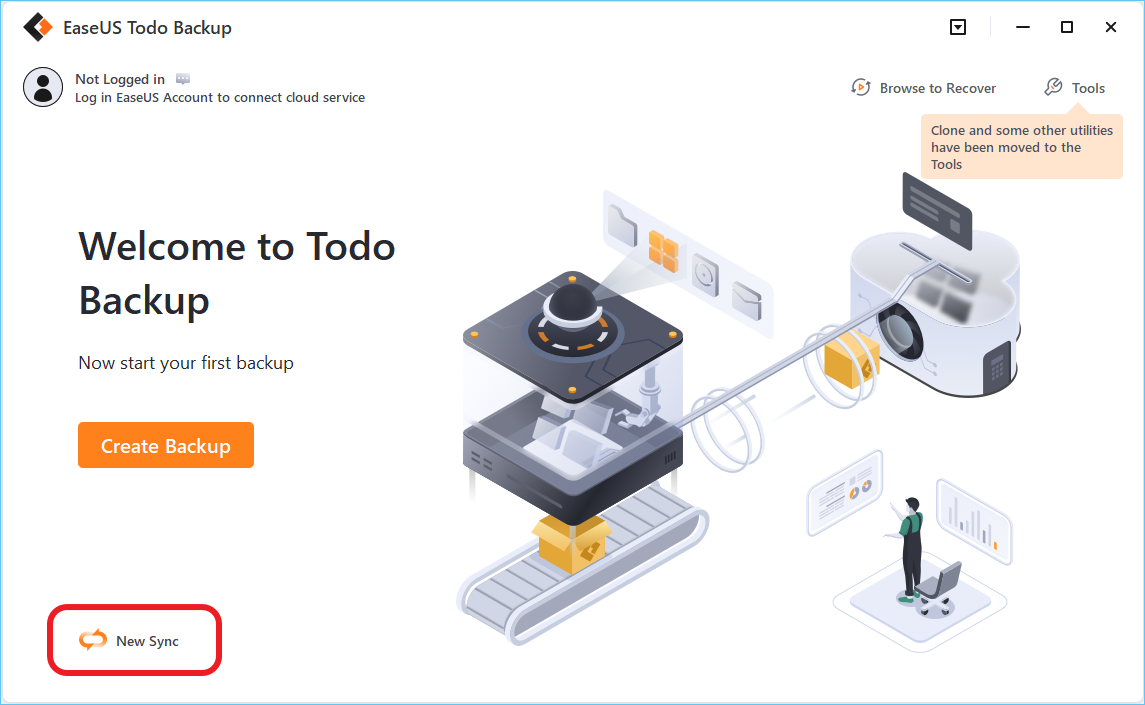
step 1. Launch EaseUS Todo Backup and click New Sync button in the bottom-left corner.
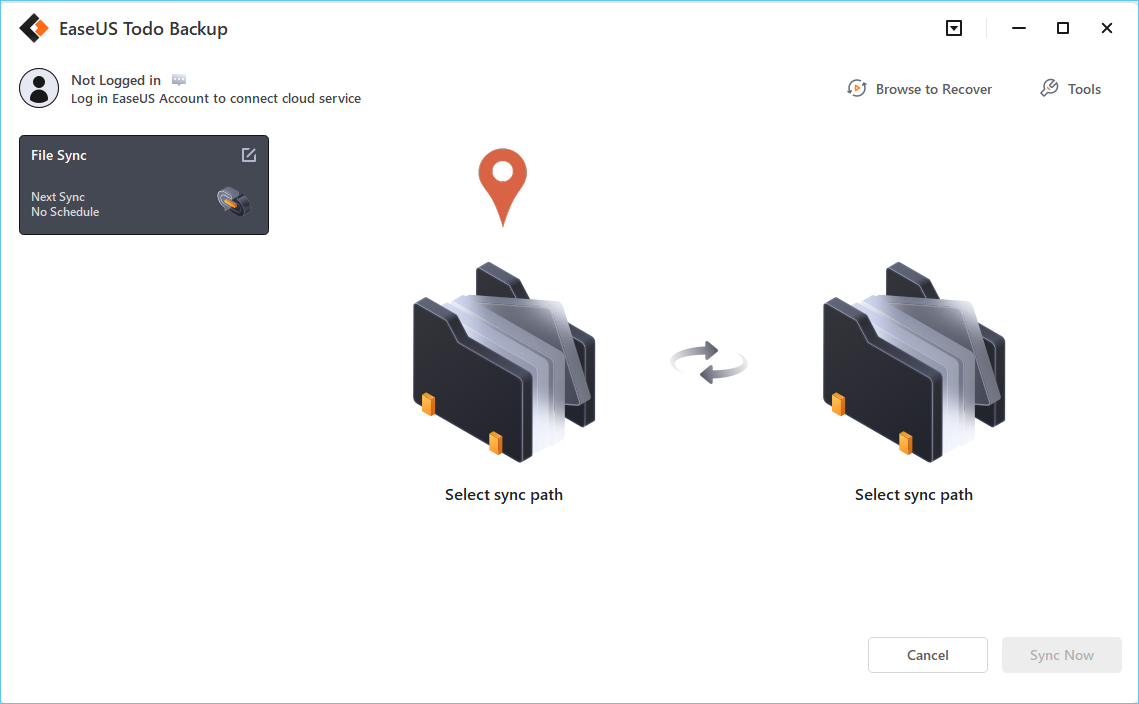
Step 2. Click Select sync path from the left side.
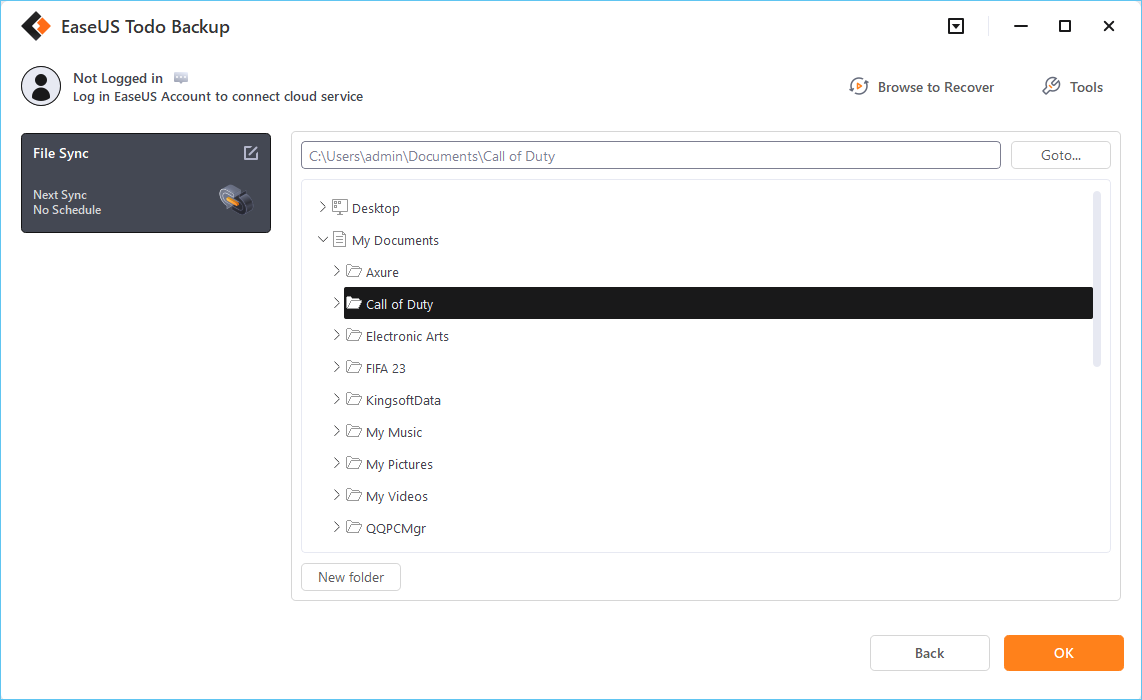
Step 3. Choose a folder that your want to sync, and click OK. The source folde can be from Desktop, My Documnets, Favorites, Computer, Network, or NAS.
Step 4. Select a target location where you want to sync files to. You can choose Two-way sync or One-way sync method according to your needs.
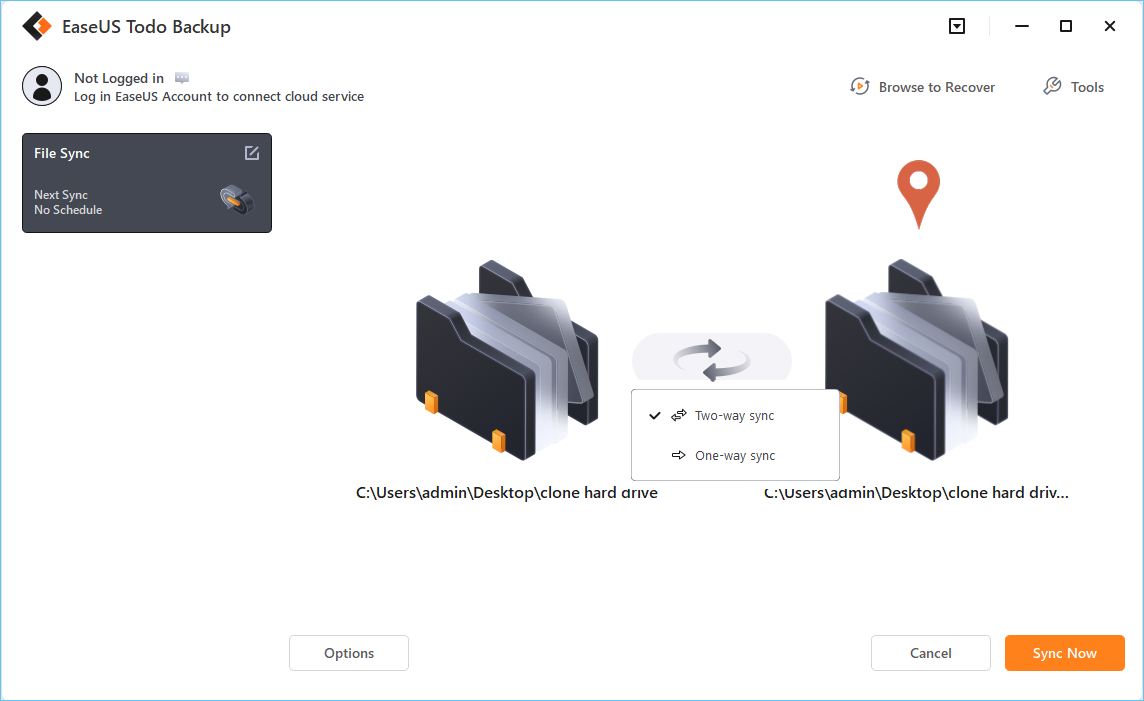
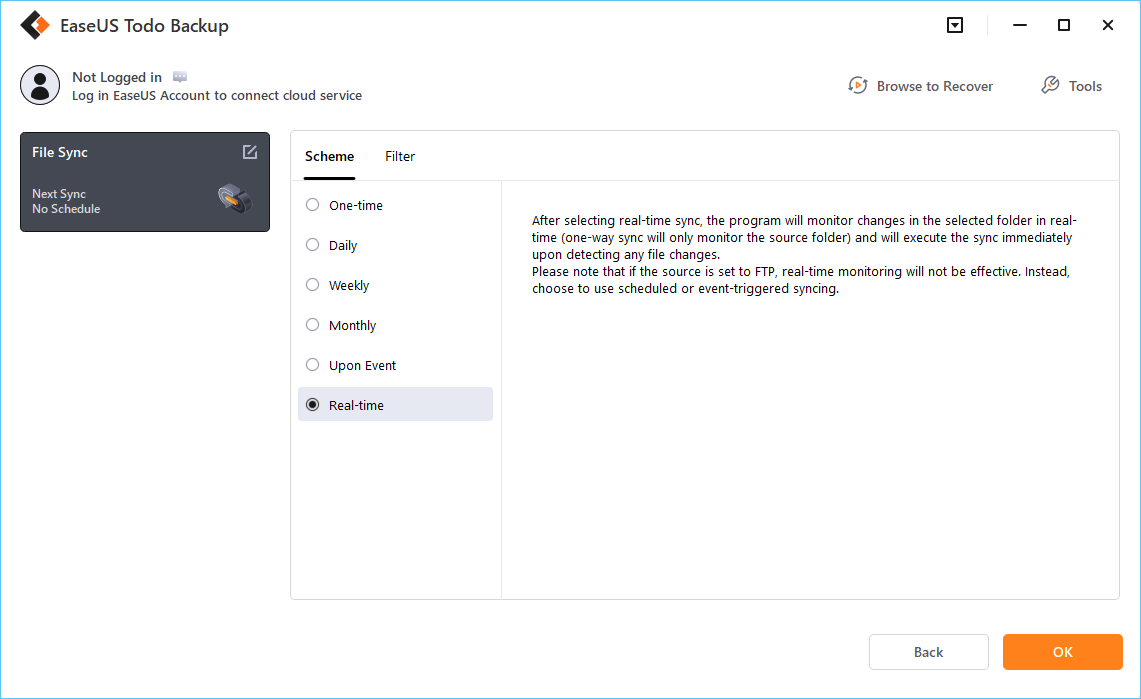
Bonus: Tap Options button to select a sync scheme, which can schedule a sync task on daily, weekly, upon an event, or real-time sync.
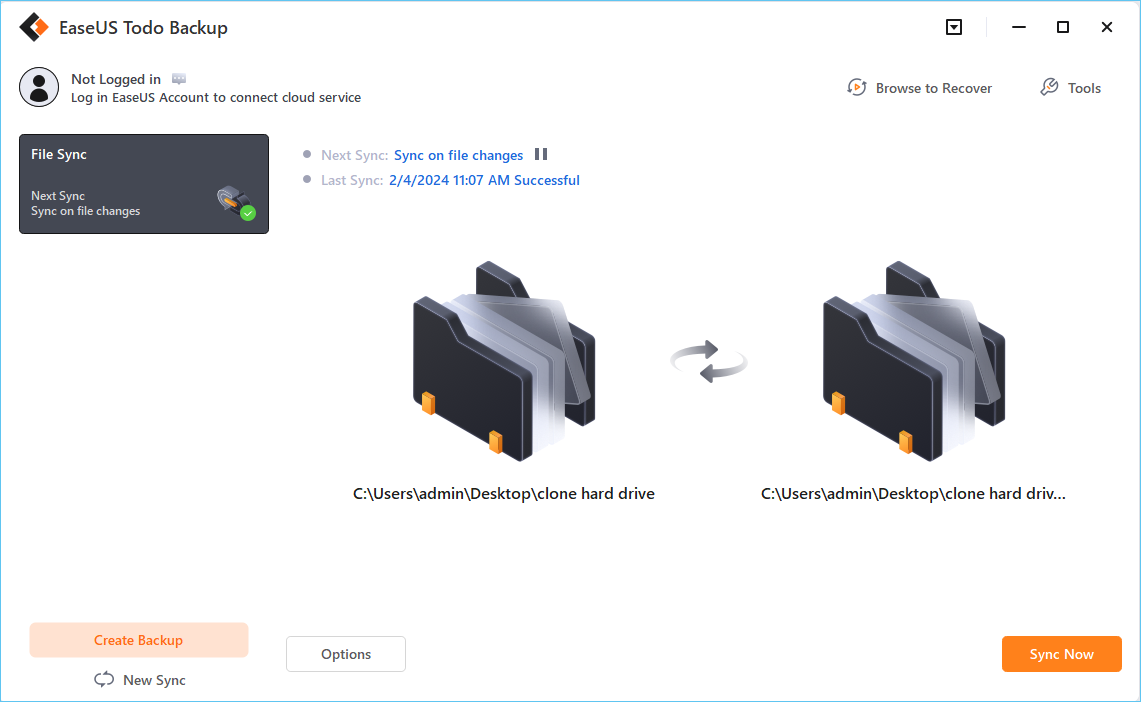
Step 5. Click Sync Now to start a sync task right now.
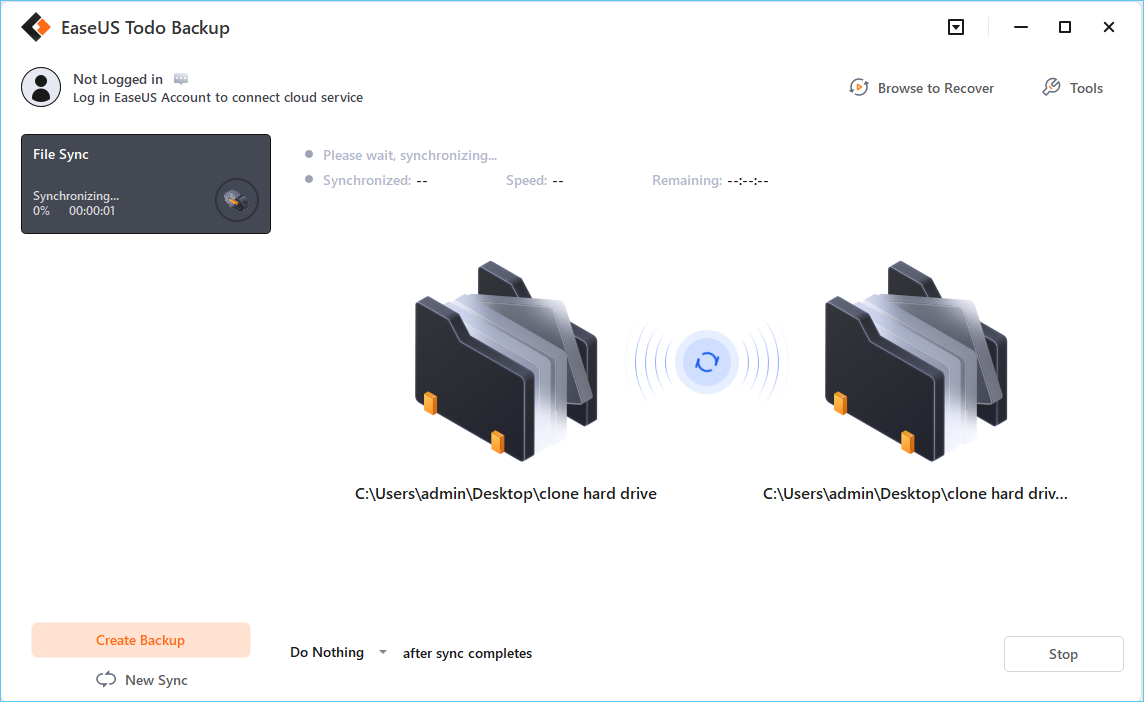
Step 6. Wait for the sync process to finish, you can see a File Sync column in the top-left corner.
Remember to share the post on your Facebook and Twitter to help others sync folders between drives.
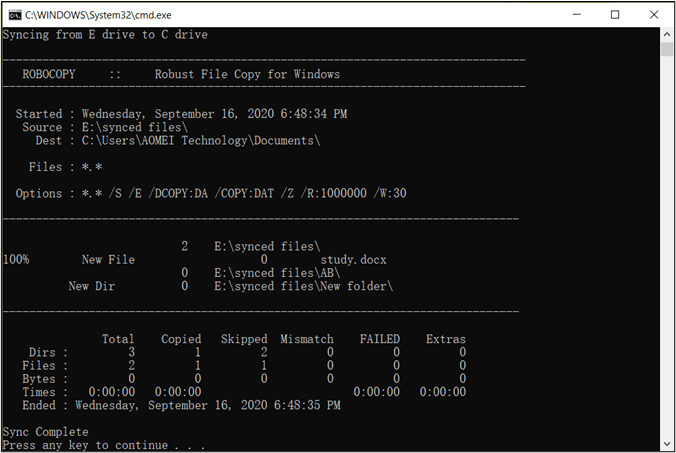
Sync Folders Between Drives on Windows with Robocopy
Robocopy is a command for synchronizing folders between drives on the same or different computers. It was first introduced as a built-in feature in Windows Vista. It can easily perform one-way or two-way sync.
Follow these steps to sync folders with the Robocopy command:
Step 1. Open the Notepad in your system.
Step 2. Write the following to create a batch file.

Step 3. Press Ctrl + S to save the file in any specified location. It should be named with a .bat extension.
Step 4. Double-click the file to sync selected folders between the designated locations. A prompt window will appear highlighting the results.
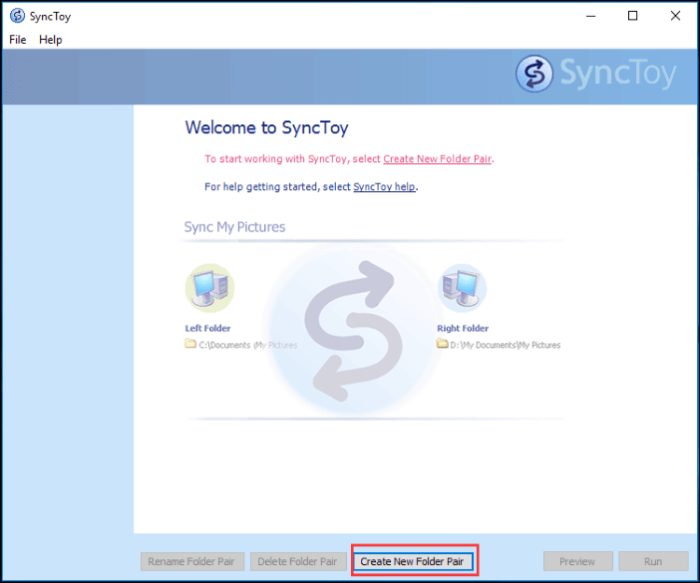
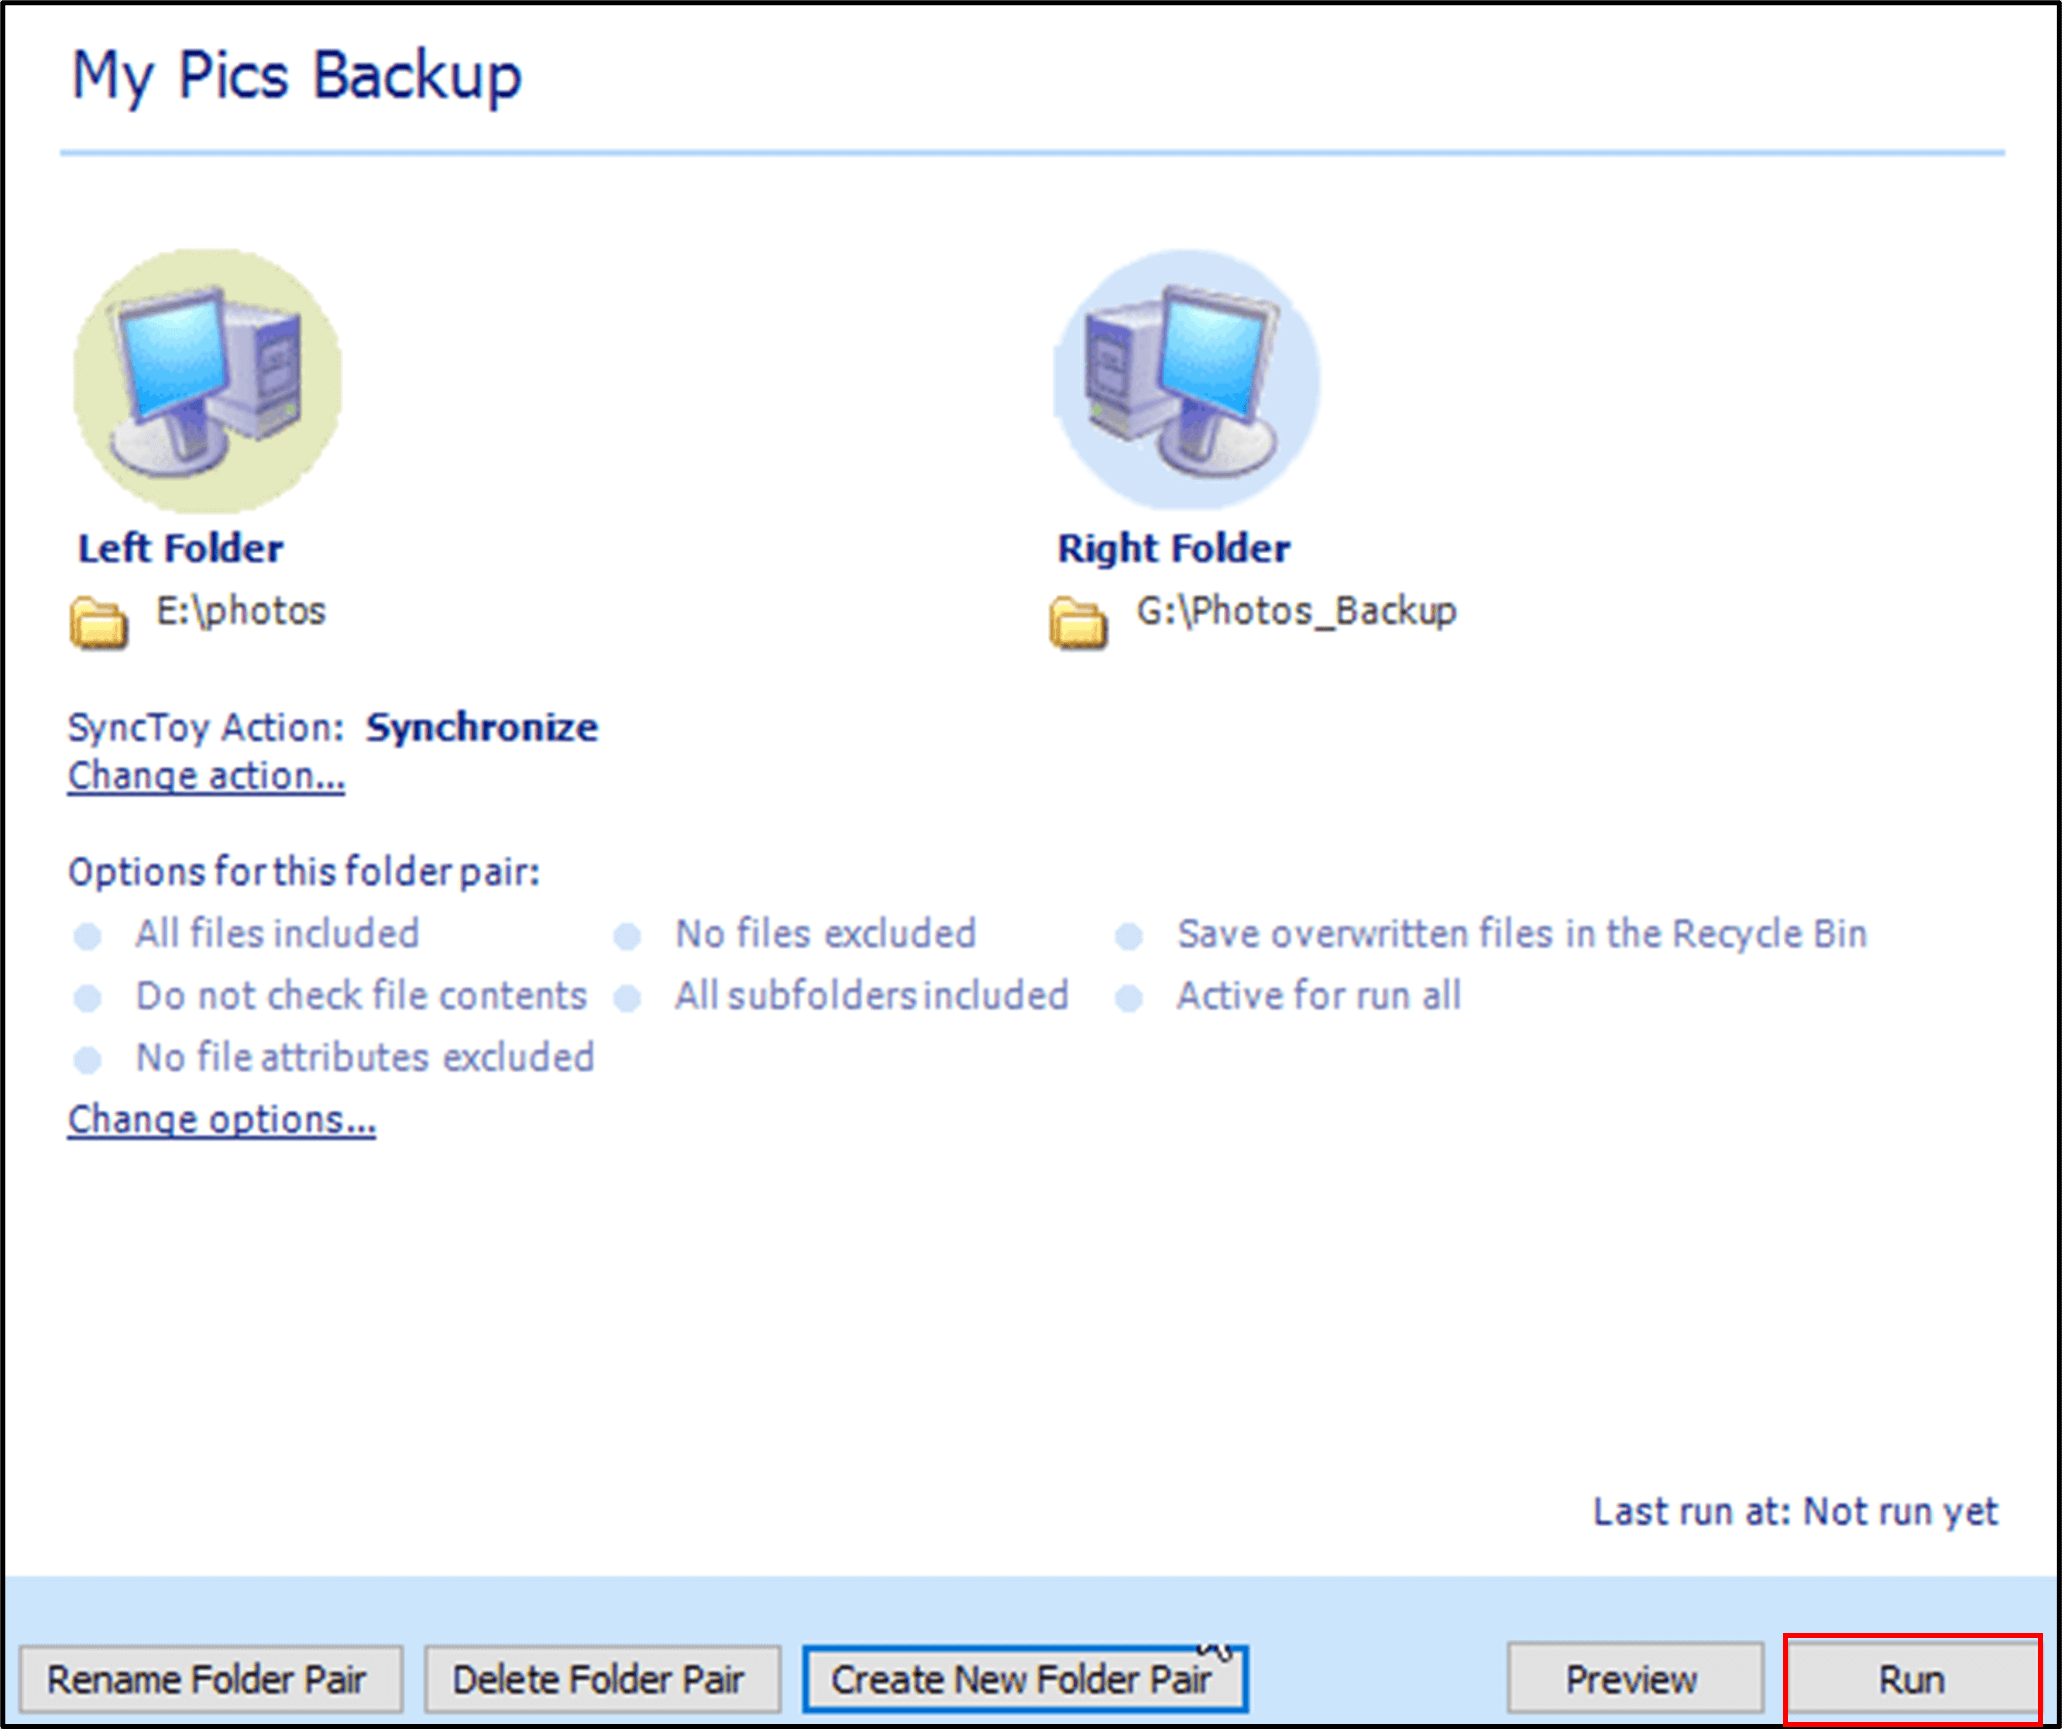
SyncToy is a tool built by Microsoft that synchronizes folders between drives in different locations. It needs to be installed in your system before running. Although the original download link for SyncToy has been removed from Windows, you can still get it from other sources. Once you download SyncToy, follow these steps to Sync Folders with it:
Step 1. Click on the SyncToy icon to launch it on the Windows main interface.
Step 2. Select the «Create New Folder Pair» option from the bottom of your screen.
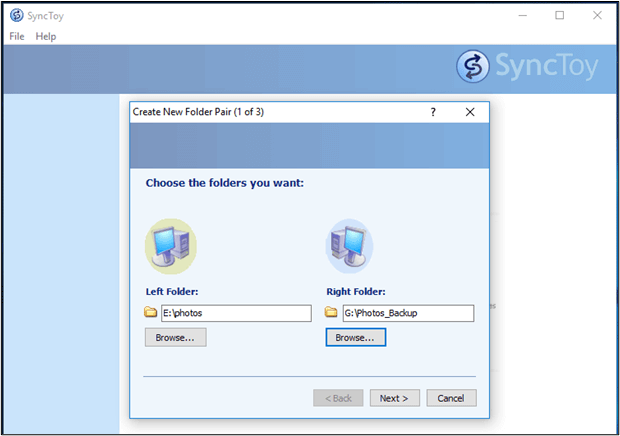
Step 3. It will show two options; «Left Folder and Right Folder.» In the Left Folder, select the source folder. On the Right Folder, you will select the target folder. After this, click on the «Next.»
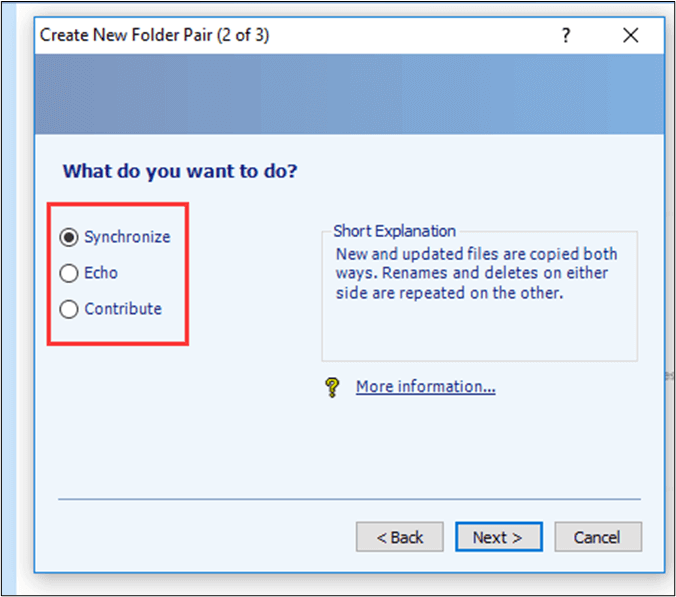
Step 4. It will show 3 options; Synchronize, Echo, and Contribute. Select the «Synchronize» option and click on the «Next» again.
Step 5. Enter a name for this task. Click on the «Run» option to start synchronization of both folders.
Remember to share the post on your Facebook and Twitter to help others sync folders between drives.
Final Words
In our world, data is the most important commodity. People have personal, financial, educational, and professional data stored on their computers. You just can’t afford to lose this data because of any malware/virus attack or system glitch. To avoid this risk, you should always sync folders between drives as a safe backup.
This blog highlights 3 methods to sync Folders between drives on Windows 7,8,10,11. Based on our research and experimentation, the EaseUS Todo Backup Free is the most efficient and secure tool for your data storage. Download EaseUS Todo Backup software and make your data 100% secure.
FAQs on Windows Sync Folders Between Drives
Does Windows 10 have a sync program?
Windows 10 has a built-in «Sync Center» feature to sync files or folders between Windows computers and the cloud storage when they are connected to the same network. The feature was first introduced in Windows Vista.
What is the easiest way to synchronize files and folders between your computer and OneDrive?
The easiest way is to use the EaseUS Todo Backup tool to sync files and folders between your computer and OneDrive. It provides 100% secure and accurate synchronization with no hiccups.
What is the best way to synchronize files between computers?
We recommend the EaseUS Todo Backup tool to synchronize files between computers. The software is quicker and more efficient than all its peers.
Whether you want to sync files from one folder to another locally or sync files to a network drive, Windows provides free ways to do it. In this article, I will show you 3 ways to sync files in Windows 10.
Method 1: Sync files with built-in tools
As you may know, Robocopy is a command-line utility that is included in Windows 10 for copying files. You can write a script to copy files and then set up a task in the Task Scheduler to run the script at a particular time.
For the script shared below, you just need to add the frequency in days, the path to the folder from where you want to move the files, and the path for the folder you want to move the files to.
Step 1. Create a new text file. Copy and paste the following command in the TXT file. Be sure to replace the number of days, destination folder, and source folder as per your needs.
@echo off
set X=<days>
set “source=C:\<Source Folder Path>”
set “destination=D:\<Destination Folder Path>”
robocopy “%source%” “%destination%” /mov /minage:%X%
exit /b

Step 2. Change the file extension to .bat and save the file.
Step 3. Open Task Scheduler. You can find it by using the search box or type “taskschd.msc” from a Run box.
Step 4. Click Create Task in the right panel and taye a task name.

Step 5. Under the Triggers tab, click New to create a Trigger. In the settings, select Daily and check the option Repeat Task Every 1 hour. You can change the frequency if needed.

Step 6. After saving the settings for Trigger, let’s go to the Action tab. Click New to create a new action. Click Browse to find the .bat file that you previously created.

Step 7. Click OK to save all the settings for this new task and close the Task Scheduler.
As you can see, it is not perfect for file sync, but if works and you don’t need to download third-party apps. Actually, Microsoft has provided its own file sync software for Windows. Keep reading to check it out.
Method 2: SyncToy
Windows also provides a dedicated tool SyncToy for file sync that you can download from Microsoft Store. The latest version is SyncToy 2.1 that allows you to synchronize files and folders between locations. You can also use it to share files with other computers and create backup copies of files and folders.
To use SyncToy, you need to download it from Microsoft website by choosing the appropriate Windows version and then install in on Windows 10. After installation, you can follow the steps below to sync two folders in Windows 10 on the same computer.
Step 1: Within the SyncToy main interface, click Create New Folder Pair to start a new task.

Step 2: specify the Two Folders You Want to Sync by clicking the Browse button. It is pretty straightforward as you can see from the screenshot.

Step 3: Select the right Method to Sync Two Folders in Windows 10. If you like two-way sync, then you should check Synchronize. Echo and Contribute are for one-way sync. The difference is deleting files in the Left Folder won’t cause the change in the Right Folder with Contribute method.

Step 4: assign a name for the synchronization task and click click the Run button to start Windows sync files between folders.
After that, this sync program will start the process of folder sync between drives and you will see whether the task is successful or not.
Sync Network Files
Windows 10 also has a built-in feature Sync Center that allows you to sync the files between your PC and network servers, so you can get them when your server or your PC is not connected to the network.
Step 1. Launch Sync Center. Press Windows+R key to bring out Run window and type mobsync in the box and tap OK.
Step 2. click on the Manage offline files link on the left side column. In the General tab, click Enable Offline Files and click Ok. You may need to restart the computer.

Steop 3. After restarting the computer, then you will have other tabs available on the Offline Files to configure the Offline Files including Disk Usage, Encryption, and Network tabs.
Step 4. Configure Disk Usage for the the available space for keeping the offline files on your PC. Under the network tab, you can choose to automatically keep your files offline if the network connection is too slow. You can also set how often you’d like to check for a slow connection.
Conclusion
That’s the 3 ways to sync files or folders in Windows 10 for free. If you like to sync files to another drive, the SyncToy is the best choice because it supports two-way sync and one-way sync. The other two options also have its own purpose. Now it is your turn. Let us know which method you prefer in the comments.
Знаете ли вы о том, что можете получить доступ к любым вашим файлам и фотографиям, где бы вы ни находились? При этом вся информация останется актуальной благодаря автоматической синхронизации. Все это возможно с бесплатным облачным хранилищем Microsoft OneDrive, которое доступно в вашей Windows 10 по умолчанию.
Начать пользоваться OneDrive просто:
Чтобы отправить документ или медиафайл в ваш OneDrive, откройте Проводник, справа выберите OneDrive и перетащите все, что хотите, в открывшуюся папку. Этот контент вы можете просмотреть откуда угодно, воспользовавшись своим мобильным устройством или зайдя на сайт OneDrive.com. Благодаря синхронизации между устройствами в OneDrive вы всегда найдете актуальные версии файлов.
OneDrive сохраняет копию загруженного файла в облаке и на ПК. Однако если на вашем устройстве мало памяти или вы вообще пользуетесь клаудбуком, можно вручную выбрать, какие именно документы будут оставаться на компьютере, а какие нет. Просто откройте папку OneDrive в Проводнике, кликните на любой папке правой кнопкой мыши и в контекстном меню кликните «Выбрать папки OneDrive для синхронизации». Уберите галочки напротив всех папок, которые вам не нужны на ПК, и вуаля – содержимое будет удалено с вашего девайса, но по-прежнему будет доступно через сайт OneDrive.com или с мобильного устройства. Вы также можете задать в настройках автоматическую отправку фотографий со смартфона в OneDrive, тогда ваши снимки будут доступны на всех ваших компьютерах.
Проведите время в облаке с удовольствием!