
Whether you want to sync files from one folder to another locally or sync files to a network drive, Windows provides free ways to do it. In this article, I will show you 3 ways to sync files in Windows 10.
Method 1: Sync files with built-in tools
As you may know, Robocopy is a command-line utility that is included in Windows 10 for copying files. You can write a script to copy files and then set up a task in the Task Scheduler to run the script at a particular time.
For the script shared below, you just need to add the frequency in days, the path to the folder from where you want to move the files, and the path for the folder you want to move the files to.
Step 1. Create a new text file. Copy and paste the following command in the TXT file. Be sure to replace the number of days, destination folder, and source folder as per your needs.
@echo off
set X=<days>
set “source=C:\<Source Folder Path>”
set “destination=D:\<Destination Folder Path>”
robocopy “%source%” “%destination%” /mov /minage:%X%
exit /b

Step 2. Change the file extension to .bat and save the file.
Step 3. Open Task Scheduler. You can find it by using the search box or type “taskschd.msc” from a Run box.
Step 4. Click Create Task in the right panel and taye a task name.

Step 5. Under the Triggers tab, click New to create a Trigger. In the settings, select Daily and check the option Repeat Task Every 1 hour. You can change the frequency if needed.

Step 6. After saving the settings for Trigger, let’s go to the Action tab. Click New to create a new action. Click Browse to find the .bat file that you previously created.

Step 7. Click OK to save all the settings for this new task and close the Task Scheduler.
As you can see, it is not perfect for file sync, but if works and you don’t need to download third-party apps. Actually, Microsoft has provided its own file sync software for Windows. Keep reading to check it out.
Method 2: SyncToy
Windows also provides a dedicated tool SyncToy for file sync that you can download from Microsoft Store. The latest version is SyncToy 2.1 that allows you to synchronize files and folders between locations. You can also use it to share files with other computers and create backup copies of files and folders.
To use SyncToy, you need to download it from Microsoft website by choosing the appropriate Windows version and then install in on Windows 10. After installation, you can follow the steps below to sync two folders in Windows 10 on the same computer.
Step 1: Within the SyncToy main interface, click Create New Folder Pair to start a new task.

Step 2: specify the Two Folders You Want to Sync by clicking the Browse button. It is pretty straightforward as you can see from the screenshot.

Step 3: Select the right Method to Sync Two Folders in Windows 10. If you like two-way sync, then you should check Synchronize. Echo and Contribute are for one-way sync. The difference is deleting files in the Left Folder won’t cause the change in the Right Folder with Contribute method.

Step 4: assign a name for the synchronization task and click click the Run button to start Windows sync files between folders.
After that, this sync program will start the process of folder sync between drives and you will see whether the task is successful or not.
Sync Network Files
Windows 10 also has a built-in feature Sync Center that allows you to sync the files between your PC and network servers, so you can get them when your server or your PC is not connected to the network.
Step 1. Launch Sync Center. Press Windows+R key to bring out Run window and type mobsync in the box and tap OK.
Step 2. click on the Manage offline files link on the left side column. In the General tab, click Enable Offline Files and click Ok. You may need to restart the computer.

Steop 3. After restarting the computer, then you will have other tabs available on the Offline Files to configure the Offline Files including Disk Usage, Encryption, and Network tabs.
Step 4. Configure Disk Usage for the the available space for keeping the offline files on your PC. Under the network tab, you can choose to automatically keep your files offline if the network connection is too slow. You can also set how often you’d like to check for a slow connection.
Conclusion
That’s the 3 ways to sync files or folders in Windows 10 for free. If you like to sync files to another drive, the SyncToy is the best choice because it supports two-way sync and one-way sync. The other two options also have its own purpose. Now it is your turn. Let us know which method you prefer in the comments.
It is always a best practice to backup important data regularly, or preferably in real-time, to prevent data loss due to unforeseen circumstances such as hard disk failure. One of the best methods to backup your files locally is by syncing the files between two folders in two different drives.
In that way, if one of the drives fails, you would have a complete backup on the other. This short tutorial will show you how to sync files between two folders in Windows 11 or Windows 10 easily using a free tool called DSyncronize.
Tip: If you want to quickly sync your files as a backup measure without much hassle, we recommend to just use a cloud storage syncing solution such as Dropbox, Google Drive or OneDrive.
However, most of these cloud storage services are free for only the first few gigabytes of cloud storage. Once you reached the free limit, you will have to pay a fee in the form of subscription for more storage size. Well, if you have a rather huge folder you want to sync and don’t feel like paying, use the method below to sync files between two folders locally instead.
Sync files between two folders or computers using DSynchronize
Synchronizing files between folders on different drives or multiple computers in the same network isn’t an easy task to accomplish. There is currently no built-in tool in Windows 11/10 that is able to achieve this. We will have to rely on a third party software to help us in this matter.
Among all the free file syncing software, we recommend DSynchronize because of its extremely easy to use and user friendly interface (unlike many others which have rather complicated and difficult GUI).
First, download DSynchronize from its official website.
http://dimio.altervista.org/eng/#DSynchronize
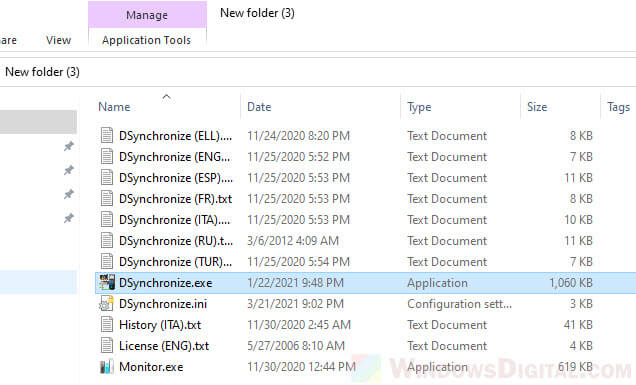
Since it’s a portable software, you don’t need to install anything. Just unzip the downloaded zip file onto a folder and launch the DSynchronize.exe (recommended to run as administrator to prevent insufficient privileges issue) from the extracted folder to start using the software.
How to sync files between two folders from different drives
Assuming you want to sync files between two folders on two different drives, here’s how to quickly do it in DSynchronize.
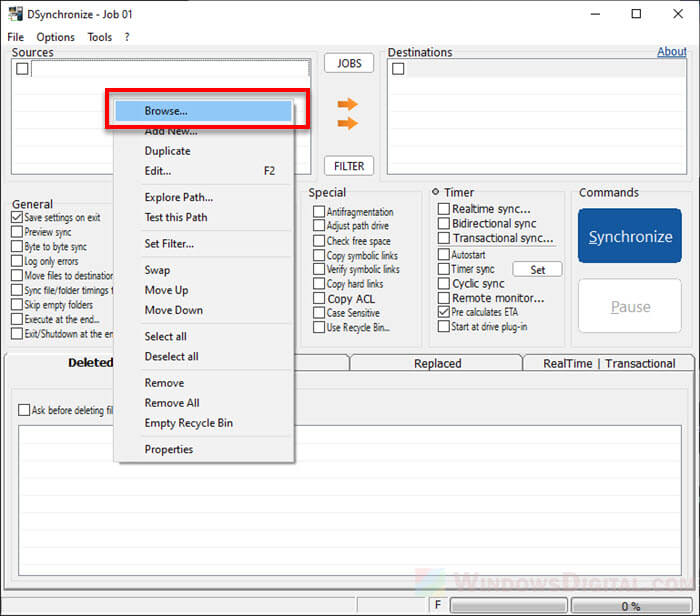
In the DSynchronize window, add a source by right-clicking anywhere in the Sources area, then select Browse. Browse to the folder which you want to sync (the folder that contains the important files you want to backup), and then click OK to add the folder as the source.
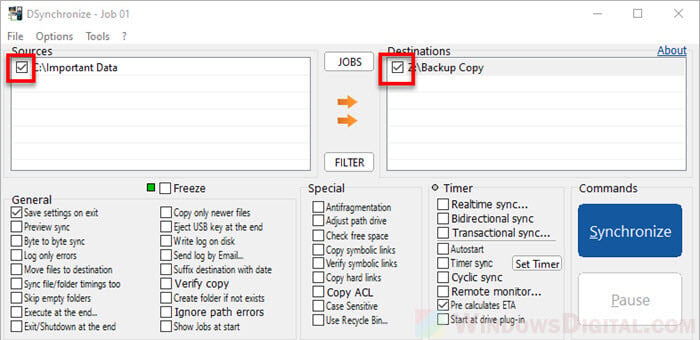
Next, right-click anywhere in the Destinations box, then select Browse. Browse to the folder where you want to sync your source files to (the location where you want to copy your files over to). Click OK to add the folder as the destination.
Note: Make sure the destination folder is empty, otherwise anything in it will be deleted if the source folder doesn’t have those files.
Click to check the checkboxes of the source(s) and destination(s) folders you’ve added.
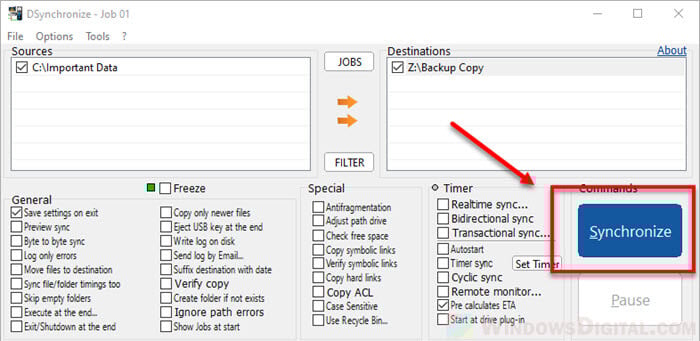
To begin syncing the files between the two folders now, click on the Synchronize button.
Sync files between two computers in Windows 11/10
To sync files between two computers using DSynchronize:
- Make sure both computers are connected to the same local network.
- Turn on Network Discovery and File sharing in Windows 11 or Windows 10 on both computers.
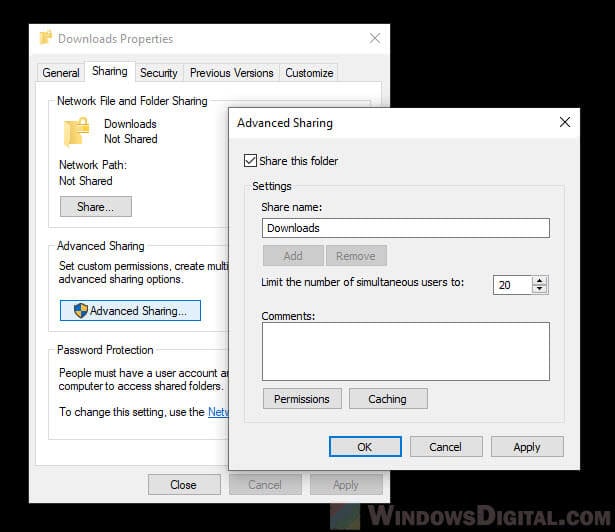
- Create a folder on the destination computer and and share the folder by right-clicking the folder > Properties > Sharing > Advanced Sharing > Share this folder, so that the source computer can see the folder from the Network directory.
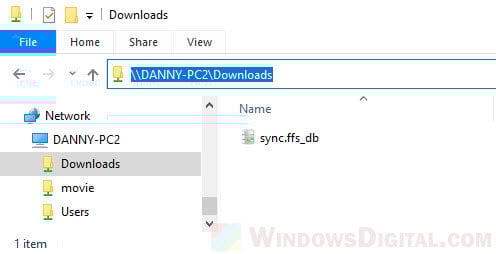
Once you’ve done all of the above, in the File Explorer, browse to the destination network folder. Copy the full path of the network folder by clicking on the path address bar while in the network folder and press CTRL + S keys to copy the entire path.
Now, in DSynchronize, manually add the destination folder by double-clicking on the empty area in the Destinations box, then paste (or manually enter) the full path of the network folder you’ve copied earlier.
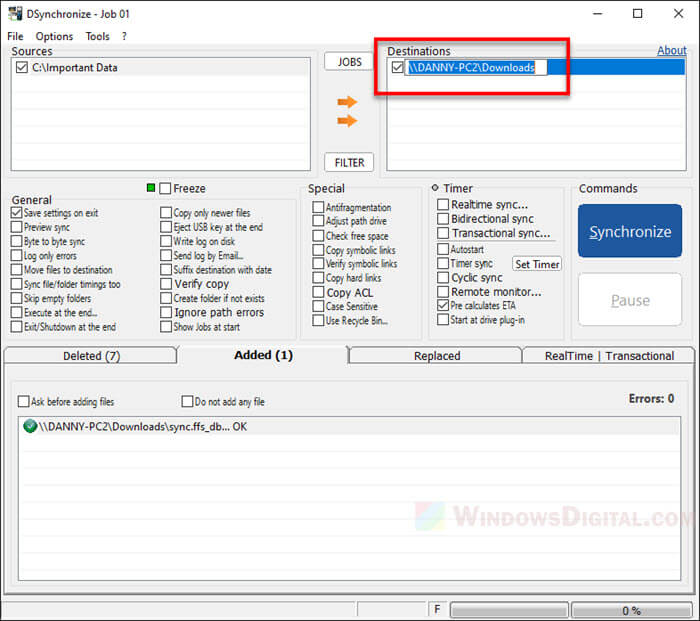
Click on the Synchronize button to begin syncing the files between the two folders from two different computers.
You can repeat the steps to add multiple destinations to sync folders across multiple computers in Windows 11/10.
How to allow automatic real time syncing in DSynchronize
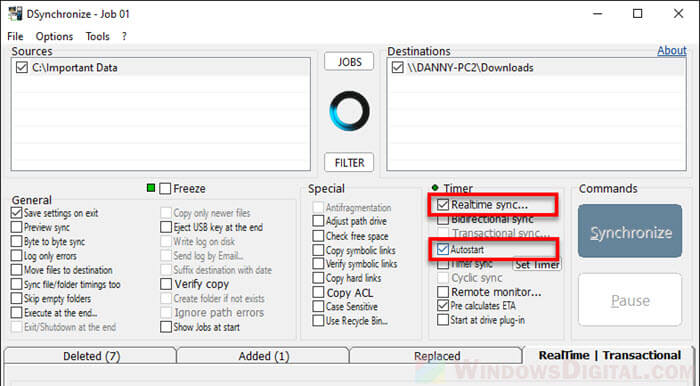
To set up automatic real time sync, enable the “Realtime sync” checkbox in DSynchronize. From now onward, whenever you make changes from either folder, it will be synced immediately in real time.
To allow DSynchronize to sync the files as soon as you startup your computer, enable the “Autostart” option in DSynchronize. When both “Realtime sync” and “Autostart” options are enabled, DSynchronize will be automatically launched upon startup of your PC and will begin real time sync immediately.
How to sync files between multiple sources or destinations
DSynchronize takes each line of source to destination as one syncing job. You can set multiple sources or destinations by adding more folders to them.
For example, to sync a single source to multiple destinations, add a new line with the same source but to a different destination. The screenshot below is an example of syncing files from a single source folder to two different destinations, so that I can have two backup copies on two different locations.
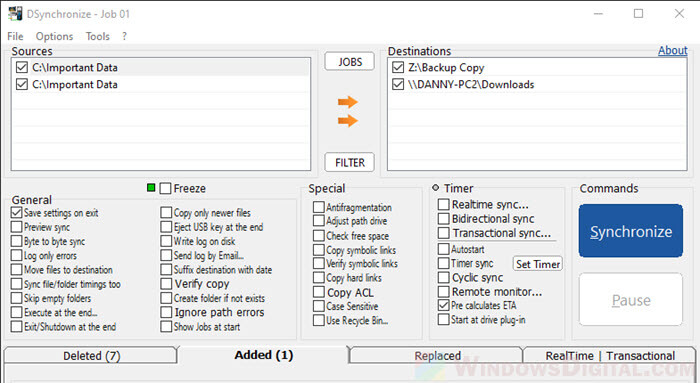
Be sure to also check out other optional configurations under “General” and “Special” which you may find useful at some point of time later as you use the software.
Readers help support Windows Report. We may get a commission if you buy through our links.
Read our disclosure page to find out how can you help Windows Report sustain the editorial team. Read more
Those who work on a PC probably know what’s it like to switch between computers and set up a new laptop from scratch or use two computers: your main desktop and a travel laptop in order to work on the road or remotely.
You’re also probably familiar with the frustration caused by realizing that you don’t have the exact same data and software on both PC, especially when you work on one device more on the other.
That’s precisely why we’ve written this detailed article where we show how you can sync your data between multiple Windows PCs and even move all your software and settings in a quick and easy way.
How can I sync folders between computers in Windows 10?
-
1. Locate the folder that you want to sync.
-
2. Right-click it and select Properties from the list of options.
-
3. Navigate to the Sharing tab, then select Advanced sharing.
-
4. Check the box next to Share this folder.
-
5. Click on permissions so that you can set up your share permissions.
-
6. Press on OK to confirm the changes.
-
7. Open your other computer.
-
8. Press Windows + R to open the Run console.
-
9. Type in the following, but replace the computername with the name of the computer where you have created the shared folder:
\computernameYou can also simply type in the internal IP address of the computer.
1. Sync folders over the network
An easy method to sync a folder between two different computers that run the Windows 10 OS is to do it via the network. For this, you need a good internet connection.
While this method is great for quick updates and syncs between folders, it doesn’t work for data such as user customizations and settings.
It also can’t help you if you want to copy your installed software from one Windows computer to another. For that, you’ll need third-party software.
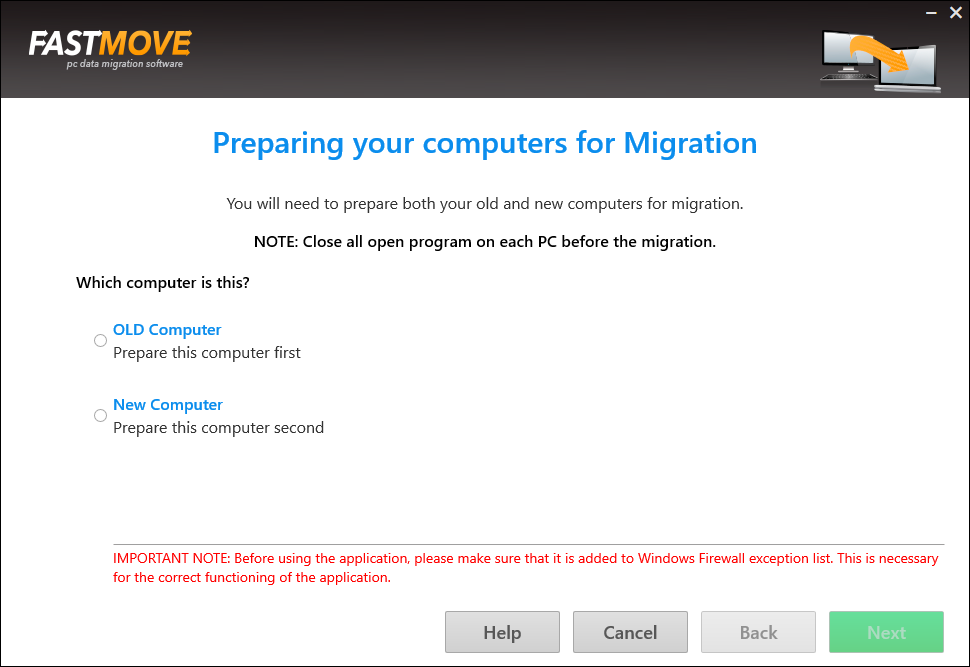
2. Sync folders and migrate data with FastMove
If syncing folders isn’t the only thing you have on your mind and you also need a fast and efficient way of migrating the entire contents of a PC in one simple move, then we recommend trying out a data migration tool.
There are a few of them on the market, which makes choosing the absolute best quite difficult, especially if you don’t know exactly what criteria to take in mind.
We’ve decided to help you make the right choice by recommending FastMove – an excellent all-in-one data migration program. What makes FastMove special is that it’s the only software of the kind that includes a folder sync feature that works both online and offline.
With FastMove you can move installed programs, and complete user profiles with all their settings and customizations, files, folders, and even device drivers. You can do all that over a network, offline using a local folder, or offline with the help of a data cable.
Syncing folders with FastMove can be done far faster than using Windows native method thanks to the dedicated Sync Folders tool designed specifically for this particular job.
Here’s how you can use FastMove to keep your data folders in sync between PCs:
- Select two locations.
- They can be on two different computers, on the same computer, on your PC, and your external HDD, etc.

- They can be on two different computers, on the same computer, on your PC, and your external HDD, etc.
- Let FastMove scan them and find which files are different or missing from one location.
- Select the files you want to copy between the two folders and launch the sync.
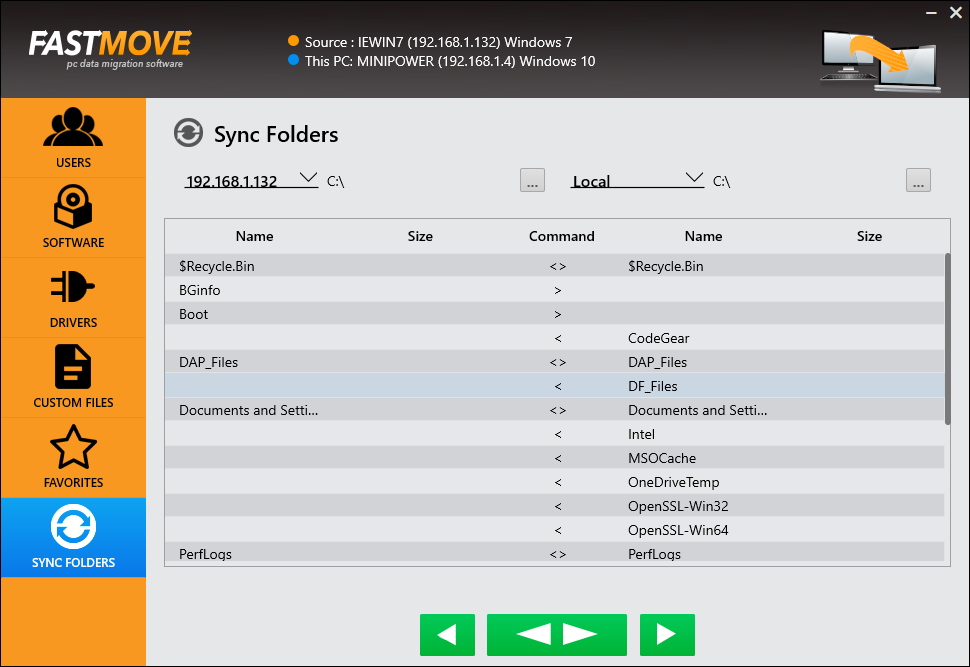
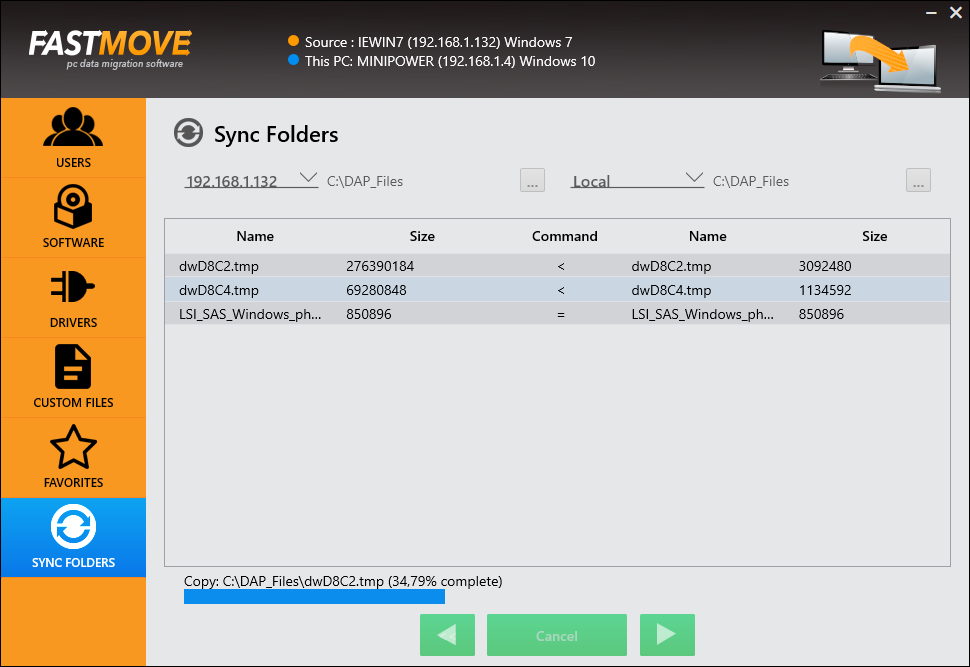
The process is really simple and works fast. If you’re using online sync, the actual speed will depend on your network speed and stability. You can also sync folders in an offline mode using a data cable.
As we’ve mentioned above, FastMove is not just a folder sync app. It’s a great program for those who need to move all kinds of data between Windows 7, Windows 8, and Windows 10 PCs in one go.
FastMove
The folders you have on your secondary Pc will be the same as the ones on your primary one. Get FastMove today!
- Microsoft wants Windows 10 users to upgrade to Windows 11 or Copilot + PCs
- Deleting ‘inetpub’ folder lets hackers permanently stop Windows updates, Microsoft warns
- The latest KB5055612 for Windows 10 22H2 brings huge stability to the OS
- Microsoft April 2025 Patch Tuesday: Fixes for 134 security vulnerabilities, one exploited Zero-Day
- With KB5055518, Windows 10 finally fixes a basic File Explorer issue
3. Sync folders using cloud services
While not specifically designed for this particular task, cloud storage services can all be used as a workaround method for syncing data between multiple PCs.
In fact, it doesn’t even matter if the cloud service that you are using has a downloadable client or not.
Here’s what you need to do in order to sync folders:
- Log into both PCs using the same cloud account.
- If the service has a downloadable client, add whatever folders you need to share in the client’s shared space on your primary PC.
- Access the shared space from the secondary PC.
If you’re looking for efficient cloud service tools to try out, know that there are plenty to choose from, and many even offer free plans.
These future-oriented cloud storage apps will offer a positive impact on keeping data safe, backup essential files, or encrypting important information.
This concludes our list of methods through which you can sync folders between computers.
If you know of any other method that we may have missed out on, let us know by leaving a reply in the comments section below, and we’ll update the article accordingly.
Teodor Nechita
Eager to help those in need, Teodor writes articles daily on subjects regarding Windows, Xbox, and all things tech-related.
When not working, you may usually find him either at the gym or taking a stroll in the park, trying to find inspiration for the next articles he may write.
Загрузить PDF
Загрузить PDF
В этой статье мы расскажем вам, как создать общую папку и пользоваться ею на компьютерах, подключенных к вашей сети. Это означает, что любой компьютер, который подключен к вашей сети, получит доступ к папке и сможет работать с файлами, которые хранятся в ней. Это можно сделать на компьютере с Windows и Mac OS X, причем компьютер, на котором находится общая папка, и компьютер, который обращается к общей папке, должны быть подключены к одной сети (проводной или беспроводной). Если вы просто хотите синхронизировать папку на своем компьютере с другой папкой или флеш-накопителем, используйте программу FreeFileSync.
-

Если вы хотите синхронизировать новую, а не существующую папку, создайте ее, выполнив следующие действия:
- перейдите в папку, в которой вы хотите создать новую папку (например, перейдите на рабочий стол);
- щелкните правой кнопкой мыши по пустому пространству;
- в меню выберите «Создать»;
- нажмите «Папку»;
- введите имя папки;
- нажмите ↵ Enter;
- перетащите файлы на значок папки.
-
Нажмите на логотип Windows в нижнем левом углу экрана.
-
Щелкните по значку в виде папки в нижней левой части меню «Пуск».
-
Найдите папку, которую вы хотите синхронизировать, а затем щелкните по ней, чтобы выбрать.
-
Она находится в верхней левой части папки. В верхней части окна откроется панель инструментов.
-
Эта опция находится в разделе «Поделиться» на панели инструментов. Откроется новое окно.
-
Он находится в верхней части окна. Раскроется меню.
-
Эта опция находится в меню.
-
Эта кнопка находится справа от меню. Теперь папка будет доступна всем пользователям, которые подключены к вашей сети.
-
Нажмите «Чтение ▼» справа от «Все», а затем в меню выберите «Чтение и запись».
-
Эта кнопка находится в нижней части окна.
-
Эта кнопка находится в нижней части окна. Окно закроется — это означает, что выбранной папкой могут пользоваться компьютеры, подключенные к вашей сети.
-
Чтобы синхронизировать папку между двумя компьютерами, оба компьютера должны быть подключены к одной беспроводной сети.
-
Теперь, когда вы создали общую папку, с ее содержимым можно работать (просматривать, добавлять и удалять файлы) на другом компьютере:
- Windows: откройте окно Проводника, щелкните по имени своего компьютера на левой панели (возможно, вам придется прокрутить ее вниз) и откройте папку.
- Mac: откройте окно Finder, щелкните по имени своего компьютера в нижней левой части окна и откройте папку.
Реклама


-
Если вы хотите синхронизировать новую, а не существующую папку, создайте ее, выполнив следующие действия:
- перейдите в папку, в которой вы хотите создать новую папку (например, перейдите на рабочий стол);
- нажмите «Файл»;
- щелкните по «Создать папку»;
- введите имя папки;
- нажмите ⏎ Return;
- перетащите файлы на значок папки.
-
Нажмите на логотип Apple в верхнем левом углу экрана. Раскроется меню.
-
Эта опция находится в верхней части меню. Откроется окно «Системные настройки».
-
Вы найдете эту опцию в правой части окна «Системные настройки».
-
Это опция в левой части окна.
-
Нажмите «+» под списком «Общие папки», выберите нужную папку и щелкните по «Добавить» в нижнем правом углу экрана.[1]
-
Нажмите «Произвольно» справа от опции «Все» в списке «Пользователи», а затем в меню выберите «Чтение и запись».
-
Эта опция находится в нижней правой части окна. Откроется новое окно.
-
Они находятся в верхней части окна.[2]
- Если с общей папкой будет работать компьютер под управлением Windows, установите флажок у «Общий доступ к Windows».
-
Эта опция находится в нижней части окна. Изменения будут сохранены, и активирован общий доступ к файлам на компьютере Mac.
- Если общий доступ к файлам не включен, установите флажок слева от «Общий доступ к файлам» в левой части окна.
-
Чтобы синхронизировать папку между двумя компьютерами, оба компьютера должны быть подключены к одной беспроводной сети.
-
Теперь, когда вы создали общую папку, с ее содержимым можно работать (просматривать, добавлять и удалять файлы) на другом компьютере:
- Mac: откройте окно Finder, щелкните по имени своего компьютера в нижней левой части окна и откройте папку.
- Windows: откройте окно Проводника, щелкните по имени своего компьютера на левой панели (возможно, вам придется прокрутить ее вниз) и откройте папку.
Реклама


-
Перейдите на страницу https://freefilesync.org/, нажмите на зеленую кнопку «Download» (Загрузить) в нижней части окна, прокрутите вниз до заголовка «Download FreeFileSync» (Загрузить FreeFileSync) и нажмите на ссылку, соответствующую вашей операционной системе.
- Например, нажмите «Download FreeFileSync 10.0 Windows Setup» для Windows или «Download FreeFileSync 10.0 macOS» для Mac OS X.
-
Этот процесс зависит от операционной системы:
- Windows: дважды щелкните по скачанному EXE-файлу, нажмите «Да», когда появится запрос, а затем щелкните по «Next» (Далее), чтобы запустить установку.
- Mac: дважды щелкните по скачанному ZIP-файлу, чтобы открыть и извлечь его содержимое, дважды щелкните по PKG-файлу в извлеченной папке и следуйте инструкциям на экране.
-
Сделайте это, если хотите, чтобы любые изменения, внесенные в папке, автоматически синхронизировались при подключении накопителя. Накопитель (флеш-накопитель или внешний жесткий диск) подключите к USB-порту компьютера.
- Пропустите этот шаг, если просто хотите синхронизировать папку с другой папкой на своем компьютере.
- На компьютере Mac вам понадобится флеш-накопитель USB-C (Thunderbolt 3) или внешний жесткий диск, или адаптер USB3.0–USB/C.
-
Для этого дважды щелкните по значку в виде двух зеленых стрелок.
-
Эта опция находится в верхней левой части окна FreeFileSync. Содержимое окна FreeFileSync будет очищено.
-
Нажмите «Browse» (Обзор) посередине окна, найдите папку с нужными файлами, щелкните по ней и нажмите «Открыть».
- На компьютере Mac нажмите «Выбрать».
-
Это папка или накопитель, с которым будут синхронизированы файлы вашей папки. Нажмите «Browse» (Обзор) в правой части окна FreeFileSync, выберите папку или накопитель и нажмите «Открыть» (Windows) или «Выбрать» (Mac).
-
Эта опция находится над столбцом первой папки. Отобразятся два списка файлов — файлы в вашей папке и файлы в другой папке или на накопителе.[3]
-
Щелкните по треугольнику справа от зеленого значка в виде шестеренки. Этот значок находится над столбцом папки или накопителя, с которым вы хотите синхронизировать свои папки. Раскроется меню.
-
Картинка с сайта: ru.wikihow.com


Эта опция находится в меню. Теперь все файлы, которые хранятся в вашей папке, будут автоматически скопированы в другую папку или накопитель.
- Имейте в виду, что файлы в другой папке (накопителе), которые не соответствуют файлам в первой папке, будут удалены.
- Чтобы синхронизировать папки в обоих направлениях и избежать удаления файлов, нажмите «<- Two way ->» (Двусторонняя синхронизация).

Эта опция находится в верхней правой части окна.

Файлы из вашей папки будут скопированы в другую папку.

Если вы хотите синхронизировать папки в будущем, сохраните настройки в файле конфигурации:
- нажмите на «Save as» (Сохранить как); это зеленый значок в виде круглой стрелки в верхней левой части окна;
- введите имя конфигурации;
- выберите папку для сохранения;
- нажмите «Save» (Сохранить).

Чтобы выполнить повторную синхронизацию своей папки с другой папкой или носителем, найдите и дважды щелкните по файлу конфигурации, который вы сохранили. Это приведет к запуску процесса синхронизации.
- Если вы переместите или переименуете свою папку или внешний накопитель, синхронизация файлов не сработает, и вам придется изменить конфигурацию.
Реклама
Советы
- Также можно создать сетевой диск на основе папки, которая хранится на вашем компьютере. Будет создана папка, к которой получат доступ все компьютеры, подключенные к вашей сети.
Реклама
Предупреждения
- Если перенести файлы из общей папки на основном компьютере, компьютеры, подключенные к одной сети, не получат доступ к таким файлам.
Реклама
Об этой статье
Эту страницу просматривали 22 721 раз.