
Robocopy – это консольная утилита Windows для копирования файлов, которую можно использовать для синхронизации/репликации файлов и каталогов, и в сценариях резервного копирования. Robocopy (Robust File Copy) доступна начиная с Windows NT 4.0 Resource Kit, но по умолчанию эта функция появилась только в Windows Vista и Windows Server 2008. Robocopy заменяет Xcopy и copy, как более функциональная.
Содержание:
- Основные возможности Robocopy
- Синтаксис и параметры robocopy
- Использование robocopy для зеркалирования каталогов
- Инкрементальное копирование с помощью robocopy
- Robocopy: перемещение файлов
- Пример использование robocopy в планировщике задач
- Отслеживание изменений в каталогах с помощью robocopy
- Коды возврата (ошибки) robocopy
Основные возможности Robocopy
Кроме обычного копирования файлов и папок из папки источника в каталог назначения, в Robocopy есть множество очень полезных функций:
- Устойчивость к обрывам сети (robocopy может продолжить копирования после восстановления сетевого доступа);
- Корректное копирование файлов с их атрибутами и NTFS правами доступа;
- Копирование с сохранением исходной временной метки;
- Возможность копирования файлов и директорий, запрещенных для доступа даже администратору, с помощью ключа /B (ключ позволяет игнорировать проверку прав доступа, ключ доступен только для участников группы Администраторы или Операторы архива);
- Возможность задать количество попыток копирования файла, если файл недоступен;
- Режим полного зеркалирования директорий;
- Пропуск уже существующих файлов (с одинаковым размером или временной меткой timestamp);
- Индикатор прогресса копирования;
- Корректная работа с длинными путями (более 260 символов);
- Эффективные алгоритмы и многопоточность позволяют выполнять копирование файлов намного быстрее, чем обычное копирование средствами Windows;
- Поддержка коды возврата (что позволяет использовать robocopy в различных внешних скриптах и утилитах).
Официальной графической версии robocopy (c GUI) от Microsoft нет. Существуют пользовательские версии, но их поддержка прекращена. Список неофициальных GUI для robocopy (это сторонние программы):
- EazyCopy
- RoboMirror
- RichCopy
Синтаксис и параметры robocopy
Robocopy имеет много параметров, которые на первый взгляд могут показаться сложными, но имея под рукой документацию, вы с легкостью разберетесь и сможете править скрипты под себя.
Официальная документация: https://docs.microsoft.com/en-us/windows-server/administration/windows-commands/robocopy
Синтаксис robocopy состоит из двух обязательных параметров (исходный и целевой каталог) и двух необязательных (фильтр файлов и параметры):
robocopy <source> <dest> [фильтр файлов] [параметры]
Поддерживаются как локальные пути, так и UNC, например, \\server\directory
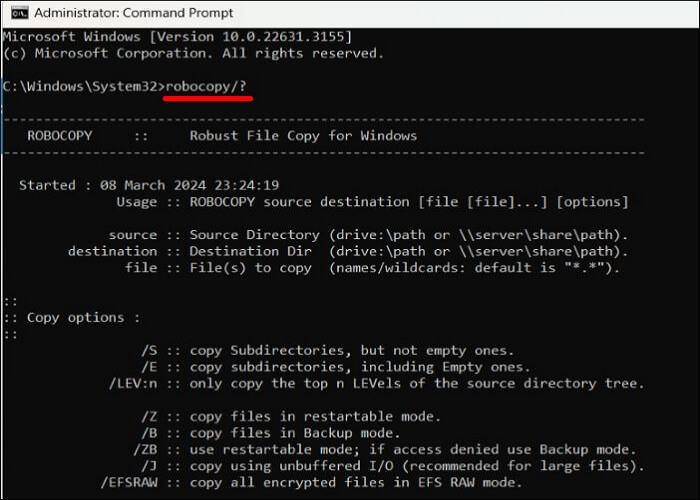
Полный синтаксис утилиты robocopy (все параметры и их описания) доступны по команде:
robocopy /?
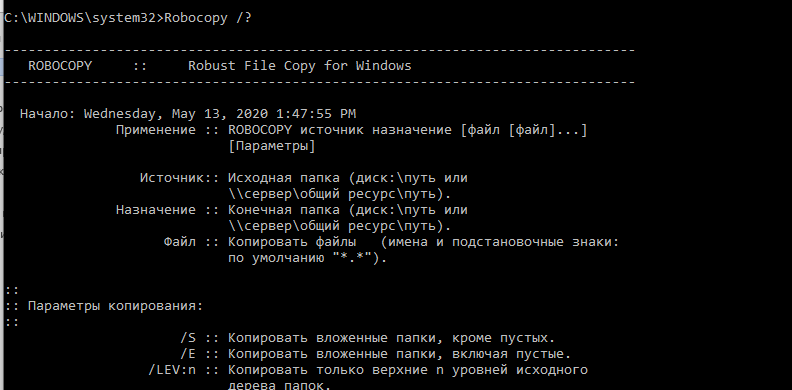
Исполняемы файл robocopy.exe находится в каталоге C:\Windows\System32.
Поскольку ключей в robocopy много, мы будем рассматривать их на практике, в готовых командах. Мы не будем рассматривать самые простые примеры использования robocopy, т.к. обычно они не вызывают вопросов. Ниже представлены готовые к применению более сложные команды robocopy, которые можно использовать в реальных сценариях.
Для тестирование различных команд robocopy без выполнения операций (копирования, перемещения или удаления) с файлами используется параметр
/L
. Данный параметр вернет список файлов и папок, которые будут скопированы вашей командой.
Использование robocopy для зеркалирования каталогов
Вы можете зеркалировать (синхронизировать) содержимое двух каталог с помощью следующей команды robocopy (под зеркалированием понимается копирование файлов из целевой папки с удалением файлов в целевом каталоге, если они удалены в источнике).
robocopy \\testnode1\C$\source\ \\testnode2\c$\dest\ *.txt /MIR /COPYALL /Z /B /J /R:3 /W:1 /REG /TEE /LOG+:%appdata%\robocopy.log
-
\\testnode1\C$\source\
— исходный каталог, откуда копируются файлы -
\\testnode2\C$\dest\
— каталог назначения, куда скопируются файлы -
*.txt
– фильтр файлов. Синхронизируются только .txt файл и директории. -
/MIR
– полное зеркалирование данных в source и dest директориях. Файлы, удаленные из source директории или не присутствующие в ней, также будут удалены из dest. Если вы хотите, чтобы удаленные из source файлы оставались в dest, то поменяйте параметр /MIR на /E -
/COPYALL
– копирует всю информацию о файле (Атрибуты, параметры безопасности и т.д.). Как альтернатива, можно применять флаг /COPY:DT для копирования timestamp, а не всей информации. /COPALL требует прав администратора -
/Z
– robocopy продолжит копирование файла при обрыве. Полезно при копировании больших файлов (неплохая альтернатива копированию файлов по BITS) -
/B
– позволяет robocopy избегать ошибки access denied error. В этом режиме robocopy игнорирует все права на файлы, которые могли бы помешать прочитать/записать файл. Этот режим требует прав администратора либо участие в группе Операторы архива -
/J
– Копирование без буфера (файлового кэша, оперативной памяти). Эффективно для больших файлов. -
/R:3
– количество попыток скопировать недоступный файл. Значение по умолчанию – миллион, поэтому необходимо его сменить. -
/W:1
– секунды между попытками скопировать недоступный файл. Значение по умолчанию – 30 секунд. -
/REG
– сохранить текущие значения ключей /R и /W в реестр как стандартные, для будущих вызовов robocopy. -
/TEE
– разделение вывода работы команды и в лог файл, и в консоль. При фоновом вызове robocopy (например, из планировщика задача) этот параметр можно убрать, оставив только /LOG -
/LOG
– путь к файлу лога
Обратите внимание на ключ /Z даже если вы копируете небольшие файлы по устойчивому каналу. Он не несёт дополнительных расходов при использовании, но в случае обрыва, вы сможете продолжить копирование просто повторно запустив скрипт.
При копировании больших файлов (более 2 Гб) с некоторых iSCSI/SAN томов, процесс robocopy может существенно использовать оперативную память сервера. Проблем обычно связано с тем, что для данного LUN в настройках RAID используется write-through кэширование вместо write-back.
Инкрементальное копирование с помощью robocopy
Сам по себе robocopy не может полностью обеспечить инкрементальное резервное копирование каталога (копирование новых и измененных файлов), для этого мы будем использовать небольшой bat скрипт:
@echo off
set date_=%date:/=-%
set source=C:\source
set dest=\\testnode2\C$\dest\%date_%
mkdir %dest%
robocopy "%source%" "%dest%" /maxage:1 /E /COPYALL /Z /B /J /R:3 /W:1 /REG /LOG+: /LOG+:%appdata%\robocopy.log
@echo on
-
set date_=%date:/=-%
— эта строчка присваивает значение переменной date_ в формате DD.MM.YYYY -
/maxage:1
— Максимальный возраст файла. Исключает файлы старше N дней или даты. Дата указывается в формате YYMMDD, например, /maxage:20200421 -
/E
– копирует подпапки, без ограничения уровня вложенности. Для контроля уровня вложенности директорий можно использовать параметр /lev, например, /lev:3
Инкрементальность осуществляется за счёт параметра /maxage:1 — файлы старше суток копироваться не будут. Для первого, “базового” копирования, можно выполнить этот скрипт без параметра /maxage.
Заметка. Если файловые системы source или dest не являются NTFS, используйте ключ
/FFT
, так как на других файловых системах (включая эмулированные NTFS) может возникнуть ошибка, из-за которой robocopy будет видеть старые файлы как измененные, из-за отличий в метке времени.
Robocopy: перемещение файлов
С помощью ключа
/mov
или
/move
вы можете переместить файлы (а точнее удалить успешно скопированные файлы из исходной директории):
robocopy C:\source\ F:\dest\ /MOVE /E /COPYALL /Z /B /J /R:3 /W:1 /REG /TEE /LOG+:%appdata%\robocopy.log
-
/MOVE
– удалить файлы и директории из исходной папки, после того как они были скопированы. Имейте в виду, что этот ключ нужно использовать вместе с /E или /S, в противном случае вы перенесете только файлы, но не директории. Если вы хотите перенести только файлы, используйте ключ /MOV
Примечание. Поведение robocopy при использовании ключей
/MOVE
и
/MOV
не интуитивно.
- Если вы используете ключ /MOVE с ключом /E, то вы перенесете все файлы, директории (включая файлы внутри них) и пустые директории. Файлы и директории удалятся из исходной папки. /MOVE с /S даст такой же результат, но пустые директории не перенесутся и будут удалены.
- Если вы используете ключ /MOV с ключом /E, то вы перенесете все файлы, включая те, которые находятся в директориях и поддиректориях, также скопируются все директории (включая пустые), но они не будут удалены из исходного каталога, в отличие от файлов. Используя /MOV с /S, вы получите такой же результат, но пустые директории не будут скопированы.
Пример использование robocopy в планировщике задач
Для примера возьмём задачу: нам необходимо с помощью robocopy регулярно синхронизировать содержимое сетевой папки между двумя серверами с ведением логов.
- Исходный путь — \\testnode1\C$\source
- Целевая директория- \\testnode2\C$\source
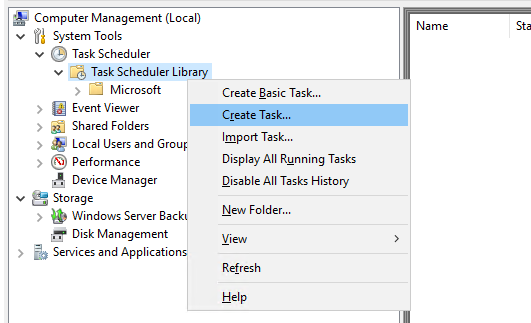
Запустите командную строку с правами администратора и введите: compmgmt.msc
Перейдите в System Tools -> Task Scheduler Library. Создайте новое задание планировщика (Create task).
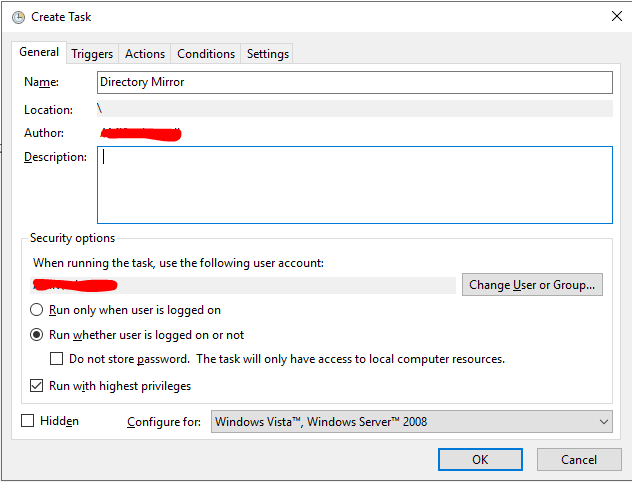
Укажите имя задания, и выберите пользователя из-под которого будет выполняться задание. Пользователь должен иметь доступ на чтению и запись в обоих каталогах (при копировании по сети между серверами домена можно использовать аккаунт System, в этом случае нужно предоставить на целевой каталог права RW для объекта computer сервера-источника) .
Выберите опцию Run whether user is logged on or not, для того чтобы задание выполнялось в фоновом режиме. Также отметьте Run with highest privileges. Эта опция сработает если аккаунт из-под которого выполняется задание, будет иметь права администратора.
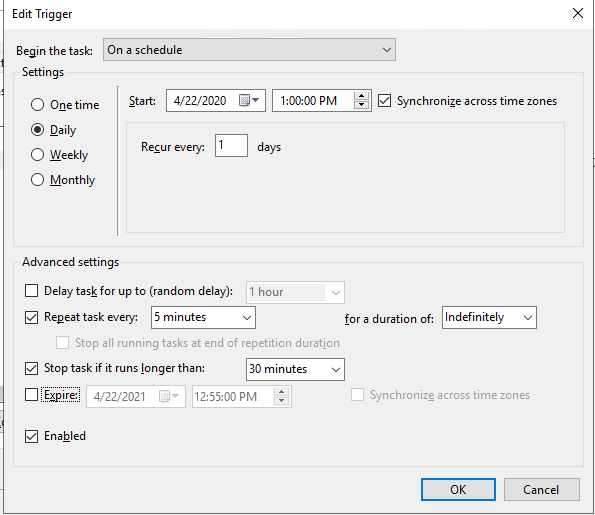
Перейдите на вкладку Triggers и создайте новый триггер.
Выберите параметр On a schedule (по расписанию), выберите время начала и отметьте Repeat task every, указав интервал выполнения. В моём случае это 5 минут – каждые 5 минут, начиная с часа дня 22 апреля (обязательно измените эту дату на ту, которая нужна вам), директории будут синхронизированы. В for a duration of поставьте Indefinitely (бесконечно)
Перейдите во вкладку Actions и нажмите New…
Выберите Start a program, и укажите путь к .bat скрипту.
Содержание robocopy-mirror.bat:
@echo off
robocopy \\testnode1\C$\source\ \\testnode2\c$\dest\ /MIR /COPYALL /Z /B /J /R:3 /W:1 /REG /LOG+:C:\robocopy.log
@echo on
Помимо журнала выполнения задания планировщика, robocopy будет писать собственный лог файл копирования в C:\robocopy.log. Если аккаунт из-под которого будет выполняться скрипт не имеет прав администратора, смените C:\robocopy.log на нужный вам путь.

Остальные настройки заполнять не надо. После нажатия на кнопку ОК, вас попросит ввести пароль от учетной записи, которую вы выбрали для запуска задания.
Если вы всё настроили правильно, директории должны начать синхронизироваться.

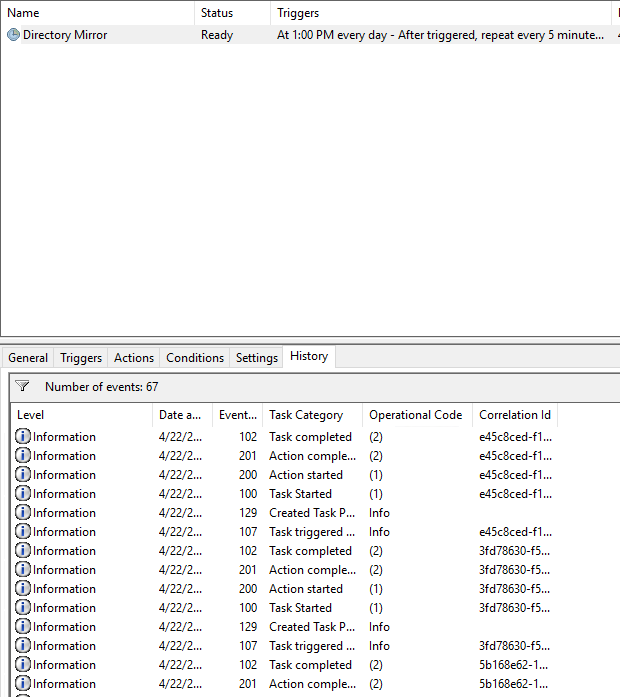
Если у вас возникли проблемы с выполнением скрипта, то обязательно проверьте вкладку History вашей задачи
Отслеживание изменений в каталогах с помощью robocopy
В robocopy есть встроенный механизм отслеживания изменений в исходном каталоге (и их последующего копирования) и встроенный планировщик – параметры
/mon
и
/mot
.
-
/mon:N
– проверяет исходную директорию на предмет изменений каждую 1 минуту, и если изменений в директории больше чем N, то будет произведено копирование в целевую директорию. Если задан параметр /mot:Y, то изменения будут проверяться каждые Y минут. -
/mot:N
– проверяет исходную директорию на предмет изменений каждые N минут. Минимальное значение N = 1, в минутах. Если параметр /mon не задан, то будет считаться что /mon:1
.bat скрипт для зеркалирования с отслеживанием изменений с интервалом в 1 минуту. Этот скрипт нужно запускать из-под аккаунта с правами администратора.
@echo off
robocopy \\testnode1\C$\source\ \\testnode2\c$\dest\ /MIR /COPYALL /Z /B /J /R:3 /W:1 /REG /LOG+:%appdata%\robocopy.log /mon:1 /mot:1
Плюсы:
- Не нужно создавать задание в планировщике задач
- Подходит для непостоянного выполнения. Например, в течение нескольких часов, в таком случае запустить скрипт руками через CMD проще, чем создавать задание в планировщике
Минусы:
- Чтобы запустить .bat скрипт в фоновом режиме, нужно либо использовать VBS скрипт, либо стороннее ПО, например, NirCmd.
- Минимальный интервал поиска изменений и копирования – 1 минута. Для меньшего интервала нужно использовать PowerShell или bat скрипт.
Коды возврата (ошибки) robocopy
Ниже приведены стандартные коды возврата robocopy, которые можно использовать для обработки различных ошибок, которые возвращает утилита после выполнения действия копирования (кот возврата эта битовая маска).
| Hex | Decimal | Meaning if set |
| 0x00 | 0 | No errors occurred, and no copying was done. The source and destination directory trees are completely synchronized. |
| 0x01 | 1 | One or more files were copied successfully (that is, new files have arrived). |
| 0x02 | 2 | Some Extra files or directories were detected. No files were copied Examine the output log for details. |
| 0x04 | 4 | Some Mismatched files or directories were detected. Examine the output log. Housekeeping might be required. |
| 0x08 | 8 | Some files or directories could not be copied (copy errors occurred and the retry limit was exceeded). Check these errors further. |
| 0x10 | 16 | Serious error. Robocopy did not copy any files. Either a usage error or an error due to insufficient access privileges on the source or destination directories. |
| Коды возврата могут комбинироваться: | ||
| 0x03 | 3 | (2+1) Some files were copied. Additional files were present. No failure was encountered. |
| 0x05 | 5 | (4+1) Some files were copied. Some files were mismatched. No failure was encountered. |
| 0x06 | 6 | (4+2) Additional files and mismatched files exist. No files were copied and no failures were encountered. This means that the files already exist in the destination directory |
| 0x07 | 7 | (4+1+2) Files were copied, a file mismatch was present, and additional files were present. |
Любое значение больше 7 говорит о том, что при копировании через robocopy возникла ошибка. Вы можете обрабатывать эти ошибки в bat файле:
if %ERRORLEVEL% EQU 16 echo ***FATAL ERROR*** & goto end
if %ERRORLEVEL% EQU 15 echo OKCOPY + FAIL + MISMATCHES + XTRA & goto end
if %ERRORLEVEL% EQU 14 echo FAIL + MISMATCHES + XTRA & goto end
if %ERRORLEVEL% EQU 13 echo OKCOPY + FAIL + MISMATCHES & goto end
if %ERRORLEVEL% EQU 12 echo FAIL + MISMATCHES& goto end
if %ERRORLEVEL% EQU 11 echo OKCOPY + FAIL + XTRA & goto end
if %ERRORLEVEL% EQU 10 echo FAIL + XTRA & goto end
if %ERRORLEVEL% EQU 9 echo OKCOPY + FAIL & goto end
if %ERRORLEVEL% EQU 8 echo FAIL & goto end
if %ERRORLEVEL% EQU 7 echo OKCOPY + MISMATCHES + XTRA & goto end
if %ERRORLEVEL% EQU 6 echo MISMATCHES + XTRA & goto end
if %ERRORLEVEL% EQU 5 echo OKCOPY + MISMATCHES & goto end
if %ERRORLEVEL% EQU 4 echo MISMATCHES & goto end
if %ERRORLEVEL% EQU 3 echo OKCOPY + XTRA & goto end
if %ERRORLEVEL% EQU 2 echo XTRA & goto end
if %ERRORLEVEL% EQU 1 echo OKCOPY & goto end
if %ERRORLEVEL% EQU 0 echo No Change & goto end
:end
Утилита robocopy имеет огромный функционал и позволяет гибко настроить операции копирования. Как альтернативу robocopy в PowerShell можно использовать командлет Copy-Item, который хоть и менее функционален, но работает с объектной моделью PowerShell, что может быть важно, если вы часто используете PowerShell или используете цепочки автоматизации с другими языками программирования.
RoboCopy.exe ИСТОЧНИК ЦЕЛЬ [ФАЙЛ [ФАЙЛ]...] [ПАРАМЕТРЫ]
-
ИСТОЧНИК (
диск:\путьили \\сервер\общий_ресурс\путь) -
ЦЕЛЬ (
диск:\путьили\\сервер\общий_ресурс\путь) -
ФАЙЛ Копировать файлы (имена и подстановочные знаки: по умолчанию
*.*)
| Копирования | |
|---|---|
/S |
Копировать вложенные папки, кроме пустых |
/E |
Копировать вложенные папки, включая пустые |
/LEV:n |
Копировать только верхние n уровней исходного дерева папок |
/Z |
Копирование файлов с возобновлением |
/B |
Копирование файлов в режиме архивирования |
/ZB |
используется режим с возобновлением; если доступ запрещен, используется режим архивации |
/EFSRAW |
Копирование всех зашифрованных файлов в режиме EFS RAW |
/COPY: флаги копирования |
что копируется для файлов (по умолчанию /COPY:DAT)(флаги копирования: D=Данные, A=Атрибуты, T=Метки времени)( S=Безопасность=NTFS ACLs', O=Сведения о владельце, U=Сведения аудита) |
/DCOPY:T |
Копирование меток времени папки |
/SEC |
Копировать файлы с параметрами безопасности (эквивалентно /COPY:DATS) |
/COPYALL |
Копировать все сведения о файле (эквивалентно /COPY:DATSOU) |
/NOCOPY |
Не копировать никаких сведений о файле (удобно использовать с параметром /PURGE) |
/SECFIX |
Исправлять параметры безопасности для всех файлов, даже пропущенных |
/TIMFIX |
Исправлять атрибуты времени для всех файлов, даже пропущенных |
/PURGE |
Удалять файлы и папки назначения, которых больше не существует в источнике |
/MIR |
Создать зеркало дерева папок (эквивалентно /E с /PURGE) |
/MOV |
Перемещать файлы (удаление из источника после копирования) |
/MOVE |
Перемещать файлы и папки (удаление из источника после копирования) |
/A+:[RASHCNET] |
Добавлять заданные атрибуты скопированным файлам |
/A+:[RASHCNET] |
Удалять заданные атрибуты из скопированных файлов |
/CREATE |
Создать только дерево папок и файлы нулевой длины |
/FAT |
Создать файлы назначения только в формате 8.3 FAT |
/256 |
Отключить поддержку длинных путей ( > 256 знаков) |
/MON:n |
Наблюдать за источником; перезапустить после n изменений |
/MOT:m |
Наблюдать за источником; перезапустить через m минут, если произошли изменения |
/RH:hhmm-hhmm |
Часы запуска — время, когда можно запускать новое копирование |
/PF |
Проверять часы запуска по файлам (не по проходам) |
/IPG:n |
Интервал между пакетами (мс) для снижения нагрузки на сеть при низкоскоростных подключениях |
/SL |
копирование самих символических ссылок вместо копирования целевого объекта этих ссылок |
| Выбора файлов | |
/A |
Копировать только файлы с установленным атрибутом Архивный |
/M |
Копировать только файлы с атрибутом Архивный и сбросить его |
/IA:[RASHCNETO] |
Включить файлы, у которых установлен какой-либо из заданных атрибутов |
/XA:[RASHCNETO] |
Исключить файлы, у которых установлен какой-либо из заданных атрибутов |
/XF file [файл]… |
Исключить файлы, соответствующие заданным именам, путям и подстановочным знакам |
/XD dirs [папки]… |
Исключить папки, соответствующие заданным именам и путям |
/XC |
Исключить измененные файлы |
/XN |
Исключить более поздние файлы |
/XO |
Исключить более ранние файлы |
/XX |
Исключить дополнительные файлы и папки |
/XL |
исключить отдельно расположенные файлы и папки |
/IS |
Включить те же файлы |
/IT |
Включить оптимизированные файлы |
/MAX:n |
Максимальный размер файла — исключить файлы, размер которых более n байт |
/MIN:n |
Минимальный размер файла — исключить файлы, размер которых менее n байт |
/MAXAGE:n |
Максимальный возраст файла — исключить файлы, возраст которых превышает n дней |
/MINAGE:n |
Минимальный возраст файла — исключить файлы, возраст которых менее n дней |
/MAXLAD:n |
Наиболее поздняя дата последнего обращения — исключить файлы, которые не использовались с даты n |
/MINLAD:n |
Наиболее ранняя дата последнего обращения — исключить файлы, которые использовались после даты n(Если n < 1900, то n = n дней, в противном случае n — дата в формате ДДММГГГГ) |
/XJ |
исключить точки соединения. (по умолчанию обычно включаются) |
/FFT |
Использовать время файлов FAT (двухсекундная точность) |
/DST |
Учитывать одночасовую разницу при переходе на летнее время |
/XJD |
Исключить точки соединения для папок |
/XJF |
Исключить точки соединения для файлов |
| Повторные попытки | |
/R:n |
число повторных попыток для неудавшихся копий: по умолчанию — 1 миллион |
/W:n |
Время ожидания между повторными попытками: по умолчанию — 30 секунд |
/REG |
Сохранить /R:n и /W:n в реестре как параметры по умолчанию |
/TBD |
Ждать, пока будут определены имена общих ресурсов (ошибка повторной попытки 67) |
| Отчет | |
/L |
Только список — файлы не копируются, не удаляются, не помечаются метками времени |
/X |
Сообщать обо всех дополнительных файлах, а не только о выбранных |
/V |
Подробный вывод с указанием пропущенных файлов |
/TS |
Включать в вывод метки времени исходных файлов |
/FP |
Включать в вывод полные пути файлов |
/BYTES |
Печатать размеры в байтах |
/NS |
Без размера — не заносить в отчет размер файлов |
/NC |
Без класса — не заносить в отчет классы файлов |
/NFL |
Без списка файлов — не заносить в отчет имена файлов |
/NDL |
Без списка папок — не заносить в отчет имена папок |
/NP |
Без хода процесса — не отображать число скопированных % |
/ETA |
Показывать оценку времени окончания копирования файлов |
/LOG: файл |
Записывать состояние в файл отчет (перезаписывать существующий отчет) |
/LOG+: файл |
Записывать состояние в файл отчет(добавлять к существующему отчету) |
/UNILOG: файл |
Записывать состояние в файл отчет в формате Юникод (перезаписывать существующий отчет) |
/UNILOG+: файл |
Записывать состояние в файл отчет в формате Юникод (добавлять к существующему отчету) |
/TEE |
Направлять выходные данные в окно консоли и в файл отчета |
/NJH |
Без заголовка задания |
/NJS |
Без сведений о задании |
/UNICODE |
Состояние вывода в формате Юникод |
| Задание | |
/JOB: имя_задания |
Взять параметры из указанного файла задания |
/SAVE: имя_задания |
Сохранить параметры в указанный файл задания |
/QUIT |
Выйти после обработки командной строки (для просмотра параметров) |
/NOSD |
Не указывается исходная папка |
/NODD |
Не указывается папка назначения |
/IF |
Включить следующие файлы |
Summary
- The Windows robocopy command is a powerful tool for automating file copy and synchronization tasks.
- Robocopy is particularly useful for backing up files, mirroring drives and directories, and scheduling file copies.
- Before using robocopy, be cautious as it doesn’t ask for confirmation and can potentially delete or overwrite files. Always double-check command line commands before running them!
Being able to keep files in two locations synchronized is useful for backing up, sharing files, and staying organized. The Windows robocopy command lets you perform file copy and synchronization from the command line, so that these tasks can be automated and scheduled.
What Is the Windows Robocopy Command
The robocopy (robust file and folder copy) is a command line tool available in Windows that copies files from one place to another. It can copy between directories on the same drive, or between devices like USB sticks and portable disks, and to network locations.
When to Use the Robocopy Command
The robocopy command is perfect for automating your workflows. If you regularly have to copy files between the same locations, you can set up a script to do it all for you rather than having to perform the task manually.
It’s particularly useful for performing backup tasks, with the added advantage that you won’t have to remember to perform the backup, improving the reliability of your backup practices. You can use robocopy to regularly back up your files to an external drive, or to cloud storage.
How to Use the Robocopy Command
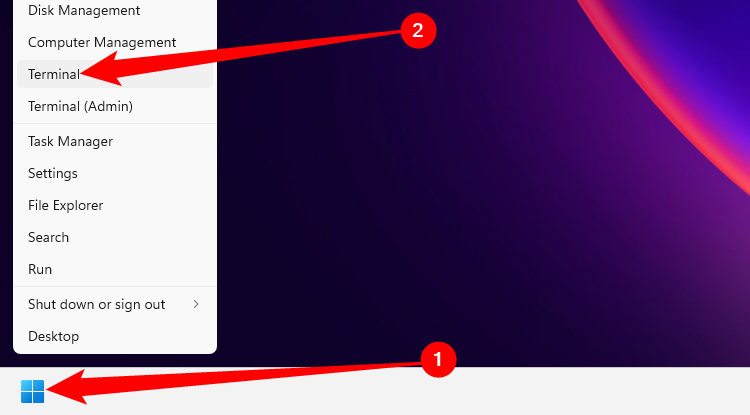
To use the robocopy command you need to open the Windows command prompt or Powershell. You can do this by right-clicking on the start menu and selecting either of the Windows Terminal or Powershell options.
The robocopy command doesn’t have a graphical interface, so you call the command with the source and destination directories, files to copy, and a list of the options you want to use to tell it how to behave.
robocopy <SOURCE> <DESTINATION> <FILES> <OPTIONS>
If no files are specified, all files are copied from the source directory to the destination directory. Commonly used options when using robocopy include:
- /MIR mirrors the directories, deleting files in the destination that aren’t in the source
- /MOVE moves files and directories, deleting them from the source once copied
- /XO files in the source that are older than the destination aren’t copied
- /XD Exclude directories matching a given name
- /b backup mode ignores file permissions that block access to files
- /l list files only, don’t actually do any copying or moving (useful for seeing what would be copied before you actually commit to running the command)
- /fp shows the full file paths in the output, again useful for seeing what robocopy is up to as it works, and previewing changes during dry runs
It’s worth pointing out that robocopy doesn’t ask for confirmation before it does something. Once you run it, it will move, delete, or overwrite files without warning, so if you’ve made a mistake in your source or destination paths, the files you want to operate on, or with any of the supplied options, data could be irretrievably lost. So, carefully check your command before you run it, test the command, and, of course, back up your files somewhere safe first!
How to Mirror (Make an Exact Copy) From One Drive or Directory to Another
To demonstrate robocopy in action, this command copies all files from the D:\ drive (the source) to the M:\ drive (the destination) on your computer.
robocopy D:\ M:\ /XO /XD "`$Recycle.Bin" "System Volume Information"
The /XO command tells robocopy not to copy files in the source that are older than those in the destination. This saves time when running the command again later on to copy only the files that have changed.
The /XD command is used to omit the «$Recycle.Bin» and «System Volume Information directories» from being copied. These are special Windows directories that hold files you’ve deleted (but not yet emptied from the Recycle Bin) and store information about the drive. Neither of these directories contain files that are needed by the user, and they often cause errors if you try to copy them, so it’s generally a good idea to leave them out of any copy operations.
Note the use of a backtick (`) before the dollar symbol in the path to the Recycle Bin directory. This is an escape character that prevents the dollar symbol from being misinterpreted as a variable.
As this command is intended for backup purposes, it doesn’t use the /MIR option to make the mirror as that would remove files in the destination that are not in the source, which would make it impossible to recover them if they were accidentally deleted.
Scripting File Copying in Windows With Robocopy
Scripting robocopy is as easy as copying your robocopy command into a batch or Powershell script.
Scheduling Robocopy to Run Automatically
The Windows task scheduler lets you automatically run programs and commands at a specified date/time, on an interval, or on a schedule. You can create a scheduled task to run your batch or Powershell script, containing your robocopy command.
What About Xcopy and Copy Commands?
Xcopy is another built-in Windows file copy command that (with the copy command for copying single files) has been around for a very long time (since the 1980’s!). While xcopy is still used by a lot of people in their scripts to copy multiple files, it is no longer the best tool for copying files. While robocopy hasn’t replaced xcopy per-se—as xcopy is still available in Windows—robocopy is faster, more reliable, and provides more options than xcopy. It does the same job, and does it better.
Robocopy is a robust tool for copying files, but it may not be the best option for inexperienced users, so before you dive in to rolling your own backup scripts, consider other, more user-friendly options. If your goal is to back up your entire computer, you can create a full system image of your Windows system and all files, so that you can restore everything in the case of disaster.
Backing up is the most important thing you can do to prevent expensive (or regrettable) data loss. Losing important work or your family photo collection irreversibly is not something anyone wants to experience, so you should have a well-thought-out backup strategy. You should make sure that the files you want to keep are properly backed up to two safe locations: a copy on a second device like a portable hard drive or USB stick, and another stored on a reputable online backup service.
Sync helps you keep two files or folders the same at a time in different locations. Changes made to one are reflected on the other, and these copies can be helpful for backups, restore points, and more. Windows offers a Robocopy command to manage syncing files on the PC. In this tutorial from EaseUS, let’s see how Robocopy sync changes only to the other file or folder. We will also learn how to automate this process with a professional tool.
Robocopy Copy Only Changed or New Files — Is It Possible
Robocopy is a robust command-based directory to copy files, folders, directories, or even one hard drive to another. Along with copying, you can use the tool for syncing tool. The utility is quite accurate and fast when mirroring files and folders of any size.
Robocopy comes with various commands to implement different use cases. Robocopy /xo is a command to copy changed files only. Upon execution, the command copy changed files only to the destination folder. This is helpful if you lose the connection or want to do an incremental and differential backup. Here are some common Robocopy commands:
- /s: To copy subdirectories, excluding empty ones.
- /e: To copy subdirectories, including empty ones.
- /lev: To copy the top N levels of the source directory tree.
- /z: To copy files in restart mode.
- /b: To copy files in Backup mode.
- /zb: Initially uses restartable mode, but upon denied access, uses file Backup mode.
- /efsraw: To copy all encrypted files in EFS RAW mode.
- /copyall: To copy all the file information. This includes the D (Data), T (Time stamps), A (Attributes), S (Security: NTFS access control list (ACL)), U (Auditing information), and O (Owner information).
If you wish to get into more details, open the command prompt and type robocopy /? the detailed information about the commands.
Is this post helpful? Share it on your social platforms, such as X and Facebook, to help more people if you find it useful!
How to Copy Only Changed Files and Folders with Robocopy
Robocopy works as a one-way file sync; you can only sync from one location to another with correct commands. To copy only new or modified files and folders (incremental sync), Robocopy comes with special commands. With the /xo or /xc options, you can let Robocopy sync changes only to the destination. Here is how to go for it:
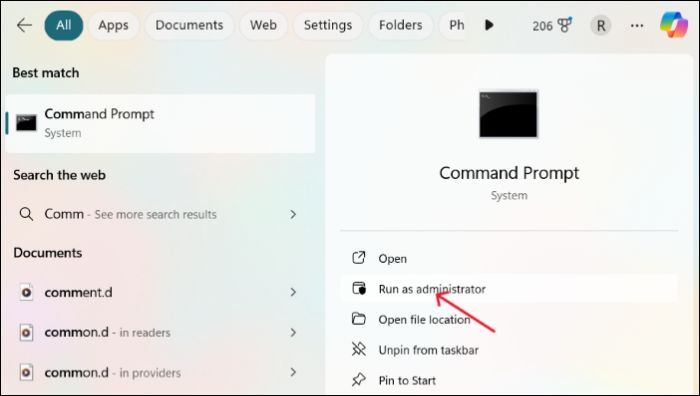
Step 1. Click on the Windows icon, and search for Command Prompt.
Step 2. Run CMD in administrator mode.
Step 3. Enter any one of the commands below and click Enter. Both commands do the same work.
- robocopy C:\sourceFolder1 E:\DestinationFolder2 /maxage:D
- robocopy C:\sourceFolder1 E:\DestinationFolder2 /xo /maxage:D
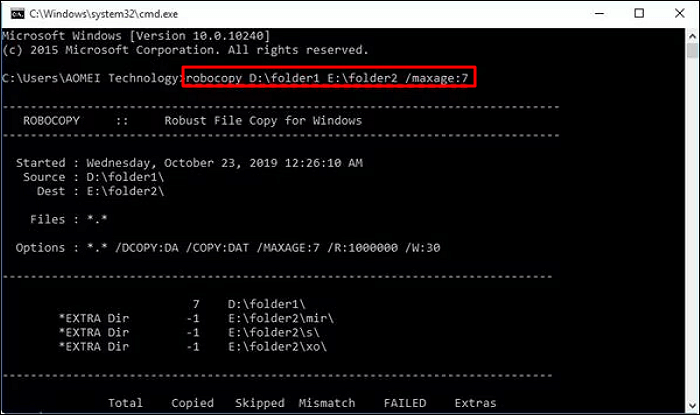
You must specify the source and destination folder and add the /xo command to copy only changed files and folders.
The /maxage:N denotes «Maximum file AGE» — exclude files older than n days/date. You can replace the N with a number of days.
Here are some similar commands to xo and xc for various use cases:
- /xo: Excludes old files (excludes all the existing files older than the copy in the source directory).
- /xc: Excludes changed files (excludes all the existing files with the same timestamp on the source directory).
- /xn: Excludes new files (excludes all the files newer than the existing files in the source directory).
- /mt: Enables multithread copy, and the default threads are set to 8, which you can manually specify based on requirements.
- /xc, /xn, /xo: Robocopy excludes all existing files in the destination directory when combined.
Try EaseUS Todo Backup to Copy Only New or Modified Files
Command-line directories are always complex and difficult for most computer users to use and execute. A simple mistake can make the whole process messy. You need detailed knowledge to execute the commands. If you have no command-line knowledge or want a user-friendly approach to achieving incremental backup (only sync changed files), EaseUS Todo Backup can be a real deal.
EaseUS Todo Backup Free, a complete backup and restoration solution, offers an exclusive incremental backup feature to update only changed or new files. You can also automate the process with frequent intervals to remove manual processes. Additionally, you can automatically back up files, folders, hard drives, or the entire system and store them on the cloud. Set up the backup and click start to save space and time for the syncing.
As one of the best file sync software for Windows, this free backup software offers whatever you want. Download the software and start your backup process now.
Step 1. To begin the backup process, click the Select backup contents button.

Step 2. Four data backup categories are listed: File, Disk, OS, and Mail.

Step 3. Lists of both local and network files are shown on the left-hand side of the screen. Expanding the directory so that you can choose the files to back up.

Step 4. Follow the guidance on the screen and choose the place where you want to store the back up.

Make sure that the backup is encrypted and set the backup schedule by clicking Options in Backup Options. You can also choose to start the backup at a certain time in Backup Scheme by clicking Options. There are many other customizable options that you can look into.

Step 5. You can store the backup file either on your computer, in EaseUS’s cloud service, or on a network-attached storage device (NAS).

Step 6. EaseUS Todo Backup enables customers store backup copies of their files on a third-party cloud drive or on the company’s own cloud storage.
If you want to back up your data on a third-party cloud drive, select Local Drive and scroll down to add Cloud Device. Then fill in your account information.

Click EaseUS Cloud, then sign up and log in with your EaseUS account if you wish to store backup files to EaseUS’ own cloud storage service.

Step 7. Click on Backup Now to start a backup. When the backup process is done, it will display as a card on the left-hand side of the screen. A right-click will let you see more about how to handle the backup job in more depth.

To Wrap Things Up
The/xo command should be used in combination with Robocopy sync changes only. However, compared to the complex and erroneous command-line utilities, the GUI versions are much better for syncing changes only. The EaseUS Todo Backup makes it easy for users to sync two files, folders, or hard drives in Windows 11, 10, 8, and 7.
EaseUS Todo Backup is also a complete backup and restoration, making it an ideal tool for backup. You can perform incremental and differential backups, store them on the cloud, and save space on your PC. Download it now, and automate the sync between two folders.
FAQs on Robocopy Copy Only Changed Files or Folders
Here are some frequently asked questions about Robocopy sync changes only.
1. How to only copy files that have been changed or are new with robocopy?
The Robocopy command to copy only changed or new files is to use /xo /maxgae. /xo exclude older files existing in the source directory, and /max age copies the new files to the destination.
2. What is the advantage of using Robocopy instead of the regular copy and paste?
Multiple advantages: Upon encountering an error, Robocopy tries again, whereas the regular copy-and-paste does not. Also, Robocopy is way faster than conventional copy-paste.
3. What is the command to copy only new files?
Robocopy has a /maxage command to copy only the new file changes to the destination folder. The /maxage indicates the farthest modification time; it can only copy newly made changes to save time and space based on the last modification.
Robocopy is one of the most-used command-line utilities to copy large volumes of data in Windows. It’s such a popular tool because of how powerful it is. But with all that power comes complexity. In this guide, we will break down all that complexity and provide a complete tutorial on using this useful tool.
Not a reader? Watch this related video tutorial!
Not seeing the video? Make sure your ad blocker is disabled.
Robocopy is a Windows command-line utility that’s been available since Windows NT. It’s a replacement for the less versatile xcopy utility. It allows you to specify a drive path or server path to copy/move files at a command prompt.
The version of Robocopy as of this writing is up to 10.0.18. This is the version I performed my testing on.
Robocopy provides a slew of features you can leverage to perform efficient and fast file copies and moves. It can:
- Copy files over a network with resume capabilities
- Can skip NTFS junction points causing failure typically from infinite loops
- Can copy file and directory attributes preserving timestamps
- Can copy NTFS permissions, owners, and auditing info
- Can copy directory timestamps
- Can copy files in ‘backup’ mode to ensure files are copied even those rights have been denied to the administrator
- Automatic retries
- Can sync two folders
- Is smart enough to skip files already copied
- Can copy paths larger than the 256 character path limit
- Perform asynchronous copies using its multithreading ability.
- Returns standardized exit codes for use in scripts
As you can see, there’s a lot to to copy. I wanted to cover everything you need to know about this handy tool.
Common Robocopy Syntax Reference
Why such a long blog post on a single utility? Just feast your eyes on the tables below. You have a lot of options to copy or move files with robocopy! You will more options in the individual sections.
These tables were built from the help syntax returned from robocopy /?. They’ve been broken up into more meaningful sections, added to over time, and cleaned up to provide more useful info.
Source Options
| Switch | Explanation | Default Behavior | Equivalent Switch | Notes |
| /S | Copy subfolders | |||
| /E | Copy subfolders including empty subfolders | |||
| /COPY:[DATSOU] | Copy options | /COPY:DAT | D=Data, A=Attributes, T=Timestamps S=Security=NTFS ACLs, O=Owner info, U=aUditing info. File Data (D) always includes file Timestamps (T) | |
| /SEC | Copy files with SECurity | /COPY:DATS | ||
| /DCOPY:T | Copy directory timestamps | |||
| /COPYALL | Copy ALL file info | /COPY:DATSOU | This will prevent dehydrating offline files and will instead copy the file’s tag (on emc VNX/Unity systems at least). This is not officially documented! If dehydration is what you need (reason i found this issue), you can’t copy the ACLs along your files. CREDIT: Monsieurx (Reddit) | |
| /NOCOPY | Copy NO file info | useful with /PURGE | ||
| /A | Copy only files with the Archive attribute set | |||
| /M | like /A, but remove Archive attribute from source files | |||
| /LEV:n | Only copy the top n LEVels of the source tree | |||
| /MAXAGE:n | MAXimum file AGE – exclude files older than n days/date | |||
| /MINAGE:n | MINimum file AGE – exclude files newer than n days/date | If n < 1900 then n = no of days, else n = YYYYMMDD date | ||
| /FFT | Assume FAT File Times | 2-second date/time granularity. This replaces NTFS timestamps. Seems to be more reliable when transferring over a network. | ||
| /256 | Turn off very long path (> 256 characters) support |
Destination Options
| Switch | Explanation | Default Behavior | Equivalent Switch | Notes |
| /A+:[RASHCNET] | Set file attribute(s) on destination files + add | |||
| /A-:[RASHCNET] | Remove file attribute(s) on destination files | |||
| /FAT | Create destination files using 8.3 FAT file names only | |||
| /CREATE | Create directory tree structure + zero-length files only | |||
| /DST | Compensate for one-hour DST time differences |
Copy Options
| Switch | Explanation | Default Behavior | Equivalent Switch | Notes |
| /L | List files only | Don’t copy, timestamp or delete any files | ||
| /MOV | Move files | Delete from source after copying | ||
| /MOVE | Move files and directories | Delete from source after copying | ||
| /sl | Copy file symbolic links instead of the target | |||
| /Z | Copy files in restartable mode | Survive a network glitch | ||
| /B | Copy files in backup mode | |||
| /J | Copy using unbuffered I/O | Recommended for large files | ||
| /NOOFFLOAD | Copy files without using the Windows copy offload mechanism | https://docs.microsoft.com/en-us/previous-versions/windows/it-pro/windows-server-2012-R2-and-2012/hh831628(v=ws.11) | ||
| /EFSRAW | Copy any encrypted files using EFS RAW mode | |||
| /TIMFIX | Fix file times on all files, even skipped files | |||
| /XO | Exclude older | if destination file exists and is the same date or newer than the source – don’t bother to overwrite it. | ||
| /XC | Exclude changed files | |||
| /XN | Exclude newer files | |||
| /XX | Exclude files present in destination but not source | /XX | ||
| /XF file [file]… | Exclude files matching given names/paths/wildcards | |||
| /XD dirs [dirs]… | Exclude directories matching given names/paths. | /XF and /XD can be used in combination e.g. ROBOCOPY c:\source d:\dest /XF *.doc *.xls /XD c:\unwanted /S | ||
| /IA:[RASHCNETO] | Include files with any of the given attributes | |||
| /XA:[RASHCNETO] | Exclude files with any of the given attributes | |||
| /IM | Overwrite modified files. This includes the same files with different times. | |||
| /IS | Overwrite files even if they are already the same | |||
| /IT | Include tweaked files | |||
| /XJ | Exclude junction points from source | /XJ | ||
| /XJD | Exclude junction points from source directories | |||
| /XJF | Exclude junction points from source files | |||
| /MAX:n | Exclude files bigger than n bytes | |||
| /MIN:n | Exclude files smaller than n bytes | |||
| /MAXLAD:n | Exclude files unused since n | |||
| /MINLAD:n | Exclude files used since n | If n < 1900 then n = n days, else n = YYYYMMDD date | ||
| /MIR | Mirror a directory tree | /PURGE /E | ||
| /PURGE | Delete dest files/folders that no longer exist in source | |||
| /XL | Exclude files present in source but not destination | |||
| /SECFIX | Robocopy /secfix fixes file security on all files, even skipped files. | Specify the type of security information you want to copy by also using one of these options: /COPYALL /COPY:O /COPY:S /COPY:U /SEC | ||
| /ZB | Use restartable mode; if access denied use Backup mode |
Monitoring Options
| Switch | Explanation | Default Behavior | Equivalent Switch | Notes |
| /R:n | Number of retries on failed copies | /R:1000000 | Always try to set this option. I recommend setting this to 10-20 to not waste time retrying. | |
| /W:n | Wait time between retries | /W:30 | Always try to set this option to a lower number to retry more quickly. I suggest 5-10. | |
| /REG | Save /R:n and /W:n in the Windows registry as default settings | |||
| /RH:hhmm-hhmm | times when new copies can be started | |||
| /TBD | Wait for sharenames to be defined | retry error 67 | ||
| /PF | Check run hours on a per file (not per pass) basis | |||
| /MON:n | Run again when more than n changes seen | |||
| /MOT:m | Run again in m minutes, if changed |
Understanding Robocopy Behavior
I’ve now completely blew your mind with all of the potential syntax options available to you. Let’s now see all of the different combinations of how we can use this syntax.
I could provide you an enormously long list of robocopy commands with an ever-growing number of switches. But I think it’s better to teach you how to fish. Let’s go over how to put sense out of all of these options.
Robocopy Only Copies Entire Directories
Every robocopy execution will have a source and a destination directory. Robocopy copies and moves files by entire directory. It’s not possible to explicitly copy a single file with robocopy. Use copy or PowerShell’s Copy-Item for that.
However, you can robocopy single file with the right filtering which you’ll learn about below. To robocopy a single file file, specify the source and destination directories immediately followed by the file name in the source.
> robocopy c:\src d:\dst copythisfile.txtSyntax Depends on the Environment
Also, the options you provide to robocopy will depend on the environment. You’ll need to answer a few questions when trying to figure out which options to use.
- Will you always be copying to an empty directory?
- Is it possible files may already exist in the destination directory?
- Will you be copying terabytes of data or just a few megabytes?
- Will you be copying files over a network or locally?
- …and more.
If there are no files in the destination file directory, you shouldn’t care about options that overwrite files. If you won’t be copying files over the network, don’t worry about those options. Explicitly define your current and potential future circumstances your environment will be in.
Recognize Default Options
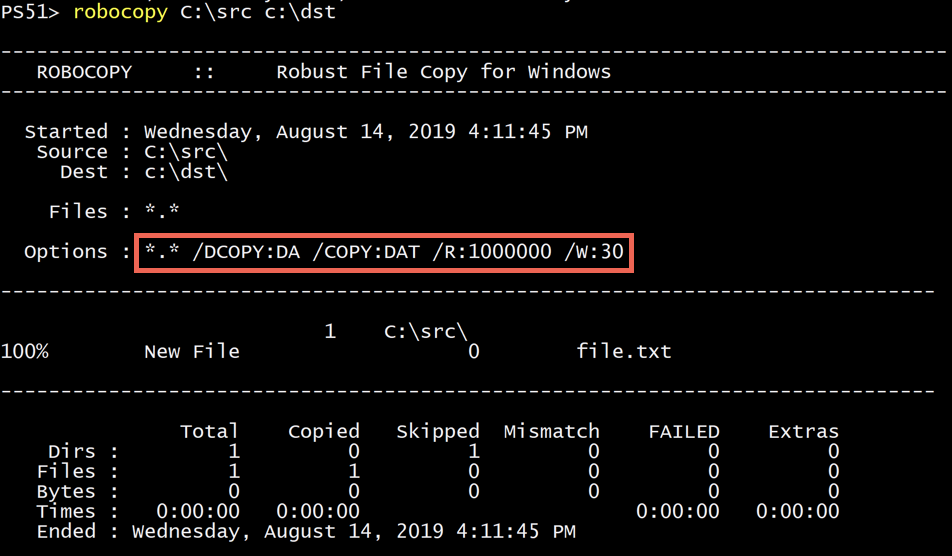
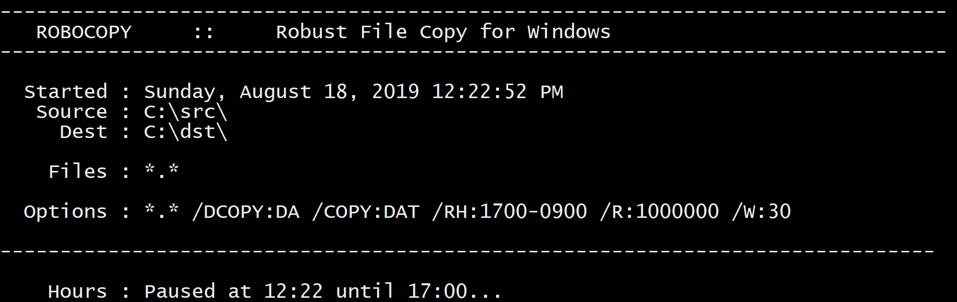
Robocopy uses a lot of options by default. You can pick them out by looking at the tables above. It also provides a handy output to every time you run the utility.
You can see below that when I ran robocopy with its most basic options (the source and destination folder), it automatically used some options. Understanding the default behavior is important.
Reference the options you see in the output with the option explanations above and you’ll understand exactly what robocopy is doing under the covers.
Understanding What Robocopy Commands can Do
If you’ve used copy or PowerShell’s Copy-Item cmdlets, you’ve probably specified a source and destination and went on about your day. There’s not a whole lot of options you can configure there. These robocopy commands have a default behavior.
But robocopy, on the other hand, understands a lot more and gives you the flexibility to tweak the behavior as much as you want.
It’s important to know robocopy isn’t just aware of the concept of a file or directory. There’s a lot more to a filesystem than that and robocopy supports just about everything.
A file sitting on a filesystem isn’t just a dumb object with a single purpose. There are many different attributes and things that go with the concept of a file. For example, a file has attributes such as:
- a timestamp (written, modified and accessed)
- NTFS ACL
- an owner
- NTFS auditing information
- hidden flag
- archived flag
When you copy or move a file, you have the option to bring all of that stuff along with it, if you want.
Understand that when you run robocopy, you’re not just copying a file, you’re also potentially copying all of the other information with it. It’s important to realize that and to account for it in the options you provide robocopy.
The Basics: Performing WhatIf Scenarios
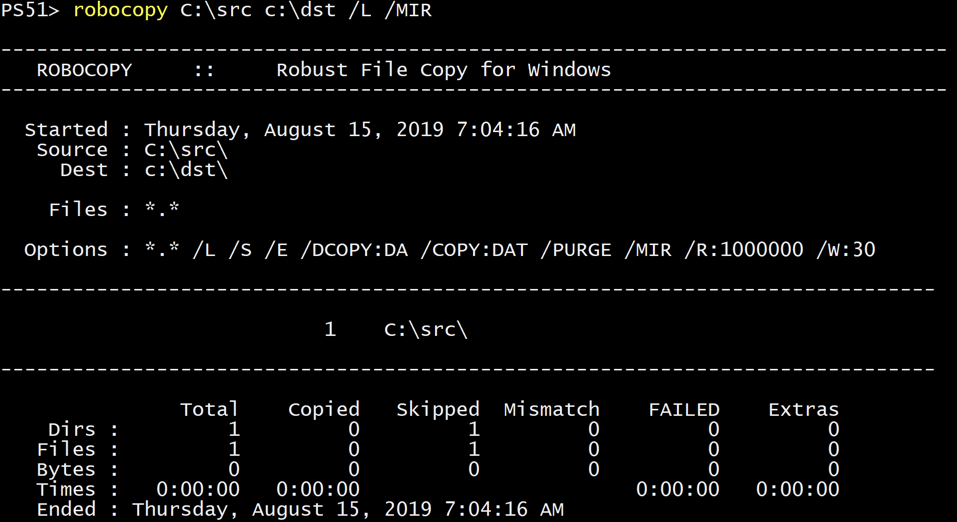
If you’ve got a huge file server somewhere you’d like to migrate and don’t want to take any action yet, you can use robocopy to return what it would have done.
Using the /L option, you can tell robocopy to enumerate all of the files and/or folders you specify and return a list of files it would have copied/moved.
You can use the /L option with any other option. This is a great way to return all of the options robocopy would have used (default or not). It will give you an overall view of what robocopy will do given the options you provided it.
/LThe Basics: Copying Files
The most basic use of robocopy is using a source and destination directory with no options.
This option will copy all files (excluding subfolders) from C:\src to C:\dst.
You can also copy everything including subfolders (empty or not) and NTFS permissions. This is, from what I can tell, the method to literally copy everything there is about a directory of files to another directory.
Below I’m copying all NTFS ACLs, file owners, subfolders (including empty ones) and all file attributes. All of this is made possible with just the /E option to include all empty subfolders and /COPYALL to catch the rest.
> robocopy C:\src C:\dst /E /COPYALLThe Basics: Moving Files
Moving files transfers files from one directory to another just like copying does. The only difference with a move operation is that the source files are removed after the copy.
To delete files/directories from the source after copying, use the /MOV option. This will remove all files in the specified directory (no subfolders).
> robocopy C:\src C:\dst /MOVYou can also use /MOVE to move all files and subfolders.
> robocopy C:\src C:\dst /MOVEThe Basics: Syncing Files
Robocopy allows you to sync two directories. This means either ensuring all files in the destination directory are in the source directory and no more. /MIR will replicate data copying all files in the source not in the destination and delete files in the destination not in the source. Beware!
> robocopy C:\src C:\dst /MIRCopying Files over a Network
If you’re copying files over a network, there are a few options that you should consider.
Robocopy allows you to copy files in ‘restartable mode’ using the /Z option. This means that if a file begins copying and fails midway, the copy can start again instead of failing completely. The /Z option is useful when the stream gets cut over a network.
Warning: Some have reported using
/Zcuts performance by 1/4. Let me know your findings.
You can also use the /FFT option. This switch has been known to more accurately preserve file timestamps when transferring over a network. This option uses FAT file system timestamps instead of NTFS.
robocopy C:\src \\SRV1\share /Z /FFTUsing /IPG to Control Inter-Packet Gap
When copying files over a network, you can use the /IPG switch. This is also known as the inter-packet gap option. This option defines (in milliseconds) the frequency in which robocopy will wait between sending new packets.
Always use UNC Paths not Drive Letters
A reader on Reddit discovered the hard way to not use mapped drives as a destination directory. Instead, always use always use a UNC path. You might run into issues with the 256-character limit if you do. Check out this Microsoft doc for more information.
Robocopy Backup Mode (Robocopy /Z)
Robocopy has a option (/B) or as a backup to restartable mode (/ZB) which copies files in backup mode. What is “backup mode” anyway?
When you usually copy a file in Windows and hit a file that requires administrative privileges to access, you’ll receive an error indicating you don’t have permission. Even though you may be running as the local administrator, Windows won’t let you access it.
WARNING: There have been reports of corrupted server volumes when copying data to a Windows Server 2016 server with de-duplication turned on. When you use the
/ZBswitch, the result will be a dedup chunk store being trashed in the System Volume Information. The copied files will not be readable and will generate errors when trying to manipulate them. Serverfault link with more info.
Backup mode is a way to access files without worry about permissions.
Robocopy uses backup mode to use the SeBackupPrivilege for reading files and the SeRestorePrivilege user right to access any files it needs. This ignores any ACEs that would normally prevent you from accessing those files.
The SeBackupPrivilege and SeRestorePrivilege user rights are normally assigned to users in the Backup Operators and Administrators groups but sometimes they can get removed. Backup module eliminates that risk and temporarily grants the user executing robocopy those rights.
If you’d like to check to see if your user account has that right, you can run whoami /priv and both rights should be displayed.
Filtering Files and Folders
The large majority of the options available to you are to exclude files and directories many different ways. I’ve broken down all of the ways you can filter or exclude files and directories based on various criteria.
By File Name or File Extension
Filtering what files get copied/moved in a robocopy call is done using wildcards. You can use a wildcard to filter on files matching a specific file name string or extension.
For example, to only copy TXT files, you can specify *.txt.
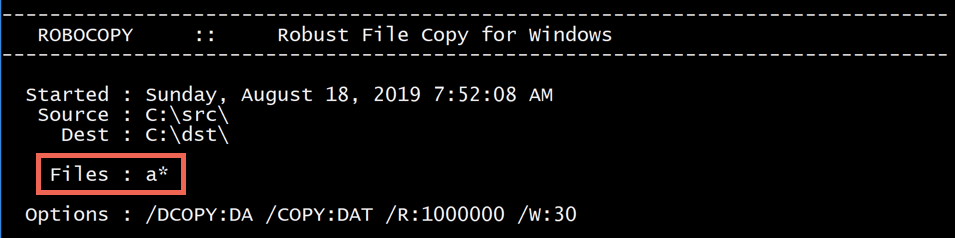
> robocopy C:\src C:\dst *.txtIf you’d like to limit to only files starting with a, you could use a*.
> robocopy C:\src C:\dst a*Y0u can also provide multiple sets of file name matches by separating them with a space as shown below.
> robocopy C:\src C:\dst a* b*When you filter by file name, robocopy will show you the filter in the output.
By Directory Name
Robocopy allows you to filter items not just by file but by directory name too. Using robocopy /xd, you can exclude certain directories matching a specific name.
When copying multiple folders, use the /XD switch to exclude folders from the run.
> robocopy C:\src C:\dst /XD "c:\src\exclude"By File/Directory Timestamp
Below you will find all of the robocopy options that will exclude files and folders based on various timestamp attributes.
| Switch | Explanation |
| /DCOPY:T | Copy directory timestamps |
| /MAXAGE:n | Exclude files older than n days/date |
| /MINAGE:n | Exclude files newer than n days/date |
| /XO | If destination file exists and is the same date or newer than the source, don’t overwrite |
| /XN | If destination file exists and is the same date or older than the source, don’t overwrite |
There are two popular options to choose when filtering on things like timestamp; /XO and /MAXAGE.
/XO allows you to exclude files from copy only if they are newer than the source. Using the /XO option, you can robocopy only new files by access date.
> robocopy C:\src C:\dsc /XOIf you know the maximum age files will be, you can also use the /MAXAGE option. This allows you to specify in YYYMMDD format the older date a file can have before it’s copied.
> robocopy c:\src c:\dst /S /MAXAGE:20191001Robocopy Jobs
You have seen that dozens of options are available to you. It’s easy for these options to soon become unwieldy. Thankfully, you have a better option than memorizing and ensuring all of these options are spot on every time.
Robocopy job files are text files containing one option per line. You’ll typically use robocopy to create these job files. Once created, you can then either use robocopy to modify them or a simple text editor.
You have various robocopy commands that work with jobs.
| Switch | Explanation | Default Behavior | Equivalent Switch | Notes |
| /JOB:jobname | Take parameters from the named job file | |||
| /SAVE:jobname | Save parameters to the named job file | |||
| /QUIT | Quit after processing command line | Useful for viewing parameters | ||
| /NOSD | No source directory is specified | |||
| /NODD | No destination directory is specified | |||
| /IF | Include the following files |
A typical job file created with robocopy has an RCJ extension and looks like the below snippet. This job file was created by running robocopy C:\src D:\dst /save:myjob. You can see that you can provide comments in the job file using :: which is most of what this file has.
Without comments, the file would only contain one option per line.
::
:: Robocopy Job C:\MYJOB.RCJ
::
:: Created by Administrator on Sunday, August 18, XXXX at 8:53:24 AM
::

::
:: Source Directory :
::
        /SD:C:\SRC\     :: Source Directory.

::
:: Destination Directory :
::
        /DD:C:\SRC\     :: Destination Directory.

::
:: Include These Files :
::
        /IF             :: Include Files matching these names
::              *.*     :: Include all names (currently - Command Line may override)

::
:: Exclude These Directories :
::
        /XD             :: eXclude Directories matching these names
::                      :: eXclude no names (currently - Command Line may override)

::
:: Exclude These Files :
::
        /XF             :: eXclude Files matching these names
::                      :: eXclude no names (currently - Command Line may override)
::
:: Copy options :
::
        /DCOPY:DA       :: what to COPY for directories (default is /DCOPY:DA).
        /COPY:DAT       :: what to COPY for files (default is /COPY:DAT).
::
:: Retry Options :
::
        /R:1000000      :: number of Retries on failed copies: default 1 million.
        /W:30           :: Wait time between retries: default is 30 seconds.
::
:: Logging Options :
::
Saving Job Files
Saving a job file is as simply as appending the /SAVE:<jobname> option to the end of your syntax. Replace <jobname> with the name of the job. The /SAVE option will create a file called <jobname>.rcj in the directory where you ran robocopy.
> robocopy C:\src C:\dst /SAVE:myjobYou must specify /SAVE as the last option. Any options specified after /SAVE will not be added to the job file. Also, note that even if an existing job file already exists, robocopy will always overwrite the existing one. Backup or version control your job files!
Note: If you attempt to use the
/MToption when saving to a job file, it will not be in the job file. Let me know if you were able to get this to be included.
Using Job Files
Once a job is saved into a job file, you can then use the /JOB:<jobname> option to specify the job file to read from. Robocopy reads all of the parameters inside of the job file. It then executes just as if you provided the options directly on the command-line.
Creating a Job File Without Running a Job Using /QUIT
The purpose of the /QUIT option isn’t obvious. On the surface, you may think /QUIT forces a running to exit. Instead, /QUIT acts more like an option to prevent a job from running in the first place.
Officially, the /QUIT option “forces robocopy to terminate processing the command line”. However, it would be better explained as creating a job file without running a job.
If you use the /SAVE option, it will also run the job automatically. There’s no way to create a job file without first running the job. You could create the RCJ job file with a text editor or you could use robocopy do it by appending /QUIT to the end.
> robocopy C:\src C:\dst /SAVE:myjob /QUITEditing a Job File
Since job files are just text files, you could edit them with your favorite text editor or you could have robocopy do it for you.
You can edit job files using a combination of /JOB, /SAVE and /QUIT.
For example, perhaps you’d like to exclude all EXE files from your robocopy job saved in a job file called backupfiles.rcj. You’ve already created the job file and don’t want to overwrite the entire thing. You can add the new option like below:
> robocopy /JOB:backupfiles /XF *.EXE /SAVE:backupfiles /QUITUsing Multiple Job Files
You can even combine the use of job files too. When specifying multiple job files in the same run, all of the options used in that run will be combined together.
For example, perhaps you have a large list of files to exclude from your backupfiles copy job. Open up a text editor, and add the following to create an exclude.rcj file.
You can then exclude these files from the backupfiles job like so:
> robocopy /JOB:backupfiles /JOB:excludeSince the original backupfiles job file was already excluding all EXE files, the above run’s syntax would look be /XF *.exe a.exe b.txt c.cer. Robocopy combines all options into one.
Robocopy Templates and Using the /NOSD and /NODD Options
If you’re working with a lot of job files, you can build job files to accept parameters. Robocopy allows you to pass values from the command-line to jobs when they are run. A parameter isn’t a robocopy term but it fits well in this scenario.
You can build robocopy jobs to accept parameters by not specifying a source or destination directory either explicitly using the /NOSD and /NODD options or just not including a source and destination directory at all.
For a simple example, create a job file with no source or destination using the syntax below. This job’s intention is to copy all TXT and EXE files from a source to a destination directory.
> robocopy *.txt *.exe /SAVE:backupfiles /QUITOn its own, this job will never work because there’s no source or destination directory specified.
When you create a job with no source and destination directory, the job file is automatically created using the /NOSD and /NODD options.
/NOSD
/NODD
/IF
    *.txt
    *.exe
/DCOPY:DA
/COPY:DAT
/R:1000000
/W:30
The /NOSD options tells robocopy you did not include a source directory while /NODD indicates you didn’t include a destination directory. This job file is a “template” for other jobs.
But you can pass “parameters” to this job file to provide the source and destination directories.
To use the job file just created to copy files from C:\src to C:\dst, you can pass these directories directly on the command-line which will then be passed to the job.
> robocopy /JOB:backupfiles C:\src C:\dstAsynchronous Copying (Robocopy /MT)
By default, robocopy only processes one file at a time. However, you can force robocopy to copy more files than at once by using the /MT option.
The /MT option allows you to specify the number of threads robocopy will use to copy files. The maximum is 128.
You can use /MT like so:
> robocopy C:\src C:\dst /MT:32I’ve chosen 32 in this case as a baseline. I suggest starting at 32 to see how your computer and network handle things and adjust the threads accordingly.
Note that if you do use
/MT, you won’t be able to use/IPGor/EFSRAW. For better performance, don’t output the log to the console. Instead, use/LOG.
Scheduling Robocopy
Robocopy has a few ways you can schedule when it runs.
Using /RH
Using the /RH option, you can tell robocopy to only run during a specific time. This is great if you have a maintenance window or a time when everyone has gone home for the day.
You can specify a start time and an end time in the format HHMM-HHMM. For example, to invoke robocopy but only allow it to run between the hours of 5PM and 9AM as defined by the system clock, run:
> robocopy C:\src C:\dst /RH:1700-0900You’ll see that if you invoke robocopy outside of those hours, it will tell you the current time and wait for the start time to run.
You must ensure that both times are in a 24-hour format and are exactly four digits long. The window must be greater than two minutes.
By default, using /RH will check for the start time before the entire run. However, if you have a lots of files and believe the process may go longer than that, you can use the /PF option. /PF will force robocopy to check the window before every file.
Using the Task Scheduler
The Output Log
Robocopy will always return an output log. Whether that log is displayed via stdout on the console and/or redirected to a log file is up to you.
You’ve got lots of options when displaying robocopy output.
| Switch | Explanation | Default Behavior | Equivalent Switch | Notes |
| /NP | No progress. Suppresses the display of progress information. This can be useful when output is redirected to a file. | |||
| /unicode | Display the status output as unicode text | |||
| /LOG:file | Output status to log file and overwrite | |||
| /UNILOG:file | Output status to unicode log file and overwrite | |||
| /LOG+:file | Output status to log file and append to existing log file | |||
| /UNILOG+:file | Output status to unicode log file and append to existing log file | |||
| /TS | Displays the file timestamps for every file processed. | |||
| /FP | Replaces simple file names with full file pathnames in the output. | |||
| /NS | Does not show file sizes. | |||
| /NC | Hides output the file class “Text Tags” (Go here for more information: https://www.uvm.edu/~gcd/2015/04/robocopy-file-classes/) | |||
| /NFL | Hides file names. Failures are still logged though. Any files files deleted or would be deleted if /L was omitted are always logged | |||
| /NDL | Hides output of the directory listing. Full file pathnames are output to more easily track down problematic files. | |||
| /TEE | Output to console window, as well as the log file | |||
| /NJH | No job header | |||
| /NJS | No job summary | |||
| /BYTES | Print sizes as bytes | |||
| /X | Report all files, not just those selected & copied | |||
| /V | Produce verbose output log, showing skipped files | |||
| /ETA | Show estimated time of arrival of copied files. See the start time of each file copy and the estimated time of completion based on the observed throughput of previous copies. Times are displayed after the file name in the format HH:MM – > HH:MM (start – > finish). | |||
| /DEBUG | Show debug volume information |
Limiting Log Elements with /NJS and /NJH
By default, robocopy returns two elements in it’s output, a job header and a job summary.
The job header is the simple ROBOCOPY header at the top.

The job summary shows a summary status of all files/folders, how much data was transferred and the time the run ended.

You can hide each of these elements using the /NJH option to hide the job header and the /NJS option to hide the job summary. You can include either of these options or both of them together.

Redirecting Output Log to a File
If you need to save the output log, you can redirect it to a text file and/or display it on the console. You can do so using traditional output redirectors like >, >>, PowerShell or the /LOG option.
To redirect the output log to a file using the /LOG option overwriting any existing log file use the syntax /LOG:<filepath> like below. The only output you will receive on the console is the path to the log file.
> robocopy C:\src C:\dst /LOG:c:\file.log

 Log File : c:\file.log
If you’d like to keep the contents of any existing log file and append results to a file, you can use the + operator as shown below.
> robocopy C:\src C:\dst /LOG+:c:\file.log

 Log File : c:\file.log
Redirecting Output Log to a File and Displaying on the Console
If you’d like to save the output log to a file yet also see it on the console, you can use the /TEE option. This option causes robocopy to write the output to the log file while still maintaining the default behavior of returning output to the console.
robocopy C:\src C:\dst /LOG+:c:\file.log /TEEExit Codes
Like all other command-line utilities, robocopy returns exit codes depending on the results of the execution. We all wish for robocopy to always exit successfully with a 0 but that doesn’t always happen.
Below you will find all of the exit code that robocopy returns and their explanation. Any exit code greater than seven indicates at least one failure during execution.
| Exit Code | Explanation |
| 0 | No action performed. Source and destination are synchronized. |
| 1 | At least one file was copied successfully. |
| 2 | Extra files or directories were detected. Examine log. |
| 3 | Exit codes 2 and 1 combined. |
| 4 | Mismatched files or directories found. Examine log. |
| 5 | Exit codes 4 and 1 combined. |
| 6 | Exit codes 4 and 2 combined. |
| 7 | Exit codes 4, 1 and 2 combined. |
| 8 | At least one file or directory could not be copied. Retry limit exceeeded. Examine log. |
| 16 | Copy failed catastrophically. |
Note that if you’re executing robocopy in a third-party utility, that utility may think any non-zero exit code is a failure. To prevent this, you can change the exit code to 0 if it returns 1.
The Robocopy “extra” file exit code is a common return code meaning an “extra” file is in the destination folder but not the source folder. This code excludes extras that will prevent any deletions from the destination.
Changing the Exit Code in a Batch File
If you’re executing robocopy with a batch file, you can find the value of the %ERRORLEVEL% variable. If it returns 1 then use the exit keyword to exit the script with 0.
> (robocopy <options>) ^& IF %ERRORLEVEL% LEQ 1 exit 0Changing the Exit Code in a PowerShell script
If you’re executing robocopy in a PowerShell script, you can invoke robocopy with Start-Process using PassThru to return the process created and Wait to wait for robocopy to finish. You can then check the ExitCode property for a value of 1. If the exit code is 1 then exit the PowerShell script with a 0 using $host.SetShouldExit().
$exitCode = (Start-Process -FilePath 'robocopy' -ArgumentList '<option>' -PassThru -Wait).ExitCode
if ($exitCode -eq 1) {
    $host.SetShouldExit(0)
}
Common Errors
If you’re dealing with thousands of files, you’re bound to run across some problems. Here’s a breakdown of common errors I’ve come across
Error Invalid Parameter
When you see an error stating error invalid parameter, this normally means that you’ve tried to pass options to robocopy out of sequence somehow. The robocopy invalid parameter 3 error is the most common, it seems.
A common reason you’d receive this error is when you specify a source or destination directory with spaces and forget to surround it with quotes.
Robocopy Examples
You can build your own strings of robocopy or you can take what others have learned and use them! In this section, I’ll cover use cases on how to use robocopy to accomplish various things.
Find the directory size of a network folder
Contributor: northendtroooper (Reddit)
> robocopy "\\MACHINE\fileshare" c:\dummy /l /xj /e /nfl /ndl /njh /r:0 /mt:64Quickly delete folder contents (ignoring permissions on subfolders)
Contributor: pizzasteveo (Reddit)
> robocopy c:\dummy c:\foldertodelete /MIRPerforming large file migrations
Contributor: @MySnozzberries (Twitter)
The goal of this snippet is to force ownership on all files back to Administrators. We then add an explicit ACE for the Administrators group for full control on every object recursively even though we are also setting inheritance.
Finally, we do a full robocopy copy with DACLs to the destination with log. Log can then be reviewed for additional permission issues or just file locks and another delta sync can be performed later.
> takeown /F .\test /R /A /D Y
> icacls .\test /grant "Administrators":(OI)(CI)F /T
> robocopy .\test .\test2 /E /SEC /FP /V /LOG:.\temp.log
Recursively force Administrators group as the owner of all files and directories. There can be ways around this, but this is the most heavy handed approach and usually the fastest.
> takeown /F .\test /R /A /D YOnce we are the owner we can now force a new ACE into the DACL for every object. This grants Administrators full control with inheritance enabled and recursively through the path.
Setting this at the root with inheritance would cover the environment, but when a share has CREATOR OWNER with Full Control (which sadly is even Microsoft’s recommendation for things like file user profile stores), the user can disable inheritance or remove ACEs at their discretion. So a heavy hand is usually the fastest fix.
> icacls .\test /grant "Administrators":(OI)(CI)F /TOnce we have changed the DACLs on the majority of files we try copying the files to a new location, common for things like file share migrations. For this, we are copying the items recursively and using the /SEC switch to also copy the Data/Attributes/Timestamps/DACLs.
Then we log the operation with full paths and for all objects (/V verbose switch) to a log, so we can remediate the <5% of errors that are commonly path length or file lock related and get more granular.
> robocopy .\test .\test2 /E /SEC /FP /V /LOG:.\temp.logThis is a simple framework for managing a file share migration with minimal impact to user experience. It also improves the control IT holds over the data. If a customer has a strong data governance practice where ownership is properly managed at a child folder level, this becomes a more complicated discussion, but most customers we find are lucky to be using inheritance and group-based ACEs only, so this is the most common situation and fix we start at.
Robocopy Alternatives
Robocopy is an awesome tool but there are so many other tools similar to it that may be of interest.
- xxcopy – A similar command-line utility with tons of options.
- Copy-Item PowerShell cmdlet – Not nearly as featured but much simpler.
- TreeSize – GUI and scriptable utility to find folder information.
Summary
Robocopy is an excellent tool to copy large sets of files. Whether you’re doing a data migration, keeping folders in sync or simply need a quick way to accurately copy files, robocopy is a great choice.