
Sync and Share Clipboard Between Windows PC and Android with your Microsoft ID. Here is the Detailed Guide to Enable Clipboard Syncing in Windows 11.
In this guide, I have explained how to enable Clipboard syncing in Windows 11 using various methods. Clipboard stores the items that you have copied from one place and want to paste them on another place. If you have to copy a single item multiple times, you can retrieve it from the Clipboard instead of repeatedly performing copy and paste manually.
On Windows 11, you can enable clipboard syncing using Group Policy Editor, Registry Editor, and from the Windows OS settings. You can also enable clipboard syncing between PC and mobile devices. This will make your work more productive and easier.
Enable Clipboard Syncing from Windows Settings
It is the easiest way to enable clipboard syncing on your Windows PC.
- Launch the Windows 11 Settings by pressing Windows + I hotkeys.
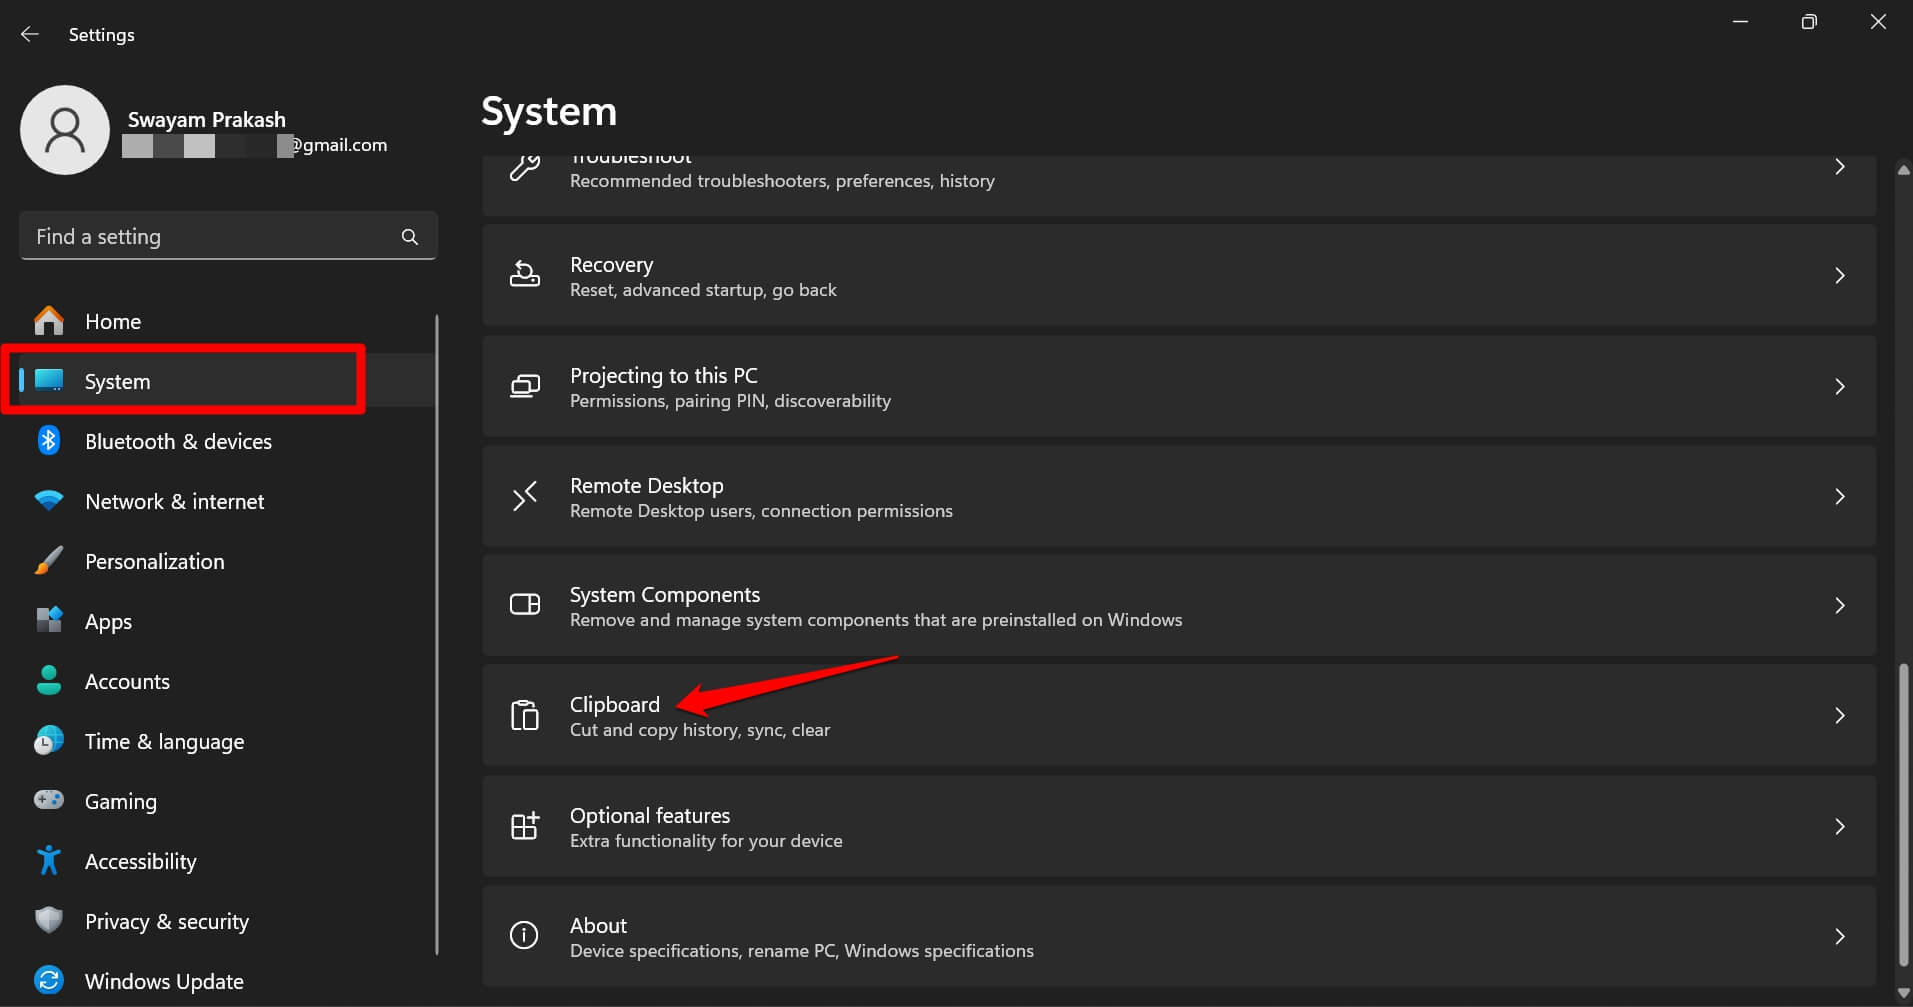
- On the left-hand panel of Settings, click on System.
- Scroll to Clipboard and click on it.

- Enable the toggle beside Clipboard History.
- Also, activate the Clipboard History feature across your devices.
- Click the radio button next to Sync Text that I Copy Automatically.

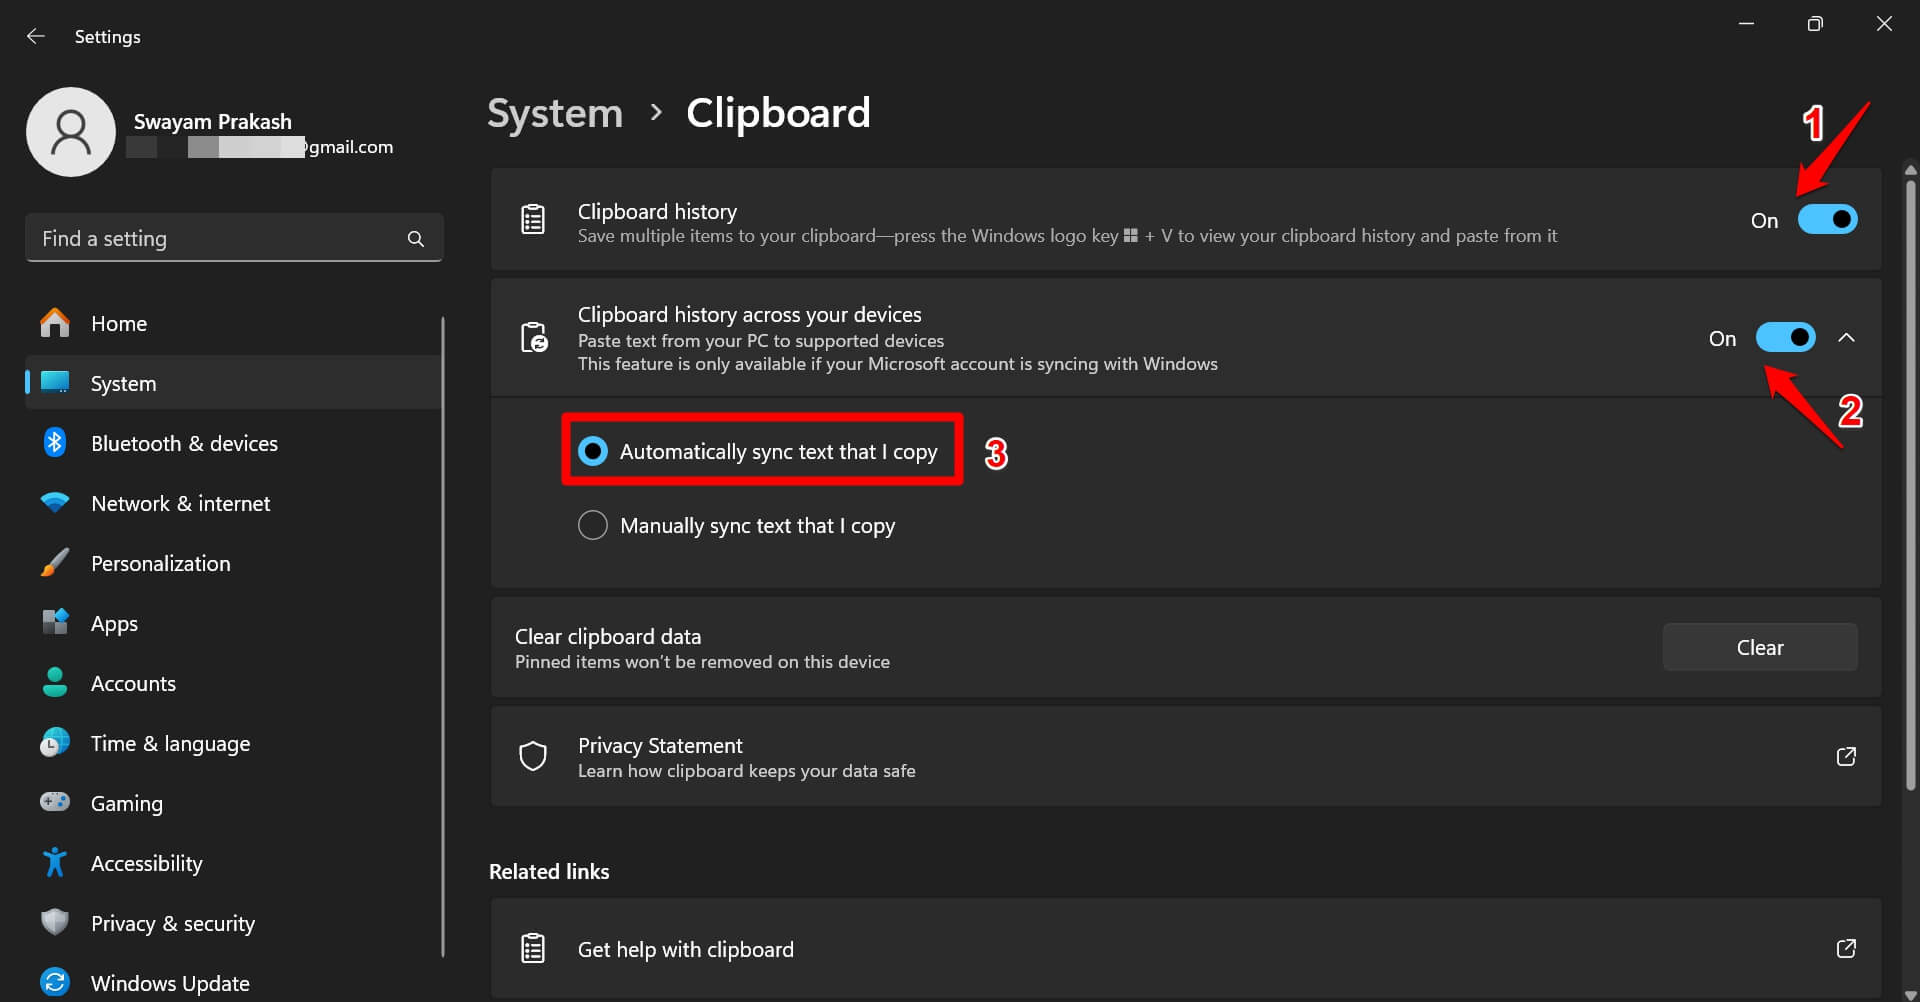
The last step explained above will allow syncing of clipboard history between the PC and devices linked to it.
Enable Clipboard Syncing Using Group Policy Editor
You can access the Local Group Policy Editor and turn on clipboard syncing for your Windows PC. Here are the steps for you.
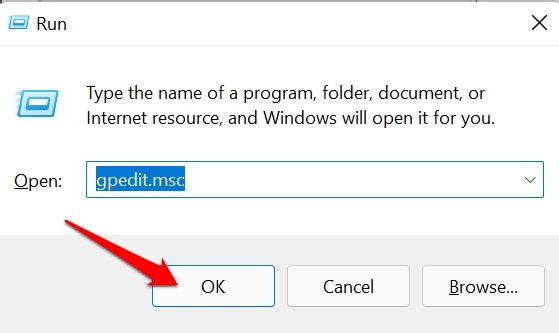
- Press Windows + R to launch the Run box.
- Type in gpedit.msc and press enter.

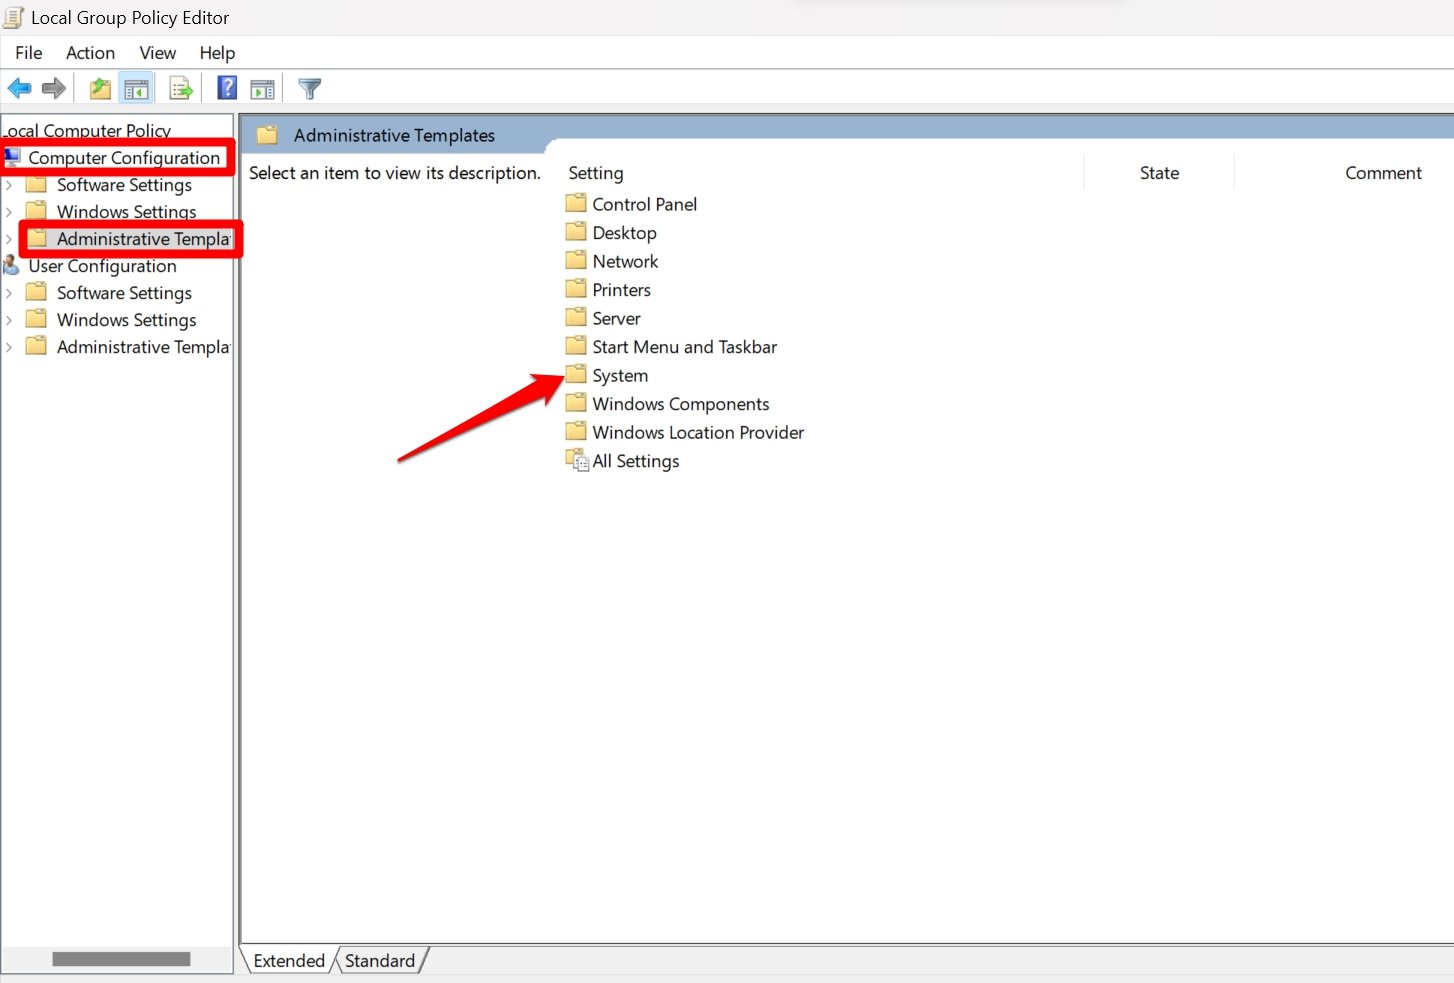
- Click on Local Computer Policy.
- Next, select Computer Configuration.
- Navigate below and double-click on Administrative Templates.

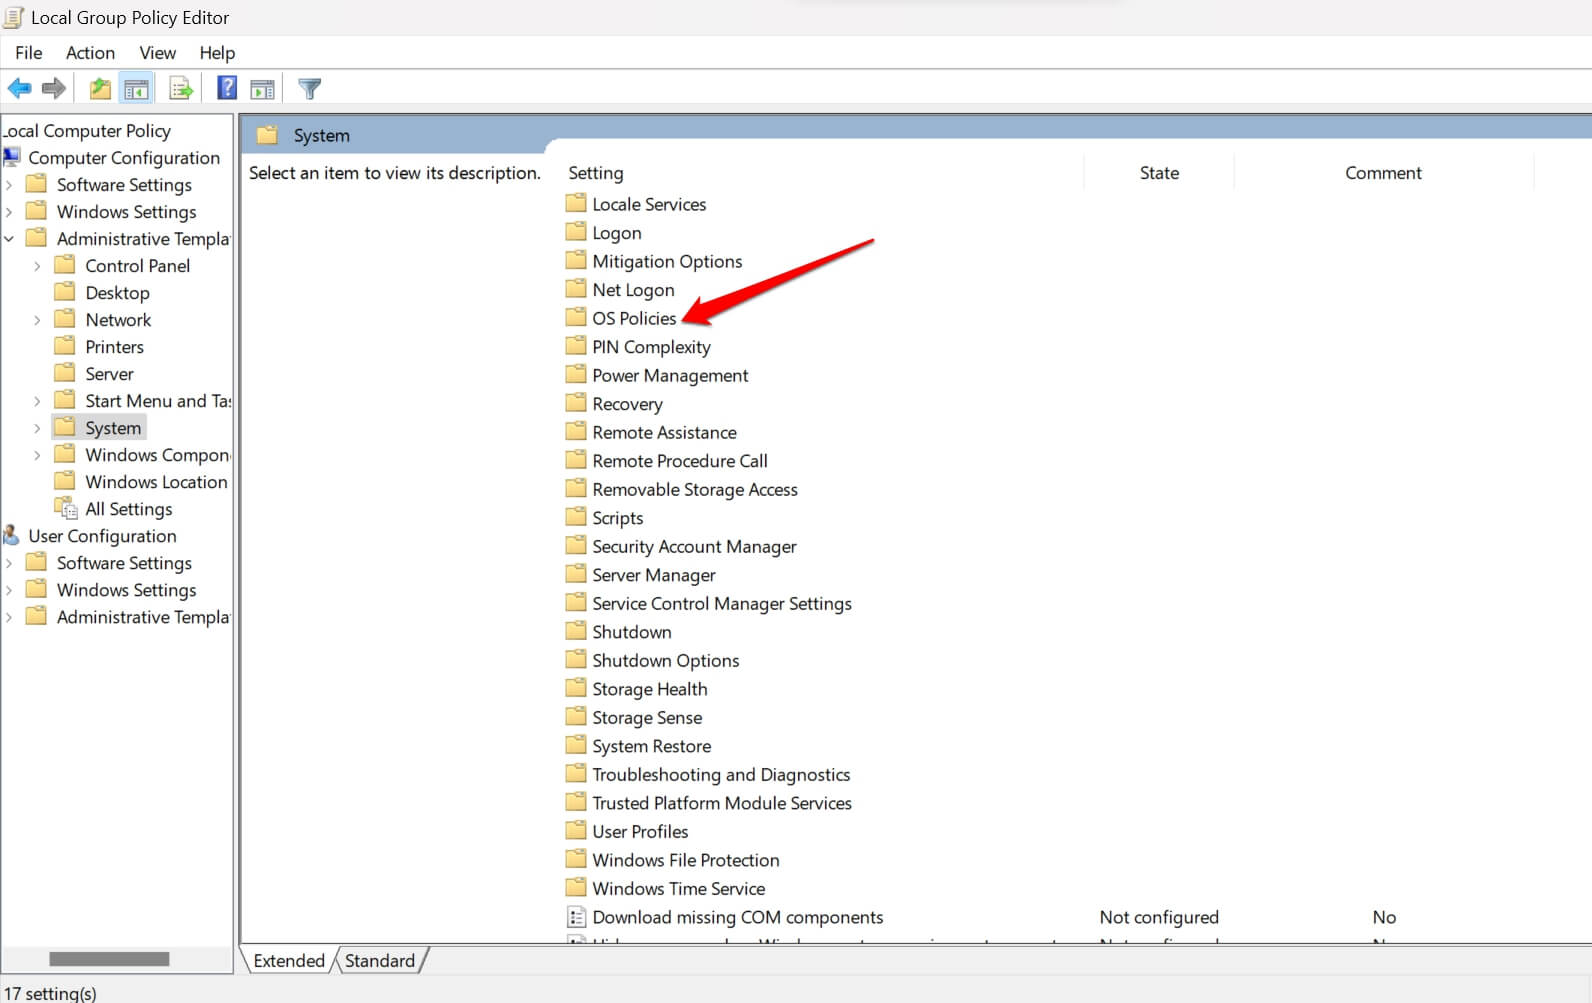
- Click on the item System followed by OS Policies.

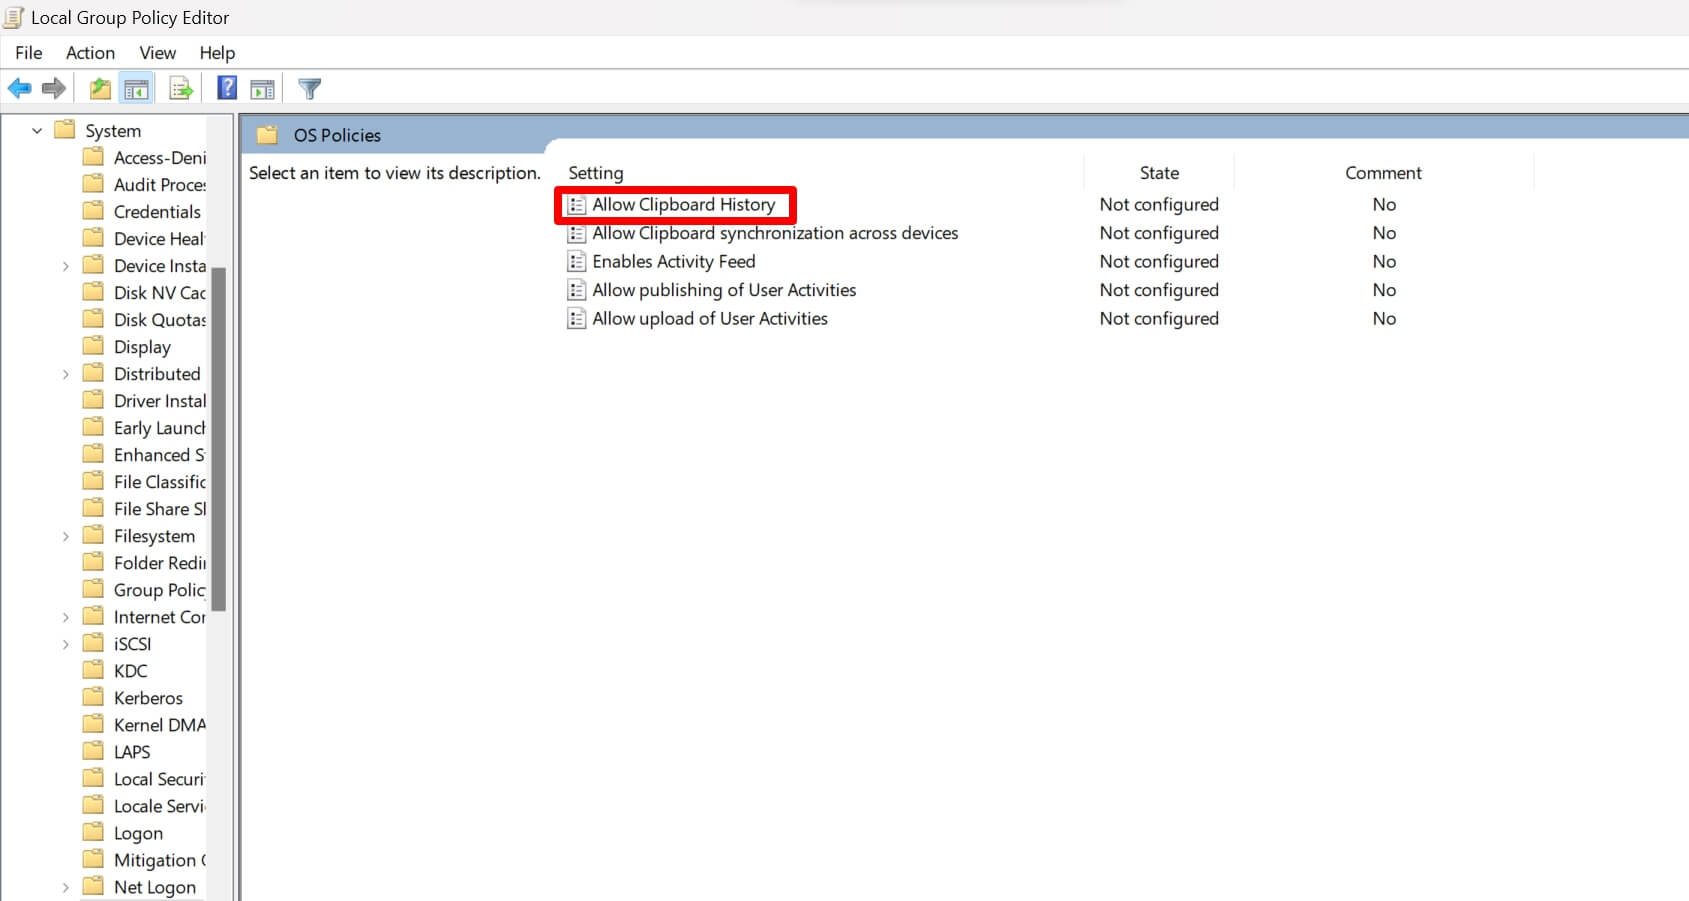
- Within the OS Policies section, double-click on Allow Clipboard History.

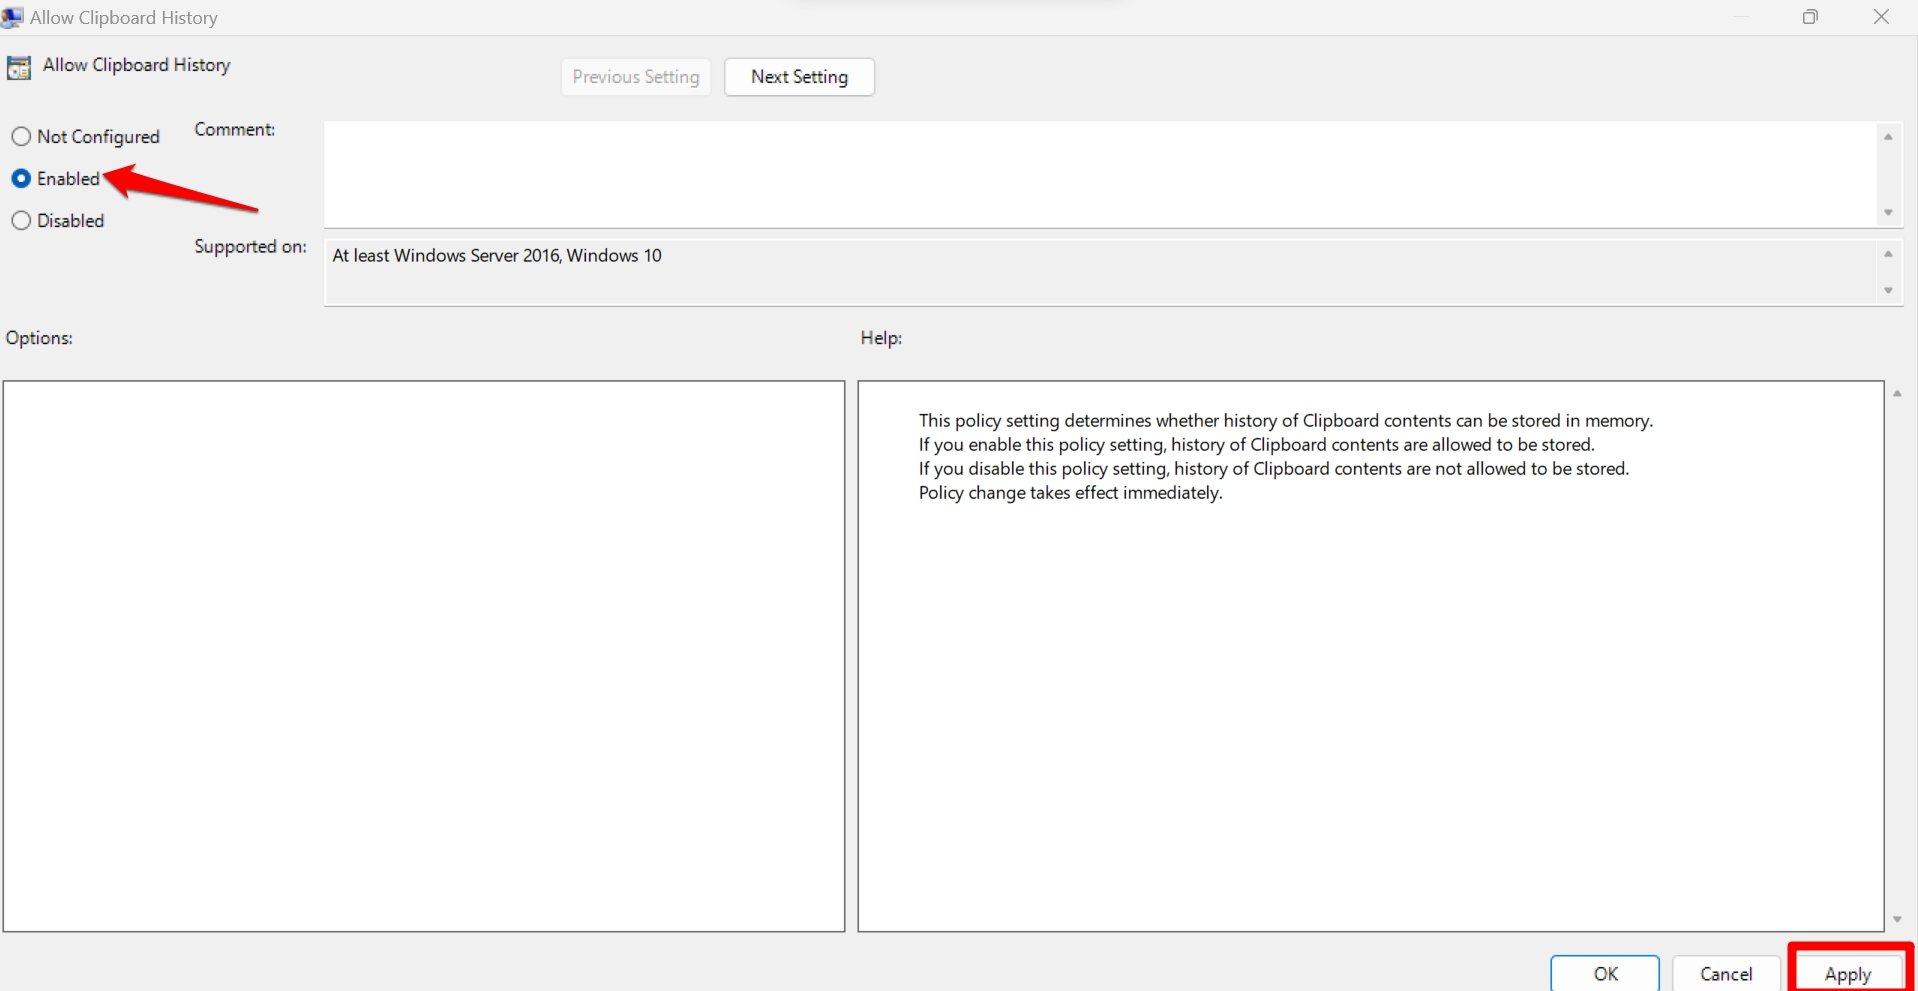
- Set the status of Allow Clipboard History as enabled.
- Click on Apply > OK to save the changes.

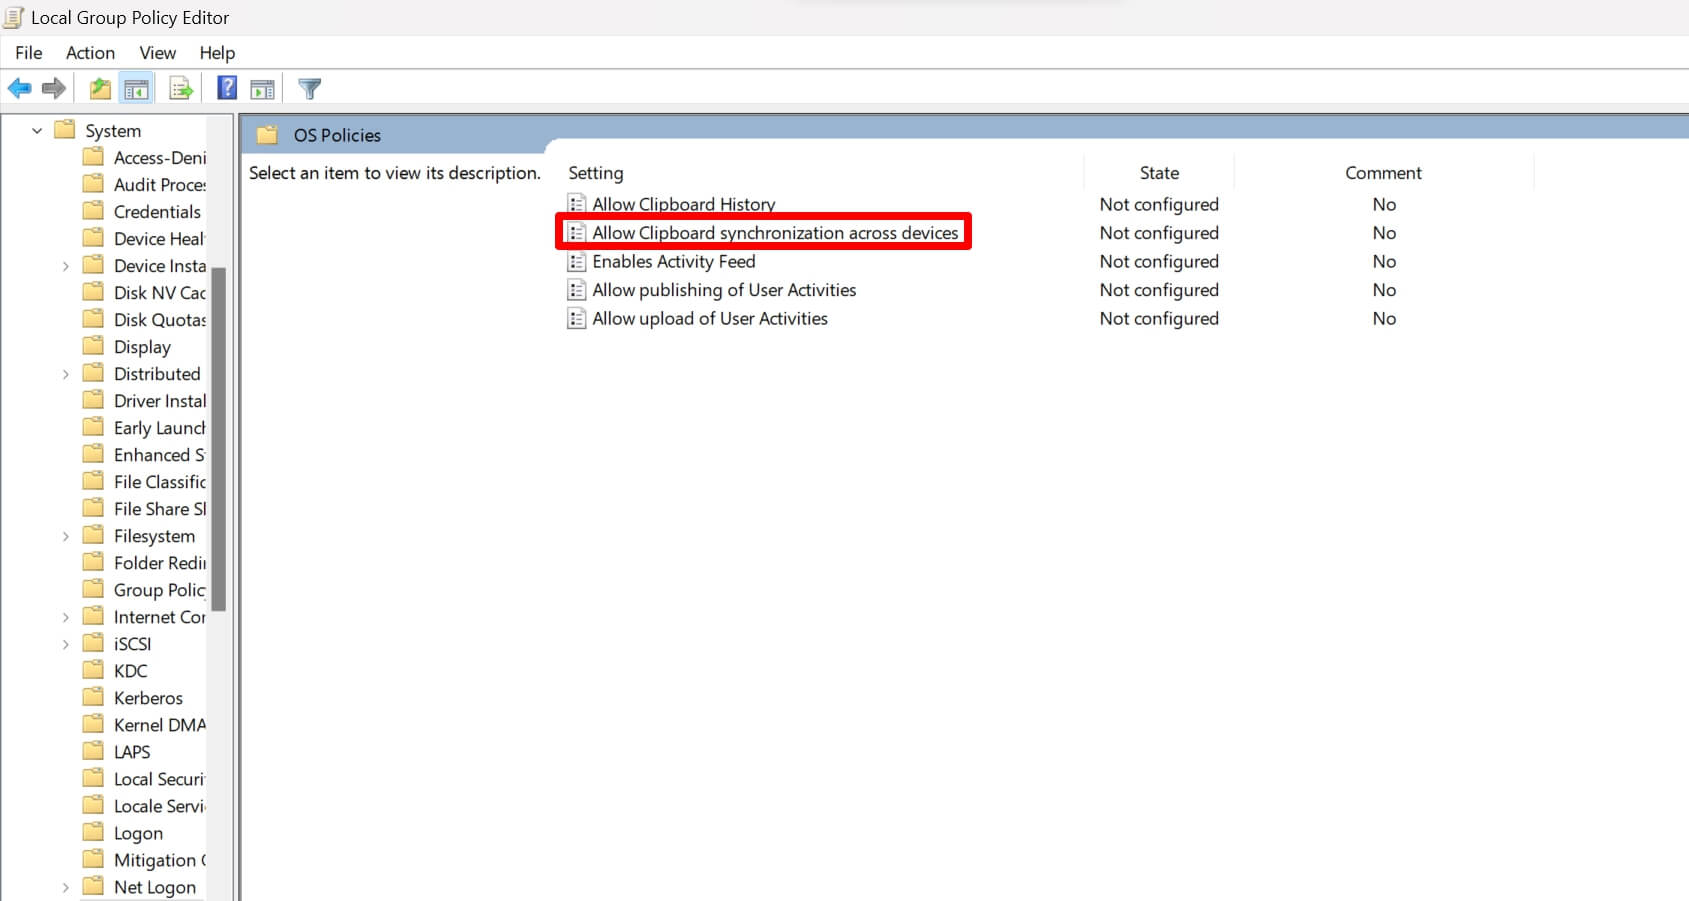
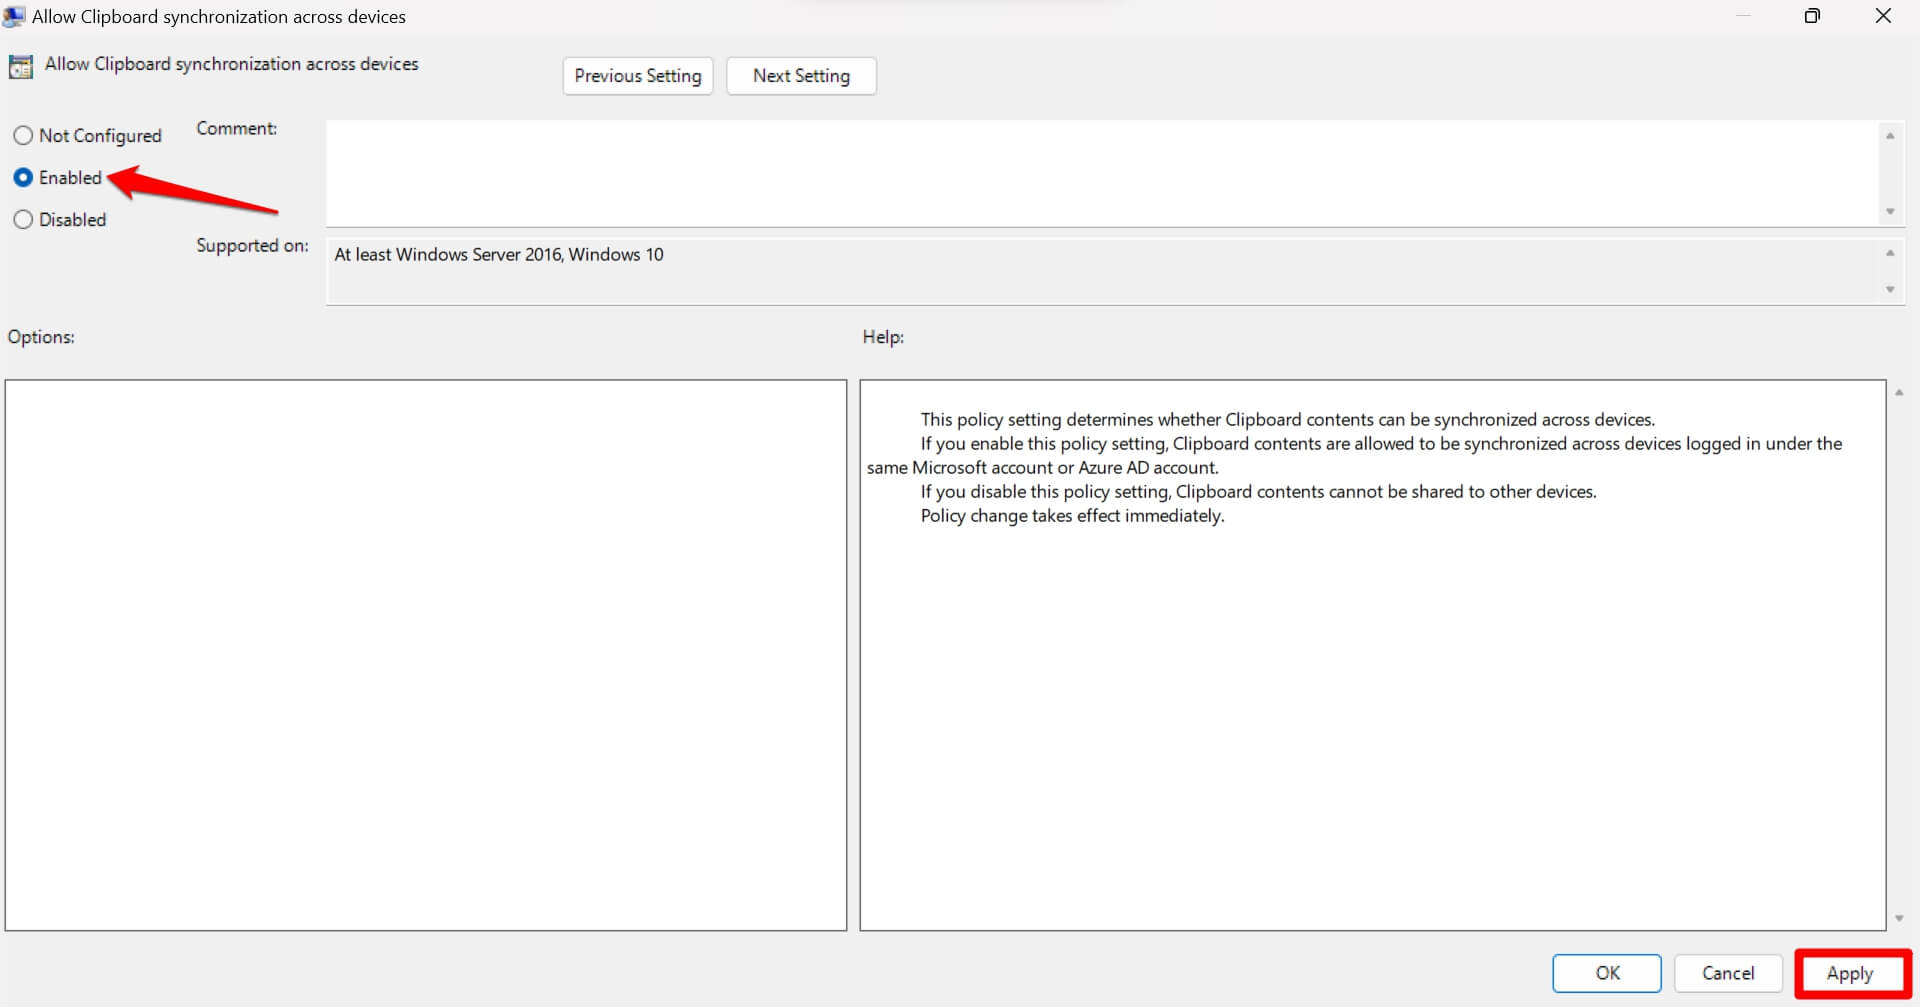
- Get back to the OS Policies section and double-click on Allow Clipboard Synchronization across Devices.
- Set it to Enabled. Click on Apply followed by OK to save the changes.

Turn On Windows 11 Clipboard Syncing Using Registry Editor
Use the Registry Editor to enable Clipboard syncing on Windows 11 only if the other two methods do not work for you. Modifying the registry may cause the computer to behave weirdly. You may back up your registry data before making changes ot it.
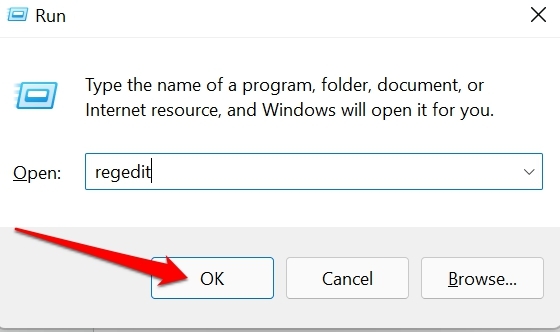
- Press Windows + R to bring up the Run box.
- Type regedit.exe and press enter key.

- Within the Windows Registry, follow this path.
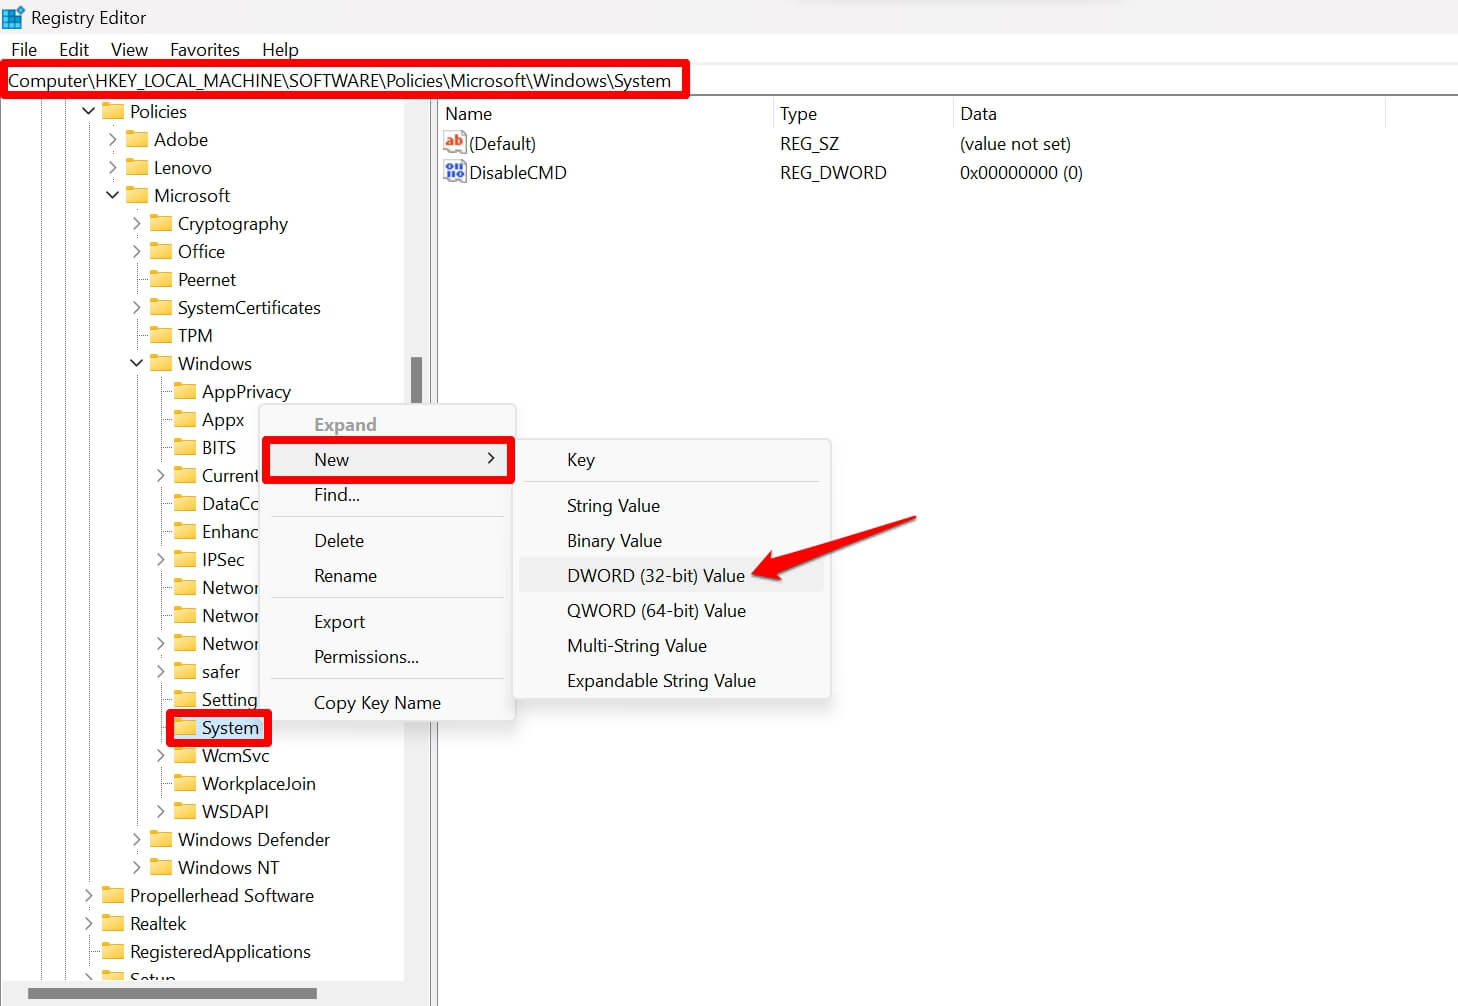
HKEY_LOCAL_MACHINE\SOFTWARE\Policies\Microsoft\Windows\System
- Right-click on the System key and select New.
- From the menu, click on DWORD (32-bit) Value.

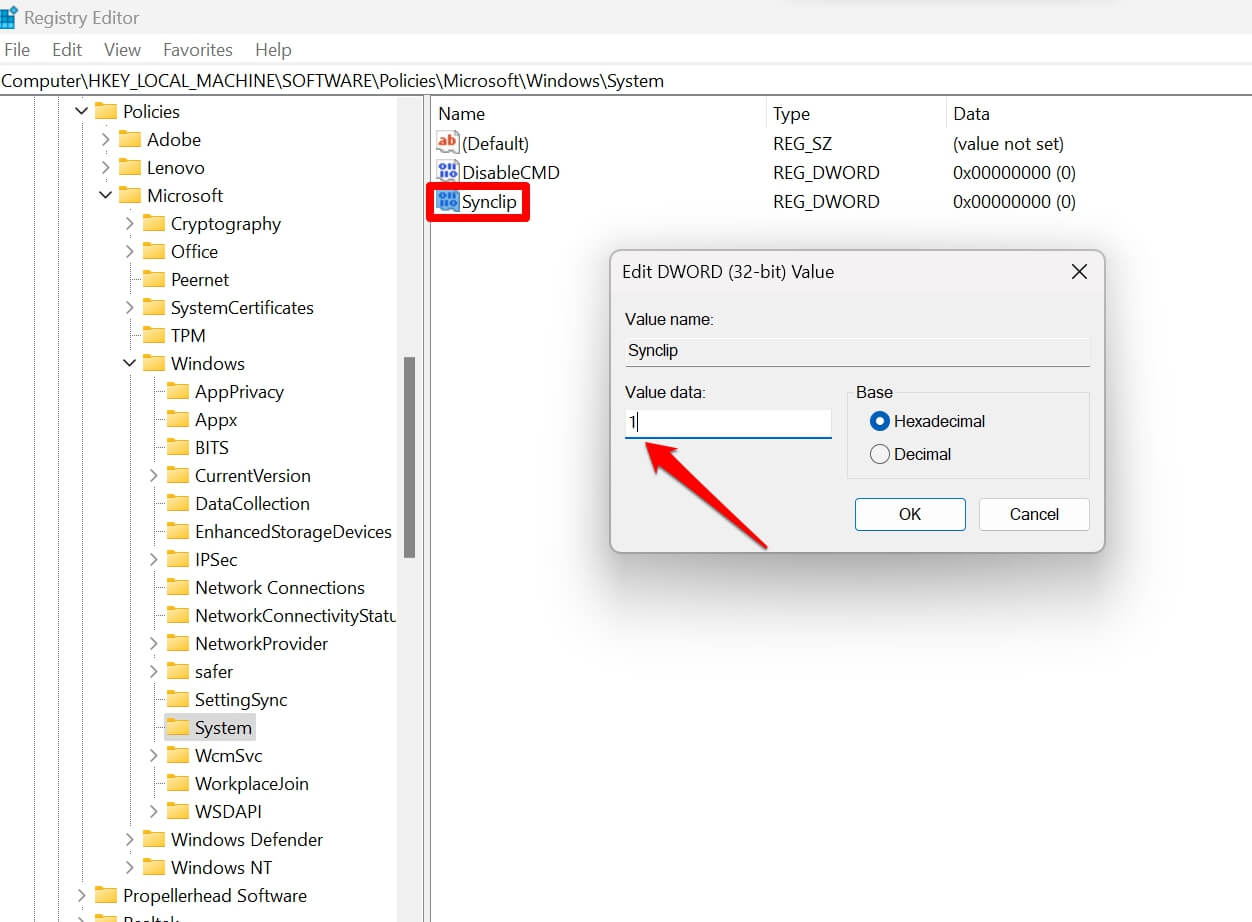
- Double-click on the new DWORD Value and set a name such as SynClip.
- Again double-click on SynClip.
- Set the Value Data as 1 to enable the feature. Press OK.

- Exit the registry and restart your computer.
How do you enable Clipboard Syncing between Windows PC and mobile devices?
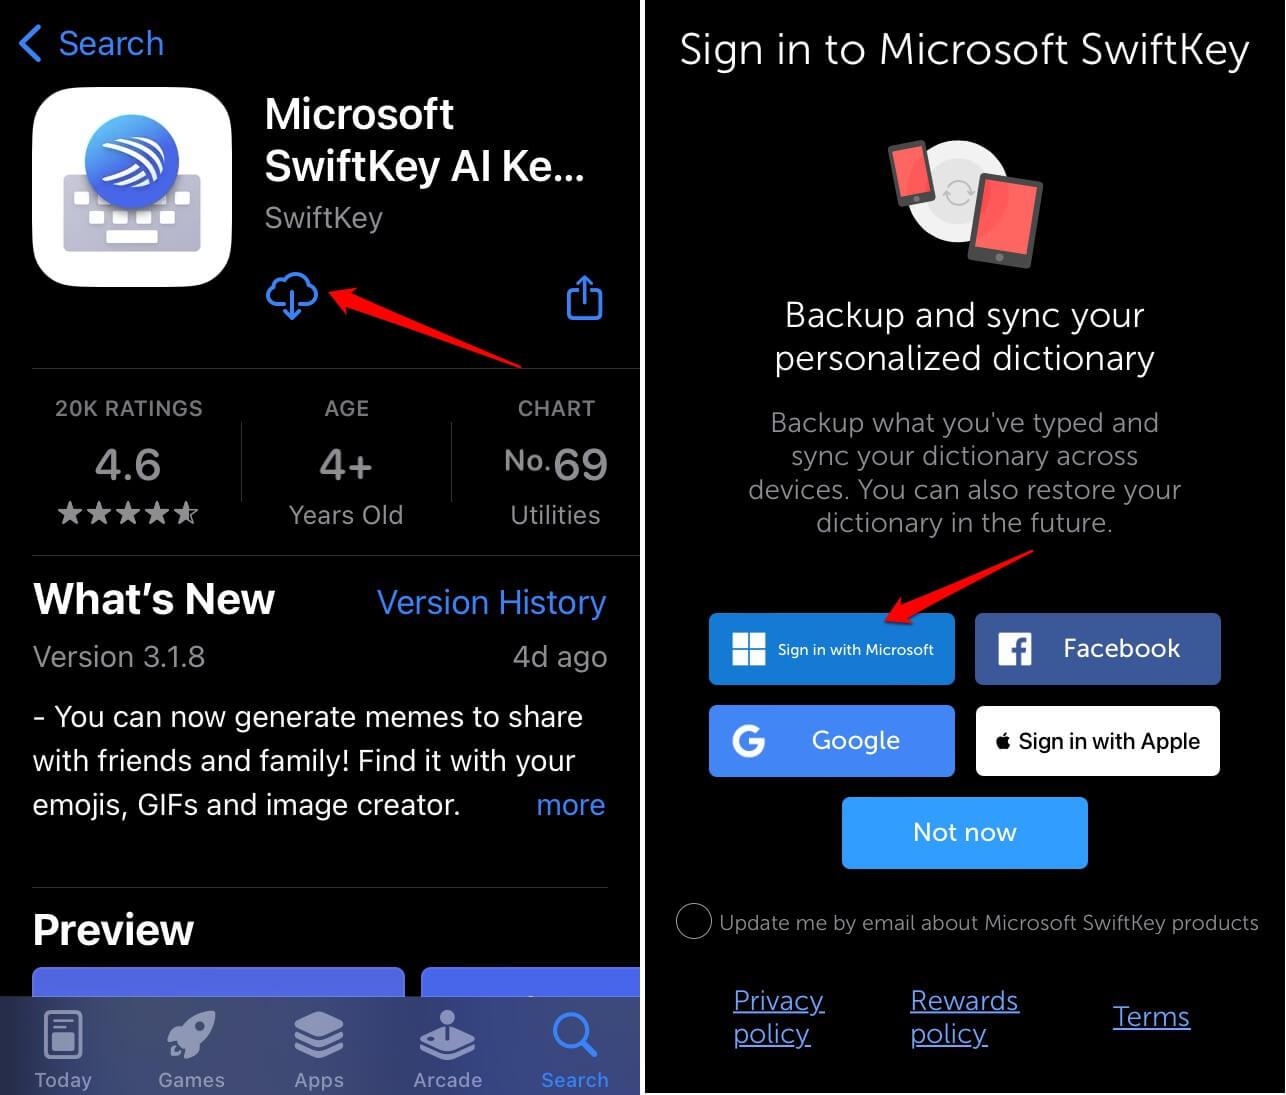
As you are using a Windows PC, install the Microsoft Swiftkey keyboard on your Android or iOS devices.
- Launch the keyboard app that you have installed.
- Sign into the account of the keyboard using the same account you use for your Windows PC.

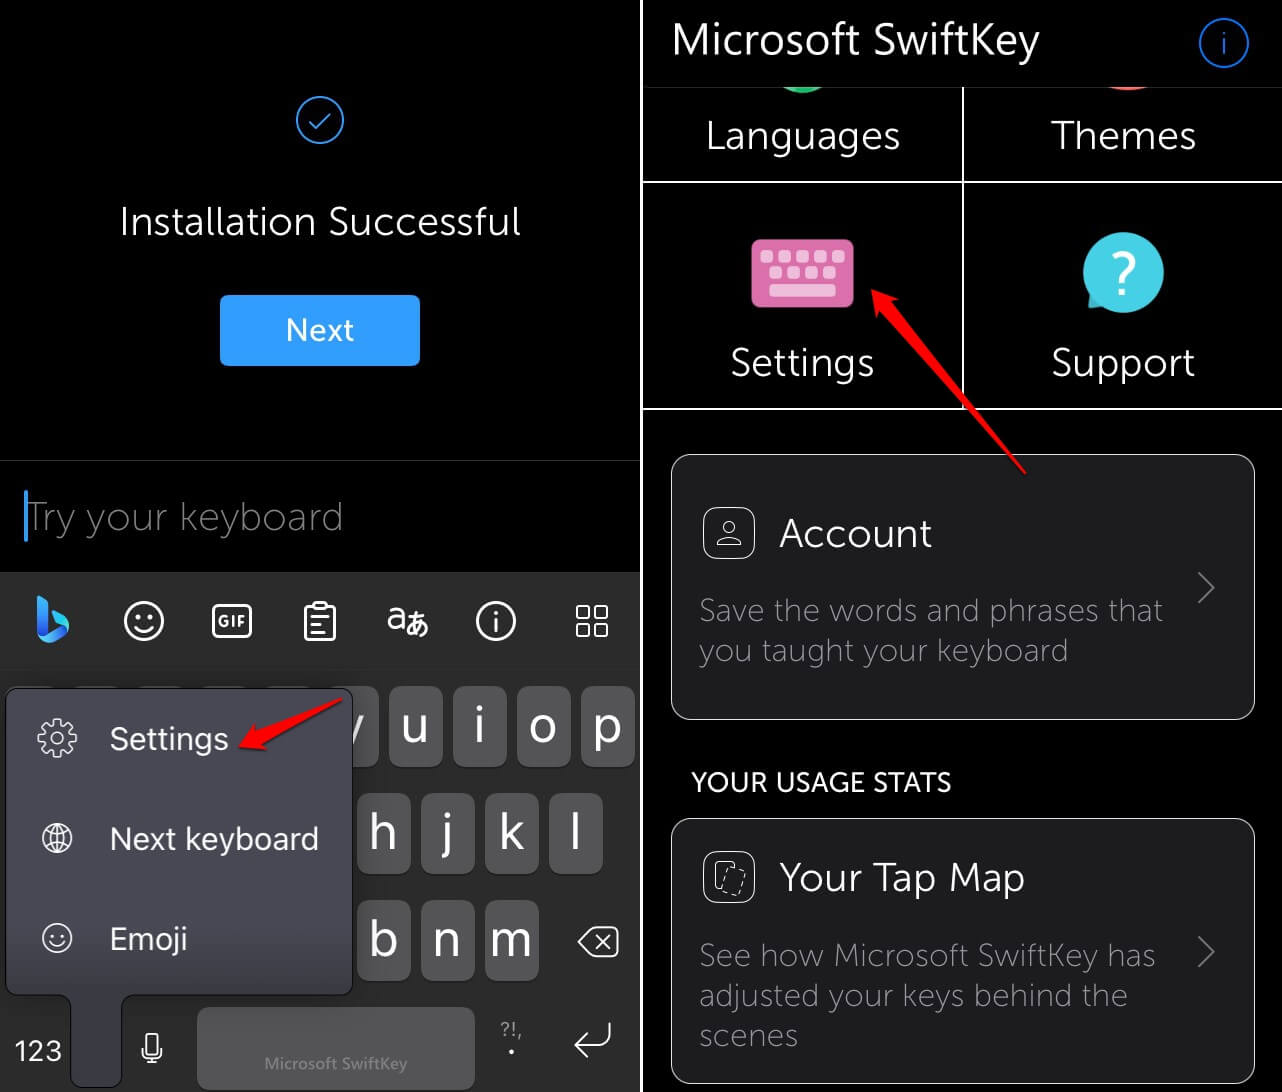
- Go to the SwiftKey settings.

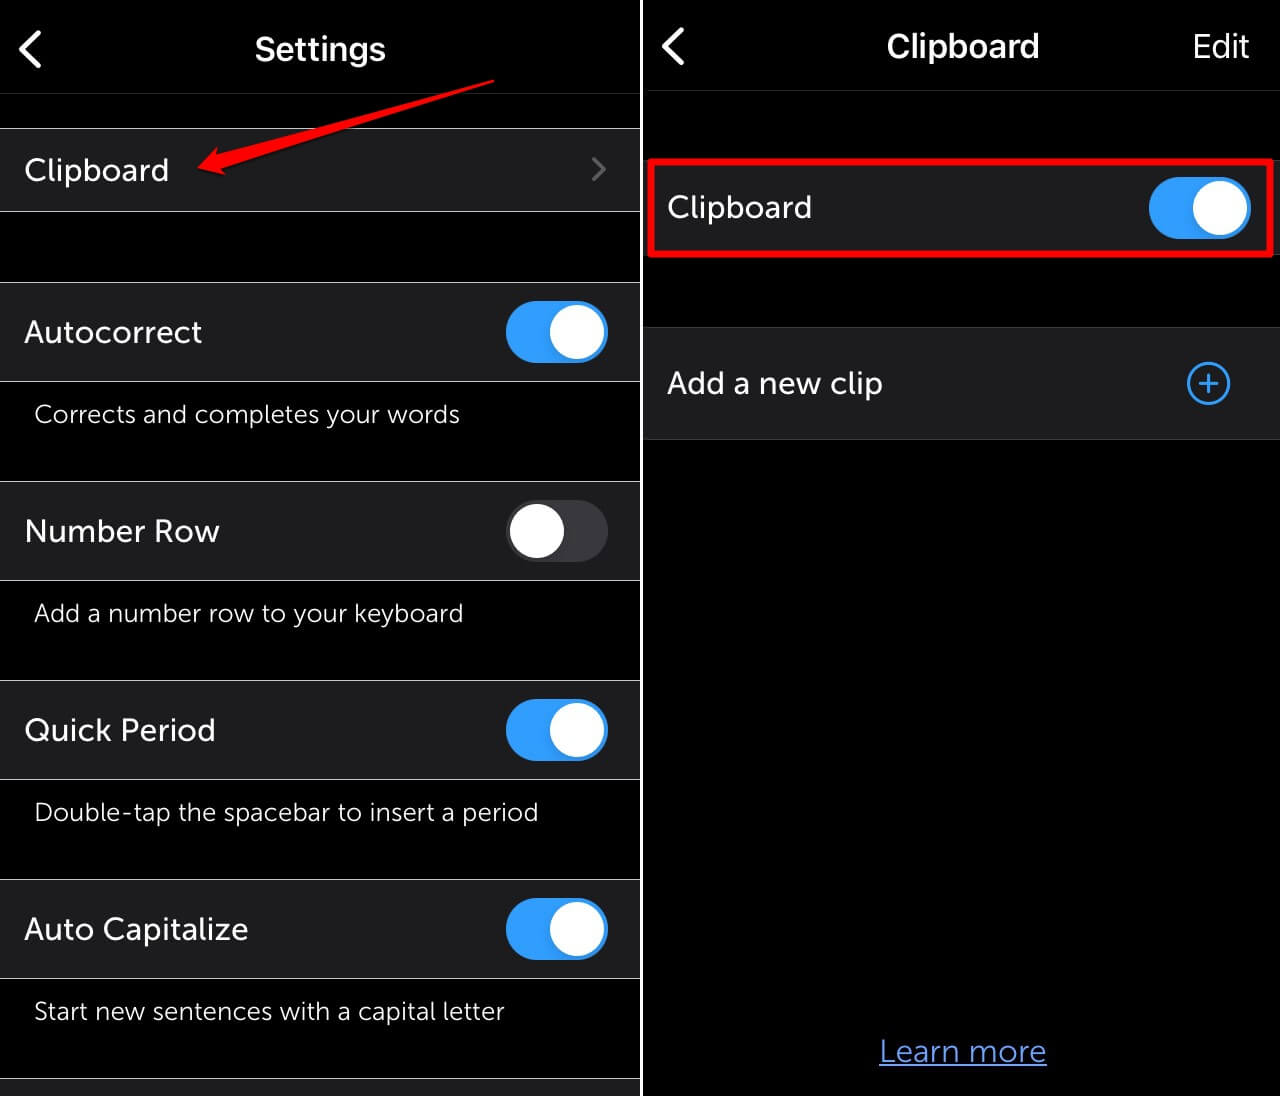
- Tap on Clipboard. Next, tap the switch beside Clipboard to enable it on Swiftkey.

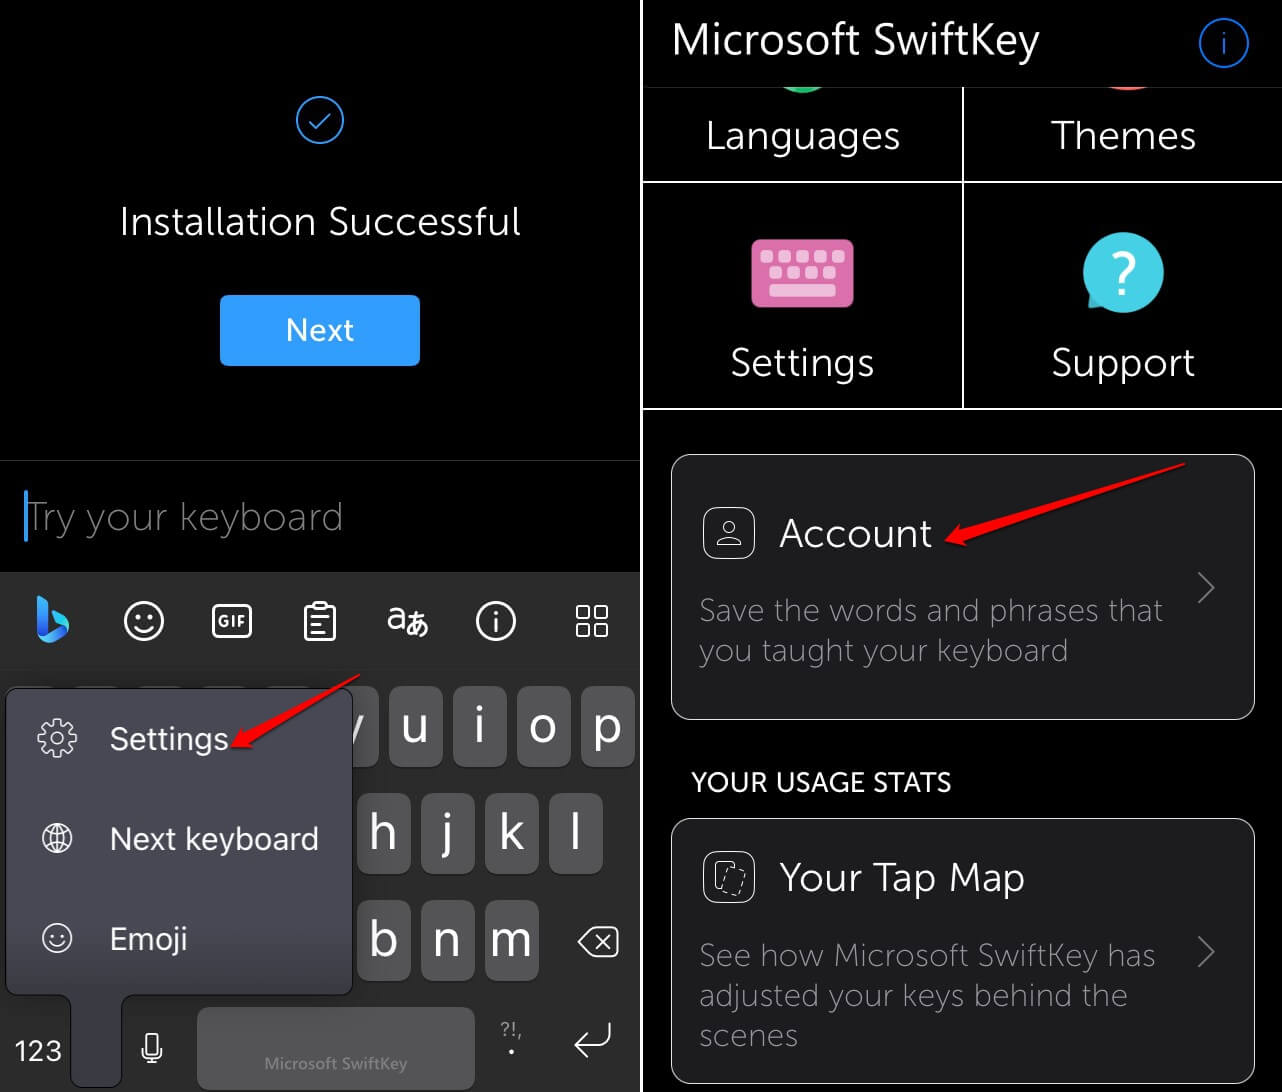
- Tap on Swiftkey account settings.
- Enable Backup & Sync to link the actions performed on Swiftkey on your PC and phone.


The above steps were carried out on an iPhone. The steps will be fairly similar on the Android version of the app.
Frequently Asked Questions(FAQs)
What are the Various Items that can be Copied to the Clipboard?
Primarily, you can copy text and images to the Clipboard.
Is it Possible to Sync the Clipboard Between a PC and a Mobile Phone?
Yes. If a computer and phone are linked, you can sync the clipboard items from one device with another.
Is Clipboard Sync Between Devices Dependent on Internet Connection?
Yes. You must have an internet connection over which both the PC and the mobile are connected to use clipboard syncing between them.
How Much Items Can I Copy to the Clipboard?
Up to 25 items can be stored on the clipboard history.
Do the Items Copied to the Clipboard Remain Even After Turning the PC Off?
No. When you turn off the computer, all the items stored on the Clipboard get removed.
Bottom Line
That’s a wrap for this guide about enabling clipboard sync on Windows 11. This feature lets you sync the clipboard items between your phone and the PC to improve your workflow. Try it out.
If you’ve any thoughts on How to Enable Clipboard Syncing in Windows 11, then feel free to drop in below comment box. Also, please subscribe to our DigitBin YouTube channel for videos tutorials. Cheers!
Readers help support Windows Report. We may get a commission if you buy through our links.
Read our disclosure page to find out how can you help Windows Report sustain the editorial team. Read more
Clipboard history is a useful Windows 11 feature for copying and pasting text and images. That feature saves up to 25 copied data clips. It enables users to copy multiple items with the Ctrl + C hotkey, which they can then select for pasting from clipboard history.
Many users have been upgrading to Windows 11 in recent months. Some who have recently upgraded to this platform have said that clipboard history doesn’t work for them.
Things were no different for Windows 10 users who complained about clipboard history issues too. Consequently, those users can’t open that feature with its hotkey in the new platform.
That doesn’t necessarily mean copying and pasting won’t work at all. They might still be able to copy and paste single items. However, the clipboard history feature that stores multiple copied items doesn’t work for them.
If clipboard history doesn’t work for you in Windows 11, you’re missing out on a revamped feature. These are some of the most likely fixes you may apply right away:
What can I do if the Windows 11 clipboard history is not working?
1. Make sure that Clipboard History is enabled in Settings
- Press the Start menu button on Windows 11’s taskbar.
- Then click the pinned Settings app on that menu.

- Select the Clipboard navigation option.
- Click the Clipboard history option’s toggle button on if it’s off.

- Then try pressing the Windows key + V hotkey to bring up clipboard history.


2. Update Windows 11
NOTE
Users have confirmed installing the Windows 11 KB5006746 update can fix clipboard history issues. You can manually download and install KB5006746 from the Microsoft Update catalog, but it should become available within the Windows Update tab.
- Press the Windows and I keys at the same, which will open Settings.
- Next, select Windows Update on the left side of Settings.
- Click the Check for updates button.

- Press the Download and Install button for an available update.

3. Restart File Explorer
- Click the magnifying glass taskbar icon, which opens the search box.

- Type Task Manager within the search box to find that utility.
- Select Task Manager in the search tool to open its window.
- Click the Processes tab, and select the Windows Explorer process there.

- Press the Restart button for Windows Explorer.


4. Clear clipboard data
- Open the Settings window as outlined in the first two steps of resolution one.
- Select Clipboard on the System tab.
- Press the Clear button.
- Open the Start menu, and select its Power and Restart options.

5. Enable the Allow Clipboard History Group Policy setting
- Right-click the Start taskbar icon to open a shortcuts menu.
- Select Run on the shortcuts menu.

- Enter this Group Policy command within the Open box:
gpedit.msc - Click OK to launch Group Policy Editor.
- Next, you’ll need to double-click Computer Configuration and Administrative Templates on the left side of Group Policy Editor.

- Then select System and OS Policies to open the settings that you can see below:

- Double-click the Allow Clipboard History setting.
- Click the Enabled radio button on the Allow Clipboard History policy window.

- Select Apply to save the new policy.
- Press the OK button to exit the Allow Clipboard History window.


6. Edit the registry
- Open Run as outlined in the first couple of steps of the previous resolution.
- Type this text within the Open box:
regedit.msc - Select the OK option launch the Registry Editor.
- Then open this key within the Registry Editor:
Computer\HKEY_LOCAL_MACHINE\SOFTWARE\Policies\Microsoft\Windows\System
- Right-click System on the left of the window and select the New context menu option.
- Select the DWORD (32-bit) Value option on the submenu.
 Value context menu option")
- Enter AllowClipboardHistory when naming the new DWORD.
- Next, double-click AllowClipboardHistory to open the window in the screenshot below:
 Value window")
- Then input 1 within the Value data text box, and click the OK option.
- Click the taskbar’s Start button.
- Select the Power option, and click the Restart button.

 Value context menu option")
 Value window")
7. Clean-boot Windows 11
- Press the Windows key + X hotkey, which opens a shortcuts menu.
- Input this text in Run’s Open box:
msconfig - Press OK to launch the MSConfig’s system tool.
- Click the Selective startup radio button, and deselect the Load startup items checkbox.

- If they’re not already selected, select the options for Load system services and Use original boot configuration.
- Select the Services tab at the top of the window.
- Click Hide all Microsoft services to select that checkbox.

- Press the Disable all button, which will deselect checkboxes for remaining third-party services.
- Select the Apply option.
- Click OK to close System Configuration.
- Finally, press the Restart button on the dialog box that pops up.
- Try activating clipboard history after clean-booting Windows 11.


Clean-booting Windows might stop a third-party program or service conflicting with clipboard history from running at startup. For example, a third-party app might have a Windows + V keyboard shortcut that conflicts with clipboard history’s hotkey.
You can restore your PC’s original boot configuration by selecting the Load startup items checkbox on MSConfig’s General tab. To re-enable all the third-party services, press the Enable all button on the utility’s Services tab.
- Microsoft wants Windows 10 users to upgrade to Windows 11 or Copilot + PCs
- Windows 11 KB5055627 update makes File Explorer more fluid
- A few keyboard settings are moving from Control Panel to Settings app in Windows 11
- Details of Windows 11 25H2 spotted in the wild; likely to be a smaller update
- Deleting ‘inetpub’ folder lets hackers permanently stop Windows updates, Microsoft warns
Should I reinstall Windows 11 to fix clipboard history?
Reinstalling Windows 11 will probably fix clipboard history when it’s not working. However, that should only be a last resort resolution. Try all the other potential solutions before considering more drastic alternatives.
There are a few different ways you can reset Windows 11. Resetting the platform, via Settings, is the most straightforward method. Our guide on how to reset Windows 11 provides full details on how you can reinstall the OS this way.
Are there any alternatives to Windows 11’s clipboard history?
There are plenty of third-party clipboard managers for Windows platforms. Some of them have better features than clipboard history. Our list including clipboard managers for Windows 10 tells you about some of the best ones.
Windows 11 is a very young desktop platform at the moment. Some Windows 10 clipboard managers might not be compatible with the latest platform. We can confirm that the ClipboardFusion and Clipboard Manager apps in our clipboard manager guide are compatible with the latest OS.
However, many clipboard managers are freeware packages. Most of those that aren’t will at least have time-restricted trial packages you can download. So, don’t hesitate to check third-party clipboard managers run in Windows 11 without purchasing them.
Windows 11’s revamped clipboard history is much better than it was in its preceding platform. It’s worth trying to get clipboard history fixed before considering alternative third-party software.
Has clipboard history changed in Windows 11?
The big M has revamped the clipboard history in Windows 11. In Microsoft’s new desktop platform, that feature has numerous additional tabs and options. For example, users can press a Clear all button within the enhanced clipboard history.
The revamped clipboard history includes new Emoji and Kaomoji emoticon tabs. Those tabs enable you to select a variety of different emoticons. Selecting emoticons adds them to documents and text editors open within Word processors and browsers.
There’s a useful new Symbols tab in Windows 11’s revamped clipboard history. Clicking that tab brings up a selection of special symbols and characters. Users can select to add geometric, mathematical, language, and Latin symbols to documents among others.
The revamped clipboard history also includes a GIF tab. That tab includes a multitude of GIF images. There you can choose images to add to Word-processed documents and emails.
Therefore, clipboard history has changed a lot in Windows 11. It’s almost like a new feature with all the additional tabs it includes for selecting and adding GIF images, emoticons, and symbols to documents and text editors.

The potential resolutions in this guide will probably do the trick for most users. We don’t promise those solutions are completely guaranteed for all users, but they’re some of the most widely confirmed resolutions.
Also, take a look at this guide on how to solve Windows 10 Clipboard issues for good. Once you solve your clipboard issue either for the whole system or for a specific app you installed, feel free to use the new and improved Windows 11 clipboard.
There might also be more ways to fix Windows 11’s clipboard history not working. If you’ve found another way to resolve that issue, feel free to share it in the comments section below.
Matthew Adams
Windows Hardware Expert
Matthew is a freelancer who has produced a variety of articles on various topics related to technology. His main focus is the Windows OS and all the things surrounding it.
He is passionate about the tech world, always staying up-to-date with the latest and greatest. With an analytical view, he likes problem-solving, focusing on errors and their causes.
In his free time, he likes to read and write about history and tries to always develop new skills.
Unable to access Windows 11’s clipboard history? Clipboard is an essential part of the Windows OS, a pretty handy feature that we frequently use for copying and pasting text and images. It is a storage area that saves items temporarily when you copy or cut anything.

Also, once you enable the Clipboard history on your Windows device, you can access the last 25 items that you pinned to the clipboard. Pretty awesome, right? It allows you to save multiple items to the clipboard that you can use later. The Clipboard History feature initially rolled out along with the Windows 10 update. Moreover,with Windows 11, the clipboard history feature becomes so much better and productive. The revamped clipboard on Windows 11 includes emojis, symbols, GIFS, and more.

You can quickly access the Clipboard History on Windows 11/10 by pressing the Windows + V key combination.
Although, if you’re unable to access the clipboard history on your device, we might have some workarounds for you. In this post, we have listed simple yet effective troubleshooting methods that you can use for fixing the “Clipboard not working” issue on Windows 11.
Also read: How To Use The Clipboard To Copy-Paste Across Windows 10 Devices
Let get started.
How To Fix Windows 11 Clipboard History Not Working
1. Manually Enable Clipboard History via Settings
If the clipboard history feature is not turned on by default, you can manually enable it via Settings. Here’s what you need to do:
Tap on the search icon placed on the Taskbar, select “Settings”. Switch to the “System” section from the left menu pane.

Scroll down through the list and tap on “Clipboard”.

Enable the “Clipboard History” feature if it wasn’t turned ON already.
Once the Clipboard History feature is enabled, you can press the Windows + V key shortcut to quickly access your recently copied items.
2. Restart File Explorer
Press the search icon placed on the Taskbar, type “Task Manager” and hit Enter.

In the Task Manager window, switch to the “Processes” tab.

Look for “Windows Explorer” in the list, select it, and then hit the “Restart” button.
Reboot your device and then try accessing the clipboard history whether it fixed the issue.
3. Clear the Clipboard Data
Another workaround to fix the “Windows 11 clipboard history not working” issue is by clearing the previously-stored data. Here’s what you need to do:
Open Settings> Clipboard.
Hit on the “Clear” button placed next to the “Clear clipboard data” option.

Reboot your device and start afresh.
Also read: How To Clear Clipboard Windows 10
4. Enable Clipboard History Feature via Group Policy Editor
Press the Windows + R key combination to open the Run dialog box. Type “Gpedit.msc” in the textbox and hit Enter to launch the Local Group Policy Editor.
In the Group Policy Editor window, navigate to the following folder location:
Computer Configuration> Administrative Templates> System> OS Policies.
Double-tap on the “Allow clipboard history” file placed on the right side of the window.

In the Properties window, check on “Enabled”.

Hit on the OK and Apply buttons to save changes.
Also read: Syncing Clipboards Between Mac and Windows Just Got Easier!
5. Edit the Registry
Another solution to fix the “Clipboard not working” issue is to edit the Registry values. Follow these quick steps:
Press the Windows + R key combination to open the Run dialog box. Type “Regedit” and hit Enter.
In the Registry Editor window, navigate to the following folder location:
Computer\HKEY_LOCAL_MACHINE\SOFTWARE\Policies\Microsoft\Windows\System
Now right-click on the System folder, select New > D-WORD (32-bit) Value.

Rename the new file as “Allow Clipboard History” and then enter 1 in the Value Data field.

Hit on OK when done. Reboot your device and check whether it fixed the issue.
Also read: Best Clipboard Manager Alternatives For Windows
Conclusion
So, yes, copy and paste like a Pro while making the most of the Clipboard History feature on Windows 11. We hope the above-mentioned solutions help you in fixing the clipboard and making it functional again. Windows 11’s revamped Clipboard History is worth a shot. Rather than using third-party clipboard managers, we would recommend you to give it a try and troubleshoot the clipboard by using the above-listed workarounds.
Do let us know which solution worked out the best for you? Feel free to drop your feedback in the comments section. Follow us on social media – Facebook, Instagram and YouTube.
Время на прочтение2 мин
Количество просмотров2.7K
В Windows Latest обнаружили в версии Windows 11 24H2 баг, который связан с историей буфера обмена. Эта функция перестала работать после обновления, и теперь появляется надпись «Здесь ничего нет — вы увидите историю буфера обмена, как только что-то скопируете».

Функцию добавили в обновлении Windows 10 за октябрь 2018 года. С помощью неё пользователь может сохранять историю скопированных элементов, включая тексты и медиафайлы, такие как изображения .jpg и .png, а затем получать к ним доступ с помощью Win+V.
Реализация истории буфера обмена в Windows 11 объединяет функцию с другими, такими как эмодзи и GIF-файлы, но в обновление 24H2 вызвало сбой в её работе.
«С последними обновлениями Windows 11 у меня включена история буфера обмена, но она не показывает элементы в моей истории», — отметил один из затронутых пользователей в сообщении Feedback Hub. «У меня установлена Windows 11 24H2 на виртуальной машине, и история буфера обмена там тоже не работает», — добавил другой.
Тестировщики в программе Windows Insider Program отметили наличие проблемы почти три месяца назад. Похоже, Microsoft проигнорировала эти отчёты.
Если история буфера обмена не работает, то можно сделать следующее:
-
открыть «Параметры»;
-
перейти в раздел «Система» и выбрать «Буфер обмена»;
-
отключить «Предлагаемые действия»;
-
не изменяя параметр «История буфера обмена», нажать Windows + V, чтобы открыть буфер обмена. Теперь он должен отображать любые новые скопированные элементы.
Затем можно снова включить «Предлагаемые действия». История буфера обмена продолжит работать.
Также можно попробовать отключить и включить функцию «История буфера обмена», затем отключить или включить «Синхронизацию истории буфера обмена на всех устройствах».
Ранее эксперты обнаружили в Windows 11 24H2 баг, который приводит к неудаляемому кэшу обновления ОС объёмом 8,63 ГБ. Эту информацию видно в системных настройках, но её нельзя удалить с помощью очистки диска (Disk Cleanup или Storage Cleanup не помогают) или других манипуляций. Помогает только чистая установка Windows 11 24H2. При попытке выполнить очистку диска и хранилища и удалить файлы кэша обновления в системе ничего не происходит и эти файлы продолжают занимать до 8,63 ГБ хранилища. Microsoft подтвердила, что в курсе проблемы.
Также ошибка в Windows 11 24H2 заставляет штатное средство проверки системных файлов sfc /scannow обнаруживать повреждённые файлы при каждом запуске и сканировании диска. В частности, SFC постоянно обнаруживает, что хэши для элемента файла Microsoft.Web.WebView2.Core.dll не совпадают.
Кроме того, пользователи пожаловались, что после обновления до версии Windows 11 24H2 они столкнулись с чрезвычайно медленной скоростью чтения и записи по протоколу SMB.