

When I switched over to Windows 10, I was so upset that I couldn’t get the game to run smoothly. My graphics were flashing pink or blue, and I would crash every time I tried to take my Sim to a different lot. If you’re having the same problem, it’s an easy fix! You just need to install the 4GB patch. And if that doesn’t work, there are several other things you can try listed below. This article contains EVERYTHING I KNOW about getting your game to work on Windows 10.
Last updated: 02/16/2021 (Updated with DXVK fix)
Increasing Available Memory
A windows update in late 2017 or early 2018 caused this bug to start happening to everyone playing The Sims 2. But the good news is it isn’t hard to fix.
The Sims 2 is an old game and it only uses 2GB of your available memory. You need a special patch for the game to access 4GB in Windows 10. When installed properly, you won’t run out of memory while you play and your game won’t crash and your graphics won’t flash pink anymore.
Here’s a step-by-step guide to help you get your game running again with no crashes and no flashing graphics.
Step 1: Inspect Your Config Log
First, I’ll show you how to make sure this is what’s causing your problem. And when we’re done, I’ll show you how to make sure it really worked.
Open up your Documents folder and navigate to the following path:
Documents > EA Games > The Sims 2 Ultimate Collection > Logs
NOTE: If you don’t have the UC, the path will be the same. It will just say “The Sims 2” only instead of “The Sims 2 Ultimate Collection.”

Find the log file that looks like the one above. It will be the name of your computer followed by -config-log.
Open the file. It will look like this:

Look for the rows that say “Memory” and “Free Memory.” If your game is only using 2GB, it will say 2048 here instead of 4096.
NOTE: I have already installed the patch in my game, so that’s why the memory shows 4096 in this screenshot.
If your log file says 2048 MB, installing the 4GB patch will fix the problem. Congratulations! Let’s fix it!
Step 2: Download the 4GB Patch
Visit the NTCORE website to download the 4GB patch.

Unzip the .exe file onto your desktop or anywhere you like. You can delete it after you install the patch, so it doesn’t really matter.
Step 3: Install the Patch
Now pay attention, because you have to install it properly or it won’t work.
Double click on the .exe file after you download and unzip it.
Your file explorer will then open up. Navigate to the following location:
Windows (C:) > Program Files (x86) > Origin Games > The Sims 2 Ultimate Collection > Fun with Pets > SP9 > TSBin

If you have the disc version of the game instead of the UC, navigate to this location:
Windows (C:) > Program Files (x86) > EA Games > The Sims 2 Mansion and Garden Stuff > TSBin
NOTE: If you don’t have Mansion and Garden Stuff, navigate to the TSBin of the most recent expansion pack you have.
Select the .exe of your game in this folder, and then click “Open.” You should get a pop-up that looks like this:
Click OK and the box will disappear.
A backup .exe file should have been created in your TSBin folder. That’s normal, so don’t worry about it. This means your game is successfully patched.
Step 4: Make Sure it Worked
- Load your game and allow it to load to the neighborhood selection screen (at least). This will update your config log.
- Close your game and return to your desktop.
- Open up your config log from your documents folder again (as in step 1). It should now say 4096 in the memory line.
- Congratulations! The Sims 2 will now run on Windows 10 and your days of crashing and flashing pink graphics are over.
Troubleshooting
If you’re still having issues after applying the patch, there are a few more things you can try. The Sims 2 is picky with modern graphics cards.
The 4GB Patch Won’t Apply (Memory Does Not Change in Log)
Recently a Patron of mine was having trouble getting the 4GB patch to apply. We tried literally everything I could think of and her memory would not change in the Config Log. I have had several comments and emails about this too.
Here’s how we fixed it and got her playing right away.
Drag the .exe file from your TS Bin to your desktop and apply the 4GB patch there. Check your log file to make sure it applied. Your memory should be updated. Then you can use the shortcut you just created on your desktop to play the game.
Moving the .Exe File – DISC VERSION ONLY!
If you have the disc version of the game, it might be necessary to move the .exe file to another folder. I have no idea why this is necessary for some computers and not others. If nothing else works, try this!
Make a backup of your folders before you do this in case you screw something up. I warned you. Also, please note if you have the Ultimate Collection this will not work for you!
The patch will automatically apply to the TSBin. Cut and paste the Sims2EP9.exe file into the CSBin.

The CSBin directory is shown above. If this doesn’t work for you, move the .exe file back into TSBin (or restore from backup) and try something else.
Graphics Rules Maker
Everyone using Windows 10 to play The Sims 2 should use the graphics rules maker.

This program is easy to install and makes “rules” for the game to follow so that it recognizes your graphics card. This will allow you to play in 1920 x 1080 resolution and make your game look the best it possibly can. See the creator’s website for further instructions. Make sure to read everything to ensure your settings are correct.
Direct X 9.0 Error After Using Graphics Rules Maker
If you get a Direct X or Access Violation error trying to run your game after using Graphics Rules Maker, you need to download a separate fix.
There’s one version for UC and one version for discs. There are fixes available for both Nvidia and Radeon graphics cards. Read the instructions carefully before installing.
My Game Won’t Start
If you’re game doesn’t start at all after applying the patch and using the graphics rules maker, you most likely need to delete your cache files. Navigate to:
C:\Users\YourName\Documents\EA Games\The Sims™ 2 Ultimate Collection
You will see two files in this folder at the very bottom:
- Accessory.cache
- Groups.cache

Delete both of them and start your game again. Don’t worry! This is completely safe and your game will generate new cache files after you start it up.
To prevent having to do this again, see the instructions here for making your cache files read-only. You will never have to delete them again. If you don’t do this, you may have to delete the files again the next time your game doesn’t start. No big deal, but a little annoying.
My Memory Still Won’t Update (DISC VERSION)
If you’ve made it all the way to the end of this tutorial and your memory STILL doesn’t update, there is one more fix that seems to work for even the most severe cases. You need to use a No-CD crack. (Don’t worry it’s perfectly legal since you own the discs.)
- Replace your .exe file with the more flexible version found on this page: http://www.leefish.nl/mybb/showthread.php?tid=7800&pid=40665#pid40665
- Click on the “No CD Hack for M&G” to download.
- Rename Sims2EP9.exe to Sims2EP9.___exe.
- Copy the new .exe file you downloaded into your CSBin folder (where the original is).
- Apply the patch to the new .exe file and try again. You may need to apply the patch on the desktop and then move to CSBin if that doesn’t work.
NONE OF THIS WORKS! MY GAME IS STILL CRASHING! (DXVK Fix)
If you’ve exhausted every other option, there’s one more thing you can try. Don’t ask me how or why this works, but it seems to do the trick when none of the other options work. When Mr. Pleasant couldn’t play Sims 2 on his new computer, this was the only thing that stopped the crashing and purple soup.
I have removed my instructions from this guide, as they have become outdated. Instead, see THIS DOCUMENT with current instructions for using the DXVK Fix, plus more advanced troubleshooting options.
If I find more information that might help, I will add it to this article in the future. If these fixes work for you (or if you have any problems), leave a comment below and let me know!
Все способы:
- Способ 1: Обновление операционной системы
- Способ 2: Запуск в режиме совместимости
- Способ 3: Замена конфигурационного файла
- Способ 4: Установка пользовательского патча
- Способ 5: Переустановка / обновление драйвера видеокарта
- Способ 6: Переустановка игры
- Способ 7: Восстановление системных файлов
- Способ 8: Восстановление системы
- Вопросы и ответы: 2
Важно! В этой статье рассказывается о методах устранения неисправности, связанной с частыми вылетами Sims 2. Если ваша проблема заключается в ошибках при запуске игры, обратитесь за помощью к другому материалу на нашем сайте. В нем приводится множество способов устранения неполадок этого типа.
Подробнее: Как запустить Sims 2 в Windows 10
Способ 1: Обновление операционной системы
Перед внесением правок в компоненты игры и операционной системы рекомендуется проверить наличие обновлений и при обнаружении установить их. Разработчики Windows 10 постоянно улучшают совместимость со старыми играми, поэтому инсталляция патча способна устранить проблему с вылетами. Если вы не знаете, как обновить ОС до последней версии, обратитесь за помощью к тематической статье на нашем сайте.
Подробнее: Обновление Windows 10 до последней версии
Обратите внимание! Некоторые пользователи жалуются на ошибку, возникающую во время инсталляции обновлений. Если и вы столкнулись с такой проблемой, перейдите по ссылке ниже к статье с описанием возможных неисправностей и способами их устранения.
Подробнее: Что делать, если обновления не устанавливаются в Windows 10
Проблема с вылетами может быть связана с плохой совместимостью игры, так как выходила она во времена, когда Windows 10 еще не существовало. Поэтому для устранения множества неисправностей рекомендуется воспользоваться специальным средством операционной системы, которое в автоматическом режиме проанализирует файлы Sims 2 и подберет наиболее подходящую конфигурацию для корректной работы.
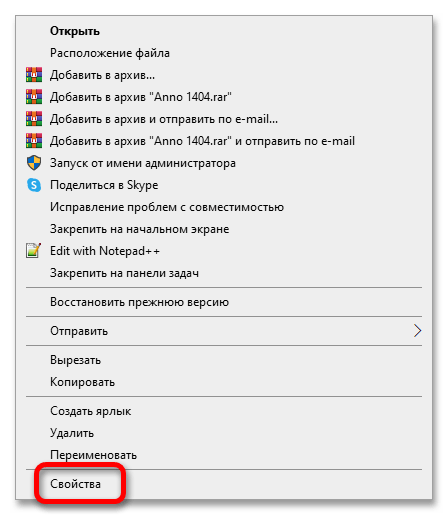
- Перейдите в свойства ярлыка игры. Для этого щелкните по нему правой кнопкой мыши и в появившемся контекстном меню выберите пункт «Свойства».
- В открывшемся окне проследуйте во вкладку «Совместимость» и нажмите по кнопке «Запуск средства устранения проблем с совместимостью».
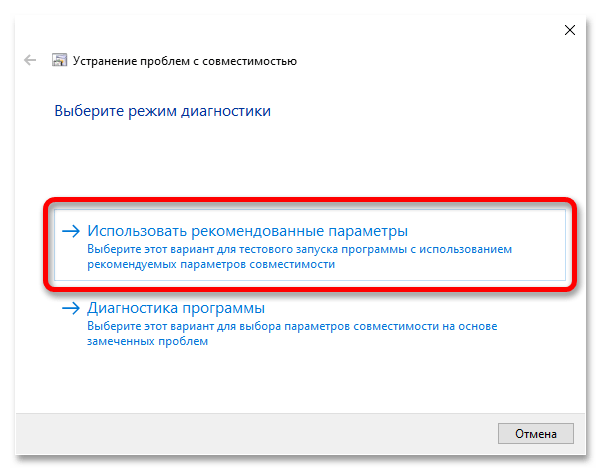
- В появившемся приветственном окне утилиты кликните по пункту «Использовать рекомендованные параметры».
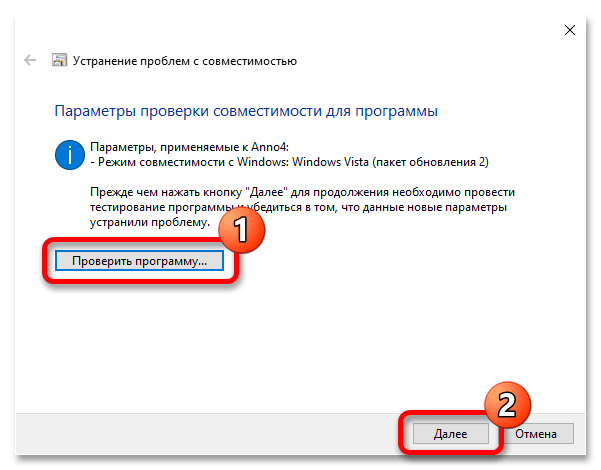
- Нажмите по кнопке «Проверить программу». Сразу после этого будет осуществлен запуск исполняемого файла игры, продолжайте играть в нее. Если спустя время ошибка не появилась, значит, средство устранения неполадок подобрало верные параметры совместимости. Выйдите из Sims 2 и щелкните по кнопке «Далее».

Примечание! Если проблема с вылетом не была устранена, все равно щелкните по кнопке «Далее».
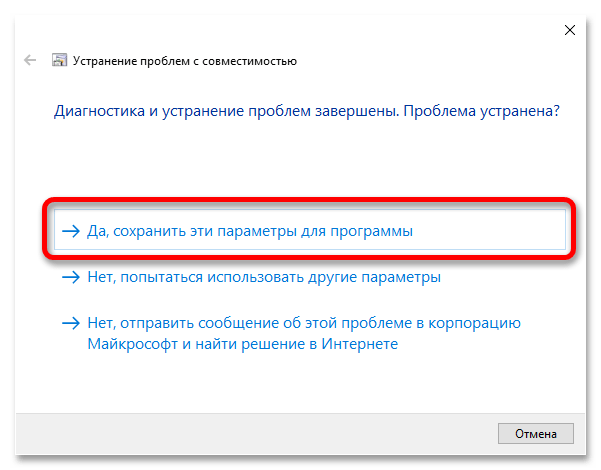
- Если в процессе игры вылета не было, ответьте на поставленный вопрос, выбрав вариант «Да, сохранить эти параметры для программы». После этого «Средство устранения неполадок» можно закрыть и продолжать играть в Sims 2.
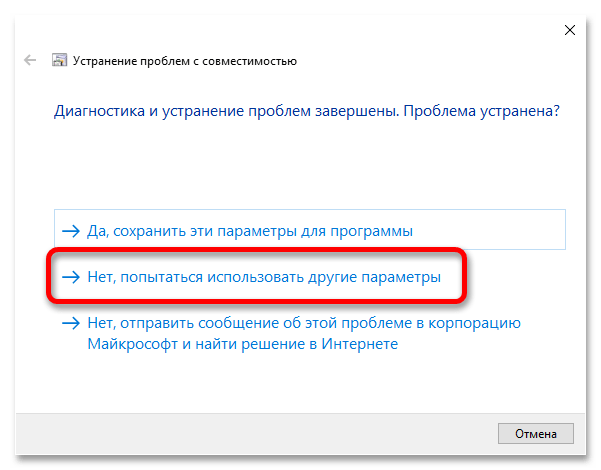
Если неисправность не была устранена и вылет произошел, щелкните по варианту «Нет, попытаться использовать другие параметры».
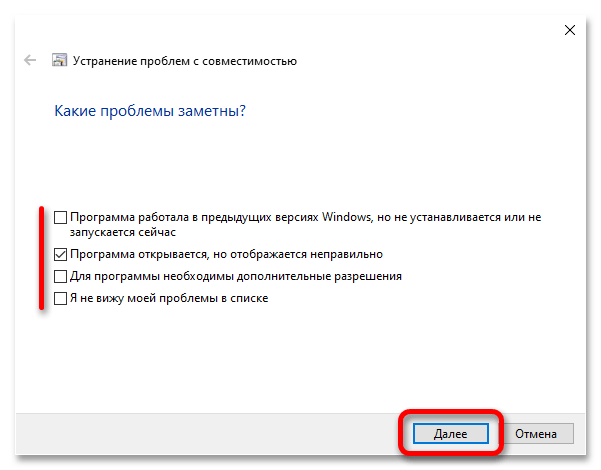
- На экране появится список с разным описанием проблемы. Поставьте отметки напротив тех пунктов, которые соотносятся с работой вашей игры. Затем щелкните по кнопке «Далее».
- Вернувшись в уже знакомое окно, снова кликните по кнопке «Проверить». Далее действуйте аналогичным образом, как было описано в пунктах №4-6 этой инструкции, только на этот раз при необходимости выберите из списка другие варианты ответов.


Способ 3: Замена конфигурационного файла
Sims 2 может некорректно работать с современными разрешениями мониторов, проявляется это в неправильном отображении некоторых элементов интерфейса и периодических вылетах при переходе в различные меню и во время загрузки локаций. Решением проблемы будет замена конфигурационного файла. Предварительно скачайте его с нашего облачного хранилища, щелкнув по кнопке ниже.
Скачать конфигурационный файл с Яндекс.Диска
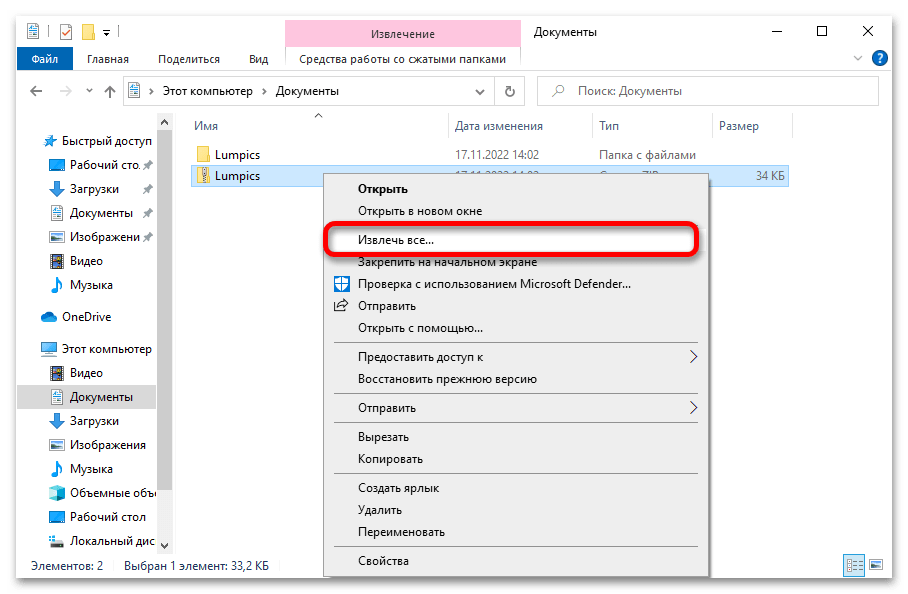
Примечание! Файл находится в ZIP-архиве, поэтому перед выполнением дальнейшей инструкции извлеките его. Для этого вы можете воспользоваться как штатными средствами операционной системы, так и программным обеспечением от сторонних разработчиков. При необходимости ознакомьтесь с тематической статьей на нашем сайте, перейдя по ссылке ниже.
Подробнее: Как распаковать ZIP-архив в Windows 10
Файл содержит параметры игры, изначально настроенные для корректной работы в Windows 10. Но по умолчанию в нем указано разрешение 1920 на 1080 пикселей. Если у вас монитор соответствует этим значениям, значит, можете пропустить начало приведенной далее инструкции и перейти сразу к ее последнему пункту. В противном случае необходимо открыть конфигурационный файл в «Блокноте» и изменить параметры разрешения.
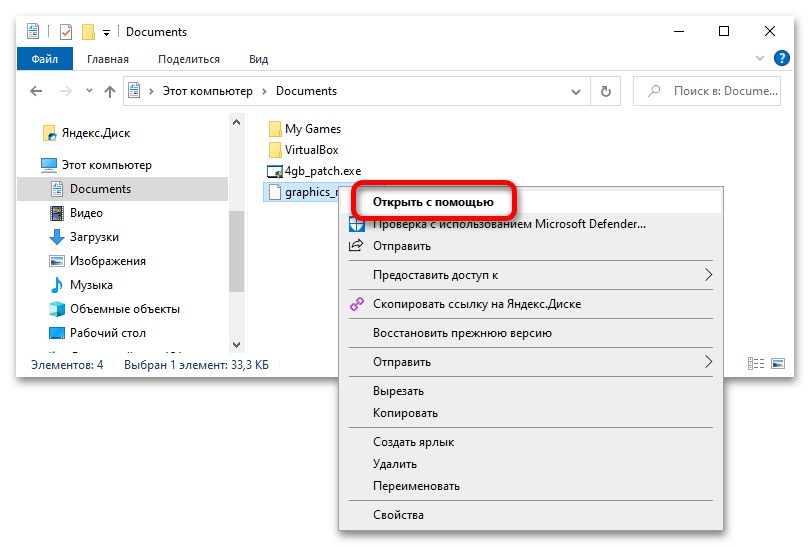
- Перейдите в папку, в которую вы извлекли содержимое архива. Откройте контекстное меню конфигурационного файла, нажав по нему правой кнопкой мыши, и выберите пункт «Открыть с помощью».
- В появившемся диалоговом окне найдите в списке приложение «Блокнот». Выделите его и щелкните по кнопке «ОК». Также рекомендуется установить отметку напротив пункта «Всегда использовать это приложение для открытия .sgr файлов», чтобы в будущем не пришлось выполнять эти же действия с другими подобными файлами.
- В открывшемся окне Блокнота необходимо найти блок параметров, отвечающих за разрешение экрана в игре. Для удобства рекомендуется воспользоваться функцией поиска. Для этого разверните меню «Правка», расположенное в верхней части интерфейса, и выберите пункт «Найти». Также вы можете для этого воспользоваться сочетанием клавиш Ctrl + F.
- В появившемся окне введите в поле «Что» указанную ниже строку, после чего нажмите по кнопке «Найти далее».
option ScreenModeResolutionКликайте по ней до тех пор, пока не увидите в основной части «Блокнота» то же содержимое, что показано на изображении ниже. Если вы случайно его пролистаете, переведите переключатель в блоке «Направление» в положение «Вверх»и снова начните кликать по кнопке «Найти далее».
- Перед вами будет располагаться четыре блока со значениями разрешения, которые соответствуют выбранным параметрам качества графики. Рекомендуется установить напротив всех строк разрешение вашего экрана, чередуя значения по горизонтали и вертикали, как это сделано на изображении ниже.

После этого сохраните изменения, воспользовавшись комбинацией клавиш Ctrl + S.
- Теперь необходимо скопировать измененный конфигурационный файл во все соответствующие директории игры. Их список вы можете видеть ниже. Заметьте, что путь начинается непосредственно с корневой папки Sims 2.
The Sims 2\Apartment Life\TSData\Res\Config
The Sims 2\Best of Business\EP3\TSData\Res\Config
The Sims 2\Best of Business\SP5\TSData\Res\Config
The Sims 2\Best of Business\SP7\TSData\Res\Config
The Sims 2\Bon Voyage\TSData\Res\Config
The Sims 2\Double Deluxe\Base\TSData\Res\Config
The Sims 2\Double Deluxe\EP2\TSData\Res\Config
The Sims 2\Double Deluxe\SP4\TSData\Res\Config
The Sims 2\Free Time\TSData\Res\Config
The Sims 2\Fun with Pets\EP4\TSData\Res\Config
The Sims 2\Fun with Pets\SP1\TSData\Res\Config
The Sims 2\Fun with Pets\SP9\TSData\Res\Config
The Sims 2\Glamour Life Stuff\TSData\Res\Config
The Sims 2\Seasons\TSData\Res\Config
The Sims 2\University Life\EP1\TSData\Res\Config
The Sims 2\University Life\SP6\TSData\Res\Config
The Sims 2\University Life\SP8\TSData\Res\ConfigПримечание! Если какой-то папки вы не найдете, пропустите ее. Это означает, что у вас просто не установлено соответствующее дополнение к игре.
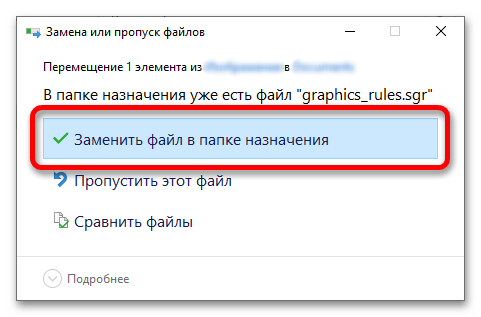
При копировании файла в целевую директорию у вас на экране каждый раз будет появляться диалоговое окно с предупреждением, что такой объект там уже есть. Каждый раз кликайте по пункту «Заменить файл в папке назначения».


Способ 4: Установка пользовательского патча
Исполняемый файл Sims 2 был создан, когда на рынке компьютерной техники еще не было 64-битных процессоров, поэтому в нем нет строк кода, обеспечивающих совместимость с оперативной памятью объемом 4 ГБ и больше. По этой причине в игре могут случаться внезапные вылеты, особенно сильно это проявляется на обширных локациях с большим количеством игровых персонажей. Чтобы устранить эту проблему, необходимо инсталлировать в корневую директорию специальный патч, который внесет правки в исполняемый файл Sims 2, но предварительно скачайте его с официального сайта разработчика.
Скачать патч с официального сайта
После разархивации перейдите в папку с этим файлом и выполните следующие действия:
- Запустите исполняемый файл инсталлятора патча двойным нажатием левой кнопки мыши. При необходимости в появившемся диалоговом окне дайте свое согласие на выполнение программы.
- В открывшемся окне файлового менеджера перейдите в корневую директорию игры и выберите ее исполняемый файл. Затем нажмите по кнопке «Открыть».
- Сразу после этого появится диалоговое окно с сообщением о том, что все прошло успешно. Закройте его, нажав по кнопке «ОК».
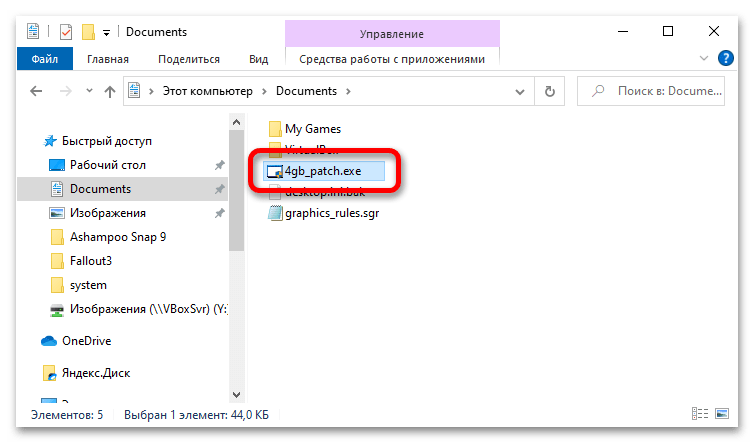

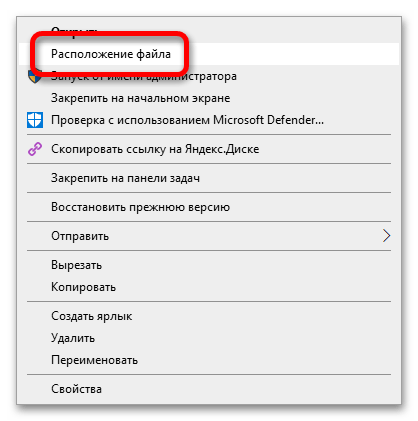
Примечание! Если вы не знаете, где находится корневая директория игры с исполняемым файлом, откройте ее через контекстное меню ярлыка на рабочем столе. Вызовите его нажатием правой кнопки мыши, после чего выберите пункт «Расположение файла».
Способ 5: Переустановка / обновление драйвера видеокарта
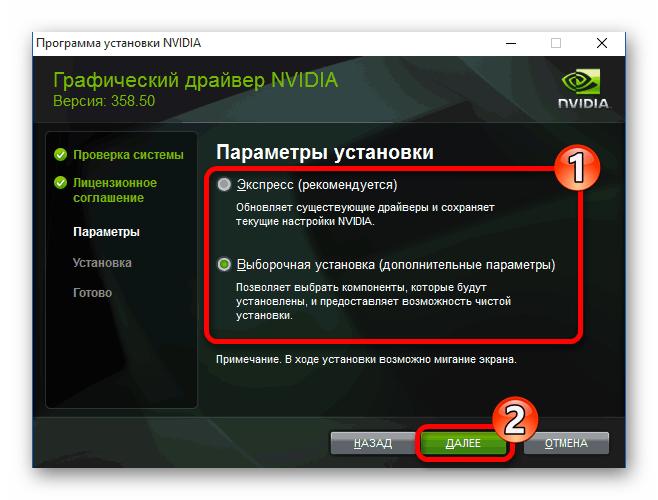
Для корректной работы игр в операционной системе должна быть установлена актуальная версия драйвера видеокарты. Если вы давно не обновляли его, следует проверить наличие апдейтов. Руководство по выполнению этой процедуры будет отличаться в зависимости от компании производителя графического чипа. У нас на сайте есть отдельные статьи, посвященные этой теме, в которых вся процедура подробно описывается, воспользуйтесь соответствующей ссылкой ниже.
Подробнее: Как обновить драйвер видеокарты NVIDIA / AMD
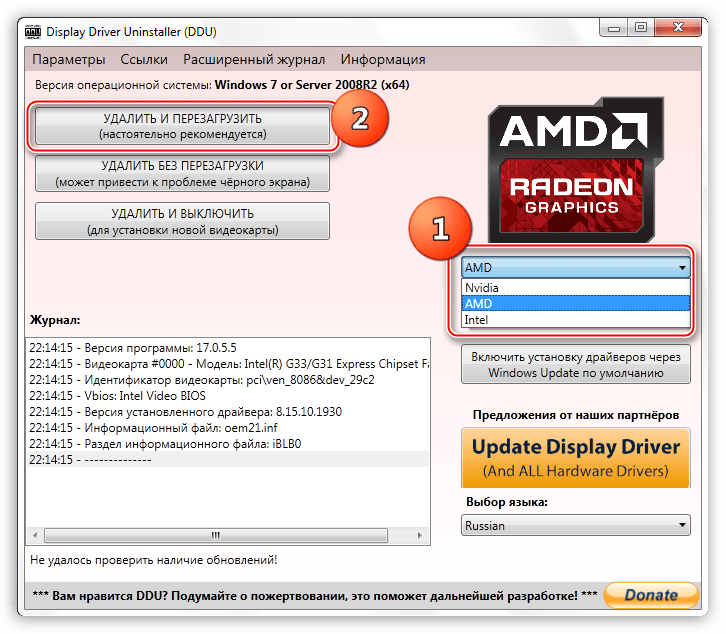
Если проблемы с Sims 2 начали появляться относительно недавно, а до этого времени все было в порядке, есть вероятность, что драйвер видеокарты повредился. В таком случае его обновление не поможет, потребуется совершить полную переустановку. Эту процедуру можно условно разделить на два этапа: удаление и инсталляция. Подробнее об этом рассказывается в другой статье на нашем сайте.
Подробнее: Как переустановить драйвер видеокарты
Способ 6: Переустановка игры
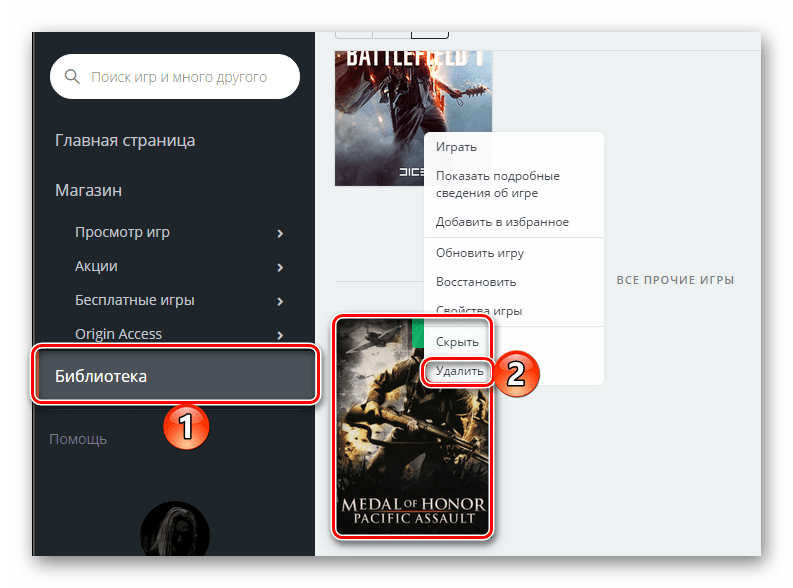
В процессе работы за компьютером по тем или иным причинам могли случайно повредиться файлы игры, что и вызвало проблемы с внезапными вылетами. В таком случае необходимо восстановить все данные. Сделать это можно путем переустановки Sims 2, но прежде игру следует полностью удалить с компьютера. Для этого рекомендуется воспользоваться ее деинсталлятором или специальным программным обеспечением от стороннего разработчика. Подробнее об этом рассказывается в другой статье на нашем сайте, при необходимости ознакомьтесь с ней.
Подробнее: Удаление игр на компьютере с Windows 10
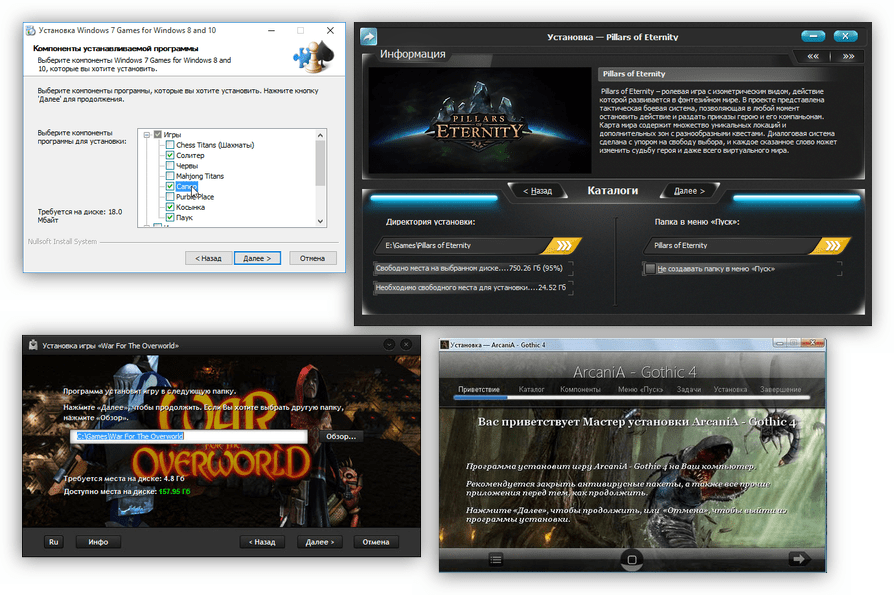
Если вы скачивали установщик Sims 2 из интернета, перед повторной инсталляцией рекомендуется прочитать тематическое руководство на нашем сайте. В нем поэтапно рассказывается о том, как инсталлировать программы и игры в операционной системе.
Подробнее: Руководство по установке программ на компьютер
Способ 7: Восстановление системных файлов
В процессе работы за компьютером повредиться могли не только игровые файлы, но и системные. Это также становится причиной внезапных вылетов в играх. Если такие проблемы вы замечали не только в Sims 2, то для их решения необходимо попробовать восстановить данные на диске операционной системы. Для этого следует воспользоваться специальной консольной утилитой Windows 10, которая производит эту процедуру в автоматическом режиме, достаточно будет ее запустить с соответствующими параметрами. На нашем сайте есть отдельная статья, в которой об этом рассказывается подробнее. При необходимости вы можете ознакомиться с ней, перейдя по ссылке ниже.
Подробнее: Восстановление целостности системных файлов в Windows 10

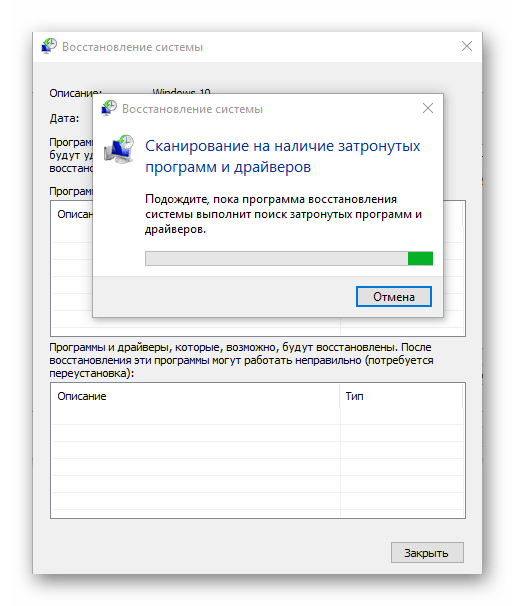
Способ 8: Восстановление системы
Если долгое время с игрой Sims 2 все было в порядке, а внезапные вылеты стали беспокоить вас относительно недавно, устранить неисправность можно путем отката операционной системы до точки восстановления. Важным фактором здесь является ее наличие. В случае удовлетворения этого требования, произведите процедуру по восстановлению. При необходимости обратитесь за помощью к другому материалу на нашем сайте, посвященному этой теме.
Подробнее: Как откатить Windows 10 до точки восстановления
Наша группа в TelegramПолезные советы и помощь
Урок обновлён 23 апреля 2023 года
Салам алейкум, дорогие симс-геймеры! В этом уроке я вам расскажу, как запустить Sims 2 на новом компьютере с Windows 10, пусть и в оконном режиме.
В предыдущем уроке я вам рассказывал, как запустить Sims 3 на современном компьютере,
После того, как у меня появился новый игровой ноутбук HP Pavilion Gaming Laptop 15, я решил сразу опробовать все мои игры Sims на нем. Sims 4 запустилась без проблем, а вот с Sims 3 не смогла запуститься. После нехитрых манипуляций Sims 3 у меня запустился. Далее установил Sims 2, запустил, и она тоже запустилась, вот только в очень низком разрешении экрана, как назло. После того, как я увидел на официальном форуме инструкцию по запуску Sims 2 на современных ПК и следовал ней, всё встало на свои места. Старый ноут Lenovo Ideapad U510 уже продержался на последних вздохах, к тому-же он был не игровой.
Перед тем, как мы начнем, я поспешу вас немного огорчить: игра Sims 2 на Windows 10 запустится пока только в оконном и псевдополноэкранном режиме. Стоит также отметить, что мой урок частично основан на моём личном опыте.
Итак, начнем.
Вам потребуется:
а) игра Sims 2 (желательно со всеми допами и каталогами)
б) компьютер с установленной Windows 10;
в) веб-установщик библиотек DirectX;
д) .NET Framework 3.5.
е) Graphics Rules Maker
1. Установка игры
Первым делом устанавливаем игру. Вы можете скачать любую версию игры: репак или лицуху. Принцип установки игры такой-же, как и для всех программ, поэтому не буду вдаваться в подробности: вы уже знаете как это делать.
После установки у вас на рабочем столе появится ярлык (если вы поставили соответствующую опцию перед установкой). Если ярлыка нет, перейдите в директорию «The Sims 2\<папка последнего дополнения/каталога>\TSBin» (пример: D:\Program Files (x86)\The Sims 2\EP9Data\TSBin), щелкните правой кнопкой мыши на файле «Sims2<номер последнего дополнения/каталога>.exe» (пример: Sims2EP9.exe) и выберите «Создать ярлык».
2. Установка библиотек DirectX
Далее необходимо установить библиотеки DirectX. После того, как я перед установкой 2-й части решил проблемы с запуском Sims 3, при запуске Sims 2 никаких ошибок не возникало, но все же объясню, что нужно делать:
1) Качаем с сайта Microsoft веб-установщик исполняемых библиотек DirectX. Это необходимо, так как без старых библиотек игра не запустится. НИКОГДА НЕ СКАЧИВАЙТЕ библиотеки с других сайтов, так как они могут быть повреждены или в них могут быть вирусы. Поэтому выполняем следующие пункты:
2) Затем запускаем скаченный файл, принимаем соглашение и жмем «Далее»;
3) Далее нам предлагают установить панель Bing. Нам она не нужна, поэтому мы снимаем галочку «Установка Панели Bing». Жмем «Далее» — начнется скачивание и установка библиотек DirectX;
4) После завершения установки жмите «Готово».
3. Подключение старого .NET Framework.
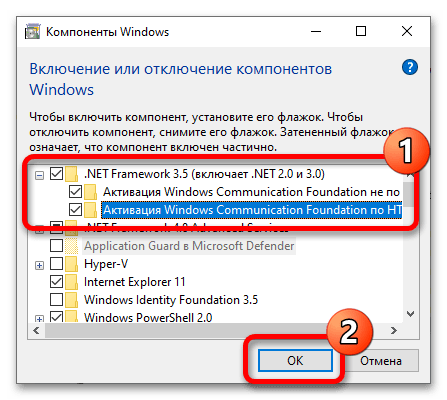
Помимо старых библиотек DirectX, для работы игры также может потребоваться старый .NET Framework. На некоторых компьютерах эти библиотеки могут быть отключены. Я сам не знаю, какой .NET Framework требуется для работы Sims 2, но всё же объясню, как включить: заходим в «Панель Управления», далее выбираем «Программы и компоненты», далее — «Включение или отключение компонентов Windows» и ставим флажок на «.NET Framework 3.5 (включает .NET 2.0 и 3.0)».
4. Добавление видеокарт с помощью Graphics Rules Maker.
Скачиваем программу Graphics Rules Maker, устанавливаем и запускаем её. Далее переходим во вкладку «Settings» и:
а) Пишем The Sims 2 (параметр «Game»);
б) Указываем директорию (параметр «Path») базовой игры (в моём случае D:\Program Files (x86)\The Sims 2, у вас может быть иначе) и, желательно, вашего последнего дополнения/каталога (в моём случае это каталог «Сады и особняки»);
в) Указываем размер занимаемой игрой текстурной памяти вашей видеокарты (параметр «Force Texture Memory»). О том, как узнать объем памяти вашей видеокарты, вы можете, перейдя на вкладку «Device Info» (строка Texture Memory) и выбрав вашу видеокарту (параметр «Device»):
г) В той же вкладке «Settings» отмечаем все доступные галочки;
д) Выбираем разрешение игры по умолчанию (параметр «Default resolution») и максимальное (параметр Maximum resolution).
г) Нажимаем «Save Files…».
После этого выскочит окно с предложением внести вашу видеокарту в базу данных игры:
Нажимаем «Yes» — появится следующее окно:
Нажимаем «OK». Но это ещё не всё.
5. Редактирование файла GraphicRules.sgr.
Однако программа Graphics Rules Maker может не добавить необходимое разрешение в игре. Поэтому нам нужно вручную отредактировать файл «GraphicRules.sgr«. Поэтому настраиваем разрешение экрана:
а) Ищем файл «GraphicRules.sgr» по адресу The Sims 2\TSData\Res\Config (в моём случае это D:\Program Files (x86)\The Sims 2\TSData\Res\Config, у вас может быть иначе), на всякий случай скопируем его в безопасное место и открываем в блокноте;
б) Нажимаем Ctrl+F и ищем строку «ScreenModeResolution» без кавычек. Вы увидите это:
option ScreenModeResolution
setting $Low
uintProp maxResWidth 800
uintProp maxResHeight 600
uintProp defaultResWidth 800
uintProp defaultResHeight 600
setting $Medium
uintProp maxResWidth 1280
uintProp maxResHeight 1024
uintProp defaultResWidth 1024
uintProp defaultResHeight 768
setting $High
uintProp maxResWidth 1600
uintProp maxResHeight 1200
uintProp defaultResWidth 1024
uintProp defaultResHeight 768
end
Здесь необходимо изменить строки «uintProp maxResWidth» и «uintProp maxResHeight«: вместо числа, указанного в строке «uintProp maxResWidth» укажите ширину вашего экрана, а в строке «uintProp maxResHeight» — высоту. Таким образом, если разрешение вашего монитора, например, 1920х1080, изменённая часть файла должна выглядеть так:
option ScreenModeResolution
setting $Low
uintProp maxResWidth 1920
uintProp maxResHeight 1080
uintProp defaultResWidth 800
uintProp defaultResHeight 600
setting $Medium
uintProp maxResWidth 1920
uintProp maxResHeight 1080
uintProp defaultResWidth 1024
uintProp defaultResHeight 768
setting $High
uintProp maxResWidth 1920
uintProp maxResHeight 1080
uintProp defaultResWidth 1024
uintProp defaultResHeight 768
end
Далее включаем сглаживание и прочие настройки:
а) Для включения сглаживания ищем строку «enumerateMultisampleLevels» без кавычек и везде заменяем «false» на «true«;
б) Для включения видимости соседних участков ищем строку «simpleTerrain» без кавычек и заменяем «true» на «false«;
в) Для включения шейдеров, а именно рыбок в пруду, красивых бассейнов и прозрачности снега при наведении мыши ищем строку «useShaders» без кавычек и заменяем «false» на «true«;
г) Для включения прорисовки 3D-объектов ищем строку «skipTangentsInVertexData» без кавычек, заменяем «true» на «false» и сохраняем файл. Если вы не можете сохранить файл, сохраните его в другое место, а потом перенесите его в нужную папку с заменой;
д) Проделываем то же самое, но с тем файлом «GraphicRules.sgr«, который расположен по адресу The Sims 2\TSData\Res\CSConfig (в моём случае это D:\Program Files (x86)\The Sims 2\TSData\Res\CSConfig, у вас может быть иначе).
Совет: Аналогичные действия повторяем с файлами «GraphicRules.sgr» в папке вашего последнего установленного дополнения или каталога (у меня — это каталог «Сады и особняки»).
После всего этого заходим в игру и выставляем все необходимые настройки на максимум (кроме параметра «Тени»: о нём речь пойдет далее).
6. Включение теней
Далее нам остаётся активировать параметр «Тени». Для этого в режиме просмотра города выбираем и загружаем любую семью. Аллилуйя! Всё работает!
7. Для тех, у кого ноутбук с дискретной картой
Если у вас стацонарник, вы можете пропустить этот пункт. Если у вас ноутбук с дискретной графикой (а таких сейчас много), необходимо, чтобы игра использовала именно её. Для этого:
а) Если у вас видеокарта от NVIDIA (как у меня):
1) Щелкаем правой кнопкой мыши по свободному пространству рабочего стола и выбираем «Панель управления NVIDIA»:
2) В правой части окна переходим в «Управление параметрами 3D»;
3) Далее переходим во вкладку «Программные настройки»;
4) Кликаем по кнопке «Добавить»:
5) Появится окно, в котором необходимо выбрать приложение. В этом списке ищем и выбираем игру The Sims 2, затем жмём «Добавить выбранную программу»:
Если The Sims 2 в списке нет, в том же окне кликаем «Обзор», затем ищем директорию, где установлена игра (в моём случае D:\Program Files (x86)\The Sims 2, у вас может быть иначе) или ваше последнее дополнение/каталог (в моём случае это каталог «Сады и особняки»). Переходим в папку «TSBin» базовой игры или вашего последнего дополнения/каталога, выбираем файл «Sims2.exe» (если у вас установлена только базовая игра) или «Sims2<номер последнего дополнения/каталога>.exe« (если у вас установлены все имеющиеся у вас дополнения/каталоги. Пример: Sims2EP9.exe) и жмём OK. Далее программа сама добавит игру.
6) В графе выбора предпочтительного графического процессора указываем видеокарту NVIDIA и жмём «Применить»:
б) Если у вас видеокарта от AMD с новым драйвером «Radeon Adrenalin Software (2020)»:
1) Так как в этой программе почему-то пропала возможность выбора видеокарты, сначала через «Диспетчер устройств» выключите встроенную видеокарту. Откройте оснастку «Выполнить» сочетанием клавиш Win+R, введите в него запрос devmgmt.msc и нажмите ОК.
2) Затем откройте блок «Видеоадаптеры» и найдите встроенную видеокарту:
Выберите её, кликните правой кнопкой мыши на названии этой же видеокарты и нажмите «Отключить устройство». В нижней части иконки в виде монитора и платы появится кружочек со стрелочкой, указывающий на то, что устройство отключено;
3) Далее на панели управления в поле ввода для поиска вводим «Панель управления» и в выпадающем выше меню выбираем «Панель управления»:
4) Ищем и кликаем на «Электропитании»:
5) Выставляем «Высокая производительность» (или «Максимальная производительность»). Правда, у меня эти параметры отсутствуют. Есть только схема «Рекомендуемая компанией HP»
Поэтому, если схема «Высокая производительность» (или «Максимальная производительность») у вас отсутствует, рекомендую вам в трее Windows 10 кликнуть на значке батарейки и выставить «Производительность»
На мой взгляд, этих шагов достаточно, чтобы заставить Sims 2 работать на видеокарте AMD Radeon с драйвером «Radeon Adrenalin Software». Если Sims 2 всё равно запускается на встроенной видеокарте, придётся зайти в BIOS и переключать карту уже здесь. Как это сделать, я не стану описывать, так как на разных ноутбуках BIOS отличается, поэтому в интернете есть много инструкций по подобным манипуляциям. Однако, я вам не советую делать этого, так как в случае неправильной настройки BIOS компьютер может вообще не запуститься! Поэтому пользователям ноутбуков с AMD Radeon остаётся только надеяться, что AMD добавит возможность переключения видеокарт.
в) Если у вас видеокарта от AMD с чуть более старым, но актуальным драйвером «Radeon Software Crimson Edition»:
1) Так же, как и с видеокартой от NVIDIA, щелкаем правой кнопкой мыши по свободному пространству рабочего стола и выбираем «Настройки Radeon»;
2) Переходим в «Настройки», затем – в «Дополнительные настройки»;
3) Щёлкните слева «Питание», затем — «Параметры приложения переключаемой графики»;
4) Справа щёлкаем «Добавить приложение» и в окне «Проводника» переходим в директорию установки Sims 2 или вашего последнего установленного дополнения/каталога, дважды кликаем на папке «TSBin», выбираем файл «Sims2.exe» (если у вас установлена только базовая игра) или «Sims2<номер последнего дополнения/каталога>.exe« (если у вас установлены все имеющиеся у вас дополнения/каталоги. Пример: Sims2EP9.exe) и жмём OK.
5) После того, как вы выбрали указанный файл, в столбике «Настройки графики» выставляем «Высокая производительность».
После этих манипуляций ваша Sims 2 будет запускаться с дискретной видеокартой.
Дополнительно прилагается видео от Ко Кекса, где наглядно показано, как заставить любую игру (в том числе и Sims 2) запускаться на дискретной видеокарте:
г) Если у вас видеокарта от AMD с очень старым, но ещё актуальным драйвером «AMD Catalyst»:
1) По-прежнему на рабочем столе Windows 10 кликаем ПКМ и выбираем «AMD Catalyst Control Center»
2) Щёлкните слева «Питание», затем — «Переключаемые графические адаптеры»;
3) Затем выберите «Высокую производительность GPU».
О том, как переключать видеокарты от NVIDIA и AMD с драйвером «Catalyst», более подробно описано в видео от канала Comp Profi:
8. Очистка кэша
Для того, чтобы игра могла нормально запуститься, необходимо из папки C:\Users\PC\Documents\EA Games\The Sims 2 удалить два файла: Acessory.cache и Groups.cache. Проблема в том, что в кэше со временем копятся старые данные, что может негативно влиять на запуск и работу игры.
9. Если игра не запускается в полноэкранном режиме?
В таком случае вам придётся запускать игру в оконном или псевдополноэкранном режимах.
Для запуска в оконном режиме щелкните правой кнопкой мыши на своем ярлыке (о том, как его создать, см. п. 1), выберите «Свойства», перейдите на вкладку «Ярлык» и в поле «Объект» в конец допишите -w -cpucount:1. Пример:
«D:\Program Files (x86)\The Sims 2\EP9Data\TSBin\Sims2EP9.exe» -w -cpucount:1
Для запуска игры в псевдополноэкранном режиме существует также программа Sims2RPC от Lazy Duchess (мне её посоветовала Lamare из DaraSims, за что огромное ей спасибо). Делаем следующее:
2) устанавливаем её удобным для вас способом;
3) запускаем её;
4) выставляем параметры так, как у меня на скрине:
5) так как при запуске игры через Sims2RPC изображение выглядит размытым, перейдите в директорию D:\Program Files (x86)\The Sims 2\EP9Data\TSBin, кликните правой кнопкой мыши на файле Sims2RPC.exe, выберите «Свойства», перейдите во вкладку «Совместимость», кликните на кнопке «Изменить параметры высокого DPI», в разделе «Переопределение масштабирования с высоким разрешением» установите галочку «Переопределите режим масштабирования высокого разрешения. Масштабирование выполняется» и установите параметр «Приложение».
То же самое вы можете сделать и с ярлыком файла Sims2RPC.exe.
10. Запуск игры
Если вы всё сделали правильно, запустите игру и проверьте её работу.
Добавлено 26.05.2023: здесь предлагается также урок по устранению розового мерцания в Sims 2.
На этом у нас всё! Думаю, что среди нас найдутся любители ретро-игр и ностальгирующие. Если вам помог этот урок, напишите об этом в комментах, ставьте лайк, делайте репост и подпишитесь на мой блог и группы в соцсетях! Всем пока и мирного вам неба над головой))
If you’ve ever tried to play The Sims 2 on a modern operating system straight after installation, you probably found that the game didn’t launch at all, crashed after a few seconds, gave you an extremely unhelpful error message or if you’re really lucky — saw terrible graphics in a tiny resolution! This guide will walk you through fixing all of that and turning it into a well-optimized game.
What this guide isn’t for though is to teach you how to obtain the game. This guide assumes you already have your copy, whether on Origin/the EA App, discs, or by any other means. If you don’t have the game and are looking to get it, it is no longer available on Origin/the EA App so I would recommend browsing thrift stores/sites for disc copies, or by following this guide by Osab — from which I have taken much useful information to get my game up and running and put this guide together. With that out of the way, lets get started!
This guide goes hand-in-hand with my video tutorial, so check that out if you haven’t already for a visual demonstration, or read on for all of the same steps as a written resource.
Section 1: Preliminary Steps
Step 1: Update your Graphics Driver
Firstly, the best thing to do is to ensure that your Graphics Driver is up to date before proceeding. I would also recommend keeping it up to date going forward and ensuring that you have the latest version each time before launching the game.
Step 2: Choose the Install Location Wisely*
This step isn’t essential — if you have already installed your game and are happy with where it is, feel free to skip ahead. If your computer only has a single drive, this step also isn’t for you. But just in case you have do have multiple drives and have not yet installed the game or would be willing to re-install/move the installation, I thought I’d share my tip about how to choose where to install the game. I would recommend ideally installing the game on the same drive as your documents, especially if you plan on using a lot of mods & CC. This can help decrease load times as it is faster and easier for the game to communicate with the files in your downloads folder. However, this does not necessarily mean that you should install the game to your Windows (C) drive which is where your documents are by default, because for many of us, this drive may be smaller than another drive we have available. If your C drive is an SSD but your other drive is not, then I would recommend having your documents and the game installation on the C drive if you have sufficient space since SSDs are much faster. If you have multiple SSDs to choose from though, you may want to consider moving your documents to the larger SSD and installing the game there too to ensure that you have ample space for a big downloads folder and that the game is in the best place to communicate with your downloads most efficiently.
Advertisement
Step 3: Disable/Uninstall OneDrive
OneDrive annoyingly comes with Windows 11 and while I personally wouldn’t want to use it for any files, it is particularly detrimental to The Sims 2. It is known to really mess up save files so ensure that OneDrive will not be able to touch your Sims 2 documents or installation folders in any way before proceeding.
Step 4: EA App Settings*
This step isn’t going to apply to everyone, but if you’re like me and were lucky enough to obtain The Ultimate Collection on Origin back when it was available, and are using the EA App to install the game, there are some settings in the app that can be changed to improve your Sims 2 experience. In the app, open the settings and apply the following:
Application
Disable: Open the EA App automatically on startup
This will prevent the app from automatically opening every time you turn your computer on, by the time we’re done with this setup, we won’t even be using the EA App to launch The Sims 2 anymore but even if you use it for other games, its very unlikely you need it every time you’re on your PC so its better to save yourself some RAM and only open it manually when you actually need it.
Disable: Enable background services
This will prevent the EA App from doing anything in the background when it is not open such as updating the app and your games, and other processes that will use your processing and RAM resources for no good reason. Disabling this could help performance.
Disable: Enable in-game overlay
The in-game overlay has been known to cause problems, not only with The Sims 2 but other games too so unless you rely on it for interacting with your friends or whatnot, disabling it will eliminate the chance of it screwing anything up.
Download
Install location: If you wish to change where your games get installed to following the advice in the previous step, you can change the location where the game will be installed to here.
Disable: Update games automatically
Its very unlikely that The Sims 2 will ever be updated, but if it did, you can bet that EA would break it — it’s better to not take that chance! This can also help with other games like The Sims 4 since you can carry on playing without letting an update break all your mods and instead update the game and your mods when you are ready.
Disable: Enable background downloads
This prevents downloads from running in the background even when the app is closed, again using your system resources like your processor, RAM and internet which is likely to decrease performance. It gives you more control if downloads can only happen when the app is actually open so you can monitor it more carefully.
Advertisement
Section 2: Tools to Fix & Optimize The Sims 2
Step 5: Graphics Rules Maker
Graphics Rules Maker is a program which can make The Sims 2 recognize modern graphics cards and therefore prevent the game from failing to launch or causing errors, as well as apply some fixes and improvements for graphics, performance and stability such as increasing the resolution and enabling edge smoothing, and allowing the game to use more texture memory which can help prevent the graphical issue of textures turning pink (aka pink soup). Here’s how:
2. Run the program as administrator.
3. Select The Sims 2 in the Game dropdown.
4. The path should hopefully automatically get set correctly, but if not, click Browse, and point it to where you installed the game.
5. Click the auto-detect button to let the program estimate the best settings for your system, which gives us a good basis we can then tweak. Click OK when prompted.
6. Go to the Device Info Tab and select your graphics card from the dropdown at the top if it is not already selected. Then if it says ‘no‘ next to ‘In Database’, click ‘add now…‘ so it turns to ‘yes‘.
7. Back to the Settings tab, check that ‘Force texture memory’ is correct. This should be your graphics card’s available memory. To check what that is, in your windows search bar, type in ‘dxdiag’ and click on the command that comes up to run it. In the DirectX Diagnostic Tool, click on a Display tab, and look at the number next to ‘Display Memory (VRAM)’ then ensure that the ‘Force texture memory’ setting in Graphics Rules Maker is set to this same number.
Note: I have just discovered that this number can actually change overtime, so make sure you check it every now and again, perhaps after each graphics driver update, and update the setting in GRM accordingly.
8. Untick the ‘Disable Sim Shadows’ setting.
9. Set the default resolution to the resolution you wish to play at, I recommend 1920×1080 and set the maximum resolution to the highest setting, which should be the resolution of your monitor.
Note: The resolution of my monitor is actually 2560×1440 but for some reason the dropdown in GRM only went up to 1080. This isn’t a big deal since I will play in 1080 anyway, but there are ways to manually set the maximum resolution if necessary.
10. Leave the other settings in the way that they were auto-detected. For Nvidia graphics cards, you’ll most likely have ‘disable texture memory estimate adjustment’ and ‘enable drivers’ memory manager’ ticked and all other settings unticked.
11. Click ‘Save Files…‘ and click OK when promoted.
12. Repeat this similar process for Body Shop:
-
Select ‘The Sims 2 Body Shop’ from the Game dropdown at the top.
-
Add your graphics card to the database in the Device Info tab.
-
Click ‘Auto-Detect’ in the Settings tab.
-
Ensure the ‘force texture memory’ amount is correct, it should be the same number you set for the game.
-
Save Files.
Advertisement
Step 6: RPC Launcher (includes the 4GB patch)
The RPC Launcher by Lazy Duchess is an awesome custom launcher for The Sims 2 with many features: the 4GB memory patch, bypasses the EA App, automatically clears cache files, a discord rich presence, borderless window mode, a fix for the firstborn syndrome, graphical enhancements, and more! Here’s how to set it up:
1.* Precautionary Step: Exclude your Sims 2 installation folder from Windows Security/your antivirus.
The RPC launcher has been known to sometimes get falsely flagged by antiviruses and Windows Security as a Trojan. Please don’t let this put you off, I can guarantee this is a completely safe and legit tool made by a reputable and trustworthy modder in The Sims 2 community. To prevent the chance of it getting screwed up by Windows Security (or anything to do with the game for that matter, not just RPC), the first step I’d recommend is to exclude your TSBin folder from antivirus scans. To be quite frank, if you have a 3rd party antivirus, to prevent that from screwing things up, I’d simply recommend getting rid of it because nowadays it’s very unlikely that you need a 3rd party antivirus as Windows Security covers you very well. If you do wish to use a 3rd party antivirus, I’d recommend googling how to set up a whitelist/exclusion/exception in your chosen program. I’ll walk you through the steps for Windows Security:
1. Click on Virus & Threat Protection
2. Under Virus & Threat Protection settings, click Manage settings
3. Scroll to the bottom and under Exclusions, click Add or remove exclusions then click yes when prompted
4. Click + Add an exclusion then select Folder from the dropdown
5. Navigate to your game’s installation folder and select it. For the Ultimate Collection, that’s: EA Games\The Sims 2 Ultimate Collection\Fun with Pets\SP9\TSBin
2. Install the Requirements:
1. On, the RPC page, click the links where it says you need the latest C++ Redistributable Package and .NET Framework. Download them then run them, you might find that it simply tells you that you already have these installed in which case you don’t need to do anything, otherwise install them.
2.* Note that on the mod page it says «It’s recommended that you have a cracked/No-CD Sims 2 M&G executable to use this launcher. The launcher will attempt to download one if your game is not cracked, but this doesn’t always work.» While it has worked for me in the past, when I did my setup this time around, RPC did not successfully crack my game for me so I had to do it manually otherwise it would not launch. It’s up to you whether you skip ahead and see if it does it automatically and if not revisit this step, or whether you do it manually as I’ll show you now — it’s easy!
2. Go to your TSBin and make a backup of your Sims2EP9.exe either by renaming it to Sims2EP9.exe.bak or by making a copy somewhere else.
3. Replace your Sims2EP9.exe with the one inside George.rar.
3. Install RPC:
Download the One-Click Auto Installer from the mod page. Extract the exe from the zip file then run it and click yes when prompted. Click Install/Repair and let it run the quick installation process. When it’s finished, click no when asked if you want to launch RPC now.
4. Configure RPC Settings:
1. Run the RPC Settings as Administrator.
General
2. Leave Automatic Updates enabled
3. Enable the Discord Rich Presence if you use Discord and want your friends to be able to see that you’re playing The Sims 2 in more detail.
4. I personally leave Smooth Camera Rotation disabled as to me it makes panning up & down jerky, but you can always try it out and see if you like it.
5. If you want to be able to choose a Sim’s zodiac sign independently of their personality points in CAS, enable Unrestrict Zodiac Sign.
6. If you wish to remove the cost of recoloring items, change the number box next to Design Tool Cost to 0. You can also change this number to whatever you like, making it cheaper or more expensive. I personally leave it at 15.
7. I recommend changing the Window Mode to Borderless. This is the best of both between fullscreen and windowed. It looks fullscreen, so it will cover the full area of your screen regardless of resolution and you won’t see the taskbar, but doesn’t have the potential problems and limitations that comes with fullscreen mode, such as the DirectX 9.0c error or alt-tabbing issues. It’s also much handier for those of us with a 2nd monitor so we can seamlessly swap to it. Bare in mind, you won’t be able to use edge scrolling in borderless mode so you’d have to adapt to using the arrow keys or WASD to move the camera around.
8. If you’d like a method of taking in-game high quality screenshots besides the windows print screen feature or the gaming bar, Enable Screenshots. With this enabled, you can press a key in-game (PrtScn by default but I’ll show you how you can change this in another step*) then screenshots will be taken and stored in a screenshots folder inside a folder in the game’s documents folder.
9. Enable Apply 4GB Patch if you have 8GB of RAM or more. This will allow The Sims 2 to use up to 4GB of your RAM instead of just 2, which makes it more stable and decreases the chance of crashing or texture issues (pink soup).
10. Enable Automatically Clean Cache. This will automatically clear some pesky cache files that can otherwise cause the game to be unable to launch.
11. Save Settings.
Graphics
12. Click the Graphics Tab
13. If you have a powerful computer and/or don’t plan on using lots of CC, you may wish to set the Lot Impostors setting to Optimized. This will improve the look of the inactive lot buildings in neighborhood view and while playing a household. This should be done cautiously because it can put a lot more strain on your system and make pink textures more likely to happen. It also requires time and effort because the change won’t happen automatically after changing this setting, you have to load each lot individually, make a change in buy mode (even if you put the object right back where it was) and save the lot in order for the impostor to change in quality. I would not recommend anyone try the High setting. As I now have a RTX 4070 Graphics Card, a Ryzen 7 7800X3D Processor, and fast RAM, I am going for the Optimized Setting despite the fact that I use lots of CC. However, when I previously had a GTX 1080, an i7 6700K and slower RAM, the Optimized setting gave me too much pink soup so I had to stick with Classic.
14. If you have a decent PC (such as my old one) I would recommend changing the Sim/Object Shadows to Medium to improve the look of the shadows. If you have a powerful PC like my new one, I would recommend changing Sim/Object Shadows to high to further improve the look of these shadows.
15. If you have a decent PC, you may want to enable Lot View Ocean Reflections so that you can see reflections in the ocean while in lot view.
16. Save Settings.
Settings.txt
17.* If you want to change the screenshot hotkey from PrtScn, go to Documents/Sims2RPC and open settings.txt. I personally like to change this to F12 since that is Steam’s default screenshot hotkey and I want to still be able to use Windows Print Screen feature too. In the txt file, you’ll see a line that says ‘screenshotKey=2C’. To figure out what you need to change that 2C to, go to the link provided 2 lines above. On that webpage, find the key you want (or Ctrl + F to search for it, in my case I’d type ‘F12’). You’ll then be brought to where that key is in the table and be able to see it’s value. F12 has a value of 0x7B so I’d replace the 2C in the txt file with 7B to change my screenshot hotkey to F12, so simply change the 2C to whatever the value of your desired key is after the 0x. Save the file.
Launcher Arguments
18.* When RPC launches The Sims 2, a console window will briefly popup which informs you of some things like clearing the cache, the current version, and the mods that are being loaded. I personally like to keep this around instead of it disappearing once the game loads, particularly since it keeps a log of the screenshots you take with it so it can be handy. If you’d like to keep it around too, right click on your Sims2RPC shortcut, at the end of the Target textbox, after the quotations, add ‘-show’ without quotations. Click Apply then OK. You can then add this shortcut to your taskbar.
5.* Install RPC Mods:
There are a few special mods that can be used with RPC that are different to the kind of mods you’d put in your Downloads folder. In your TSBin folder, you’ll now see a mods folder. It already has randomizer.asi which is Randomizer Fixes (Basically Firstborn Syndrome Fix 2.0) so that mod is already included when you install RPC so you don’t need to download it separately. This is what fixes the First Born Syndrome without you having to do anything manually in-game, it also fixes some other randomization issues. However, there are currently two other RPC mods that you may wish to download and put in this mods folder:
-
Separate Top/Bottoms for non-Everyday Clothes Mod: This makes it so the tops & bottoms clothing categories are shown for every outfit, not just everyday. For example, you could choose a t-shirt and separate shorts to wear for Athletic! Note that you won’t have many clothing options in these categories by default, so its worth editing some CC.
-
Sim Bio on Tombstones: This mod adds a new ‘about’ interaction to urns and tombstones if the deceased Sim has a biography, and will display it in a pop-up message when clicked.
Note that if for whatever reason you don’t want to or can’t use the RPC launcher (though I can’t recommend it enough and I almost guarantee following these steps exactly will get it working for you), then you must apply the 4GB patch separately and continue launching the game the same way as before such as via the EA App, and remember to manually delete your cache files between launches.
Advertisement
Step 7: Empty Standby Memory
If you open your Task Manager and go to the Performance tab then Click Memory, you’ll likely see that a chunk of your memory composition is ‘standby’, which technically means it is not available. Some modern programs can utilize this standby memory but for old applications like The Sims 2, it is not usable. There is little to no benefit of this standby memory in general, but it is hugely detrimental to The Sims 2 and other old programs. Because of this, The Sims 2 may think you have run out of memory and therefore crash, when you actually haven’t because there is still some in standby. We are going to set up a system that will automatically clear standby memory and make it available, so that you never face a problem with it in The Sims 2.
2. When the program downloads, move it to somewhere that you will no longer move it from, so that you know where it is but it’s not in your way because you’ll never need to actively use it again after this initial setup, but it will need to stay where it is.
3. Right click on the EmptyStandbyList.exe and go to Properties. Click on the Compatibility Tab then tick ‘Run this program as an administrator’, then click Apply then OK.
4. In your Windows Search bar, search for ‘Task Scheduler’ and right click on the program when it comes up and run as administrator.
5. Click ‘Create Task…’.
6. In the General Tab, give it a clear name like ‘Empty Standby List’.
7. Click ‘Change User or Group…’ then click Advanced then Find Now. Then in the Search Results, find SYSTEM and double click it, then click OK.
8. Tick ‘Run with the highest privileges’.
9. Tick ‘Hidden’.
10. Click the Triggers tab then click ‘New…’
11. Ensure ‘On a schedule’ is selected in the top dropdown box next to ‘Begin the task:’.
12. Ensure ‘One time’ is selected in the settings.
13. Tick ‘Repeat task every:’ and change the dropdown to 5 minutes. Change the dropdown next to ‘for a duration of:’ to indefinitely.
14. Ensure Enabled is ticked then click OK.
15. Click the Actions tab then click ‘New…’
16. Ensure ‘Start a program’ is selected in the Action dropdown.
17. Click Browse then navigate to your EmptyStandbyList.exe and click Open, then click OK.
18. If you use a laptop, go to the Conditions tab and untick the checkboxes that say ‘start the task only if the computer is on AC power’ and ‘stop if the computer switches to battery power’.
19. Go to the Settings tab, untick the box next to ‘Stop the task if it runs longer than:’.
20. Tick ‘Run task as soon as possible after a scheduled start is missed’.
21. Tick the box next to ‘If the task fails, restart every:’, leave the 1 minute selected, and increase the ‘Attempt to restart up to:’ 5 times.
22. Click OK. Then, test it works by observing whether your standby chunk is cleared out in your Task Manager > Performance > Memory within 5 minutes of finishing the setup.
Advertisement
Step 8: Shadow Fix
The last step before we get in game is actually going to be installing our first regular Sims 2 mod. Since we unticked the disable sim shadows in Graphics Rules Maker, we’re likely going to see black boxes under sims’ feet. However, with this mod by Nopke, we can fix the shadows and make them look nicer without having to disable them.
1. Go to the Sim Shadow Fix mod page and take a look at the image that shows a comparison between not fixed, 0.2, 0.3 and 0.4. Decide which you think looks best. I personally like 0.3 best.
2. Go to the download tab, and download the version you like the look of best. If you have intel HD graphics, you may want to get the ‘reallyNotMisty’ version, otherwise its most likely the regular version you want.
3. If you have already tried to launch your game, you should already have an EA Games > Sims 2 folder in your documents. If you don’t yet, you’ll want to try to launch your game now to generate one.
4. Once you have your Sims 2 folder (Documents\EA Games\The Sims™ 2 Ultimate Collection if you have the Ultimate Collection), create a new folder called ‘Downloads’. Ensure it is spelled correctly and has a capital D.
5. Drag the .package file from inside the .zip you downloaded into your Downloads folder.
Advertisement
Section 3: In-Game Settings
Step 9: Change some Settings In-Game
All that’s left now is to change some of the settings within the The Sims 2 to improve the graphics. Without doing the previous steps, some of these settings such as increasing the resolution and enabling edge smoothing would not be available so it’s important to do those first.
1. Launch the game with Sims2RPC.
2. Load a neighborhood then a household.
3. Click the … button then Graphics/Performance Options.
4. For the best look, ensure Shadows, Lighting, Graphic Effects, Sim/Object Detail and Texture Detail are all set to high. Ensure Reflections, UI Transparency, and Snow on Ground are all on, and ensure Use Square Pixels and Object Hiding are Off.
5. Change the Screen Size to your desired resolution, in most cases this should be 1920×1080. Note that this may then make your borderless/fullscreen game become windowed, but if you restart your game, your preferred mode should be restored (i.e. borderless).
6. Drag Edge Smoothing all the way down to More.
7. Apply Changes.
8. Go to Game Options.
9. Turn ‘Display Custom Content Dialog at Startup’ Off. Then, click the star icon under this setting and tick ‘Enable Custom Content’ then click OK. This will allow you to use CC and also prevent getting a warning message every time you launch your game with CC.
10. Increase View Distance to Extra Large. Note that you can follow this tutorial to actually improve this setting further.
11. Turn Fade Distance Off.
12.* I personally recommend disabling CLICKABLE Neighbors (not the Neighbors option, leave that on) as I don’t click on nearby houses to swap the household I’m playing with and I tend to just click them by mistake.
13. Go to Camera Options.
14. Increase Snapshot Size to Large.
15. Increase Snapshot Picture Quality to High.
16. Increase Video Capture Size to Large.
17. Increase Video Capture Quality to High.
Note that I don’t recommend the DXVK fix because it has always made things worse for me when I’ve tried it in the past (on an NVIDIA graphics card), but in the unlikely event that you have carefully followed all of these steps and your game still won’t run properly, especially if you have an AMD graphics card, you might want to look into that.
And that’s all folks! Hope that helped! Feel free to ask any questions you have.
Readers help support Windows Report. We may get a commission if you buy through our links.
Read our disclosure page to find out how can you help Windows Report sustain the editorial team. Read more
No doubt, you have at least heard of the Sims games at least once in your life. We say that because this gaming franchise is surely among the top 5 most popular ones in the world so far.
This simulator has managed to gain tens of millions of fans worldwide, and users are still playing old versions of the game such as The Sims 2, even though Sims 4 has been out for quite some time.
However, people still playing Sims 2 on Windows 10/11 are talking about a DirectX error that leaves them unable to play.
Lucky for you, today we are about to focus on this nasty issue and show you what you can do to fix it.
Why do I get the Sims 2 DirectX 9 error?
As with most games nowadays, such errors don’t just happen for one reason. The Sims 2 DirectX 9 error can be triggered by random game or PC bugs, corrupted game files, or maybe even outdated software or drivers.
You should know that incompatibility issues with other programs that are running on your PC can be another cause, along with a faulty or nonexistent internet connection.
There are many causes for the Sims 2 DirectX 9.0c error on Windows 10 or Windows 11, and we are about to show you how to fix it.
How can I fix the Sims 2 DirectX error?
1. On Windows 11
1.1 Restart your PC
We’re going to start you off with a pretty simple solution from this troubleshooting process. However, even though it is simple, it might very well prove to be the most effective one.
What is that, you ask? A simple system restart should do the trick and get rid of the DirectX 9 Sims 2 error, according to other users who were in the same situation.
Simply restart your PC and everything should go back to normal. If not, the following steps in this guide will surely help you overcome the issue.
1.2 Run The Sims 2 as an administrator
- Navigate to the folder where The Sims 2 is installed.
- Right-click the Sims 2 executable and select Run as administrator.
1.3 Update your GPU
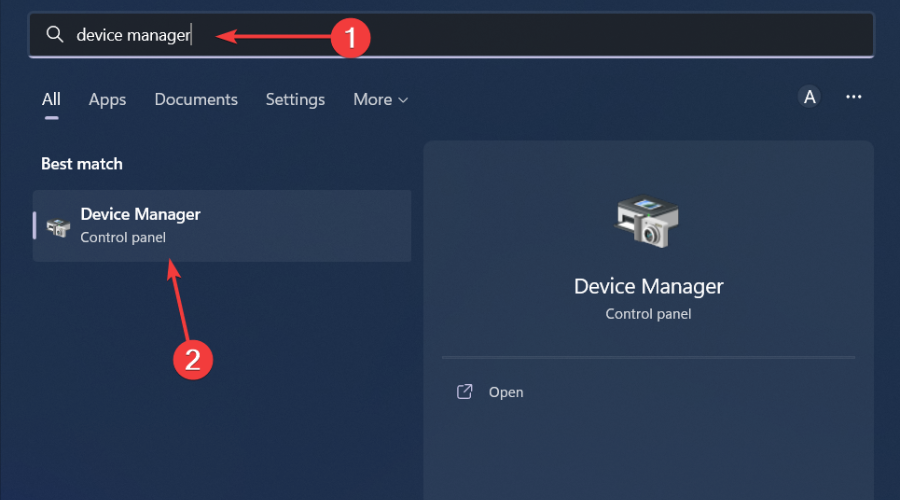
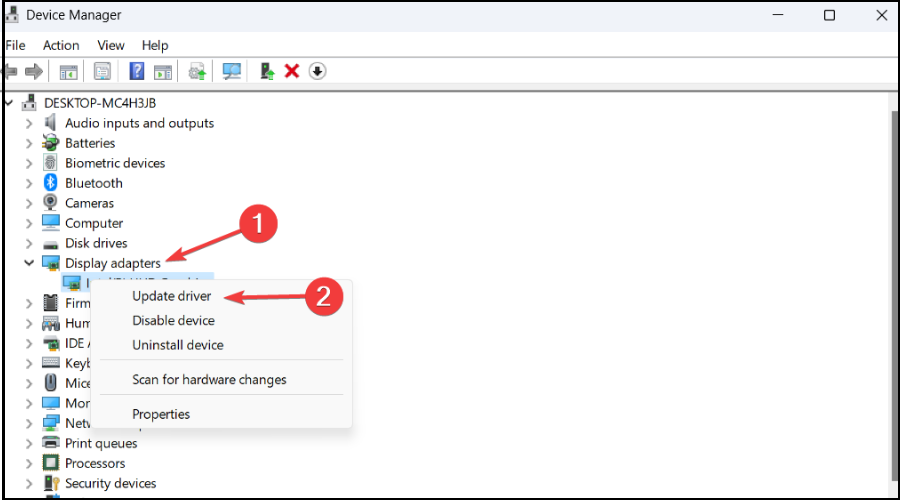
- Search for Device Manager and open the app.

- Expand Display adapters, then right-click on our GPU and select Update driver.
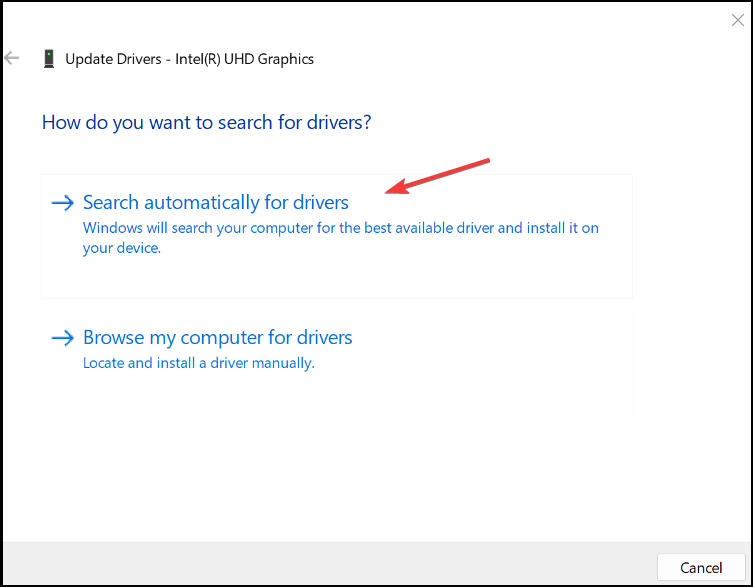
- Select Search automatically for drivers.

Ensure your system performs smoothly and avoids all GPU driver errors by using a complete driver update assistant, namely Outbyte Driver Updater, that will do the job for you.
Here’s how to safely update your drivers:
- Download and install the Outbyte Driver Updater app.
- Launch the software and wait for the app to detect all incompatible drivers.
- Now, it will show you a list of all faulty drivers to select the ones to Update or Ignore.

- Click on Update & Apply Selected to download and install the newest versions.
- Restart your PC to ensure the applied changes.

OutByte
Keep your GPU in a flawless state without worrying about possible driver issues.
Disclaimer: You may need to upgrade the app from the free version to perform specific actions.
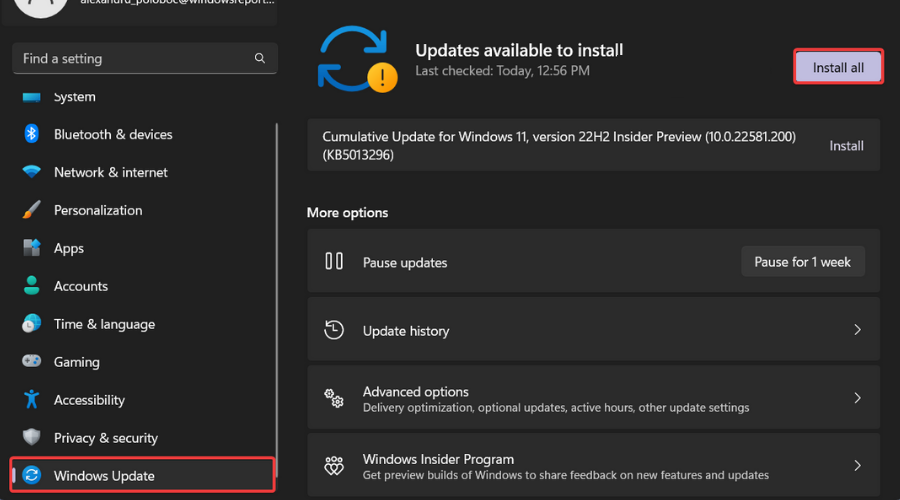
1.4 Update Windows
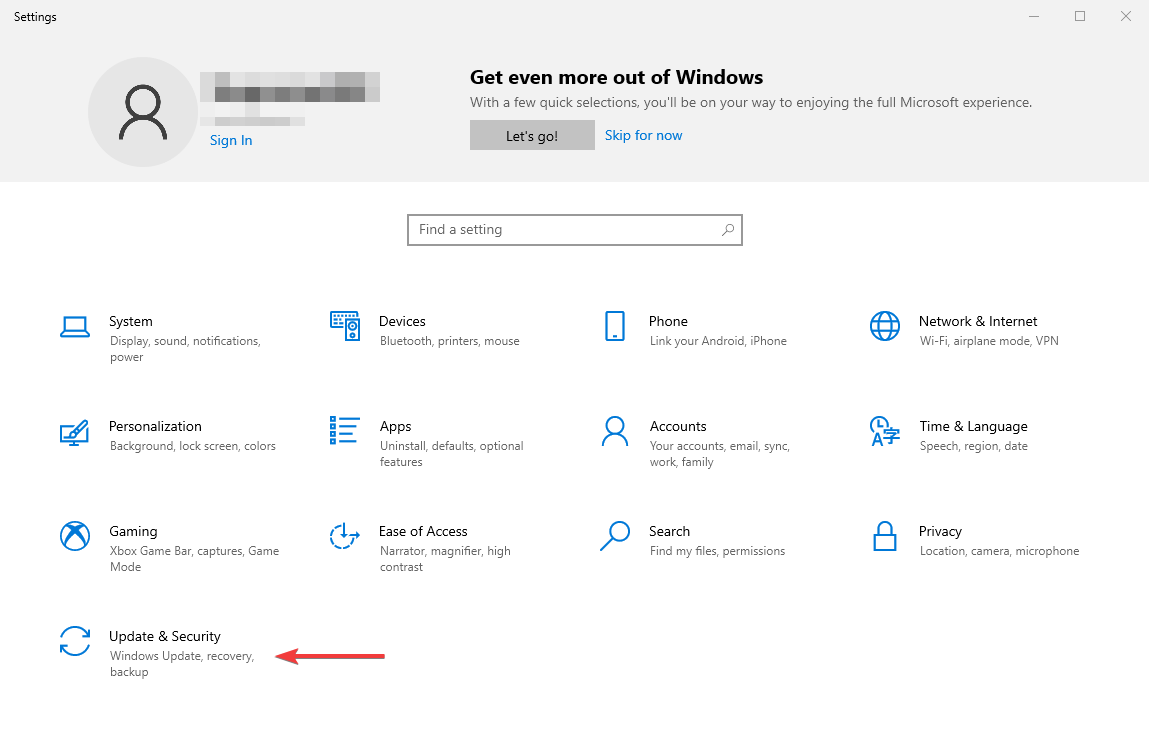
- Press Windows + I to access Settings.
- Select the Windows updates tab and click Install all.
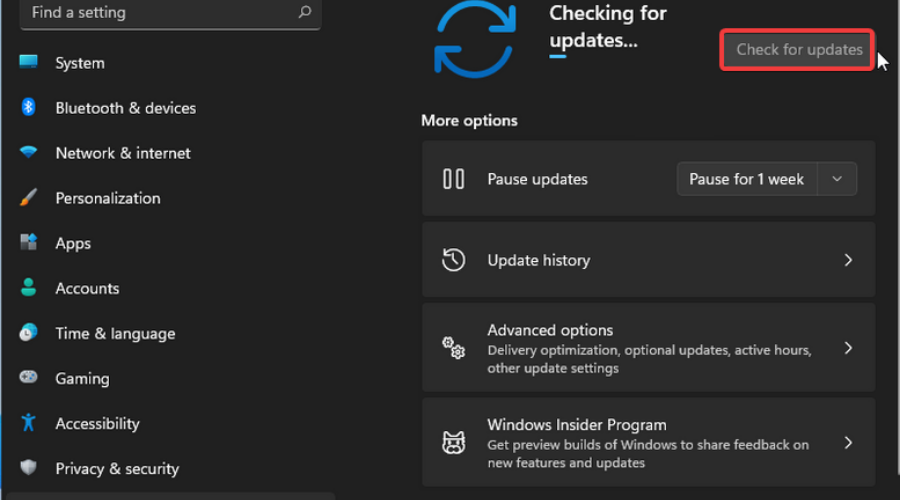
- If no updates are queued for installation, press the Check for updates button
This also helps when The Sims 2 is not working on Windows 11.
1.5 Manually download & install DirectX 9
- Download DirectX 9.0c redistributable from June 2010 from the official website.
- Run the directx_Jun2010_redist.exe setup file as an administrator.
- Restart your PC.
- Recent Windows 11 update lets you disable profanity filter in voice typing
- Meta under fire after AI chatbot caught having sexual talks with minors
- OpenAI decides to reverse recent GPT-4o update after user find bot being overly appeasing
- Microsoft’s hotpatching for Windows Server 2025 to be subscription-based starting July
2. On Windows 10
2.1 Run the game as an administrator
- Navigate to the folder where The Sims 2 is installed.
- Right-click the Sims 2 executable and select Run as administrator.
2.2 Update your graphics card driver
-
1. Search for Device Manager and open the app.
-
2. Expand the Display adapters section.
-
3. Locate and right-click on your GPU in the list and select Update driver.
-
4. Select Search automatically for drivers.
-
5. Wait for the new drivers to be updated, then check whether the Sims 2 DirectX error persists.
If you’re a Windows 10 user encountering the Sims 2 DirectX 9 error, updating your GPU is a method that is likely to solve it. This can be done quite easily via Device Manager.
2.3 Update your Windows
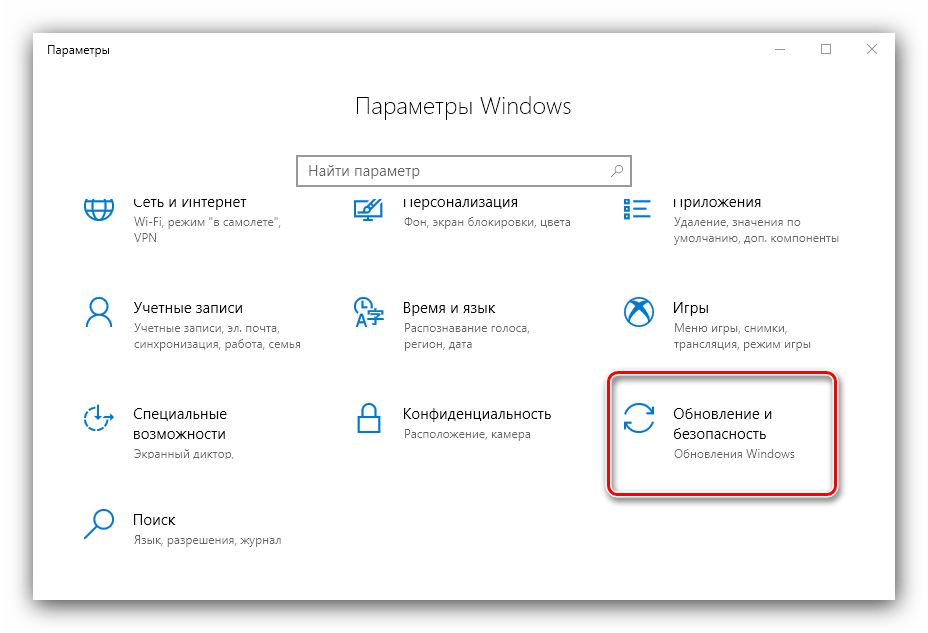
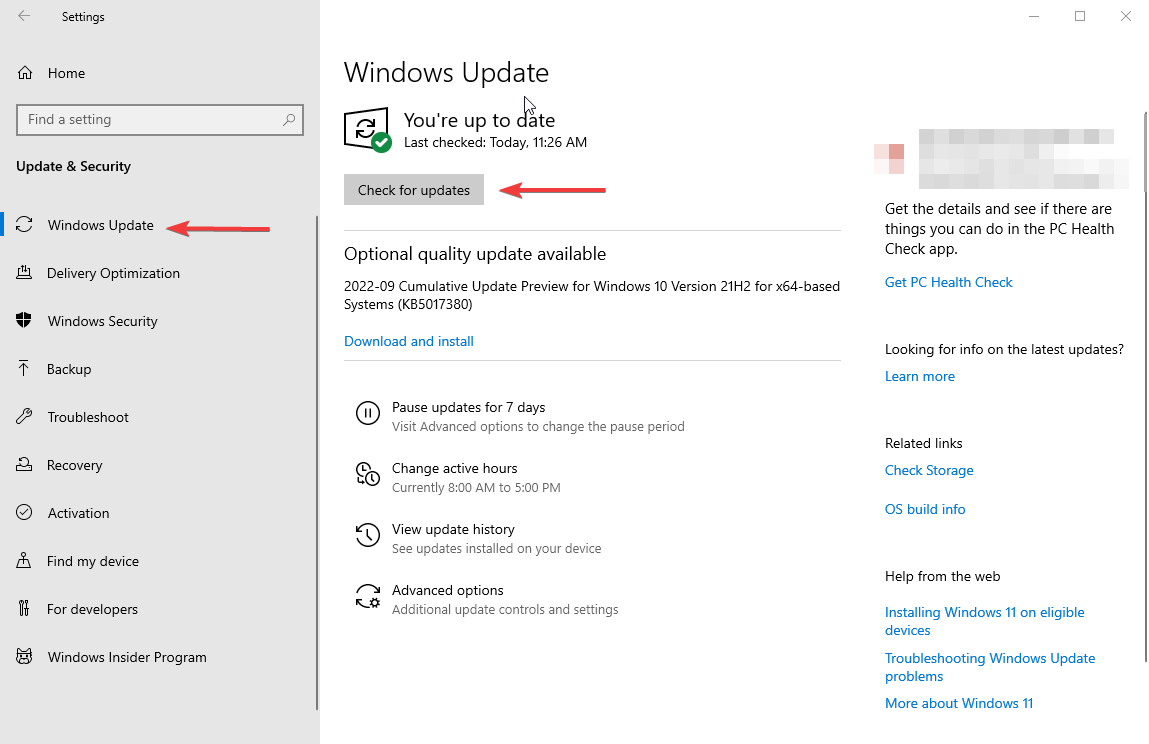
- Press Win + I to access Settings.
- Select the Update & Security tab.

- Select the Windows Update tab and press the Check for updates button.
2.4 Manually download and install DirectX 9
- Download DirectX 9.0c redistributable from June 2010 from the official website.
- Run the directx_Jun2010_redist.exe setup file as an administrator.
Are you also stuck on The Sims 2 and can’t put it aside? If so, we can show you what to do if your Sims 2 crashes on your Windows 10 PC.
Can I play The Sims 2 on Xbox Series X|S or Playstation 5?
Unfortunately, no, you can’t. There is no backward compatibility for this vintage game, so there’s no playing it on next-gen consoles just yet.
There have been some rumors about a remastered version of The Sims 2 in the works, but most Sims fans are waiting on Sims 5 after the fourth title was such a big hit.
If you want to play the vintage Sims 2, you have to look at machines/operating systems that will run it, first of all.
But, to answer your question, no, there’s no Sims 2 for Xbox Series X|S, or Sony’s latest PlayStation5. However, if you play it on your Windows PC, at least you have the guarantee it works.
Has this guide helped you fix the Sims 2 DirectX 9 error on your Windows 10/11 PC? Let us know in the comments section below.
Alexandru Poloboc
Tech Journalist
With an overpowering desire to always get to the bottom of things and uncover the truth, Alex spent most of his time working as a news reporter, anchor, as well as TV and radio entertainment show host.
A certified gadget freak, he always feels the need to surround himself with next-generation electronics.
When he is not working, he splits his free time between making music, gaming, playing football, basketball and taking his dogs on adventures.