
Simple-Windows-Service-in-C-
To Install the Windows Service
C:\>sc create "My Sample Service" binPath= C:\SampleService.exe
A space is required between binPath= and the value[?]. Also, use the full absolute path to the service executable.
You should now see the service in the Windows Services console.
From here you can start and stop the service.
To Uninstall the Service
C:\>sc delete "My Sample Service"
Время на прочтение3 мин
Количество просмотров143K
Многие из нас сталкиваются с такой задачей, когда нужно запускать своё приложение при запуске компьютера. Конечно можно поместить ярлык в автозагрузку, но как-то это неправильно. Да к тому же если комп перегрузился, а пользователь не залогинелся, то и ваше приложение тоже не запустится.
Самым верным решением в данной ситуации является написание Windows сервиса.
Пример создания сервиса в Studio 2010, .Net C# под катом
Шаг 1. Создание проекта.
Создайте новый проект, выбрав шаблон Windows Service
Переименуйте класс сервиса как вам нужно.
Получили такой вод код:
namespace ExampleSrv

{

  public partial class MyService : ServiceBase

  {

    public MyService()

    {

      InitializeComponent();

    }protected override void OnStart(string[] args)

    {

    }protected override void OnStop()

    {

    }

  }

}* This source code was highlighted with Source Code Highlighter.
Это и есть, собственно, сам сервис.
Используйте OnStart и OnStop события для реализации своей поставленной задачи.
Шаг 2. Добавление установщика.
Чтобы ваш сервис заставить работать, его нужно установить.
Чтобы его установить, он должен иметь установщик.
Клик правой кнопкой… Add installer
Теперь у нас есть serviceProcessInstaller и serviceInstaller
В первом можете поставить значение Account в LocalSystem.
Во втором укажите имя сервиса, описание и не забудьте поставить StartType — Automatic.
Установщик готов.
Шаг 3. Логирование.
Для того чтобы вы смогли узнать что делал ваш сервис, когда он стартовал, завершался или что-нибудь еще, вы можете использовать системное логирование.
Делается это очень легко.
Перетаскиваете из Toolbox в свой сервис EventLog.
Примерно так делается логирование:
public partial class MyService : ServiceBase

  {

    public MyService()

    {

      InitializeComponent();

    }protected override void OnStart(string[] args)

    {

      AddLog("start");

    }protected override void OnStop()

    {

      AddLog("stop");

    }public void AddLog(string log)

    {

      try

      {

        if (!EventLog.SourceExists("MyExampleService"))

        {

          EventLog.CreateEventSource("MyExampleService", "MyExampleService");

        }

        eventLog1.Source = "MyExampleService";

        eventLog1.WriteEntry(log);

      }

      catch{}

    }

  }* This source code was highlighted with Source Code Highlighter.
Шаг 4. Установка.
Чтобы установить сервис, нужно вызвать утилиту установки и передать параметром путь к своему сервису.
Для этого я создал install.bat такого вида:
C:\Windows\Microsoft.NET\Framework\v4.0.30319\installutil.exe D:\...\ExampleSrv\bin\Debug\ExampleSrv.exe

pause
Если вы выбрали в serviceProcessInstaller значением поля Account — User, то при установке вы должны будете ввести логин и пароль учетной записи, под которой будет запускаться сервис. Внимание! Писать домен перед именем пользователя обязательно!
Запускаем батник обязательно с правами администратора и наблюдаем в конце:
The Commit phase completed successfully.
The transacted install has completed.
Это значит что сервис установлен.
Проверяем:
Установился.
Пару раз делаем запуск и остановку. Смотрим логи:
Видим когда сервис запускался и останавливался.
Наш сервис готов.
Материал частично взят от сюда:
msdn.microsoft.com/en-us/library/zt39148a(VS.80).aspx
1- You have a good C programming background.
2- You are planning to write your own windows service. I guess it is good to start
from here.
1) Service Main: commonly called “ServiceMain” and the standard prototype for it is
It sends information to Service Control Manager (SCM) — which will take care of the status of the service — and it will register the service in the SCM.In the end of this function we will have a loop which will have our service.
2) Service CTRL Handler: this function will handle the standard requests from SCM and will response for its requests. The prototype of this function is:
3) Service Initialization function: this function will initialize the Service topically global variables, cleaning up stuff if needed, and preparation for the service. Note that this function should return a value to tell the SCM that Service successfully initialized.The prototype is:
Notes
Before showing an example I would like you to consider the following notes:
1- Service name should not contain spaces and it should not be long. In the given example below it was named “MyService”.
2- WINAPI is same as __stdcall and it is not really needed on some compiler. Also DWORD is equivalent for unsigned long.
3- The outputs of the service on x64 systems will be under “c:\Windows\SysWOW64”, and on x32 systems under “C:\Windows\System32”.
4- If the service requires an interactive process (like sending messages or loading forms) then go and read more about this in the references below. On some versions of windows in control panel —> system and security —> administrative tools —> services, then right click on the service and click on properties, then in the “Log On” tap check “Allow this service to interact with desktop” this may solve the problem.
5- Sometime service seems to be running nicely but it is not behaving as it should, well in this case we should consider the permissions give to this service, specially if we are reading/writing, a great tool called “Procmon” available on Microsoft website allow us to monitor the process so we can debug it, after installing run it and select PID filter to display your service behaviors only.
6- Each service executes in the security context of a user account, and it can be “LocalService”, “NetworkService”, or LocalSystem, every account has different privileges. These accounts do not have passwords.
7- A command-line utility, sc.exe also can be used to control services. Its commands correspond to the functions provided by the SCM. It Service (like example below) does not have “ServiceInstall” function then we would use this tool to install it.
8- Windows Vista/7 has a security feature called “Session 0 Isolation” which means service runs on Session 0 and regular user runs on session 1, and they can’t send each other messages, so it could be a problem for some services, as solution CreateProcessAsUser function may does the job.
9- The example compiled and tested under windows 7 ultimate x64 with minGW- GCC version 4.6.1.
10- If compiler did not detect the ” _WIN32_WINNT” declaration automatically then for windows 7 it is (0x0601), Vista (0x0600), and XP (0x0501).
11- Text editors can read and write files using at least the different ASCII CR/LF conventions. The text editor Notepad is not one of them so it would be better to use Wordpad if “myRamInfo.txt” does not seem to have proper format.
Example
/**************************************************************
In
this example, the function WriteMemInfo() will write information
about available physical memory(RAM) on the system. The file
myRamInfo.txt will be updated every 5 seconds.
**************************************************************/
//#define
_WIN32_WINNT 0x0501 // for XP
//#define
_WIN32_WINNT 0x0601 // for 7
//#define
_WIN32_WINNT 0x0600 // for Vista
#include
<windows.h>
#include
<stdio.h>
SERVICE_STATUS
ServiceStatus;
SERVICE_STATUS_HANDLE
ServiceStatusHandle;
DWORD
ServiceInitialization(DWORD argc, LPTSTR *argv, DWORD
*specificError);
void
WINAPI ServiceMain(DWORD argc, LPTSTR *argv);
void
WINAPI ServiceCtrlHandler(DWORD opcode);
void
WriteMemInfo(void);
int
main(){
SERVICE_TABLE_ENTRY
DispatchTable[] = {{«MyService»,
ServiceMain}, {NULL, NULL}};
if
(!StartServiceCtrlDispatcher(DispatchTable))
//WriteMemInfo(«StartServiceCtrlDispatcher()
failed, error: %d.\n», GetLastError());
printf(«StartServiceCtrlDispatcher()
failed, error: %ld.\n»,
GetLastError());
else
printf(«StartServiceCtrlDispatcher()
looks OK.\n»);
return
0;
}
//
Stub initialization function…
DWORD
ServiceInitialization(DWORD argc, LPTSTR *argv, DWORD
*specificError){
//
These statments have no effect!
*argv;
argc;
specificError;
return
0;
}
void
WINAPI ServiceMain(DWORD argc, LPTSTR *argv){
DWORD
status;
DWORD
specificError;
//
Type of service, application or driver…
ServiceStatus.dwServiceType
= SERVICE_WIN32;
//
The service is starting…
ServiceStatus.dwCurrentState
= SERVICE_START_PENDING;
//
The service can be stopped & can be paused and continued.
ServiceStatus.dwControlsAccepted
= SERVICE_ACCEPT_STOP | SERVICE_ACCEPT_PAUSE_CONTINUE;
ServiceStatus.dwWin32ExitCode
= 0;
ServiceStatus.dwServiceSpecificExitCode
= 0;
ServiceStatus.dwCheckPoint
= 0;
ServiceStatus.dwWaitHint
= 0;
ServiceStatusHandle =
RegisterServiceCtrlHandler(«MyService»,
ServiceCtrlHandler);
if
(ServiceStatusHandle == (SERVICE_STATUS_HANDLE)0){
printf(«RegisterServiceCtrlHandler()
failed, error: %ld.\n»,
GetLastError());
return;
}else
printf(«RegisterServiceCtrlHandler()
looks OK.\n»);
//
Initialization code goes here…return the status…
status
= ServiceInitialization(argc, argv, &specificError);
//
Handle error condition
if
(status != NO_ERROR){
//
The service is not running…
ServiceStatus.dwCurrentState
= SERVICE_STOPPED;
ServiceStatus.dwCheckPoint
= 0;
ServiceStatus.dwWaitHint
= 0;
ServiceStatus.dwWin32ExitCode
= status;
ServiceStatus.dwServiceSpecificExitCode
= specificError;
SetServiceStatus(ServiceStatusHandle,
&ServiceStatus);
return;
}
//
Initialization complete — report running status.
ServiceStatus.dwCurrentState
= SERVICE_RUNNING;
ServiceStatus.dwCheckPoint
= 0;
ServiceStatus.dwWaitHint
= 0;
if
(!SetServiceStatus(ServiceStatusHandle, &ServiceStatus)){
status
= GetLastError();
printf(«SetServiceStatus()
error: %ld\n»,
status);
}
else
printf(«SetServiceStatus()
looks OK.\n»);
//
This is where the service does its work…
while(ServiceStatus.dwCurrentState
== SERVICE_RUNNING){
WriteMemInfo();
Sleep(5000);
}
return;
}
//
Handler function — receives Opcode, calls SetServiceStatus()
void
WINAPI ServiceCtrlHandler(DWORD Opcode){
DWORD
status;
switch(Opcode){
case
SERVICE_CONTROL_PAUSE:
//
Do whatever it takes to pause here…
ServiceStatus.dwCurrentState
= SERVICE_PAUSED;
break;
case
SERVICE_CONTROL_CONTINUE:
//
Do whatever it takes to continue here…
ServiceStatus.dwCurrentState
= SERVICE_RUNNING;
break;
case
SERVICE_CONTROL_STOP:
//
Do whatever it takes to stop here…
ServiceStatus.dwWin32ExitCode
= 0;
ServiceStatus.dwCurrentState
= SERVICE_STOPPED;
ServiceStatus.dwCheckPoint
= 0;
ServiceStatus.dwWaitHint
= 0;
if
(!SetServiceStatus(ServiceStatusHandle, &ServiceStatus)){
status = GetLastError();
printf(«[MY_SERVICE]
SetServiceStatus() error: %ld\n»,
status);
}
printf(«Leaving
MyService.\n»);
return;
case
SERVICE_CONTROL_INTERROGATE:
//
Fall through to send current status.
break;
default:
//
else
printf(«Unrecognized
opcode %ld.\n»,
Opcode);
}
//
Send current status.
if
(!SetServiceStatus(ServiceStatusHandle, &ServiceStatus)){
status
= GetLastError();
printf(«SetServiceStatus
error %ld.\n»,
status);
return;
}
else
printf(«SetServiceStatus()
is OK.\n»);
return;
}
//
Some RAM info …
void
WriteMemInfo(void){
MEMORYSTATUS
MemState;
MemState.dwLength = sizeof
(MemState);
//
Get Memory info
GlobalMemoryStatus(&MemState);
//
Get Time info
SYSTEMTIME
timeInfo;
GetLocalTime(&timeInfo);
FILE
*fp;
char
Wbuffer[32]=»
Free RAM is: «;
sprintf(Wbuffer+strlen(Wbuffer),«%ld
MB — «,(MemState.dwAvailPhys)/(1024*1024));
sprintf(Wbuffer+strlen(Wbuffer),«%d:%d:%d
\r\n»,timeInfo.wHour,timeInfo.wMinute,timeInfo.wSecond);
fp=fopen(«myRamInfo.txt»,
«ab»);
fwrite(Wbuffer,
sizeof(Wbuffer[0]),
sizeof(Wbuffer)/sizeof(Wbuffer[0]),
fp);
fclose(fp);
return;
}
Short manual for SC tool
Service Control Manager (SCM) is a special system process under Windows NT family of operating systems, which starts, stops and interacts with Windows service processes.The command-line tool SC.exe allows us to communicate with SCM. Here is a small how to:
Create the service
sc create MyServiceName binPath= YOUR_EXE_PATH
example
sc create MyServiceName binPath= «c:\Users\username\Desktop\service_test.exe
Start the Service
sc start MyServiceName
Stop the Service
sc stop MyServiceName
Delete the Service
sc delete MyServiceName
References
An article that shows how to create a simple Windows service in C++.
- Download sample — 3.3 KB
Introduction
This article shows how to create a basic Windows Service in C++. Services are very useful in many development scenarios depending on the architecture of the application.
Background
There are not many Windows Service examples that I found in C++. I used MSDN to write this very basic Windows service.
Using the code
At a minimum a service requires the following items:
- A Main Entry point (like any application)
- A Service Entry point
- A Service Control Handler
You can use a Visual Studio template project to help you get started. I just created an «Empty» Win32 Console Application.
Before we get started on the Main Entry Point, we need to declare some globals that will be used throughout the service. To be more object oriented you can always create a class that represents your service and use class members instead of globals. To keep it simple I will use globals.
We will need a SERVICE_STATUS structure that will be used to report the status of the service to the Windows Service Control Manager (SCM).
SERVICE_STATUS g_ServiceStatus = {0};
We will also need a SERVICE_STATUS_HANDLE that is used to reference our service instance once it is registered with the SCM.
SERVICE_STATUS_HANDLE g_StatusHandle = NULL;
Here are some additional globals and function declarations that will be used and explained as we go along.
SERVICE_STATUS        g_ServiceStatus = {0};
SERVICE_STATUS_HANDLE g_StatusHandle = NULL;
HANDLE                g_ServiceStopEvent = INVALID_HANDLE_VALUE;

VOID WINAPI ServiceMain (DWORD argc, LPTSTR *argv);
VOID WINAPI ServiceCtrlHandler (DWORD);
DWORD WINAPI ServiceWorkerThread (LPVOID lpParam);

#define SERVICE_NAME  _T("My Sample Service")
Main Entry Point
int _tmain (int argc, TCHAR *argv[])
{
    SERVICE_TABLE_ENTRY ServiceTable[] =
    {
        {SERVICE_NAME, (LPSERVICE_MAIN_FUNCTION) ServiceMain},
        {NULL, NULL}
    };

    if (StartServiceCtrlDispatcher (ServiceTable) == FALSE)
    {
        return GetLastError ();
    }

    return 0;
}
In the main entry point you quickly call StartServiceCtrlDispatcher so the SCM can call your Service Entry point (ServiceMain in the example above). You want to defer any initialization until your Service Entry point, which is defined next.
Service Entry Point
VOID WINAPI ServiceMain (DWORD argc, LPTSTR *argv)
{
    DWORD Status = E_FAIL;

    // Register our service control handler with the SCM
    g_StatusHandle = RegisterServiceCtrlHandler (SERVICE_NAME, ServiceCtrlHandler);

    if (g_StatusHandle == NULL)
    {
        goto EXIT;
    }

    // Tell the service controller we are starting
    ZeroMemory (&g_ServiceStatus, sizeof (g_ServiceStatus));
    g_ServiceStatus.dwServiceType = SERVICE_WIN32_OWN_PROCESS;
    g_ServiceStatus.dwControlsAccepted = 0;
    g_ServiceStatus.dwCurrentState = SERVICE_START_PENDING;
    g_ServiceStatus.dwWin32ExitCode = 0;
    g_ServiceStatus.dwServiceSpecificExitCode = 0;
    g_ServiceStatus.dwCheckPoint = 0;

    if (SetServiceStatus (g_StatusHandle , &g_ServiceStatus) == FALSE)
    {
        OutputDebugString(_T(
          "My Sample Service: ServiceMain: SetServiceStatus returned error"));
    }

    /*
     * Perform tasks necessary to start the service here
     */

    // Create a service stop event to wait on later
    g_ServiceStopEvent = CreateEvent (NULL, TRUE, FALSE, NULL);
    if (g_ServiceStopEvent == NULL)
    {
        // Error creating event
        // Tell service controller we are stopped and exit
        g_ServiceStatus.dwControlsAccepted = 0;
        g_ServiceStatus.dwCurrentState = SERVICE_STOPPED;
        g_ServiceStatus.dwWin32ExitCode = GetLastError();
        g_ServiceStatus.dwCheckPoint = 1;

        if (SetServiceStatus (g_StatusHandle, &g_ServiceStatus) == FALSE)
	{
	    OutputDebugString(_T(
	      "My Sample Service: ServiceMain: SetServiceStatus returned error"));
	}
        goto EXIT;
    }

    // Tell the service controller we are started
    g_ServiceStatus.dwControlsAccepted = SERVICE_ACCEPT_STOP;
    g_ServiceStatus.dwCurrentState = SERVICE_RUNNING;
    g_ServiceStatus.dwWin32ExitCode = 0;
    g_ServiceStatus.dwCheckPoint = 0;

    if (SetServiceStatus (g_StatusHandle, &g_ServiceStatus) == FALSE)
    {
        OutputDebugString(_T(
          "My Sample Service: ServiceMain: SetServiceStatus returned error"));
    }

    // Start a thread that will perform the main task of the service
    HANDLE hThread = CreateThread (NULL, 0, ServiceWorkerThread, NULL, 0, NULL);

    // Wait until our worker thread exits signaling that the service needs to stop
    WaitForSingleObject (hThread, INFINITE);


    /*
     * Perform any cleanup tasks
     */

    CloseHandle (g_ServiceStopEvent);

    // Tell the service controller we are stopped
    g_ServiceStatus.dwControlsAccepted = 0;
    g_ServiceStatus.dwCurrentState = SERVICE_STOPPED;
    g_ServiceStatus.dwWin32ExitCode = 0;
    g_ServiceStatus.dwCheckPoint = 3;

    if (SetServiceStatus (g_StatusHandle, &g_ServiceStatus) == FALSE)
    {
        OutputDebugString(_T(
          "My Sample Service: ServiceMain: SetServiceStatus returned error"));
    }

EXIT:
    return;
}
The Service Main Entry Point performs the following tasks:
- Initialize any necessary items which we deferred from the Main Entry Point.
- Register the service control handler which will handle Service Stop, Pause, Continue, Shutdown, etc control commands. These are registered via the
dwControlsAcceptedfield of theSERVICE_STATUSstructure as a bit mask. - Set Service Status to
SERVICE_PENDINGthen toSERVICE_RUNNING. Set status toSERVICE_STOPPEDon any errors and on exit. Always setSERVICE_STATUS.dwControlsAcceptedto 0 when setting status toSERVICE_STOPPEDorSERVICE_PENDING. - Perform start up tasks. Like creating threads/events/mutex/IPCs/etc.
Service Control Handler
VOID WINAPI ServiceCtrlHandler (DWORD CtrlCode)
{
    switch (CtrlCode)
	{
     case SERVICE_CONTROL_STOP :

        if (g_ServiceStatus.dwCurrentState != SERVICE_RUNNING)
           break;

        /*
         * Perform tasks necessary to stop the service here
         */

        g_ServiceStatus.dwControlsAccepted = 0;
        g_ServiceStatus.dwCurrentState = SERVICE_STOP_PENDING;
        g_ServiceStatus.dwWin32ExitCode = 0;
        g_ServiceStatus.dwCheckPoint = 4;

        if (SetServiceStatus (g_StatusHandle, &g_ServiceStatus) == FALSE)
        {
            OutputDebugString(_T(
              "My Sample Service: ServiceCtrlHandler: SetServiceStatus returned error"));
        }

        // This will signal the worker thread to start shutting down
        SetEvent (g_ServiceStopEvent);

        break;

     default:
         break;
    }
}
The Service Control Handler was registered in your Service Main Entry point. Each service must have a handler to handle control requests from the SCM. The control handler must return within 30 seconds or the SCM will return an error stating that the service is not responding. This is because the handler will be called in the context of the SCM and will hold the SCM until it returns from the handler.
I have only implemented and supported the SERVICE_CONTROL_STOP request. You can handle other requests such as SERVICE_CONTROL_CONTINUE, SERVICE_CONTROL_INTERROGATE, SERVICE_CONTROL_PAUSE, SERVICE_CONTROL_SHUTDOWN and others supported by the Handler or HandlerEx function that can be registered with the RegisterServiceCtrlHandler(Ex) function.
Service Worker Thread
DWORD WINAPI ServiceWorkerThread (LPVOID lpParam)
{
    //  Periodically check if the service has been requested to stop
    while (WaitForSingleObject(g_ServiceStopEvent, 0) != WAIT_OBJECT_0)
    {
        /*
         * Perform main service function here
         */

        //  Simulate some work by sleeping
        Sleep(3000);
    }

    return ERROR_SUCCESS;
}
This sample Service Worker Thread does nothing but sleep and check to see if the service has received a control to stop. Once a stop control has been received the Service Control Handler sets the g_ServiceStopEvent event. The Service Worker Thread breaks and exits. This signals the Service Main routine to return and effectively stop the service.
Installing the Service
You can install the service from the command prompt by running the following command:
C:\>sc create "My Sample Service" binPath= C:\SampleService.exe
A space is required between binPath= and the value[?]. Also, use the full absolute path to the service executable.
You should now see the service in the Windows Services console. From here you can start and stop the service.
Uninstalling the Service
You can uninstall the service from the command prompt by running the following command:
C:\>sc delete "My Sample Service"
History
- 11/28/2012: Initial release of article and code.
- 11/29/2012: Improved code and fixed one typo in article sample code.
- 11/03/2015: Updated details on how to install the service based on user comments.
In this article I will explain how to build a simple Windows Service that runs periodically at regular intervals and as well as once a day at specific (certain) time of day using C# and VB.Net.
The Windows service will support two modes
1. Interval mode: where Windows Service execute a task at regular intervals after some delay
2. Daily mode: where the Windows Service will execute a task at specific (certain) time of day.
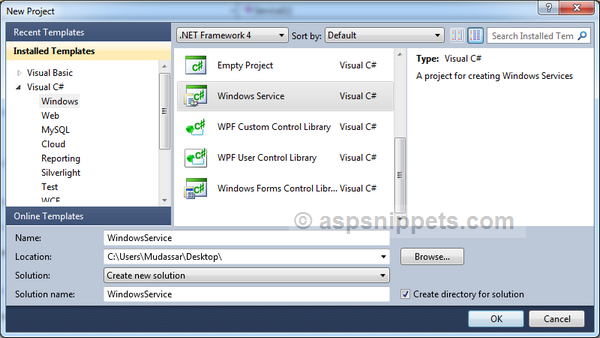
Creating a Windows Service Project
The very first step is to add a new project of type Windows Service as shown below.
Adding App.Config File
Next you need to add an Application Configuration File (App.Config file). This file will be used to control the Windows Service and make it work in different modes.
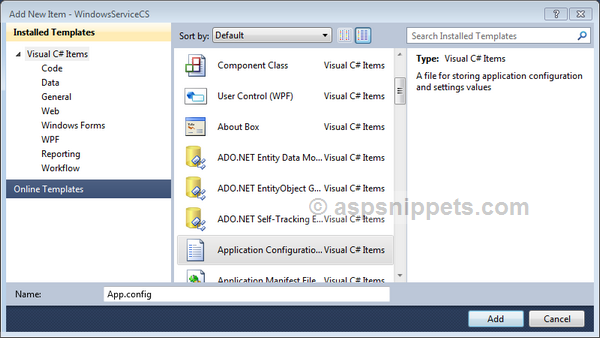
After adding the file, you will need to copy the following AppSettings to the App.Config file.
<?xmlversion=«1.0«encoding=«utf-8« ?>
<configuration>
<appSettings>
<add key =«Mode« value =«Daily«/>
<!— <add key =»Mode» value =»Interval»/>—>
<add key =«IntervalMinutes« value =«1«/>
<add key =«ScheduledTime« value =«18:41«/>
</appSettings>
</configuration>
Below is the description of each AppSetting.
Mode: It is used to set the Mode. There are two types of modes namely Daily and Interval.
IntervalMinutes: It is used when Mode is set to Interval. It consist of the Interval value in Minutes after which the Windows Service will perform a task. In other words it is the delay value.
ScheduledTime: This setting is used when the Mode is set to Daily. It is used to notify the Windows Service the time it should perform a task. The value specified is in 24 hour time format.
Timer Configuration
The following code has to be placed in the Service.cs Class. I am making use of a Timer class belonging to the System.Threading namespace in order to execute the Windows Service periodically at regular intervals and as well as once a day at specific (certain) time of day.
The Timer has a Callback method which gets triggered automatically when the due time is elapsed.
We will start with importing the following namespaces.
C#
using System.IO;
using System.Threading;
using System.Configuration;
VB.Net
Imports System.IO
Imports System.Threading
Imports System.Configuration
Below is the Windows Service class with the OnStart and OnStop event handlers.
When the Windows Service starts it calls the ScheduleService method which first reads the Mode AppSetting.. There’s a ScheduledTime variable which is set in both modes.
When the Mode is set to Daily then the ScheduledTime is read from the AppSettings. In the case when the scheduled time is passed, it is updated to same time on the next day.
When the Mode is set to Interval then the IntervalMinutes is read from the AppSettings and the schedule time is calculated by adding the IntervalMinutes to the Current Time.
Finally the Timer is set to run the scheduled time. When the scheduled time is elapsed, the Timer’s Callback method is triggered which logs the current date and time to a Text file.
C#
public partial class Service1 : ServiceBase
{
public Service1()
{
InitializeComponent();
}
protected override void OnStart(string[] args)
{
this.WriteToFile(«Simple Service started {0}»);
this.ScheduleService();
}
protected override void OnStop()
{
this.WriteToFile(«Simple Service stopped {0}»);
this.Schedular.Dispose();
}
private Timer Schedular;
public void ScheduleService()
{
try
{
Schedular = new Timer(new TimerCallback(SchedularCallback));
string mode = ConfigurationManager.AppSettings[«Mode»].ToUpper();
this.WriteToFile(«Simple Service Mode: « + mode + » {0}»);
//Set the Default Time.
DateTime scheduledTime = DateTime.MinValue;
if (mode == «DAILY»)
{
//Get the Scheduled Time from AppSettings.
scheduledTime = DateTime.Parse(System.Configuration.ConfigurationManager.AppSettings[«ScheduledTime»]);
if (DateTime.Now > scheduledTime)
{
//If Scheduled Time is passed set Schedule for the next day.
scheduledTime = scheduledTime.AddDays(1);
}
}
if (mode.ToUpper() == «INTERVAL»)
{
//Get the Interval in Minutes from AppSettings.
int intervalMinutes = Convert.ToInt32(ConfigurationManager.AppSettings[«IntervalMinutes»]);
//Set the Scheduled Time by adding the Interval to Current Time.
scheduledTime = DateTime.Now.AddMinutes(intervalMinutes);
if (DateTime.Now > scheduledTime)
{
//If Scheduled Time is passed set Schedule for the next Interval.
scheduledTime = scheduledTime.AddMinutes(intervalMinutes);
}
}
TimeSpan timeSpan = scheduledTime.Subtract(DateTime.Now);
string schedule = string.Format(«{0} day(s) {1} hour(s) {2} minute(s) {3} seconds(s)», timeSpan.Days, timeSpan.Hours, timeSpan.Minutes, timeSpan.Seconds);
this.WriteToFile(«Simple Service scheduled to run after: « + schedule + » {0}»);
//Get the difference in Minutes between the Scheduled and Current Time.
int dueTime = Convert.ToInt32(timeSpan.TotalMilliseconds);
//Change the Timer’s Due Time.
Schedular.Change(dueTime, Timeout.Infinite);
}
catch(Exception ex)
{
WriteToFile(«Simple Service Error on: {0} « + ex.Message + ex.StackTrace);
//Stop the Windows Service.
using (System.ServiceProcess.ServiceController serviceController = new System.ServiceProcess.ServiceController(«SimpleService»))
{
serviceController.Stop();
}
}
}
private void SchedularCallback(object e)
{
this.WriteToFile(«Simple Service Log: {0}»);
this.ScheduleService();
}
private void WriteToFile(string text)
{
string path = «C:\\ServiceLog.txt»;
using (StreamWriter writer = new StreamWriter(path, true))
{
writer.WriteLine(string.Format(text, DateTime.Now.ToString(«dd/MM/yyyy hh:mm:ss tt»)));
writer.Close();
}
}
}
VB.Net
Public Class Service1
Protected Overrides Sub OnStart(ByVal args() As String)
Me.WriteToFile(«Simple Service started at « + DateTime.Now.ToString(«dd/MM/yyyy hh:mm:ss tt»))
Me.ScheduleService()
End Sub
Protected Overrides Sub OnStop()
Me.WriteToFile(«Simple Service stopped at « + DateTime.Now.ToString(«dd/MM/yyyy hh:mm:ss tt»))
Me.Schedular.Dispose()
End Sub
Private Schedular As Timer
Public Sub ScheduleService()
Try
Schedular = New Timer(New TimerCallback(AddressOf SchedularCallback))
Dim mode As String = ConfigurationManager.AppSettings(«Mode»).ToUpper()
Me.WriteToFile((Convert.ToString(«Simple Service Mode: «) & mode) + » {0}»)
‘Set the Default Time.
Dim scheduledTime As DateTime = DateTime.MinValue
If mode = «DAILY» Then
‘Get the Scheduled Time from AppSettings.
scheduledTime = DateTime.Parse(System.Configuration.ConfigurationManager.AppSettings(«ScheduledTime»))
If DateTime.Now > scheduledTime Then
‘If Scheduled Time is passed set Schedule for the next day.
scheduledTime = scheduledTime.AddDays(1)
End If
End If
If mode.ToUpper() = «INTERVAL» Then
‘Get the Interval in Minutes from AppSettings.
Dim intervalMinutes As Integer = Convert.ToInt32(ConfigurationManager.AppSettings(«IntervalMinutes»))
‘Set the Scheduled Time by adding the Interval to Current Time.
scheduledTime = DateTime.Now.AddMinutes(intervalMinutes)
If DateTime.Now > scheduledTime Then
‘If Scheduled Time is passed set Schedule for the next Interval.
scheduledTime = scheduledTime.AddMinutes(intervalMinutes)
End If
End If
Dim timeSpan As TimeSpan = scheduledTime.Subtract(DateTime.Now)
Dim schedule As String = String.Format(«{0} day(s) {1} hour(s) {2} minute(s) {3} seconds(s)», timeSpan.Days, timeSpan.Hours, timeSpan.Minutes, timeSpan.Seconds)
Me.WriteToFile((Convert.ToString(«Simple Service scheduled to run after: «) & schedule) + » {0}»)
‘Get the difference in Minutes between the Scheduled and Current Time.
Dim dueTime As Integer = Convert.ToInt32(timeSpan.TotalMilliseconds)
‘Change the Timer’s Due Time.
Schedular.Change(dueTime, Timeout.Infinite)
Catch ex As Exception
WriteToFile(«Simple Service Error on: {0} « + ex.Message + ex.StackTrace)
‘Stop the Windows Service.
Using serviceController As New System.ServiceProcess.ServiceController(«SimpleService»)
serviceController.[Stop]()
End Using
End Try
End Sub
Private Sub SchedularCallback(e As Object)
Me.WriteToFile(«Simple Service Log: « + DateTime.Now.ToString(«dd/MM/yyyy hh:mm:ss tt»))
Me.ScheduleService()
End Sub
Private Sub WriteToFile(text As String)
Dim path As String = «C:\ServiceLog.txt»
Using writer As New StreamWriter(path, True)
writer.WriteLine(String.Format(text, DateTime.Now.ToString(«dd/MM/yyyy hh:mm:ss tt»)))
writer.Close()
End Using
End Sub
End Class
Adding an Installer to the Windows Service
Once the Windows Service is ready to go we need to add the Installer class to our Windows Service as without it, the Windows Service will not install.
Following are the steps to add Installer class.
1. Right Click the Service1.cs class and click View Designer in the context menu.
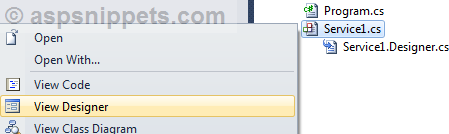
2. Once the Design View is show, you need to right click and then select Add Installer in the context menu.
Setting the Windows Service Name and StartType
The above action will add an Installer class named ProjectInstaller. Now you need to open the ProjectInstaller.Designer class and look for InitializeComponent Method.
In this method we will modify the ServiceName of the Windows Service and also set its StartType to Automatic, so that along with the computer the Windows Service will start automatically.
Note: If you don’t set the StartType to Automatic, the default value is Manual and hence the Windows Service will not start automatically when the machine is started.
C#
private void InitializeComponent()
{
this.serviceProcessInstaller1 = new System.ServiceProcess.ServiceProcessInstaller();
this.serviceInstaller1 = new System.ServiceProcess.ServiceInstaller();
//
// serviceProcessInstaller1
//
this.serviceProcessInstaller1.Password = null;
this.serviceProcessInstaller1.Username = null;
//
// serviceInstaller1
//
//Set the ServiceName of the Windows Service.
this.serviceInstaller1.ServiceName = «SimpleService»;
//Set its StartType to Automatic.
this.serviceInstaller1.StartType = System.ServiceProcess.ServiceStartMode.Automatic;
//
// ProjectInstaller
//
this.Installers.AddRange(new System.Configuration.Install.Installer[] {
this.serviceProcessInstaller1,
this.serviceInstaller1});
}
VB.Net
Private Sub InitializeComponent()
Me.ServiceProcessInstaller1 = New System.ServiceProcess.ServiceProcessInstaller()
Me.ServiceInstaller1 = New System.ServiceProcess.ServiceInstaller()
‘
‘ServiceProcessInstaller1
‘
Me.ServiceProcessInstaller1.Password = Nothing
Me.ServiceProcessInstaller1.Username = Nothing
‘
‘ServiceInstaller1
‘
‘Set the ServiceName of the Windows Service.
Me.ServiceInstaller1.ServiceName = «SimpleService»
‘Set its StartType to Automatic.
Me.ServiceInstaller1.StartType = System.ServiceProcess.ServiceStartMode.Automatic
‘
‘ProjectInstaller
‘
Me.Installers.AddRange(New System.Configuration.Install.Installer() {Me.ServiceProcessInstaller1, Me.ServiceInstaller1})
End Sub
Making the Windows Service Automatically start after Installation
After the installation one has to start the Windows Service manually through the Services section of My Computer Management.
We can start the Windows Service automatically after installation by making use of the AfterInstall event handler which triggers immediately after Windows Service is installed.
You will need to open the ProjectInstaller class and override the AfterInstall event handler and add the code to start the Windows Service.
C#
[RunInstaller(true)]
public partial class ProjectInstaller : System.Configuration.Install.Installer
{
public ProjectInstaller()
{
InitializeComponent();
}
protected override void OnAfterInstall(IDictionary savedState)
{
base.OnAfterInstall(savedState);
//The following code starts the services after it is installed.
using (System.ServiceProcess.ServiceController serviceController = new System.ServiceProcess.ServiceController(serviceInstaller1.ServiceName))
{
serviceController.Start();
}
}
}
VB.Net
Public Class ProjectInstaller
Public Sub New()
MyBase.New()
‘This call is required by the Component Designer.
InitializeComponent()
‘Add initialization code after the call to InitializeComponent
End Sub
Protected Overrides Sub OnAfterInstall(savedState As IDictionary)
MyBase.OnAfterInstall(savedState)
‘The following code starts the services after it is installed.
Using serviceController As New System.ServiceProcess.ServiceController(ServiceInstaller1.ServiceName)
serviceController.Start()
End Using
End Sub
End Class
Installing the Windows Service using InstallUtil.exe
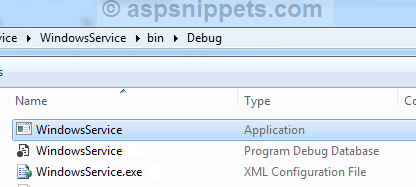
Once all the processes are complete, we can now build the Windows Service. Once the Windows Service is build you need to find the EXE file in the Debug folder of the Project.
Note: Once the Windows Service is ready for deployment, it is recommended to make use of the Release version of the EXE file instead of the Debug version.
To find the EXE, simply right click Project and select Open Folder in Windows Explorer. Now navigate to Bin => Debug folder and look for the EXE file with name same as that of the project.
Now copy and build the path in a Notepad (Text) file.
Note: I would recommend to build the command in a Notepad and save it somewhere so that you can use it multiple times.
InstallUtil Syntax
InstallUtil /i <Path of Windows Service EXE file>
Example:
InstallUtil /i C:\Users\Mudassar\Projects\WindowsService\bin\Debug\WindowsService.exe
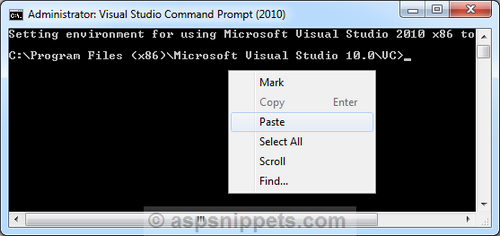
Now you need to open Programs => Microsoft Visual Studio 2010 => Visual Studio Tools => Visual Studio Command Prompt (2010).
Note: I am making use of Visual Studio 2010, and hence you need to use the appropriate version installed on your computer. And make sure you are logged in as Administrator. Without Administrator rights it would not allow you to install the Windows Service.
In the command prompt window, copy the InstallUtil command from Notepad and right click in the Command Prompt and click Paste and then press Enter key.
Now the Installer will ask for Logon permissions to run the Windows Service and hence you will need to add Windows Username and Password of user who has appropriate permission.
Note: Username must include Domain Name or the Computer name.
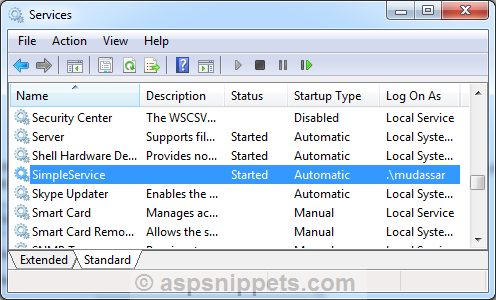
After successful installation you will see the following message.

You can find the Windows Service in the Services window. In order to open Services window in the Run Command type, services.msc and hit enter.
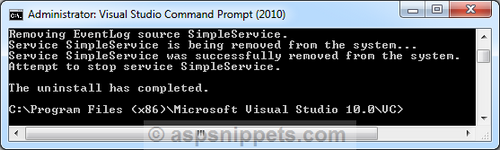
Uninstalling the Windows Service using InstallUtil.exe
The syntax for uninstalling a Windows Service is very similar to the installation syntax.
InstallUtil Syntax
InstallUtil /u <Path of Windows Service EXE file>
Example:
InstallUtil /u C:\Users\Mudassar\Projects\WindowsService\bin\Debug\WindowsService.exe
After successful uninstallation you will see the following message.
Downloads