
Current version: 1.2.15 | Release notes
Direct download
Windows
Installer (.exe): Download
More downloads…
Installer (.exe): 64 bit | 32 bit | ARM
Portable (.zip): 64 bit | 32 bit | ARM
How to check if your computer is 32 bit or 64 bit
Windows warning message
You will probably see a warning message when running the installer. Click More info and then Run anyway to continue.
Click here for more information.
You may see a Windows Defender warning message. It looks like this:
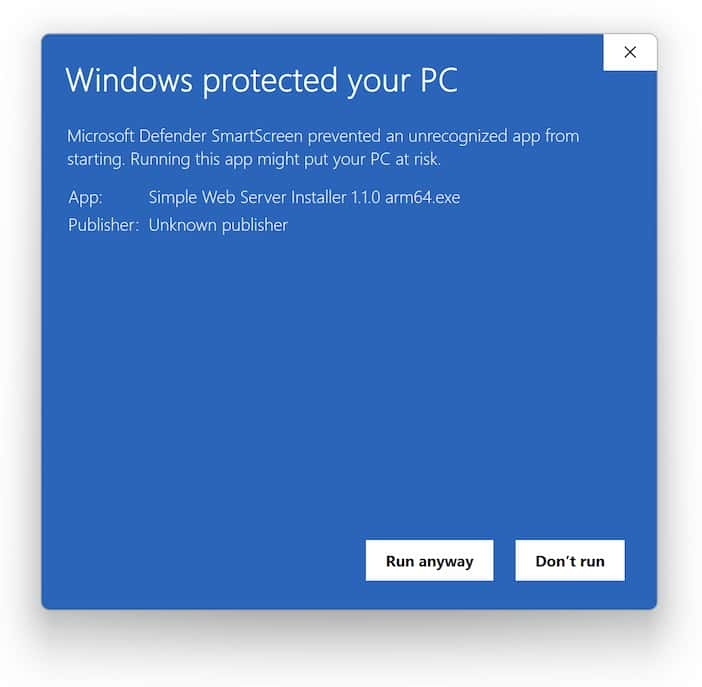
Why does this warning message appear?
It’s because the program is not signed, which means Windows can’t verify the developer/publisher. In order to get rid of this warning message, we would need to buy a signing certificate, which is too expensive given that this is a free project. If you are concerned about this warning message, then you can download the program from the Microsoft Store instead.
macOS
Installer (.dmg): Download
More downloads…
Installer (.dmg): Intel Chip | Apple Silicon
Standalone (.app inside .zip): Intel Chip | Apple Silicon
How to check if your Mac has an Intel processor or Apple silicon
These downloads require Mac OSX 10.15 or later.
Click here for older versions of Mac OSX.
For Mac OSX 10.13 and 10.14
The last compatible version is 1.2.9.
Installer (.dmg): Intel Chip
Standalone (.app inside .zip): Intel Chip
For older versions of Mac OSX
Try version 1.2.0. If it doesn’t work, you’re out of luck.
Installer (.dmg): Intel Chip (Mac OSX 10.12+)
Standalone (.app inside .zip): Intel Chip
Linux
Debian/Ubuntu (.deb): 64 bit | ARM
Fedora/openSUSE (.rpm): 64 bit | ARM
Portable (.zip): 64 bit | ARM
If we don’t have the download you need, you can manually build for your platform.
Chrome OS
Simple Web Server is not supported on Chrome OS. Chrome OS users should use Web Server for Chrome for as long as Chrome Apps continue to work on the platform.
- Overview

Simple, minimalist web server for testing and debugging purposes. Runs as a Windows application only.
It’s free for commercial and non-commercial use.
The server is extremely simple to use. Just unpack the ZIP file, run the executable, and that’s all. You can tweak the configuration later if needed.
Download — Tiny Web Server Application
- Download and unpack the ZIP package.
- Optional: edit RebexTinyWebServer.exe.config.
- Run RebexTinyWebServer.exe
- Press Start button to begin serving files via HTTP/HTTPS.
- Supports HTTP and HTTPS protocols.
- Runs as a stand-alone Windows application (not a service).
- TLS 1.3/1.2 support and up-to-date TLS cipher support.
- Legacy TLS 1.1/1.0 supported as well.
- Detailed activity log (optional raw communication logging).
- Free to use, even for commercial purposes.
- Runs on any Windows OS with .NET Framework 4.6 or higher.
- No setup needed. Just unpack the ZIP file and run.
-
Local web development and testing
Need to test your web page now? Not willing to wait days or weeks
for your tech-support department to install a testing web server?
Don’t want to spend hours learning how to configure a full-features web
server yourself?Get Tiny Web Server and start testing your HTML pages over HTTPS in minutes.
-
Need temporary local web server for connectivity testing
Install Tiny Web Server, run it and try connecting from other PCs and devices in your local network.
-
Need a production web server
Tiny Web Server is meant for testing and debugging purposes only.
It is not intended for Internet-facing endpoints.
Tiny Web Server runs on:
- Windows 11, 10.
- Windows Server 2019, 2016, or 2012.
- Windows 8.1, 7, Vista, Server 2008. You might have to install .NET Framework 4.6 first when using the server on these legacy systems.
The server can be configured using RebexTinyWebServer.exe.config file.
This configuration file must be placed in the same folder as the executable file.
httpPort-
TCP port on which the server listens for HTTP connections.
If not specified, the HTTP is disabled. httpsPort-
TCP port on which the server listens for HTTPS connections.
If not specified, the HTTPS is disabled. webRootDir-
Root data folder. If the folder does not exist,
the server creates it and puts some test data there.
Default is./wwwroot. defaultFile-
Default file to be sent if the request URL points to a directory.
Default isindex.html. serverCertificateFile-
Path to the server certificate with associated private key.
PKCS #12 (.pfx file extension) format is supported.
A new self-signed certificate is generated if it does not exist:.pfxfile is intended to be used on the server..cerfile is intended to be installed on the client into
the «Trusted Root Certification Authorities» store.
For more information, read our
Introduction to Public Key Certificates.
Default isserver-certificate.pfx. serverCertificatePassword- Password for the server certificate.
tlsVersions-
Possible values:
TLS13,TLS12,TLS11,TLS10,SSL30.
(SSL30will not work ifTLS13is enabled.)
Default isTLS13, TLS12, TLS11, TLS10. legacyMode-
If set to
true, the server operates in legacy mode with vulnerable cipher suites enabled
to achieve better compatibility with legacy devices.
Also the initial server certificate is generated with 512-bit RSA key and signature hash algorithm is SHA-1
(instead of 2048-bit RSA key with SHA-256).
Default isfalse. autoStart-
If set to
true, the server starts when application is started.
No need to press the button.
Default isfalse. decodeUri-
If set to
true, the server decodes received URI before mapping it to a physical path.
Default istrue.
Note:
To minimize possible «port in use» conflict, the initial values of ports are assigned to 1180 for HTTP and 11443 for HTTPS.
If you need to test your web client with standard ports, please modify httpPort and httpsPort
in the configuration file to 80 for HTTP and 443 for HTTPS and make sure there is no other service using those ports.
Rebex Tiny Web Server is free for commercial and non-commercial use. See the End User License Agreement (EULA) for details.
1.0.5 (2025-03-13)
- Upgraded Rebex TLS library.
1.0.4 (2024-11-13)
- Upgraded Rebex TLS library.
1.0.3 (2024-04-22)
- Fixed config paths (relative to executable instead of current directory).
- Improved log window and fixed occasional beeping.
- Initial log level made configurable.
1.0.2 (2024-01-11)
- Added possibility to configure enabled TLS versions (see
tlsVersionsconfig key). - Added better compatibility with legacy devices (see
legacyModeconfig key). - Extended list of known file extensions to provide better
Content-typeto the client.
1.0.1 (2023-07-03
- Added URI decoding to map physical paths correctly (see
decodeUriconfig key). - Added support for UNC paths.
- Upgraded Rebex TLS library.
1.0.0 (2022-02-22)
- First version.
Contact
Have a feature request or a question? Contact us or ask
at Rebex Q&A Forum.
В целях тестирования или в качестве простой заглушки на этапе развертывания сервиса у меня периодически возникает необходимость в запуске простого веб сервера на Windows. Чтобы не устанавливать на хосте полноценный IIS, вполне можно запустить простейший HTTP веб сервер прямо из консоли PowerShell. Такой веб сервер можно запустить на любом TCP порту с помощью встроенного .NET класса System.Net.HttpListener.
Откройте консоль PowerShell и создайте прослушиватель Http:
$httpListener = New-Object System.Net.HttpListener
Затем нужно указать на каком порту должен слушать ваш листенер. В нашем примере я хочу запустить HTTP веб сервер на порту 9090:
$httpListener.Prefixes.Add("http://localhost:9090/")
Чтобы слушать на всех интерфейсах компьютера, используйте такой адрес: http://+:9090/
Для проверки доступности порта с удаленного компьютера используйте команду Test-NetConnection.
Запускаем прослушиватель:
$httpListener.Start()
Вы можете использовать в объекте HttpListener различные виды аутентификации (Basic, Digest, Windows, Negotiate, или NTLM) и также привязать SSL сертификат для доступа по HTTPS.
Если выполнить этот код, в Windows появится отдельный процесс, который ожидает подключения на порту 9090. Проверьте это с помощью команды:
nestat –na 9090
или выведите список открытых портов с помощью PowerShell:
Get-NetTCPConnection -State Listen | Select-Object -Property LocalAddress, LocalPort, State | Sort-Object LocalPort |ft
Теперь создайте на диске текстовый файл с HTML кодом, который должен отобразить ваш веб-сервер. Например:
<!DOCTYPE html>
<html>
<head>
<title>
Light PowerShell Web Server</title>
<meta name="viewport" content="width=device-width, initial-scale=1">
<style>
body {background-color:#ffffff;background-repeat:no-repeat;background-position:top left;background-attachment:fixed;}
h1{font-family:Arial, sans-serif;color:#000000;background-color:#ffffff;}
p {font-family:Georgia, serif;font-size:14px;font-style:normal;font-weight:normal;color:#000000;background-color:#ffffff;}
</style>
</head>
<body>
<h1>Test web page </h1>
<p>This web page was generated from PowerShell using the System.Net.HttpListener class</p>
 </body>
</html>
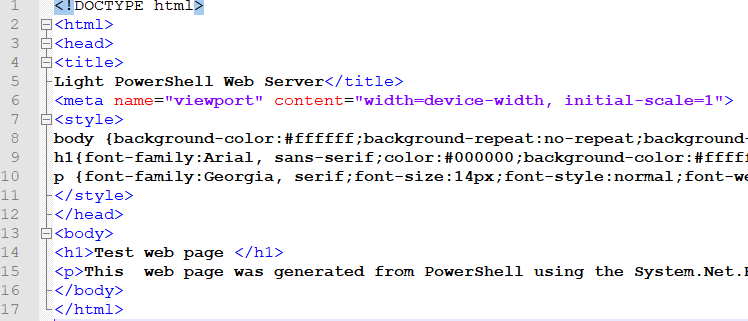
Я сохранил этот HTML код в файл C:\PS\testwebpage.html в кодировке UTF8.
Теперь выполните следующие команды, чтобы прочитать ваш html файл и отправить ответ в браузер пользователя.
$context = $httpListener.GetContext()
$context.Response.StatusCode = 200
$context.Response.ContentType = 'text/HTML'
$WebContent = Get-Content  -Path "C:\PS\testwebpage.html" -Encoding UTF8
$EncodingWebContent = [Text.Encoding]::UTF8.GetBytes($WebContent)
$context.Response.OutputStream.Write($EncodingWebContent , 0, $EncodingWebContent.Length)
$context.Response.Close()
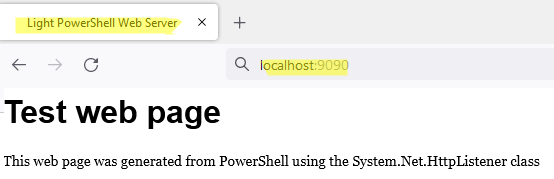
Откройте URL адрес вашего HTTP сервера в браузере (http://localhost:9090) или получите содержимое веб страницы с помощью PowerShell. Данный скрипт вернет HTML код только один раз после чего ваш слушатель будет остановлен автоматически (обрабатывается только один запрос пользователя).
Освободите TCP порт:
$httpListener.Close()
Если нужно, чтобы HTTP сервер возвращал вашу страничку постоянно, нужно добавить PowerShell код в цикл. В следующем примере HTTP сервер будет запущен в цикле, который завершается при нажатии любой клавиши в консоль PowerShell.
write-host "Press any key to stop HTTP listener after next request"
while (!([console]::KeyAvailable)) {
$context = $httpListener.GetContext()
$context.Response.StatusCode = 200
$context.Response.ContentType = 'text/HTML'
$WebContent = Get-Content -Path "C:\PS\testwebpage.html" -Encoding UTF8
$EncodingWebContent = [Text.Encoding]::UTF8.GetBytes($WebContent)
$context.Response.OutputStream.Write($EncodingWebContent , 0, $EncodingWebContent.Length)
$context.Response.Close()
Write-Output "" # Newline
}
$httpListener.Close()
Такой HTTP сервер на PowerShell будет жить пока вы не закроете консоль PowerShell или не закроете сеанс методом
.Close
.
Такой легкий веб сервер можно запустить на любом хосте Windows без необходимости установки роли Internet Information Services или других сторонних программ. Права администратора также н не нужны. Можно использовать такой HTTPListener в качестве простейшего REST сервера или для получения информации с компьютера через HTTP.
Web Server for Windows
A simple web server for windows with Nginx, PHP, MariaDB/PostgreSQL and phpMyAdmin
- Nginx 1.xx
- PHP 7.x
- cURL
- OPCache
- APCu
- Sendmail
- Composer
- MariaDB 10.x
- phpMyAdmin 5.x
- With config for phpMyAdmin configuration storage
- phpMyAdmin 5.x
- PostgreSQL 12.x
- pgAdmin 4.xx
Getting
cmd
cd C:\
git clone https://gitlab.com/breithbarbot/web-server-windows.git server
Download
- Download the source files and extract to the each respective folder
- C:\server\nginx: Nginx
- C:\server\php: [Minimum recommended version 7.4.2] PHP (x64 Thread Safe)
- The VC15 builds require to have the Visual C++ Redistributable for Visual Studio 2017 x64
- C:\server\mariadb: MariaDB (ZIP file — Windows x86_64)
- C:\server\phpmyadmin: [Minimum recommended version 5.0.1] phpMyAdmin
- C:\server\pgsql: PostgreSQL
Configuration
General
-
Update your PATH system variable
C:\server\mariadb\binC:\server\pgsql\binC:\server\nginxC:\server\php
-
Restart your system (or just restart all open terminals).
Nginx
nginx-1.X.X.zip in:
C:\server\nginx.
Execute: cp C:\server\nginx\conf\nginx.conf C:\server\nginx\conf\nginx.conf.bak
Configuration
- Edit nginx files:
- nginx documentation
- Edit:
# C:\server\nginx\conf\nginx.conf

#user  nobody;
# Calcul: grep processor /proc/cpuinfo | wc -l
worker_processes  auto;

error_log  C:/server/var/log/nginx/error.log warn;
pid        C:/server/var/log/nginx/nginx.pid;

events {
    # Definition of the maximum number of simultaneous connections (Use the command to know the maximum value of your server: `ulimit -n`)
    worker_connections  1024;
    multi_accept        on;
}

http {
    ##
    # ngx_http_charset_module
    ##
    charset  utf-8;


    ##
    # ngx_http_core_module
    ##
    client_max_body_size  500M;
    include               mime.types;
    default_type          application/octet-stream;
    keepalive_timeout     65s;
    sendfile              on;
    #tcp_nopush           on;


    ##
    # ngx_http_gzip_module
    ##
    gzip             on;
    gzip_proxied     any;
    gzip_comp_level  6;
    gzip_types       text/plain text/css application/json application/x-javascript text/xml application/xml application/xml+rss text/javascript;


    ##
    # ngx_http_log_module
    ##
    #log_format  main  '$remote_addr - $remote_user [$time_local] "$request" '
    #                  '$status $body_bytes_sent "$http_referer" '
    #                  '"$http_user_agent" "$http_x_forwarded_for"';
    #access_log        C:/server/var/log/nginx/http_access.log  main;
    error_log          C:/server/var/log/nginx/http_error.log  warn;


    ##
    # Virtual Host Configs
    ##
    include  C:/server/nginx/conf/conf.d/*.conf;
}
Virtual Host
Place your configuration files in the
conf.ddirectory.
- Create:
# C:\server\nginx\conf\conf.d\default.conf

# HTTP Server
server {
    listen       80;
    server_name  localhost;


    root   c:/server/www;


    location / {
        index  index.html index.htm index.php;
    }


    # redirect server error pages to the static page /50x.html
    #
    error_page   500 502 503 504  /50x.html;
    location = /50x.html {
        root   html;
    }


    # pass the PHP scripts to FastCGI server listening on 127.0.0.1:9000
    #
    location ~ \.php$ {
        fastcgi_pass   127.0.0.1:9000;
        fastcgi_index  index.php;
        fastcgi_param  SCRIPT_FILENAME  $realpath_root$fastcgi_script_name;
        include        fastcgi_params;
    }


    # deny access to .htaccess files, if Apache's document root
    # concurs with nginx's one
    #
    location ~ /\.ht {
        deny  all;
    }


    #access_log  C:/server/var/log//nginx/localhost.access.log;
    error_log   C:/server/var/log//nginx/localhost.error.log warn;
}
PHP
php-7.X.X-Win32-VC15-x64.zip in:
C:\server\php.
Execute: cp C:\server\php\php.ini-development C:\server\php\php.ini
Configuration
- List of Supported Timezones
- Edit:
; C:\server\php\php.ini

[PHP]
realpath_cache_size = 10M
realpath_cache_ttl = 300
memory_limit = 512M
error_log = "C:\server\var\log\php_errors.log"
post_max_size = 50M
include_path = ".;C:\server\php\pear"
extension_dir = "ext"
sys_temp_dir = "C:\server\var\tmp"
upload_tmp_dir = "C:\server\var\tmp"
upload_max_filesize = 10M
extension=bz2
extension=curl
extension=fileinfo
extension=gd2
extension=intl
extension=mbstring

[Date]
date.timezone = Europe/Paris

[Session]
session.save_path = "C:\server\var\tmp"
session.gc_maxlifetime = 86400

[soap]
soap.wsdl_cache_dir="C:\server\var\tmp"
PEAR
- Create folder:
mkdir C:\server\php\pear - PEAR Packages
cURL / SSL
- Download: https://curl.haxx.se/docs/caextract.html
- Save file in: C:\server\php\extras\ssl\cacert.pem
- Edit:
; C:\server\php\php.ini

[PHP]
extension=openssl

[curl]
curl.cainfo = "C:\server\php\extras\ssl\cacert.pem"

[openssl]
openssl.cafile="C:\server\php\extras\ssl\cacert.pem"
OPCache (Optional)
- Edit:
; C:\server\php\php.ini

[opcache]
zend_extension=opcache
opcache.enable=1
opcache.enable_cli=1
opcache.memory_consumption=256
opcache.interned_strings_buffer=16
opcache.max_accelerated_files=30000
opcache.error_log="C:\server\var\log\php_opcache_errors.log"
APCu (Optional)
- Download 7.4 Thread Safe (TS) x64
- Save file in:
C:\server\php\ext\php_apcu.dll - Edit at the end:
; C:\server\php\php.ini

[apcu]
extension=apcu
apc.enabled=1
apc.enable_cli=1
apc.shm_size=64M
apc.ttl=3600
Sendmail (Optional)
- Download: https://www.glob.com.au/sendmail/
- Copy all files in: C:\server\sendmail
- Edit:
; C:\server\php\php.ini

[mail function]
sendmail_path = "\"C:\server\sendmail\sendmail.exe\" -t"
- Edit file:
C:\server\sendmail\sendmail.ini
Composer
- Download and install: https://getcomposer.org/download/
- The default installation folder/file is: C:\ProgramData\ComposerSetup\bin\composer.phar
- If you have this error during install: Signature mismatch, could not verify the phar file integrity
- Comment temporarily:
zend_extension=opcachein C:\server\php\php.ini, run Composer install and after, uncomment.
- Comment temporarily:
Xdebug (Optional)
- Download PHP 7.4 VC15 TS (64 bit)
- Save file in:
C:\server\php\ext\php_xdebug.dll - Add at the end:
; C:\server\php\php.ini

[Xdebug]
zend_extension=xdebug
xdebug.profiler_enable_trigger = 1
xdebug.profiler_output_dir = "C:/server/var/tmp/profiler"
xdebug.remote_host=127.0.0.1
xdebug.remote_port=9001

; Display all the tree
xdebug.var_display_max_depth = -1
xdebug.var_display_max_children = -1
xdebug.var_display_max_data = -1
MariaDB
mariadb-10.X.X-winx64.zip in:
C:\server\mariadb.
- Documentation
Installation (In admin)
# Create windows service
C:/server/mariadb/bin/mysql_install_db.exe --datadir=C:/server/mariadb/data --service=MariaDB

# Start and stop the new service
net start MariaDB
net stop MariaDB
Configuration
-
Edit:
; C:\server\mariadb\data\my.ini

[mysqld]
datadir=C:/server/mariadb/data

socket=C:/server/var/tmp/mariadb.sock

tmpdir=C:/server/var/tmp

long_query_time=10

key_buffer_size=256M
sort_buffer_size=4M
read_buffer_size=2M
table_open_cache=400

query_cache_limit=16M
query_cache_size=64M

collation-server=utf8mb4_general_ci
character-set-server=utf8mb4

[client]
socket=C:/server/var/tmp/mariadb.sock
plugin-dir=C:/server/mariadb/lib/plugin
-
Edit:
; C:\server\php\php.ini

[PHP]
extension=mysqli
extension=pdo_mysql
Various
- Default login: root
- Default password: EMPTY
- For set or unset password?
- Start mariadb server in admin in safe mode.
C:/server/bin/start-mariadb-safe-mode.bat
- Run commands:
- For set password:
 USE mysql;
 UPDATE user SET `password` = PASSWORD('YOUR_PASSWORD') WHERE `User` = 'root';
 FLUSH PRIVILEGES;
 quit;
- For unset password:
UPDATE user SET password = '' WHERE User = 'root';
- For set password:
- Restart MariaDB
- Start mariadb server in admin in safe mode.
Debug?
C:/server/mariadb/bin/mysqld.exe --defaults-file=C:/server/mariadb/data/my.ini --log-error=C:/server/var/log/mariadb/ --console
Remove service (In admin)
C:/server/mariadb/bin/mysqld.exe --remove
phpMyAdmin
phpMyAdmin-5.X.X-all-languages.zip in:
C:\server\phpmyadmin.
- Creation of a symbolic link
- Execute (In cmd in Administrator):
mklink /D C:\server\www\phpmyadmin C:\server\phpmyadmin
- Execute (In cmd in Administrator):
Configuration (Automatique)
- Using Setup script
Configuration (Manual)
-
Execute:
cp C:/server/phpmyadmin/config.sample.inc.php C:/server/phpmyadmin/config.inc.php
-
phpMyAdmin Blowfish Secret Generator
-
Edit/create:
// C:\server\phpmyadmin\config.inc.php

/**
* This is needed for cookie based authentication to encrypt password in
* cookie. Needs to be 32 chars long.
*/
$cfg['blowfish_secret'] = ''; /* YOU MUST FILL IN THIS FOR COOKIE AUTH! */

/**
* Servers configuration
*/
$i = 0;

/**
* Server: localhost
*/
$i++;
/* Authentication type */
$cfg['Servers'][$i]['auth_type'] = 'config';
/* Server parameters */
$cfg['Servers'][$i]['hide_db'] = 'information_schema|mysql|performance_schema|phpmyadmin';
$cfg['Servers'][$i]['host'] = 'localhost';
$cfg['Servers'][$i]['compress'] = false;
$cfg['Servers'][$i]['user'] = 'root';
// $cfg['Servers'][$i]['password'] = '';
$cfg['Servers'][$i]['AllowNoPassword'] = true;

/**
* phpMyAdmin configuration storage settings.
*/

/* User used to manipulate with storage */
// $cfg['Servers'][$i]['controlhost'] = '';
// $cfg['Servers'][$i]['controlport'] = '';
$cfg['Servers'][$i]['controluser'] = 'pma';
$cfg['Servers'][$i]['controlpass'] = 'pmapass';

/* Storage database and tables */
$cfg['Servers'][$i]['pmadb'] = 'phpmyadmin';
$cfg['Servers'][$i]['bookmarktable'] = 'pma__bookmark';
$cfg['Servers'][$i]['relation'] = 'pma__relation';
$cfg['Servers'][$i]['table_info'] = 'pma__table_info';
$cfg['Servers'][$i]['table_coords'] = 'pma__table_coords';
$cfg['Servers'][$i]['pdf_pages'] = 'pma__pdf_pages';
$cfg['Servers'][$i]['column_info'] = 'pma__column_info';
$cfg['Servers'][$i]['history'] = 'pma__history';
$cfg['Servers'][$i]['table_uiprefs'] = 'pma__table_uiprefs';
$cfg['Servers'][$i]['tracking'] = 'pma__tracking';
$cfg['Servers'][$i]['userconfig'] = 'pma__userconfig';
$cfg['Servers'][$i]['recent'] = 'pma__recent';
$cfg['Servers'][$i]['favorite'] = 'pma__favorite';
$cfg['Servers'][$i]['users'] = 'pma__users';
$cfg['Servers'][$i]['usergroups'] = 'pma__usergroups';
$cfg['Servers'][$i]['navigationhiding'] = 'pma__navigationhiding';
$cfg['Servers'][$i]['savedsearches'] = 'pma__savedsearches';
$cfg['Servers'][$i]['central_columns'] = 'pma__central_columns';
$cfg['Servers'][$i]['designer_settings'] = 'pma__designer_settings';
$cfg['Servers'][$i]['export_templates'] = 'pma__export_templates';

/**
* End of servers configuration
*/

/**
* Directories for saving/loading files from server
*/
$cfg['UploadDir'] = 'import';
$cfg['SaveDir'] = 'save';

$cfg['MaxRows'] = 50;

$cfg['DefaultLang'] = 'fr';

$cfg['ShowPhpInfo'] = true;
$cfg['ForceSSL'] = false;
$cfg['Import']['charset'] = 'utf-8';
$cfg['Export']['compression'] = 'gzip';
$cfg['Export']['charset'] = 'utf-8';
$cfg['NavigationTreeEnableGrouping'] = false;
-
Run:
mkdir C:\server\phpmyadmin\import
mkdir C:\server\phpmyadmin\save
- Run:
C:/server/mariadb/bin/mysql.exe -u root < C:/server/phpmyadmin/sql/create_tables.sql - Create a new user/password in phpMyAdmin for phpMyAdmin configuration storage with full privileges (without GRANT access) for the phpmyadmin database.
- Update
$cfg['Servers'][$i]['controluser']and$cfg['Servers'][$i]['controlpass']variables inconfig.inc.php
- Update
- Delete DB (optional): test
- Optimisation
- http://localhost/phpmyadmin/server_status_advisor.php
-
PostgreSQL
postgresql-11.X-X-windows-x64-binaries.zip in:
C:\server\pgsql.
- Documentation
Installation (In admin)
# Create data DB folder
mkdir C:\server\pgsql\data

# Place the cuseur
cd C:\server\pgsql\bin
initdb.exe -U postgres -A password -E utf8 -W -D ../data

# Create Windows service
cd C:\server\pgsql\bin
pg_ctl register -D C:/server/pgsql/data -N PostgreSQL

# Start and stop PostgreSQL server
net start PostgreSQL
net stop PostgreSQL
Configuration
- Edit:
; C:\server\php\php.ini

[PHP]
extension=pdo_pgsql
extension=pgsql
Debug?
# Place the cuseur
cd C:\server\pgsql\bin

# Start server
pg_ctl -D ../data -l trace_file start

# Stop server
pg_ctl -D ../data -l trace_file stop
Remove service (In admin)
pg_ctl unregister -N PostgreSQL
Start & Stop all servers
- Start (In admin):
C:/server/_start.bat - Stop (In admin):
C:/server/_stop.bat
For future update ?
- Execute:
- Comparison between your config and the README.md doc
Uninstall
- Backup your DB(s) and project(s)
- Kill all services
- Remove entry your PATH system variable:
- C:\server\mariadb\bin
- C:\server\nginx
- C:\server\php
- Remove MariaDB service (in admin):
C:/server/mariadb/bin/mysqld.exe --remove - Restart your system.
Web-server software is a powerful tool that helps users to manage their online presence. It is used to host websites and provide services to visitors on the internet. Web-server software can be used for various purposes, such as creating a website, hosting files, providing email services, and much more.
Web-server software is designed to be user-friendly and easy to use. It has a wide range of features that make it suitable for both beginners and experienced users. Some of these features include:
• Easy Setup: Web-server software is designed to be easy to install and configure. It includes a comprehensive setup wizard that helps users to quickly and easily set up their web-server.
• Security: Web-server software is designed with security in mind. It includes features such as SSL encryption, IP filtering, and password protection to keep your data secure.
• Scalability: Web-server software can easily be scaled up or down to meet your changing needs. It supports a wide range of operating systems and can be used on both Linux and Windows servers.
• Performance: Web-server software is designed to be highly performant. It can handle large amounts of traffic and provides a reliable and stable platform for hosting your website.
• Reliability: Web-server software is designed to be reliable and provide a high level of uptime. It includes features such as redundancy and failover systems to ensure your site is always online.
• Support: Web-server software includes a wide range of support options. It includes a comprehensive knowledgebase, video tutorials, and a friendly customer support team that is available 24/7.
Web-server software is an essential tool for anyone looking to host a website or provide online services. It is easy to use, reliable, and secure, making it the perfect solution for both personal and business use.
The main benefit of using web-server software is that it simplifies the process of setting up, managing, and hosting webpages.
The web-server software must be able to support a minimum of 20 concurrent connections, and must be able to handle a minimum of 20000 requests per second. It must be able to process requests from cllients using HTTP 1.1 protocol and must be able to manage both static and dynamic content. The software must be able to support multiple platforms, including Windows, Linux and MacOS. The softare must be able to handle multiple languages, including PHP, Python and Java. The web-server must be able to secure connections using TLS/SSL protocols and must provide support for virtual hosting. The software must be resilient, able to recover quickly from failure, and must provide built-in support for auto-scaling. Finally, the software must be able to manage and log all requests, errors and accesses.
Easy to set up and use, ideal for beginners.
Supports standard protocols, ensuring compatibility and functionality.
Low resource usage, ideal for less powerful hardware.
Limited security features compared to more sophisticated servers.
May struggle with high traffic, resulting in slower speeds.
Lacks advanced customization and configuration options.
👨💻️ USER REVIEWS AND COMMENTS 💬
image/svg+xmlBotttsPablo Stanleyhttps://bottts.com/Florian Körner
Logan L*******i
This web-server software was relatively easy to setup and configure, but I have had some issuees with it crashing unexpectidly.
image/svg+xmlBotttsPablo Stanleyhttps://bottts.com/Florian Körner
Harris Cheesman
Simple web-server software is a lightweight program that allows users to host web pages on a local server. It is easy to install and configure, making it ideal for small-scale projects or personal use. The software typically supports basic HTTP and HTTPS protocols and can handle static content, such as HTML, CSS, and JavaScript. Some versions may also include a simple file manager for managing web files. Overall, this software is a great choice for those looking to set up a quick and simple web server without the need for extensive technical knowledge.
image/svg+xmlBotttsPablo Stanleyhttps://bottts.com/Florian Körner
Rhys O.
Simple web-server software is a basic, user-friendly solution for hosting websites and serving web pages.
image/svg+xmlBotttsPablo Stanleyhttps://bottts.com/Florian Körner
Logan
Easy to configure, user-friendly interface, reliable performance.
Intuitive setup, consistent uptime, highly customizable.
Offers quick response times, secure connections.
Efficient operation, excellent support, diverse functionality.
Convenient, user-friendly, effectively simplifies web hosting.
Reliable, straightforward, excellent for beginners.
Smooth operation, detailed logs, superb caching.
Flexible, secure, and efficient with updates.
Excellent server control, robust security features.
Stable connection, simple user management.
High-speed performance, easy to navigate.
Clean interface, rapid data transfer speeds.
image/svg+xmlBotttsPablo Stanleyhttps://bottts.com/Florian Körner
David
Efficient, user-friendly, secure, flexible, speedy response.