
Все способы:
- Разница между сжатием и компрессией в Windows 10
- Вариант 1: Сжатие как изменение размера
- Способ 1: Управление дисками
- Способ 2: Консольная утилита Diskpart
- Способ 3: Консоль «PowerShell»
- Вариант 2: Компрессия диска
- Способ 1: Из свойств тома
- Способ 2: Утилита Compact
- Вопросы и ответы: 0
Разница между сжатием и компрессией в Windows 10
В Windows 10 термин «Сжатие» имеет два значения. Так, под сжатием диска может пониматься уменьшение размера логического раздела (тома), выполняемое через оснастку «Управление дисками», консоль или средствами сторонних программ. При этом данные, хранящиеся в сжимаемом разделе, не обрабатываются. Также под сжатием диска может иметься ввиду компрессия сохраненных на нем данных. В этом втором случае фактический размер раздела не изменяется, происходит лишь увеличение объема доступного на нем свободного пространства, получаемого за счет сжатия записанных на диск файлов. Ниже рассмотрены оба варианта.
Вариант 1: Сжатие как изменение размера
Сжать том в Windows 10 можно как минимум тремя способами: в системной оснастке с графическим интерфейсом, в «Командной строке» и в «PowerShell».
Способ 1: Управление дисками
Уменьшить размер логического раздела в Windows 10 проще всего во встроенной оснастке «Управление дисками».
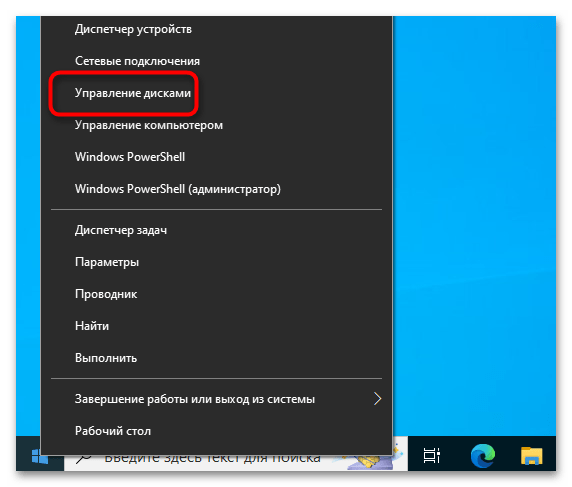
- Запустите оснастку «Управление дисками» из контекстного меню кнопки «Пуск».
- Кликните по сжимаемому разделу правой кнопкой мыши и из меню выберите опцию «Сжать том».

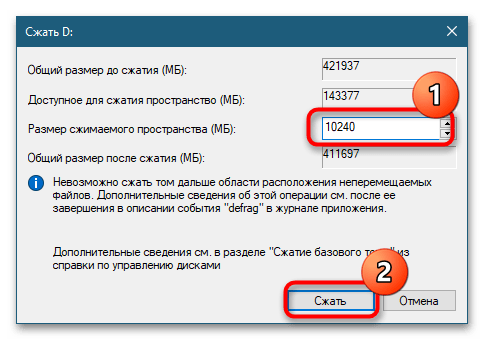
- В поле «Размер сжимаемого пространства (МБ)» укажите размер в мегабайтах, на который хотите уменьшить раздел. Нажмите кнопку «Сжать».


Результатом такого сжатия станет появление на физическом жестком диске нераспределенного пространства, на месте которого затем можно будет создать новый том.
Способ 2: Консольная утилита Diskpart
Другим, менее удобным способом сжатия тома в Windows 10, является использование консольного инструмента Diskpart, работающего из «Командной строки».
- Запустите от имени администратора классическую «Командную строку» из поиска Windows или другим известным способом.
- Последовательно выполните следующие команды:

Результат выполнения команды будет тот же, что и при использовании оснастки с графическим интерфейсом — появление на диске нераспределенной области.
Способ 3: Консоль «PowerShell»
Вместо утилиты Diskpart для сжатия тома можно использовать средства консоли «PowerShell».
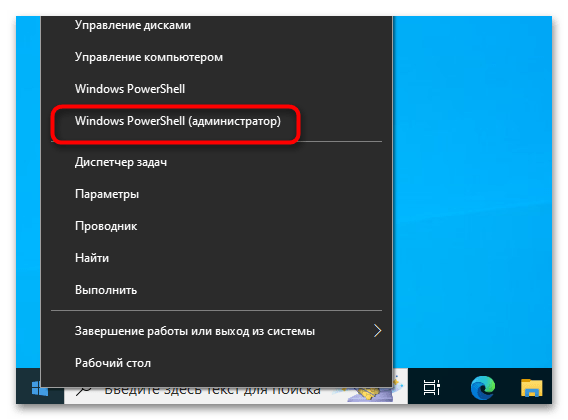
- Запустите «PowerShell» от имени администратора из контекстного меню кнопки «Пуск».

- Последовательно выполните эти команды:
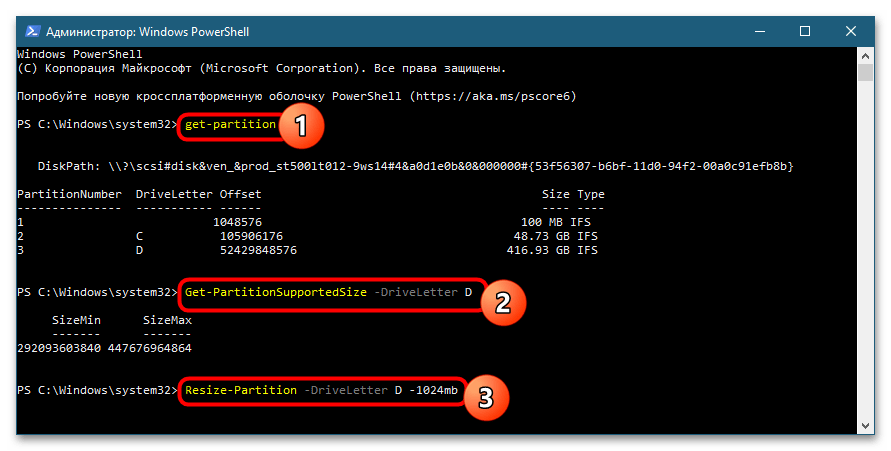
get-partition– выводит список доступных томов с указанием их букв;Get-PartitionSupportedSize -DriveLetter D– показывает, насколько может быть сжат раздел;Resize-Partition -DriveLetter D -1024mb, где D – это буква сжимаемого тома, а 1024mb – произвольный размер сжатия в мегабайтах. Если том сжимается на несколько гигабайт, вместо «mb» нужно указать «gb».

Вариант 2: Компрессия диска
Как уже было сказано, под сжатием тома в Windows 10 также может пониматься компрессия хранящихся на диске данных. Сжать раздел в Windows 10 можно по-разному.
Способ 1: Из свойств тома
Это самый простой, наглядный и доступный способ, осуществляемый через посредничество оболочки Windows.
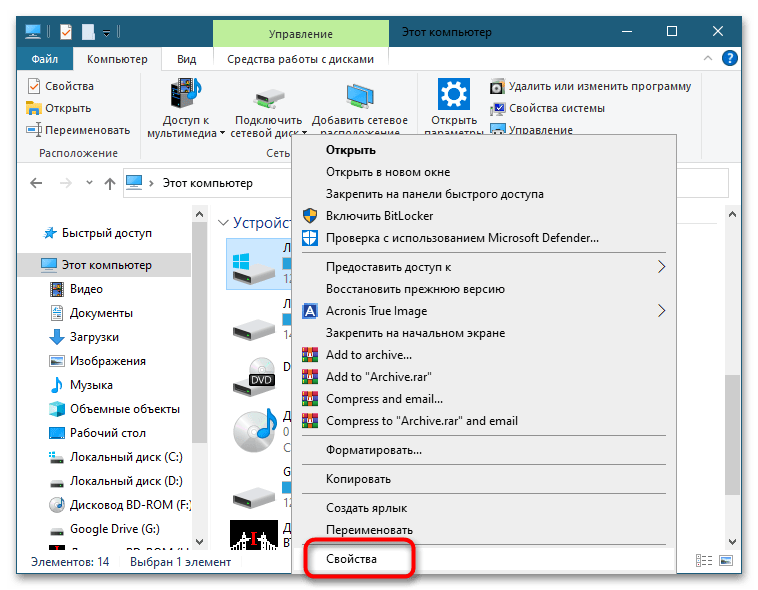
- Откройте свойства сжимаемого раздела из его контекстного меню.
- На вкладке «Общие» отметьте флажком опцию «Сжать этот диск для экономии места» и нажмите «Применить».
- Выберите режим сжатия и нажмите «OK» в предыдущем окне свойств. По умолчанию сжатие применяется ко всем каталогам рекурсивно.

Способ 2: Утилита Compact
Для сжатия данных в Windows предусмотрена консольная утилита Compact, запускаемая из интерфейса «Командной строки» или «PowerShell». Удобнее использовать второй инструмент.
Перед ее использованием рекомендуем прочитать в интернете о том, что такое «Compact OS» в Windows 10 и как именно работают механизмы сжатия.
- Запустите от имени администратора «PowerShell» из контекстного меню кнопки «Пуск».
- Перейдите в корень сжимаемого тома, для чего выполните команду
cd X:\, где X – буква тома. - Выполните команду сжатия
compact /c /i /s:\.

Процедура сжатия займет некоторое время, зависеть оно будет от количества имеющихся на диск данных. Обратите внимание, что использование команды compact, равно как и сжатия из свойств тома, доступно только на дисках с файловой системой NTFS. Это правило в той же мере касается сжатия томов путем уменьшения их размера, то есть способами, описанными в Варианте 1.
Наша группа в TelegramПолезные советы и помощь
On new laptops with preloaded Windows, you will mostly find one volume, occupying full Hard Disk space. So, you may only have a ‘C‘ drive (Windows drive) and no other volumes. However, you can shrink the existing volume in Windows 10 or 11 and create a new volume using freed-up space.
But remember, you can only shrink the free space left in your disk drive otherwise, there may be a data loss. For example, if your C drive is of 500 GB with 300 GB used and 200 GB free space, you can shrink only up to 200 GB of your C drive space. And shrinking more than that will cause data loss.
SEE ALSO: How to Extend C Drive in Windows 10 and Windows 11?
Shrink a Volume in Windows 11 or 10 to Create Free Space
One more important thing before we start. The data in HDD is not aligned systematically. The data gets scattered in the HDD disk over time. So, we recommend you run defragmentation first.
So, in this tutorial, we are going to explain how to shrink a disk drive (volume) in Windows 11 and 10 to free up some space. And this same process works for Windows 7, and Windows 8/8.1 as well.
Step 1: Open Computer Management and Select Disk Management
First of all, open Computer Management. Right-click on the ‘My Computer‘ or ‘This PC‘ icon and select ‘Manage‘. Alternatively, you can also type compmgmt.msc in RUN and press ENTER. This will open the Computer Management utility.
compmgmt.msc and press EnterIn the Computer Management console, select ‘Disk Management‘ from the left pane to manage local disk drives.
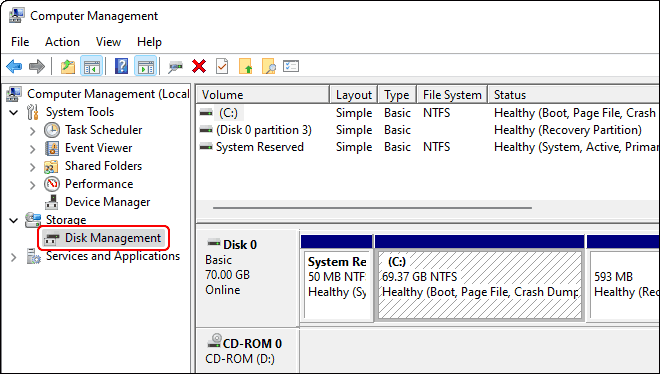
The above screenshot shows that this PC has only one disk drive (C:) of around 70 GB but there are no other volumes. So, we will shrink this volume in Windows 11 or 10 to free up space for another disk drive.
SEE ALSO: Recovery Partition Blocking C Drive Extension? Here is the Fix.
Step 2: Shrink the Volume and Create Free Space
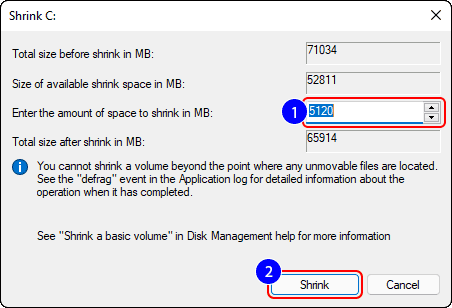
Right-click on the drive that you want to shrink (Drive C in our case) and select ‘Shrink Volume…‘

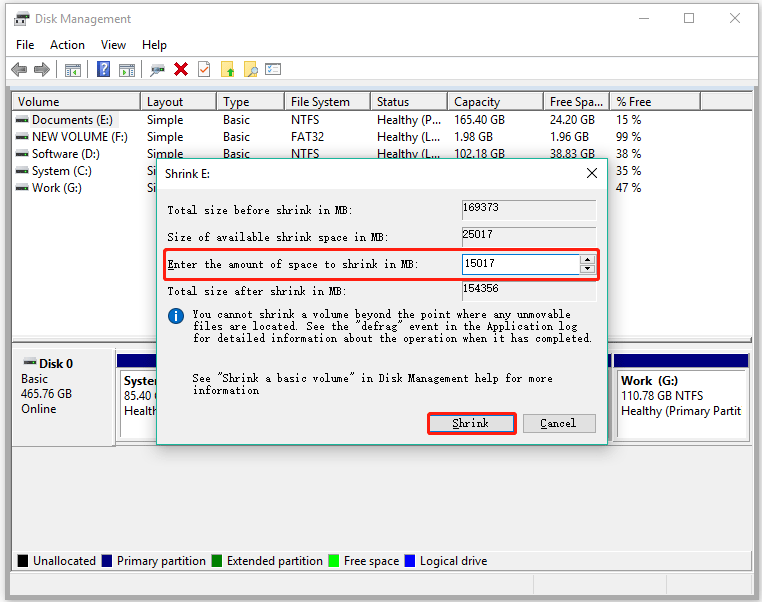
A New Shrink Volume window will open showing the selected volume’s details. Enter the amount of space to shrink (in MB) and click on ‘Shrink‘ to shrink the entered amount of the space from the selected disk drive (C). So, in this example, we have entered 5120MB (=5GB) space to shrink.
Step 3: Shrink Volume Successfully Completed
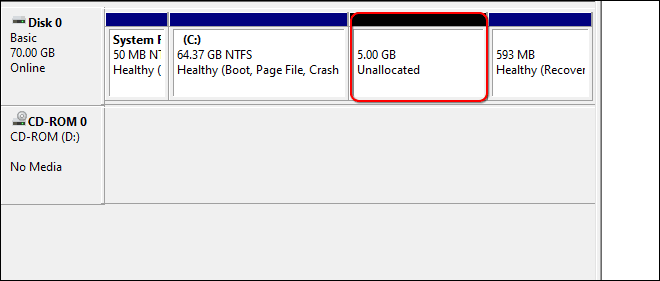
Go back to ‘Disk Management‘ and check available disk space. Here, you can see the space of the existing volume has been shrunk. And you can see unallocated space equal to the shrunken size in your disk. You can use this unallocated space to create a new volume.
SEE ALSO: How to Free Up Space in C Drive on Windows 11 and 10?
The above tutorial explained, how you can easily shrink existing volume in Windows to free up space for creating a new volume. You can either create a new volume from unallocated space using or you can also use it for installing other Operating systems.
Hope you liked the tutorial. Feel free to share your queries and suggestions in the comment section below.
Hi there, we are the editorial staff at WINDOSPC (former HELLPC). We are a team of funny and technical people. Feel free to get in touch with us via Contact-Us page.
how to shrink volume in windows 10
Shrinking a volume in Windows 10 is a straightforward process that allows you to reduce the size of an existing partition to free up space for other uses. By using the built-in Disk Management tool, you can easily accomplish this in just a few steps.
In this section, we will walk you through the steps to shrink a volume in Windows 10, enabling you to reallocate disk space efficiently.
Step 1: Open Disk Management
First, right-click the Start button and select «Disk Management.»
Disk Management is a powerful tool that helps you manage your disk partitions without needing third-party software. By right-clicking the Start button, you quickly access this utility.
Step 2: Select the Volume to Shrink
Next, right-click the volume you want to shrink and choose «Shrink Volume.»
Make sure you select the correct volume, as shrinking the wrong one could cause data loss. «Shrink Volume» is the option that initiates the resizing process.
Step 3: Enter the Amount to Shrink
Enter the amount of space you wish to shrink in megabytes (MB) and click «Shrink.»
You will see a dialog box showing the total size before shrink, space available for shrink, and the size you want to shrink. Carefully enter the desired amount of space to free up.
Step 4: Wait for the Process to Complete
Wait a few moments for the system to shrink the volume.
This process might take a few minutes, depending on the size of the volume and the amount of space you are shrinking. Be patient and avoid interrupting the process.
Step 5: Verify the New Volume Size
Afterward, check the Disk Management window to verify the new size of your volume.
You should see the newly allocated free space as «Unallocated» next to the resized partition. This space can now be used to create new volumes or extend existing ones.
After completing these steps, your selected volume will be smaller, and you will have unallocated space available for other uses.
Tips for Shrinking Volume in Windows 10
- Backup Important Data: Always back up your data before modifying disk partitions to prevent data loss.
- Check Disk Health: Ensure your disk is healthy by running tools like CHKDSK before shrinking a volume.
- Free Up Space: Delete unnecessary files or move them to another drive to maximize the space available for shrinking.
- Close Applications: Close all running applications to avoid conflicts during the shrinking process.
- Use Reliable Power Source: Ensure your computer is plugged in to avoid power interruptions that could corrupt your disk.
Frequently Asked Questions
Can I shrink the system volume (C:)?
Yes, you can shrink the system volume, but be cautious as this volume contains your operating system. Always back up your data first.
What should I do if «Shrink Volume» is greyed out?
This usually happens if there is not enough free space or unmovable files are in the way. Defragment your disk and try again.
How do I use the unallocated space after shrinking the volume?
You can use the unallocated space to create new partitions or extend existing ones using Disk Management.
Will I lose data if I shrink a volume?
No, shrinking a volume should not cause data loss, but it’s always best to back up your data just in case.
Can I undo the shrink operation?
No, you can’t undo it directly. You can extend the volume back to its original size if the space hasn’t been used by another partition.
Summary
- Open Disk Management.
- Select the volume to shrink.
- Enter the amount to shrink.
- Wait for the process to complete.
- Verify the new volume size.
Conclusion
Shrinking a volume in Windows 10 is an efficient way to manage your disk space without needing additional software. By following the steps outlined above, you can easily resize your partitions and make better use of your disk space.
Remember, always back up your data before making any changes to your disk partitions to prevent data loss. For more advanced disk management features, other tools are available but mastering Disk Management in Windows 10 can save you time and hassle.
Feel free to explore other features of Disk Management and take control of your computer’s storage like a pro. Happy resizing!
Matt Jacobs has been working as an IT consultant for small businesses since receiving his Master’s degree in 2003. While he still does some consulting work, his primary focus now is on creating technology support content for SupportYourTech.com.
His work can be found on many websites and focuses on topics such as Microsoft Office, Apple devices, Android devices, Photoshop, and more.
You are here:
Home » Windows 10 » How To Shrink A Volume Or Partition In Windows 10
If you have recently bought a new PC preinstalled with Windows 10, you likely have found that the manufacturer has created just one or two partitions on the large drive. For instance, if your PC ships with 500 GB HDD, you likely have a single partition of size around 440 GB, where Windows 10 is installed.
Most users like to create multiple partitions on a drive to avoid saving all files on the partition where Windows is installed. If the “C” drive or the partition where Windows 10 is installed is too large, you might want to shrink the system drive (the drive where Windows is installed) and create new partitions.
Use Disk Management to shrink a volume or partition
Luckily, the Disk Management tool can be used to shrink and extend partitions in Windows 10. The Disk Management tool offers a wizard-style interface for extend and shrink operations. And the best thing is that you can extend and shrink partitions without losing data.
In this guide, we will see how to shrink a partition in Windows 10 with losing data.
Complete the given below directions to shrink a volume in Windows 10.
WARNING: Although your data will be safe, we recommend you backup your important data to an external drive or second drive on the PC just in case if something goes completely wrong.
Step 1: In the Start menu or taskbar search box, type Diskmgmt.msc, and then press Enter key to open Disk Management.

Step 2: Right-click on the partition that you want to shrink, and then click Shrink Volume option.

Step 3: You will see the following dialog with the following details:
# Total size of the partition before shrink in MB
# Size of available shrink space in MB
")
As the above dialog displays, it’s not possible to shrink a volume beyond the point where any unmovable files are located.
In the field next to Enter the amount of space to shrink in MB, enter the amount of space you would like to shrink in MB. Note that the amount must be less than the amount mentioned in the field next to the Size of available shrink space in MB. For those who don’t know 1 GB = 1000 MB.
After entering the amount of space to shrink, click the Shrink button. That’s it! The amount of space that you got by shrinking the volume will appear as Unallocated in Disk Management.
Create a new partition from the unallocated space
To create a new partition from the unallocated space, right-click on it, click New simple volume, click Next, enter the size, click Next, select a drive letter for your new partition, click Next, select a file system, click Next and finally, click Finish button to create a new volume out of the unallocated space.
")
If you’re unable to shrink a partition using Disk Management, you can use a third-party software compatible with Windows 10. There are plenty of free partition managers around. We recommend you try out MiniTool Partition Wizard, AOMEI Partition Assistant Standard Edition, or EaseUS Partition Master Free software.
In Disk Management, you can see an option labeled by Shrink Volume after clicking an NTFS partition. What does the option do? Simply put, it can decrease the space of a partition to create unallocated space. Now follow the guide from MiniTool Partition Wizard to learn more about “what does Shrink Volume do”.
Windows allows you to perform advanced storage tasks using Disk Management, such as partitioning a hard drive, assigning a drive letter to a partition, extending partition, shrinking partition, and so on. It is easy to perform these tasks, but before performing them, you can spend some time learning about what they do. In this post, we discuss “what does Shrink Volume do in Disk Management”.
Shrink Volume Windows 10
What does Shrink Volume do in Disk Management? When to use Shrink Volume? How to access Shrink Volume in Disk Management? These questions are discussed below.
What Does Shrink Volume Do in Disk Management?
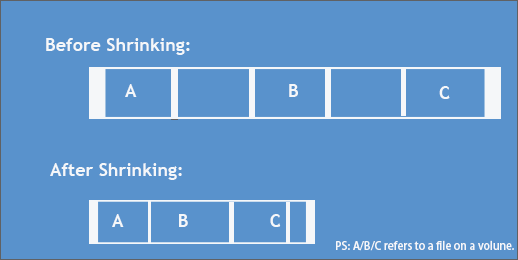
Shrink Volume is one of the functions of Disk Management. When you activate the function, any ordinary files will be automatically relocated on the partition to decrease the space of the partition and create unallocated space.
When to Use Shrink Volume?
Shrinking volume eventually creates unallocated space. So, there are two main intentions or reasons for shrinking a volume.
One is using the unallocated space to create a new volume for storing important files, setting up SSD over-provisioning, and so on. The other is extending the size of the adjacent volume (using Disk Management).
How to Access Shrink Volume in Disk Management?
To access this function, you just need to right-click the Windows icon on the taskbar, choose the Disk Management option, and right-click the partition you want to shrink. You will see the function in Disk Management.
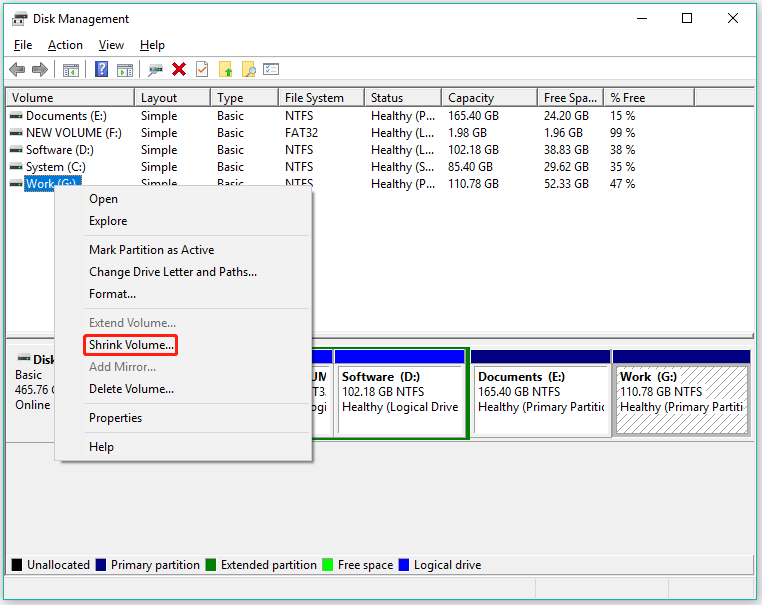
If the function is in the state like the above image, you can directly choose it and follow the on-screen instructions to shrink the volume. But if you find Shrink Volume is greyed out like the following image, you need to make some changes to make it available.
The “Shrink Volume greyed out” issue can lie in the following causes:
The partition is not an NTFS partition or RAW partition. Disk Management allows you to only shrink the RAW and NTFS partition. To break the limitation, you can convert the files system of the partition to NTFS and then shrink it with the Windows tool, or use the shrinking tool like MiniTool Partition Wizard.
There are unmovable files at the end of the partition. Or, there is some virtual memory on the partition. Certain files, like paging files and the shadow copy storage area, cannot be automatically relocated, but the volume that contains such files can be shrunk to the point where these files are located.
In this case, you can try transferring virtual memory from the volume you want to shrink to another volume to make the option available in Disk Management.
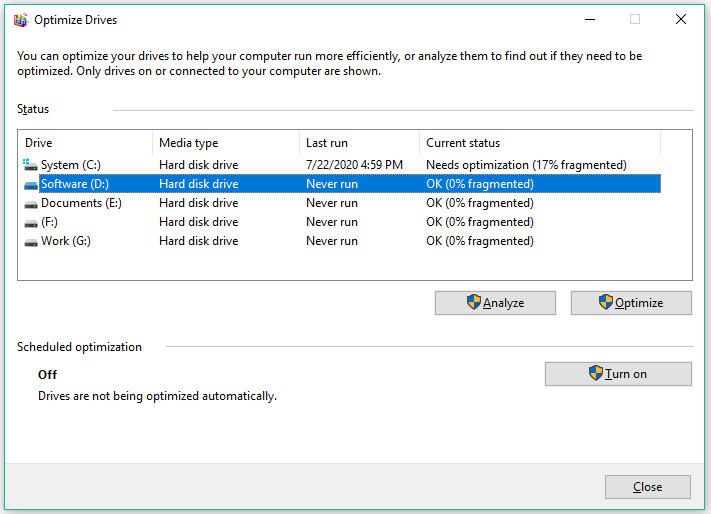
There are some disk fragments on the partition of an HDD. In this case, you can defrag the volume to make Shrink Volume available. The steps to defrag a drive are as follows:
- Press Windows + E to call out File Explorer.
- Right-click the partition you want to shrink and choose the Properties option.
- Switch to the Tools tab and then click the Optimize option.
- Select the partition you want to shrink again and click the Optimize button.
- Wait until the defragging process ends.
How to Shrink Volume in Windows 10?
To safely shrink a volume in Windows 10, you can use Disk Management as well as other shrinking tools like DiskPart and MiniTool Partition Wizard.
Note: If you want to shrink a drive (especially the C drive) through Disk Management or DiskPart, please delete the unnecessary files from the drive and then back up the important files before shrinking the drive.
Editor’s Choice: Shrink Volume via MiniTool Partition Wizard
This way can safely shrink a partition that uses the file system like NTFS and FAT32 within three steps:
- Choose Move/Resize Partition.
- Determine how much space you want to decrease.
- Click Apply.
MiniTool Partition Wizard FreeClick to Download100%Clean & Safe
Now follow the tutorial below to use one of the three utilities to shrink the volume.
Shrink Volume via Disk Management
Several steps are required to shrink a volume using Disk Management and they are:
Step 1: Access the Shrink Volume option in Disk Management.
Step 2: Wait for Disk Management to query available space to shrink.
Step 3: When you see a pop-up window, enter the size (in MB) you want to decrease and then click the Shrink button.
Shrink Volume via DiskPart
Alternatively, you can use DiskPart, another Windows built-in tool, to shrink a volume. But note that this tool has the same limitations as Disk Management.
Here is how to shrink volume in Windows 10 using DiskPart:
Step 1: Run the DiskPart utility.
- Press Windows + R to call out the Run window.
- Enter diskpart into the Run window and then hit the Enter key.
Step 2: Once the utility runs, input the following commands and hit the Enter key after inputting.
list volume
select volume # (replace # with the volume number, e.g., select volume 3)
shrink desired = * (replace * with the amount of space you want to shrink, e.g., shrink desired = 1024)
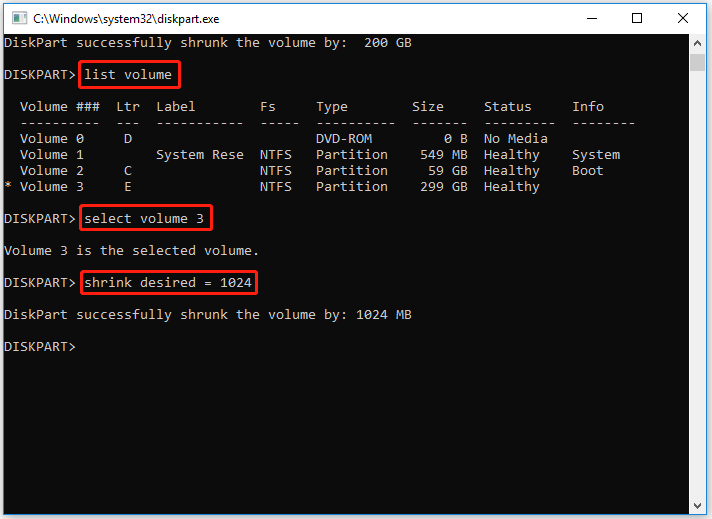
Step 3: When you receive the message saying “DiskPart successfully shrunk the volume by: …”, you can input Exit and hit the Enter key to close DiskPart.
Shrink Volume via MiniTool Partition Wizard
In addition, you can use MiniTool Partition Wizard to shrink a volume in Windows 10. This shrinking tool can shrink any partition that has free space without data loss with the Enhanced Data Protecting Mode enabled.
Plus, it is a comprehensive tool that can check and fix file system errors, migrate Windows operating system, recovery data and partitions, rebuild MBR, and so on.
Let’s see how to shrink a volume in Windows 10 using the shrinking tool.
Note: If you want to resize a system partition, please use MiniTool Partition Wizard Bootable in case of boot issues.
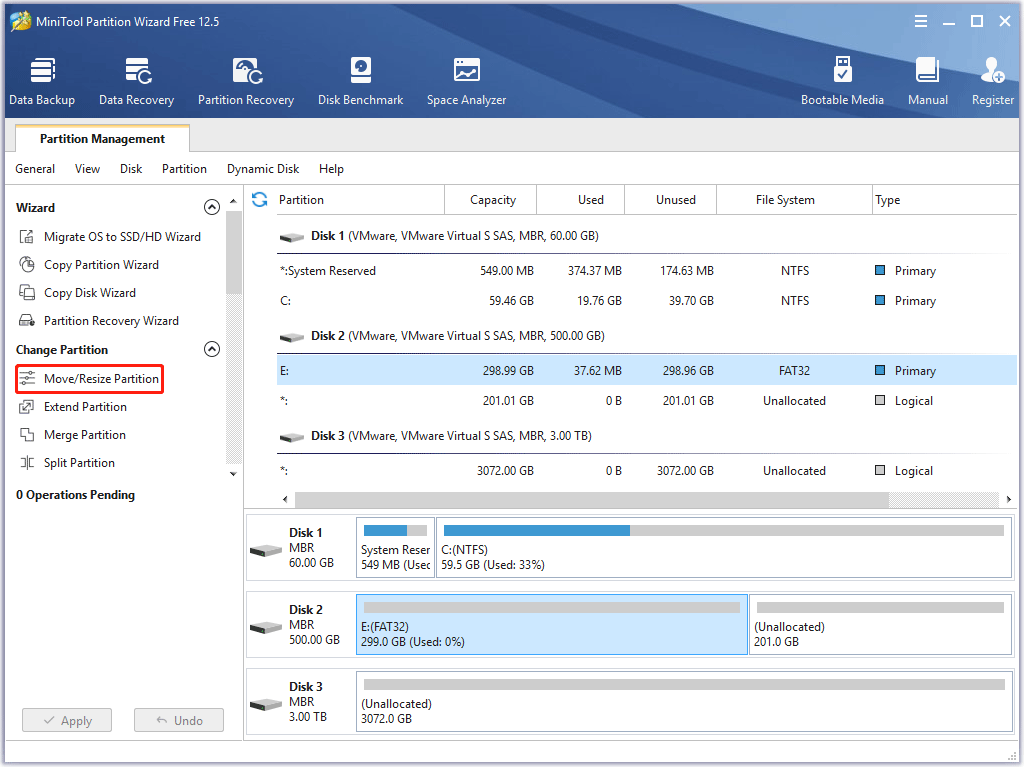
Step 1: Launch MiniTool Partition Wizard to access its main interface. Then select the partition that you want to shrink and choose the Move/Resize Partition feature.
MiniTool Partition Wizard FreeClick to Download100%Clean & Safe
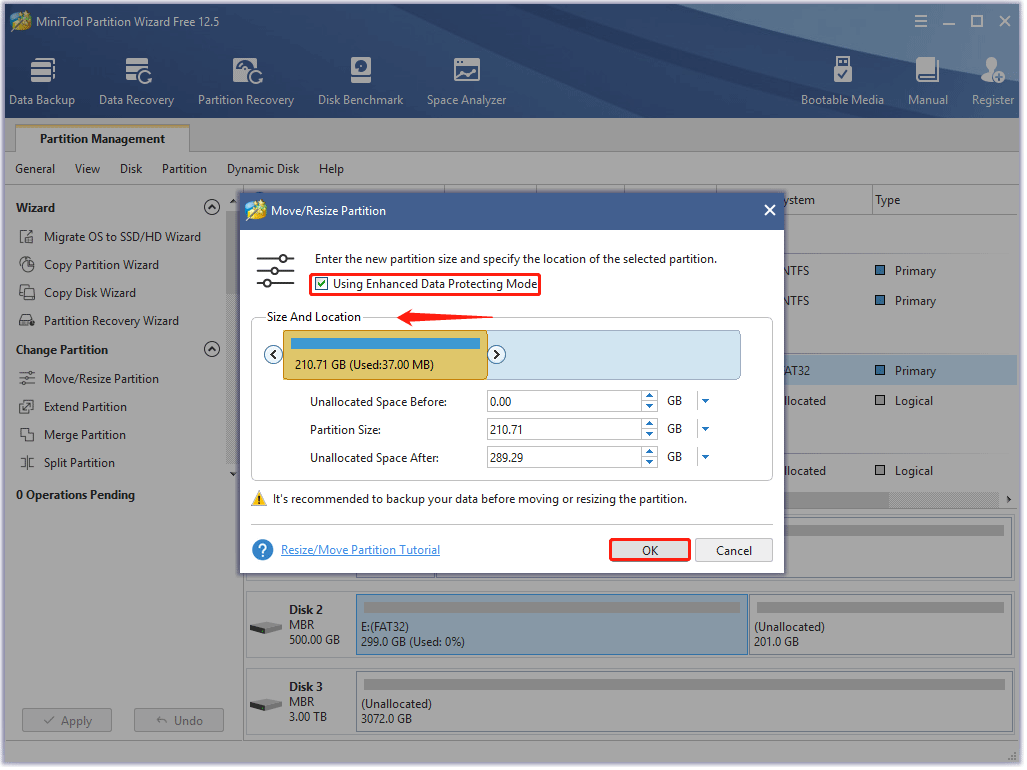
Step 3: On the Move/Resize Partition window, you should:
- Keep the Using Enhanced Data Protecting Mode option ticked.
- Move the slide handle leftward and then click the OK button.
Note: In this step, you can adjust the location of the partition and the unallocated space on your hard drive by dragging the whole partition handle.
Step 3: The software returns to its main interface. On the interface, preview the shrinking result. If you are satisfied with it, you can click the Apply button to let the software perform the task.
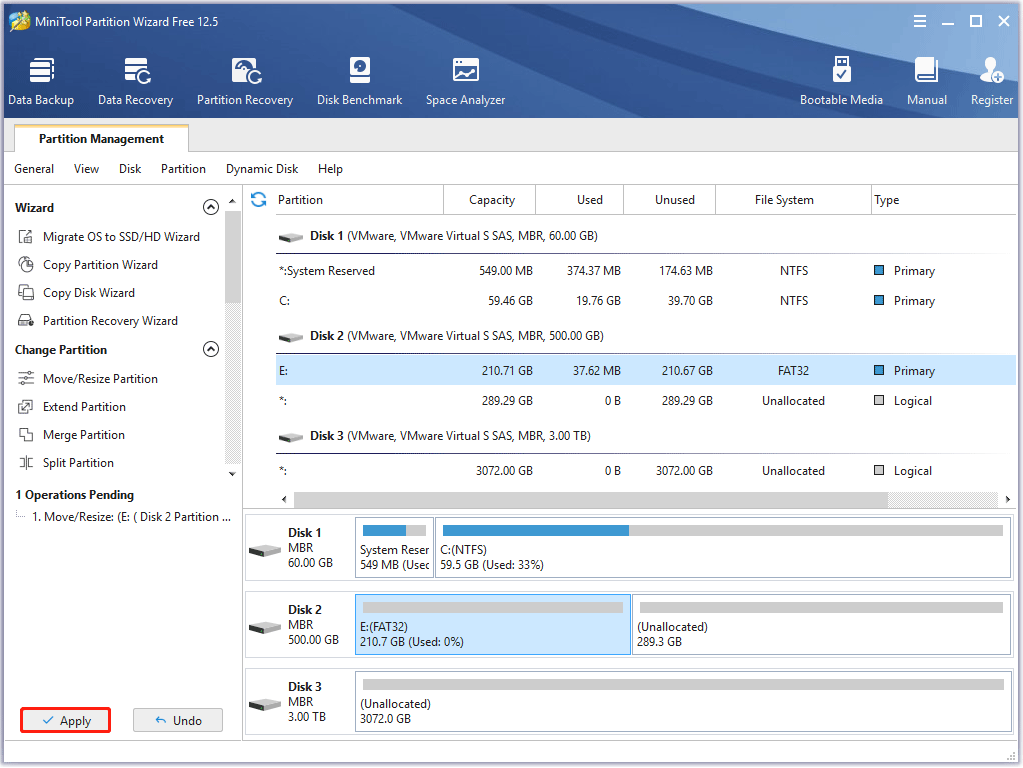
MiniTool Partition Wizard is a powerful shrinking tool. With it, I shrank a FAT32 partition with ease.Click to Tweet
What to Do After Shrinking a Volume?
After shrinking a volume, you get new unallocated space and you can use it to create a new partition or extend a partition. So, here we continue to show how to easily complete the two things with the help of MiniTool Partition Wizard.
MiniTool Partition Wizard FreeClick to Download100%Clean & Safe
Create a New Volume
It is easy to create a volume in Windows 10 whether you use Disk Management, DiskPart, or MiniTool Partition. However, some rules must be learned about. Otherwise, you might fail to create a volume and receive error messages, like “No Free MBR Slot”.
Here are the rules:
- On an MBR disk, you can create up to four primary partitions or three partitions and one extended partition (containing numerous logical partitions).
- On a GPT disk, you can create up to 128 partitions.
So, check your disk is using MBR partition style or GPT partition style. You can launch MiniTool Partition Wizard and then see if your disk is labeled by MBR or GPT.
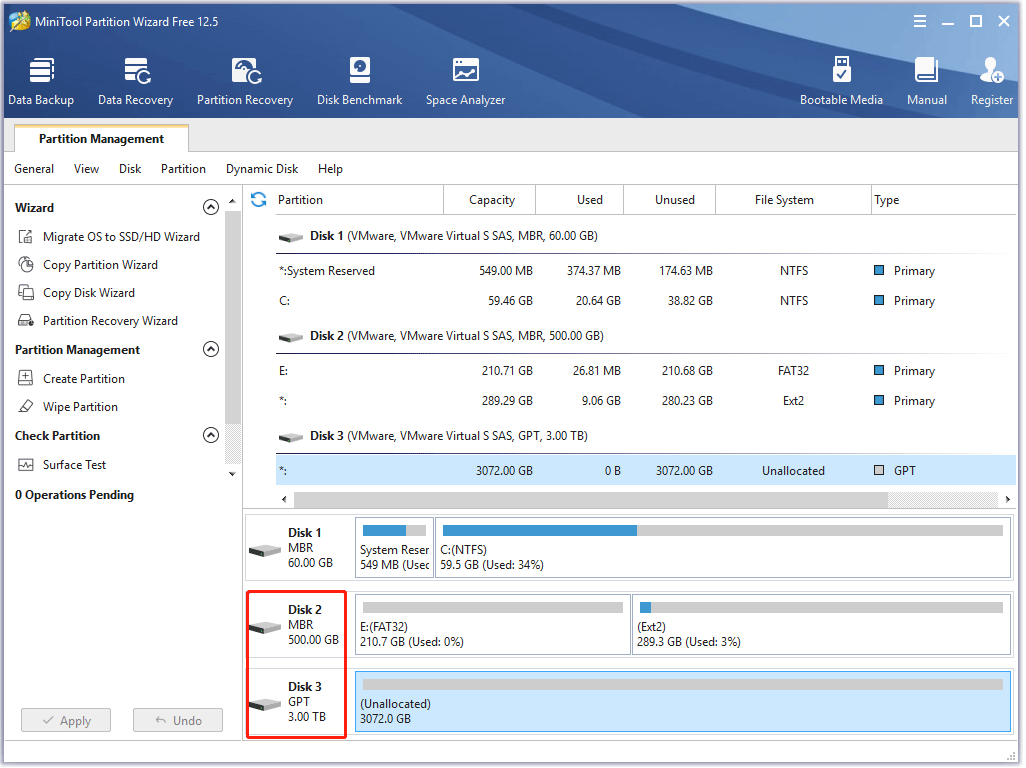
After learning about the partition style of your disk, you can create a volume based on the aforementioned rules.
Here is how to create a new partition on unallocated space with MiniTool Partition Wizard.
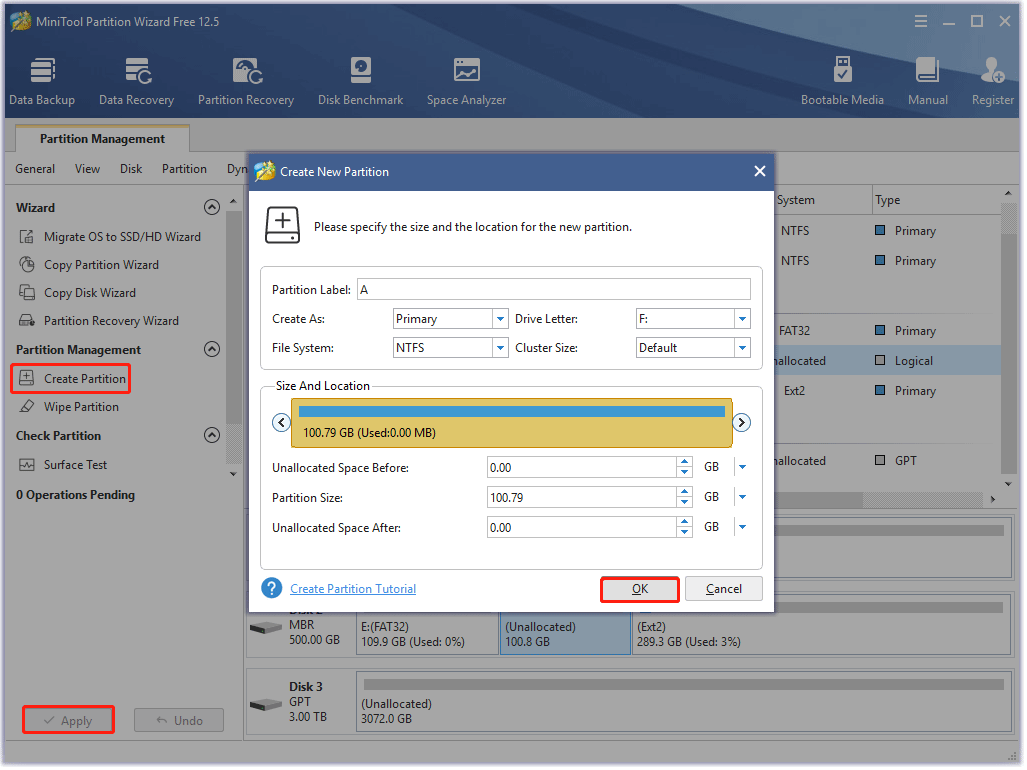
- On the MiniTool software’s interface, select the unallocated space and then choose the Create Partition option from the left side.
- On the Create New Partition window, confirm the parameters including partition type, drive letter, file system, cluster size (optional), and partition size. After that, click the OK button.
- Preview the creation result and click the Apply button.
The MiniTool software begins to execute the task and can complete it in a few seconds. Once the partition is created, you can use it for storing files.
Extend a Volume
Disk Management only allows you to extend a volume when there is unallocated space after the volume. Well, how to extend a volume which is not in that case? You can try MiniTool Partition Wizard. Its Extend Partition feature can be used when there is unused space on your hard drive. The operations are as follows:
- Launch the MiniTool software and get access to its main interface.
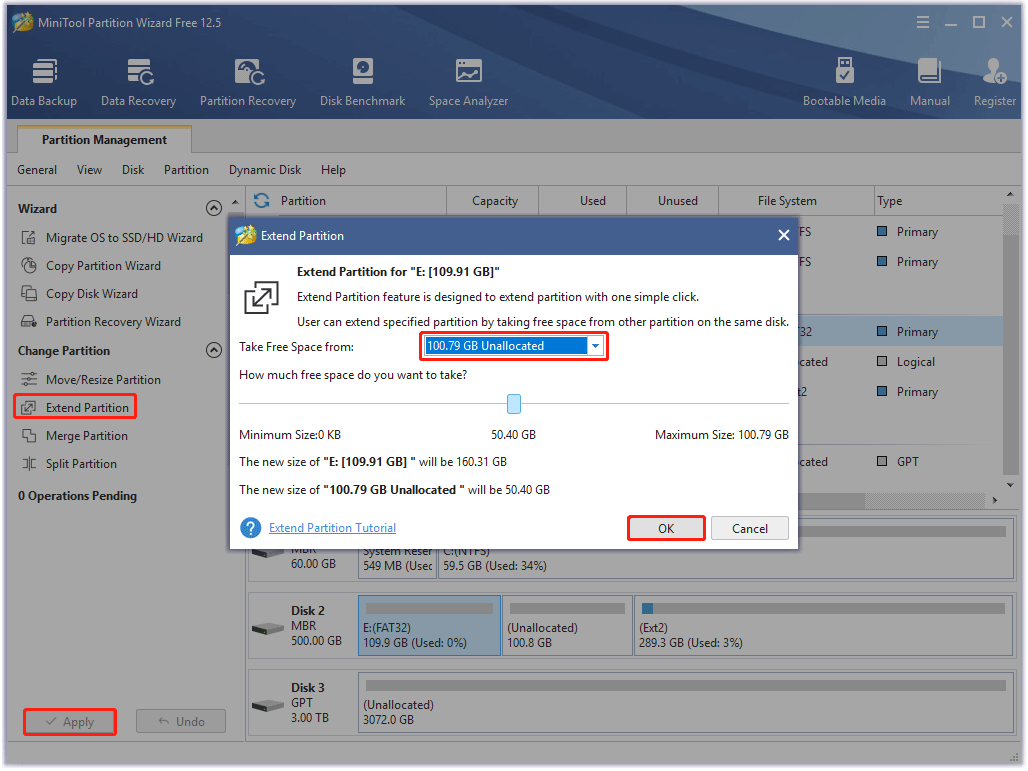
- Select the partition you want to extend and then choose the Extend Partition feature from the left side.
- On the Extend Partition window, choose the unallocated space from the drop-down menu of Take Free Space from. Then, determine how much free space you want to take. Finally, click the OK button.
- Preview the result and then click the Apply button.
What does Shrink Volume do in Disk Management? How to shrink volume in Windows 10? How to use the unallocated space after shrinking a volume? All these questions are discussed in this post.Click to Tweet
Final Thoughts on Shrinking Volume
What does Shrink Volume do in Disk Management? Shrinking volume can decrease the space of a partition by relocating the files on it. So, shrinking a volume might lead to data loss if the process is interrupted.
To protect data integrity, especially it in C drive, please back up it before shrinking it using the Windows built-in tools. Or you can try MiniTool Partition Wizard, its Enhanced Data Protecting Mode function can secure data on the partition that you want to shrink. But if you want to resize the C drive, please try its bootable version.
That’s all about “Shrink Volume Windows 10”. If you have any questions about the subject, please leave them in the comment zone; if you run into some issues when using MiniTool software, please do not hesitate to contact us via [email protected]. Regardless of your comment or email, we will reply to you as soon as possible.