
Applies ToWindows 11 Windows 10
Various language and keyboard/input layout settings in Windows can be managed in the Settings app including:
-
Installing and removing languages.
-
Changing the Windows display language.
-
Changing the language used by Microsoft Store apps and websites.
-
Adding speech features to a language.
-
Adding and removing keyboard/input layouts.
-
Changing keyboard/input layouts.
This article covers these tasks.
Note: For the sake of simplicity, the rest of this article refers to keyboard/input layout as just keyboard layout.
Select the desired task from the following list:
To check what languages are currently installed in Windows:
-
In the Time & language > Language & region window, the currently installed languages are displayed in the Language section.
The first step in setting language settings in Windows is making sure that the desired language is installed. To install a language in Windows:
-
Since language packs are downloaded via the Internet, make sure that the Windows device is connected to the Internet.
-
Save all work and close out of any open apps.
-
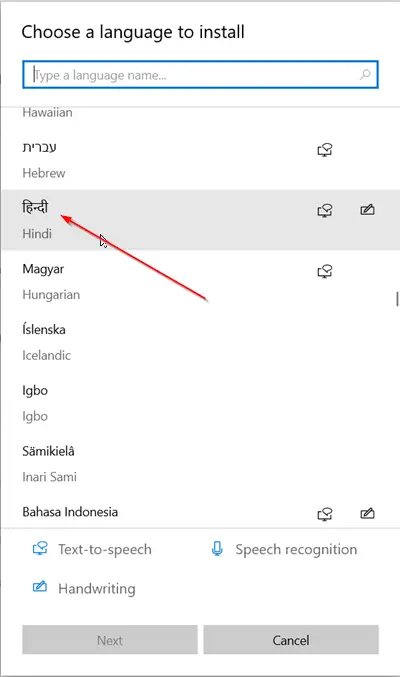
In the Time & language > Language & region window, under the Language section, select the Add a language button next to Preferred languages.
-
In the Choose a language to install window, enter in the name of the desired language in the Type a language name… text box or scroll through the list of available languages. Once the desired language is displayed, select it and then select the Next button.
-
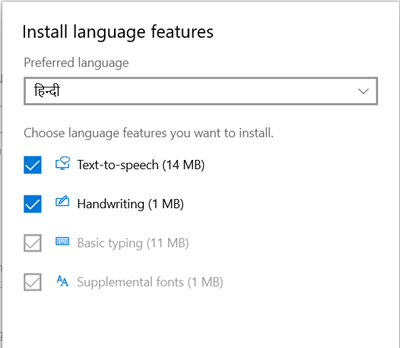
In the Install language features window:
-
Under Optional language features, make sure Language pack is selected.
-
Under Optional language features, select any additional desired features, such as speech recognition.
-
Under Language preferences, if the language being installed should be set as the Windows display language, select Set as my Windows display language. For more information, see the Change the Windows display language section in this article.
-
-
Once all the options are selected as desired in the Install language features window, select the Install button.
-
In the Time & language > Language & region window, the following message is displayed under the Language section:
Please wait while the language finishes installing. This could take a few minutes.
In the list of languages, the download and install progress of the selected language is also displayed.
-
Once the selected language is finished installing, the language is added as a language under the Language section in the Time & language > Language & region window.
-
If the option Set as my Windows display language was selected:
-
The following message is displayed under the Language section in the Time & language > Language & region window prompting to sign out of Windows:
Windows needs to sign you out in order to apply your new display language.
To sign out of Windows, select the Sign out button next to the message.
Note: If there’s no Sign out button next to the message, then manually sign out by right-clicking on the Start menu and then selecting Shutdown or sign out > Sign out.
-
At the Windows sign-on screen, sign back into Windows. The Windows display language is applied and changes the selected display language.
Warning: When the Windows display language is changed, it might also change the keyboard layout to match the language. The input language icon at the sign-on screen shows the currently selected keyboard layout. Be aware of the possible different keyboard layout when entering the username and password at the Windows sign-on screen.
If necessary, use the password reveal icon in the password box to verify that the password is being entered correctly with the current keyboard layout. The keyboard layout can be changed from the sign-on screen using the input language icon.
Changing the keyboard layout only changes the layout and doesn’t change the Windows display language.
-
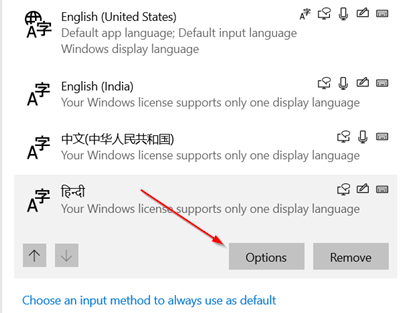
Note: A single language edition of Windows might be installed if one of the following messages is displayed when trying to add a language pack:
Only one language pack allowed.
Your Windows license supports only one display language.
For more information, see Check whether a version of Windows supports multiple languages.
The Windows display language determines the language used by the Windows user interface. It also determines the language used by Windows features such as the Settings app and File Explorer.
Changing the Windows display language also causes the selected language to move to the top of Preferred languages list. The first supported language in the Preferred languages list determines the language used by Microsoft Store apps and websites.
Important: Some languages aren’t fully localized. For languages that aren’t fully localized, some elements in Windows might still appear in the first language that is fully localized in the Preferred languages list.
To change the Windows display language:
-
Ensure that Windows already has the desired language installed before switching to it. To check what languages are currently installed in Windows, follow the section Check what languages are installed in Windows in this article. If the desired language isn’t currently installed, follow the section Install a language pack in this article.
-
Save all work and close out of any open apps.
-
In the Time & language > Language & region window, under the Language section, select the desired Windows display language in the drop-down menu next to Windows display language.
Tip: If the desired display language isn’t displayed in the Windows display language drop-down menu, see the section Install a language pack in this article to install the language.
-
The following message is displayed under Windows display language:
Windows needs to sign you out in order to apply your new display language.
To sign out of Windows, select the Sign out button.
Note: If there’s no Sign out button next to the message, then manually sign out by right-clicking on the Start menu and then selecting Shutdown or sign out > Sign out.
-
At the Windows sign-on screen, sign back into Windows. The Windows display language is applied and changes to the selected display language.
Warning: When the Windows display language is changed, it might also change the keyboard layout to match the language. The input language icon at the sign-on screen shows the currently selected keyboard layout. Be aware of the possible different keyboard layout when entering the username and password at the Windows sign-on screen.
If necessary, use the password reveal icon in the password box to verify that the password is being entered correctly with the current keyboard layout. The keyboard layout can be changed from the sign-on screen using the input language icon.
Changing the keyboard layout only changes the layout and doesn’t change the Windows display language.
Changing the Windows display language changes the language used by the Windows user interface and Windows features such as the Settings app and File Explorer. By default, it also changes the language used by Microsoft Store apps and websites by moving the selected Windows display language to the top of the Preferred languages list. For more information, see the section Change the Windows display language in this article.
However, the language used by Microsoft Store apps or websites can be controlled independently of the Windows display language. For example, the Windows display language can be in one language, while the language used by Microsoft Store apps or websites can be in another. The first supported language in the Preferred languages list determines the language used by Microsoft Store apps and websites.
To change the language used by Microsoft Store apps and websites:
-
In the Time & language > Language & region window, the current preferred order of the installed languages is shown under Preferred languages in the Language section.
-
To move the desired language for Microsoft Store apps and websites to the top of the Preferred languages list, select the language and then drag it to the top of the list. Observe how moving the language to the top of the Preferred languages list doesn’t affect the language selected as the Windows display language.
-
If desired, reorder the preference of other installed languages by selecting the language and then dragging it to the desired location in the Preferred languages list.
To install speech features for a language:
-
Since speech features are downloaded via the Internet, make sure that the Windows device is connected to the Internet.
-
Make sure that the language where speech is going to be used is set as the display language.
-
In the Time & language > Language & region window, under the Language section, select the ellipses next to the current Windows display language and then select Language options.
-
In the Time & language > Language & region > Options window, under the Language Features section, select the Download button next to each desired speech features that should be installed. For example:
-
Text-to-speech.
-
Basic Speech recognition.
-
Enhanced speech recognition.
Note: Not all languages have speech features. If some or all of the above features aren’t available as an option, that language doesn’t have those speech features.
-
Adding a keyboard layout allows selection of an alternate keyboard layout for the current Windows display language. Alternate keyboard layouts allow directly entering of characters using the keyboard or input device that aren’t available in the current Windows display language’s keyboard layout. For example, characters only found in other languages.
Note: A full language pack that matches the language of the desired keyboard layout doesn’t always need to be installed to gain access to that keyboard layout. All languages, including the current Windows display language, have keyboard layouts in various different languages. The current Windows display language might have the keyboard layout of the desired keyboard layout in a different language.
To add a keyboard layout:
-
In the Time & language > Language & region window, under the Language section, select the ellipses next to the current Windows display language and then select Language options.
-
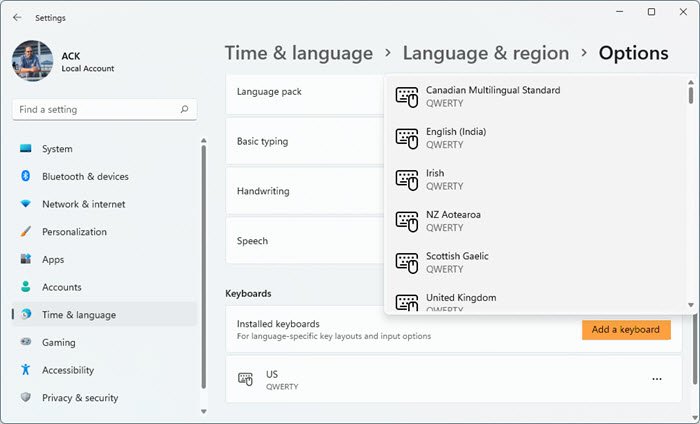
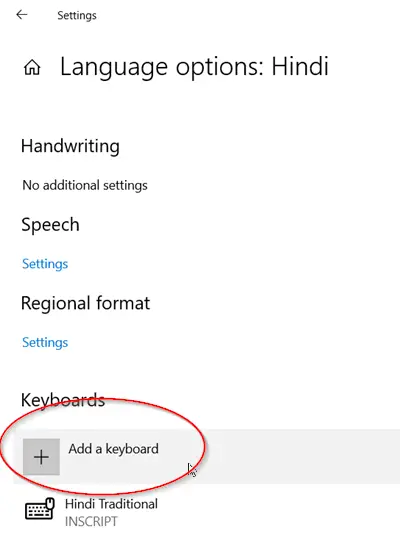
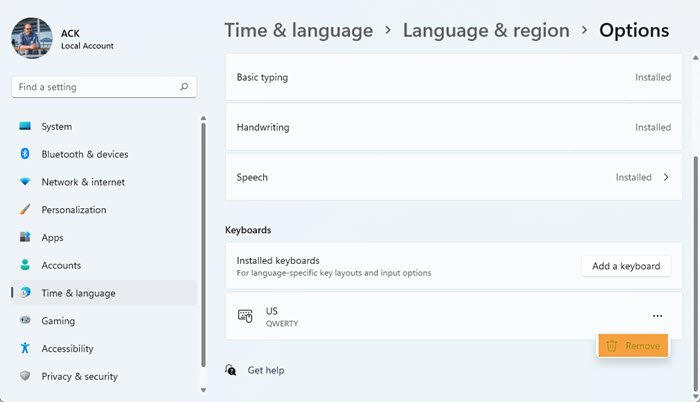
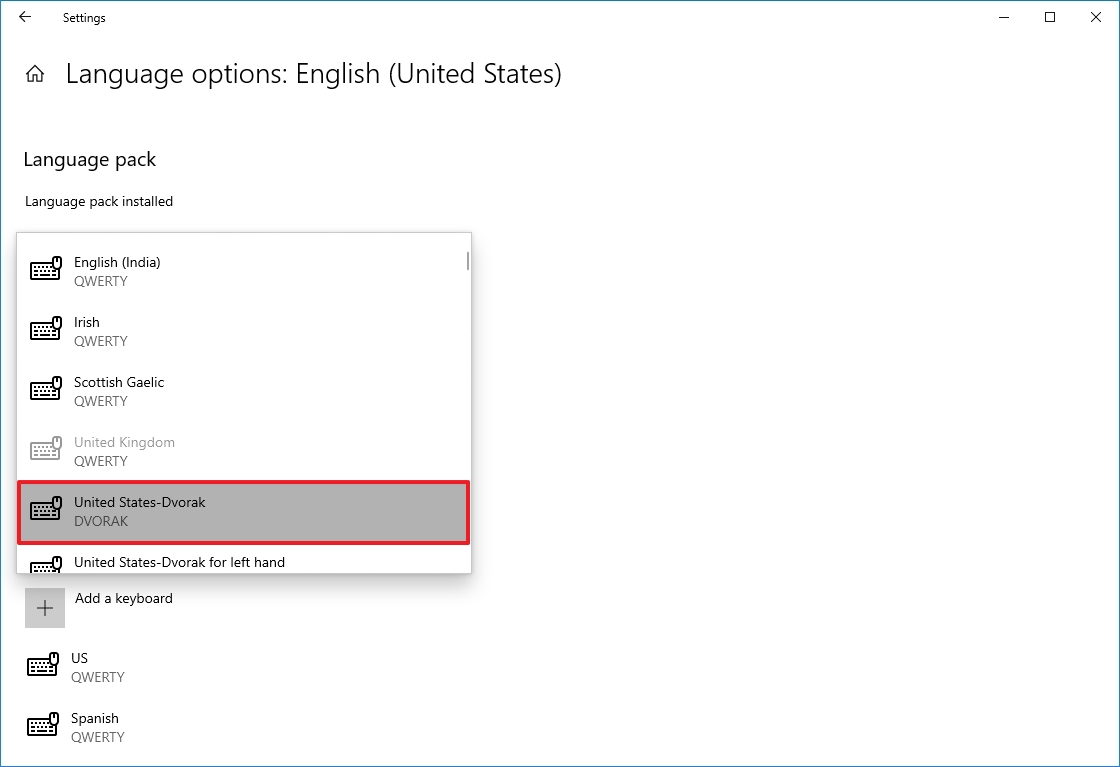
In the Time & language > Language & region > Options window, under the Keyboards section, verify that the desired keyboard layout isn’t already installed. If it’s not, then select the Add a keyboard button next to Installed keyboards.
-
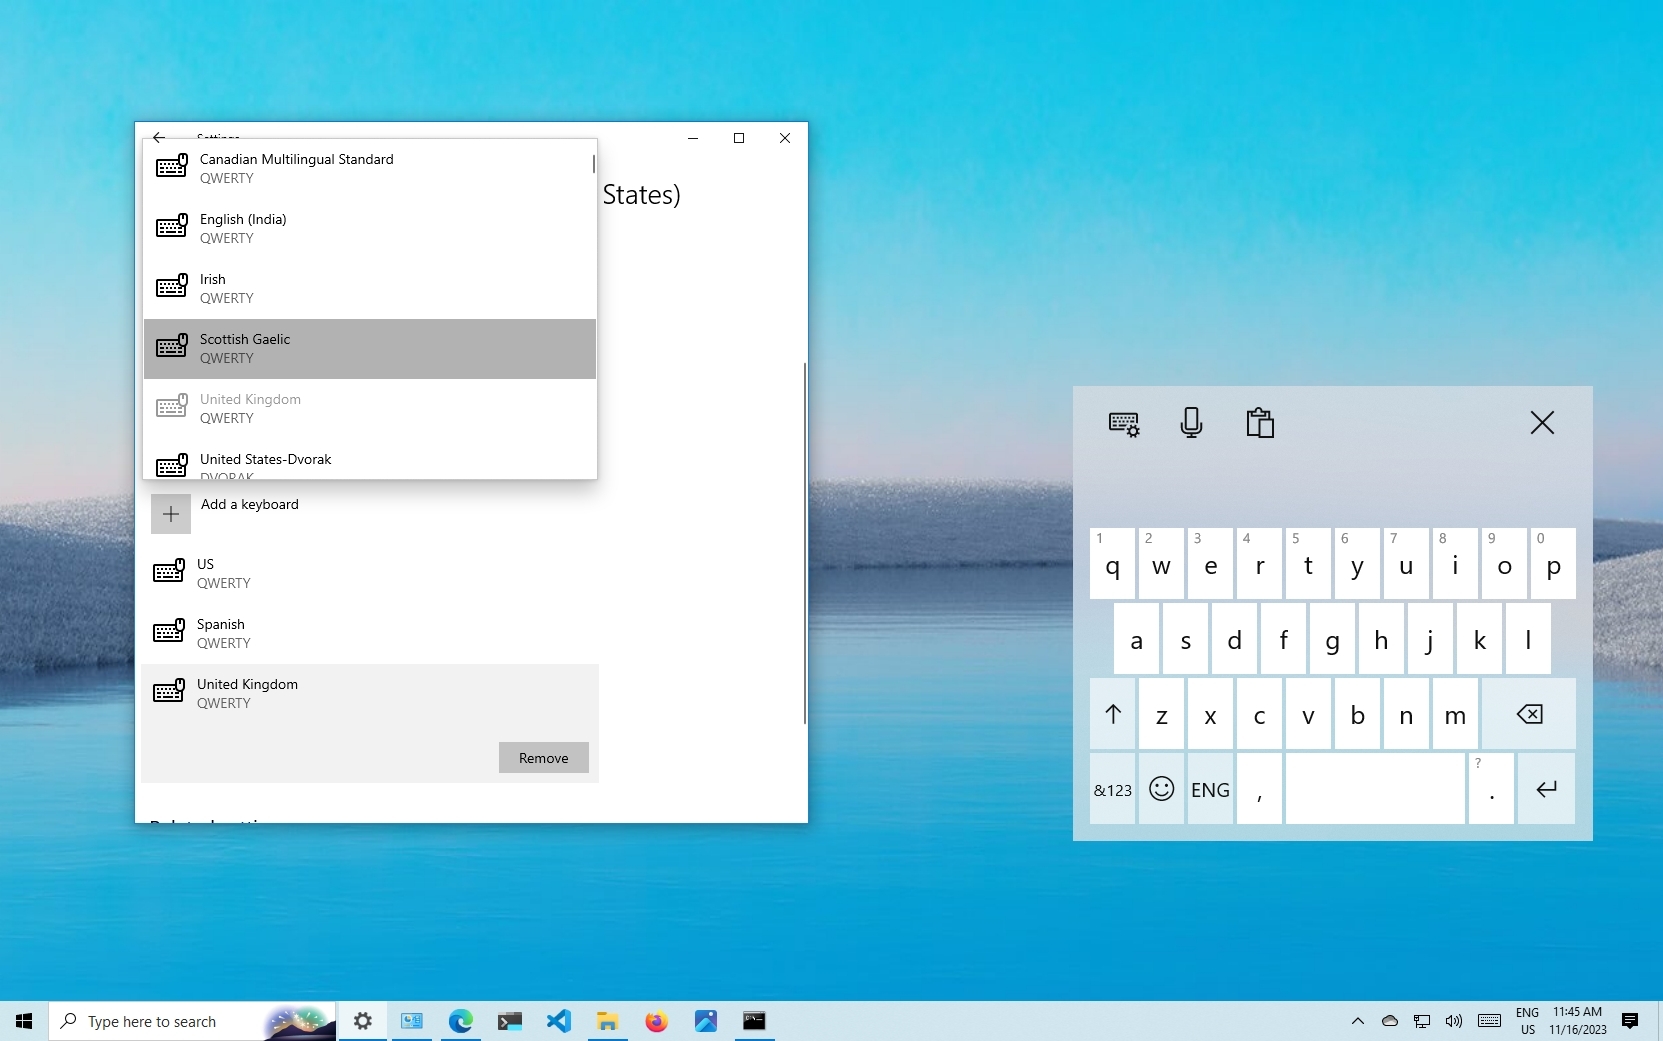
In the pop-up menu that appears, scroll through the list of keyboard layouts and then select the desired keyboard layout. The list is sorted first with the keyboard layouts from the selected language, and then alphabetically.
Important: If the desired keyboard layout isn’t listed, start this section over, but instead of the current Windows display language, select the language that matches the desired keyboard layout.
If the language that matches the desired keyboard layout isn’t installed, then follow the section Install a language pack in this article to install the language of the desired keyboard layout.
-
Once the desired keyboard layout is selected, it should display in the Time & language > Language & region > Options window under the Keyboards section. To switch to the keyboard layout that was installed, see Change the keyboard layout section in this article.
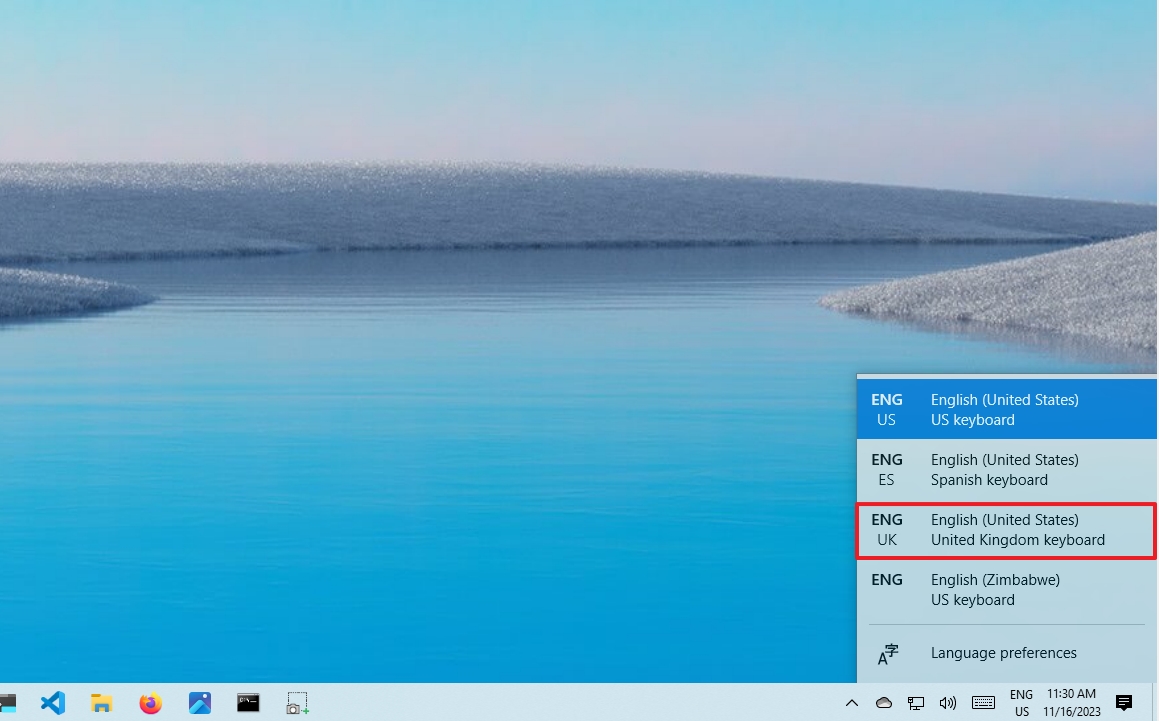
A keyboard layout can be selected from the input language icon in the system tray area of the taskbar. The input language icon displays the currently selected keyboard layout. To select a different keyboard layout:
-
In the system tray area of the taskbar, select the input language icon.
-
A pop-up menu is displayed with the available keyboard layouts. Select the desired keyboard layout.
-
The input language icon changes to the selected keyboard layout.
Tips: A keyboard layout can also be selected by holding down the Windows logo key on the keyboard and then selecting the Spacebar. Each selection of the Spacebar while holding down the Windows logo key cycles through the installed keyboard layouts. If selecting the Spacebar doesn’t do anything, only one keyboard layout is installed. To see what languages and keyboard layouts are currently installed in Windows, see the following sections in this article:
-
Check what languages are installed in Windows.
-
Add a keyboard layout.
If the desired keyboard layout isn’t available, follow the section Add a keyboard layout in this article.
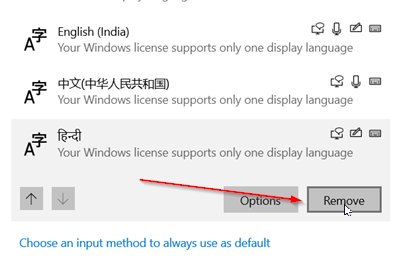
To remove a currently installed language pack:
-
In the Time & language > Language & region window, under the Language section, select the ellipses next to the language that needs to be removed and then select Remove.
Note: If the Remove button is greyed out, the selected language to be removed is the current Windows display language. Switch to another Windows display language before attempting to remove the language. For more information, see Change the Windows display language section in this article.
-
In the dialog box that appears, confirm removing the language by selecting the Yes button.
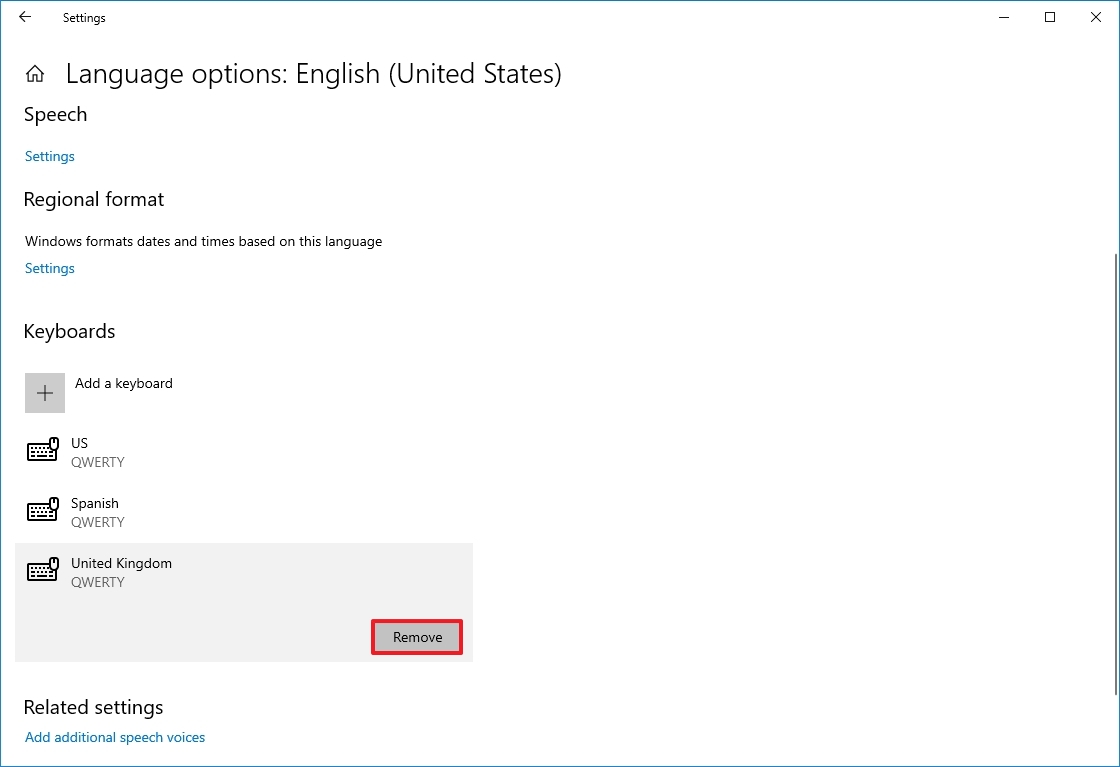
To remove a currently installed keyboard layout:
-
In the Time & language > Language & region window, under the Language section, select the ellipses next to the language that contains the keyboard that needs to be removed and then select Language options.
Note: Installed keyboard layouts aren’t always part of a matching language. The keyboard layout might be installed as part of the current Windows display language. Languages can contain keyboard layouts that aren’t the same language as the language pack.
For this reason, the keyboard layout can be located either under the current Windows display language or the language that matches the keyboard layout. If the keyboard layout to be removed isn’t under the current Windows display language, then check the language that matches the keyboard layout.
-
In the Time & language > Language & region > Options window, under the Keyboards section, select the ellipses next to the keyboard that needs to be removed and then select Remove.
Note: If the Remove button is greyed out, the selected keyboard layout is the only installed keyboard layout for the current Windows display language. Add another keyboard layout before attempting to remove the keyboard layout. For more information, see Add a keyboard layout section in this article.
The input language icon in the system tray area of the taskbar allows selection of keyboard layouts. By default, the input language icon is enabled and displays in the taskbar. For more information, see the Change the keyboard layout section of this article.
An alternative to the input language icon is the legacy language bar found in previous versions of Windows. If the legacy language bar is enabled, then the input language icon in the taskbar is disabled and no longer displays. To reenable the input language icon and display it in the taskbar, follow these steps:
-
Select Start and then select Settings > Time & language > Typing .
Or
Select the following Time & language > Typing shortcut:
Open Time & language > Typing
-
In the Time & language > Typing window, select Advanced keyboard settings.
-
In the Time & language > Typing > Advanced keyboard settings window, under Switching input methods, uncheck the option Use the desktop language bar when it’s available.
Warning: Unchecking the option Use the desktop language bar when it’s available causes the input language icon to display again in the taskbar. However, it causes the legacy language bar to no longer display. If the legacy language bar is preferred over the input language icon, then leave the option Use the desktop language bar when it’s available enabled.
Additional options for the legacy language bar can be found under the Language bar options link in the Time & language > Typing > Advanced keyboard settings window.
Need more help?
Want more options?
Explore subscription benefits, browse training courses, learn how to secure your device, and more.
Download Windows Speedup Tool to fix errors and make PC run faster
On your Windows computer, you are presented with a lot of keyboard layouts as per your current Region. However, you are also provided with an option to add or remove the keyboard layout on your Windows 11/10 computer. In this guide, we will learn how to do the same.

Switching to different layouts enables you to type all the characters for the language, including diacritics [a sign, such as tilted ‘n’ (‘ñ‘, ‘Ñ‘), which when written above or below a letter indicates a difference in pronunciation from the same letter when unmarked or differently marked]. Follow the below steps to add or remove the keyboard layout in Windows 11/10.
In Windows 11 you see the Keyboard options here to add a Keyboard layout:
- Press Win+I to open Settings
- Select Time & Language
- Click on Language and Region
- Under Languages, click on the three dots associated with the current language and select Language options.
- Go to the Keyboards section, and click on Add a keyboard.
- Select one from the available options.
How to add Keyboard layout in Windows 10
In Windows 10, follow these steps:
- Open Settings
- Click Time & language
- Under its section, select Language
- Here Add or select a language
- Finally, Install or remove the keyboard layout
You can also choose to change a keyboard layout on Windows 10 but you need to have more than one added to it first. Now let us see the procedure in detail.
1] Open Windows 10 Settings
Hit the Windows key located in the lower-left corner of your computer screen and select the ‘Settings’ option.
Choose the ‘Time & language’ tile. Under its section, select the ‘Language’ option.
2] Add or select a language

Next, under the ‘Preferred Languages’ section visible on the right, choose ‘Add a preferred language’.
Choose the language you are looking to add and hit the ‘Next’ button. You can use the search box provided to find the desired language faster.
3] Install or remove the layout
Choose the language features you would like to install. If you are not intending to install some of the language features shown there, uncheck the box marked against these options and press the ‘install’ button.
Once installed, go to the Windows display language section, select the language, and choose ‘Options’.
Next, from the ‘Language Options’ window that opens, choose the ‘Add a keyboard’ option.
How to remove Keyboard layout in Windows 11/10
In Windows 11, open Settings, go to Time & language > Language & region, then from the Language section, click on the three associated with the current language, go to Keyboard, click on the three dots associated with the layout you want to remove, and click on Remove.
In Windows 10, to remove the layout, simply go to the Windows display language section again and select the layout. Hit the ‘Remove’ button.
That’s it! This way you can choose to add or remove the keyboard layout in Windows 11/10.
Related reads:
- How to change Windows Keyboard Layout
- Windows keyboard language changes on its own
- Windows keeps adding Keyboard layouts without permission.
How do I add a second keyboard layout in Windows 11?
You can add as many keyboard layouts as you want in Windows 11, all you have to do is, go to Settings > Time & language > Language & region, then from the Language section, click on the three dots associated with the language, go to Keyboards, and click on Add a keyboard.
Also Read: Reset Keyboard settings to default in Windows.
A post-graduate in Biotechnology, Hemant switched gears to writing about Microsoft technologies and has been a contributor to TheWindowsClub since then. When he is not working, you can usually find him out traveling to different places or indulging himself in binge-watching.
(Image credit: Future)
On Windows 10, in the initial setup, you usually get prompted to configure additional keyboard layouts. However, you can always add or remove layouts if you don’t choose the correct setting or must type in another language.
Typically, changing the input settings is uncommon, but there are many situations when you might need to. For instance, sometimes you may need to switch to the Spanish layout to write words that include special characters like «Ñ,» or prefer a different layout, such as the United States-Dvorak.
Whatever the reason it might be, Windows 10 ships with easy settings to add, remove, and change layouts for hardware and touch keyboards.
In this how-to guide, I will walk you through the steps to manage keyboard layouts on Windows 10.
How to add keyboard layout on Windows 10
To add a new keyboard layout on Windows 10, use these steps:
- Open Settings.
- Click on Time & Language.
- Click on Language.
- Under the «Preferred languages» section, select the current default language.
- Click the Options button.

- Under the «Keyboards» section, click the «Add a keyboard» button.
- Select the new keyboard layout to add to Windows 10.
- Repeat steps 6 and 7 to add more layouts.
Once you complete the steps, the new keyboard layout will be added to the device, and you can switch between them using the instructions below.
How to change keyboard layout on Windows 10
While changing layouts is straightforward, it’ll reconfigure some of the keyboard keys, which means some of the keys may print a different character depending on the layout.
All the latest news, reviews, and guides for Windows and Xbox diehards.
To switch between keyboard layouts on Windows 10, use these steps:
- Click the Input Indicator icon in Taskbar (bottom right).
- Select the new keyboard layout.
- Repeat steps 1 and 2 to switch back to the default layout.
After you complete the steps, you can start typing with the new keyboard layout.
Enable Input Indicator
If the Input Indicator is not present in the Taskbar, you can enable it through the Settings app.
To enable the Input Indicator on Windows 10, use these steps:
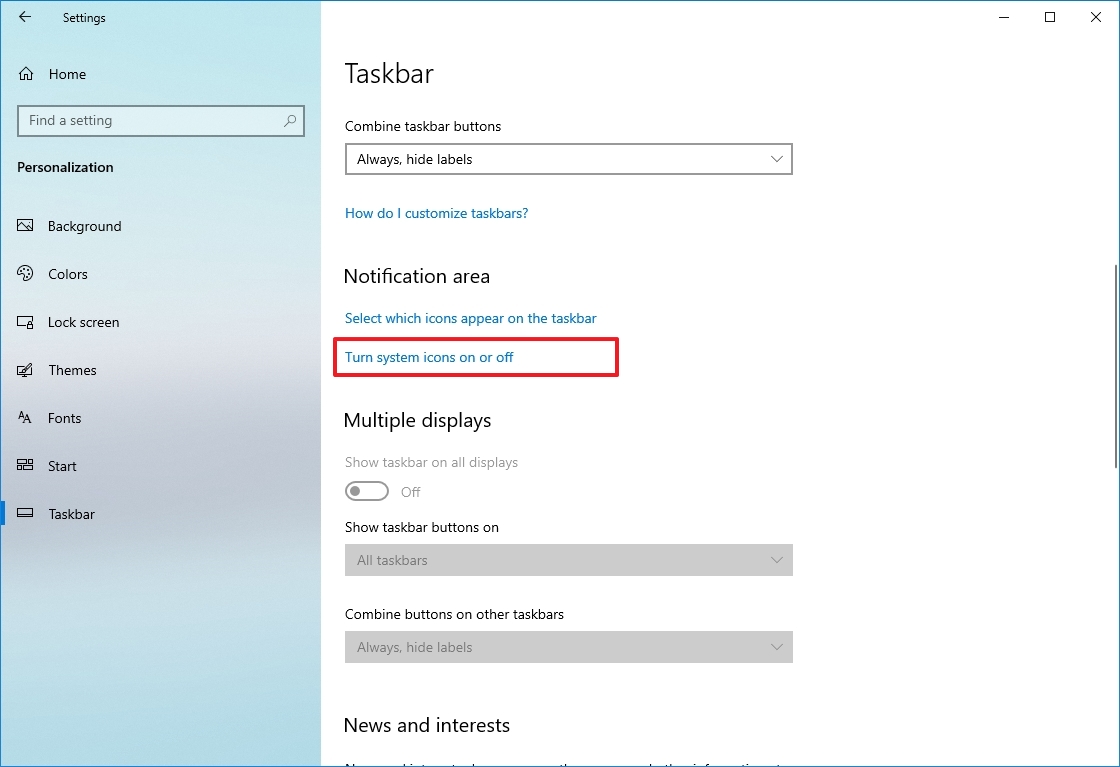
- Open Settings.
- Click on Personalization.
- Click on Taskbar.
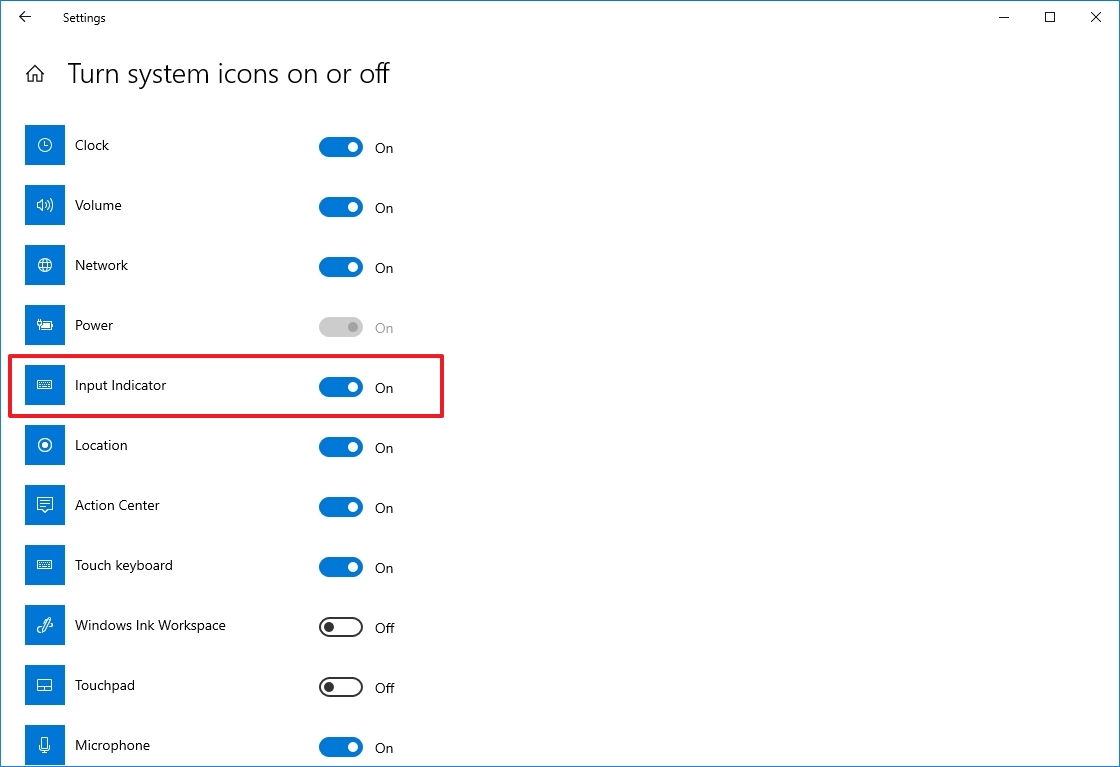
- Under the «Notification area» section, click the «Turn system icons on or off» option.
- Turn on the Input Indicator toggle switch.
Once you complete the steps, the icon will appear in the Taskbar’s notification area to access the layouts and switch between them. You can also use the «Windows key + Spacebar» keyboard shortcut to cycle between the available keyboard layouts quickly.
How to remove keyboard layout on Windows 10
To remove a keyboard layout on Windows 10, use these steps:
- Open Settings.
- Click on Time & Language.
- Click on Language.
- Under the «Preferred languages» section, select the current default language.
- Click the Options button.
- Under the «Keyboards» section, select the keyboard to remove from the list.
- Click the Remove button.
- Repeat steps 6 and 7 to remove additional layouts.
Once you complete the steps, the keyboard layout will be removed from the device.
More resources
For more helpful articles, coverage, and answers to common questions about Windows 10 and Windows 11, visit the following resources:
- Windows 11 on Windows Central — All you need to know
- Windows 10 on Windows Central — All you need to know
Mauro Huculak has been a Windows How-To Expert contributor for WindowsCentral.com for nearly a decade and has over 15 years of experience writing comprehensive guides. He also has an IT background and has achieved different professional certifications from Microsoft, Cisco, VMware, and CompTIA. He has been recognized as a Microsoft MVP for many years.
If you have installed the Windows 10 Build 17063 and up, you would notice that the classic Control Panel options is replaced with a new settings page.
This new feature allows users to customize their keyboard layout, which is more ideal if you want to change your display language. It also offers speech recognition and text-to-speech feature.
The Keyboard layout on Windows 10 gives you more options when you want to use more than one unit language.
You can also use alternative keyboard layouts and not just the usual QWERTY layout. There are different things you can do with the new feature in Windows 10.
So, if you want to customize your settings, all you have to do is to add or remove a keyboard layout.
How to Add a Keyboard Layout on Windows 10

Installing a New Language
- To add a keyboard layout, first, you need to install a language you prefer by going to Settings.
- Next, select Time & Language.
- Click Language.
- Go to the right side of the screen and look for “Add a preferred language” button under “Preferred Languages”.
- Next, look for the language that you want to add. Click on your preferred language and click Next.
- If you don’t want to install some of the language features, simply uncheck the checkbox next to it.
- Click Install.
- Your new language will be installed and you will find the language indicator in the taskbar.

Adding a Keyboard Layout
- To add the keyboard layout, click on the Options button of your preferred language (Seen in the first image above).
- Under the Keyboards section, click on the “Add a keyboard” button.

Removing a Keyboard Layout on Windows 10
If you want to remove a particular keyboard layout in Windows 10, you can do so using the following steps:
- In the Settings app go to the Time & Language section.
- Click Language.
- Next, look for Preferred Languages and click on the language that you want to remove.
- Select Options.
- Click Keyboards and select Remove.

Another option to remove a keyboard layout is through the Registry Editor.
- First, launch the Run dialog box by pressing Windows key + R.
- Type regedit to open the Registry Editor.
- Next, navigate to these registry keys to launch the list of keyboard installed.
- HKEY_USERS.DEFAULT\Keyboard Layout\Preload
- HKEY_CURRENT_USER\Keyboard Layout\Preload
- HKEY_USERS.DEFAULT\Control Panel\International\User Profile
- HKEY_USERS.DEFAULT\Control Panel\International\User Profile System Backup
- In the list of Keyboard Identifiers, look for the key that you want to delete.
- Click to remove.
Changing a Keyboard Layout on Windows 10
You also have the option to change your keyboard layouts. However, take note that it will reconfigure some of your keys, which may result in creating a different character in the output. If you want to change a keyboard layout, press Windows key + Spacebar and change the layouts.
Did the article help you? Let us know if the methods above helped you add and remove the keyboard layouts on your Windows 10.
Windows Dispatch is a website supported by its readers & community. Some pages may contain affiliate links which may allow us to earn a little money when you buy through them.
Aileen G. M.
A technology writer with a degree in Business Administration majoring in Marketing. Aileen loves creating helpful but simple guides for troubleshooting and fixing complex issues on today’s gadgets and services.
Managing multiple keyboard layouts in Windows enables users to type in different languages and customize their input methods. Adding keyboard layouts through Group Policy Objects (GPO) allows administrators to deploy standardized language settings across an organization’s computers. This process uses registry keys to control keyboard layouts and language preferences.
The Windows registry stores keyboard layouts in the HKEY_CURRENT_USER\Keyboard Layout\Preload path. Each layout gets assigned a priority number, with “1” being the default layout. These settings can be managed centrally through GPO to ensure consistent language support across all domain computers.
How to Add Keyboard Layouts in Windows
Whether you’re multilingual, learning a new language, or just prefer an alternate keyboard setup like Dvorak or Colemak, Windows makes it easy to add and switch between different keyboard layouts. Here’s a step-by-step guide for Windows 10 and Windows 11 users.
1. Open the Settings App
Start by opening Settings:
- Press Windows key + I to open the Settings window.
- Alternatively, click the Start Menu and select Settings (the gear icon).
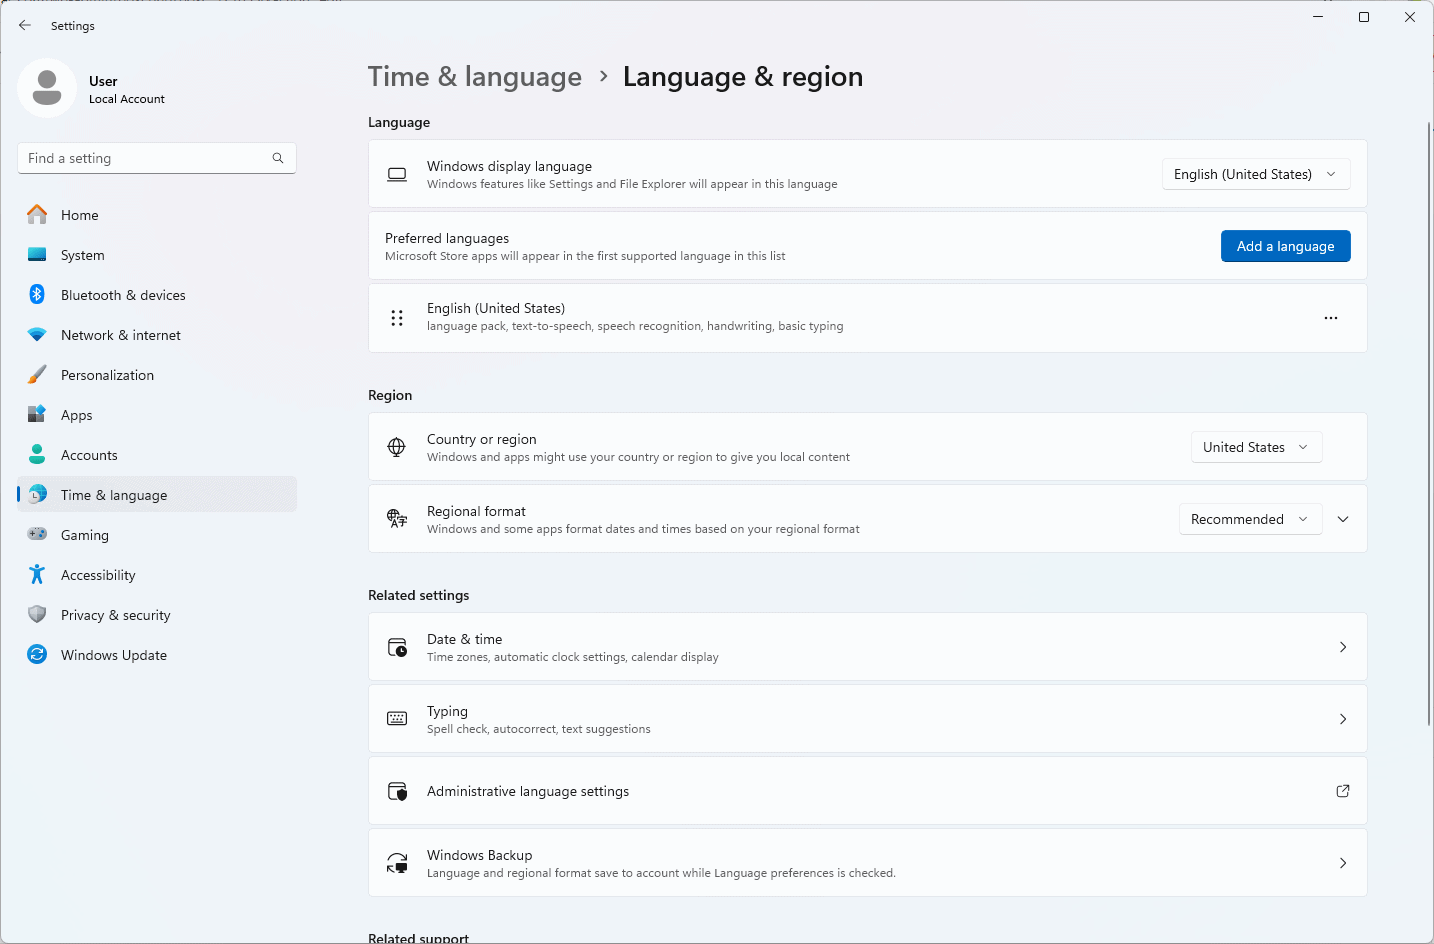
2. Navigate to Language Settings
Once in Settings:
- Click on Time & Language.
- Select Language (on Windows 10) or Language & Region (on Windows 11).
3. Choose Your Preferred Language or Add a New One
If you already have the language installed:
- Under Preferred languages, select your language and click Options.
- In the Keyboards section, click Add a keyboard.
- Choose the layout you want (e.g., US-Dvorak, Canadian French, Arabic 101).
If the language isn’t installed yet:
- Click Add a language.
- Search for the desired language, select it, and click Next.
- Choose whether to set it as your display language, then install.
- After installation, repeat the steps above to add a keyboard layout.
4. Switch Between Keyboard Layouts
You can now switch between keyboard layouts easily:
- Press Windows key + Spacebar to toggle between layouts.
- Or click the language icon on the taskbar (bottom right corner) and choose the layout you want.
5. Remove a Keyboard Layout (Optional)
To tidy up or remove unused layouts:
- Go back to the Language settings.
- Select your language > Options.
- Under Keyboards, click the layout you want to remove, then hit Remove.
Adding multiple keyboard layouts can improve your productivity and comfort, especially if you type in different languages or prefer alternative input styles. With quick toggling and customization options built into Windows, switching between layouts is seamless and hassle-free.
Key Takeaways
- Group Policy Objects control keyboard layouts through specific registry keys
- Multiple keyboard layouts can be assigned different priority levels
- Windows supports centralized deployment of keyboard settings across domain computers
Managing Keyboard Layouts in Windows
Windows supports multiple keyboard layouts, letting users type in different languages and character sets. The operating system provides built-in tools to add, remove, and customize keyboard configurations through both the Settings app and system registry.
Adding and Configuring Keyboard Layouts
Users can add new keyboard layouts through Windows Settings. To begin, open Settings and select Time & Language.
Select Language & Region, then click the three dots next to the preferred language. Choose Language Options from the menu.
The Keyboards section displays all currently installed layouts. Click “Add a keyboard” to view available options.
Windows shows a keyboard indicator in the taskbar after adding multiple layouts. Users can switch between layouts using Win + Space or clicking the language indicator.
Common layouts include QWERTY (US), AZERTY (French), and QWERTZ (German). Each layout matches specific language typing needs.
Removing Unwanted Keyboard Layouts
Open Windows Settings and navigate to Time & Language > Language & Region.
Click the three dots next to the language containing the unwanted keyboard layout. Select Language Options.
In the Keyboards section, locate the layout to remove. Click the minus (-) icon or remove button next to it.
The system prevents removing the last remaining keyboard layout. At least one layout must stay active.
Keyboard Layouts and System Registry
Keyboard layouts are stored in the Windows Registry under HKEY_CURRENT_USER\Keyboard Layout\Preload.
Each layout has a unique identifier code. For example, “00000409” represents US English QWERTY.
Registry modifications require careful attention. Incorrect changes can affect keyboard functionality.
The system stores additional layout data in HKEY_LOCAL_MACHINE\SYSTEM\CurrentControlSet\Control\Keyboard Layouts.
Creating Custom Keyboard Layouts
Microsoft Keyboard Layout Creator lets users build custom layouts. This tool works on Windows 10 and 11.
Users can modify existing layouts or create new ones from scratch. The tool supports key remapping and special character assignments.
Custom layouts need proper testing before deployment. Export the finished layout as an installation package.
The tool generates files needed for system-wide installation. Users must have administrative rights to install custom layouts.
Custom layouts appear in Windows Settings like standard options after installation.
Frequently Asked Questions
Keyboard customization and domain management offer extensive options for personalized text input across devices and platforms. Multiple keyboard layouts and language support enhance productivity for users working across different domains.
How can I install additional keyboards on my Android device?
Users can add new keyboards through Android Settings > System > Languages & Input > Virtual Keyboard. Tap “Manage keyboards” and toggle on desired keyboard options.
The Play Store offers many third-party keyboard apps with additional features and language support.
What are the steps to add a new keyboard language on a Samsung smartphone?
Open Settings and navigate to General Management > Keyboard list and default. Select “Samsung Keyboard” settings.
Tap “Languages and types” to see available options. Choose desired languages and tap “Done” to save changes.
How does one create custom keyboard shortcuts for specific domain-related tasks?
Windows users can set custom shortcuts through Settings > Keyboard > Custom Shortcuts. Enter the desired key combination and assign the specific action.
For domain-specific tasks, IT administrators can deploy group policies to standardize shortcuts across network computers.
What is the process for adding a domain to the Android keyboard dictionary?
Access keyboard settings and locate the “Dictionary” or “Text correction” options. Select “Personal dictionary” to add custom words.
Enter domain-specific terms and optional shortcuts. The keyboard will suggest these words during typing.
How to manage multiple keyboard layouts on a single device?
Use the language bar or keyboard switcher icon to toggle between installed layouts. The Alt + Shift shortcut switches between keyboards on most systems.
Create separate profiles for different domains to maintain organized keyboard settings.
Can keyboard settings be synchronized across different domains or applications?
Microsoft accounts can sync keyboard preferences across Windows devices when signed into the same domain.
Cloud keyboard services store user dictionaries and custom settings, enabling consistent typing experiences across connected devices.