
To find the network interface name in Windows Command Prompt, use the command `getmac` or `ipconfig` to display the interface names along with their corresponding MAC or IP addresses.
getmac
or
ipconfig
Understanding CMD and Network Interfaces
What is CMD?
Command Prompt (CMD) is a command-line interpreter available in various Windows operating systems. It allows users to execute commands to perform various system tasks, from simple file manipulations to more complex network configurations. CMD is a powerful tool for both novice users and advanced system administrators, enabling users to interact with the system directly and automate tasks through scripting.
What is a Network Interface?
A network interface refers to a hardware or software component that allows a device to connect to a network. In the context of computers, it typically represents the point at which the computer interfaces with networking hardware (such as a network card) or virtual interfaces (like software-based connections).
Network interfaces can be broadly classified into two categories:
- Wired interfaces (e.g., Ethernet) connect through physical cables and provide a stable connection.
- Wireless interfaces (e.g., Wi-Fi) connect without cables, offering flexibility but with potential disruptions.
How to Reset Network Settings Windows 11 Cmd Effortlessly
Launching CMD
How to Access Command Prompt
To find the network interface name in Windows CMD, you first need to access the command prompt. Here’s how you can do that:
-
Using the Start Menu: Click on the Start menu, type “cmd” or “Command Prompt” in the search bar, and hit enter. A CMD window will open.
-
Using Run dialog: Press Windows Key + R to open the Run dialog. Type “cmd” and press Enter. This will launch the Command Prompt.
Additionally, if you need administrative privileges for certain commands, right-click on the Command Prompt icon and select “Run as administrator.”
How to Get Battery Serial Number from Cmd
Finding the Network Interface Name
Using the `ipconfig` Command
The `ipconfig` command is a vital tool for network diagnostics in Windows. This command provides information about your network configuration and allows you to view the details of each network interface.
-
Command Example:
ipconfig /all -
When you execute this command, you will see a wealth of information about your network interfaces. Look for the section labeled “Ethernet adapter” or “Wireless LAN adapter,” depending on your connection type.
-
What to Look For: The names of network interfaces are typically listed under “Description.” For instance, you might see an entry that says “Wi-Fi” or “Ethernet,” denoting the respective interfaces in your system.
In the output, you’ll also find essential details about each interface, such as the IPv4 Address and Subnet Mask, which can help you further understand your network setup.
Using the `Get-NetAdapter` Command (Windows PowerShell)
Alternatively, if you prefer using PowerShell, the `Get-NetAdapter` command provides an efficient way to view interface information. PowerShell is often utilized for its enhanced scripting capabilities.
-
Command Example:
Get-NetAdapter -
Upon execution, this command displays a list of all network adapters configured on your system. You will see columns like «Name,» «Status,» and «Mac Address.»
-
Detailed Output Explanation: The Name column directly correlates to the network interface name you’re looking for. For example, it may show names like “Wi-Fi” for wireless connections or “Ethernet” for wired connections, along with their operational status (Up or Down), helping you quickly ascertain which interfaces are active.
Exploring the `netsh` Command
The `netsh` command is another powerful tool that aids in network configuration and communication troubleshooting.
-
Command Example:
netsh interface show interface -
Running this command provides a concise output showing the interfaces on your system along with their statuses.
-
Interpreting the Output: Focus on the column labeled “Interface Name” to find the network interface names. The status will tell you whether an interface is connected or disconnected, which can be particularly useful in troubleshooting scenarios.
How to Get Laptop Serial Number from Cmd: A Quick Guide
Advanced Tips and Tricks
Filtering Results
If you have multiple interfaces and want to narrow your search, the `findstr` command can filter the output effectively.
- Using findstr Example:
ipconfig /all | findstr /C:"Description" - This command will return only the lines in the `ipconfig` output that contain the word “Description,” thus allowing you to focus directly on network interface names.
Saving Output to a File
For further analysis or documentation, you might want to save the output of your commands into a text file.
- Using Redirection Example:
ipconfig /all > network_info.txt - This command creates a file named `network_info.txt` in the current directory, containing the output of the `ipconfig /all` command. You can then review or share this file as needed.
How to Unlock Administrator Account in Windows 10 Using Cmd
Troubleshooting Common Issues
When trying to find your network interface names in CMD, you may encounter common errors:
-
No interfaces found: This could happen if the network drivers are not installed or if the network interfaces are disabled. Ensure that your network adapters are working correctly and enabled in device settings.
-
Access Denied: If certain commands require administrative privileges, make sure you are running CMD as an administrator.
For troubleshooting, verify your network connections and consider updating network drivers through the Device Manager.
How to Run Cmd as Administrator in Windows 11
Conclusion
Knowing how to find network interface names in Windows CMD is crucial for effective network management and troubleshooting. Whether you prefer using `ipconfig`, `Get-NetAdapter`, or `netsh`, mastering these commands can help you navigate your network settings with confidence.
How to Install Python on Windows 11 Using Cmd
Additional Resources
For further reading and detailed documentation on CMD commands, visit the official Microsoft documentation. You can also explore community forums and tutorials that delve into CMD networking and scripting techniques.
How to Get Wifi Password Using Cmd Windows 11
FAQ Section
What are the differences between PowerShell and CMD?
PowerShell offers enhanced capabilities, incorporating both command-line features and a scripting language, enabling more complex tasks than CMD. CMD is more straightforward and often used for basic tasks, whereas PowerShell excels in automation and managing system complexities.
Can I find interface names on older versions of Windows?
Most commands discussed are compatible with older versions of Windows, though command syntax may vary slightly. It’s important to check related documentation for those specific versions.
Are there graphical alternatives to find network interface names?
Yes, Windows provides a graphical interface to view network settings, which can be accessed through Control Panel > Network and Sharing Center > Change adapter settings. This method can be more user-friendly for those less familiar with command-line tools.
The ipconfig command is used in Windows to display information about a computer’s network interfaces.
Basic Use
To execute the ipconfig command open the Windows Command Prompt (cmd) and type ipconfig. The command will display information about each of the network interfaces (NICs) on the computer. Here is the output for a single network interface:
C:\>ipconfig

Windows IP Configuration

Wireless LAN adapter Wi-Fi:

   Connection-specific DNS Suffix  . : xyz.st.provider.net.
   IPv6 Address. . . . . . . . . . . : 2601:0:4501:0:f064:0:d977:505f
   Temporary IPv6 Address. . . . . . : 2601:0:4501:0:648b:0:1531:fae6
   Temporary IPv6 Address. . . . . . : 2601:0:4501:0:8916:0:f988:98d
   Link-local IPv6 Address . . . . . : fe80::f064:4a1a:0:0f%5
   IPv4 Address. . . . . . . . . . . : 192.168.0.11
   Subnet Mask . . . . . . . . . . . : 255.255.255.0
   Default Gateway . . . . . . . . . : fe80::0:7eff:0:0%5
                                       192.168.0.1
The default output includes information on the interface’s IP addresses, subnet mask, and default gateway (router). To obtain additional information such as DHCP and DNS settings use the /all option. It will also display information about the physical interface such as the MAC address and device description:
C:\>ipconfig /all

Windows IP Configuration

Wireless LAN adapter Wi-Fi:

   Connection-specific DNS Suffix  . : xys.st.provider.net.
   Description . . . . . . . . . . . : Intel(R) Dual Band
   Physical Address. . . . . . . . . : 01-02-03-04-05-06
   DHCP Enabled. . . . . . . . . . . : Yes
   Autoconfiguration Enabled . . . . : Yes
   IPv6 Address. . . . . . . . . . . : 2601:0:0:9630:f064:0:0:505f
   Temporary IPv6 Address. . . . . . : 2601:0:0:9630:0:f520:0:fae6
   Temporary IPv6 Address. . . . . . : 2601:0:0:9630:0:ab2b:0:98d
   Link-local IPv6 Address . . . . . : fe80::0:4a1a:0:505f%5
   IPv4 Address. . . . . . . . . . . : 192.168.0.11(Preferred)
   Subnet Mask . . . . . . . . . . . : 255.255.255.0
   Lease Obtained. . . . . . . . . . : Friday, April 16, 2021 10:14 AM
   Lease Expires . . . . . . . . . . : Sunday, April 18, 2021 1:16 PM
   Default Gateway . . . . . . . . . : 0::0:0:0:0%5
                                       192.168.0.1
   DHCP Server . . . . . . . . . . . : 192.168.0.1
   DHCPv6 IAID . . . . . . . . . . . : 75800000
   DHCPv6 Client DUID. . . . . . . . : 01-00-00-61-00-00-00-00-00-00-13
   DNS Servers . . . . . . . . . . . : 0:0:0::1
                                       0:0:0::2
                                       8.8.8.8
                                       1.1.1.1
   NetBIOS over Tcpip. . . . . . . . : Enabled
Common Ipconfig Options
The following table lists common options for the ipconfig command.
Using Ipconfig to Reset Your DHCP IP Address
If your network adapter is configured to obtain an IP address automatically using DHCP you can reset it by using the /release and /renew parameters for ipconfig.
C:\>ipconfig /release

C:\>ipconfig /renew
This will reset the IP address on all network interfaces on the computer. To reset the IP address of just one interface, provide its name as an argument. If the interface name contains spaces be sure to enclose it in quotes.
C:\>ipconfig /release "Wi-Fi"
One thing to note is that the interface name displayed by ipconfig is not necessarily the actual name of the interface. For example, if you try to use the name «Wireless LAN adapter Wi-Fi» to release the interface from the example above you will receive the following error:
C:>ipconfig /release "Wireless LAN adapter Wi-Fi"

Windows IP Configuration

The operation failed as no adapter is in the state permissible for
this operation.
To obtain a true list of the network interface names use the wmic command:
C:\>wmic nic get NetConnectionID
NetConnectionID

Ethernet
Wi-Fi
Bluetooth Network Connection
Note that the interface is actually called «Wi-Fi». That is the name you will need to use in ipconfig to release or renew the DHCP address for the interface.
Using Ipconfig to Display Your DNS Cache
In order to increase speed and efficiency computers often cache DNS information, at least for a short time period. You can use the /displaydns option for ipconfig to display your current DNS cache.
C:\>ipconfig /displaydns

Windows IP Configuration

forcesafesearch.google.com
    ----------------------------------------
    Record Name . . . . . : forcesafesearch.google.com
    Record Type . . . . . : 1
    Time To Live  . . . . : 56066
    Data Length . . . . . : 4
    Section . . . . . . . : Answer
    A (Host) Record . . . : 216.239.38.120
To delete all of your DNS cache entries (flush) you can use ipconfig’s /flushdns option.
C:>ipconfig /flushdns

Windows IP Configuration

Successfully flushed the DNS Resolver Cache.
Setting a Network Interface’s IP Address
While ipconfig lets you display information, it cannot be used to change an interface’s IP address. For that you can use the netsh command, however, the command is being deprecated by Microsoft, so you are better of using PowerShell.
First open PowerShell and type Get-NetIPConfiguration. Below is an example of the output for a single interface. Note the interfaces InterfaceIndex.
PS C:\> get-netipconfiguration

InterfaceAlias       : Wi-Fi
InterfaceIndex       : 5
InterfaceDescription : Intel(R) Dual Band
NetProfile.Name      : wifissid 3
IPv6Address          : 2601:0:0:9630:0:4a1a:0:505f
IPv4Address          : 192.168.0.11
IPv6DefaultGateway   : fe80::0:0:0:d58e
IPv4DefaultGateway   : 192.168.0.1
DNSServer            : 8.8.8.8
                       1.1.1.1
Next set the IP address, subnet mask, and default gateway for the interface using the New-NetIPAddress cmdlet:
PS C:\>New-NetIPAddress -InterfaceIndex 5 -IPAddress 192.168.0.100 -PrefixLength 24 -DefaultGateway 192.168.0.1
Here is a breakdown of the parameters used:
-InterfaceIndex: The index of the interface you want to update
-IPAddress: The IP address you want to assign to the interface
-PrefexLength: The number of bits used by the subnet mask
-DefaultGateway: The IP address of the computer’s default gateway (router)
Next you can use the Set-DnsClientServerAddress cmdlet to specify the DNS servers for the interface to use:
PS C:\>Set-DNSClientServerAddress -InterfaceIndex 5 -ServerAddresses ("8.8.8.8", "1.1.1.1")
Here is a breakdown of the parameters used:
-InterfaceIndex: The index of the interface you want to update
-ServerAddresses: A list of the DNS servers to assign to the interface
Links and Resources
-
Ipconfig documentation
-
Netsh documentation
-
Get-NetIPConfiguration documentation
-
New-NetIPAddress
-
Set-DNSClientServerAddress
Last Updated on September 30, 2024 by
With the Netsh command-line utility, you have a powerful tool at your disposal to configure and monitor your network interfaces, firewall, and other network-related settings. Here are 20 Netsh command examples, each with detailed explanations, to help you become a network management pro.
1. Display Network Interfaces
To see all of your network interfaces, use:
netsh interface show interface
This command lists all network interfaces on your system, showing their state, whether they’re connected, and if they’re admin enabled.
2. Assign a Static IP Address
Set a static IP for an Ethernet connection:
netsh interface ip set address "Ethernet" static 192.168.1.10 255.255.255.0 192.168.1.1
Replace “Ethernet” with your interface’s name, and the IP addresses with your desired static IP, subnet mask, and default gateway.
3. Switch to DHCP
To obtain an IP address automatically from a DHCP server:
netsh interface ip set address "Ethernet" dhcp
This command is useful when moving from a static IP to an automatic configuration.
4. Set a Static DNS Server
Define a specific DNS server for an interface:
netsh interface ip set dns "Ethernet" static 8.8.8.8
This sets Google’s DNS server as your primary DNS server.
5. Obtain DNS Automatically
To revert to obtaining DNS server addresses automatically:
netsh interface ip set dns "Ethernet" dhcp
This is useful when switching back to a dynamic network environment.
6. Add a Secondary DNS Server
Add a backup DNS server:
netsh interface ip add dns "Ethernet" 8.8.4.4 index=2
This adds Google’s secondary DNS server for redundancy.
7. Enable IP Forwarding
Turn on IP forwarding for an interface:
netsh interface ipv4 set interface "Ethernet" forwarding=enabled
This is particularly useful for setting up a machine as a router.
8. Reset TCP/IP Stack
To reset the TCP/IP stack:
netsh int ip reset resetlog.txt
This can resolve a multitude of network connectivity issues.
9. Export Interface Configuration
Save your interface configuration to a file:
netsh interface ip dump > interface_config.txt
This is a great way to back up your configuration before making changes.
10. Import Network Configuration
To apply a saved configuration:
netsh -f interface_config.txt
This command restores your network settings from a file.
11. Enable Windows Firewall
Turn on the firewall for all profiles:
netsh advfirewall set allprofiles state on
Security is paramount, and this ensures your firewall is active.
12. Block All Incoming Connections
To enhance security by blocking all unsolicited attempts to connect:
netsh advfirewall set allprofiles firewallpolicy blockinbound,allowoutbound
This setting is useful for a lockdown scenario.
13. Allow a Program Through the Firewall
Create an exception for a specific application:
netsh advfirewall firewall add rule name="Allow MyApp" dir=in action=allow program="C:Program FilesMyAppapp.exe"
Replace the path with the actual location of the executable you wish to allow.
14. Delete a Firewall Rule
Remove a previously added rule:
netsh advfirewall firewall delete rule name="Allow MyApp"
This is how you revoke access when it’s no longer needed.
15. Show Wireless Networks
List all available wireless networks:
netsh wlan show networks
A quick way to scan for Wi-Fi networks around you.
16. Connect to a Wireless Network
To connect to a known wireless network:
netsh wlan connect name="YourSSID"
Replace “YourSSID” with the actual network name.
17. Display Wireless Drivers
Check the wireless drivers installed:
netsh wlan show drivers
This can help troubleshoot wireless network issues.
18. Add Wi-Fi Profile from XML
Import a Wi-Fi profile from an XML file:
netsh wlan add profile filename="pathtowirelessprofile.xml"
This is useful for deploying network settings across multiple machines.
19. Delete Wi-Fi Profile
Remove a stored Wi-Fi profile:
netsh wlan delete profile name="YourSSID"
Use this to clear out old or unused Wi-Fi profiles.
20. View Current IP Configuration
To see your current IP settings:
netsh interface ipv4 show config
This provides a detailed view of your IP configuration.
By mastering these Netsh commands, you’ll be well-equipped to handle a wide range of network configurations and troubleshooting tasks. Remember to open the command prompt as an administrator to ensure these commands execute properly. With Netsh, you’re just a few keystrokes away from a fully customized network setup.
FAQ – Netsh Command Line
Q: How do you use the netsh command in Windows?
A: To use the netsh command in Windows, open Command Prompt or Windows PowerShell and enter the command you want to use, following the netsh syntax. For example, netsh interface ip show config displays the current IP configuration.
Q: What is the syntax for running netsh commands on a local area network adapter?
A: The syntax for running netsh commands on a local area network adapter involves specifying the context, such as netsh lan, followed by the operation you want to perform. For instance, netsh lan show profile will display a list of LAN profiles on your system.
Q: Can netsh commands be run on both Windows Server and Windows 10?
A: Yes, netsh commands can be run on both Windows Server and Windows 10 using Command Prompt or Windows PowerShell. The syntax and available commands may vary slightly depending on the version and configuration of the operating system.
Q: What is the purpose of using netsh trace in network troubleshooting?
A: The purpose of using netsh trace in network troubleshooting is to start a network trace that can help diagnose and capture network-related activities and issues. You can start a trace with netsh trace start and then stop it with netsh trace stop.
Q: How do I display a list of available netsh commands and their syntax?
A: To display a list of available netsh commands and their syntax, you can simply type netsh at the command prompt and then use the /? or help command. This will provide you with a list of contexts and commands that netsh supports.
Q: What features does the netsh firewall command manage in Windows?
A: The netsh firewall command is used to manage settings related to Windows Firewall and IPsec, allowing you to configure and display the current firewall settings, create or delete rules, and monitor network traffic that is filtered by the Windows Filtering Platform.
Q: How can I modify network configuration using netsh on a Windows network?
A: To modify network configuration using netsh on a Windows network, you must first determine the appropriate netsh context for the settings you wish to change, such as netsh interface ipv6. Then, use the specific commands within that context to modify settings, such as netsh interface ipv6 set address.
Q: Is it possible to configure wireless network settings using netsh commands?
A: Yes, it is possible to configure wireless network settings using netsh commands. For example, netsh wlan set profile allows you to configure wireless network profiles, and netsh wlan show networks displays available wireless networks.
Q: What is the function of the netsh lan command in managing network adapter settings?
A: The netsh lan command is used to manage network adapter settings, particularly for wired Ethernet connections. It allows you to display the current configuration, manage profiles, and make changes to the adapter settings.
Q: Can netsh be used to manage IPv6 configurations on a Windows Server?
A: Yes, netsh can be used to manage IPv6 configurations on a Windows Server. The command netsh interface ipv6 provides various options to view and configure IPv6 settings, including addresses, neighbors, and routes.
Q: How can I access the Network Shell (netsh) from the command prompt?
A: To access the Network Shell (netsh) from the command prompt, you need to open the command prompt window, which can be done by typing cmd into the Windows search bar and selecting the Command Prompt app. Once open, you can enter netsh to start using the utility.
Q: What is the function of the Windows Filtering Platform (WFP) within netsh?
A: The Windows Filtering Platform (WFP) within netsh allows users to access and configure various network filtering options. Using the netsh wfp command, you can manage and monitor the network packets processed by the Windows Firewall and IPsec.
Q: How do I use netsh to modify the network configuration on Windows Server 2016?
A: To modify the network configuration on Windows Server 2016 using netsh, you must start netsh from the command prompt or Windows PowerShell with the appropriate syntax. For example, you can use netsh interface ipv4 set address to change IP address settings.
Q: What syntax is used for netsh commands on Windows 7 and later versions?
A: The syntax used for netsh commands on Windows 7 and later versions typically starts with the netsh context, followed by the action and parameters. For example, the command netsh interface tcp set heuristics disabled uses the netsh command syntax to disable TCP heuristics.
Q: Can netsh be used as a command-line scripting utility for network configurations?
A: Yes, netsh can be used as a command-line scripting utility for network configurations. It allows users to run commands and scripts that display or modify the network configuration of computers running Windows Server and other Windows operating systems.
Q: How do I export wireless network profiles using netsh on Windows?
A: To export wireless network profiles using netsh on Windows, you can use the command netsh wlan export profile key=clear. This command exports the wireless network profiles to XML files, which can then be imported on other machines or kept as backups.
Q: What is the purpose of the netsh trace diagnose command?
A: The purpose of the netsh trace diagnose command is to start a diagnostic trace that helps identify and resolve issues related to the network. It can capture a trace of network traffic and provide information useful for troubleshooting.
Q: When managing IPv6 configurations, how would I use netsh on a Windows Server?
A: When managing IPv6 configurations on a Windows Server, you would use netsh with the appropriate IPv6 context commands, such as netsh interface ipv6 show addresses to display current IPv6 addresses or netsh interface ipv6 add route to add new IPv6 routes.
Q: What steps are needed to refresh the wireless settings on a laptop using netsh?
A: To refresh the wireless settings on a laptop using netsh, you would enter the command netsh wlan refresh in the command prompt. This updates the wireless network settings based on the current configurations and available networks.
Q: How do you use netsh to work with wireless commands on Windows?
A: To use netsh to work with wireless commands on Windows, you must enter the wireless context by typing netsh wlan at the prompt, followed by the specific command you want to run, such as netsh wlan show profiles to display a list of all wireless network profiles on the machine.
command line following command netsh is a command-line configuration entry to a list configuration entry from a list command line tool netsh also list of netsh netsh interface set windows server 2008 r2 run the command netsh is a command-line configuration entry to a list configuration entry from a list command line tool netsh also list of netsh netsh interface set windows server 2008 r2
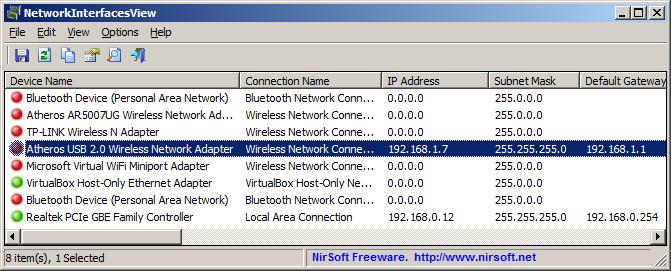
| NetworkInterfacesView v1.35 — Show network adapters information and disable / enable them Copyright (c) 2013 — 2023 Nir Sofer |
Description
NetworkInterfacesView is a simple tool that displays the list of all network adapters/interfaces installed on your system.
It displays network interfaces that are currently active, as well as network interfaces that have been installed previously, and now
they are not connected (like USB wireless network adapters).
For every network interface found on your system, the following information is displayed (if it’s stored in the Registry):
Device Name, Connection Name, IP Address, Subnet Mask, Default Gateway, DHCP Server, Status, MAC Address and more…
You can select one or more network interface items and then export them to xml/html/csv/tab-delimited file, or copy them into the clipboard and then paste them
into Excel or other spreadsheet application.
System Requirements
This utility works on any version of Windows, starting from Windows 2000 and up to Windows 11.
Both 32-bit and 64-bit systems are supported.
Versions History
- Version 1.35:
- Added IPv6 addresses and IPv6 DNS servers.
- Version 1.30:
- Added secondary sorting support: You can now get a secondary sorting, by holding down the shift key while clicking the column header. Be aware that you only have to hold down the shift key when clicking the second/third/fourth column. To sort the first column you should not hold down the Shift key.
- Added option to change the sorting column from the menu (View -> Sort By). Like the column header click sorting, if you click again the same sorting menu item, it’ll switch between ascending and descending order. Also, if you hold down the shift key while choosing the sort menu item, you’ll get a secondary sorting.
- Added ‘Sort By’ dropdown to the toolbar.
- Version 1.27:
- Added ‘Metric’ column.
- Version 1.26:
- Added ‘Interface Index’ column.
- Version 1.25:
- Added ‘Disable+Enable Selected Interfaces’ option (F8), which allows you to disable and then enable again the selected network interface.
- Added /DisableEnable command-line option, which allows you to disable and then enable again the network interface from command-line.
- Added ‘Config Registry Key’ column, which displays the Registry key that stores the network card configuration like, «Speed & Duplex»,
«Large Send Offload», «Wake on Magic Packet», «Flow Control», «Green Ethernet», «Transmit Buffers», «Receive Buffers», «TCP Checksum Offload», and so on. Also added ‘Open Config In RegEdit’ option to open this Registry key in RegEdit. - If you modify the values of this configuration Registry key and then use the Disable+Enable option, the network card will start working with the new configuration.
- Version 1.21:
- Added ‘Interface LUID’ column.
- Added ‘Select All’ and ‘Deselect All’ to the ‘Column Settings’ window.
- Version 1.20:
- Added new option: ‘Open Device Properties Window’ (F2).
- Version 1.15:
- Added /RunAsAdmin command-line option for running NetworkInterfacesView as administrator.
- Added ‘Interface Speed’ column.
- Added ‘Open In RegEdit’ option.
- Version 1.10:
- Added option to disable and enable the selected network adapters. Be aware that these actions require elevation (‘Run As Administrator’).
Also, on 64-bit system, you must use the 64-bit version of NetworkInterfacesView - Added /enable and /disable command-line options.
- Added ‘Run As Administrator’ option (Ctrl+F11), which allows you to easily run NetworkInterfacesView as administrator on Windows Vista/7/8/2008/10.
- Added x64 build.
- Added option to disable and enable the selected network adapters. Be aware that these actions require elevation (‘Run As Administrator’).
- Version 1.00 — First release.
Start Using NetworkInterfacesView
NetworkInterfacesView doesn’t require any installation process or additional DLL files. In order to start using it,
simply run the executable file — NetworkInterfacesView.exe
After you run NetworkInterfacesView, the main window displays the list of all network interfaces found in the Registry of your system.
You can select one or more items, and then export them to xml/csv/tab-delimited/html file by using the ‘Save Selected Items’ option (Ctrl+S).
You can also copy the selected items into the clipboard (Ctrl+C), and then paste them into Excel or other spreadsheet application.
Command-Line Options
| /disable <Name1> <Name2> <Name3>… |
Disables the specified network adapters. You can specify the Interface GUID, the connection name , and the device name. For example: NetworkInterfacesView.exe /disable «Local Area Connection» NetworkInterfacesView.exe /disable {1BC6B2D1-1606-3029-256F-2EB709923499} {F430061F-D117-29C0-B1A9-F11D473AD7CE} |
| /enable <Name1> <Name2> <Name3>… | Enables the specified network adapters. You can specify the Interface GUID, the connection name , and the device name. |
| /DisableEnable <Name1> <Name2> <Name3>… | Disables and then enables the specified network adapters. You can specify the Interface GUID, the connection name , and the device name. |
| /RunAsAdmin | Runs NetworkInterfacesView as administrator. |
| /stext <Filename> | Save the list of all network interfaces into a regular text file. |
| /stab <Filename> | Save the list of all network interfaces into a tab-delimited text file. |
| /scomma <Filename> | Save the list of all network interfaces into a comma-delimited text file (csv). |
| /stabular <Filename> | Save the list of all network interfaces into a tabular text file. |
| /shtml <Filename> | Save the list of all network interfaces into HTML file (Horizontal). |
| /sverhtml <Filename> | Save the list of all network interfaces into HTML file (Vertical). |
| /sxml <Filename> | Save the list of all network interfaces to XML file. |
| /sort <column> |
This command-line option can be used with other save options for sorting by the desired column. If you don’t specify this option, the list is sorted according to the last sort that you made from the user interface. The <column> parameter can specify the column index (0 for the first column, 1 for the second column, and so on) or the name of the column, like «IP Address» and «Device Name». You can specify the ‘~’ prefix character (e.g: «~Status») if you want to sort in descending order. You can put multiple /sort in the command-line if you want to sort by multiple columns.
Examples: |
| /nosort | When you specify this command-line option, the list will be saved without any sorting. |
Translating NetworkInterfacesView to other languages
In order to translate NetworkInterfacesView to other language, follow the instructions below:
- Run NetworkInterfacesView with /savelangfile parameter:
NetworkInterfacesView.exe /savelangfile
A file named NetworkInterfacesView_lng.ini will be created in the folder of NetworkInterfacesView utility. - Open the created language file in Notepad or in any other text editor.
- Translate all string entries to the desired language.
Optionally, you can also add your name and/or a link to your Web site.
(TranslatorName and TranslatorURL values) If you add this information, it’ll be
used in the ‘About’ window. - After you finish the translation, Run NetworkInterfacesView, and all translated
strings will be loaded from the language file.
If you want to run NetworkInterfacesView without the translation, simply rename the language file, or move
it to another folder.
License
This utility is released as freeware.
You are allowed to freely distribute this utility via floppy disk, CD-ROM,
Internet, or in any other way, as long as you don’t charge anything for this and you don’t
sell it or distribute it as a part of commercial product.
If you distribute this utility, you must include all files in
the distribution package, without any modification !
Disclaimer
The software is provided «AS IS» without any warranty, either expressed or implied,
including, but not limited to, the implied warranties of merchantability and fitness
for a particular purpose. The author will not be liable for any special, incidental,
consequential or indirect damages due to loss of data or any other reason.
Feedback
If you have any problem, suggestion, comment, or you found a bug in my utility,
you can send a message to nirsofer@yahoo.com
NetworkInterfacesView is also available in other languages. In order to change the language of
NetworkInterfacesView, download the appropriate language zip file, extract the ‘networkinterfacesview_lng.ini’,
and put it in the same folder that you Installed NetworkInterfacesView utility.
| Language | Translated By | Date | Version |
|---|---|---|---|
| Brazilian Portuguese | Paulo Guzmán | 04/03/2013 | 1.00 |
| Dutch | Jan Verheijen | 29/10/2023 | 1.35 |
| French | Largo | 31/10/2023 | 1.35 |
| French | skorpix38 | 24/02/2013 | 1.00 (feb2013) |
| French | Anthony MAGNAN (Netbew) | 09/02/2022 | 1.21 |
| German | «Latino» | 21/04/2025 | 1.35 |
| Greek | geogeo.gr | 28/02/2013 | 1.00 |
| Hungarian | Timinoun | 03/08/2024 | 1.35 |
| Italian | R.B. | 30/10/2023 | 1.35 |
| Korean | VenusGirl (비너스걸) | 08/01/2023 | 1.25 |
| Persian | ZendegiyeSabz | 31/10/2023 | 1.35 |
| Polish | Hightower | 02/11/2023 | 1.35 |
| Romanian | Jaff (Oprea Nicolae) | 25/02/2013 | 1.00 |
| Russian | Dmitry Yerokhin | 30/10/2023 | 1.35 |
| Simplified Chinese | DickMoore | 02/01/2024 | 1.35 |
| Serbian | Dejan Jovanovic | 15/06/2013 | 1.00 |
| Slovak | František Fico | 16/11/2023 | 1.35 |
| Traditional Chinese | Danfong Hsieh | 30/10/2023 | 1.35 |
| Turkish | HARUN ARI | 30/10/2023 | 1.35 |
Have you ever run into an issue on a Windows machine with network connectivity? Maybe it was some rogue software installer making unknown changes to registry keys, or perhaps you suspect a virus is installed and need to track down its activity. Luckily Network Shell (netsh) utility is just around to help.
Netsh is a command-line utility that allows you to configure and display the status of various network configurations of Windows machines or servers. And in this tutorial, you’ll learn just about every command-line feature Netsh provides.
Ready? Read on and keep your network connectivity at its peak!
Prerequisites
This tutorial comprises hands-on demonstrations. But so long as you have a Windows PC or server, you’re good to go – This tutorial uses Windows 2019 Datacenter Edition, but Netsh works in all modern Windows editions.
What is Network Shell (Netsh)?
Before you dive into executing your first netsh command, kick-off this tutorial by getting a high-level overview of Netsh. So, what is Netsh anyway?
You might have worked with dozens of networking command-line tools such as ping, tracert, telnet, etc., but they are bound for a specific purpose.
With the Netsh command-line utility, you can configure and work with various network components. These network components are not limited to network interfaces, Windows firewalls, server roles, etc., on computers running Windows Server.
Running Netsh Commands
You now have a basic idea of Netsh and its usefulness for monitoring and configuring your network. But how do you actually execute netsh commands?
You can execute netsh commands on command-line consoles like PowerShell or the command prompt on a Windows machine. But as the command prompt’s successor, this tutorial demonstrates running the netsh commands on PowerShell.
1. Log in to your Windows Server using your RDP client. Windows has a default RDP client installed.
2. After you log in, open PowerShell as administrator, and run the netsh command below to access the netsh command-line session.
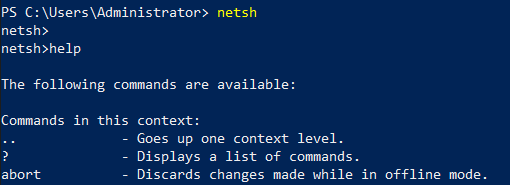
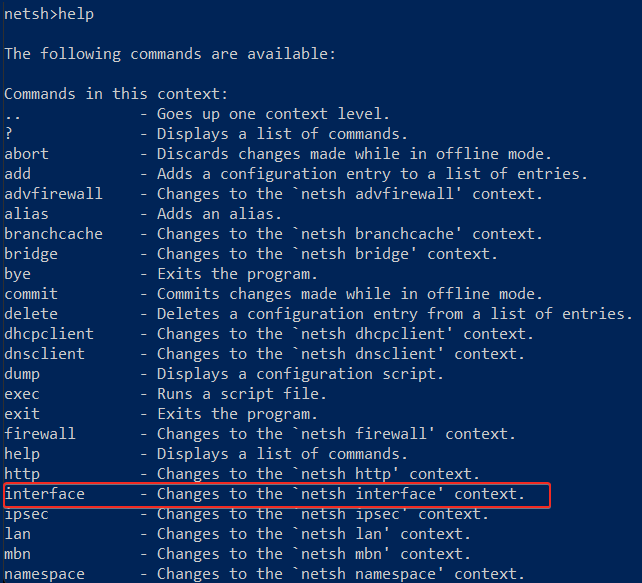
3. In the netsh prompt, run the help command to see all commands you can use inside your netsh command-line session. help
Pick one command you’d like to run, but this tutorial uses the interface command.
4. Lastly, run the interface command below to show all available network interfaces. interface show interface

Using Netsh Utility Commands
You now have access to the netsh prompt, and you’re almost ready to manage your network connectivity. But before you dive deeper into Netsh, you’ll be running basic Netsh utility commands to familiarize yourself with how Netsh works.
There are two ways you can run Nesh utility commands as follows:
- Run the
netshcommand alone to access the netsh prompt, then run the Netsh utility command.
- Running the
netshcommand followed by the Netsh utility command.
Like the help command you learned in step three of the “Running Netsh Commands” section, run some other Netsh utility commands below that Netsh offers:
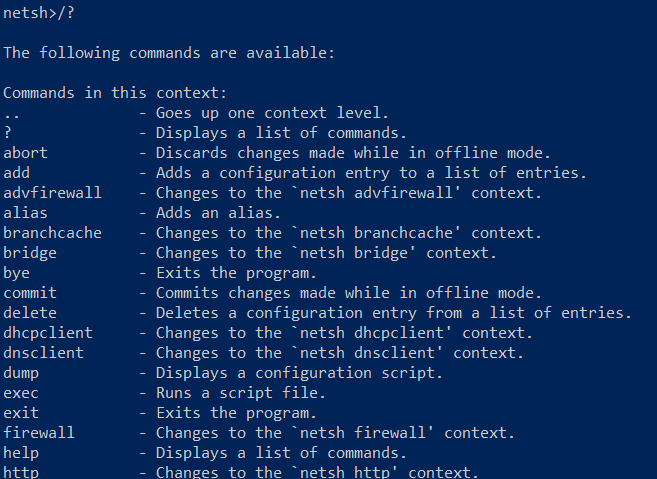
/?– Similar tohelpbut commonly used for most of the commands you can use within Netsh utility.
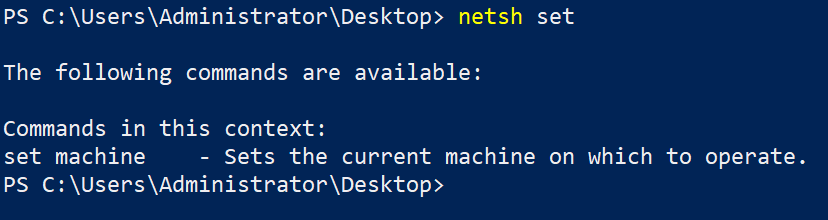
show– This command displays the commands available with each context.

popd allows you to restore a context from a first-in-last-out (FILO) stack, while pushd pushes the current context on a stack.
Both commands don’t have outputs, but you can append the help command to see how these commands function, as shown below.
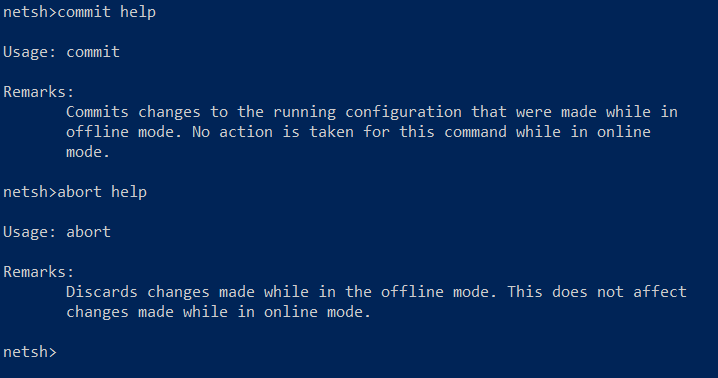
- The
commitcommand commits changes made to the running configuration while in offline mode. In contrast, theabortcommand discards changes made in the running configuration while in offline mode.
These commands don’t have output, but appending the help command lets you view the command’s usage.
quitandbye– Lets you exit out of Netsh utility.
Fetching and Executing Netsh Utility Commands from a Text File
Like every other command, the netsh command allows you to declare parameters while executing tasks for simplicity and flexibility.
When working with Windows network configurations, you’ll find yourself dealing with Netsh. And using parameters in your netsh commands comes in handy. One good example is calling upon commands from a dedicated source, like a text file.
Create a file named myfile.txt on your desktop and add the help command in the file.
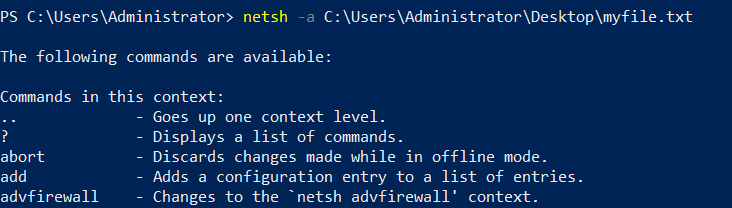
Now, run the netsh command below with the -a flag to specify the file’s path containing the netsh command.
netsh -a C:\Users\Administrator\Desktop\myfile.txt
Below, you can see the netsh command called and executed the help command from the myfile.txt file.
If you wish to run the command on a remote windows machine, consider using the
-rflag, as shown below. But make sure the Remote Registry service runs on the remote computer. netsh -r shanky
Executing Netsh Commands Under a User Account
If you like to keep track of changes you make to your network configuration, run Netsh commands under a user account. How? By using the -u parameter followed by the account’s username.
Run the following netsh command to list available network interfaces under a user account (-u) named shanky.
To specify the user’s password, append the
-pparameter followed by the password.
netsh -u shanky -p hellopass interface show interface

netsh Commands Under a Different User AccountIf you need to run the
netshcommand under a user account from a specific domain, consider using theDomainName\\usernameparameter.
Listing Available Network Interfaces
A network interface connects your computer and a private or public network. And knowing which interface your machine uses and the network configurations to troubleshoot is crucial.
This information helps resolve issues or provide your network configurations to third-party vendors for support.
1. Execute the netsh interface command below to show all available interfaces currently present on your machine.
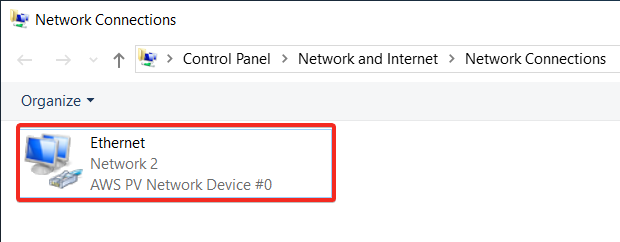
Running netsh Commands Under a Different User AccountAs you can see below, only one interface (Ethernet) takes care of all the network flow (in/out) from your machine.

2. Now, click the start menu, type ncpa.cpl, as shown below, and press Enter to open the Network Connections window (step three).
3. Finally, verify if the netsh command returned the correct details of interfaces. Below, you can see the name of the active interface is Ethernet.
Gathering Information on Network Interfaces
What other good things come with listing available network interfaces on your system? Dig deeper to get comprehensive information from your network interfaces. Why? In a large organization, other departments require those details if they need to host applications on your network.
Run the following command that works the same as listing (show) each network interface available. But this time, you’ll get more details about each network interface configuration (config), such as DHCP status, IP address, etc.
netsh interface ipv4 show config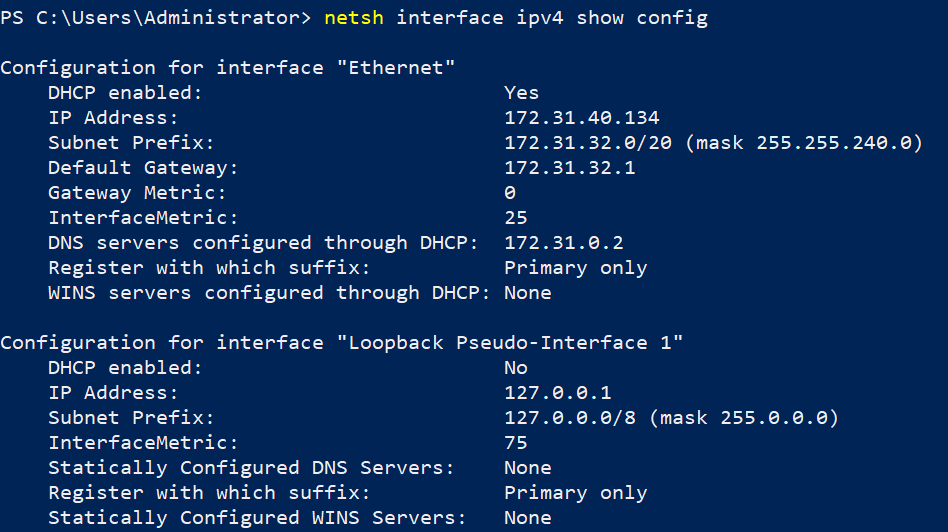
The Loopback Pseudo-Interface is used mainly for troubleshooting purposes and allows you to connect to servers running on the local machine for testing. But note that the loopback interface does not represent any actual hardware.
Setting a Static IPv4 Address and DNS Server
From the detailed listing of available interfaces, one of the most important concepts is the IP address of the Windows machine. The IP address for the Ethernet network interface is Dynamic. As a result, the IP address is allocated by itself from the pool of available IP addresses of the subnet.
But at times, you need to have a static IP address allocated to your machine, such as to test applications where a reboot of the machine is required. So change the dynamic IP address settings to manual type where IPs remain persistent.
1. Open the Network Connections window to see available network interfaces.
2. Next, right-click on the Ethernet interface and select properties, opening Ethernet’s Properties window.
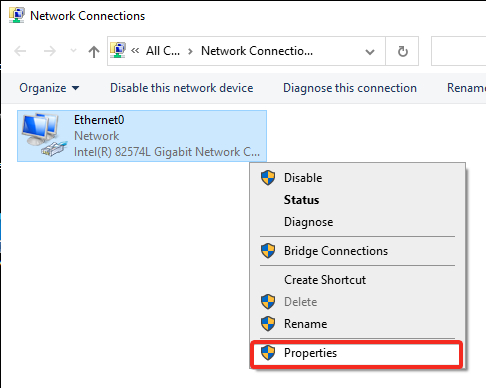
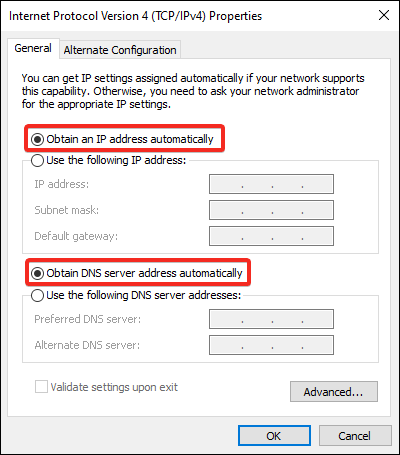
3. Select Internet Protocol Version 4 (TCP/IPv4), as shown below, and click on Properties to open the IPV4’s properties window.
As you can see below, the IP settings are set to obtain an IP address automatically.
Click on Cancel to close the Properties window, and you’ll manually change the IP address in the following step.
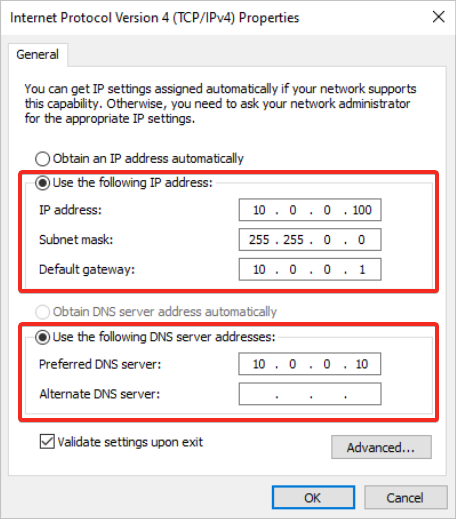
4. Now, run the below netsh interface command to manually set the following IP address settings:
- IP Address –
10.0.0.100 - Subnet mask –
255.255.0.0 - Default gateway –
10.0.0.1
netsh interface ip set address "Ethernet" static 10.0.0.100 255.255.0.0 10.0.0.1 To change the IPv6 address of the Ethernet interface, you will need to use
netsh int ipv6 set to address 7 2001::2
To roll back to using a dynamic IP address, run the following command:
netsh interface ip set address "Ethernet" dhcp
5. Run the following command to define a DNS server. Doing so allows your Windows machine to communicate to other networks.
netsh interface ip set address "Ethernet" static 10.0.0.100 255.255.0.0 10.0.0.1 To disable the Ethernet interface on your Windows system, consider running the following command:
netsh interface set interface name="Ethernet" admin=disabled
6. Lastly, as shown below, open the IPv4 settings again as you did in steps two to three to verify the interface’s IP address settings changed.
Managing Wired Network Interfaces
You previously managed the Ethernet network interface, but there could be multiple interfaces, such as wireless, wired, and Bluetooth-based network interfaces. What if you need information only for wired network interfaces as they are most important?
Consider using Netsh commands for wired LAN that provide methods to configure connectivity and security settings. The Netsh lan commands configure the local computer or multiple computers using a logon script.
Run the netsh lan command below to list all the wired network interfaces available on your Windows machine.
netsh lan show interfaces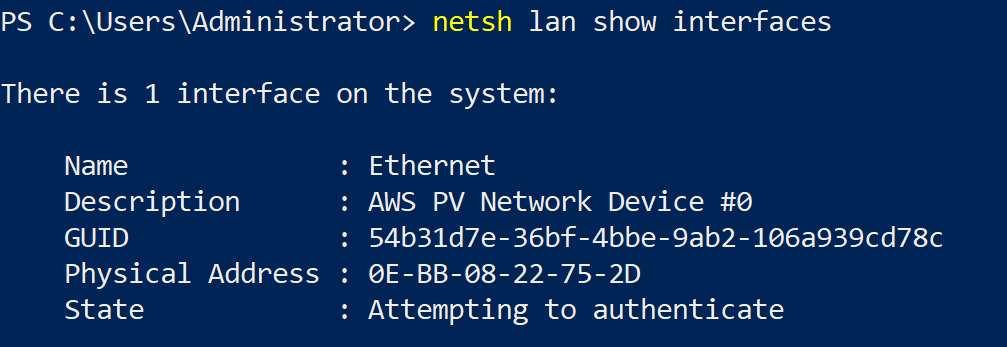
Now, run the below command if you need to display the list of wired profiles configured on the computer.
If the interface parameter is defined, only the profile contents for the specified interface are displayed. Otherwise, all profiles will be displayed with their name and description.
netsh lan show profiles interface ="Ethernet"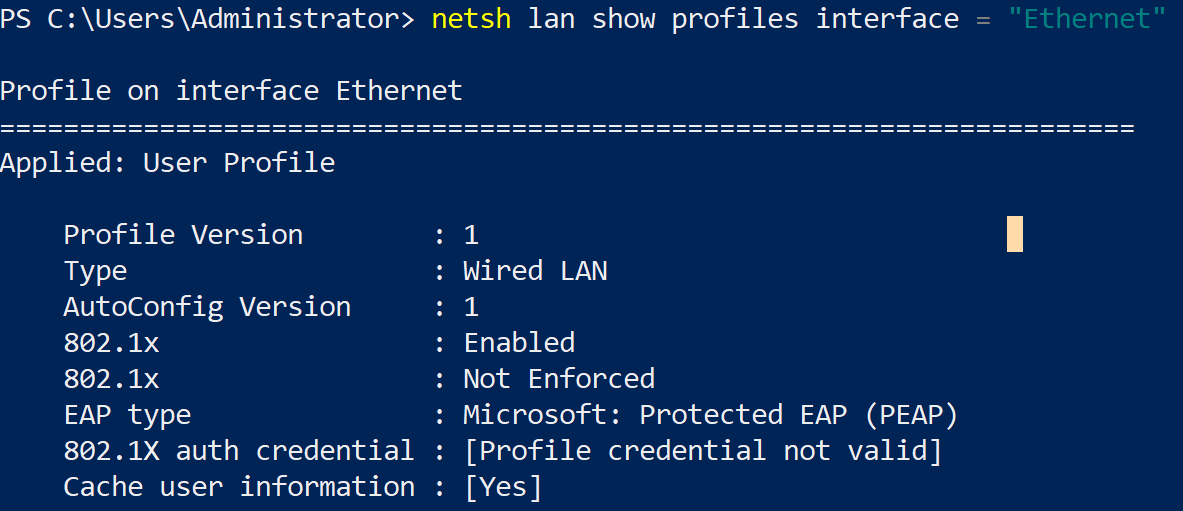
Managing the Windows Firewall
Securing your network is a top priority achievable by managing your Windows firewall. How? By adding firewall rules with the Netsh advfirewall command. The advfirewall command allows you to control and manage your Windows firewall.
The
advfirewallcontext works mainly on three profile settings; domain, private and public
Run the below command to enable (action=allow) the ping protocol (icmpv4) from your Windows firewall by setting a rule named ALL ICMP V4.
netsh advfirewall firewall add rule name="All ICMP V4" dir=in action=allow protocol=icmpv4
Now, run the below command to add a rule named Open Port 80 on your machine.
You can choose any port that you’d like to open. But this command opens port 80, allowing traffic to flow in and out.
netsh advfirewall firewall add rule name= "Open Port 80" dir=in action=allow protocol=TCP localport=80
The
advfirewallcontext provides the same functionality that thenetsh firewallcontext gives. But thenetsh firewallcontext might be deprecated in the future.
Capturing Network Traces
Trace is another crucial context to troubleshoot and collect event information regarding network connections. You can use the trace context to collect event information using Event Tracing for Windows (ETW) to log network events.
But first, you’ll have to identify scenarios you can trace your network connections.
You can use Netsh to collect a packet capture without installing third-party tools like Wireshark.
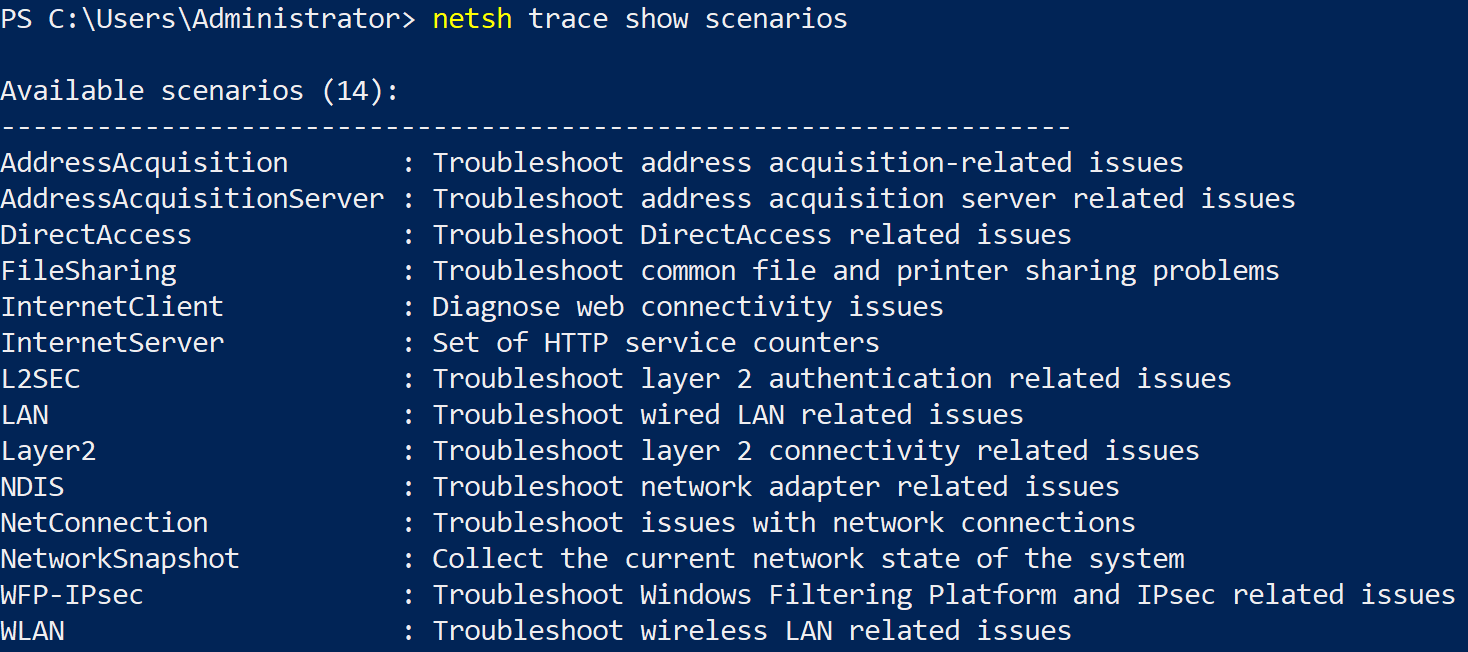
Run the command below to help you find available scenarios where tracing your network connections would work based on the issue you’re dealing with in your network.
netsh trace show scenariosAs you can see below, multiple scenarios are available to work with trace.
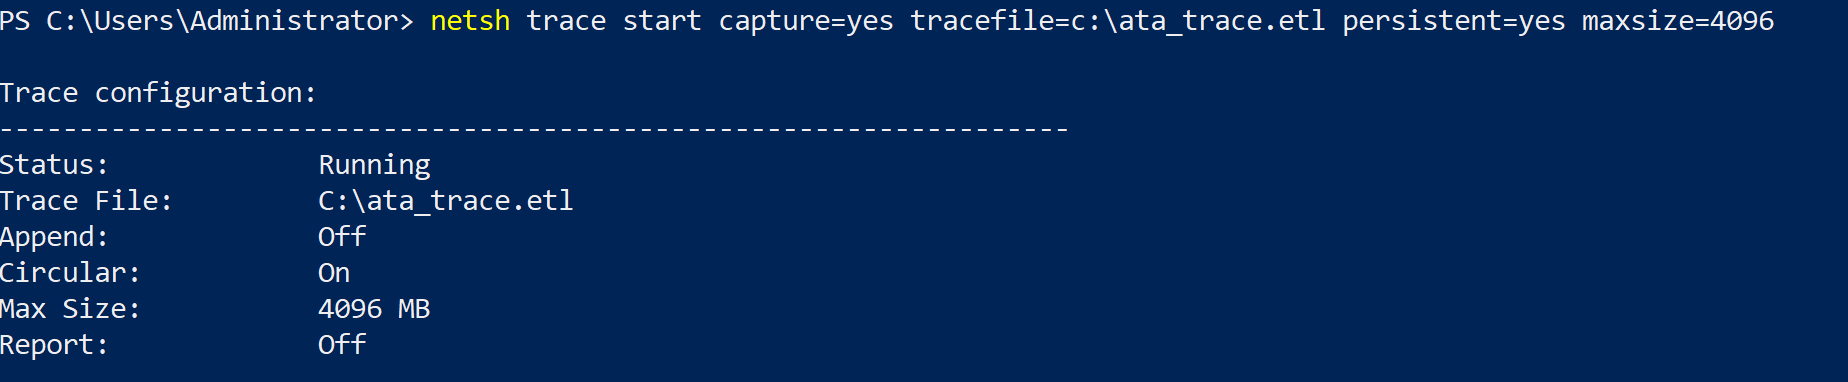
Now, execute the below netsh trace start command to capture (capture=yes) all network details to a specified ETL file (tracefile) called ata_trace.etl. The persistent parameter permanently stores the file in the specified location when the value is true (yes).
netsh trace start capture=yes tracefile=c:\ata_trace.etl persistent=yes maxsize=4096If you wish to stop the traces from getting captured, run the below command instead:
netsh trace stop
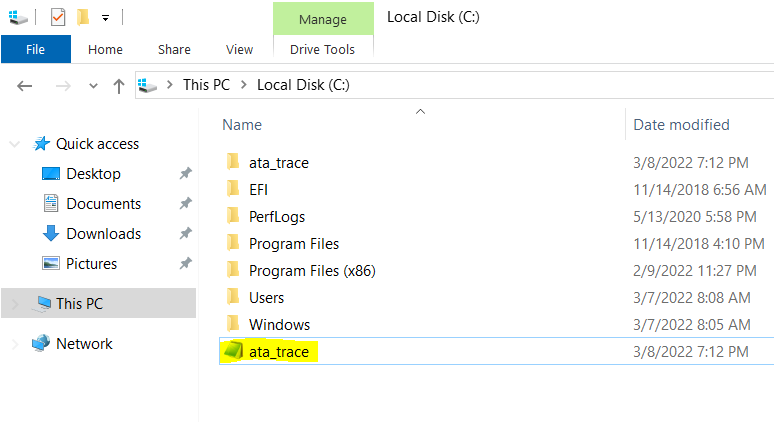
As you can see below, the file (ata_trace) has been created and stored in the C:\ drive.
Diagnosing the Windows Firewall and IPsec Events
Nowadays, monitoring alerts is crucial for any organization running applications or microservices. Perhaps you’ve decided to spin up some new Windows machine or Virtual host and check filtered data about the connectivity and firewall settings. If so, consider using the Windows Filtering Platform (WFP).
The Netsh commands for the WFP allow you to conduct checks and filtration on the firewall for systems that support Windows firewall and IPsec.
Run the following command to save the current operational state of the WFP and IPsec to an XML file (wfpstate.xml) on the working directory by default.
With a copy of the state file (wfpstate.xml), you can further examine the WFP and IPsec state to find the root cause of a problem.

Perhaps you like to save the XML file to another location. If so, append the file flag and specify a save location, as shown below. Replace location with the actual save location and statefile.xml with your preferred file name.
netsh wfp show state file="location\statefile.xml"
Now, run the below command to save a list of network traffic events (netevents) to a file called netevents.xml in the working directory by default.
Like with the wfpstate.xml file, you can also specify a save location and file name for the network traffic events XML file (netevents.xml).

If you need to diagnose a specific protocol only, use the protocol parameter below.
The below command saves a list of network traffic events only for the TCP/IP protocol in XML format, where 6 is TCP/IP’s protocol number.
netsh wfp show netevents protocol=6
Validating Incoming and Outgoing Traffic
If you’re working with many applications where traffic comes in and leaves your network, you need to validate that traffic. How? Winsock is an interface that allows you to handle all the input/output requests for internet applications in a Windows system.
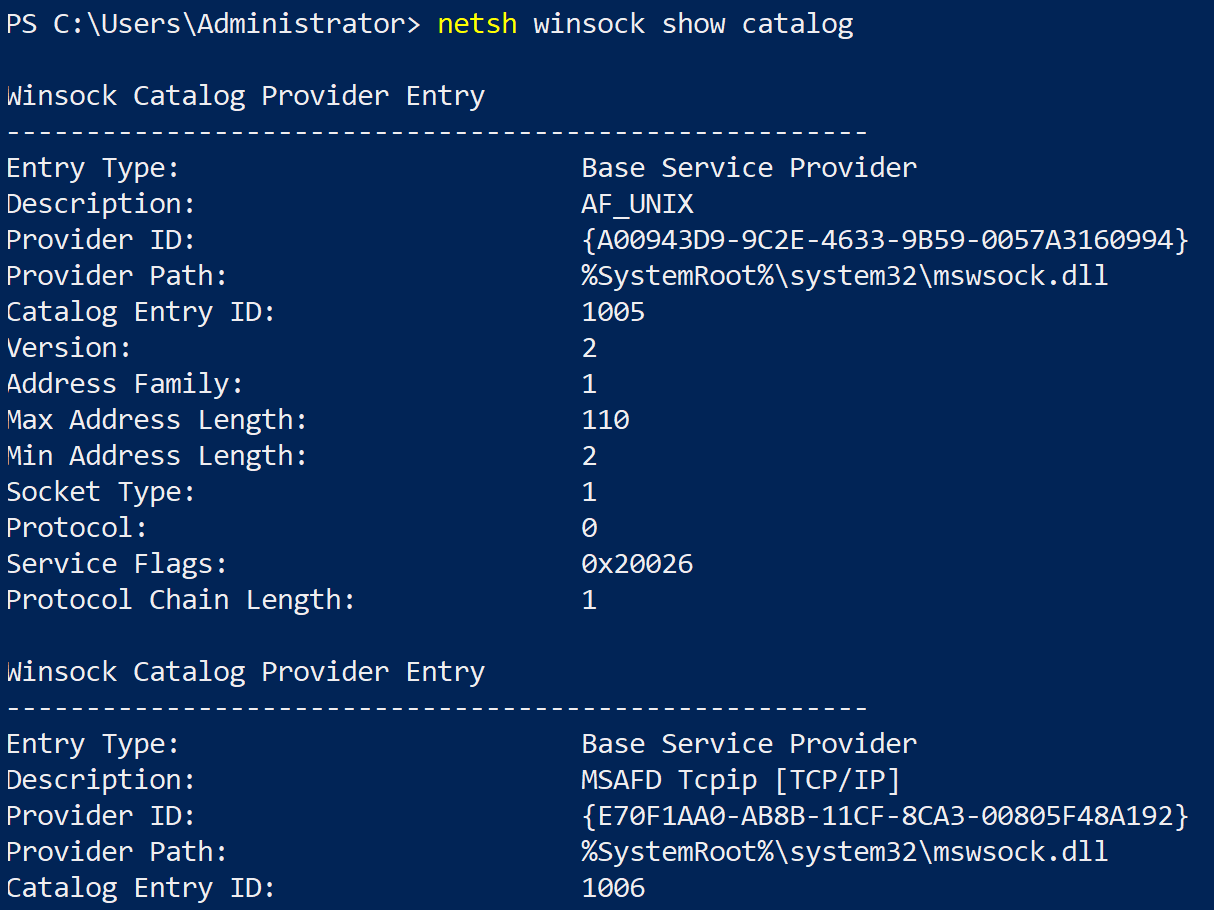
Execute the following netsh winsock command to show all the stored Windows sockets installed on your machine.
netsh winsock show catalogBelow, you can see all the Windows sockets entries and details of each one.
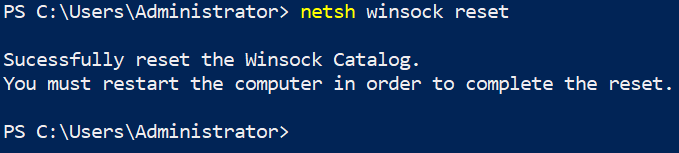
The Winsock catalog tends to contain incorrect entries or becomes corrupt. In that case, run the netsh command below to perform a Winsock reset. This command sets the Winsock catalog and associated registry settings to their defaults
Working with Alias and Unalias Using Netsh Command
Alias is an essential concept in networking. An alias instructs the shell to replace one string with another while executing the commands. Similarly, Netsh also uses Alias, a user-defined character string, which Netsh treats as a look-alike to another character string.
The syntaxes to add and delete an alias are below:
# Adds an alias
netsh add alias
# Deletes an alias
netsh delete alias
Reserving a Uniform Resource Locator (URL)
Reserving a URL properly in your system is crucial to defining the syntax of a URL endpoint to a web application. A reserved URL is defined for both the Web service and the web portal when configuring the applications on a server.
Three options are used along with the netsh command, add urlacl, show urlacl, and delete urlacl.
1. Run the below command to reserve a URL entry in the system where, url specifies the fully qualified URL, and user specifies the user or user-group name (DOMAIN).
netsh http add urlacl url=https://127.0.0.1:80/ user=\Everyone
Next, run the below command to show the list of all access control lists for a particular reserve URL (https://127.0.0.1:80/)
netsh http show urlacl url=https://127.0.0.1:80/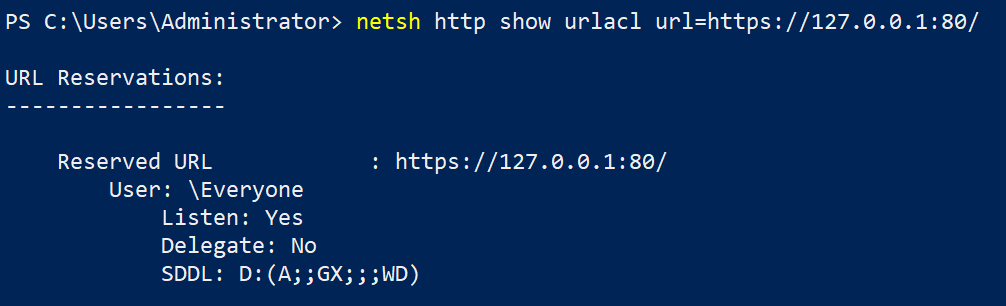
3. Finally, execute the command below to delete reserved URLs.
netsh http delete urlacl url=https://127.0.0.1:80/
Managing Netsh Configuration and Query Commands
Nowadays, broadband and networking are crucial on laptops, computers, and mobiles. And knowing how to query and configure mobile broadband settings and parameters comes in handy.
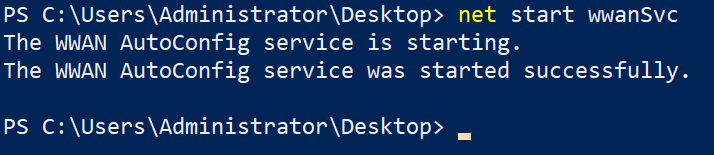
But first, you must ensure the WWAN AutoConfig service is running.
1. Run the below command to start the wwanSvc service. net start wwanSvc
2. Next, run the netsh add command below to add a network profile (Wi-Fi-Marriott Bonvoy.xml) in the mobile broadband interface’s profile data store configuration table.
Be sure to change Wi-Fi-Marriott Bonvoy.xml with the network profile (XML file) you like to add.
To check all the Mobile Broadband interfaces, run the below command.
netsh mbn show interface
netsh wlan add profile filename="c:\New folder\Wi-Fi-Marriott Bonvoy.xml"
Perhaps you like to export a network profile. If so, run the following command, where
SSIDis the network interface, anddestinationis the network profile’s save path:netsh wlan export profile "SSID" key=clear folder=destination
3. Run the following command to connect to a particular mobile broadband network interface (delhi_Sagar_5GHz). Replace Wi-Fi Network with your Wi-Fi network name.
netsh wlan connect name="Wi-Fi Network"
4. Execute the below command to delete a network config profile (Marriott Bonvoy).
Deleting a network config profile from the profile data store is similar to running add command. The difference is that you’ll replace add with the delete sub-context in the command.
netsh wlan delete profile name="Marriott Bonvoy"
5. Now, run the following netsh dump command to capture and display interface configuration scripts.
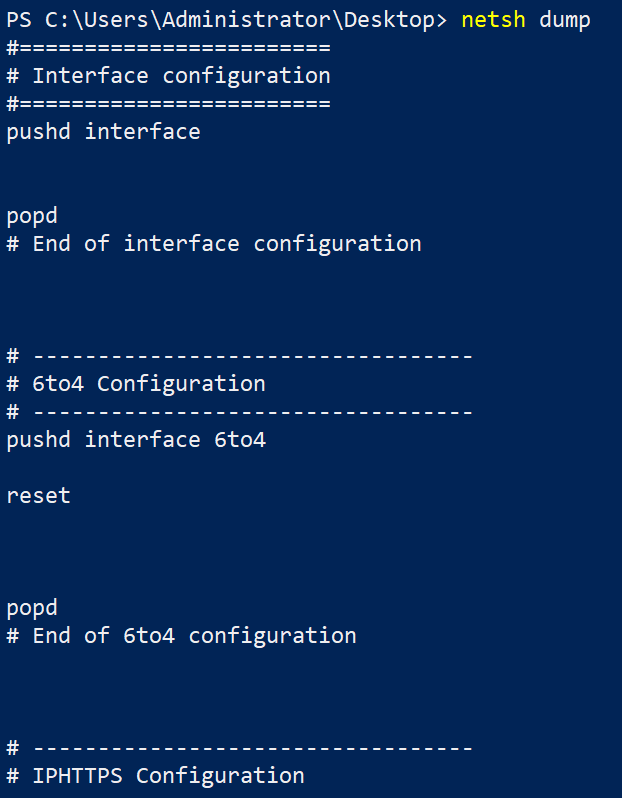
If you wish to have a copy of the configuration details you can later review, run the following command. This command doesn’t print anything on the console but instead saves the output to a text file (netconfig.txt).
netsh dump > netconfig.txt6. Execute the netsh set command below to set the configuration of specified interfaces, such as the following:
- Setting the mobile broadband data auto-connect state for the given interface.
- Turning the mobile broadband data on or off for the specified profile set or interface.
- Setting the mobile broadband data highest connection category for the given interface.
Managing HTTP System Settings
Another important netsh command to look at is netsh http, which allows you to query and configure HTTP.sys settings and parameters.
These HTTP.sys settings can be, but are not limited to the following:
- The cache of the HTTP service.
- All the cached URL resources of the HTTP service.
- All certificate bindings.
- A snapshot of all the HTTP services.
Windows HTTP Services provides developers with an HTTP client API to send requests through the HTTP protocol to other HTTP servers.
Execute the below netsh command to show you a list of all the commands you can run to view the http service-related settings and configurations.
Below, you’ll see various options you can use with the netsh http command.
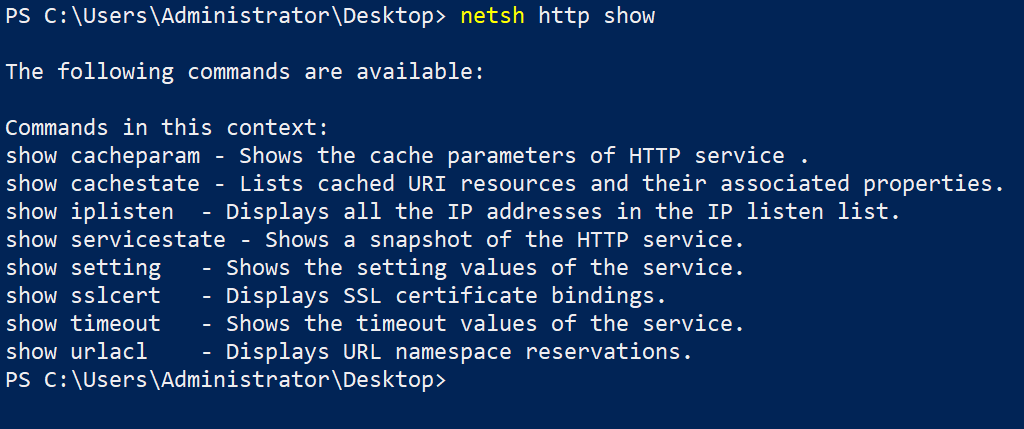
netsh http CommandNow, run the below command to verify the HTTP settings and configuration, cacheparam perhaps.
netsh http show cacheparam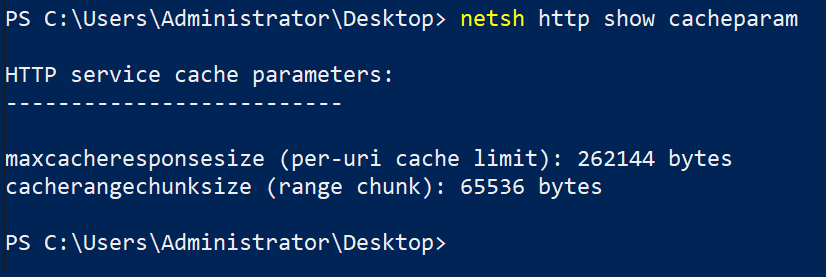
Automating Netsh Commands Execution with Batch Scripts
So far, you learned everything you need to know about Netsh utility, so consider yourself a pro. But at times, you need to run dozens of commands in one go and store the results. So why not automate executing Netsh commands with Batch scripts?
Create a file named myfile.bat on your desktop and copy/paste the code below to the myfile.bat file. The code below shows all network interfaces and configurations of all network interfaces.
# Show all the interfaces of the Windows System
interface show interface
# Show the configurations of all the interfaces
interface ipv4 show config
# Show all the Wired lan network interfaces
lan show interfaces
# Updating the firewall rule to add ping protocol
advfirewall firewall add rule name="All ICMP V4" dir=in action=allow protocol=icmpv4
# Show all the events in the network
wfp show events
# Show all the network events
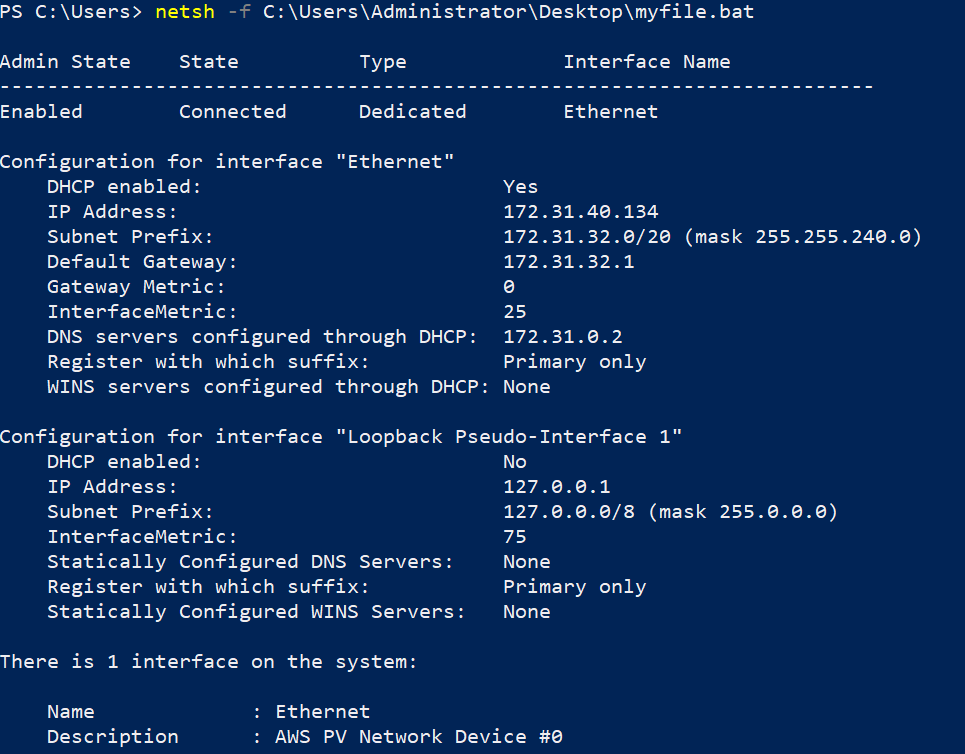
wfp show neteventsNext, run the below netsh command to execute the myfile.bat script from the specified folder path (-f C:\Users\Administrator\Desktop\).
netsh -f C:\Users\Administrator\Desktop\myfile.batAs you can see below, the netsh commands inside the batch file (myfile.bat) were executed successfully.
Conclusion
Throughout this tutorial, you’ve learned different netsh commands to control your network configuration and diagnose potential issues. Netsh utility is a free tool with many features you can use whether you’re just checking out your network configuration or monitoring your network closely.
With this newfound knowledge, you can now monitor interfaces, run trace commands and scripts, and even convert all IP address settings.
Now that you’re a Netsh guru, how do you plan to use it? Why not automate command executions by compiling commands into a PowerShell script you can run at will?