
Время непрерывной работы Windows с момента последней перезагрузки (uptime) можно узнать разными способами.
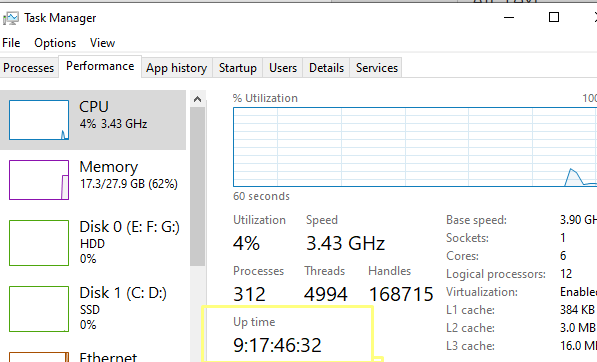
В графическом интерфейсе общее время работы Windows можно найти в диспетчере задач.
- Запустите Task Manager (выполните команды
taskmgr.exe
или нажмите сочетание клавиш
Ctrl+Shift+Esc
) - Перейдите на вкладку Производительность (Performance) -> вкладка ЦП (CPU)
- Время непрерывной работы компьютера содержится в поле Up time
-

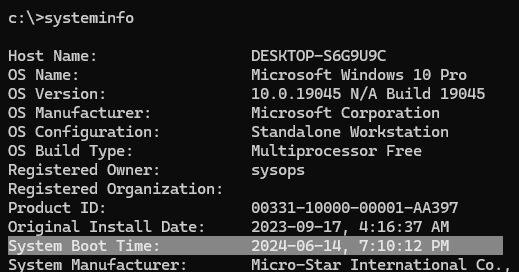
Также можно получить текущий uptime из командной строки. Выполните команду:
Systeminfo
Время последней загрузки (перезагрузки) Windows указано в значении System Boot Time.
В данном случае в командной строке отобразится только время последней загрузки. Чтобы вычислить значение uptime, как разницу между текущим временем и временем загрузки Windows, воспользуйтесь PowerShell командами:
$boot_time = Get-CimInstance Win32_OperatingSystem | select LastBootUpTime
(Get-Date) - $boot_time.LastBootUpTime | SELECT Days,Hours,Minutes,Seconds
Команда вернет значение аптайма компьютера в днях и часах.
В новых версиях PowerShell Core 6.x и 7.x для получения времени работы системы можно использовать новый командлет Get-Uptime. Это командлет сразу выведет значение uptime в днях, часах, минутах (в формате TimeSpan). Или можно вывести время с последней загрузки компьютера:
Get-Uptime -Since
Можно получить значение аптайм с удаленного хоста:
$remotePC='pcbuh01'
(Get-Date) - (Get-CimInstance Win32_OperatingSystem -ComputerName $remotePC).LastBootupTime
Эту команду можно использовать для удаленного опроса uptime компьютеров в домене AD. Для получения списка компьютеров обычно используется командлет Get-ADComputer.
Обратите внимание, что на десктопных версиях Windows 10 и 11 по умолчанию включена функция гибридной загруки (Быстрый запуск, Fast Boot). В этом режиме, когда пользователь выключает компьютер, Windows фактически не выключается, а выгружает ядро и драйверы в файл гибернации. В этом случае (как и после пробуждения после режима сна и обычной гибернации) аптайм компьютера не сбрасывается при включении.
on January 29, 2012
You can find the time windows was last rebooted on your computer using systeminfo or wmic commands. Both the commands are explained below.
Using Systeminfo:
You can run the below command to find the Windows boot time.
systeminfo | findstr /C:"System Boot Time"
The above command works on Windows 7. If you are using Windows XP, then you need to run a slightly different command.
systeminfo | findstr /C:"System Up Time"
Example:
c:\>systeminfo | findstr /C:"System Boot Time"
System Boot Time:          1/29/2012, 4:54:04 PM
Using WMIC:
We can find the boot time using wmic os command.
c:\>wmic os get lastBootUpTime
LastBootUpTime
20120129165404.109999+330
c:\>
WMIC command shows the time up to milliseconds.
To check Windows boot time from the CMD, you can use the systeminfo command. To check the boot time from PowerShell, use the Get-ComputerInfo command.
To check Windows boot time from CMD, run the following command:
systeminfo | findstr /i /c:"boot time"The systeminfo command displays information about your computer. In the previous example, we filtered the systeminfo output using findstr to show the last boot time without all other information.

On Windows PowerShell, execute the following command to check Windows Boot Time:
Get-ComputerInfo -Property OsLastBootUpTimeLike systeminfo, the Get-ComputerInfo cmdlet displays various information about your computer. In the previous example, we used the -Property parameter to get the last boot time without other details.

You can use both commands to find the last boot time on Windows 10, Windows 11, and Windows Server.
Windows 10 and Windows Uptime are two very important system metrics to monitor. This blog will teach you how to check your boot time in Windows 10, as well as the uptime of a specific device or computer. The process is quick and easy with just a few steps!.
The “how to check boot time windows 10 cmd” is a command-line tool that allows users to check the boot time and uptime of their computer.
Many server administrators use Windows uptime as a metric to solve day-to-day problems that may develop in the system. You’ll discover how to check startup time in Windows 10 and Windows Server in this post. You are able to choose the method that is most convenient for you. Use this article as a reference in the future.
Checking server uptime and obtaining historical Windows uptime are the two primary sections of this article. The first step will be to determine how long the computer has been up since it was last rebooted. In this article, this is referred to as “current” uptime.
The second section of the article will concentrate on determining “historical” uptime, or how long a Windows system has been up between reboots. You’ll learn how to read the Windows event log using PowerShell to get historical uptime figures.
How to Check Windows 10 and Windows Server Boot Time
Let’s get started by looking at a couple different methods for determining the current Windows uptime.
Throughout this section, you’ll get a demonstration of how to verify startup time in Windows 10 by running commands locally on a Windows PC. You may, however, execute these tests remotely using PowerShell Remoting (excluding Manager of Tasks).
Manager of Tasks
One of the most simple and straightforward ways to find uptime is to simply open Manager of Tasks.
To check Windows uptime with Manager of Tasks, right-click the Windows taskbar and select Manager of Tasks or press Ctrl–Shift–Esc. Once Manager of Tasks is open, click on the Performance tab. Under the Performance tab, you will see a label of Up Time.
Finding Windows uptime with Manager of Tasks
Viewer of Events
Viewer of Events is very commonly used by most sysadmins on a regular basis, which makes it a great option for a non-command line-related method of retrieving uptime. Event ID 6005 and 6006 can be used to identify when the event log service starts or stops, which occurs during boot/shut downtimes. Follow these steps to identify uptime via Viewer of Events:
- Bring up the Start Menu and simply search for Viewer of Events, you can also get to it via Computer Management.
- Expand the Windows Logs area on the left and choose System.
- Click “Filter Current Log…” on the right hand side of your window now that we’re just interested in System events.
- We need to search for our suitable Event IDs in the Event ID area (by default, this will be prefilled with text reading “All Event IDs”), write “6005, 6006,” and then click OK.
After that, you may add the two times together to get a total uptime. We may also query the history of uptimes since numerous occurrences of these events are preserved!
You now have filtered Event Logs that show you not just the most recent bootup/shutdown, but also all known bootup/shutdown timings.
PowerShell
You can get uptime in PowerShell in a few different methods. You may use WMI or the Windows event log to query WMI.
When using WMI, you may pick the LastBootUpTime property from the Win32 OperatingSystem class, as seen below.
PS51> Get-CimInstance Win32_OperatingSystem | Select-Object LastBootUpTime LastBootUpTime ————– 9/25/2019 9:37:37 PM
Use the Get-WinEvent cmdlet in PowerShell to access the Event Log. You’ll need to look for event IDs 6005 or 6006 to see when the machine was last started.
PS51> Get-WinEvent -ProviderName EventLog | Where-Object {$_.Id -eq 6005 -or $_.Id -eq 6006} | Select-Object -First 1 TimeCreated TimeCreated ———– 9/25/2019 9:37:52 PM
WMIC
WMIC is a tried-and-true approach that has been used for many years and offers a command-line interface for WMI. To query uptime using WMIC, you must use the Win32 OperatingSystem WMI class, which is a little hidden. You may use the WMIC syntax os get lastbootuptime to retrieve the last time the server was launched, as shown below.
> wmic os get lastbootuptime LastBootUpTime 20190925213737.500000-240
WMIC is pre-installed with Windows, so you don’t need to download anything to use it.
Utility for System Information
The systeminfo command gives extensive information about a computer’s settings and may be used to check its uptime. You may parse the text using the built-in find command line tool to get the information you need.
Simply enter systeminfo | find in either Command Prompt or PowerShell.
> systeminfo | find “System Boot Time:” System Boot Time: 9/25/2019, 9:37:37 PM
To use systeminfo, you don’t need to download anything since it comes pre-installed with Windows.
Command for Net Statistics
Net Statistics, often known as net stats, may be used to rapidly query uptime. The net stats command delivers summary statistics about your current session. The Statistics since… line may be seen below. This is the date when the machine was turned on.
> net stats srv Workstation Statistics for \NATES-PC Statistics since 9/25/2019 9:37:52 PM –SNIP– The command completed successfully.
Command for Uptime
If you need a small, portable utility to find Windows uptime, look no further than NeoSmart Technologies’ Command for Uptime for Windows. This utility is perfect for quickly querying uptime on any Windows version. The major benefit of this tool is the convenience factor. If you find yourself using this many times per day you may want to consider this method.
Extract uptime.exe to percent WinDir% System32 after downloading the utility. Then just enter uptime into a command prompt.
Tool for calculating uptime
To use this application remotely, you must first copy it to the Windows computers you want to monitor uptime on.
The Get-ServerUptimeReport script is now available.
Download Get-ServerUptimeReport.ps1 from the community so you don’t have to develop the PowerShell yourself.
PS51> Install-Script -Name Get-ServerUptimeReport
You may provide a machine name as a parameter to this script. It will then examine the computer’s System event log for both a start and stop event to compare. The total time the server was online till the event log rolled will then be returned.
An example of how to run this script on a server is shown below. It will provide you the total uptime for all occurrences in the server’s event log, including the current uptime.
PS51> ./Get-ServerUptimeReport.ps1 -ComputerName sqlsrv1 Startup Shutdown Uptime (Days) Uptime (Min) ——- ——– ————- ———— 9/16/2017 12:40:00 PM 9/22/2017 4:20:11 PM 6.15 8860.18 9/16/2017 10:22:49 AM 9/16/2017 12:22:36 PM 0.08 119.79 9/16/2017 3:22:12 PM 9/22/2017 4:20:11 PM 6.04 8697.98
Finding Windows Uptime on a Large Number of Servers
This script calculates the uptime of a single server over a period of time. But what if you need this information for a large number of servers at the same time? To do so, compile a list of servers and then send each computer’s name to this script one by one.
In the PowerShell console, for example, create an array with all of your servers. The variable array will be named $servers in this case.
However, you may be getting server names from Active Directory, Hyper-V, or a text file in reality. You’ll be good as long as you can construct an array of server names.
Define all of the server names, then use a loop to iterate through them all, as seen below.
foreach ($server in $servers) $servers = ‘WEBSRV1′,’SQLSRV1’ Get-ServerUptimeReport.ps1 -ComputerName $server Get-ServerUptimeReport.ps1 -ComputerName $server Get-ServerUptimeReport.ps1 -Com Startup Shutdown Uptime (Days) Uptime (Min) ———- ———— ——————- —————— 9/16/2017 12:45:48 PM 9/22/2017 4:25:39 PM 6.15 8859.86 9/16/2017 10:42:52 AM 9/16/2017 12:42:34 PM 0.08 119.7 9/16/2017 2:42:17 PM 9/22/2017 4:25:39 PM 6.07 8743.38 9/16/2017 12:40:00 PM 9/22/2017 4:25:39 PM 6.16 8865.65 9/16/2017 10:22:49 AM 9/16/2017 12:22:36 PM 0.08 119.79 9/16/2017 3:22:12 PM 9/22/2017 4:25:39 PM 6.04 8703.46
This code works, but there’s no way to tell which server each row refers to. Using a computed property, add a server name to the result, as seen below.
foreach ($server in $servers) $servers = ‘WEBSRV1′,’SQLSRV1′ Get-ServerUptimeReport.ps1 -ComputerName $server | Select-Object -Property *,@n=’ServerName’;e=$server | Select-Object -Property *,@n=’ServerName’;e=$server Startup Shutdown Uptime (Days) Uptime (Min) ServerName ———- ———— ——————- —————— ————— 9/16/2017 12:45:48 PM 9/22/2017 4:34:59 PM 6.16 8869.19 9/16/2017 WEBSRV1 10:42:52 AM 9/16/2017 12:42:34 PM 0.08 119.7 WEBSRV1 9/16/2017 2:42:17 PM WEBSRV1 9/16/2017 2:42:17 PM WEBSRV1 9/16 9/22/2017 4:34:59 PM 6.08 8752.71 WEBSRV1 Startup Shutdown Uptime (Days) Uptime (Min) ServerName ———- ———— ——————- —————— ————— 9/16/2017 12:40:00 PM 9/22/2017 4:35:01 PM 6.16 8875.01 9/16/2017 10:22:49 AM SQLSRV1 9/16/2017 12:22:36 PM 0.08 119.79 9/16/2017 3:22:12 PM SQLSRV1 9/22/2017 4:35:01 PM 6.05 8712.81 SQLSRV1
We now have a fantastic little tool that can give us with a fast report on our servers’ uptime over time!
Summary
You’ve now seen a variety of methods for determining Windows uptime. You’ll get the same information regardless of whatever choice you choose. Choose the best option for your situation.
Also, don’t forget about the Get-ServerUptimeReport PowerShell script if you require a historical report on uptime history!
The “how to check uptime in windows server using powershell” is a command-line tool that allows users to check the boot time and uptime for a Windows Server.
Frequently Asked Questions
How do I check Windows boot time?
A: If you have Windows 10, you can check your boot time in the settings. It should look like this 0 seconds when its finished loading. You dont need to do anything special for a Linux or Mac system as these operating systems already include functionality that lets you monitor start-up times on their own without third party software.
How do I check my computer uptime?
A: To check your computers uptime, you can either use a free online service such as www.uptime.com or another program that monitors the operating system’s uptime like “System Monitor by NirSoft.
How can I tell when Windows 10 last rebooted?
A: You cannot tell when Windows 10 last rebooted.
Related Tags
- how to check uptime in windows cmd
- how to check uptime in windows 10
- system uptime windows 10
- check uptime cmd
- windows uptime format
Introduction
Booting up your computer is one of the essential parts of using any operating system, and Windows 11 is no different. The time it takes from turning on your computer to reaching the login screen can significantly affect your productivity and user experience. If you’ve noticed that your Windows 11 device is taking longer than expected to boot, it may warrant some investigation. In this article, we will cover everything you need to know about checking boot time in Windows 11, along with understanding potential causes of slow boot times and how you can improve them.
Understanding Boot Time
What is Boot Time?
Boot time refers to the duration it takes for a computer to start from a powered-off state to a fully operational state where the user can log in. This time can vary based on several factors, including hardware specifications, the installed operating system, system services, and startup applications.
Why Check Boot Time?
Measuring your boot time can help diagnose performance issues with your system. If your boot time becomes notably longer, it may indicate problems with hardware, software conflicts, or unnecessary applications running at startup. Regularly monitoring your boot time can keep your system running smoothly.
Methods to Check Boot Time in Windows 11
There are multiple methods you can use to check the boot time in Windows 11. Below are detailed steps for each method.
Method 1: Using Windows Event Viewer
The Event Viewer is a built-in tool in Windows that logs various events occurring within the system, including boot times.
-
Open the Event Viewer:
- Press
Win + Ron your keyboard to open the Run dialog box. - Type
eventvwr.mscand hit Enter. This opens the Event Viewer.
- Press
-
Locate the Boot Time Logs:
- In the Event Viewer, navigate to the left pane and expand the
Windows Logsfolder. - Click on the
Systemlog. - To filter the logs, find the “Action” menu in the top panel and select
Filter Current Log.
- In the Event Viewer, navigate to the left pane and expand the
-
Set the Filter:
- In the filter window, enter
6005and6006into the Event ID field to focus on System Startup events. - Click
OK.
- In the filter window, enter
-
Review the Logs:
- Scroll through the filtered logs to find entries with the Event ID numbers mentioned above.
- The
Event ID 6005indicates the «Event Log service started,» and6006indicates the «Event Log service stopped.» - Check timestamps to calculate your boot time. For example, if Event ID 6005 is logged at 08:01:00 and 6006 is logged at 08:01:30, boot time is 30 seconds.
Method 2: Using the Task Manager
You can also check the boot time of your Windows 11 system using the Task Manager.
-
Open the Task Manager:
- Right-click on the Taskbar and select
Task Manager, or pressCtrl + Shift + Esc.
- Right-click on the Taskbar and select
-
Go to the Performance Tab:
- Click on the
Performancetab located at the top.
- Click on the
-
Access the Startup Impact:
- From the left sidebar, select
Startup. - Here you will see a list of applications that start during the boot process, along with their
Startup Impactrating.
- From the left sidebar, select
-
Check Boot Time:
- While this does not give an exact measurement of your boot time, it allows you to infer which applications are slowing down your boot process. Reducing the number of high-impact startup applications can significantly decrease boot time.
Method 3: Using Command Prompt
For those comfortable using the Command Prompt, you can access boot time details as follows:
-
Open Command Prompt:
- Type
cmdin the Windows search bar, right-click onCommand Prompt, and selectRun as administrator.
- Type
-
Run
systeminfoCommand:- In the Command Prompt window, type
systeminfo | find "Boot Time"and press Enter. - This command will show you the last time your system was booted. However, it won’t provide the boot duration.
- In the Command Prompt window, type
-
Using
bcdeditCommand:- Another command is
bcdedit /enumwhich can show additional system boot parameters that help diagnose boot issues but doesn’t track time.
- Another command is
Method 4: Using Performance Monitor
Performance Monitor is a more advanced tool that provides in-depth details about system performance, including boot times.
-
Open Performance Monitor:
- Press
Win + Rto open the Run dialog. - Type
perfmonand hit Enter.
- Press
-
Create a New Data Collector Set:
- In the left pane, expand
Data Collector Sets. - Right-click
User Definedand selectNew > Data Collector Set.
- In the left pane, expand
-
Set Up Boot Time Monitoring:
- Follow the wizard to create a new Data Collector Set.
- You can choose to include
Performance Counters, where you can find various boot performance counters. - Set a duration for how long you want it to monitor.
-
Start the Data Collector Set:
- Right-click the newly created Data Collector Set and select
Start. - After rebooting your system, return to Performance Monitor and check the results.
- Right-click the newly created Data Collector Set and select
Method 5: Using Windows Settings
Windows 11 includes built-in diagnostic tools to evaluate startup performance.
-
Open Windows Settings:
- Press
Win + Ito open the Settings menu.
- Press
-
Navigate to System:
- Navigate to the
Systemsection and then selectAbout.
- Navigate to the
-
Check Advanced Startup Options:
- Here you can find options for recovery, which may show recent boot times or performance metrics.
Analyzing Boot Time
After gathering boot time measurements using the methods described above, it’s crucial to analyze the results properly.
Evaluating Boot Time Performance
-
Average Boot Time:
- Typically, the average boot time for Windows 11 should be under 30 seconds for an SSD and up to 1 minute for an HDD. If your times exceed these averages, troubleshooting is necessary.
-
Comparison with Previous Measurements:
- If you regularly check your boot time, it’s beneficial to compare the current measurements with past results to identify trends.
-
Impact of Startup Programs:
- Identify any applications that you don’t need to start during boot. High-impact programs can drastically affect the boot time. Consider disabling unnecessary applications.
Troubleshooting Slow Boot Times
If you’ve determined your boot time is longer than expected, several troubleshooting steps may help improve it.
1. Disable Unnecessary Startup Applications
Many applications may be set to run on startup, and disabling them can improve boot time.
- Open Task Manager (as described in Method 2).
- Go to the Startup Tab:
- Right-click on any application you do not need immediately at startup and select
Disable.
- Right-click on any application you do not need immediately at startup and select
2. Check for Updates
Sometimes slow boot times can be due to outdated operating system files or device drivers.
- Open Windows Settings (Press
Win + I). - Go to Windows Update:
- Navigate to
Update & Security>Windows Updateand click onCheck for updates.
- Navigate to
3. Optimize Startup Services
Some background services may delay boot times.
-
Open Run Command:
- Press
Win + R, typemsconfig, and hit Enter.
- Press
-
Go to Services Tab:
- In the System Configuration window, go to the
Servicestab and checkHide all Microsoft services. - Uncheck services that are unnecessary at startup.
- In the System Configuration window, go to the
4. Run Disk Cleanup
A cluttered drive can slow down the boot process. Running Disk Cleanup to remove temporary files can help.
-
Search for Disk Cleanup:
- Type
Disk Cleanupin the Windows search bar.
- Type
-
Select the Drive:
- Choose the drive you want to clean up (most often, the C: drive where Windows is installed).
-
Select Files to Delete:
- Check the boxes for the file types you want to remove, and click
OK.
- Check the boxes for the file types you want to remove, and click
5. Check Disk for Errors
A failing hard drive may lead to longer boot times.
-
Open Command Prompt as Administrator:
- Type
cmdin the Windows search bar, right-click on it, and selectRun as administrator.
- Type
-
Run Check Disk:
- Type
chkdsk /fand press Enter. You may need to restart your PC for the check to run.
- Type
6. Upgrade Hardware
If you’re still facing long boot times after troubleshooting, it may be time to consider a hardware upgrade.
-
Upgrade to an SSD:
- If your computer still operates on an HDD, consider upgrading to an SSD for a significant speed boost during boot-up.
-
Increase RAM:
- Upgrading your RAM can also help if your boot time is affected by slow application loading during startup.
Conclusion
Checking and understanding boot times in Windows 11 is crucial for maintaining an efficient user experience. By consistently monitoring boot performance and addressing issues as they arise, you can keep your system running smoothly. Make sure you utilize the various built-in tools and settings Windows provides to check and improve boot times. A well-optimized startup can increase your productivity and ensure you spend less time waiting for your machine to become usable.
With the insights shared in this article, you can take charge of your Windows 11 boot times, leading to improved performance and a seamless computing experience. Remember, a little maintenance can go a long way when it comes to operating systems and user satisfaction.