
Если вам потребовалось отключить BitLocker для диска (HDD и SSD) или флешки в Windows 10 — сделать это очень просто, при условии, что вы можете получить доступ к нему, можете открыть содержимое — знаете пароль или имеете другой путь способ разблокировки.
В этой инструкции подробно о методах снять шифрование BitLocker с диска Windows 10. В случае, если открыть содержимое диска нет возможности, доступ отсутствует, ключей восстановления тоже нет, к сожалению, единственный метод отключение BitLocker — форматирование этого диска с потерей данных.
Снятие шифрования BitLocker с диска или флешки
Сначала про отдельный момент, касающийся некоторых ноутбуков и ПК с предустановленной Windows 10. На них может быть по умолчанию включена функция «Шифрование устройства», которая отключается не так же, как включенное вами вручную шифрование BitLocker. Если системный диск был зашифрован при покупке, то для отключения шифрования выполните следующие шаги (не на любом компьютере с Windows 10 есть такие пункты):
- Зайдите в Параметры — Обновление и безопасность.
- В меню слева выберите «Шифрование устройства» и отключите шифрование устройства.
- Также пункт «Шифрование устройства» можно найти в Параметры — Система — О системе.
В случае, если требуется отключить BitLocker для диска или флешки, шаги будут следующими:
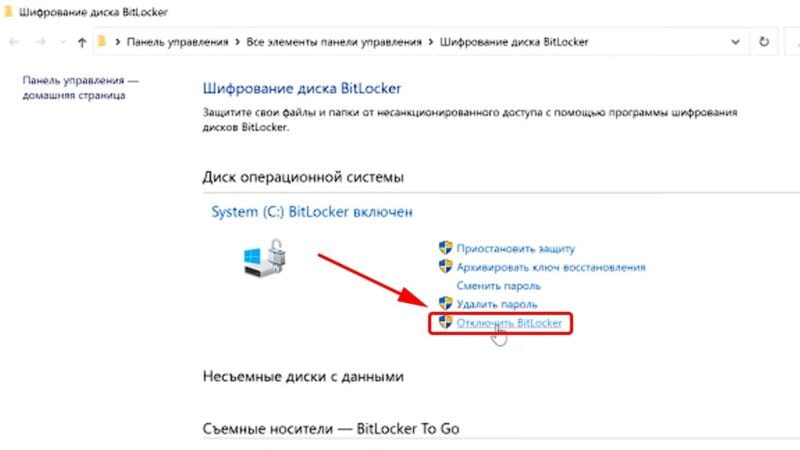
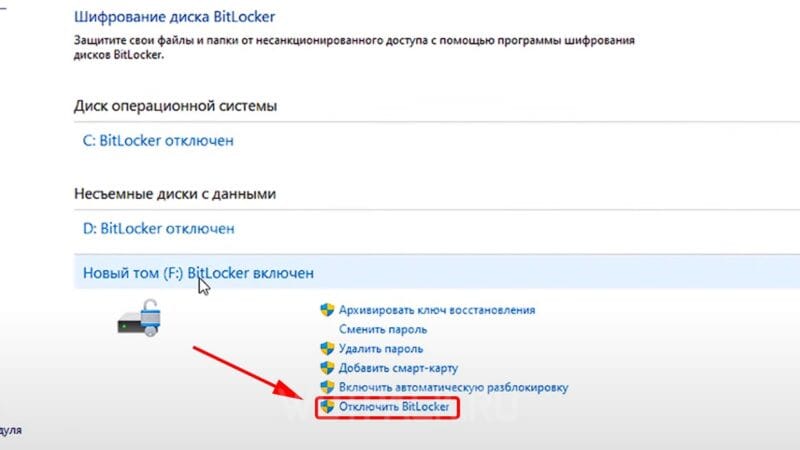
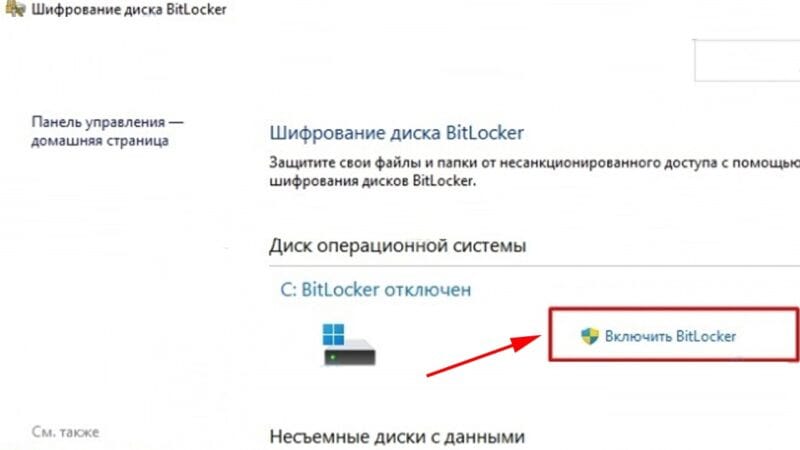
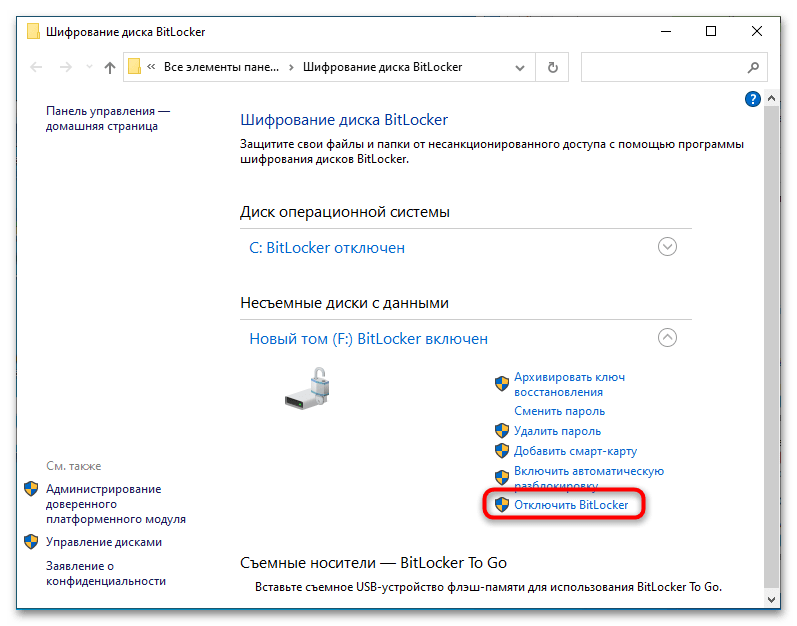
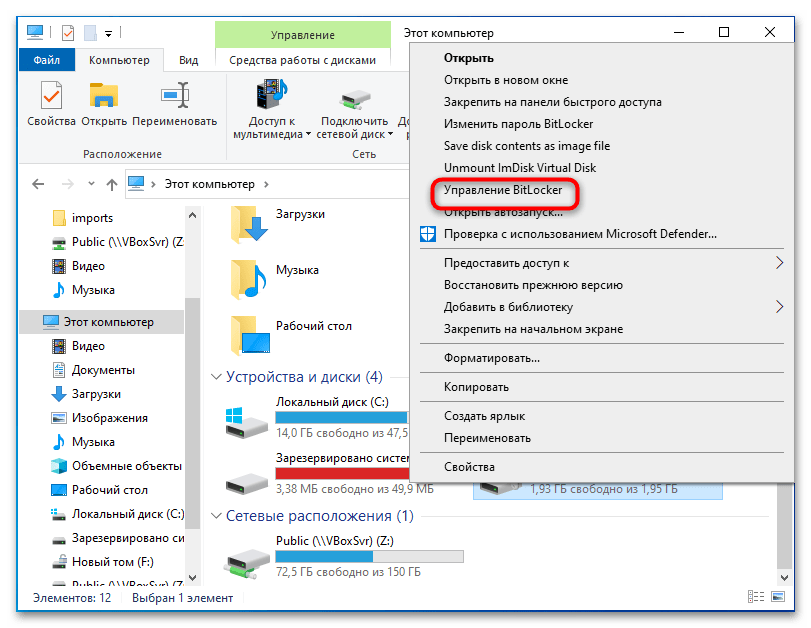
- В проводнике нажмите правой кнопкой мыши по зашифрованному и разблокированному диску, выберите пункт «Управление BitLocker». Также в параметры BitLocker можно попасть через Панель управления — Шифрование BitLocker.

- Найдите ваш диск в списке и нажмите «Отключить BitLocker» (требуются права администратора на компьютере).

- Подтвердите отключение BitLocker.


Учитывайте, что процесс расшифровки диска и снятия BitLocker может занять продолжительное время, вплоть до нескольких часов, особенно для медленных и заполненных HDD — не запускайте процесс на ноутбуке от батареи или на ПК, если его в ближайшее время потребуется выключить.
Отключение BitLocker — видео инструкция
Надеюсь, материал был полезен. Если же остались вопросы — задавайте в комментариях, я постараюсь помочь.
Шифрование диска BitLocker – особая технология защиты данных в операционной системе Microsoft Windows. БитЛокер обеспечивает информационную безопасность через шифрование томов, что позволяет снизить риск похищения и раскрытия персональных данных. Шифрование дисков BitLocker может иметь негативные последствия, поэтому при необходимости его можно отключить.
В этом гайде подробно разберем шифрование BitLocker в Windows 10 и 11. Читайте дальше, чтобы узнать, как отключить БитЛокер и разблокировать диск.
Шифрование BitLocker недоступно в домашней версии Windows 10.
Что такое BitLocker для Windows 10/11
Кратко опишем, зачем нужен BitLocker в системах Windows:
- Защищает данные через полное шифрование.
- Используется для устранения несанкционированного доступа к информации на потерянных или украденных устройствах.
Не смотря на очевидные достоинства, шифрование BitLocker замедляет SSD и жесткие диски.
Как узнать, включен ли BitLocker
Ниже представлена инструкция для проверки шифрования через BitLocker Windows:
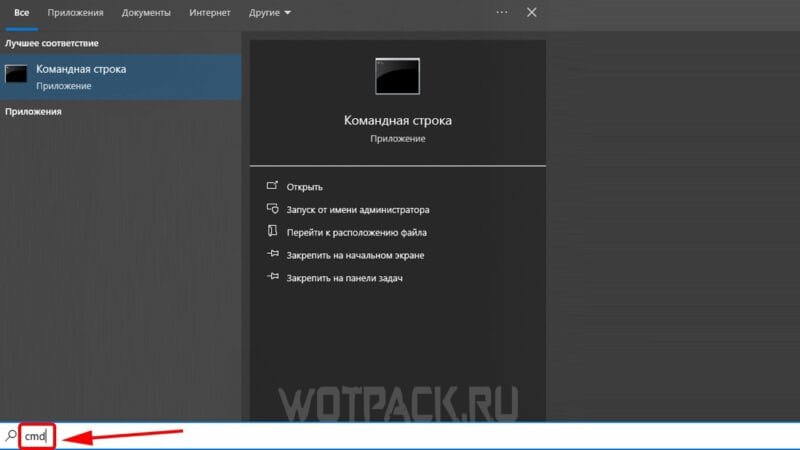
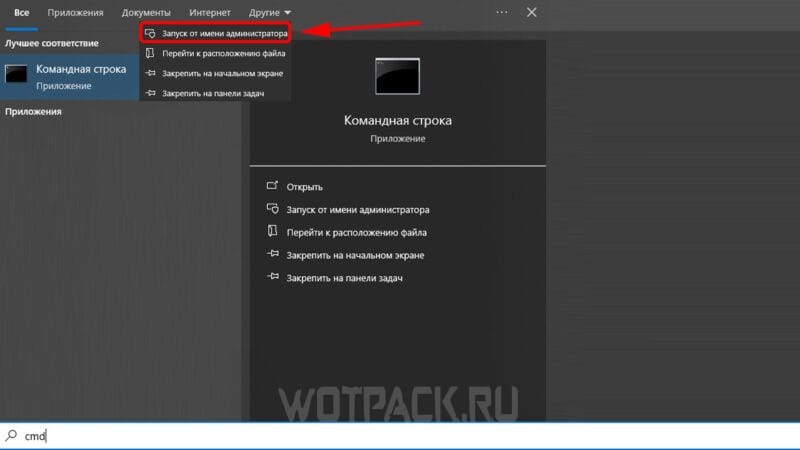
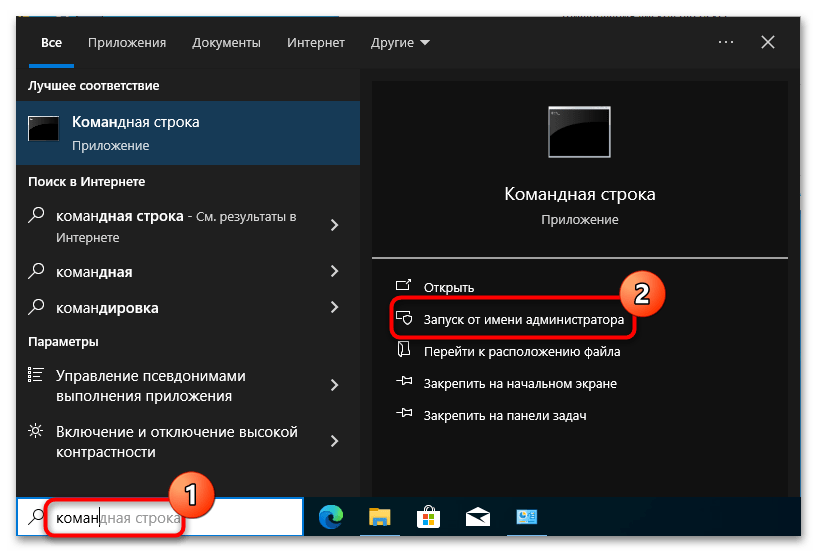
- Введите в строку поиска «cmd».

- Откройте приложение «Командная строка» от имени администратора с помощью правой кнопки мыши.
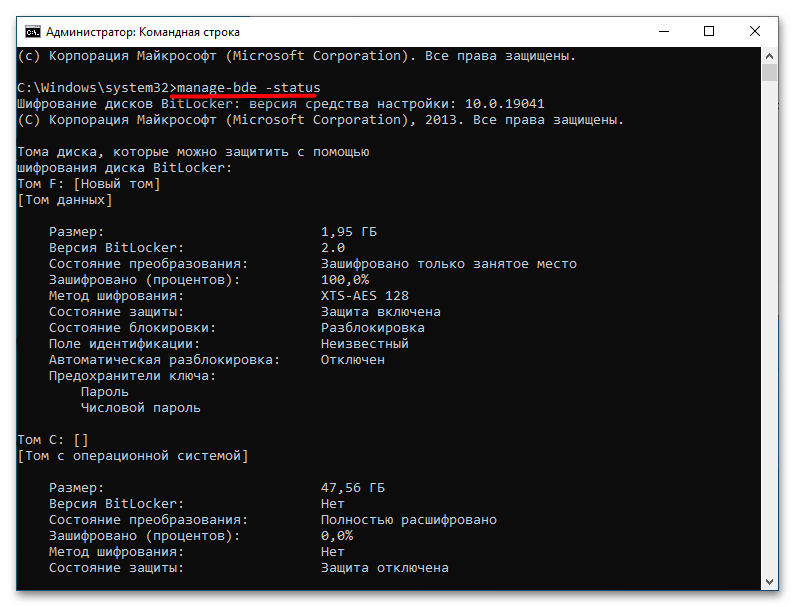
- Введите в консоль команду «Manage-bde –status» и дождитесь загрузки данных.
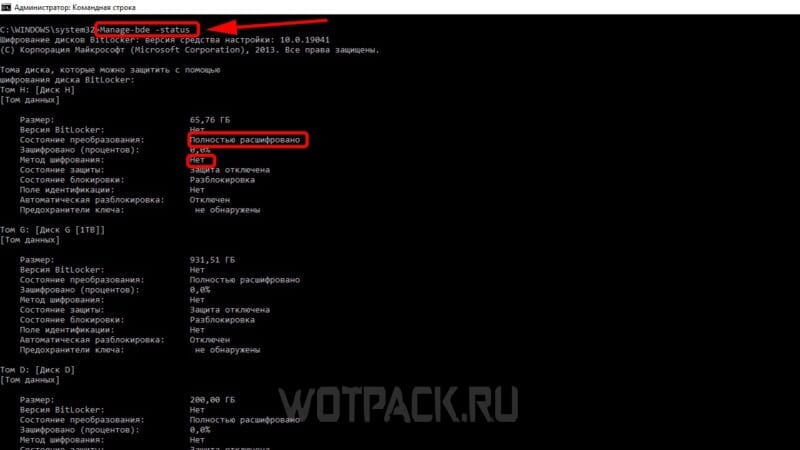
Если в пункте «Состояние преобразования» [Conversion Status] есть запись «Полностью расшифровано», а в графе «Метод шифрования» [Encryption Method] написано «Нет», то BitLocker отключен.
Нужно ли отключать шифрование диска BitLocker
Бесплатное шифрование диска BitLocker по умолчанию встроено в системы Windows 10/11, поэтому разберем, необходима ли активация этой защиты:
- Если случится так, что ПК будет украден или утерян, то злоумышленники не смогут завладеть данными, что хранятся на дисках.
- Когда пользователь включает компьютер и заходит в свою учетную запись, все данные расшифровываются, поэтому файлы будут защиты до принудительной блокировки ПК.
- Шифрование дисков может замедлить работу системы.
- Если ключ восстановления BitLocker [BitLocker Recovery Key] будет утерян, то зашифрованные данные не получится восстановить, а диск придется форматировать.
Таким образом БитЛокер рекомендуется использовать в том случае, когда есть риск потерять конфиденциальные данные или очень ценную информацию, а если компьютер используется только для видеоигр и воспроизведения медиафайлов, то активировать шифрование не обязательно.
Как отключить шифрование диска BitLocker
В следующих пунктах покажем, как выключить БитЛокер в Windows 10 и 11.
Отключить БитЛокер можно через консоль с помощью команды «Manage-bde -off диск» – где вместо слова «диск» необходимо вписать букву нужного тома.
На Windows 10
Следующие действия помогут отключить BitLocker в Windows 10:
- Войдите в систему с правами администратора.
- Откройте панель управления, нажмите на раздел «Система и безопасность», после чего выберете пункт «Шифрование устройства» или «Шифрование диска BitLocker».
- Около иконки с нужным томом нажмите «Отключить BitLocker».
На Windows 11
Кратко поясним, как отключить BitLocker в Windows 11:
- Запустите Windows с правами администратора.
- Откройте через параметры системы раздел «Конфиденциальность и безопасность» и выберете пункт «Шифрование устройства» или «Шифрование диска BitLocker».
- Около нужного диска нажмите кнопку «Отключить BitLocker».
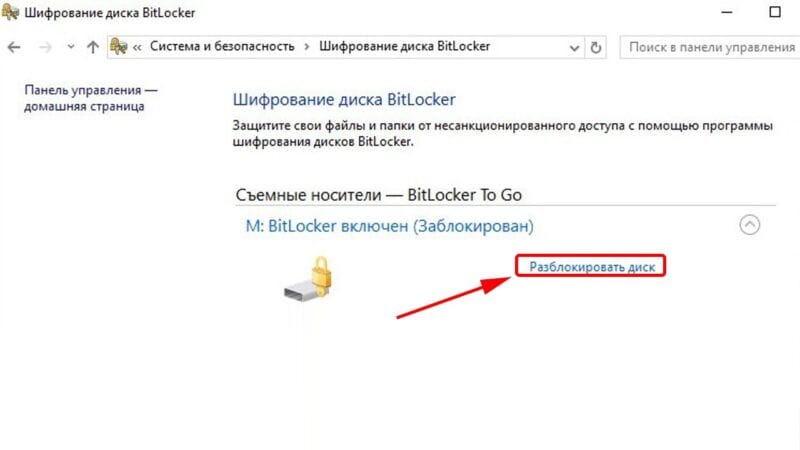
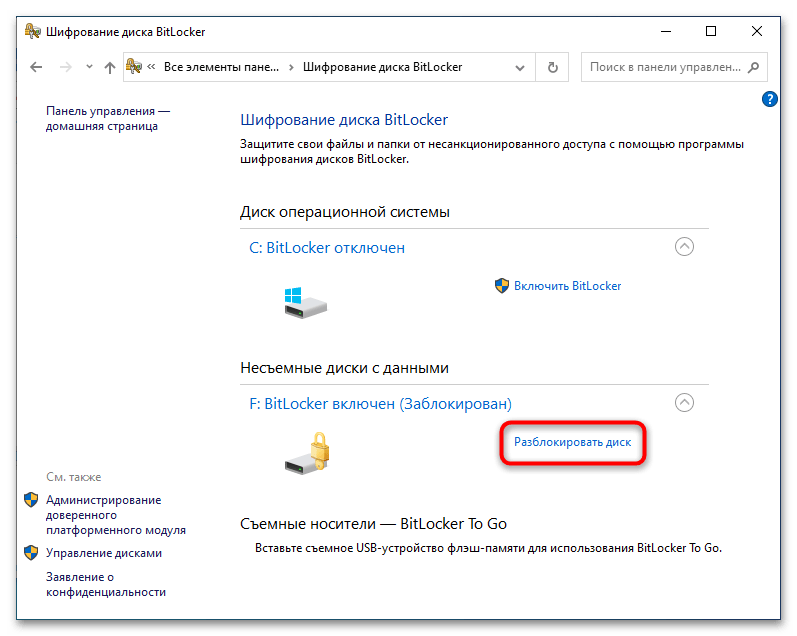
Как разблокировать диск с BitLocker
Системные диски с защитой БитЛокер можно разблокировать – расскажем об этом в следующих пунктах.
Существует два основных способа для разблокировки диска с защитой БитЛокер – с помощью пароля и через ключ восстановления.
На Windows 10
Перечислим действия, которые позволят разблокировать диск с БитЛокер в Windows 10:
- Откройте панель управления компьютера, после чего перейдите в раздел «Система и безопасность» и нажмите на пункт «Шифрование диска BitLocker».
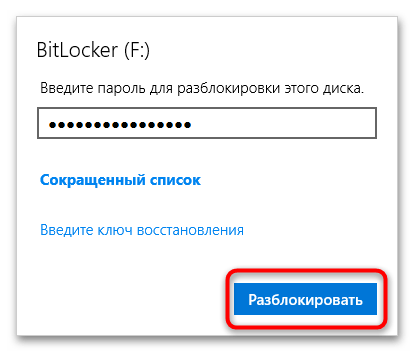
- В списке выберите зашифрованный том и нажмите «Разблокировать диск».
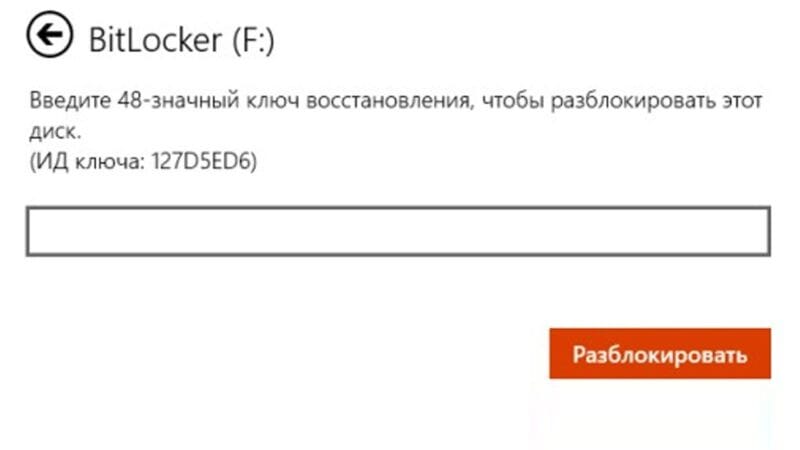
- Введите правильный пароль или подключите идентификационную карту, а если это невозможно, то используйте ключ восстановления через подраздел «Дополнительные параметры».
На Windows 11
Перечислим действия, которые позволят разблокировать диск с БитЛокер в Windows 11:
- Откройте параметры компьютера, перейдите в раздел «Конфиденциальность и безопасность», выберете пункт «Шифрование».
- Выберите нужный зашифрованный том и нажмите «Разблокировать диск».
- Введите требуемый пароль или ключ восстановления БитЛокер.
Как разблокировать диск без ключа
Бывают ситуации, когда ключ восстановления утерян и стоит вопрос, как разблокировать BitLocker. БитЛокер – это продукт Microsoft для обеспечения безопасности данных, поэтому сотрудники компании и служба поддержки не смогут предоставить новый индивидуальный ключ восстановления. Таким образом разблокировать диск без ключа невозможно.
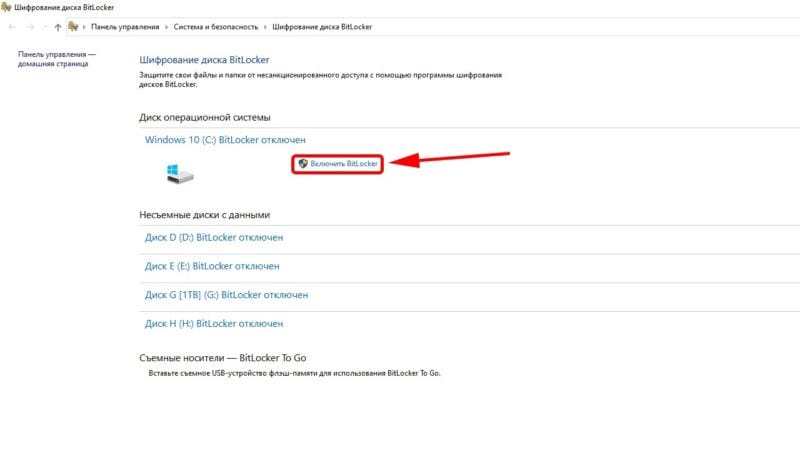
Как включить шифрование диска BitLocker
Далее приведем инструкции, которые позволят активировать шифрование БитЛокер в Windows.
Обязательно сохраните ключ восстановления БитЛокер в удобном месте (распечатанный лист, текстовый файл или на электронной почте).
На Windows 10
Способ включить BitLocker в Windows 10:
- Войдите в систему под учетной записью администратора.
- Вбейте в строку поиска «BitLocker», чтобы открыть «Шифрование диска BitLocker», или откройте этот раздел через панель управления в пункте «Система и безопасность».
- Выберите из списка нужный диск операционной системы, после чего нажмите на кнопку «Включить BitLocker».
На Windows 11
Способ включить BitLocker в Windows 11:
- Запустите Windows с профиля администратора.
- Откройте через «Пуск» меню «Параметры».
- Выберите раздел «Конфиденциальность и безопасность».
- Откройте пункт «Шифрование устройства», а если он отсутствует, то – «Шифрование диска BitLocker».
- Для нужного диска выберете «Включить BitLocker».
Надеемся, что подготовленный материал помог узнать, что такое БитЛокер Windows, а также отключить его. Дополнительные вопросы можно оставить в комментариях.
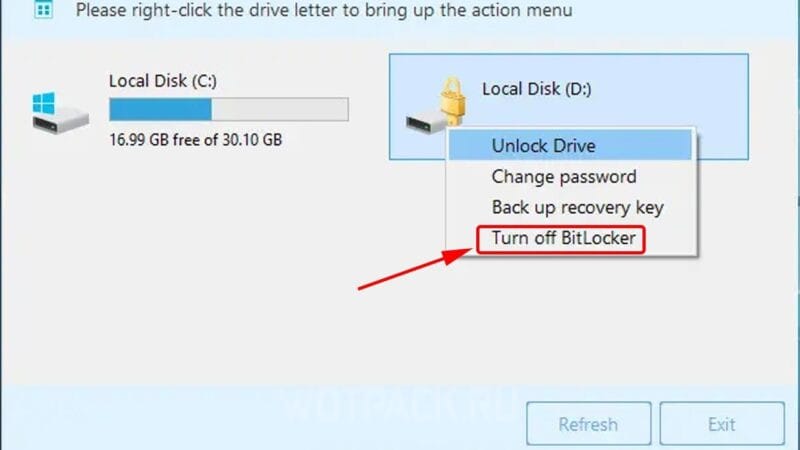
Процедура отключения шифрования BitLocker может отличаться в зависимости от того, заблокирован или разблокирован раздел в данный момент.
Способ 1: Штатный апплет
Удобнее всего для отключения шифрования БитЛокер использовать средства штатного одноименного компонента.
- Запустите апплет «Шифрование диска BitLocker», для чего выполните команду
control /name Microsoft.BitLockerDriveEncryptionв вызванном нажатием клавиш Win + R диалоговом окошке быстрого запуска приложений. - Выберите зашифрованный диск. Если он заблокирован, доступна будет только одна опция – «Разблокировать диск». Кликните по ней.
- Введите пароль БитЛокера или 48-значный код разблокировки, если пароль утерян.
- После этого в окне апплета станут доступны и другие опции. Выберите «Отключить BitLocker» и подтвердите деактивацию функции в диалоговом окошке.

Если диск уже разблокирован, опция «Отключить BitLocker» будет доступна сразу после запуска апплета. В этом случае перейти к настройкам БитЛокера можно будет также непосредственно из контекстного меню диска.
Процедура расшифровки диска займет некоторое время. Ее продолжительность будет зависеть от объема диска, его типа (SSD или HDD), метода шифрования и количества записанных данных.
Способ 2: «Командная строка»
Для отключения шифрования БитЛокер также можно использовать средства классической «Командной строки» или «PowerShell».
- Откройте «Командную строку» либо «PowerShell» с правами администратора из поиска Windows или другим известным способом.
- Выполните команду
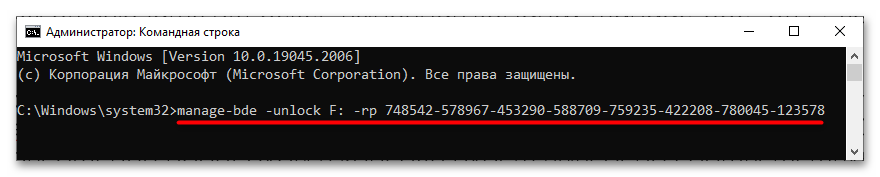
manage-bde -status, чтобы получить список всех зашифрованных томов. - Если диск заблокирован, используйте команду следующего вида:
manage-bde -unlock F: -rp key, где F – это буква диска, а key – 48-значный ключ разблокировки. - Далее, чтобы отключить BitLocker, воспользуйтесь командой
manage-bde -off F:, где F – буква диска.
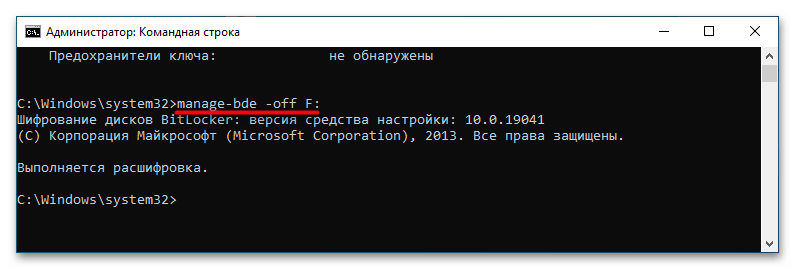
Если диск уже разблокирован, для отключения БитЛокера достаточно одной команды manage-bde -off F:. Начнется процедура расшифровки данных, которая займет некоторое время. По завершении в консоли будет выведено соответствующее уведомление.
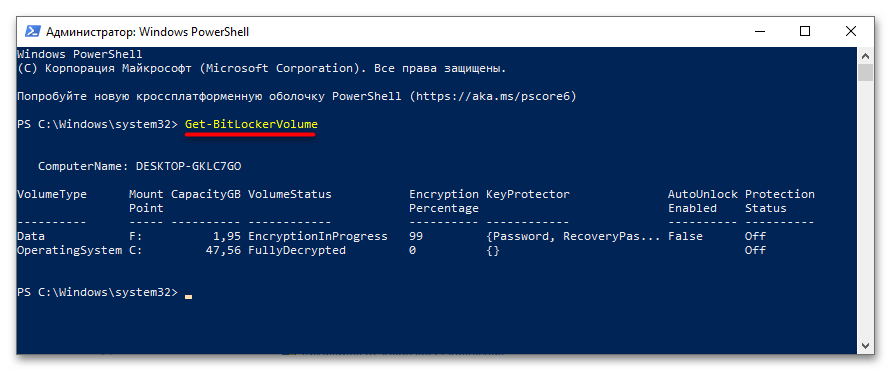
Способ 3: «PowerShell»
С тем же успехом для отключения шифрования разделов в Windows можно использовать консоль «PowerShell». Ниже приведен способ отключения шифрования для уже разблокированного диска.
- Запустите «PowerShell» с правами администратора из контекстного меню кнопки «Пуск».
- Получите список дисков с указанием их статуса шифрования, для чего введите команду
Get-BitLockerVolume. - Чтобы отключить шифрование выбранного раздела, выполните команду
Disable-BitLocker -MountPoint "F:", где F – его буква. Подтвердите действие вводом Y и нажатием клавиши Enter.
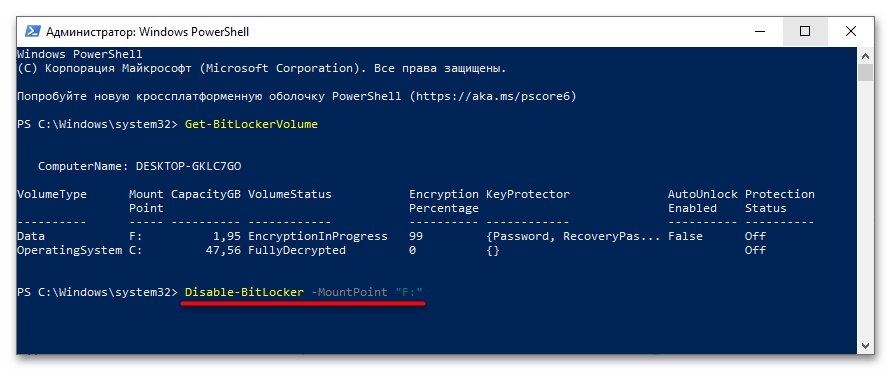
Если диск заблокирован, используйте для его разблокировки те же команды, что и в Способе 2. Как и в приведенных выше примерах, на расшифровку данных потребуется некоторое время.
Наша группа в TelegramПолезные советы и помощь
Updated on Apr 28, 2025
BitLocker is a powerful data encryption feature built into your computer’s OS for data safety. It offers comprehensive protection for the entire drive, ensuring that sensitive files remain inaccessible to unauthorized users. However, there may be instances where you need to disable this feature temporarily. A few examples include resolving technical issues, preparing to sell your device, or upgrading system components.
EaseUS will show you how to disable BitLocker in Windows 11/10 within no time. By the end, you can quickly deactivate this feature on Lenovo, Dell, or Asus devices. Learn how to decrypt your hard drive and understand the critical aspects of handling encrypted data to avoid potential security risks.
How to Turn Off BitLocker in Windows 11/10 — 4 Ways
Depending on your preference and familiarity with the system, there are many reliable ways to turn off this feature. These range from using third-party software to built-in utilities to help you decide the best solution. Outlined below are four straightforward methods to turn off/disable BitLocker in Windows 11/10 within no time:
Way 1. Disable Bitlocker Encryption via EaseUS Partition Master
You should utilize professional software to deactivate this feature to avoid any adverse effects. The safest way to turn off/disable BitLocker in Windows 11/10 is EaseUS Partition Master Free. This software streamlines all your disk management needs from partitioning and formatting to resizing your drives. When it comes to turning off BitLocker, it offers the most uncomplicated process that is suited for all users.
Advantages of EaseUS Partition Master
- 1. Unlike other methods, it provides a graphical interface that makes it easy to navigate for users unfamiliar with advanced system tools.
- 2. Mistyping a command when using manual methods can lead to unintended issues, but this tool automates the process to minimize the risk of mistakes.
- 3. Besides disabling BitLocker, this robust software offers a comprehensive suite of disk management features, including partition resizing, cloning, and formatting.
- 4. It simplifies steps that would otherwise require multiple manual commands or navigating through several system settings to disable BitLocker.
Step-by-Step Tutorial To Turn Off/Disable BitLocker in Windows 11/10
You can follow the detailed instructions given below to safely deactivate this data encryption feature on your PC:
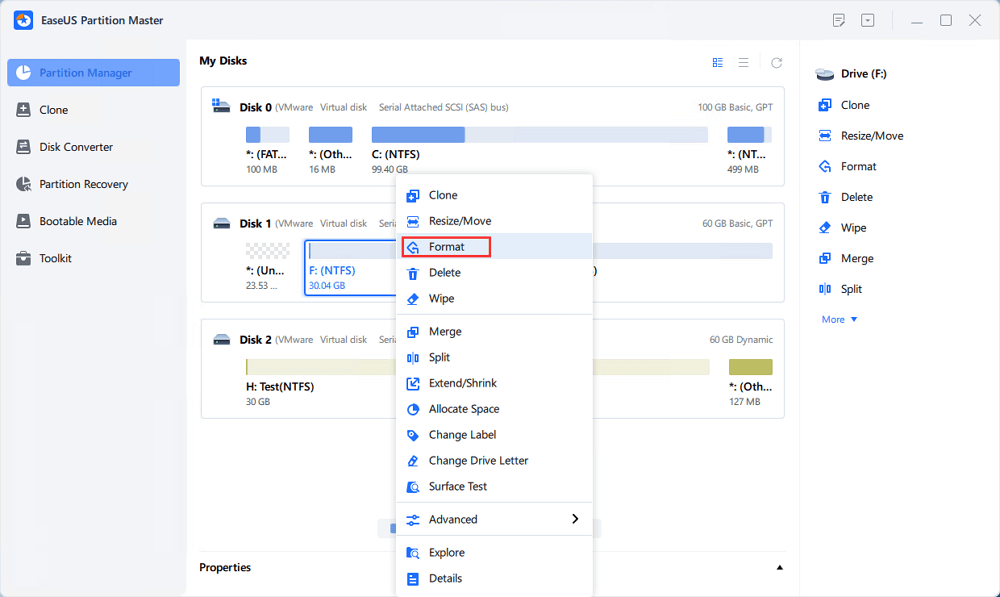
Step 1. Run EaseUS Partition Master, right-click the hard drive partition you intend to format and choose «Format».
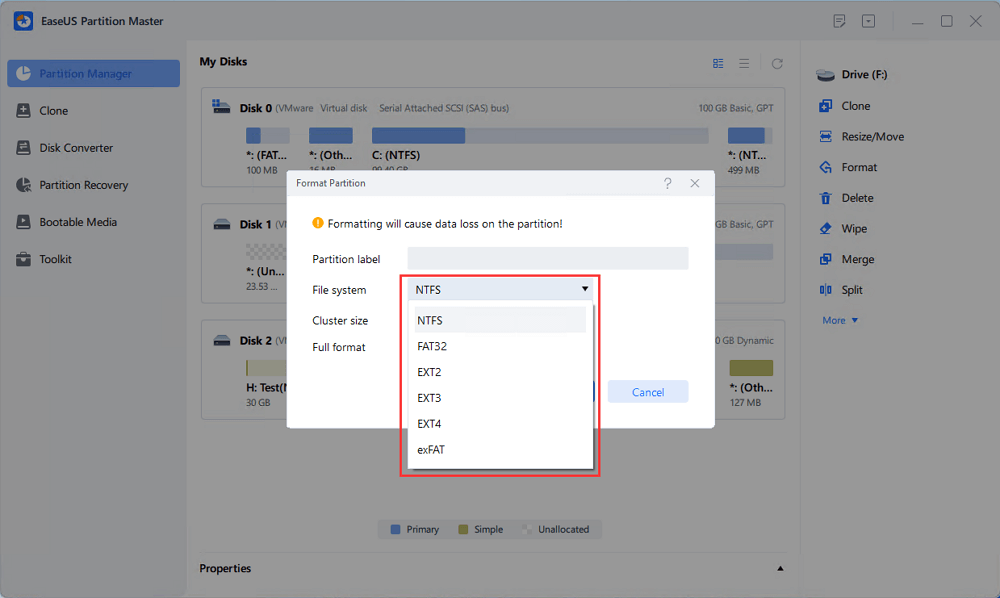
Step 2. In the new window, set the Partition label, File system (NTFS/FAT32/EXT2/EXT3/EXT4/exFAT), and Cluster size for the partition to be formatted, then click «OK».
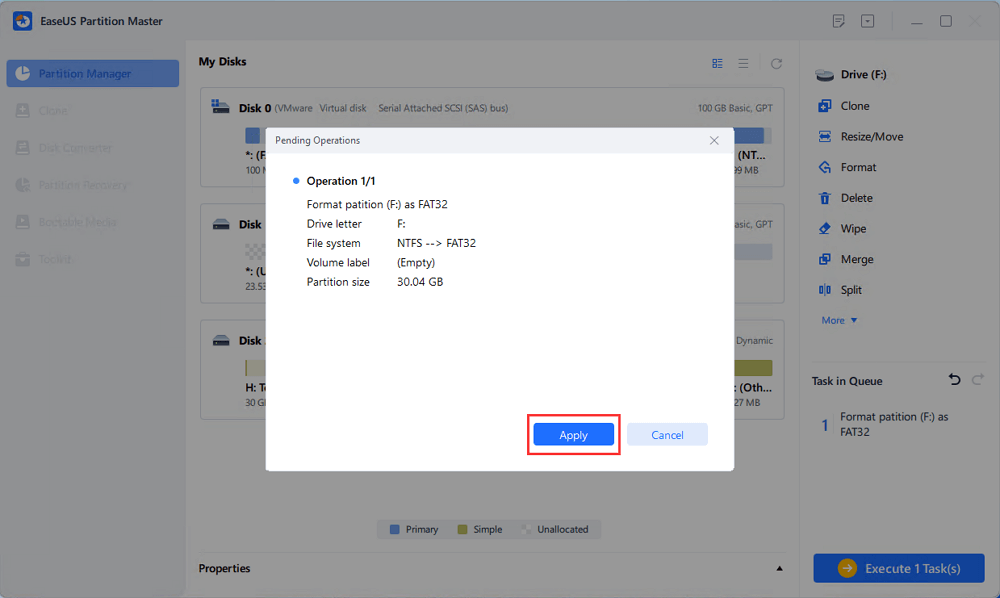
Step 3. Then you will see a warning window, click «Yes» in it to continue.

Step 4. Click the «Execute 1 Task(s)» button to review the changes, then click «Apply» to start formatting the partition on your hard drive.
Related Features
- Partition or format encrypted drives after disabling BitLocker to optimize storage: Partition A BitLocker Drive, Format Bitlocker encrypted drive
- Easily decrypt and remove encryption from BitLocker-protected drives without needing to access complex system settings:
- Fix The Drive Protected by BitLocker Is Already Unlocked Error
There is no doubt that EaseUS Partition Master is the optimal solution for turning off/disabling BitLocker in Windows 11/10. With additional benefits like disk cloning and partition management, this tool goes beyond just disabling BitLocker, offering comprehensive solutions for managing your storage.
Way 2. Remove BitLocker via Command Prompt (manage-bde command line)
Another effective method to disable BitLocker encryption using CMD. This method provides direct control over the process, allowing you to disable it quickly through a few simple commands. While this approach is more technical, it’s a reliable option for users who are comfortable working with Command Prompt. Detailed below how to turn off/disable BitLocker in Windows 11/10 via CMD:
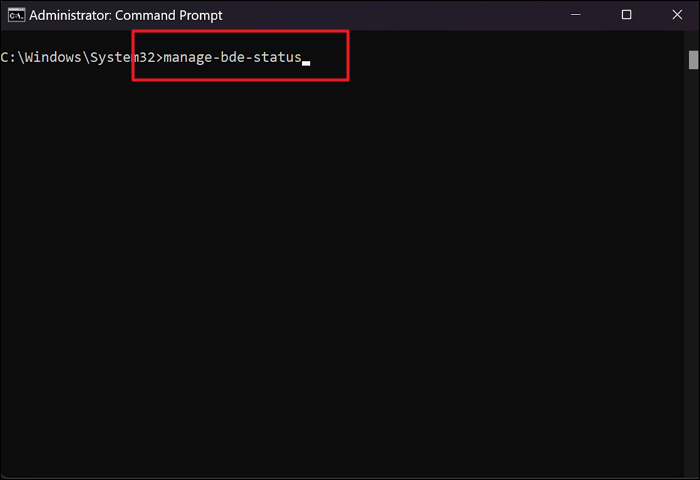
Step 1. Get started by opening Command Prompt with admin permissions by typing «cmd» in the Start menu. Now, you can right-click on the result to select «Run as administrator» to launch it. Within the CMD, run the «manage-bde -status» instruction to view the status of BitLocker on your drives.
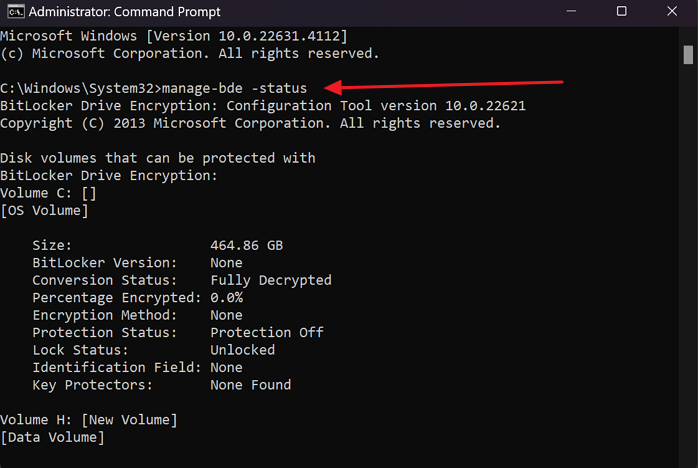
Step 2. Once the command result is displayed, ensure that «Conversion Status» is set to «Fully Decrypted» and «Percentage Encrypted» is «0.0%» to proceed. When you come across the «Percentage Encrypted: 100.0%» display, execute the following instruction:
«manage-bde -off C:» (substitute «C:» with the encrypted drive letter)

Step 3. After this instruction is processed, BitLocker on the targeted drive will be disabled. You can again run the «manage-bde-status» command to confirm this before moving forward.
You can also run manage commands to unlock Bitlocker when you forget the password:
Way 3. Turn Off BitLocker in Windows GUI Mode
You can turn off this feature using the familiar Windows interface for users who prefer a more straightforward and visual method. This method is ideal for those who may not be comfortable with command-line tools and prefer to navigate through the visual interface. It can be done via the Control Panel using these steps to turn off/disable BitLocker in Windows 11/10 without the need for technical knowledge:
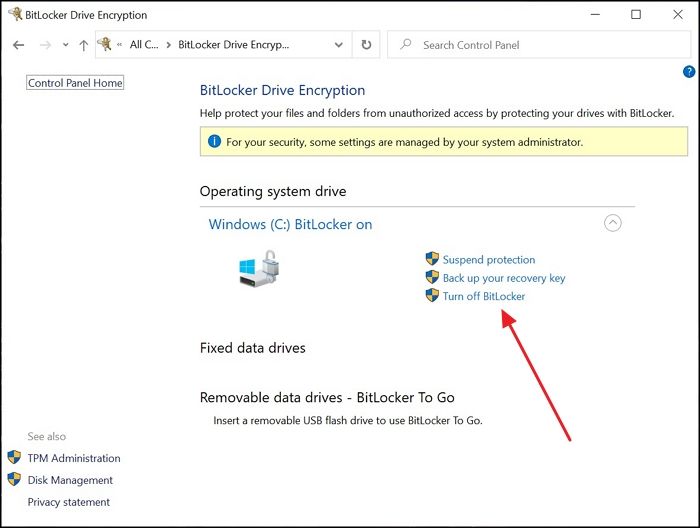
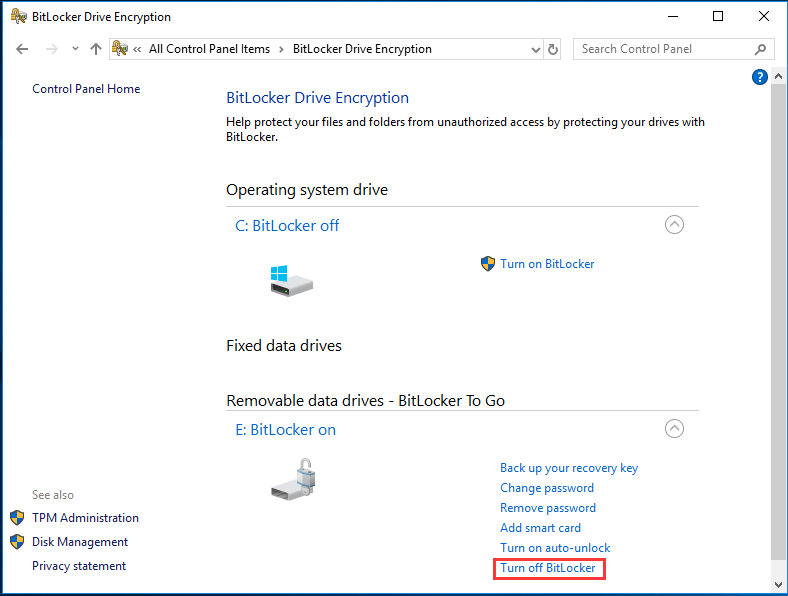
Step 1. Commence the operation by accessing the Windows Search bar to look for and launch the Control Panel. Here, click the «System and Security» option to tap «BitLocker Drive Encryption» on the subsequent screen.
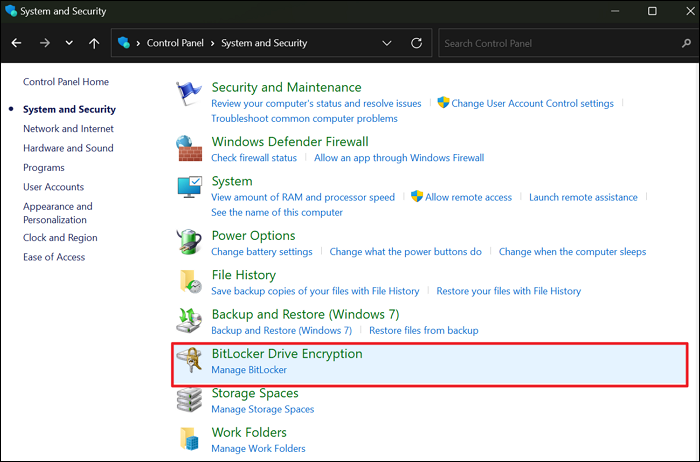
Step 2. Now, locate the drive whose BitLocker you want to disable to utilize the «Turn Off BitLocker» choice. You’ll be prompted to confirm by clicking «Turn off BitLocker/Decrypt the drive» to continue.
Before diving into the last fix, you can share these workable ways with more users online:
Way 4. Unlock BitLocker via Windows PowerShell
Users who prefer to use PowerShell on their computers over Command Prompt can also turn off this feature through commands. This powerful scripting tool offers a flexible and efficient way to manage system settings, including BitLocker. It provides a variety of commands mentioned in the following steps to streamline the decryption process to turn off/disable BitLocker in Windows 11/10:
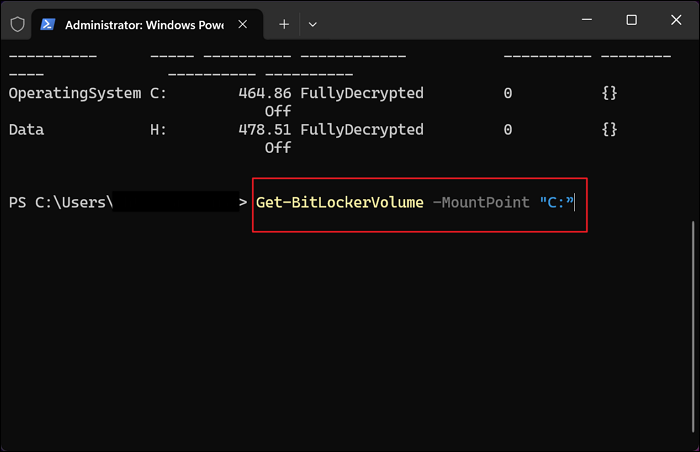
Step 1. On your PC, utilize the «Win + X» keys to access the Power Menu and click «Windows PowerShell (Admin)» to launch this command line tool with admin powers. In Windows 11, choose «Terminal (Admin)» from the list, and once it opens, run the «Get-BitLockerVolume» command to view the BitLocker status of drives.
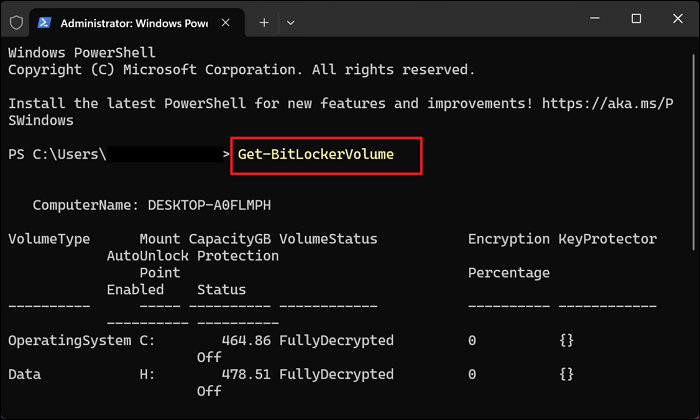
Step 2. From the given results, utilize the «Volume Status» and «Encryption KeyProtector Percentage» to determine each drive’s BitLocker status. If any is not «FullyDecrypted,» employ the «Disable-BitLocker -MountPoint «C: «command to decrypt the drive.
Step 3. Before executing the command, remember to replace «C:» with the drive letter you want to decrypt. Later, you can monitor the status of the decryption process by using the «Get-BitLockerVolume -MountPoint «C:» «command.
Conclusion
In summary, we’ve explored four effective methods to turn off/disable BitLocker in Windows 11/10. Each technique offers a unique approach tailored to different user preferences and technical skills. Among these methods, we highly recommend trying EaseUS Partition Master. Its comprehensive disk management features make it a standout choice for users looking to easily disable BitLocker.
Beyond just turning off BitLocker, this software offers additional functionalities such as partition resizing and disk cloning. This makes it an invaluable tool for anyone looking to manage their storage efficiently. Give this advanced program a try to simplify your BitLocker decryption process and enhance your overall disk management experience.
As this matter concerns your sensitive data on your computer, it is given that you have more queries. Explained below are a few common questions regarding how to turn off/disable BitLocker in Windows 11/10.
1. Why can’t I turn off Windows BitLocker?
There can be several reasons behind it, including system corruption and the lack of administrative powers for the operation. Other reasons include TPM error, group policy, or corporate environment for BitLocker management. You can resolve it by gaining the required permissions and running a system check.
2. How do I turn off BitLocker in Windows safe mode?
Utilize the instructions given below to deactivate this encryption feature in Safe Mode:
Step 1. First, click «Restart» on your PC while holding the Shift key to enter into Safe Mode and select «Troubleshoot.» Next, choose «Advanced options» and move to click «Restart» in «Startup Settings.»
Step 2. Press the F4 key to boot your computer into Safe Mode and access the Command Prompt with admin powers to execute the «manage-bde -status» command. It will list the encrypted drives that you decrypt via the «manage-bde -off C:» instruction.
3. How do I disable BitLocker in BIOS?
Doing this is not possible as BitLocker operates at the operating system level rather than the BIOS level. You will need to boot into Windows and access the BitLocker management console to deactivate encryption.
What is BitLocker? How to turn off BitLocker Windows 10 with ease? This post from MiniTool will demonstrate how to remove BitLocker Windows 10. Refer these 7 ways to turn off BitLocker Windows 10.
BitLocker is a Microsoft built-in feature in Windows Pro and Enterprise version starting with Windows Vista. The BitLocker feature is designed to protect data by providing encryption for entire volumes, such as password protect USB drive.
In addition, the BitLocker uses the AES encryption algorithm in cipher block chaining or XTS mode with a 128-bit or 256-bit Key.
However, some people don’t need the BitLocker feature and wonder how to turn off BitLocker Windows 10. In order to remove BitLocker Windows 10, you come to the right place. This post shows how to disable BitLocker Windows 10.
7 Way to Disable BitLocker Windows 10
In this part, we will demonstrate 7 ways to disable BitLocker Windows 10.
Way 1. Disable BitLocker Windows 10 via Control Panel
First of all, you can choose to disable BitLocker Windows 10 via Control Panel.
Now, here is the tutorial.
- Open Control Panel.
- Choose BitLocker Drive Encryption.
- Expand the BitLocker-protected drive and choose Unlock drive.
- Then input the password.
- Then click Turn off BitLocker.
Way 2. Disable BitLocker via Settings
In order to turn off BitLocker Windows 10, you can also try removing BitLocker Windows 10 through the Settings app.
Now, here is the tutorial.
- Press Windows key and I key together to open Settings.
- In the pop-up window, choose System.
- In the pop-up window, choose About from the left panel.
- Then locate the Device encryption section in the right panel and choose Turn off button.
- Then in the confirmation window, click Turn off again.
After that, the BitLocker feature has been disabled on your computer.
Way 3. Disable BitLocker via Local Group Policy Editor
In order to turn off BitLocker Windows 10, you can choose to disable it via Local Group Policy Editor.
Now, here is the tutorial.
- Press Windows key and R key together to open Run dialog.
- Type gpedit.msc in the box and click OK to continue.
- In the pop-up window, navigate to the following path: Computer Configuration -> Administrative Templates -> Windows Components – > BitLocker Drive Encryption -> Fixed Data Drives.
- Then select Deny write access to fixed drives not protected by BitLocker.
- In the pop-up window, choose Not Configure or Disabled. Then click Apply and OK to confirm the changes.
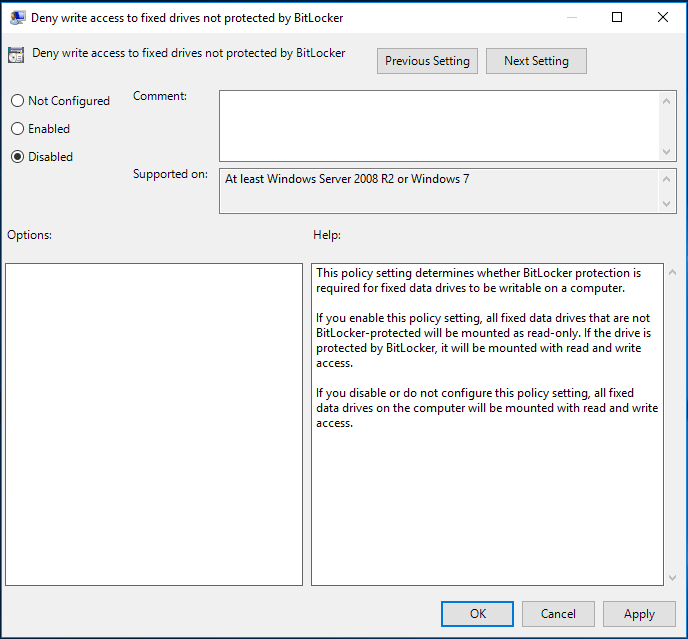
After that, the BitLocker feature has been disabled from the computer.
Way 4. Disable BitLocker via CMD
As for how to turn off BitLocker Windows 10, you can choose to disable BitLocker via CMD.
Now, here is the tutorial on how to disable BitLocker CMD.
- Open Command Prompt as administrator.
- In the pop-up window, type the command manage-bde -off X: and hit Enter to continue. Please replace X with the actual hard drive letter.
- Then the decryption process will begin. It will take some time and please do not interrupt it.
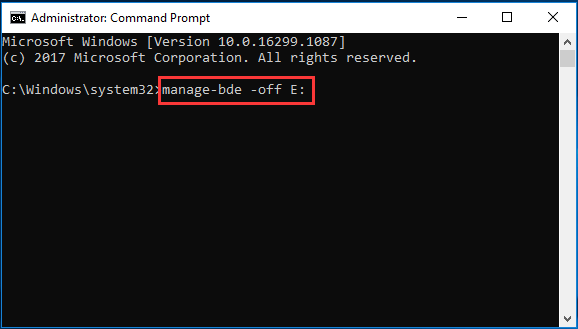
When it is finished, you have finished the process of disabling BitLocker cmd.
Way 5. Disable BitLocker via PowerShell
In order to turn off BitLocker Windows 10, you can also choose to disable it through PowerShell.
Now, here is the tutorial.
- Type PowerShell in the search box of Windows and choose the best-matched one.
- Then right-click it to choose Run as administrator.
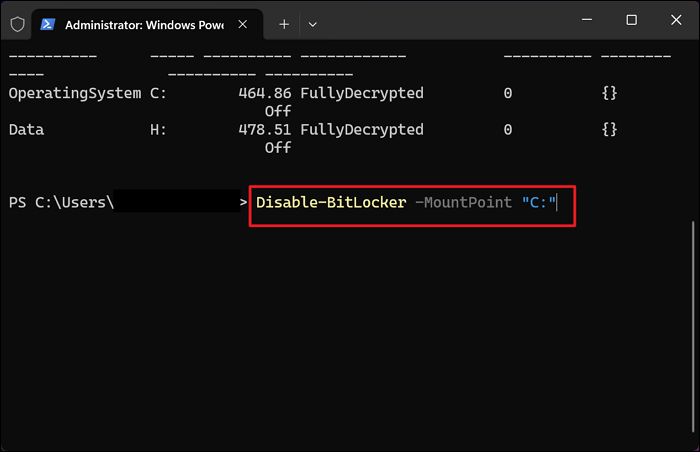
- In the pop-up window, type the command Disable-BitLocker -MountPoint “X:” and hit Enter to continue. Please replace the X with the actual encrypted hard drive letter.
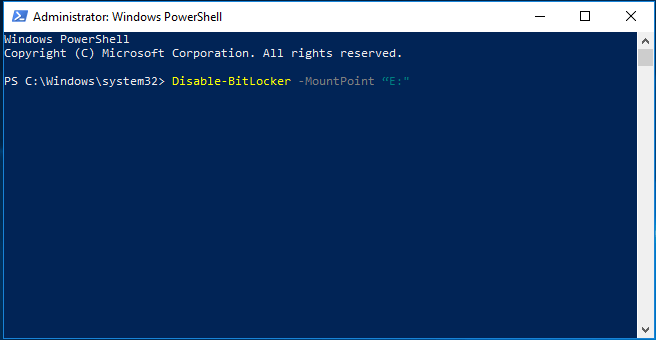
When it is finished, the BitLocker feature of the encrypted hard drive has been disabled.
In addition, you can also choose to disable BitLocker for all volumes. Just input the following commands to continue.
$BLV = Get-BitLockerVolume
Disable-BitLocker -MountPoint $BLV
After that, you are able to remove BitLocker Windows 10.
Way 6. Disable BitLocker Service
There is another way for you to remove BitLocker Windows 10. You can choose to disable BitLocker service.
Now, here is the tutorial.
- Press Windows key and R key together to open Run dialog.
- In the pop-up window, type services.msc in the box and click OK to continue.
- In the Services window, find the BitLocker Drive Encryption Service and double-click it.
- Then change its Startup type to Disabled.
- Then click Apply and OK to save the changes.
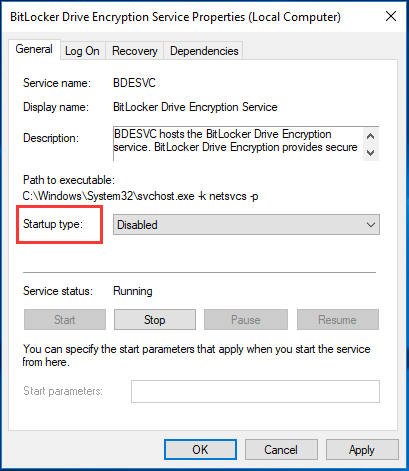
When it is finished, you have disabled BitLocker Windows 10.
Way 7. Format Encrypted Hard Drive
There is an available way for you to remove BitLocker Windows 10. If there is no important file on the hard drive, you can choose to format it and remove BitLocker Windows 10. If there are important files on it, it is not recommended to use this way.
Now, here is the tutorial.
- Right-click the encrypted hard drive, then choose Format.
- In the pop-up window, set the file systems and check the option Quick format. Then click Start to continue.
After that, you have removed BitLocker from the hard drive Windows 10. If you have lost data after formatting, you can read the post to How To Recover Files From Formatted Hard Drive (2020) – Guide to learn more.
Final Words
To sum up, this post has introduced 7 ways to turn off BitLocker Windows 10. If you want to disable BitLocker, try these ways. If you have any better way on how to turn off BitLocker Windows 10, you can share it in the comment zone.