
Время на прочтение18 мин
Количество просмотров447K
Часто путают терминал и шелл. В тех же *nix есть шеллы (bash, csh, zsh, …) и терминалы (konsole/guake/yaquake/tilda и т.д. и т.п.) Для мира Windows общеизвестный терминал только один – стандартное консольное окошко, которое часто ошибочно называют «cmd.exe». И мало кто знает о существовании множества других эмуляторов терминала. Известных шеллов больше, их целых два: cmd.exe и powershell.exe. И хотя есть как минимум три порта bash (MinGW, CygWin, GIT) многие юниксоиды предпочитают ругать cmd.exe.
Меня не устраивал ни один из найденных альтернативных терминалов (как в 2009-м, когда я начал работу над ConEmu, так и сейчас). Казалось бы требований немного, вот основные:
- работа с консольными приложениями, использующими консольное API: например Far просто не запустится в mintty или PowerShell ISE;
- визуальные улучшения вроде табов (вкладок) и split-screen;
- быстрая и удобная работа с пометкой/копированием/вставкой текста;
- должен быть похож на терминал, а не на рождественскую игрушку с кучей графических свистелок и сопелок которые даже отключить нельзя;
- не должен зависеть от сторонних библиотек типа .Net, Qt, VC/GCC redist и прочих устанавливаемых пакетов, занимать по возможности мало места и не требовать инсталляции на новую машину;
- наконец, мне, как приверженцу Far Manager, хотелось интеграции с этим файловым менеджером — редакторы и вьюверы в табах, drag&drop файлов между Far и другими приложениями и т.п.
Отвечает ли этим требованиям ConEmu? Терминал (Free & OpenSource) пишется программистом «для себя» с учетом пожеланий других пользователей программы. В минимально-необходимой комплектации занимает около 2 мегабайт, что конечно больше нескольких килобайт, но все-таки пренебрежимо мало. Установки не требует, может быть портабельным если рядом с ConEmu.exe создать файлик ConEmu.xml. От сторонних библиотек не зависит.
Обзор возможностей
Рассказать «про все» в рамках одной статьи невозможно, поэтому здесь описаны только некоторые функции, на мой взгляд наиболее интересные большинству пользователей.
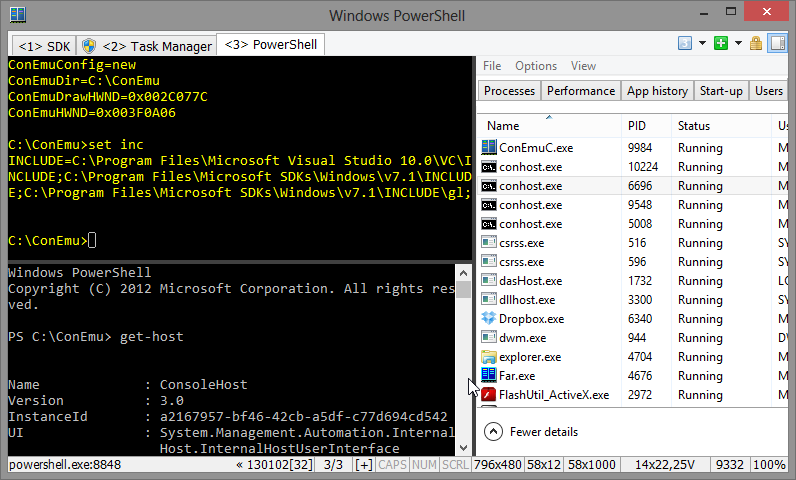
Наглядность. В табах могут отображается не только заголовки консолей, но и дополнительная информация вроде активного процесса, прогресса архивации, chkdsk, powershell, копирования в Far Manager. Например, не нужно переключаться в таб чтобы узнать закончилась ли компиляция проекта, запущенная в этом табе. В статусной строке можно настроить список отображаемых «колонок» вроде координат видимой области и курсора, PID активного процесса в консоли, статусов CAPS/NUM/SCRL, коэффициента прозрачности и др. Многие колонки кликабельны, например можно щелкнуть по «колонке» с прозрачностью для быстрого ее изменения.
Минималистичность. Интерфейс (самого терминала, а не окна настроек) содержит всего два дополнительных графических элемента — табы и статусная строка. Но и их можно отключить, если вы предпочитаете «чистую» консоль.
Портабельность. Настройки можно хранить в файле ConEmu.xml созданном в папке программы.
Работа с текстом. Поддерживаются два стиля пометки текста — обычный для текстовых редакторов и «прямоугольный» как в обычной консоли. Пометка и вставка текста удобна как с клавиатурой так и с мышкой.
Quake/Tilda. Поддержка режима игровых консолей. Терминал умеет «выезжать» при нажатии выбранной комбинации клавиш (по умолчанию Ctrl+~) и прятаться при потере фокуса или нажатии Esc.
Запуск любых приложений. Пользователь может настроить любое количество предопределенных задач (Task) для быстрого запуска в ConEmu или из списка переходов (jump list) панели задач Windows 7. Задача может запускать один или несколько процессов или шеллов (powershell, SDK, компиляция проектов и т.д.) Можно даже запускать простые GUI приложения вроде PuTTY, TaskManager, GVim.
Работа с цветом. Несколько предопределенных палитр (например Solarized, PowerShell, xterm, и др.), возможность настройки своих цветов консоли, поддержка управляющих кодов ANSI X3.64, 24-битный цвет при работе в Far Manager.
Интеграция. Умеет добавлять себя (и выбранные команды-шеллы) в контекстное меню Windows Explorer. Умеет перехватывать создание стандартного терминала Windows.
Гибкая настройка и управление. В диалоге Settings можно найти настройки на любой вкус и цвет. Практически любому действию можно назначить комбинацию клавиш, а простейший макро-язык позволяет выполнять нестандартные действия.
Немного истории
В начале был Zoin и его анонс Эмулятор консоли на форуме Far Manager. Не знаю, планировал ли автор развитие эмулятора, но в 2009-м году появилось несколько форков предлагающих разные улучшения: вертикальную прокрутку, табы для редакторов и вьюверов Far, отображение контекстного меню для файлов по правой кнопке и перетаскивание файлов между консольным Far и другими приложениями. Идея мне понравилась и, объединив все «патчи», я стал развивать эмулятор добавляя новые возможности и исправляя баги. На тот момент было несколько альтернатив (самые известные – Console2 из бесплатных и TakeCommand из платных), но ни одна у меня не прижилась. «Пользуюсь фаром 15 лет» поэтому в первую очередь нужна была оболочка для него.
Установка
ConEmu можно скачать с оф.сайта в двух вариантах: инсталлятор и 7z архив. Разницы между ними в общем-то никакой, просто инсталлятор умеет создавать ярлыки и позволяет отключить не нужные части продукта. Рекомендую пробовать последние Alpha-версии, т.к. с момента выхода последнего Stable прошло много времени, исправлено много багов, появилось много новых возможностей.
Для адептов bash на зеркале проекта есть специально подготовленные пакеты для MinGW. Их достаточно развернуть в папку MinGW чтобы в ConEmu сразу запускался «sh.exe –login –i».
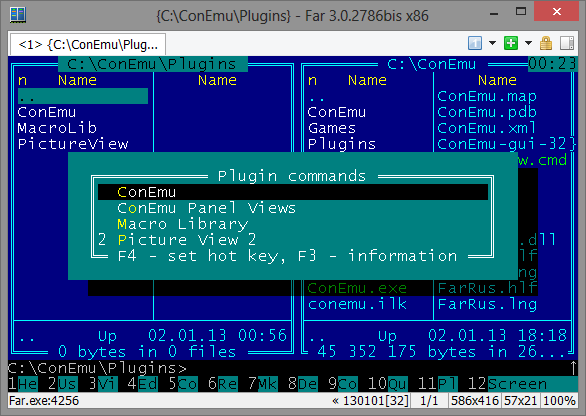
Пользователям Far Manager: для полноценной работы в Far должны быть загружены плагины ConEmu. Убедитесь, что при использовании инсталлятора плагины устанавливаются в подпапку Plugins вашего каталога с Far.exe. Обратите внимание, что инсталлятор позволяет выбрать папку установки как для самого ConEmu так и для плагинов к Far.
Пользователям антивирусов: инсталлятор как и сам ConEmu троянов не содержит, как говорится, «исходники открыты».
При первом запуске программа спросит где вы предпочитаете хранить настройки — в файле ConEmu.xml или в реестре.
Теперь можно запускать ConEmu.exe или ConEmu64.exe (разница между 32-битной и 64-битной версией отсутствует).
По умолчанию ConEmu при старте запускает один таб с «предпочитаемым» шеллом:
- Far.exe (если найден рядом с ConEmu.exe);
- cmd.exe или tcc.exe (если установлен TakeCommand или TCC/LE);
- sh.exe (если ConEmu установлен в режиме «MinGW»).
Первый запуск
При первом запуске отображается диалог «Fast configuration», он содержит несколько основных опций влияющих на работу программы.
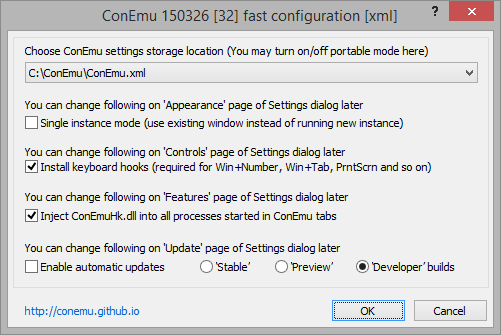
Install keyboard hooks. ConEmu умеет отбирать у системы определенные комбинации клавиш (когда в фокусе окно программы). Например Win+цифра можно переключаться на таб с определенным номером. Практически все комбинации клавиш с ConEmu настраиваются или отключаются (Win+Alt+K), но если вам вообще не нужен перехват комбинаций с модификатором Win – можете отключить флажок.
Inject ConEmuHk.dll. Для многих возможностей ConEmu требуется перехват определенных функций WinAPI. Библиотека ConEmuHk.dll (или ее 64-битная версия ConEmuHk64.dll) внедряется в запускаемые во вкладках ConEmu процессы и перехватывает функции через разделы импорта. К сожалению, перехватываемых функций становится все больше и соответственно увеличивается время перехвата. И хотя в цифрах это лишь миллисекунды, некоторые пользователи жалуются на замедление выполнения команд в ConEmu. Если вы из них – отключите этот флажок. В планах попробовать перейти на перехват в стиле detours, возможно это ускорит процесс.
Enable automatic updates. Думаю, в переводе не нуждается. Обновление выполняется тем же способом, что и при установке. То есть если вы установили ConEmu распаковкой 7z–архива, то для обновления потребуется архиватор (7–zip или WinRar).
Настройка
В принципе, ConEmu работает сразу и настройки не требует, но у любого пользователя/админа/программиста есть свои предпочтения и специфика работы.
Полный диалог настроек открывается либо с клавиатуры комбинацией Win+Alt+P либо вызовом из системного меню ConEmu пункта «Settings».
Можно заблудиться в куче вкладок и настроек, но все настройки сгруппированы по смыслу, а для неочевидных опций отображаются всплывающие подсказки при наведении курсора мышки. Наверное не стоит рассказывать в этой статье про каждую опцию, поэтому пробежимся только по основным и наиболее интересным.
Выбор шелла
Итак, скорее всего вам нужно будет настроить свой список шеллов, как запускаемых при старте, так и быстро доступных.
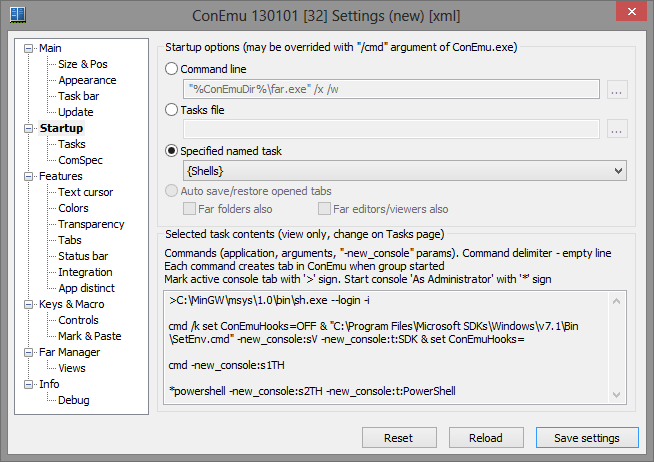
Идем на вкладку «Startup». Если нужно запускать только один шелл — все просто: выбираем «Command line» и вводим требуемое, например:
C:\MinGW\msys\1.0\bin\sh.exe --login -i
В принципе, в качестве шелла можно запускать любое консольное приложение или командный файл для cmd, python, и т.п. Можно даже запускать некоторые GUI приложения вроде PuTTY, notepad, gvim и т.п.
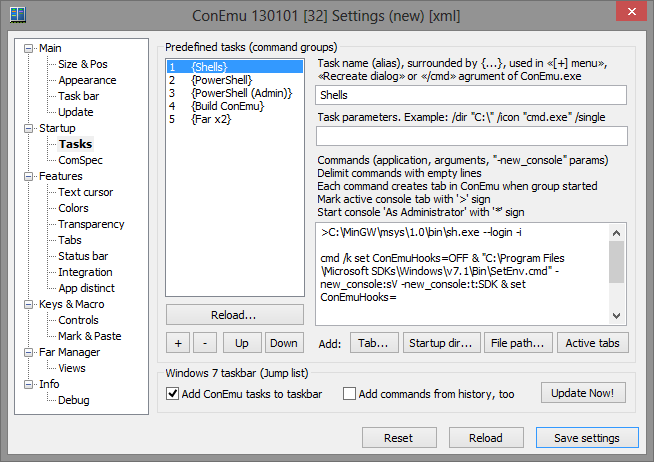
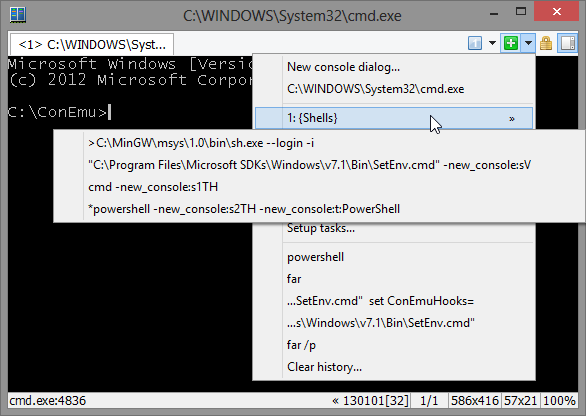
Если при старте нужно запустить сразу несколько шеллов — идем на вкладку «Tasks» (задачи) и начинается магия. Диалог настроек и так перегружен, поэтому задачи создаются «в текстовом виде».
>C:\MinGW\msys\1.0\bin\sh.exe --login -i
cmd /k set ConEmuHooks=OFF & "C:\Program Files\Microsoft SDKs\Windows\v7.1\Bin\SetEnv.cmd" -new_console:sV -new_console:t:SDK & set ConEmuHooks=
cmd -new_console:s1TH
*powershell -new_console:s2TH -new_console:t:PowerShell
Называем его «Shells», возвращаемся на вкладку «Startup» и выбираем «Specified named task».
В итоге при старте ConEmu получаем 4 консоли в сетке 2×2 причем активной будет вкладка sh.exe, а powershell.exe запускается в режиме админа (после подтверждения UAC) и его вкладка получает фиксированное название «PowerShell».
Параметр «-new_console» специальный параметр, обрабатывающийся в ConEmu и вырезающийся из командной строки при запуске программы. О нем можно писать много и долго, а пока отошлю на сайт проекта.
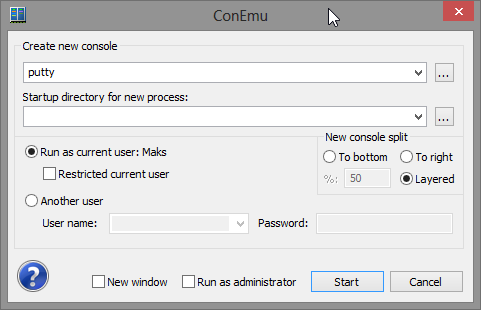
Запуск новых консолей
Если отображается панель кнопок (toolbar) то кнопка [+] открывает диалог запуска новой консоли. Здесь можно указать любую программу с параметрами, выбрать строку запуска из истории или выбрать заранее созданную задачу. Здесь можно создать «split», запустив новую консоль на одном экране с текущей. «Run as administrator» запускает новую консоль в режиме администратора. Флажок «New window» запустит новый процесс ConEmu.exe с выбранной командой.
На панели кнопок у кнопки [+] есть «стрелка» для открытия меню. Это же меню можно открыть комбинацией Win+N. Здесь отображаются команды из истории и заранее созданные задачи. Правый щелчок мышкой по пункту с задачей открывает меню второго уровня со списком команд этой задачи – так можно посмотреть ее содержимое или запустить только одну из команд задачи.
Можно создать ярлык и запускать новую консоль в уже запущенной копии ConEmu. Например, создайте на рабочем столе ярлык для запуска Far Manager (считаем что Far и ConEmu установлены в папку C:\Far)
"C:\Far\ConEmu.exe" /single /cmd "C:\Far\Far.exe"
Запуск из списка переходов (Jump List) панели задач Windows 7. Отсюда удобно запускать наиболее употребительные задачи, например запуск компиляции ваших проектов.
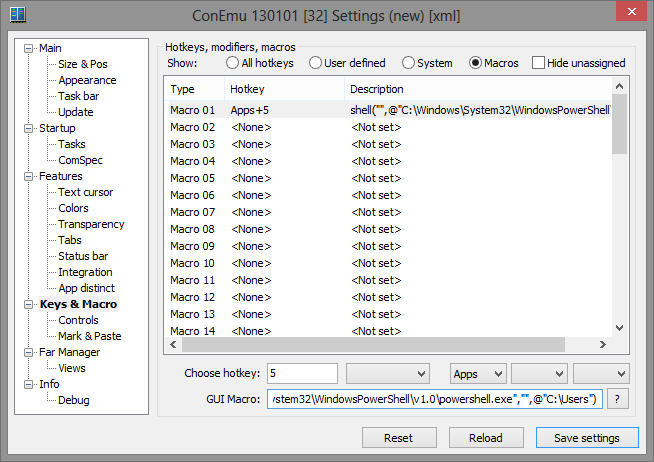
Быстрый запуск по комбинации клавиш. Если ярлыков (хоткей можно задать в свойствах ярлыка) и задач (Win+N и цифра номера задачи) не хватает – можно создать макрос запуска любой команды. Откройте вкладку «Keys & Macro» диалога настройки (Win+Alt+K), выберите один из «Macro NN» и введите в поле «GUI Macro» что-то вроде:
shell("",@"C:\Windows\System32\WindowsPowerShell\v1.0\powershell.exe")
Поддерживаются два синтаксиса строк: C-string где используются \r\n\t\a\e\"\\, и Verbatim-string вроде @"app.exe ""C:\My Documents\File.txt""".
Из командной строки шелла, запущенного во вкладке ConEmu можно запустить новую вкладку с помощью специального параметра -new_console. Его опции позволяют запускать вкладки в режиме администратора, под другим пользователем, включать и отключать подтверждение закрытия после завершения команды, запускать вкладки «в фоне», разбить активную консоль вертикально или горизонтально (split-screen).
cmd /c dir /s c:\ -new_console:bc
или использовать cmd-файл, включенный в поставку ConEmu
csudo dism.exe /online /enable-feature /featurename:NetFX3 /All /Source:D:\sources\sxs /LimitAccess
В контекстном меню таба (правый клик на табе или Shift+правый клик в консоли) есть пункт «Duplicate root». Он создает копию шелла в новой вкладке. Например в текущей вкладке cmd вы запустили компиляцию проекта, при вызове «Duplicate root» будет создана новая вкладка с тем же текущим путем, что был до запуска компиляции, и с теми же переменными окружения.
Аналогично действуют комбинации клавиш Ctrl+Shift+O и Ctrl+Shift+E, но они создают копию шелла, разбивая активную консоль вертикально или горизонтально (split-screen).
Пометка, копирование и вставка текста
Настроек на вкладках «Mark & Paste» и «Controls» много. Расскажу об умолчаниях.
Поддерживается два типа пометки текста:
- Text selection — стандарт для текстовых редакторов;
- Block selection — прямоугольные блоки, как в обычной консоли.
Варианты для начала пометки в стиле «Text selection»: Shift+СтрелкаВлево, Shift+СтрелкаВправо или удерживая ЛевыйShift начните пометку мышкой (drag с зажатой левой кнопкой мышки).
Варианты для начала пометки в стиле «Block selection»: Shift+СтрелкаВверх, Shift+СтрелкаВниз или удерживая ЛевыйAlt начните пометку мышкой (drag с зажатой левой кнопкой мышки).
Примечание: при работе в Far Manager Shift+Стрелка обрабатываются в Far а не в ConEmu.
Копирование в буфер обмена помеченного блока с клавиатуры: Ctrl+C или Enter. Нажатие Esc отменяет пометку.
При пометке текста мышкой копирование выполняется сразу при отпускании левой кнопки мышки.
Вставка текста из буфера обмена
Ctrl+V вставляет только первую строку из буфера обмена. Почему только первую? Чаще всего в терминале запущен шелл и было бы обидно, если команда начнет выполняться до того как вы проведете ревизию того, что вставилось в консоль.
Shift+Ins и щелчок правой кнопки мышки вставляет все строки из буфера обмена.
Выбор и вставка путей к файлам и папкам
Комбинации Ctrl+Shift+D и Ctrl+Shift+F открывают стандартные Windows-диалоги выбора пути к папке или файлу и вставляют выбранный путь в консоль.
Бонус в командной строке
При щелчке левой кнопкой мышки в командной строке ConEmu пытается переместить курсор в позицию щелчка. А Ctrl+BackSpace удаляет слово слева от курсора.
Гиперссылки и ошибки компиляции
ConEmu умеет открывать гиперссылки в браузере по умолчанию (ShellExecute) а ссылки на ошибки компиляции в редакторе. Удерживая ЛевыйCtrl щелкните левой кнопкой мышки по гиперссылке www... или по файлу с ошибкой test.c(50): error: ....
Шрифт
Вкладка «Main». Шрифт можно выбрать любой: моноширный или пропорциональный, растровый или векторный, с включенным сглаживанием или отключенным (Clear Type, Standard, None). Пропорциональный шрифт в консоли смотрится несколько странно, но если хочется – то можно отключить флажок «Monospace».
Хочется отметить также то, что ConEmu умеет использовать не только шрифты установленный в системе. Просто скопируйте желаемые файлы шрифтов (поддерживаются fon, ttf, otf, и моноширные bdf) в папку ConEmu и перезапустите программу. Новые шрифты появятся в списке доступных на вкладке настройки шрифтов «Main». Не стоит копировать слишком много шрифтов – их обработка может занять значительное время при старте программы. Регистрацию «локальных» шрифтов можно отключить на вкладке «Features» флажком «Auto register fonts».
Для отображения псевдографики (рамки в Far Manager и т.п.) можно настроить отдельный шрифт. В некоторых шрифтах используемых в качестве основного рамки получаются несимпатичными.
Иногда нужно быстро поменять размер шрифта. Это можно сделать не открывая окно настроек — удерживая клавишу Ctrl крутите колесико мышки.
Quake/Tilda
Вызов ConEmu в стиле игровых консолей доступен «из коробки». Открываем вкладку «Main» и включаем флажок «Quake style slide down». При желании там же включаем «Auto–hide on focus lose». Если рамка вообще не нужна – в поле «Frame width» поставьте «0» вместо «-1» («-1» — показывать рамку полностью). Здесь же можно настроить отступы поля консоли от краев окна ConEmu – включите «Center console in ConEmu workspace» и выберите количество пикселей в «Pad size».
Режим «поверх всех окон» можно включит на вкладке «Appearance» флажком «Always on top».
Показывать ли окно ConEmu на панели задач? Открываем вкладку «Task bar» и выбираем желаемые опции. По умолчанию в Quake режиме при минимизации (скрытии) окно скрывается в TSA (taskbar status area – область рядом с часиками), это опция «Auto minimize to TSA». А чтобы вообще не показывать иконку в панели задач – щелкните радиокнопку «Don’t show ConEmu window on Taskbar» и включите «Always show TSA icon» чтобы не потерять ConEmu.
Клавиша активации. Их может быть две (так все запущено на некоторых раскладках клавиатуры). Открываем вкладку «Keys & Macro» и в самом начале списка видим «Minimize/Restore» и «Minimize/Restore (alternative)». Можно выбрать любую комбинацию клавиш (по умолчанию это Ctrl+~), но имейте в виду, что эта комбинация регистрируется как глобальный хоткей в системе со всеми вытекающими. Например, некоторые комбинации могут быть уже зарезервированы системой или другими приложениями.
Клавиша скрытия. Та же что и клавиша активации, но дополнительно окно ConEmu можно скрывать просто клавишей Esc. Откройте вкладку «Task bar» и в группе «Minimize ConEmu by Esc» выберите опцию «Always». Там же есть флажок «Map Shift+Esc to Esc» чтобы можно было все-таки послать в консоль клавишу «Esc» если это необходимо.
Размер (высоту) окна можно менять. Наведите мышку на рамку (или на то место, где она должна быть), подождите пару секунд, и у окна появится обычная resizable рамка которую можно тянуть мышкой.
Панель задач Windows 7
Поддержка списка переходов (Jump List). После создания вашего списка задач на вкладке «Tasks» включите флажок «Add ConEmu tasks to taskbar» и нажмите кнопку «Update Now».
Отображение прогресса на панели задач.

Фоновая картинка
Если вам не нравится унылое черное окошко – фон можно заменить на картинку или сплошной цвет. Замена фона выполняется для выбранных индексов цветов – поле «Replace color indexes». По умолчанию в поле стоит «*» – автовыбор, но если, например, нужно заменять фон для темно-зеленого цвета (палитру можно посмотреть на вкладке «Colors») введите «#2» вместо «*». Фоновая картинка указывается в поле «Path» (bmp, jpg, png файлы), но в этом же поле можно указать и сплошной цвет, например «48 10 36» чтобы получить цвет фона терминала в Ubuntu. Если картинка слишком яркая – ее можно притушить слайдером «Darkening».
Еще одна возможность для пользователей Far Manager – установка цвета фона из плагинов Far. На Хабре уже была статья «Визуализация разных дисков в файловом менеджере или Не совсем консольный FAR». Описываемый там плагин устарел и не работает в текущих версиях ConEmu, но аналогичный функционал реализован плагином «ConEmu Background». Чтобы включить раскраску панелей откройте в Far Manager список «Plugins configuration» (Alt+Shift+F9 в панелях), выберите плагин «ConEmu Background» и включите флажок «Enable plugin».
Автообновление
ConEmu умеет обновляться автоматически, если он был установлен инсталлятором или развернут из 7z–архива. Для обновления 7z–архивом требуется установленный архиватор 7zip или WinRar. На владке «Update» можно выбрать параметры обновления: проверять при запуске или ежечасно; показывать диалог с сообщением о новой версии или только нотификацию в TSA; обновляться на последнюю или только на стабильную версию; настройка proxy–сервера; путь для хранения скачанных версий и т.д.
Цветовые палитры
На вкладке «Colors» можно выбрать одну из предопределенных цветовых схем (Solarized, Standard VGA, PowerShell, xterm, и др.) или настроить свою схему цветов. Настроенную схему можно сохранить: введите имя в поле «Schemes» и нажмите кнопку «Save».
Стандартной палитры в 16 цветов не всегда хватает, но в ConEmu есть две возможности расширения цветового пространства.
Extend foreground colors
За счет потери одного индекса цвета фона в ConEmu можно настроить дополнительно 16 цветов для текста. Например, для приглашения командной строки можно указать ярко-красный цвет фона, выбрать в выпадающем списке его индекс (#12) и настроить палитру цветов с индексами 16..31. После этого текст будет отображен цветами палитры 16..31, а цвет фона (ярко-красный) заменен на окружающий (скорее всего это будет черный).
Подробнее можно почитать здесь.
TrueColor
Унылая 16-цветная консольная палитра надоела разработчику плагина Colorer для редактора Far Manager и появился Colorer TrueMod. В результате консольный редактор засиял новыми красками, а информация о цветах стала храниться в SharedMemory в дополнение к собственно консоли. Кроме цветов появилась возможность использовать Bold/Italic/Underline шрифты для участков текста.
В Far 3.0 поддержка TrueColor стала нативной и настройку расширенных атрибутов (24бита на цвет и Bold/Italic/Underline) можно выполнить для любого элемента интерфейса. Кто говорил, что в фаре недостаточно цветов для подсветки групп файлов?
Опция может быть отключена на вкладке «Colors» флажком «TrueMod (24bit color) support». Ее отключение экономит некоторое количество мегабайт памяти.
ANSI X3.64
В *nix терминалах можно использовать Escape-последовательности и даже в DOS они были доступны со стандартным драйвером ANSI.SYS. В терминале Windows про них решили забыть, правда есть несколько программ позволяющих использовать ANSI в Windows, например ANSICON.
В ConEmu поддержка ANSI X3.64 встроена. Для этого должны быть включены флажки «Inject ConEmuHk» и «ANSI X3.64» на вкладке «Features». Полный список поддерживаемых в ConEmu ANSI кодов.
С помощью ANSI можно не только выводить цветной текст. Например в заголовке таба можно отображать текущую директорию в cmd.
Прозрачность окна ConEmu
При желании на вкладке «Transparency» можно настроить прозрачность окна ConEmu. Можно выбрать различные значения прозрачности для активного и неактивного окна. Например ConEmu может полностью «исчезнуть» с экрана при потере фокуса если слайдер прозрачности для неактивного окна передвинуть в крайнее левое положение.
Если вы не отключили статусную строку, то в ней может отображаться текущее значение прозрачности в процентах (список отображаемых «колонок» статусной строки тоже настраивается). При щелчке мышкой по колонке с прозрачностью всплывает меню в котором можно быстро изменить коэффициент прозрачности или отключить его.
Табы
При работе с несколькими консолями одновременно или при работе с редакторами и просмотрщиками в Far Manager (в Far должен быть загружен плагин ConEmu) табы сильно облегчают жизнь. Кроме того, в заголовке таба показывается прогресс операции в процентах (копирование, распаковка архивов, chkdsk, прогресс в PowerShell, и др.)
В табе отображается значок «Щит» если эта консоль запущена в режиме администратора.
Отображаемый текст можно настроить по шаблону, например можно в табе показывать имя и PID активного процесса, порядковый номер консоли, заголовок окна консоли, имя редактируемого или просматриваемого в Far Manager файла, признак наличия изменений в редакторе.
Если cmd.exe запущен в режиме администратора – в заголовке окна консоли он отображает префикс «Администратор:». ConEmu умеет отбрасывать эту избыточную информацию.
Если табы не нужны – их можно полностью отключить или включить автопоказ при появлении более одного таба.
Переключение между табами также настраивается по желанию. Стандартные комбинации Ctrl+Tab и Ctrl+Shift+Tab. Режим «Recent mode» включенный по умолчанию позволяет перебирать табы в порядке их активации. При включенном «Lazy tab switch» фактическое переключение таба произойдет при отпускании клавиши Ctrl. А до отпускания клавиши Ctrl табы можно переключать и стрелками Влево/Вправо.
Табы можно активировать по номеру консоли, который можно показывать в заголовке таба. По умолчанию предлагается комбинация Win+цифра (должны быть включены флажки «Install keyboard hooks» и «Win+Number – activate console» на вкладке «Controls»). То есть Win+1 активирует первую консоль, Win+2 – вторую и т.д. Если консолей открыто более 9 то нужно нажимать последовательно две цифры удерживая клавишу Win, например «Win+2,4» активирует 24-ю консоль (и кому их столько понадобится?). Если открыты редакторы/вьюверы в Far Manager то Win+цифра будет последовательно перебирать их (флажок «Host-Key+Number iterates Far windows»).
Вместо клавиши «Win» можно выбрать любую другую комбинацию клавиш-модификаторов, например Ctrl+Shift или Apps. Перейдите на вкладку «Keys & Macro» и прокрутите список клавиш до пункта «Activate console by number». Вы можете выбрать любые три клавиши-модификатора.
Статусная строка
По желанию отключается и настраивается. Доступно большое количество колонок вроде имени и PID активного процесса, координаты видимой области и курсора, ИД текущей раскладки клавиатуры, статусы CAPS/NUM/SCROLL, номер активной консоли, коэффициент прозрачности и т.д. По многим колонкам можно щелкать мышкой для их изменения.
ConEmu Here
На вкладке «Integration» можно настроить контекстное меню для Windows Explorer и установить ConEmu как терминал по умолчанию для запуска консольных приложений.
«ConEmu Here» и «ConEmu Inside». Вы можете создать неограниченное количество пунктов меню для запуска разных шеллов (cmd, powershell, bash, SDK и т.п.) Введите команду в поле «Command» дайте пункту меню соответствующее название в поле «Menu item», опционально укажите путь к иконке отображаемой в меню (не работает в WinXP) и нажмите кнопку «Register». Список ранее зарегистрированных пунктов отображается в выпадающем списке «Menu item».
Отличие «ConEmu Inside» от «ConEmu Here» в том, что терминал будет запущен как часть окна Windows Explorer (Inside).
ConEmu может использоваться как плагин и в других программах. Для этого укажите дескриптор окна в котором должен разместиться ConEmu и команду, которую он должен выполнить. Например:
ConEmu.exe /insidewnd 0x13A40 /cmd powershell.exe
Default terminal
ConEmu может подменять собой стандартный терминал Windows, запуск с ярлыка «Windows SDK Command Prompt», запуск «ipconfig /all» из диалога Win+R, запуск консольных приложений из TotalCmd, отладка консольных программ в Visual Studio – все может быть перехвачено и запущено в ConEmu.
Как это работает: на вкладке «Integration» нужно указать список процессов, в которые будет загружена библиотека ConEmuHk.dll (например «explorer.exe|devenv.exe|totalcmd.exe») и включить флажок «Force ConEmu as default terminal» а также, при желании, «Register on OS startup». В указанных процессах будут перехвачены функции CreateProcessA, CreateProcessW, WinExec для запуска консольного приложения в ConEmu.
IDE style
Выше уже было сказано про запуск любых команд из списка переходов. Например, для сборки ConEmu я сделал cmd-файл настраивающий окружение SDK и запускающий nmake или devenv.com.
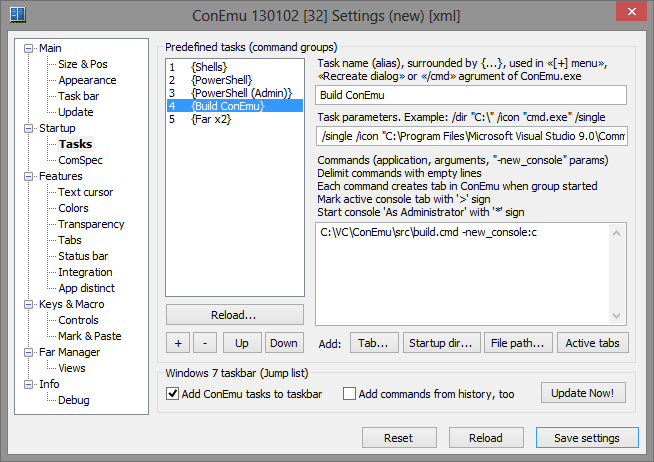
Ключ «/single» в поле «Task parameters» указывает использовать один экземпляр ConEmu (запуск в новом табе). Ключ «-new_console:c» в тексте команды является аналогом «pause» в cmd, чтобы консоль не закрылась после завершения компиляции.
В случае ошибок компиляции (вывод компилятора сохраняется в файл Error.log) вызывается скрипт TypeBuildErrors.cmd "%~dp0Errors.log" подсвечивающий строки с информацией об ошибках красным шрифтом, а предупреждения — синим. Исправив ошибки в редакторе Far Manager можно перезапустить компиляцию — Win+~ (хоткей по умолчанию для перезапуска таба).
App distinct
Здесь можно изменить некоторые опции в зависимости от процесса в консоли.
Например для PowerShell запущенном в режиме админа задать свою палитру.
Здесь же будет возможность задать свою фоновую картинку (просят давно, но пока не готово).
Keys & Macro
Здесь можно увидеть список всех комбинаций клавиш используемых в программе. Быстрый способ открыть эту вкладку – Win+Alt+K.
Также есть возможность задавать некоторое количество пользовательских действий через GuiMacro. Например назначить на Ctrl+D выход из текущего шелла: print("exit\n").
Far Manager
Интеграция с Far это тема для отдельной статьи. Важно, чтобы в Far был загружен плагин ConEmu (то есть в списке F11 из панелей был виден пункт «ConEmu»).
Краткий список возможностей.
- Drag&Drop файлов из панелей в другие приложения;
- щелчок правой кнопкой мышки помечает файлы, а длинный щелчок (удерживайте правую кнопку мышки >1 секунды) открывает графическое EMenu;
- панели можно двигать мышкой
- в плагине Unicode CharMap символы отображаются соответствующим шрифтом;
- файлы в панелях можно отображать в режиме Tile и Thumbnail;
- поддержка тачскринов, например прокрутка двумя пальцами, жест zoom, длинный тап по кейбару открывает меню (Alt/Shift/Ctrl/Fn).
Вкладка Debug
В основном вкладка для отлова багов. Но может быть интересна и пользователям.
Например, при выборе радиокнопки «Shell» ConEmu показывает запускаемые в консоли процессы и загружаемые dll-ки. Почти то же самое можно подсмотреть в ProcessMonitor, но здесь есть бонус — при компиляции проектов VC cl.exe и link.exe запускаются не с ключами а с параметром пакетным-файлом. ConEmu покажет содержимое этого файла.
Разное
Win+A или кнопка на тулбаре — заморозить консоль (поставить на паузу).
Щелчок правой кнопкой мышки по крестику в заголовке окна скрывает ConEmu в область уведомлений (Taskbar status area).
Полоса прокрутки по умолчанию скрыта и появляется при наведении мышки в правый край консоли. При работе в Far Manager колесо мышки обычно обрабатывается самим Far (прокрутка панелей, меню, и пр.), но при наведении курсора на полосу прокрутки — колесо прокручивает консоль.
Поиск текста — Apps+F или из меню «Edit» пункт «Find text». Искать умеем по всей консоли, но для этого консоль должна быть заморожена (Freeze console).
Можно показать «настоящую» консоль комбинацией Ctrl+Win+Alt+Space.
Заключение
Казалось бы от терминала нужно не много, но работа над ConEmu далека от завершения и в планах реализация многих возможностей. Например «бесконечный» буфер (сейчас ограничен 9999 строками «реальной» консоли), полноценная поддержка xterm 256 colors, горизонтальная прокрутка, сниппеты, оптимизация и т.д.
И, конечно, документация. Банально не хватает времени чтобы поддерживать актуальность wiki, некоторые страницы ожидают перевода, а многие возможности описаны только в WhatsNew.
Обновлено
Официальный сайт переехал по адресу http://conemu.github.io.
A “Window Terminal” is a command-line interface inside a GUI window. While the Windows operating system is a perfectly-capable OS that can perform various tasks and functions using just the GUI itself, a terminal running on top of Windows allows you to perform administrative tasks with convenience.
Using different terminals, you can connect to remote computers, transfer large files, execute cmdlets remotely, and even run apps and programs on a remote computer.
Other than that, it also enables you to perform complex automation tasks in a few cmdlets which can take a while if performed traditionally using Windows GUI.
If you are a system administrator, or just like using the command line, this article lists the best terminal emulators you can run on top of Windows 10 and Windows 11 with maximum command support and ease of use.
Table of Contents
Top Terminal Emulators for Windows
Windows Terminal
Download Windows Terminal

The Windows Terminal comes preinstalled in Windows 10 and 11. It can also be downloaded from Microsoft Store.
Although it lacks some of the features that other terminal emulators hold, it still provides convenient CLI usage without having to install a third-party emulator.
The Windows Terminal is an improvement over the legacy Command Prompt and Windows PowerShell, and combines these CLIs plus the Git Bash, Windows Subsystem for Linux (WSL), and Azure Cloud Shell into an integrated interface.
Additionally, it allows running multiple tabs simultaneously, allowing you to perform multiple tasks and connections at the same time.
Cmder
Download Cmder

Cmder is another Windows terminal built on top of “ConEmu” with the addition of Clink. Clink enhances the features of ConEmu by integrating support for Git commands, amongst Command Prompt and PowerShell. It supports running Unix-base cmdlets on top of the Windows OS and is fully compatible with Cygwin, Mintty, and msysgit.
Cmder comes in two versions – portable and full. Only the full version supports Unix-based commands, while the portable version is only 10 MBs in size and can be run directly from a USB. The portable version is widely used by sysadmins which they can carry around in a USB and use as per need.
Additionally, like Windows Terminal, Cmder can also run multiple tabs simultaneously.
That said, there are reports of non-Unicode characters having issues running with Cmder. If you use such characters often, then you may want to opt for another terminal.
ZOC Terminal Emulator
Download ZOC Terminal Emulator

Even though ZOC Terminal Emulator is an excellent command line tool, it is not free to use. This is perhaps the only drawback of the tool.
Other than that, like most other emulators, ZOC has a multi-tabbed interface that allows you to run multiple instances at the same time.
This tool does not only have a terminal interface like Windows Terminal but also includes a bunch of settings and menus that you can use your mouse to access. Additionally, it also supports Linux (Xterm) emulation, which includes 256-color support, meta-keys, and local printing. It also includes the Cisco CLI as well.
This terminal is an all-in-one solution for heavy file transfers and utilizes X, Y, and Zmodem, amongst FTP, FTPS, SFTP, and SCP.
Xshell
Download Xshell

Xshell is available in both free (for non-commercial use) and paid versions.
This terminal emulator supports SSH, SFTP, RLOGIN, Telnet, and SERIAL. Xshell comes in multiple language packs to cater to clients all around the world and is also designed for commercial use.
Multi-session management, work automation, support for UTF-8 coding, data safety, and security are some of the salient features of Xshell. Using the MIT Kerberos authentication system, this tool enables users to specify a master password to restrict access and keep the data safe and secure.
ConEmu
Download ConEmu

ConEmu is a free, open-source, Windows-specific terminal emulator with multi-tab support. The tool offers many CLI tabs as well as Graphical User Interface (GUI) programs that can be customized.
As it offers many customization options, such as hotkeys, personalized color palettes, and an auto-hideable mode, the software is popular amongst programmers and developers. ConEmu is also compatible with numerous shells, including PowerShell, PuTTY, and Cmder.
However, the lack of key functions, such as remote connections, makes the software less than ideal for novice users.
Hyper
Download Hyper

Hyper is a cross-platform, web-based terminal emulator. By “web-based,” we mean that it uses web-based technologies like CSS, Electron, and JavaScript to connect to remote devices.
Using Hyper, you can connect to multiple devices using the SSH protocol. Moreover, it has the ability to be expanded using plugins and add-ons. With multi-tab support, tiling pane, support for different themes, quick rendering, and split screen view, hyper becomes the ideal Windows terminal for sysadmins and developers on the go.
Putty
Download Putty

Putty is perhaps one of the most popular and love terminals out there. Designed for both advanced users and beginners, it has a simplistic design that supports SSH, Telnet, Rlogin, SUPDUP, and Serial protocols for a secure, remote connection.
Using the PSFTP (PuTTY SFTP client) and PSCP (PuTTY Secure Copy client) utilities, it can safely transfer files between computers. Putty supports SSH-1, SSH-2, and naming session profiles for storing configuration.
Honorable Mentions
Apart from the top 7 Windows terminal emulators that we have discussed above, there still are plenty of other emulators that are equally good. Here is a list in case your needs are not met using the aforementioned terminal emulators:
- MobaXterm
- KiTTY
- ConsoleZ
- z/Scope
- FireCMD
- Terminus
- Git Bash
Closing Thoughts
Terminal Emulators let you gain more control over the remote devices. It allows you to perform certain tasks, such as automation, that previously weren’t possible using the Windows GUI. Moreover, it also allows you to control computers with different operating systems from a PC running the Windows OS.
Let us know which one of these emulators did you prefer and why?
Best Terminal Emulators For Windows: Cmd and PowerShell Alternatives
A terminal app, also known as a command-line interface (CLI) or shell, is a program that provides text-based interaction with a computer’s operating system. It allows users to execute commands by typing them as text inputs and receiving text-based outputs in response.
A terminal provides a command prompt where users can enter commands to perform various tasks, such as navigating the file system, running programs, managing processes, configuring system settings, and more. These commands are usually entered using specific syntax and keywords recognized by the operating system or the shell.
In Windows, the most common terminal application is the Windows PowerShell or Windows Command Prompt. However, these tools can be limited in their features and customization.
In this tutorial, we will look at various terminal applications for Windows that you can use to replace the default PowerShell or CMD applications.
#1 Tabby
One of the most epic, well-developed, high-performance, and highly customizable terminal app for Windows is Tabby or Tabby.sh
Tabby is a free, open-source cross-platform terminal emulator offering many features for sys administrators, developers, and geeks.
It includes features such as:
- Runs on Windows, Mac, and Linux
- Integrated SSH client with a connection manager
- Integrated serial terminal
- PowerShell, PS Core, WSL, Git-Bash, Cygwin, Cmder, and CMD support
- Full Unicode support, including double-width characters
- File transfer from/to SSH sessions via SFTP and Zmodem
- Theming and color schemes
- Fully configurable shortcuts and multi-chord shortcuts
- Remembers your tabs and split panes
- Proper shell experience on Windows, including tab completion
- Integrated encrypted container for SSH secrets and configuration
- Multiple nested panes
- Progress bars and activity notifications for tabs
- Tabby remembers open tabs and panes where you left off
- Tabs on any side of the window
- Optional quake mode (terminal docked to a side of the screen)
- Optional global hotkey to focus/hide the terminal
- Bracketed paste
- SSH2 client with a connection manager
- SFTP and Zmodem file transfers
- X11 and port forwarding
- Jump hosts
- Agent forwarding — including Pageant and Windows native OpenSSH Agent
- Login scripts
- Optional built-in password manager with a master passphrase
- Proxy command support
- Support for different shells in the same window
- Better tab completion cmd.exe thanks to Clink.
- Explorer menu integration
- Optional portable mode
- Current directory detection that works
- Multiple connection profiles
- Newline conversion
- Text, readline and byte-by-byte input modes
- Text and hexdump output modes
- Zmodem
- Non-standard baud rates
- Themes customizable with CSS
- Extensible via plugins (in JS)
- A bunch of color schemes already included
- Telnet client
- Font ligatures and font fallback
- Clickable URLs, IPs and paths
- WinSCP integration
- Shell profiles
- Simultaneous multi-pane input
- Optional PuTTY style right-click paste and copy on select
- macOS vibrancy and Win 10 fluent background support
And so much more.
#2 Hyper.JS
Hyper or Hyper.js is a terminal application built by Vercel with the aim of providing a beautiful and extensible experience for command-line interface users, built on open web standards.
You can learn how to install Hyper here:
https://geekbits.io/how-to-set-up-the-hyper-terminal-geekbits/
#3 Windows Terminal
The Windows Terminal is a modern, fast, efficient, powerful, and productive terminal application for command-line tools and shells like Command Prompt, PowerShell, and WSL.
Its main features include
- multiple tabs
- panes
- Unicode and UTF-8 character support
- a GPU-accelerated text rendering engine
- custom themes, styles, and configurations.
- and more.
Windows Terminal is the official PowerShell and CMD replacement from Microsoft. It is built with the aim of providing a native and exceptional shell experience out of the Box. Windows Terminal is now the default terminal emulator in the latest Windows Versions.
#4 Cmder
We cannot forget about Cmder.
Cmder is a software package that provides a console emulator for Windows, a more friendly environment for users familiar with Unix-style command line interfaces.
It is a portable console emulator bundled with utilities like git, a Unix emulator, SSH, and many more. It benefits those who often need to use Unix or Linux-style command line on Windows.
Cmder is built on top of ConEmu and incorporates Clink, which brings Bash-style shell functionality to the Windows command line, like persistent history, syntax highlighting, and more.
This package provides a more robust and feature-rich command-line experience on Windows.
#5 MobaXterm
Finally, we have MobaXterm from Mobatek. This is the Swiss-army knife for all of you who need comprehensive remote tooling.
It is an advanced terminal for Windows with an X11 server, a tabbed SSH client, and several other network tools for remote computing (VNC, RDP, telnet, rlogin).
MobaXterm allows users to manage their computers in a remote location. This can be particularly useful for system administrators, developers, webmasters, and anyone needing to remotely work with their computers.
MobaXterm brings all the essential Unix commands to the Windows desktop, in a single portable executable file that works out of the box.
It has a lot of features like:
- Embedded X server: Fully configured Xserver based on X.org.
- Several Unix/Linux commands: bash, ls, cat, sed, grep, awk, rsync, etc.
- Add-ons and plugins: You can extend MobaXterm capabilities with plugins.
- Versatile session manager: All your network tools in one app: Rdp, Vnc, Ssh, Mosh, and X11.
- Portable and light application.
- Professional application: MobaXterm Professional has been designed for security and stability.
Unfortunately, the professional version of MobaXterm is not free and requires a license of $69 per user. However, you can get the free version which includes support from various tools.
Windows terminal emulation programs help you connect with different servers and perform many tasks effortlessly. Hence, you can read this article to know about them in detail.
Terminal emulators for Windows help you access a distant or local host by replicating the traditional computer terminals. These emulation programs let you communicate with your operating system via command-line interfaces.
However, unlike traditional terminals, the emulators are more user-friendly with a graphical interface and offer greater customization and system control. Moreover, emulation software helps you perform software development, system debugging, and various other tasks with much ease.
Hence, the next section of this article lists the best Windows terminal emulation software curated after in-depth research and analysis of all the available options. Let us begin with it without wasting your and our other readers’ valuable time.
List of the Best Terminal Emulators for Windows in 2024
You can choose from the following carefully picked terminal programs for Windows 10 and 11.
1. Cmder

You cannot go wrong with Cmder if you are looking for the best terminal for Windows 11. It is free and open-source software with the Monokai color scheme and a custom prompt layout. We like this program because of its portability (you can carry it anywhere in the Cloud or on a USB stick). Moreover, written in Powershell and C++, Cmder is built on ConEMu (a popular console emulator) and boasts the following features to justify its position on this list.
Key features of Cmder
- This software offers bash-style completion through Clink enhancements
- It brings Unix capabilities to your computer by coordinating with MinTTY, Cygwin, myysgit, and PowerShell command-line applications
- There is a split feature, allowing you to effortlessly view various consoles within a single window
- You can customize the software interface (set themes, transparency, fonts, etc.)
- Cmder works seamlessly with the VS Code terminal
Get it Now
Also Read: Best Xbox 360 Emulators For Windows PC
2. Hyper

You can choose Hyper if you prioritize extensibility via plugins for your various needs. Hyper is among the best terminal emulators for Windows, well-known because of its excellent plugin support, split tabs to facilitate multitasking, CSS support, and the following impeccable features.
Key features of Hyper
- You can use Hyper to connect to more than a single system via dial-up modem and SSH
- It helps you transfer data among networks like a host and remote server
- Hyper offers seamless integration with shell setups like zsh, bash, and fish
- This software supports image size configuration and command modification
Get it Now
3. ZOC Terminal

Let us introduce you to ZOC Terminal, yet another Windows terminal emulation software. It is a popular software among developers because of its seamless integration with remote machines and text-based servers, tabbed interface, effortless customization, line graphics, and the following notable features.
Key features of ZOC Terminal
- This software boasts keyboard remapping and mouse support
- ZOC Terminal makes it easy for you to communicate with hosts through Secure Shell and Telnet
- The dial-up connection support of this software enables seamless communication to mainframes and host
- You can search for and highlight text with ZOC Terminal’s automatic highlight tool
Get it Now
Also Read: Best Nintendo DS Emulator for Windows and Mac
4. Konsole

Next, we have Konsole on our list of the best terminal emulators for Windows 10 and 11 in 2024. It helps you by integrating a command-line interface into the KDE desktop environment. Moreover, split views, tabbed terminals, an easy-to-use profile manager, and the following features make Konsole a good emulation tool.
Key features of Konsole
- You can customize the color scheme of the software
- It allows you to work with applications such as Kate and Dolphin effortlessly
Get it Now
5. ConEmu

Here comes ConEmu. It is among the best open-source Windows terminal programs because of its highly personalizable graphical interface (you can customize hotkeys, and color palettes, and use an auto-hideable mode), compatibility with PowerShell, Cmder, PuTTY (and many other shells), and the following cutting-edge features.
Key features of ConEmu
- ConEmu boasts seamless integration with Explorer
- You can open multiple shells simultaneously
- This Unicode application supports Perl, Java, and many other languages
Get it Now
Also Read: Best GBA (Game Boy Advance) Emulators For Windows PC
6. Mintty

Let us introduce you to Mintty. It is among the best Cygwin-based open-source terminal emulators for Windows. Bidirectional rendering, character encoding, full character attribution, copy-paste and drag-and-drop text, and the following are some of the remarkable features of this software.
Key features of Mintty
- This software boasts XTerm compatibility
- It supports vector graphics image display
- Mintty boasts a tabbed window interface
- It supports multiple monitors
- You can use it with MinGW/MSYS
Get it Now
7. PuTTY

The list of the best Windows serial terminals cannot be complete without mentioning PuTTY, a popular emulator. Created by Simon Tatham in C language, this software supports multiple network protocols like SSH, Secure copy protocol (SCP), and Telnet, along with delighting users with the following features.
Key features of PuTTY
- You can perform secure file transfer among computers via the PuTTY Secure Copy Client (PSCP) and PuTTY SFTP client (PSFTP) tools
- PuTTY boasts xterm support
- It allows you to run Linux and Windows commands in a common environment
- This software supports DSA, RSA, and other algorithms to transfer data confidentially
Get it Now
Also Read: Best Windows Emulators for Mac
Concluding the Best Terminal Emulators for Windows
In this article, we listed the best Windows terminal emulation software. Hopefully, you found this list useful and you got the perfect program for your requirements. However, if you have any doubts about selecting an emulator or have any suggestions regarding this piece of writing, you can leave a comment in the comments section. We will be extremely happy to answer your questions and consider your recommendations.
Introduction to Windows Terminal
In the landscape of command-line interfaces, Windows Terminal is a powerful tool that enhances the functionality and usability of the command line in Windows 10 and Windows 11. Designed to provide a fast and fluid experience, Windows Terminal consolidates different command-line interfaces and shells, including Command Prompt, PowerShell, and the Windows Subsystem for Linux (WSL), into a modern application that supports tabs, customization, and rich text rendering.
In this guide, we will delve into the features of Windows Terminal, how to install it, and provide a comprehensive overview of essential operations and configurations that beginners need to know. Whether you’re a developer, a system administrator, or just someone who enjoys tinkering with command lines, Windows Terminal can significantly enhance your productivity.
Installing Windows Terminal
How to Install via Microsoft Store
-
Open Microsoft Store: Click on the Start Menu and type «Microsoft Store». Select the application from the search results.
-
Search for Windows Terminal: In the Microsoft Store, use the search bar to locate «Windows Terminal».
-
Download and Install: Click on «Get» to download and install Windows Terminal on your system.
How to Install via GitHub Releases
If you prefer the latest features or updates directly, you can also install Windows Terminal via the GitHub releases.
-
Visit the GitHub Releases Page: Go to the Windows Terminal GitHub Releases page.
-
Download the Installer: Find the latest release and download the
.msixbundlefile. -
Install the Application: Double-click the downloaded file and follow the installation prompts.
Verifying Installation
After installation, open Windows Terminal by searching for it in the Start Menu. The application should start without any issues, presenting a clean interface with tabs labeled for different shells.
Understanding the Windows Terminal Interface
Navigation
Upon launching Windows Terminal, you’ll notice a tabbed interface allowing you to work with multiple command line sessions simultaneously. Default tabs include:
- PowerShell: The powerful scripting language and shell.
- Command Prompt: The traditional DOS-like command-line interpreter.
- Windows Subsystem for Linux: If installed, this allows you to run a Linux environment natively on Windows.
Each tab can be switched through with simple mouse clicks or keyboard shortcuts, enhancing multitasking capabilities.
The Prompt
When you open a new shell, you’ll see a prompt indicating that the terminal is ready to accept commands. The prompt typically shows the current working directory and a cursor where you can start typing commands.
Status Bar
At the bottom of the window, the status bar displays useful information, such as the current profile (shell) you are using, the cursor position, and the command history of the respective session.
Basic Command Line Operations
For beginners, familiarizing yourself with basic command line operations is essential.
Navigation Commands
cd: Change directory. Usecdto navigate to a specific folder.dir(Windows) /ls(Linux): List files and directories in the current folder.mkdir: Create a new directory.rmdir: Remove an empty directory.del: Delete a file.
File Manipulation Commands
- Copying Files:
copy - Moving Files:
move - Renaming Files:
rename
System Information Commands
systeminfo: Displays detailed information about the system.ipconfig(Windows) /ifconfig(Linux): Shows network settings.tasklist/taskkill: Lists running processes and kills them.
Exiting Terminal
To exit Windows Terminal, simply close the tab or type exit in any shell.
Customizing Windows Terminal
One of the standout features of Windows Terminal is its robust customization options. Let’s explore how you can tweak settings to suit your preferences.
Opening Settings
-
Access Settings: Click on the dropdown arrow next to the tabs and select «Settings». Alternatively, you can press
Ctrl + ,. -
Understanding the Settings UI: The settings menu is divided into several sections such as Profiles, Appearance, and Key Bindings.
Configuring Profiles
Each command-line environment in Windows Terminal is a profile. You can customize individual profiles as follows:
-
Changing the Shell: Each profile allows you to set the command line interface. For instance, under PowerShell, you can specify the executable path if you want to use a specific version.
-
Changing Appearance: You can modify the background color, text color, font family, and font size.
-
Naming Profiles: Change the name of the profile by editing the «Name» field. This way, you can easily identify different profiles.
-
Setting Startup Behavior: Choose which shell opens by default when launching Windows Terminal by selecting it under the Startup section.
Customizing Appearance
-
Background Image: You can set a background image for a terminal profile by specifying its path in the «BackgroundImagePath» field.
-
Color Schemes: You can alter the colors of text, backgrounds, and cursor switches by defining a «color scheme» or selecting from existing schemes offered in Windows Terminal.
Using JSON for Advanced Configuration
For users who prefer advanced customization, you can edit the settings.json file directly. This file contains all configuration details for Windows Terminal and allows for precise control over every aspect.
-
Locate
settings.json: You can open this file by selecting «Open JSON file» from the settings menu. -
Editing the File: Adjust the values in the JSON file to change profiles, colors, and behavior according to your needs. Use proper JSON syntax to avoid errors.
-
Example of a Profile: Here’s a sample profile block you might find in
settings.json:{ "guid": "{your-guid-here}", "name": "Custom PowerShell", "commandline": "C:\Windows\System32\WindowsPowerShell\v1.0\powershell.exe", "hidden": false, "colorScheme": "Campbell", "fontFace": "Cascadia Code", "fontSize": 12, "startingDirectory": "//wsl$/Ubuntu-20.04/home/user" }
Using Tabs Effectively
Tabs in Windows Terminal allow you to run multiple sessions concurrently.
Opening New Tabs
- Using Keyboard Shortcuts: Press
Ctrl + Shift + Tto open a new tab. - Using the Dropdown Menu: Click on the dropdown arrow next to the tabs and select «New Tab».
Renaming Tabs
You can rename a tab by right-clicking on the tab and selecting «Rename Tab». This is useful for identifying which task or shell each tab is being used for.
Closing Tabs
Close tabs by clicking on the «X» on the tab itself or by pressing Ctrl + W.
Keyboard Shortcuts
Familiarizing yourself with keyboard shortcuts enhances efficiency while working within Windows Terminal.
- Open New Tab:
Ctrl + Shift + T - Close Tab:
Ctrl + WorCtrl + Shift + W - Switch List of Tabs:
Ctrl + Shift + Tab - Copy Selected Text:
Ctrl + Shift + C - Paste from Clipboard:
Ctrl + Shift + V - Toggle Fullscreen:
Alt + Enter - Zoom In:
Ctrl + Plus (+) - Zoom Out:
Ctrl + Minus (-)
Advanced Features
Windows Terminal is equipped with several advanced features that cater to power users.
Terminal Multiplexing
Utilize panes within Windows Terminal to visualize multiple shells side by side.
- Split Pane: You can split your terminal horizontally or vertically by using
Alt + Shift + Dfor vertical andAlt + Shift + Efor horizontal.
JSON Profile Synchronization
For users who use multiple devices, Windows Terminal allows you to sync settings across different machines using your Microsoft account. You can enable this link through the settings menu to ensure that all your configurations are maintained.
Terminal Settings Synchronization
For developers and users across multiple systems, enabling sync for terminal settings is essential. Ensure your terminal sync settings are on so all your customized profiles and appearances are retained.
Using WSL (Windows Subsystem for Linux)
Windows Terminal integrates seamlessly with WSL, allowing you to run Linux distributions directly.
-
Installing WSL: If not already installed, you can set it up via PowerShell by running:
wsl --install -
Accessing WSL in Windows Terminal: Open a new tab and select your installed Linux distribution from the dropdown menu.
-
Running Linux Commands: Use your Linux shell just as you would on a regular Linux terminal.
Troubleshooting Common Issues
As you use Windows Terminal, you might encounter a few common issues. Here are some troubleshooting tips:
Terminal Not Opening
- Reinstall: If Windows Terminal fails to open, try reinstalling the application.
Commands Not Recognized
Ensure that you have command-line utilities or WSL properly installed. If using WSL, ensure you’ve run wsl --install to get the Linux distribution set up.
Custom Configurations Breaking Terminal
If modifications to the settings.json lead to issues, revert to a previous version of the file if possible, or delete the problematic lines.
Conclusion
Windows Terminal is a crucial application for anyone looking to manage their Windows environment effectively. From installation to advanced features, this guide has provided a detailed pathway for beginners to navigate the powerful capabilities of Windows Terminal.
As you become more comfortable with the command line, you’ll find that Windows Terminal can streamline countless tasks, allowing you to focus on what matters most: productivity and efficiency. With ongoing updates and community support, Windows Terminal will continue to evolve and offer even more functionality to an ever-expanding user base.
Dive in, experiment with the features, and let Windows Terminal transform the way you interact with your computer! Whether for development, system administration, or personal projects, the terminal has capabilities that support countless workflows. Embrace this tool, and you’ll be well on your way to becoming a command line pro!