
С 15.06.2022 г. IE 11 не поддерживается
IE11 станет недоступным с 14.02.2023. Сайты, созданные для IE, можно перезапустить в режиме IE в Microsoft Edge.
Сервер SharePoint Server 2016 был спроектирован, разработан и протестирован в качестве основного элемента стратегии «Программное обеспечение как услуга» (Software as a Service, SaaS) корпорации Майкрософт.
Важно! Если выбрать язык ниже, содержимое страницы динамически отобразится на выбранном языке.
-
Date Published:
17.07.2019
File Name:
officeserver.img
Корпорация Майкрософт спроектировала, разработала и протестировала сервер SharePoint Server 2016 в полном соответствии со своей стратегией «программное обеспечение как услуга» (SaaS). Благодаря этому сервер SharePoint Server 2016 создан надежным и производительным решением, помогающим пользователям повысить мобильность своего бизнеса.
-
Чтобы скачать.
- Выберите язык установки в списке Выберите язык.
- Нажмите кнопку Скачать.
- Нажмите кнопку Сохранить, чтобы скопировать файл образа диска на компьютер.
Чтобы установить SharePoint Server 2016:
- Дважды щелкните файл образа, чтобы подключить его в качестве диска в системе компьютера.
- Перейдите на подключенный диск.
- Запустите файл splash.hta, чтобы открыть начальную страницу SharePoint Server 2016.
- ЩелкнитеУстановка необходимого ПО, чтобы открыть программу подготовки продуктов Microsoft SharePoint 2016.
- Чтобы завершить установку необходимого ПО, следуйте инструкциям программы.
- В меню Начало работы с SharePoint Server 2016 нажмите кнопку Установка SharePoint Server, чтобы открыть программу установки Microsoft SharePoint Server 2016.
- При необходимости введите ключ продукта. Вы можете воспользоваться одним из приведенных ниже ключей продукта. Срок пробного периода — 180 дней. Перейти на лицензированную версию можно в любой момент пробного периода, а также по его завершении. Для этого вам потребуется ввести соответствующий ключ продукта в центре администрирования.
- Корпоративный ключ продукта для пробной версии: NQGJR-63HC8-XCRQH-MYVCH-3J3QR.
- Стандартный ключ продукта для пробной версии: RTNGH-MQRV6-M3BWQ-DB748-VH7DM.
- Примечание. Чтобы включить Project Server 2016, вам потребуется корпоративный ключ продукта для SharePoint.
Подробные инструкции по установке см. в статье Установка SharePoint Server 2016.
Включение Project Server 2016
- Установите SharePoint Server 2016 с корпоративным ключом продукта.
- Создайте ферму серверов SharePoint Server 2016.
- Запустите командную консоль SharePoint 2016.
- Выполните в ней эту команду: Enable-ProjectServerLicense -Key <Project Server License Key>.
- Вы можете воспользоваться приведенным ниже лицензионным ключом. Срок пробного периода — 180 дней. Перейти на лицензированную версию можно в любой момент пробного периода, а также по его завершении. Для этого вам потребуется ввести соответствующий лицензионный ключ с помощью упомянутой команды.
- Лицензионный ключ для пробной версии Project Server: Y2WC2-K7NFX-KWCVC-T4Q8P-4RG9W.
- Подробные инструкции по установке см. в статье Enable-ProjectServerLicense.
Подробные инструкции по установке см. в статье Развертывание Project Server .
In this article, we will learn How to Install SharePoint 2016 step by step and exploring the most common SharePoint configuration wizard issues that you may face during installing and configuring SharePoint 2016.
-
1
Install and configure SharePoint 2016 step by step-
1.1
Download SharePoint Server 2016 -
1.2
Minimum SharePoint Server 2016 System Requirements.-
1.2.1
Database server running a single SQL instance. -
1.2.2
Web server or application server in a three-tier farm. -
1.2.3
Supported Deployment Scenarios for SharePoint 2016 -
1.2.4
Supported Operating System Requirements for SharePoint 2016 -
1.2.5
Supported .NET Framework for SharePoint 2016 -
1.2.6
Supported SQL Server for SharePoint 2016
-
1.2.1
-
1.1
-
2
Install SharePoint 2016 Prerequisites-
2.1
Install SharePoint 2016 Prerequisites Online -
2.2
Install SharePoint 2016 Prerequisites Offline-
2.2.1
Install SharePoint 2016 Prerequisites Common Issues
-
2.2.1
-
2.3
Install SharePoint 2016 Step by Step -
2.4
Configure SharePoint 2016 step by step-
2.4.1
Install SharePoint 2016 Common Issues
-
2.4.1
-
2.1
Install and configure SharePoint 2016 step by step
- On 24 August 2015, Microsoft announced the availability of the SharePoint Server 2016 Preview that not recommended to install on the production environment.
- On 18 November 2015, Microsoft announced the availability of SharePoint Server 2016 Beta 2 that not recommended to install on production environments. also, you can’t upgrade from Preview to Beta 2.
- On 20 January 2016 Microsoft announced the availability of SharePoint Server 2016 Release Candidate (RC) that is an update to SharePoint Server 2016 Beta 2 and can be installed over Beta 2 but not include InfoPath and SharePoint Designer as SharePoint Server 2013 RC! Read more at SharePoint Designer 2016 and InfoPath 2016 Alternatives.
- On 14 March 2016 Microsoft announced the availability of SharePoint Server 2016 Release to Manufacturing (RTM).
- On 12 April 2016, The first SharePoint Server 2016 April 2016 CU for SharePoint Server 2016 after RTM is released.

Note: You can’t upgrade from SharePoint Server 2016 Preview to Beta 2 and you can’t upgrade from Preview to RTM and you can’t upgrade from Beta 2 to RTM.
So in this article, we will explain how to install SharePoint 2016 by following below steps:
- Download SharePoint Server 2016.
- Identify System Requirements.
- Identify Deployment Scenarios.
- Identify the Operating System Requirements.
- Identify the .Net Framework.
- Identify SharePoint Database Server Requirements.
- Identify SharePoint Prerequisite.
- Demonstrate SharePoint Installation Steps.
The SharePoint 2016 installation is similar to the older versions of SharePoint except MinRole Topology which is introduced for the first time in SharePoint 2016. Read more at what’s new and deprecated in SharePoint 2016.
Download SharePoint Server 2016
SharePoint Server 2016 has been designed, developed, and tested with the Microsoft Software as a Service (SaaS) strategy at its core. To download the SharePoint 2016, please check SharePoint Server 2016.
Before we getting started, it’s strongly recommended to first read SharePoint 2019/2016: Service Accounts Recommendations as well as SQL Server Best Practices for SharePoint 2016/2019
Minimum SharePoint Server 2016 System Requirements.
Database server running a single SQL instance.
- Processor:64-bit, 4 cores.
- RAM: 12-24 GB.
- HardDisk : 80 GB for system drive, 100 GB for second drive.
Web server or application server in a three-tier farm.
- Processor:64-bit, 4 cores.
- RAM: 8-16 GB.
- HardDisk : 80 GB for system drive, 100 GB for second drive.
Supported Deployment Scenarios for SharePoint 2016
- Workgroup: Unsupported.
- Domain Controller: Developer Installation.
- Client OS: Unsupported.
- Dynamic Memory: Unsupported.
- Windows Web Server: Unsupported.
Supported Operating System Requirements for SharePoint 2016
SharePoint Server 2016 is supported on
- Windows Server 2012 R2.
- Windows Server Technical Preview.
- Windows Server 2012 R2 Standard or Datacenter (Desktop Experience).
- Windows Server 2016 Standard or Datacenter (Desktop Experience).
- Windows Server 2019 Standard or Datacenter (Desktop Experience).
You might also like to read Is it possible to install SharePoint Server on Windows Core?
Supported .NET Framework for SharePoint 2016
- Windows Server 2012 R2: SharePoint 16 requires .NET Framework 4.5.2
- Windows Server Technical Preview “Threshold”: SharePoint 2016 requires .NET Framework 4.6.
You might also like to read offline Install .NET 3.5 Framework on Windows Server 2012 R2.
Supported SQL Server for SharePoint 2016
- SharePoint Server 2016 requires SQL Server 2014 with SP1 for its databases. You can download SQL Server from the TechNet Evaluation Center.
- In addition SharePoint Server 2016 will support SQL Server 2016, 2017. For additional information on SQL Server 2016 click here.
You might also like to read Supported SQL Server Version for SharePoint 2016.
Install SharePoint 2016 Prerequisites
Before installing SharePoint 2016 prerequisites,we recommend to:
- Read SharePoint 2016: Service Accounts Best Practices.
- Prepare SharePoint 2016 Product Key.
- Enterprise trial product key:
NQGJR-63HC8-XCRQH-MYVCH-3J3QR - Standard trial product key:
RTNGH-MQRV6-M3BWQ-DB748-VH7DM
- Enterprise trial product key:
You might also like to read SharePoint Foundation 2016 Alternatives and Extend SharePoint Trial Period.
Install SharePoint 2016 Prerequisites Online
If you have an internet connection, you can easily use the SharePoint Preparation Tool (prerequisiteinstaller.exe) to install all SharePoint 2016 Prerequisite automatically.
Steps
- Double click on SharePoint 2016 installer,
- Click on “Install software prerequisites” to install all prerequisites component online.

- Accept Licence Agreement and Next to show the progress of the installation.

- Restart your server.

- After Server restart, The SharePoint Preparation Tool would be run again automatically to complete the installation. but if it’s not started, please check Continue prerequisiteInstaller.exe after server restart.

You might also like to read SharePoint 2016: SharePoint Preparation Tool Download Error.
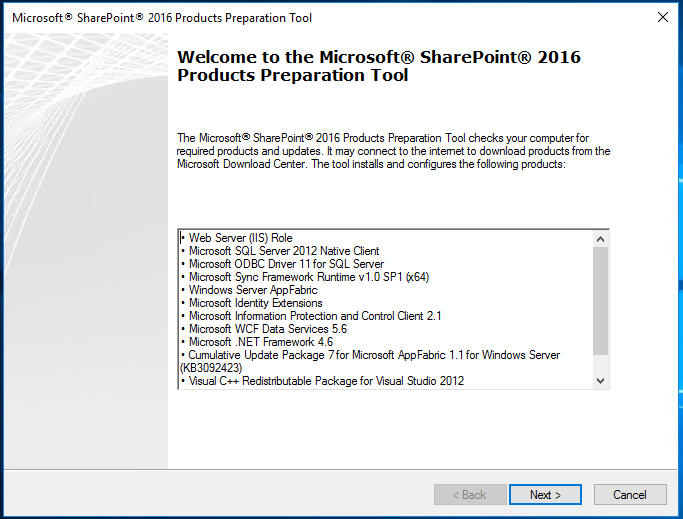
Install SharePoint 2016 Prerequisites Offline
If you don’t have an internet connection, so in this case, you will need to Offline Install SharePoint 2016 Prerequisites by downloading the below components and manually install it:
- Application Server Role, Web Server (IIS) Role.
- Microsoft SQL Server 2012 Native Client. Installs with the Microsoft SQL Server 2012 Feature Pack.
- Microsoft ODBC Driver 11 for SQL Server.
- Microsoft Sync Framework Runtime v1.0 SP1 (x64).
- Windows Server AppFabric 1.1.
- Cumulative Update Package 1 for Microsoft AppFabric 1.1 for Windows Server (KB2671763).
- Microsoft Identity Extensions.
- Microsoft Information Protection and Control Client.
- Microsoft WCF Data Services 5.0.
- Microsoft WCF Data Services 5.6.
- Microsoft .NET Framework 4.5.2.
- Update for Microsoft .NET Framework to disable RC4 in Transport Layer Security (KB2898850).
- Visual C++ Redistributable Package for Visual Studio 2013.
Install SharePoint 2016 Prerequisites Common Issues
Of course, the Offline install SharePoint 2016 Prerequisites is a boring solution, but if you don’t have an internet connection on the SharePoint server, this will be the only option to can install SharePoint 2016 Prerequisites.
In this section, we’ll list most of common issue that we have faced during Install SharePoint 2016 Prerequisites Offline.
- The tool was unable to download Microsoft SQL 2012 Native Client.
- Windows Server AppFabric is not correctly configured in SharePoint 2016.
- SharePoint 2016: SharePoint Preparation Tool Download Error.
- SharePoint 2016 setup unable to proceed: This Product Requires Microsoft .Net Framework 4.5.
Install SharePoint 2016 Step by Step
Once, you have installed SharePoint 2016 prerequisites successfully, you should follow the below steps to setup and install SharePoint 2016:
Steps
- Click on the SharePoint installation file, provide your SharePoint Server Product Key or you can also use one of the below SharePoint trial keys:
- Enterprise trial product key:
NQGJR-63HC8-XCRQH-MYVCH-3J3QR
- Standard trial product key:
RTNGH-MQRV6-M3BWQ-DB748-VH7DM
- Enterprise trial product key:

SharePoint 2016 provides a trial version for (180 days) 6 months
- Again accept the license agreement.

- Choose the file location for SharePoint server and search server files. Search index files need sufficient free space. then click install now.

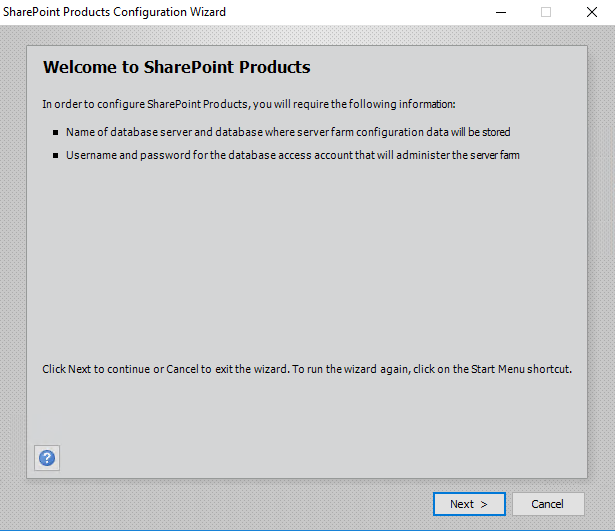
Configure SharePoint 2016 step by step
Steps
- After the file installation finished, run configuration wizard and click close.
Note: if you want to install a SharePoint Language Pack, uncheck “run configuration wizard”, then install SharePoint Language Pack, and after that run SharePoint configuration wizard.
Check also Download Arabic Language Packs for SharePoint 2016.

- Click Next.

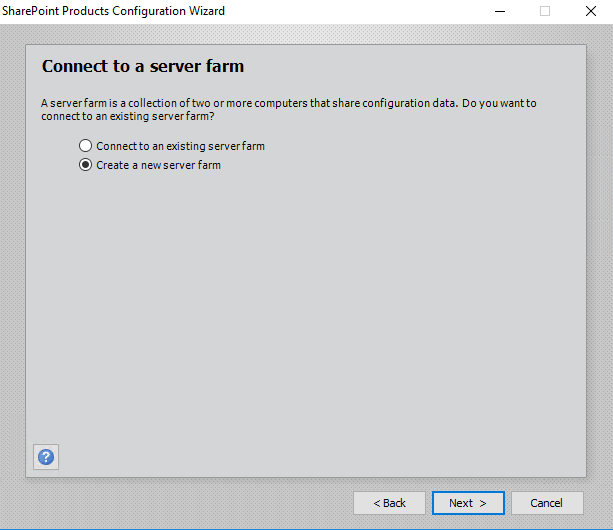
- Select Create a new server farm.

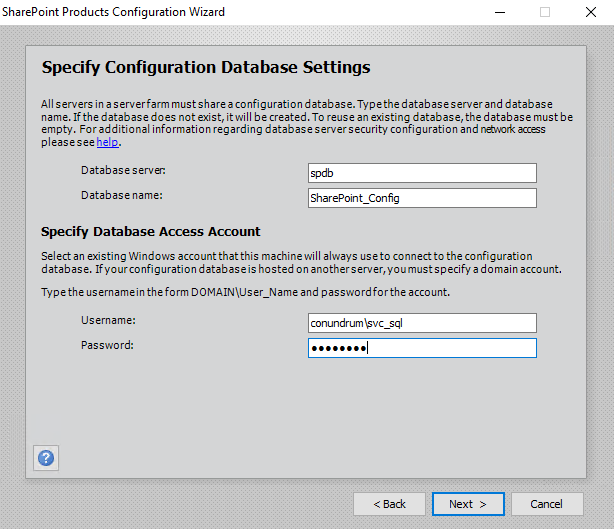
- Enter the database server and database access account with (Dbcreator,SecurityAdmin) as server role (Farm Account).
- then press Next.

In this step, you may get Cannot connect to database master at SQL server. The database might not exist, or the current user does not have permission to connect.
- Type the passphrase, click Next.

- You should now see a new screen that not found before in all previous SharePoint versions. It’s a Minrole feature.
- MinRole provides an out-of-the-box experience that provides topology recommendations, simplifies on-premises server farm deployments, and reduces the unit of scale to simplify capacity planning while providing predictable performance characteristics through enabling selective provisioning of SharePoint server roles based on position and function within a topology.
- A predefined server role is configured and optimized for its intended purpose provisioning the expected services designed to support its function within a server farm environment.
- MinRole enables an administrator to select the appropriate server role for a specific server when provisioning SharePoint Server 2016 based on five (5) predefined configurations:
- Special Load: Reserved for services to be isolated from other services, I.e. 3rd party, PerformancePoint, etc.
- Web Front End: Services end-user requests, optimized for low latency.
- Single Server Farm: Provisions all services on the server for single-server deployment. This role is provided for evaluation and development purposes.
- Search: Reserved for Search services.
- Application: Services the backend jobs or the requests triggered by backend jobs, optimized for high throughput.
- Distributed Cache: Services distributed cache for the farm. Optionally, the server assigned to this role can load balance end user requests among the web front ends.
- In this article, we will use a single-server farm installation so I will go with the last option. Click Next.

Check also, Simply, What’s new and deprecated in SharePoint Server 2016?
- Specify the port for Central Admin or can use the default, Click Next.

- Review the settings and Click Next.

- Wait a moment until the SharePoint Configuration wizard completed successfully!

- Great, the SharePoint 2016 has been installed and configured Successfully.

Install SharePoint 2016 Common Issues
In this section, we’ll list most of common issue that we have faced during configuring SharePoint 2016:
- Cannot connect to database master at SQL server. The database might not exist, or the current user does not have permission to connect.
- SharePoint 2019: SharePoint Configuration Wizard failed to create configuration database.
- SharePoint 2019: Cannot connect to database master at SQL server.
- SharePoint 2016: Failed to create the configuration database. Microsoft.SharePoint.Upgrade.SPUpgradeException was thrown
Conclusion
In this post, we have explained How to install SharePoint 2016 step by step and how t overcome most of common issue that you may face during the installation and configuration process.
See Also
- Install and Configure Project Server 2016.
Have a Question?
If you have any related questions, please don’t hesitate to ask it at deBUG.to Community.
Recently there was an article on StarWind Blog dedicated to Exchange 2016 installation written by Nicolas Prigent, so I decided that some folks might want to get something similar for SharePoint 2016, so here you are. Disclaimer: I did not touch on scripting SharePoint installation with PowerShell or any other advanced stuff, but I promise that you’ll find some interesting details beyond of “how do I click my way through setup wizard” information.
Microsoft’s SharePoint evolved quite dramatically in three previous major releases (2007, 2010, 2013) and now we have yet another version – SharePoint 2016. As usual, in this release, you can find additional functionality and loads of things to learn. But I think what you may be interested in it is just how to do a quick install to play with the latest version of SharePoint and test if it works well for your scenarios whatever they are. For example, in my case, I am going to test different scenarios of integration between K2 blackpearl and SharePoint 2016 among many other things. Disclaimer: if you in a mood to read somewhat dry and lengthy official installation guide – it exists and should be perused before doing production installation, but as the usual official documentation does not go as a pleasant easy read for the majority of people.
SharePoint 2016 is the first version of SharePoint product which has been fully developed in the cloud and then released as an on-prem product, as Microsoft likes to say these days battletested in the cloud and ready for hyper-scale :-). If you followed SharePoint product line closely enough you might also know that this is a version which Microsoft didn’t want to release at all until demand from client base made them reconsider this and release yet another version of on-premise product (as a result it is geared heavily towards integration with SharePoint Online and Office 365).
Yes, I do confirm that you can do so-called “spousal mode” installation when you just click Next/OK in each prompt and not going into any details. Yet at the same time, real-life production installation will be well out of scope for the introductory article. Hence here we just try to properly install single-box SharePoint 2016 server for test purposes covering just enough details to make it right, and additionally touching a bit on some stuff beyond just installation process covering best practices related to the configuration of SQL Server for SharePoint and installation of language packs.
I think I will later do another blog post on specific new features of this release but for now, I mention that in this version Microsoft introduced new and improved patching process and that the only supported upgrade scenario to this version is database attach.
Before you run SP 2016 setup there is some ground work to do. You will need the following platform wise (refer to official Hardware and software requirements for SharePoint Server 2016 for more details):
- Windows Server on which you install SharePoint 2016 – this can be VM with Windows Server 2012 R2 or 2016 Standard or Datacenter.
- SQL Server – which is the crucial component for your SharePoint farm. You will need either the 64-bit edition of Microsoft SQL Server 2014 SP1 or Microsoft SQL Server 2016 RTM.
For this tutorial, I decided to use new and shiny things so I’m using Windows Server 2016 Standard as base OS for SharePoint 2016 installation and separate VM with Server 2016 Standard and SQL Server 2016 Enterprise.
First important piece of a groundwork we must do is provisioning of dedicated SQL Server instance for SharePoint. Obviously, I won’t be covering entire SQL Server instance installation process, but I will explain below how to setup SQL alias as well as couple of settings you want to take care of for your SharePoint SQL Server just to avoid time you may otherwise waste later rebuilding your environment just because you did not get the basics right (AKA “rip and replace” time).
First of all, your SQL server collation must be configured for case-insensitive. The SQL Server database collation must be configured for case-insensitive, accent-sensitive, Kana-sensitive, and width-sensitive. This is to ensure file name uniqueness consistent with the Windows operating system (sources: 1, 2). I would suggest you set your instance to have the same collation as SharePoint data bases – Latin1_General_CI_AS_KS_WS – just don’t forget to do this during SQL installation (it is very easy to rush through SQL Server Setup without even noticing that tab where this setting can be configured):

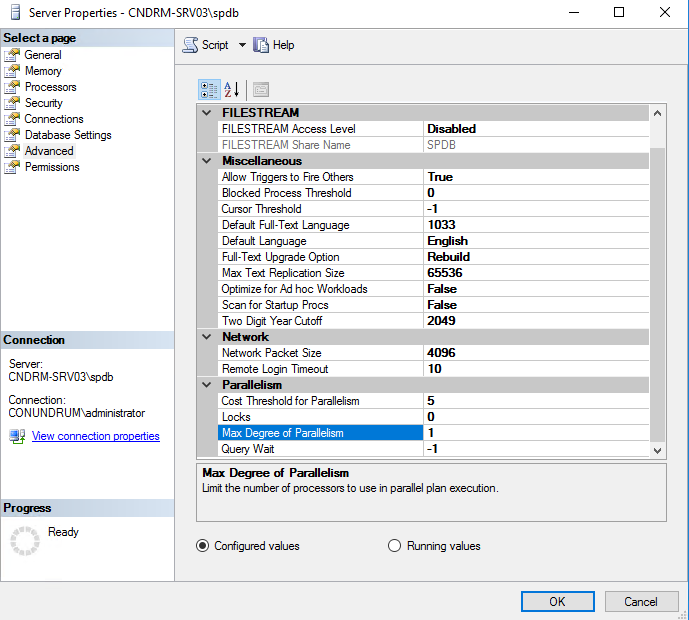
Additional SharePoint SQL instance settings we have to take care of are covered below. First, we need to set Max Degree of Parallelism to 1 to make sure that a single SQL Server process serves each request:
Once this is done another thing to remember is that you should not enable auto-create statistics on SharePoint content databases – SharePoint databases use a stored procedure that maintains the statistics (proc_UpdateStatistics). To make sure that auto-create statistics is not enabled you can use the following SQL script which lists all databases on your server which have auto-create statistics enabled:
SELECT name

FROM sys.databases

WHERE is_auto_create_stats_on = 1;
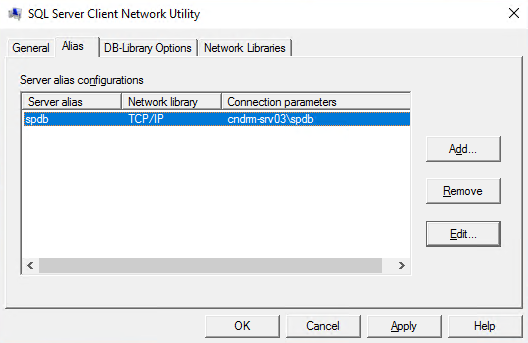
Last thing, which will ensure better flexibility for us is SQL alias – having it will simplify maintenance and make it easier to move SharePoint databases to another server without the need to change anything on SharePoint side. Fire off SQL Server Client Network Utility and create a new alias for your SharePoint SQL Server instance. Just to be on a safe side create the alias using both x86 and x64 versions of cliconfg.exe – “C:\windows\syswow64\cliconfg.exe” and “C:\windows\system32\cliconfg.exe”, they write alias configuration in different registry hives and bitness of application which reads these settings defines where this application will look for alias properties. For example, SharePoint 2016 setup is x86 application and will look for alias parameters in x86 registry hive.
Now with dedicated SQL service instance/server configured and alias created we have due application isolation and flexibility on our application backend side. Essentially by doing this, we covered most of best practices mentioned in Best practices for SQL Server in a SharePoint Server 2016 farm TechNet article.
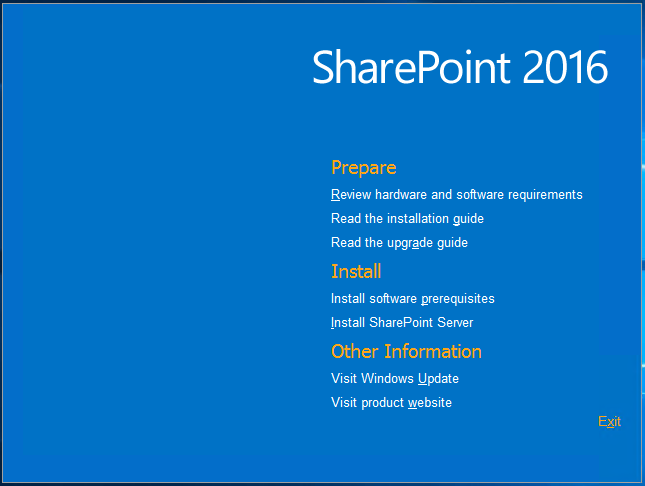
Once servers with required features are in place you can employ splash screen to kick off installation of prerequisites:
Alternatively, you can directly execute prerequisiteinstaller.exe. As I’m running this on Windows Server 2016 this is my first step, but in case you run older versions of Windows Server make sure to install the following update Windows RT 8.1, Windows 8.1, and Windows Server 2012 R2 update: April 2014 before running prerequisites installer. Prerequisites installer takes care of required Windows Server features and other software prerequisites like .NET Framework 4.6:
This handy tool downloads and installs all these prerequisites for you – it will take some time depending on your VM and internet connectivity speed. It won’t prompt you for restart after completion but I would recommend you to do it anyway as reboot never hurts after installing a bunch of additional software on the server.
We are done with prerequisites now, and ready to start the installation of SharePoint Server itself – this is also the two-step process. First setup just installs files asking you about location for SharePoint Server and SharePoint Search files (index), and on the second step you start Configuration Wizard to configure your SharePoint Server:
Be informed that configuration process may start/reset IIS in the process – so take this possible service interruption into account (not a big deal if you installing test box and wizard warns you about this). First, we opt out to Create a new server farm:
Next, specify our SQL alias in Database server field as well as database access account (in case you can’t connect though you sure that alias, credentials, and rights are in order make sure alias has been created using x86 version of cliconfg.exe):
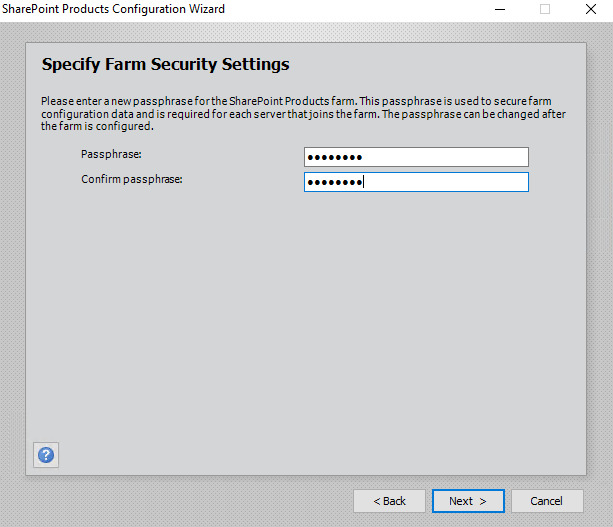
On the next step, specify your farm passphrase – this one will be required for adding additional servers to your farm and can be changed afterward:
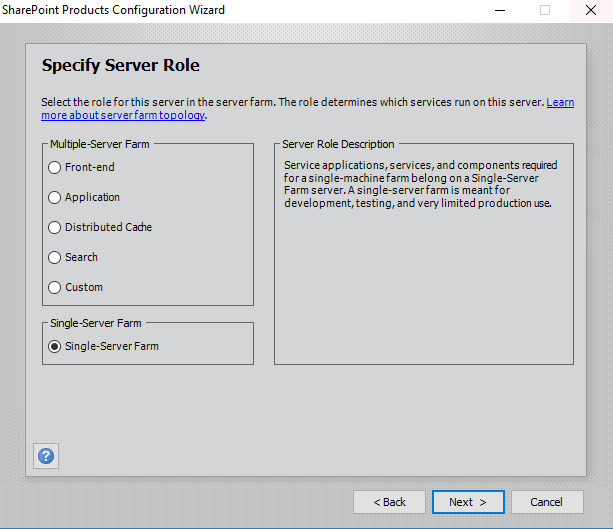
After this Specify Server Role step presented to you. This one is no brainer in a single-server farm scenario (and distributed installation is a bit out of scope for this article). This is an interesting step as here you can see so-called SharePoint MinRoles which is also a new thing introduced in SharePoint 2016. MinRole is a new farm topology based on a set of predefined server roles introduced in SharePoint Server 2016. When configuring your SharePoint farm, you now select the role of a server when you create a new farm or join a server to an existing farm. Once again we installing single-server farm here:
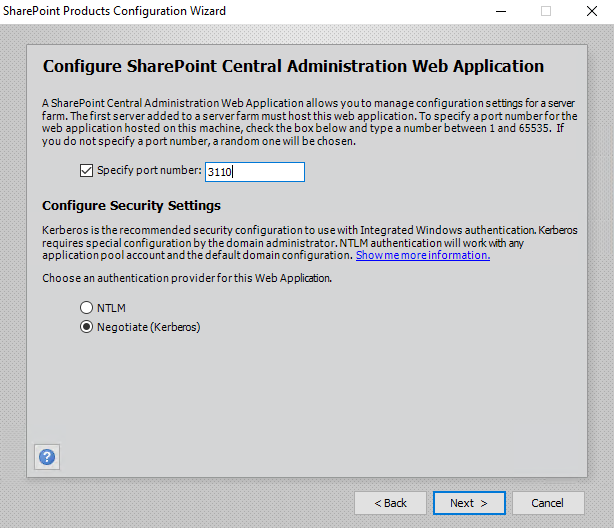
And finally, we need to configure SharePoint Central Administration Web Application – we can specify port number as well as select security settings (NTLN or Negotiate (Kerberos), with the latter option being more secure). Make sure enter port number you like at this step, otherwise you end up with some auto-generated random port for your Central Administration web application:
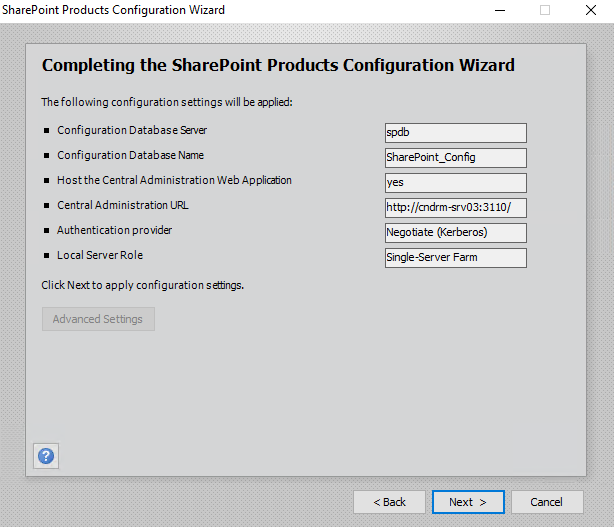
Next review your selections and if everything is OK just click next to begin actual configuration process which will create your configuration database:
Once configuration process is completed you should receive confirmation that configuration was successful:
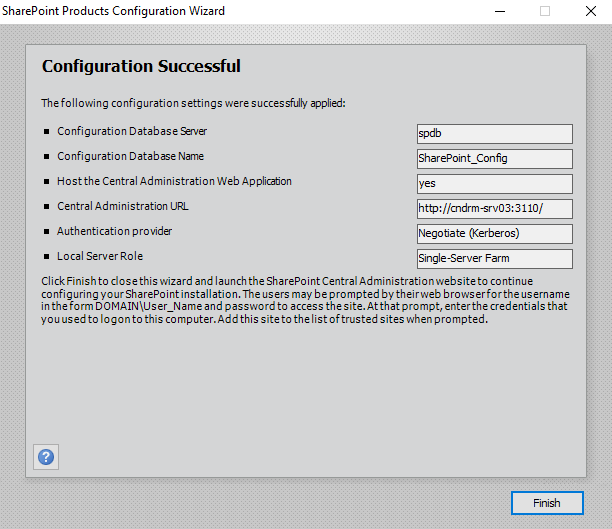
After clicking Finish button, Configuration Wizard will launch a browser window with SharePoint Central Administration page where after replying to CEITP participation prompt you can select whether you will use Wizard or Manual way of configuring your SharePoint farm.

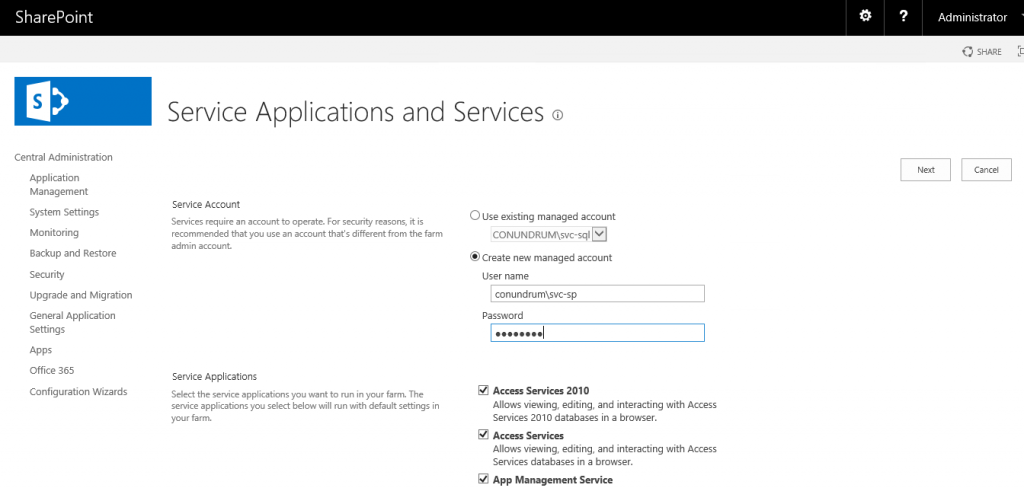
We will opt out for the simplest option “Start the Wizard”, and it will provision service application and services for us:
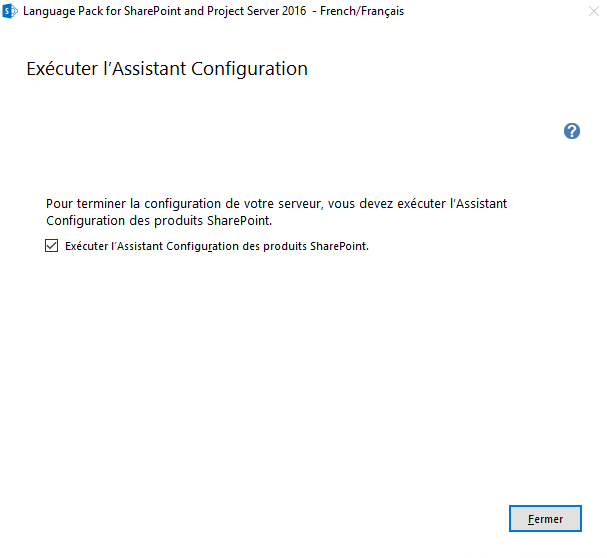
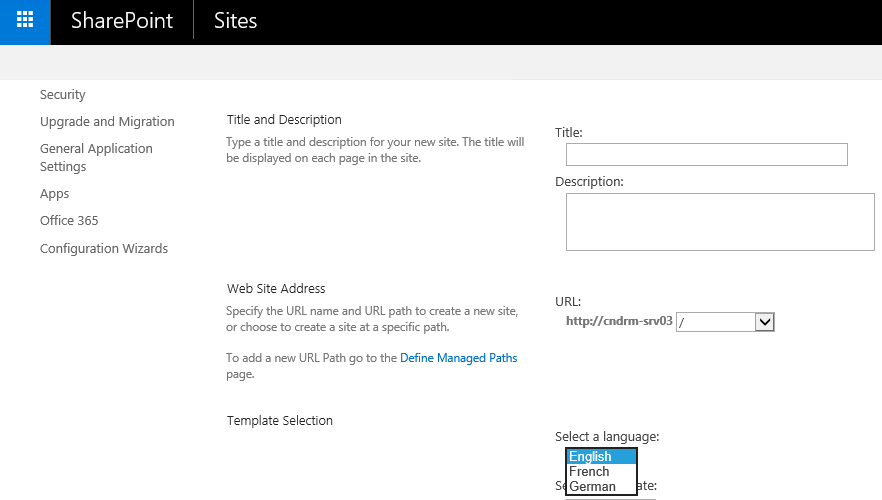
After famous “This shouldn’t take long” message which can take the arbitrary (large) amount of time we finally have done with the installation process and can start working with our SharePoint farm – we will be presented with Create Site Collection page. But before we wrap up with installation let’s also apply language pack or two for SharePoint 2016 (depending on your needs 🙂 ). That language which was used when you initially installed SharePoint (in my case it was English) becomes SharePoint installation base language, and additional ones may be added as language packs. Download language pack you need and install it, once binaries are installed make sure you keep ticket by default check box to run Configuration Wizard as you need to run through it to have your language pack applied:
As an aspiring polyglot, I’ve applied both French and German language packs for my farm, and the easiest way to verify that language packs were installed is Language drop down on Create New Site Collection page which presents additional languages:
I hope this article was useful for you and I’m going to write a bit more about new features introduced in SharePoint 2016 soon.
- Installing Exchange Server 2016 on Windows Server 2016
- The High Availability Features in SQL Server 2016 Standard Edition
/
Andreas Glaser
How to successfully install SharePoint 2016 step by step as an administrator or developer.
Install SharePoint 2016 — The Complete E-Book:
Scenario
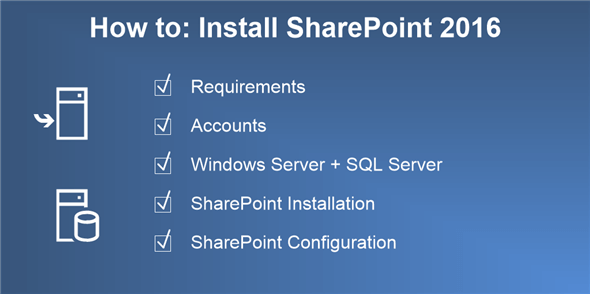
We will install SharePoint 2016 based on the following scenario:
It’s a
- SharePoint 2016 single-server installation, including
- basic installation accounts, and
- SQL Server and Windows Server setup.
PowerShell automation is not shown.
Back to top
Helpful Tips
You may believe it or not but the following tips are the most useful I’ve seen during my years of installing SharePoint for my clients.
Meet all Hardware Requirements
Often I hear «SharePoint can’t have such high requirements…» or «We won’t need all features and there’s no need to scale…».
Don’t try to mess with hardware and software requirements and don’t try to run a SharePoint server at the most minimal requirements. Of course it costs money and it doesn’t matter if it’s their hardware or your time: It has to be paid. But believe me if you need to change things later it takes way more time and resources than you would have invested at the beginning.
Get enough Time
Installing SharePoint can’t be compared to installing a tool or application. It includes way more effort than a Windows Server or SQL Server since it’s based on different types of servers and a working infrastructure. Usually you will get challenges if you put a system on top combining different servers and services.
Take your time and schedule resources in time. Installing SharePoint can be done in some hours or days… it all depends on how well you and your team are prepared or not.
Prepare your Install Packages
This should be just a small thing but believe me it happens more often than you think and eats up your precious time really fast. Make sure that you prepare your own packages and that your customer has everything in place. It’s a waste of time if you need to wait when you are ready to install SharePoint. I met a lot of customers where time and resources were limited but the preparation wasn’t done.
Documentation
Documentation is everything and often it’s not done. It doesn’t matter if you give the project to someone else who needs to get into it. Usually there is more than one environment to install: staging, production or a recovery environment. There are hundreds of steps included and since nobody remembers all the steps which were done it’s important to write them down (and to take screenshots). This way the installation process can be done by different people or at different times.
Summary
You can ruin a really great SharePoint installation by missing the following things:
- Meet the requirements
- Try to get resources in time
- Take your time and do it properly
- Verify if you prepared everything for yourself and if your customer has done it too
- Document everything
Back to top
Hardware and Software Requirements
Please make sure you meet all SharePoint 2016 hardware and software requirements.
SharePoint has specific hardware, software, domain and account requirements before you can successfully install it. You need to meet them before you can start your installation to minimize waiting time and mistakes.
Back to top
Administrative and Service Accounts
These are the official account requirements [1] in order to install SharePoint 2016.
Basic Installation Accounts
You need to create at least the following domain accounts in Active Directory to successfully install SharePoint 2016:
Basic Installation Accounts
| Required Account | Example |
|---|---|
| SQL Server Service Account | sqlSvcAcc |
| SharePoint Setup Administrator | spAdmin |
| SharePoint Farm Account | spFarmAcc |
Service Accounts
Service accounts aren’t needed for a successful SharePoint 2016 installation.
Assign Permission
The SharePoint 2016 setup administrator is the only account where you need to assign permission manually.
SQL Server Service Account
- Permission are assigned automatically during installation of SQL Server 2014.
- The SQL Server service account should be a domain account and is used to run SQL Server.
SharePoint Setup Administrator
SharePoint 2016 Farm Account
Permissions are automatically assigned by the SharePoint 2016 setup administrator so you don’t have to do it.
The farm account is used for the following things [1]:
- Configure and manage the server farm.
- Act as the application pool identity for the SharePoint Central Administration website.
- Run the Microsoft SharePoint Foundation Workflow Timer Service.
Back to top
SQL Server 2014 Configuration
I haven’t seen any official or unofficial documentation about required features yet so I’ll use the minimum set of features that worked with older versions of SharePoint.
.NET Framework 3.5.1
SQL Server 2014 requires .NET Framework 3.5 SP1 so you need to enable the feature using «Server Manager > Add Roles and Features > .NET Framework 3.5»:

SQL Server 2014 Installation
The following steps apply if you don’t have a SQL server yet. If you have a SQL Server 2014 SP1 instance you can skip to the step below: «SQL Server 2014 configuration».
Select a new SQL Server stand-alone installation and wait until the install rules have been checked. After that select the SQL Server Feature Installation:


Please select at least the following minimum features:
- Database Engine Services
- Management Tools — Basic


Keep the default instance.
Add the SQL Server service account (in my case: sqlSvcAcc) plus password and keep the collation settings.


If you create a development environment add the current administrator and SharePoint 2016 setup administrator as SQL Server administrators.

Start the SQL Server 2014 installation.
SQL Server 2014 Configuration
Open SQL Server 2014 Management Studio and give the following permissions.
Assign the dbcreator and securityadmin server role to the SharePoint 2016 setup administrator which is in my case spAdmin.

Please also make sure you respect the following SQL Server best practices by Microsoft:
- Do not enable auto-create statistics on SharePoint content databases.
- Do not manually restrict database size in SQL Server.
- Keep max degree of parallelism (MAXDOP) to 1 for instances of SQL Server that host SharePoint databases.
Back to top
Windows Server 2012 R2 Configuration
Usually I like to know which Windows Server 2012 R2 role services and features are enabled: If you run the SharePoint 2016 prerequisites installer you won’t see the exact configuration steps. Anyway it’s sufficient for this scenario.
SharePoint 2016 Prerequisites Installer
The prerequisites installer installs and configures all SharePoint 2016 requirements but it doesn’t show you in detail what it does.


Make sure everything installed successfully and restart your server if required.
The prerequisites installer also downloads required patches and hotfixes for Windows Server 2012. In case you want to download them manually please read: SharePoint 2016 hardware and software requirements.
Back to top
SharePoint 2016 Installation
SharePoint 2016 now comes with the new MinRole feature (SharePoint MinRole Explained) which configures a server for a specific role in a SharePoint topology like a Web Server or Application Server.
SharePoint 2016 Installation
Start the installation of SharePoint Server 2016 and use one of the following trial product keys:
- Enterprise: NQGJR-63HC8-XCRQH-MYVCH-3J3QR
(Required to enable Project Server 2016) - Standard: RTNGH-MQRV6-M3BWQ-DB748-VH7DM
The keys are valid for 180 days and you can change to a licensed version anytime during the trial or after the trial has expired using Central Administration.
Enter the product key and keep the file location.


Run the SharePoint Products Configuration Wizard.

SharePoint 2016 Configuration Wizard
Create a new server farm and enter your SQL Server [SERVERNAME] and specify the SharePoint 2016 farm account.
I installed SQL Server and SharePoint 2016 in the same machine so I used localhost as the SQL Server name.


Select the Single Server farm for our testing purposes. Specify a port number and start the configuration.


Once the installation has finished you can open SharePoint 2016 Central Administration.


Once you see the SharePoint 2016 Central Administration you’re done with the installation:

Back to top
Install SharePoint 2016 — The Complete E-Book:
All trademarks are property of their respective owners.
© 2017–2024
Contact
Resources
Company Information
Provide feedback
Saved searches
Use saved searches to filter your results more quickly
Sign up
Appearance settings