
v1.3.2
- Add macOS arm64 build.
v1.3.1
Update upstream to v4.23.2.
e75c2797695bc7e534c6f087d93aeb207caa63a6  bin/v2ray-plugin-linux-amd64-v1.3.1.tar.gz
60c2f1b079d05284c5de937d5848373e351f6372  bin/v2ray-plugin-linux-386-v1.3.1.tar.gz
fad7ec71d51d5eed7f5035024cca781c53187660  bin/v2ray-plugin-darwin-amd64-v1.3.1.tar.gz
e138f7cbb15fc54c793b1472fe91fe57a491233f  bin/v2ray-plugin-darwin-386-v1.3.1.tar.gz
8b7ebfbb98a26f5a9cb206a631bda17fcd418bd6  bin/v2ray-plugin-windows-amd64-v1.3.1.tar.gz
fcb25cae77b392178efb91c6fb2450fb3f9e7da3  bin/v2ray-plugin-windows-386-v1.3.1.tar.gz
055e4dae88ea212e12d4082e76f8f8b8f3b804ce  bin/v2ray-plugin-freebsd-amd64-v1.3.1.tar.gz
5bca419ebbf8f79568d64ebcc748122d1f493f91  bin/v2ray-plugin-freebsd-386-v1.3.1.tar.gz
6344623e9525354fa100e63645d8aa5ea373696a  bin/v2ray-plugin-linux-arm-v1.3.1.tar.gz
c6d8723bd021c477bd29954e3753cbcb46887662  bin/v2ray-plugin-linux-arm64-v1.3.1.tar.gz
145399c5422ad57dc70d28b8ada0b98843686846  bin/v2ray-plugin-linux-mips-v1.3.1.tar.gz
v1.3.0
Minor bug fixes.
a8496d00e6dc117be37f1688e87a34eb05ab9729  v2ray-plugin-linux-amd64-v1.3.0.tar.gz
944231eb3d65a4a611ea4c0c6f427aafdb379a60  v2ray-plugin-linux-386-v1.3.0.tar.gz
c7d778f29bf3b4c91e845b5d461aab7c3fcb5ac5  v2ray-plugin-darwin-amd64-v1.3.0.tar.gz
7549b7a65883834f59d7c816f512385a1d57c9af  v2ray-plugin-darwin-386-v1.3.0.tar.gz
dd22810301e188785169c89f5bfc68cbb9304ec7  v2ray-plugin-windows-amd64-v1.3.0.tar.gz
85d49a81eadf1c5835987eea12c0f7a2b0973369  v2ray-plugin-windows-386-v1.3.0.tar.gz
61681c054b7109ba3a66e174016a407881151d34  v2ray-plugin-freebsd-amd64-v1.3.0.tar.gz
c93a85bb273fa4cf88c075987b1cbcd0302e326d  v2ray-plugin-freebsd-386-v1.3.0.tar.gz
f8cd848da1d71a560c35f80c07b2f5026638681e  v2ray-plugin-linux-arm-v1.3.0.tar.gz
2be93cf2b665990589153cd9ddc25e232f3ddb36  v2ray-plugin-linux-arm64-v1.3.0.tar.gz
6ee766406863d636c485502d62e9a70e184e1121  v2ray-plugin-linux-mips-v1.3.0.tar.gz
v1.2.0
Minor bug fixes.
fcb273cfda505d07a9a15942fd13d18ba82bba39  v2ray-plugin-linux-amd64-v1.2.0.tar.gz
a068c5656f846ac87289c211e0ee34528696bc80  v2ray-plugin-linux-386-v1.2.0.tar.gz
12b558f53a5d401b88a58e9372fff5ebe94e9287  v2ray-plugin-darwin-amd64-v1.2.0.tar.gz
631a9e909b232c1fae48b5806a9c41f9f463ec62  v2ray-plugin-darwin-386-v1.2.0.tar.gz
81524ec59886e958e644288b23c0179720aafea4  v2ray-plugin-windows-amd64-v1.2.0.tar.gz
4942e0dd39c27bf8be2a4e8efd75a9b661191fa4  v2ray-plugin-windows-386-v1.2.0.tar.gz
a7dda05415cc3f755455da4702189a95e71764ed  v2ray-plugin-freebsd-amd64-v1.2.0.tar.gz
64387cc15597a4081c324b82b83fb0d7f45a6b0b  v2ray-plugin-freebsd-386-v1.2.0.tar.gz
eb61535fc43267e36226c026861fbfff34ec0c02  v2ray-plugin-linux-arm-v1.2.0.tar.gz
7317ff2b6ab5213598093b2ded39de80325e1c92  v2ray-plugin-linux-arm64-v1.2.0.tar.gz
b3c53df304ff7c251b3231df0682e5366c4016d7  v2ray-plugin-linux-mips-v1.2.0.tar.gz
v1.1.0
- Minor bug fixes.
- Update v2ray to v4.16.
91d965d6035bc1e6cb7d7fb4744e6eb75fd85d84  v2ray-plugin-linux-amd64-v1.1.0.tar.gz
b1916b7c341e8abc4e5462872ee709af3cdaab46  v2ray-plugin-linux-386-v1.1.0.tar.gz
7228d5e10016f565ab81decdb1a6a20188e48aaa  v2ray-plugin-darwin-amd64-v1.1.0.tar.gz
fec0a985344913ef90928dbe9350aebe3f37b930  v2ray-plugin-darwin-386-v1.1.0.tar.gz
c1159ed5c64c45bc95d9a8907f5a99c20fb54f03  v2ray-plugin-windows-amd64-v1.1.0.tar.gz
d97804eb1f3a157f04f2de109364080768eee39c  v2ray-plugin-windows-386-v1.1.0.tar.gz
c1e3360a23436f391d6917f84fe670b40d11d661  v2ray-plugin-freebsd-amd64-v1.1.0.tar.gz
7b0ca49f3673e4511e981eacf8a4e033b4b57c13  v2ray-plugin-freebsd-386-v1.1.0.tar.gz
c9d3a6f5647a18cf33de793ee0a9943b4b383b9b  v2ray-plugin-linux-arm-v1.1.0.tar.gz
b3dc59e20e8b69d2dd7a9229a46442b7bbfb03eb  v2ray-plugin-linux-mips-v1.1.0.tar.gz
v1.0
v20190114
v20190109
First release.
8fa675d08aa9fe9b789d8db5c555b1d65b69802f  v2ray-plugin-linux-amd64-20190109.tar.gz
0b8a72fc00d8d1d525d5e14224c08f98ed7a031d  v2ray-plugin-linux-386-20190109.tar.gz
4e3f4dd5cc880cbd56452c1c9da7566ea04d07f5  v2ray-plugin-darwin-amd64-20190109.tar.gz
6a9d7e161888f9b242ad4a8aba791310cbaca491  v2ray-plugin-darwin-386-20190109.tar.gz
f92e65ac480799bfe00317e52ad8bccb017205da  v2ray-plugin-windows-amd64-20190109.tar.gz
6cfb0bdf88ac6cb5007c7332450bdd6eaa4f4e58  v2ray-plugin-windows-386-20190109.tar.gz
e4ffa1bd43388d320e284f7b99a7dc62d1b2f827  v2ray-plugin-freebsd-amd64-20190109.tar.gz
6ac8c4580931c0ebf6e84200548d4d9ae988798e  v2ray-plugin-freebsd-386-20190109.tar.gz
cf448aa74673b3a02e3f8f65e03d055bee69e94f  v2ray-plugin-linux-arm-20190109.tar.gz
By following this post, you can create an SS + V2Ray plugin server without having to buy a domain name.
The server in this post runs Debian 11, and the client runs Windows 11.
Install Nginx on Server
1 |
apt install nginx |
Create Self-Signed CA Certificate
Create a directory to hold your certificates:
1 |
mkdir /etc/openssl |
Change into the directory that will hold your certificates:
1 |
cd /etc/openssl |
Generate a private key for your CA certificate:
1 |
openssl ecparam -out ca.key -name secp384r1 -genkey |
Generate a certificate signing request:
1 |
openssl req -new -sha256 -key ca.key -out ca.csr |
Enter anything you like for Country Name, State or Province Name, Locality Name, Organization Name, and Organizational Unit Name. For example:
1 |
Country Name (2 letter code) [AU]: |
For Common Name, put Private CA.
Leave Email Address blank.
Leave the ‘extra’ attributes (challenge password and company name) blank.
Sign the certificate signing request, creating your certificate:
1 |
openssl x509 -req -sha256 -days 365 -in ca.csr -signkey ca.key -out ca.crt |
Create Server Certificate
Generate a private key for your server certificate:
1 |
openssl ecparam -out example.com.key -name secp384r1 -genkey |
Generate a certificate signing request:
1 |
openssl req -new -sha256 -key example.com.key -out example.com.csr |
Enter anything you like for Country Name, State or Province Name, Locality Name, Organization Name, and Organizational Unit Name. For example:
1 |
Country Name (2 letter code) [AU]: |
For Common Name, put example.com.
Leave Email Address blank.
Leave the ‘extra’ attributes (challenge password and company name) blank.
Sign the certificate signing request, creating your certificate:
1 |
openssl x509 -req -in example.com.csr -CA ca.crt -CAkey ca.key -CAcreateserial -out example.com.crt -days 365 -sha256 |
Make the server private key readable by Nginx:
1 |
chmod +r example.com.key |
Configure Nginx
Generate Diffie-Hellman parameters:
1 |
openssl dhparam -out /etc/nginx/dhparam 2048; |
This may take a long time.
Edit the Nginx default site:
1 |
vi /etc/nginx/sites-available/default |
Delete the default contents, and enter contents as below:
1 |
server { |
Change /abcdefgh to a secret path of your choice.
Save the configuration file.
Restart Nginx with your revised configuration file:
1 |
systemctl restart nginx |
Download V2Ray Plugin to Server
Put software v2ray-plugin into directory /usr/bin/ like this:
1 |
cd ~ |
Install Shadowsocks on Server
Download the Shadowsocks-libev install script for Debian from GitHub by issuing this command in your terminal emulator:
1 |
wget https://raw.githubusercontent.com/teddysun/shadowsocks_install/master/shadowsocks-libev-debian.sh |
Make the script executable by issuing the command to set the execution bit:
1 |
chmod +x shadowsocks-libev-debian.sh |
Think up a password. Our example is socKsecreT2021%d.
Think up a port number. Our example is 8008.
Choose an encryption method. Our example is aes-256-gcm.
Run the install script by issuing the command:
1 |
./shadowsocks-libev-debian.sh |
Enter your choise of password, port, and encryption method. Your run of the script will look like this:
1 |
############################################################# |
Press any key to continue.
Wait while the installs and compiles take place. This may take a long time.
At the end of the install script, the parameters are redisplayed:
1 |
Congratulations, Shadowsocks-libev server install completed! |
Configure Shadowsocks on Server
Edit the Shadowsocks configuration file:
1 |
vi /etc/shadowsocks-libev/config.json |
Add lines for the plugin and plugin options, like this:
1 |
{ |
Remember the comma after what used to be the last option.
Save the edited file.
Restart Shadowsocks on Server
Restart Shadowsocks with your configuration file which now specifies the V2Ray plugin:
1 |
/etc/init.d/shadowsocks restart |
End work on server:
1 |
exit |
Download CA Certificate to Client
Now you are going to work on the Windows PC that will be your client.
Open Windows PowerShell (right-click on Windows Start button, then select Windows Terminal).
Issue the command below, replacing 123.45.67.89 by your actual server IP address:
1 |
scp root@123.45.67.89:/etc/openssl/ca.crt Downloads/ca.crt |
Close Windows PowerShell.
Import CA Certificate on Client
Open a Run box (Win+r), type mmc, and click OK.
In the Microsoft Management Console:
- Click File
- Select the option Add/Remove Snap-in
- In the window Add or Remove Snap-ins, select Certificates
- Click the Add button
- Select Computer account, and click Next
- Select Local computer, and click Finish
- Click OK
Expand the tree in the left pane. Then continue like this:
- Right-click on Trusted Root Certification Authorities
- Select All Tasks
- Select Import
- Click Next
- Browse to your
ca.crtfile in theDownloadsfolder - Click Open
- Click Next
- Click Next
- Click Finish
- Click OK
Close the Microsoft Management Console.
Download Shadowsocks to Windows Client
Open a browser and go to https://github.com/shadowsocks/shadowsocks-windows/releases.
Download the most recent release of Shadowsocks for Windows. For example, right now the most recent release is Shadowsocks-4.4.0.185.zip.
Unzip Shadowsocks-4.4.0.185.zip. This creates a folder Downloads\Shadowsocks-4.4.0.185.
Install 7-Zip
Install 7-Zip from https://www.7-zip.org if you do not have it on your PC already.
Download V2Ray Plugin to Windows Client
In your browser, download the most recent V2Ray plugin for Windows from https://github.com/shadowsocks/v2ray-plugin/releases. It will be named something like v2ray-plugin-windows-amd64-v1.3.1.tar.gz.
Right-click on the download, and use 7-Zip to extract v2ray-plugin-windows-amd64-v1.3.1.tar.
Right-click on that, and use 7-Zip again to extract from this the application v2ray-plugin_windows_amd64.exe.
Copy v2ray-plugin_windows_amd64.exe into the Shadowsocks folder Downloads\Shadowsocks-4.4.0.185.
Configure Shadowsocks on Windows Client
Start Shadowsocks.exe for the first time.
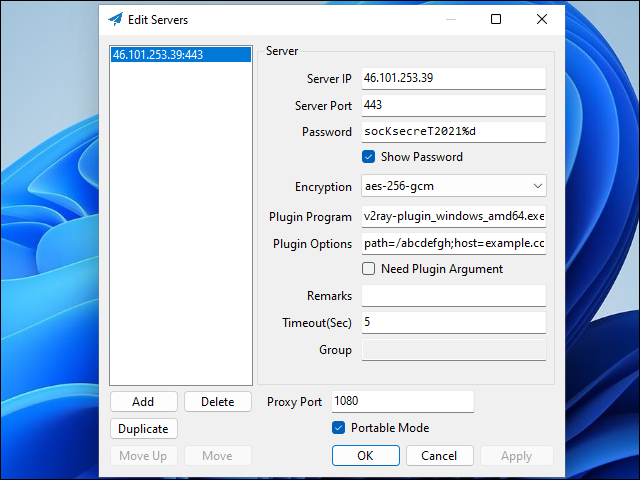
When the Edit Servers box appears:
- For Server IP, put the IP address of your server, e.g.
123.45.67.89 - For Server Port, put
443 - For Password put your chosen password, e.g.
socKsecreT2021%d - For Encryption, select your chosen method, e.g.
aes-256-gcm - For Plugin Program, put
v2ray-plugin_windows_amd64.exe - For Plugin Options, put
path=/abcdefgh;host=example.com;tls - Replacing
/abcdefghin the above by the secret path you configured Nginx to use
Click Apply.
Click OK.
Install Firefox Browser
If you do not already have Firefox installed, install Firefox now from https://www.mozilla.org/en-US/firefox/new.
Configure Firefox Browser
From the Firefox hamburger menu, choose Settings.
In Settings, on the General page, under Network Settings, click Settings.
Configure Firefox to use a Manual proxy configuration.
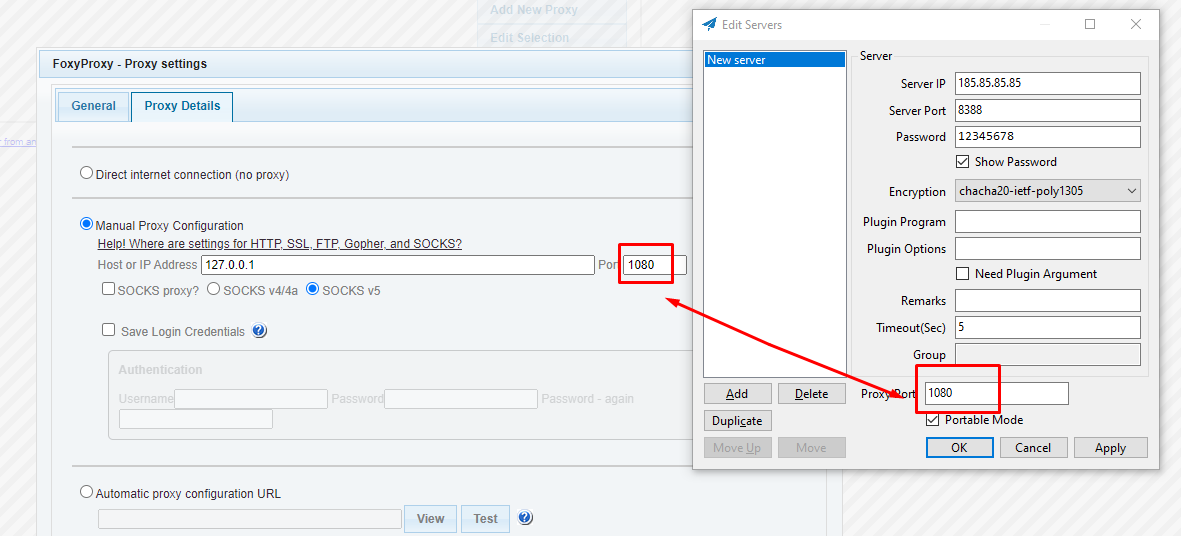
Specify the SOCKS Host at IP address 127.0.0.1, Port 1080.
Check the box to proxy DNS requests when using SOCKS v5.
Click OK.
Test Windows Client to Server Connection
In Firefox, visit https://whatismyipaddress.com.
You should see the IP address and location of your server, not your client.
Server Shadowsocks Classic
First uprgade system
apt update && apt uprgade -y
Install need packets
apt install shadowsocks-libev -y
View what your ip address
ip -br a
Edit options parametrs you can change port and all ip "::1", "127.0.0.1" for example “185.85.85.85”
nano /etc/shodowsocks-libev/config.json
{
"server":["::1", "127.0.0.1"],
"mode":"tcp_and_udp",
"server_port":"8388",
"local_port":"1080",
"password":"12345678 ",
"timeout":"60",
"method":"chacha20-ietf-poly1305"
}
{
"server":["185.85.85.85"],
"mode":"tcp_and_udp",
"server_port":"8388",
"local_port":"1080",
"password":"12345678 ",
"timeout":"60",
"method":"chacha20-ietf-poly1305"
}
after change restart service:
service shadowsocks-libev restart
and see status:
service shadowsocks-libev status
after status active add shadowsocks to autorun after restart:
systemctl enable shadowsocks-libev
V2Ray Plugin
Download plugin for VPS
https://github.com/shadowsocks/v2ray-plugin/releases
need togo to shadowsocks folder
cd /etc/shadowsocks-libev/
wget https://github.com/shadowsocks/v2ray-plugin/releases/download/v1.3.2/v2ray-plugin-linux-amd64-v1.3.2.tar.gz
repacket him
tar -xvf v2ray-plugin-linux-amd64-v1.3.2.tar.gz
remove zip file
rm v2ray-plugin-linux-amd64-v1.3.2.tar.gz
rename
mv v2ray_plugin-linux_amd64 v2ray-plugin
and edit
nano /etc/shodowsocks-libev/config.json
{
"server":["185.85.85.85"],
"mode":"tcp_and_udp",
"server_port":"8388",
"local_port":"1080",
"password":"12345678 ",
"timeout":"60",
"method":"xchacha20-ietf-poly1305",
"nameserver":"1.1.1.1",
"no_delay": true,
"fast_open": true,
"reuse_port": true,
"plugin":"/etc/shadowsocks-libev/v2ray-plugin",
"plugin_opt":"server"
}
after change restart service:
service shadowsocks-libev restart
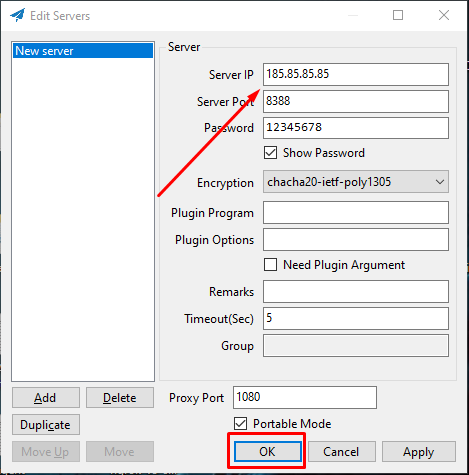
Client Shadowsocks Classic
Download and unzip
https:github.com/shadowsocks/shadowsocks-windows/releases
add ip server, port and password
If you want you can add to proxy for web-browser
Download Foxy Proxy from Chrome Extensions
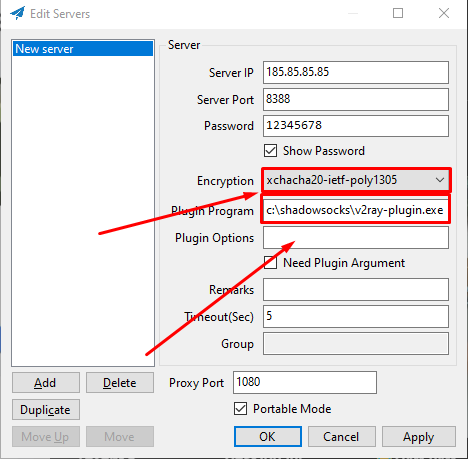
Client to V2Ray for Windows
https://github.com/shadowsocks/v2ray-plugin/releases
Download and unzip rename to v2ray-plugin.exe
https://github.com/shadowsocks/v2ray-plugin/releases/download/v1.3.2/v2ray-plugin-windows-amd64-v1.3.2.tar.gz
and replace to shadowsocks folder c:\shadowsocks\v2ray-plugin.exe
Client For Android Shadowsocks+V2Ray
shadowsocks can download from GooglePlay
and plugin V2Ray from f-droid
https://f-droid.org/en/packages/com.github.shadowsocks.plugin.v2ray/
Время на прочтение5 мин
Количество просмотров135K
Цель: открыть заблокированные провайдером сайты;
Примерное время: 30 минут;
Стоимость: бесплатно;
Что надо делать: нажимать кнопки, копировать и вставлять текст, читать простые слова на английском.
Project V — набор инструментов, которые помогут обойти замедление или полную блокировку сайтов. Он разработан азиатскими гениями для обхода великого китайского фаервола.
-
Обход замедлений и блокировок
-
Скрытие IP адреса
-
В сравнении с VPN:
-
Незаметен для провайдера
-
Меньше просадки по скорости
-
Меньше расход аккумулятора на мобильных устройствах\
-
Конечно, всё это не приходит так просто. При установке вручную нужно выполнить несколько действий:
-
Аренда сервера
-
Регистрация домена
-
Получение SSL сертификата
-
Настройка Nginx
-
Настройка Shadowsocks сервера
-
Настройка клиента
В этом руководстве я расскажу, как сократить этот список и упростить действия, чтобы они были доступны энтузиасту с минимальными знаниями в айти.
Мы будем разворачивать собственный сервер на бесплатных мощностях с использованием скрипта для автоматического деплоя.
Подготовка
Для деплоя на сервер вам понадобится установить python3.7 на свой компьютер. У маководов и линуксоидов питон установлен из коробки, и всё должно завестись сразу. Если нет, вот тут есть инструкция по установке.
Регистрируемся

Для примера воспользуемся сервером Microsoft Azure. Панель управления интуитивно понятна, регистрация проста, а при создании сервера мы сразу получаем доменное имя для него.
Сервис бесплатно предоставляет виртуальную машину под управлением Linux на год. 750 часов в месяц хватит для бесперебойной работы сервера. Учтите, что объем трафика на бесплатном лимите ограничен 15 гигабайтами в месяц. Бесплатные сервера устанавливают достаточно жесткие лимиты, и вы можете по аналогии с этим руководством завести еще пару серверов на других ресурсах: амазон, гугл и оракл.
Переходим по ссылке Жмем Continue to Azure portal, проходим регистрацию, заполняем поля. В процессе потребуется привязать карту, с неё спишут и сразу вернут 70 рублей. Используйте виртуальную карту qiwi или тинькофф, чтобы не нарваться на неожиданное списание.
Создаем сервер

После регистрации переходим по ссылке
И среди сервисов выбираем virtual machines
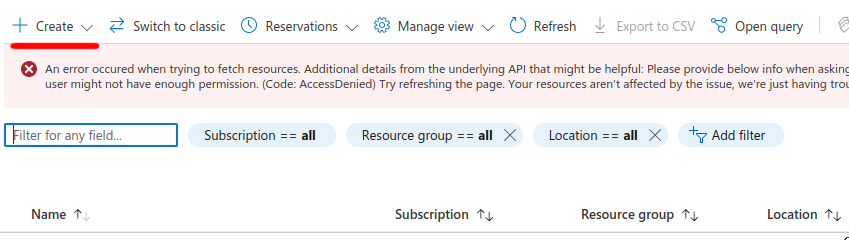
В углу списка нажимаем Create, нас переводят на страницу выбора параметров машины. Далее настроим её, чтобы пользоваться бесплатно. В окне настройки есть несколько вкладок, нас в первую очередь интересуют Basics, Disk и Networking

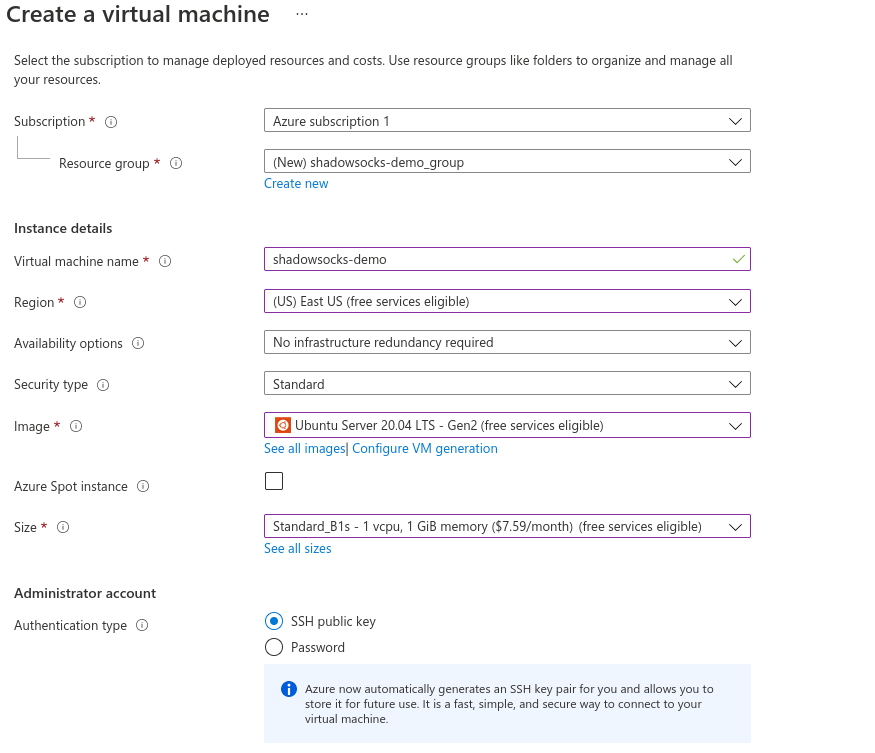
Basics
Примечание: здесь и далее пометка (free services eligible) означает доступность для бесплатного использования
-
Имя виртуальной машины — ставим любое
-
В качестве региона выберите один из доступных для бесплатного использования. Учтите, что в регионе может не быть бесплатных машин, и придется попробовать с другим.
-
Image — Ubuntu Server 20.04 LTS
-
Size — Standart_B1s
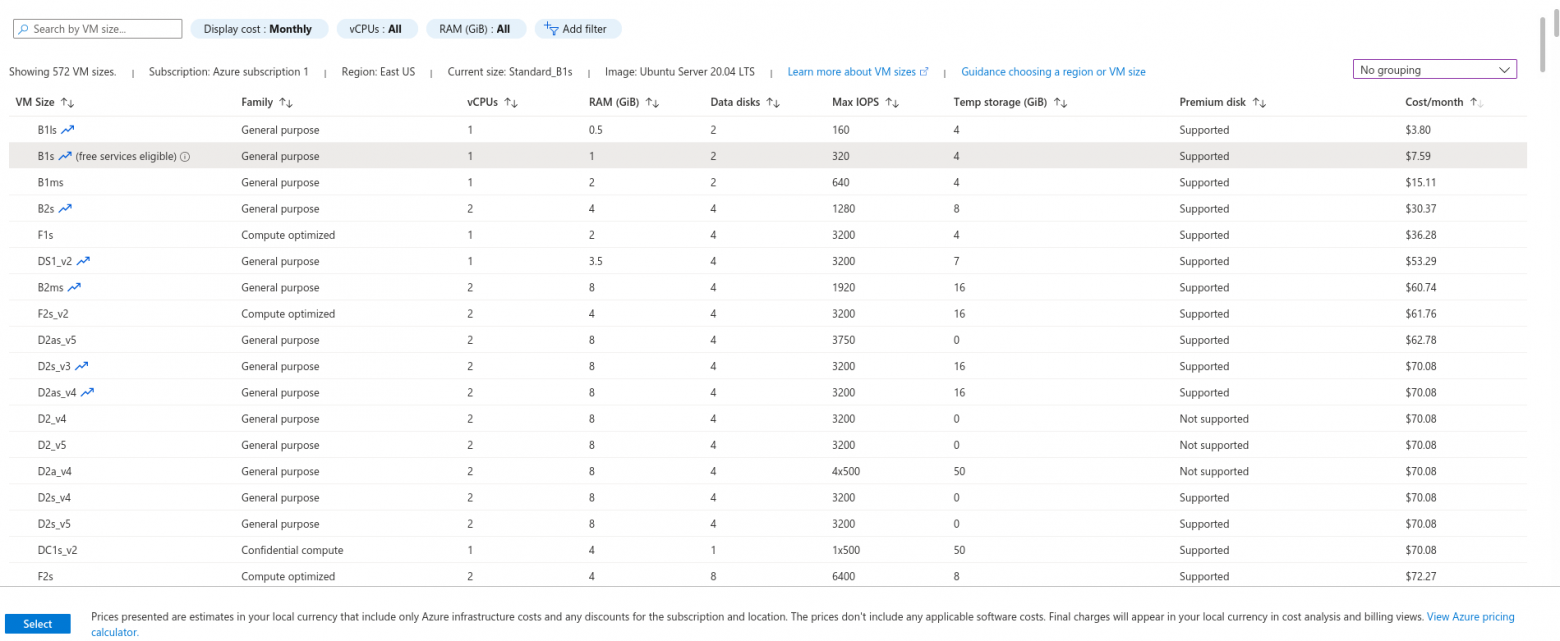
При выборе размера B1s может не быть в списке. Нажмите See all sizes , отключите группировку в правом верхнем углу и поставьте сортировку по стоимости. Он будет в самом начале с пометкой free services eligible
-
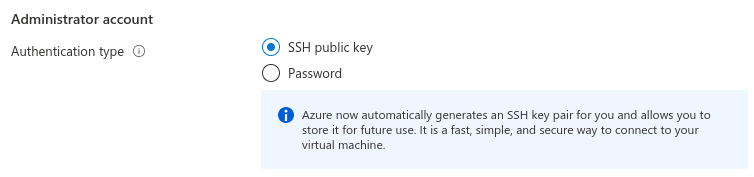
Способ аутентификации — SSH public key

-
Username — выставляем любой, запомните — пригодится вдальнейшем
-
SSH public key source — тут возможны два варианта:
-
Use existing public key если у вас уже есть сгенерированный ключ
-
Generate new key pair если вы не знаете, что это такое. Можете задать любое имя для ключа
-

Disk
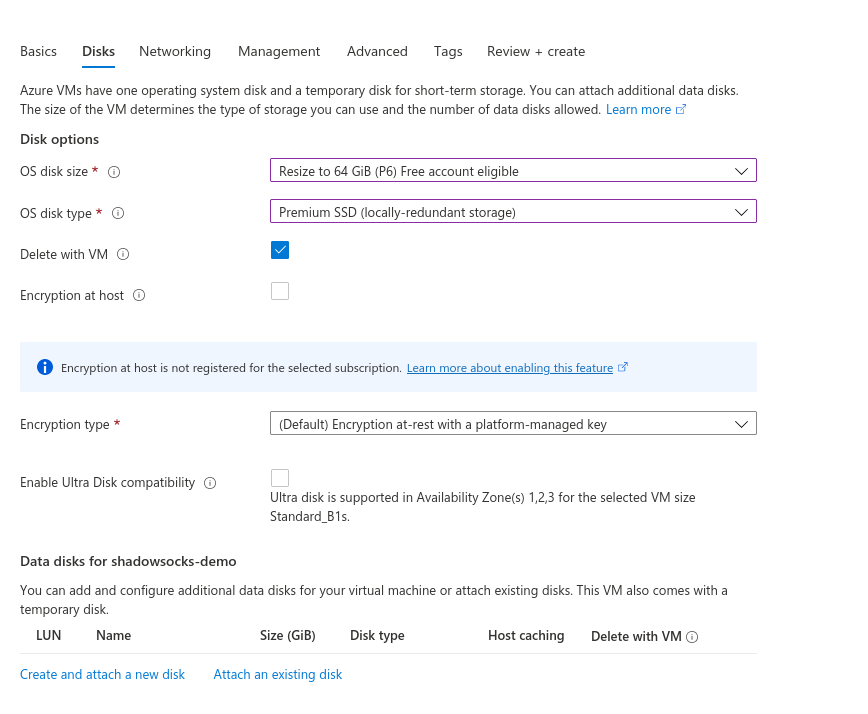
-
OS disk size — выставляем 64 гигабайта
Networking

-
Select inbound ports — включаем 80, 443 и 22 порты
Завершение настройки
После этого можете нажать review+create. Вас перекинет на страницу со статусом создания виртуальной машины. Если ранее вы выбрали генерацию ssh ключа, сайт предложит сохранить его. Сохраните на компьютер, он понадобится позже.
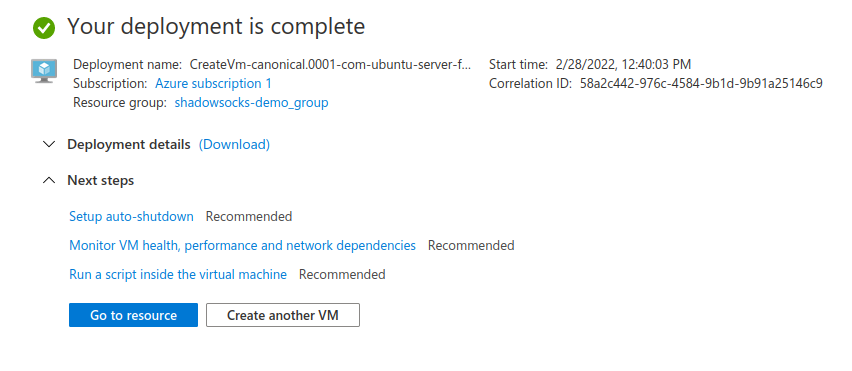
После появления надписи Your deployment is complete, можно перейти к странице со статусом созданной виртуальной машины. Жмём Go to resource

Здесь нас интересует строка DNS name в правой колонке, раздел networking. Жмём configure

-
Выставляем DNS name label. Пусть это будет не слишком подозрительное название — “мир рыбалки” или “кот сегодняшнего дня” вполне подойдет
-
IP address assignment — static
Настройка завершена. Вернитесь на предыдущий экран со статусом сервера и скопируйте DNS name, оно понадобится дальше.
Настройка проксирования
Скачиваем проект и задаем настройки для сервера
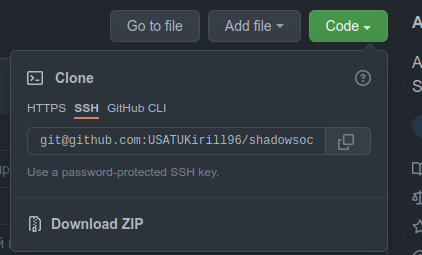
Качаем проект из репозитория на гитхабе.
Если у вас не установлен локально git, можете скачать архив и разархивировать в удобное место
Открываем папку с проектом shadowsocks-vray-playbooks. Все дальнейшие команды будут выполняться в терминале внутри неё.
-
Для windows: в папке shadowsocks-vray-playbooks зажмите шифт и нажмите правую кнопку мыши. Выберите пункт “Открыть окно PowerShell здесь”
-
Для linux: ПКМ → open in terminal
Введите в терминал следующие команды:
python3 -m pip install virtualenv
python3 -m virtualenv venv
source venv/bin/acvtivate
pip install -r requirements.txt
Если в будущем вы захотите поднять сервер на другой машине, нужно будет активировать виртуальное окружение через source venv/bin/activate
В папке deploy вы найдете файл hosts.example.ini скопируйте его и переименуйте в hosts.ini, замените в нем значения на следующие
server ansible_host=DNS name, которое вы задавали на последнем этапе настройки сервера

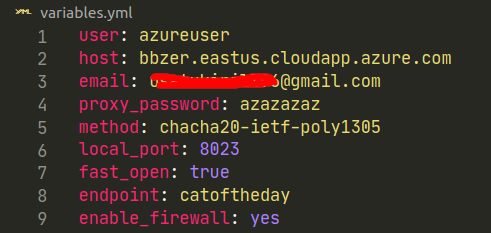
В папке с проектом вы найдете файл variables.example.yml скопируйте его и переименуйте в variables.yml, замените в нем значения на следующие:
user: Имя пользователя на сервере - то что вы писали в Username при настройке сервера
host: Домен,оформленный для сервера (DNS name)
email: Ваша электронная почта
proxy_password: Пароль для доступа к прокси, поставьте что-то сложное
method: Оставить как в примере
local_port: Порт, на котором будет работать ваш локальный сервер. Можно оставить как в примере
fast_open: Оставить как в примере
endpoint: эндпоинт для прокси. Можно поставить что-то наименее подозрительное для провайдера или оставить как в примере
enable_firewall: yes для включения фаервола после стартовой настройки. Если на сервере уже есть ваши проекты, и вы не знаете для чего это, включение может вызвать ошибки в их работе
Если при создании сервера вы выбрали Generate new key pair:
-
скопируйте скачанный ключ в текущую папку, а в variables.yml допишите строку
ansible_ssh_private_key_file: имя загруженного ключа (напр. key.pem)
-
Введите в терминале
ansible-playbook -i inventories/hosts.ini --extra-vars "@variables.yml" deploy/client.yml --tags prepare_ssh
Выгружаем прокси сервер
Введите в терминале последовательно следующие команды:
Настройка окружения виртуальной машины
ansible-playbook -i inventories/hosts.ini --extra-vars "@variables.yml" deploy/setup.yml
Если это новый сервер, и на нем нет ваших проектов, введите следующую команду чтобы очистить iptables
ansible-playbook -i inventories/hosts.ini --extra-vars "@variables.yml" deploy/setup.yml --tags disable-iptables
Выгрузка сервера. Если на этом этапе падают ошибки, проверьте, правильно ли вы заполнили variables.yml
ansible-playbook -i inventories/hosts.ini --extra-vars "@variables.yml" deploy/server.yml
Генерация конфигов для клиента
ansible-playbook -i inventories/hosts.ini --extra-vars "@variables.yml" deploy/client.yml
Пользуемся твиттором
В директории с проектом появилась папка client-config. В ней вы найдете shadowsocks-libev.json конфиги для десктопного клиента, а также qr код для мобильного телефона.
Для десктопных клиентов включите переадресацию трафика из браузера на локальный сервер
firefox: settings → general → network settings

iOS
Shadowrocket — стоит 3$. Открываем, нажимаем иконку скана, сканируем qr код, пользуемся
Android
Нужно установить shadowsocks client и v2ray плагин к нему
-
Клиент
-
Плагин
Открываем клиент, нажимаем иконку скана, сканируем qr код, пользуемся
Ubuntu linux
-
Выполните в терминале команды для установки клиентского приложения и плагина:
sudo apt update
sudo apt install shadowsocks-libev
sudo apt install shadowsocks-v2ray-plugin
-
Скопируйте клиентский конфиг в папку с конфигом ss-client:
cp client-config/shadowsocks-libev.json /etc/shadowsocks-libev/config.json -
Запустите сервер командой
ss-local
Windows
-
Скачайте последнюю версию shadowsocks и распакуйте архив
-
Скачайте последнюю версию v2ray, распакуйте архив, переименуйте файл внутри в v2ray.exe и сохраните в папку с shadowsocks
-
Запустите Shadowsocks.exe, заполните поля как в конфиге client-config/shadowsocks-libev.json или импортируйте из него настройки
# Using v2ray+ws+tls+CDN works good, but it kills the battery on android phone.

# For this reason, good to know how to setup shadowsocks + v2ray plugin.
#
# This post shows you how to setup the server.
# We make a unique path, so you can still have regular v2ray on another path.
#
# You need VPS server ubuntu 18.04 or 16.04, we used digitalocean for example
# You need a domain name, either free or cheap 1 $ year (for 1st year, e.g. godaddy)
# You need an account at cloudflare
#
# We will route shadowsocks traffic over TLS https, via cloudflare CDN
# This means the Chinese cannot know your actual server IP, all they
# see a domainname, and a website, which should be boring and very long make them read it all.
# The Chinese cannot block your server IP, and cannot launch a DDOS attack.
#
# A few things you should change and make random.
# 1) the path , below we used abc123. use something random
# 2) shadowsocks password, below we used pass1234, use something random
#
# Ok lets get started.
# Create droplet on digitalocean
# get your IP e.g. 167.71.130.183
#
# In cloudflare
# point your domain to IP
# example.com167.71.130.183
# IMPORTANT turn off all encryption to example.com
# later we will turn it on again after we have https certs
#
# login to digitalocean droplet
#
#
apt-get update
apt-get upgrade -y
apt-get install nginx python-certbot-nginx -y
# Test you can access http://example.com by http (not https)
# Set the server_name and add reverse proxy
nano /etc/nginx/sites-available/default
# Change from
# server_name _;
# to
server_name example.com;
location /abc123 {
proxy_redirect off;
proxy_pass http://127.0.0.1:10001;
proxy_http_version 1.1;
proxy_set_header Upgrade $http_upgrade;
proxy_set_header Connection "upgrade";
proxy_set_header Host $http_host;
}
# Reload data
nginx -s reload
# Add https
# remember press 2 for redirect, the rest doesn't really matter.
certbot --nginx
# IMPORTANT afterwards switch back cloudflare, turn on full encryption
# verify https is working https://example.com
# add plugin
wget --no-check-certificate https://tls.mbed.org/download/mbedtls-2.16.4-gpl.tgz
wget https://github.com/Mbed-TLS/mbedtls/archive/refs/tags/mbedtls-2.16.5.tar.gz
gunzip mbedtls-2.16.5.tar.gz
tar -xvf mbedtls-2.16.5.tar
cp -rf mbedtls-mbedtls-2.16.5/ mbedtls-2.16.5/
wget https://github.com/Mbed-TLS/mbedtls/archive/refs/tags/mbedtls-2.16.5.tar.gz
cp mbedtls-2.16.5.tar.gz mbedtls-2.16.5.gtz
wget -O ubuntu-ss-install.sh https://github.com/M3chD09/shadowsocks-with-v2ray-plugin-install/raw/master/ubuntu-ss-install.sh
chmod +x ubuntu-ss-install.sh
./ubuntu-ss-install.sh
Congratulations, Shadowsocks-libev server install completed
Your Server IP : example.com
Your Server Port : 443
Your Password : pass1234
Your Encryption Method: aes-256-gcm
Your Plugin : v2ray-plugin
Your Plugin options : tls;host=example.com
Enjoy it!
# backup of install script, just for reference, incase
# github version disappears https://pastebin.com/38UjgNNd
# edit config file, to move the shadowsocks server to 10001 (or whatever internal port you like)
# and change the plugin_opts
nano /etc/shadowsocks-libev/config.json
{
"server":"0.0.0.0",
"server_port":10001,
"password":"pass1234",
"timeout":300,
"method":"aes-256-gcm",
"plugin":"v2ray-plugin",
"plugin_opts":"server;path=/abc123;loglevel=none"
}
# restart shadowsocks server
systemctl restart shadowsocks
systemctl status shadowsocks
# That is it, it works in China.
# And using the shadowsocks app with v2ray plugin, saves the battery.
# Screenshots phone
#
# To configure shadowsocks + v2ray plugin for windows client
# Download v2ray plugin for windows
# https://github.com/shadowsocks/v2ray-plugin/releases
# e.g. v2ray-plugin_windows_386.exe
#
# Open shadowsocks for windows
# Plugin Program C:..path.../v2ray-plugin_windows_386.exe
# Plugin Options path=/abc123;host=example.com;tls
#
comments/help welcome