
Copilot is your AI companion
Always by your side, ready to support you whenever and wherever you need it.

This download details page provides the complete set of Administrative templates (ADMX) for Windows Server 2008. Additionally, there is a separate download that includes the ADMX and ADML files for Group Policy preferences.
Important! Selecting a language below will dynamically change the complete page content to that language.
-
File Name:
2008ADMX.msi
preferences.msi
File Size:
11.5 MB
324.0 KB
Administrative templates provide Group Policy setting information for the items that appear under Administrative Templates. Group Policy tools use Administrative template files to populate policy settings in the user interface. This allows administrators to manage registry-based policy settings.
Administrative template files in Windows Server 2008 and Windows Vista are divided into ADMX (language-neutral) and ADML (language-specific) files. ADML files are XML-based ADM language files that are stored in a language-specific folder. By default, the %Systemroot%\PolicyDefinitions folder on a local computer stores all ADMX files, and ADML files for all languages that are enabled on the computer.
-
Supported Operating Systems
Windows Server 2008
- Windows Vista with Service Pack 1 with Remote Server Administration Tools (RSAT). You can download RSAT from either of the following locations:
- Microsoft Remote Server Administration Tools for Windows Vista SP1 32-bit Edition (KB941314) (http://go.microsoft.com/fwlink/?LinkId=115118)
- Microsoft Remote Server Administration Tools for Windows Vista SP1 64-bit Edition (KB941314) (http://go.microsoft.com/fwlink/LinkId=112367)
- Windows Vista with Service Pack 1 with Remote Server Administration Tools (RSAT). You can download RSAT from either of the following locations:
-
- Double-click the .msi file that corresponds to the Administrative templates you want to install, and then follow the instructions in the wizard to complete the installation.
By default, the new ADMX files will be downloaded to the following directory on your local computer: C:\Program Files\Microsoft Group Policy\Windows Server 2008\PolicyDefinitions. Under the PolicyDefinitions directory, the new ADML files will be downloaded to the appropriate language-specific subdirectories for all 34 languages for which this release is available. - To ensure that the new ADMX and ADML files are propagated throughout the domain, on the computer on which you downloaded the new ADMX and ADML files, copy the new PolicyDefinitions directory to the appropriate location under SYSVOL on the appropriate domain controller. Doing so will ensure that all language-specific subdirectories are also copied to SYSVOL.
Important: Updates to SYSVOL are replicated to all domain controllers in the domain, which results in increased network traffic and load placed on the domain controllers. Therefore, to minimize the impact of this operation in your domain, we recommend that you schedule the copying of updated ADMX and ADML files to SYSVOL outside core business hours.
For more information about administering Administrative template policy settings, see the Managing Group Policy ADMX Files Step-by-Step Guide (http://go.microsoft.com/fwlink/?LinkId=60363).
- Double-click the .msi file that corresponds to the Administrative templates you want to install, and then follow the instructions in the wizard to complete the installation.
-
This download includes the Administrative template released for Windows Server 2008, in the following languages:
- bg-BG Bulgarian — Bulgaria
- cs-CZ Czech — Czech Republic
- da-DK Danish — Denmark
- de-DE German — Germany
- el-GR Greek — Greece
- en-US English — United States
- es-ES Spanish — Spain
- et-EE Estonian — Estonia
- fi-FI Finnish — Finland
- fr-FR French — France
- he-IL Hebrew — Israel
- hr-HR Croatian — Croatia
- hu-HU Hungarian — Hungary
- it-IT Italian — Italian
- ja-JP Japanese — Japan
- ko-KR Korean — Korea
- lt-LT Lithuanian — Lithuania
- lv-LV Latvian — Latvia
- nb-NO Norwegian (Bokmål) — Norway
- nl-NL Dutch — The Netherlands
- pl-PL Polish – Poland
- pt-BR Portuguese — Brazil
- pt-PT Portuguese — Portugal
- ro-RO Romanian — Romania
- ru-RU Russian — Russia
- sk-SK Slovak — Slovakia
- sl-SI Slovenian — Slovenia
- sr-latn-cs Serbian (latin) – Serbia
- sv-SE Swedish — Sweden
- th-TH Thai — Thailand
- uk-UA Ukrainian — Ukraine
- zh-CN Chinese — China
- zh-HK Chinese — Hong Kong SAR
- zh-TW Chinese — Taiwan
ServerWatch content and product recommendations are editorially independent. We may make money when you click on links to our partners. Learn More.
In the previous installment of our series dedicated to the most prominent Directory Services-related features available in the Windows Server 2008, we started discussing Group Policy functionality by describing its basic principles and providing an overview of innovations incorporated into its client-based components. In this article, we will shift our attention to improvements in the area of manageability, focusing on the new version of Group Policy templates.
The latest iteration of Group Policy templates offer much-improved manageability.
Starting with the Windows 2000 platform, Microsoft considerably enhanced its ability to centrally administer a variety of computer and user characteristics. Thanks to Active Directory based Group Policies, it became possible to enforce uniform settings across arbitrary collections of domain members. However, their initial implementation exhibited some undesired behavior. The majority of problems were related to the mechanism used to present registry-based settings in Group Policy editing tools, which relied on specially formatted files, known as Administrative Templates (also referred to as ADM files).
While their sole purpose was to provide a friendly interface when assigning desired registry modifications (actual changes were saved in a Registry.pol file stored in the %SystemRoot%sysvoldomainnamePoliciesPolicyGUID folder), they were also automatically copied to the same location (presumably to ensure consistent administrative experience during subsequent edits). This typically resulted in an increased volume of replication traffic and higher disk space usage on domain controllers, since each Group Policy Object that referenced registry entries defined by a template included its copy in the Adm subfolder of the GPO GUID-labeled folder under SYSVOL share. With sizes of individual ADM files reaching a few MB, negative impact in environments with large number of policies in place and slow network links was a serious consideration.
Another frequently encountered issue was caused by default behavior of Group Policy Editor, which automatically copied local (residing in the %systemroot%inf folder) version of an administrative template used during viewing or editing session, providing it was newer than the SYSVOL based one (note that such action can be prevented by enabling Turn off Automatic Update of ADM files Group Policy setting, located under Computer ConfigurationAdministrative TemplatesSystemGroup Policy node of a GPO). Reliance on timestamp (rather than version number) was commonly the source of unnecessary confusion (especially following Service Pack installation on client computers or modifications to Microsoft-supplied templates) and unexpected surge in replication traffic. Geographically distributed companies that operated in a multi-lingual environment faced an additional challenge, resulting from an inability of several, language-specific copies of a template to coexist in the same GPT folder.
Effectively, it was not unlikely for the SYSVOL to contain templates defined in different languages (depending on a location of creators of respective GPOs). Always use local ADM files for Group Policy editor Group Policy setting provided some relief to Windows XP and Server 2003 based IT staff when dealing with this issue; however, this workaround was contingent on having copies of all templates used across the enterprise on each administrative system. While this approach had its advantages (allowing you to remove ADM files from the SYSVOL share), it also introduced management overhead (forcing you to develop a methodology ensuring that consistent set of templates is maintained on all systems from which Group Policy is viewed or edited).
Leveraging ADMX templates
Vista and Windows Server 2008 help you resolve these problems by leveraging ADMX templates (the name is indicative of their new XML-based format), which offer a number of important advantages over their predecessors:
- The
SYSVOLbloat caused by multiple copies of the same templates scattered across individual Group Policy Template folders is eliminated, since ADMX files are automatically loaded from a couple of designated locations. The first one is the%SystemRoot%PolicyDefinitionsfolder on a computer from which you intend view or edit registry-based Group Policy settings. The second one is a shared area called Central Store, corresponding to thedomainPoliciesPolicyDefinitionsdirectory underSYSVOLshare, replicated across all domain controllers in the same domain (such approach minimizes volume of replication traffic and eliminates management overhead associated with maintaining set of templates on each administrative workstation). - Unlike ADM files, their ADMX equivalents are identical, regardless of language settings of GPO creators. Elements of each template that vary depending on a language pack installed on the computer from which policies are created or viewed (such as
Explain Textand theSupportedstrings) are stored separately in ADML resource files, residing by default in the%SystemRootPolicyDefinitionsLanguageIDfolder, whereLanguageIDrepresents an ISO locale identifier for a specific target language and culture (e.g.en-USdesignates the United States English).
These rules are a bit more complex in a mixed environment, where you encounter different versions of operating systems and template file types (as well as Group Policy Objects that were configured through their interaction). One one hand, the latest renditions of Group Policy Management Console and Group Policy Editor (present in both Vista and Windows Server 2008) will leverage the local PolicyDefinitions folder and attempt to connect to the Central Store, by checking whether the FullyQualifiedDomainNamePoliciesPolicyDefinitions folder (where FullyQualifiedDomainName designates fully qualified name of the domain where the edited GPO is hosted) resides under the SYSVOL share on a target domain controller. Note that Group Policy Editing tools connect by default to the PDC Emulator, although you have ability to point to a different one if desired via Change Domain Controller option in the Group Policy Management Console.
In addition, these tools are fully capable of working with either local or SYSVOL-based ADM files. More specifically, they will ignore ADM files if their ADMX-based counterparts are available, automatically load any custom ADM files residing in a target GPT folder, and allow you to add any additional ones using Add/Remove Templates... entry in the context-sensitive menu of the Administrative Templates node in the Group Policy Management Editor console. This behavior introduces an undesired side effect, causing any changes to the default ADM templates (such as Conf.adm, Inetres.adm, System.adm, Wmplayer.adm and Wuau.adm) to be missing from the Group Policy Editor interface once you start using its newer version. It would need to be incorporated into a custom template if you are planning on managing them going forward. Note that this does not impact in any way functionality of the corresponding Group Policy Object, since its registry changes are stored in Registry.pol file, not affected by your choice of templates.
On the other hand, keep in mind Windows XP and Windows Server 2003-based Group Policy management tools are not capable of editing or viewing ADMX templates, and they are not aware of the Central Store functionality. As the result, any existing registry-based GPO settings introduced via ADMX-based templates will not display correctly in the older versions of Group Policy Editor. Instead, they will appear in the “Extra Registry Settings” section of the Group Policy Management Console-based reports. Due to these limitations, you should avoid using Group Policy management tools from legacy systems in such scenarios. If this is not feasible for some reason, take advantage of the Always use local ADM files for Group Policy editor Group Policy setting we described earlier to prevent negative consequences associated with their default behavior. You must also ensure each of them has full range of templates avaialable locally.
Configuring Your Central Store
To configure the Central Store, you create a PolicyDefinitions subfolder under FullyQualifiedDomainNamePolicies folder in the SYSVOL share on an arbitrary domain controller in the target domain. You might want to start with its PDC Emulator. It is important to note that this does not have to be a domain controller running Windows Server 2008, since this feature does not have a dependency on the version of server operating system or a specific domain functional level. However, if you have not introduced any Windows Server 2008-based domain controller in your forest but want to be able to control via Group Policies some of enhancements introduced in Vista, such as wired and wireless connectivity, as well as BitLocker Drive Encryption and Trusted Platform Module functionality, you will need to extend Active Directory schema.
In the case of the former, you can follow instructions outlined in the TechNet article Active Directory Schema Extensions for Windows Vista Wireless and Wired Group Policy Enhancements. The procedure required to support the latter is also documented on TechNet site in the article BitLocker Drive Encryption Configuration Guide: Backing Up BitLocker and TPM Recovery Information to Active Directory.
Next, copy all content stored in the %SystemRoot%PolicyDefinitions (including ADMX files and language specific subfolders with ADML resource files) to the newly created folder on the domain controller. If you expect that the same set of templates will be used by administrators from other, non-U.S.-English countries, create corresponding language-specific subfolders and copy there appropriate set of ADML files. You can download them, along with Windows Server 2008 Administrative Templates, from the Microsoft Download Center. In addition, since local ADMX files (or their ADML counterparts) are no longer automatically copied to the SYSVOL share during viewing or editing domain-based Group Policy Objects, ensure that you keep the Central Store up-to-date whenever a new version of administrative templates is released (e.g., following a new Service Pack release, introduction of a new version of client or server operating system, or deployment of a feature supported via custom registry-based Group Policy settings).
Finally, include in your Central Store any custom ADM files that you have been using to configure existing Group Policy Objects. Keep in mind that you would need to repeat this procedure for each domain in your environment.
Unfortunately, even though the format of ADMX and ADML files is based on well-documented XML principles (you can find more information on this subject in the .admx and .adml File Structure Microsoft Technet and ADMX Schema MSDN articles), their creation or even direct editing is far from straightforward (incidentally, this was also one of more common complaints regarding their ADM-based predecessors).
If you are planning on switching fully to ADMX format (for consistency sake and to further limit size of SYSVOL), you might want to take advantage of utilities, which help with automating such transition, such as ADMX Migrator (created and supported by FullArmour, but available from the Microsoft DownloadCenter), which facilitates conversion via both command line and a Microsoft Management Console-based interface. The latter can also be used for for creating and modifying ADMX Administrative templates.
In the next article of our series, we will continue our discussion about the Group Policy related topics, focusing on features incorporated into a new version of Group Policy Management Console.
Follow ServerWatch on Twitter

В очередной статье из цикла «конспект админа» мне хотелось бы освежить в памяти несколько нюансов использования групповых политик. Заодно поразвлекаемся с созданием своих шаблонов и с автоматизацией работы с этими самыми политиками.
Освежаем память
Я не буду рассказывать, что такое групповые политики, и остановлюсь лишь на основных моментах, которые стоит иметь в виду при работе с ними.
В системах Windows помимо доменных существуют и локальные групповые политики ― управлять ими можно при помощи оснастки gpedit.msc на системах редакции Professional и выше. Часто считается, что без домена можно настраивать локальные групповые политики только для всех пользователей на компьютере. Это не совсем верно ― с выходом Windows Vista появилась возможность использовать множественную локальную групповую политику или MLGPO. Этот механизм позволяет настраивать отдельные политики для разных пользователей.
Добраться до него можно через вызов консоли mmc: при добавлении оснастки «Управление объектами групповой политики» нажать кнопку «Обзор». Далее на вкладке «Пользователи» уже можно выбрать конкретного пользователя или группу «Администраторы» и «Не администраторы». К сожалению, управление для группы пользователей не реализовано.

Управление групповой политикой для отдельных пользователей.
Бывало и так, что на отдельностоящем терминальном сервере разворачивали Active Directory только для того, чтобы отдельному пользователю настроить поведение драйвера для EasyPrint. Не надо так.
При добавлении доменных групповых политик стоит помнить про порядок их применения ― политика, примененная последней, будет обладать наивысшим приоритетом (да и на собеседованиях часто спрашивают).
Итак, предположим, что у нас есть компьютер в домене и четыре групповые политики: локальная на этом компьютере; политика на подразделение, в котором находится компьютер; политика на домен и политика на лес. Порядок их применения будет следующим:
- Локальная групповая политика.
- Групповая политика сайта.
- Групповая политика домена.
- Групповая политика верхнего подразделения.
- Групповая политика дочернего подразделения.
То есть чем ближе к объекту, тем приоритетнее, за исключением локальной групповой политики. Если надо отключить применение вышестоящих политик, то ставьте блокировку наследования.

Блокировка наследования.
Любую групповую политику можно условно разделить на две конфигурации ― пользователя и компьютера. Обычно политики с настройками компьютеров назначаются на подразделение, в котором находятся компьютеры. А политики с настройками пользователей ― на пользователей.
Если надо применить настройки компьютера к подразделению с пользователями и наоборот, используют так называемое замыкание групповой политики. Например, такая настройка пригодится, когда нужно применить специфические политики к пользователям для работы на терминальных серверах.
Работа замыкания настраивается непосредственно в политике ― «Настройка компьютера ― Административные шаблоны ― Система ― Режим обработки замыкания пользовательской групповой политики». Подробнее про механизм уже писали в статье про использование Merge\Replace в GPO. Я лишь добавлю, что режим замыкания групповой политики ― тоже частый вопрос на собеседовании.

Настройка замыкания групповой политики.
Физически доменные групповые политики находятся в папке SYSVOL на контроллерах домена. Папка реплицируется между контроллерами. Каждая групповая политика выглядит как папка с именем в виде GUID.

Групповые политики домена.
Правила фильтрации, настраиваемые через редактор групповой политики, соответствуют настройкам прав NTFS на соответствующую подпапку.
Говоря о правилах фильтрации, нельзя не упомянуть обновление MS16-072, которое «сломало» групповые политики. Теперь для того чтобы работали правила фильтрации, надо добавлять к каждому фильтру правило «на чтение», но не «на применение» группе Domain Computers.
В каждой папке с групповой политикой существуют подпапки Machine и User, соответствующие настройкам пользователя и компьютера. Если углубиться в подпапки, можно легко понять структуру групповой политики:
- В корне папки находится файл GPT.ini с настройками групповой политики, такими как ее название.
- В подпапках Machine и User сидят файлы registry.pol с настройками соответствующих веток реестра.
- По пути Microsoft\Windows NT\SecEdit можно найти шаблон настроек безопасности ― GptTmpl.inf.
- В подпапке Preferences находятся предпочтения групповых политик, представляющие из себя подпапки с файлами xml.
- В подпапке Applications сидят дистрибутивы для развертывания через групповые политики.
- В папке Scripts находятся скрипты на logon\logoff для пользователя и startup\shutdown для компьютера.
- В папке Documents and Settings есть настройки перенаправления пользовательских папок.
- Наконец, в папке Adm находятся устаревшие шаблоны групповой политики.
Подробнее про структуру можно почитать в материале Group Policy Basics, поэтому перейдем сразу к шаблонам.
Административные шаблоны
По сути своей административные шаблоны ― это специальные файлы с инструкциями по изменению клиентского реестра (ветки HKCU или HKLM) и настройками отображения изменяемых параметров через «Управление групповой политикой». В принципе, реестр можно менять и через «Предпочтения групповых политик». Но разница здесь не только в красивом интерфейсе.
| Способ изменения реестра | Как ведет себя при удалении политики со стандартными настройками | Можно ли изменить параметр вручную | Можно ли изменить параметр через приложение |
| Шаблоны | Параметр реестра восстанавливается на значение «по умолчанию», если настройки по умолчанию есть в шаблоне | — | — |
| Предпочтения политик | Параметр реестра не изменяется | + | + |
Сравнение предпочтения групповых политик и административных шаблонов.
Другими словами, настройка реестра через шаблоны групповых политик более строгая. Тогда как настройка через предпочтения групповых политик напоминает периодическое применение reg-файла. Конечно, предпочтения позволяют не только менять параметры реестра, но и довольно гибко настраиваются. Тем и ценны.
Это актуально при изменении ветки Policies, и настраиваемое приложение должно хранить свои настройки в реестре. Простое изменение параметров через Предпочтения и Шаблоны будет работать схожим образом, только шаблоны могут оказаться удобнее.
До появления Windows Vista\2008 в качестве шаблона групповых политик брали исключительно стандарт .adm. Будучи с простой структурой, которую было легко редактировать вручную, этот стандарт обладал и рядом недостатков:
- Для каждого языка приходилось создавать отдельный файл шаблона.
- Файл шаблона физически находился в папке с групповой политикой. При использовании одного и того же шаблона он сохранялся в каждую папку, что увеличивало занимаемое место и время репликации.
- Не поддерживались мультистроковые параметры и параметры QWORD.
На замену устаревшему стандарту появился новый. Новые шаблоны представляют собой два файла: сам шаблон, не зависимый от языка ― .admx и языковой «пакет» к нему ― файл .adml. Теперь шаблоны можно «положить» в центральное хранилище, и обращаться к нему, не плодя одинаковые файлы в папке SYSVOL.
Не обошлось без ложки дегтя ― теперь содержимое файла представляет собой популярный в индустрии формат XML. И создавать новые шаблоны в блокноте стало уже не так удобно.
Под большинство параметров, которые могут понадобиться, шаблоны уже существуют. Кроме того, многие производители приложений выпускают свои административные шаблоны. Вот несколько примеров:
- MS Office 2016.
- FireFox и Thunderbird.
- Google Chrome.
- Adobe Acrobat и Reader.
- Каталог шаблонов для различного ПО.
Если возникает необходимость разработать и внедрить свой административный шаблон, то самый простой вариант ― это создать старый файл .adm и сконвертировать его в admx специальной утилитой. Вариант посложнее ― начинать сразу с .admx.
Создаем свой шаблон
Для начала разберем простой пример. Создадим шаблон групповой политики, который позволит нам включать и выключать отображение скрытых и системных файлов, а заодно и отображение расширений.
Сразу скажу, что это можно провернуть через «Предпочтения групповых политик» ― в параметрах панели управления ― опции папки. Но мы легких путей не ищем и заодно не хотим, чтобы параметры отображения можно было менять вручную.
За необходимые нам параметры отвечают три ключа в реестре:
- Software\Microsoft\Windows\CurrentVersion\Explorer\Advanced\Hidden.
- Software\Microsoft\Windows\CurrentVersion\Explorer\Advanced\HideFileExt.
- Software\Microsoft\Windows\CurrentVersion\Explorer\Advanced\ShowSuperHidden.
Содержимое ADM-шаблона, который разберем далее, под спойлером.
CLASS USER
CATEGORY !!ShowExplorer
    POLICY !!ShowHiddenFiles
        KEYNAME "Software\Microsoft\Windows\CurrentVersion\Explorer\Advanced"
        EXPLAIN !!ShowHiddenFilesExplanation
        VALUENAME "Hidden"
        VALUEON NUMERIC "1"
        VALUEOFF NUMERIC "2"
    END POLICY

    POLICY !!ShowFileExtensions
        KEYNAME "Software\Microsoft\Windows\CurrentVersion\Explorer\Advanced"
        EXPLAIN !!ShowFileExtensionsExplanation
        VALUENAME "HideFileExt"
        VALUEON NUMERIC "0"
        VALUEOFF NUMERIC "1"
    END POLICY

    POLICY !!ShowSuperHiddenFiles
        KEYNAME "Software\Microsoft\Windows\CurrentVersion\Explorer\Advanced"
        EXPLAIN !!ShowSuperHiddenFilesExplanation
        VALUENAME "ShowSuperHidden"
        VALUEON NUMERIC "1"
        VALUEOFF NUMERIC "0"
    END POLICY
END CATEGORY

[strings]
ShowExplorer="Отображение файлов в проводнике"
ShowHiddenFiles="Показывать скрытые файлы"
ShowHiddenFilesExplanation="Когда эта настройка включена, проводник будет показывать скрытые файлы."
ShowSuperHiddenFiles="Показывать системные файлы"
ShowSuperHiddenFilesExplanation="Когда эта настройка включена, проводник будет показывать системные файлы"
ShowFileExtensions="Показывать расширения файлов"
ShowFileExtensionsExplanation="Когда эта настройка включена, проводник будет показывать расширения файлов"
Разберем подробнее синтаксис файла.
- CLASS. Может принимать значение USER или MACHINE ― в зависимости от класса будет изменятся ветка реестра HKCU или HKLM соответственно.
- CATEGORY. Строка, в которой задается имя «папки» политики.
- POLICY. В строке задается название конкретной политики ― у нас таких будет три.
- KEYNAME. Путь в реестре к изменяемым параметрам.
- EXPLAIN. Отсылка к «переменной» с объяснением настройки.
- VALUENAME. Название изменяемого параметра в реестре.
- VALUEON**VALUEOFF**. Значение, которое будет принимать параметр при включении и выключении его в политике.
- [strings]. Секция со значениями переменных, которые я использовал для текстовых строк. Можно их не использовать, но тогда могут быть проблемы из-за русского языка.
Помимо задействованных опций есть и другие, например:
- EDITTEXT. Текстовое поле для ввода.
- NUMERIC. Поле для ввода цифр.
- CHECKBOX. Список, где можно отмечать параметры «галочками».
- COMBOBOX. Список с «переключателем»
- DROPDOWNLIST. Выпадающий список.
- LISTBOX. Список для ввода нескольких элементов.
Подробнее со всеми параметрами можно ознакомится в разделе MSDN ADM Format.
Установить новый шаблон не просто, а очень просто ― достаточно щелкнуть правой кнопкой мыши по пункту «Административные шаблоны», выбрать «Добавление и удаление шаблонов» и добавить наш свежесозданный шаблон.

Добавленный шаблон.
После установки шаблона он отобразится в ветке «Классические административные шаблоны».

Теперь можно сконвертировать наш шаблон в .admx с помощью утилиты faAdmxConv из ADMX Migrator.

Конвертируем шаблон.
После конвертации получившийся шаблон .admx и папку Ru-ru с файлом локализации .adml нужно скопировать в папку %Systemroot%\PolicyDefinitions для локальной политики или в папку Sysvol\PolicyDefinitions на контроллере домена.

Установленный шаблон .admx.
Полный листинг получившегося шаблона и файла локализации под спойлером.
Шаблон:
<?xml version="1.0" encoding="utf-8"?>
<policyDefinitions revision="1.0" schemaVersion="1.0">
  <policyNamespaces>
    <target prefix="fullarmor" namespace="FullArmor.6fb075d6-ddee-4302-9d06-50c4d83e1910" />
    <using prefix="windows" namespace="Microsoft.Policies.Windows" />
  </policyNamespaces>
  <supersededAdm fileName="E:\1\explorer.adm" />
  <resources minRequiredRevision="1.0" />
  <supportedOn>
    <definitions>
      <definition name="SUPPORTED_NotSpecified" displayName="$(string.ADMXMigrator_NoSupportedOn)" />
    </definitions>
  </supportedOn>
  <categories>
    <category name="ShowExplorer" displayName="$(string.ShowExplorer)" />
  </categories>
  <policies>
    <policy name="ShowHiddenFiles" class="User" displayName="$(string.ShowHiddenFiles)" explainText="$(string.ShowHiddenFilesExplanation)" presentation="$(presentation.ShowHiddenFiles)" key="Software\Microsoft\Windows\CurrentVersion\Explorer\Advanced" valueName="Hidden">
      <parentCategory ref="ShowExplorer" />
      <supportedOn ref="SUPPORTED_NotSpecified" />
      <enabledValue>
        <decimal value="1" />
      </enabledValue>
      <disabledValue>
        <decimal value="2" />
      </disabledValue>
    </policy>
    <policy name="ShowFileExtensions" class="User" displayName="$(string.ShowFileExtensions)" explainText="$(string.ShowFileExtensionsExplanation)" presentation="$(presentation.ShowFileExtensions)" key="Software\Microsoft\Windows\CurrentVersion\Explorer\Advanced" valueName="HideFileExt">
      <parentCategory ref="ShowExplorer" />
      <supportedOn ref="SUPPORTED_NotSpecified" />
      <enabledValue>
        <decimal value="0" />
      </enabledValue>
      <disabledValue>
        <decimal value="1" />
      </disabledValue>
    </policy>
    <policy name="ShowSuperHiddenFiles" class="User" displayName="$(string.ShowSuperHiddenFiles)" explainText="$(string.ShowSuperHiddenFilesExplanation)" presentation="$(presentation.ShowSuperHiddenFiles)" key="Software\Microsoft\Windows\CurrentVersion\Explorer\Advanced" valueName="ShowSuperHidden">
      <parentCategory ref="ShowExplorer" />
      <supportedOn ref="SUPPORTED_NotSpecified" />
      <enabledValue>
        <decimal value="1" />
      </enabledValue>
      <disabledValue>
        <decimal value="0" />
      </disabledValue>
    </policy>
  </policies>
</policyDefinitions>
Файл локализации:
<?xml version="1.0" encoding="utf-8"?>
<policyDefinitionResources revision="1.0" schemaVersion="1.0">
  <displayName></displayName>
  <description></description>
  <resources>
    <stringTable>
      <string id="ShowExplorer">Отображение файлов в проводнике</string>
      <string id="ShowHiddenFiles">Показывать скрытые файлы</string>
      <string id="ShowHiddenFilesExplanation">Когда эта настройка включена, проводник будет показывать скрытые файлы.</string>
      <string id="ShowSuperHiddenFiles">Показывать системные файлы</string>
      <string id="ShowSuperHiddenFilesExplanation">Когда эта настройка включена, проводник будет показывать системные файлы</string>
      <string id="ShowFileExtensions">Показывать расширения файлов</string>
      <string id="ShowFileExtensionsExplanation">Когда эта настройка включена, проводник будет показывать расширения файлов</string>
      <string id="ADMXMigrator_UnresolvedString">ADMX Migrator encountered a string that is not present in the source ADM string table.</string>
      <string id="ADMXMigrator_NoSupportedOn">ADMX Migrator encountered a policy that does not have a supportedOn value.</string>
    </stringTable>
    <presentationTable>
      <presentation id="ShowHiddenFiles" />
      <presentation id="ShowFileExtensions" />
      <presentation id="ShowSuperHiddenFiles" />
    </presentationTable>
  </resources>
</policyDefinitionResources>
Действительно, xml в новом формате читается чуть хуже, чем старый .adm. Для облегчения работы с новым форматом в поставке ADMX Migrator есть утилита faAdmxEditor.msc. Помимо этой утилиты есть и скрипты для конвертации reg-файлов в шаблоны, и сторонние платные утилиты.
Конечно же, можно обойтись без вот-этого-всего и разобраться самостоятельно ― оставлю это в качестве домашнего задания. Благо на портале MSDN есть подробное описание XML-схемы, и есть неплохие материалы с примерами в сети. Например, «Административные шаблоны групповой политики».
Теперь перейдем к автоматизации.
Автоматическое управление
Работать с групповыми политиками из командной строки довольно тоскливо. Основных инструментов можно выделить три.
PowerShell. Есть набор командлетов для резервного копирования, восстановления и управления групповыми политиками. Создание новых политик ограничено ― можно лишь изменять реестр. Впрочем, в большинстве случаев и этого достаточно. В качестве примера создадим групповую политику, которая отключит автоматическое обновление Adobe Reader DC.
За отключение автоматического обновления отвечает ключ реестра bUpdater в ветке [HKEY_LOCAL_MACHINE\SOFTWARE\Policies\Adobe\Acrobat Reader\DC\FeatureLockDown]. Установив параметр в 0, мы отключим опцию.
Создание групповой политики на PowerShell будет выглядеть так:
Import-module -Name GroupPolicy
Write-Host "Создаем новый объект политики с именем Adobe_Reader_disable_autoupdate"
New-GPO -Name Adobe_Reader_disable_autoupdate
Write-Host "Добавляем нужное нам значение реестра"
Set-GPRegistryValue -Name "Adobe_Reader_disable_autoupdate" -key "HKLM\SOFTWARE\Policies\Adobe\Acrobat Reader\DC\FeatureLockDown" -ValueName  bUpdater -TypeDWord -value 0
Write-Host "Прилинковываем новый объект к нужному OU"
Set-GPLink -Name Adobe_Reader_disable_autoupdate -Target "ou=Computers,dc=domain,dc=com" -LinkEnabled Yes
Свежесозданная групповая политика.
Полный список и описание командлетов доступны в материале Technet Group Policy Cmdlets in Windows PowerShell.
Интерфейс COM к GPMC (консоли управления групповой политикой). Способ позволяет сделать с политиками многое, на любом языке программирования, поддерживающим COM-интерфейсы. К сожалению, популярность он не приобрел и примеров в сети довольно мало, несмотря на богатое описание методов интерфейса на портале MSDN. Немногочисленные примеры использования доступны для загрузки в галерее Technet.
LGPO.exe. Не так давно Microsoft заменил набор утилит для работы с локальными групповыми политиками на единую утилиту. Скачать ее можно на официальном сайте. Утилита удобна для копирования и развертывания локальных групповых политик. Заявлена и поддержка MLGPO. Создавать свои политики тоже можно. Также программа удобна для создания и изменения файлов реестра registry.pol. Для примера изменим локальную групповую политику, добавив в нее отключение обновления несчастного Acrobat Reader DC.
Сделаем бэкап локальной групповой политики командой
lgpo.exe /b C:\Temp /n "Backup"В папке C:\Temp появится подпапка с GUID по структуре схожая с доменными групповыми политиками:
Теперь развернем registry.pol в текстовый файл:
LGPO.exe /parse /m C:\temp\{GUID}\DomainSysvol\GPO\Machine\registry.pol >> reg.txtСинтаксис текстового файла очевиден. Добавим в него значения реестра для отключения автоматического обновления «Акробата»:
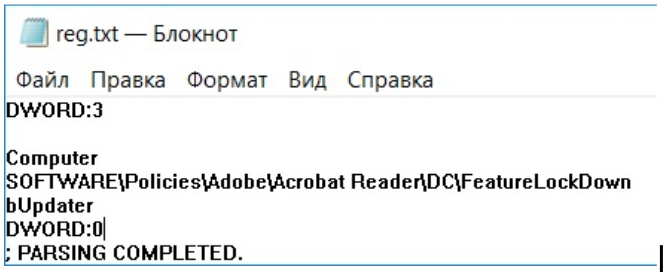
Добавленный в файл параметр реестра.
Теперь останется завернуть наш reg.txt обратно в registry.pol и импортировать изменившийся файл обратно в локальную групповую политику:
LGPO.exe /r C:\Temp\reg.txt /w C:\Temp\registry.pol
LGPO.exe /m C:\Temp\registry.polВсе эти махинации, конечно же, можно завернуть в один скрипт и использовать для массового изменения локальной групповой политики привычным инструментом для запуска команд на удаленных компьютерах. Подробнее про методы запуска команд можно почитать в нашей статье «1000++ способ запуска команд на удаленном компьютере».
Конечно же, зная структуру доменной групповой политики, ничто не мешает сделать удобный именно вам инструмент для создания и управления политиками. Поделитесь в комментариях, есть ли у вас свои способы настройки реестров пользовательских машин?
Прочитано: 1 696
Долгое время мне не нужно было ничего настраивать на домен контроллере в плане групповых политик, все работало хорошо и проблем в подконтрольной сети не было, ну это так обычно бывает, когда все настроено. Но как всегда, когда что-то да нужно, то нет инструментов под рукой или коллегами по цеху внесены в текущую инфраструктуру изменения о которых они забыли отразить в единой базе отчетов. Да такое бывает, вот к примеру мне нужно было создать политику по управлению настройками Google Chrome и создав политику в своем домене я обнаружил, что почему-то нет дефолтных шаблонов (Administrative Templates), вот что я всего лишь вижу:
Чтобы поправить текущую ситуацию в моем домене (polygon.local Windows Server 2008 R2), а именно я объединю все шаблоны GPO в едином месте нужно:
- Скачиваем ADMX файлы для Windows Server 2008 R2 и Windows 7
- Скачиваем ADMX файлы для Windows 8.1 и Windows Server 2012 R2
Проверяю, что я залогинен (права Domain Admins) на домен контроллере (srv-dc) и запускаю инсталляторы ADMX файлов:
Win7-2008R2-admx.msi — Next — I Agree, Next – Каталог установки по умолчанию:
C:\Program Files (x86)\Microsoft Group Policy\win72008r2\ (Everyone), Next — Next — Close.
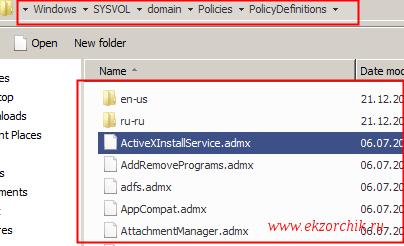
После копирую из каталога установки по умолчанию все файлы в каталог (командная строка запущена с правами Администратора) \\srv-dc\SYSVOL\polygon.local\Policies\PolicyDefinitions (он же => C:\Windows\SYSVOL\domain\Policies\PolicyDefinitions)
C:\Windows\system32>mkdir "C:\Windows\SYSVOL\domain\Policies\PolicyDefinitions"
После копируем каталог: C:\Program Files (x86)\Microsoft Group Policy\win72008r2\PolicyDefinitions — en-us & ru-ru в каталог: C:\Windows\SYSVOL\domain\Policies\PolicyDefinitions
C:\Windows\system32>xcopy /Y "C:\Program Files (x86)\Microsoft Group Policy\win72008r2\PolicyDefinitions\*.admx" C:\Windows\SYSVOL\domain\Policies\PolicyDefinitions\
Должно это в конечно итоге выглядеть так:
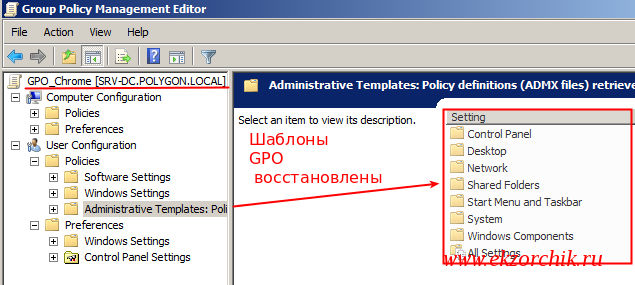
После чтобы появились настройки нужно на домен контроллере сделать Logoff/Logon и изменения применятся как должно было быть, а не с тем чем я столкнулся в начале этой заметки:
После запускаю оснастку Group Policy Management на домен контроллере (srv-dc):
Start — Control Panel — Administrative Templates — Group Policy Management и к примеру разворачиваю настройки User Configuration: Policies — Administrative Templates: и вот они шаблоны которые собственно и должны быть: Control Panel, Desktop, Network, Shared Folders и многие другие. Пример см. ниже в виде наглядного скриншота.
Итого вот так просто данная проблема была решена, я с таким если честно сталкиваюсь не первый раз по приходу на новое место работы. Такое ощущение что до меня системный администратор как то не заморачивался, но нет и нет, если лень разбираться что будет городить такой огород из настроек, что действительно проще все переустановить предварительно собрав максимум информации что и для чего используется ну и конечно же забекапировать а то мало ли что.
Не только для политик User Configuration будут шаблоны, но и для Computer Configurations то же. Т.е. сейчас все политики централизованы в одном месте и к ним можно добавлять свои admx * adml файлы. Я уже рассматривал это к примеру в заметке по единому отключению ipv6 на рабочих местах и это работает.
А что дальше, а дальше я прощаюсь, до новых практических реальных заметок на моем блоге, с уважением Олло Александр aka ekzorchik.
To add ADMX templates to Group Policy, Windows Server 2008 and above uses a Central Store to store Administrative Template files. In Windows 7, the ADM folder is not created in a GPO as in earlier versions of Windows. Therefore, domain controllers do not store or replicate redundant copies of .adm files. To take advantage of the benefits of .admx files, you must create a Central Store in the SYSVOL folder on a domain controller. The Central Store is a file location that is checked by the Group Policy tools. The Group Policy tools use any .admx files that are in the Central Store. The files that are in the Central Store are later replicated to all domain controllers in the domain.
The Central Store for .admx and .adml files are located at the following locations:
.ADMX Files
\\<your domain>\SYSVOL\<FDQN>\policies\PolicyDefinitions\
.ADML Files
\\<your domain>\SYSVOL\<FDQN>\policies\PolicyDefinitions\en-us
Ex. \\contoso\SYSVOL\contoso.microsoft.com\policies\PolicyDefinitions\
Whenever you want to add a new template to the central store, you must find or download the new .ADMX and the .ADML files and copy them to the central store. For example, if your company is upgrading from IE9 to IE11, you will need to update the group policy templates so that any new policies related to IE11 become available for domain administrators. You can search the Internet and download these ADMX/ADML files or you can install IE11 on your PC which will update the ADMX and ADML files on your PC during the IE11 installation. In order to update the Central Store, all you need to do is copy those ADMX and ADML files from your PC to the appropriate SYSVOL locations. For Windows 7 comptuers, the local .ADMX and .ADML files are located at the following locations:
.ADMX Files
C:\Windows\PolicyDefinitions
.ADML Files
C:\Windows\PolicyDefinitions\en-US
The name of the template files for IE9 are
C:\Windows\PolicyDefinitions\inetres.admx
C:\Windows\PolicyDefinitions\en-US\inetres.adml
As a network administrator, all you have to do to update the central store with the latest IE11 template files is to:
** Note – Please make a copy of the old .ADMX and .ADML files before you replace them just in case you need them.
copy FROM C:\Windows\PolicyDefinitions\inetres.admx TO —–> \\contoso\SYSVOL\contoso.microsoft.com\policies\PolicyDefinitions\
copy FROM C:\Windows\PolicyDefinitions\en-US\inetres.adml TO —–> \\contoso\SYSVOL\contoso.microsoft.com\policies\PolicyDefinitions\en-us
Open GPMC and modify the IE group policy and you will now notice the latest IE11 policies are available to you and all administrators.
References
http://support.microsoft.com/kb/929841
http://technet.microsoft.com/en-us/library/gg699401.aspx
http://support.microsoft.com/kb/2411821