
Provide feedback
Saved searches
Use saved searches to filter your results more quickly
Sign up
Appearance settings
A Simple Windows Forms Application Project Template in C++/CLR.
- Note: If images in this article are blurry, right click on them and open in new tab.
- Note: Tested on VS2022, please let me know any bugs with other versions of Visual Studio (2017/19).
Watch Video Guide
Learn more about WinForms and C++ GUI Frameworks in General
Use this template to create a Windows Forms Application using C++. This is similar to the Windows Forms Application Project Template for C#, provided in VS by default.
VS2010 included something like this, but from 2021 it has been removed. So use this template to create GUI apps using C++/CLR with the WinForms Framework provided with .NET.
To install the extension, just download and run the installer.
To create a new project, Launch Vs, Create New Project->Search for CppWinForms
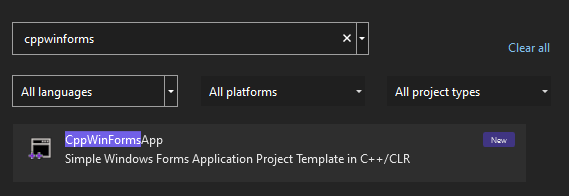
Then Create the project.
If you are getting a build tools error like this,
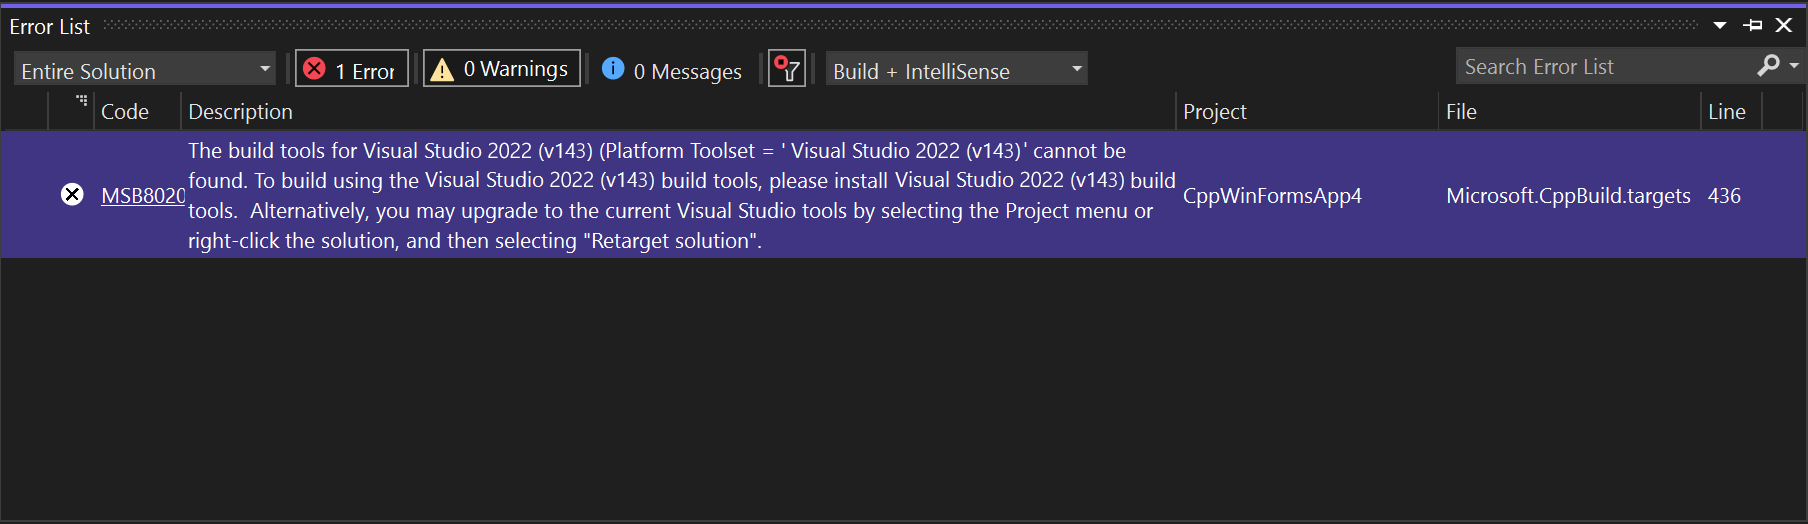
Then, go to your project properties and choose your Visual Studio Version under platform toolset.
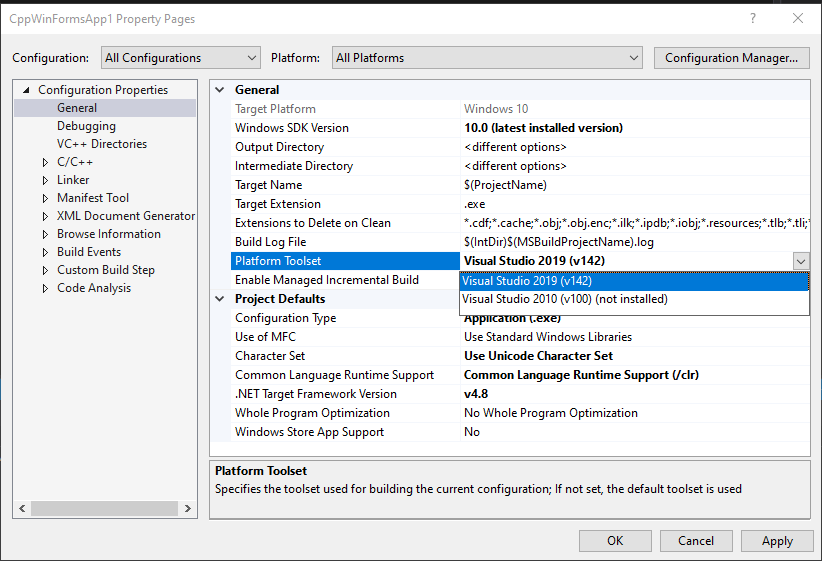
Hit OK.
Open, MyForm.h to view the GUI Form with the Designer (found under Header Files).
If you are getting this error
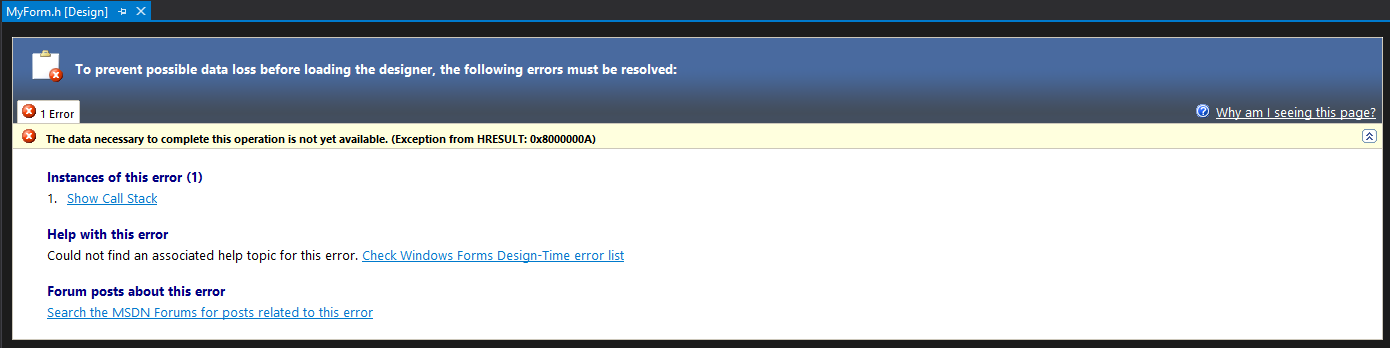
Close the file, wait a few seconds and re open it.
All problems should be solved now! Contact via Telegram for any suggestions, improvements or issues.
The XAF uses built-in Templates for automatic UI construction. The templates for WinForms applications are listed below.
Templates
LightStyleMainForm

Class: LightStyleMainForm
Namespace: DevExpress.ExpressApp.Win.Templates.
Displays the main Window without excessive borders. To use this template, set the IModelOptionsWin.FormStyle property to Standard and WinApplication.UseLightStyle to true.
LightStyleMainRibbonForm

Class: LightStyleMainRibbonForm
Namespace: DevExpress.ExpressApp.Win.Templates
Displays the main Window with the Ribbon form style without excessive borders. To use this template, set the IModelOptionsWin.FormStyle property to Ribbon and WinApplication.UseLightStyle to true.
OutlookStyleMainRibbonForm
Class: OutlookStyleMainRibbonForm
Namespace: DevExpress.ExpressApp.Win.Templates.Ribbon
Used to display the main Window with the Outlook form style. To use this template, apply settings as the IModelRootGroupsStyle.RootGroupsStyle article describes, and set the RootGroupStyle property to OutlookSimple or OutlookAnimated.
DetailFormV2

Class: DetailFormV2
Namespace: DevExpress.ExpressApp.Win.Templates
Displays a Detail View in a new Window. To use this template, set the IModelOptionsWin.FormStyle property to Standard.
DetailRibbonFormV2

Class: DetailRibbonFormV2
Namespace: DevExpress.ExpressApp.Win.Templates.Bars
Displays a Detail View in a new Window with the Ribbon form style. To use this template, set the IModelOptionsWin.FormStyle property to Ribbon.
Class: PopupForm
Namespace: DevExpress.ExpressApp.Win.Templates
Used to display pop-up windows with a Detail View. For instance, a logon form is displayed by the PopupForm Template.
NestedFrameTemplateV2
Class: NestedFrameTemplateV2
Namespace: DevExpress.ExpressApp.Win.Templates
Used to display a Window or Frame nested into another Window or Frame. For instance, a List Property Editor or Detail Property Editor’s window is displayed by the NestedFrameTemplateV2 Template.
LookupForm

Class: LookupForm
Namespace: DevExpress.ExpressApp.Win.Templates
Used to display pop-up windows with a List View. For instance, PopupWindowShowAction type Actions use the LookupForm Template to display their pop-up window.
LookupControlTemplate
Class: LookupControlTemplate
Namespace: DevExpress.ExpressApp.Win.Templates
Used to display a Lookup Property Editor’s drop down window.
Deprecated Templates
MainFormV2

Class: MainFormV2
Namespace: DevExpress.ExpressApp.Win.Templates
Displays the main Window. To use this template, set the IModelOptionsWin.FormStyle property to Standard.
MainRibbonFormV2

Class: MainRibbonFormV2
Namespace: DevExpress.ExpressApp.Win.Templates.Bars
Displays the main Window with the Ribbon form style. To use this template, set the IModelOptionsWin.FormStyle property to Ribbon.
How To’s
- How to: Access the Bar Manager
- How to: Access the Document Manager
- How to: Access the Ribbon Control
- How to: Create a Custom WinForms Ribbon Template
- How to: Create a Custom WinForms Standard Template
- How to: Adjust Window Size and Style (WinForms)
- How to: Customize Window Status Messages (WinForms)
- High DPI Support in a Windows Forms Application
C# Windows Form Template. For a walkthrough of this project template, see create a windows forms app in visual studio with c#. For example, enter or type windows forms app in the search box.
Theme of window form is not changing in wpf. The samples browser is geared towards the idea of learning by example, by demonstrating the usage of the extensive feature set of the ultimate ui for windows forms controls. We have 20 images about c# windows form template including images, pictures, pdf, wword, and more.
Make Sure You Select A Windows Application As The Template.
On the create a new project window, choose the windows forms app (.net framework) template for c#. (if you prefer, you can refine your search to quickly get to the template you want. Step 1) the first step involves the creation of a new project in visual studio.
We’re Redefining What It Means To Be A Tax And Accounting Professional By Helping Firms Add High Value Advisory Services And The Technology To Manage It All, Built By Accountants For Accountants.
C# is one of the most popular programming languages to develop major projects for final year engering students. Here we are providing c# projects based on windows or web application with source code, database, and documentation.c# is used for developing web applications, websites related projects. Library for easy creation of custom wizards, aero wizards, and wizard97 style wizards.
If You Are Looking For C# Windows Form Template You’ve Come To The Right Place.
In this article i will show you how to make login form in windows application using c# where i will enter a dummy data in the form of username and password and will check that the entered data by the user is correct or not. The normal windows form appears on the screen. Download windows form application project in c#.net.
Over 120 Advanced Winforms Ui Controls & Components.
If it is correct, the user gets into his account. Before use the syncfusion winforms project template, check whether the. Choose between our showcase samples, feature samples, and our legacy samples along with their source code with full c# and vb.net projects.
Custom **Resizable** Windows Forms Themes.
On the create a new project window, choose the windows forms app (.net framework) template for c#. Use visual studio 2019 and windows driver kit (wdk) 10 to build, test, and deploy. This form could accept the following.</p>reviews:
Post Views: 314
Содержание
- Практическое руководство. Создание шаблонов проектов How to: Create project templates
- Использование мастера экспорта шаблонов Use the Export Template Wizard
- Другие способы создания шаблонов проектов Other ways to create project templates
- Практическое руководство. Создание шаблонов элементов How to: Create item templates
- Добавление шаблона элемента в диалоговое окно «Добавление нового элемента» Add an item template to the Add New Item dialog box
- Включение шаблона элемента для использования в проекте универсального приложения для Windows Enable the item template to be used in a Universal Windows App project
- Включение шаблонов для конкретных подтипов проектов Enable templates for specific project subtypes
- Создание шаблона элемента вручную Manually create an item template
- Практическое руководство. Создание многофайловых шаблонов элементов How to: Create multi-file item templates
- Использование мастера экспорта шаблонов Use the Export Template Wizard
- Создание шаблона многофайлового элемента вручную Manually create a multi-file item template
- Пример Example
- Шаг 1. Создание проекта приложения Windows Forms Step 1: Create a Windows Forms App project
- Откройте Visual Studio 2017. Open Visual Studio 2017
- Запустите Visual Studio 2019. Open Visual Studio 2019
- Сведения о проекте приложения Windows Forms About the Windows Forms App project
- Дальнейшие действия Next steps
Практическое руководство. Создание шаблонов проектов How to: Create project templates
В этом разделе содержатся сведения о создании шаблона с помощью мастера экспорта шаблонов, который упаковывает шаблон в ZIP-файл. This topic shows you how to create a template using the Export Template Wizard, which packages your template in a .zip file.
Использование мастера экспорта шаблонов Use the Export Template Wizard
Создайте проект. Create a project.
Называя проект, который будет источником для шаблонов, используйте только допустимые символы идентификаторов. Use only valid identifier characters when naming a project that will be the source for a template. В противном случае в проектах, созданных из шаблона, могут возникать ошибки компиляции. Otherwise, compilation errors can occur in projects that are created from the template. Дополнительные сведения о допустимых символах идентификаторов см. в статьях Имена объявленных элементов (Visual Basic) и Идентификаторы (C++). For more information about valid identifier characters, see Declared element names (Visual Basic) or Identifiers (C++). Кроме того, можно использовать параметры шаблона, чтобы применять безопасные имена классов и пространств имен. Alternatively, you can use Template parameters to use «safe» names for classes and namespaces.
Внесите в проект все необходимые изменения, пока он не будет готов к сохранению в качестве шаблона. Edit the project until it is ready to be exported as a template. Например, может потребоваться отредактировать файлы кода, чтобы указать, где должна быть выполнена замена параметра. For example, you might want to edit code files to indicate where parameter replacement should take place. См. раздел Практическое руководство. Замена параметров в шаблоне. See How to: Substitute parameters in a template.
В меню Проект выберите команду Экспорт шаблона. On the Project menu, choose Export Template.
Открывается мастер экспорта шаблонов. The Export Template Wizard opens.
На странице Выбор типа шаблона выберите Шаблон проекта. On the Choose Template Type page, select Project Template. Выберите проект, который необходимо экспортировать в шаблон, а затем нажмите кнопку Далее. Select the project you want to export to a template, and then choose Next.
На странице Выбор параметров шаблона введите имя шаблона и необязательное описание, значок и рисунок предварительного просмотра для шаблона. On the Select Template Options page, enter a name and optional description, icon, and preview image for your template. Эти элементы будут отображаться в диалоговом окне Новый проект. These items will appear in the New Project dialog box. Нажмите кнопку Готово. Choose Finish.
Проект будет экспортирован в ZIP-файл и помещен в указанное выходное расположение, а также (если установлен соответствующий флажок) импортирован в Visual Studio. The project is exported into a .zip file and placed in the specified output location, and, if selected, imported into Visual Studio.
Чтобы найти шаблон в диалоговом окне Новый проект, разверните узел Установленные, а затем категорию, которая соответствует элементу ProjectType в VSTEMPLATE-файле. To find your template in the New Project dialog box, expand Installed and then expand the category that corresponds to the ProjectType element in the .vstemplate file. Например, VSTEMPLATE-файл, содержащий
, по умолчанию отображается в разделе Установленные > Visual C#. For example, a .vstemplate file that contains
appears under Installed > Visual C#, by default. Шаблон можно расположить во вложенном каталоге типа проекта. Для этого просто создайте папку в этом каталоге и поместите в нее ZIP-файл проекта. You can organize your template into a subdirectory of the project type just by creating a folder in that directory and placing your template’s .zip file in it. Дополнительные сведения см. в разделе Практическое руководство. размещать и упорядочивать шаблоны. For more information, see How to: Locate and organize templates.
На странице Выбор параметров шаблона введите имя шаблона и необязательное описание, значок и рисунок предварительного просмотра для шаблона. On the Select Template Options page, enter a name and optional description, icon, and preview image for your template. Эти шаблоны будут отображаться в диалоговом окне создания проекта. These items will appear in the dialog box where you create a new project. Нажмите кнопку Готово. Choose Finish.
Проект будет экспортирован в ZIP-файл и помещен в указанное выходное расположение, а также (если установлен соответствующий флажок) импортирован в Visual Studio. The project is exported into a .zip file and placed in the specified output location, and, if selected, imported into Visual Studio.
Чтобы найти шаблон в диалоговом окне создания проекта, можно использовать поиск по имени или прокрутку списка. To find your template in the dialog box where you create a new project, search for it by name or scroll through the list. (Фильтрация по языку или типу проекта для пользовательских шаблонов сейчас не поддерживается.) (Filtering based on language or project type is not currently possible for user templates.)
Другие способы создания шаблонов проектов Other ways to create project templates
Шаблоны проектов можно создать вручную, собрав файлы, образующие проект, в папку, а затем создав VSTEMPLATE-файл XML с соответствующими метаданными. You can create project templates manually by gathering the files that constitute the project into a folder and creating a .vstemplate XML file with the appropriate metadata. Дополнительные сведения см. в статье Практическое руководство. Создание веб-шаблонов вручную. For more information, see How to: Manually create web templates.
Если у вас установлен пакет SDK для Visual Studio, можно поместить готовый шаблон в оболочку (VSIX-файл для развертывания) с помощью шаблона Проект VSIX. If you have the Visual Studio SDK installed, you can wrap the finished template in a VSIX file for deployment by using the VSIX Project template. Дополнительные сведения см. в разделе Приступая к работе с использованием шаблона проекта VSIX. For more information, see Get started with the VSIX project template.
Источник
Практическое руководство. Создание шаблонов элементов How to: Create item templates
В этой статье показано, как создать шаблон элемента с помощью мастера экспорта шаблонов. This article shows you how to create an item template by using the Export Template Wizard. Если шаблон будет состоять из нескольких файлов, см. статью Практическое руководство. Создание многофайловых шаблонов элементов. If your template will consist of multiple files, see How to: Create multi-file item templates.
Добавление шаблона элемента в диалоговое окно «Добавление нового элемента» Add an item template to the Add New Item dialog box
Создайте или откройте проект в Visual Studio. Create or open a project in Visual Studio.
Добавьте элемент в проект и измените его по своему усмотрению. Add an item to the project, and modify it if you want to.
Отредактируйте файл кода, чтобы указать, где должна быть выполнена замена параметра. Modify the code file to indicate where parameter replacement should take place. Дополнительные сведения см. в разделе Практическое руководство. заменить параметры в шаблоне. For more information, see How to: Substitute parameters in a template.
В меню Проект выберите команду Экспорт шаблона. On the Project menu, choose Export Template.
На странице Выбор типа шаблона выберите Шаблон элемента, затем проект, который содержит элемент, и нажмите кнопку Далее. On the Choose Template Type page, choose Item Template, select the project that contains the item, and then choose Next.
На странице Выбор элемента для экспорта выберите элемент, для которого нужно создать шаблон, а затем нажмите кнопку Далее. On the Select Item To Export page, choose the item you want to create a template for, and then choose Next.
На странице Выбор ссылок для элементов выберите ссылки на сборки, включаемые в шаблон, а затем нажмите кнопку Далее. On the Select Item References page, select the assembly references to include in the template, and then choose Next.
На странице Выбор параметров шаблона введите имя шаблона и необязательное описание, значок и рисунок предварительного просмотра, а затем нажмите кнопку Готово. On the Select Template Options page, enter the template name and optional description, icon image and preview image, and then choose Finish.
Файлы для шаблона добавляются в ZIP-файл и копируются в каталог, который вы указали в мастере. The files for the template are added to a .zip file and copied to the directory you specified in the wizard. Расположением по умолчанию является папка %USERPROFILE%\Documents\Visual Studio \My Exported Templates. The default location is %USERPROFILE%\Documents\Visual Studio \My Exported Templates.
Если вы не выбрали параметр Автоматически импортировать шаблон в Visual Studio в мастере экспорта шаблонов, найдите экспортированный шаблон. If you did not select the option Automatically import the template into Visual Studio in the Export Template Wizard, locate the exported template. Затем скопируйте его в каталог пользовательских шаблонов элементов. Then, copy it to the user item template directory. Расположением по умолчанию является папка %USERPROFILE%\Documents\Visual Studio \Templates\ItemTemplates. The default location is %USERPROFILE%\Documents\Visual Studio \Templates\ItemTemplates.
Закройте Visual Studio, а затем откройте среду повторно. Close Visual Studio and then reopen it.
Создайте новый проект или откройте существующий, а затем выберите Проект > Добавить новый элемент или нажмите клавиши CTRL+SHIFT+A. Create a new project, or open an existing project, and then choose Project > Add New Item or press Ctrl+Shift+A.
Шаблон элемента появится в диалоговом окне Добавление нового элемента. The item template appears in the Add New Item dialog box. Если вы добавили описание в мастере экспорта шаблонов, оно будет отображаться в правой части диалогового окна. If you added a description in the Export Template Wizard, the description appears on the right side of the dialog box.
Включение шаблона элемента для использования в проекте универсального приложения для Windows Enable the item template to be used in a Universal Windows App project
Мастер выполняет за вас основную часть работы по созданию базового шаблона, но во многих случаях необходимо вручную изменить VSTEMPLATE-файл после экспорта шаблона. The wizard does much of the work to create a basic template, but in many cases you need to manually modify the .vstemplate file after you have exported the template. Например, если элемент должен отображаться в диалоговом окне Добавление нового элемента для проекта универсального приложения Windows, необходимо выполнить ряд дополнительных действий. For example, if you want the item to appear in the Add New Item dialog for a Universal Windows App project, you have to perform a few extra steps.
Выполните шаги из предыдущего раздела по экспорту шаблона элемента. Follow the steps in the previous section to export an item template.
Извлеките созданный ZIP-файл и откройте VSTEMPLATE-файл в Visual Studio. Extract the .zip file that was created, and open the .vstemplate file in Visual Studio.
Для проекта универсальной платформы Windows на C# добавьте следующий XML-код внутри элемента: For a C# Universal Windows project, add the following XML inside the element:
Сохраните VSTEMPLATE-файл в Visual Studio и закройте его. In Visual Studio, save the .vstemplate file and close it.
Скопируйте и вставьте VSTEMPLATE-файл обратно в ZIP-файл. Copy and paste the .vstemplate file back to the .zip file.
Если откроется диалоговое окно Копирование файла, выберите параметр Копировать с заменой. If the Copy File dialog box appears, choose the Copy and Replace option.
Теперь можно добавить основанный на этом шаблоне элемент в проект универсальной платформы Windows из диалогового окна Добавление нового элемента. You can now add an item based on this template to a Universal Windows project from the Add New Item dialog box.
Включение шаблонов для конкретных подтипов проектов Enable templates for specific project subtypes
Можно указать, что шаблон должен отображаться только для определенных подтипов проекта, например Windows, Office, базы данных или веб-сайта. You can specify that your template should only appear for only certain project subtypes, such as Windows, Office, Database, or Web.
Найдите в VSTEMPLATE-файле элемент ProjectType для шаблона элемента. Locate the ProjectType element in the .vstemplate file for the item template.
Задайте для элемента одно из следующих текстовых значений: Set the text value of the element to one of the following values:
В следующем примере показан шаблон элемента, доступный для проектов Office. The following example shows an item template for Office projects.
Создание шаблона элемента вручную Manually create an item template
В некоторых случаях может потребоваться вручную создать шаблон элемента с нуля. In some cases you may want to create an item template manually, from scratch.
Создайте проект и его элемент. Create a project and project item.
Измените элемент проекта, пока он не будет готов к сохранению в качестве шаблона. Modify the project item until it is ready to be saved as a template.
Отредактируйте файл кода, чтобы указать, где должна быть выполнена замена параметра. Modify the code file to indicate where parameter replacement should occur, if anywhere. Дополнительные сведения о замене параметров см. в статье Практическое руководство. Замена параметров в шаблоне. For more information about parameter replacement, see How to: Substitute parameters in a template.
Создайте XML-файл и сохраните его, используя расширение VSTEMPLATE, в одном каталоге с файлом элемента проекта. Create an XML file and save it with a .vstemplate file extension in the same directory as your project item file.
Измените VSTEMPLATE-файл с кодом XML для предоставления метаданных шаблона элемента. Edit the .vstemplate XML file to provide item template metadata. Дополнительные сведения см. в статье Справочник по схемам шаблонов (расширяемость) и в примере из предыдущего раздела. For more information, see Template schema reference (extensibility) and the example in the previous section.
Сохраните VSTEMPLATE-файл и закройте его. Save the .vstemplate file and close it.
В проводнике выберите файлы, которые нужно включить в шаблон. In Windows Explorer, select the files you want to include in your template. Щелкните выбранные файлы правой кнопкой мыши и выберите пункты Отправить > Сжатая ZIP-папка. Right-click the selection, and choose Send to > Compressed (zipped) folder. Выбранные файлы будут сжаты в ZIP-файл. The files that you selected are compressed into a .zip file.
Источник
Практическое руководство. Создание многофайловых шаблонов элементов How to: Create multi-file item templates
Шаблоны элемента могут указывать только один элемент, но иногда этот элемент состоит из нескольких файлов. Item templates may only specify one item, but sometimes the item is made up of multiple files. Например, для шаблона элемента Windows Forms в Visual Basic требуется три следующих файла: For example, a Windows Forms item template requires the following three files:
файл, содержащий код для формы; A file that contains the code for the form
файл, содержащий сведения конструктора для формы; A file that contains the designer information for the form
файл, содержащий внедренные ресурсы для формы. A file that contains the embedded resources for the form
Многофайловым шаблонам элементов нужны параметры, чтобы при создании элемента использовались правильные расширения имен файлов. Multi-file item templates require parameters to ensure that the correct file extensions are used when the item is created. Если вы создаете многофайловый шаблон элемента с помощью мастера экспорта шаблонов, эти параметры создаются автоматически, а дальнейшая правка не требуется. If you create a multi-file item template by using the Export Template Wizard, these parameters are automatically generated, and no further editing is required.
Использование мастера экспорта шаблонов Use the Export Template Wizard
Многофайловый шаблон элемента создается аналогично однофайловому шаблону элемента. You can create a multi-file item template in the same manner as you would a single-file item template. См. практическое руководство по Создание шаблонов элементов. See How to: Create item templates. На странице Выбор элементов для экспорта мастера выберите файл, который содержит зависимые файлы (например, файл формы Windows Forms). On the Select Item To Export page of the wizard, select the file that has dependent files (for example, a Windows Forms form file). Мастер автоматически включит в шаблон все зависимые файлы, например файлы ресурсов и конструктора. The wizard automatically includes any dependent files, such as designer and resource files, in the template.
Создание шаблона многофайлового элемента вручную Manually create a multi-file item template
Создайте шаблон элемента так же, как если бы вы создавали однофайловый шаблон элемента вручную, но включите каждый файл, который составляет многофайловый элемент. Create the item template as you would manually create a single-file item template, but include each file that constitutes the multi-file item.
В VSTEMPLATE-файл XML-кода добавьте элемент ProjectItem для каждого отдельного файла и добавьте атрибут TargetFileName в этот элемент. In the .vstemplate XML file, add a ProjectItem element for each individual file, and add a TargetFileName attribute to this element. Присвойте атрибуту TargetFileName значение $входное_имя_файла$.расширение_файла, где расширение_файла — это расширение файла, включаемого в шаблон. Set the value of the TargetFileName attribute to $fileinputname$.FileExtension, where FileExtension is the file extension of the file that is being included in the template. Пример: For example:
Когда в проект добавляется элемент, производный от этого шаблона, имена файлов будут производными от имени, вводимого пользователем в диалоговом окне Добавление нового элемента. When an item derived from this template is added to a project, the file names will derive from the name that the user enters in the Add New Item dialog box.
Выберите файлы для включения в шаблон, щелкните выделение правой кнопкой мыши и выберите пункты Отправить > Сжатая ZIP-папка. Select the files to be included in your template, right-click the selection, and choose Send to > Compressed (zipped) folder.
Выбранные файлы будут сжаты в ZIP-файл. The files that you selected are compressed into a .zip file.
Скопируйте ZIP-файл в расположение, где находится пользовательский шаблон элемента. Copy the .zip file to the user item template location. По умолчанию это каталог %USERPROFILE%\Documents\Visual Studio \Templates\ItemTemplates. By default, the directory is %USERPROFILE%\Documents\Visual Studio \Templates\ItemTemplates. Дополнительные сведения см. в разделе Практическое руководство. размещать и упорядочивать шаблоны. For more information, see How to: Locate and organize templates.
Закройте Visual Studio, а затем откройте среду повторно. Close Visual Studio and then reopen it.
Создайте новый проект или откройте существующий, а затем выберите Проект > Добавить новый элемент или нажмите клавиши CTRL+SHIFT+A. Create a new project, or open an existing project, and then choose Project > Add New Item or press Ctrl+Shift+A.
Многофайловый шаблон элемента появится в диалоговом окне Добавление нового элемента. The multi-file item template appears in the Add New Item dialog box.
Пример Example
В приведенном ниже примере показан шаблон Windows Forms. The following example shows a Windows Forms template. Когда на основе этого шаблона создается элемент, имена трех созданных файлов будут соответствовать имени, введенному в диалоговом окне Добавление нового элемента. When an item is created based on this template, the names of the three files created will match the name entered in the Add New Item dialog box.
Источник
Шаг 1. Создание проекта приложения Windows Forms Step 1: Create a Windows Forms App project
Первый шаг в создании программы для просмотра изображений — это создание проекта приложения Windows Forms. When you create a picture viewer, the first step is to create a Windows Forms App project.
Откройте Visual Studio 2017. Open Visual Studio 2017
В строке меню выберите Файл > Создать > Проект. On the menu bar, choose File > New > Project. Диалоговое окно должно выглядеть так же, как на следующем снимке экрана. The dialog box should look similar to the following screenshot.
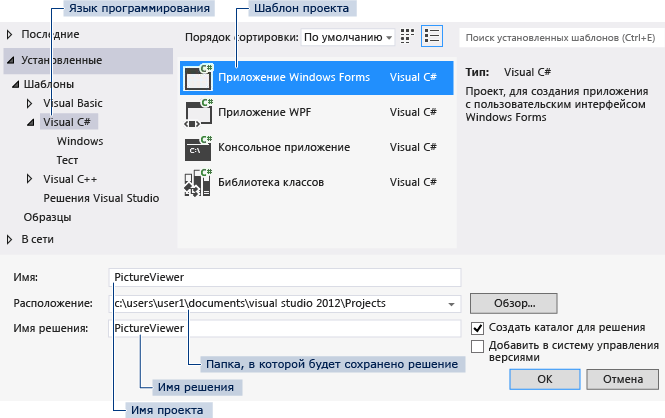
Диалоговое окно _ _»Новый проект» New project _ _dialog box
В левой части диалогового окна Новый проект выберите Visual C# или Visual Basic, а затем — Классическое приложение Windows. On the left side of the New Project dialog box, choose either Visual C# or Visual Basic, and then choose Windows Desktop.
В списке шаблонов проектов выберите Приложение Windows Forms (.NET Framework). In the project templates list, choose Windows Forms App (.NET Framework). Назовите новую форму PictureViewer и нажмите кнопку ОК. Name the new form PictureViewer, and then choose the OK button.
Дополнительные сведения см. в разделе Установка Visual Studio. For more information, see the Install Visual Studio page.
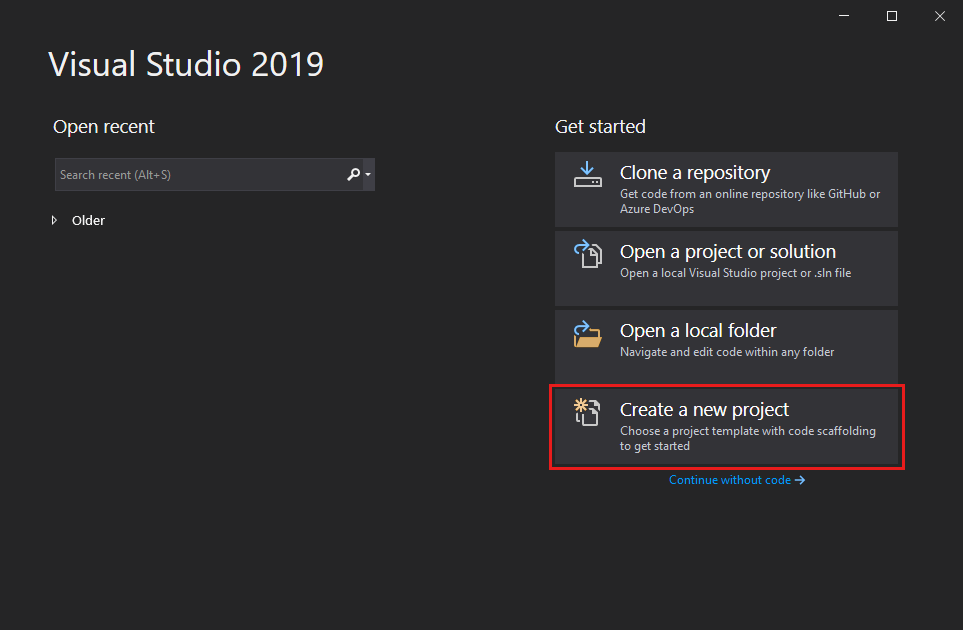
Запустите Visual Studio 2019. Open Visual Studio 2019
На начальном экране выберите Создать проект. On the start window, choose Create a new project.
В поле поиска окна Создание проекта введите Windows Forms. On the Create a new project window, enter or type Windows Forms in the search box. Затем в списке Тип проекта выберите Рабочий стол. Next, choose Desktop from the Project type list.
Применив фильтр Тип проекта, выберите шаблон Приложение Windows Forms (.NET Framework) для C# или Visual Basic и нажмите кнопку Далее. After you apply the Project type filter, choose the Windows Forms App (.NET Framework) template for either C# or Visual Basic, and then choose Next.

Если шаблон Приложение Windows Forms (.NET Framework) отсутствует, его можно установить из окна Создание проекта. If you don’t see the Windows Forms App (.NET Framework) template, you can install it from the Create a new project window. В сообщении Не нашли то, что искали? выберите ссылку Установка других средств и компонентов. In the Not finding what you’re looking for? message, choose the Install more tools and features link.

Затем нажмите кнопку Изменить в Visual Studio Installer. After that, choose the Modify button in the Visual Studio Installer. Вам может быть предложено сохранить результаты работы; в таком случае сделайте это. You might be prompted to save your work; if so, do so. Выберите Продолжить, чтобы установить рабочую нагрузку. Next, choose Continue to install the workload.
В поле Имя проекта окна Настроить новый проект введите PictureViewer. In the Configure your new project window, type or enter PictureViewer in the Project name box. Затем нажмите Создать. Then, choose Create.
Visual Studio создает решение для приложения. Visual Studio creates a solution for your app. Решение играет роль контейнера для всех проектов и файлов, необходимых приложению. A solution acts as a container for all of the projects and files needed by your app. Более подробно эти термины поясняются далее в этом учебнике. These terms will be explained in more detail later in this tutorial.
Сведения о проекте приложения Windows Forms About the Windows Forms App project
Среда разработки содержит три окна: главное окно, Обозреватель решений и окно Свойства. The development environment contains three windows: a main window, Solution Explorer, and the Properties window.
Если какое-либо из этих окон отсутствует, можно восстановить макет окон по умолчанию. If any of these windows are missing, you can restore the default window layout. В строке меню выберите Окно > Сброс макета окна. On the menu bar, choose Window > Reset Window Layout.
Можно также отобразить окна с помощью команд меню. You can also display windows by using menu commands. В строке меню выберите Вид > Окно «Свойства» или Обозреватель решений. On the menu bar, choose View > Properties Window or Solution Explorer.
Если открыты какие-либо другие окна, закройте их с помощью кнопки Закрыть (x) в верхнем правом углу. If any other windows are open, close them by choosing the Close (x) button in their upper-right corners.
Если выбрать файл, содержимое в окне Свойства изменится. If you choose a file, the contents of the Properties window changes. Если открыть файл кода (с расширением .cs в C# и .vb в Visual Basic), откроется сам файл кода или конструктор для него. If you open a code file (which ends in .cs in C# and .vb in Visual Basic), the code file or a designer for the code file appears. Конструктор — это визуальная поверхность, на которую можно добавлять элементы управления, такие как кнопки и списки. A designer is a visual surface onto which you can add controls such as buttons and lists. При работе с формами Visual Studio такая поверхность называется конструктор Windows Forms. For Visual Studio forms, the designer is called the Windows Forms Designer.
Окно «Свойства». В этом окне производится изменение свойств элементов, выбранных в других окнах. Properties window In this window, you can change the properties of items that you choose in the other windows. Например, выбрав форму Form1, можно изменить ее название путем задания свойства Text, а также изменить цвет фона путем задания свойства Backcolor. For example, if you choose Form1, you can change its title by setting the Text property, and you can change the background color by setting the Backcolor property.
В верхней строке в обозревателе решений отображается текст Решение «PictureViewer» (1 проект). Это означает, что Visual Studio автоматически создала для вас решение. The top line in Solution Explorer shows Solution ‘PictureViewer’ (1 project), which means that Visual Studio created a solution for you. Решение может содержать несколько проектов, но пока что вы будете работать с решениями, которые содержат только один проект. A solution can contain more than one project, but for now, you’ll work with solutions that contain only one project.
В строке меню выберите Файл > Сохранить все. On the menu bar, choose File > Save All.
Другой вариант — нажать кнопку Сохранить все на панели инструментов, как показано на рисунке ниже. As an alternative, choose the Save All button on the toolbar, which the following image shows.
Visual Studio автоматически заполняет имя папки и имя проекта, а затем сохраняет проект в папке проектов. Visual Studio automatically fills in the folder name and the project name and then saves the project in your projects folder.
Дальнейшие действия Next steps
Источник