
Последнее обновление: 25.11.2023
Для создания графических приложений на C# можно использовать .NET CLI, но также можно
использовать бесплатную и полнофункциональную среду разработки — Visual Studio Community 2022, которая в ряде случаев облегчает проектирование
приложения. Так, загрузим установщик Visual Studio по адресу:
https://www.visualstudio.com/en-us/downloads.

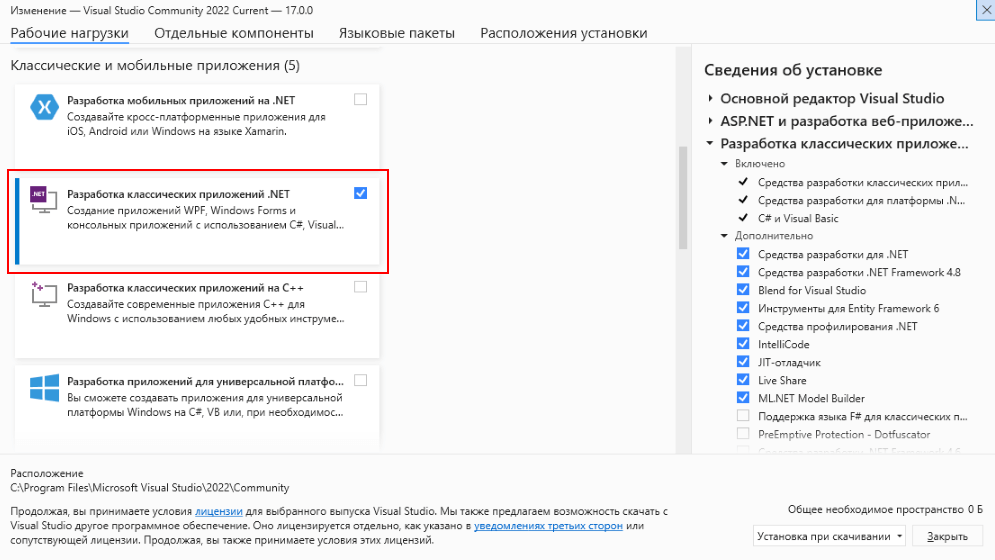
Чтобы добавить в Visual Studio поддержку проектов для Windows Forms и C# и .NET, в программе установки среди рабочих нагрузок нужно
выбрать только пункт Разработка классических приложений .NET. Можно выбрать и больше опций или вообще все опции, однако стоит
учитывать свободный размер на жестком диске — чем больше опций будет выбрано, соответственно тем больше места на диске будет занято.
После установки среды и всех ее компонентов, запустим Visual Studio и создадим проект графического приложения.
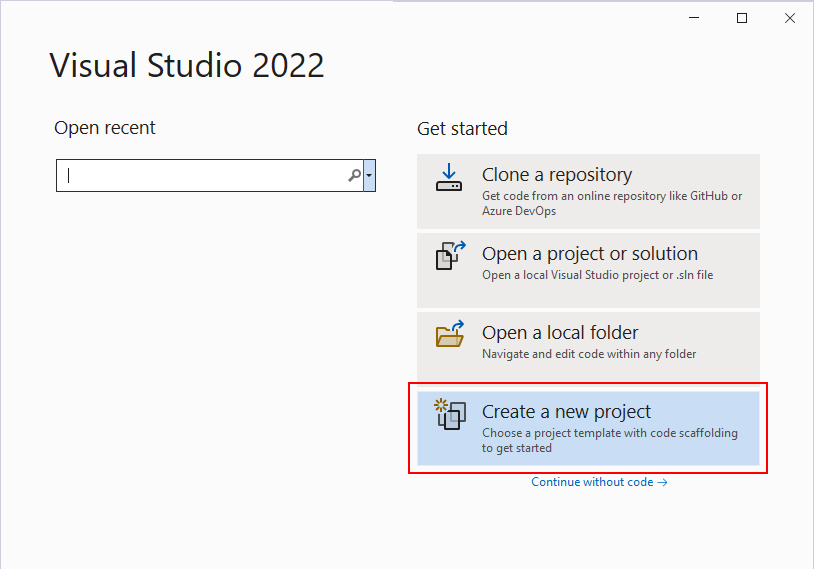
На стартовом экране выберем Create a new project (Создать новый проект)
На следующем окне в качестве типа проекта выберем Windows Forms App:

Стоит отметить, что среди шаблонов можно увидеть еще тип Windows Forms App (.NET Framework) — его НЕ надо выбирать, необходим именно тип
Windows Forms App.
Далее на следующем этапе нам будет предложено указать имя проекта и каталог, где будет располагаться проект.
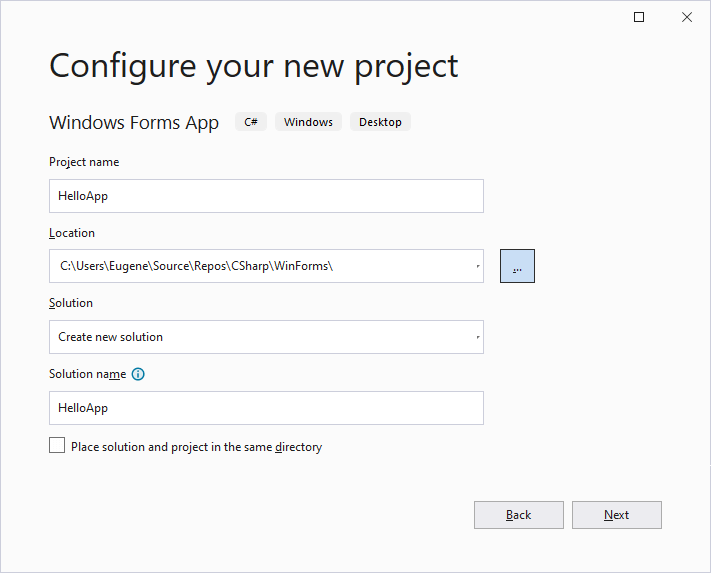
В поле Project Name дадим проекту какое-либо название. В моем случае это HelloApp.
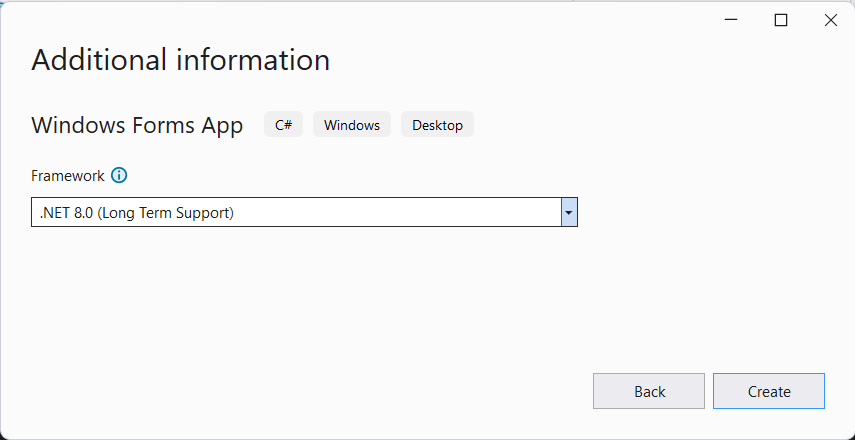
На следующем окне Visual Studio предложит нам выбрать версию .NET, которая будет использоваться для проекта. Выберем последнюю на данный момент версию — .NET и нажмен на кнопку Create (Создать) для создания проекта.
После этого Visual Studio откроет наш проект с созданными по умолчанию файлами:
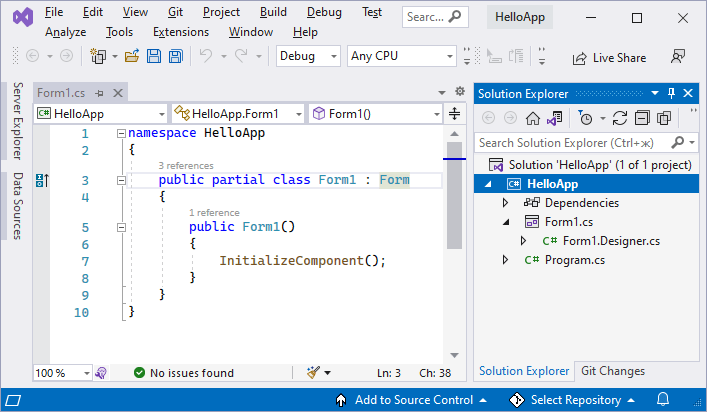
Справа находится окно Solution Explorer, в котором можно увидеть структуру нашего проекта. Практически этот тот же проект, который создается с
помощью .NET CLI:
-
Dependencies — это узел содержит сборки dll, которые добавлены в проект по умолчанию.
Эти сборки как раз содержат классы библиотеки .NET, которые будет использовать C# -
Form1.Designer.cs: он содержит определение компонентов формы, добавленных
на форму в графическом дизайнере -
Далее идет файл единственной в проекте формы — Form1.cs, который по умолчанию открыт в центральном окне.
-
Program.cs определяет точку входа в приложение
Запуск приложения
Чтобы запустить приложение в режиме отладки, нажмем на клавишу F5 или на зеленую стрелочку на панели Visual Studio.
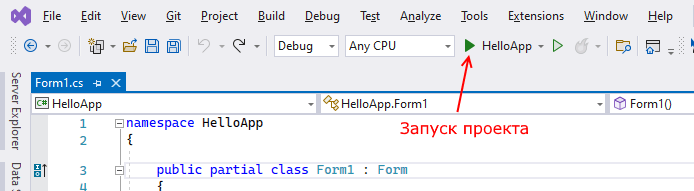
После этого запустится пустая форма Form1 по умолчанию.
После запуска приложения студия компилирует его в файл с расширением exe. Найти данный файл можно, зайдя в папку проекта и далее в каталог
\bin\Debug\net8.0-windows
Рассмотрев вкратце создание проекта графического приложения, мы можем перейти к обзору основных компонентов и начнем мы с форм.
Prerequisites
- Visual Studio 2022
- TX Text Control .NET for Windows Forms
Step 1: Create a New Project
- Open Visual Studio 2022.
- Click on «Create a new project».
- From the options, select C# under Languages, Windows under Platform, and Desktop under Project Type.
- Scroll to find the Windows Forms App template.
- Select it and click Next.

Step 2: Name Your Project and Choose the Framework
- Enter a project name and click Next.
- Select your Framework version as .NET 6 (Long-term support) and click Create.

Step 3: Install the Required NuGet Package
- Right-click the project in Solution Explorer.
- Select Manage NuGet Packages from the context menu.
- Choose Text Control Offline Packages as the package source, then click Browse.
- Find TXTextControl.TextControl.WinForms.SDK and click Install.

Step 4: Add the Text Control to Your Form
- In Solution Explorer, open Form1.
- In the Toolbox, find the TX Text Control 32.0 tab.
- Select the TextControl icon and draw it onto the Windows form.

Step 5: Customize the Text Control
- Click the Smart Tag in the upper right corner of TextControl.
- In the Wizards group, click on:
- Add a Button Bar
- Add a Status Bar
- Add a Ruler
- Add a Vertical Ruler
- Finally, click Arrange Controls Automatically.

The controls will now be connected and docked to fill the container.

Step 6: Build and Compile
- Click the Start button to build and compile the project.
- The application will start and the Text Control will be displayed on the form.
Conclusion
In this tutorial, you learned how to create a new Windows Forms application in Visual Studio 2022 and how to add a Text Control to the form. You also learned how to customize the Text Control by adding a Button Bar, Status Bar, Ruler, and Vertical Ruler. Finally, you built and compiled the project to see the Text Control in action.
Windows Forms
Text Control combines the power of a reporting tool and an easy-to-use WYSIWYG word processor — fully programmable and embeddable in your Windows Forms application. TX Text Control .NET for Windows Forms is a royalty-free, fully programmable rich edit control that offers developers a broad range of word processing features in a reusable component for Visual Studio.
See Windows Forms products
Related Posts
Getting Started with Windows Forms (.NET Framework)
by Bjoern Meyer| September 1, 2022
This article shows how to use the TX Text Control .NET for Windows Forms TextControl class within a .NET Framework (4.8) application in Visual Studio 2022.
Getting Started with Windows Forms (.NET 5 and better)
by Bjoern Meyer| September 1, 2022
This article shows how to use the TX Text Control .NET for Windows Forms TextControl class within a .NET 6 application in Visual Studio 2022.
New Getting Started Article Hub Launched
by Bjoern Meyer| July 11, 2022
We just launched a new getting started article hub that helps to find articles, samples, and tutorials by filtering by types, technologies and Text Control components.
Creating Your First Windows Forms Application with C#
by Bjoern Meyer| January 1, 2020
This Windows Forms tutorial shows how to create your first desktop application with C# using TX Text Control .NET for Windows Forms.
In this article, we’ll learn How to how to create a Windows Forms Application in Visual Studio with C#.
Create a New Project
First, you’ll create a C# application project. The project type comes with all the template files you’ll need, before you’ve even added anything.
On the Create a new project window, choose the Windows Forms App (.NET Framework) template for C#.
(If you prefer, you can refine your search to quickly get to the template you want.)
In the Configure your new project window, type or enter HelloWorld in the Project name box. Then, choose Create.
After you select your C# project template and name your file, Visual Studio opens a form for you. A form is a Windows user interface.
On the left-hand side of Visual Studio, you will also see a ToolBox. The toolbox contains all the controls which can be added to a Windows Forms. Controls like a text box or a label are just some of the controls which can be added to a Windows Forms.
Example 1 : Add Two Numbers in C# Windows Form Application.
The following example creates a C# windows Form application with two text boxes, one button,four label controls. When user enters two numbers in to first two text boxes and clicks on button1 then sum has to be calculated for those two numbers and display the result in label4.
Step 1:
Create a windows application and design the form as follows.
Open Visual Studio ->File -> New Project ->Visual C#-> select Windows Forms Application
Give the name of the application and click on OK.
Step 2:
Set the following properties for the controls on the form.
label1 >> Text: First Number
label2 >> Text: Second Number
label3 >> Text: Result
label4 >> Text: Name: lblResult
button1 >> Text: Sum Name: btnSum
textBox1>> Name: txtNumber1
textBox2>> Name: txtNumber2
Step 3:
Double click on the sum button and write the following code in the click event of that button to calculate sum and display the result in result textbox.
|
private void btnSum_Click(object sender, EventArgs e) { int num1, num2, sum; num1=Convert.ToInt32(txtNumber1.Text); num2 = Convert.ToInt32(txtNumber2.Text); sum = num1 + num2; lblResult.Text = sum.ToString(); } |
Output:
Example 2: MessageBox.Show Method in C#
MessageBox is a class in C# and Show is a method that displays a message in a small window in the center of the Form. MessageBox is used to provide confirmations of a task being done or to provide warnings before a task is done. Create a Windows Forms app in Visual Studio and add a button on it. Something like this below.
Let’s say, you want to show a message on a button click event handler. Here is the code for that.
Note: By default the OK Button will be shown.
MessageBox with Title
The following code snippet creates a simple MessageBox with a title.
|
string message = «Simple MessageBox»; string title = «Title»; MessageBox.Show(message, title); |
MessageBox with Buttons
A MessageBox can have different button combinations such as YesNo and OKCancel. The MessageBoxButtons enumeration represents the buttons to be displayed on a MessageBox and has following values.
- OK
- OKCancel
- AbortRetryIgnore
- YesNoCancel
- YesNo
- RetryCancel
The following code snippet creates a MessageBox with a title and Yes and No buttons. This is a typical MessageBox you may call when you want to close an application. If the Yes button is clicked, the application will be closed. The Show method returns a DialogResult enumeration.
|
string message = «Do you want to close this window?»; string title = «Close Window»; MessageBoxButtons buttons = MessageBoxButtons.YesNo; DialogResult result = MessageBox.Show(message, title, buttons); if (result == DialogResult.Yes) { this.Close(); } else { // Do something } |
MessageBox with Icon
A MessageBox can display an icon on the dialog. A MessageBoxIcons enumeration represents an icon to be displayed on a MessageBox and has the following values.
- None
- Hand
- Question
- Exclamation
- Asterisk
- Stop
- Error
- Warning
- Information
The following code snippet creates a MessageBox with a title, buttons, and an icon.
|
string message = «Do you want to abort this operation?»; string title = «Close Window»; MessageBoxButtons buttons = MessageBoxButtons.AbortRetryIgnore; DialogResult result = MessageBox.Show(message, title, buttons, MessageBoxIcon.Warning); if (result == DialogResult.Abort) { this.Close(); } elseif(result == DialogResult.Retry) { // Do nothing } else { // Do something } |
MessageBox with Default Button
We can also set the default button on a MessageBox. By default, the first button is the default button. The MessageBoxDefaultButton enumeration is used for this purpose and it has the following three values.
- Button1
- Button2
- Button3
The following code snippet creates a MessageBox with a title, buttons, and an icon and sets the second button as a default button.
|
string message = «Do you want to abort this operation?»; string title = «Close Window»; MessageBoxButtons buttons = MessageBoxButtons.AbortRetryIgnore; DialogResult result = MessageBox.Show(message, title, buttons, MessageBoxIcon.Warning, MessageBoxDefaultButton.Button2); if (result == DialogResult.Abort) { this.Close(); } elseif(result == DialogResult.Retry) { // Do nothing } else { // Do something } |
Example 3: Calculate Area and Perimeter of a Rectangle Using C# Windows Form Application
In this example, we’ll learn How to calculate area and perimeter of a rectangle in C# WinForm. To find the area of a rectangle or a square you need to multiply the length and the width of a rectangle.
Form Design:
Source Code:
|
private void button1_Click(object sender, EventArgs e) { int width = Convert.ToInt32(txtWidth.Text); int length = Convert.ToInt32(txtLength.Text); int area = width * length; int perimeter = (width + length) * 2; lblPerimeter.Text = «Perimeter : « + perimeter; lblArea.Text = «Area : « + area; } |
Output:
Example 4:
July 25, 2023
1 min read
views 8029
Arthur C. Codex
chats: 7
Engineering
.Net
In this tutorial, we will walk through the process of creating a Windows Forms Application using .NET. This is a step-by-step guide aimed at helping both novice and experienced developers understand the process.

Prerequisites
- .NET SDK installed on your machine.
- Visual Studio IDE.
Step 1: Create a New Windows Forms Application
Open Visual Studio, and select ‘Create a new project’. In the project template selection screen, choose ‘Windows Forms App (.NET)’.
Step 2: Name Your Project
Give your project a meaningful name and location on your machine to save it. Click ‘Create’ to proceed.
Step 3: The Project Structure
Visual Studio will generate a project structure for you, with ‘Program.cs’ as the entry point of the application.
Step 4: Adding Controls to the Form
Open ‘Form1.cs’ and design your form by dragging and dropping controls from the Toolbox onto the form.
Step 5: Writing Code
Double-click on a button control to enter the code view. We will add a simple code snippet to display a message box when the button is clicked.
  private void button1_Click(object sender, EventArgs e)
  {
    MessageBox.Show("Hello, World!");
  }
Step 6: Running the Application
Press F5 or click on ‘Start Debugging’ to run the application. When you click the button, a message box should be displayed.
Conclusion
That’s it! You’ve created a simple Windows Forms Application with .NET. With this fundamental knowledge, you can start building more complex applications. If you need to hire .NET remote developers, don’t hesitate to contact Reintech!
If you’re interested in enhancing this article or becoming a contributing author, we’d love to hear from you.
Please contact Sasha at [email protected] to discuss the opportunity further or to inquire about adding a direct link to your resource. We welcome your collaboration and contributions!
Glossary
Visual Studio IDE
Visual Studio IDE is a powerful development environment created by Microsoft. It supports multiple programming languages like C#, C++, and Visual Basic. It’s widely used for creating web applications, mobile apps, and games. It offers features such as IntelliSense (code completion), debugging tools, and Git integration. Learn more on the official Visual Studio website.
Windows Forms App
Windows Forms (WinForms) is a free and open-source graphical (GUI) class library included as a part of Microsoft’s .NET Framework or Mono Framework, providing a platform to write rich client applications for desktop, laptop, and tablet PCs.
For more information, check out the official Microsoft documentation.
.NET SDK
The .NET SDK, or Software Development Kit, is a set of tools, libraries, and documentation that developers use to create applications for the .NET platform. It includes the .NET runtime for running applications, an application host for launching apps, and the dotnet command-line interface (CLI) for creating, building, testing, and managing .NET apps. For more information, visit the official .NET download page.