
What is SFTP?
SFTP is a well known Secure File Transfer Protocol among IT folks and developers, used for integration and automation purposes. Part of its charm is that it enables remote access and file transfer within or between organizations, including the accessing, transferring and managing of files over a reliable data stream.
What does «mapping a drive» mean?
Drive mapping provides a shortcut to access a network resource, through the assignment of a drive letter to a remote share. The resource is stored on a different device, while behaving as any other local hard drive file. To access it, you can simply select a local drive from Windows Explorer and the resource will appear in My Computer and Windows Explorer.
Run and Monitor Scheduled Tasks on your Favorite Apps
Cron To Go simplifies the monitoring, alerting, and management of your cron jobs’ performance, uptime, and status — ensuring seamless operation.
Why should I map SFTP as a drive on Windows 11?
Mapping SFTP as a drive allows you to work with a remote file system as if it were a local disk drive, eliminating the nuisance of working with files stored on remote servers by enabling you to access them as if they were on your computer quickly and easily.
Mapping 101
Don’t have an SFTP server? Set one up quickly with SFTP To Go.
Cloud FTP with maximum security and reliability
SFTP To Go offers managed cloud storage service — highly available, reliable and secure. Great for companies of any size, any scale.
- Install the latest version of WinFsp. Download the .msi file from here and then open it to install.
- Install the latest version of SSHFS-Win. Download the .msi file that is compatible with your Windows installation (32 or 64 bit) and then open it to install.
- We also recommend installing SSHFS-Win manager. It lets you easily manage one or more connections as well as create a connection using private/public key authentication. Download and run the .exe file from here to install.
Now that you’ve got all of the required foundations laid out, you can start mapping your SFTP servers as Windows drives.
If you haven’t installed SSHFS-Win Manager, follow these steps to map your SFTP server using user/password authentication:
- Open your Windows Explorer and right click
This PC.
-
Click Map network drive… and in the dialog that opens, choose your drive letter.
-
In the folder input, type your user name and host name in the following pattern:
\\sshfs\[sftpuser]@[sftphost].
For example:\\sshfs\mary@companysftp.com.
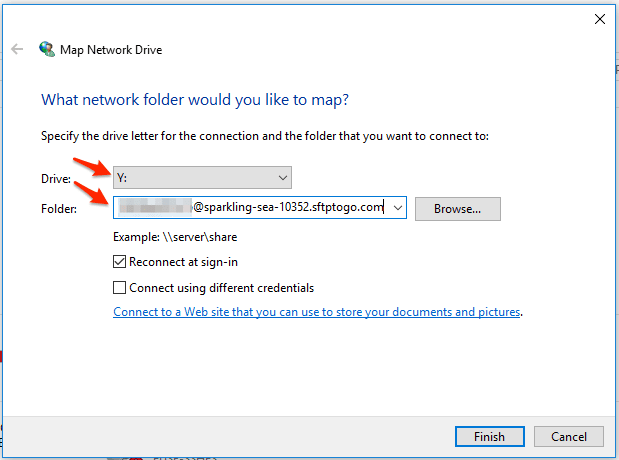
- Click
Finishand in the next dialog enter your password. - The new drive letter should now show up in your Windows Explorer and you can use it to access your SFTP server.
If you’d like to use private/public key authentication, we recommend following these steps with SSHFS-Win Manager:
- Open SSHFS-Win manager and add a new connection by clicking
Add Connection, entering all of the required connection details. Then, clickSave.
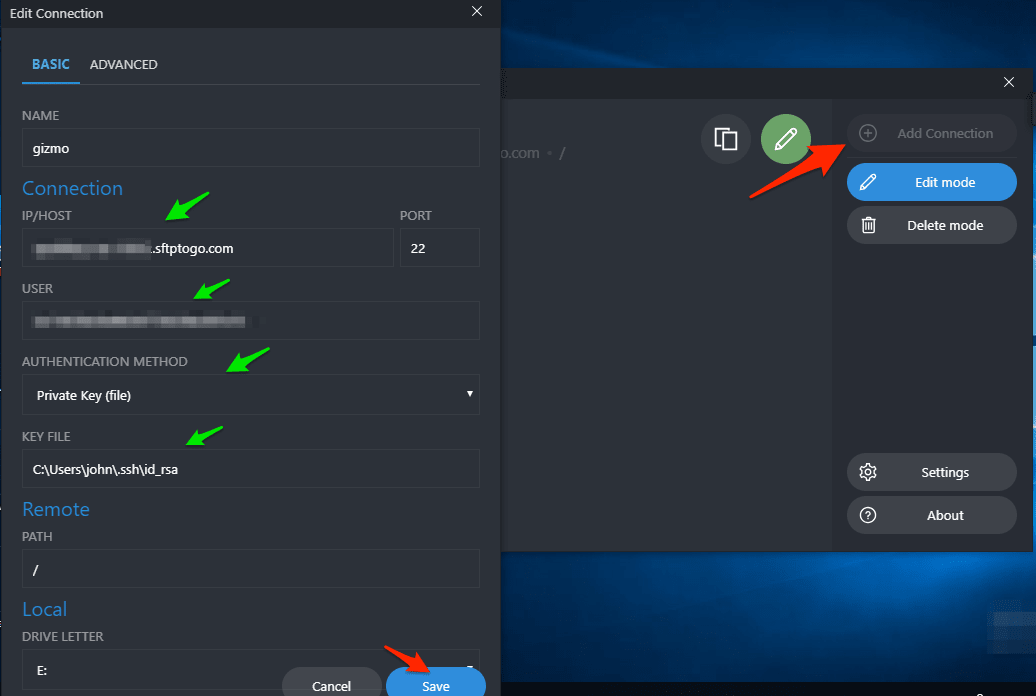
- Click the connection to start it.
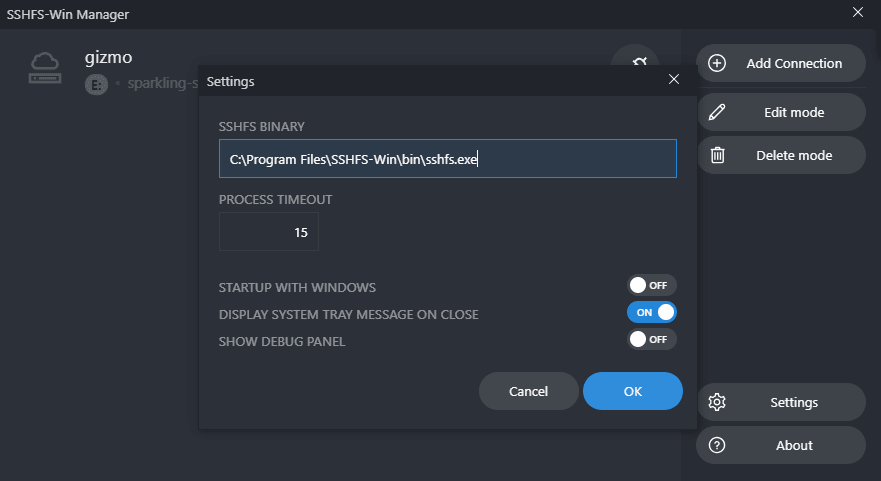
- If the connection doesn’t start and there are no error messages, click
Settingsand ensure that the path to SSHFS Binary is set correctly. Continue to try starting the connection again.
Unmapping SFTP on Windows
- Open your Windows Explorer.
- Right click your mapped drive and click
disconnect.
And you’re done! Fairly easy, right? Now go on and enjoy your easy access to files hosted on SFTP servers!
Cloud FTP with maximum security and reliability
SFTP To Go offers managed cloud storage service — highly available, reliable and secure. Great for companies of any size, any scale.
Post photo by Timo Wielink on Unsplash
You’ve successfully subscribed to SFTP To Go: Managed SFTP Cloud Storage as a Service
Welcome back! You’ve successfully signed in.
Great! You’ve successfully signed up.
Success! Your email is updated.
Your link has expired
Success! Check your email for magic link to sign-in.
Sign in to your How-To Geek account
Quick Links
-
Why Do I Want to Do This?
-
Installing and Configuring Swish
If you frequently access a remote SFTP directory, you know all too well what a hassle it is to work only via stand-alone SFTP client. Read on to see how easy it is to integrate the remote directory into Windows Explorer.
Why Do I Want to Do This?
Opening up a dedicated SFTP client for the occasional file transfer isn’t much of a hassle, but if you’re frequently accessing a remote directory for purposes such as uploading torrent or NZB files to a watch directory, making frequent changes to files on a web server, or otherwise frequently hopping in and out of the remote location, it can be a real pain to constantly connect and reconnect the dedicated client.
Today, we’re highlighting how easy it is to integrate secure remote access into Windows Explorer so that accessing and transferring files is as simple as opening up My Documents.
What Do I Need?
For this tutorial you’ll need the following things:
- A Windows-based PC
- A copy of Swish (free)
- An SFTP account to test your connection
A note on our methods: since Windows 2000, Windows has supported direct FTP access through Windows Explorer. You can simply type ftp://username@example.com in any Windows Explorer address bar and then plug in your password to access a remote FTP host.
The problem with this setup, though it works quite smoothly, is that FTP is inherently insecure, and except for basic file transfers of publicly available data (like grabbing a Linux distro), it should be avoided. Further compounding the whole security issue is that Windows has no built in mechanism for establishing an SFTP connection—this is where Swish comes in.
Installing and Configuring Swish
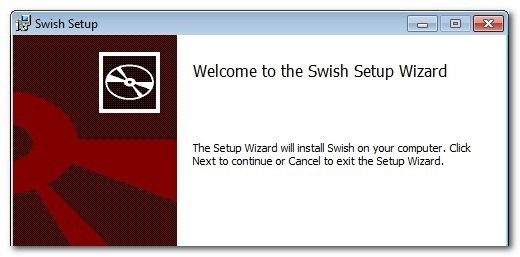
The installation process for Swish is your typical and straight forward installation. Run the installer, accept the license agreement, confirm the installation location, and let it rip.
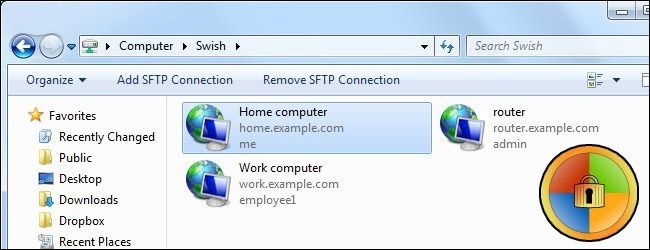
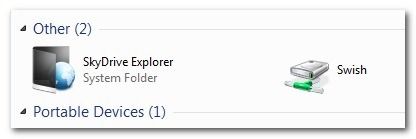
After the application is installed, it will appear as if not a whole lot has happened. In order to see the addition Swish has made to your system, navigate to My Computer. There you will see an entry under «Other» for Swish:
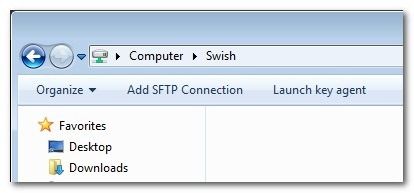
Double click on the entry to enter into the Swish network directory. There are two buttons not typically found in Explorer «Add SFTP Connection» and «Launch key agent». Of primary importance to us it the SFTP connection button; if you’re connecting to a server that uses public key authentication, however, you’ll also want to be aware of the «Launch key agent» button as it executes Pageant, a free key agent application included with Swish.
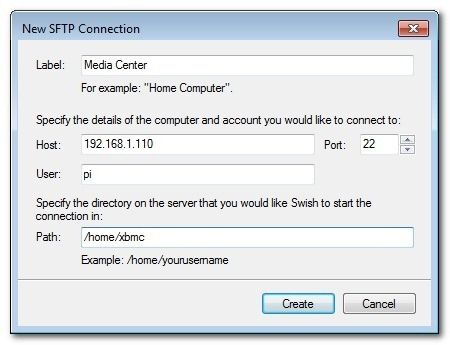
Click «Add SFTP Connection» and fill out the information for your host:
Click create, and check that a new entry exists in the Swish directory:
When you click on an entry for the first time you’ll be prompted to approve the SSH key for that connection:
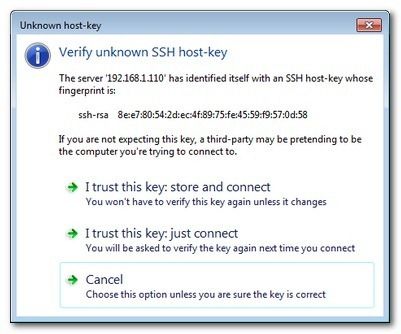
Click «I trust this key: store and connect» and then, when prompted, enter your password. You will only need to enter your password once; it will be stored along with your approved SSH key for easy and speedy future access to your remote directory.
After approving the key and entering your password, you’re in business:
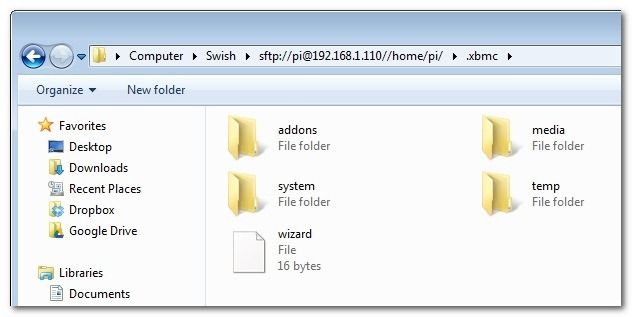
You now have proper and integrated access to your remote SFTP directory from within Windows Explorer. You can open files, copy files, and otherwise work with your remote files as if they were local to your machine.
Have a cool Explorer integration tip to share, SFTP related or otherwise? Join the conversation below to share your tip.
Swish
What is Swish?
Swish is a plugin for Microsoft Windows Explorer that adds support for SFTP.
If you’ve used Explorer’s built-in FTP support, Swish is that but for SFTP
over SSH.
Supported Operating Systems
- Windows 8 (most tested)
- Windows 7 (occasionally tested)
- Windows Vista (rarely tested)
Swish may also work on Windows XP, but we haven’t tested that in a while.
Binaries
Binary installers are on our website.
Getting involved
We welcome patches to help improve Swish.
Swish fetches almost all its dependencies when you configure it with CMake.
That magic happens thanks to the Hunter package manager. However, you will
need Perl installed. Strawberry Perl is good, and available on Chocolatey.
You’ll also need a compiler (obviously), a recent version of the Windows SDK
and CMake.
Licensing
This program is free software: you can redistribute it and/or modify
it under the terms of the GNU General Public License as published by
the Free Software Foundation, either version 3 of the License, or (at
your option) any later version.
This program is distributed in the hope that it will be useful, but
WITHOUT ANY WARRANTY; without even the implied warranty of
MERCHANTABILITY or FITNESS FOR A PARTICULAR PURPOSE. See the GNU
General Public License for more details.
You should have received a copy of the GNU General Public License
along with this program. If not, see http://www.gnu.org/licenses/.
If you modify this Program, or any covered work, by linking or
combining it with the OpenSSL project’s OpenSSL library (or a modified
version of that library), containing parts covered by the terms of the
OpenSSL or SSLeay licenses, the licensors of this Program grant you
additional permission to convey the resulting work.
Why have an exception for OpenSSL?
The OpenSSL library is incompatible with the GPL license because it
contains an advertising clause. However lots of useful, open source
software (including our own projects) need to use it and currently the
alternatives aren’t quite up to scratch. As we want these projects to
be able to reuse Washer, we have added this exception to the GPL — a
common technique used by other projects such as wget.
If GnuTLS improves to the point where OpenSSL is no longer
necessary, we may remove this exception.
Transferring files and data between machines is critical for developers and IT administrators. However, traditional protocols like FTP have major security flaws that open dangerous loopholes. The Secure File Transfer Protocol (SFTP) eliminates these gaps with strong encryption, file integrity checks and authentication.
In this comprehensive expert guide, we dive deep into the complete process for setting up seamless SFTP access in Windows Explorer.
Why SFTP is Essential: Advantages Over FTP
Let‘s first understand why SFTP should always be preferred over the insecure FTP protocol:
Encryption and Security
All data transferred over FTP is in plain text. This means anyone in the network can intercept usernames, passwords and sensitive data using packet sniffers.
SFTP encrypts all traffic with strong ciphers like AES-256, RSA-3072 etc. making it impossible to decipher. Even capturing packets will not reveal actual file contents.
FTP protocol security: None

SFTP protocol security: 256-bit AES, RSA 3072-bit keys
File Integrity Checks
SFTP uses checksums with each file transfer to prevent data corruption. This guarantees 100% accurate delivery without losses or errors:
FTP file integrity checks: None

SFTP file integrity checks: SHA-1, MD5 checksums
Failing transfers are automatically resumed from the last point instead of having to restart.
Authentication and Access Controls
FTP has essentially no authentication outside of a username and password. No auditing capabilities exist for tracking access or file actions.
SFTP enforces:
- Public-key infrastructure (PKI) based authentication
- Configurable access permissions at user/group level
- Complete audit logs with every file operation
Admins can strictly control who does what.
Adoption Rates Growing Rapidly
According to surveys, SFTP usage has shot up exponentially while FTP usage has plummeted:
| Year | % SFTP Usage | % FTP Usage |
|---|---|---|
| 2015 | 18% | 63% |
| 2018 | 34% | 44% |
| 2022 | 58% | 15% |
Trend shows SFTP rapidly replacing FTP completely in near future.Most developers now consider SFTP the de-facto standard for file transfers.
SFTP Server Options for Windows
A variety of SFTP server solutions exist for Windows. Evaluating our needs, we find the SolarWinds FREE SFTP/SCP Server to be an ideal fit:
SolarWinds FREE SFTP/SCP Server
A free Windows SFTP server used by over 500,000 administrators. Key highlights:
Features
- Easy setup and configuration
- Active Directory integration
- Virtual folders and user isolation
- Bandwidth throttling
- Transfer logging/reporting
Security
- AES-256 + RSA-4096 encryption
- SSH key exchange protection
- Custom public keys
Administration
- User and permission management
- Automated user creation
- Scheduled automated transfers
The free version easily handles 5 simultaneous connections with 2GB bandwidth per user. Fits perfectly for our tutorial.
Some other options reviewed:
- Bitvise SSH Server: Advanced paid solution with enterprise features. Overkill for our needs.
- Rebex Tiny SFTP Server: Lacks advanced controls. 30-day trialware.
- WinSSHD: Open-source but very limited capabilities.
After comparing the pros and cons, SolarWinds FREE SFTP/SCP Server is the best platform for us.
With the foundations set, let‘s move on to the SFTP connection steps.
Step 1 – Install and Configure SFTP Server
We install and set up the SolarWinds SFTP application:
1. Download
Get the installer from Solarwinds Free SFTP/SCP Server and run.
2. Open Server Console
The console provides options to configure SFTP settings:
3. Set SFTP Port
Default is 22. Can modify if needed:
Settings > SFTP > TCP/IP Profile > Port4. Allow Program in Firewall
Critical or connections fail!
Windows Defender Firewall > Allow an app > C:\Program Files\SolarWinds\SolarWindsSFTPServer.exe5. Add Inbound Firewall Rule
Open the specified port. We use 22:
New-NetFirewallRule -DisplayName "SFTP Inbound" -Profile @("Domain", "Private", "Public") -Direction Inbound -Action Allow -Protocol TCP -LocalPort 226. Create SFTP User
Set permissions and folder access:
SolarWinds SFTP > Users > Create NewThe server configuration is now complete!
We map the SFTP path on Windows Explorer to access remote files:
1. Launch Windows Explorer
File Explorer is used to connect SFTP:
2. Enter Connection String
Map a drive with the following syntax:
sftp://username:password@hostname:port/path For example:
sftp://john:pass123@ftpserver.company.com:22/users/john/3. Permanently Save Credentials
Use «Connect using different credentials» to save credentials permanently:
The account details are now securely stored and mapped.
4. Transfer Files Over SFTP
We can now seamlessly transfer data through the mapped SFTP drive!
Advanced Tip
For faster transfers, enable «Use Buffer Size» under File Explorer > View > Options > Advanced settings.
Troubleshooting Common SFTP Issues
If facing connection problems, some things to check:
| Issue | Troubleshooting Steps |
|---|---|
| Authentication Failed | – Confirm account credentials – Verify user permissions – Check SSH keys if enabled |
| Timed Out | – Server unavailable – Network blocking port 22 – Firewall blocking traffic |
| Connection Refused | – SFTP server not running – Invalid host address |
| Slow Transfer Speed | – Enable buffer settings – Check network bandwidth |
Following structured troubleshooting, most problems can be quickly identified and resolved.
Securing SFTP Servers
With exponential growth in cyberattacks, keeping SFTP servers secure is critical:
Some expert-recommended best practices include:
Infrastructure Security
- Place SFTP behind firewall at subnet level
- Minimum OS hardening and disable unused services
- Disable root SSH/SFTP access to prevent 0-day exploits
Access Control
- Use SSH keys instead of just password authentication
- Implement 2-factor authentication (2FA)
- Restrict failed login attempts to 3-5 maximum
Activity Monitoring
- Check auth/security system and kernel logs
- Use intrusion detection software
- Integrate with central SIEM system for threat analytics
User Security Training
With up to 90% breaches caused by human error like phishing, strong security training is vital to prevent compromises.
By implementing defensive measures proactively, SFTP infrastructure can provide robust protection against evolving cybersecurity threats.
Conclusion
Setting up and connecting Secure FTP in Windows Explorer provides developers an easy yet powerful file transfer system with military-grade security, reliability and flexibility. Seamless drag and drop functionality coupled with automated mappings makes routine data exchange effortless.
As threats accelerate, transitioning from outdated protocols like FTP to SFTP futureproofs infrastructure against emerging attack vectors like sniffing, tampering and exploits. Carefully implementing access controls and activity monitoring takes this protection to the next level.
Combined with security best practices tailored for SFTP servers, both confidentiality and integrity of critical data can be maintained in alignment with industry security compliance standards.
With this expert guide, you should have a strong handle on configuring robust SFTP connectivity across Windows systems and hardening them against security risks! Let me know if you need any clarification or have additional questions.
With the Windows Explorer and a little Trick you can access in just a few steps to an SFTP Server. How to do this, we will show you in this practical tip.
SFTP-Server: Using Windows Explorer to access it
Latest Videos
SFTP , unlike FTP, an encrypted connection, and builds a single direct connection between the Client and the Server. Thus, the connection between you and your Server is more secure than using FTP. The file transfer is running instead via SSH — the Server must support for this, according to SSH.
- With Windows Explorer you can restore since Windows 7 is very easy to connect to an FTP Server. For SFTP, you need a Tool to allow this Swish:. Download the installer for Swish-SFTP , download and install it.
- Start Windows Explorer and navigate to «This PC».
- Under «devices and drives» is displayed in addition to your drives now also a «Swish» drive. You can open it with a double click.
- Now select in the row above the button «SFTP-add connection».
- It is a small window in which you can access to specify data for your Server opens. The default Port for SFTP is 22. This can be in your case, however, different. Information you receive from your Provider. Fill in all the fields and confirm with «Create“.
- In the folder «Swish» is displayed after successful dial-in to the newly created SFTP Server. You can open this with a double click.
- When you first Open, you must first confirm that you trust the Server, and then enter your password. You confirm this with «OK»
- Now the specified folder on the SFTP Server, and you have secure access to your files.