Настройка собственного DNS сервера вам может потребоваться в случае, если ваш хостинг-провайдер и регистратор домена не предоставляют NS сервера для привязки домена, либо вам самостоятельно необходимо контролировать настройки и записи DNS.
Данная инструкция будет актуальна для ОС Windows Server версии 2012 — 2022.
- Добавление роли «DNS-сервера»
- Создание первичной зоны «DNS-сервера»
- Добавление «DNS-записей»
- Проверка работоспособности
Добавление роли «DNS-сервера»
Откройте «Server Manager».
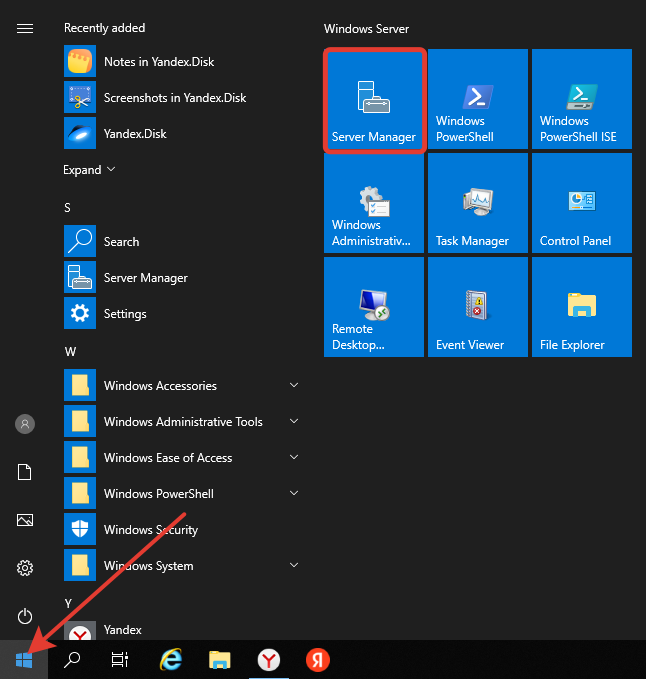
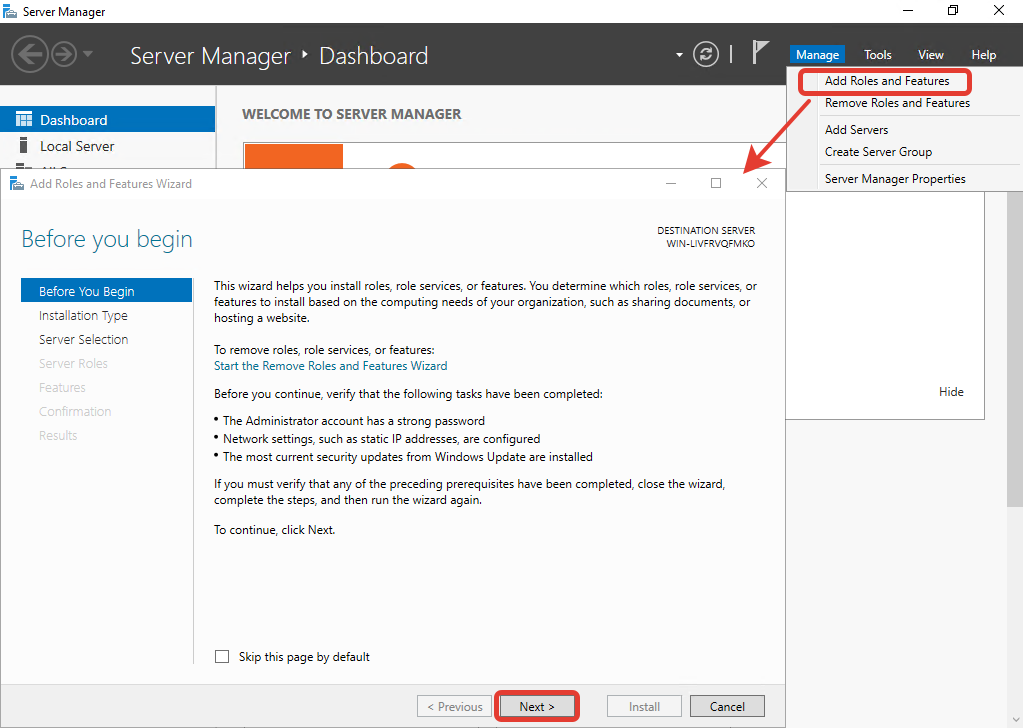
В правом верхнем меню выберите «Manage» > «Add Roles and Features». В появившемся окне нажмите «Next».
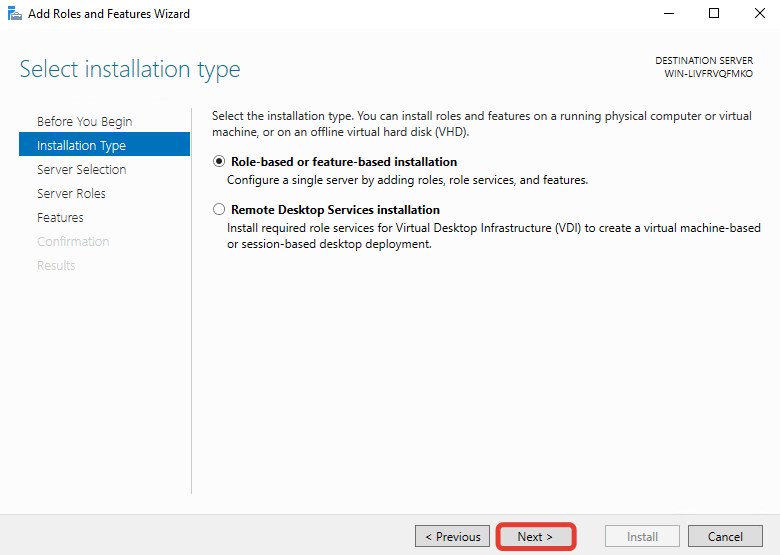
Далее убедитесь, что выбран пункт «Role-based or feature-based installation» и нажмите «Next».
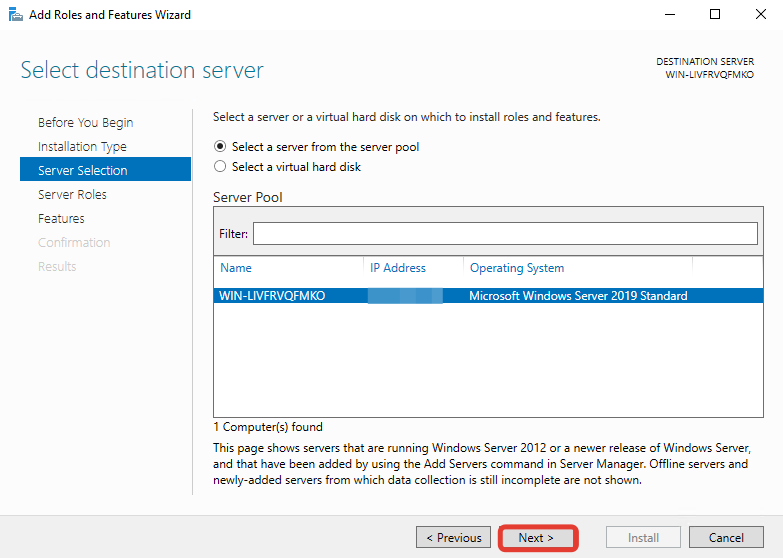
В окне выбора сервера установки ничего не меняйте и нажмите «Next».
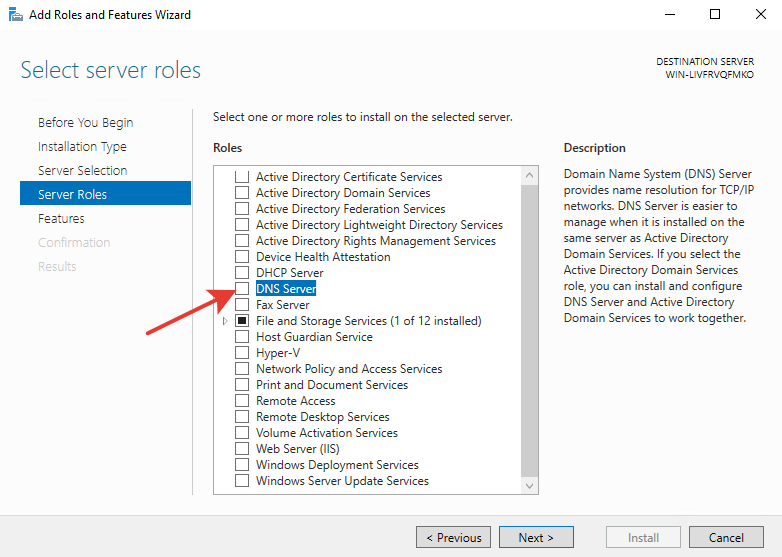
В окне выбора роли поставьте галочку на пункте «DNS Server».
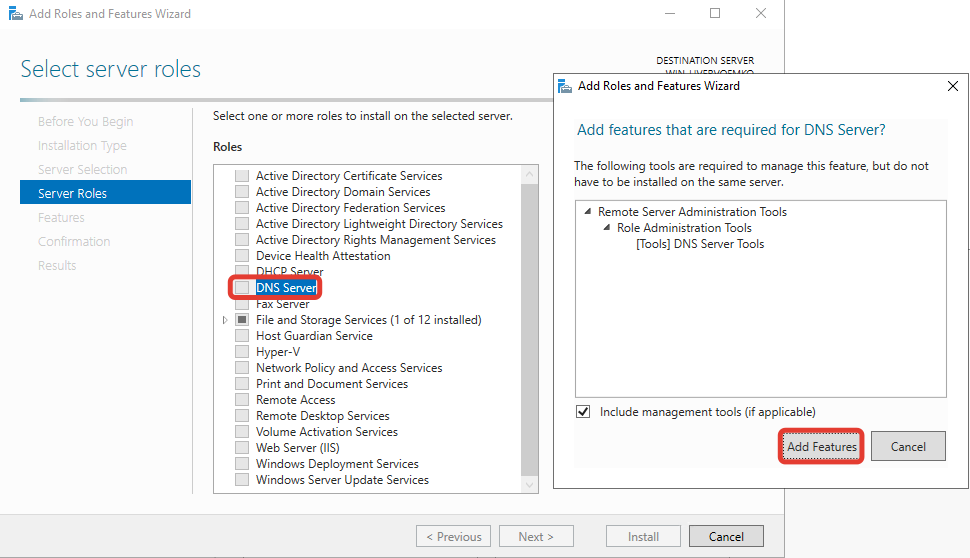
В появившемся окне согласитесь с добавлением утилит, нажав на кнопку «Add Features».
Нажмите кнопку «Next».
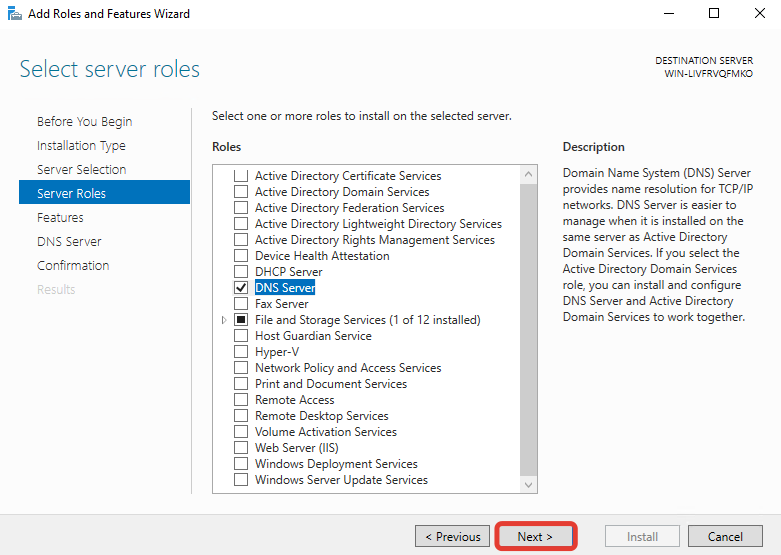
Далее ничего не меняйте, нажмите кнопку «Next».
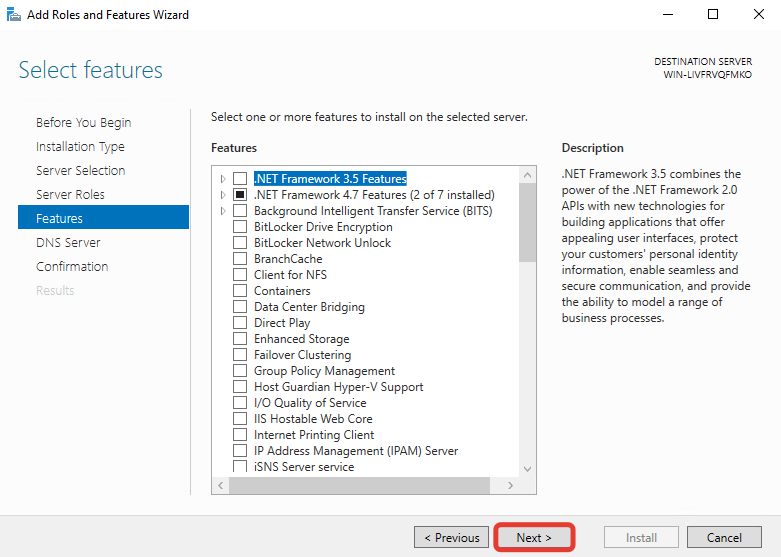
Нажмите «Next».
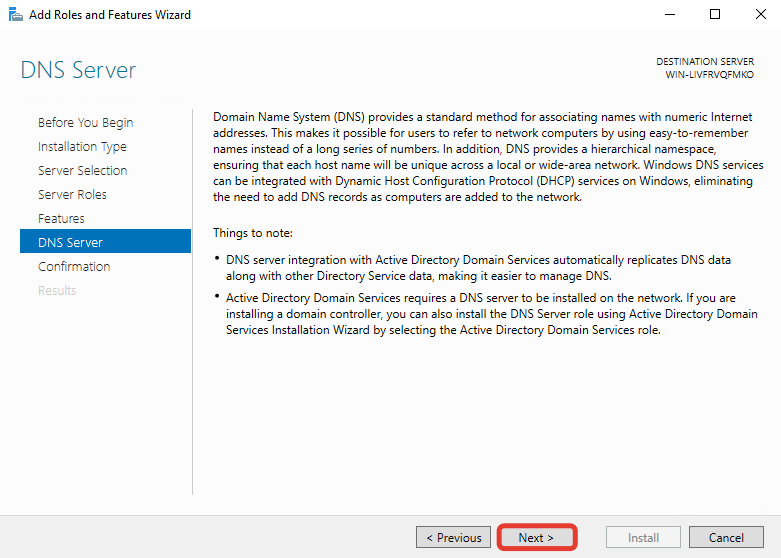
Далее для начала установки нажмите кнопку «Install».
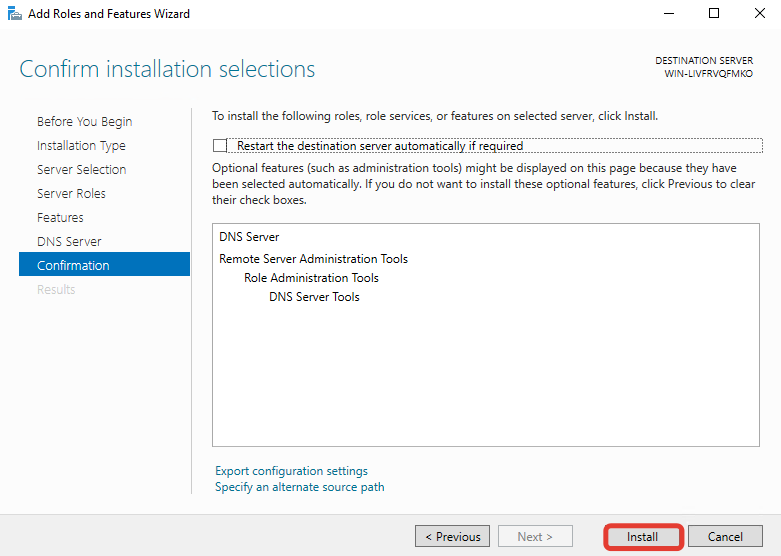
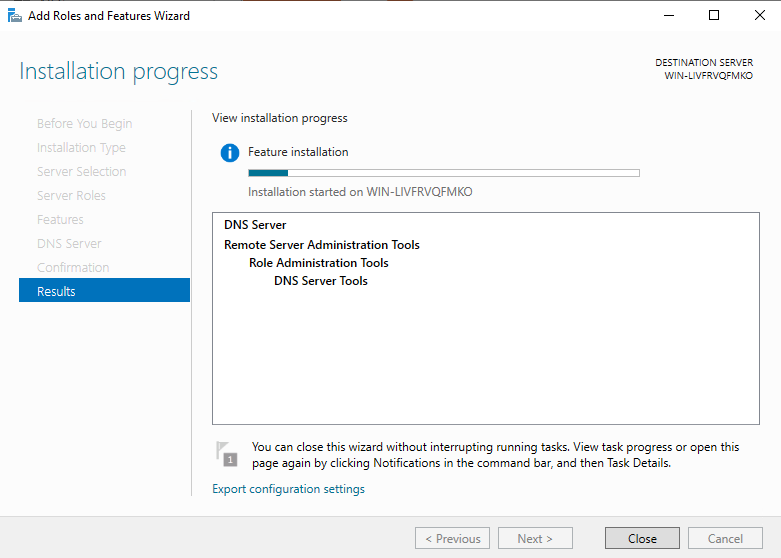
Ждём завершения установки роли «DNS Server».
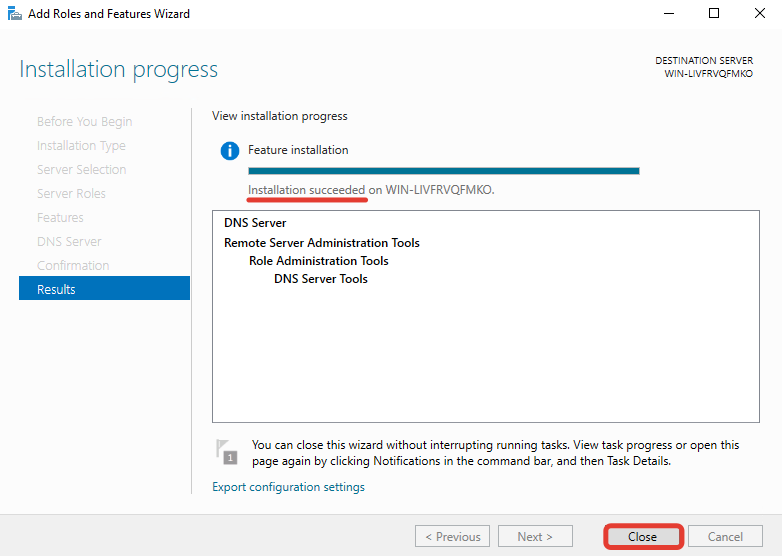
Как только увидите надпись о завершении установки «Installation succeeded», закройте окно, нажав «Close».
Создание первичной зоны «DNS-сервера»
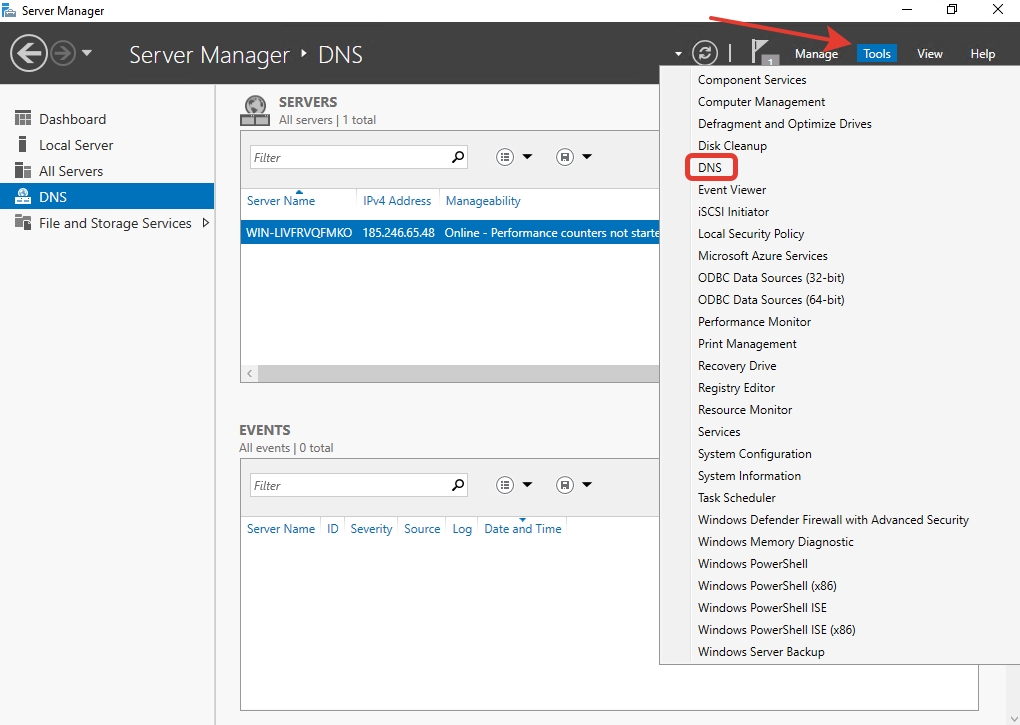
Возвращаемся в «Server Manager», в правом верхнем углу наведите курсор на «Tools» и выберите пункт «DNS».
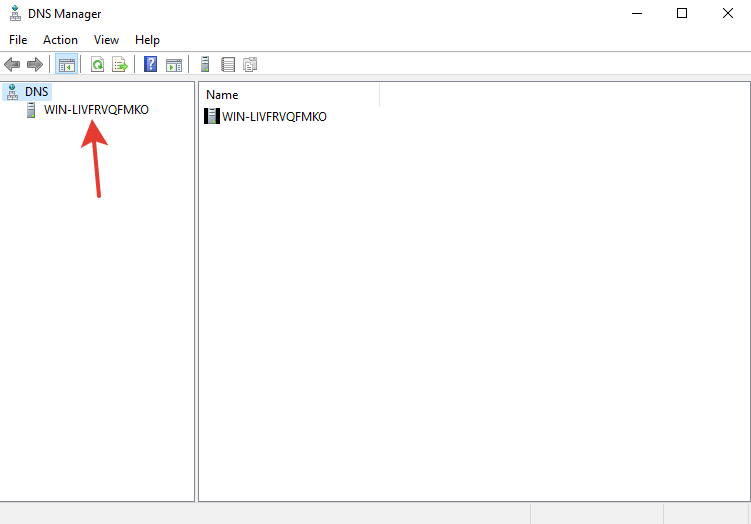
Двойным кликом выберите ваш сервер, в данном случае это «WIN-LIVFRVQFMKO».
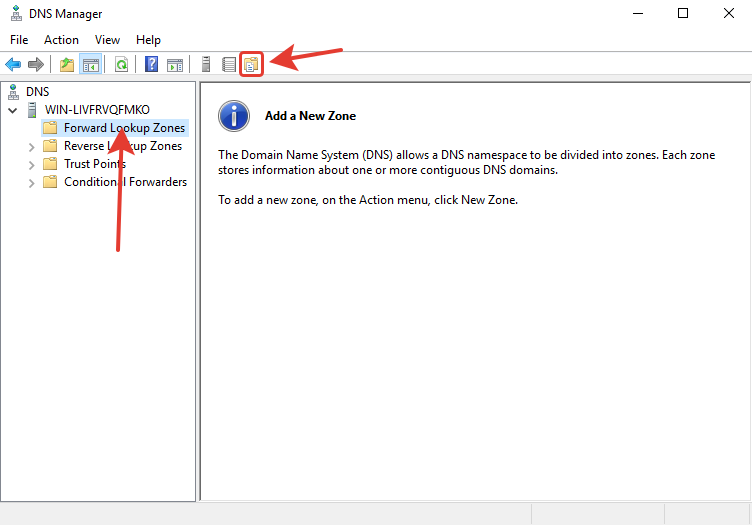
Выберите «Forward Lookup Zones» и нажмите кнопку «New Zone».
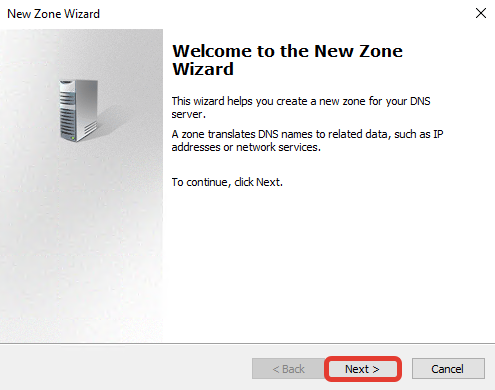
Нажмите «Next».
Выберите первичный тип зоны «Primary zone», нажмите «Next».
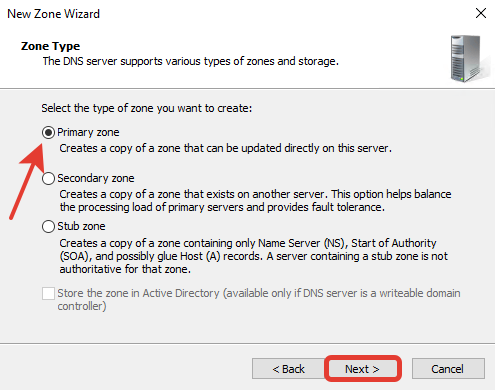
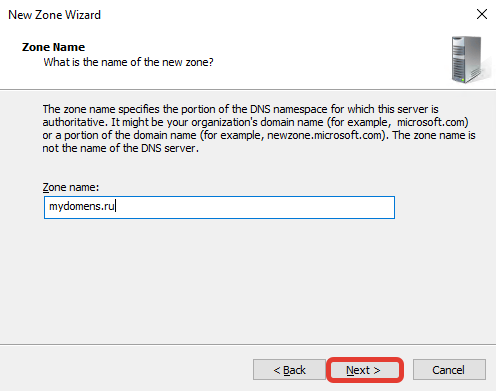
В поле «Zone name» введите имя домена, на основе которого будут создаваться DNS сервер, нажмите «Next».
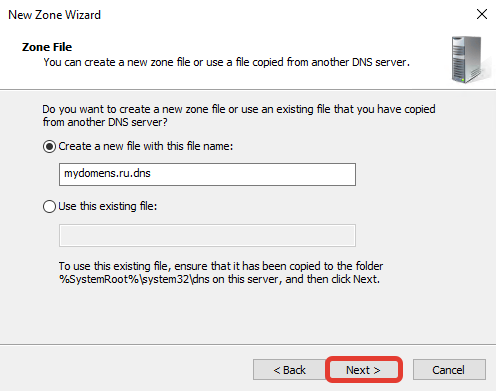
При необходимости поменяйте название создаваемого файла зоны, нажмите «Next».
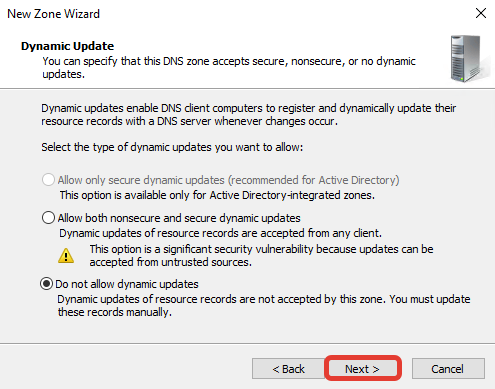
Выберите «Do not allow dynamic updates», чтобы запретить динамическое обновление зоны для повышения безопасности, нажмите «Next».
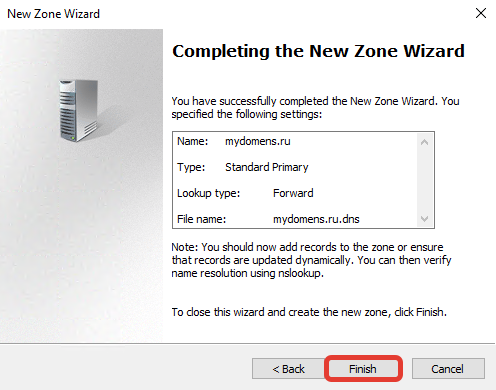
Нажмите «Finish».
Добавление «DNS записей»
Выберите зону созданного домена и нажмите кнопку «New Record». Далее выберите из предложенного списка пункт «Host (A or AAAA)» для привязки домена к IP-адресу и нажмите кнопку «Create Record…».
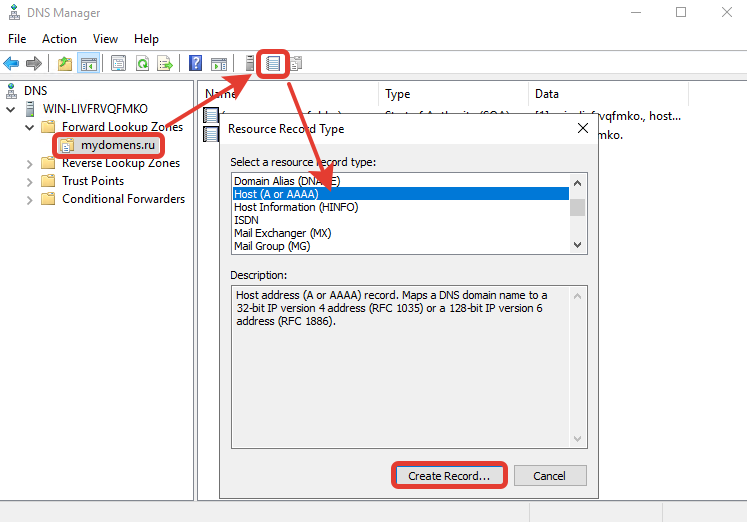
В появившемся окне добавьте «А» записи для основного домена зоны. Для этого поле «Name» оставьте пустым (в данном случае «А» запись будет добавлена для основного домена зоны mydomens.ru). В поле «IP address» введите IP, куда должен быть привязан домен. После нажмите кнопку «Add Host».
Остальные записи типа «А» добавляются по тому же принципу. Добавим для примера запись для домена mail.mydomens.ru. В поле «Name» введите имя поддомена mail, в поле «IP address» введите IP-адрес.
Все добавленные записи вы можете видеть в списке DNS записей зоны.
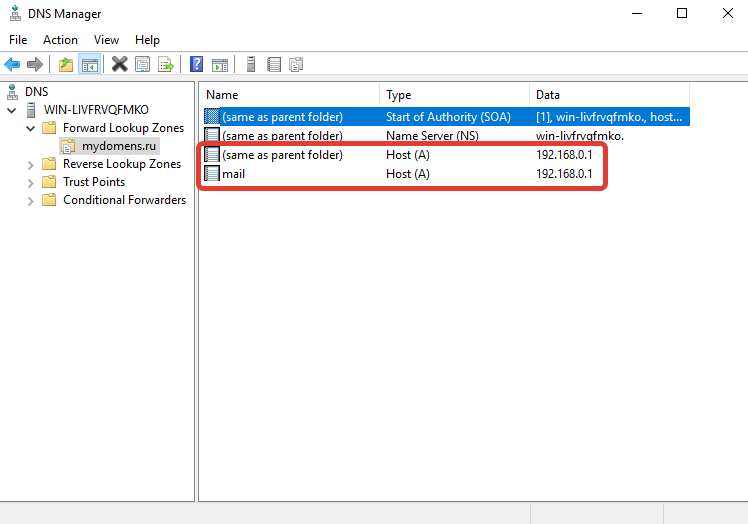
Добавьте все необходимые «А» записи для доменов. Обязательно добавьте «А» записи для NS адресов в том же соответствии, как они указаны у регистратора домена:
ns1.mydomens.ru\192.168.1.1
ns2.mydomens.ru\192.168.1.2
Далее отредактируйте запись типа «Name Server (NS)». Для этого выберите запись в списке, она создана по умолчанию, после нажмите кнопку «Properties».
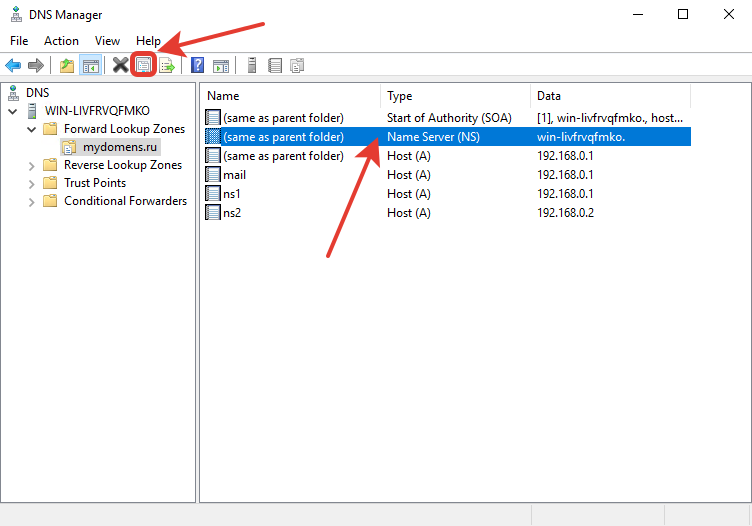
В появившемся окне выделите имеющуюся запись из списка и нажмите кнопку «Edit…».
В первом поле введите имя NS адреса, ниже введите соответствующий ему IP, после нажмите «Enter» на клавиатуре, далее нажмите кнопку «OK».
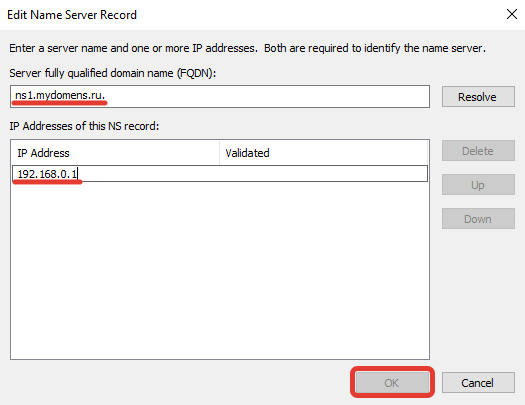
Далее добавьте второй NS, для этого нажмите кнопку «Add…».
Введите соответствующие данные в поля и нажмите кнопку «ОК».
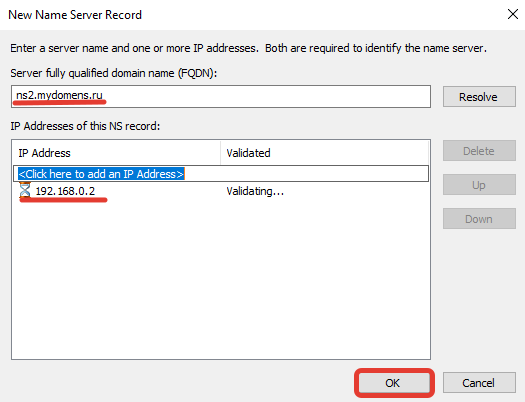
Проверьте, что все NS записи добавлены верно, и нажмите кнопку «ОК».
Отредактируйте «SOA» запись.
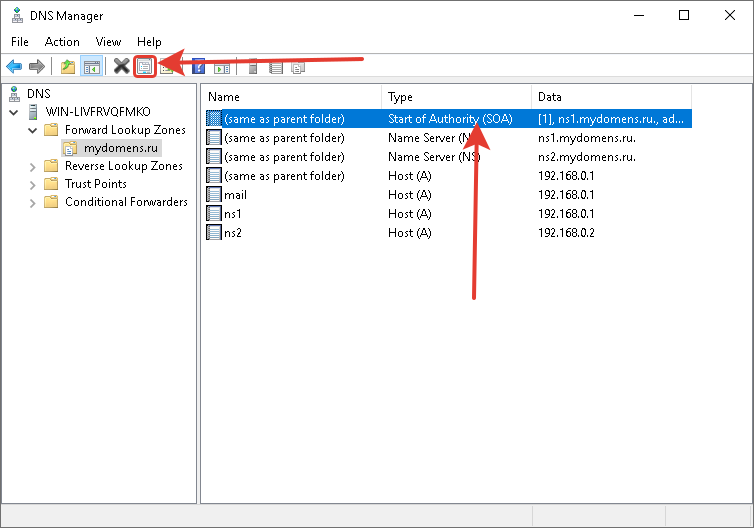
В поле «Primary server» введите первичный NS адрес вашей DNS зоны. В поле «Responsible person» введите email адрес ответственного лица зоны DNS, вместо знака @ поставьте точку. Далее нажмите кнопку «ОК».
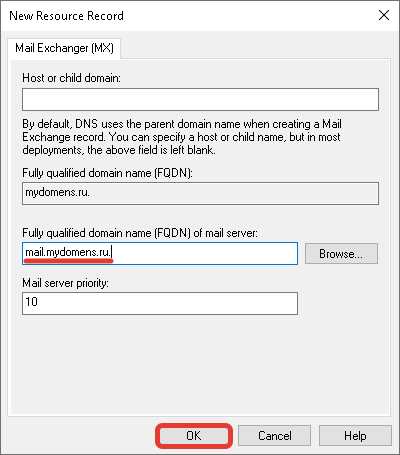
Добавьте «MX» запись для указания сервера, на который будет приходить почта на домен.
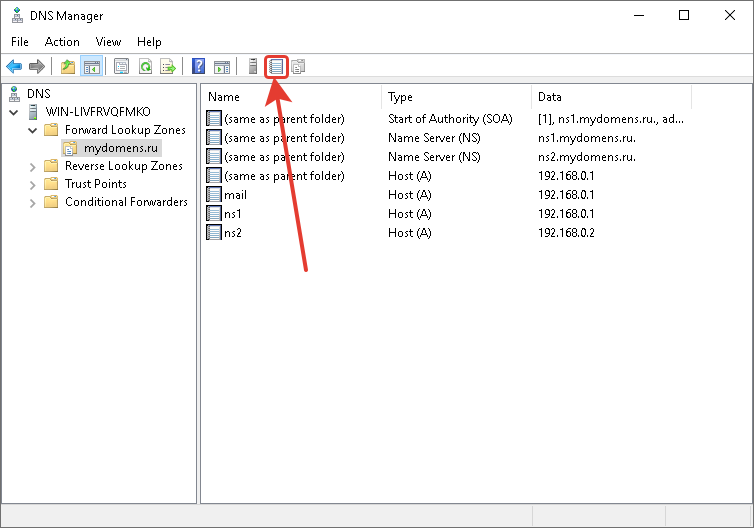
В окне выбора типа записи выберите «Mail Exchanger (MX)».
Если добавляете запись для основного домена зоны, поле «Host» оставьте пустым. В поле «mail server» введите доменное имя почтового сервера, куда будет пересылаться почта для домена.
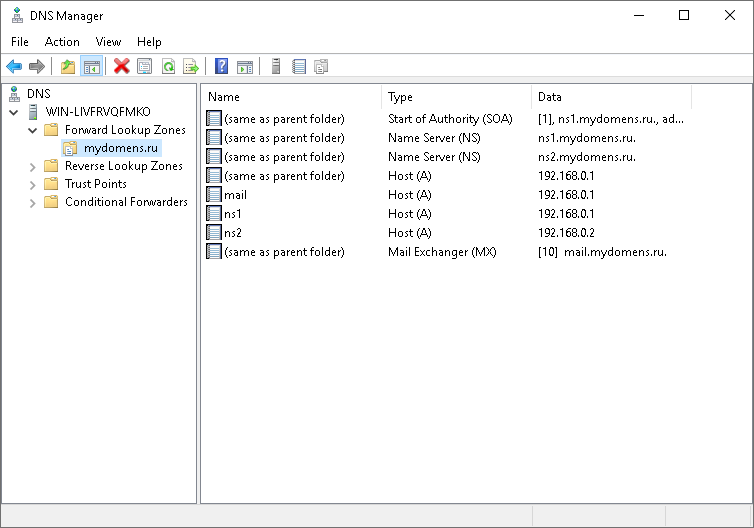
После выполнения всех настроек у вас должен получится примерно следующий перечень записей.
Проверка работоспособности
Для проверки вы можете воспользоваться командной строкой CMD или PowerShell, сторонними ресурсами для проверки DNS записей, например https://2whois.ru/?t=dig.
После выполнения запроса записей зоны вы должны получить соответствующую запись запрошенную с DNS сервера. При запросе записи типа ANY, с сервера будут отданы все имеющиеся DNS записи домена. Для примера рассмотрим два варианта проверки, через PowerShell и на сайте 2whois.ru.
PowerShell
Для проверки используйте следующий синтаксис команды: nslookup -type=ANY имя_домена IP_сервера
После выполнения соответствующей команды вы увидите сервер, с которого получена информация, и соответствующий перечень записей, добавленных вами ранее.
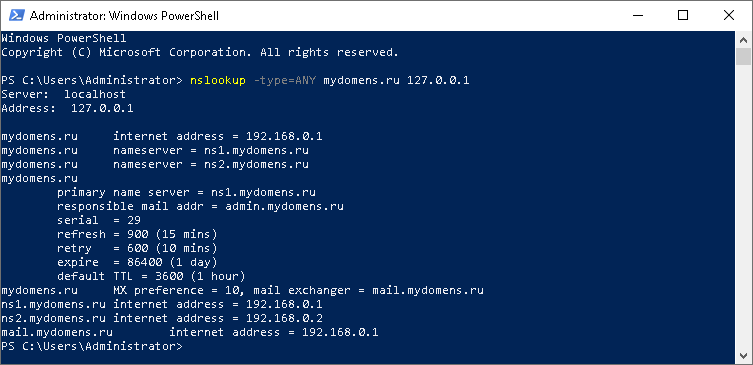
В случае если запрашиваемые записи не удалось получить, проверьте введенную команду, если введено всё верно, но записи не отдаются, обратитесь в службу поддержки вашего сервера.
Онлайн сервис 2whois.ru
Для проверки работы DNS сервера на сайте https://2whois.ru/ выберите вкладку DIG, далее в поле «Домен или IP» введите имя домена, который вы добавляли ранее. В поле «DNS сервер» введите IP адрес сервера, на котором вы выполняли настройки. В поле «Тип записи» выберите «ANY» для получения всех записей доменной зоны. После нажмите кнопку «DIG».
После получения результата проверки в секции «ANSWER SECTION» вы увидите перечень записей, добавленных ранее на сервер, это будет означать, что DNS сервер функционирует и работает корректно.
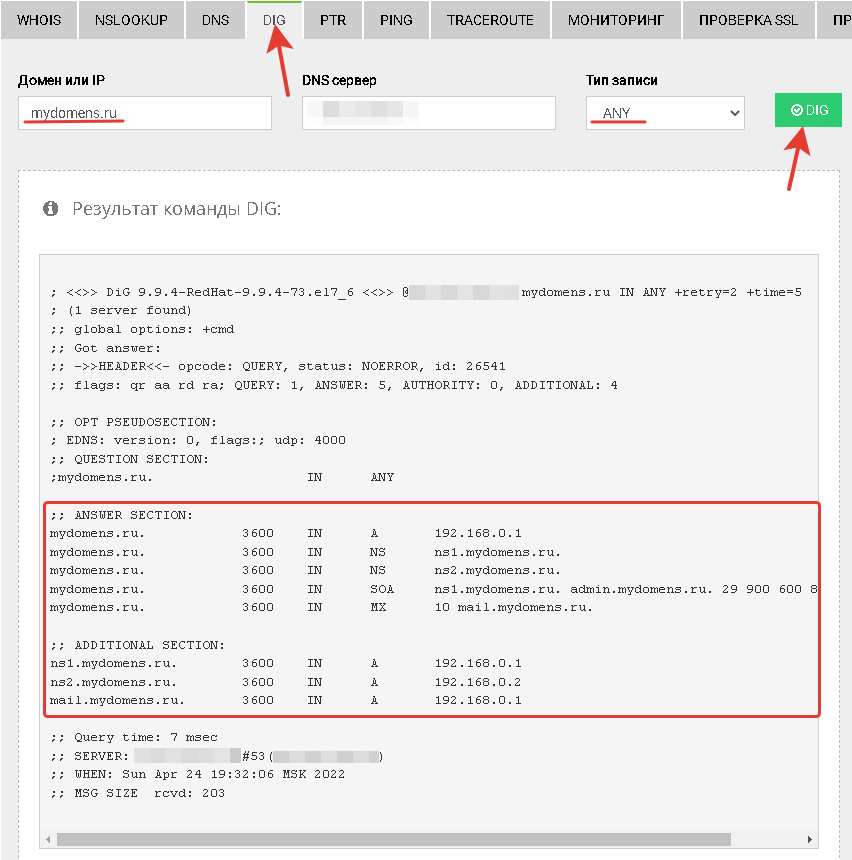
Если добавленных ранее записей в данной секции не появится, обратитесь в службу поддержки вашего сервера.
Салимжанов Р.Д
Part 3 Basic Configuration of Windows Server 2019(DNS, AD)
Salimzhanov R.D.
Во второй части, мы рассмотрели, как провести настройку удаленного доступа и установку необходимых служб, таких как, DHCP-сервер.
Сейчас мы рассмотрим настройку DNS-сервера и Active Directory (AD).
Мы знаем, что DNS-сервер — это технология интернет-протокола, которая переводит человеко-читаемые доменные имена в IP-адреса компьютеров, чтобы обеспечить связь между ними. DNS (Domain Name System) серверы хранят базы данных доменных имен и их соответствующих IP-адресов, позволяя пользователям получить доступ к веб-сайтам и другим ресурсам в интернете по их доменным именам.
А если простыми словами, то DNS сервер работает по принципу.
После ввода названия какого-либо сайта в браузер:
1) Запрос, который ввел пользователь переадресуется на DNS-сервер.
2) Интернет-провайдер настраивает на своем сетевом оборудовании локальные DNS-серверы. Далее сервер DNS ищет записи о соответствии запрашиваемого домена IP-адресу.
3) По IP-адресу устройство ищется во всемирной паутине.
4) Если оно найдено, запрос обрабатывается и возвращается ответ. В итоге пользователь видит запрошенный сайт.
5) Если не удалось определить IP-адрес устройства, пользователь получает сообщение об ошибке.
Настройка DNS-сервера внутри компании имеет несколько важных целей:
1. Управление именами: Внутренний DNS-сервер позволяет управлять именами хостов и служб внутри сети, что упрощает доступ к ресурсам.
2. Ускорение доступа: Локальный DNS-сервер может значительно ускорить разрешение имен, так как запросы не нужно отправлять на внешние серверы.
3. Безопасность: Внутренний DNS-сервер позволяет контролировать и фильтровать запросы, что может повысить уровень безопасности сети.
Перейдем к настройке, следуем инструкции в скринах:
Создадим зону DNS:
Обратная зона DNS (Reverse DNS Zone) используется для преобразования IP-адресов в доменные имена. Это обратный процесс по сравнению с обычным DNS, где доменное имя преобразуется в IP-адрес. То есть простыми словами мы присвоим имя нашему серверу для пинга с пользовательского ПК.
DNS и Active Directory (AD) являются взаимосвязанными технологиями, поскольку Active Directory зависит от DNS для обеспечения разрешения имен компьютеров и других сетевых ресурсов.
В среде Windows-сервера Active Directory использует DNS для регистрации и поиска устройств, служб и других ресурсов в сети. Когда компьютер присоединяется к домену Active Directory, он автоматически регистрирует свое имя и IP-адрес в службе DNS. Это позволяет другим компьютерам в сети находить и общаться с ним по его имени вместо IP-адреса.
Таким образом, DNS и Active Directory тесно интегрированы для обеспечения эффективной и безопасной работы сети в среде Windows.
Настроим Active Directory (AD):
Создание дополнительных папок (или контейнеров) в Active Directory (AD) позволяет организовать и управлять объектами более эффективно. К примеру, нам это пригодится, когда будем настраивать групповую политику.
Добавляем пользователя в раздел User:
Далее переходим на другой ПК подключений к нашему серверу и подключаемся через нашего созданного пользователя:
Далее входим от пользователя.
Если выдает ошибку проверьте подключение:
После входа автоматически перезагружается ПК.
После перезагрузки входим под созданного пользователя и работаем, если нужно что-то поменять в системе, то заходим от админа (созданного естественно заранее).
Теперь на сервере в подразделении компьютеров отображается подключение:
Если надо мы его можем перенести в другое нужное нам подразделение:
Следующая часть будет об управлении групповыми политиками.
1) Основные сведения об обратной зоне DNS // [электронный ресурс]. URL: https://learn.microsoft.com/ru-ru/azure/dns/dns-reverse-dns-overview / (дата обращения 16.08.2024).
2) Помощник Админа // [канал]. URL: https://t.me/channel_adminwinru (дата обращения 18.08.2024).
The Domain Name System (DNS) is a crucial component of the TCP/IP protocol suite that maps human-readable domain names to IP addresses. It enables seamless communication between computers on a network or the internet. In this guide, we’ll walk through the steps to install and configure a DNS Server on Windows Server 2019.
Prerequisites
Before proceeding, ensure that your Windows Server 2019 has a static IP address configured. A static IP address is required for the DNS Server to function correctly.
Step 1: Install the DNS Server Role
1. Open the Server Manager.
2. Navigate to the “Manage” menu and select “Add Roles and Features.”
3. In the “Add Roles and Features Wizard,” click “Next” until you reach the “Server Roles” page.
4. Select the “DNS Server” role from the list of available roles.
5. Click “Add Features” when prompted, and then click “Next.”
6. Proceed through the remaining prompts, confirming the installation selections.
7. Click “Install” to begin the installation process.
8. Wait for the installation to complete, and then click “Close.”
Step 2: Configure DNS Forward Lookup Zone
With the DNS Server installed, you can now configure a DNS Forward Lookup Zone. A Forward Lookup Zone requests the IP address that corresponds to a fully qualified domain name (FQDN). When you type a domain name like “example.com” in your browser, the DNS Forward Lookup Zone translates that FQDN to the IP address of the server hosting that site.
Follow these steps to add a DNS Forward Lookup Zone:
2. Right-click your server name and choose “New Zone…” to open the New Zone Wizard.
3. Click “Next” on the first Wizard screen.
4. Choose the “Primary Zone” option and click “Next.”
5. Select “Forward Lookup Zone” and click “Next.”
6. Enter the desired “Zone Name” for the lookup and click “Next.”
7. Specify a “Zone File” or use the auto-generated one, then click “Next.”
8. Configure dynamic updates if needed, or click “Next” to proceed.
9. Review the settings and click “Finish” to complete the New Zone Wizard.
10. Verify that your Forward Lookup Zone appears in the DNS Manager.
With the Forward Lookup Zone configured, you can now add DNS records for your domain names and their corresponding IP addresses.
Conclusion
You have successfully installed and configured a DNS Server on Windows Server 2019, including setting up a DNS Forward Lookup Zone. With the DNS Server up and running, you can now manage domain name resolution for your network or organization. Remember to follow best practices and keep your DNS Server updated with the latest security patches and updates.
Welcome to my ultimate guide on configuring Windows Server 2022 DNS! If you’re looking to set up a rock-solid DNS server, you’re in the right place. DNS is the backbone of any network, and getting it right is crucial. So, let’s dive in and see what it takes to configure Windows Server 2022 DNS like a pro.
Introduction to DNS and Windows Server 2022
First things first, let’s get a clear understanding of what DNS is. DNS, or Domain Name System, is like the phonebook of the internet. It translates human-readable domain names (like www.example.com) into IP addresses (like 192.0.2.1) that computers use to identify each other on the network. Windows Server 2022 brings a bunch of new features and improvements to the DNS service, making it more efficient and secure than ever before.
Why Choose Windows Server 2022 for DNS?
Windows Server 2022 is a powerhouse when it comes to DNS. It offers a ton of features that make it a great choice for both small businesses and large enterprises. Here are a few reasons why you might want to choose Windows Server 2022 for your DNS needs:
- Enhanced Security: Windows Server 2022 includes advanced security features like DNSSEC (DNS Security Extensions) to protect your DNS data from tampering and spoofing.
- Improved Performance: The latest version of Windows Server comes with performance improvements that make DNS queries faster and more efficient.
- Easy Management: The DNS management tools in Windows Server 2022 are user-friendly and intuitive, making it easy to configure and manage your DNS server.
Installing the DNS Server Role
Alright, let’s get our hands dirty. The first step in configuring Windows Server 2022 DNS is to install the DNS Server role. Here’s how you can do it:
- Open Server Manager from the Start menu.
- Click on Add roles and features.
- Select Role-based or feature-based installation and click Next.
- Choose your server from the server pool and click Next.
- Select the DNS Server role from the list of roles and click Next.
- Click Next through the Features, DNS Server, and Confirmation pages.
- Finally, click Install to begin the installation process.
Once the installation is complete, you can move on to the actual configuration.
Configuring DNS Server Settings
Now that the DNS Server role is installed, it’s time to configure the settings. Here’s what you need to do:
- Open the DNS Manager from the Start menu.
- In the DNS Manager, right-click on your server name and select Configure a DNS Server.
- Follow the prompts to set up your DNS server. You’ll need to provide information like the server’s IP address, the domain name, and any forwarders you want to use.
Remember, forwarders are DNS servers that your server will query if it can’t resolve a name itself. This can be useful for improving performance and reliability.
Creating and Managing DNS Zones
DNS zones are like containers that hold the DNS records for a particular domain. There are two types of zones you need to know about: forward lookup zones and reverse lookup zones.
- Forward Lookup Zones: These zones contain records that map domain names to IP addresses.
- Reverse Lookup Zones: These zones contain records that map IP addresses to domain names.
To create a new forward lookup zone, follow these steps:
- In the DNS Manager, right-click on Forward Lookup Zones and select New Zone.
- Follow the prompts to create the new zone. You’ll need to provide the zone name (which is usually the domain name) and select the zone type (usually Primary Zone).
To create a new reverse lookup zone, the process is similar:
- In the DNS Manager, right-click on Reverse Lookup Zones and select New Zone.
- Follow the prompts to create the new zone. You’ll need to provide the network ID for the zone and select the zone type.
Adding DNS Records
DNS records are the meat and potatoes of your DNS configuration. They contain the information that maps domain names to IP addresses. Here are some of the most common types of DNS records you’ll need to know about:
- A Records: These records map a domain name to an IPv4 address.
- AAAA Records: These records map a domain name to an IPv6 address.
- CNAME Records: These records map a domain name to another domain name.
- MX Records: These records specify the mail servers for a domain.
- PTR Records: These records map an IP address to a domain name (used in reverse lookup zones).
To add a new DNS record, follow these steps:
- In the DNS Manager, right-click on the zone you want to add the record to and select New [Record Type] (e.g., New Host (A or AAAA)).
- Fill in the required information for the record and click Add Host.
Configuring DNS Security (DNSSEC)
Security is a big deal when it comes to DNS. DNSSEC (DNS Security Extensions) is a set of extensions to DNS that provide security by enabling DNS responses to be validated. Here’s how you can configure DNSSEC on Windows Server 2022:
- In the DNS Manager, right-click on the zone you want to secure and select DNSSEC > Sign the Zone.
- Follow the prompts to sign the zone. You’ll need to provide information like the key signing key (KSK) and zone signing key (ZSK).
Remember, DNSSEC can be a bit complex, so make sure you understand the basics before diving in. There are plenty of resources online that can help you get up to speed.
Monitoring and Troubleshooting DNS
Once your DNS server is up and running, you’ll want to keep an eye on it to make sure it’s performing well. Windows Server 2022 includes a bunch of tools to help you monitor and troubleshoot your DNS server.
- DNS Manager: The DNS Manager includes a bunch of built-in tools for monitoring and troubleshooting. You can use it to view event logs, check the status of your zones, and more.
- PowerShell: PowerShell is a powerful scripting language that you can use to automate tasks and troubleshoot issues. There are plenty of PowerShell cmdlets available for managing DNS.
- Performance Monitor: Performance Monitor is a tool that you can use to track the performance of your DNS server. You can use it to monitor metrics like query volume, response time, and more.
Here’s a quick PowerShell script to check the status of your DNS zones:
Get-DnsServerZone | Select-Object ZoneName, ZoneType, DsIntegrated, DynamicUpdate, ScavengeServersAdvanced DNS Configuration
If you’re feeling adventurous, there are a bunch of advanced DNS configurations you can explore. Here are a few ideas to get you started:
- Conditional Forwarders: Conditional forwarders allow you to forward DNS queries to different DNS servers based on the domain name. This can be useful for improving performance and reliability.
- Stub Zones: Stub zones are like mini forward lookup zones that contain only the necessary records to resolve a domain name. They can be useful for improving performance and reducing the load on your DNS server.
- DNS Policies: DNS policies allow you to control how DNS queries are processed based on criteria like the client’s IP address, the query type, and more. This can be useful for implementing things like split-horizon DNS or geo-location-based DNS.
Best Practices for DNS Configuration
Configuring DNS can be a bit tricky, so it’s important to follow best practices to ensure everything runs smoothly. Here are a few tips to keep in mind:
- Keep It Simple: Don’t overcomplicate your DNS configuration. Keep it simple and straightforward to make it easier to manage and troubleshoot.
- Document Everything: Document your DNS configuration thoroughly. This will make it easier to troubleshoot issues and make changes in the future.
- Regularly Update: Keep your DNS server up to date with the latest security patches and updates. This will help protect your server from vulnerabilities and improve performance.
- Monitor and Test: Regularly monitor your DNS server and test your configuration to ensure everything is working as expected.
Conclusion
And there you have it—a comprehensive guide to configuring Windows Server 2022 DNS. I hope this guide has given you the confidence to set up and manage your own DNS server. Remember, DNS is a critical part of any network, so take the time to get it right. Follow the best practices, document everything, and regularly monitor your server to ensure it’s performing well.
If you have any questions or run into any issues, don’t hesitate to reach out. I’m always here to help!
FAQ
What is DNS and why is it important?
DNS, or Domain Name System, is a critical component of the internet that translates human-readable domain names into IP addresses that computers use to identify each other on the network. It’s important because it enables users to access websites and other online resources using easy-to-remember domain names instead of complex IP addresses.
How do I install the DNS Server role on Windows Server 2022?
To install the DNS Server role on Windows Server 2022, open Server Manager, click on Add roles and features, select Role-based or feature-based installation, choose your server from the server pool, select the DNS Server role, and follow the prompts to complete the installation.
What are DNS zones and how do I create them?
DNS zones are containers that hold the DNS records for a particular domain. There are two types of zones: forward lookup zones and reverse lookup zones. To create a new zone, open the DNS Manager, right-click on Forward Lookup Zones or Reverse Lookup Zones, and select New Zone. Follow the prompts to create the new zone.
How can I secure my DNS server?
To secure your DNS server, you can configure DNSSEC (DNS Security Extensions). DNSSEC provides security by enabling DNS responses to be validated. To configure DNSSEC, open the DNS Manager, right-click on the zone you want to secure, and select DNSSEC > Sign the Zone. Follow the prompts to sign the zone.
Install and Configure DNS Server on Windows Server. Surely, to install Domain Name System (DNS) on Windows Server is straightforward. Still, it is essential to understand DNS and how it works to set up a robust and effective DNS infrastructure. That includes installing DNS and creating and managing our first DNS records.
Installing and Configuring DNS in Windows Server
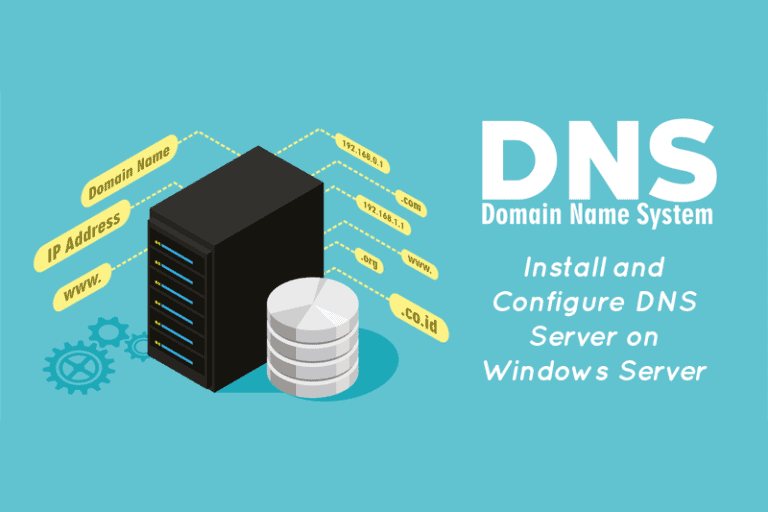
We know the Domain Name System and what it does, but we need to know how to install and configure DNS. For this article, we use the Windows Server 2012R2 DNS install process, which we also use for later builds like Windows Server 2016, 2019, and 2022.
Overview of the Domain Name System
All in all, a Domain Name is a human readable version of an IP address. Well, an IP Address is what every computer on the internet uses to address itself when communicating with other computers via the TCP/IP network protocol. IP (v4) addresses, for example, look like a series of numbers and decimal points, such as 192.168.1.12.
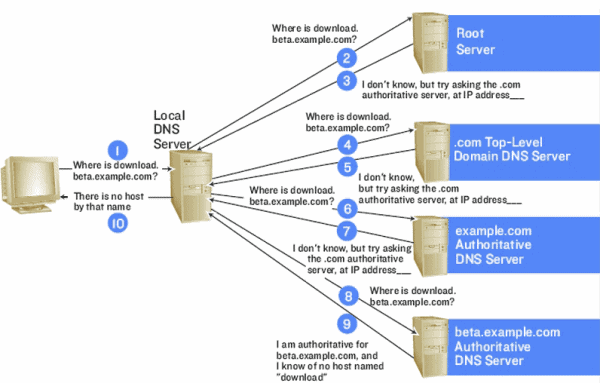
When users enter a domain name, such as www.infrasos.com, their browser communicates with a network of root domain name servers, which act as a reference book, providing the IP address associated with that domain name. The browser then communicates directly with the hosting server using that IP address.
Altogether, DNS serves as a go between, translating user requests into IP addresses. Without DNS, users need to memorize and enter long IP addresses when connecting to other websites, rather than simply typing in the website’s name.
Prerequisites
Before configuring our DNS, we must have the following information:
- Our domain name.
- The IP address and hostname of each server that we want to provide name resolution for.
Additionally, before we configure our computer as a DNS, we need to verify that the following minimum conditions are proper:
- A server running Windows Server 2012R2, 2016, 2019, or 2022 operating system and an open Remote Desktop Protocol (RDP) 3389 port.
- A domain user with appropriate administrative privileges in configuring the DNS.
- Minimum of 4 GB of RAM and 2-core CPU.
Installing the DNS Server Role
Basically, installing the DNS Server Role in Windows Server is a simple process that allows you to configure and manage a DNS server for your network. It involves adding the DNS server role to your Windows Server machine, configuring basic DNS settings, and creating and managing DNS records. First of all, log in as an administrator user to the Windows Server and follow the steps below to install the DNS server on our Windows Server:
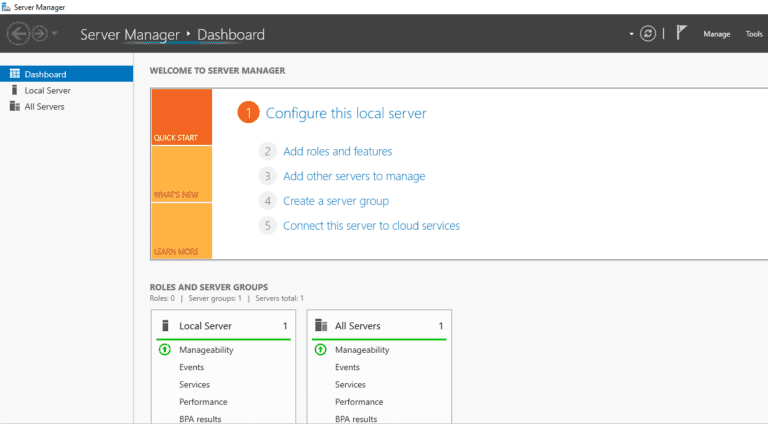
Step 1: Launch the Server Manager, as illustrated below:
Step 2: Select Add roles and features.
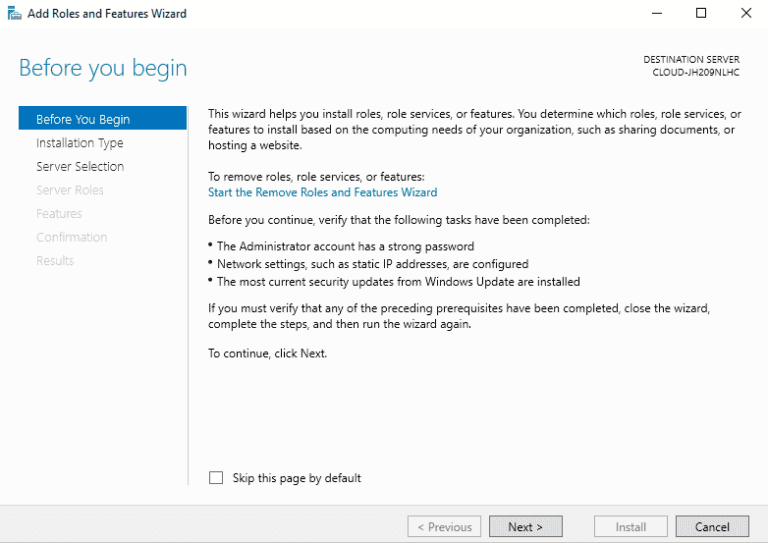
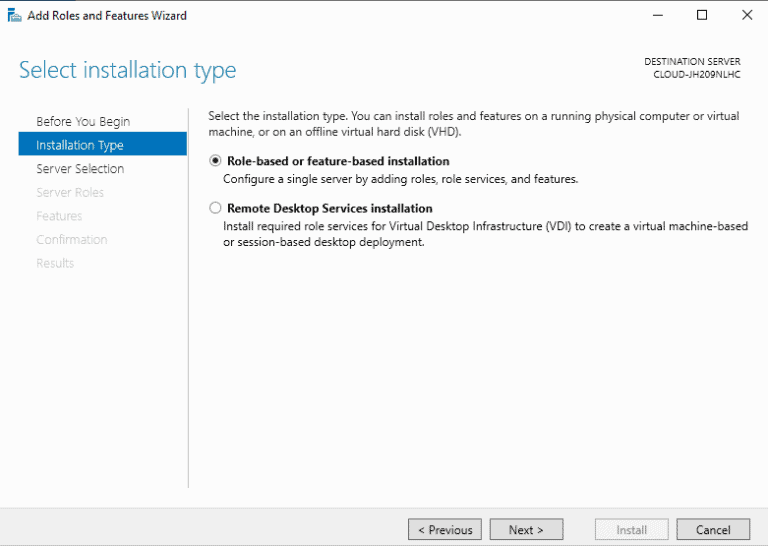
Step 4: Click on Next after selecting Role based and feature based installation.
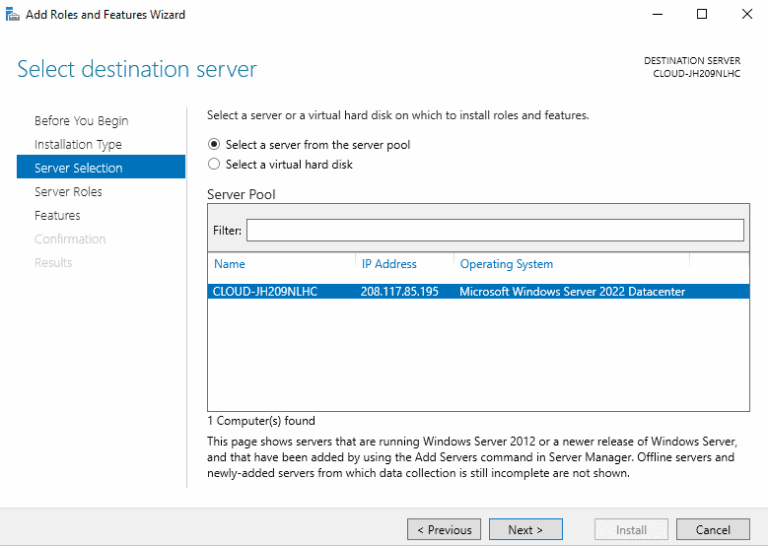
Step 5: Choose a server from the pool and press Next.
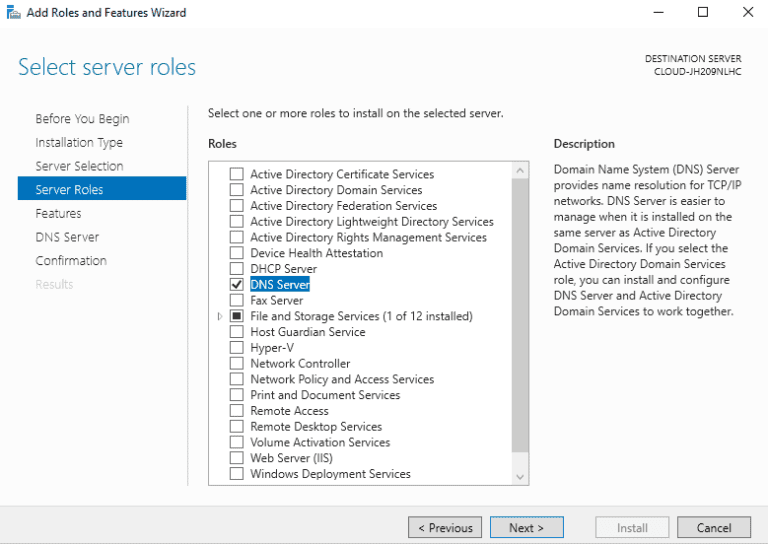
Step 6: Pick the DNS server and click Next.
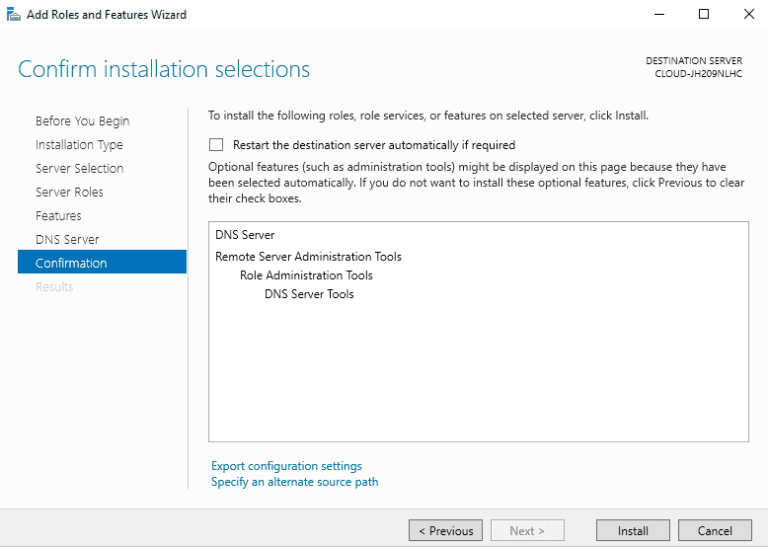
Step 7: Double check all settings before clicking the Install button to begin the installation.
Step 8: Allow some time for the installation to complete. Once done, click the Close to exit the installation wizard.
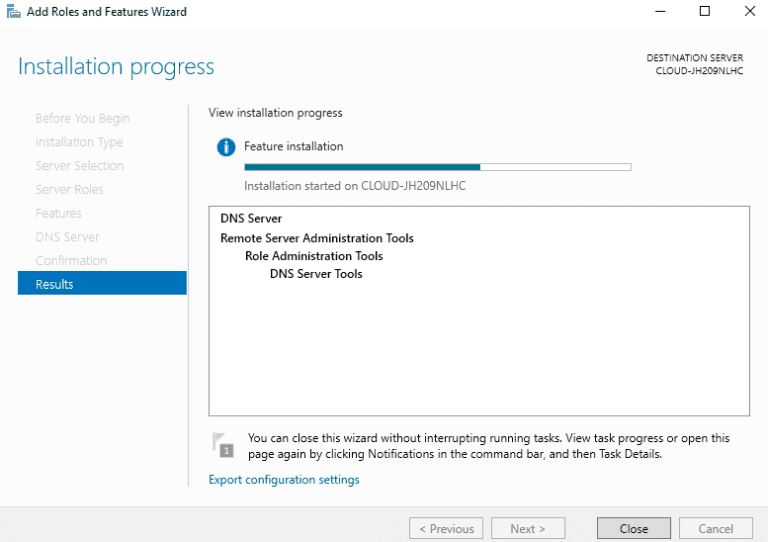
Installing the DNS Server Role Using PowerShell
Using PowerShell, we automate the installation process, making it easier and more efficient to set up a DNS server for your network. Here are the steps to install the DNS Server Role using PowerShell on Windows Server:
Step 1: Open Windows PowerShell as an admin by pressing the Windows key + X and selecting Windows PowerShell (Admin) from the menu.
Step 2: Use the Install-WindowsFeature command to install the DNS Server Role:
Install-WindowsFeature -Name DNS -IncludeManagementTools
Step 3: Press Enter to run the command. You see a message indicating that the installation process has started.
Step 4: Wait for the installation process to complete, which may take several minutes.
Step 5: After the installation is complete, use the Get-WindowsFeature command to confirm that the DNS Server Role has been installed:
Get-WindowsFeature -Name DNS
Step 6: You should see a message indicating that the DNS Server Role is installed, and the display name should be DNS Server.
As a result, using PowerShell to install the DNS Server Role saves time and effort compared to manually installing the role through the graphical user interface. Additionally, using PowerShell allows us to automate the installation process, making it easier to set up multiple DNS servers consistently and repeatedly.
In this part of the article about how to Install and Configure DNS Server on Windows Server we are configuring DNS server first.
Active Directory & Azure AD User Reporting Tools by InfraSOS
Try us out for Free, Access to all features. – 200+ AD Report templates Available. Easily customise your own AD reports.
Configuring the DNS Server
Now, that we have set up the DNS server role, we can use the DNS service inside the server. We need to create forward and reverse lookup zones to resolve the name to IP address and vice versa.
Configuring the Forward Lookup Zone
Evidently, a Forward Lookup Zone in DNS is a database of resource records that map domain names to IP addresses. Hence, we use it to resolve host names to IP addresses.
Certainly, the Forward Lookup Zone is vital because it enables clients to access network resources using domain names instead of IP addresses. This lookup zone makes it easier for users to remember and access network resources, and it helps improve the network’s readability and maintainability.
Steps
In order to create a forward lookup zone, follow the steps below:
Step 1: On the server manager, navigate to Tools > DNS to access the DNS manager, as shown below:
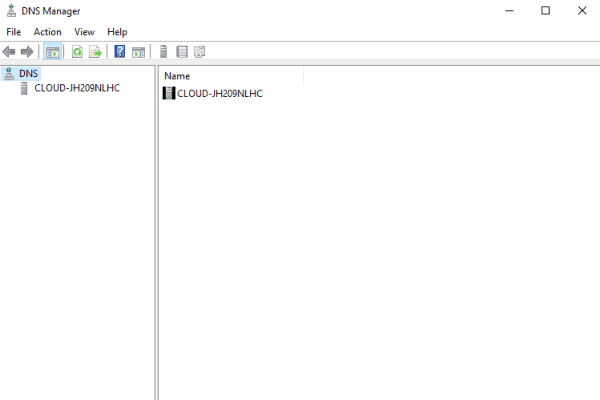
Step 2: Right click on the server name and select Properties.
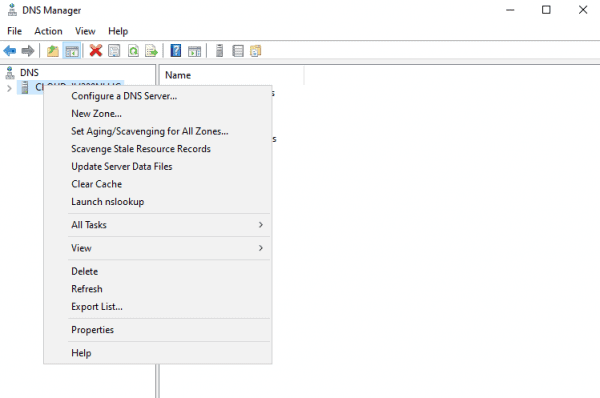
Step 3: Select the New Zone option.
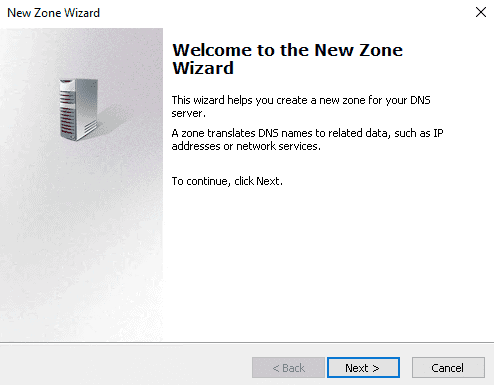
Step 5: Choose the Primary zone and press Next.
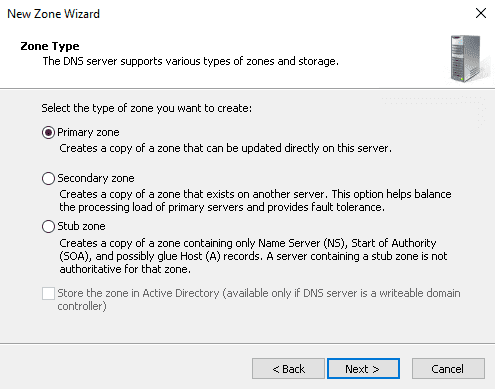
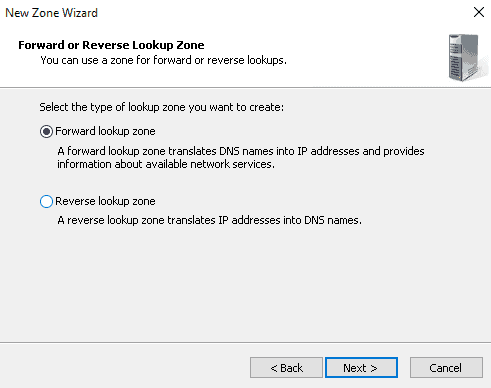
Step 6: Click Next after selecting the Forward lookup zone.
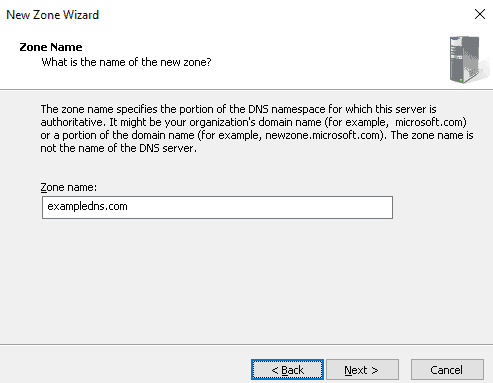
Step 7: Enter the name of our zone and press Next.
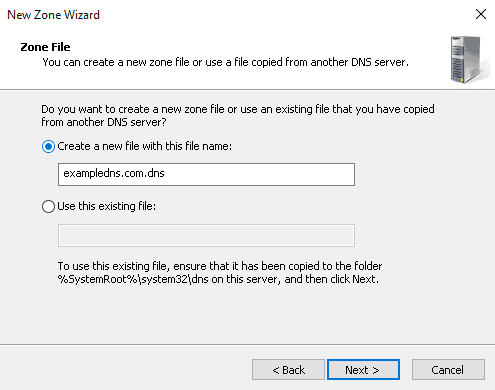
Step 8: Choose “Create a file with the file name” and press Next.
Step 9: Check the box next to “Do not allow dynamic update” and click Next.
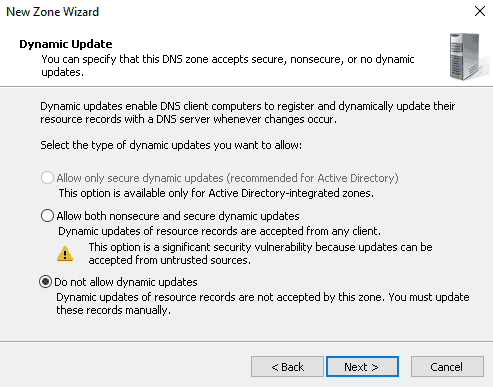
Step 10: Press the Finish button.
Next, with Install and Configure DNS Server on Windows Server we configure Reverse Lookup Zone.
Configuring the Reverse Lookup Zone
Following, a Reverse Lookup Zone in DNS is a database of resource records that map IP addresses to host names. By all means, we use this lookup zone to resolve IP addresses to hostnames.
Further, a Reverse Lookup Zone is different from the Forward Lookup Zone. In that it maps IP addresses to host names, while the Forward Lookup Zone maps host names to IP addresses. Additionally, the Reverse Lookup Zone is typically less frequently used than the Forward Lookup Zone, as clients are more likely to access network resources using host names rather than IP addresses.
Steps
Indeed, to create a forward lookup zone, follow the steps below:
Step 1: On the server manager, navigate to Tools > DNS to access the DNS manager:

Step 2: Right click on the server name and select Properties.

Step 3: Here, select the New Zone option.

Step 5: Now, choose the Primary zone and press Next.

Step 6: From this step forward, the setup is different from our previous section. Next, click Next after selecting the Reverse lookup zone.
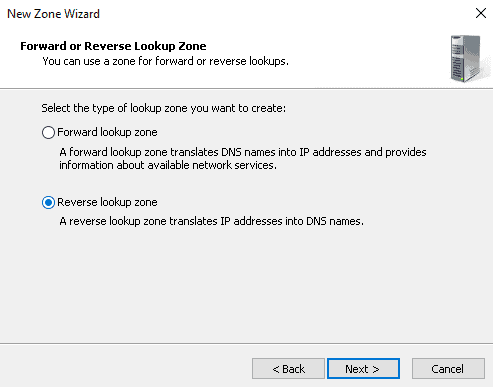
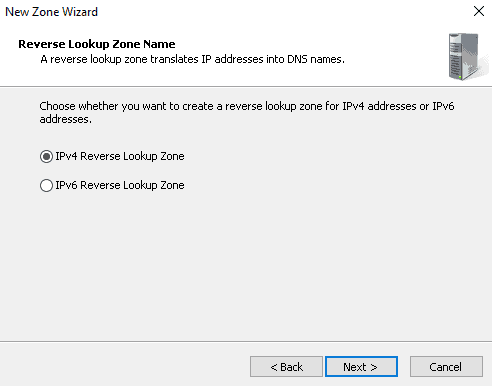
Step 7: After, select IPv4 Reverse Lookup Zone and click on Next.
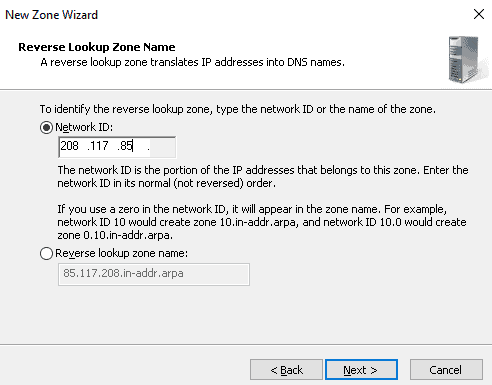
Step 8: Define your network ID and click Next.
Step 9: Further, choose “Create a file with the file name” and press Next.
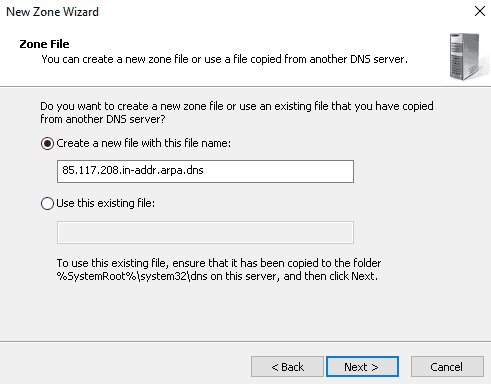
Step 9: Please check the box next to “Do not allow dynamic update” and click Next.

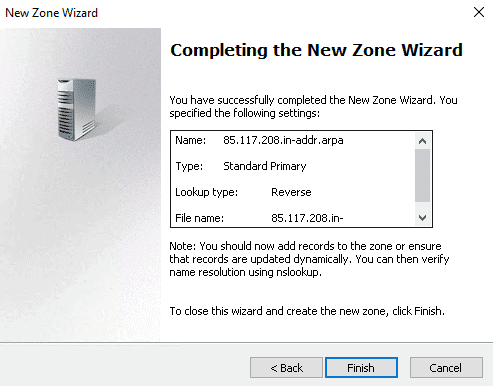
Step 10: In sum, press the Finish button.
Configuring DNS Records
Moreover, DNS records are essential for several reasons:
- Domain name resolution: In short, we use DNS records to map domain names to IP addresses, allowing clients to access network resources using human readable names rather than IP addresses.
- Network functionality: Properly configured DNS records are critical for ensuring network services and applications function correctly.
- Network security: In similar fashion, we use DNS records to secure our network by providing information about which IP addresses correspond to our domain names. We use this information to block malicious traffic and improve network security.
- Load balancing: By creating multiple A records for the same hostname and assigning different IP addresses to each record, we distribute incoming traffic across multiple servers, improving the performance and reliability of our network.
- Management and administration: In this case, DNS records are managed and updated centrally, making organizing and maintaining our network easier.
Overall, DNS records are a fundamental part of the functioning of the internet and are critical for ensuring that domain names are resolved to IP addresses. That network services and applications work correctly and that networks are secure and reliable.
Steps
Please follow the below steps to add A and PTR records to DNS:
Step 1 : On the DNS manager, right click on the forward lookup zone.
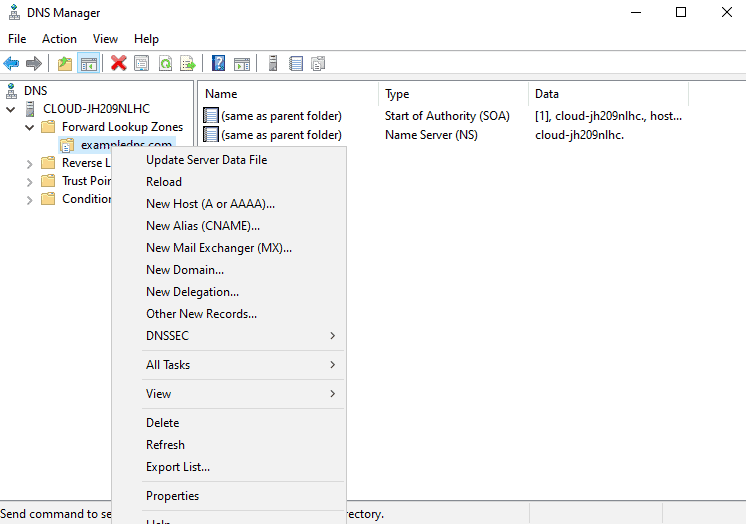
Step 2: Click on the New Host (A or AAAA).
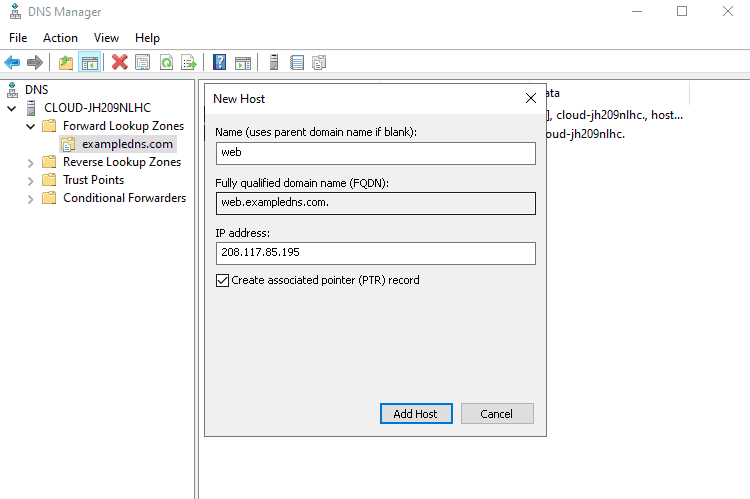
Step 3: Provide the host’s parent domain name and IP address, select “Create associated pointer record” and then click on the Add Host button.
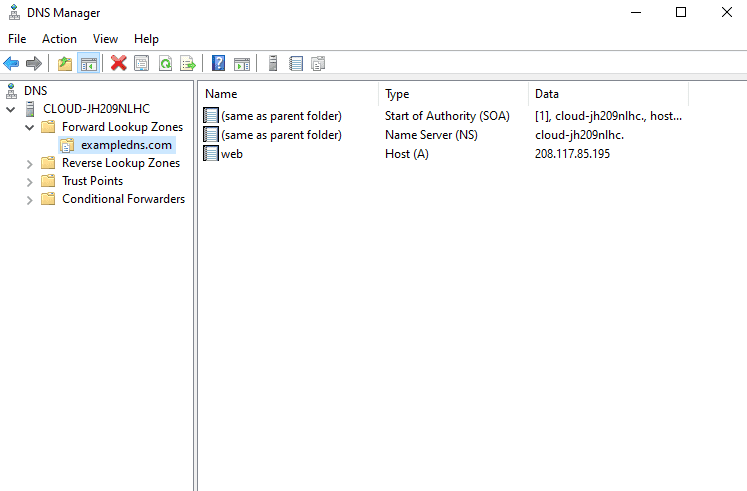
When creating a zone in Windows Server DNS, the Start of Authority (SOA) and Name Server (NS) records are automatically created for several reasons:
-
Start of Authority (SOA) Record: The SOA record defines the start of a DNS zone and provides information about the zone itself. This record is required for all zones and is used to identify the authoritative source of information for the zone. In addition, the SOA record contains essential information, such as the primary DNS server for the zone, the email address of the person responsible for the zone, and the refresh and retry intervals for the zone.
-
Name Server (NS) Record: The NS record identifies the authoritative DNS servers for a particular zone. These servers serve DNS information for the zone and resolve DNS queries for the domain. The NS record is also used to delegate subdomains to other DNS servers.
Given that, the process is streamlined and simplified by automatically creating the SOA and NS records when creating a zone in Windows Server DNS, ensuring that the required information for the zone is present and accurate. Particularly, this helps to ensure that the zone functions correctly and that the network resolves DNS queries for the domain.
Other Types of DNS Records
In the above example, we created A (forward lookup) and PTR (reverse lookup) records. However, these are only some records available when managing the DNS. Here are some examples below:
| Type of Record | Definition | Example |
| A (Address) | Example, that maps a host name to an IPv4 address |
www.example.com A 192.168.1.100 |
| AAAA (IPv6 Address) | Another, that maps a host name to an IPv6 address |
www.example.com AAAA 2001:db8:0:1234::1 |
| MX (Mail Exchange) | Specifies the mail servers responsible for a specific domain name |
example.com MX mail.example.com |
| CNAME (Canonical Name) | Following example, that maps an alias to a true or canonical domain name |
www.example.com CNAME example.com |
| NS (Name Server) | Specifies the name servers for a specific domain name |
example.com NS ns1.example.com ns2.example.com |
| PTR (Pointer) | Here, it maps an IPv4 or IPv6 address to a host name (reverse DNS lookup) |
100.168.192.in-addr.arpa PTR www.example.com |
| SRV (Service) | Similarly, it specifies the host and port for a specific service for a domain name |
_sip._tcp.example.com SRV 10 5 5060 sip.example.com |
| TXT (Text) | Stores text-based information such as SPF records, email routing information, or other information |
example.com TXT “v=spf1 mx a:example.com ~all” |
Note: This table lists the most common types of DNS records, but many other types are available. In detail, the specific records we need depends on our network’s requirements and the services we want to provide.
Verifying DNS Records
Now, we need to test whether the DNS name resolution works. First, open our command line interface and run the nslookup command:
We should see the name of the Primary DNS server that our machine is currently connected to:
					Default Server:  web.exampledns.com
Address:  208.117.85.195
In fact, now please type the Fully Qualified Domain Name (FQDN) of our added host:
We should see the name to IP address resolution in the following output. A valid output means that our forward lookup is working:
					Server:  web.exampledns.com
Address:  208.117.85.195

Name:    sample.exampledns.com
Address:  208.117.85.1
Subsequently, next try typing, the IP address of our added host:
And we should see the IP address to name resolution in the following output which also means our reverse lookup is functioning:
					Server:  web.exampledns.com
Address:  208.117.85.195

Name:    sample.exampledns.com
Address:  208.117.85.1
Thank you for reading the article about how to Install and Configure DNS Server on Windows Server. We shall conclude the article now.
Install and Configure DNS Server on Windows Server Conclusion
In conclusion, installing and configuring DNS on Windows Server is critical for any organization that wants to provide reliable and secure domain name resolution services. Finally, DNS is a critical component of the internet. Therefore, it is vital to ensure that we resolve domain names to IP addresses, that network services and applications work correctly, and that networks are secure and reliable.
By configuring DNS in Windows Server, we improve the management and administration of our network, as well as provide enhanced security and reliability. Installing and configuring DNS in Windows Server is straightforward. We use the graphical user interface or the command line to configure DNS servers and create and manage DNS records.
Fell free to explore more about the Active Directory content by navigating here.
You will find more PowerShell content over here.
Try InfraSOS for FREE
Invite your team and explore InfraSOS features for free
- Free 15-Days Trial
- Easy Setup
- Full Access to Enterprise Plan
