
-
Select Start and select Clock from the app list or enter Clock into the search box.
-
Select Timer or Alarm.
-
If you select Timer, there are four preset timers you can use. If you want to create a new timer, select .
-
If you select Alarm, there is one preset alarm you can use. If you want to create a new alarm, select .
-
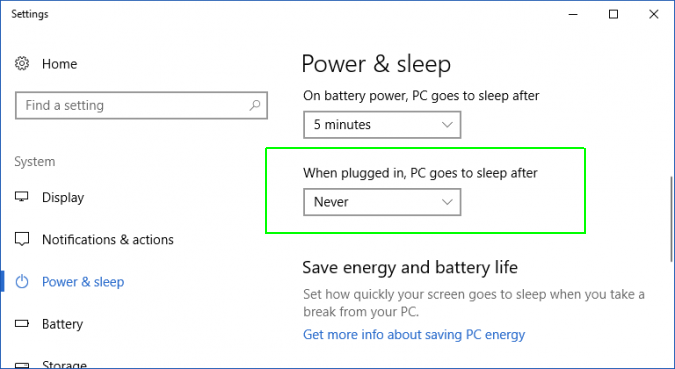
Alarms and timers work even if the app is closed or your device is locked. If you see a warning that notifications only show if the device is awake, make sure your device doesn’t go to sleep (Go to Start > Settings > System > Power & battery , then select Screen and sleep to adjust your device’s sleep settings).
-
Keep your laptop or tablet plugged in and make sure the volume on your device is high enough to hear the alarm or timer.
-
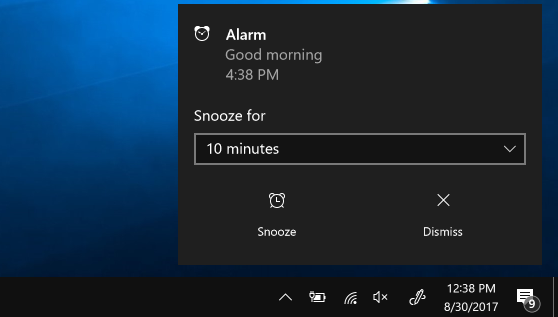
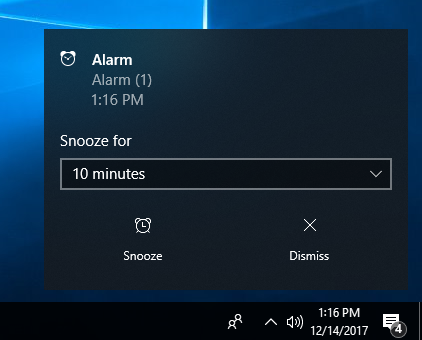
To respond to an alarm, select Snooze, or Dismiss the alarm to stop it entirely.

-
If you need to change the time zone of your clock, go to Settings > Time & language > Date & time. You can either set Set time zone automatically to On or set it to Off and use the drop down menu under Time zone to choose your preferred time zone manually.
Need more help?
Want more options?
Explore subscription benefits, browse training courses, learn how to secure your device, and more.
Last Updated :
21 Apr, 2025
The built-in application of Windows 10 simplifies the setting of alarms, providing a simple and effective interface for users to efficiently arrange their schedules. There are many useful features that the application contains.
With just a few clicks, you can set alarm on your windows for important tasks, appointments, or simply to wake you up in the morning. So how do Windows 10 users take advantage of the power of the Clock app? In this guide, we’ll walk you through the quick and easy steps to set alarms using the built-in Alarm & Clock app in Windows 10. Let’s get into this guide, and we will discover just what steps need to be taken for them to arrive at full understanding.
Set Alarm Clock on laptop
- How to Set Alarm on Your Windows 10?
- How to Set Repeating Alarm in Windows 10?
- How to Change Your Alarm Sound in Windows 10?
- How to Give an Alarm Name in Windows 10?
- How to Select Snooze Time in Windows 10?
- How to Edit & Delete Existing Alarms in Windows 10?
How to Set Alarm on Your Windows 10?
The Clock app is a built-in application that comes along with the standard Windows 10 installation. To set alarm on Windows 10, you need to follow the few steps mentioned below. The whole process of setting up an alarm in Windows 10 is very easy if you follow all the steps accurately.
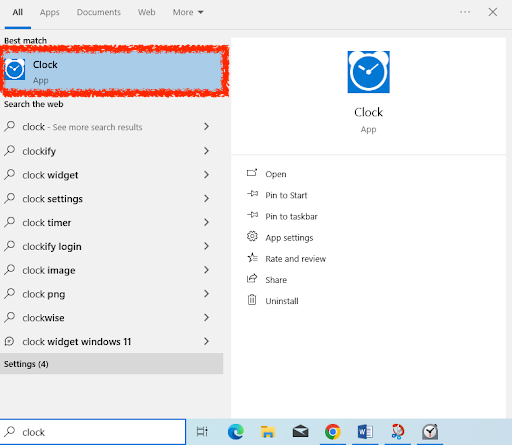
Step 1: To navigate to the Clock app, click on the Start button in the lower left-hand corner of your screen and enter «Clock» into search. Click on the Clock app to open as shown below:
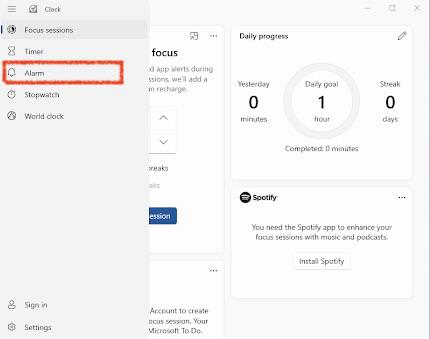
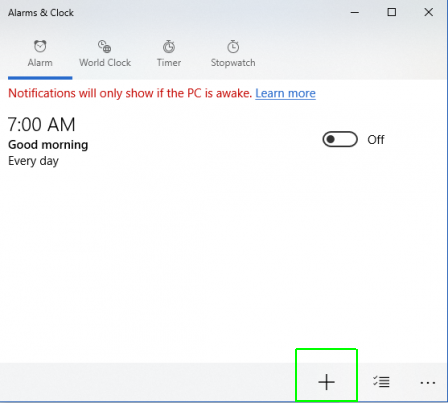
Step 2: Once the Alarms & Clock app is opened, you can find several options in the left panel. To set a new alarm, click on the Alarm option as shown:
Step 3: To add a new alarm, click on the «+» icon. Doing so will open a new window where you can set your alarm.
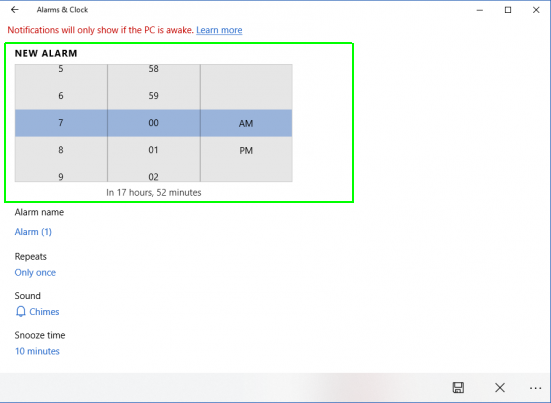
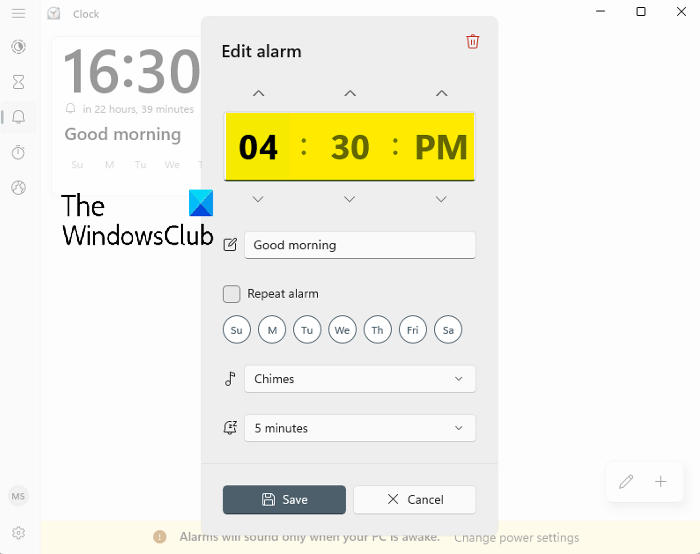
Step 4: You’ll find various options in the alarm settings window to set your alarm. Select alarm time from the hour and minute dropdown menus and choose between AM or PM. There are various other features for you to try.
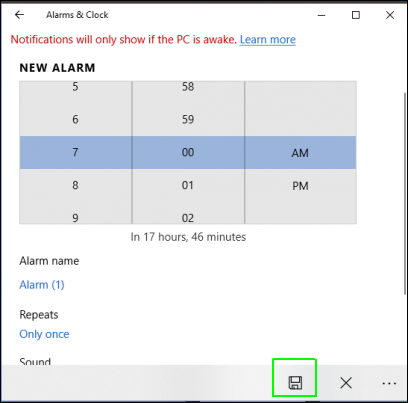
Step 5: Once you’ve set your alarm, click on the Save option for your alarm to ring. The alarm would come into effect only when you save it.
How to Set Repeating Alarm in Windows 10?
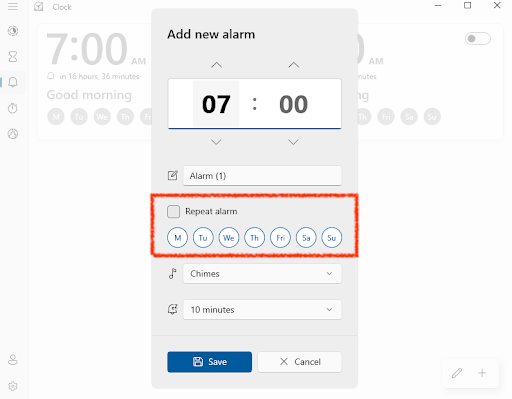
You can set alarm to repeat in Windows 10. You can select whether or not you want the alarm to repeat daily, just on certain days of the week, or not at all. To have a repeating alarm, tick the “Repeat Alarm” checkbox and add customization to the repeats according to your needs.
How to Change Your Alarm Sound in Windows 10?
Changing the alarm sound on your Windows 10 computer is simple and allows you to personalize your waking experience. Follow these easy steps to customize the sound of your alarms and enhance your set alarm on Windows experience:
Windows clock app has different alarm sounds. You can pick your favourite one from the Sound dropdown menu.\
How to Give an Alarm Name in Windows 10?
You can also name your alarm and this would possibly serve as a useful reminder of the alarm’s purpose or place. To name your alarm, simply click on the write label and name your alarm as shown.
This personalized touch can make it easier to manage multiple set alarms on Windows and ensure you stay organized throughout your day.
How to Select Snooze Time in Windows 10?
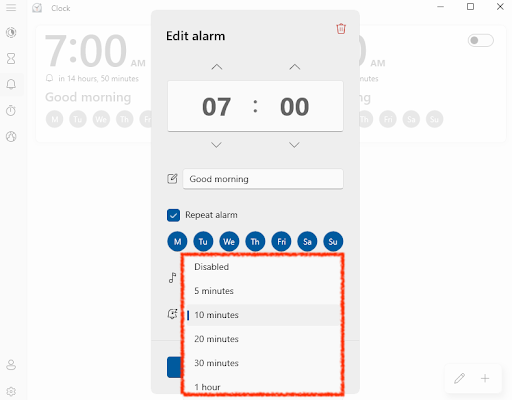
When your set alarm on Windows goes off, you may see a notification on your display screen. You can pick out to snooze the alarm for a few minutes or push aside it altogether. You can select the snooze time according to your convenience from “10 minutes” to “1 hour”, or you can disable it.
How to Edit & Delete Existing Alarms in Windows 10?
To manage or delete current alarms, move to the main Alarms tab in the app. Here, you can see a list of all of your stored alarms. You can toggle them on or off, edit their settings, or delete them as you want.
Conclusion
The Clock app in Windows 10 is more than just a timekeeping tool; it’s a powerful ally in your quest for efficient time management. Its customizable features and user-friendly interface ensure that you stay organized and on top of your commitments. With just a few clicks, you can set alarms on Windows for various purposes, from waking up in the morning to reminding yourself of crucial tasks throughout the day.
In this guide, we’ve provided you with a simple and easy-to-follow tutorial on how to set alarms effectively on your Windows 10 system. We’ve covered everything from accessing the Alarm & Clock app to customizing alarm sounds and managing your existing alarms. By following these steps, you can streamline your daily schedule and make the most out of your time.
Most of us don’t have old-fashioned clock radios at home or portable alarm clocks to take with us on the road. When you need to be woken up at a particular time, you can use your smartphone, but any Windows 10 device can also do the job. Windows 10 has a built-in alarm clock app, which you can set up using the following steps.
1. Type «alarm» into the Windows search box.

2. Click the «Alarms & Clock» icon.
3. Click the plug button to add a new alarm time. You can also select an existing alarm to edit it.
4. Set an alarm time. You can also set the alarm sound, snooze time, number of times the alarm repeats and the name of the alarm, but these are all optional settings.
5. Click the save button in the lower right corner of the window.
Note that, on most computers, the alarm screen will say that «Notifications will only show if the PC is awake.» So, for your alarm to go off, you will need to configure your computer NOT to go to sleep.
Sign up to receive The Snapshot, a free special dispatch from Laptop Mag, in your inbox.
To stop your computer from sleeping:
1. Type «sleep» into the Windows search box

2. Click «Power and Sleep Settings»
3. Set Sleep time to «Never» under «when plugged in» and / or «on battery.» If you don’t let it sleep when you’re on battery, your computer could run out of juice.
Windows 10 Performance and Productivity
- Previous Tip
- Next Tip
- Best Windows 10 Keyboard Shortcuts
- MIrror Your Screen to a TV or Monitor
- Speed Windows 10 Boot Time
- Get Superfast Mouse, Touchpad Speeds
- Calibrate Your Monitor
- Activate ‘God Mode’
- Defragment Your Hard Drive
- Measure the Time it Takes for Apps to Load at Boot
- Use Maximum CPU Power
- Enable Swipe to Delete in Email
- Copy and Paste at the Command Prompt
- How to record your screen in Windows 10
- Use Offline Maps
- Get the Full Layout in Windows 10’s Touch Keyboard
- Create a .Reg File for Easy Registry Hacks
- Record PC Gameplay on the Xbox App
- Perform a Clean Install of Windows 10
- Uninstall Windows 10 and Roll Back to 7 or 8
- Enable the Linux Bash Shell
- Generate a Detailed Battery Report
- Turn a PC into a Wireless Display
- Open Folders in the Taskbar
- Open Sites in the Taskbar
- Import Gmail Contacts
- Get Android Notifications
- Use Multiple Desktops
- Use Eye Control
- Use the Timeline Feature to Resume a Task
- Send Web Pages from Phone to PC
- All Windows 10 Tips
- Increase your Battery Life
Want to use alarms in Windows 10 to keep track of time or remind yourself of important tasks? It’s super easy! In just a few steps, you can set alarms that will alert you with a sound and a notification, ensuring you never miss an important moment. Here’s a quick guide on how to set, edit, and delete alarms using the Alarms & Clock app in Windows 10.
Setting up alarms in Windows 10 is a breeze with the Alarms & Clock app. Following these steps will help you set up an alarm in no time.
Step 1: Open the Alarms & Clock app
First, open the Alarms & Clock app by clicking on the Start menu and typing «Alarms» in the search bar. Select the app from the list.
Once you open the app, you’ll see a straightforward interface with different tabs like Alarm, Clock, Timer, and Stopwatch. We’ll focus on the Alarm tab for now.
Step 2: Click on the «Alarm» tab
Next, click on the «Alarm» tab located at the top of the window. This is where you can manage all your alarm settings.
In this tab, you’ll find any existing alarms you’ve set up. If it’s your first time here, the list will be empty. Don’t worry, setting up an alarm is easy!
Step 3: Add a new alarm
Click the plus (+) button at the bottom right of the window to create a new alarm.
A new window will pop up where you can set the time, name, and recurrence for your alarm. It’s pretty self-explanatory and user-friendly.
Step 4: Set the alarm time
Use the sliders to adjust the hour and minute of your alarm. Then, choose AM or PM.
This step ensures that your alarm will go off at the exact time you need it. Double-check the time to make sure it’s correct.
Step 5: Customize your alarm
You can also customize your alarm by giving it a name, choosing the days it should repeat, and selecting a sound.
Naming your alarm helps you know what the alert is for. Moreover, selecting specific days to repeat keeps you from having to set the alarm every time.
Step 6: Save your alarm
Finally, click the save button (which looks like a floppy disk) to save your alarm settings.
Your alarm is now set and will appear in the list under the Alarm tab. You can create multiple alarms and manage them from this screen.
Once you complete these actions, your alarm will ring at the time you set. You’ll see a notification on your screen, and you’ll hear the alert sound you selected.
Tips for Using Alarms in Windows 10
- Use descriptive names: Label your alarms with specific names so you remember what each one is for.
- Adjust sound settings: Choose an alarm sound that you’ll easily hear and recognize.
- Test the alarm: Set a test alarm to ensure the sound and notifications are working correctly.
- Utilize recurrence settings: Set your alarm to repeat on specific days to avoid having to set it manually each time.
- Check volume settings: Make sure your computer’s volume is up and not muted, or you might miss the alarm.
Frequently Asked Questions
Can I set multiple alarms?
Yes, you can set multiple alarms, and each one can have its own settings and time.
How do I delete an alarm?
Simply click on the alarm in the list, then click the trash can icon to delete it.
What if my computer is in sleep mode?
Alarms in Windows 10 work even if your computer is in sleep mode, as long as it’s not turned off completely.
Can I choose a custom sound for my alarm?
Yes, Windows 10 allows you to choose from a list of sounds, but you can’t currently upload your own custom sound.
How do I edit an existing alarm?
To edit an alarm, click on it in the list. This will open the settings window where you can make changes and save them.
Summary
- Open the Alarms & Clock app.
- Click on the «Alarm» tab.
- Add a new alarm.
- Set the alarm time.
- Customize your alarm.
- Save your alarm.
Conclusion
Using alarms in Windows 10 is a straightforward yet powerful way to keep track of your time and ensure you never miss important events or tasks. With just a few clicks, you can set up multiple alarms, customize them to fit your needs, and ensure they repeat on the days you choose. The Alarms & Clock app is user-friendly and offers various customization options, making it a valuable tool for anyone looking to stay organized.
So, next time you need a gentle nudge to remind you of an upcoming meeting, a scheduled break, or even just to wake up from a nap, consider using Windows 10 alarms. Happy time-keeping!
Matt Jacobs has been working as an IT consultant for small businesses since receiving his Master’s degree in 2003. While he still does some consulting work, his primary focus now is on creating technology support content for SupportYourTech.com.
His work can be found on many websites and focuses on topics such as Microsoft Office, Apple devices, Android devices, Photoshop, and more.
In the past, we would use old-fashioned table clocks to set an alarm. It would help us to wake up on time prior to an important event. However, in today’s time, you can set an alarm on your phone or computer. In this post, we will show you how to set an Alarm on a Windows computer.
Setting an alarm these days is not just restricted to waking you up. But it also helps you to remind a certain task or an event at a certain time. While we all know how to set an alarm on a mobile phone, setting an alarm on a Windows 11/10 can be tricky. Especially, if you are not updated with the new features.

What’s interesting is, while Windows 11 comes with a built-in Clock app now, it allows you to do a lot more. For example, you can set an alarm, create focus timers, use a stopwatch, and more.
Moving on, in this post, we will guide you on how to set an alarm on a Windows 11/10 computer for those who are new to the Clock app.
Things to do before you set an alarm on Windows PC
Setting an alarm or making any changes to the Windows Clock app correctly, depends on the correct time zone and the date & time of the system. If that’s not set correctly, your alarm won’t work properly.
Hence, before you set an alarm on your computer, make sure that it meets a few conditions as below:
1] Set the correct Time Zone and Date/Time
Before you use the Clock or set an alarm, you must check if the Date and time, or the Time Zone of your PC is set correctly. If not, you can follow the below steps to adjust the Date & time settings:
- Go to Start, search for date and time, and select Date & time settings under Best Match.
- This will open the Time & Language settings page in the Settings app. Here, go to Set the time zone automatically and turn it off.
- Next, set the Time zone manually by selecting the appropriate zone from the drop-down.
- Now, click on Change next to Set the date and time manually, and select the correct date and time.
2] Disable Sleep mode in Windows
You must also check if the sleep mode for your Windows PC is on. If it is, then it will prevent the Clock app from ringing the alarm whenever your PC goes off to sleep. In this case, you must disable the Sleep mode before you set the alarm in Windows. Here’s how:
- Press the Win + I keys together to launch the Settings app.
- Next, click on System on the left, and then click on Power & Battery on the right.
- On the next screen, under Power, expand the Screen and Sleep section. Here, set all the options to Never.
Read: Windows goes to sleep automatically randomly
3] Update the Clock app
To make sure that you can use all the new features of the Clock app, it’s important to keep the app up-to-date. Hence, it’s recommended to update the Clock app to the latest version.
To set an Alarm on your Windows PC, follow these steps. We also show how to set the Alarm name, Alarm sound, Number of days, and Snooze time:
- Open the Clock and click on the Alarm option on the right.
- This will open the Edit alarm window. Here, select AM or PM, and then change the time by clicking on the up and down arrows.
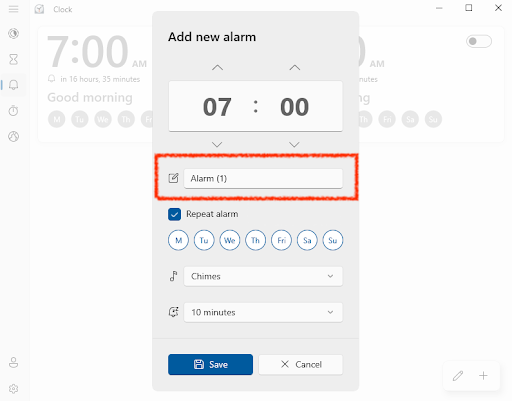
- You can then go to the Alarm Name field and create a suitable name for the alarm, for example, Good Morning. This is to wake you up in the morning.
- Next, you can select the day from the day abbreviations below, and this will automatically check the Repeat alarm box above.
- Or, you can select the Repeat alarm box and set it for a selected day, or all days (as per your requirement).
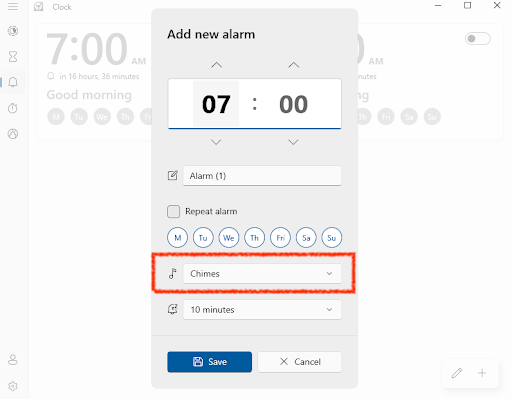
- Next, in the Alarm Chime field, you can select an alarm sound as per your choice.
- You can also select the Snooze Time if you want and as per your requirement.
- Now, press Save to apply the changes and this will turn on the alarm automatically.
For the current day, you need not select days but simply set the alarm time, make any other edits like changing the Alarm sound, or Snooze Time, and hit Save.
Read: Alarm clock not working on Windows even when set
How to Enable/Disable Alarms in Windows
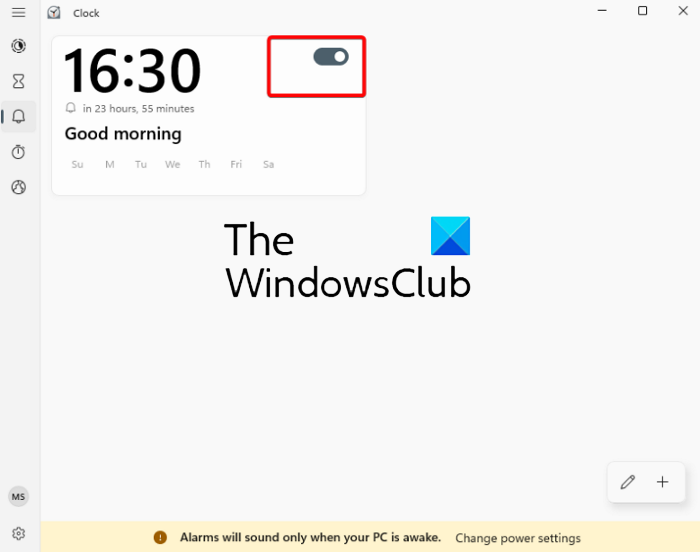
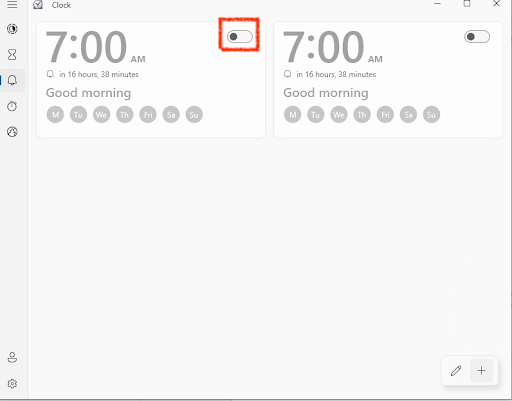
If you have already set the alarm time previously and you simply want to turn it on, you can move the toggle to the right to enable the alarm.
Likewise, if you do not want the alarm to ring, simply move the toggle to the left to turn it off.
How to Add an Alarm in Windows
If you want to add an alarm, for example, you have already set an alarm to wake up, and now you want to add an alarm to remind you of an event, simply click on the “+” symbol on the bottom right.
This will open another Edit alarm window with the same layout. Now, you can set the second alarm (following the above steps) for another event and this will be added to the alarm list.
How to Delete an Alarm in Windows
If you want to delete an alarm, you can simply right-click on the alarm and select Delete.
Alternatively, you can click on the pencil icon (Edit alarms) on the bottom right (before the “+” symbol), hit the trash icon button on the upper right of the alarm, and click on the checkmark symbol to save the changes.
We hope this helps.
Read: How to add a clock to Windows Start Menu using Alarms & Clock app
Does Windows 11 have a built-in alarm?
Windows 11/10 comes with a built-in Clock app that features a built-in alarm. So, if you have something important coming up, it’s easier for you to set an alarm right on your Windows PC. In addition, you can do a lot more with the Clock, for example, create Focus sessions, set a timer, use the Stopwatch, or additional World Clocks for different locations.
Why I can’t find the alarm in Windows 11?
If your Windows alarm or the Clock app is not opening or missing, restart your PC and see. If the alarm still does not show up, check if the Clock app is updated to the latest version. If nothing helps, you may have to reset the Clock app to fix the issue.