Finding the network credentials for your Wi-Fi on Windows 11 isn’t as complex as it sounds. With just a few steps, you can easily discover your Wi-Fi username and password. This guide will walk you through the process, ensuring you can connect your devices seamlessly.
By following these steps, you’ll be able to locate your Wi-Fi credentials in no time. Whether you need to connect a new device or share your network with a friend, knowing where to find this information is super helpful.
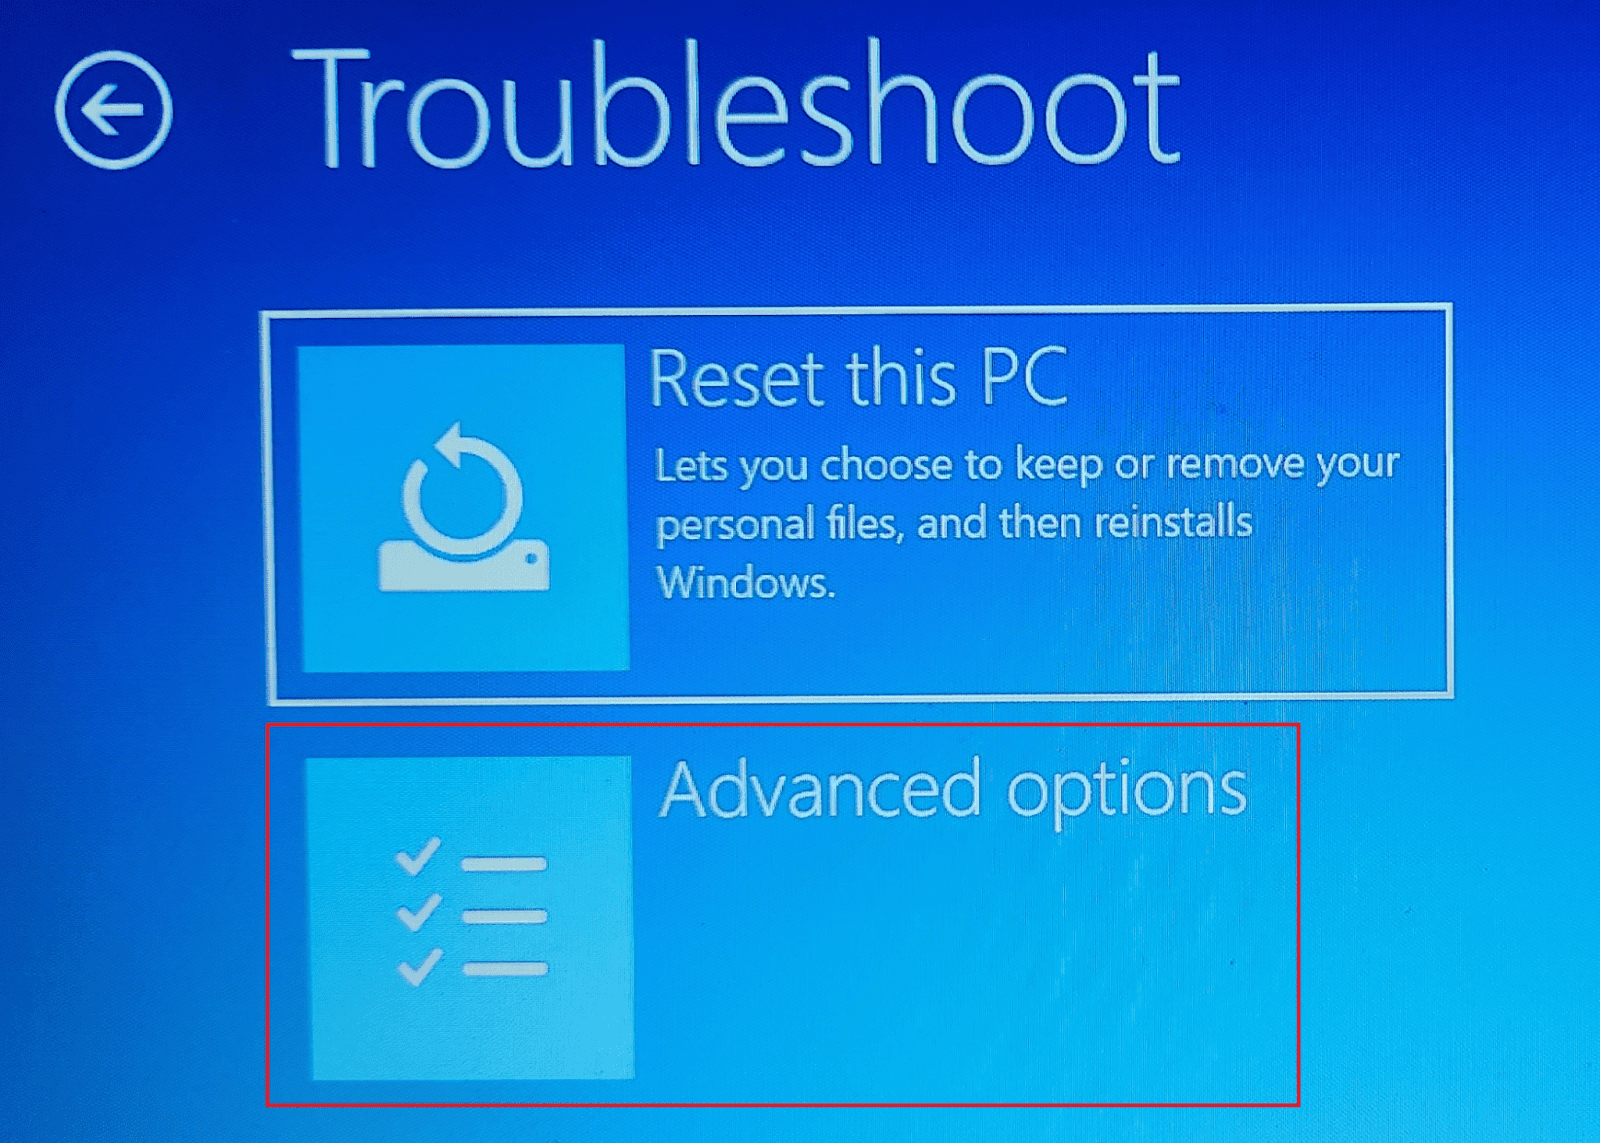
Step 1: Open the Settings
First, click on the Start menu and select the Settings gear icon.
In the Settings menu, you can access various system settings. This is your main hub for making changes to your Windows 11 system.
Step 2: Go to Network & Internet
Next, navigate to ‘Network & Internet’ within the Settings menu.
This section will show you all things related to your internet connection, including Wi-Fi, Ethernet, and other network settings.
Step 3: Select Wi-Fi
After that, click on the ‘Wi-Fi’ option in the Network & Internet settings.
Here, you can see active Wi-Fi connections and manage your network preferences.
Step 4: Choose Your Connected Network
Now, click on the name of the Wi-Fi network you’re currently connected to.
This will bring up detailed information about your Wi-Fi network, including the security type, signal strength, and other relevant data.
Step 5: View Wi-Fi Properties
Scroll down and click on ‘View Additional Properties’.
In this section, you’ll find more technical details about your network. It’s like peeking under the hood of your Wi-Fi connection.
Step 6: Check the Network Security Key
Finally, find the ‘Network Security Key’ field—this is your Wi-Fi password.
Your network security key is essentially your Wi-Fi password, the magic word that lets devices connect to your network.
Once you’ve completed these steps, you’ll have your network credentials in hand. This process not only helps you access your Wi-Fi password but also gives you a better understanding of your network settings.
Tips for Finding Network Credentials Username and Password Windows 11
- Keep your credentials safe: Write down your Wi-Fi username and password and store them in a secure place.
- Use a password manager: Consider using a password manager to keep track of your network credentials securely.
- Regularly update your password: Change your Wi-Fi password periodically to enhance security.
- Share with care: Only share your network credentials with trusted individuals.
- Backup your credentials: Make a backup of your network settings to avoid losing your credentials.
Frequently Asked Questions
How can I find my Wi-Fi password on Windows 11?
You can find your Wi-Fi password by navigating to Settings > Network & Internet > Wi-Fi > your connected network > View Additional Properties, and then checking the ‘Network Security Key’ field.
Is the network username the same as the SSID?
No, the network username typically refers to the login credentials provided by your Internet Service Provider (ISP), while the SSID is the name of your Wi-Fi network.
What if I can’t find my network credentials?
If you can’t find your network credentials, try resetting your router or contacting your ISP for assistance.
Can I see the passwords for other networks I’ve connected to before?
Yes, but you’ll need to use the Command Prompt with specific commands to retrieve passwords for networks you’ve connected to previously.
Why is my Wi-Fi password not showing up?
If your Wi-Fi password is not displayed, ensure you have administrative rights on the computer. Sometimes, certain permissions are required to view this information.
Summary
- Step 1: Open the Settings.
- Step 2: Go to Network & Internet.
- Step 3: Select Wi-Fi.
- Step 4: Choose Your Connected Network.
- Step 5: View Wi-Fi Properties.
- Step 6: Check the Network Security Key.
Conclusion
Finding your network credentials username and password on Windows 11 is straightforward when you know where to look. By following the steps outlined above, you can quickly access your Wi-Fi information and ensure all your devices stay connected. Remember, keeping your credentials safe and secure is just as important as knowing where to find them. For further reading, consider exploring more advanced network settings or how to enhance your home network security. Happy surfing!
Matt Jacobs has been working as an IT consultant for small businesses since receiving his Master’s degree in 2003. While he still does some consulting work, his primary focus now is on creating technology support content for SupportYourTech.com.
His work can be found on many websites and focuses on topics such as Microsoft Office, Apple devices, Android devices, Photoshop, and more.

Людмила Бурым
Более 20 лет опыта в IT (программирование баз данных, постановка задач по разработке ПО, сопровождение пользователей, написание технической документации и отчетов) в сфере управления финансами.
Задать вопрос
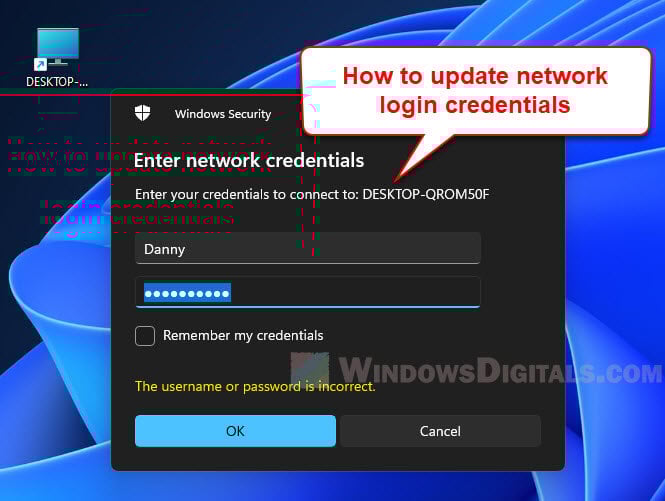
Когда несколько компьютеров находятся в одной локальной сети, удобно обращаться к их общим сетевым ресурсам. Защитной мерой для предупреждения несанкционированного доступа служит Ввод сетевых учетных данных. Это связано с политикой Microsoft по защите компьютеров с ОС Windows 10/11.
В некоторых случаях при введении логина и пароля продолжает поступать сообщение «Введите сетевые учетные данные», сопровождающееся ошибкой «Неверное имя пользователя или пароль». Здесь мы предоставим доступные способы устранения того, что операционная система не принимает учетные данные и продолжает их запрашивать. Для Windows 10 и Windows 11 решения будут идентичны.
Содержание
- Windows просит ввести сетевые учетные данные
- Где взять сетевые учетные данные
- Как отключить ввод сетевых учетных данных
- Измените текущий профиль сети
- Измените или удалите информацию в Диспетчере учетных данных
- Отключите общий доступ, защищенный паролем
- Выключите службу Диспетчера учетных данных
- Измените получение IP-адреса на автоматическое
- Измените локальную политику безопасности
- Заключение
Windows просит ввести сетевые учетные данные
Безопасность операционной системы требует указания логина и пароля для проверки прав доступа к ресурсам в локальной сети при пытке подключиться к сетевым дискам, удаленному рабочему столу другого компьютера или печати на сетевом принтере. Это помогает предотвратить несанкционированный доступ и защищает данные от неавторизованного использования.
Одной из распространенных проблем Windows является отказ в регистрации с повторным запросом даже при их правильном вводе.

Это считается ошибкой сетевых учетных данных и означает отсутствие возможности входа на другой компьютер в локальной сети.
Проблема может быть связана с тем, что на вашем ПК неверные настройки доступа, службы диспетчера учетных данных, неправильные параметры, относящиеся к системным настройкам.
Где взять сетевые учетные данные
Для подключения к локальной сети и использованию ее ресурсов необходимо ввести правильные аутентификационные данные. Здесь есть несколько вариантов:
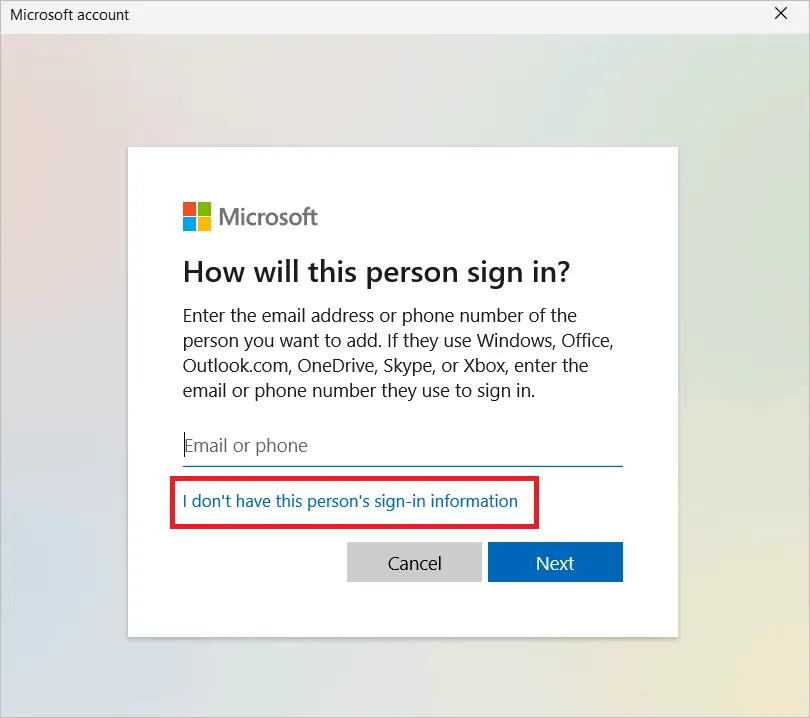
- Это логин и пароль локальной учетки Windows пользователя устройства, к которому вы планируете подключиться.
- Учетная запись Microsoft. В этом случае имя пользователя будет соответствовать адресу электронной почты, связанной с учетной записью Microsoft. Пароль будет также к ней привязан.
- Имя устройства+логин локальной учетки. Например, имя компьютера, к которому вы подключаетесь KOMP, а имя пользователя USER. В этом случае используемый логин будет KOMPUSER. Пароль тот же, что для п.1.
Устанавливая пароль помните, что безопасность вашей системы зависит от правильности и надежности выбора пароля.
Как отключить ввод сетевых учетных данных
Постоянный ввод информации может показаться неудобным для доступа. Отключение ввода может значительно облегчить процесс подключения к ресурсам локальной сети. Существует несколько способов обойти эту процедуру и сохранить время и усилия.
Измените текущий профиль сети
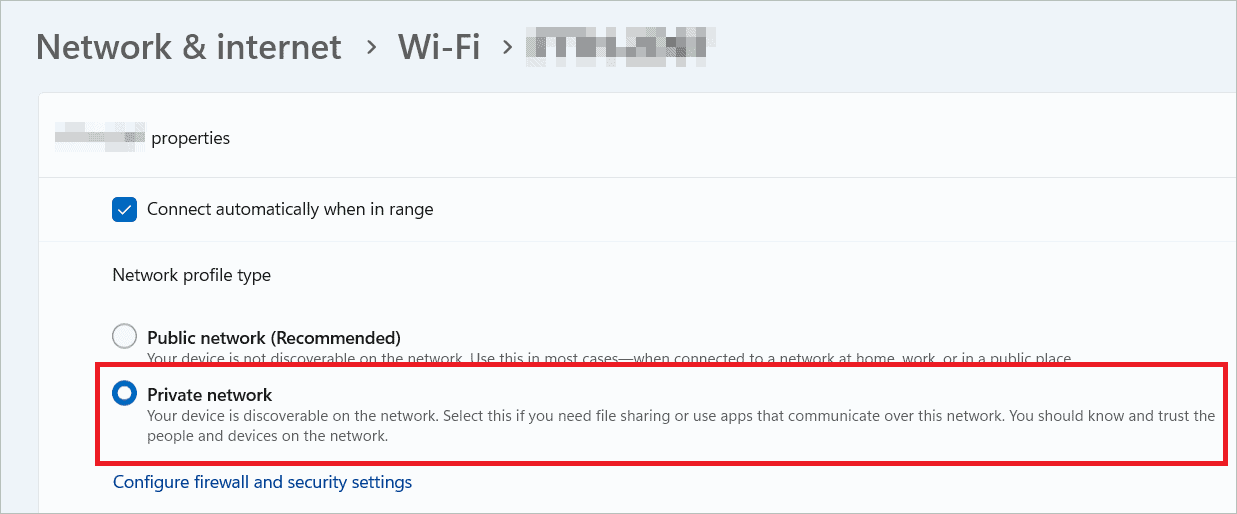
Проблема может возникнуть, если ваш сетевой профиль установлен как общественный. В этом случае ваш компьютер будет более ограничен для доступа к другим компьютерам и сетевым ресурсам. Это связано с проблемами безопасности, поскольку общественные сети часто не защищены и могут быть доступны любому в пределах досягаемости.
Чтобы решить проблему, установите сетевое соединение как частное. Тогда с компьютера можно будет свободно заходить на другие сетевые устройства без необходимости постоянной проверки подлинности.

Кликните по значку подключения к Интернету на панели задач и через предложенное меню перейдите в «Параметры сети и Интернет». На вкладке «Состояние» посмотрите, какой используется профиль сети.
Если профиль написан «Общественная», как на скриншоте, нажмите «Свойства» и активируйте в следующем окне режим «Частные».

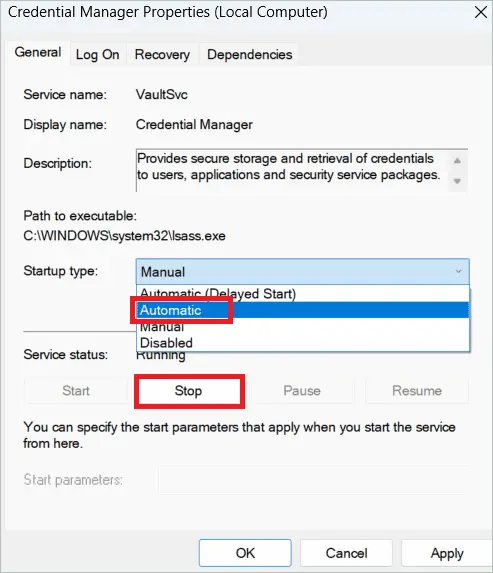
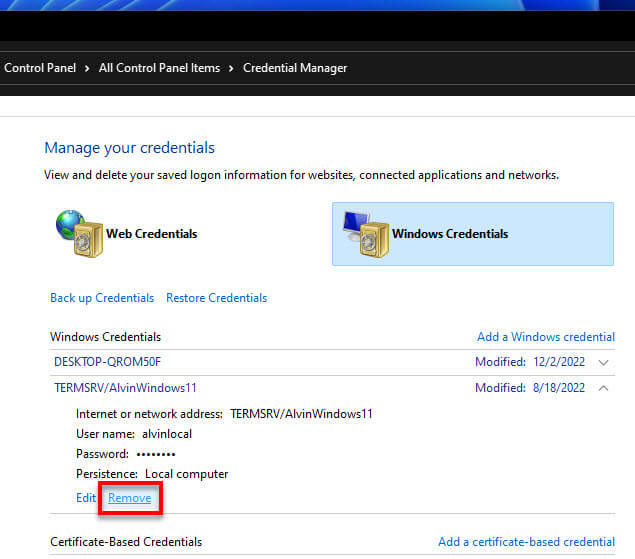
Измените или удалите информацию в Диспетчере учетных данных
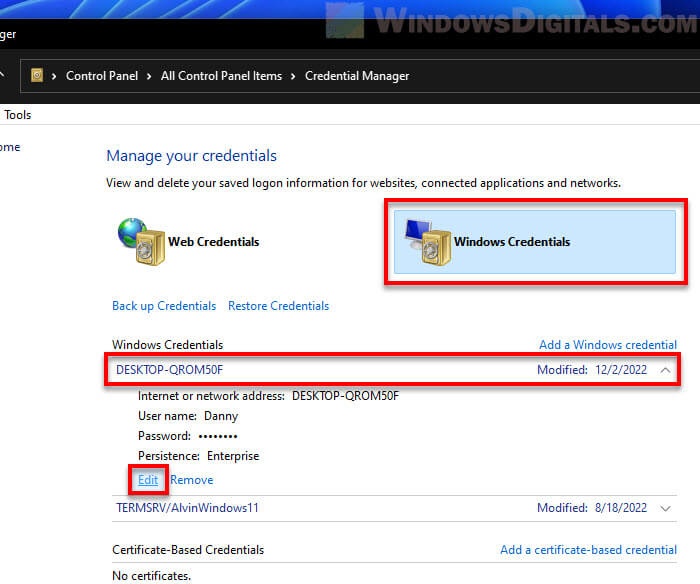
Если на устройстве, куда вы хотите залогиниться, поменяли имя пользователя или пароль, то на вашем ПК оно станет недействительным. Внесите изменения в информацию о неактуальных записях или удалите их.
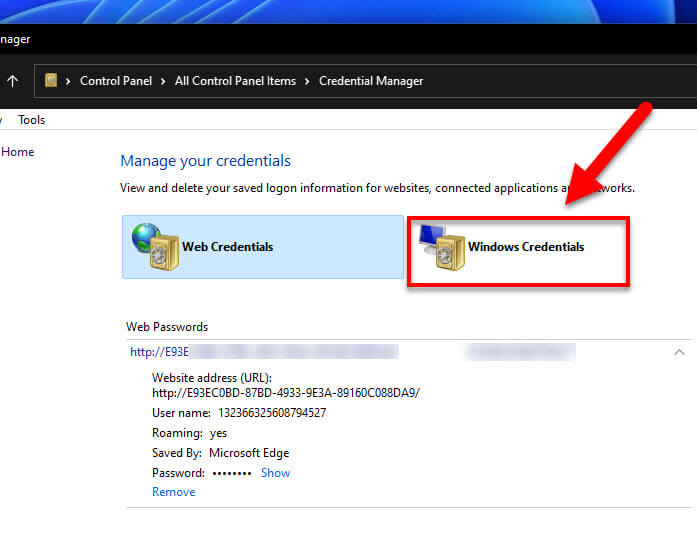
Для добавления учетных данных в хранилище Windows:
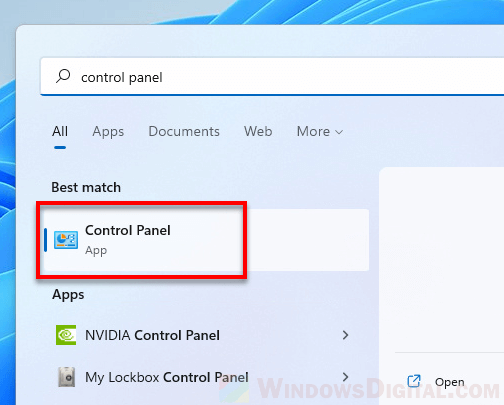
- В строке поиска справа от кнопки «Пуск» наберите «Диспетчер учетных данных» и соответствующий раздел из появившегося списка.
- Кликните «Учетные данные Windows» справа.
- Щелкните на интересующую вас сетевую учетную запись. В открывшемся окне можно изменить информацию или убрать запись полностью.
- Нажмите на «Правка», введите необходимые данные и сохраните результат.

Для удаления учетной записи воспользуйтесь соответствующим пунктом меню “Удалить”. Подтвердите свое действие и не забудьте все сохранить.
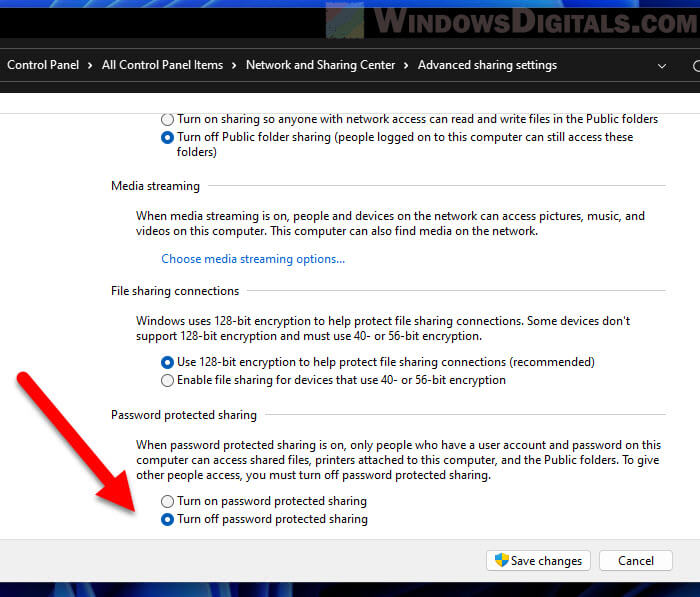
Отключите общий доступ, защищенный паролем
Эта функция позволяет только людям с учетными записями пользователей на вашем компьютере получать доступ к расшаренным файлам. Деактивируйте этот параметр на вашем компьютере и на удаленном таким образом:
- Выберите «Параметры сети и Интернет» через иконку подключения к сети, размещенную на панели задач.
- Зайдите в «Центр управления сетями и общим доступом».
- Перейдите в «Изменить дополнительные параметры общего доступа».
- Раскройте раздел «Все сети» для открытия полного набора параметров.
- В разделе «Общий доступ, защищенный паролем» находится раздел «Отключить общий доступ, защищенный паролем». Активируйте его.
- Сохраните изменения.

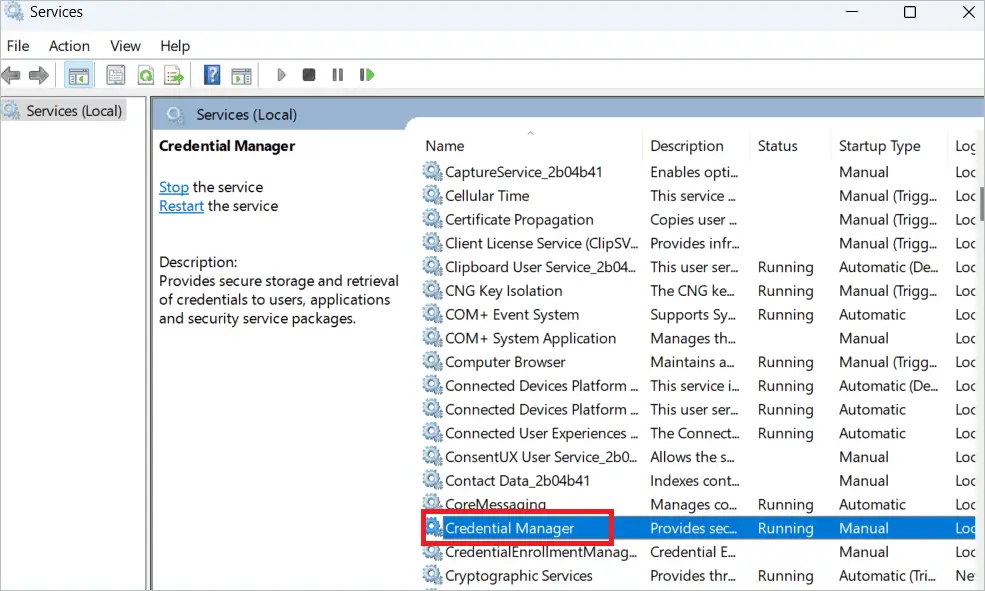
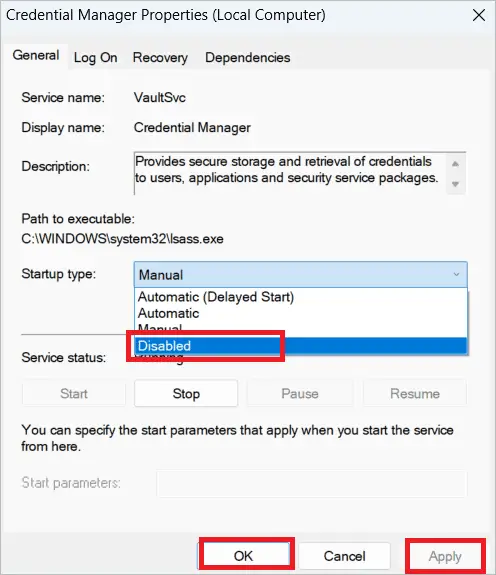
Выключите службу Диспетчера учетных данных
Для этого выполните последовательно действия:
- Откройте приложение «Службы» через окно поиска Windows.
- Найдите и дважды кликните по строке «Диспетчер учетных данных» – откроются его свойства.
- В раскрывающемся окне установите: «Тип запуска» – «Отключена», «Состояние» – «Остановить»
- Сохраните изменения, перезагрузите компьютер и протестируйте решение проблемы.

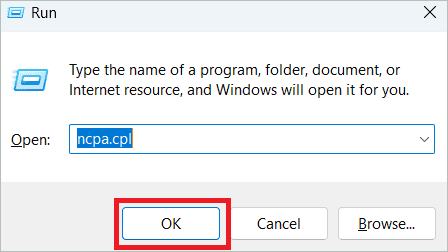
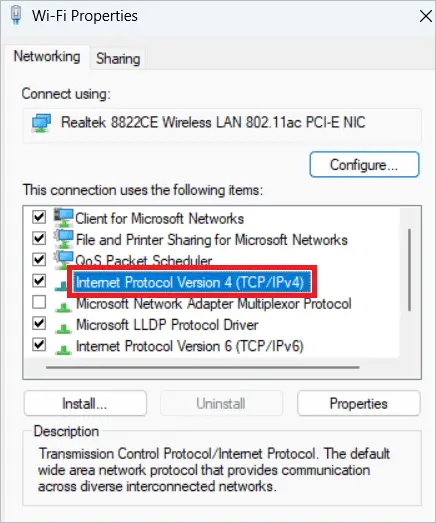
Измените получение IP-адреса на автоматическое
Если IP-адрес компьютера настроен неправильно, вы можете столкнуться с ошибкой сетевых данных из-за неоднозначной идентификации устройства в локальной сети. Для устранения проблемы установите его автоматическое получение. Для этого:
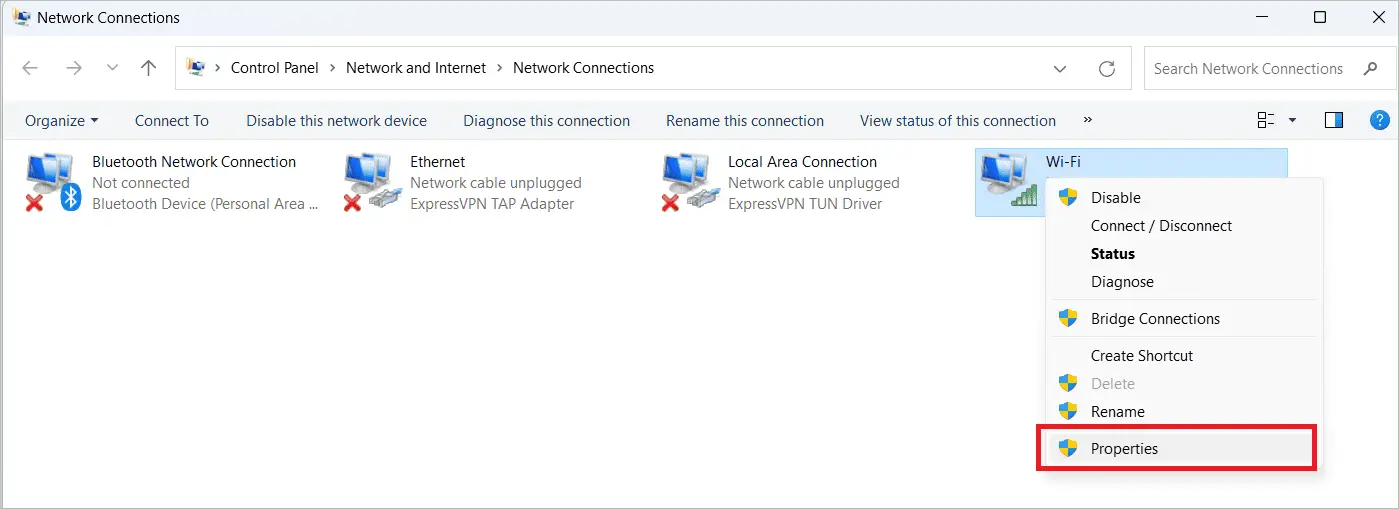
- В окне поиска Windows наберите «Сетевые подключения» и откройте «Просмотр сетевых подключений».
- Найдите название своей рабочей сети и правой кнопкой мыши вызовите «Свойства».
- Два раза кликните «Протокол Интернета версии 4 (TCP/IPv4)».
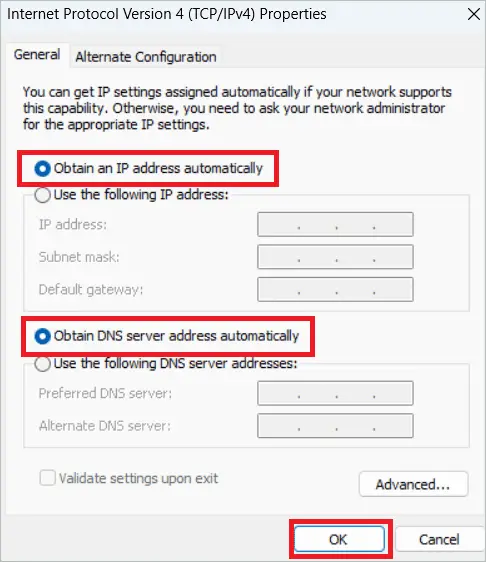
- Сделайте активными радиокнопки «Получить IP-адрес автоматически» и «Получить адрес DNS-сервера автоматически» и сохраните изменения.
- Не забудьте перезагрузить компьютер и проверьте, решена ли проблема.

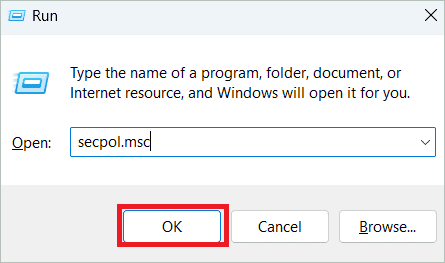
Измените локальную политику безопасности
Некоторые политики безопасности в ряде случаев могут влиять на доступ к сети и вызвать ошибку сетевых данных. Можете отключить политику, затрудняющую доступ, следующим образом:
- Нажмите одновременно «Win + R» на клавиатуре, в командном окне выполните «secpol.msc» для открытия консоли локальной политики безопасности.
- Разверните раздел «Локальные политики», зайдите в «Параметры безопасности».
- Найдите и щелкните два раза политику «Учетные записи: ограничить использование пустых паролей только консольным входом», чтобы изменить ее свойства.
- Установите с помощью переключателя статус «Отключен».
- Сохраните изменения и сделайте перезагрузку компьютера.

Заключение
Ввод сетевых учетных данных является обязательным этапом для обеспечения безопасности Windows при подключении к локальной сети. Это одна из мер которую следует предпринять при входе. Но иногда этот ввод заканчивается ошибкой, методы исправления которой были рассмотрены в этой статье.
Надеемся, что приведенные здесь простые способы помогли вам исправить ошибку и подключиться к сетевым ресурсам.
Key Takeaways
- Entering network credentials to access the network resources keeps the network data and resources safe and secure.
- Several users encounter the Enter network credentials in Windows 11 error while trying to enter a network.
- You can try changing different settings to fix the issue and access the network’s shared resources.
If you have more than one computer on your home network or are an IT administrator, you probably know the importance of network credentials. Network credentials are put in place to prevent unauthorized users from gaining entry into your network resources resulting in file loss. But many users got the Enter network credentials in Windows 11 error even after entering the correct user name and password while trying to access machines on the network.
The appearance of the network credentials error on Windows doesn’t necessarily mean the credentials you entered are wrong. You may check if the Caps Lock is accidentally enabled or some keys are not working. If you don’t gain network access in Windows 10 or 11, you cannot share files and access other computers in the network. You may have to troubleshoot deeper to identify the issue.
If you get the Enter network credentials in Windows 11 error, you may first check if you have entered the correct credentials on Windows 11. If you are not able to access the network even after the initial checks, you may fix the network credentials issue by following the solutions in the article.
1. Disable Password-Protected Sharing
If you have protected your files and folders using passwords, they become difficult to access across the network. The Enter network credentials in Windows 11 error can be kept at bay by turning off password protected sharing. When you disable the option, file-sharing can be done without entering credentials.
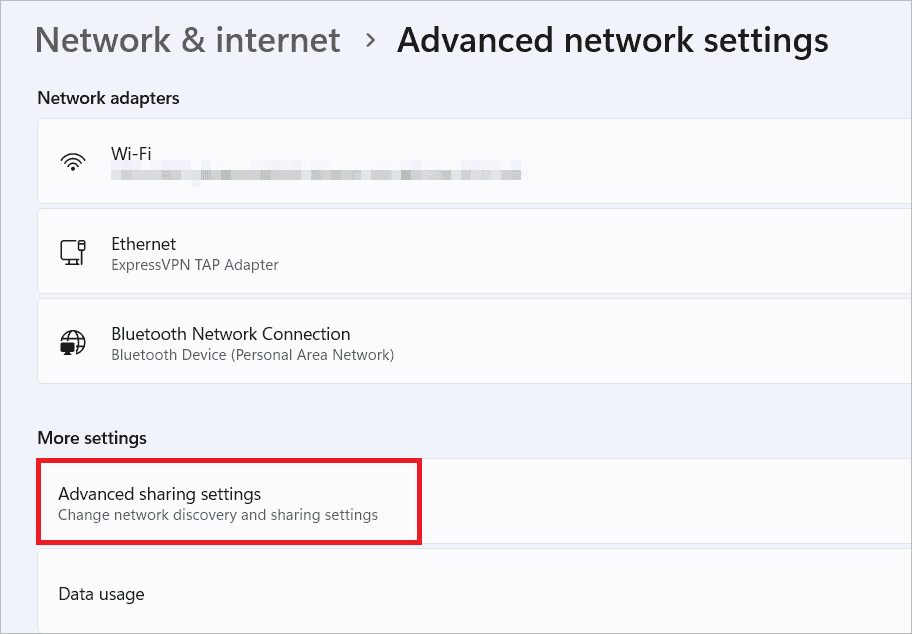
Right-click the network icon in the taskbar, and select “Network and Internet settings.”
Select “Advanced network settings” on the right side.
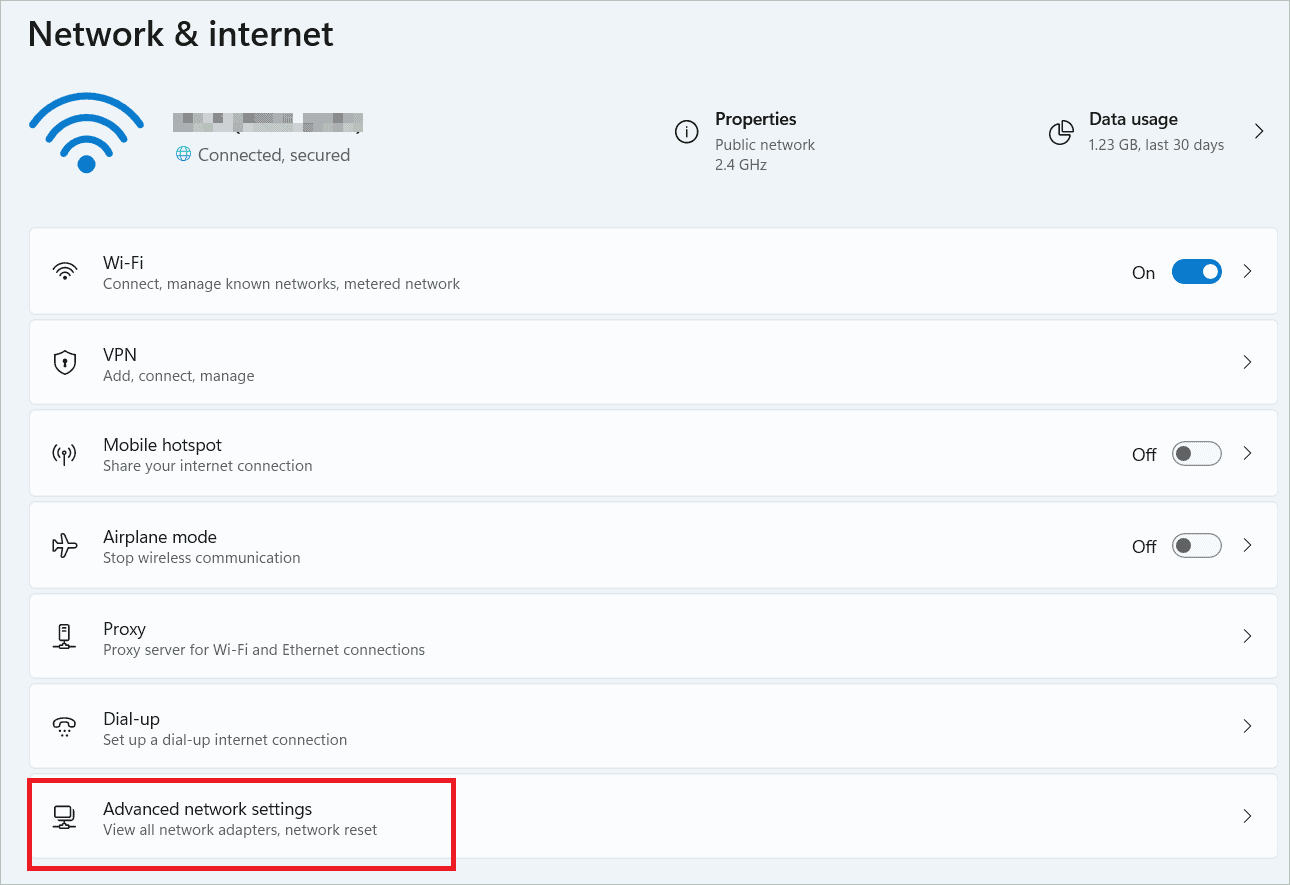
Now, select “Advanced sharing settings” under More settings.
Expand All networks and toggle off “Password protected sharing” to access resources without a password.
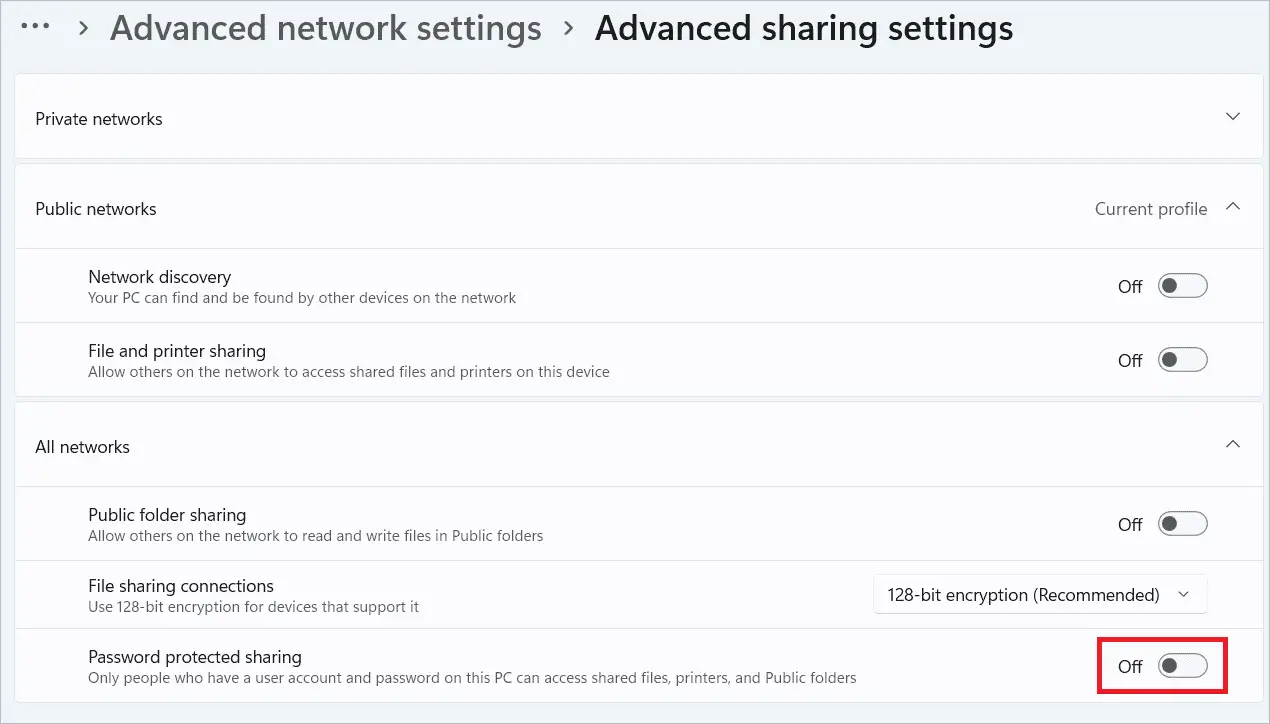
Once your work is done, remember to re-enable the option for security.
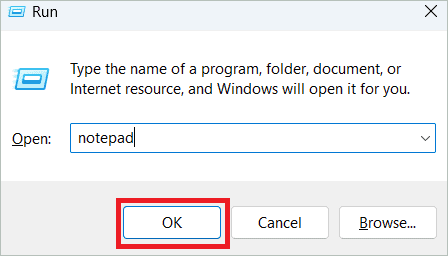
2. Clear All Credentials
Credential Manager is a place where all your usernames and passwords are stored. Just like decluttering your space, you can clear all the credentials from Windows Credential Manager. This might fix network credentials errors.
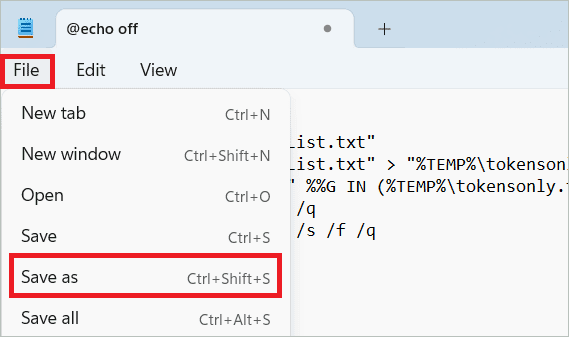
Press the Windows key + R to open the Run dialog box. Type “notepad” and click “OK” to open a notepad.
Copy and paste the following code into the notepad.
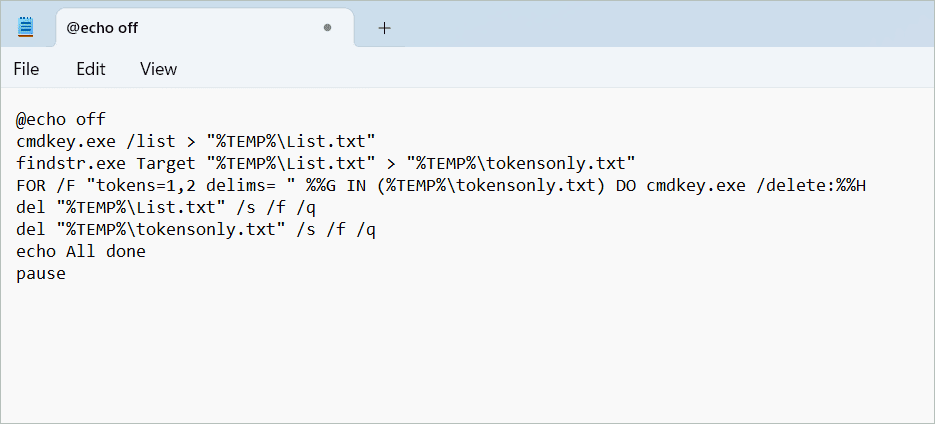
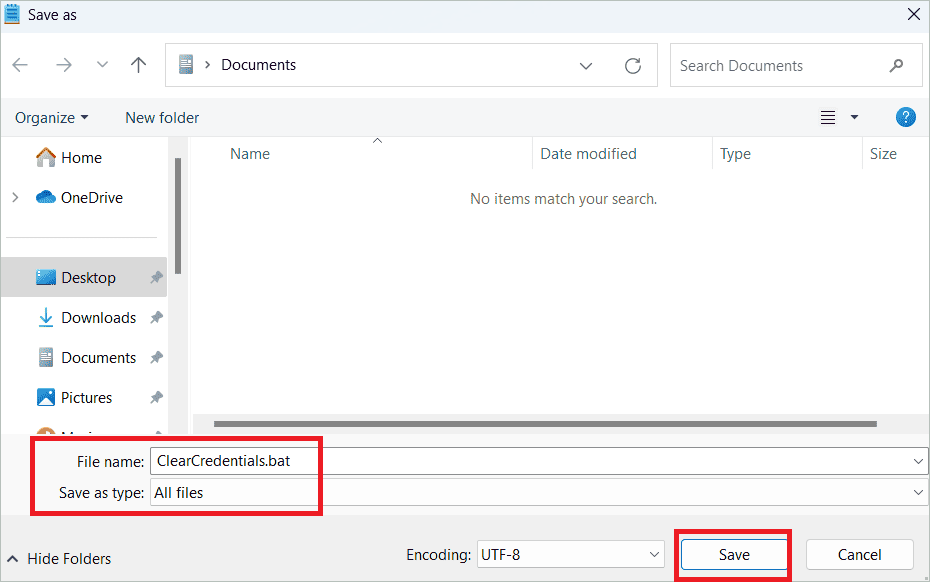
Select File > Save as and give the filename ClearCredentials.bat.
Then, in the Save as type field, select “All files” and Click “Save” to save the file.
Finally, run the batch file by running it as an administrator.
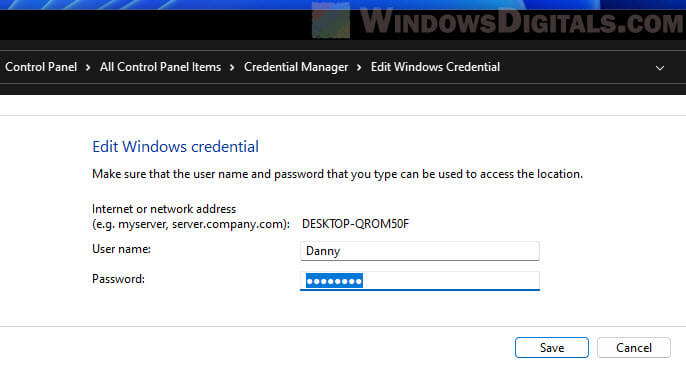
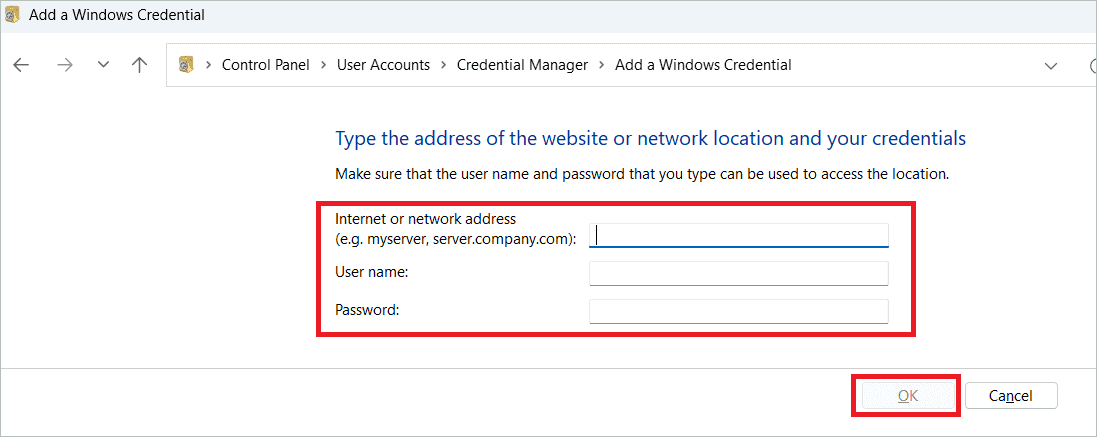
3. Add The Target PC Credentials To The Credential Manager
It is necessary to know the credentials of the target computer to access the data contained in it. But if you get the Enter network credentials in Windows 11 error while trying to gain entry, you may manually add its credentials to the Credential Manager.
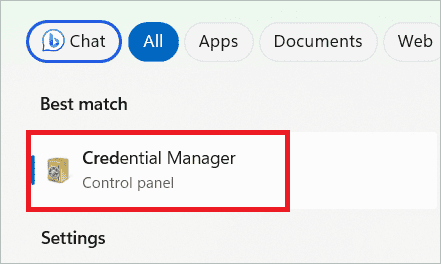
Type “credential manager” in the search bar and open the Credential Manager.
Select “Windows Credentials” under Manage your credentials and click “Add a Windows credential.”
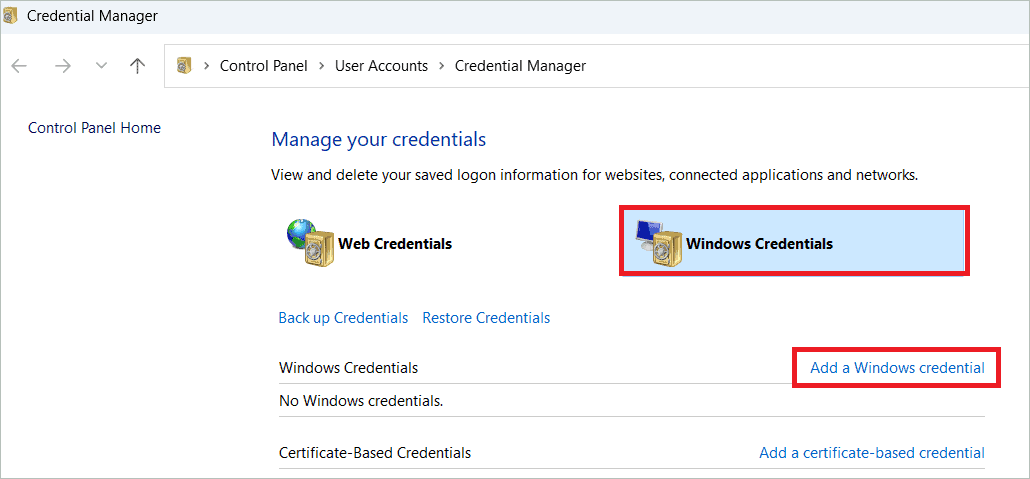
Now, add the credentials of the PC you want to access and click “OK.”
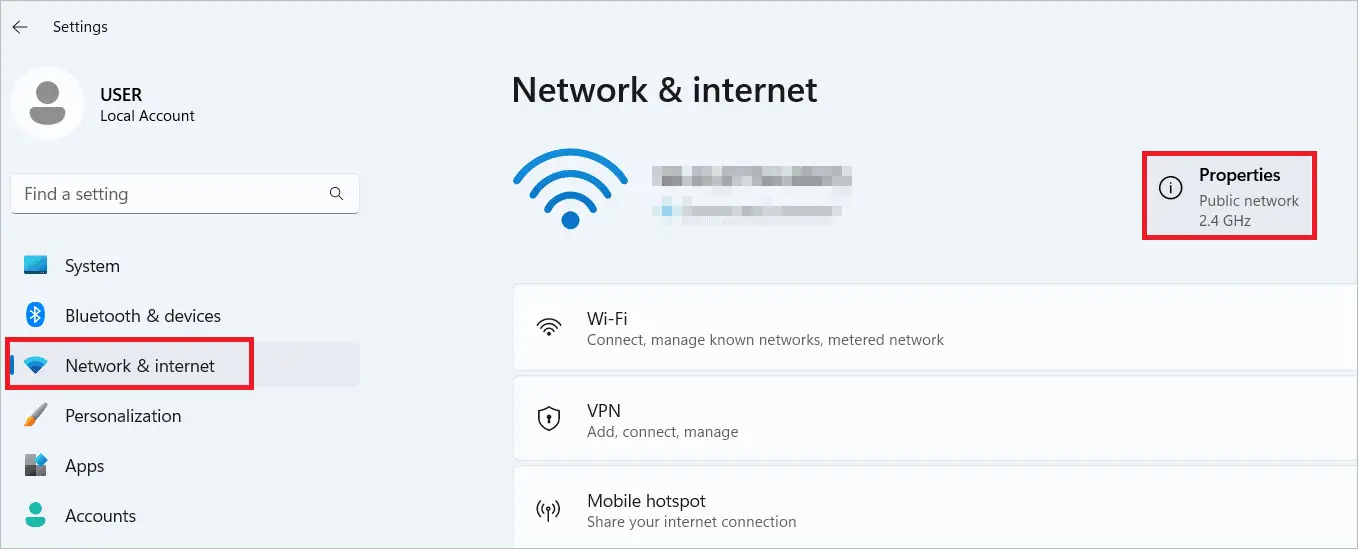
4. Make The Network Profile Private
If you have opted for a public profile, you may face issues while sharing files as the firewall plays its part. So, you can make the profile private and check if the network credentials on Windows error persists.
Press the Windows key + I to open Windows Settings. Next, select “Network & Internet” in the left pane and “Properties” in the right.