
В этой статье мы рассмотрим, как в Linux смонтировать общую сетевую папку, расположенную на хосте Windows. В Windows для доступа к общим сетевым папкам используется протокол SMB (Server Message Block), который ранее назывался CIFS (Сommon Internet File System). В Linux для доступа к сетевым папкам Windows по протоколу SMB можно использовать клиент cifs-utils или Samba.
- Смонтировать сетевую папку в Linux с помощью cifs-util
- Автоматическое монтирование сетевой папки в Linux
- Linux: подключиться к сетевой папке с помощью клиента samba
Содержание:
Совет. Для доступа к сетевым папкам по SMB/CIFS используется порт TCP/445. Для разрешения имени используются порты UDP 137, 138 и TCP 139. Если эти порты закрыты, вы сможете подключиться к сетевой папке Windows только по IP адресу.
Смонтировать сетевую папку в Linux с помощью cifs-util
Вы можете смонтировать сетевую папку, находящуюся на Windows хосте, с помощью утилит из пакета cifs-util. Для установки пакета выполните команду:
- В Ubuntu/Debian:
$ sudo apt-get install cifs-utils - В CentOS/Oracle/RHEL:
$ sudo dnf install cifs-utils
Создайте точку монтирования:
$ sudo mkdir /mnt/share
Теперь вы можете смонтировать сетевую папку с компьютера Windows под пользователем User03с помощью команды:
$ sudo mount.cifs //192.168.31.33/backup /mnt/share -o user=User03
Укажите пароль пользователя Windows для подключения к сетевой папке.
При подключении сетевой SMB папки можно задать дополнительные параметры:
$ sudo mount -t cifs -o username=User03,password=PasswOrd1,uid=1000,iocharset=utf8 //192.168.31.33/backup /mnt/share
- //192.168.31.33/backup – сетевая папка Windows
- /mnt/share – точка монтирования
- -t cifs – указать файловую систему для монтирования
- -o опции монтирования (эту опцию можно использовать только с правами root, поэтому в команде используется sudo)
- username=User03,password=PasswOrd1 – имя и пароль пользователя Windows, у которого есть права доступа к сетевой папке. Можно указать имя пользователя guest, если разрешен анонимный доступ к сетевой папке
- iocharset=utf8 – включить поддержку кодировки UTF8 для отображения имен файлов
- uid=1000 – использовать этого пользователя Linux в качестве владельца файлов в папке

По умолчанию шары Windows монтируются в Linux с полными правами (0755). Если вы хотите изменить права по-умолчанию при монтировании, добавьте в команду опции:
dir_mode=0755,file_mode=0755
Если вы хотите использовать имя компьютера при подключении сетевого каталога Windows, добавьте в файл /etc/hosts строку:
IP_АДРЕС ИМЯ_КОМПЬЮТЕРА
Чтобы не указывать учетные данные пользователя Windows в команде монтирования сетевой папки, их можно сохранить в файле.
Например:
$ mcedit ~/.windowscredentials
Добавьте в файл:
username=User03
password=PasswOrd1
Для подключения к папке под анонимным пользователем:
username=guest
password=
Если нужно указать учетную запись пользователя из определенного домена Active Directory, добавьте в файл третью строку:
domain = vmblog.ru
Измените права на файл:
$ chmod 600 ~/.windowscredentials
Теперь при подключении сетевой папки вместо явного указания имени пользователя и пароля можно указать путь к файлу:
$ sudo mount -t cifs -o credentials=/home/sysops/.windowscredentials,uid=1000,iocharset=utf8 //192.168.31.33/backup /mnt/share
Отмонтировать сетевую SMB папку:
$ sudo umount /mnt/share
Автоматическое монтирование сетевой папки в Linux
Можно настроить автоматическое монтирование сетевой папки Windows через /etc/fstab.
$ sudo mcedit /etc/fstab
Добавьте в файл следующую строку подключения SMB каталога:
//192.168.31.33/backup /mnt/share cifs user,rw,credentials=/home/sysops/.windowscredentials,iocharset=utf8,nofail,_netdev 0 0
- rw – смонтировать SBM папку на чтение и запись
- nofail – продолжить загрузку ОС если не удается смонтировать файловую систему
- _netdev – указывает что подключается файловая система по сети. Linux не будет монтировать такие файловые системы пока на хосте не будет инициализирована сеть.
Вы можете указать версию протокола SMB, которую нужно использовать для подключения (версия SMB 1.0 считается небезопасной и отключена по-умолчанию в современных версиях Windows). Добавьте в конец строки с настройками подключения параметр vers=3.0.
//192.168.31.33/backup /mnt/share cifs user,rw,credentials=/home/sysops/.windowscredentials,iocharset=utf8,nofail,_netdev,vers=3.0 0 0
Если на стороне хоста Windows используется несовместимая (старая версия) SMB, при подключении появится ошибка:
mount error(112): Host is downилиmount error(95): Operation not supported
Чтобы сразу смонтировать сетевую папку, выполните:
$ mount -a
Linux: подключиться к сетевой папке с помощью клиента samba
Установите в Linux клиент samba:
- В Ubuntu/Debian:
$ sudo apt-get install smbclient - В CentOS/Oracle/RHEL:
# dnf install smbclient
Для вывода всех SMB ресурсов в локальной сети:
$ smbtree -N
Вывести список доступных SMB папок на удаленном хосте Windows:
smbclient -L //192.168.31.33 -N
Если в Windows запрещен анонимный доступ, появится ошибка:
session setup failed: NT_STATUS_ACCESS_DENIED
В этом случае нужно указать учетную запись пользователя Windows, которую нужно использовать для подключения:
smbclient -L //192.168.31.33 -U User03
Если нужно использовать учетную запись пользователя домена, добавьте опцию –W:
smbclient -L //192.168.31.33 -U User03 –W Domain

Для интерактивного подключения к сетевой папке Windows используется команда:
smbclient //192.168.31.33/backup -U User03 -W Domain
или
smbclient //192.168.31.33/backup -U User03
Для анонимного доступа:
smbclient //192.168.31.33/backup -U Everyone
После успешного входа появится приглашение:
smb: \>
Вывести список файлов в сетевой папке:
dir
Скачать файл из сетевой папки Windows:
get remotefile.txt /home/sysops/localfile.txt
Сохранить локальный файл из Linux в SMB каталог:
put /home/sysops/localfile.txt remotefile.txt
Можно последовательно выполнить несколько команд smbclient:
$ smbclient //192.168.31.33/backup -U User03 -c "cd MyFolder; get arcive.zip /mnt/backup/archive.zip"
Полный список команд в smbclient можно вывести с помощью команды help. Команды smbclient схожи с командами ftp клиента.
При использовании команды smbclient может появиться ошибка:
Unable to initialize messaging contextsmbclient: Can't load /etc/samba/smb.conf - run testparm to debug it.
Чтобы исправить ошибку, создайте файл /etc/samba/smb.conf.
Если на хосте Windows отключен протокол SMB 1.0, то при подключении с помощью smbclient появится ошибка:
Reconnecting with SMB1 for workgroup listing.
protocol negotiation failed: NT_STATUS_CONNECTION_RESET
Unable to connect with SMB1 -- no workgroup available.
Contents
-
Client Access — Browsing SMB shares
- Ubuntu Clients
- Windows Clients (XP,Server,Vista, Win7)
-
Samba Client — Manual Configuration
- Connecting using CIFS
- Connecting using SMBFS (deprecated)
The samba package is a meta-package intended to be installed on file and printer sharing servers. Clients do not need this meta-package (you are acting as a client if you need to access files on another computer). For example, installing samba is not necessary if you only need your Ubuntu system to do any of the following:
-
Access shared folders, drives and printers on a Windows computer (that is, act as a client with Windows servers). To do this, you only need the smbfs plugin. See MountWindowsSharesPermanently for more information.
- Have your Windows computer use (via a network) a printer that is attached to a Linux computer. CUPS can be configured to make the printer accessible to the network.
-
Share directories between two Linux computers. You can use NFS or setup an SSH server on one computer and access it from other computers using an scp or sftp client, or Places -> Connect to Server… and choose «SSH» as the service type.
Ubuntu Clients
Ubuntu and Gnome make it easy to access files on a Windows network share. Open the Places Menu, then click on Network. You will see a Windows network icon. Double-click to open it. The next window shows all the domains/workgroups found on your network. Inside each domain/workgroup you will see all the computers on the domain/workgroup with sharing enabled. Double-click on a computer icon to access its shares and files.
-
If you want to be able to share folders with nautilus (the file browser), install the nautilus-share package (installed by default in Ubuntu 9.10 Desktop edition):
sudo apt-get install nautilus-share
Alternate: From the menu at the top select «Location» -> «Connect to a server». In the «Service type» pull down select «Windows share». Enter the server ip address in the «Server:» box and the share name in the «Share:» box. Click «Connect» and then «Connect» again on the second dialog box
Alternate 12.04: Double clicking on ‘Windows network’ did not work for me. So I went to ‘Go’ menu in the nautilus file browser and clicked ‘Location’. I got an address bar at the top of the window. I entered «smb://192.168.2.148» (substitute the IP address of your Samba server) — I was presented with user/password window — After typing in user/passwd I was able to see the samba shares on the server and browse the files/folders.
Note: The default installation of Samba does not synchronize passwords. You may have to run «smbpasswd» for each user that needs to have access to his Ubuntu home directory from Microsoft Windows.
Windows Clients (XP,Server,Vista, Win7)
Microsoft Windows clients connect and browse through their corresponding network interface.
Example: XP clients can open Windows Network Neighborhood or My Network Places to browse available SMB shares.
Samba Client — Manual Configuration
This section covers how to manually configure and connect to a SMB file server from an Ubuntu client. smbclient is a command line tool similar to a ftp connection while smbfs allows you to mount a SMB file share. Once a SMB share is mounted it acts similar to a local hard drive (you can access the SMB share with your file browser (nautilus, konqueror, thunar, other).
Connecting to a Samba File Server from the command line
Connecting from the command line is similar to a ftp connection.
List public SMB shares with
smbclient -L //server -U user
Connect to a SMB share with
smbclient //server/share -U user
Enter you user password.
You can connect directly with
smbclient //server/share -U user%password
but your password will show on the screen (less secure).
Once connected you will get a prompt that looks like this :
smb: \>
Type «help» , without quotes, at the prompt for a list of available commands.
Connecting using CIFS
CIFS is included in the smbfs package and is a replacement for smbfs (I know, the terminology here is a little confusing).
Reference : http://linux-cifs.samba.org/
As above, install by any method, smbfs, on Ubuntu 12.10, smbfs has been replaced by cifs-utils.
Allow non-root users to mount SMB shares
By default only root may mount SMB shares on the command line. To allow non-root users to mount SMB shares you could set the SUID, but I advise you configure sudo. You should configure sudo with visudo
You may either allow the group «users» to mount SMB shares, or add a group, samba, and add users you wish to allow to mount SMB shares to the samba group.
sudo groupadd samba
sudo adduser user samba
Change «user» to the username you wish to add to the samba group.
sudo visudo
In the «group» section add your group you wish to allow to mount SMB shares
Add a line  in the "group" section :
## Members of the admin group may gain root privileges
%admin ALL=(ALL) ALL
%samba   ALL=(ALL) /bin/mount,/bin/umount,/sbin/mount.cifs,/sbin/umount.cifs
Change «%samba» to «%users» if you wish to allow members of the users group to mount SMB shares.
The following will mount the myshare folder on myserver to ~/mnt (it will be in your home directory):
mkdir ~/mnt
sudo mount -t cifs //myserver_ip_address/myshare ~/mnt -o username=samb_user,noexec
Note: «samba_user» = the user name on the samba server (may be different from your log-in name on the client).
The «noexec» option prevents executable scripts running from the SMB share.
You will be asked for BOTH your sudo and then your samba_user password.
To umount,
sudo umount ~/mnt
Automagically mount SMB shares
In order to have a share mounted automatically every time you reboot, you need to do the following:
With any editor, create a file containing your Windows/Samba user account details:
gksu gedit /etc/samba/user
KDE users must use kdesu rather than gksu and instead of Gedit they can use Kwrite as editor.
… it should contain two lines as follows:
username=samba_user
password=samba_user_password
Note: «samba_user» = the user name on the samba server (may be different from your log-in name on the client). «samba_user_password» is the password you assigned to the samba_user on the samba server.
Save the file and exit gedit.
Change the permissions on the file for security:
sudo chmod 0400 /etc/samba/user # permissions of 0400 = read only
Now create a directory where you want to mount your share (e.g. /media/samba_share):
sudo mkdir /media/samba_share
Now, using any editor, and add a line to /etc/fstab for your SMB share as follows:
sudo cp /etc/fstab /etc/fstab.bak
gksu gedit /etc/fstab
Add a line for your SMB share:
//myserver_ip_address/myshare /media/samba_share cifs credentials=/etc/samba/user,noexec 0 0
The share will mount automatically when you boot. The «noexec» option prevents executable scripts running from the SMB share.
To mount the share now, without rebooting,
sudo mount /media/samba_share
You can unmount the share with :
sudo umount /media/samba_share
If you wish to increase security at the expense of convenience, use this line in /etc/fstab
//myserver_ip_address/myshare /media/samba_share cifs noauto,credentials=/etc/samba/user,noexec 0 0
The noexec» option prevents executable scripts running from the SMB share.
Edit /etc/samba/user, remove the password (leave just the samba user).
Now the share will NOT automatically mount when you boot and you will be asked for your samba password.
Mount the share with :
sudo mount /media/samba_share
CIFS may cause a shutdown error.
CIFS VFS: Server not responding.
There is a fix in the troubleshooting section of this forum post.
Back to top
Connecting using SMBFS (deprecated)
Note: This method still works, but as outlined under the «CIFS» section above is «deprecated» (no longer maintained and pending removal from the kernel).
Mounting a share on the local filesystem allows you to work around programs that do not yet use GnomeVFS to browse remote shares transparently. To mount a SMB share, first install smbfs:
sudo apt-get update
sudo apt-get install smbfs
To allow non root accounts to mount shares, change the permissions on the smbmnt program thus:
sudo chmod u+s /usr/bin/smbmnt /usr/bin/smbumount
Note: This may be a security risk as after setting the SUID bit anyone can mount a SMB share. I advise you configure sudo, as above.
The working line in /etc/sudoers is as follows (see CIFS section above):
%samba ALL=(ALL) /bin/mount,/bin/umount,/sbin/mount.cifs,/sbin/umount.cifs,/usr/bin/smbmount,/usr/bin/smbumount
This allows any user in the samba group to mount SMB shares (you will need to create a samba group and add users).
The following will mount the myshare folder on myserver to ~/mnt (it will be in your home directory):
mkdir ~/mnt
smbmount //myserver/myshare ~/mnt
To umount,
smbumount ~/mnt
In order to have a share mounted automatically every time you reboot, you need to do the following:
Open a shell as root
sudo -s
Create a file containing your Windows/Samba user account details:
vi /etc/samba/user
…it should contain two lines as follows:
username=george
password=secret
Change the permissions on the file for security:
chmod 0600 /etc/samba/user
Now create a directory where you want to mount your share (e.g. /mnt/data):
mkdir /mnt/data
Now edit the file system table (/etc/fstab) and add a line as follows:
//server/share /mnt/data smbfs credentials=/etc/samba/user,rw,uid=bob 0 0
…where ‘bob’ is the non-root user you log into ubuntu with, ‘server’ is the name or address of the Windows machine and ‘share’ is the name of the share.
To mount the share now, just use the following command as root. It will mount automatically on subsequent reboots.
mount /mnt/data
to be continued…
Ubuntu Client
On the Ubuntu client using the menu at the top, go to «Places» -> «Network». You will see an icon «Windows network» and should be able to browse to your shared folder. You will be asked for a password, leave it blank. Click the «Connect button.
(no need for a password).
If you would like to mount your SMB share using your (server) hostname rather than the IP Address, edit /etc/hosts and add your samba server (syntax IP Address hostname).
192.168.1.100 hostname
Where «hostname» = the name of your samba server.
Windows Client
On Windows open «My Computer» and navigate to «My Network Places». Navigate to your Ubuntu server and your share will be available without a password.
Alternate : From the menu at the top select «Tools» -> «Map Network Drive». Select an available letter for your SMB share (Default is z: ). In the «Folder:» box enter \\samba_server_ipaddress\share. Tic (Select with the mouse) the option «Reconnect at login» if you want the share to be automatically mounted when you boot Windows. Click the «Finish» box. A dialog box will appear, enter your samba user name and password. Click «OK».
If you would like to mount your SMB share using your (server) hostname rather than the IP Address, edit C:\WINDOWS\system32\drivers\etc\hosts and add your samba server (syntax IP Address hostname).
192.168.1.100 hostname
Where «hostname» = the name of your samba server.
In the Windows operating system, there is a feature called file sharing. On one computer, you can set up windows-shared folder that will be accessible to all computers on the local network. This is done using the SMB protocol, which has several versions. In Linux, you can open and create shared folders using Samba.
The Samba server supports all versions of the SMB protocol. However, there are some compatibility issues. In this article, I will explain how to access a Windows Shared folder in Linux using popular desktop environments and the command line.
Table of Contents
- Why It May Not Work?
- Ensure that Everything is Set Up Correctly in Windows
- Finding Shares in Linux Terminal
- Open Shared Folder in KDE Dolphin
- Open Share in GNOME Nautilus
- Mounting a Shared Folder in the Terminal
- Wrapping Up
Why It May Not Work?
In older versions of Linux distros and Windows 7 everything worked fine because they used the SMB1 protocol. However, there have been several changes recently. In 2017, the Wannacry virus emerged, which exploited vulnerabilities in the SMB1 protocol. As a result, modern versions of Windows have disabled support for SMB1 and now use SMB3 by default. Samba has also disabled SMB1 since version 4.11. However, SMB2 and SMB3 lack support for device discovery in the local network.
In general, this is no longer necessary because there is a network discovery protocol called Zeroconf. In Linux, its open-source implementation, Avahi, is used. Linux servers and NAS storage can publish themselves on the local network using this protocol. So that, there is no need to support it in SMB. However, Microsoft decided to use its own protocol called WS-Discovery, and that’s where the problems began.
At the time of writing this article, Linux system has issues with discovering shared folders in the local network. The Nautilus file manager in GNOME does not support WS-Discovery at all, and there are no production-ready terminal utilities for it either. You can track the current status of implementing WS-Discovery support in this GVFS issue. However, in 2020, the KDE team added support for this protocol in the Dolphin file manager using kdsoap-ws-discovery-client.
Later, a program for KDE called Smb4k appeared, which can discover network resources using Avahi and the WS-Discovery protocol, but it needs to be compiled with a special option. So that, in GNOME, you can only open a Windows shared folder by knowing the IP address of the computer where it is located. Whereas in KDE, it is a bit more convenient to do so.
Ensure that Everything is Set Up Correctly in Windows
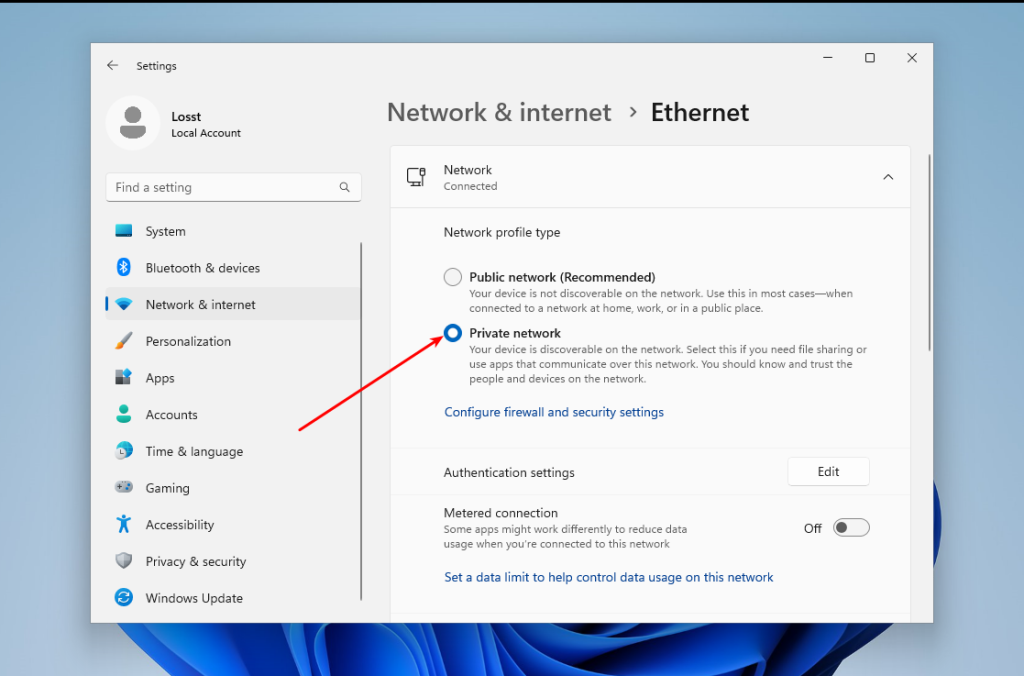
Previously, it was enough to go to File Explorer and enable file sharing there. But it no longer works that way. First, you need to make your current network private in Windows. By default, only private networks are considered secure, and Windows machines can be discovered in them. To do this, open Settings -> Network & Internet -> Ethernet and select Network Profile Type -> Private Network:
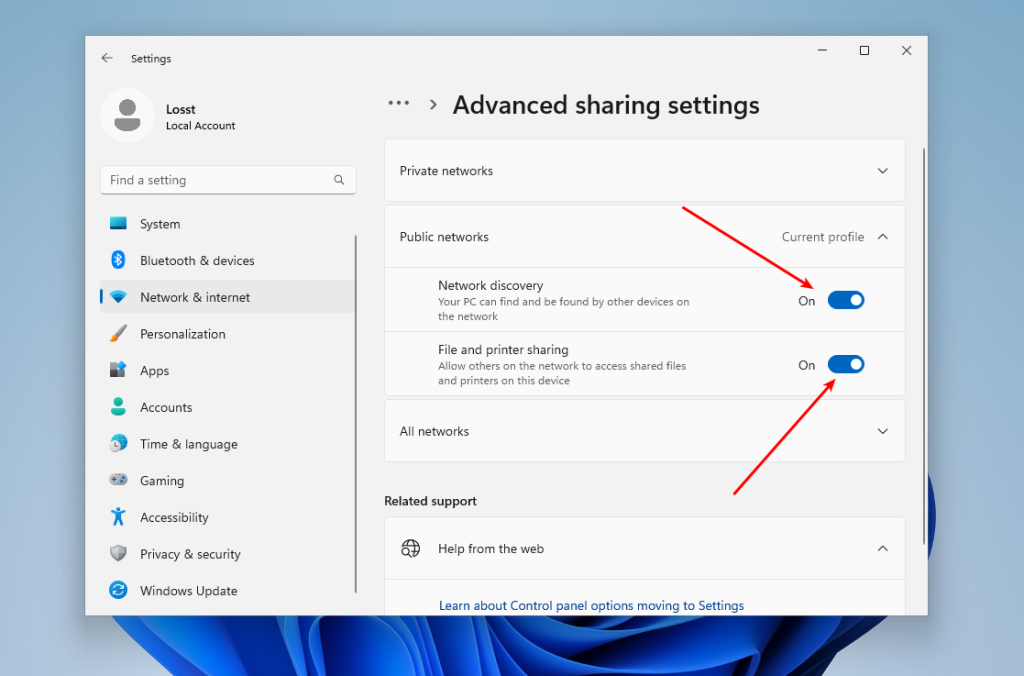
If your current network is wireless, you should do the pretty same thing. Next, go back and select Advanced Sharing Settings. In this window, enable Network discovery and File and printer sharing:
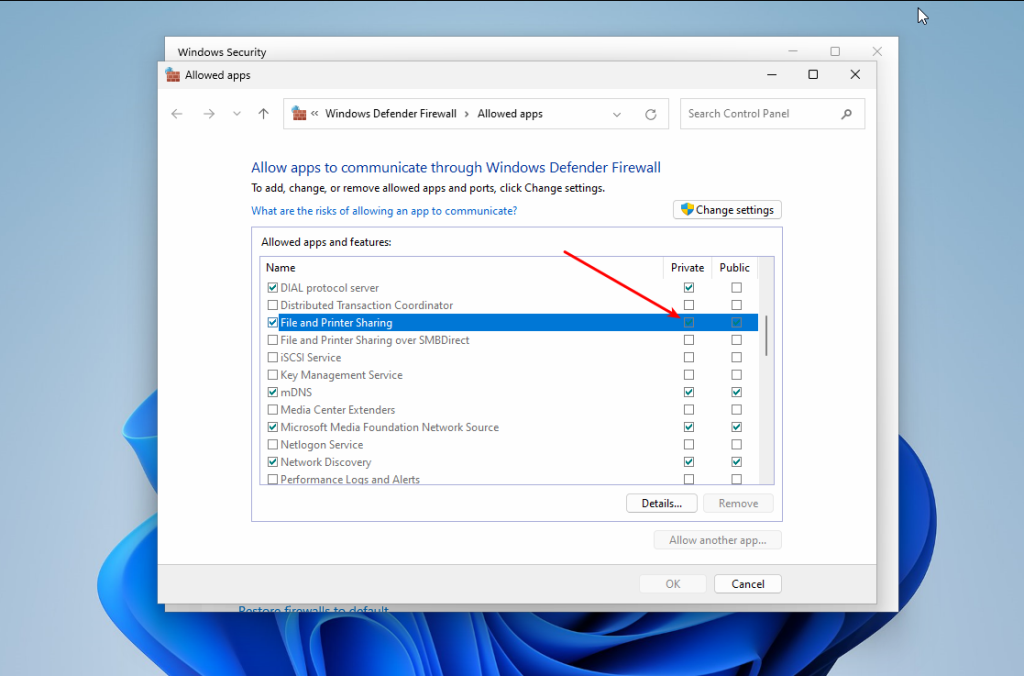
Finally, you need to ensure that the firewall is configured correctly and allows SMB connections. To do this, go back to the main Settings menu, then open Privacy & Security -> Firewall & network protection. Click on Allow an app through the firewall:

Make sure that File and printer sharing and Network discovery are enabled for Private networks:
That’s it. Now you can go to your Linux machine.
Although there are no command-line tools for working with WS-Discovery, you can try to find devices with shared resources using Nmap. This program cannot search for resources like Avahi does, but it can help you find IP addresses with an open port 445. This port is used by SMB. To do this, you need to install the following packages (Ubuntu):
sudo apt install nmap smbclient
Or Fedora:
sudo dnf install nmap samba-client
Also, you need to find out the IP address range of your local network. You can take your IP address and mask and just replace the fourth digit with zero. For example:
ip -br a
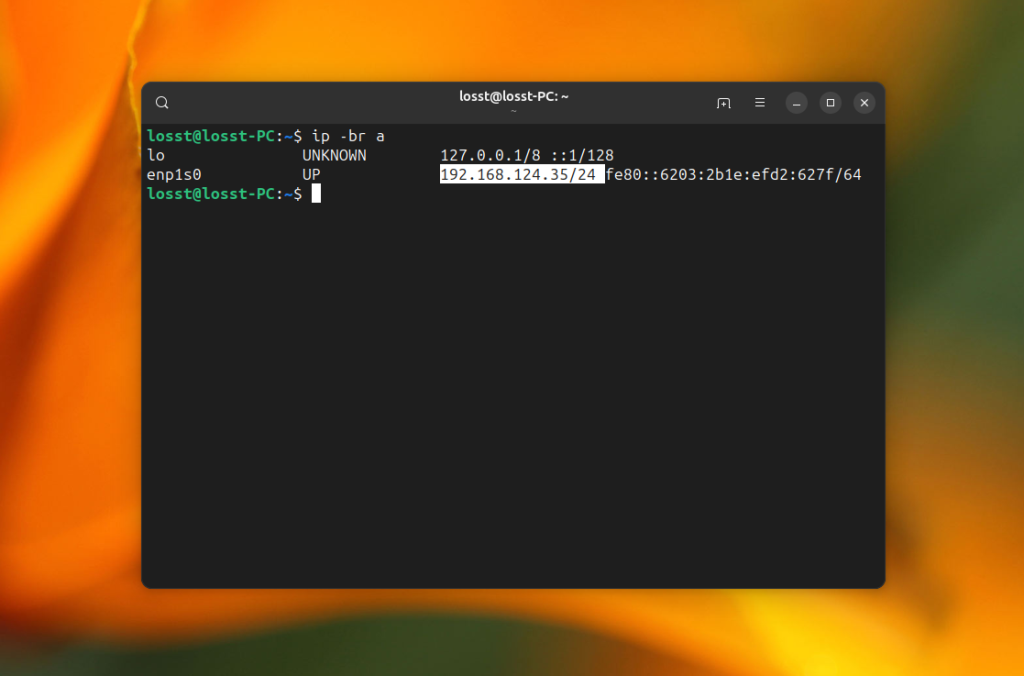
The command for the search will look like this. Replace 192.168.124.0/24 with your local network address range and run it in the the terminal window with sudo privileges:
nmap -p 445 --open -n -Pn 192.168.124.0/24
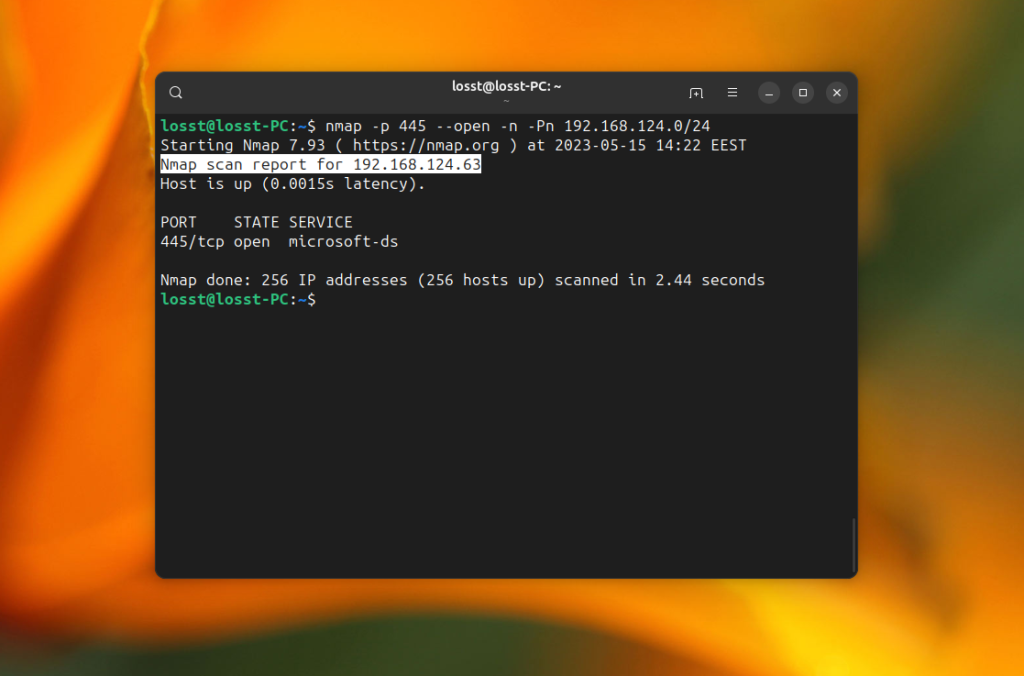
The -p option specifies the port 445, -Pn option disables ICMP discovery and treats all IP addresses as alive, -n disables DNS hostname resolution. The command may take quite a while, but as a result, it will find hosts with open port 445 if such hosts exist in your local network:
This can’t be considered as normal network discovery, but it works. Now you can use smbclient to see which shared folders are on the server that you found. For example:
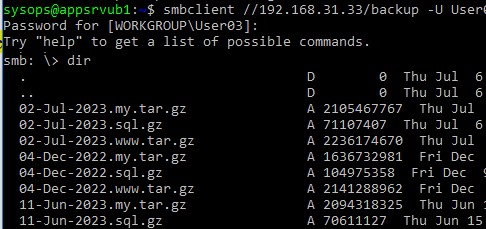
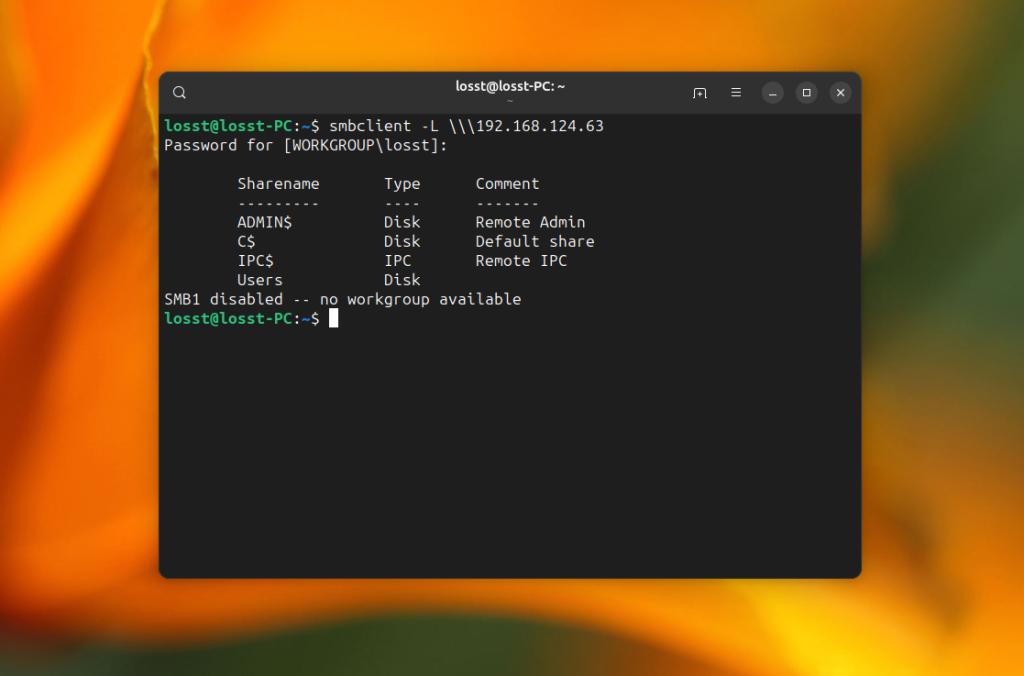
smbclient -L 192.168.124.63
The command will ask you to enter the share password. Usually, it is password for your Windows user, and then it will show all available shared folders:
Now let’s have a look at how to mount them.
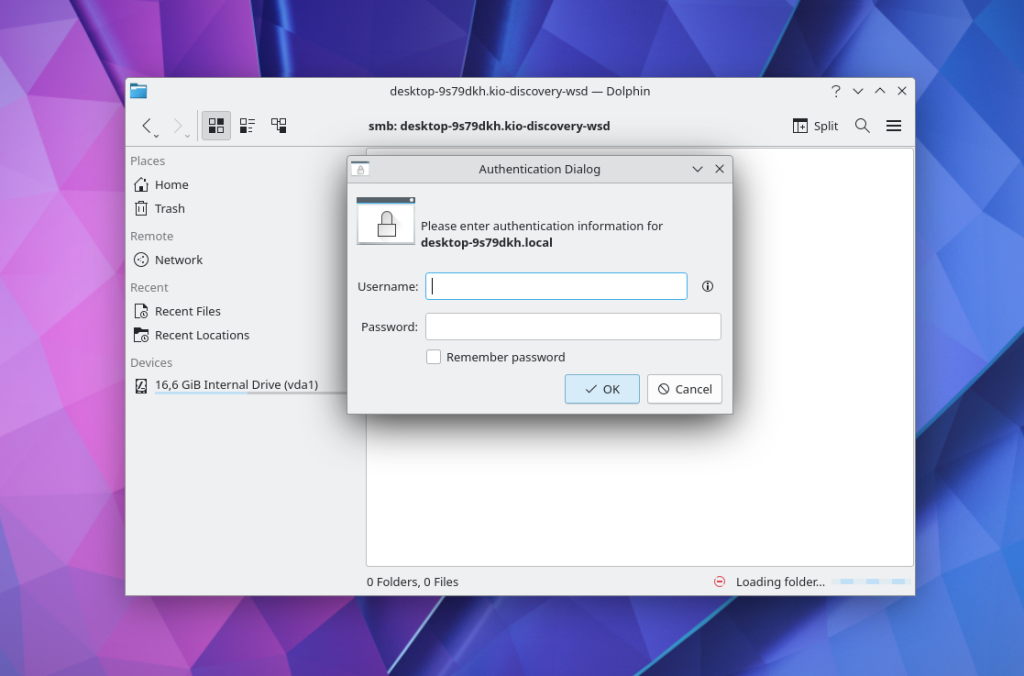
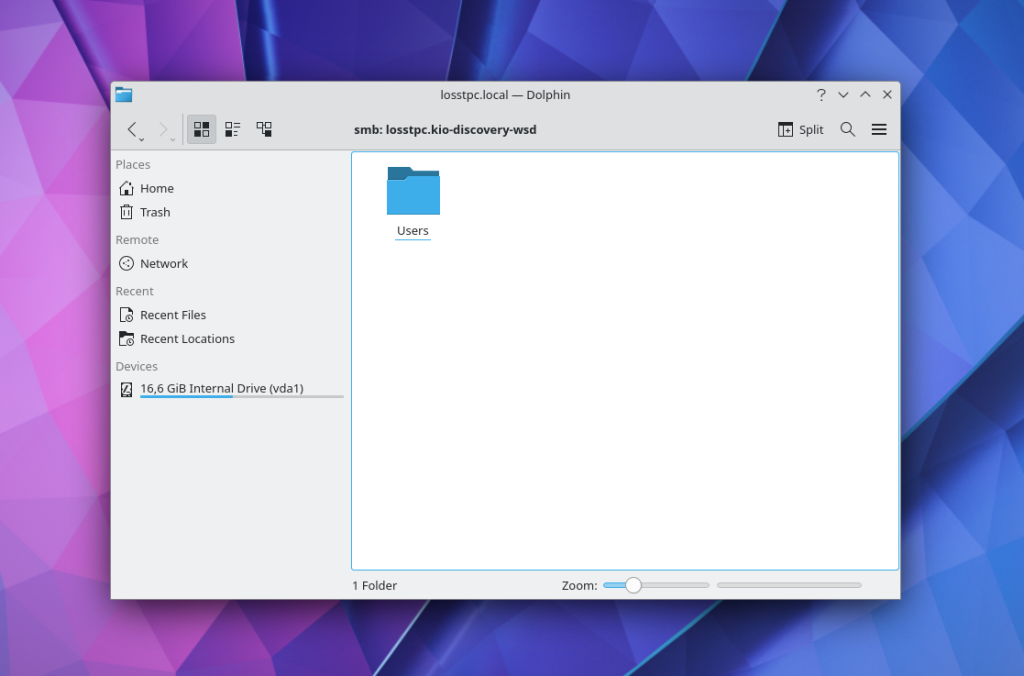
To open a shared folder in KDE, you can use the Dolphin file manager. As I mentioned earlier, here you can see all available computers that have network drive on the local network. To do this, run Dolphin, then open Network, and then Shared Folders (SMB):

Click on one of the resources and enter the username and password to view the available folders:
This is what shared folders from Windows 11 look like. Here you can find windows files:
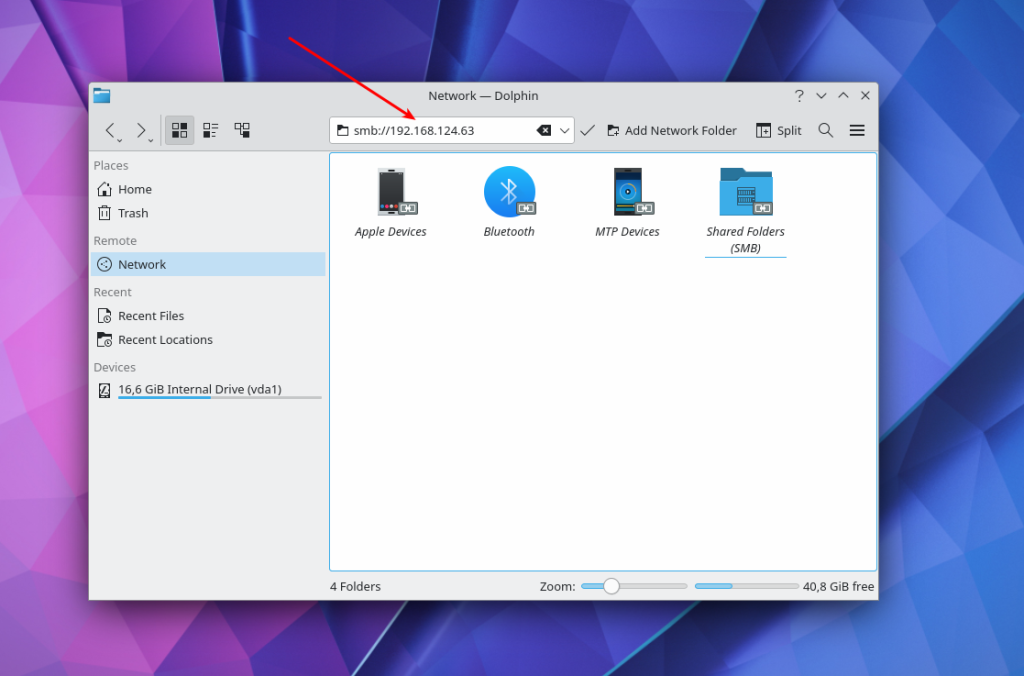
If network discovery does not work in your case, you can still enter the IP address of the resource in the text field at the top of the window and connect to it. For example, smb://192.168.124.63/
If you want to connect to a Windows shared folder in the GNOME graphical interface, you can use the Nautilus file manager. Open Other Locations and find at the bottom of the window the inscription Connect to Server and a field for entering an address.
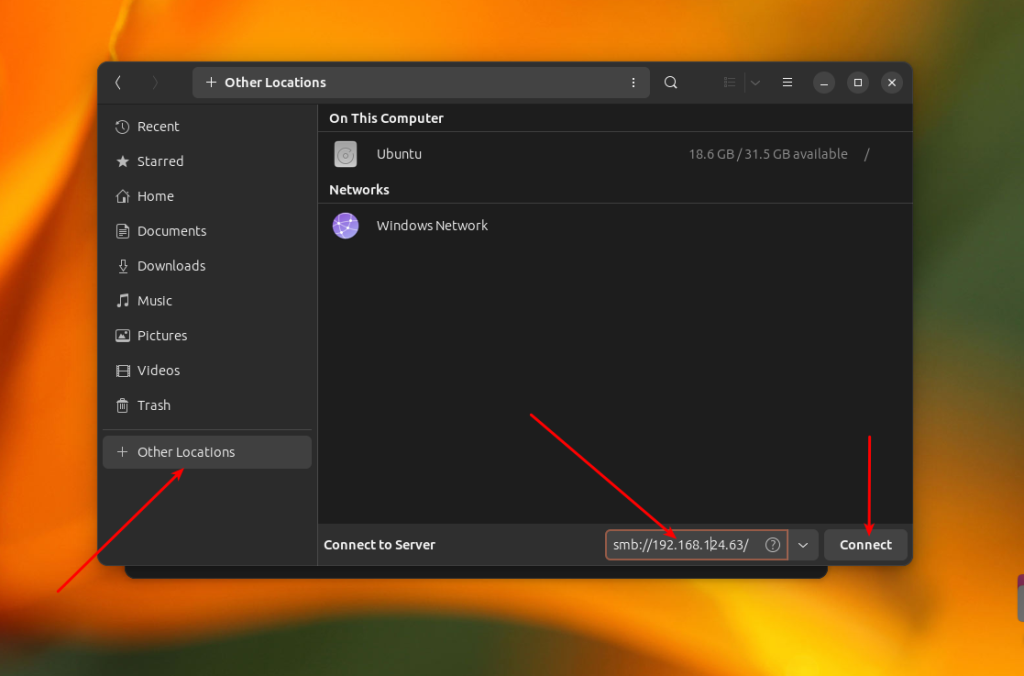
There’s no point in opening the Windows Network item, because GVFS, which is used in GNOME for disk mounting, does not support the WS-Discovery protocol. To connect to a remote windows share located on a server with IP 192.168.124.63, enter this address and press the Connect button:
smb://192.168.124.63
In the next window, you need to enter a password and after that, you can view the files of the shared folder:
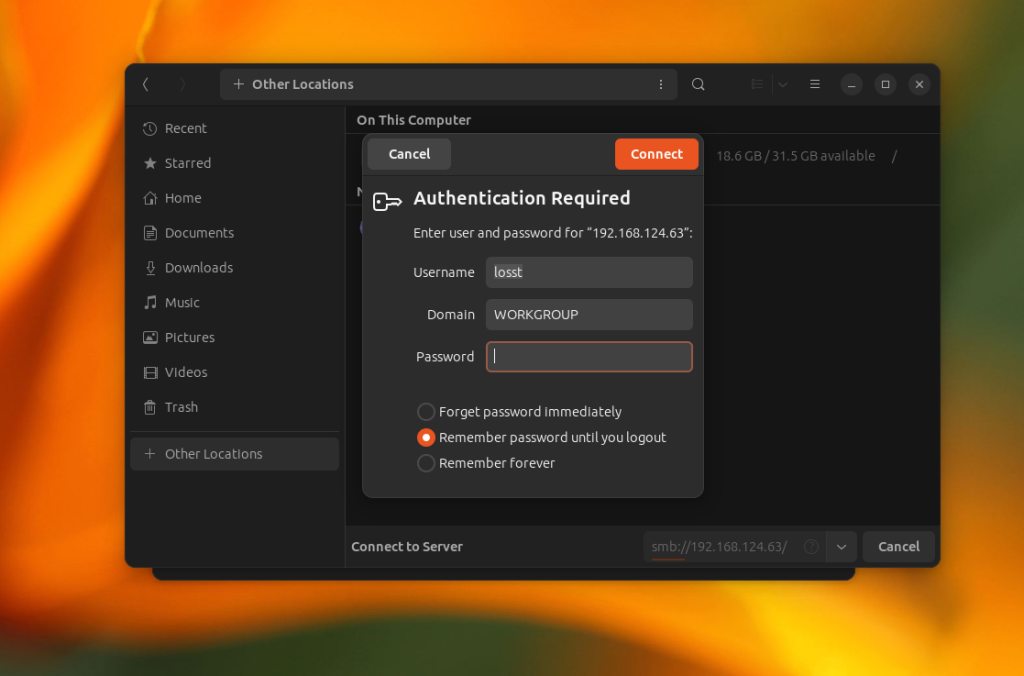
After this, you can browse your windows folders.

Additionally, you can use a shortcut on the left panel to access a remote share which is already mounted.
If you want to mount windows share in the terminal, you can use cifs-utils and the mount command. Firstly, install the cifs-utils package. The command for Ubuntu:
sudo apt install cifs-utils
In Fedora:
sudo dnf install cifs-utils
Now, you can execute the mount command specifying the cifs file system type and the username option. Note that you can’t mount the root of the cifs share, you need to add any folder in the path. For example, Users on 192.168.124.63:
sudo mount -t cifs -o username=losst //192.168.124.63/Users /mnt/
If you want to have write access to the windows share folder, you need to add the uid option with the identifier of your user. For the first user, it’s usually 1000:
sudo mount -t cifs -o username=losst,uid=1000 //192.168.124.63/Users /mnt/
You can find the identifier of the current user in the UID environment variable:
echo $UID
If you want to mount share automatically at system startup, you need to save the share username and password in a credentials file, for example, /etc/share/windows-credentials. For instance:
sudo mkdir -p /etc/share/
username=losst

password=password

domain=workgroup
And then add the following line to the /etc/fstab file:
//192.168.124.63/Users /mnt/share cifs credentials=/etc/share/windows-credentials,uid=1000,nofail 0 0
The nofail option is needed to allow your computer to boot even if the remote folder could not be mounted. After this, reload systemd settings:
sudo systemctl daemon-reload
Create the mount point directory:
sudo mkdir -p /mnt/share
You can check that everything is working using the following command:
sudo mount /mnt/share
If everything is ok, you could see contents of mounted share in the /mnt/share folder:
Wrapping Up
In this article, we looked at how to mount Windows network share in Linux using a graphical interface or in the terminal. Despite some difficulties, this can be used quite effectively. Do you know any other applications or scripts which can help with that? Share their names in the comments section below.
The article is distributed under Creative Commons ShareAlike 4.0 license. Link to the source is required .
If you work with different operating systems, it’s handy to be able to share files between them. This article explains how to set up file access between Linux (Fedora 33) and Windows 10 using Samba and mount.cifs.
Samba is the Linux implementation of the SMB/CIFS protocol, allowing direct access to shared folders and printers over a network. Mount.cifs is part of the Samba suite and allows you to mount the CIFS filesystem under Linux.
Caution: These instructions are for sharing files within your private local network or in a virtualized host-only network between a Linux host machine and a virtualized Windows guest. Don’t consider this article a guideline for your corporate network, as it doesn’t implement the necessary cybersecurity considerations.
Access Linux from Windows
This section explains how to access a user’s Linux home directory from Windows File Explorer.
1. Install and configure Samba
Start on your Linux system by installing Samba:
dnf install sambaSamba is a system daemon, and its configuration file is located in /etc/samba/smb.conf. Its default configuration should work. If not, this minimal configuration should do the job:
[global]
        workgroup = SAMBA
        server string = %h server (Samba %v)
        invalid users = root
        security = user
[homes]
        comment = Home Directories
        browseable = no
        valid users = %S
        writable = yes
You can find a detailed description of the parameters in the smb.conf section of the project’s website.
2. Modify LinuxSE
If your Linux distribution is protected by SELinux (as Fedora is), you have to enable Samba to be able to access the user’s home directory:
setsebool -P samba_enable_home_dirs onCheck that the value is set by typing:
getsebool samba_enable_home_dirsYour output should look like this:
3. Enable your user
Samba uses a set of users and passwords that have permission to connect. Add your Linux user to the set by typing:
smbpasswd -a <your-user>You will be prompted for a password. This is a completely new password; it is not the current password for your account. Enter the password you want to use to log in to Samba.
To get a list of allowed user types:
pdbedit -L -vRemove a user by typing:
smbpasswd -x <user-name>4. Start Samba
Because Samba is a system daemon, you can start it on Fedora with:
systemctl start smbThis starts Samba for the current session. If you want Samba to start automatically on system startup, enter:
systemctl enable smbOn some systems, the Samba daemon is registered as smbd.
4. Configure the firewall
By default, Samba is blocked by your firewall. Allow Samba to access the network permanently by configuring the firewall.
You can do it on the command line with:
firewall-cmd --add-service=samba --permanentOr you do it graphically with the firewall-config tool:

5. Access Samba from Windows
In Windows, open File Explorer. On the address line, type in two backslashes followed by your Linux machine’s address (IP address or hostname):

You will be prompted for your login information. Type in the username and password combination from step 3. You should now be able to access your home directory on your Linux machine:

Access Windows from Linux
The following steps explain how to access a shared Windows folder from Linux. To implement them, you need Administrator rights on your Windows user account.
1. Enable file sharing
Open the Network and Sharing Center either by clicking on the
Windows Button > Settings > Network & Internet
or by right-clicking the little monitor icon on the bottom-right of your taskbar:
In the window that opens, find the connection you want to use and note its profile. I used Ethernet 3, which is tagged as a Public network.
Caution: Consider changing your local machine’s connection profile to Private if your PC is frequently connected to public networks.
Remember your network profile and click on Change advanced sharing settings:

Select the profile that corresponds to your connection and turn on network discovery and file and printer sharing:

2. Define a shared folder
Open the context menu by right-clicking on the folder you want to share, navigate to Give access to, and select Specific people… :

Check whether your current username is on the list. Click on Share to tag this folder as shared:

You can display a list of all shared folders by entering \\localhost in File Explorer’s address line:


Image by:
<p class=»rtecenter»><sup>(Stephan Avenwedde, <a href=»https://opensource.com/%3Ca%20href%3D»https://creativecommons.org/licenses/by-sa/4.0/» rel=»ugc»>https://creativecommons.org/licenses/by-sa/4.0/» target=»_blank»>CC BY-SA 4.0</a>)</sup></p>
3. Mount the shared folder under Linux
Go back to your Linux system, open a command shell, and create a new folder where you want to mount the Windows share:
mkdir ~/WindowsShareMounting Windows shares is done with mount.cifs, which should be installed by default. To mount your shared folder temporarily, use:
sudo mount.cifs //<address-of-windows-pc>/MySharedFolder ~/WindowsShare/ -o user=<Windows-user>,uid=$UIDIn this command:
<address-of-windows-pc>is the Windows PC’s address info (IP or hostname)<Windows-user>is the user that is allowed to access the shared folder (from step 2)
You will be prompted for your Windows password. Enter it, and you will be able to access the shared folder on Windows with your normal Linux user.
To unmount the shared folder:
sudo umount ~/WindowsShare/You can also mount a Windows shared folder on system startup. Follow these steps to configure your system accordingly.
Summary
This shows how to establish temporary shared folder access that must be renewed after each boot. It is relatively easy to modify this configuration for permanent access. I often switch back and forth between different systems, so I consider it incredibly practical to set up direct file access.
This work is licensed under a Creative Commons Attribution-Share Alike 4.0 International License.
#
# Пример файла конфигурации Samba для Debian GNU/Linux.
#
#
# Это основной конфигурационный файл Samba. Чтобы понять значение
# указанных здесь опций, прочитайте man-руководство smb.conf(5).
# У Samba есть большое количество опций настройки, большинство
# из которых здесь не показаны.
#
# Некоторые опции, который часто стоит настроить, показаны как
# закомментированные примеры в этом файле.
#  - Когда такие опции закомментированы с помощью ";", то эта
#    предложенная настройка включает опцию, которая отличается
#    от поведения по умолчанию Samba.
#  - Когда комментарий начинается с "#", то эта предложенная
#    настройка соответствует поведению по умолчанию Samba,
#    однако опция достаточно важна, чтобы быть упомянутой.
#
# ЗАМЕЧАНИЕ: всякий раз, когда Вы изменили этот файл, нужно
# проверить корректность сделанных настроек с помощью запуска
# команды "testparm" - она покажет базовые ошибки синтаксиса.
#==================== Глобальные настройки ====================
[global]
## Браузинг/идентификация ###
# Поменяйте это имя так, чтобы оно соответствовало рабочей
# группе / домену NT, куда сервер Samba будет входить как часть
# сетевого окружения:
   workgroup = WORKGROUP
# server string это эквивалент поля NT Description (описание сервера):
        server string = %h server (Samba, Ubuntu)
# Секция поддержки службы Windows Internet Name Serving:
# WINS Support - Tells the NMBD component of Samba to enable its WINS Server
#   wins support = no
# WINS Server - сообщает WINS-клиенту компоненты NMBD.
# Замечание: Samba может быть либо сервером WINS, либо клиентом WINS,
# но не может выполнять обе эти роли одновременно.
;   wins server = w.x.y.z
# Эта опция предотвратит для nmbd поиск NetBIOS-имен через DNS.
   dns proxy = no
#### Сетевые настройки ####
# Специфический набор интерфейсов / сетей для привязки службы.
# Это может быть либо имя интерфейса, либо IP-адрес/маска;
# обычно предпочитают имена интерфейсов.
;   interfaces = 127.0.0.0/8 eth0
# Привязка только и именованным интерфейсам и/или сетям; для её применения
# Вы должны использовать вышеуказанную опцию 'interfaces'. Рекомендуется
# разрешить эту функцию, если Ваша машина с Samba не защищена файерволом
# или сама является файерволом. Однако эта опция не может корректно
# обрабатывать динамические или не широковещательные интерфейсы.
;   bind interfaces only = yes
#### Отладка / учет ####
# Говорит Samba использовать отдельный log-файл для каждой машины, которая
# подключится:
   log file = /var/log/samba/log.%m
# Предел размера отдельных лог-файлов (в килобайтах).
   max log size = 1000
# Если Вы хотите, чтобы Samba писала только в системный лог (syslog),
# то установите следующий параметр как 'yes'.
#   syslog only = no
# Мы хотим свести к минимуму количество информации, сохраняемой в syslog.
# Вместо этого все должно идти в /var/log/samba/log.{smbd,nmbd}. Если Вы
# хотите писать именно в syslog, то должны установить следующий параметр
# в какое-то большее число.
   syslog = 0
# Сделать что-нибудь значимое, когда Samba упала: отправить письмо
# backtrace админу:
   panic action = /usr/share/samba/panic-action %d
####### Аутентификация #######
# Роль сервера. Определяет, в каком режиме будет работать Samba. Возможные
# значения "standalone server", "member server", "classic primary
# domain controller", "classic backup domain controller", "active
# directory domain controller".
#
# Большинство пользователей предпочитают "standalone sever" или "member server".
# Запуск в качестве "active directory domain controller" сначала потребует
# запуска "samba-tool domain provision" чтобы вычистить базы данных и создать
# новый домен.
   server role = standalone server
# Если Вы хотите использовать зашифрованные пароли, то Samba должна знать,
# какую базу данных паролей Вы используете.
   passdb backend = tdbsam
   obey pam restrictions = yes
# Этот двоичный параметр (yes/no) управляет, будет ли Samba делать попытки
# синхронизировать пароль Unix с паролем SMB, когда изменен шифрованный
# пароль SMB password в базе passdb.
   unix password sync = yes
# Для синхронизации пароля Unix, работающей на системе Debian GNU/Linux,
# должны быть установлены следующие параметры (благодаря Ian Kahan
<< kahan@informatik.tu-muenchen.de> для отправки корректного чат-скрипта
# программе passwd в Debian Sarge).
   passwd program = /usr/bin/passwd %u
   passwd chat = *Enter\snew\s*\spassword:* %n\n *Retype\snew\s*\spassword:*
    %n\n *password\supdated\ssuccessfully* .
# Эта двоичная опция управляет, будет ли использоваться PAM для изменений
# пароля, когда запрашивается SMB-клиент вместо программы, перечисленной
# d'passwd program'. Значение по умолчанию 'no'.
   pam password change = yes
# Эта опция управляет, как не успешные попытки аутентификации будут отображаться
# на анонимные подключения:
   map to guest = bad user
########## Домены ###########
#
# Следующие установки дают эффект только если установлено 'server role = primary
# classic domain controller', 'server role = backup domain controller', или
# 'domain logons'.
#
# Задает место нахождения директории профиля пользователя с точки зрения
# клиента). Следующий пример требует наличия настроенной на сервере Samba
# шары [profiles] (см. ниже):
;   logon path = \\%N\profiles\%U
# Другой общий выбор - сохранение профиля в домашней директории пользователя
# (это вариант по умолчанию для Samba):
#   logon path = \\%N\%U\profile
# Следующая установка дает эффект только если установлено 'domain logons'.
# Задает место нахождения домашней директории пользователя (с точки зрения
# клиента):
;   logon drive = H:
#   logon home = \\%N\%U
# Следующая установка дает эффект только если установлено 'domain logons'.
# Задает скрипт, запускаемый при логоне. Скрипт должен быть сохранен в шаре
# [netlogon].
# Замечание: файл скрипта должен иметь имя формата 'DOS'.
;   logon script = logon.cmd
# Это позволяет создавать пользователей Unix на контроллере домена через SAMR
# RPC pipe. Пример команды создает учетную запись пользователя  с запрещенным
# паролем Unix; пожалуйста адаптируйте этот пример под свои нужды:
; add user script = /usr/sbin/adduser --quiet --disabled-password --gecos "" %u
# Это позволяет учетным записям машины быть созданными на контроллере домена
# через SAMR RPC pipe. Следующий пример настройки подразумевает, что группа
# "machines" существует на системе:
; add machine script  = /usr/sbin/useradd -g machines -c "%u machine account"
 -d /var/lib/samba -s /bin/false %u
# Это позволяет группам Unix быть созданными на контроллере домена
# через SAMR RPC pipe.
; add group script = /usr/sbin/addgroup --force-badname %g
############ Разное ############
# Использование следующей строки позволит Вам настроить пользовательскую
# конфигурацию на базе машин. Строка %m будет заменена именем netbios машины,
# которая подключается.
;   include = /home/samba/etc/smb.conf.%m
# Некоторые умолчания для winbind (убедитесь, что Вы не используете эти
# диапазоны для чего-то еще).
;   idmap uid = 10000-20000
;   idmap gid = 10000-20000
;   template shell = /bin/bash
# Настройка опций шар пользователя, чтобы разрешить не-root
# пользователям расшаривать папки командой net usershare.
# Максимальное количество шар пользователя. 0 (по умолчанию) означает,
# что функция usershare запрещена.
;   usershare max shares = 100
# Разрешает пользователям, которым даны привилегии usershare, создавать
# публичные шары, не только аутентификационные:
   usershare allow guests = yes
#======================= Определения шар =======================
# Раскомментируйте следующее (и настройте другие опции ниже по мере
# надобности), чтобы разрешить шары домашней директории по умолчанию.
# Это расшарит каждую домашнюю директорию пользователя как
# \\server\username:
;[homes]
;   comment = Home Directories
;   browseable = no
# По умолчанию домашние директории экспортируются только для чтения
# (read-only). Поменяйте следующий параметр на 'no', если хотите
# иметь возможность писать в них:
;   read only = yes
# Маска создания файла установлена на 0700 по соображениям безопасности.
# Если Вы хотите создавать файлы с разрешениями group=rw, то установите
# следующий параметр на 0775 (полный доступ для всех задается маской 0x777).
;   create mask = 0700
# Маска создания директории установлена на 0700 по соображениям безопасности.
# Если Вы хотите создавать каталоги с разрешениями group=rw, то установите
# следующий параметр на 0775 (полный доступ для всех задается маской 0x777).
;   directory mask = 0700
# По умолчанию к шарам \\server\username могут подключаться кто угодно,
# кто имеет доступ к серверу Samba. Раскомментируйте следующий параметр
# для гарантии, что только "username" может подключиться к шаре
# \\server\username. Это может потребовать подстройки, если используются
# схемы внешней аутентификации.
;   valid users = %S
# Раскомментируйте следующее, чтобы создать директорию netlogon для
# логонов домена (Domain Logons). Также потребуется сконфигурировать
# Samba, чтобы она функционировала как контроллер домена.
;[netlogon]
;   comment = Network Logon Service
;   path = /home/samba/netlogon
;   guest ok = yes
;   read only = yes
# Раскомментируйте следующее, чтобы создать директорию profiles для
# хранения профилей пользователей (см. выше опцию "logon path").
# Также потребуется сконфигурировать Samba, чтобы она функционировала
# как контроллер домена. Путь ниже должен быть записываемым для всех
# пользователей, чтобы могли быть созданы их директории, когда пользователи
# логинятся первый раз.
;[profiles]
;   comment = Users profiles
;   path = /home/samba/profiles
;   guest ok = no
;   browseable = no
;   create mask = 0600
;   directory mask = 0700
[printers]
   comment = All Printers
   browseable = no
   path = /var/spool/samba
   printable = yes
   guest ok = no
   read only = yes
   create mask = 0700
# Клиенты Windows видят это имя шары как источник загружаемых драйверов принтера:
[print$]
   comment = Printer Drivers
   path = /var/lib/samba/printers
   browseable = yes
   read only = yes
   guest ok = no
# Раскомментируйте, чтобы позволить удаленное администрирование драйверов
# принтеров Windows. Вам может понадобиться заменить 'lpadmin' именем
# группы, членами которой являются Ваши пользователи с полномочиями
# администратора. Обратите внимание, что Вам нужно установить подходящие
# разрешения Unix для этих пользователей на директорию драйверов, чтобы
# они могли туда записывать:
;   write list = root, @lpadmin
# Эта шара для обмена файлами, в неё имеют полный доступ кто угодно
# без необходимости использования правильного пароля:
[share]
   path = /home/share/
   read only = No
   create mask = 0777
   directory mask = 0777
   browseable = yes
   public = yes