
Applies ToMicrosoft365.com Office для бизнеса Office 365 для малого бизнеса Администратор Microsoft 365 Служба Office 365, предоставляемая 21Vianet служба Office 365 для малого бизнеса, предоставляемая 21Vianet — для администраторов Служба Office 365, предоставляемая 21Vianet, — для администраторов
Имя вашего компьютера определяет его в сети.
Поиск имени вашего компьютера в Windows 10
-
Откройте панель управления.
-
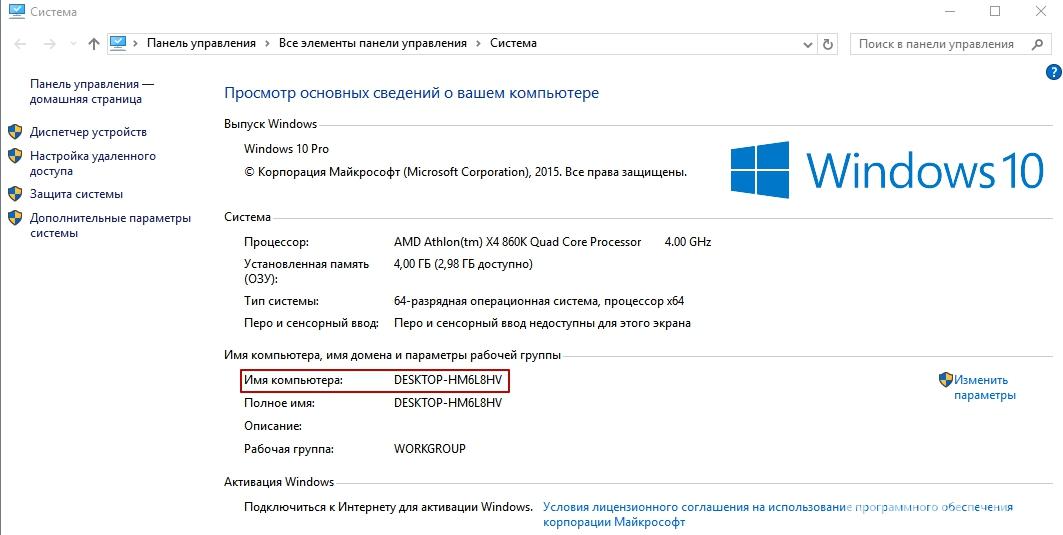
Щелкните ссылку Система и безопасность > Система.
На странице «Просмотр основных сведений о вашем компьютере» см. полное имя компьютера в разделе Имя компьютера, имя домена и параметры рабочей группы.
Поиск имени вашего компьютера в Windows 8
-
Нажмите клавиши Windows+X, чтобы отобразить список команд и параметров.
-
Щелкните пункт Система.
Имя компьютера появится в разделе Имя компьютера, имя домена и параметры рабочей группы.
Поиск имени вашего компьютера в Windows 7
-
Нажмите кнопку Пуск, щелкните правой кнопкой мыши пункт Компьютер, а затем щелкните пункт Свойства.
Имя компьютера появится в разделе Имя компьютера, имя домена и параметры рабочей группы.
Поиск имени вашего компьютера на компьютере Mac
-
Выберите меню Apple > Системные настройки > Общий доступ.
Имя компьютера появится вверху окна.
Нужна дополнительная помощь?
Нужны дополнительные параметры?
Изучите преимущества подписки, просмотрите учебные курсы, узнайте, как защитить свое устройство и т. д.
Самый простой способ узнать имя компьютера — это открыть окно «Свойства системы» и посмотреть там.

Добраться до этого окна можно с помощью горячих клавиш «Win+Pause/Break», либо через контекстное меню (правая клавиша мышки) значка компьютера на рабочем столе («Этот компьютер»), выбрав пункт меню «Свойства».
Более экзотический способ для обычного пользователя — это вызвать встроенное приложение «Сведения о системе» через панель поиска: либо нажать горячие клавиши «Win + S» и набрать в открывшейся панели команду «msinfo32», либо щелкнуть левой клавишей мышки на значке лупы на панели задач и ввести ту же команду в той же панели. В окне «Сведения о системе» имя компьютера будет «скрываться» под псевдонимом «Имя системы».

Have you ever had to identify your Windows computer for networking or system management purposes? It’s a common task, and in this guide, we’ll show you how to find the name of your computer on Windows. It can come in handy in many situations, regardless of whether you are tech-savvy or getting started with computers.
To begin with, knowing your computer’s name is crucial for connecting it to a network, sharing files and printers, and troubleshooting network-related issues. In addition, providing your computer’s name when you request support or configure remote access can ensure a smoother experience and save you time.
So, let’s dive into the steps for discovering your computer’s identity.
Note: The method works on Windows 10 and Windows 11. However, we will use Windows 11 to demonstrate the methods.
1. Using the Search Box
This is one of the most common and easiest ways to find your computer name in Windows 11 and 10. Follow the steps below.
Step 1: Click on the Windows icon in the taskbar or press the Windows key on your keyboard.

Step 2: Now, type PC Name.
Step 3: In the search results, click ‘View your PC name.’

You will be taken to Windows Settings. Next to the device name, you will find your Windows PC name on the right pane.
Also Read: How to fix it if Windows Settings reset to default upon reboot
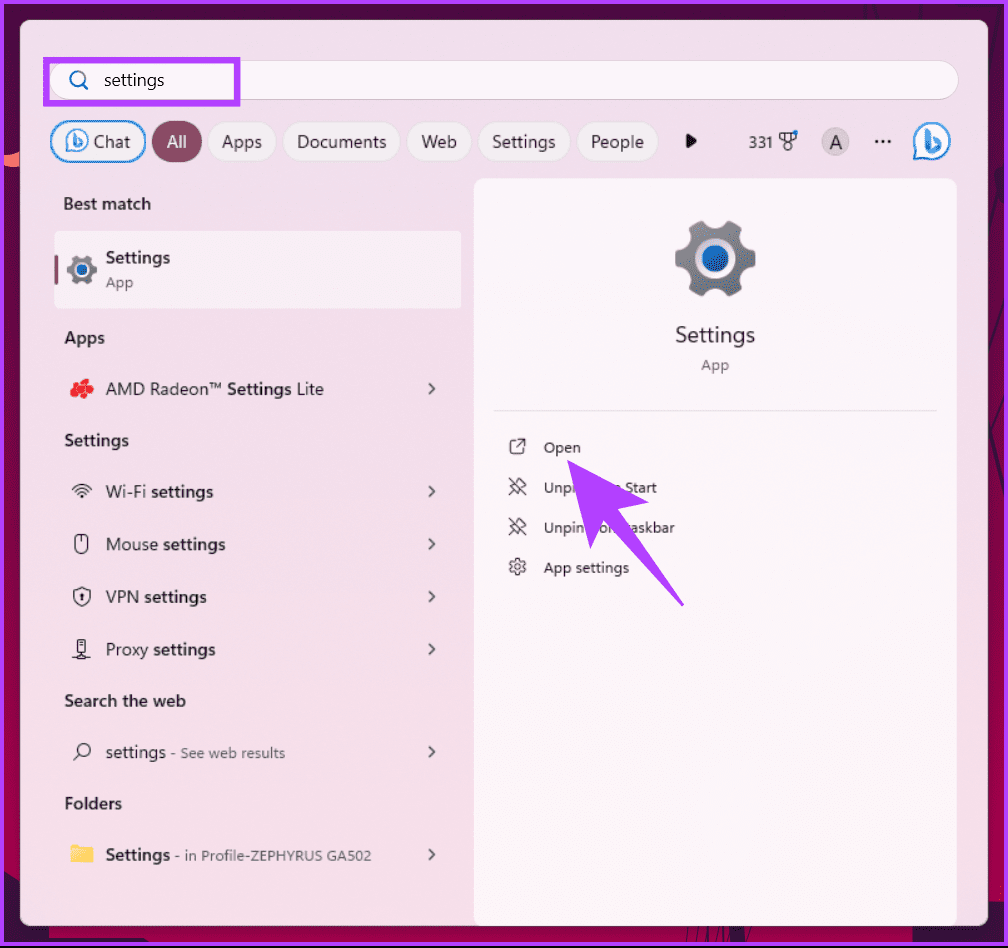
2. Using the Settings App
Unlike the method above, you can directly open Windows Settings and find your Windows PC name. Follow the instructions.
Step 1: Press the Windows key on your keyboard, type Settings, and click Open.
Note: Alternatively, press ‘Windows key + i’ to open Settings directly.
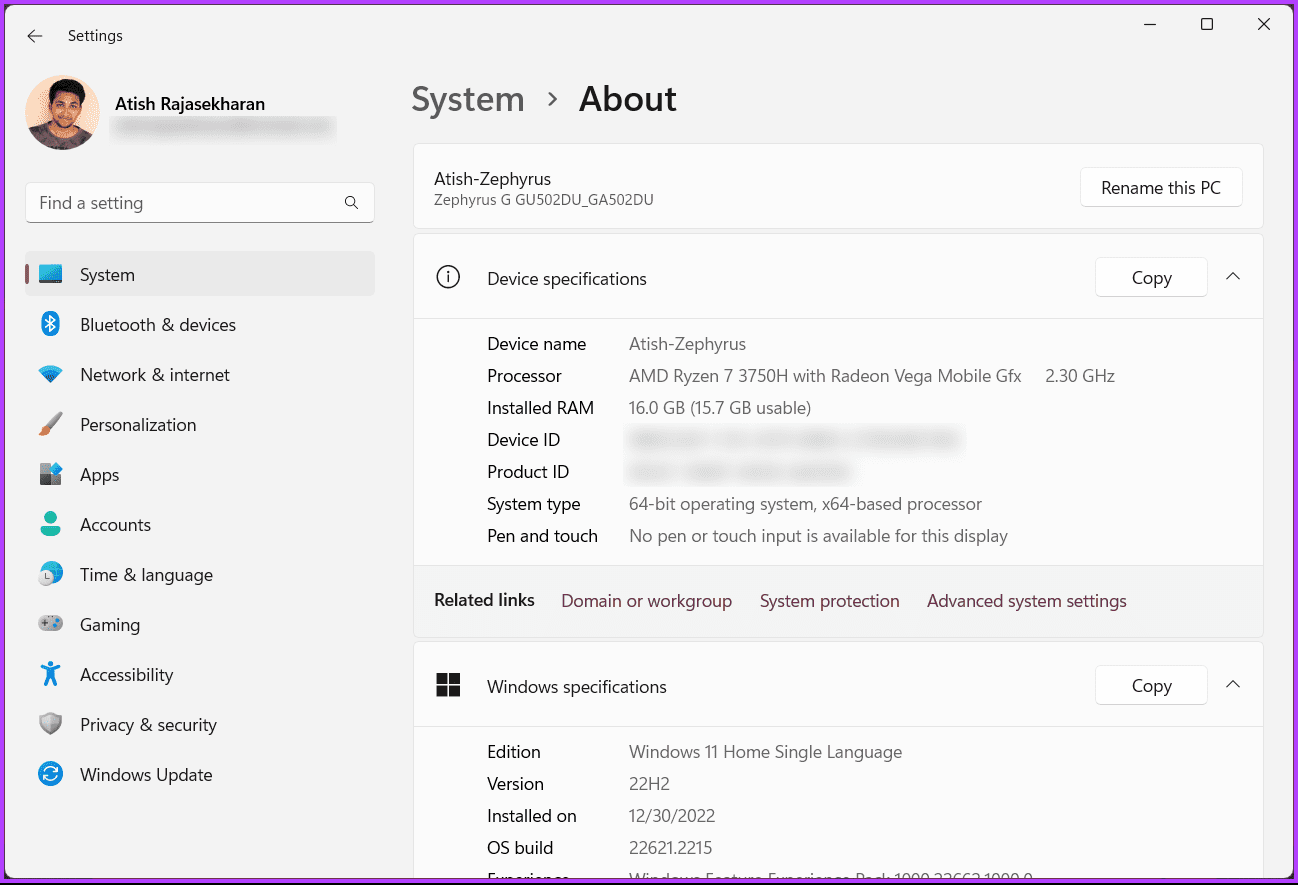
Step 2: Under System, scroll down to the About section in the right pane and click on it.
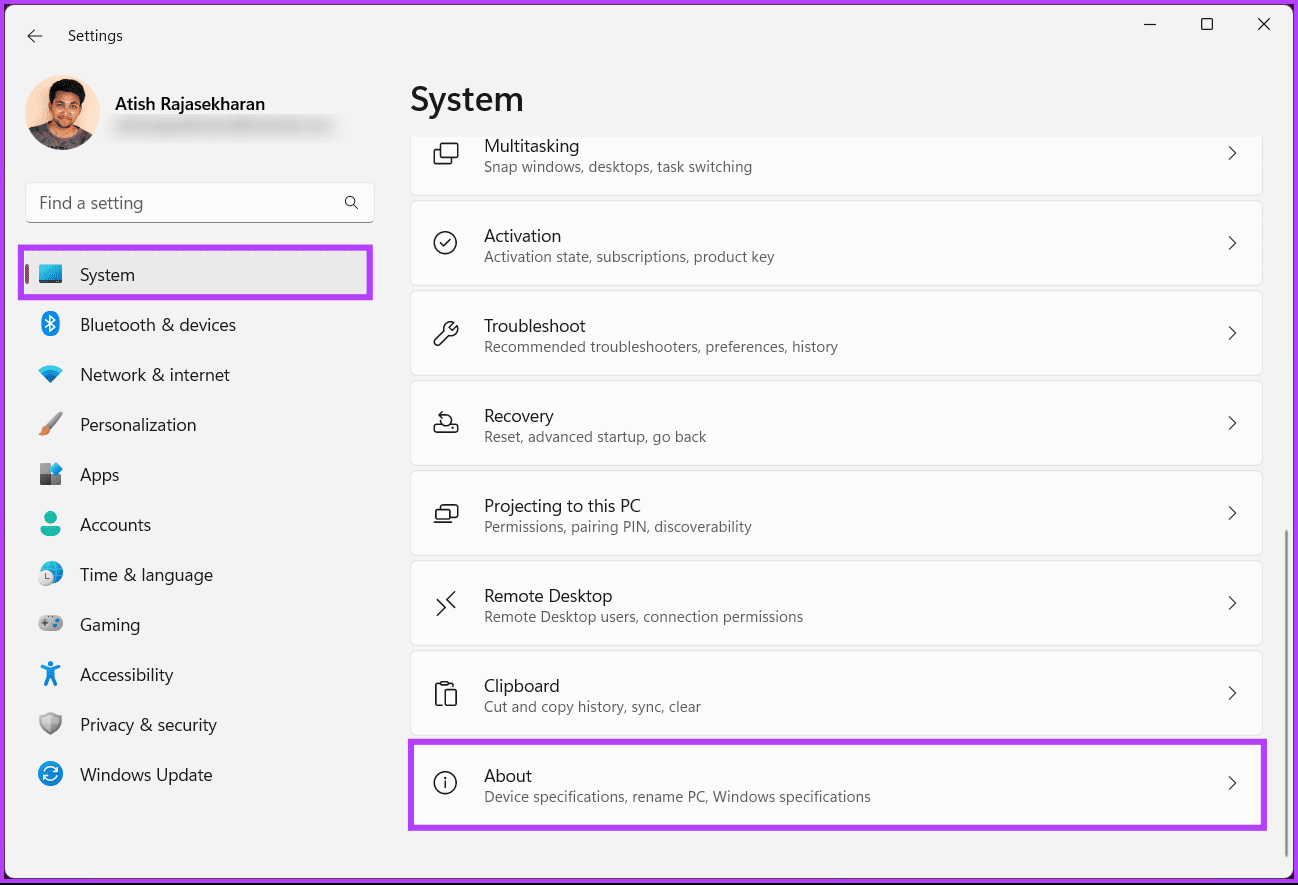
Your PC name will appear next to the device name.
Moreover, you can rename your PC from here by pressing the ‘Rename this PC’ button. That said, move on to the following method if you want to do the same from File Explorer.
3. Using File Explorer
Finding your Windows PC name using File Explorer may sound tricky, but it is not. Here’s how to find the Windows PC name.
Step 1: Press the Windows key on your keyboard, type File Explorer, and click Open.
Note: Alternatively, press ‘Windows key + E’ on your keyboard to open File Explorer.

Step 2: Find and right-click on This PC in the left pane.
Step 3: From the context menu, choose Properties.

There you have it. You will be taken to the About section in the Settings, where you can find the Windows PC name next to the Device name.
Step 1: Press’ Windows + X’ on your keyboard. Alternatively, right-click on the Windows icon on your taskbar.
Step 2: In the context menu, choose System.

During this process, you will be taken to Windows Settings. On the right pane, you will find the name of your Windows PC located next to the device name.
Check out the next method if you don’t want to follow the steps but want a quick keyboard shortcut.
Also Read: How to run programs or games as administrator in Windows 11
5. Using a Keyboard Shortcut
This method is by far the most straightforward method to find your computer name in Windows 11 and 10. All you need to do is press ‘Windows key + Pause/Break’ on your keyboard.

You will be taken to the Windows Settings, where you will find the name of the Windows PC beside the device’s name under Device specifications. The only downside to this method is that not all laptops have the Pause/Break key, which is why the next method will help you.
6. Using Command Prompt
This method may suit you if you prefer commands rather than GUIs. There are two ways to find your computer name with CMD. Both use commands. Let’s proceed.
Step 1: Press the Windows key on your keyboard, type Command Prompt, and click ‘Run as administrator.’
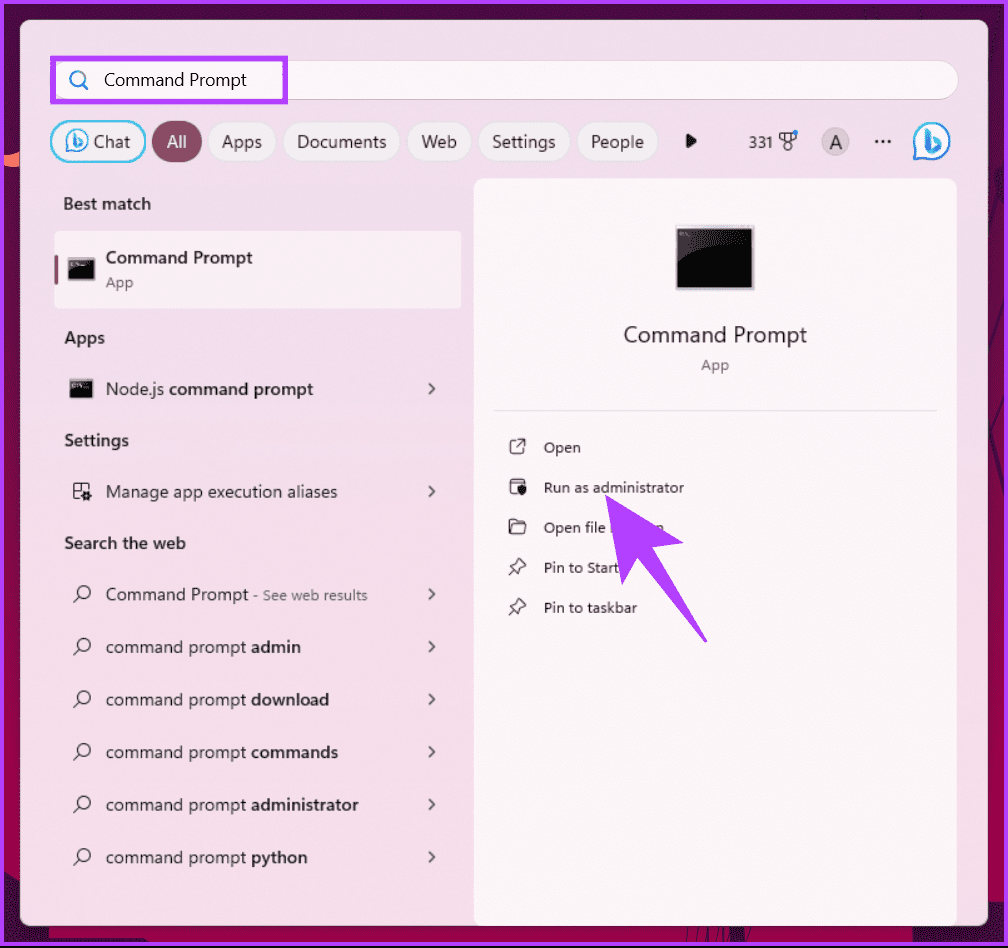
Step 2: Once opened, type the below command and hit Enter.
hostname

This command displays your Windows PC name. You can use another command to get more information about your Windows PC; continue with the below steps.
Step 3: Type the below command and press Enter.
ipconfig /all
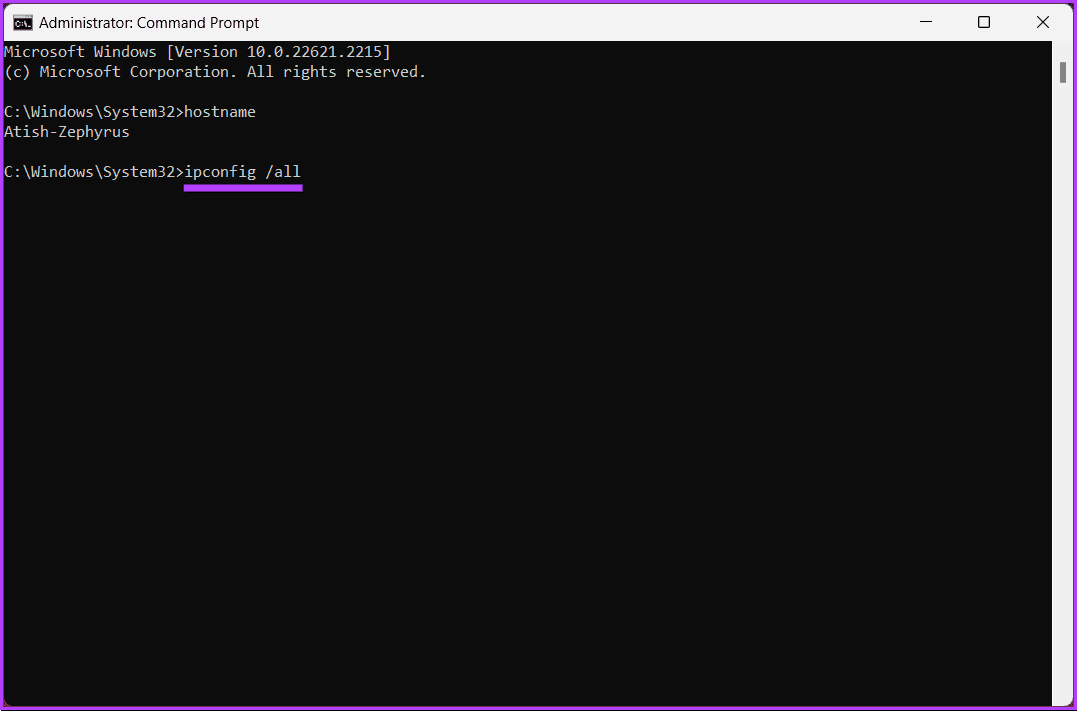
There you go. Here, you can see all the details about your Windows PC, from the name to the network adapter. Check out some answers to common questions in the FAQ section below.
FAQs on Find Your Computer Name in Windows
1. Are there any restrictions when changing the computer name?
Yes, when changing your computer name, there are some naming conventions and restrictions to follow. For example, it should not contain any special characters or spaces.
2. Will changing the computer name affect my files or software?
Changing your computer name should not affect your files or software. However, it’s a good practice to restart your computer after changing the name to ensure that all changes take effect.
Know Your Windows Machine Better
By following the methods mentioned in this article, you now know how to find the name of your computer on Windows. You may also want to read the best ways to check RAM type on PC running Windows 10 or Windows 11.
Was this helpful?
Thanks for your feedback!
The article above may contain affiliate links which help support Guiding Tech. The content remains unbiased and authentic and will never affect our editorial integrity.
In the following tutorial, you will learn how to find the Hostname in Windows 10 using the System Information utility, Command Prompt, and PowerShell.
I will also demonstrate how to change the Hostname using the Rename-Computer PowerShell command.
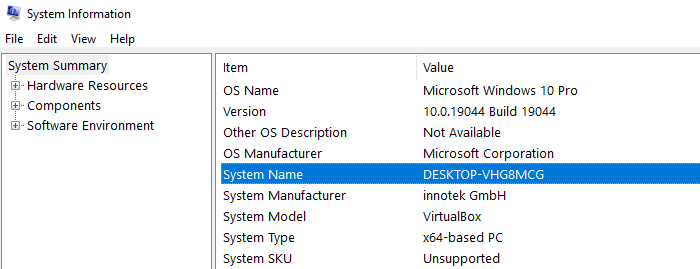
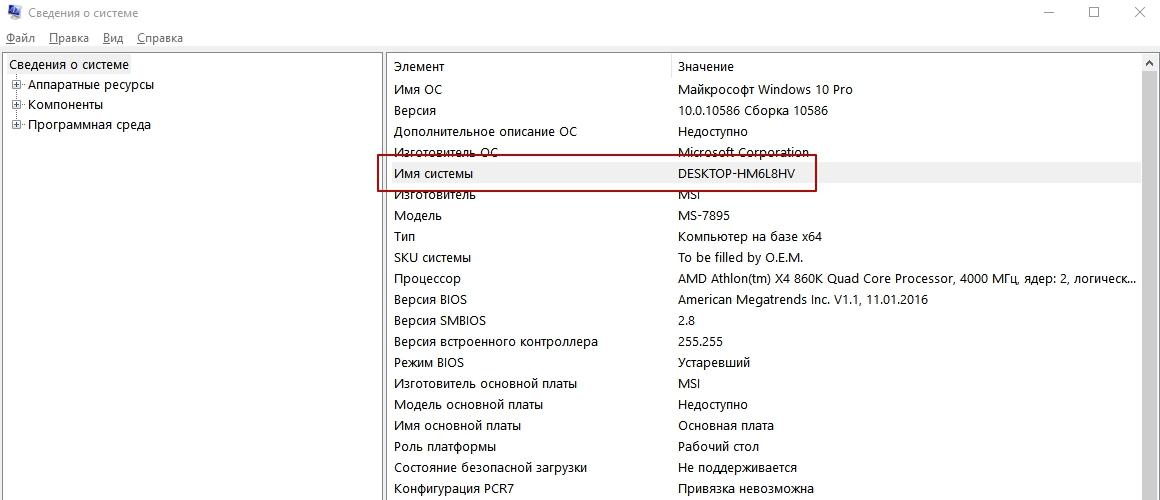
The built-in System Information tool displays basic system details, including Windows version, Processor type, Installed Physical Memory, and Hostname.
On your Windows computer, click the Start button, type msinfo32, and then press Enter to open the System Information utility.
Next to System Name, you will find the Hostname, as shown in the following screenshot.
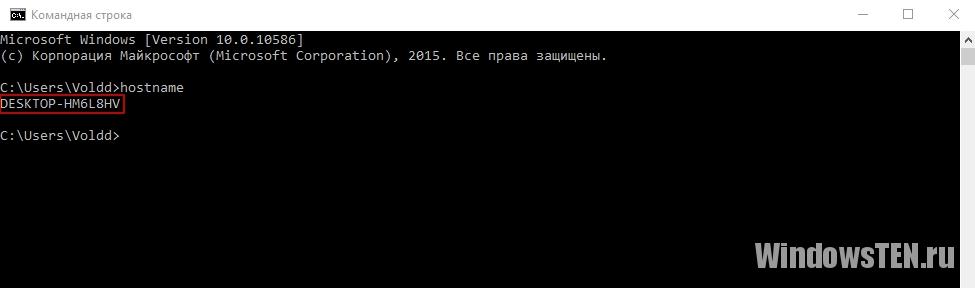
The Hostname Command
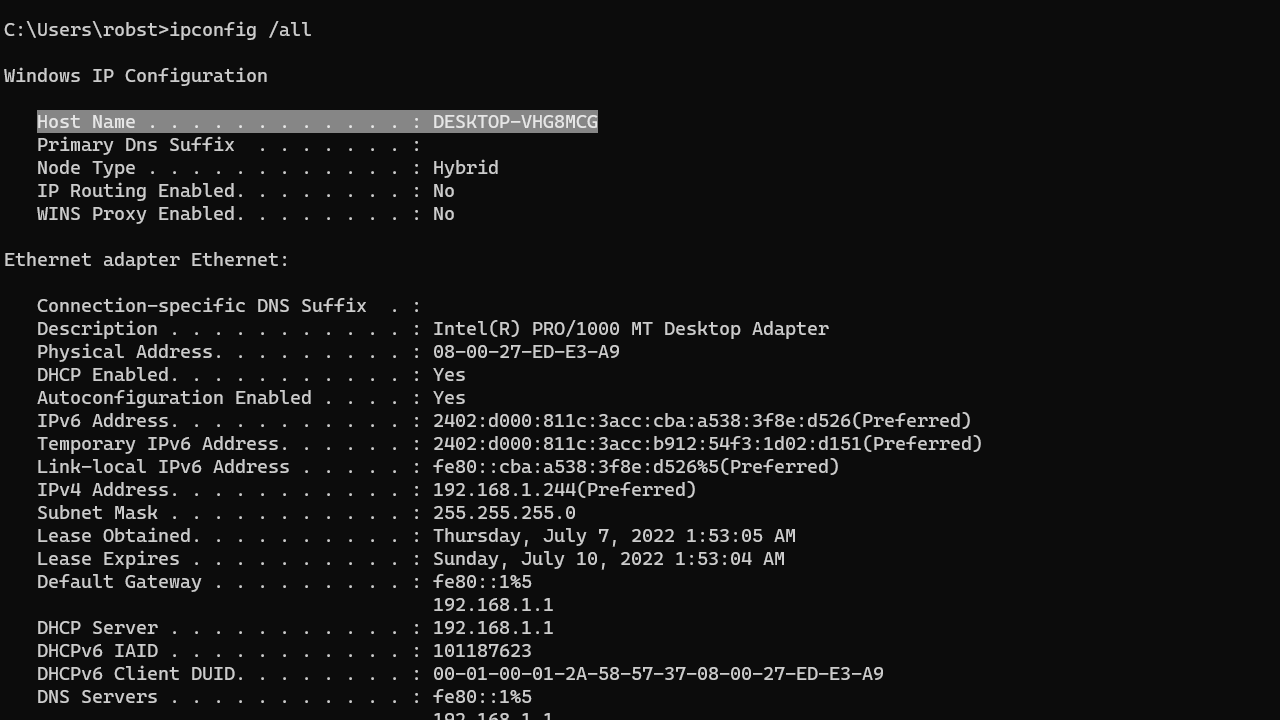
At a command prompt, type hostname and press Enter to find the Hostname of the local computer.
hostname
Alternatively, you can also use the ipconfig /all command to find the hostname. The hostname is found under the Windows IP Configuration section.
On a PowerShell prompt, you can use the Get-ComputerInfo command to find the computer name:
Get-ComputerInfo -Property CsName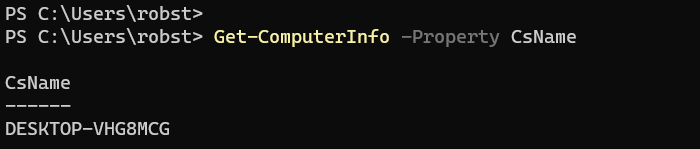
Changing the Hostname
To change the hostname, use the Rename-Computer PowerShell command.
Example
The following command changes the hostname of the local computer to MyPC.
Rename-Computer -NewName MyPC -RestartThe command will change the hostname and will restart your computer immediately. If you don’t want to restart your computer, don’t use the -Restart parameter (the name will not change until you restart Windows).
Rename-Computer -NewName MyPC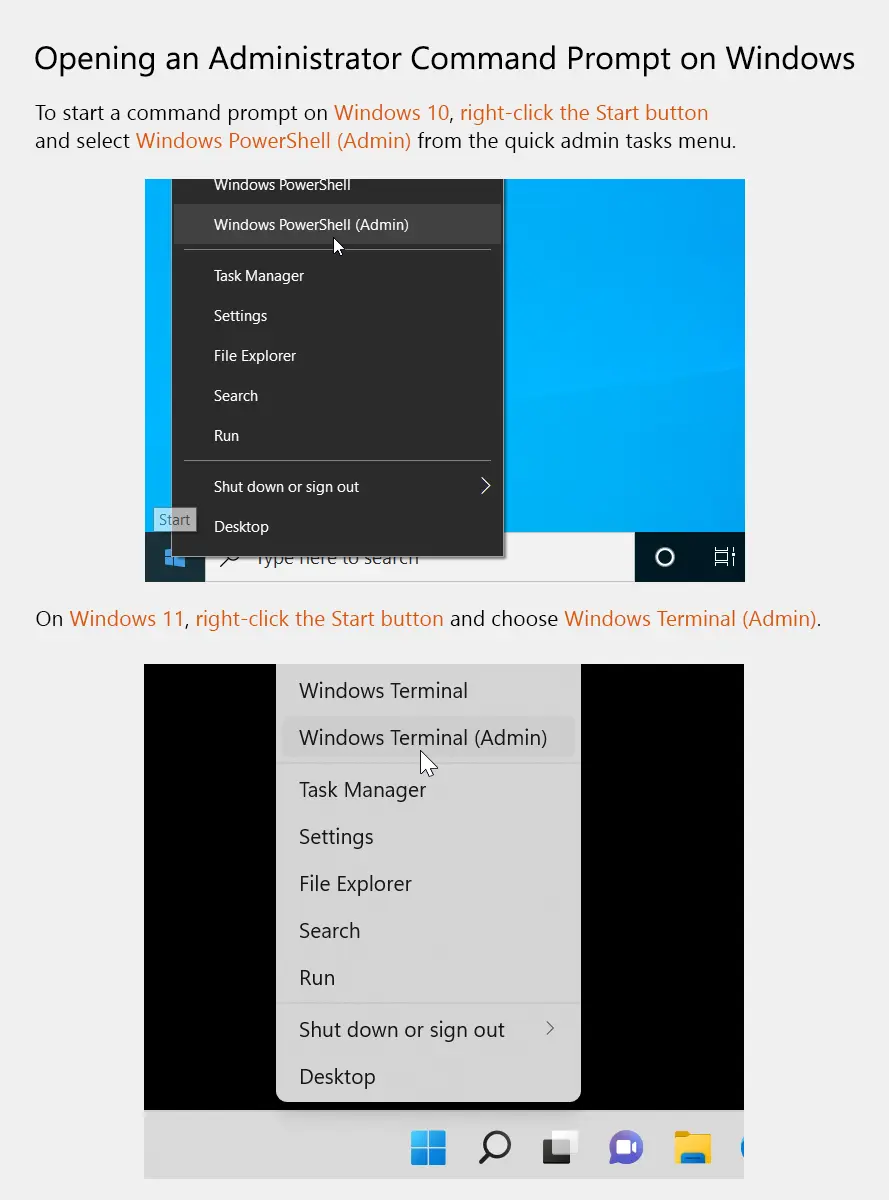
-
Где посмотреть?
-
В сведениях системы
-
В окне Система
-
В командной строке
-
Изменение
-
В приложении Параметры
-
В свойствах системы
-
В командной строке
-
Видео
-
Вывод
Идентификация в сети выполняется по названию ПК, поэтому оно должно быть уникальным. Но даже если вас просто не устраивает его название, в этой статье вы прочитаете о том, как изменить имя компьютера в Windows 10 на то, которое вам нравится.
Где посмотреть?
Если имя ПК в локальной сети не уникальное, при подключении возникнут сетевые конфликты. Поэтому узнайте его перед подключением устройства (как подключить ПК к сети, читайте в статье “Как настроить Wi-Fi на Windows 10»). Сделать это можно несколькими способами.
В сведениях системы
- Запустите окно «Выполнить» → введите в нем команду: msinfo32.
- В окне «Сведения системы» в пункте «Имя системы» указано название ПК.

В окне Система
ПКМ на меню Пуск → Система → строка Имя компьютера.
В командной строке
ПКМ на меню Пуск → командная строка → введите команду: hostname → отобразится имя ПК.
Изменение
Если вы хотите изменить имя ПК, используйте один из нижеописанных способов.
В приложении Параметры
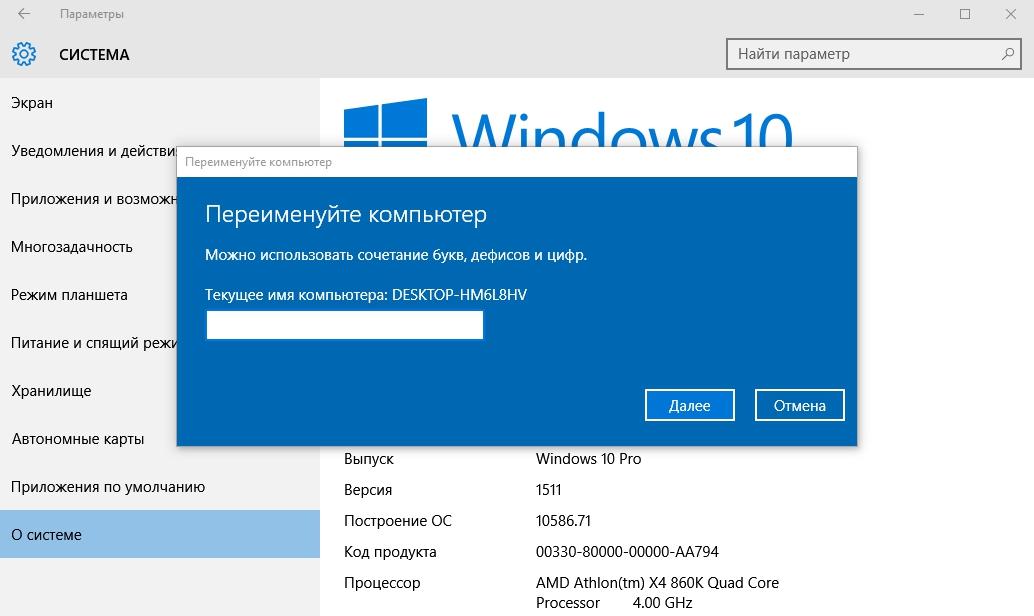
- Меню Пуск → приложение Параметры → Система → О системе → Переименование компьютера.

- В открывшемся окне будет указано старое название устройства, и предложено ввести новое. После ввода названия подтвердите изменения и перезагрузите устройство.


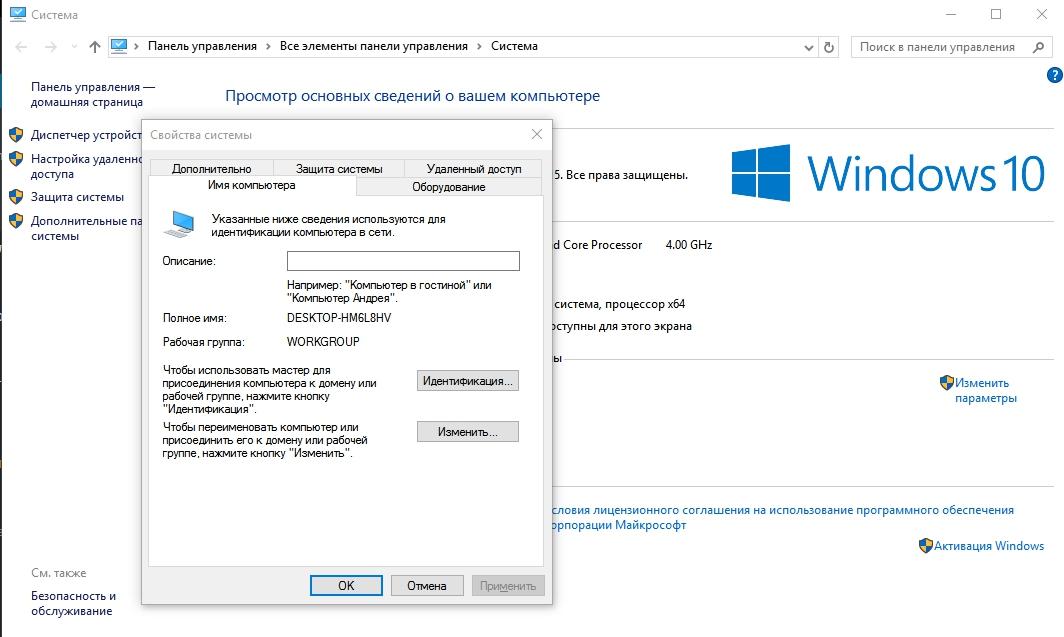
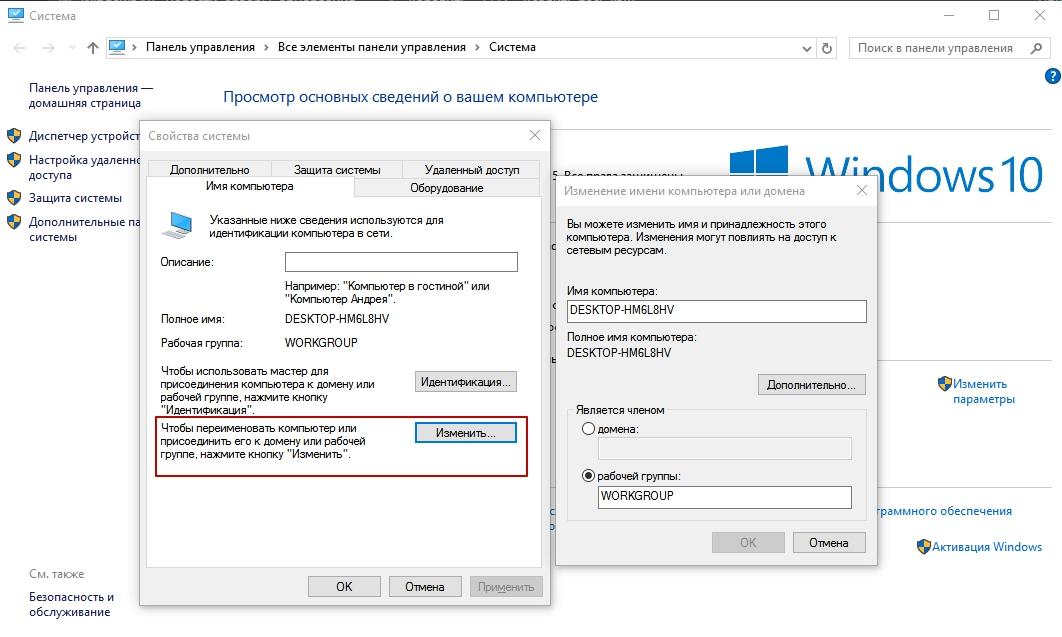
В свойствах системы
- ПКМ на меню Пуск → Система.
- Выберите слева пункт «Дополнительные параметры системы».

- Перейдите во вкладку «Имя компьютера» → нажмите кнопку «Изменить» в блоке «Чтобы переименовать этот компьютер, нажмите…».

Полезно знать! Здесь вы можете изменить принадлежность устройства к группе!
- После ввода нового названия перезагрузите ПК.
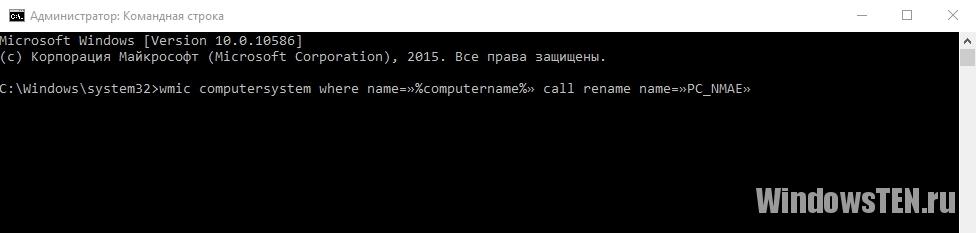
В командной строке
- ПКМ на меню Пуск → Командная строка (администратор) → введите команду: wmic computersystem where name=»%computername%» call rename name=»pc_name»
где pc_name – новое название для устройства. - После выполнения операции перезагрузите ПК.

Видео
На видео показано наглядно, как изменить название ПК.
Вывод
Узнать название устройства можно несколькими способами. Оно должно быть уникальным. Если вы решите изменить имя ПК, тогда сделайте это с помощью командной строки, приложения Параметры или панели управления.