
Since its launch, Windows 11 has brought a variety of new features and enhancements, particularly for gamers. With its improved interface, streamlined performance, and integration of Xbox services, the operating system is tuned to provide an exceptional gaming experience. However, with these upgrades, users may find themselves wondering about certain features and settings, especially when it comes to Xbox networking. The changes can create challenges for users looking to access Xbox networking features efficiently. This article aims to explore where Xbox networking is located on Windows 11, how to navigate it, and the various features available.
The Importance of Xbox Networking
Before diving into details about the location of Xbox networking on Windows 11, it’s essential to understand why Xbox networking is critical for gamers. Xbox networking connects players to various online services, allowing them to play multiplayer games, access Xbox Game Pass, integrate their Xbox Live accounts, and enjoy social features like friends lists, achievements, and party chat. An effective network connection is vital for ensuring smooth and lag-free online gameplay, enhancing overall user experience.
Finding Xbox Networking Settings
In Windows 11, Microsoft has altered the way network and gaming options are located and configured compared to previous versions of Windows. If you’re looking for Xbox networking settings, they can primarily be accessed through the Xbox app, Windows Settings, and the Network & Internet menu.
Accessing Xbox Networking via the Xbox App
-
Install the Xbox App: If you haven’t already, download the Xbox app from the Microsoft Store. The app integrates various Xbox services, allowing you to manage your gaming library, check your friends’ online status, and more.
-
Sign In: After installation, sign in with your Microsoft account associated with your Xbox profile. This action will sync your gaming data, friends list, and other Xbox-related features.
-
Navigate to Network Settings: In the Xbox app, click on the profile icon located in the upper right corner. From there, select «Settings.» Inside the settings menu, you will find the “Network” tab, where you can manage various connection preferences, check your current network status, and troubleshoot potential issues.
Accessing Network & Internet Settings
If you prefer more direct access to broader network settings, you can explore Windows 11’s built-in settings:
-
Open Settings: Click on the «Start» menu and select «Settings» (the gear icon), or press
Windows + Ion your keyboard. -
Network & Internet: Choose the «Network & Internet» tab in the left sidebar. This section allows you to view and manage your network connectivity options, either through Wi-Fi, Ethernet, or mobile data.
-
Properties and Advanced Options: Depending on your connection type (Wi-Fi or Ethernet), you can view properties such as IP address settings, DNS settings, and network status. There may also be personal hotspot options and VPN configurations available.
Using Xbox Networking Settings in the Game Bar
The Xbox Game Bar is another useful tool for accessing Xbox features, including networking:
-
Open the Xbox Game Bar: Press
Windows + Gwhile gaming to launch the Xbox Game Bar overlay. -
Network Options: In the overlay, you will find various widgets, including the Network option. This feature provides you with real-time information about your network connection, including latency and data usage.
-
Troubleshooting: If you encounter network issues while gaming, you can use the Xbox Game Bar to check for any active connections or disruptions that could affect your performance.
Optimizing Xbox Networking on Windows 11
Once you’ve located the necessary settings and tools, it’s important to optimize your networking for the best gaming experience. Here are several steps you can take to ensure that your Xbox networking works efficiently on Windows 11:
1. Check Your Internet Connection
Before diving into more technical settings, always ensure that your internet connection is stable and running at an optimal speed. Use online speed tests to evaluate your download and upload speeds, as these are critical for online gaming.
2. Configure Network Settings
For enhanced performance, ensure that your DNS settings are optimized. You can either use your ISP’s default DNS or switch to public DNS services like those provided by Google (8.8.8.8, 8.8.4.4) or Cloudflare (1.1.1.1). These options may offer faster resolution times, improving your overall gaming experience.
3. Enable Quality of Service (QoS)
Quality of Service (QoS) is a feature available on most modern routers that prioritizes gaming traffic over other types of network traffic. Head to your router settings.
To enable QoS:
- Log in to your router’s admin interface (usually accessed via a browser).
- Navigate to the QoS settings and enable it.
- Assign a high priority to gaming devices or applications.
By prioritizing your connection, you can minimize latency and improve overall responsiveness while gaming.
4. Use Port Forwarding
For some games, particularly those requiring peer-to-peer connectivity, you may need to enable port forwarding. This setting lets you open specific ports required for the game traffic and can improve connectivity.
To set up port forwarding:
- Find out which ports are needed for your game (usually available on the game’s official support page).
- Log in to your router’s settings and navigate to the port forwarding section.
- Input the required ports and the internal IP address of your gaming device.
5. Disable Background Applications
Before starting a gaming session, close unnecessary applications that may consume bandwidth. This action can help minimize lag and ensure that your gaming connection remains stable.
6. Update Network Drivers
Keep your network drivers updated to ensure compatibility with Windows 11. Outdated drivers can lead to connectivity issues and negatively impact gaming performance.
- Press
Windows + Xand choose «Device Manager.» - Locate the «Network adapters» section, right-click on your network adapter (such as Wi-Fi or Ethernet), and select «Update driver.»
- Follow the prompts to search automatically for updated driver software.
Troubleshooting Xbox Networking Issues
Even with optimal settings, you may still encounter issues with Xbox networking on Windows 11. Here are some common problems and how to troubleshoot them:
1. NAT Type Issues
Network Address Translation (NAT) type plays a significant role in online gaming. There are generally three types: Open, Moderate, and Strict. Open NAT is ideal for uninterrupted gaming, while Strict can limit connectivity with other players.
To check and change your NAT type:
- In the Xbox app, navigate to the Network settings.
- You can see your NAT type displayed there. If it shows «Strict,» you may need to enable UPnP (Universal Plug and Play) in your router settings or configure port forwarding as previously discussed.
2. Connectivity Problems
If you’re having trouble connecting to Xbox Live, you should first check the service status of Xbox Live on Microsoft’s official website. Sometimes, the issue may be on their end.
If Xbox Live is operational, you could try:
- Resetting your network router.
- Running the Windows Network Troubleshooter by going to Settings > System > Troubleshoot > Other troubleshooters and selecting «Internet Connections.»
3. Latency and Lag
High latency or lag can be caused by a variety of issues. To troubleshoot spasmodic connections:
- Use a wired Ethernet connection instead of Wi-Fi for improved stability.
- Turn off other devices connected to the network that may be using bandwidth.
- Consider changing your Internet Service Provider (ISP) if your current speed does not meet your gaming needs.
Conclusion
Navigating the Xbox networking features on Windows 11 may seem a bit complex with all the changes. Nevertheless, the integration of useful tools like the Xbox app and Game Bar, along with improved settings within Windows 11, has made it easier to optimize your gaming experience. By understanding where the Xbox networking settings are located and how to manage them effectively, you can enjoy seamless online gaming and connect with your friends more effortlessly. Follow best practices for optimizing your network, and don’t hesitate to troubleshoot any issues you encounter along the way.
With these tools and tips in hand, you can focus on what really matters: gaming. By leveraging Windows 11’s capabilities, the Xbox ecosystem can be more enjoyable and engaging, promoting a rich connected experience for gamers worldwide. Whether you’re competing in multiplayer arenas or exploring expansive single-player worlds, well-managed Xbox networking ensures that gameplay remains smooth and uninterrupted, allowing you to truly immerse yourself in your gaming adventures.
After being released in 2019, the Xbox app for Windows PCs and laptops has been serving users well, allowing them to manage their Xbox account activities and play console games using their PC Game Pass subscription. However, after upgrading from Windows 10 to Windows 11, many users have reported that the Xbox app is not working and/ or opening on their PCs and laptops.
So, in this in-depth article, we have listed some of the best fixes that you can try when you experience the Xbox app not working issue in Windows 11. Read this till the end to get the Xbox app on your Windows 11 device up and running again.
Fix Xbox App Not Working in Windows 11
Now, the Xbox app not working in Windows 11 issue can happen due to a variety of issues. These include outdated app versions, outdated Windows versions, issues in system files, conflicts with third-party apps or background processes, and others.
So, check out some of the top fixes listed right below and try them out on your Windows 11 device one by one to see which one works the best.
1. Check for Internet Issues and Xbox Server Issues
As you might already know that the Xbox app in Windows 11 requires an active internet connection and relies on Microsoft’s Xbox servers to operate properly on PCs and laptops. Hence, before proceeding to the technical fixes below, there are a couple of things that you need to check.
Firstly, check whether your internet is active or not as oftentimes, an inactive internet network causes the Xbox app to malfunction on Windows 11 PCs and laptops. And secondly, go to the official Xbox Server Status page via the provided link to check whether or not there are any active server issues.
If your internet is not working, you can contact your internet provider to fix that. However, if there is an active issue on the Xbox servers, you will have to wait for Microsoft’s back-end developers to fix that. Following that, the Xbox app should be working on your Windows 11 device again.
2. Disable VPN in Windows 11
Now, if you are using a VPN application on your Windows 11 PC or laptop, it might cause issues for the Xbox app and prevent it to run on your device. So, if your internet is working fine and there are no issues in the Xbox servers and yet you are facing the Xbox app not working issue, you might want to check whether your VPN is disabled or not.
You see VPN virtually changes the location of your IP address and if your VPN is set for a region where the Xbox app is not available, the app will not open or work on your Windows 11 device. So, disable your VPN, restart your Windows 11 device, and open the Xbox app to check whether the issue is fixed or not.
3. Sync Date and Time in Windows 11
Another potential cause for the Xbox app not working issue in Windows 11 could be an incorrect date and time set on your PC or laptop. The date and time that is set for your Windows 11 device affect the working of system apps and even web browsers, and incorrect date and time could cause system apps to malfunction and prevent websites to open.
In this case, you can set the correct date and time for your Windows 11 device to get the Xbox app up and running again. Follow the steps right below to do that:
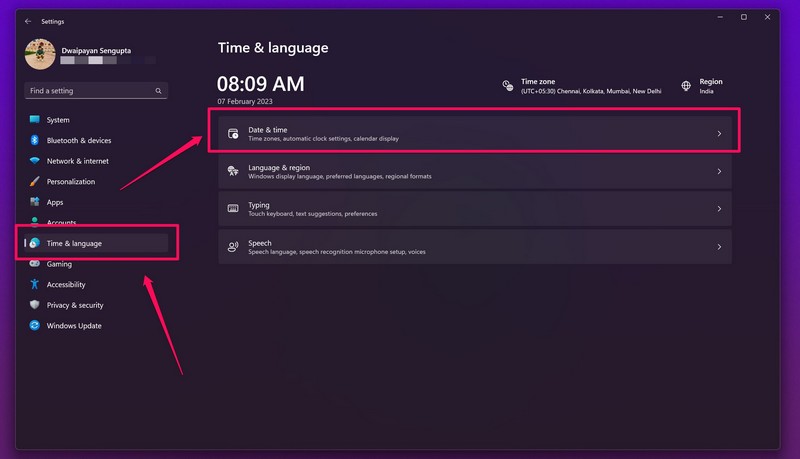
1. Use Windows + I to open the Settings app in Windows 11
2. Go to the Time & language tab and click Date & time.
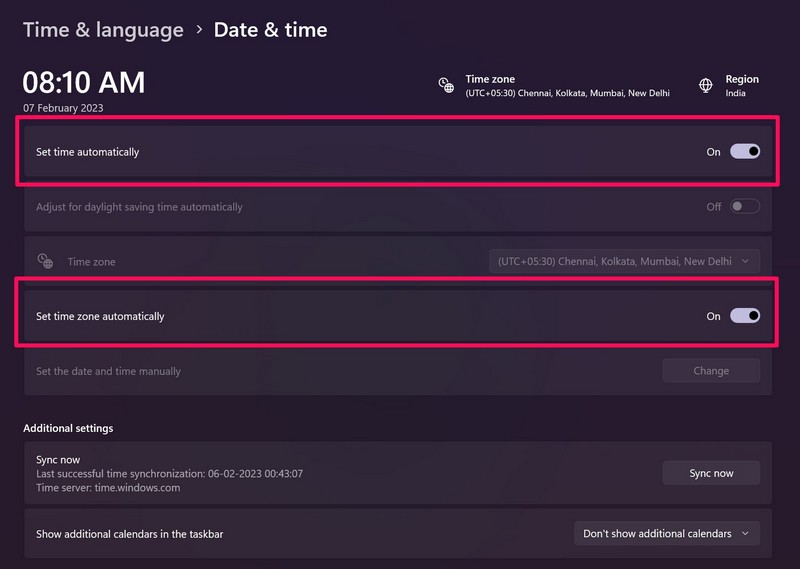
3. Now, click the toggles for Set time automatically and Set time zone automatically to enable both options.
4. Next, click the Sync now button to sync the date and time of your Windows 11 PC or laptop.
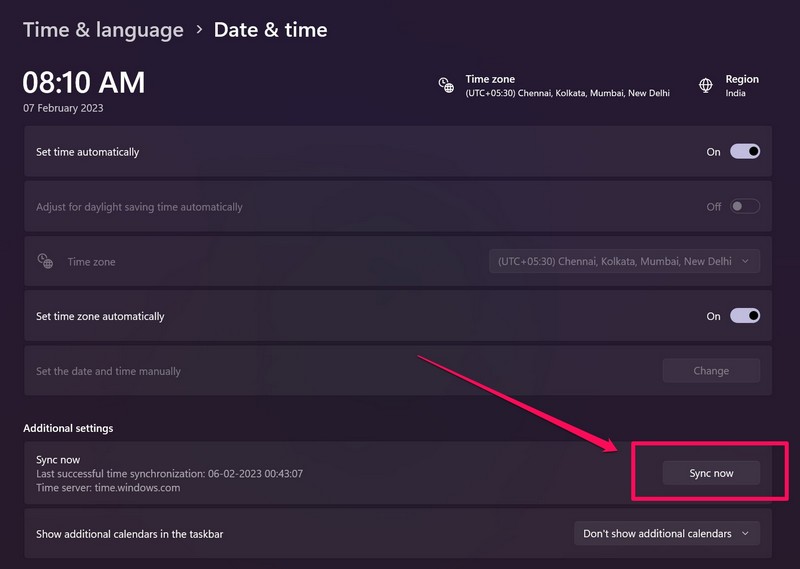
5. Restart your device.
4. Restart the Xbox Services in Windows 11
If setting the correct date and time for your Windows 11 PC or laptop did not fix the Xbox app not working issue, you can try restarting the Xbox gaming services on your device. This can fix minor glitches in the backend Xbox services in Windows and get the Xbox app running again.So, here’s how you can restart the Xbox services in Windows 11:
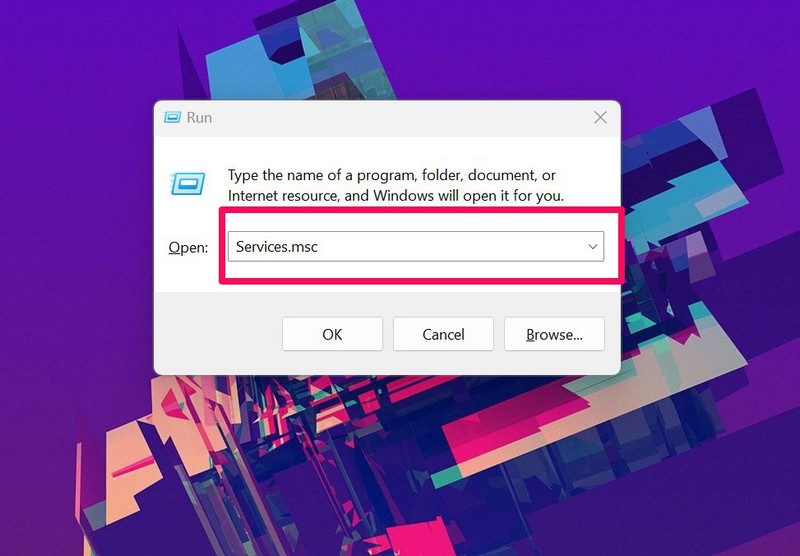
1. Use Windows + R to launch the Run tool in Windows 11.
2. Type in Services.msc in the text field and press Enter.
3. On the right pane, find Gaming Services, right-click on it, and select the Restart option.
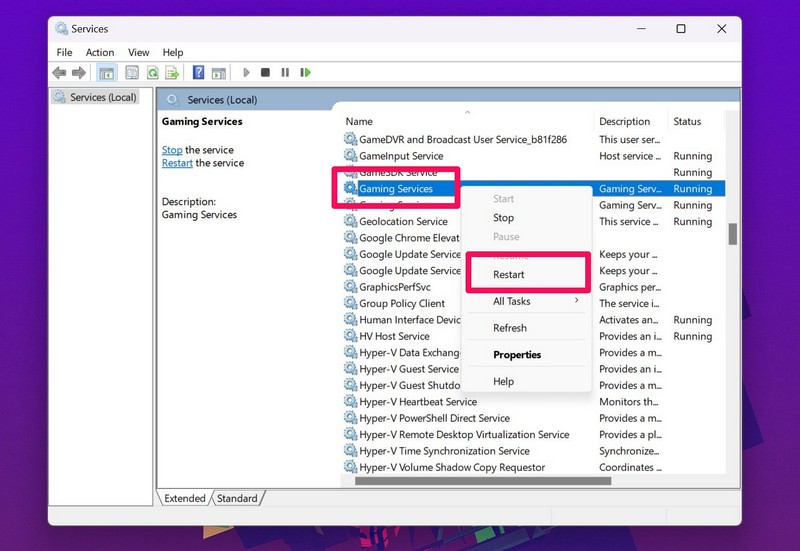
4. Next, find Xbox Accessory Management Service and Xbox Live Auth Manager and restart both services as explained above.
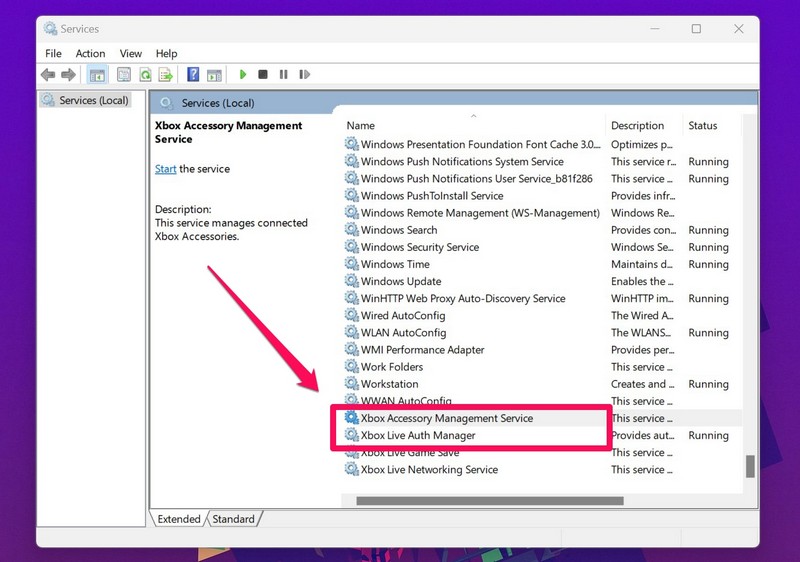
5. Close the Services window and check whether or not the Xbox app is opening in Windows 11.
5. Check Xbox App Update in Windows 11
More often than not, users forget to keep apps on their Windows 11 PCs and laptops up to date. And as aforementioned, outdated app versions can cause such issues on your device. The Xbox app is just like any other system app that can be updated via the Microsoft Store in Windows 11.
So, when you face the Xbox app not working or launching issue on your Windows 11 PC or laptop, follow the steps below to check for updates for the Xbox app:
1. Launch the Microsoft Store app in Windows 11.
2. Go to the Library tab on the left nav bar.
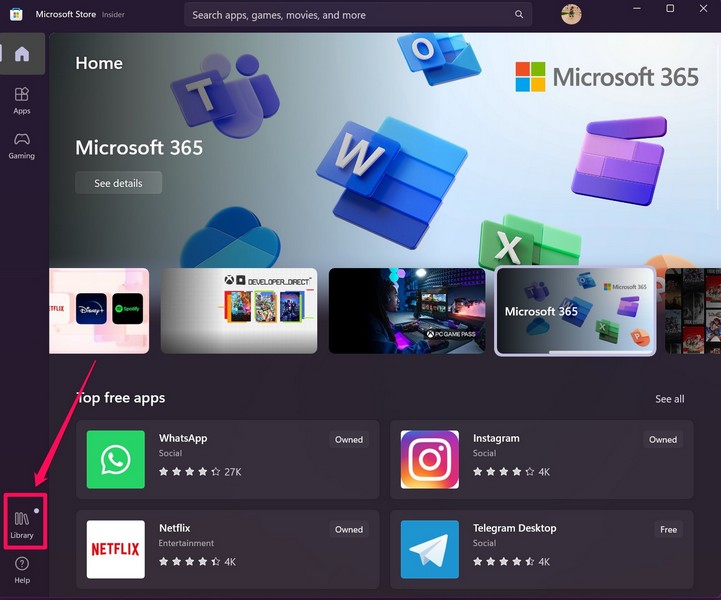
3. Click the Get updates button.
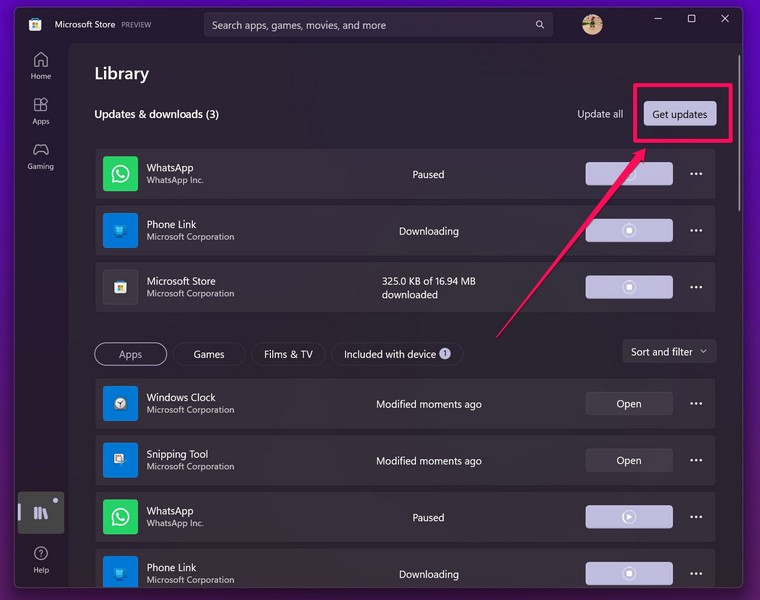
4. If the Xbox app is not up to date, you should see the latest update for it appear on this page.
5. Click the Get button beside it to update the Xbox app.
Following the update, launch the Xbox app in Windows 11 and check whether the issue is fixed or not.
6. Enable Xbox App Services in Startup Apps on Windows 11
Now, when you start your Windows 11 PC or laptop, Windows automatically runs the Xbox App Services process in the background to allow you to open the Xbox app without any issues.
However, if somehow the Xbox App Services process is disabled in Startup apps on Windows 11, it might cause the Xbox app not working issue.So, follow the steps right below to enable Xbox App Services in Startup apps on your Windows 11 PC or laptop:
1. Use Ctrl + Shift + Esc to launch the Task Manager in Windows 11.
2. Go to the Startup apps tab on the left nav bar.
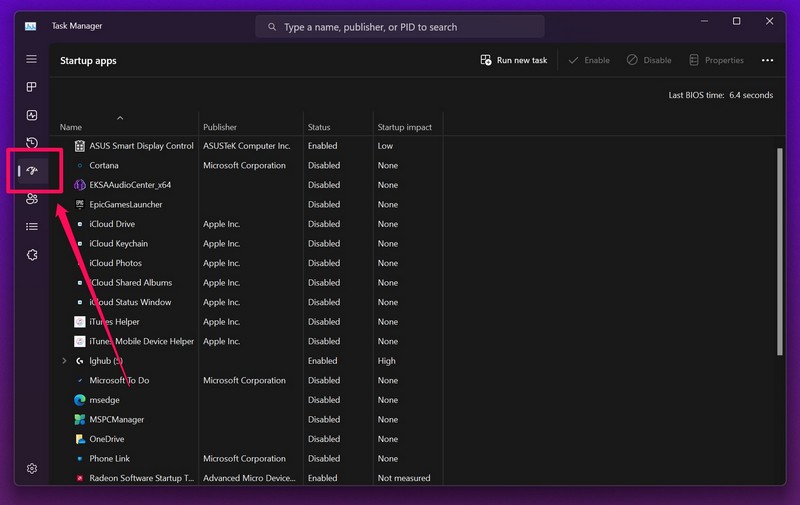
3. Scroll down to find Xbox Game Services and click on it to select.
4. With Xbox Game Services selected, click the Enable button at the top.
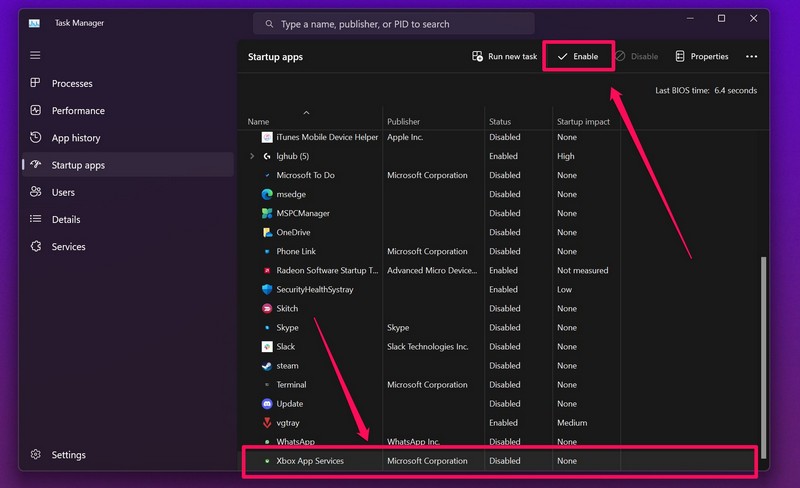
5. Close the Task Manager window and restart your Windows 11 PC or laptop.
6. Wait for Windows to completely boot and then launch the Xbox app.
7. Run Windows Store Troubleshooter in Windows 11
The Windows Store troubleshooter is a dedicated troubleshooting tool in Windows 11 that can help detect issues in system apps, such as the Xbox app, and help you fix them on your device. It is a nifty in-built tool and here’s how you can run it on your PC or laptop:
1. Use Windows + I to launch the Settings app in Windows 11.
2. Under the System tab on the left nav bar, go to the Troubleshoot menu.
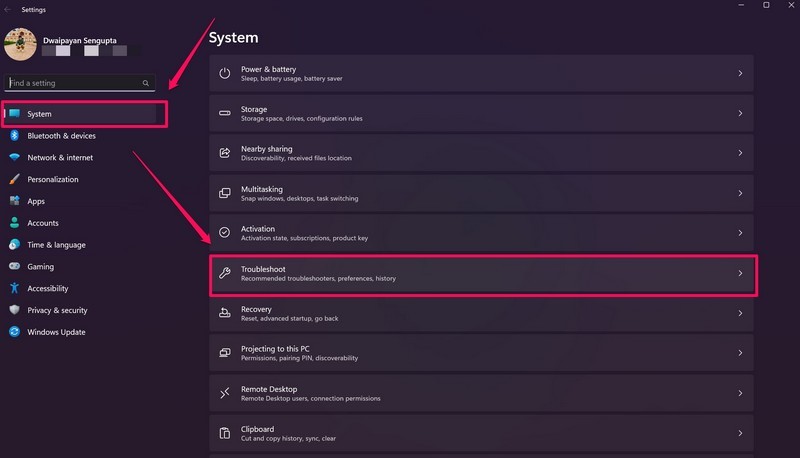
3. Click the Other troubleshooters option on the following page.
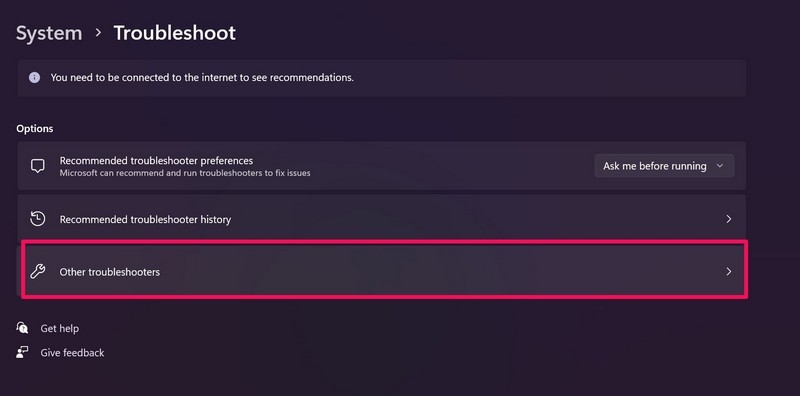
4. Scroll down to find the Windows Store troubleshooter on the list and click the Run button beside it.
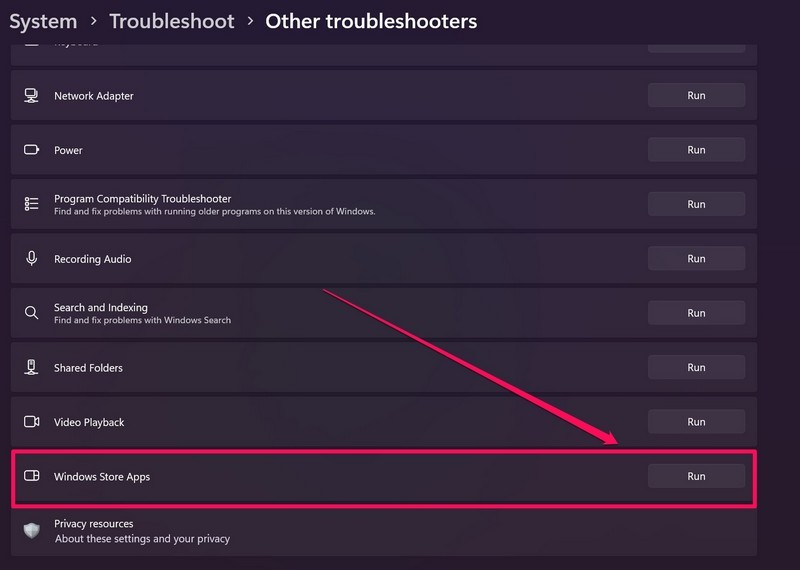
5. Wait for the troubleshooter to complete the process and fix the detected issues.
6. Restart your Windows 11 PC or laptop after troubleshooting.
Launch the Xbox app after the restart. It should work fine now.
8. Repair or Reset the Xbox App in Windows 11
Now, if the Windows Store troubleshooter did not fix the Xbox app not working in Windows 11 issue on your device, your next move should be repairing and/ or resetting the app. To do these, follow the steps right below:
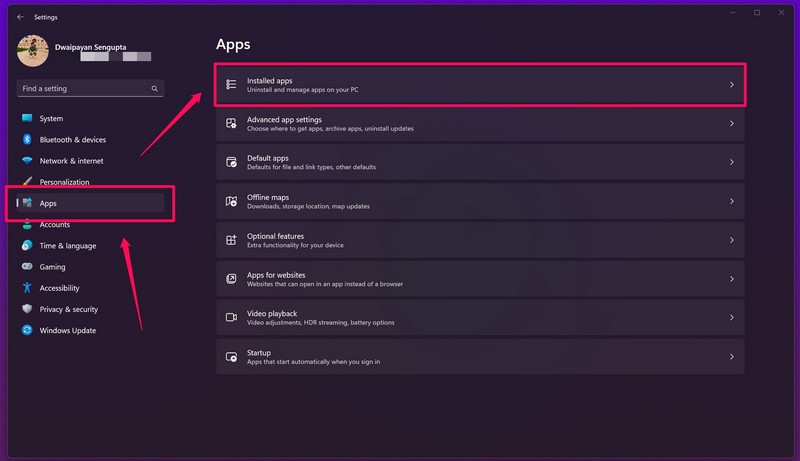
1. Use Windows + I to open the Settings app in Windows 11.
2. Under the Apps tab on the left nav bar, select the Installed apps option.
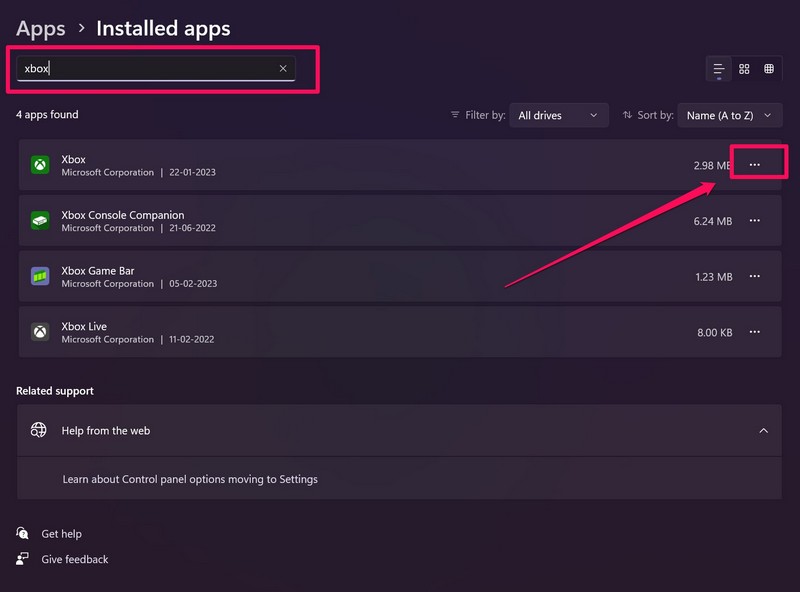
3. Use the provided search bar to find the Xbox app and click the three-dot button.
4. Select Advanced options on the context menu.
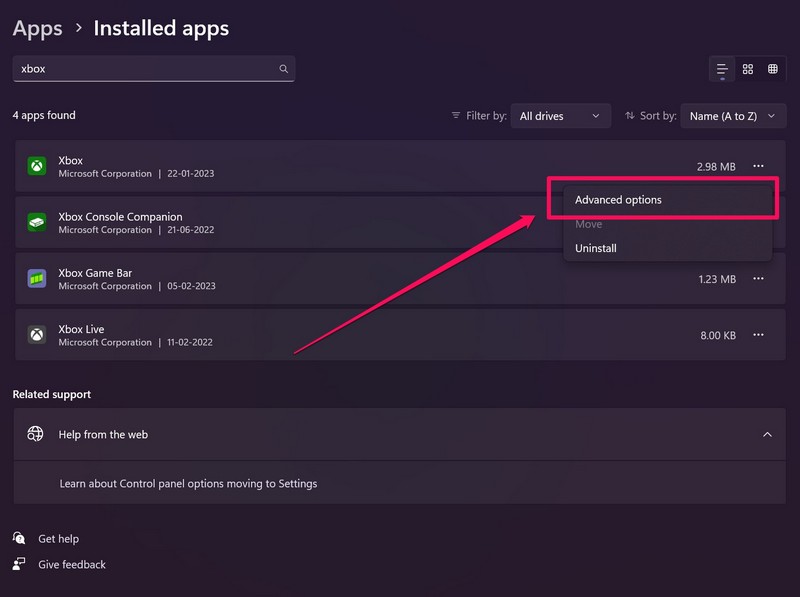
5. Now, scroll down to the Reset section and click the Repair button.

6. Wait for the Repair process to complete and check whether the Xbox app is opening in Windows 11 or not.
7. If repairing the Xbox app did not work, go to the Advanced options page for the app once again using the above steps.
8. This time, click the Reset button under the Reset section.
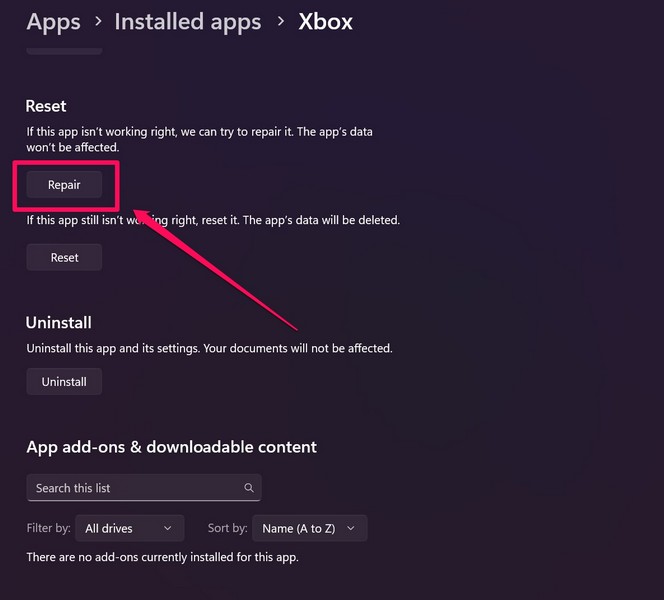
9. Wait for the Reset process to complete and then restart your device.
Following the restart, launch the Xbox app and check if it is working or not.
9. Run SFC Scan in Windows 11
Issues in system files in Windows 11 can be another reason why the Xbox is not working on your PC or laptop. In this case, the SFC scan or the System File Checker scan is your best option to fix the issue as the nifty command-line tool checks the system file directory and replaces missing or corrupt files.
Hence, there is a high chance that the SFC scan will fix the Xbox app not working issue on your Windows 11 device. So, to run the SFC scan in Windows 11, follow the steps right below:
1. Use Windows + S to open Windows search and search for cmd.
2. Click the Run as administrator button for the Command Prompt app in the search results.

3. Click Yes on the following User Account Control prompt.
4. Once the Command Prompt program opens, type in the following command and press Enter:
sfc /scannow
5. Wait for the scan to complete.
6. Restart your Windows 11 PC or laptop after completion.
10. Run DISM Scans in Windows 11
The Deployment Image Servicing and Management scans, aka DISM scans, are a set of command-line tools like the SFC scan that checks the disk images in Windows and fixes issues in system apps.
So, if the SFC scan did not fix the Xbox app not working in Windows 11 issue, chances are the DISM scans might. Here’s how to run the DISM scans in Windows 11:
1. Launch the Command Prompt program as an administrator in Windows 11 as explained in the above method.
2. Once the program opens, type in the following commands and press Enter one by one:
DISM /Online /Cleanup-Image /CheckHealthDISM /Online /Cleanup-Image /ScanHealthDISM /Online /Cleanup-Image /RestoreHealthNote: Run the above commands one by one in Command Prompt. Do not run them simultaneously.

3. After the DISM scans are completed, restart your Windows 11 PC or laptop.
11. Check for Viruses or Malware in Windows 11
Although chances are low, digital threat actors like viruses or malware can cause issues in system apps in Windows 11. So, the Xbox app not working issue can also be caused by a virus or malware program that is installed on your device.
In this case, you can use the Windows Security tool to scan your PC or laptop for threat actors and delete them from your device. To do this, follow the steps right below:
1. Press Windows + I to launch the Settings app in Windows 11.
2. Under the Privacy & security tab, click the Windows Security option.
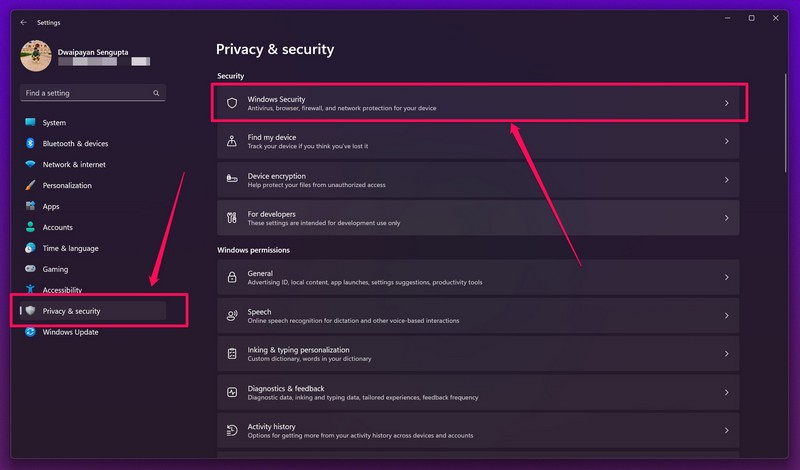
3. Next, click the Virus and threat protection option.
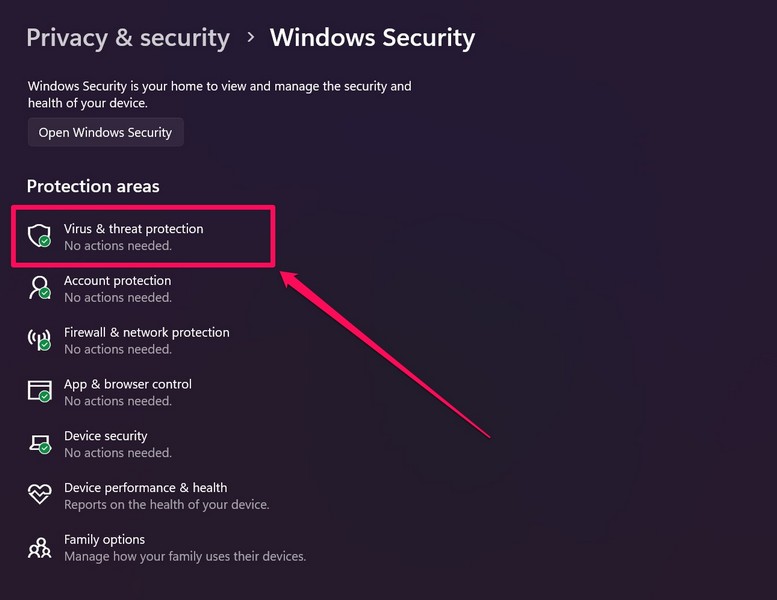
4. On the following page, click the Quick scan button to start the scan.
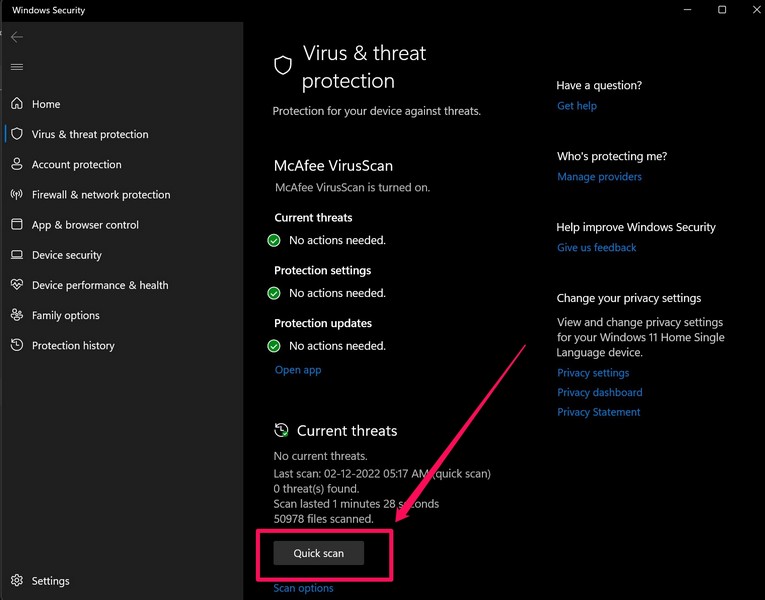
5. Wait for the scan to complete.
Now, after the scan is completed, you might have to delete or uninstall third-party apps or games that contain the threat actors. So, remove the virus or malware-laden programs from your PC or laptop and restart the system. Following the restart, launch the Xbox app and check whether or not it is working or opening in Windows 11.
12. Check for Windows Updates
Other than misconfigured settings, outdated app versions, and issues in the system, outdated Windows versions can also cause issues in system apps in Windows 11. So, if you are still facing the Xbox app not working in Windows 11 issue on your device, you might want to check for the latest Windows 11 updates and install them on your device.
To do that, follow the steps right below:
1. Use the Windows + I shortcut to launch the Settings app in Windows 11.
2. Under the Windows Update tab on the left nav bar, click the Check for updates button.

3. Once the latest Windows 11 updates show up, click the Download and install button.
4. Wait for the update to complete.
5. Restart your Windows 11 PC or laptop.
FAQs
Is the Xbox app available for Windows 11 PCs or laptops?
Yes, the Xbox app from Microsoft is available for Windows 11 PCs and laptops in Microsoft Store. It comes pre-installed with the latest Windows 11 laptops.
Can I update the Xbox app in Windows 11?
Yes, just like other system apps in Windows 11, Microsoft allows users to update the Xbox app via its official Microsoft Store app.
What is the difference between Xbox Console App and Xbox App in Windows 11?
While the Xbox Console Companion app is the native app that allows users to access console control features, the new Xbox app serves as a game-launcher app in Windows 11. The latter also allows users to manage their PC Game Pass subscription in Windows 11.
Is the Xbox app available on Windows 10?
Yes, the Xbox app is available for Windows 10. While the Xbox app comes pre-installed with Windows 11 on PCs and laptops, Windows 10 users can download and update it via the Microsoft Store.
How to remove the Xbox app on my Windows 11 laptop?
Just like any other application in Windows 11, you can simply uninstall the Xbox app from your PC or laptop. Use Windows search to find the app, right-click on it, and select the Uninstall option. Follow the on-screen instructions to remove the app from your Windows 11 laptop.
Wapping Up
So, there you have it. This was all about fixing the Xbox app not working in Windows 11 issue on PCs and laptops. Be sure to try out all the solutions listed above to get the Xbox app up and running on your device.
We hope one of the above fixes works for you and that you are able to solve the issue. Let us know which solution worked for you in the comments. Meanwhile, you can check out our other in-depth fix guides like this one on various Windows 11 topics right here!
This service supports the Windows.Networking.XboxLive application programming interface.
This service exists in Windows 11 only.
Startup Type
| Windows 11 version | Home | Pro | Education | Enterprise |
|---|---|---|---|---|
| 21H2 | Manual | Manual | Manual | Manual |
| 22H2 | Manual | Manual | Manual | Manual |
| 23H2 | Manual | Manual | Manual | Manual |
| 24H2 | Manual | Manual | Manual | Manual |
Default Properties
| Display name: | Xbox Live Networking Service |
| Service name: | XboxNetApiSvc |
| Type: | share |
| Path: | %WinDir%\system32\svchost.exe -k netsvcs -p |
| File: | %WinDir%\system32\XboxNetApiSvc.dll |
| Error control: | normal |
| Object: | LocalSystem |
| Privileges: |
|
Default Behavior
The Xbox Live Networking Service is running as LocalSystem in a shared process of svchost.exe. Other services might run in the same process. If Xbox Live Networking Service fails to start, the error is logged. Windows 11 startup proceeds, but a message box is displayed informing you that the XboxNetApiSvc service has failed to start.
Dependencies
Xbox Live Networking Service is unable to start, if at least one of the following services is stopped or disabled:
- Base Filtering Engine
- CNG Key Isolation
- IKE and AuthIP IPsec Keying Modules
- Windows Defender Firewall
Restore Default Startup Type for Xbox Live Networking Service
Automated Restore
1. Select your Windows 11 edition and release, and then click on the Download button below.
2. Save the RestoreXboxLiveNetworkingServiceWindows11.bat file to any folder on a local drive such as SSD or a hard disk.
3. Right-click the downloaded batch file and select Properties.
4. Check the Unblock checkbox and click OK.
5. Right-click the batch file again and select Run as administrator.
6. Restart the computer to save changes.
Note. Make sure that the XboxNetApiSvc.dll file exists in the %WinDir%\system32 folder. If this file is missing you can try to restore it from your Windows 11 installation media.
Yea, though I walk through the valley of the shadow of death, I will fear no evil: for thou art with me; thy rod and thy staff they comfort me.
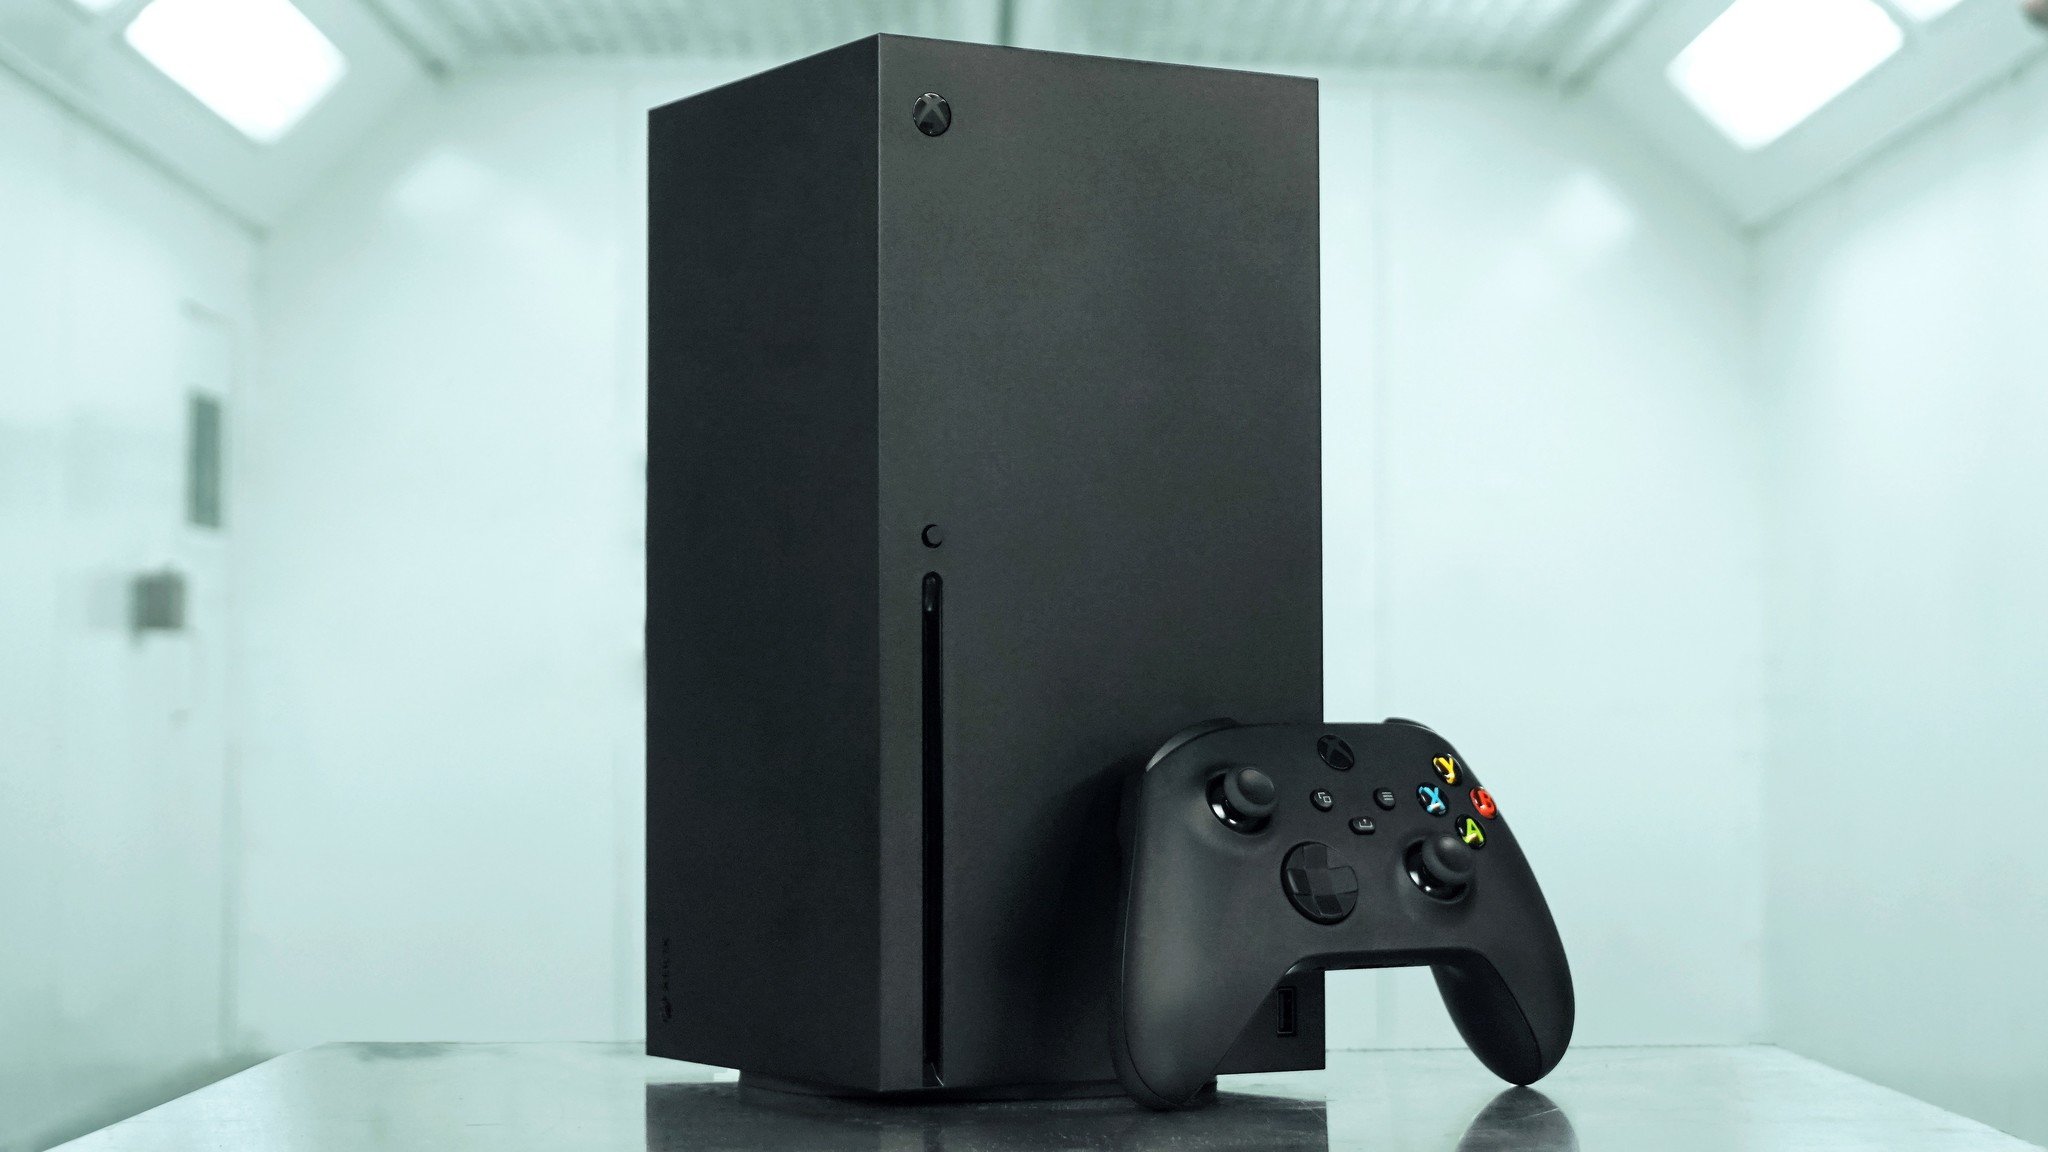
(Image credit: Matt Brown | Windows Central)
Microsoft’s latest consoles may count among the fastest and most powerful consoles ever released, but all the hardware prowess in the world matters little if your connection to the internet is tenuous or unreliable. High latency or moments of lag can mean the difference between victory and defeat in an online multiplayer game, and the difference between fun and frustration when using your Xbox.
The Xbox Series X and Xbox Series S are undoubtedly impressive, but they can’t overcome these issues on their own. In this Xbox Series X|S networking guide, we’ll go over everything you need to know about connecting your console to the internet, ensuring your connection is smooth and consistent, and making the most of online multiplayer games. Follow these in-depth tips and tricks if you have any problems getting, or staying, online.

A catalog of games
Xbox Game Pass Ultimate
All your gaming needs, in one subscription
Is the Xbox Game Pass Ultimate the best value in all of gaming? It’s possible. Ultimate bundles your Xbox Live Gold subscription, an Xbox Game Pass subscription for both Xbox consoles and Windows PCs, and Xbox Cloud Gaming for on-the-go. That means access to hundreds of games, with more added all the time, for a single monthly subscription cost.
How do I connect to the internet with Xbox Series X|S?

The first step to pairing your powerful Xbox Series X|S with the internet is, well, getting your console online. There are two ways to connect your Xbox Series X|S to the internet: wired and wireless.
For most people, a wired internet connection is going to be the preferred route. A physical connection between your console and your router guarantees the best speeds and stability, at the expense of needing a cable connecting the two devices. Wireless connections can still provide perfectly adequate speeds for online play but trade some of the efficiency of a wired connection for convenience. Which one will work best for you depends on your setup and the overall convenience for which you’re looking.
In this Xbox Series X|S networking guide, we’ll go over how to connect your Xbox Series X|S to the internet both with and without wires.
Using a wired Ethernet connection
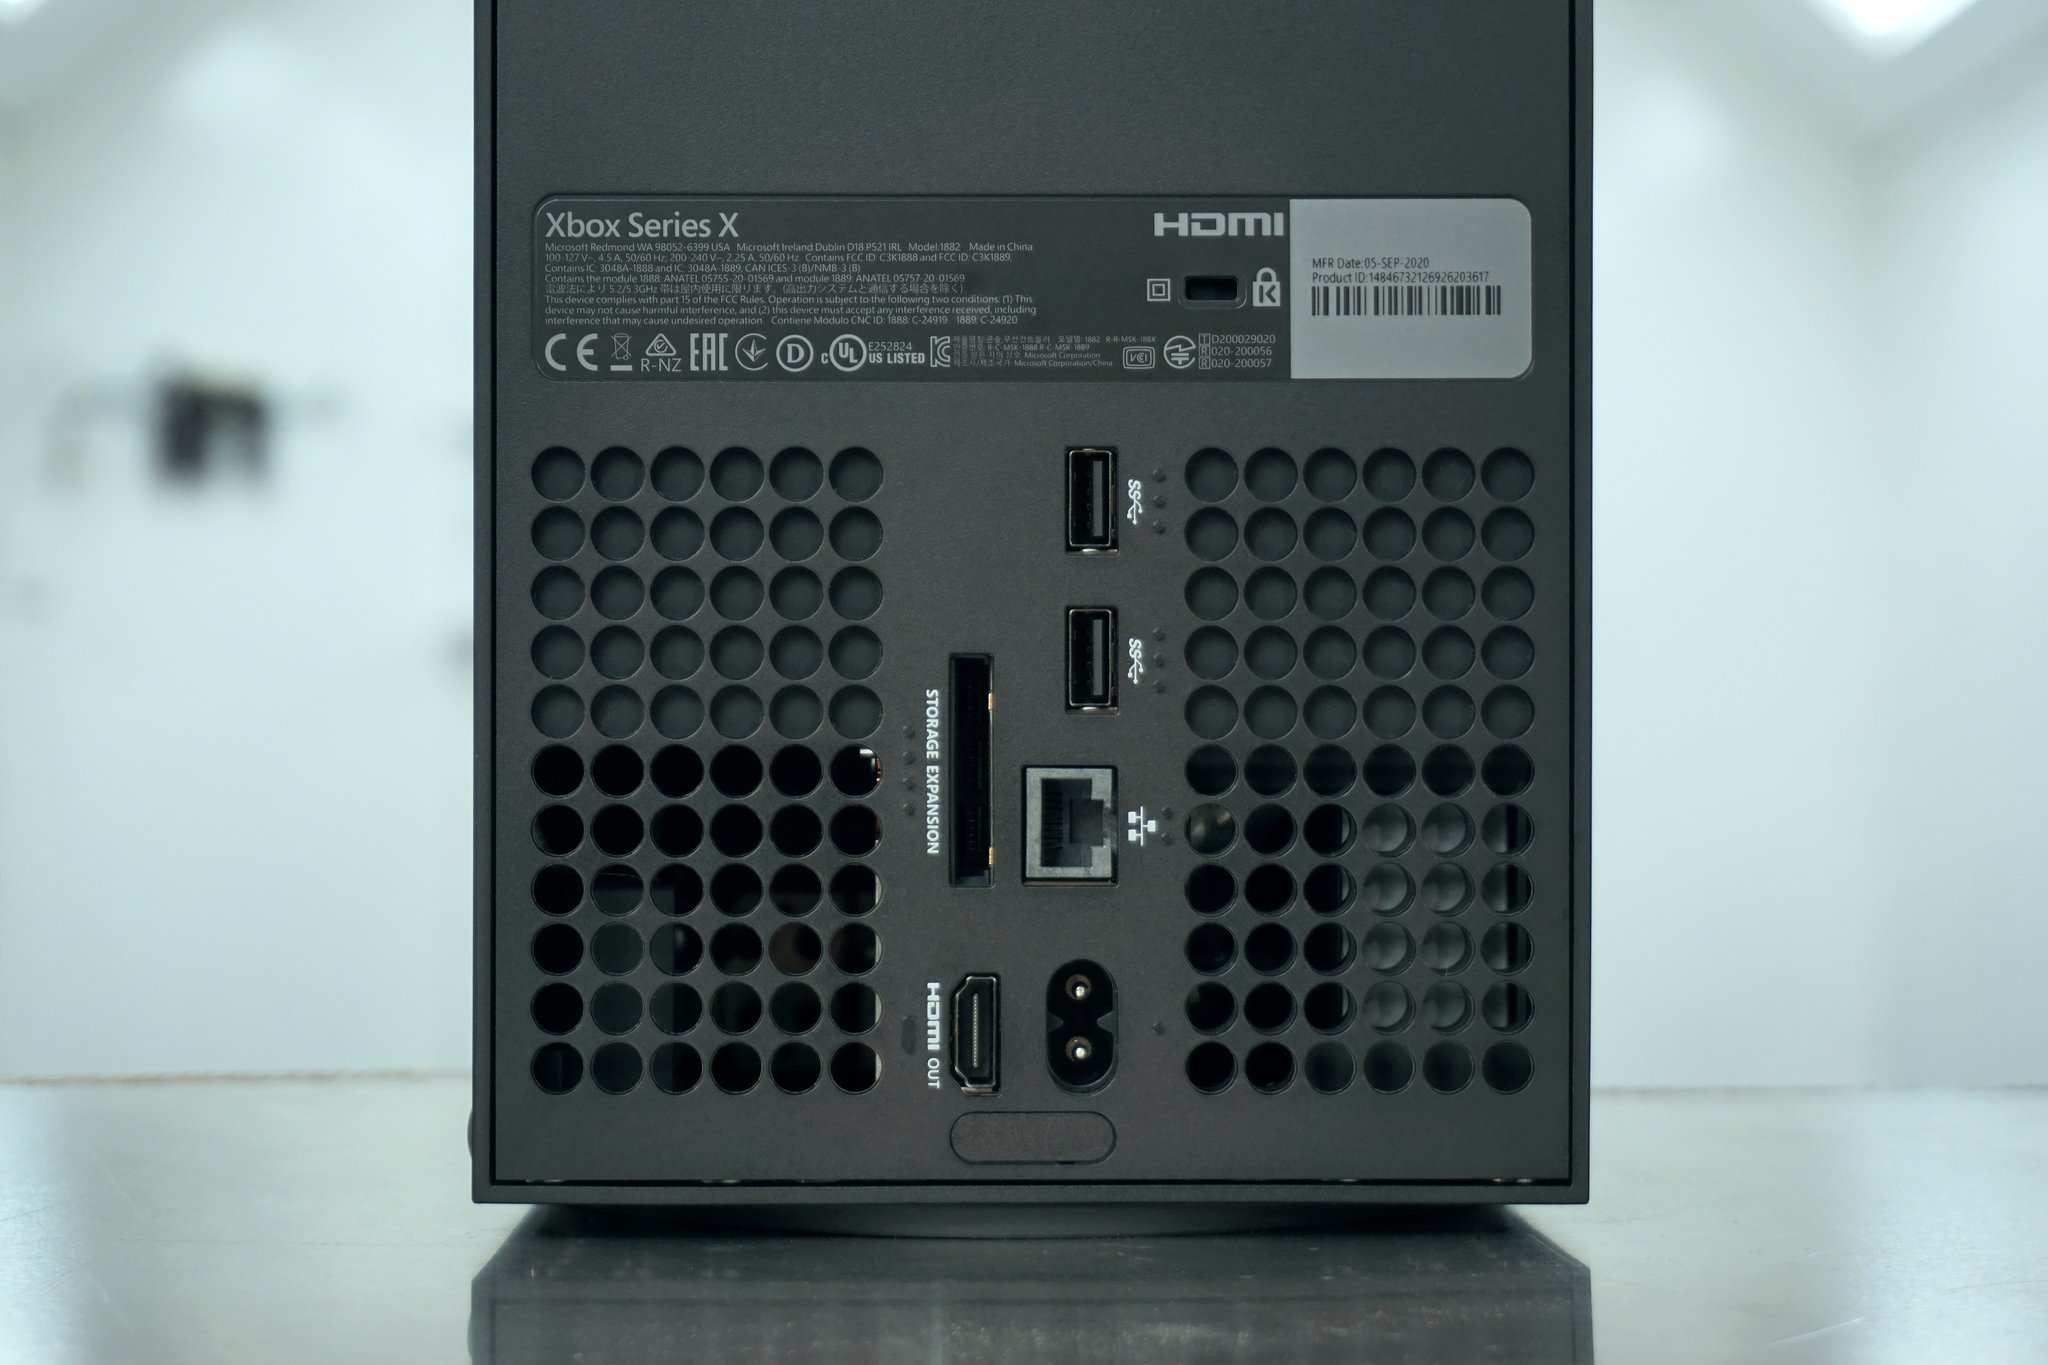
Connecting your Xbox Series X|S to the internet using a wired connection is not only the best way to go for optimal download speeds, but it’s also the most effortless setup process.
All you need to do is plug an Ethernet cable into your internet router and then run that Ethernet cable to the corresponding port on the back of your Xbox Series X|S. Once your console is connected via Ethernet, it’ll automatically attempt to connect to Xbox Live and the internet.
All the latest news, reviews, and guides for Windows and Xbox diehards.
Whether or not this will be worth it to you usually rests in how far away your Xbox Series X|S is from your router. Running Ethernet cables around the house can be a hassle. However, it doesn’t get any easier than simply plugging in a cable, and you’re guaranteed the best possible connection through Ethernet.
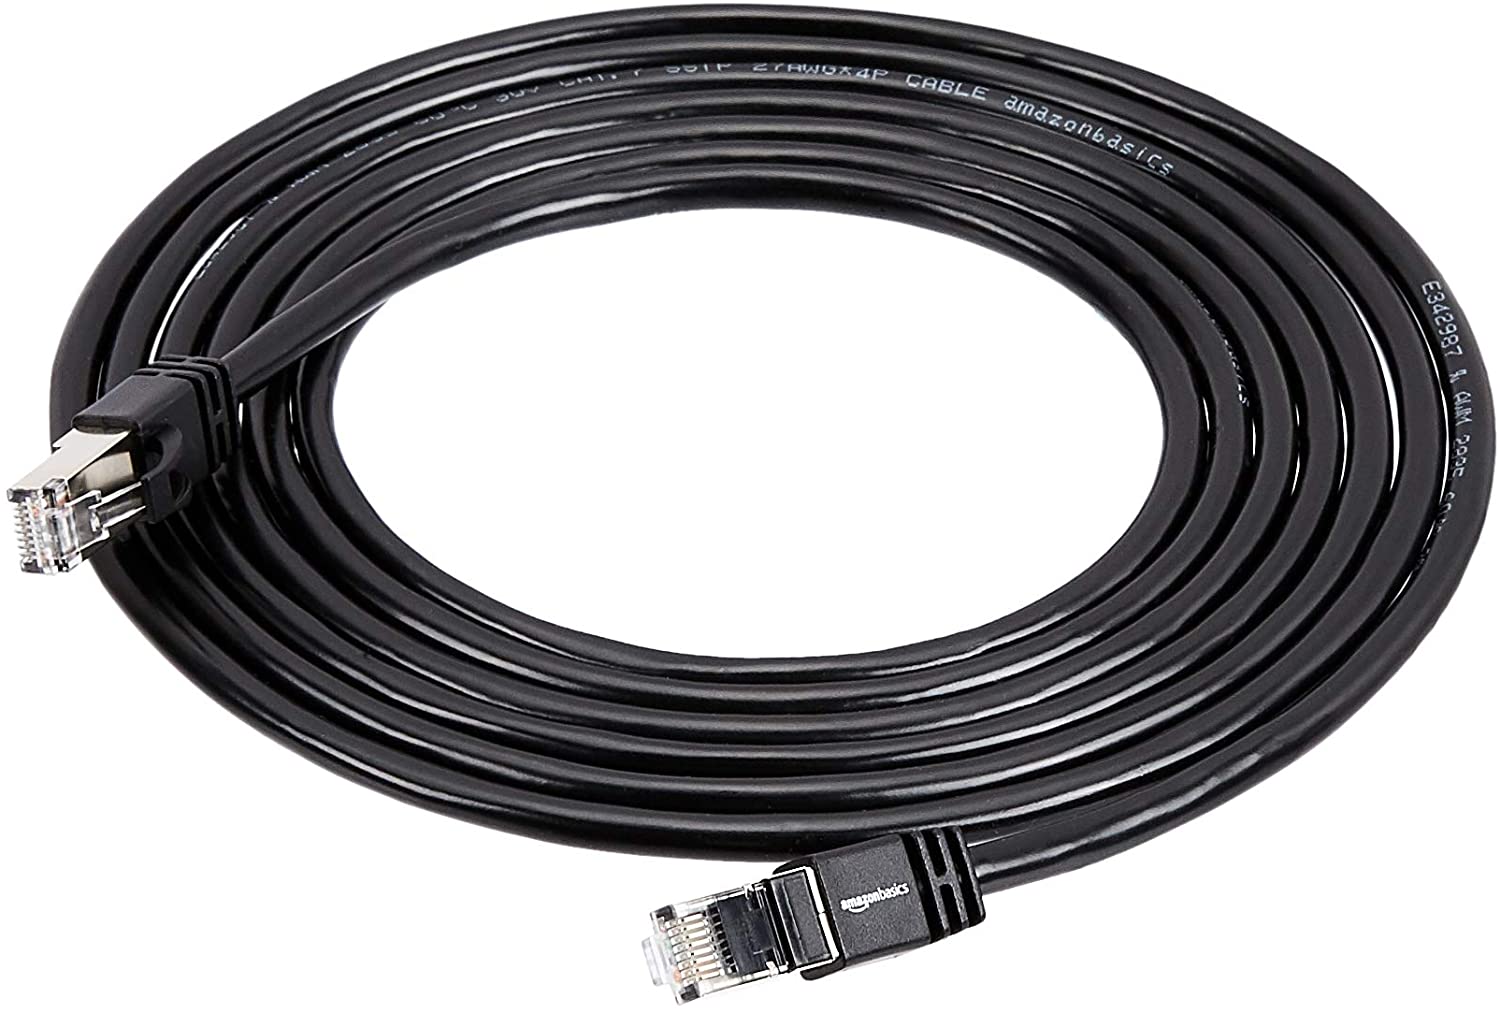
Amazon Basics Cat7 Ethernet Cable
If you’re in need of a basic Ethernet cable that’ll get the job done, this simple solution is effective for practically any internet speeds your network could support, all the way up to a theoretical 10Gbps. Available in a variety of sizes, depending on how far you need to travel.
Using a wireless Wi-Fi connection
Suppose you’re not able to connect your Xbox Series X|S to the internet using a wired connection, or it’s simply not worth the hassle or added expense of buying and running an Ethernet cable between your router and console. In that case, you can always resort to a wireless connection.
A wireless internet connection, or Wi-Fi, is used by phones, tablets, and practically everything else to connect to the internet. Wi-Fi can still provide excellent speeds for downloading and playing games, without the wired connection, but it isn’t always reliable. Using one of the best Wi-Fi routers can massively improve the reliability and speeds of your connection, making the trade-offs more than worth it for many situations.
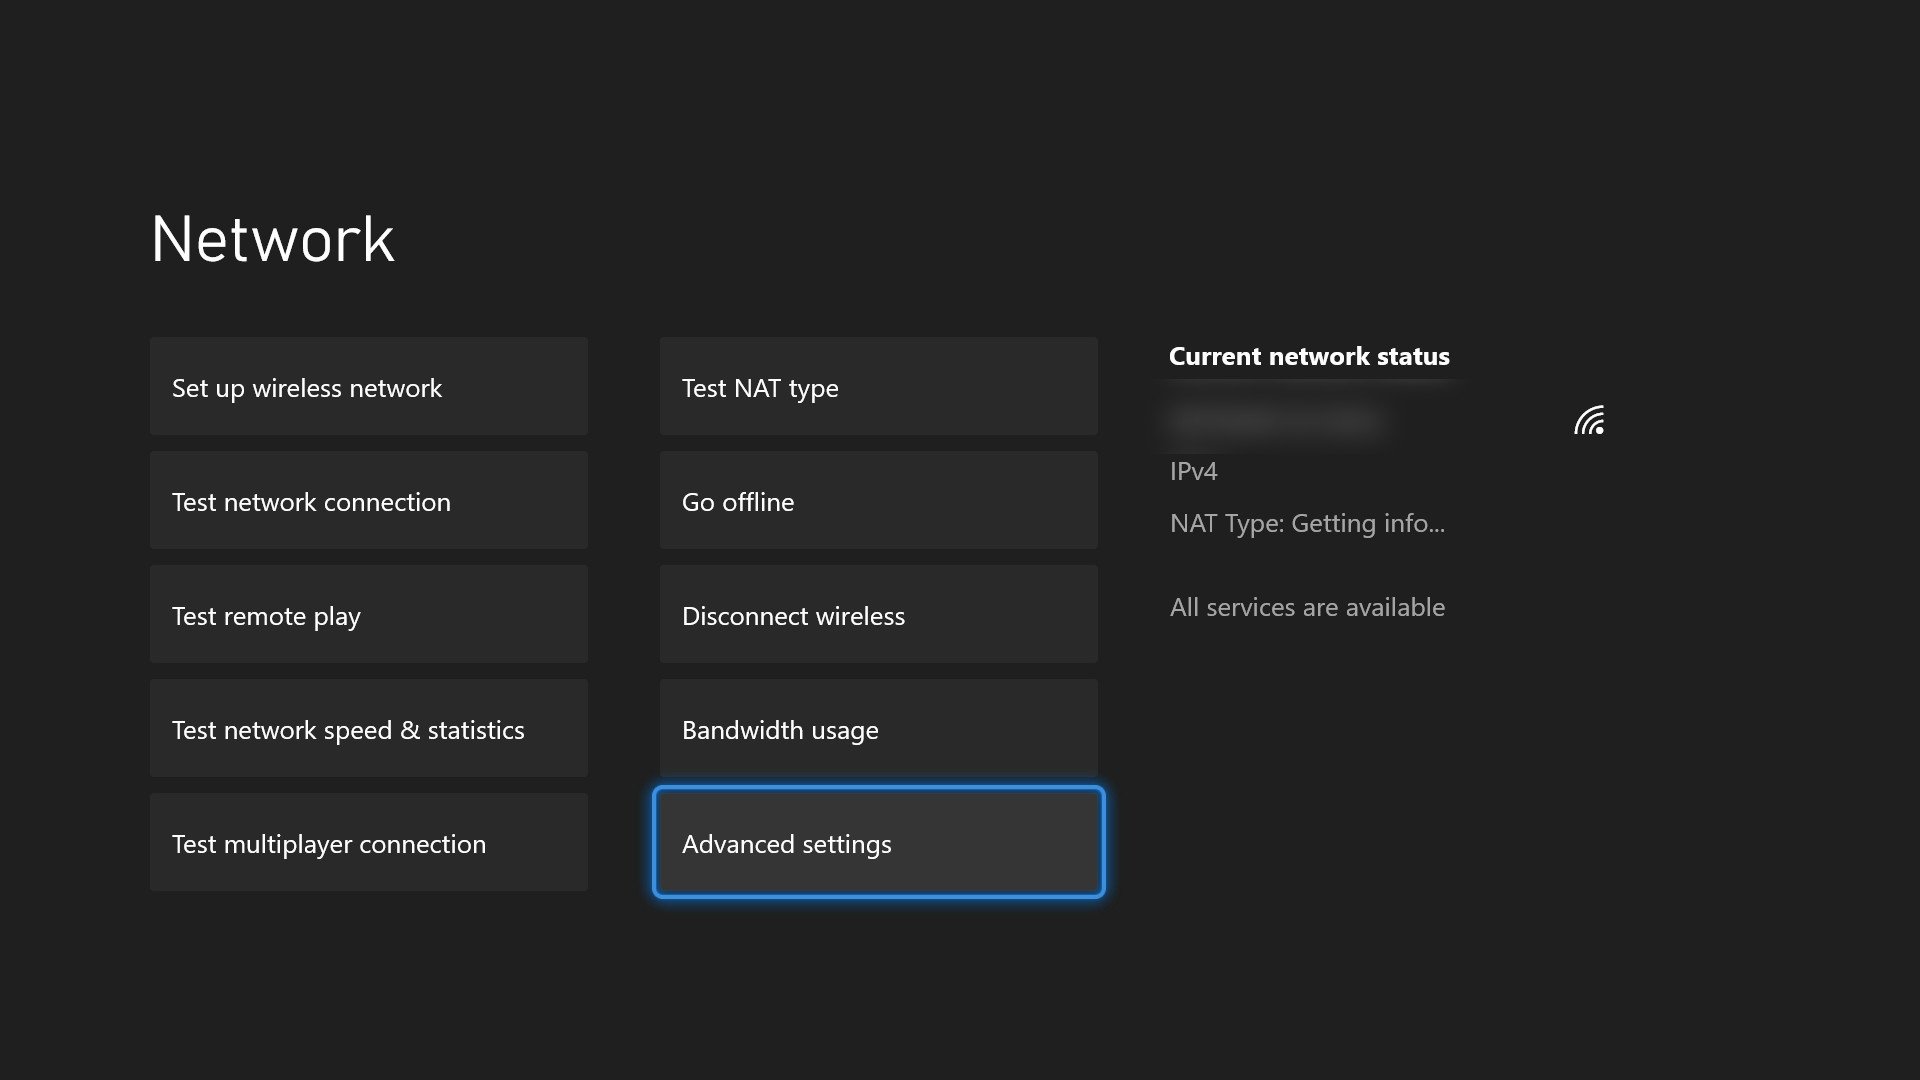
To connect your Xbox Series X|S to your Wi-Fi, follow these steps:
- On your Xbox Series X|S, open the Xbox Guide by pressing the «Xbox» button in the middle of your controller.
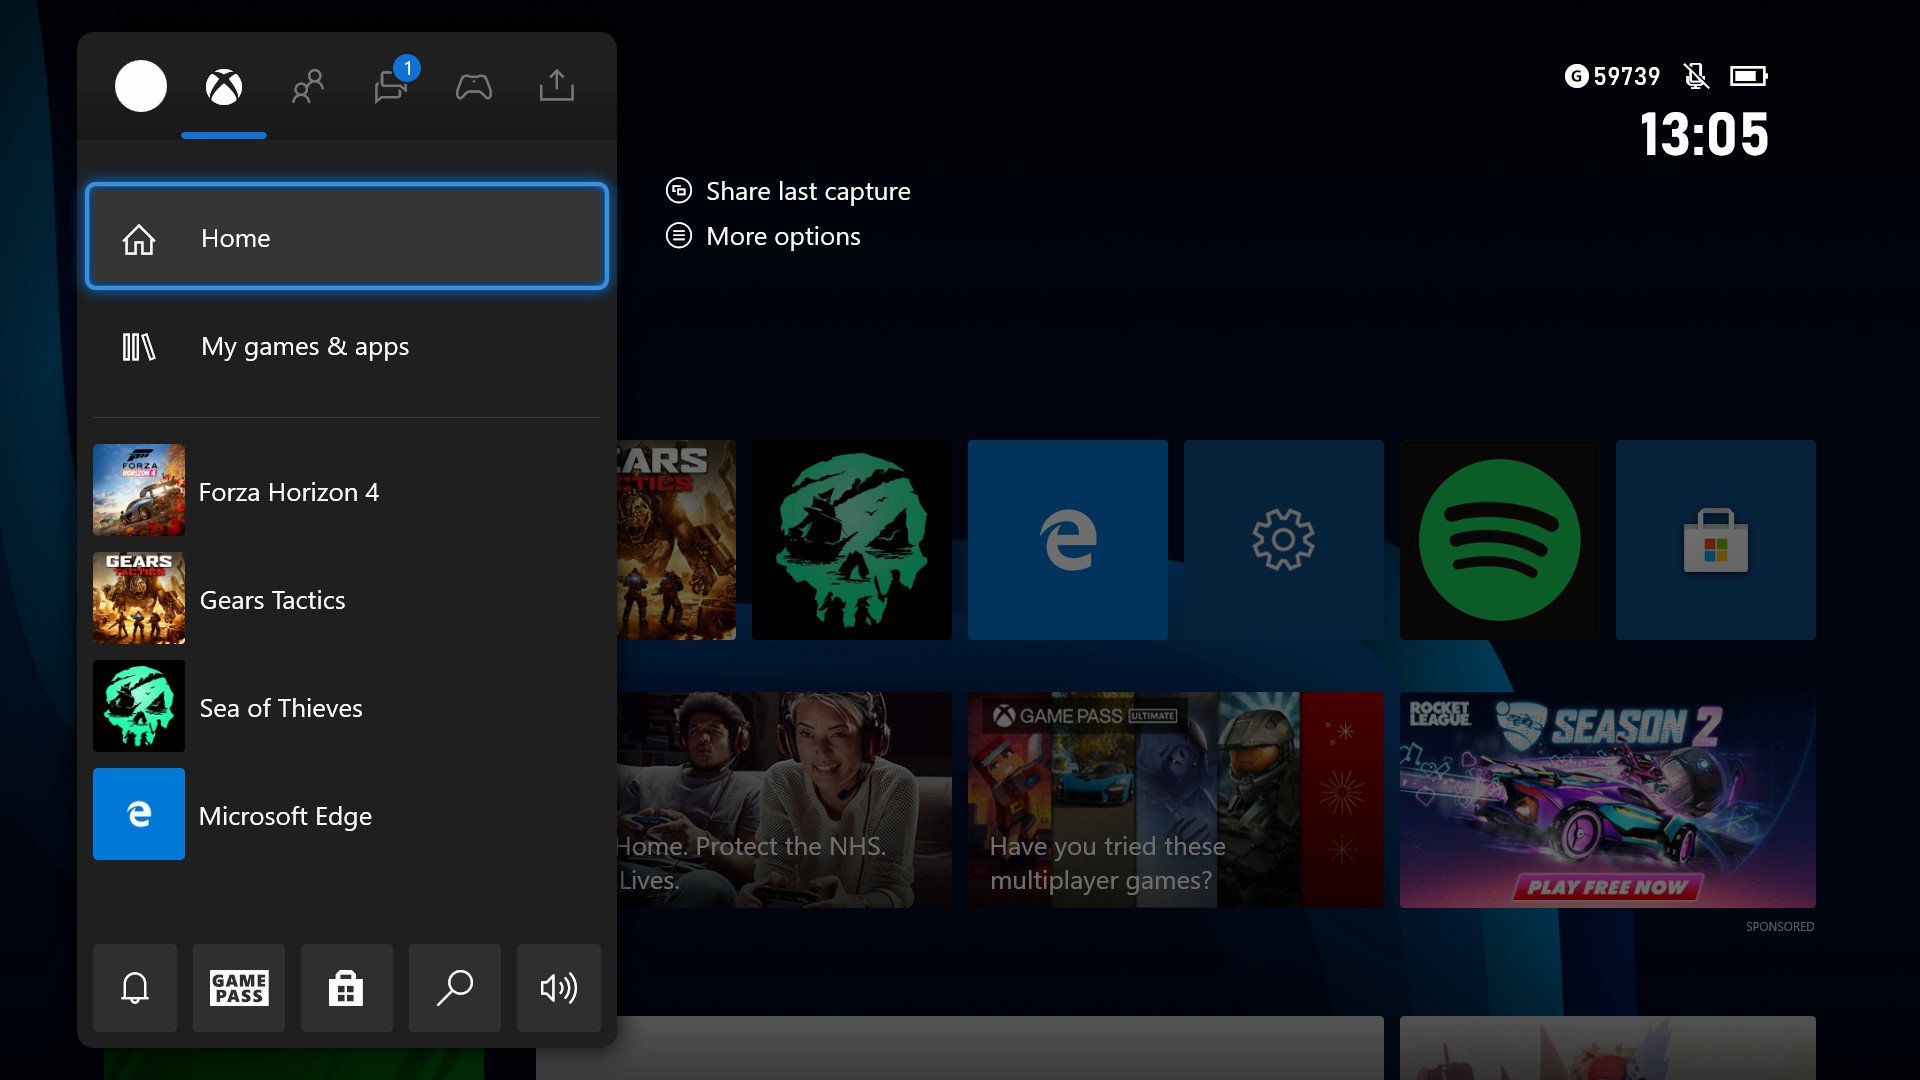
- Once the Guide is opened, scroll to the «Profile & system» tab using the bumpers, D-pad, or right analog stick on your controller.
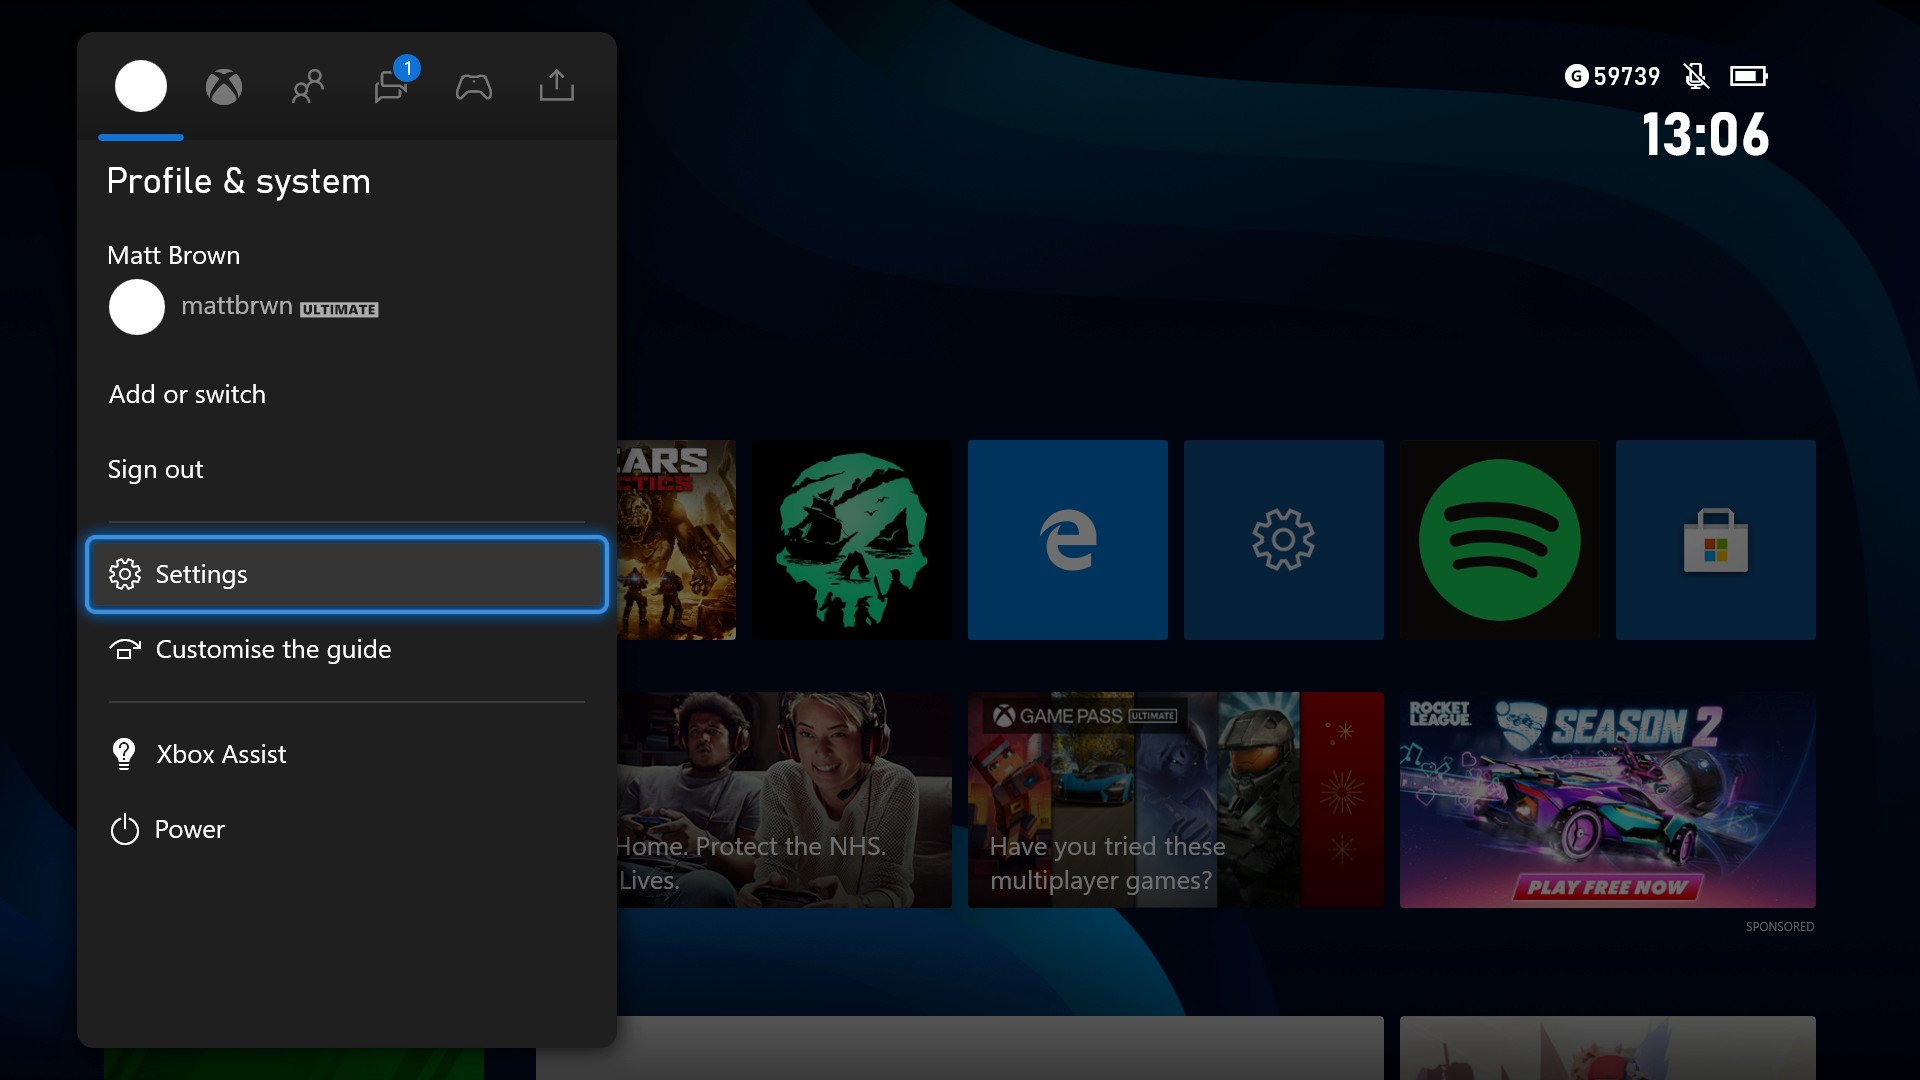
- On the «Profile & system» tab of the Guide, navigate to the «Settings» button and open Settings on your console.
- Once Settings is opened, navigate to the «General» section located at the top.
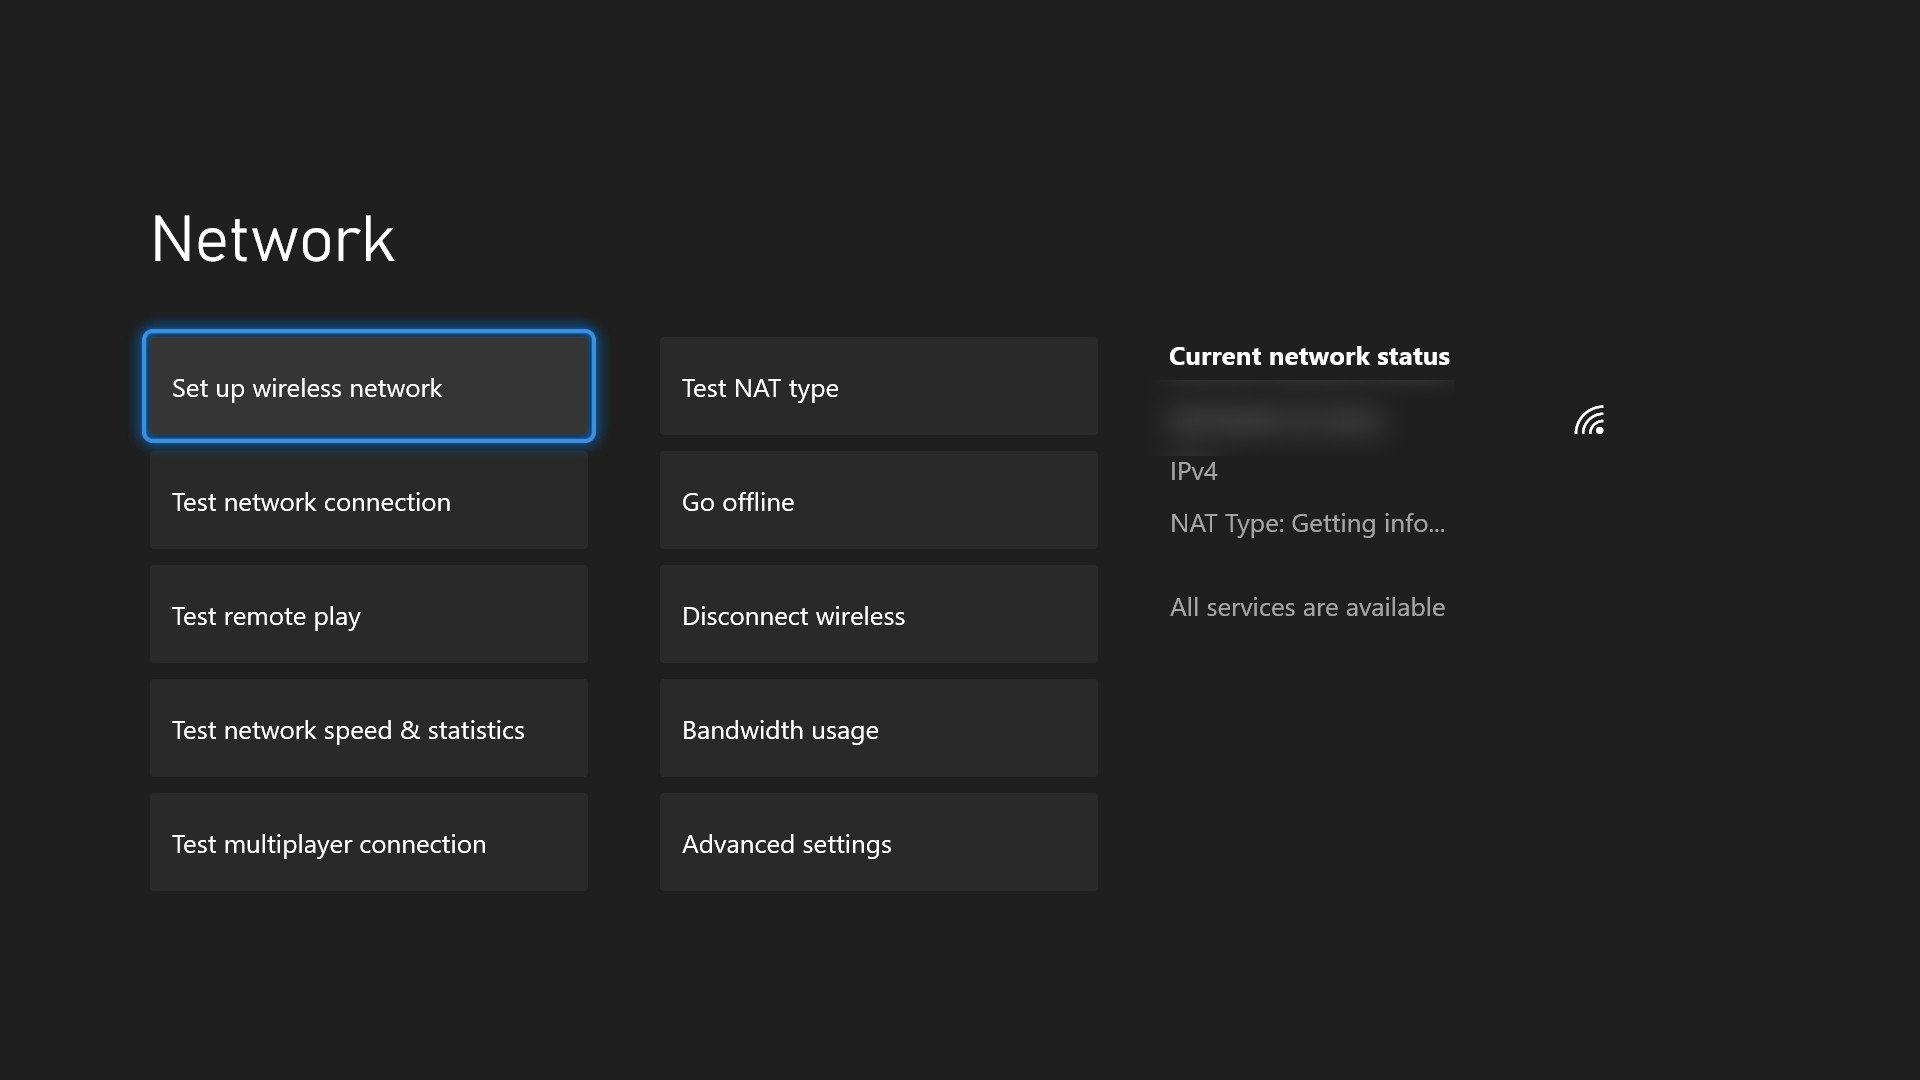
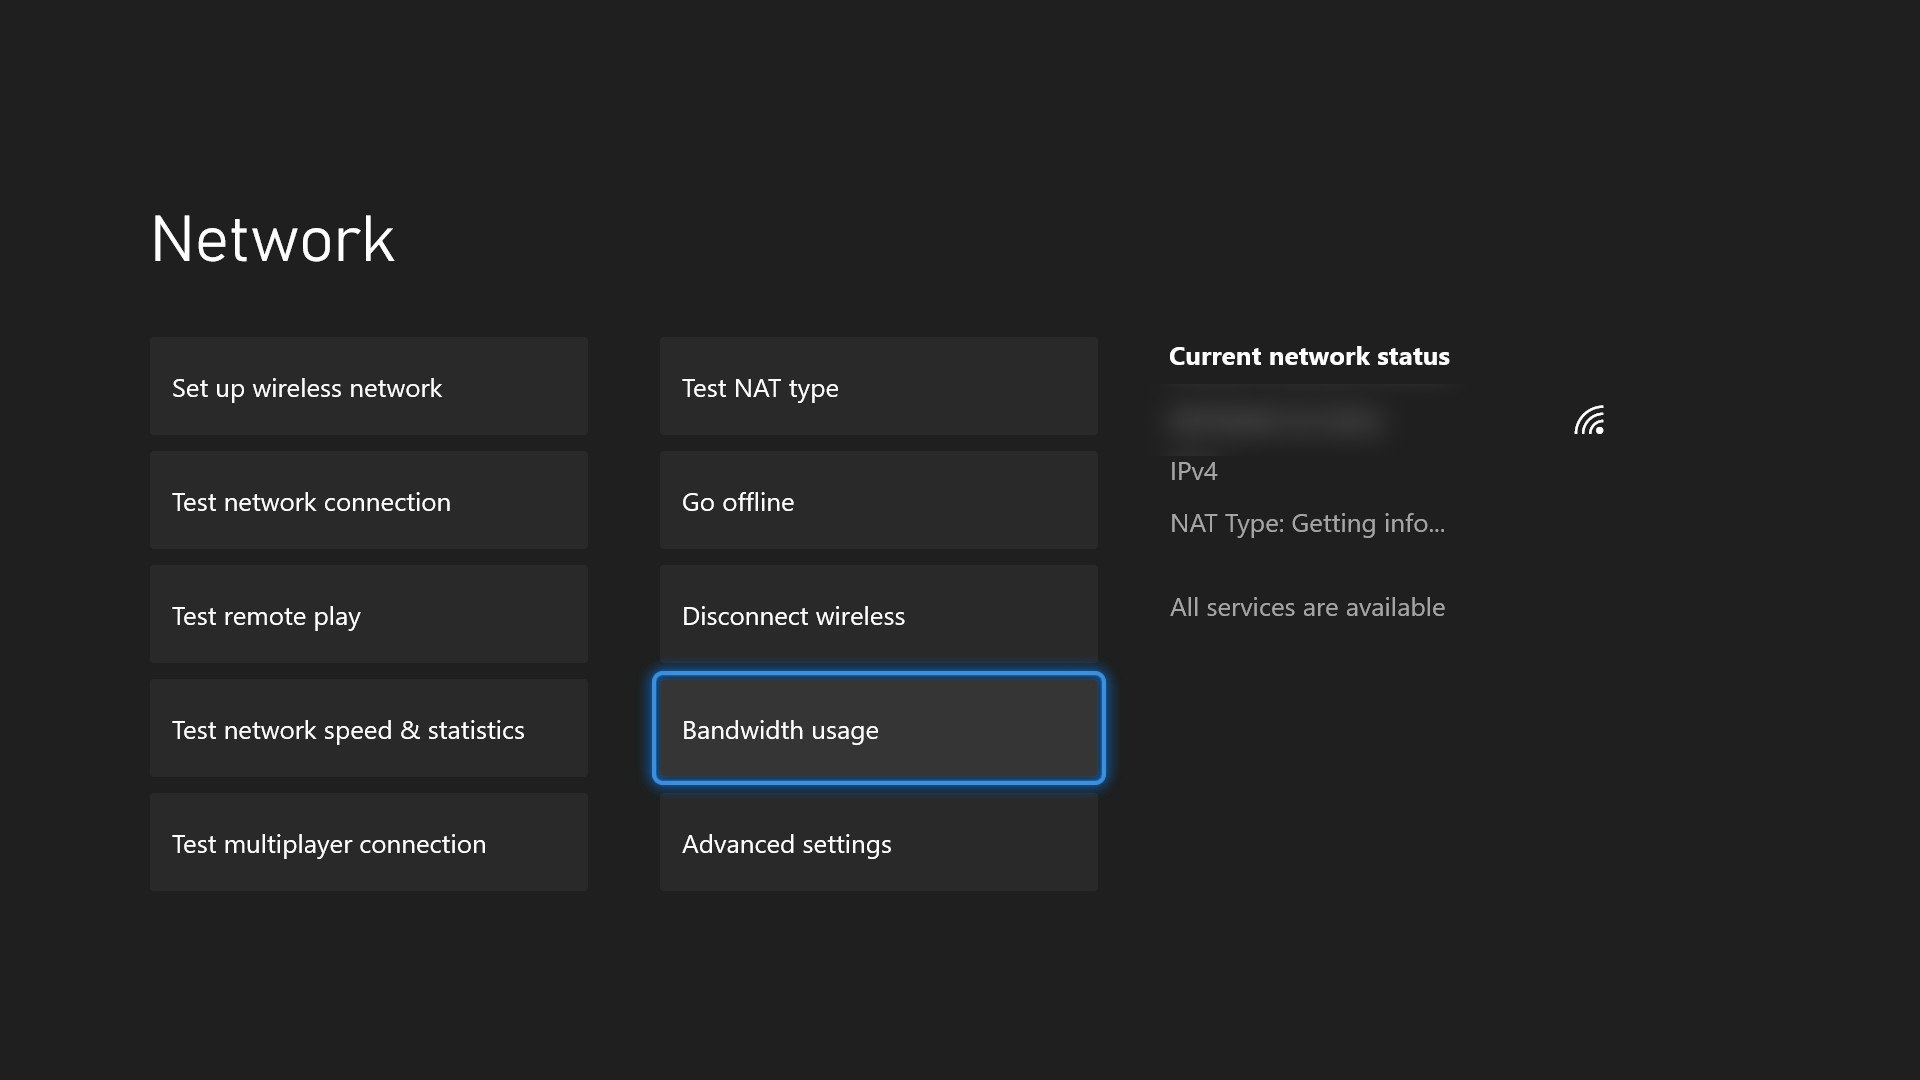
- Inside the «General» section of Settings, navigate to and open the «Network settings» to access all the network-related settings on your console.
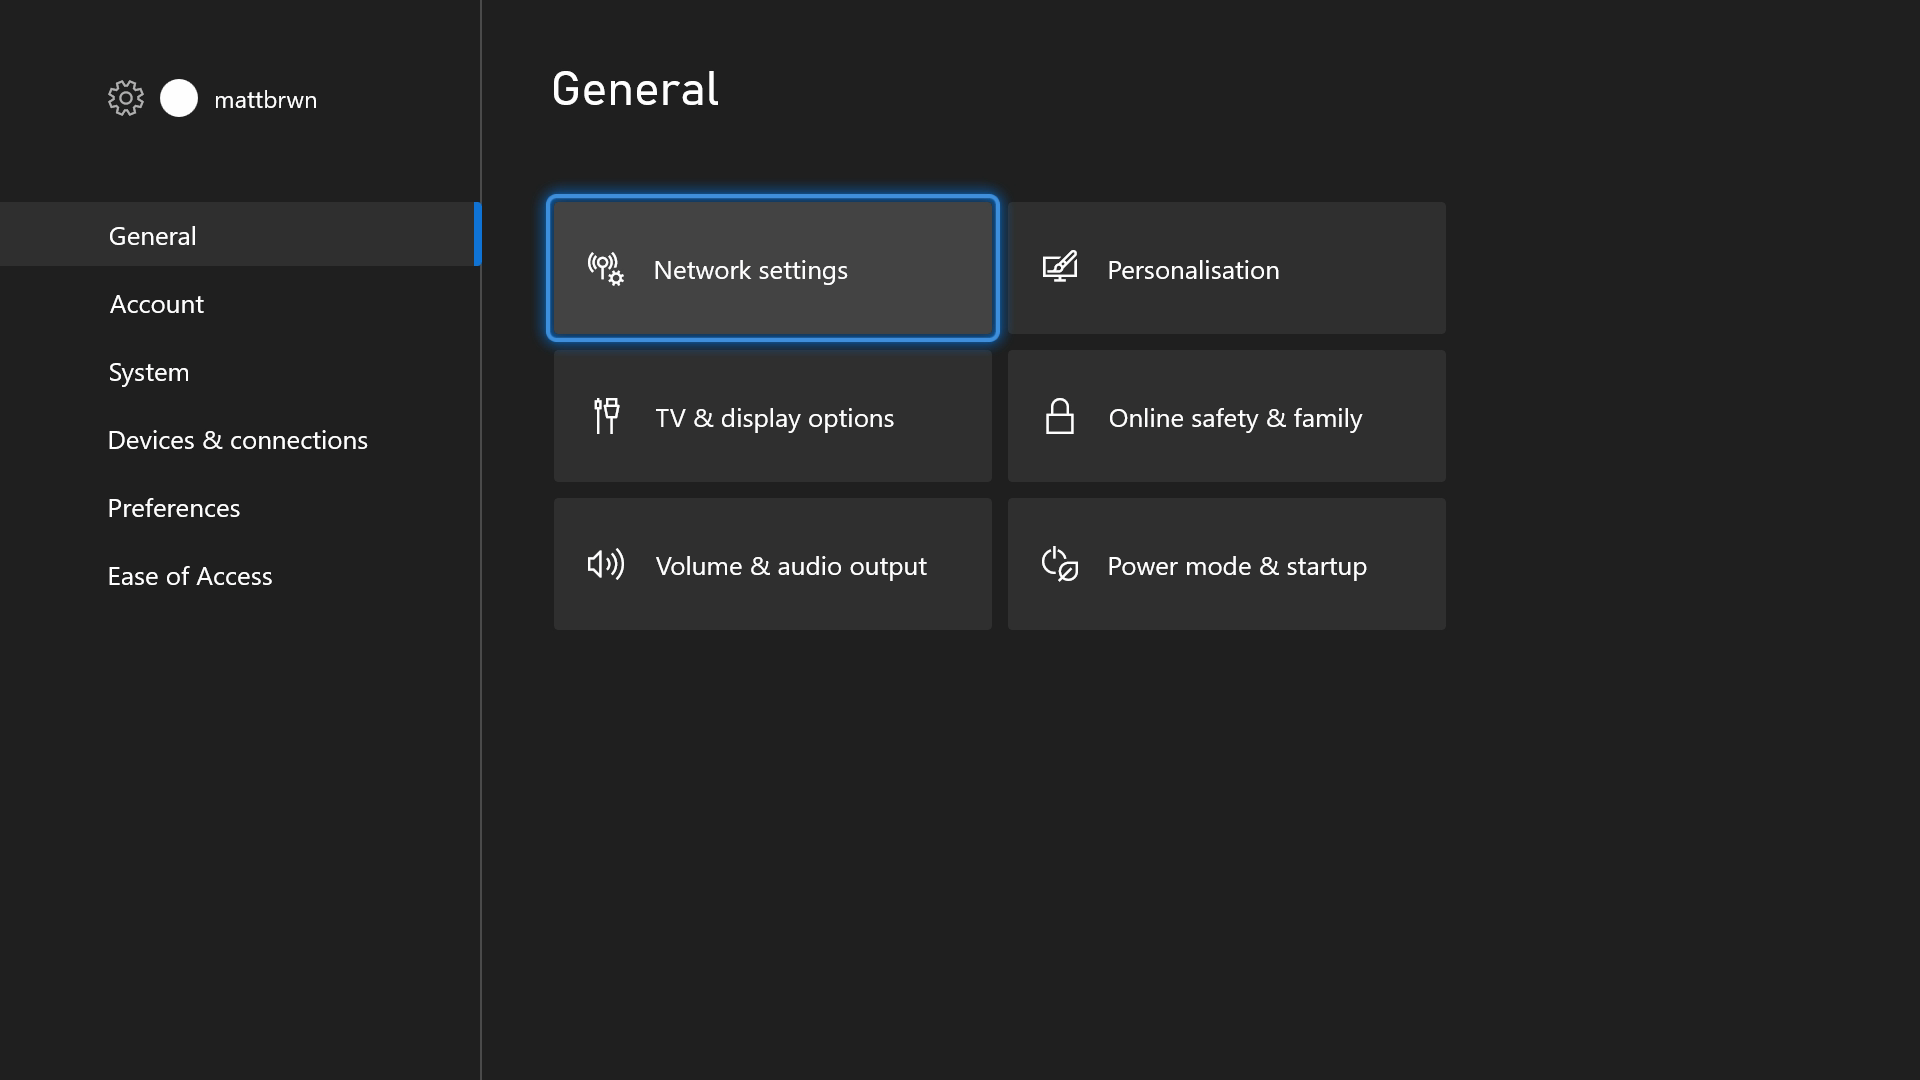
- Inside the «Network settings» section, navigate to and open «Set up wireless network» to find and connect your console to Wi-Fi.
- Note: If you do have an Ethernet cable plugged into your Xbox Series X|S, you’ll need to unplug it to set up a wireless network.
- Inside the «Set up wireless network» section, your Xbox Series X|S will display a list of available wireless networks currently in range. Find the Wi-Fi network you wish to connect to and select it from this list.
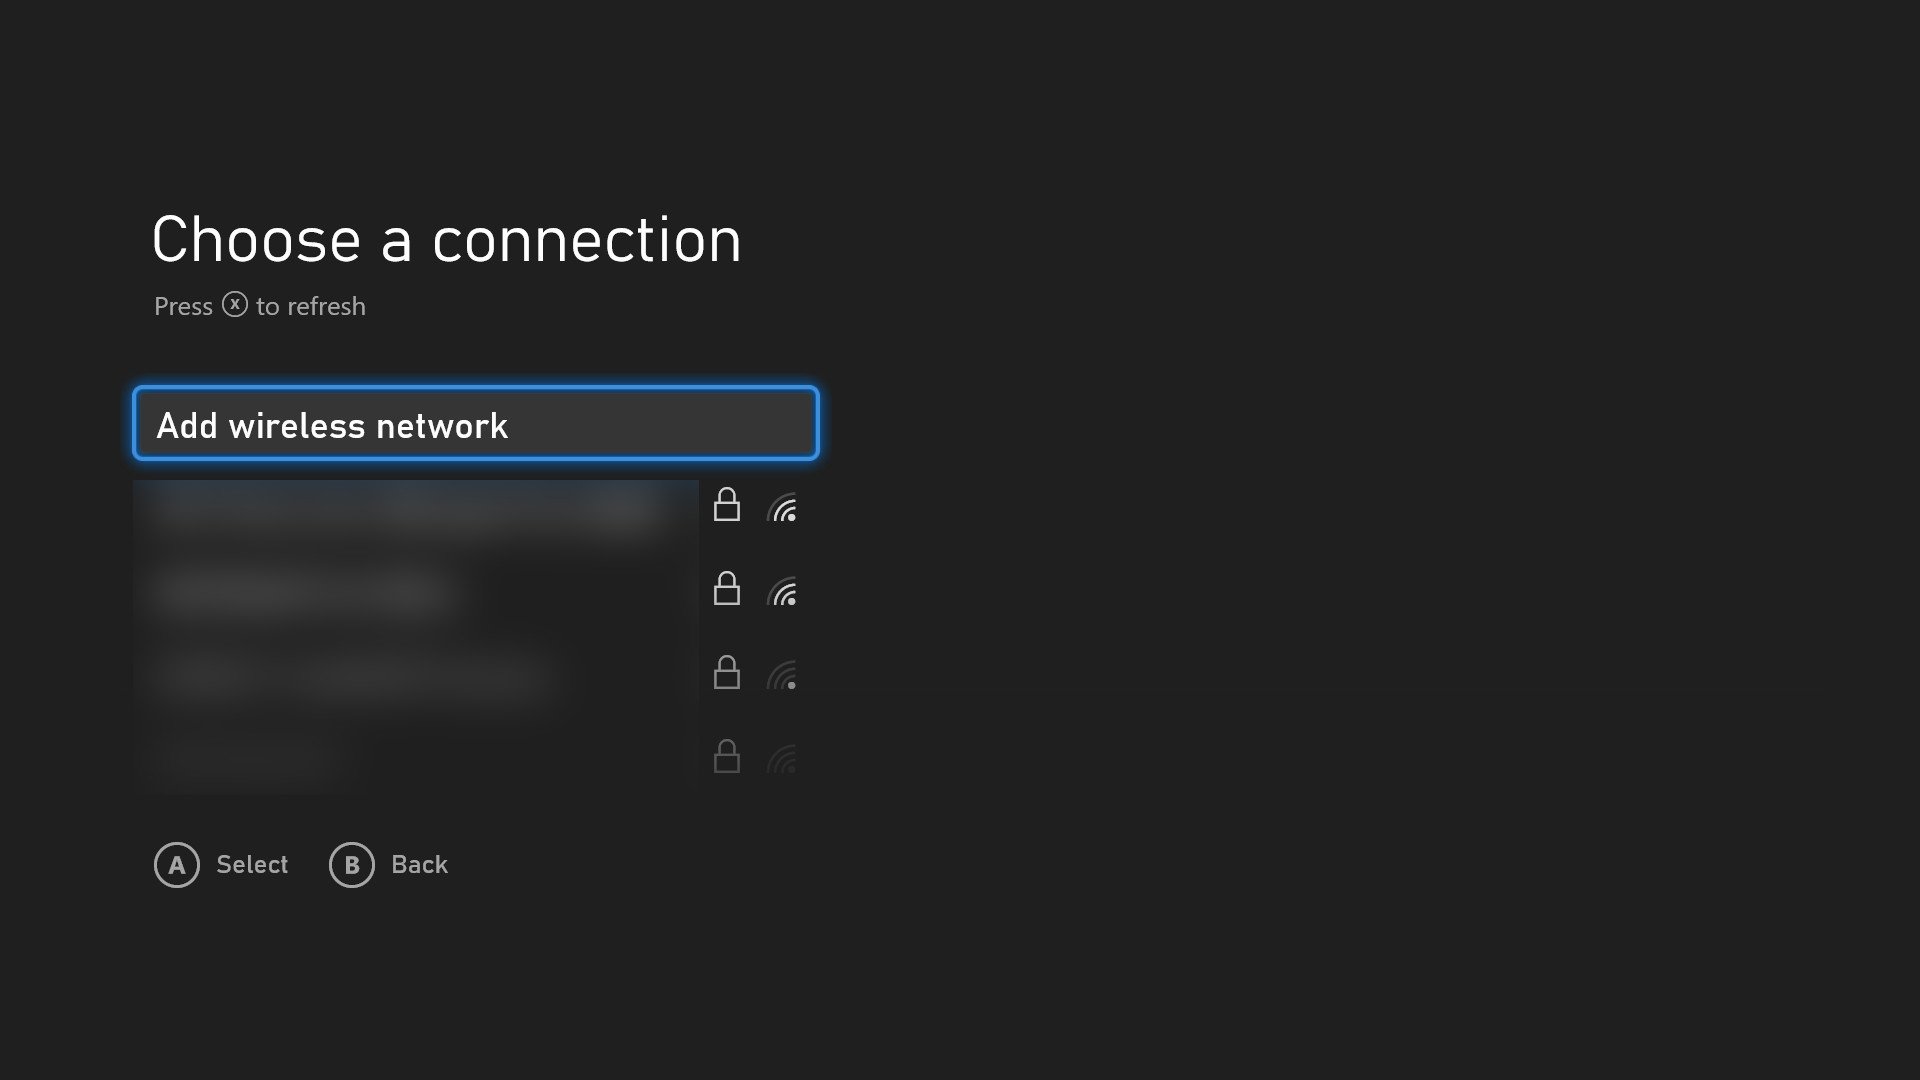
- If necessary, enter your Wi-Fi network password when prompted. Your Xbox Series X|S will inform you if the password was correct or if you need to try again.
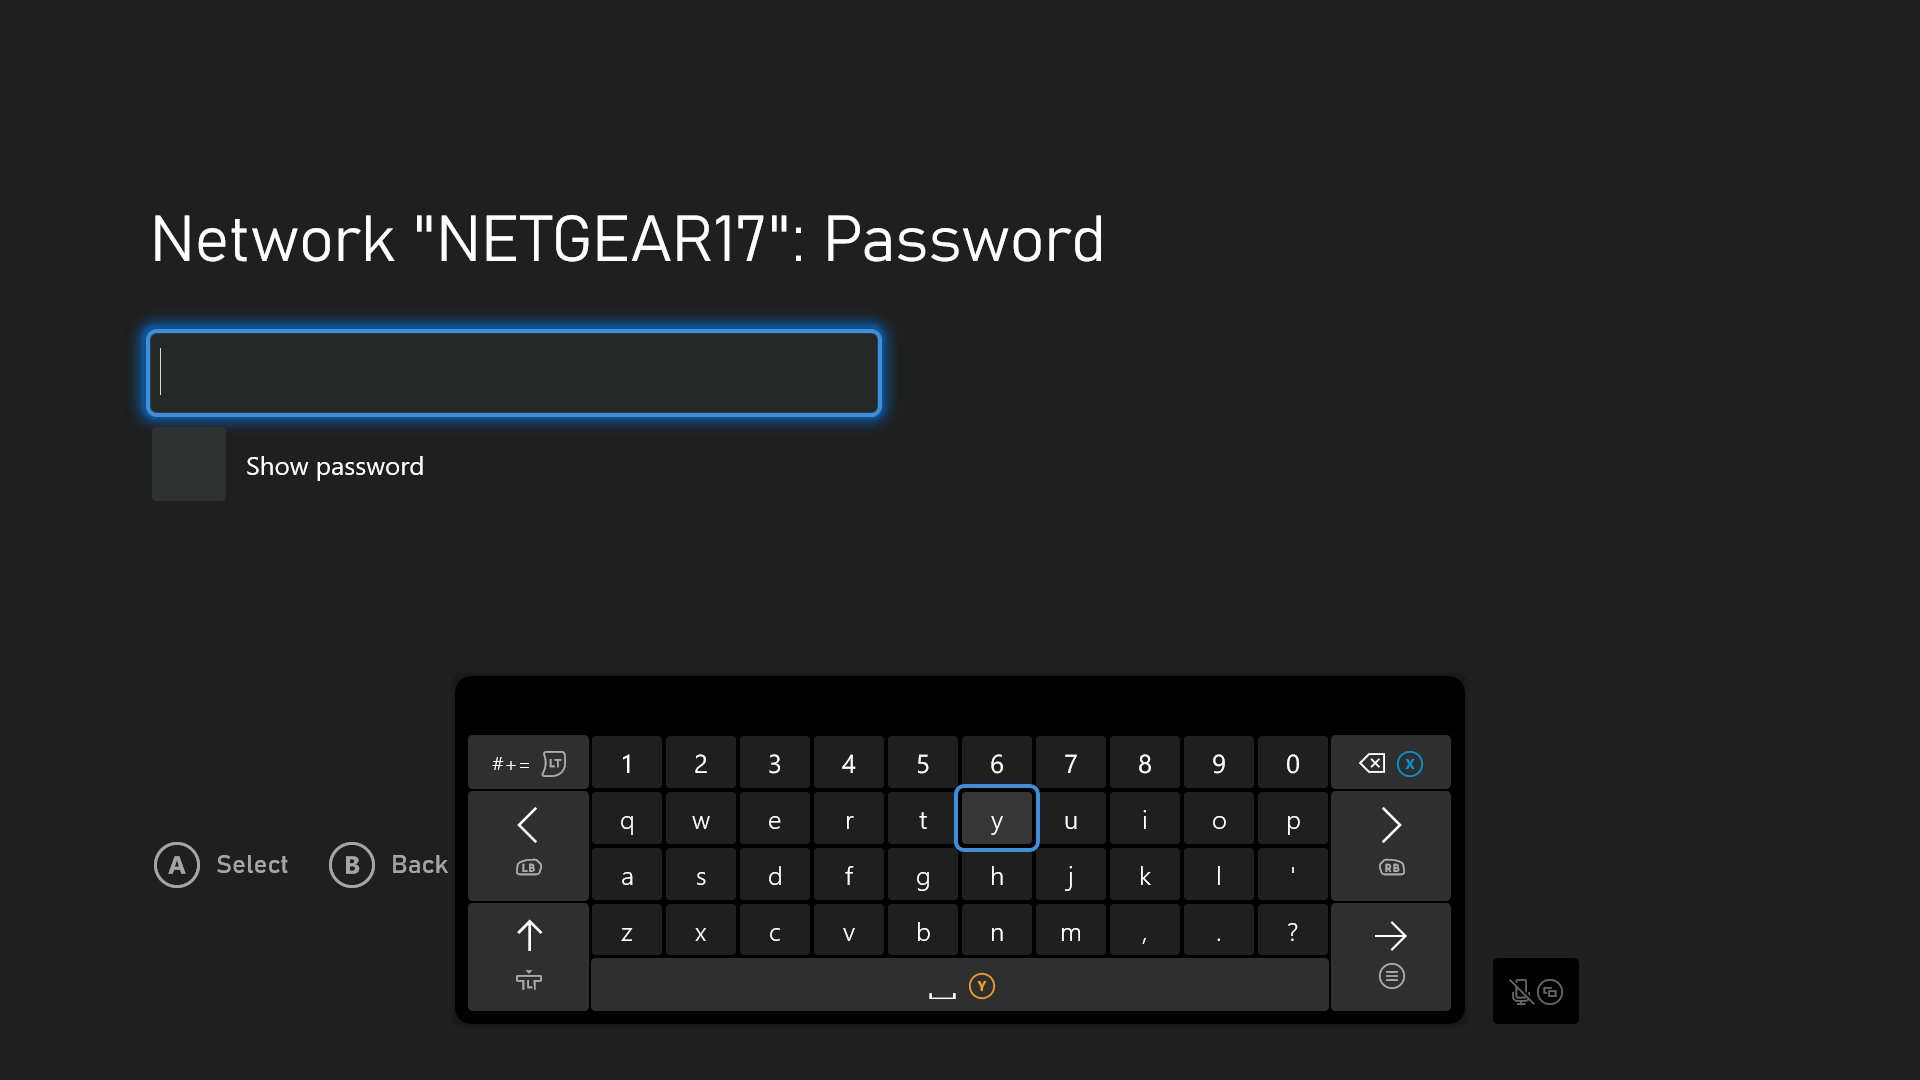
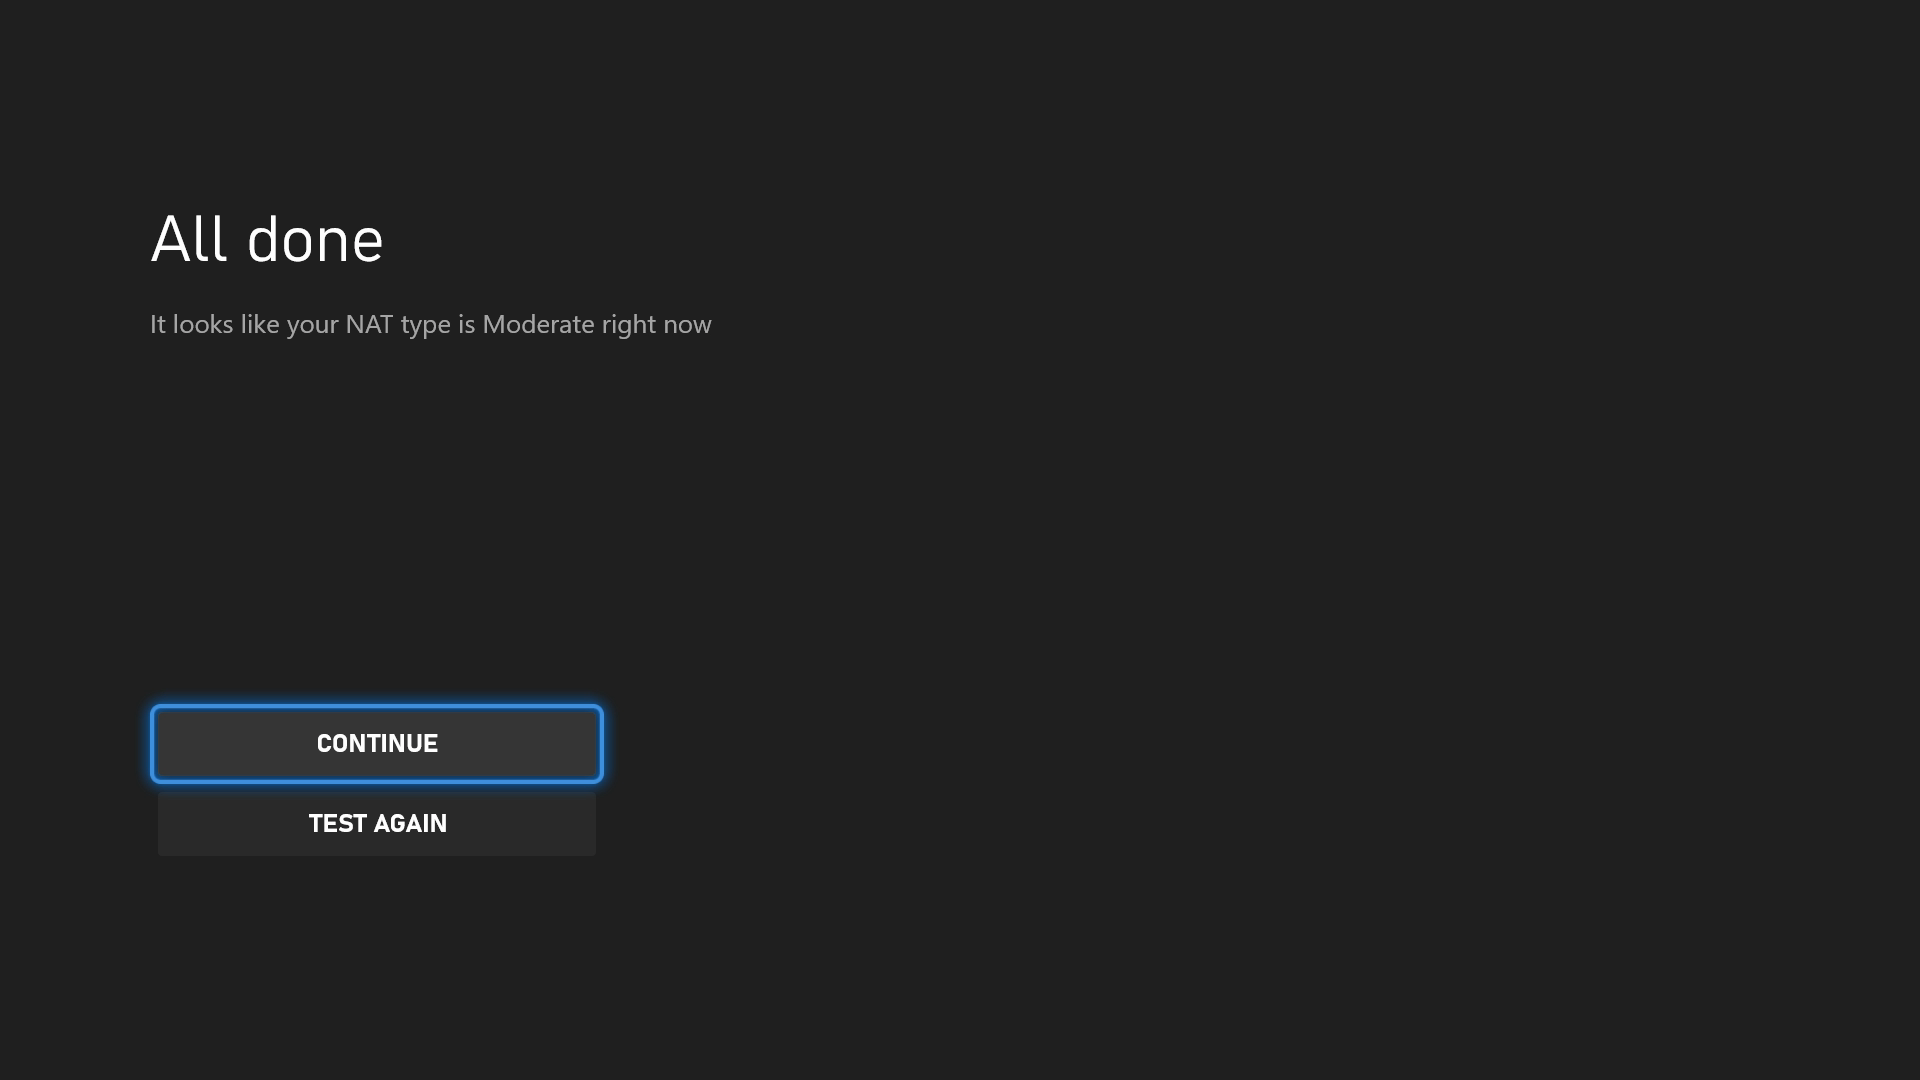
- If you entered your password correctly, your Xbox Series X|S will automatically connect to your Wi-Fi network. When prompted, select the «Continue» button to finish the setup process.

How do I test my connection with Xbox Series X|S?
Once your Xbox Series X|S is connected to the internet, it’s vital that you know how to test your connection. This will help you ensure that everything is working properly and can even help you isolate issues if something has gone wrong. Fortunately, the Xbox Series X|S features a pretty decent set of built-in tools that allow you to do exactly this.
In this Xbox Series X|S networking guide, we’ll go over the two tools you can use to test your internet connection, and when you should use them.
Test network connection
The first diagnostic tool your Xbox Series X|S provides to you is also the simplest: testing your network connection. This tool quickly checks whether or not your Xbox Series X|S is properly connected to the network, and will either give you an «It’s all good» message or let you know that something has gone wrong with some troubleshooting options.
To test the network connection on your Xbox Series X|S, follow these steps:
- On your Xbox Series X|S, open the Xbox Guide by pressing the «Xbox» button in the middle of your controller.
- Once the Guide is opened, scroll to the «Profile & system» tab using the bumpers, D-pad, or right analog stick on your controller.
- On the «Profile & system» tab of the Guide, navigate to the «Settings» button and open Settings on your console.
- Once Settings is opened, navigate to the «General» section located at the top.
- Inside the «General» section of Settings, navigate to and open the «Network settings» to access all the network-related settings on your console.
- Inside the «Network settings» section, navigate to and open the «Test network connection» option to run the troubleshooting tool.
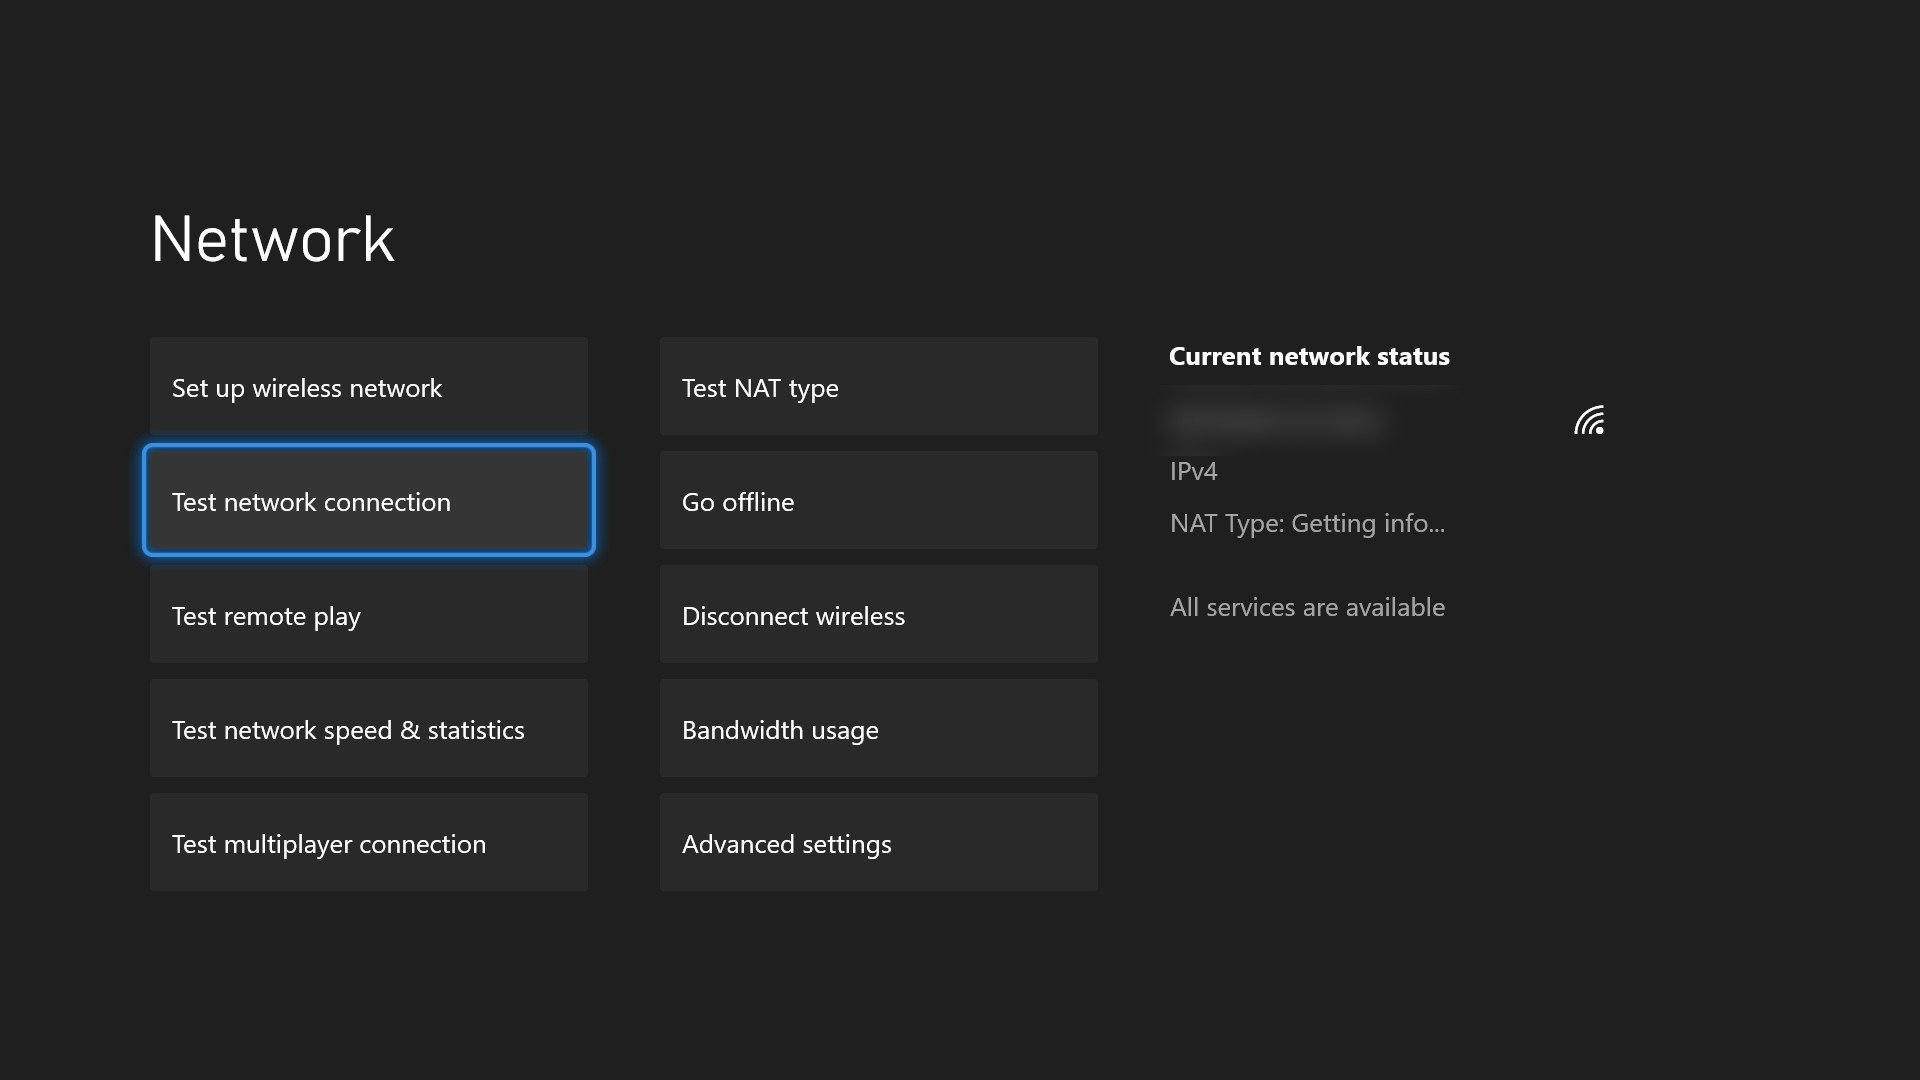
- After a few seconds, your Xbox Series X|S will inform you of the state of your console’s network connection.

If your console is correctly connected to the network with no issues, you’ll get an «Everything is good» message. If something went wrong, your Xbox will provide you with a set of troubleshoots you can perform to locate the problem and get back online. I suggest going back to the first step and ensuring you’re properly connected to the internet and then verifying that your internet is working with other devices in your house before attempting other solutions or troubleshooting methods. Oftentimes, the simplest solution is the correct one!
Test multiplayer connection
Being connected to the internet isn’t the only thing necessary for gaming on your Xbox Series X|S. Online services like multiplayer games and more are all powered by Xbox Live, Microsoft’s extensive online system that’s been the backend of Xbox consoles for years. If you’re connected to the internet but are still running into issues, use this troubleshooter to test your connection to Xbox Live.
To test the multiplayer connection on your Xbox Series X|S, follow these steps:
- On your Xbox Series X|S, open the Xbox Guide by pressing the «Xbox» button in the middle of your controller.
- Once the Guide is opened, scroll to the «Profile & system» tab using the bumpers, D-pad, or right analog stick on your controller.
- On the «Profile & system» tab of the Guide, navigate to the «Settings» button and open Settings on your console.
- Once Settings is opened, navigate to the «General» section located at the top.
- Inside the «General» section of Settings, navigate to and open the «Network settings» to access all the network-related settings on your console.
- Inside the «Network settings» section, navigate to and open the «Test multiplayer connection option to run the troubleshooting tool.
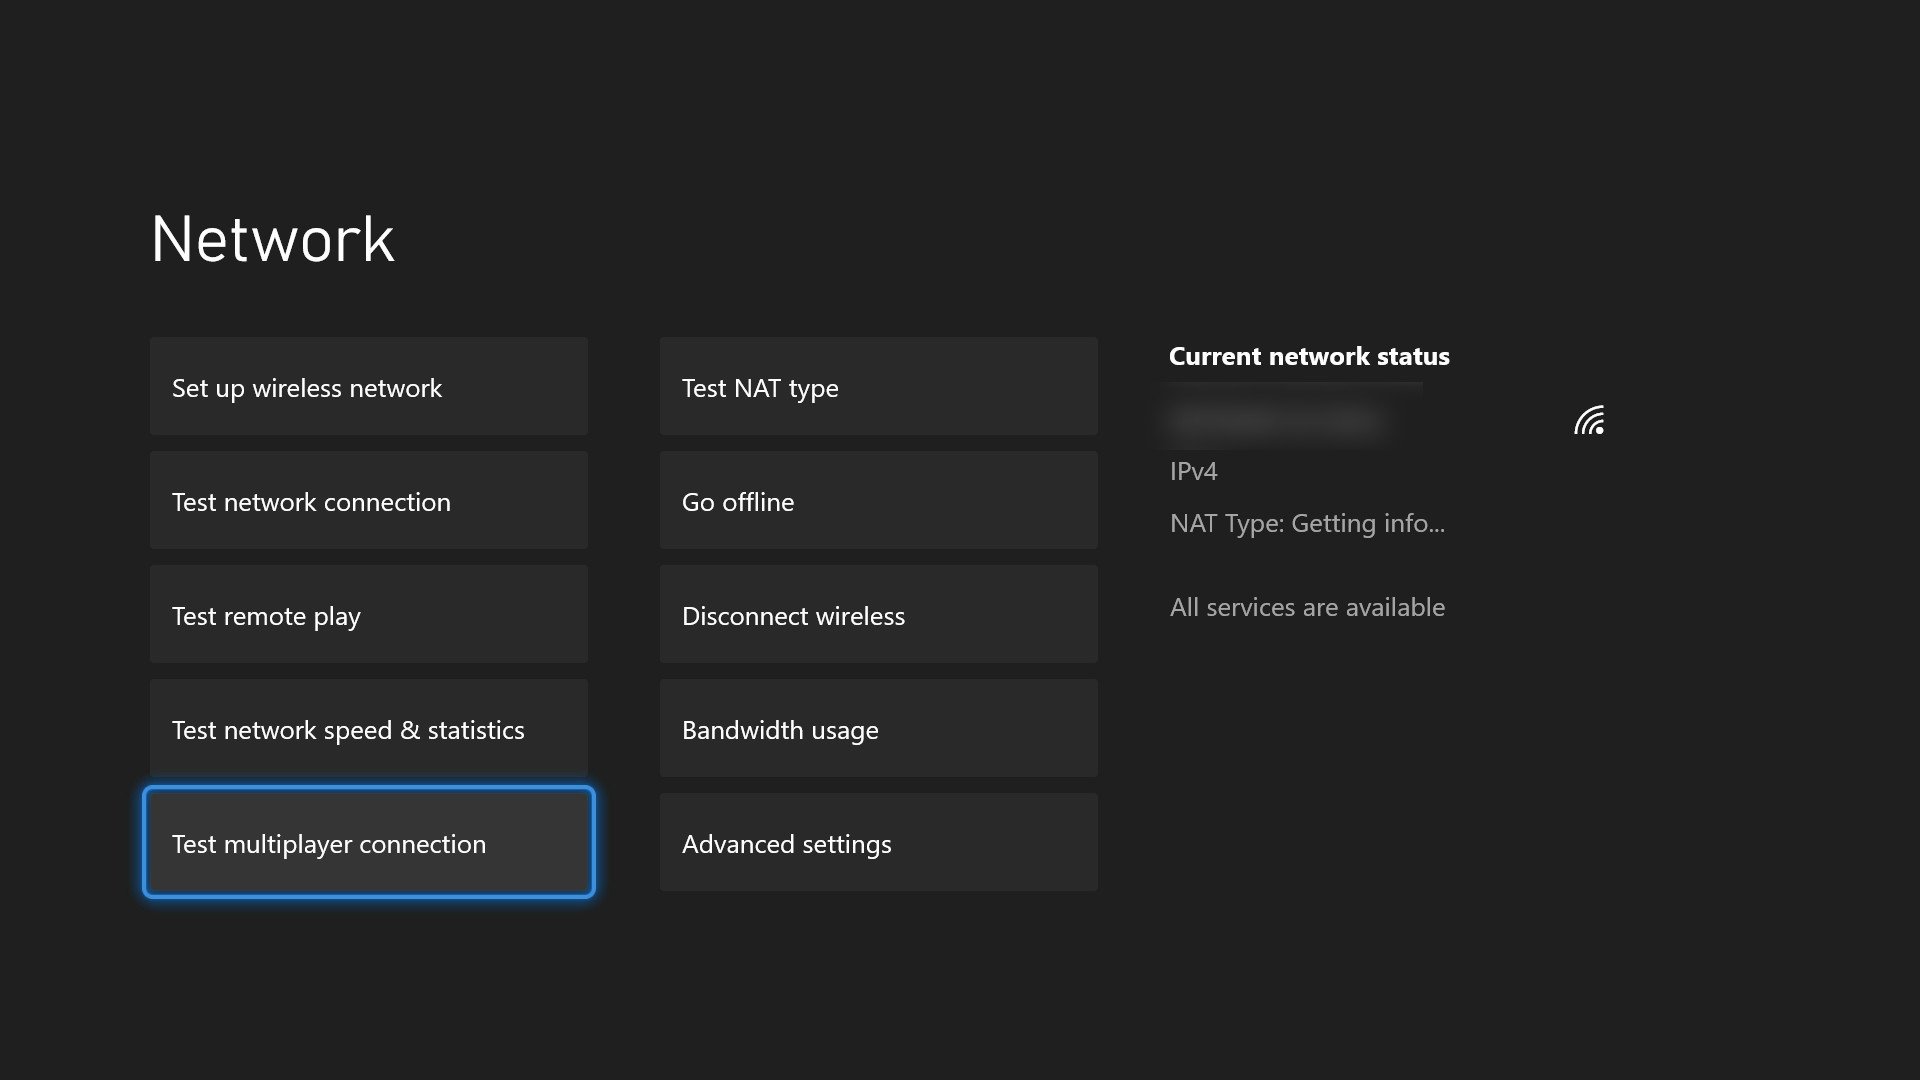
- After a few moments, your Xbox Series X|S will inform you of the state of your console’s multiplayer connection, which often takes a little bit longer than the basic network connection test.

If there aren’t any problems, you’ll get an «Everything is good» message. If there are problems, it could be with Xbox Live. You can use our guide to check if Xbox Live is down right now, but this tool should also let you know if there are any problems with Xbox Live.
You can also use some of the below tips and tricks for any other multiplayer issues that aren’t related to an Xbox Live outage. For example, another common issue for multiplayer issues is your NAT type. If you get a message about it, look below for ways to improve your NAT type.
Test network speed & statistics
The final diagnostic tool that your Xbox Series X|S provides is a decent overview of your network speed and statistics. Experiencing glacial downloads or abnormal amounts of latency in online multiplayer? Run a quick network check using this tool and see what speeds your Xbox Series X|S is reporting. While this alone doesn’t give you any methods to improve matters, it gives you a place to start when trying to find the issue.
To test your network speed and statistics on your Xbox Series X|S, follow these steps:
- On your Xbox Series X|S, open the Xbox Guide by pressing the «Xbox» button in the middle of your controller.
- Once the Guide is opened, scroll to the «Profile & system» tab using the bumpers, D-pad, or right analog stick on your controller.
- On the «Profile & system» tab of the Guide, navigate to the «Settings» button and open Settings on your console.
- Once Settings is opened, navigate to the «General» section located at the top.
- Inside the «General» section of Settings, navigate to and open the «Network settings» to access all the network-related settings on your console.
- Inside the «Network settings» section, navigate to and open the «Test network speed & statistics» option to run the diagnostic tool.
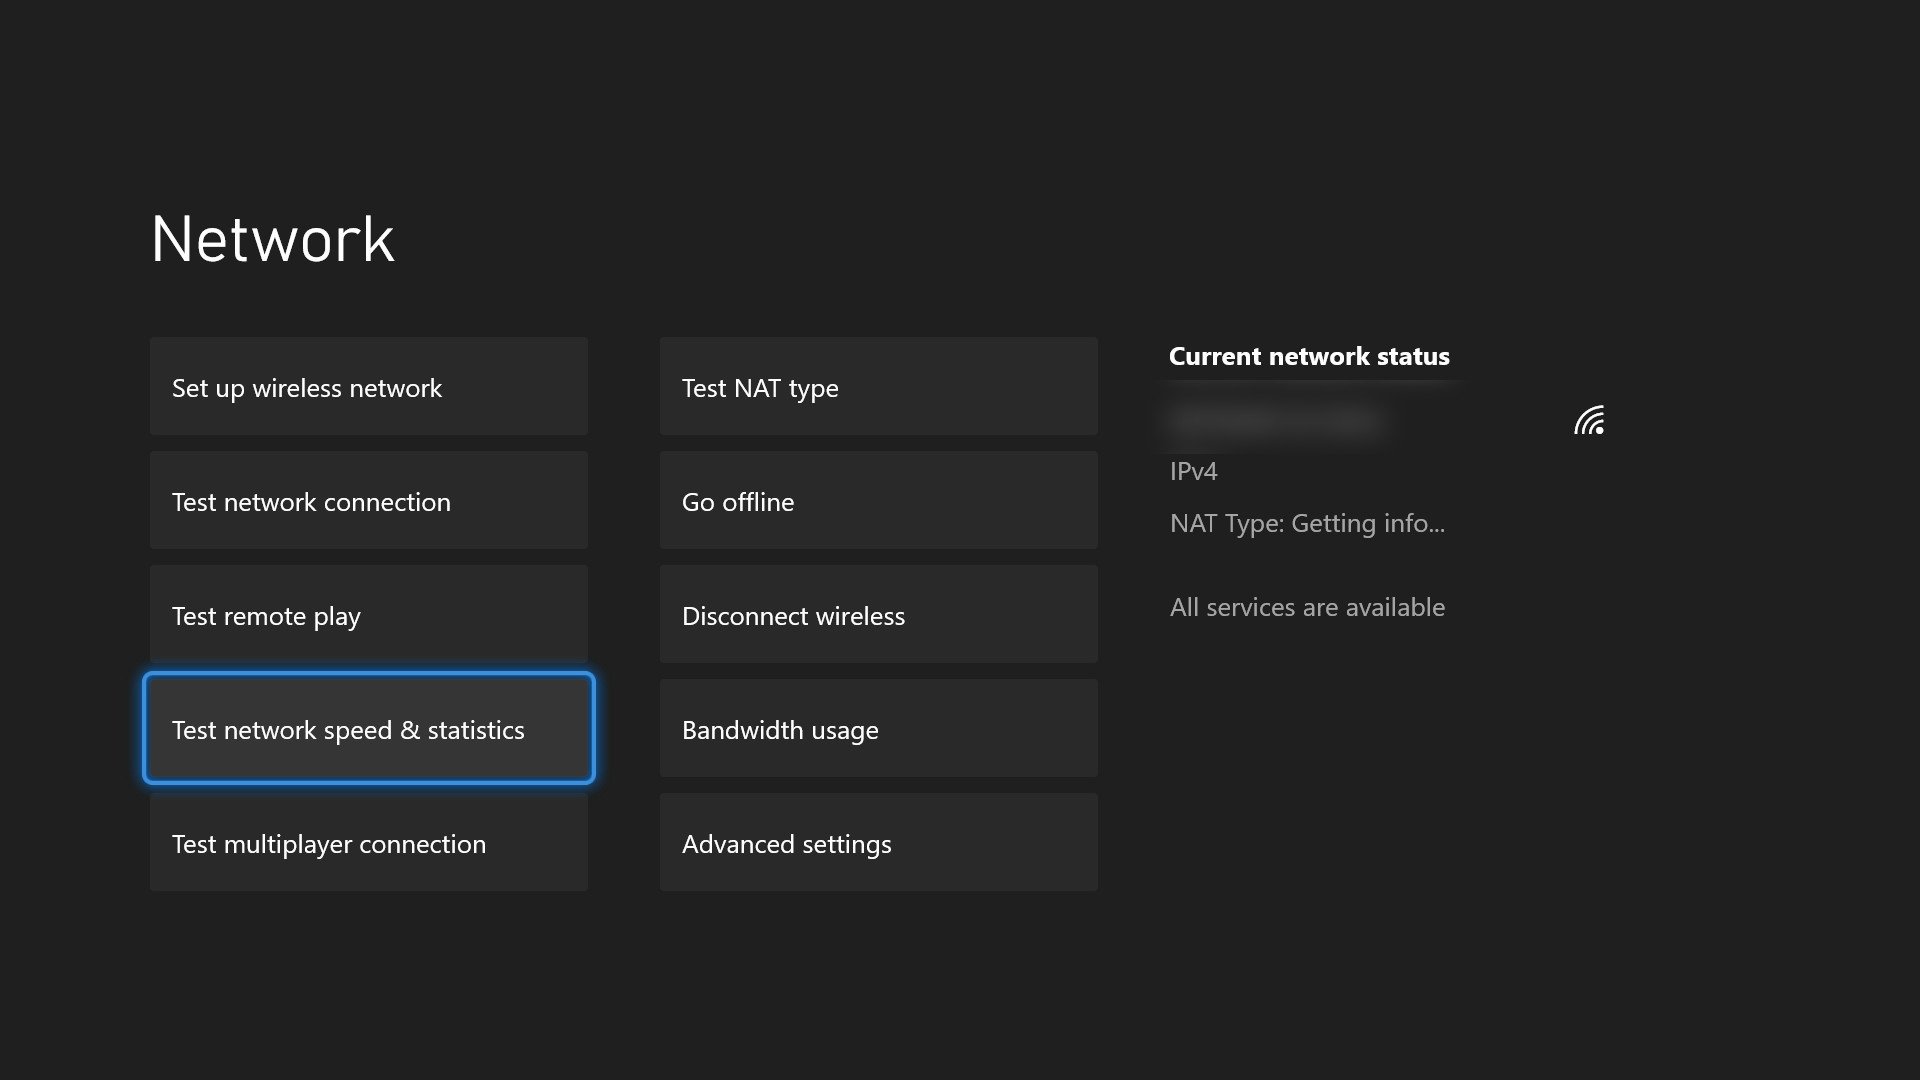
- After a few moments, your Xbox Series X|S will provide the numbers on some key statistics related to your network. This test may take a second but can give you lots of helpful information.
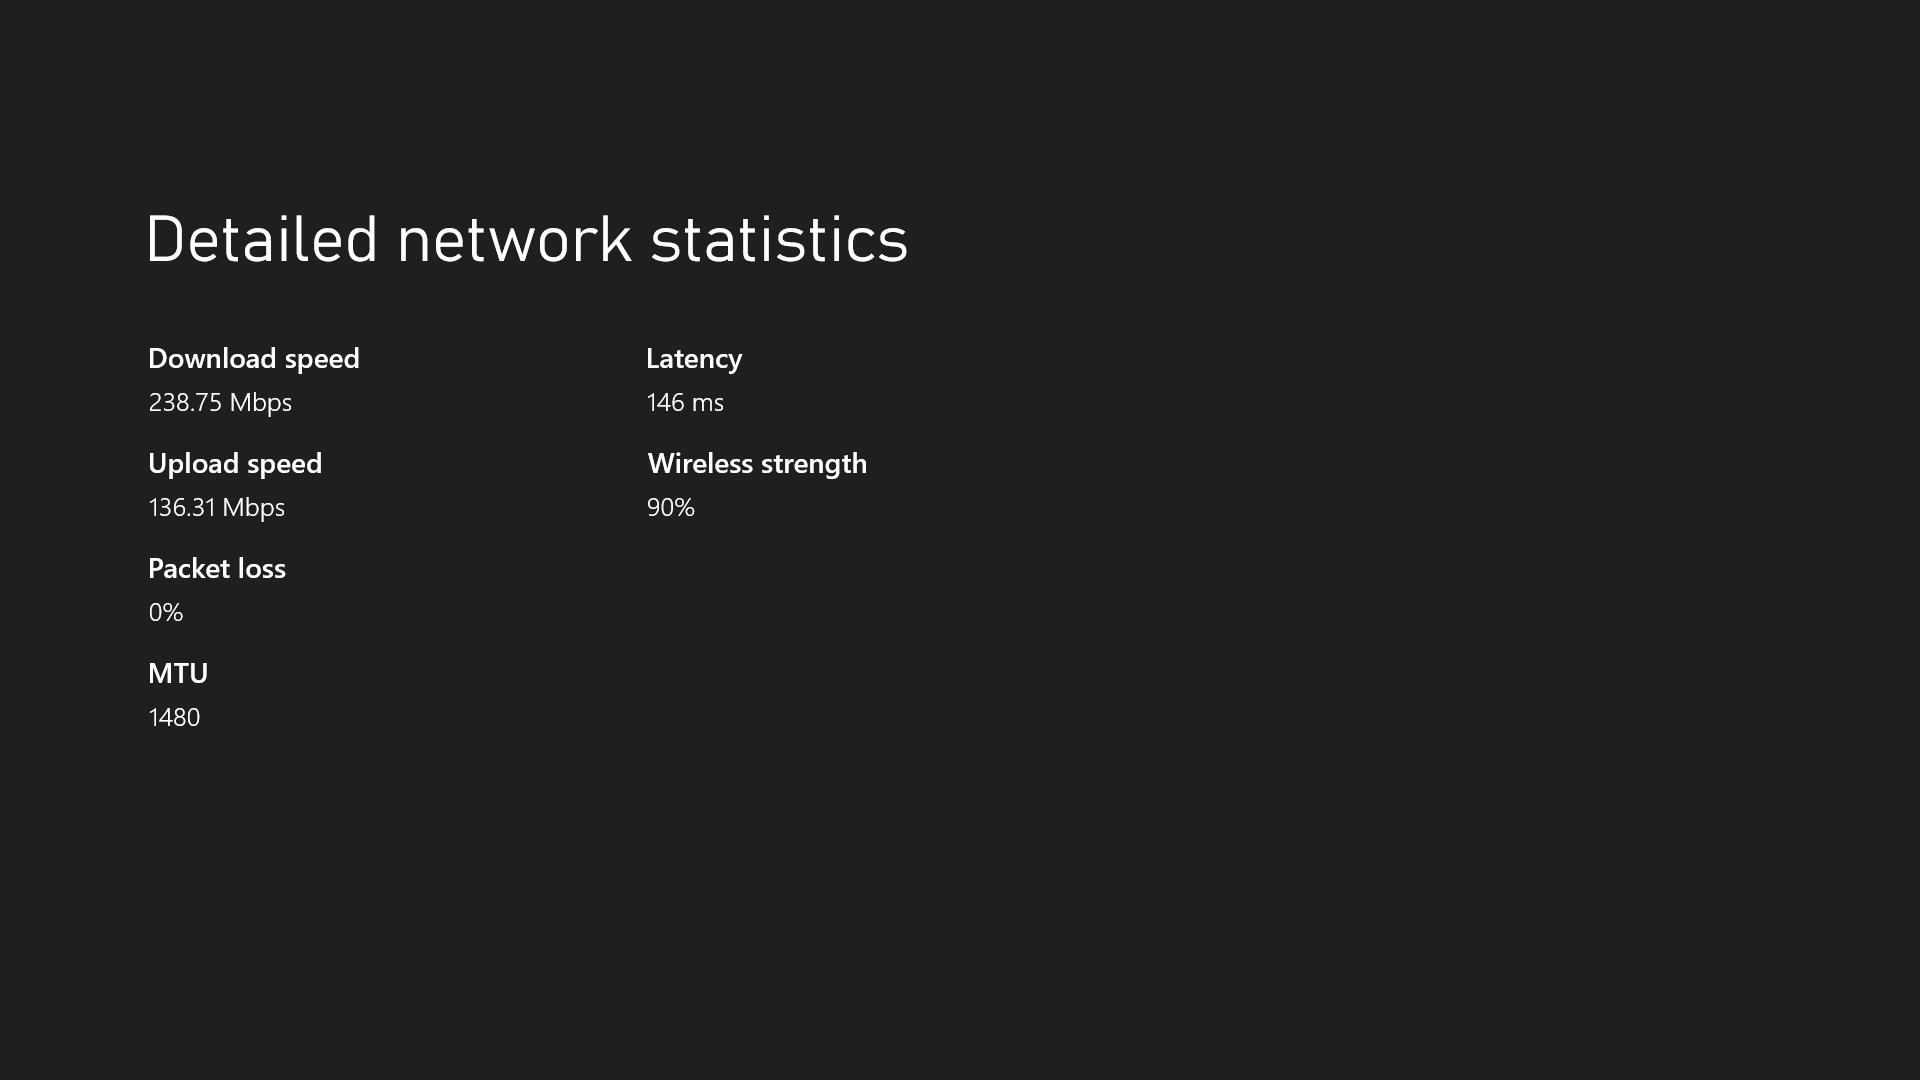
The «Test network speed & statistics» tool provides the following information:
- Download speed. Your download speed refers to the rate at which your Xbox Series X|S can pull information in. This directly affects things like game downloads and updates and can make the biggest difference in how stable your online multiplayer experience is.
- Upload speed. Your upload speed refers to the rate at which your Xbox Series X|S can push information out. This directly affects things like uploading screenshots and game clips. This is usually lower than your download speed, depending on your provider.
- Packet loss. This metric refers to how much information is lost when transmitting across your network, in the form of data «packets.» You want this number to be a flat zero, or as close to zero as you can get. Any packet loss is a sign of an unstable network or tons of network congestion.
- MTU. This metric refers to the maximum size any given data packet can be when transmitted over your network. You typically won’t mess with this, but the default size is around the 1,500 range. Anything significantly lower than 1,500 can potentially cause issues, while those with high-speed networks in their home might be able to support a higher MTU.
- Latency. Finally, latency is a crucial metric for online multiplayer and refers to the gap in time between a player doing something and the game responding to that action. For example, pressing the trigger on your controller to your gun firing. Latency is shown in milliseconds, and you want this number to be as low as possible.
How do I fix slow download speeds with Xbox Series X|S?

Nothing can put an abrupt and sudden halt to a gaming session faster than glacial download speeds. Video games, especially large «AAA» modern titles and online multiplayer games, feature larger initial install sizes and require constant updates. Slow download speeds can turn a fifteen-minute wait into a two-hour sludge. If you’re experiencing slow download speeds on your Xbox Series X|S that might not represent your internet capabilities, this Xbox Series X|S networking guide will give you some tips and tricks to try.
If you’re experiencing slow download speeds on your Xbox Series X|S, follow these steps:
Check your connection
Before you move forward with attempting to fix slow download speeds on your Xbox Series X|S, you first need to know with what you’re working. Fortunately, your Xbox Series X|S gives you an easy way to get some stats on how things are running in the background. Simply follow the steps earlier in this Xbox Series X|S networking guide to find out how to test your network speed and statistics, which also breaks down all the relevant stats for you.
The biggest thing you’re looking for here is simply your download speeds. Download speeds will have the most significant impact on, well, how quickly your Xbox Series X|S can download things. On top of download speeds, packet loss can also be consequential. Having any packet loss at all can be a sign of network congestion or instability, which brings us to the next tip for fixing slow download speeds on your Xbox Series X|S.
Use the best connection
When it comes to connecting your Xbox Series X|S to the internet, you have two options: wired and wireless. We always suggest using a wired connection to your router whenever possible, as this will offer you the fastest possible speeds on your network. A wired connection is more reliable and less affected by distance, interference, and network congestion. If you’re able to run an Ethernet cable between your internet router and your Xbox Series X|S, it’s definitely worth the time spent.
If you’re using a wireless connection, most modern internet service providers (ISP) can still provide a great experience. However, there are still things to consider beyond simply using a wireless connection. Depending on your router and provider, you may have two separate wireless bands: 2.4GHz and 5GHz. It’s becoming increasingly common for routers and ISPs to offer dual-band, which gives you access to both. Often this will appear in your «available networks» list as two separate networks.
While this may seem confusing, the differences between the two bands are relatively simple. 2.4GHz offers the greatest range and is suited for devices that are either far away from the router or that move around a lot (like phones and tablets). However, 2.4GHz connections offer slower speeds, higher latency, and are more susceptible to interference from other wireless signals.
5GHz, on the other hand, is much more appropriate for gaming, which relies on the fastest speeds and lowest latency. 5GHz connections can work great for your Xbox Series X|S, provided your console is reasonably close to the router. What 5GHz connections gain in speed, reliability, and latency they lose in distance and penetration through walls. If you can’t use a wired connection, though, 5GHz is undoubtedly the way to go for wireless.
Close background games & apps
This tip to fixing the slow download speeds on your Xbox Series X|S may not be immediately apparent. Having any games or apps running in the background of your Xbox Series X|S can drastically reduce your download speeds, even if your internet speeds are fantastic. This is due to how the Xbox OS operates, prioritizing games and apps with internet bandwidth and system resources. Restricting background processes ensures the best possible experience when playing but can be a bummer when downloading something.
Games that require internet bandwidth themselves, or apps that require online access like streaming services, may affect this performance even more. This is even more exacerbated on the Xbox Series X|S, as Xbox Series X|S Optimized titles require even more system resources to run. While this shouldn’t be considered a «problem» with Xbox consoles (the system is working as intended), it can be annoying when you’re trying to install something new.
Our advice? When you need the best download speeds on your Xbox Series X|S, close down any background games or apps.
To close a game or app, simply highlight it either on your Xbox Dashboard or inside the Xbox Guide. Once it’s highlighted, press the «Menu» button on your controller (to the right of the «Xbox» button) and select the «Quit» option from the menu. The «Queue» page under «Manage» in «My games & apps,» which lists all your ongoing installations and updates, provides an button to suspend your currently running game if something is throttling your download speeds, a helpful addition that can free up some bandwidth for your downloads.
If you use Xbox’s «Instant-on» power mode, your Xbox Series X|S will also download and install games and updates even when the console is turned off, which can also provide optimal download speeds.
Avoid peak game times
While it’s not something that’s easily noticed, the internet does have «peak times» that significantly affect overall speeds and ease of use. When everyone in your area is getting off work or school and heading home to use the internet, this increased usage can cause a few hours of strain on not only your internet service provider (ISP) but also Xbox Live itself. This strain can result in slower download speeds and higher latency.
Honestly, there’s not a ton you can do to «fix» this problem, but you can try to avoid big downloads around peak times instead. Downloading games early in the morning or late at night can lead to faster speeds. It’s not always easy to tell when peak times are at, especially since they can change from area-to-area, over time, and through events like holidays, but being mindful of these fluctuations can lessen the frustration of slow download speeds.
Change DNS settings
Now that we’ve gotten the more basic tips out of the way, this Xbox Series X|S networking guide will go over some more advanced tricks that interested users can use to potentially improve their download speeds. The first thing that players can consider when facing slow download speeds is switching to a different DNS.
First, a quick explainer: Domain Name System (DNS) settings is a massive, mostly hidden part of using the internet that translates things that users see like web URLs to information that computers understand, or internet protocol (IP) addresses. Without DNS, simple tasks like browsing the web would be far more challenging and overall a chore. These servers act as gateways to the internet.
For the most part, your internet service provider (ISP) will handle DNS. These default DNS settings shouldn’t ever cause any issues, and the vast majority of people will be pleased with what they provide. However, advanced users can see increased speeds when switching to a third-party anycast DNS.
To switch your Xbox Series X|S to a third-party DNS like GoogleDNS and OpenDNS, follow these steps:
- On your Xbox Series X|S, open the Xbox Guide by pressing the «Xbox» button in the middle of your controller.
- Once the Guide is opened, scroll to the «Profile & system» tab using the bumpers, D-pad, or right analog stick on your controller.
- On the «Profile & system» tab of the Guide, navigate to the «Settings» button and open Settings on your console.
- Once Settings is opened, navigate to the «General» section located at the top.
- Inside the «General» section of Settings, navigate to and open the «Network settings» to access all the network-related settings on your console.
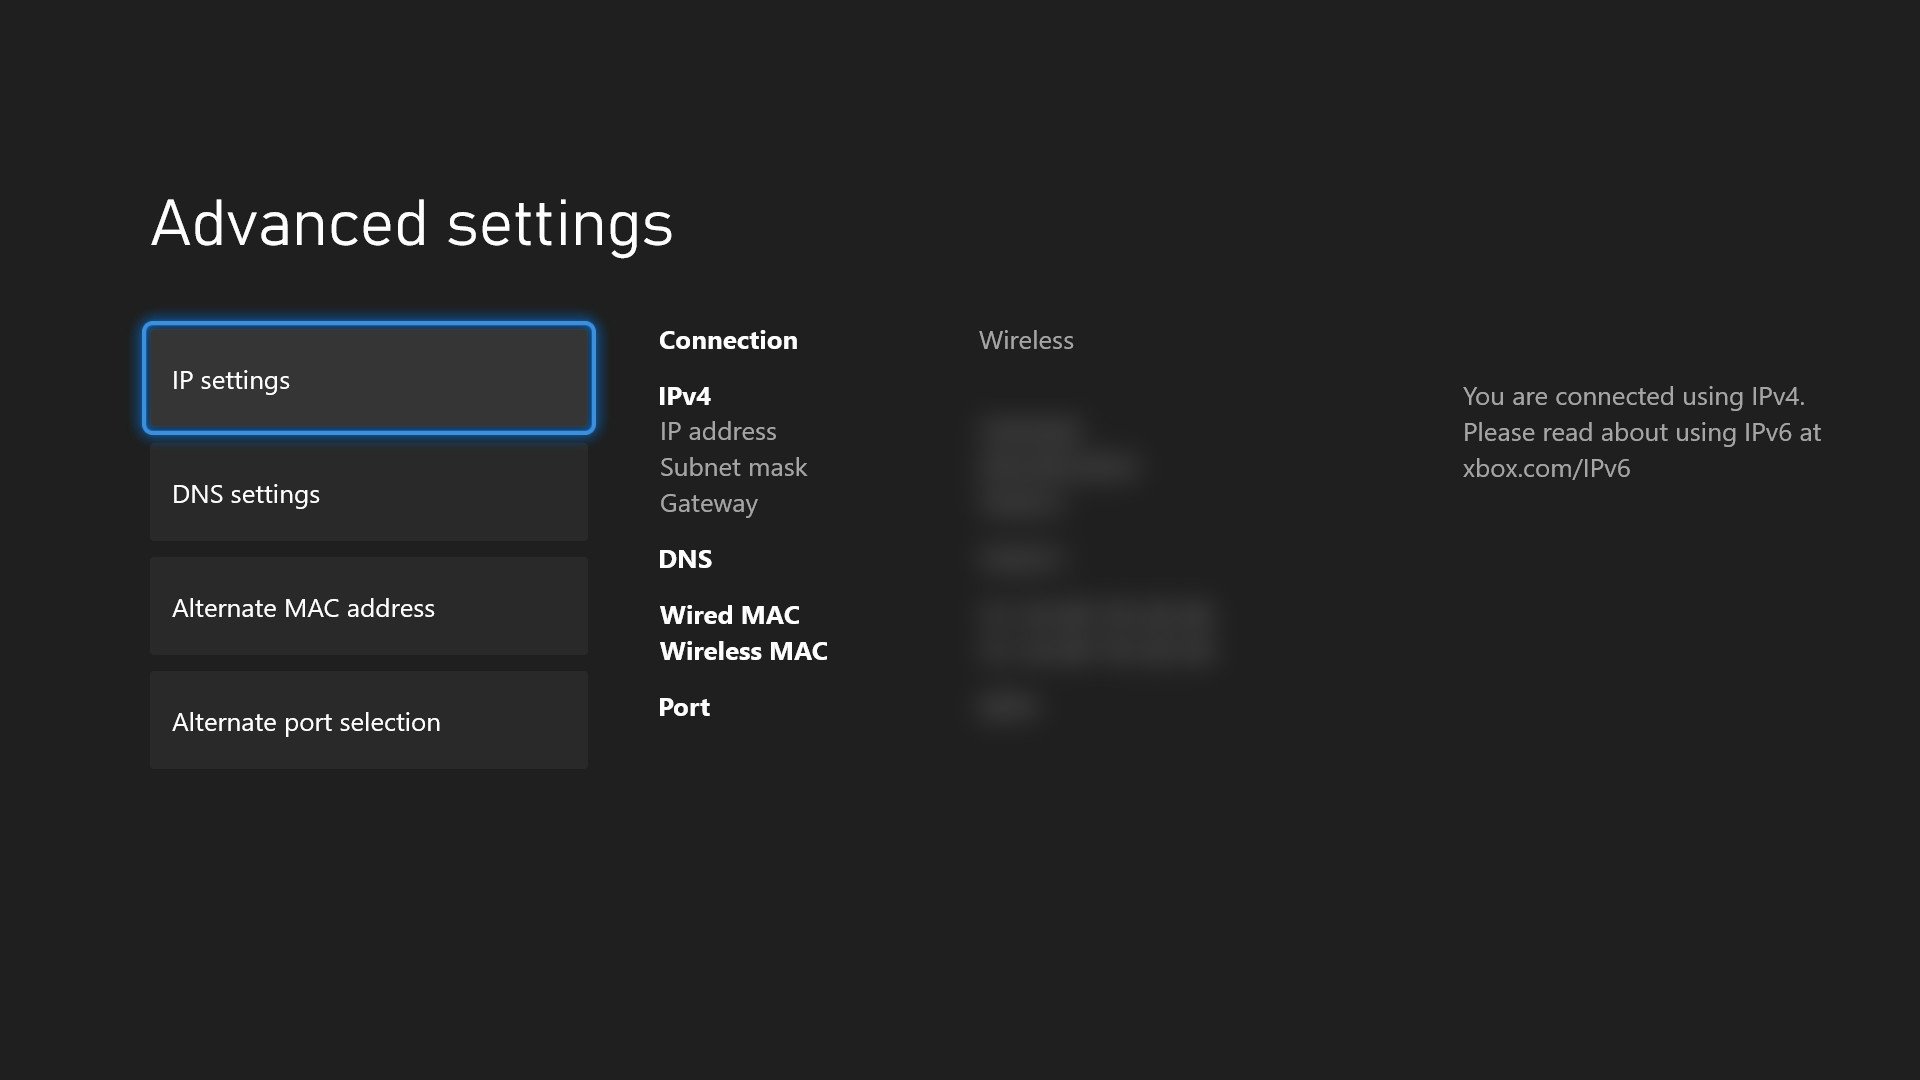
- Inside the «Network settings» section, navigate to and open the «Advanced settings» option to open a set of more advanced controls.
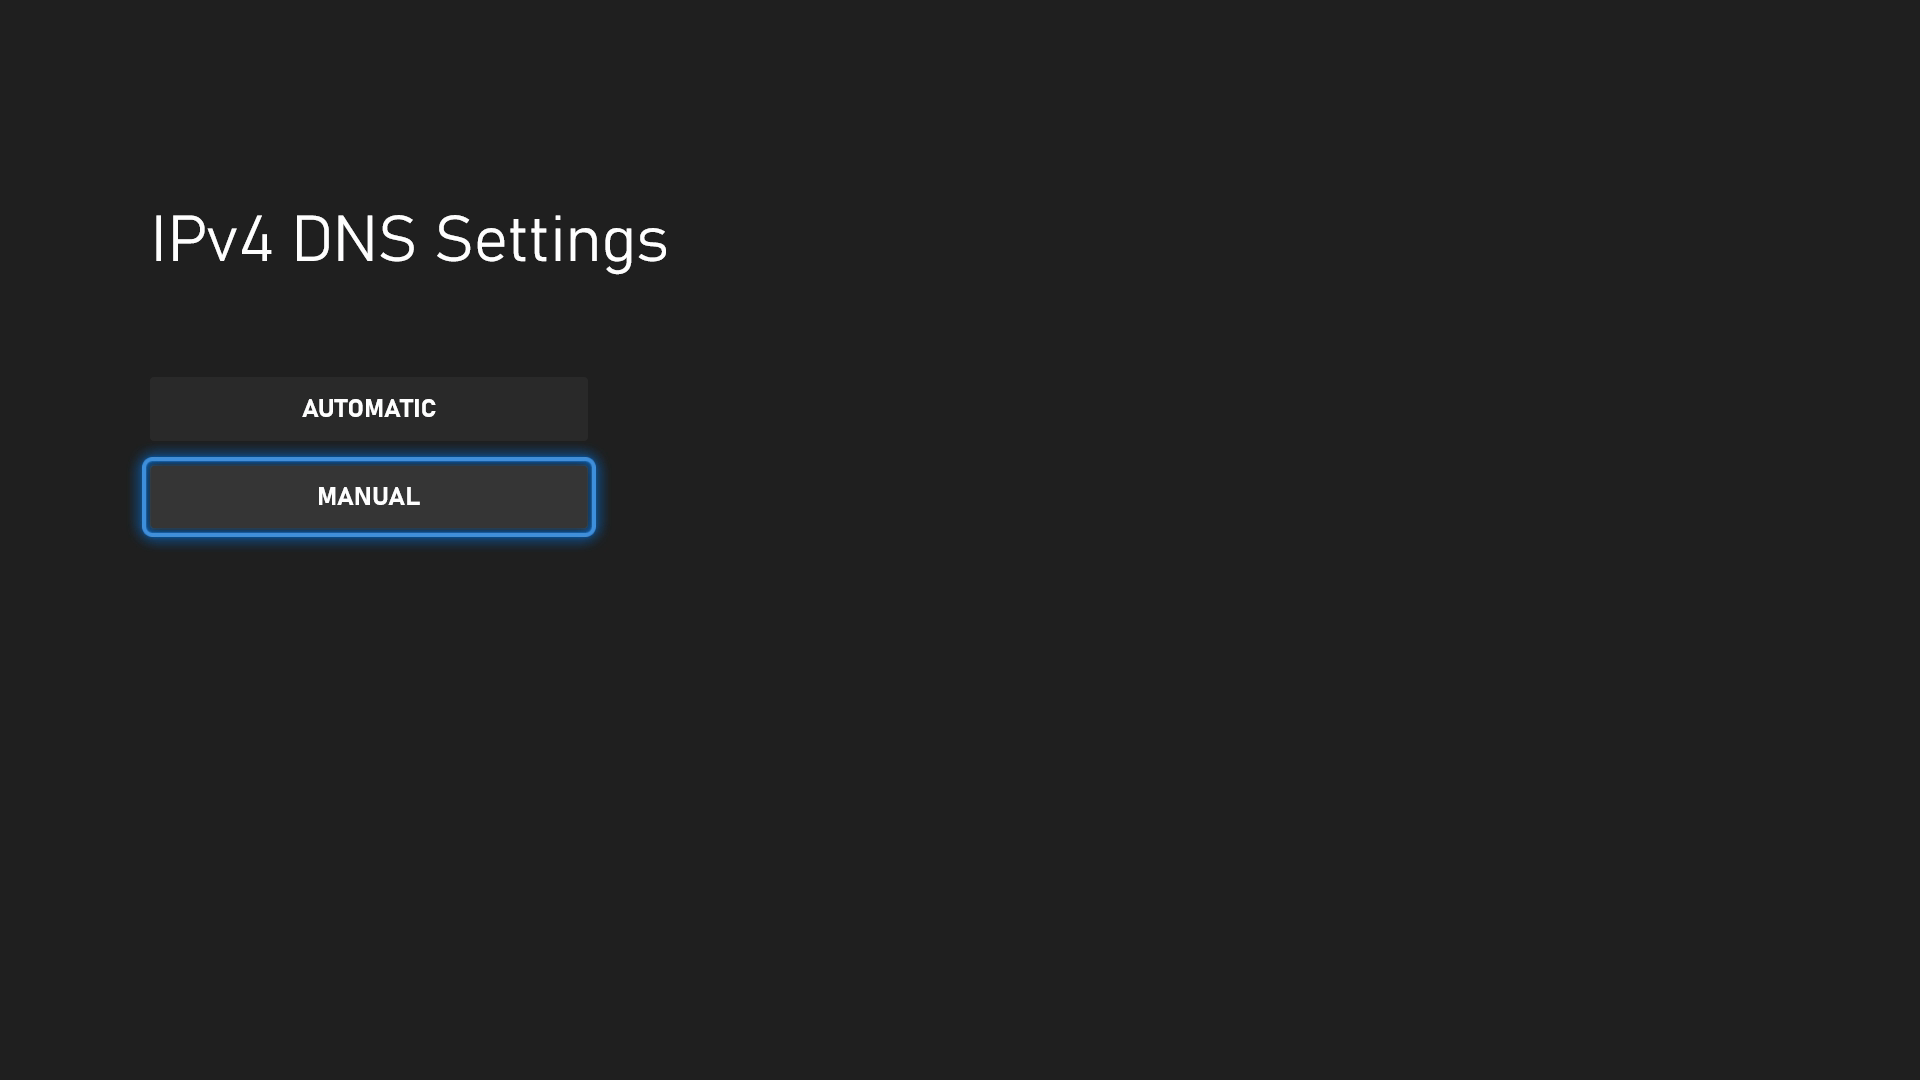
- Inside the «Advanced settings» section, navigate to and open the «DNS settings» option to access the DNS options.
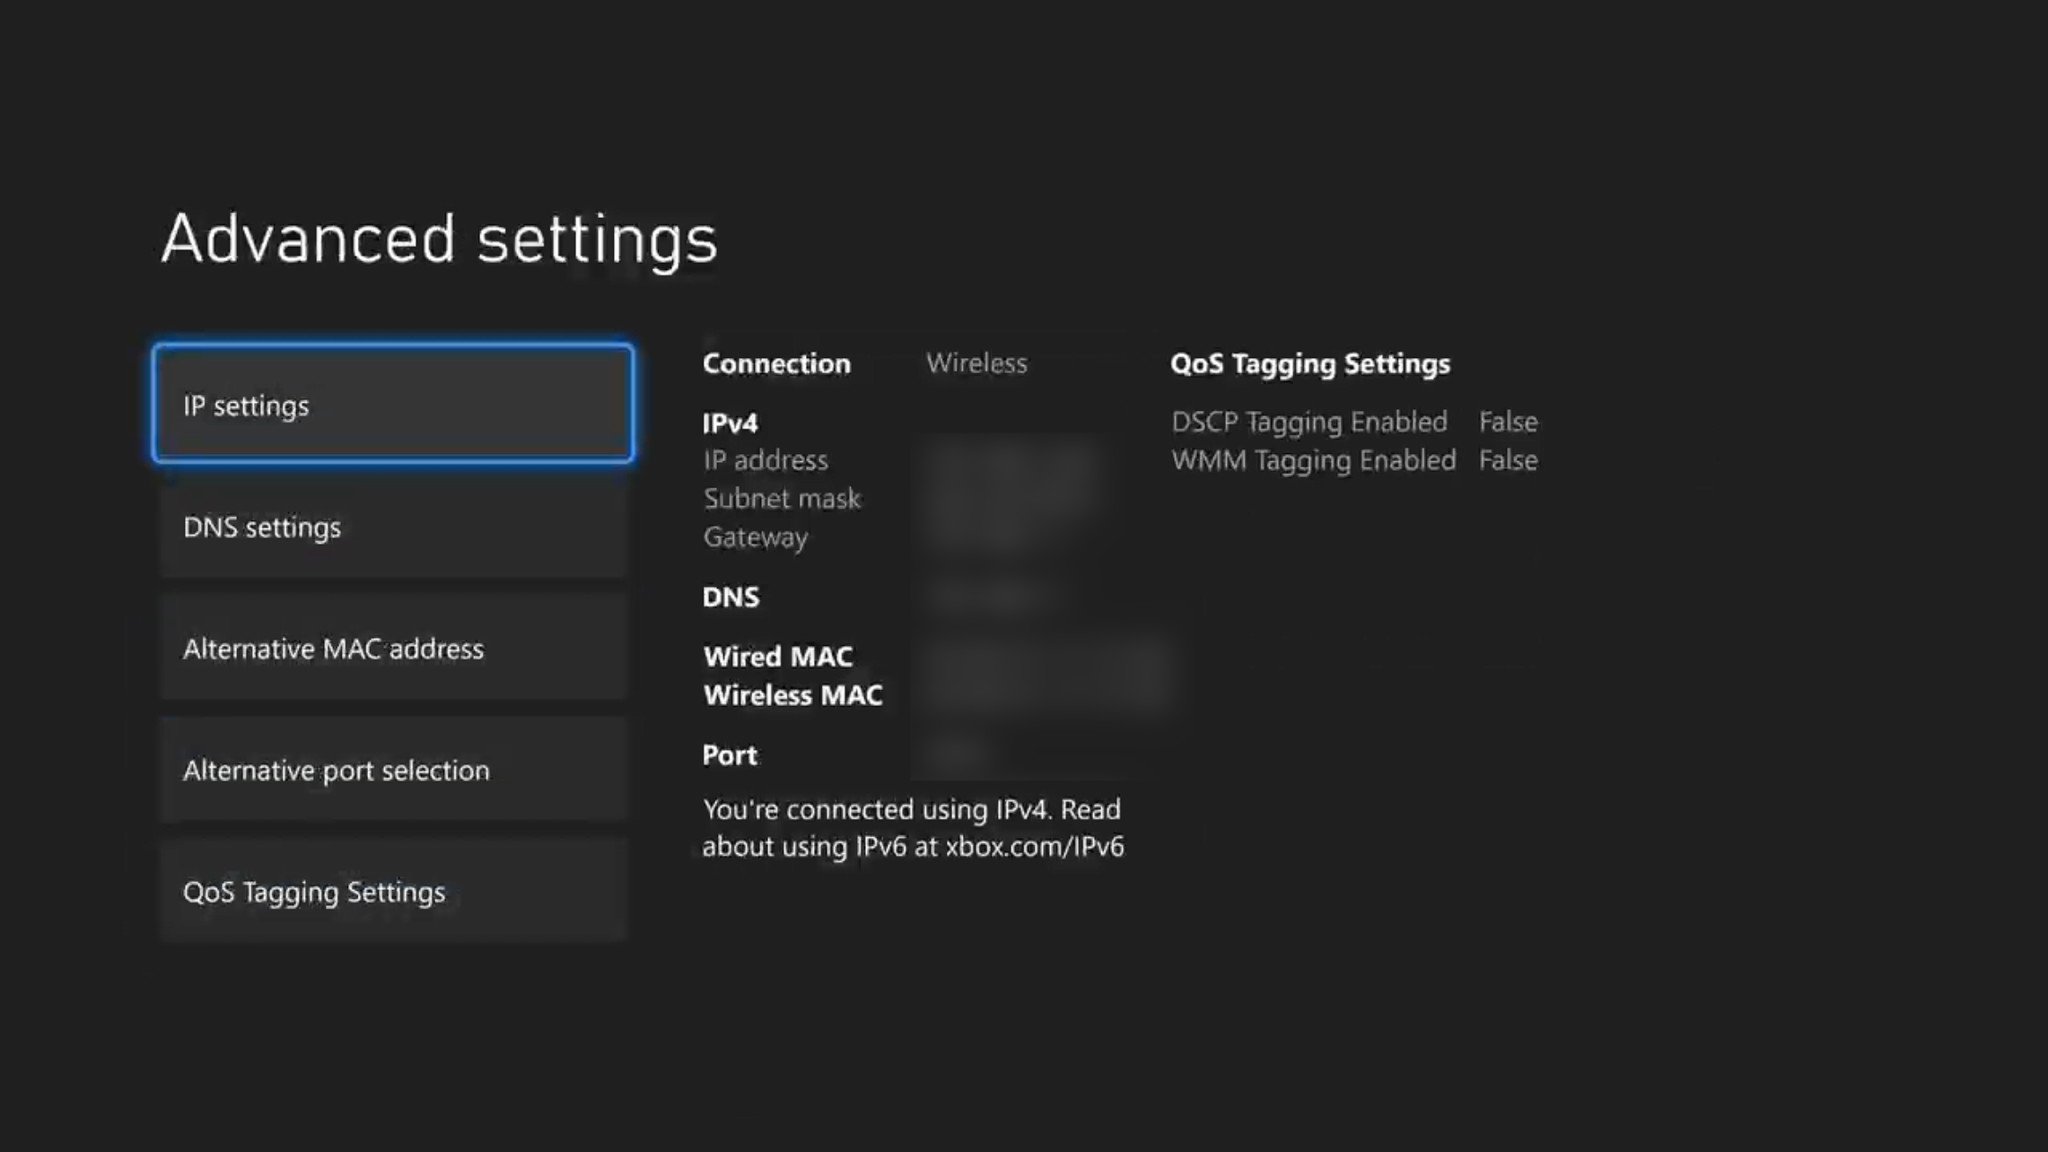
- Inside the «DNS settings» section, select the «Manual» option to manually enter a new DNS address.
- Once you select the «Manual» option, you’ll need to enter the primary address for the DNS you want to use.
- GoogleDNS: If you’re using this third-party DNS, enter
8.8.8.8as the primary address. - OpenDNS: If you’re using this third-party DNS, enter
208.67.222.222as the primary address. - Third-party: If you’re using another third-party DNS, enter the primary address for it here.
- GoogleDNS: If you’re using this third-party DNS, enter
- After confirming the primary address for your third-party DNS, you’ll need to enter the secondary address for the DNS you want to use.
- GoogleDNS: If you’re using this third-party DNS, enter
8.8.4.4as the secondary address. - OpenDNS: If you’re using this third-party DNS, enter
208.67.220.220as the secondary address. - Third-party: If you’re using another third-party DNS, enter the secondary address for it here.
- GoogleDNS: If you’re using this third-party DNS, enter
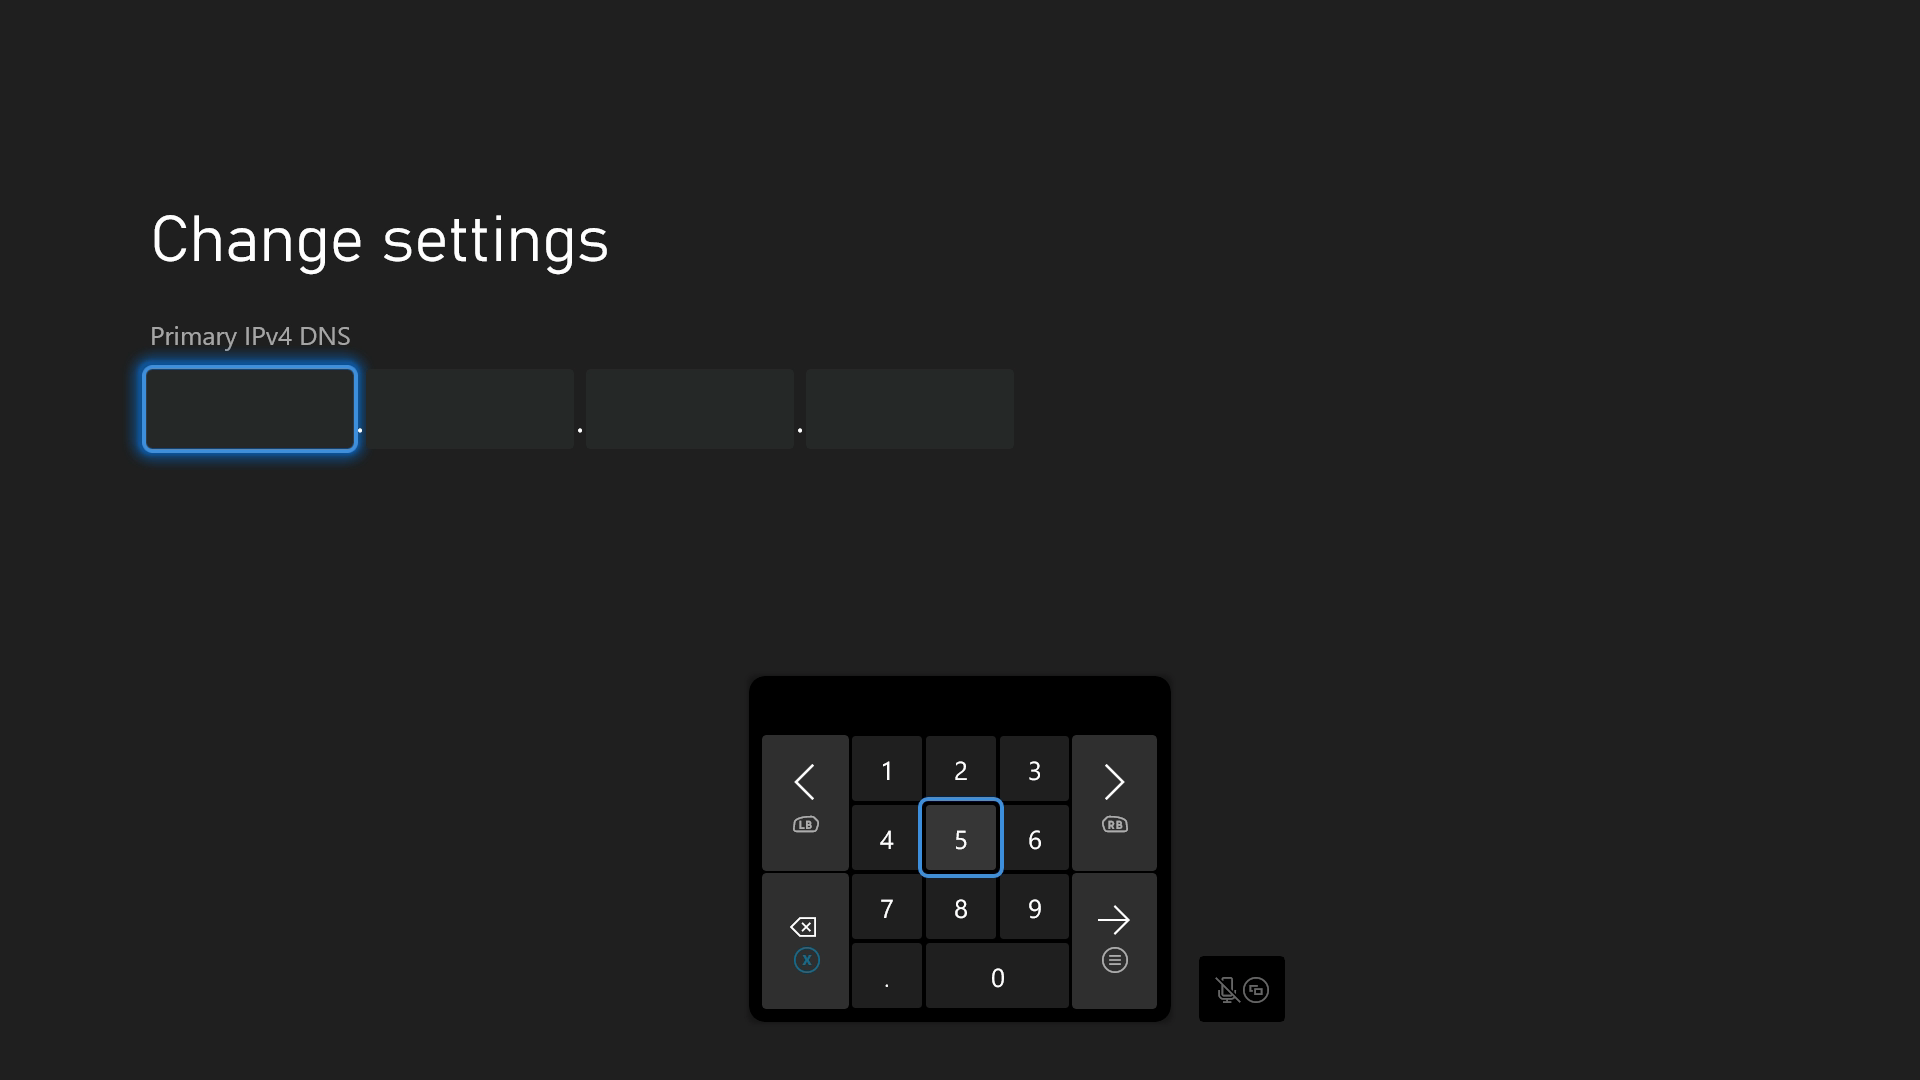
- Once you enter both addresses, your DNS should change to the third-party option you selected.
- Note: You can switch back to your ISP’s default DNS at any point by following these steps and selecting «Automatic» instead of «Manual.»
- Note: If you’re using an IPv6 connection instead of IPv4, the above DNS addresses will still work.
Once you complete all of these steps, you may see increased speeds on your Xbox Series X|S. Of course, every device on your network relies on DNS to browse the web, including your Windows computer. If you notice improvements on your Xbox Series X|S and also want to see them on your PC, check out our guide on how to change DNS settings on Windows 10.
Enable IPv6 addresses
IP stands for «internet protocol,» and IP addresses are something that every device requires to browse the internet. IPv4 is the aging standard of IP addresses and is 32-bit, but it is running out of available addresses with the increased number of devices and internet services that exist. The lack of available addresses requires a lot more work and translation and can lead to lower speeds and longer latency on your Xbox Series X|S.
IPv6, on the other hand, is the new standard and is in 128-bit, which essentially equates to way more available IP addresses to use. IPv6 is still relatively new (as far as being an officially ratified internet standard) but is becoming increasingly available to users.
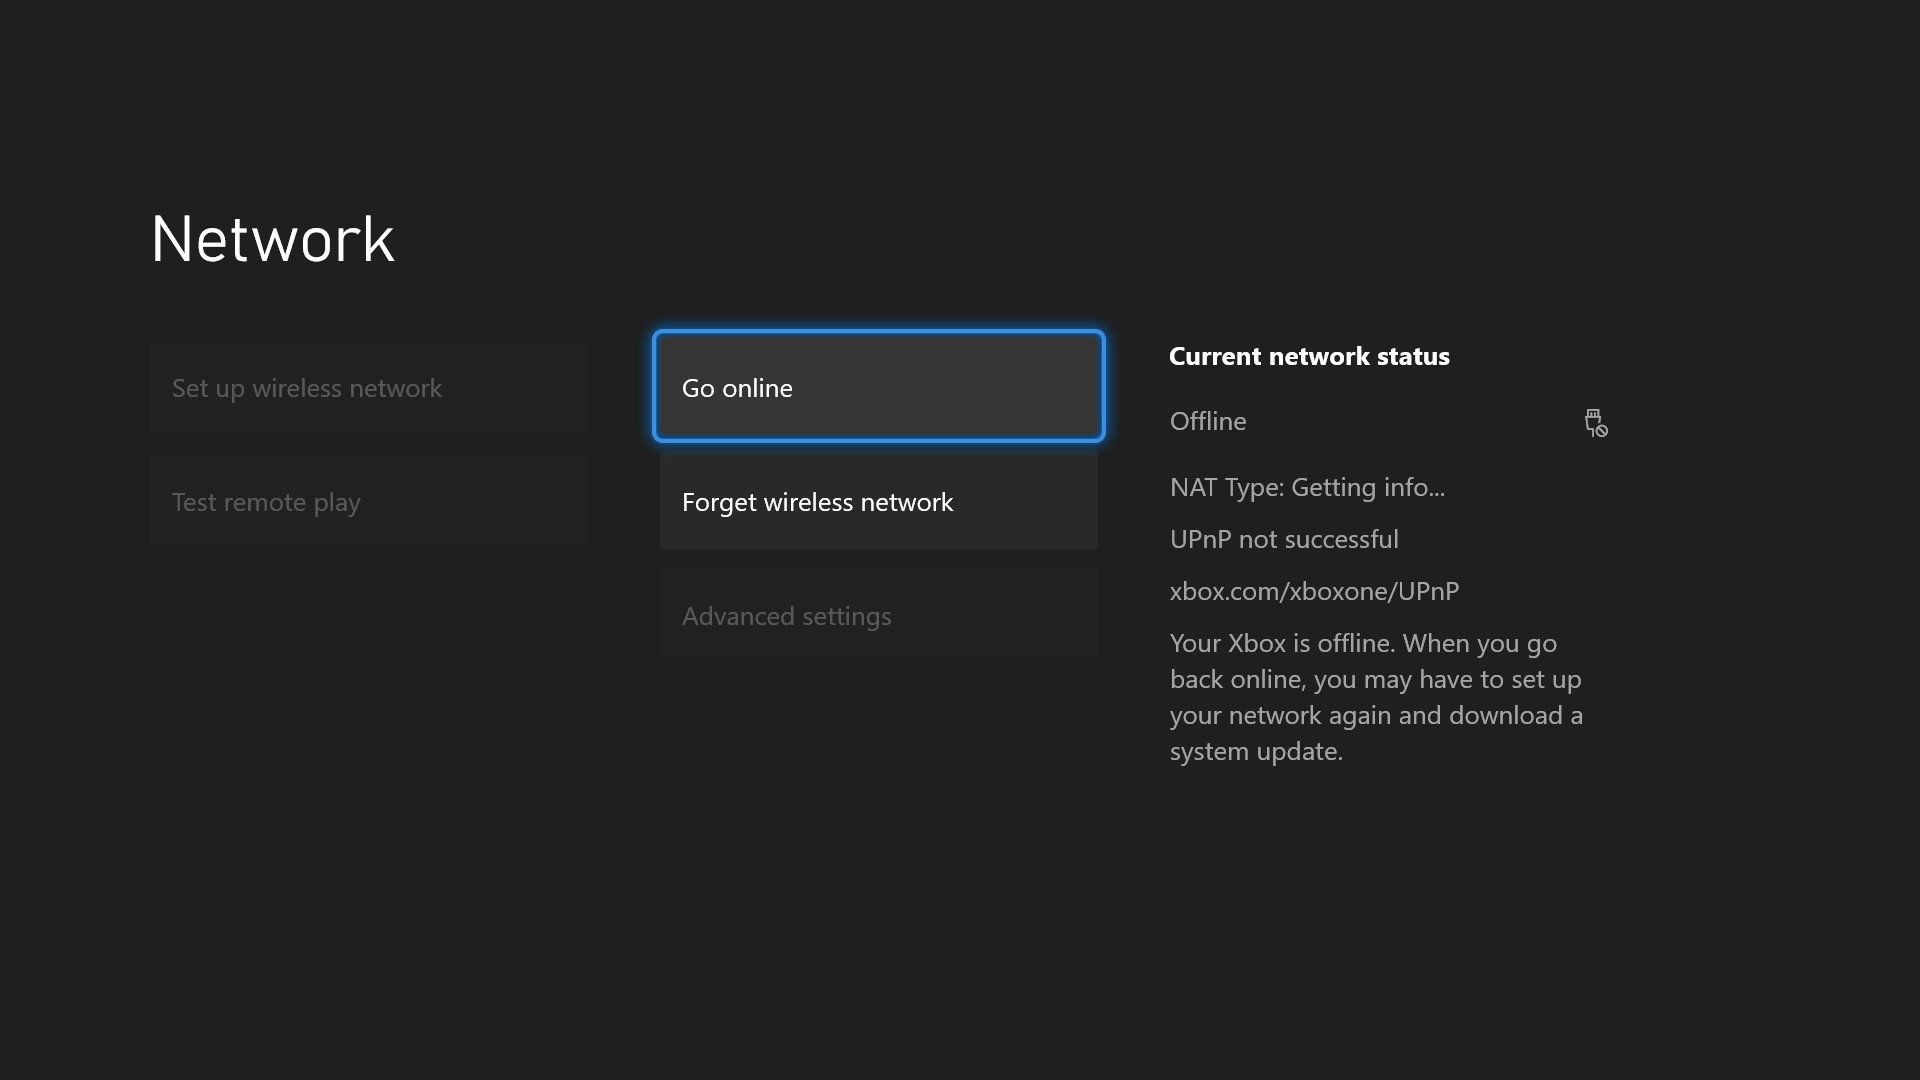
Your Xbox Series X|S automatically detects if it’s using an IPv4 or IPv6 connection from your internet service provider (ISP), and there’s nothing you can do to change it from your end. However, you can see the «Current network status» of your Xbox Series X|S on the right side of the «Network settings» section of Settings. The second item listed here should be «IPv4» or «IPv6,» depending on which connection you’re currently using.
If listed as IPv4, consider reaching out directly to your ISP and asking them if they provide an IPv6 connection. If not, there’s not a whole lot you can do besides finding a new ISP. Still, if your ISP can set you up with IPv6, you could notice considerable improvements on your Xbox Series X|S to downloads and overall speed.
Enable Quality of Service
Finally, enabling Quality of Service (QoS) is another advanced tip that can lead to fantastic results on your Xbox Series X|S. QoS manages the bandwidth on your network, scaling depending on the current traffic on your network. Using QoS, you can prioritize specific devices and tasks, ensuring your Xbox Series X|S always has access to adequate bandwidth when required.
Under ideal network conditions, QoS isn’t likely to make a huge difference, but in times when your network is congested or there’s a lot of traffic, QoS can ensure your Xbox Series X|S has the bandwidth it needs. Most QoS is enabled on a per-router or network basis, meaning you’ll need to refer to your specific router documentation to learn how to enable it. However, Xbox Series X|S consoles do now have specific settings to enable QoS on the console, as long as your router or network supports it.
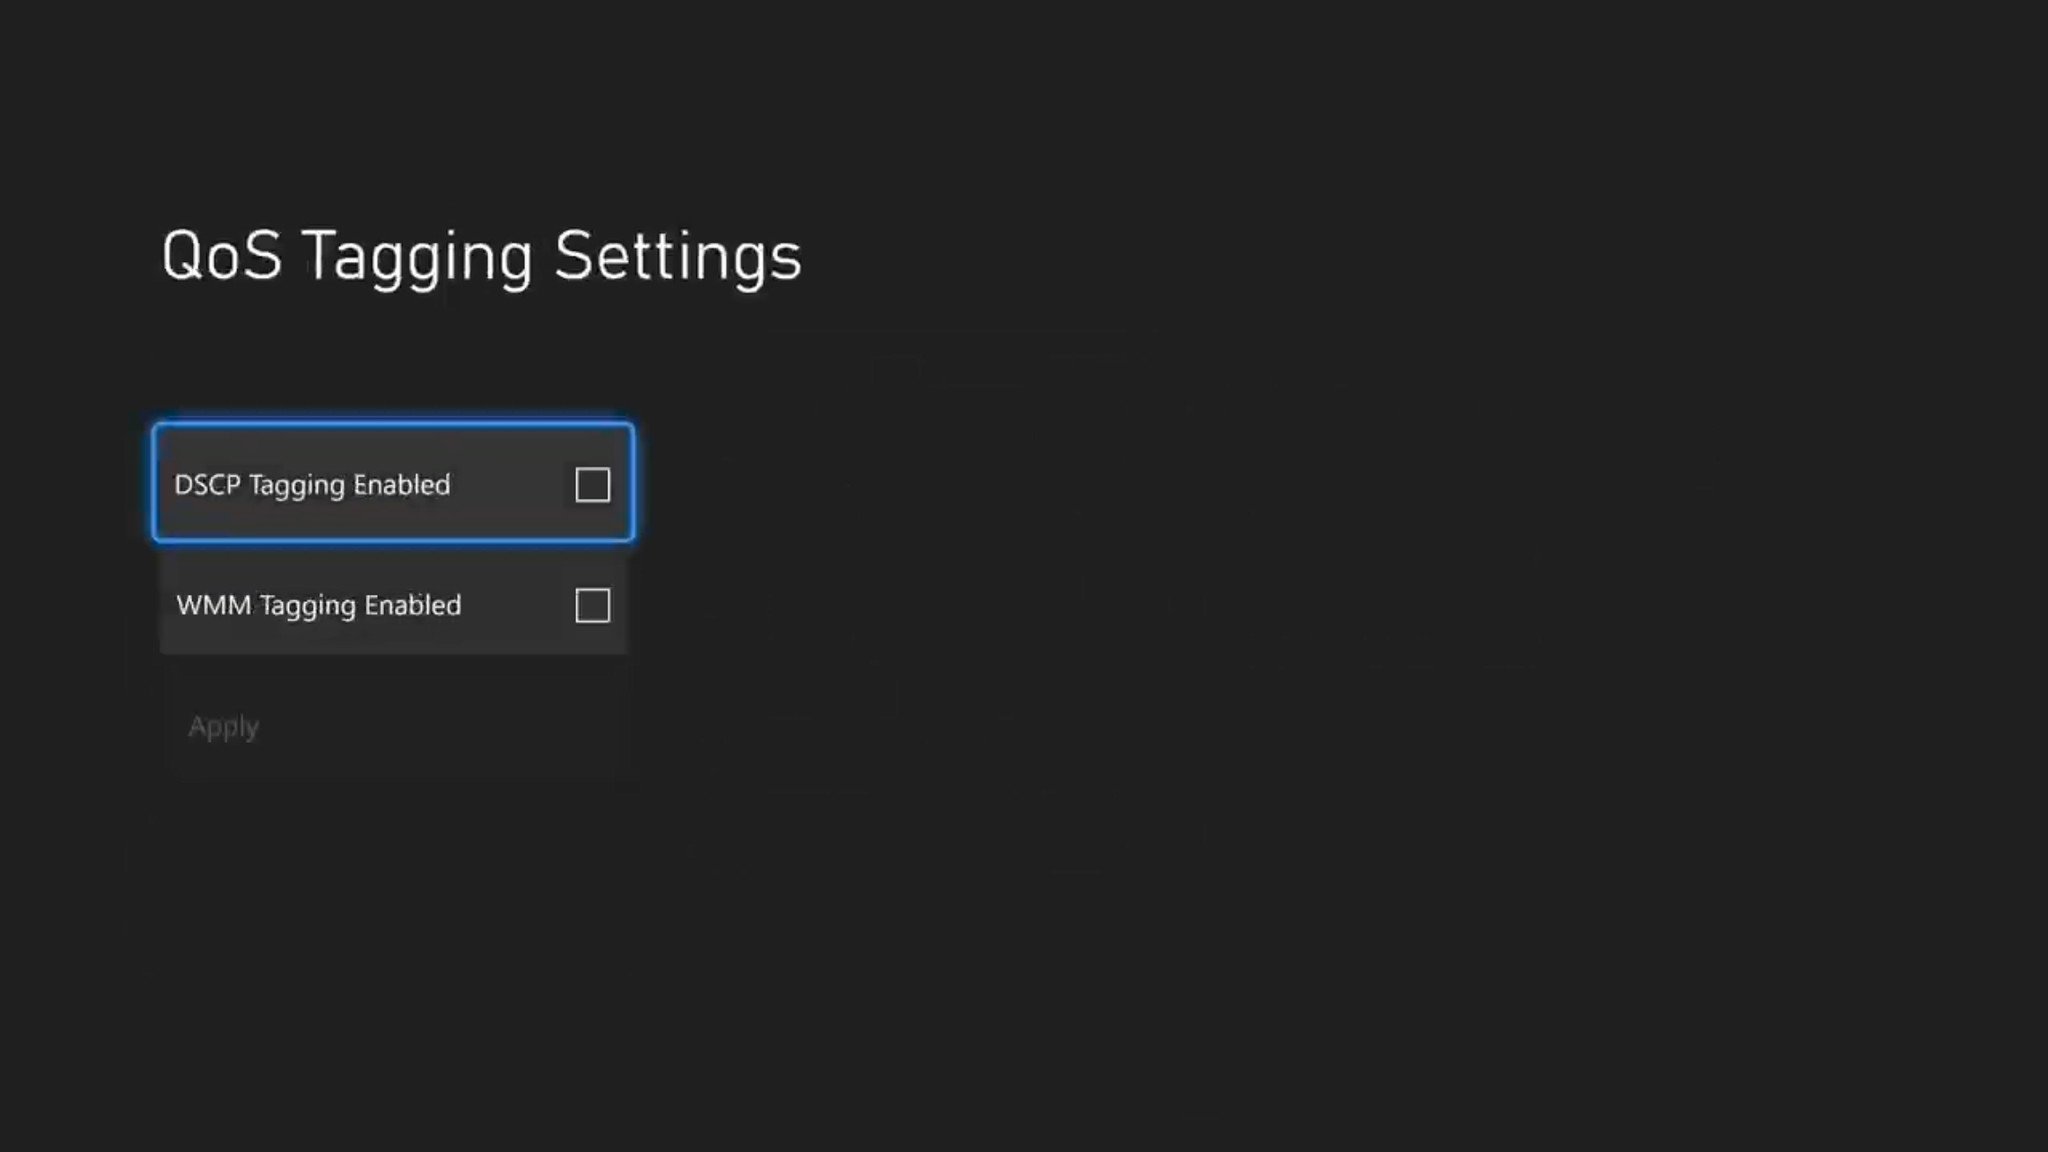
Xbox Series X|S consoles support QoS Tagging, which means your console can tag latency-sensitive outbound tasks like online multiplayer sessions, streaming and cloud services, Xbox Party Chat, and more. When your network becomes congested, these tags provide bandwidth priority to those services on supported, QoS-enabled networks, ensuring you never miss a beat. There are two QoS Tagging options on Xbox Series X|S:
- Differentiated Services Code Point (DSCP) Tagging enabled. DSCP is done at the IP address packet level, and functions with both wired and wireless networks. DSCP identifies latency-sensitive network traffic on your console, and works with QoS-enabled routers or networks, or with ISP networks that support a standard known as Low Latency DOCSIS to ensure that traffic is provided with the necessary bandwidth. This is the only QoS Tagging option necessary for those on a wired network, and is also great for most wireless networks.
- Wi-Fi Multimedia (WMM) Tagging enabled. WMM is done at the wireless packet level, and therefore only functions with wireless networks. This standard is normally enabled by default on supported network, and helps protect latency-sensitive network traffic from network congestion and high latency. This QoS Tagging option is great for wireless networks, but does nothing for wired networks.
To enable QoS on your Xbox Series X|S, follow these steps:
- On your Xbox Series X|S, open the Xbox Guide by pressing the «Xbox» button in the middle of your controller.
- Once the Guide is opened, scroll to the «Profile & system» tab using the bumpers, D-pad, or right analog stick on your controller.
- On the «Profile & system» tab of the Guide, navigate to the «Settings» button and open Settings on your console.
- Once Settings is opened, navigate to the «General» section located at the top.
- Inside the «General» section of Settings, navigate to and open the «Network settings» to access all the network-related settings on your console.
- Inside the «Network settings» section, navigate to and open the «Advanced settings» option to open a set of more advanced controls.
- Inside the «Advanced settings» section, navigate to and open the «QoS Tagging Settings» option to access the QoS Tagging options.
- On the «QoS Tagging Settings» page, enable the QoS Tagging options you desire to help protect your console from network congestion and latency.Note: While both these QoS Tagging options shouldn’t negatively affect your network experience, even on supported network, you may experience issues on a small minority of networks. In these cases, you should disable QoS Tagging.
How do I fix multiplayer lag with Xbox Series X|S?

Once you’ve downloaded everything you want on your Xbox Series X|S, you’ll probably want to hop online and play. However, issues with lag and other connectivity problems with multiplayer aren’t necessarily intrinsically tied to low download speeds, and can have different solutions and underlying issues. In order to remain competitive with online multiplayer, you want your speeds and latency to be as close to «instant» as possible.
On top of everything mentioned in the previous section on download speeds, this Xbox Series X|S networking guide will go over a few other things you can keep in mind when wanting to get the most out of online multiplayer.
Check your connection
There are a few things you can attempt to rectify multiplayer lag on your Xbox Series X|S, but before you do anything, you should run a few tests to try and isolate the issue. Two factors are applicable when it comes to playing online: your connection to the internet and your connection to Xbox Live.
Your connection to the internet affects everything you do on your Xbox Series X|S online, and it’s also the most information-dense test you can run. Fortunately, we’ve already been over how to run this useful test. Simply follow the steps earlier in this Xbox Series X|S networking guide to find out how to test your network speed and statistics, which also breaks down all the relevant stats for you.
All of the stats here can affect your multiplayer experience on your Xbox Series X|S, but the most important metrics will be your download and upload speeds, packet loss, and latency. Your speeds should be as high as possible, your packet loss should be as close to zero as possible, and your latency should be as low as possible. For a passable multiplayer experience, the minimum download / upload speed we suggest is 2MBps, a packet loss close to zero, and latency below 200ms.
If you notice any deficiencies in these stats, that could very well be the primary cause of any multiplayer lag you’re experiencing. However, you could also have issues connecting to Xbox Live, Microsoft’s server-backend that powers all Xbox online experiences. For the most part, Xbox Live is stable, fast, and players don’t have to do anything on their end to make things work. Every so often, though, Xbox Live may go down for periods or have issues in certain areas.
There’s also a test built-in to your Xbox Series X|S that will tell you exactly how your connection to Xbox Live is and if you’re ready to start playing online multiplayer. Just like with the previous test, we’ve already been over exactly how to run this test. Simply follow the steps earlier in this Xbox Series X|S networking guide to determine how to test your multiplayer connection, which will tell you clearly how your Xbox Live connection is.
You should get a simple «Everything is good» message most of the time after running this test. However, if there are any issues with Xbox Live, you should get a message here letting you know that there was a problem. You can also use our guide to check if Xbox Live is down right now, but this tool is built right into your Xbox Series X|S.
Consider the multiplayer design
When it comes to online multiplayer, it isn’t always dependent on your connection or your internet speed. Every multiplayer game is different, and the way they handle online multiplayer can dramatically affect how reliable and stable your connection is. Many games have been negatively affected by their approach to online networking. Depending on the game you’re playing, the multiplayer lag and other issues you’re experiencing may not be related to your setup or anything that’s up to you.
There are two standard approaches to online multiplayer that can affect your experience: peer-to-peer (P2P) and dedicated servers.
P2P is the more affordable option and can be quite common with online multiplayer games built by indie developers. P2P means a game uses its players’ personal networks to host online multiplayer connections while using one player’s console as the central server. This is entirely reliant on individual users’ networks and is far more prone to lag, latency issues, and interruptions. That isn’t to say that P2P doesn’t have a place, but as time goes on, it becomes increasingly uncommon and is generally less desirable than the other form of multiplayer networking.
Dedicated servers mean a game has central servers with the sole purpose of hosting online multiplayer. This approach takes the strain off player networks, typically guaranteeing the lowest lag and latency, and with a global network can provide a consistent experience for all players. Dedicated servers have become more common recently with the rise of cloud superpowers like Microsoft and Amazon that are happy to rent servers out, and is the ideal solution for online multiplayer.
Still, even games with dedicated servers can still experience multiplayer issues due to how the game is built, the number of players the servers are trying to support at once, and more. Many factors contribute to online multiplayer, especially with the hosting portion of it. Still, the simple distinction between P2P and dedicated servers can make a world of difference for online games, especially larger ones. Unfortunately, this does mean that the issues players can experience in online multiplayer games could be related to the game’s design. In this case, some games can be improved on a per-case basis if you’re willing to research them.
Aim for Open NAT
Another huge part of how the internet works is Network Address Translation (NAT), which allows multiple devices to map internal IP addresses to external addresses. This especially plays a massive role in anything that many people are involved in, like online multiplayer games. There are three types of NAT: Open, Moderate, and Strict. In rough terms, a player’s NAT type can help dictate what other players with whom they’re compatible when playing multiplayer games.
To put it simply, an Open NAT will have the least number of problems with online multiplayer, while a Strict NAT type can experience more issues. The below table gives a good indication of how different NAT types work with each other. In other words, which players with whom you can connect.
Swipe to scroll horizontally
| NAT type | Open | Moderate | Strict |
|---|---|---|---|
| Open | ✓ | ✓ | ✓ |
| Moderate | ✓ | ✓ | Row 1 — Cell 3 |
| Strict | ✓ | Row 2 — Cell 2 | Row 2 — Cell 3 |
The end goal for players is to aim for Open NAT, but this isn’t as simple as it sounds. For most players, you hopefully won’t have to mess with anything and will already have an Open NAT. For the rest, it’s a manual process that can be quite difficult. Fortunately, we have three different methods you can try to change your NAT type to Open.
If you’re not sure what NAT type you currently have on your Xbox Series X|S, you can see the «Current network status» of your Xbox Series X|S on the right side of the «Network settings» section of Settings. The third option here should list your NAT type, which should hopefully say «Open.» If it doesn’t, then read on in our Xbox Series X|S networking guide for some ideas on how you can make your NAT type Open.
Do not mix and match UPnP, port forwarding, or DMZ when trying to get an Open NAT type on your Xbox Series X|S. If one option does not work, undo all the work you did before moving on to the next option.
Test your NAT type
Before you move forward with any of the other portions in this section of our Xbox Series X|S networking guide, you’ll first want to be familiar with how to test your NAT type on your Xbox Series X|S. Testing isn’t necessary to determine what kind of NAT type your Xbox Series X|S uses (it’ll tell you like mentioned above), but it is essential to «finalize» any changes you make below. To save us some time, follow the steps below to test your NAT type on your Xbox Series X|S:
- On your Xbox Series X|S, open the Xbox Guide by pressing the «Xbox» button in the middle of your controller.
- Once the Guide is opened, scroll to the «Profile & system» tab using the bumpers, D-pad, or right analog stick on your controller.
- On the «Profile & system» tab of the Guide, navigate to the «Settings» button and open Settings on your console.
- Once Settings is opened, navigate to the «General» section located at the top.
- Inside the «General» section of Settings, navigate to and open the «Network settings» to access all the network-related settings on your console.
- Inside the «Network settings» section, navigate to and open the «Test NAT type» option to run the NAT type tool.
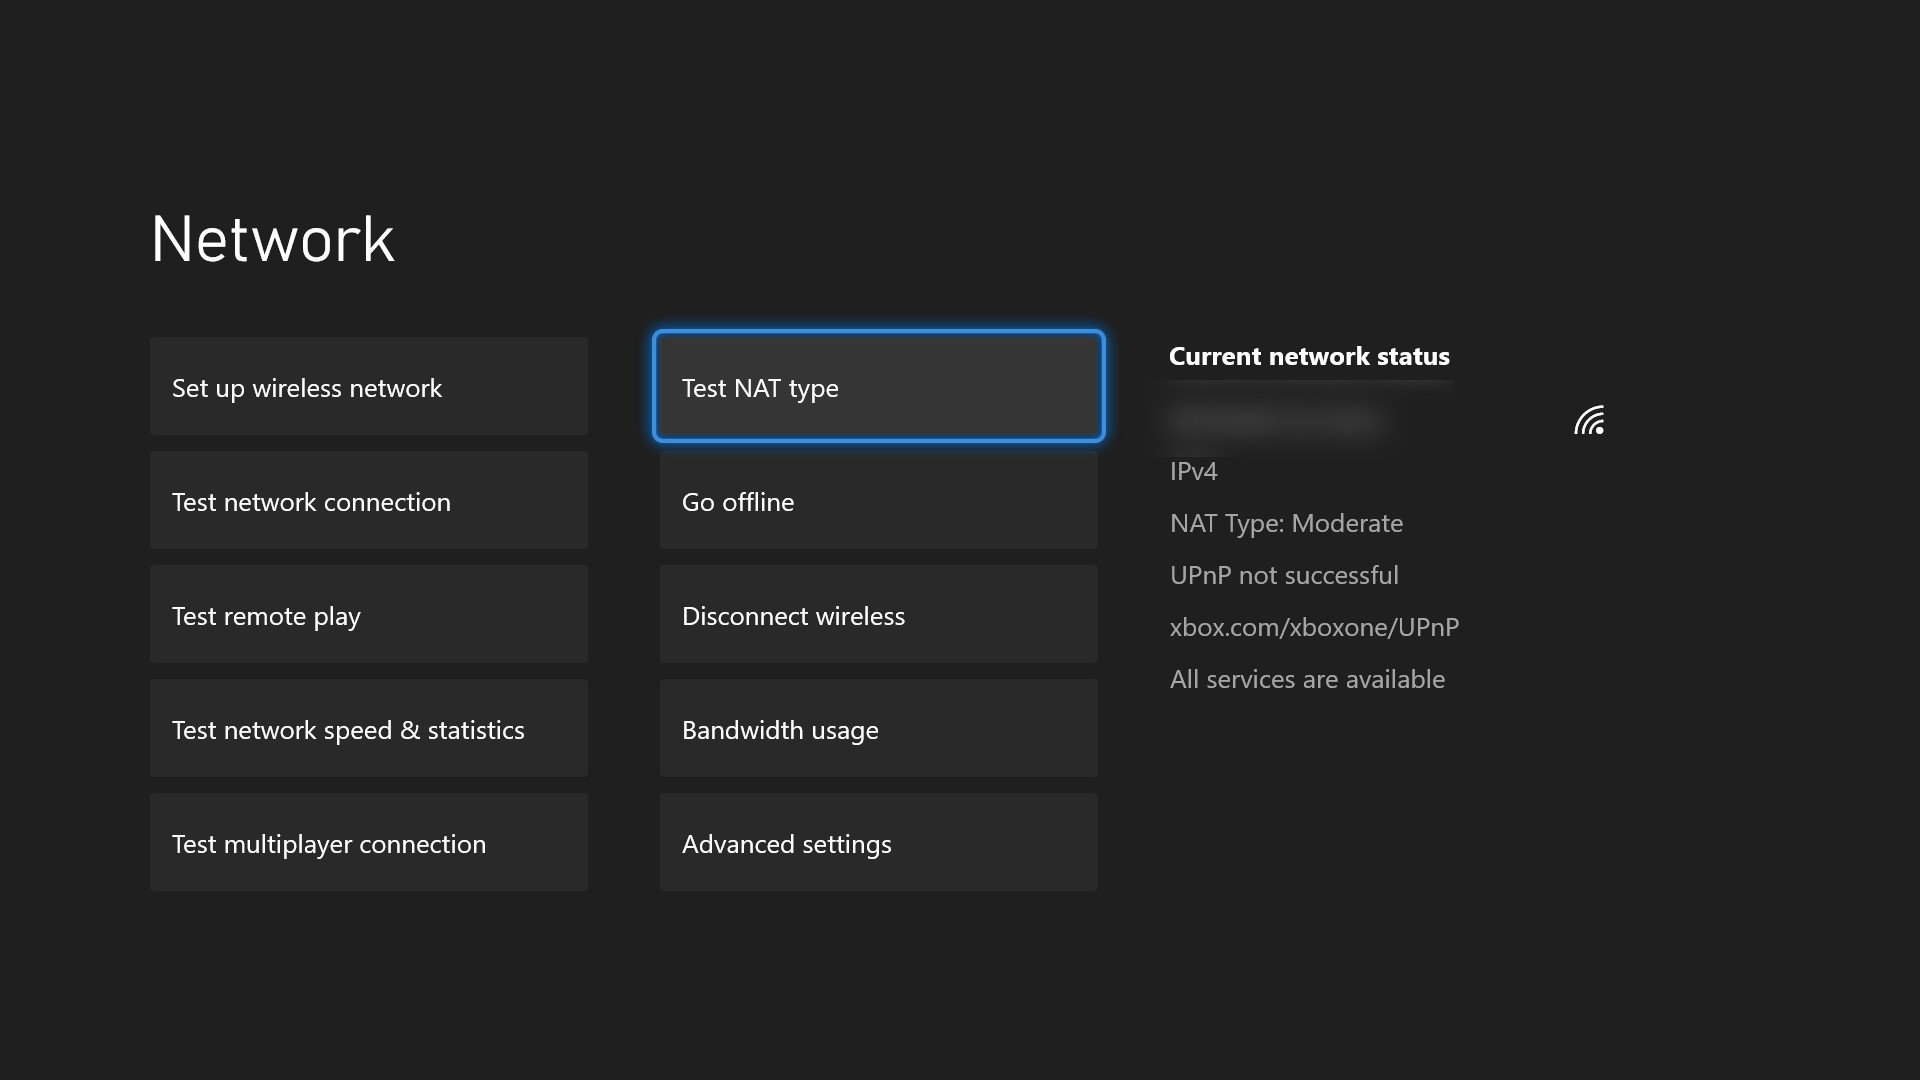
- Your Xbox Series X|S will automatically run the «Test NAT type» tool, which may take several moments. When it’s done, you’ll get a concise message about what NAT type your Xbox Series X|S is now using.
Universal Plug and Play (UPnP)
UPnP is the default for a lot of modern routers. It’s a set of protocols that automatically handles port mapping, or how your network handles incoming and outgoing traffic, to improve communications across devices. UPnP avoids the hassle of other methods, like port forwarding, by letting your router handle the work instead of being done manually.
It should be mentioned that UPnP isn’t always the most secure and has been criticized in the past for its open nature and known vulnerabilities that can be maliciously exploited. Port forwarding requires more manual work but can be more secure because of this. On top of that, UPnP and how it’s implemented can vary wildly from router to router, so less-reputable routers may be less secure than others. If you’re concerned about security over convenience, UPnP may not be the best choice, but it should be mentioned that, especially for home users with closed-off systems like consoles, UPnP is a perfectly viable option.
Enabling UPnP is not guaranteed to make your NAT type Open on your Xbox Series X|S, but it can be the first step. If UPnP doesn’t work, we recommend trying port forwarding instead (the section directly below).
If it isn’t already enabled, UPnP can dramatically improve your network connections with online multiplayer. However, the steps vary wildly from router to router. We can provide the basic process, but enabling UPnP will require some research on your exact router.
Do not mix and match UPnP, port forwarding, or DMZ when trying to get an Open NAT type on your Xbox Series X|S. If one option does not work, undo all the work you did before moving on to the next option.
To enable UPnP on your Xbox Series X|S for an Open NAT type, follow these steps:
- On a PC or other browser-enabled device, navigate to your router’s login page.
- Note: Every router can be different. You’ll have to research your specific router make and model to determine how to access its login page and how to enable UPnP.
- On your router login page, login using the required credentials.
- After you’ve logged in to your router, find and navigate to the UPnP menu.
- Note: If your router does not support UPnP, we recommend moving on to port forwarding.
- Inside the UPnP menu on your router, enable UPnP.
- Once you’ve enabled UPnP, make sure to save your changes.
- Once you’ve saved your changes, go to your Xbox Series X|S.
- On your Xbox Series X|S, follow these steps to test your NAT type.
- If enabling UPnP succeeded in changing your NAT type to Open, your Xbox Series X|S will let you know after a few moments. Otherwise, undo these steps and move on to port forwarding.
Port forwarding
When UPnP doesn’t work, isn’t available, or you’re willing to trade convenience for some added security, you can try manual port forwarding. While UPnP handles a lot of protocols automatically, port forwarding allows you to direct specific traffic to your Xbox Series X|S personally, massively opening up connectivity. Because port forwarding is device-specific and can even be catered to specific games and online experiences, port forwarding often solves a ton of online multiplayer issues.
So why wouldn’t you use port forwarding instead of the less secure and consistent UPnP? The biggest reason is convenience. Many modern routers enable UPnP by default, handle it quite well, and the majority of users won’t ever have to worry about security concerns. On the other hand, port forwarding is much more manual and requires comfort getting into the gritty details of your network and your Xbox Series X|S settings.
Port forwarding can drastically improve your speeds, network connections, and more, especially with low-latency games and chat on your Xbox Series X|S. However, the precise way to enable port forwarding also varies wildly from router to router, so personal research will be required for the exact make and model of your router. Below is the basic outline for enabling port forwarding, but we can’t provide all of the information.
If you have issues enabling port forwarding on your console, double-check all of the information and go through the steps one by one to ensure everything was done correctly. If port forwarding still does not Open your NAT type, your last resort is DMZ, which you can find below.
Do not mix and match UPnP, port forwarding, or DMZ when trying to get an Open NAT type on your Xbox Series X|S. If one option does not work, undo all the work you did before moving on to the next option.
To enable port forwarding on your Xbox Series X|S for an Open NAT type, follow these steps:
- On your Xbox Series X|S, open the Xbox Guide by pressing the «Xbox» button in the middle of your controller.
- Once the Guide is opened, scroll to the «Profile & system» tab using the bumpers, D-pad, or right analog stick on your controller.
- On the «Profile & system» tab of the Guide, navigate to the «Settings» button and open Settings on your console.
- Once Settings is opened, navigate to the «General» section located at the top.
- Inside the «General» section of Settings, navigate to and open the «Network settings» to access all the network-related settings on your console.
- Inside the «Network settings» section, navigate to and open the «Advanced settings» section to access the most advanced network settings for your Xbox Series X|S.
- Inside the «Advanced settings» section, take note of and record the IP address of your Xbox Series X|S.
- Inside the «Advanced settings» section, take note of and record the MAC address of your Xbox Series X|S.
- On a PC or other browser-enabled device, navigate to your router’s login page.
- Note: Every router can be different. You’ll have to research your specific router make and model to determine how to access its login page and how to enable port forwarding.
- On your router login page, login using the required credentials.
- After you’ve logged in to your router, manually assign an IP address to your Xbox Series X|S, using the previously recorded IP and MAC addresses.
- If necessary, once you’ve manually assigned an IP address, save your changes.
- On your Xbox Series X|S, follow these steps to test your network connection.
- If your Xbox Series X|S is still connected to your network, navigate to the port forwarding section on your router.
- Note: If your Xbox Series X|S is no longer connected to your network, follow the steps of this section from the beginning, double-checking that you have all the right information.
- Inside the port forwarding section on your router, open the following ports, using the appropriate protocol:
- UDP:
88, 500, 3544, 4500 - TCP & UDP:
3074
- UDP:
- If necessary, once you’ve opened the ports, save your changes.
- On your Xbox Series X|S, follow these steps to test your NAT type.
- If enabling port forwarding succeeded in changing your NAT type to Open, your Xbox Series X|S will let you know after a few moments. Otherwise, repeat these steps if necessary, or move on to DMZ as a last resort for resolving NAT issues.
Demilitarized Zone (DMZ)
If UPnP and port forwarding fail to Open your NAT type, then using the DMZ (also known as a perimeter zone) should be your last resort. While UPnP and port forwarding map ports to improve network connections, the DMZ completely removes network restrictions for a device (without completely removing network security). While the DMZ is practically guaranteed to improve your NAT type, it also allows unsolicited traffic to be sent to your Xbox Series X|S.
Xbox Series X|S use a restricted OS with tons of built-in security and limited access, so using the DMZ is usually acceptable. However, the DMZ should never be used with a PC or other, more open devices. Even with your Xbox Series X|S, the DMZ should be your last choice, after UPnP and port forwarding have already failed to improve your NAT type. Before using the DMZ, I recommend returning to the previous sections in this Xbox Series X|S networking guide and going through UPnP and port forwarding one more time. I also recommend having a decent understanding of how networks work before using DMZ.
The exact process for enabling the DMZ for your Xbox Series X|S will vary wildly depending on your router. While the basic steps are outlined below, it’ll still be up to you to research the exact make and model of your router for the rest of the details.
If you have any issues enabling the DMZ for your Xbox Series X|S, go through all of the steps and double-check that you have all the correct information and followed the steps in order.
Do not mix and match UPnP, port forwarding, or DMZ when trying to get an Open NAT type on your Xbox Series X|S. If one option does not work, undo all the work you did before moving on to the next option.
To enable the DMZ on your Xbox Series X|S, follow these steps:
- On your Xbox Series X|S, open the Xbox Guide by pressing the «Xbox» button in the middle of your controller.
- Once the Guide is opened, scroll to the «Profile & system» tab using the bumpers, D-pad, or right analog stick on your controller.
- On the «Profile & system» tab of the Guide, navigate to the «Settings» button and open Settings on your console.
- Once Settings is opened, navigate to the «General» section located at the top.
- Inside the «General» section of Settings, navigate to and open the «Network settings» to access all the network-related settings on your console.
- Inside the «Network settings» section, navigate to and open the «Advanced settings» section to access the most advanced network settings for your Xbox Series X|S.
- Inside the «Advanced settings» section, take note of and record the IP address of your Xbox Series X|S.
- Inside the «Advanced settings» section, take note of and record the MAC address of your Xbox Series X|S.
- On a PC or other browser-enabled device, navigate to your router’s login page.
- Note: Every router can be different. You’ll have to research your specific router make and model to determine how to access its login page and how to enable the DMZ.
- On your router login page, login using the required credentials.
- After you’ve logged in to your router, manually assign an IP address to your Xbox Series X|S, using the previously recorded IP and MAC addresses.
- If necessary, once you’ve manually assigned an IP address, save your changes.
- On your Xbox Series X|S, follow these steps to test your network connection.
- If your Xbox Series X|S is still connected to your network, navigate to the DMZ section on your router.
- Note: If your Xbox Series X|S is no longer connected to your network, follow the steps of this section from the beginning, double-checking that you have all the right information.
- In the DMZ section on your router, enable the DMZ.
- Once the DMZ has been enabled, enter the assigned IP address for your Xbox Series X|S from earlier.
- If necessary, once you’ve entered the assigned IP address, save your changes.
- On your Xbox Series X|S, follow these steps to test your NAT type.
- If enabling the DMZ for your Xbox Series X|S succeeded in changing your NAT type to Open, your Xbox Series X|S will let you know after a few moments. If not, be sure to go back through this section and repeat this process step-by-step.
How do I reduce data usage with Xbox Series X|S?

The Xbox Series X|S are gaming beasts, but all those multiplayer games, streaming apps, downloads and updates, and more can quickly burn through internet bandwidth. If you have a limited amount of bandwidth or a metered connection through your internet service provider (ISP), you’ll want to know how to monitor and reduce the data usage on your Xbox Series X|S. Fortunately, there’s quite a bit you can do here to reduce the strain on your data cap.
The last stop in this Xbox Series X|S networking guide will go over all the ways you can reduce data using on your Xbox Series X|S, so you can make the most of your gaming without worrying about going over your data cap.
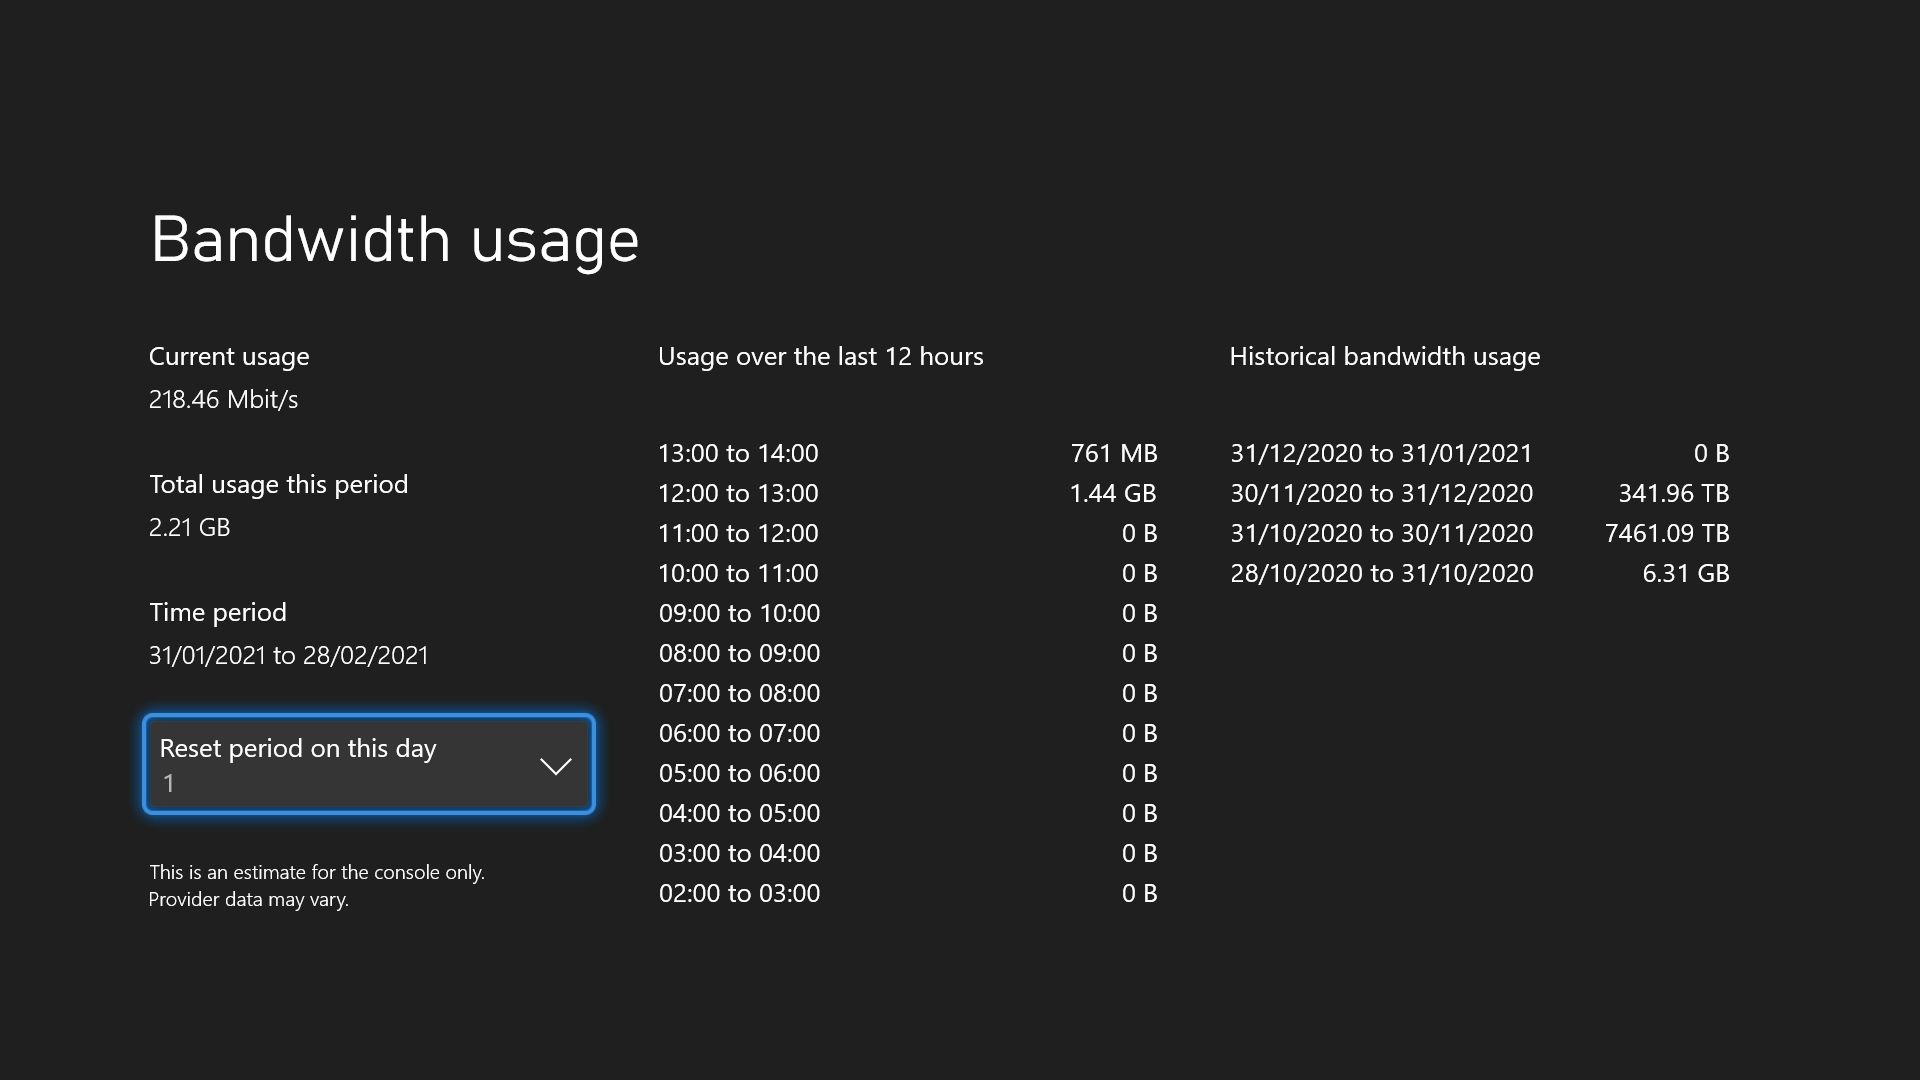
Check your data usage
Before doing anything to reduce how much data your Xbox Series X|S is consuming on your network, you might want to check the numbers first. Fortunately, your Xbox Series X|S provides an easy way to track how much data your Xbox Series X|S is using right now, an hour-by-hour breakdown of the last day, usage so far for the current period, and historical tracking for total usage in previous months. You can even choose what day your Xbox Series X|S resets its monthly tracking, that way you can sync it to when your ISP resets your bandwidth cap.
This test can provide invaluable insight into how much data you’re using, when you’re using it, and how much you need to change to avoid going over.
To check your data usage on your Xbox Series X|S, follow these steps:
- On your Xbox Series X|S, open the Xbox Guide by pressing the «Xbox» button in the middle of your controller.
- Once the Guide is opened, scroll to the «Profile & system» tab using the bumpers, D-pad, or right analog stick on your controller.
- On the «Profile & system» tab of the Guide, navigate to the «Settings» button and open Settings on your console.
- Once Settings is opened, navigate to the «General» section located at the top.
- Inside the «General» section of Settings, navigate to and open the «Network settings» to access all the network-related settings on your console.
- Inside the «Network settings» section, navigate to and open the «Bandwidth usage» section» to access all the information on your data usage.
- Your Xbox Series X|S will display all the relevant information you need in a nice, easy-to-read format. You can always return to this section whenever you need to.
Go offline
While there are plenty of ways to reduce how much data you’re using on your Xbox Series X|S, the most effective way is to simply go offline. Your Xbox Series X|S contains a relatively easy-to-find toggle that lets you completely disconnect from the internet without unplugging cables or forgetting Wi-Fi networks. When you’ve gone offline, your Xbox Series X|S won’t use any data at all.
Of course, this also means that your Xbox Series X|S isn’t going to be online, which means you won’t be able to do anything internet-connected. Online multiplayer, streaming apps, web browsing, game downloads, and everything in between won’t work at all.
Going offline is a great option if you want to play a single-player game, watch a movie off a Blu-ray or DVD, or do something else that doesn’t need you to connect to the internet. You can still do plenty without worrying about your Xbox Series X|S using data in the background.
To go offline with your Xbox Series X|S, follow these steps:
- On your Xbox Series X|S, open the Xbox Guide by pressing the «Xbox» button in the middle of your controller.
- Once the Guide is opened, scroll to the «Profile & system» tab using the bumpers, D-pad, or right analog stick on your controller.
- On the «Profile & system» tab of the Guide, navigate to the «Settings» button and open Settings on your console.
- Once Settings is opened, navigate to the «General» section located at the top.
- Inside the «General» section of Settings, navigate to and open the «Network settings» to access all the network-related settings on your console.
- Inside the «Network settings» section, navigate to and open the «Go offline option» to take your console offline immediately.

- Once your Xbox Series X|S has gone offline, the «Network settings» section will remove and grey out unnecessary functions. You can return here and hit the «Go online» option to reconnect to your network whenever you want.
Disable automatic updates
Your Xbox Series X|S uses automatic updates by default to ensure your games and console are always up-to-date and ready to play. For those with ample bandwidth and data, this is typically the best option, as it’s more convenient and can lead to fewer interruptions before game time. However, players who need to use their data wisely may prefer to disable automatic updates and instead rely on manually updating games and apps when necessary.
Xbox consoles haven’t always provided the option to disable just automatic updates, but your Xbox Series X|S does.
To disable automatic updates on your Xbox Series X|S, follow these steps:
- On your Xbox Series X|S, open the Xbox Guide by pressing the «Xbox» button in the middle of your controller.
- Once the Guide is opened, scroll to the «Profile & system» tab using the bumpers, D-pad, or right analog stick on your controller.
- On the «Profile & system» tab of the Guide, navigate to the «Settings» button and open Settings on your console.
- Once Settings is opened, navigate to the «System» section located near the middle.
- Inside the «System» section of Settings, navigate to and open the «Updates» section to access all update-related settings on your console.
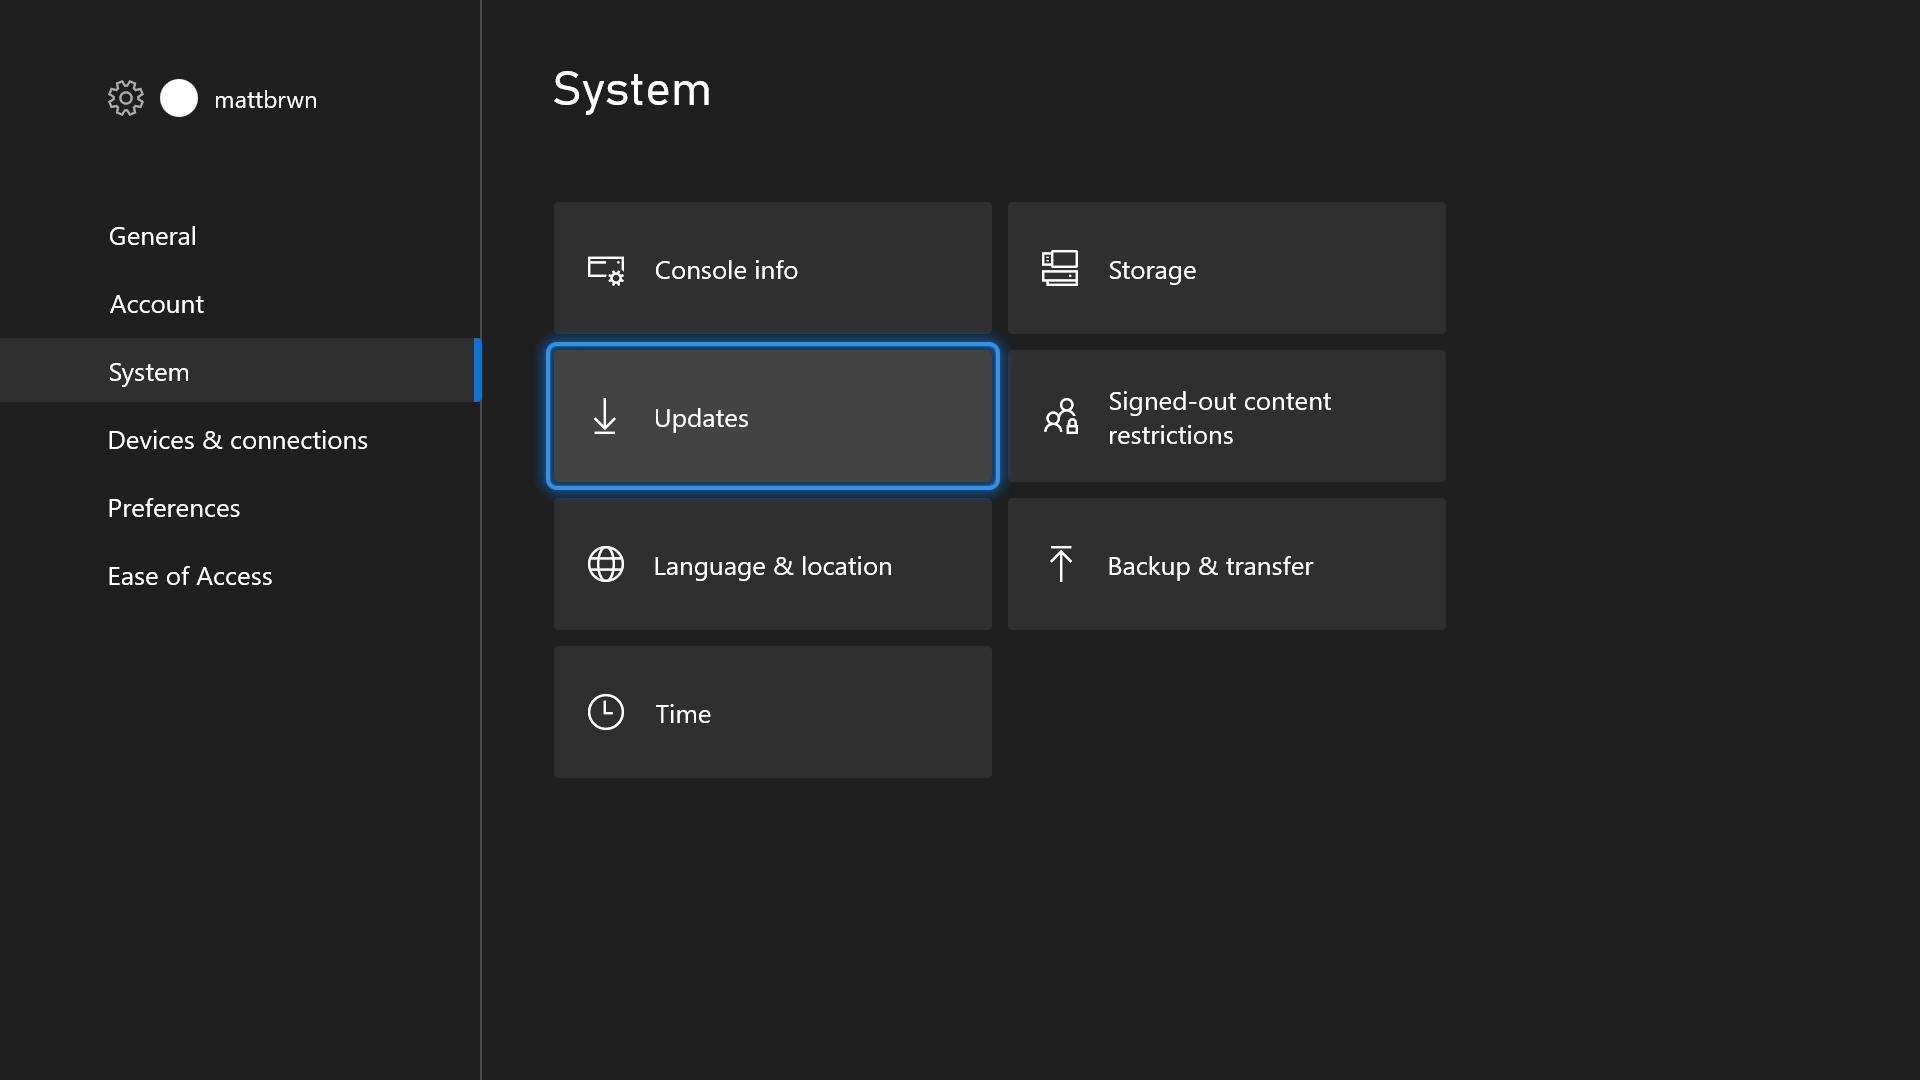
- Inside the «Updates» section, you’ll see a page with the following options:
- Console update status. The top option in the «Updates» section lets you know if a console update is available or not.
- Latest console update status. The next option in the «Updates» section gives you more information about the last time your console was updated.
- Keep my console up to date. The next option in the «Updates» section lets you toggle on and off automatic updates for your Xbox Series X|S. By default, it’ll be turned on.
- Keep my games & apps up to date. The final option in the «Updates» section lets you toggle on and off automatic updates for your games and apps. By default, it’ll be turned on.
- To disable all automatic updates on your Xbox Series X|S, toggle off the «Keep my console up to date» and «Keep my games & apps up to date» options. You can toggle just one or both if you choose.
Turn off «Instant-on» mode
One of the features that made the Xbox One great (and was improved on further with the Xbox Series X|S) was «Instant-on» mode. This power mode means that, even when «turned off,» your Xbox console is in a low-power state. In «Instant-on» mode, your Xbox Series X|S can install updates in the background when you’re not using it, turn on nearly instantaneously, and can keep your most recent game or app in memory without using Quick Resume.
With «Instant-on» mode, you can also remotely play, install, and manage games installed on your Xbox Series X|S, usually from the Xbox mobile app.
However, «Instant-on» mode also means that your Xbox Series X|S continues to use both power and data when it’s turned off. If you’ve disabled automatic updates, then that’s the majority of any data your Xbox Series X|S will use in «Instant-on» mode, but it’s not necessarily all of it. If you want to minimize data usage to the absolute max, then you can turn off «Instant-on» mode on your Xbox Series X|S.
To disable «Instant-on» mode on your Xbox Series X|S, follow these steps:
- On your Xbox Series X|S, open the Xbox Guide by pressing the «Xbox» button in the middle of your controller.
- Once the Guide is opened, scroll to the «Profile & system» tab using the bumpers, D-pad, or right analog stick on your controller.
- On the «Profile & system» tab of the Guide, navigate to the «Settings» button and open Settings on your console.
- Once Settings is opened, navigate to the «General» section located at the top.
- Inside the «General» section of Settings, navigate to and open the «Power mode & startup» section to access all power-related settings on your Xbox Series X|S.
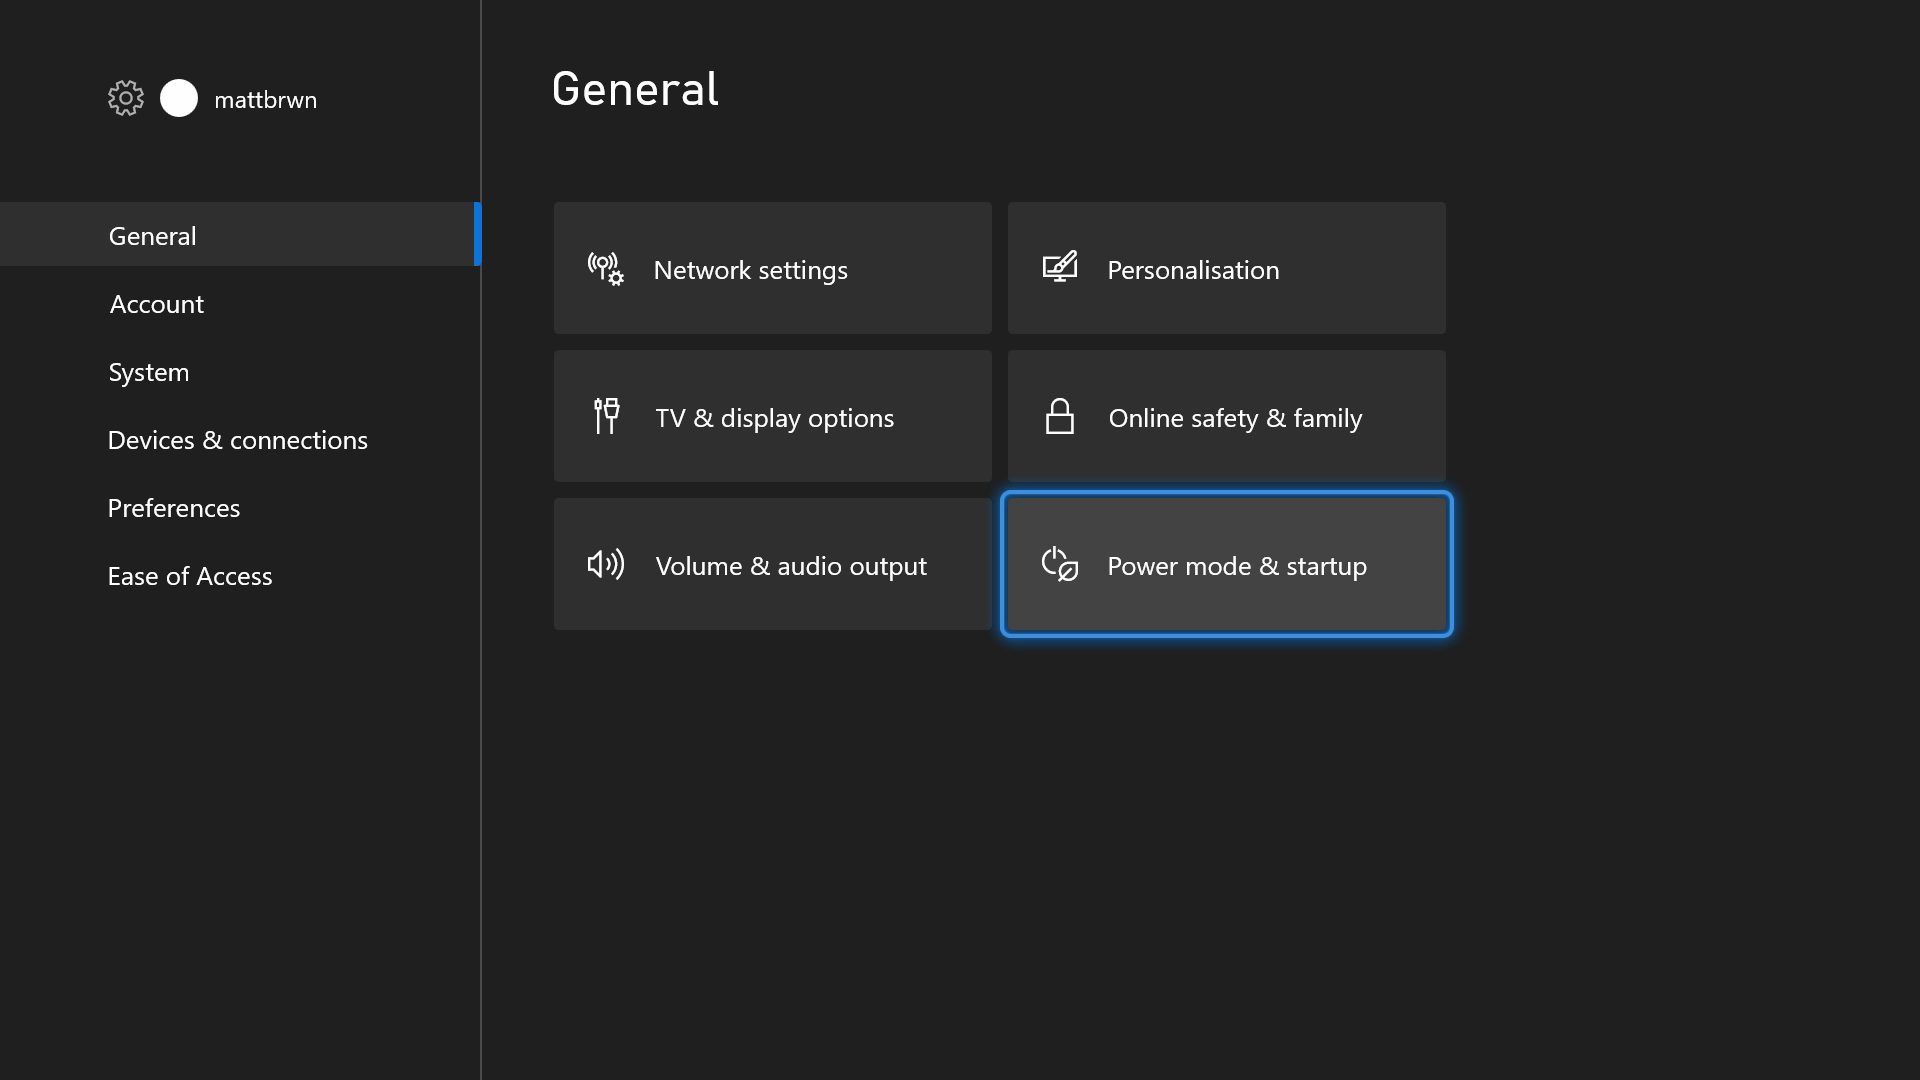
- Inside the «Power mode & startup» section, navigate to the «Power mode» dropdown option in the middle.
- Open the «Power mode» dropdown menu and change the power mode from «Instant-on» mode to «Energy-saving» mode.
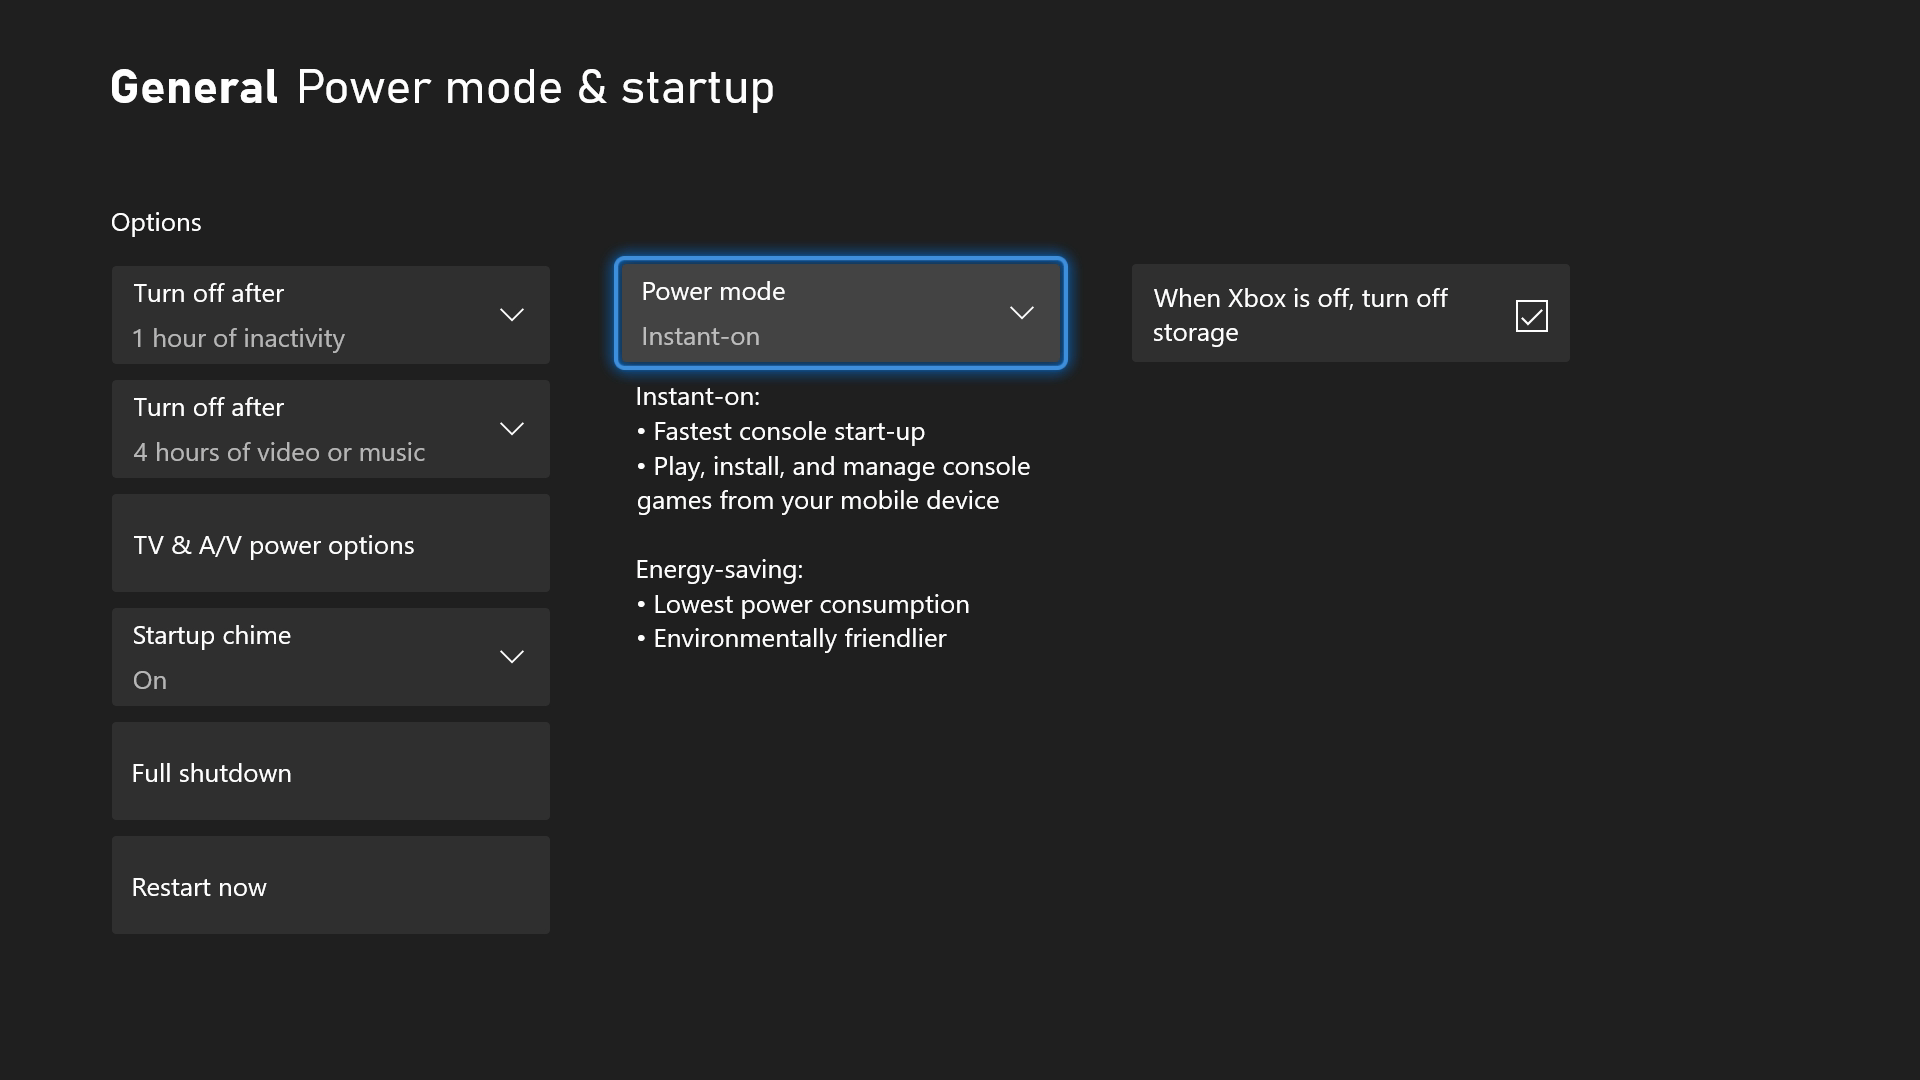
Install games with discs
One of the biggest drains on data caps with consoles is the download and installation of games. This is especially true of the Xbox Series X|S, where powerful hardware translates to increasingly large install sizes for games. One way of mitigating how much time and data is spent on installing games is using discs for the initial setup.
Unfortunately, the Xbox Series S will not be able to take advantage of this. Microsoft’s more affordable gaming console lacks a physical disc drive and is therefore digital-only. In the case of the Xbox Series S, players will instead have to exercise caution and only install the games they want to play.
For the Xbox Series X, though, using physical discs is still very much an option. By using discs, you’ll reduce how much of a game you’ll have to install. Keep in mind; most modern games still require a portion to be downloaded over the internet and often require day-one updates to be playable. Still, using a disc can save a considerable amount of data, and every bit can count when working with a limited data cap.
With physical discs, there’s also the potential for reselling your old games later on to recoup a small amount of the costs. Physical copies can often be cheaper (especially when used), and you get the feeling of being able to hold and actually own your games. Of course, using physical discs also requires that you use the physical disc any time you want to play that game.
Avoid data-hungry games and apps
Finally, our final tip for reducing data usage on your Xbox Series X|S is simply to try and avoid data-hungry games and apps. While this may seem like a no-brainer, it’s not always obvious which of your games and apps are using the most data. Avoiding or limiting use of these games and apps can have a massive effect on how much data you have left. You can also keep track of your data usage on your Xbox Series X|S with the tip above, which helps keep track of what games and apps are hungrier than others.
Video streaming apps like Netflix, Hulu, YouTube, and others can use GBs of data an hour, depending on your quality settings. Intensive multiplayer games like Call of Duty can be a consistent drain on data caps if you’re not careful. Bandwidth-heavy apps like Twitch can also consume a considerable amount of data (both if you’re streaming or watching streams), as well.
Outside of your internet connection, there’s nothing that you want to be fast more than your console’s storage. Ensure that you have plenty of space for your games and quick load speeds with one of the best Xbox Series X|S external SSDs If you follow this guide, you’re sure to have a blast playing all the best Xbox games around.
A catalog of games
Xbox Game Pass Ultimate
All your gaming needs, in one subscription
Is the Xbox Game Pass Ultimate the best value in all of gaming? It’s possible. Ultimate bundles your Xbox Live Gold subscription, an Xbox Game Pass subscription for both Xbox consoles and Windows PCs, and Xbox Cloud Gaming for on-the-go. That means access to hundreds of games, with more added all the time, for a single monthly subscription cost.
Zachary Boddy (They / Them) is a Staff Writer for Windows Central, primarily focused on covering the latest news in tech and gaming, the best Xbox and PC games, and the most interesting Windows and Xbox hardware. They have been gaming and writing for most of their life starting with the original Xbox, and started out as a freelancer for Windows Central and its sister sites in 2019. Now a full-fledged Staff Writer, Zachary has expanded from only writing about all things Minecraft to covering practically everything on which Windows Central is an expert, especially when it comes to Microsoft. You can find Zachary on Twitter @BoddyZachary.
Introduction
Experiencing the frustration of the Xbox app not opening on your Windows 11 computer? You’re not alone. With the growing popularity of Xbox Game Pass and the convenience of playing Xbox titles on PCs, having a functional Xbox app has become an essential part of many gamers’ lives. In this comprehensive guide, we’ll explore various solutions to tackle this common issue and get you back in the game. From troubleshooting techniques to system optimizations, we’ve got you covered with a range of strategies to fix the Xbox app not opening on Windows 11. So, let’s dive in and ensure your gaming experience remains uninterrupted and enjoyable.
Close All Xbox App Processes
First and foremost, terminate all active Xbox App processes on your PC. Launch the Task Manager, and within the Processes tab, identify and end any Microsoft Store, Xbox app, and associated processes. This step ensures that any background activities related to the Xbox App are halted, providing a clean slate for our upcoming troubleshooting methods.

Task Manager > Processes > End Task
Check the Xbox Live Server Status
First, confirm that the Xbox Live servers are operational in your area by visiting the Xbox status page. Make sure the Xbox Status is active, and not limited or under maintenance. If an outage is affecting the «Account & Profile» services, you’ll need to wait for the issue to be resolved.
If the servers are functioning properly, the problem may be due to corrupted Xbox App files or conflicts with your Windows settings. In this case, continue with the following troubleshooting steps to resolve the issue.
Xbox Live Services > Account and Profile
Fix Corrupted Xbox App Files
Begin by opening your Windows settings and heading to the Apps section. Locate the Xbox application in the list of installed apps, and click on the three-dot menu icon beside it. Choose «Advanced Options» from the dropdown menu.
In the Xbox App’s advanced settings, scroll down to find the Repair and Reset options. Click on «Repair» followed by «Reset» to clear the cache and restore the application as if it were freshly installed from the Microsoft Store. Keep in mind that this process may require you to log back into your Microsoft account.
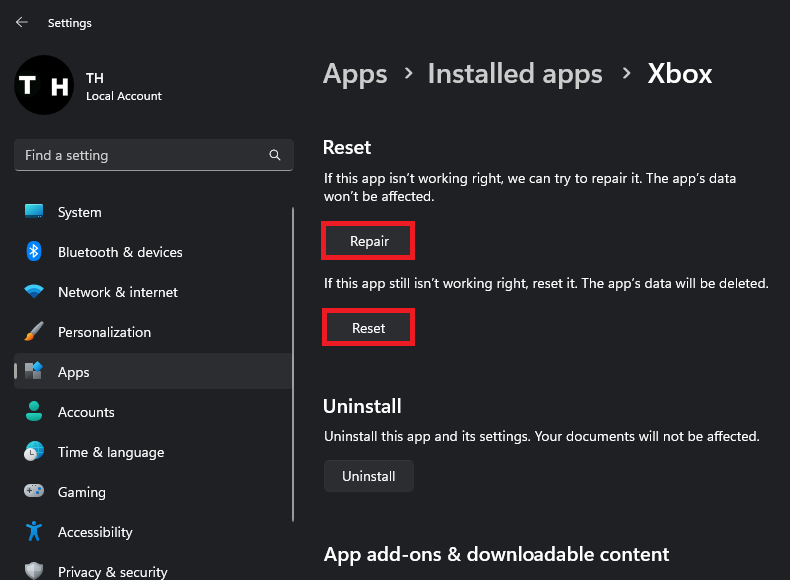
Repair and Reset the Xbox App
Deactivate VPN Connection
In case the Xbox app still fails to open, ensure that you disable any active VPN connections. VPNs can conceal your connection, potentially obstructing the successful launch of certain apps on your PC, including the Xbox app.

Windows Settings > Network & Internet > VPN
Configure System Time Automatically
Finally, ensure your Windows PC’s date and time settings are configured automatically. Navigate to the Time & Language settings, select Date & Time, and confirm that the «Set time automatically» option is enabled. This can help resolve various app-related issues, including those with the Xbox app.
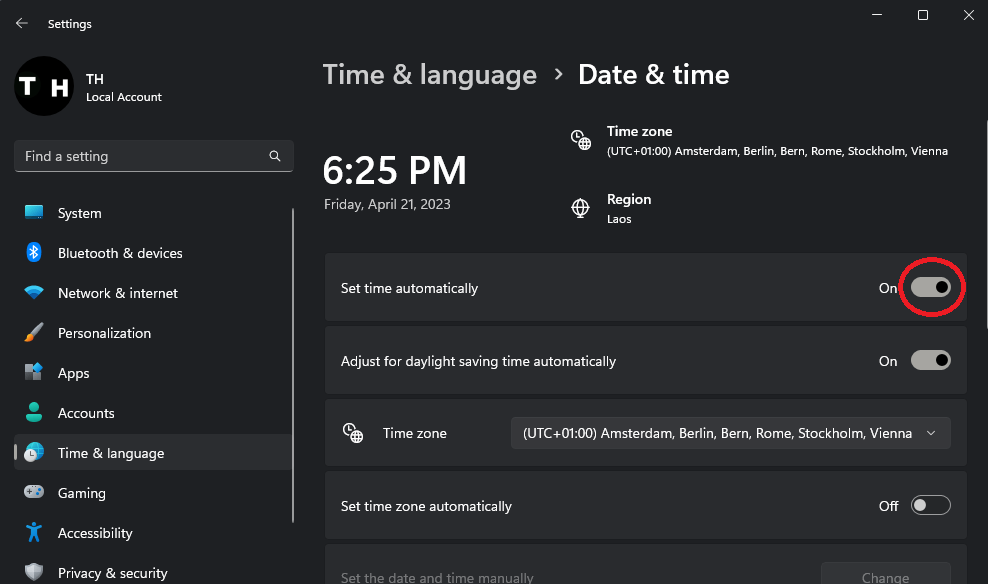
Windows Settings > Time & Language > Date & Time
-
The Xbox app might not open due to various reasons, such as corrupted app files, VPN interference, incorrect date and time settings, or even Xbox Live server issues. Follow our troubleshooting guide to resolve these issues and get your Xbox app working again.
-
Visit the Xbox Status page to check if the Xbox Live servers are experiencing any issues or outages. If the «Account & Profile» services are affected, you may have to wait until the issue is resolved.
-
To repair the Xbox app files, go to your Windows settings, click on Apps, locate the Xbox app, and select «Advanced Options.» Scroll down and click on «Repair» followed by «Reset» to clear the cache and fix any corrupted files.
-
Disabling your VPN connection might help, as VPNs can mask your connection and interfere with the proper launching of some apps, including the Xbox app. If you’re using a VPN, try disabling it and see if the app opens.
-
To set the system time automatically, navigate to your Time & Language settings, select Date & Time, and enable the «Set time automatically» option. This can help resolve app-related issues, such as the Xbox app not opening.