
Skip to content
It is now possible to change Default Terminal Application in Windows 10. The appropriate option is available starting in build 21390 and Windows Terminal 1.9, which can now be set as the default host for console apps in Windows.
The default console host is the application that handles execution of any command line application such as PowerShell, command prompt, etc. They will work inside the specified terminal emulator session by default.
For example, if you select Windows Terminal, PowerShell and command prompt will run sessions will always run inside Windows Terminal.
However, if you select Windows Console Host, this will restore the classic behavior of Windows, and you will have PowerShell, command prompt, WSL, and other console apps running in their own PowerShell and command prompt window.
This post will show you how to change the default terminal app to Windows Console Host or Windows Terminal on Windows 10. This can be done either in command prompt properties or in Windows Terminal settings.
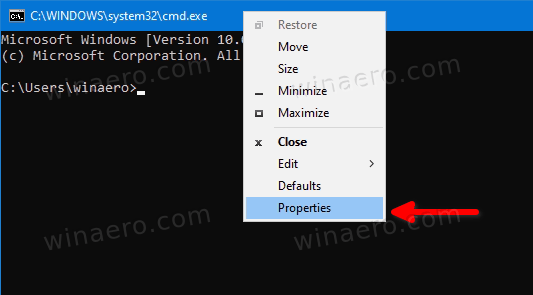
- Open a new Command Prompt or PowerShell window.
- Right-click the title bar and select Properties from the menu.

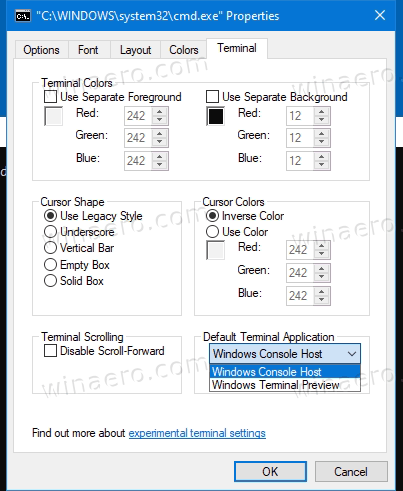
- Switch to the Terminal tab in the Properties dialog.
- Under Default Terminal Application, select either Windows Console Host or Windows Terminal.

- Click OK to apply the change.
You are done.
Note that if the option will not be available if you have already set the default terminal application to Windows Terminal. In this case, you will need to use the following method instead.
Set Default Terminal app in Windows Terminal Settings
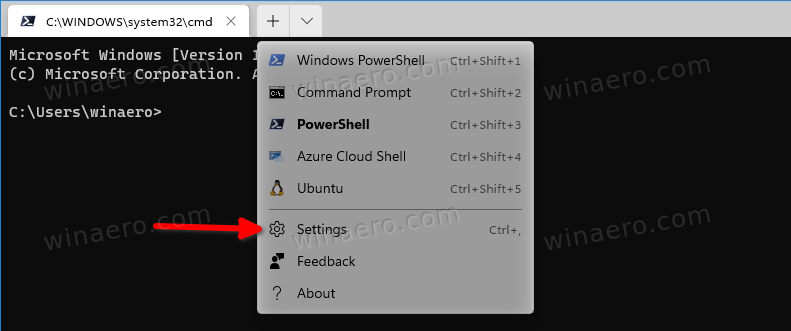
- Open the Windows Terminal app.
- Click on the down arrow icon next to the New tab button.
- Now, select Settings from the menu.

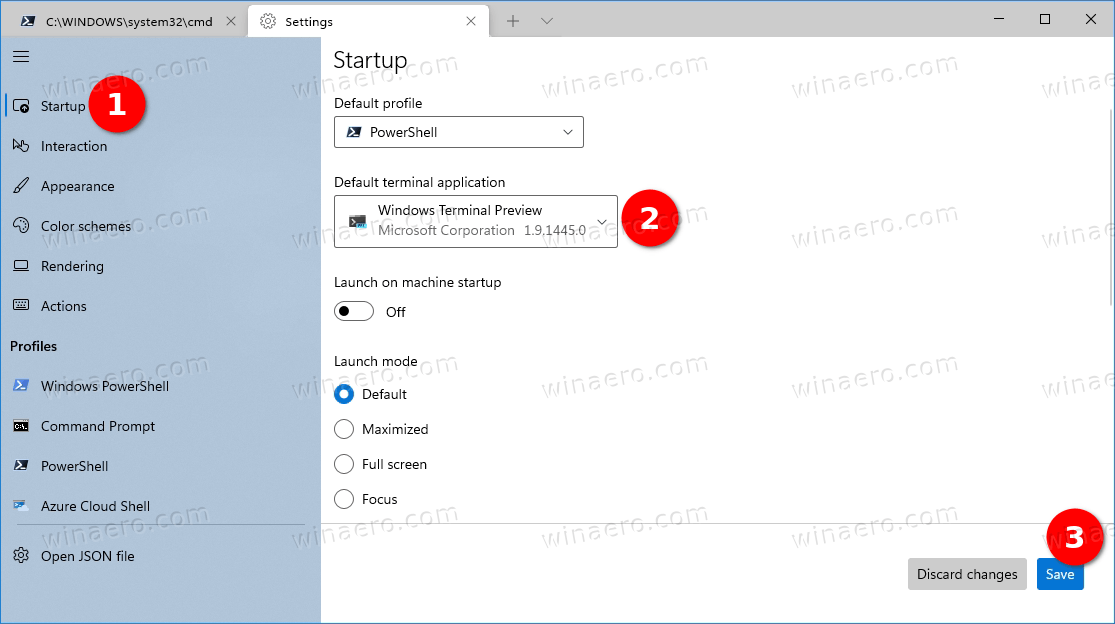
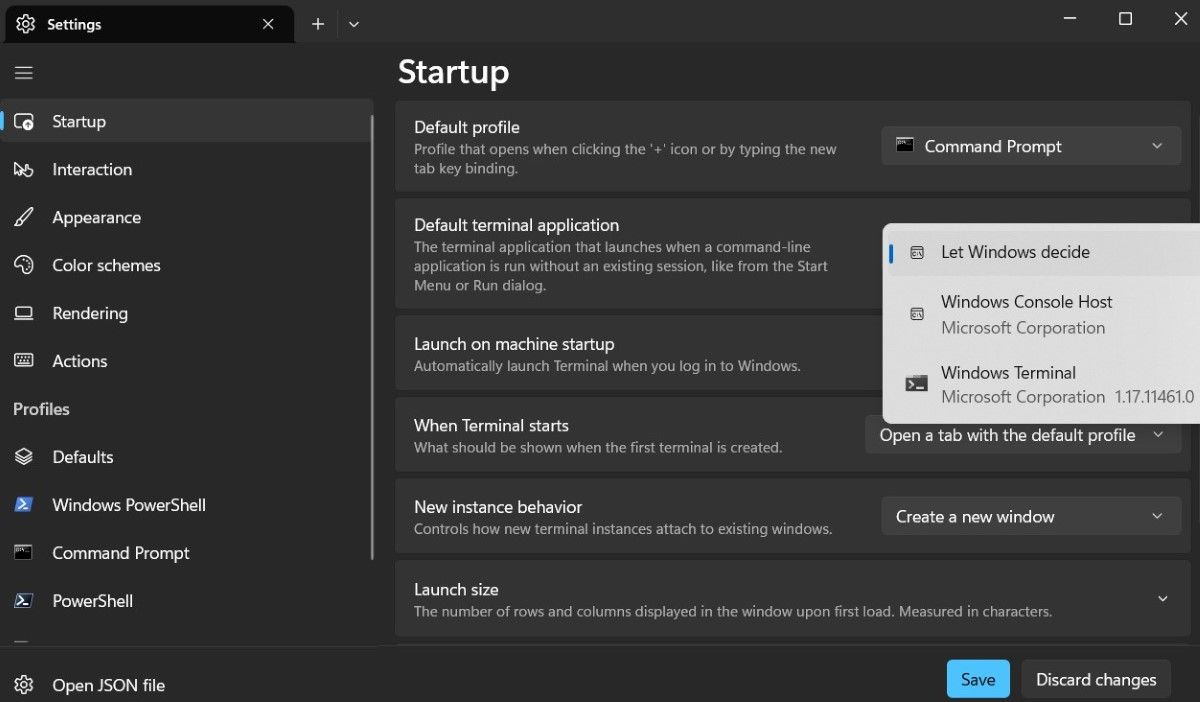
- Click on the Startup section on the left.
- On the right, select Windows Console Host or Windows Terminal for what you want in the Default Terminal Application drop-down list.

- Finally, click on the Save button to apply the changes.
That’s it.
Support us
Winaero greatly relies on your support. You can help the site keep bringing you interesting and useful content and software by using these options:
If you like this article, please share it using the buttons below. It won’t take a lot from you, but it will help us grow. Thanks for your support!
If you are a technology enthusiast who loves customizing Windows 10, you might have heard about the Windows Terminal. Microsoft introduced it as an open-source command-line tool to replace the default Command Prompt. Windows Terminal is a modern and customizable tool that allows users to run multiple command-line utilities in tabs and split panes. With Windows Terminal, you can easily customize the fonts, themes, and background images, amongst others.
However, some users may not know that the Windows Terminal is not the default terminal app when opening links with the “Open command window here” option. The good news is, it is possible to configure the Windows Terminal as the default terminal in Windows 10 so that it automatically opens when using the “Open command window here” option.
In this article, we’ll show you different methods to set Windows Terminal as the default terminal in Windows 10. We’ll also cover the potential issues you may face, and recommend some solutions to fix them.
Video Tutorial:
What’s Needed
Before we begin, you’ll need to ensure that you have the Windows Terminal app installed on your Windows 10 computer. You can download it from the Microsoft Store or through the official Windows Terminal GitHub repository. Additionally, you may need administrative privileges to modify the Windows Registry and access some of the commands.
What Requires Your Focus?
To set Windows Terminal as the default terminal app, you will need to pay attention to the following:
– Understanding the risks involved in modifying the Windows Registry
– Knowing the different methods available to change the default terminal
– Following the steps carefully to avoid making mistakes that could damage your system
Different Methods to Set Windows Terminal as Default Terminal
Here are some methods you can use to set Windows Terminal as the default terminal app on your Windows 10 PC.
Method 1: Using Open with Command Prompt
This is the easiest method to set Windows Terminal as the default terminal in Windows 10. Here’s how:
1. Open File Explorer and navigate to the directory where you want to open Command Prompt.
2. Hold down the Shift key and right-click on the folder or file.
3. Select “Open with” and then click “Windows Terminal”.
Pros:
– Easy and straightforward
– No need to access the Windows Registry
Cons:
– Not ideal for setting Windows Terminal as the default terminal globally
Method 2: Changing the Default Property in Shortcut
You can also set Windows Terminal as the default terminal by modifying the properties of the Command Prompt shortcut. Here’s how:
1. Locate the Command Prompt shortcut in your Start menu.
2. Right-click on the Command Prompt shortcut and select “Properties”.
3. In the “Target” field, change the path from “cmd.exe” to “wt.exe”.
4. Click “OK” to save the changes.
Pros:
– Allows you to set Windows Terminal as the default terminal globally
– Easy to change and revert if necessary
Cons:
– Any modifications here will only apply to the Command Prompt shortcut
Method 3: Accessing Windows Registry
For advanced users, you can set Windows Terminal as the default terminal app by accessing the Windows Registry. Here’s how:
1. Press “Windows Key + R” to open the Run dialog box.
2. Type “regedit” in the field and click “OK”.
3. Navigate to HKEY_LOCAL_MACHINE\SOFTWARE\Microsoft\Command Processor
4. Right-click and create a new string value named “Autorun”.
5. Set the value data to “%USERPROFILE%\AppData\Local\Microsoft\WindowsApps\wt.exe”.
6. Restart your computer.
Pros:
– Globally modifies the default terminal settings
– Allows for granular customization of default settings
Cons:
– Risk of damaging your registry if not done properly
– Advanced knowledge required
Sometimes, users may encounter difficulties setting Windows Terminal as the default terminal app. Here are some potential reasons why and how to fix them:
1. The Windows Terminal app is not installed on your computer. Download and install it before proceeding.
2. Another terminal app is set as the default. Check your default apps settings in “Settings > Apps > Default apps > Choose default apps by file type” and change the default app to Windows Terminal.
3. Your Windows Registry settings may not be allowing for the changes. You can run the Registry Editor as an administrator and try again.
4. You may have a corrupted user profile. Create a new user profile and try to set Windows Terminal as the default terminal app there.
Implications and Recommendations
Setting Windows Terminal as the default terminal app on your Windows 10 computer can have several implications. For instance, it can help you increase efficiency and productivity when working with the command-line interface. However, if done improperly, making changes in the Windows Registry or command lines can damage your system or cause irreversible effects.
Therefore, we recommend that you only make these changes if deemed necessary. Additionally, we recommend backing up your Windows Registry before making any changes to avoid losing essential data.
5 FAQs About Setting Windows Terminal as Default Terminal
Q1: How do I open Windows Terminal as an administrator?
A: To open Windows Terminal as an administrator, click on the “Start” menu, type “Windows Terminal” in the search bar, right-click on the app icon and select “Run as administrator”.
Q2: Can I customize Windows Terminal’s appearance?
A: Yes, Windows Terminal is highly customizable. You can change the background image, font size and style, opacity, and more. Check out the official documentation for more information.
Q3: Can I change the default terminal app using PowerShell?
A: Yes, you can use PowerShell to change the default terminal app. Run PowerShell as an administrator and type the following command: “New-ItemProperty -Path HKLM:\SOFTWARE\Microsoft\Command Processor -Name Autorun -Value ‘%USERPROFILE%\AppData\Local\Microsoft\WindowsApps\wt.exe’ -Force”. This should set Windows Terminal as the default terminal app.
Q4: What is the difference between Windows Terminal and Command Prompt?
A: Windows Terminal is a modern command-line tool from Microsoft that allows users to run multiple command-line utilities in tabs and split panes. It also allows for deeper customization of the command-line interface. Command Prompt is the default command-line interface on Windows.
Q5: How do I revert the changes I made to the Windows Registry?
A: To revert the changes you made to the Windows Registry, open the Registry Editor, navigate to the registry key you created, right-click on it and select “Delete”. Alternatively, you can change the value data to “cmd.exe” to set Command Prompt as the default terminal app.
In Conclusion
Setting Windows Terminal as the default terminal app in Windows 10 can be easily achieved using different methods. Whether you choose to modify the Command Prompt shortcut or access the Windows Registry, be sure to have administrative privileges and follow the steps carefully to avoid causing damage to your system. Remember, customization and efficiency come with responsibility, so always be cautious when making changes to your computer’s settings.
- Windows Terminal can be the default app for launching PowerShell and Command Prompt from Windows Terminal > General and changing the “Default terminal application” setting.
- On Windows 11, you can also open Settings > System > For Developers and choose “Windows Terminal” in the “Terminal” setting.
- On Windows 10, open Settings > Update & Security > For Developers and choose “Windows Terminal” in the “Terminal” setting.
- It’s also possible to change the default profile through the JSON settings file for the Windows Terminal.
- Finally, you can change the default settings from the Windows Console Host’s “Terminal” tab.
On Windows 11 (and 10), you can now open Command Prompt, PowerShell, and WSL directly into the Windows Terminal app instead of the legacy Windows Console, and in this guide, I will teach you how.
Although the system automatically makes the Windows Terminal the default command-line experience, you can change this behavior manually in case your setup still defaults to the Windows Console or you want to set another version of the terminal as the default. (I personally use the “Windows Terminal Preview” as my default experience.)
In this guide, I will teach you how to make the Windows Terminal experience the default application on Windows.
- Set Terminal default console on Windows from Terminal
- Set Terminal default console on Windows 11 from Settings
- Set Terminal default console on Windows 10 from Settings
- Set Terminal default console on Windows from JSON file
- Set Terminal default console on Windows from Console
Set Terminal default console on Windows from Terminal
To open Command Prompt, PowerShell, or WSL with the Windows Terminal app by default, use these steps:
-
Open Start on Windows 11 (or 10).
-
Search for Windows Terminal and click the top result to open the app.
-
Click the menu (down-arrow) button and select the Settings option.
-
Click on Startup.
-
Use the “Default terminal application” setting and select the Windows Terminal option.

-
(Optional) Choose the Command Prompt option in the “Default profile” setting.
-
Click the Save button.

Once you complete the steps, the next time you open Command Prompt or PowerShell, the command-line tool will open on Windows Terminal instead of the legacy Windows Console Host.
Set Terminal default console on Windows 11 from Settings
To configure the Windows Terminal as the system default, use these steps:
-
Open Settings (Windows key + I).
-
Click on System.
-
Click the For developers page.
-
Choose the Windows Terminal option from the “Terminal” setting.

Quick note: You can also make the preview version of the terminal your default experience, and you can use this setting to revert the default setting to the Windows Console.

After you complete the steps, launching Command Prompt, PowerShell, or another command-line tool will open in the terminal by default.
Set Terminal default console on Windows 10 from Settings
To make the Windows Terminal the default experience on Windows 10, use these steps:
-
Open Settings (Windows key + I).
-
Click on Updated & Security.
-
Click on For developers.
-
Choose the Windows Terminal option from the “Terminal” setting.


Once you complete the steps, Windows 10 will now use the Windows Terminal as the default command-line console experience.
Set Terminal default console on Windows from JSON file
To open Command Prompt, PowerShell, or WSL with the Windows Terminal app by default, use these steps:
-
Open Start on Windows 11 (or 10).
-
Search for Windows Terminal and click the top result to open the app.
-
Click the menu (down-arrow) button and select the Settings option.
-
Click the “Open JSON file” button from the bottom-left corner.

-
Select, right-click, and copy the “guid” for for the console you want to open by default.

-
At the top of the files, replace the current “guid” in the “defaultProfile” field.

-
Click the File menu and choose the Save option.


Once you complete the steps, restart the Windows Terminal, and the console you selected should start by default.
Set Terminal default console on Windows from Console
Alternatively, you can always enable the feature within the Windows Console Host with these steps:
-
Open Start.
-
Search for Command Prompt or PowerShell and click the top result to open the app.
-
Right-click the title bar and select the Defaults option.

-
Click the Terminal tab.
-
Select the Windows Terminal option under the “Default Terminal Application” section.
-
Click the OK button.

Once you complete the steps, the apps will launch automatically using the Windows Terminal application.
Update July 12, 2024: This guide has been updated to ensure accuracy and reflect changes to the process.
Sign in to your MUO account

If you find the default terminal emulator on your Windows PC—Windows Console Host—to be too basic and lacking in features, there are a few good alternatives. These alternative apps, like Windows Terminal, offer several advanced features like tabs, profiles, the ability to open multiple windows, and more.
Setting a terminal as the default app for Command Prompt and PowerShell is fairly straightforward. Here are some methods you can use to make the switch.
1. How to Change the Default Terminal App via Windows Terminal’s Settings
The most straightforward way to change the default command-line interface on your Windows computer is by using Windows Terminal’s settings menu. Here are the steps you can follow.
- Press Win + S to open the search menu.
- Type Terminal in the search box and press Enter (see how to open the Windows Terminal for more methods).
- Click the down-arrow icon at the top and select Settings from the resulting menu.
- Use the drop-down menu next to Default terminal application to select your chosen terminal from the list.
- Optionally, you can set the Default profile that opens when you launch the Terminal app.
-
Click the Save button at the bottom.

If you want to undo the above changes later, simply repeat the above steps and select Windows console host or Let Windows decide in the Default terminal application drop-down menu.
Alternatively, you can also reset the Terminal app on your PC. If you are interested in doing that, check our guide on how to reset the Windows Terminal settings to their defaults in Windows.
2. How to Change the Default Terminal App Using Windows Console Host Properties
Another way to change the default terminal app on your Windows 10 or 11 PC is via the Windows Console Host properties. Here are the steps for the same.
- Click the magnifying icon on the taskbar to access the search menu.
- Type in command prompt or powershell in the search box and select the first result that appears.
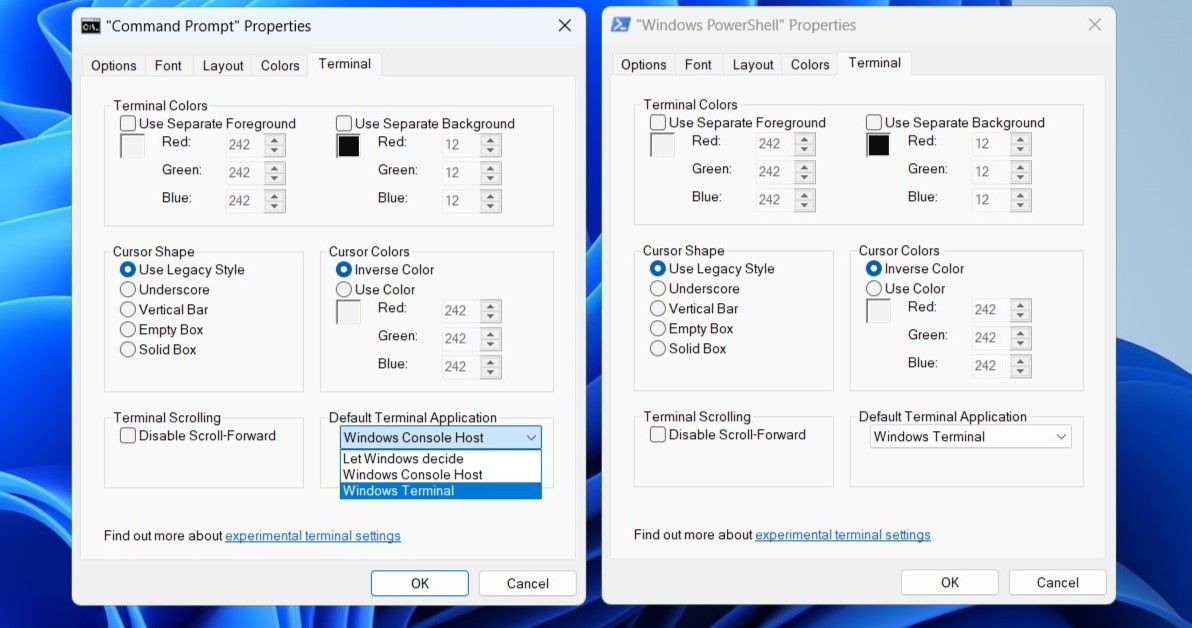
- Right-click on the title bar of the Command Prompt or PowerShell window and select Properties.
- In the “Command Prompt” Properties or “Windows PowerShell” Properties window that appears, switch to the Terminal tab.
- Click the drop-down menu under Default Terminal Application to select your favorite terminal app, or Let Windows decide to revert the option to its default.
-
Click the OK button to save your changes.

3. How to Change the Default Terminal App From Windows Settings
The Settings app makes it easy to set or change the default apps on your Windows computer. Here’s how you can use it to set your chosen terminal as the default app for Command Prompt and PowerShell.
- Open the Start menu and click the gear-shaped icon or use the Win + I keyboard shortcut to launch the Settings app.
- Select the Privacy & security tab from the left pane.
- Under the Security section, click the For developers option.
-
Use the drop-down menu next to Terminal to select your chosen terminal app, or choose Let Windows decide to undo any changes you’ve made previously.


Once you complete the above steps, both Command Prompt and PowerShell will launch in the chosen app.
Changing the Default Terminal App Is Easy
If you frequently use command-line tools, it makes sense to switch to a better terminal app. As we just saw, the process is not too difficult as long as you follow the steps mentioned above.
If you have set Windows Terminal as your default terminal app for Command Prompt and PowerShell, now is a good time to learn some Windows Terminal tips, tricks, and shortcuts to improve your experience.
Windows 11 with default settings launch all command lines tools in classic Windows Console Environment a.k.a Windows Host Console. Fortunately, it is possible for users to set Windows Terminal default Terminal app in Windows 11.
You might be wondering why to switch from Windows Host Console to Windows Terminal, right? Here’s a answer.
After making Windows Host Console default terminal app in Windows 11 whenever you launch Command Prompt and PowerShell, it opens in a separate window as a result you end up with multiple active windows on the desktop.
On the other hand, Windows Terminal app is a fast, efficient, modern, productive and powerful terminal app command-line tools (DISM, SFC) and shells like PowerShell, Command Prompt, and WSL. Its multiple tabs view feature make it easier for users to manage various command line tools at a same time.
Apart from that, you can run Command Prompt and Windows PowerShell sidewise. It also offer other features like support for UTF-8 and Unicode character, GPU accelerated text rendering engine, styles, configuration, and custom themes.
We all know that these features will never make it to Windows Console Host app and as result left know choice, but set Windows Terminal as default terminal app in Windows 11
If this sound interesting to you and would like to switch from Windows Console Host to Windows Terminal in Windows 11, then in this blog post we will cover all possible ways on how to do that:
Change Default Terminal app using Settings app
Open the Settings app on Windows 11 by pressing the Windows + I key combo.
Head to the Privacy & Security tab in the left sidebar of the Settings app, and then on the right side, click on For Developers.

Click on the drop-down menu under the Terminal section, and then select Windows Terminal.

Instantly, Windows Terminal will be set as default terminal app in Windows 11. Head over to this section to learn how to set CMD as default profile for Windows Termina.
Change Default Terminal app using Windows Terminal app
Press the Windows + X key combo and then from the menu that opens up, click on Windows Terminal (Admin).

When UAC dialog box appear, click Yes to continue.

In the Windows Terminal app, you need to click on the Down arrow icon and then from the menu select Settings.

Here using the Default Terminal application drop-down select Windows Terminal.
Once done, click on Save to apply the changes.
Change Default Terminal apps using Command Prompt Properties
Press the Windows key to open the Start Menu. In the Start Menu, search for CMD and then click on Command Prompt from the search result to open the Command Prompt.

Now, right-click on the title bar on the Command Prompt, and then from the menu that opens up, click on Properties.

Head to the Terminal tab in the Properties window. Here, click on the drop-down menu under the Default Terminal Application and then select any of the options given there.

After doing so, click on OK to save the changes you have made.
Change Default Profile for Windows Terminal app in Windows 11
After changing default terminal to Windows Terminal in Windows 11, out of the box Windows PowerShell is set as a default profile for it. What that mean is, whenever you launch Windows Terminal app, it will launch Windows PowerShell to get started.
Although, you can quickly launch Command Prompt in Windows Terminal, it is also possible to set Command Prompt as default shell or open up whenever you launch Windows Terminal.
If you want learn the steps, then here’s how you can do that:
In Windows Terminal windows, you need to click on the down arrow icon and select Settings to launch Windows Terminal settings.

Here, using default profile drop-down select Command Prompt from the list and you’re done.
So these were the three different methods to set Windows terminal as default terminal app in Windows 11.
Which method you’re doing to use? Are you going to switch from Windows Console Host to Windows Terminal? Let us know in the comments.
Viney Dhiman, the mind behind GeekerMag, is a seasoned content writer with over 12 years of experience. Specializing in simplifying complex tech concepts, he covers Windows OS, Android, iOS, web apps, and product reviews. His work can be found on popular tech websites like Gizmodo and The Verge, and he has been interviewed by the Microsoft Edge team.