
Table of Contents:
For the most part, Windows 11 and Windows 10 manage system resources very well, but there are certain instances where users are left wondering why their Windows performance is bad. This issue comes up, especially when the computer has a weak processor and an app is particularly intensive. Thankfully, a Task Manager feature that lets you set CPU affinity so you can claw back some resources from other apps.
To be clear, when you set processor affinity in Windows 10, you won’t always notice a substantial difference. It all depends on if resources are being used by other apps on your system, whether your PC meets the recommended specs and various other factors. However, knowing how to use the feature to assign certain CPU cores to specific applications can be very useful in some scenarios.
Additionally, some have success in modifying their processor affinity for gaming. Some very old games, for example, try to spread a single-core workload across a multi-core processor, which can lead to a crash. Manually assigning the application to a single thread solves this. Conversely, those getting lag on Discord or other VoIP applications while playing an intensive game can assign only a portion of their cores to the game to ensure their system has enough resources to handle both at once.
In this tutorial, we’ll be covering how to set CPU/processor affinity for individual apps, as well as how to change the CPU priority to prefer foreground apps.
How to Set CPU Affinity for a Specific App
In most cases, it will be enough to set processor affinity for a specific app that you’d like to have some more resources. When looking at the set affinity in Task Manager, bear in mind that the CPU numbers displayed are core/logical cores. This means you may see 6 on a 4 core processor, or 12 on a 6 core Ryzen 2600, for example. For the most part, all you need to consider is the ratio available of cores your program is getting, not which ones.
⚠️ Please note: The process described below is the same in Windows 11 as it is in Windows 10. However, bear in mind that we’ll be using screenshots from Windows 10, so your UI may look a little different. We’ll point out any changes you need to be aware of as they come up.
- Open Task Manager
Press the Windows key and type “Task Manager”, clicking the first result, or press “Ctrl + Shift + Esc”.

- Click “More details”
Depending on whether you’ve opened Task Manager before, you may not have to do this.

- Right-click the app you want to modify and click “Go to details”

- Right-click the app in the “Details” window and choose “Set affinity”
- Select the cores/logical cores you’d like to assign to the program


How to Change CPU Priority to Prefer Windows Background Apps or Programs
As well as designating CPU cores for each application, you can change the way Windows 11 and 10 schedules CPU resources generally. This takes two forms: a focus on programs or a focus on background apps, with the former being the default.
- Open System Properties
Press “Windows + R” to open Run and type “sysdm.cpl” and press “Enter”.

- Go to the “Advanced” tab of System Properties
While there, look under the “Performance” tab for “Settings”.

- In Performance Options, change your CPU affinity scheduling to “Programs” or “Background services”
Once you’re done, press “OK”.


How to Set CPU Affinity Using PowerShell
-
Open PowerShell:
- Right-click on the Start menu and select “Windows PowerShell (Admin)” to run PowerShell with administrative privileges.
-
Find the Process ID (PID):
- First, you need to find the Process ID (PID) of the application for which you want to set the CPU affinity. Type
Get-Processto list all running processes along with their PIDs.
- First, you need to find the Process ID (PID) of the application for which you want to set the CPU affinity. Type
-
Set CPU Affinity:
- Use the
ProcessAffinityproperty to set the CPU affinity. The affinity is set using a bitmask, where each bit represents a CPU core. For example, to set an application to use only the first core, use 1 (binary 0001), for the first two cores use 3 (binary 0011), and so on. - The command format is:
(Get-Process -Id PID).ProcessorAffinity = AFFINITY_VALUE - For example, to set the affinity of a process with PID 1234 to use the first two cores, the command is:
(Get-Process -Id 1234).ProcessorAffinity = 3
- Use the
- Administrator Privileges: You need administrator privileges to change the CPU affinity of a process.
- Understanding Bitmask: Each bit in the bitmask represents a CPU core. The rightmost bit is the first core, the next bit to the left is the second core, and so on.
- Temporary Change: These changes are temporary and only apply until the application is closed or the computer is restarted.
Remember, incorrectly setting CPU affinity can lead to system instability or degraded performance, so use these commands carefully.
How to Set CPU Affinity Using Command Prompt
-
Open Command Prompt:
- Search for “cmd” in the Start menu, right-click on “Command Prompt” and select “Run as administrator”.
-
Use the Windows Management Instrumentation Command-line (WMIC):
- WMIC allows more direct control but is a bit more complex. The command format is:
wmic process where processid="PID" CALL setpriority "AFFINITY_VALUE"
- WMIC allows more direct control but is a bit more complex. The command format is:
-
Example:
- To set the affinity for a process with PID 1234 to use only the first two cores, the command is:
wmic process where processid="1234" CALL setaffinity "3"
- To set the affinity for a process with PID 1234 to use only the first two cores, the command is:
- Administrator Privileges: You need administrator privileges to change the CPU affinity of a process.
- Understanding Bitmask: Each bit in the bitmask represents a CPU core. The rightmost bit is the first core, the next bit to the left is the second core, and so on.
- Temporary Change: These changes are temporary and only apply until the application is closed or the computer is restarted.
Remember, incorrectly setting CPU affinity can lead to system instability or degraded performance, so use these commands carefully.
FAQ on CPU Affinity and Priority Settings
Can setting CPU affinity improve performance for gaming?
Yes, particularly for older games not optimized for multi-core processors. Assigning these games to a single core can prevent crashes and improve performance.
What is the difference between CPU affinity and CPU priority?
CPU affinity determines which cores an application can use, while CPU priority decides the amount of CPU time allocated to an application.
Is it better to set CPU affinity for individual apps or change overall CPU priority?
It depends on your needs. Setting affinity is useful for specific apps, especially if they are resource-intensive, while changing CPU priority affects how the system allocates resources to all applications.
Does setting CPU affinity affect all users on the computer?
No, CPU affinity settings apply only to the specific instance of the application and need to be set each time the application is run.
Can setting CPU affinity harm my computer?
No, it won’t harm your computer, but improper configuration may lead to suboptimal performance of applications.
What are Prefetch and SuperFetch in Windows 10 and 11?
Prefetch and SuperFetch are features that accelerate startup for frequently used applications by preloading data into memory.
How do I know which CPU cores to assign to an application?
You don’t need to select specific cores; focus on the ratio of cores allocated to the program, considering the total number of cores your processor has.
Can I set CPU affinity for background services?
While CPU affinity is typically set for applications, CPU priority settings can influence how resources are allocated to background services.
What should I do if setting CPU affinity doesn’t improve performance?
If there’s no noticeable improvement, try resetting the affinity to its default state or adjusting CPU priority settings.
Is setting CPU affinity useful for all types of applications?
It’s most beneficial for CPU-intensive applications or older programs not optimized for multi-core processors.
How does setting CPU affinity interact with multi-core processors?
It allows you to control how an application uses the multiple cores, which can be crucial for performance in multi-core environments.
Can I set CPU affinity from the command line?
Yes, you can use command-line tools like Windows PowerShell to set affinity, though this method is more advanced and not covered in the tutorial.
Related: How to Disable/Enable Prefetch and Superfetch in Windows
Last Updated on January 12, 2025 3:19 pm CET
Ryan Maskellhttps://ryanmaskell.co.uk
Ryan has had a passion for gaming and technology since early childhood. Fusing the skills from his Creative Writing and Publishing degree with profound technical knowledge, he enjoys covering news about Microsoft. As an avid writer, he is also working on his debut novel.
Setting Processor Affinity in Windows 10
Setting processor affinity in Windows 10 can help optimize the performance of certain applications by assigning specific CPU cores to handle their tasks. This can be particularly helpful for resource-heavy programs or when running multiple applications simultaneously. Follow the steps below to configure your processor affinity settings in Windows 10.
How to Set Processor Affinity in Windows 10
We’ll walk you through setting processor affinity for a specific application using the Task Manager. This involves selecting which CPU cores an application can use, which can help improve performance or troubleshoot issues.
Step 1: Open Task Manager
Press Ctrl+Shift+Esc to open Task Manager.
This is the quickest way to access Task Manager, but you can also right-click the taskbar and select «Task Manager» from the context menu.
Step 2: Go to the «Details» Tab
Click on the «Details» tab in Task Manager.
The «Details» tab shows a more detailed view of running processes, including their memory and CPU usage.
Step 3: Find Your Application
Locate the application process for which you want to set affinity.
You can sort the processes by name, CPU usage, or memory usage to find your application more easily.
Step 4: Right-Click the Process
Right-click on the process and select «Set affinity.»
This will open a new window where you can configure which CPU cores the application is allowed to use.
Step 5: Select CPU Cores
Check or uncheck the CPU cores you want the application to use, then click «OK.»
Each checkbox represents a CPU core, and you can select one or multiple cores based on your needs.
Step 6: Close Task Manager
Close Task Manager to apply the changes.
Your settings will take effect immediately, optimizing the application’s performance based on your configuration.
After completing these steps, the application will use the specific CPU cores you selected, potentially improving its performance and your system’s overall efficiency.
Tips for Setting Processor Affinity in Windows 10
- Know Your Application: Some applications benefit greatly from CPU affinity settings, while others may not. Research your application’s requirements before making changes.
- Monitor Performance: After setting affinity, monitor the application’s performance to see if there are any improvements.
- Use with Caution: Setting affinity incorrectly can lead to performance issues or system instability, so use this feature judiciously.
- Revert Changes if Needed: If you notice any negative impact, you can always revert the changes by unchecking and rechecking the CPU cores.
- Use for Troubleshooting: If an application is behaving unexpectedly, setting affinity can sometimes help identify CPU-related issues.
Frequently Asked Questions about Setting Processor Affinity in Windows 10
What is processor affinity?
Processor affinity allows you to assign specific CPU cores to a particular application, potentially improving its performance by reducing the load on other cores.
Can setting affinity improve gaming performance?
In some cases, yes. Assigning a game to specific CPU cores can free up other cores for system processes, leading to smoother gameplay.
Will my changes persist after a restart?
No, changes made through Task Manager are temporary and will reset after a system restart. You’d need to set affinity again if needed.
Is it safe to set processor affinity?
Yes, but be cautious. Incorrect settings can cause system instability or reduced performance. Always monitor the system after making changes.
Can I set affinity for multiple applications?
Yes, you can set affinity for as many applications as you need. Just repeat the steps for each application.
Summary
- Open Task Manager
- Go to the «Details» Tab
- Find Your Application
- Right-Click the Process
- Select CPU Cores
- Close Task Manager
Conclusion
Setting processor affinity in Windows 10 can be a useful tool for optimizing the performance of certain applications. By assigning specific CPU cores to handle an application’s tasks, you can ensure that your system runs more smoothly, especially when dealing with resource-intensive programs.
While setting processor affinity can offer performance boosts, it’s important to use this feature wisely. Not all applications will benefit, and incorrect settings could lead to issues. Always monitor your system’s performance after making changes and be ready to revert if necessary.
For those looking to delve deeper, Microsoft’s documentation and various tech forums can offer more insights into advanced settings and troubleshooting. So, the next time your system feels sluggish, consider tweaking the processor affinity settings—it might just be the boost you need.
Matt Jacobs has been working as an IT consultant for small businesses since receiving his Master’s degree in 2003. While he still does some consulting work, his primary focus now is on creating technology support content for SupportYourTech.com.
His work can be found on many websites and focuses on topics such as Microsoft Office, Apple devices, Android devices, Photoshop, and more.
Set CPU Affinity in Windows 10: A Comprehensive Guide
In the world of computing, efficiency and performance can often hinge on how resources are allocated. One critical aspect of resource management in operating systems like Windows 10 is CPU affinity. This concept allows users to define how specific processes interact with the processors (or cores) of a computer, leading to optimized performance for certain applications. In this article, we will explore the importance of CPU affinity, how to set it in Windows 10, and its implications for both average users and advanced professionals.
Understanding CPU Affinity
What is CPU Affinity?
CPU affinity, also known as processor affinity, refers to the assignment of a process or thread to run on a specific CPU core or set of cores. By default, the Windows operating system manages CPU scheduling dynamically, meaning it decides which core will run which process based on numerous factors. However, setting CPU affinity allows the user or system administrators to explicitly designate which cores to use for particular processes.
Why Use CPU Affinity?
-
Enhanced Performance: By running specific processes on designated CPU cores, users can minimize context switching and improve cache memory efficiency. This can be particularly beneficial for high-performance applications such as video editing software, game engines, or database management systems.
-
Resource Management: In multi-core systems, setting affinity can help balance the load across the CPU cores, preventing any single core from becoming a bottleneck.
-
System Stability: In some scenarios, certain applications may behave better when confined to specific cores, such as legacy programs or software known to have compatibility issues with newer hardware architectures.
-
Testing and Analysis: Developers and performance testers often use CPU affinity to analyze the performance characteristics of their software in a controlled environment.
Using Task Manager
One of the most user-friendly ways to set CPU affinity is through the built-in Windows Task Manager. Here’s a step-by-step guide on how to do this:
-
Open Task Manager: Right-click on the Taskbar and select «Task Manager,» or press Ctrl + Shift + Esc.
-
Locate the Process: Click on the «Details» tab to view all running processes. Find the process for which you want to set CPU affinity.
-
Set CPU Affinity:
- Right-click on the desired process and select «Set affinity.»
- A dialog box will appear showing the available CPU cores.
- Check or uncheck the boxes next to the CPU cores you want the process to utilize.
- Click «OK» to apply the changes.
-
Confirm the Changes: Once you set affinity, the process will run using only the designated cores. You can verify this by checking the «Affinity» column in Task Manager.
Using Command Prompt
For users who prefer the command line or need to automate tasks, setting CPU affinity via the Command Prompt is another option. Here’s how to do it:
-
Open Command Prompt: Search for «cmd» in the start menu, right-click, and select «Run as administrator.»
-
Identify the Process ID (PID): You will need the PID to set affinity. You can find this in Task Manager under the «Details» tab.
-
Use the
startcommand: Enter the following command to set affinity:start /affinity- The “ represents which cores to assign to the process. Each bit in the mask corresponds to a CPU core, starting with the least significant bit (right) at core 0.
- For example, if you want to set affinity to cores 0 and 1, the mask would be
3(binary11). - Replace “ with the name of your executable. For instance:
start /affinity 3 notepad.exe
Using PowerShell
PowerShell offers another powerful method to set CPU affinity, which can be particularly useful for administrators managing multiple tasks. Here’s how:
-
Open PowerShell: Search for “PowerShell” in the start menu and right-click to run as administrator.
-
Use the
Get-ProcessandSet-Processcmdlets:$process = Get-Process -Name "" $process.ProcessorAffinity =- Replace
with your specific process andwith the decimal representation of the cores you want to allocate. For example, to set affinity for cores 0 and 1:$process.ProcessorAffinity = 3
- Replace
Using Software Tools
For users who want a more visual interface or need to set CPU affinity for multiple processes regularly, various third-party tools can facilitate this process. Options like Process Lasso allow users to programmatically manage process priorities and CPU affinities with personalized rules.
-
Download and Install Process Lasso: This software is widely recognized for its ability to optimize CPU usage.
-
Launch the Program: Once installed, you can see all running processes.
-
Setting Affinity: Right-click on the desired process, select «CPU Affinity,» and choose the cores you want to assign.
Considerations When Setting CPU Affinity
While setting CPU affinity can yield performance benefits, it’s essential to consider several factors:
-
Application Behavior: Not all applications will benefit from being limited to specific processors. Modern applications are often designed to dynamically manage their CPU resources. Forcing CPU affinity may hinder performance rather than help it.
-
System Configuration: Ensuring you understand your CPU architecture is crucial. Understanding hyper-threading and the number of cores versus threads is essential for effective affinity settings.
-
Reverting Affinity: If you encounter unexpected behavior, it’s easy to revert affinity settings back to default, allowing the Windows operating system to manage them automatically.
-
Windows 10 Updates: Changes in Windows updates or driver releases can impact how affinity settings work. Regularly check for updates and revisits your settings after major updates.
Practical Scenarios for Setting CPU Affinity
1. Gaming Performance
Gamers often look to optimize their setups to achieve the best performance. By setting the CPU affinity for a game to specific cores, users can reduce lag and improve frame rates. For example, some older games or CPU-heavy titles may benefit from being restricted to certain cores to prevent interference from background processes.
2. Video Rendering
Video editing and rendering software can consume significant CPU resources. By assigning these applications to certain cores, users can ensure smoother performance during intensive tasks. Industry-standard software such as Adobe Premiere Pro can benefit greatly from careful management of CPU affinity.
3. Server Management
In a server environment, applications such as SQL Server or web servers may need to maximize their performance. Setting CPU affinity can help ensure that critical applications consistently run without interruptions caused by other processes.
4. Multithreading Applications
Some applications are designed to run multithreaded tasks. For these types of applications, spreading the workload across multiple cores can yield better results. It’s worth experimenting with CPU affinity to see if specific workloads exhibit better performance.
Conclusion
Setting CPU affinity in Windows 10 is a powerful tool that can lead to better resource management, enhanced performance for certain applications, and overall system stability. Understanding the nuances of CPU affinity and how to manipulate it using Task Manager, Command Prompt, PowerShell, or third-party tools can provide a significant advantage for both regular users and advanced professionals alike.
By grasping the concepts and practical applications of CPU affinity, users can take control of their system’s performance and ensure their machine runs optimally for their specific needs. As technology continues to advance and applications evolve, the importance of performance tuning will only increase, making knowledge of CPU affinity a valuable asset in today’s tech landscape.
Always remember to approach CPU affinity adjustments with caution—what works for one application may not be ideal for another. Regular monitoring and adjustments can lead to the best possible outcomes, ensuring that your Windows 10 system operates seamlessly and efficiently.
По умолчанию в Windows запущенное приложение может выполняться на любом из ядер CPU. Распределением процессов между ядрами управляет операционная система. Однако вы можете вручную привязать определенные процессы к ядрам процессора с помощью Processor Affinity. В этой статье мы покажем, как вручную привязать программу/процесса к определенным ядрам.
Чаще всего ручная привязка процессу к ядрам нужна, когда:
- Вы хотите ограничить использование ресурсов CPU для определенного приложения;
- Некоторые legacy приложения могут некорректно работать в многоядерной архитектуре;
- Вы хотите повысить производительность ресурсоемкого приложения, выделив программе отдельные ядра CPU. Благодаря этому можно гарантировать доступность ядер для вашего процесса и уменьшить задержки, связанные с выбором и переключением между процессами.
Задать ядра CPU для приложения с помощью Task Manager
Вы можете вручную привязать процесс к определенным ядрам с помощью Task Manager.
- Запустите
Taskmgr.exeи перейдите на вкладку Details; - Найдите нужный процесс, щелкните по нему правой клавишей и выберите Set Affinity;
- В открывшемся окне появится список ядер процессора. По умолчанию процесс может выполняться на любом из ядер CPU;
- Вы можете оставить включенными только те ядра, на которых должен выполняться ваш процесс.
В утилите Process Explorer вы можете также назначить ядра CPU для любого процесса. Щелкните по любому процессу и выберите Set Affinity.
Настройка Processor Affinity с помощью PowerShell
Вы можете управлять привязками процессам к ядрам с помощью PowerShell. Например, чтобы отобрать привязку процесса pwsh.exe к CPU, выполите такую команду PowerShell:
Get-Process pwsh | fl ProcessorAffinity
ProcessorAffinity : 63
Что означает число 63? Значение ProcessorAffinity это битовая маска, где каждому биту соответствует номер ядра процессора.
Получить количество ядер CPU на компьютере можно из переменной окружения:
$env:NUMBER_OF_PROCESSORS

В текущем компьютере доступно 6 ядер (если процессор поддерживает HyperThreading, то каждое ядро процессора будет считаться двумя логическими ядрам).
В нашем случае битовая маска для ProcessorAffinity получилась так:
| CPU | Decimal | (2*decimal-1) | Hex |
| CPU0 | 1 (20) | 1 | 1 |
| CPU1 | 2 (21) | 3 | 2 |
| CPU2 | 4 (22) | 7 | 4 |
| CPU3 | 8 (23) | 15 | 8 |
| CPU4 | 16 (24) | 31 | 10 |
| CPU5 | 32 (2)5 | 63 | 20 |
| CPU6 | 64 (2)6 | 127 | 40 |
| CPU7 | 128 (2)7 | 255 | 80 |
1+2+4+8+16+32=63
Это означает, что для процесса доступны все 6 ядра.
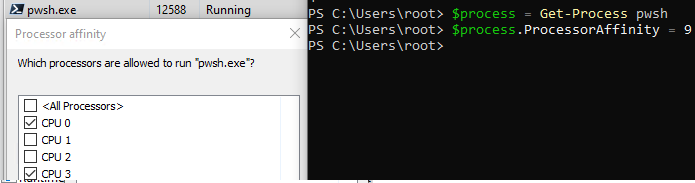
Если вы хотите разрешить процессу использовать только 0 и 3 ядра, значение ProcessorAffinity нужно задать 9 (1+8)
Чтобы задать привязку ядер для процесса с помощью PowerShell, выполните команду:
$process = Get-Process pwsh
$process.ProcessorAffinity = 9
Если вы указали некорректно значение, команда вернет ошибку:
SetValueInvocationException: Exception setting "ProcessorAffinity": "The parameter is incorrect."
Проверьте текущие настройки процесса в Task Manager:
Если вам нужно сразу запустить процесс с привязкой к определенным ядрам, используйте такую команду:
Invoke-Command -ScriptBlock {cmd /c start /affinity 1 pwsh.exe}
Ярлык для запуска программы на одном ядре CPU
Для корректной работы некоторых устаревших приложений нужно, чтобы оно работато на первом ядре CPU.
Для запуска программы на CPU0 нужно выполнить такую команду:
cmd.exe /C start /affinity 1 myapp.exe
В данном примере в параметре affinity мы указали 1. Это значение ProcessorAffinity, которое указывает что программа будет всегда выполняться на первом ядре.
Выполните команду и проверьте, что процесс выполняется на CPU0.
В командной строке значение affinity задается в шестнадцатеричном режиме. Проще всего посчитать значение с помощью калькулятора в режиме Programmer.
Например:
1 (CPU0) + 2 (CPU1) +8 (CPU3) + 20 (CPU5) = 2B

Команда для запуска программы с привязкой к 4 ядрам:
cmd.exe /C start /affinity 2b pwsh.exe
Проверьте, что процесс привязан к указанным четырем ядрам.
Вы можете сразу увеличить приоритет процесса с помощью параметра /High:
cmd.exe /C start /high /affinity 1 myapp.exe
Другие возможные значение приоритета процесса: /low | /normal | /high | /realtime | /abovenormal | /belownormal
Если вам нужно постоянно запускать программу на одном ядре, можете создать на рабочем столе ярлык с параметрами:
cmd.exe /c start "Acrobat DC" /affinity 1 "C:\Program Files\Adobe\Acrobat DC\Acrobat\Acrobat.exe"

Если вы хотите изменить иконку ярлыка, нажмите кнопку Change Icon и укажте полный путь к исполняемому exe файлу целевого приложения. Выберите из ресурсов иконку, которая вам нравится.

Теперь, пользователю достаточно дважды щелкнуть по ярлыку, чтобы запустить приложение на одном ядре.
Некоторые приложениях Microsoft позволяют задать CPU Affinyty в настройках:
Setting affinity in Windows 10 allows you to assign specific CPU cores to a particular program, enhancing performance for demanding applications or managing CPU resources more efficiently. Here’s a quick and easy guide on how to do it.
By following these steps, you’ll be able to assign CPU cores to specific programs, ensuring they run more smoothly and efficiently.
Step 1: Open Task Manager
Right-click on the taskbar and select «Task Manager.»
The Task Manager is a powerful tool for managing your system. You can also open it by pressing Ctrl + Shift + Esc.
Step 2: Go to the Details Tab
Click the «Details» tab in the Task Manager.
This tab provides detailed information about all the running processes on your computer, including resource usage.
Step 3: Find Your Program
Scroll through the list and find the program you want to set the affinity for.
Sometimes, the program might be listed under a different name. Look for the executable (.exe) file name if you can’t find it.
Step 4: Right-click and Select «Set Affinity»
Right-click on the program and choose «Set Affinity.»
A new window will pop up, allowing you to choose which CPU cores the program can use.
Step 5: Choose Your Cores
Check or uncheck the boxes next to the CPU cores you want the program to use, then click «OK.»
If unsure, you can select all cores to let Windows manage it. Otherwise, pick specific cores to optimize performance.
After completing these steps, the program will run only on the selected CPU cores, potentially improving its performance or stability.
Tips for Setting Affinity in Windows 10
- Know Your CPU: Understand how many cores your CPU has so you can allocate them effectively.
- Experiment: Try different core combinations to see which works best for your program.
- Monitor Performance: Use Task Manager to monitor the program’s performance after setting affinity.
- Save Settings: Remember that affinity settings reset after a reboot or program restart.
- Prioritize Important Programs: Set affinity for critical applications to ensure they get the resources they need.
Frequently Asked Questions
What is CPU affinity?
CPU affinity is a feature that allows you to assign a specific program to certain CPU cores, potentially improving performance or efficiency.
Why would I want to set CPU affinity?
Setting CPU affinity can help optimize the performance of demanding applications or manage resource usage more precisely.
Can I set affinity for multiple programs?
Yes, you can set affinity for as many programs as you like, but remember that settings will reset when the program or Windows restarts.
Does setting affinity improve gaming performance?
It might, especially if a game is not well-optimized for multi-core processors. Experiment to see what works best for your setup.
Will setting affinity harm my CPU?
No, setting affinity won’t harm your CPU. It’s just a way to manage how programs use the CPU cores.
Summary of Steps
- Right-click on the taskbar and select «Task Manager.»
- Click the «Details» tab.
- Find the program you want to set affinity for.
- Right-click on the program and select «Set Affinity.»
- Choose your CPU cores and click «OK.»
Conclusion
Setting CPU affinity in Windows 10 is a handy way to ensure your critical applications get the resources they need to run smoothly. While the process might seem a bit technical, it’s straightforward once you get the hang of it. By experimenting with different settings, you can optimize your system’s performance for various tasks, whether it’s gaming, video editing, or running complex calculations.
Keep in mind that affinity settings reset after a reboot, so you’ll need to reapply them if necessary. Understanding your CPU and monitoring performance can help you make the most of this feature. If you’re curious and want to dive deeper, plenty of resources are available online to help you master CPU management.
So, go ahead and give it a try. You might be surprised at how much smoother your programs run. Happy tweaking!
Kermit Matthews is a freelance writer based in Philadelphia, Pennsylvania with more than a decade of experience writing technology guides. He has a Bachelor’s and Master’s degree in Computer Science and has spent much of his professional career in IT management.
He specializes in writing content about iPhones, Android devices, Microsoft Office, and many other popular applications and devices.
Read his full bio here.