
The SESSION1 INITIALIZATION FAILED bug check has a value of 0x0000006D. This bug check indicates that the initialization of the Microsoft Windows operating system failed. You may encounter this error when booting or shutting down your Windows 11/10 computer due to hardware malfunction or device driver issue. . In this post, we will provide the most suitable solutions you can try to successfully resolve this issue.

If you get the SESSION1 INITIALIZATION FAILED BSOD error when you boot your Windows 11/10 system, you can try our recommended solutions below in no particular order and see if that helps to resolve the issue.
- Run the Blue Screen Online Troubleshooter
- Run SFC and DISM scan
- Restore or Replace the smss.exe file
- Update outdated drivers
- Run CHKDSK
- Reset or In-place Upgrade Repair or Reinstall Windows 11/10
Let’s take a look at the description of the process involved concerning each of the listed solutions.
Before you try the solutions below, check for updates and install any available bits on your Windows 11/10 device and see if the error reappears. If you can log in normally, good; else you will have to boot into Safe Mode, enter the Advanced Startup options screen, or use the Installation Media to boot to be able to carry out these instructions.
1] Run the Blue Screen Online Troubleshooter
A BSOD would appear when a Windows system comes across a serious problem. Once this occurs, the Windows system will stop responding and fail to boot, and all hard drives become inaccessible. The Blue Screen Online Troubleshooter from Microsoft more often than not will fix BSOD errors. The wizard helps beginners & novice PC users troubleshoot their Blue Screens and fix the stop error automatically.
Read: Black Screen Troubleshooter will fix Blank screen errors on Windows 11/10
2] Run SFC and DISM scan
The System File Checker is a command-line utility that checks all of the system files for problems. If a corrupt system file is triggering this error, the SFC scan will most likely fix it. Otherwise, you will have to follow up with the DISM (Deployment Image Servicing and Management) scan which is similar but slightly different in function and will fix corrupt or damaged system images on your Windows 11/10 computer.
3] Restore or Replace the smss.exe file

The smss.exe is the executable file responsible for running the Session Manager Subsystem (or Windows Session Manager). It’s an important component of the Windows operating system that starts running immediately when you click the power button. It’s responsible for creating user sessions and monitoring other crucial system processes to make sure they’re working correctly. The legitimate smss.exe file is located in the C:\Windows\System32 directory.
This process will crash your computer if csrss.exe (Client Server Runtime) or winlogon.exe (Windows Logon Application) malfunction or unexpectedly stop working, hence the BSOD error in view. Also, if the smss.exe file gets damaged, corrupted, or missing your system may freeze or stop responding.
This solution requires you to restore or replace the smss.exe file on your PC with a healthy copy from Winbindex by simply downloading the file and copying it to the system32 folder. To restore or replace the file locally, do the following:
- Enter the Advanced Startup Options screen.
- Access Command Prompt.
- In CMD prompt window, enter the following lines and hit Enter after each line:
C:
cd windows/system32/
copy c:windowssystem32dllcachesmss.exe
- Alternatively, instead of the last line, you can use:
copy c:windowsServicePackFilesi386smss.exe
- Once done, type exit and hit Enter to close Command Prompt and restart your computer.
Read: What is SMSS.exe Process in Windows 11/10? Displaying High CPU usage?
4] Update outdated drivers

Drivers are an essential component of every operating system because they enable Windows to recognize and use your hardware. If you encounter a BSOD error, chances are one or more device drivers are faulty or incompatible with your Windows operating system. In this case, you can:
- Manually update drivers via Device Manager if you have already downloaded the .inf or .sys file for the driver.
- Update driver via Command Prompt.
- Get the driver updates on the Optional Updates section under Windows Update.
- Download the latest version of the driver from the manufacturer’s website.
- Automatically update your drivers using any of the free Driver Update Software for Windows 11/10 PC.
Read: How to remove old and useless Drivers in Windows
5] Run CHKDSK

A problem with your hard disk typically causes BSODs. So, you can run the CHKDSK command to see if this is the case. This command will examine your hard disk for problems and fix them (if possible).
To run CHKDSK, do the following:
- Press Windows key + R to invoke the Run dialog.
- In the Run dialog box, type cmd and then press CTRL + SHIFT + ENTER to open Command Prompt in admin/elevated mode.
- In the command prompt window, type the command below and hit Enter.
chkdsk /x /f /r
You will receive the following message:
CHKDSK cannot run because the volume is in use by another process. Would you like to schedule this volume to be checked the next time the system restarts? (Y/N).
- Press the Y key on the keyboard and then reboot your computer.
After CHKDSK completes, check to see if the issue is resolved. Otherwise, try the next solution.
Read: ChkDsk will not run at startup in Windows
6] Reset or In-place Upgrade Repair or Reinstall Windows 11/10

If you have exhausted all possible options and yet nothing has worked so far up to this point, you can try Reset This PC, or Cloud Reinstall to reset every Windows component. You may also try In-place Upgrade Repair and see if that helps. In the unlikely event that this procedure didn’t help with the issue at hand, you will have to clean and install Windows 11/10.
Hope this helps!
These posts might interest you:
- PROCESS1_INITIALIZATION_FAILED, 0x0000006B, Blue Screen
- Logon Process Initialization Failure in Windows 11/10
- IO1 INITIALIZATION FAILED Blue Screen error
- HAL INITIALIZATION FAILED Stop Error 0x0000005C
How do I fix the initialization failed?
Generally, to fix the initialization failed error on your Windows 11/10 depends on the instance or how the error occurred. You may try the following suggestions:
- Update your drivers and Windows
- Run the BSOD Troubleshooter
- Run the SFC scan
- Run DISM
- Check the hard drive
- Disable or remove the problematic software
- Use Command Prompt
- Change Disk Controller mode from RAID or AHCI to SATA/ATA
What is initialization failed?
Hal Initialization Failed Error generally occurs due to corrupt or outdated drivers, incompatible hardware, damaged system files, faulty hard drive, or virus attack. If not fixed immediately, the BSOD error may lead to permanent data loss situations.
How do I fix PHASE1 INITIALIZATION FAILED?
To fix PHASE1 INITIALIZATION FAILED BSoD on your Windows 11/10 system, you can try the following suggestions:
- Make sure your Windows is up to date
- Update your drivers
- Run the BSOD Troubleshooter
- Run the SFC scan
- Run DISM
- Check the hard drive
- Copy Catroot, Catroot2, and CodeIntegrity folders from a working PC
- Temporarily uninstall your antivirus software
What is interactive logon?
Interactive login is authentication to a computer through the usage of their local user account or by their domain account, usually by pressing the CTRL+ALT+DEL keyboard shortcut. When the user is logged in, Windows will run applications on behalf of the user and the user can interact with those applications.
Read: How to enable or disable CTRL+ALT+DEL Secure Logon in Windows
What is logon process initialization failure?
This issue occurs because a system-wide event is used during the logon process before the event object is created. This behavior causes the logon process to fail.
How to fix the issue reported by «error code session1_initialization_failed»
Special Offer
Instructions
The following steps should fix the session1_initialization_failed issue:
- Step 1.Download Outbyte PC Repair application See more information about Outbyte uninstall instructions EULA Privacy Policy
- Step 2.Install and launch the application
- Step 3.Click the Scan Now button to detect issues and abnormalities
- Step 4.Click the Repair All button to fix the issues
| Compatibility | Win 11, 10, 8, 7 |
| Download Size | 21.2 MB |
| Requirements | 300 MHz Processor, 256 MB RAM, 50 MB HDD |
Limitations: trial version offers an unlimited number of scans, backups and restores of your Windows system elements for free. Registration for the full version starts from USD 29.95.
A malfunction reported by «error code session1_initialization_failed» may happen due to a number of different factors. Common causes include incorrectly configured system settings or irregular entries in the system elements, to name a few. Such issues may be resolved with special software that repairs system elements and tunes system settings to restore stability.
The article provides details on what the issue means, potential causes, and ways to resolve the issue.
- 1Meaning of the «error code session1_initialization_failed»
- 2Causes of the «error code session1_initialization_failed»
- 3Ways to repair the «error code session1_initialization_failed»
Meaning of the «error code session1_initialization_failed»
«Error code session1_initialization_failed» is an issue name that usually contains details of the malfunction, including why it occurred, which system component or application malfunctioned, along with some other information. The numerical code in the issue name usually contains data that can be deciphered by the manufacturer of the component or application that malfunctioned. The issue with using this code may occur in many different locations within the system, so even though it carries some details in its name, it is still difficult for a user to pinpoint and fix the issue cause without specific technical knowledge or appropriate software.
Causes of the «error code session1_initialization_failed»
If you have received this warning on your PC, it means that there was a malfunction in your system operation. «Error code session1_initialization_failed» is one of the issues that users get as a result of the incorrect or failed installation or uninstallation of software that may have left invalid entries in your system elements, improper system shutdown due to a power failure or another factor, someone with little technical knowledge accidentally deleting a necessary system file or system element entry, as well as a number of other causes.
Ways to repair the «error code session1_initialization_failed»
For an immediate fix of such issues, advanced PC users may be able to repair it by manually editing system elements, and others may want to hire a technician to do it for them. However, since any manipulations with Windows system elements carry a risk of rendering the operating system unbootable, whenever a user is in any doubt of their technical skills or knowledge, they should use a special type of software that is meant to repair Windows system elements without requiring any special skills from the user.
The following steps should help fix the issue:
- Download Outbyte PC Repair application Special offer. See more information about Outbyte uninstall instructions EULA Privacy Policy
- Install and launch the application
- Click the Scan Now button to detect potential issue causes
- Click the Repair All button to fix found abnormalities
The same application can be used to run preventative measures to reduce the chance of this or other system issues appearing in the future.
How To Fix Session1 Initialization Failed BSOD in Windows 11/10 [Solution]
In this tutorial, i will provide the most suitable solutions you can try to successfully resolve this issue. This SESSION1 INITIALIZATION FAILED thats accompanied by the value of 0x0000006d. It indicates that the intialization of the Microsoft Windows operating system failed. And generally speaking this initialization failed is caused by incompatible drivers, system incompatibility, memory conflicts, corrupted system failed, and bad sectors on the hard drive and incompatible or malfunctioning hardware.
Commands Used In This Tutorial:
1. sfc /scannow
2. Dism /Online /Cleanup-Image /RestoreHealth
1. Open Command Prompt (Admin) or Terminal (Admin) by right-clicking the Start Menu button.
2. Press Enter after entering the line sfc/scannow and Dism /Online /Cleanup-Image /RestoreHealth.
Issues Addressed In This Tutorial:
session 1 initialization failed on windows 11
session 1 initialization failed
b1 initialize library failed 0xc00000bb fix
how to fix setup initialization error
how to fix process1 initialization failed in windows 10
stop code session 1 initialization failed
process initialization failed in windows 11
fix session1 initialization failed
how to fix session 1 initialization failed
how to fix sign in process initialization failure
A blue screen error called “Process1 Initialization Failed” appears when the boot files are damaged. This issue most frequently occurs following a hardware or software installation. This BSOD problem might also result in losing crucial files, much like other BSOD failures.
Process1 Initialization Failed issue might come from corrupted files and software like other BSOD failures. A clean Windows install can frequently fix the problem if it is software-related. However, if this difficulty is hardware-related, a costly replacement of the problematic component may be the only option.
Thank you for watching this tutorial! I hope you found the information valuable and that it helps you on your journey. If you have any questions or suggestions, please leave them in the comments below. Don’t forget to like and subscribe for more content like this. Stay curious, keep learning, and we’ll see you in the next video!
Disclaimer: This channel doesn’t promote any illegal contents, all content are provided by this channel is meant for educational purposes only and share my knowledge with everyone that is totally Legal, informational. And followed all the Youtube community guideline rules. The videos are completely for Legal.
#windowstutorials #windows11 #fix
[ad_2]
source
Readers help support Windows Report. We may get a commission if you buy through our links.
Read our disclosure page to find out how can you help Windows Report sustain the editorial team. Read more
BSoD errors are among the most alarming on a Windows computer. So, we understand the panic when many of our readers reach out to us after encountering the SESSION1 INITIALIZATION FAILED BSoD. We will show you some of the best solutions in this guide.
You may also consider reading up on similar errors, like the BSoD error 0x00000154 on Windows 11.
What causes the SESSION1 INITIALIZATION FAILED BSoD?
The error can be caused by any one of the following:
- Corrupt or outdated system or component drivers.
- Incompatible or malfunctioning hardware.
- Bad or damaged system files.
- Bad sectors on the hard drive.
We often recommend using specialized bad sector repair tools to avoid certain system complications.
How do I fix SESSION1 INITIALIZATION FAILED?
We recommend the following workaround before trying other solutions:
- Scan your computer for viruses.
If the problem persists after a scan, you may proceed to the detailed fixes below.
NOTE
Note that you may first have to boot into Safe Mode before applying most of the solutions in this guide.
1. Update system drivers
- Right-click on the Start menu and select Device Manager.

- If you have any categories with a yellow badge, you may have to expand them, right-click on the driver and select Update driver.

- Select Search automatically for drivers.

- Follow the instructions to update the driver, perform the steps for as many drivers as possible, and verify if it fixes the SESSION1 INITIALIZATION FAILED BSoD.


Updating your system drivers manually can be tricky if you’re not tech-savvy enough to search for the proper device version.
Fortunately for the users, there are tailor-made driver applications developed to update any PC drivers securely and much faster.
Sometimes, malfunctioning drivers can cause multiple system errors. If this happens to your PC, you may need to update or reinstall certain drivers entirely. As the process is not quite straightforward, we recommend using a reliable driver updater for the job.
Here’s how to do it:
- Download and install Outbyte Driver Updater.
- Launch the software.
- Wait for the app to detect all faulty drivers.

- Now, it will show you all the malfunctioning drivers listed to select the ones to Update or Ignore.
- Click on Update & Apply Selected to download and install the newest versions.
- Restart your PC to ensure the applied changes.

Outbyte Driver Updater
Secure your Windows PC with Outbyte from various errors caused by problematic drivers.
Disclaimer: this program needs to be upgraded from the free version in order to perform some specific actions.
2. Run a CHKDSK scan
- Press Windows + R to open the Run dialog.
- Type cmd and hit Ctrl + Shift + Enter to open an elevated Command Prompt.
- Type the command below, and hit Enter.
chkdsk /f /r
- Once completed, verify if it fixes the SESSION1 INITIALIZATION FAILED BSoD.

- D3dx11_42.dll Not Found: How to Fix it
- Windows 11 Shutdown After Inactivity: 4 Ways to Stop it
- Windows Shuts Down Instead of Restarting: 4 Ways to Fix it
3. Run file repair scans
- Press Windows + R to open the Run dialog.
- Type cmd and hit Ctrl + Shift + Enter to open an elevated Command Prompt.
- Type the command below, and hit Enter.
sfc /scannow
- Once complete, input the command below and hit Enter.
DISM /Online /Cleanup-Image /ScanHealth
- Finally, restart the computer and verify it fixes the SESSION1 INITIALIZATION FAILED error.


4. Roll back your drivers
NOTE
Note that this step may only be needed if the BSoD started occurring after a new driver was installed or updated.
- Right-click on the Start menu and select Device Manager.
- Expand the category for the recently installed or updated driver and double-click on the driver.
- Click the Driver tab and select the Roll Back Driver button.

- Select any reason for rolling back from the options and click Yes. Now you may verify if the fix works.


That is as far as we discuss in this article. The SESSION1 INITIALIZATION FAILED error is one of the less complex BSoDs.
You may also consider using system restore. However, this would work only if you created a system restore point before the error started. We have a guide that shows you how to create a restore point in Windows 11.
Don’t hesitate to contact us using the comment section, and let us know if you successfully used any of these solutions.
Afam Onyimadu
Windows Software Expert
Afam is a geek and the go-to among his peers for computer solutions. He has a wealth of experience with Windows operating systems, dating back to his introduction to Windows 98. He is passionate about technology amongst many other fields. Aside from putting pen to paper, he is a passionate soccer lover, a dog breeder, and enjoys playing the guitar and piano.
Many users reported that they have encountered the SESSION1 INITIALIZATION FAILED error. What to do to avoid data loss caused by this error and how to solve this error? This article from MiniTool Partition Wizard will give you answers.
Here is a true example from the Microsoft forum.
Hello everyone, currently getting a Session1_Initialization_Failed blue screen when booting my PC. When the computer restarts, it goes directly into Automatic Repair which fails. Let me know if you need any more information, thanks for any help that can be provided!https://answers.microsoft.com/en-us/windows/forum/all/session-1-initialization-failed/
What is the SESSION1 INITIALIZATION FAILED error? How to fix this error? Keep reading to know the answers.
What Is SESSION1 INITIALIZATION FAILED Error
What is the SESSION1 INITIALIZATION FAILED error? Actually, it is a BSOD error message. That’s accompanied by the value of 0x0000006D. It indicates that the initialization of the Microsoft Windows operating system failed.
Generally speaking, Windows SESSION1 INITIALIZATION FAILED is caused by incompatible drivers, system incompatibility, memory conflicts, corrupted system files, bad sectors on the hard drive, etc. As for how to fix the error, the common methods are shown below.
Because the computer cannot boot successfully, in this case, you should boot the computer into Safe Mode and then perform these actions. For how to start a PC with a blue screen in safe mode, the steps are:
- Press Win + X and then click Shut down or sign out. Then press Shift and click Restart to enter Windows Recovery Environment (WinRE).
- When you are in WinRE, navigate to Troubleshoot > Advanced options > Startup Settings > Restart.
- After the computer restarts, there is a list of options. Press the F5 key to choose the Enable Safe Mode with Networking
How to Fix the SESSION1 INITIALIZATION FAILED Error
Now try the following solutions one by one to get rid of the Windows 10 SESSION1 INITIALIZATION FAILED error.
Way 1: Update Outdated Drivers
Drivers are an essential part of every operating system. If you encounter the SESSION1 INITIALIZATION FAILED error, it is possible that the driver is not compatible with your Windows operating system. So, you should try to update them.
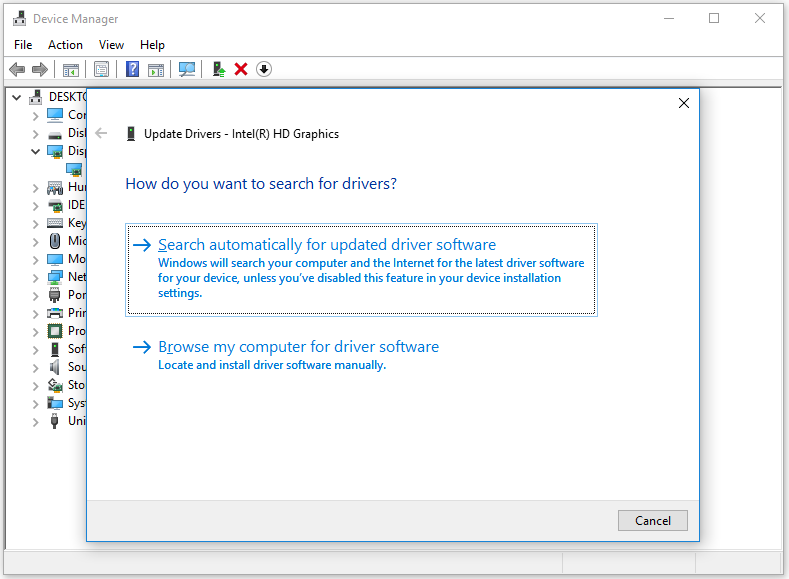
Step 1: Press the Win + S key and type Device Manager in the Search box. Then press Enter.
Step 2: Expand the directory and right-click a driver to select Update Driver.
Step 3: In a pop-up window, select Search automatically for updated driver software. Then your Windows will check, download and install the latest and appropriate driver.
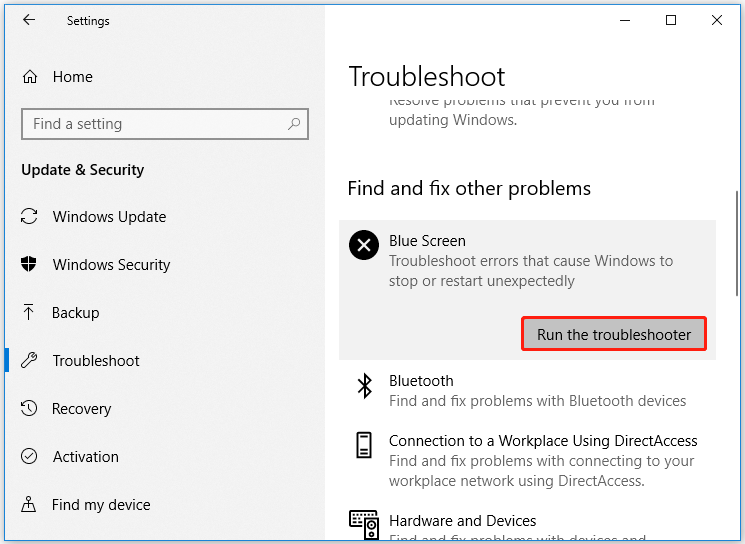
Way 2: Run the Blue Screen Troubleshooter
If the SESSION1 INITIALIZATION FAILED error still appears, it’s time to run the Blue Screen Troubleshooter. It is a Windows tool designed to assist a user in fixing blue screen errors.
For how to run the Blue Screen Troubleshooter, you need to go to the path: Settings > Update & Security > Troubleshoot > Blue Screen > Run the troubleshooter.
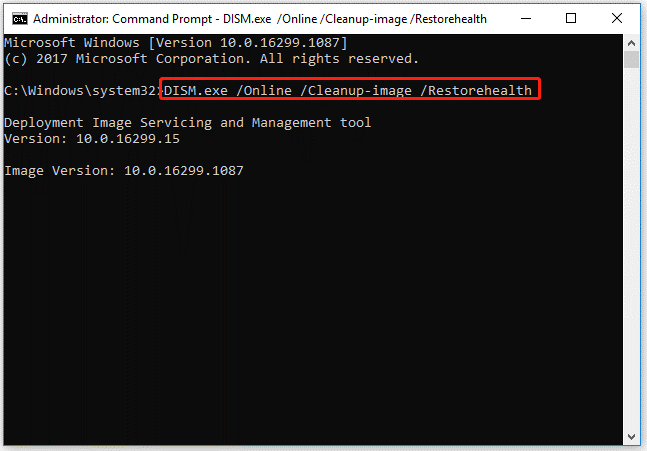
Way 3: Run DISM and SFC Tools
Windows 10 SESSION1 INITIALIZATION FAILED error may be caused by corrupted system files. You can repair them by running DISM and SFC tools. These two tools should be used in Windows PowerShell or Command Prompt. So, launch PowerShell or Command Prompt first. Here shows how to use DISM and SFC in Command Prompt.
Step 1: Type cmd in the Windows search bar. Then right-click on Command Prompt and select Run as administrator.
Step 2: In the Command Prompt window, type DISM.exe /Online /Cleanup-image /Restorehealth and press Enter.
Step 3: When the DISM tool completes its task, type sfc /scannow and press Enter.
Step 4: Wait patiently until the process is 100% complete.
Way 4: Check Hard Disk Errors
The blue screen with SESSION1 INITIALIZATION FAILED may be caused by file system errors or bad sectors on your hard disk. So, it’s important to check if the hard drive gets faulty. There are 2 methods to check the hard disk for errors. For that:
Method 1: Use CHKDSK
CHKDSK is a disk error checking and repair utility built into Windows. It scans hard drive partitions for internal errors and repairs them at the same time. To use CHKDSK to repair a corrupted hard drive partition, follow these steps:
Step 1: Type cmd in the Search box. Then right-click on Command Prompt and select the Run as administrator option to open Command Prompt as administrator. Then click Yes to get Admin access.
Step 2: In the Command Prompt window, type the chkdsk G: /f command and press Enter.
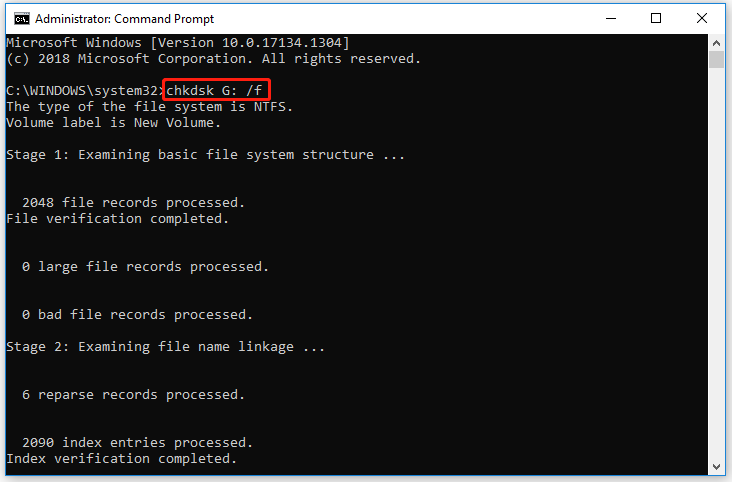
Tips:
“G” represents the hard drive partition letter.
Method 2: Use MiniTool Partition Wizard
Although CHKDSK can be used to check the hard drive for errors, this tool often runs into various issues like CHKDSK being write-protected, CHKDSK getting stuck, etc. So, it’s highly recommended you use a powerful disk manager – MiniTool Partition Wizard. It can help you check bad sectors but also repair file system errors easily and quickly.
MiniTool Partition Wizard FreeClick to Download100%Clean & Safe
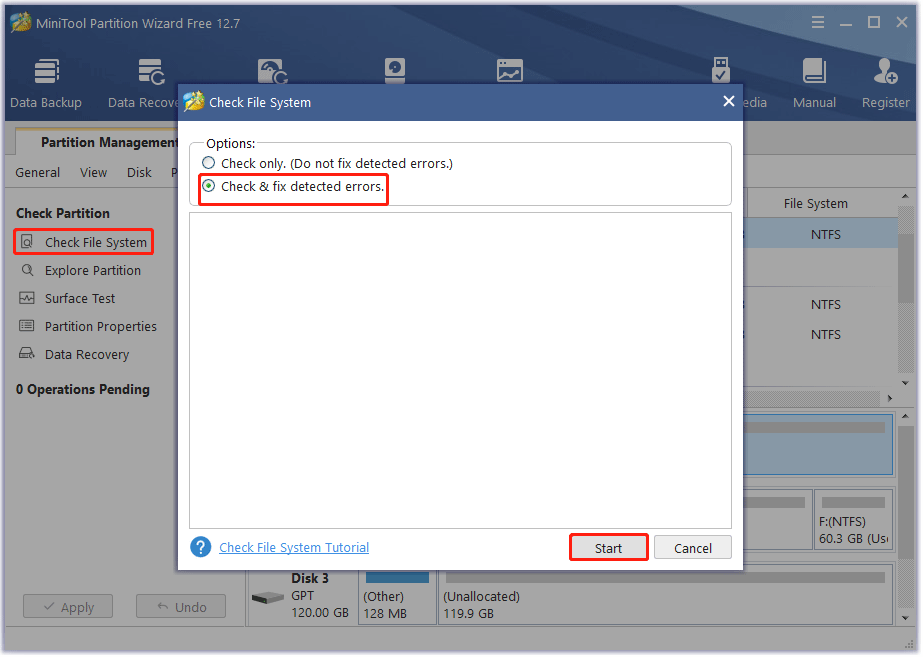
Step 1: Launch the MiniTool software to get its main interface, and then select the target drive and click on Check File System from the left action panel.
Step 2: Select Check & fix detected errors and click on the Start button. This tool will check and repair file system errors immediately.
Step 3: In the main interface, select the drive again and click on Surface Test from the left pane.
Step 4: Click on the Start Now button in the pop-up window. After that, this tool will scan the whole external drive immediately and show you the test result.
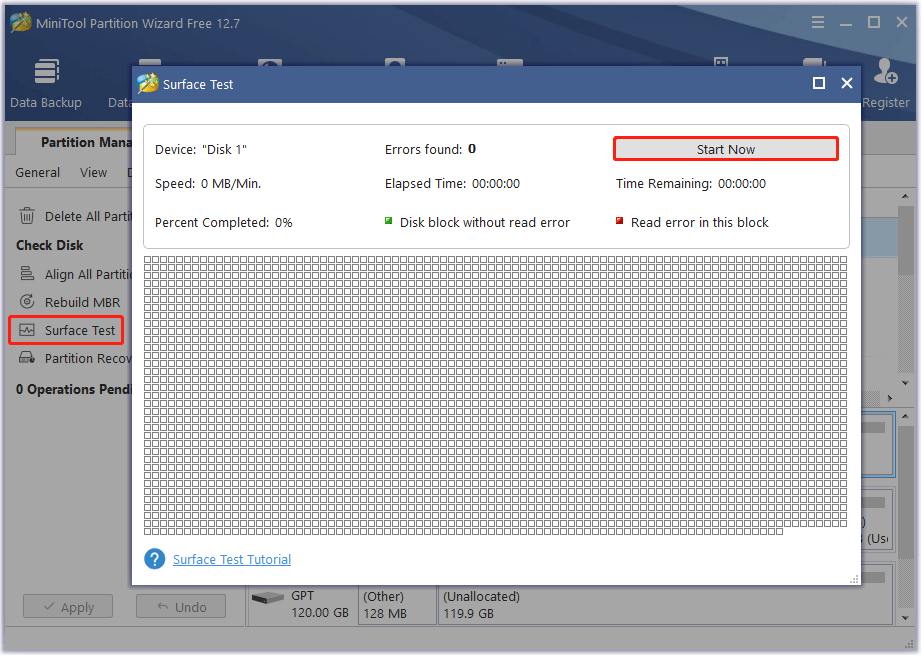
Step 5: When the hard drive error test process is completed, the bad sectors on the hard drive will be marked with red color. In this case, you can either use this bad sector repair guide or consider replacing it with a new one.
Way 5: Use the Mode of Compatibility with an Old Version of Windows
Windows 10 SESSION1 INITIALIZATION FAILED error may be caused by outdated software. If this error occurs after launching a program, then using Windows compatibility mode can help you get rid of the problem. To do that, follow the steps below:
Step 1: Right-click on the program on the desktop, and then select Properties.
Step 2: Go to the Compatibility tab, check the Run this program in compatibility mode for box and then select Windows 8 or older Windows version from the drop-down menu.
Step 3: Click on the Apply and OK buttons to execute the changes.
Way 6: Disable the Unnecessary Programs at the Startup
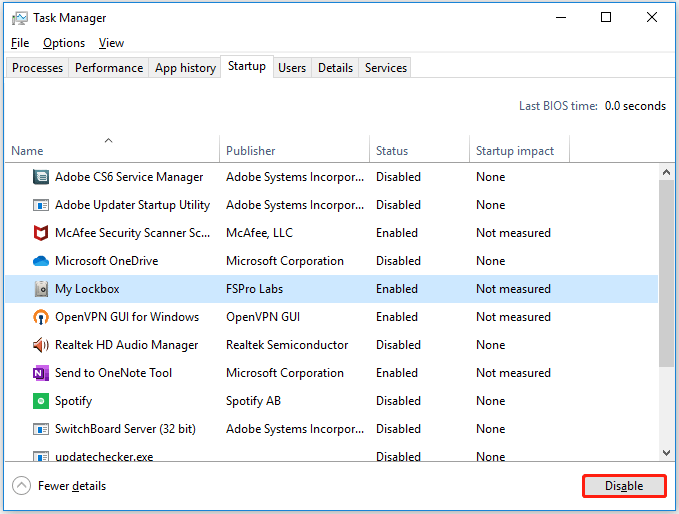
Software that causes SESSION1 INITIALIZATION FAILED 0x0000006D may be written to the Windows startup list, so the error occurs immediately after system startup without any user activity. You can remove programs from startup using Task Manager.
Step 1: Right-click on Task Bar and then select Task Manager.
Step 2: Switch to the Startup tab.
Step 3: Select the unnecessary program and then click on the Disable button in the right lower corner of the window.
Way 7: Run Windows Memory Diagnostic
Go on to check if the Memory is the cause of the SESSION1 INITIALIZATION FAILED 0x0000006D error. Here is how to do that:
Step 1: Type memory into the Windows search bar.
Step 2: Click on Windows Memory Diagnostic under Best match.
Step 3: Once the memory test tool opens, click on the Restart now and check for problems (recommended) option.
Step 4: Wait until the computer finish memory diagnosis. This process will usually take a few minutes.
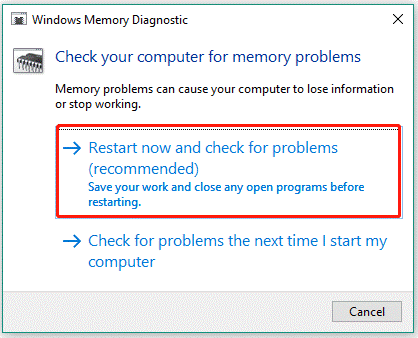
Step 5: Finally, check the result in Event Viewer.
- Right-click the Windows icon on the taskbar and then choose the Event Viewer
- When Event Viewer opens, expand the Windows Logs entry on the left pane.
- Select the System option in the list and then click the Find option in the right pane.
- Type MemoryDiagnostics-Results in the search box on the pop-up window, and click the Find Next
- Close the Find dialog box.
- On Event Viewer, double-click the MemoryDiagnostics-Results source and view the test result.
If it reads “Windows Memory Diagnostic tested the computer’s memory and detected no errors”, it means the memory is innocent, and you can try the next solution.
If it shows one or more errors, you can run the memory test again and recheck the result. If it still shows at least one error, you RAM modules might have problems, and it may need to be replaced.
Way 8: Reinstall OS
If the above methods can’t solve the Windows 10 SESSION1 INITIALIZATION FAILED error, you can try to clean reinstallation of the OS to solve it. Some users report that they have solved the SESSION1 INITIALIZATION FAILED error through this method.
If you perform a clean reinstallation of the OS, you should use MiniTool Partition Wizard to back up or recover data in advance. Follow the tutorial to complete the reinstallation.
Here are 8 solutions for the Windows 10 SESSION1 INITIALIZATION FAILED error. I think these methods can help you.Click to Tweet
Recover Data from the SESSION1 INITIALIZATION FAILED Error
When the SESSION1 INITIALIZATION FAILED error happens and you can’t boot your computer into Windows, you can use MiniTool Partition Wizard to recover your data. Surely, if your computer can boot into Windows but you find your data is lost, you can also try it to recover data.
MiniTool Partition Wizard DemoClick to Download100%Clean & Safe
Here is a tutorial on how to recover data when the computer can’t boot.
Step 1: Plug the prepared USB into the working computer or insert the prepared CD/DVD into its CD/DVD burner.
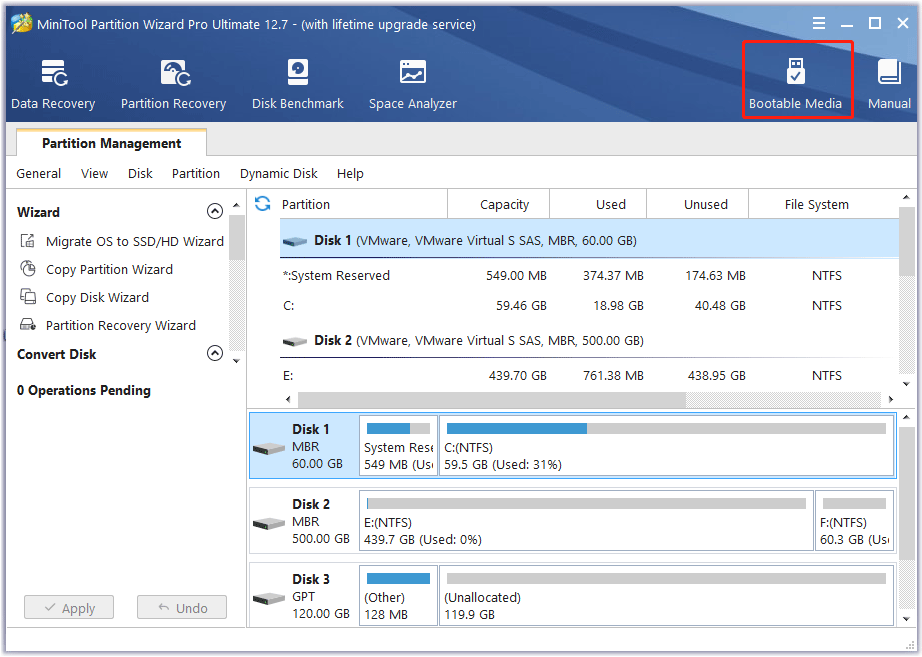
Step 2: Download the software and then launch it to access its main interface. Click Bootable Media in the upper right corner and follow the on-screen instructions to create a bootable USB, CD, or DVD.
Step 3: Plug the bootable USB into the original computer which the operating system cannot boot or put the bootable CD or DVD into it.
Step 4: Restart the computer and press F2 or another key to enter BIOS menu. Change boot settings to make your computer boot from the USB or CD/DVD flash drive.
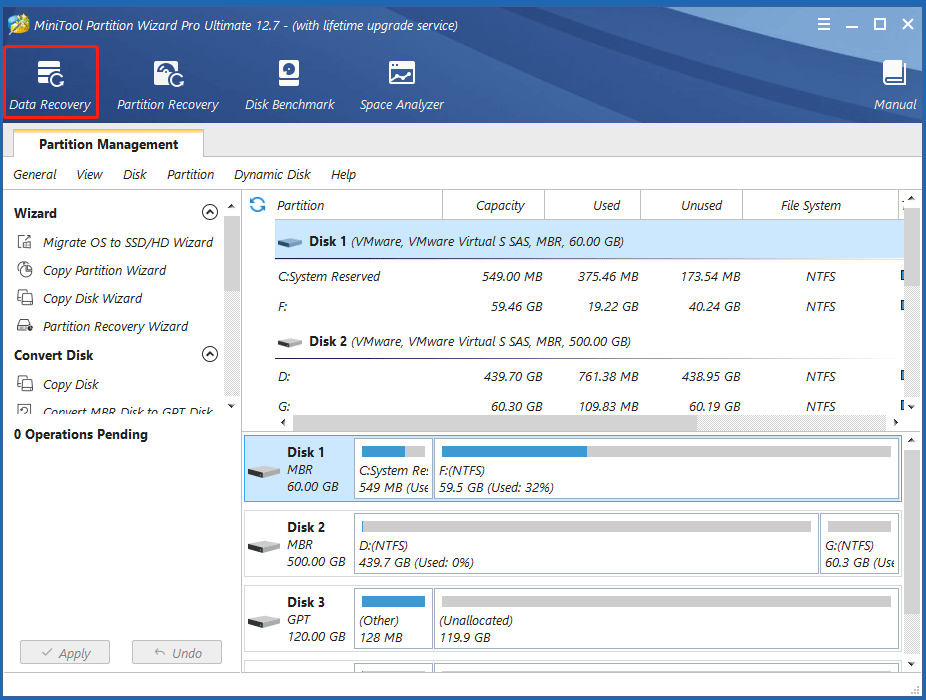
Step 5: In the main interface of MiniTool Partition Wizard, click on Data Recovery from the top toolbar.
Step 6: Click on the Scan button under the partition you need to recover the data.
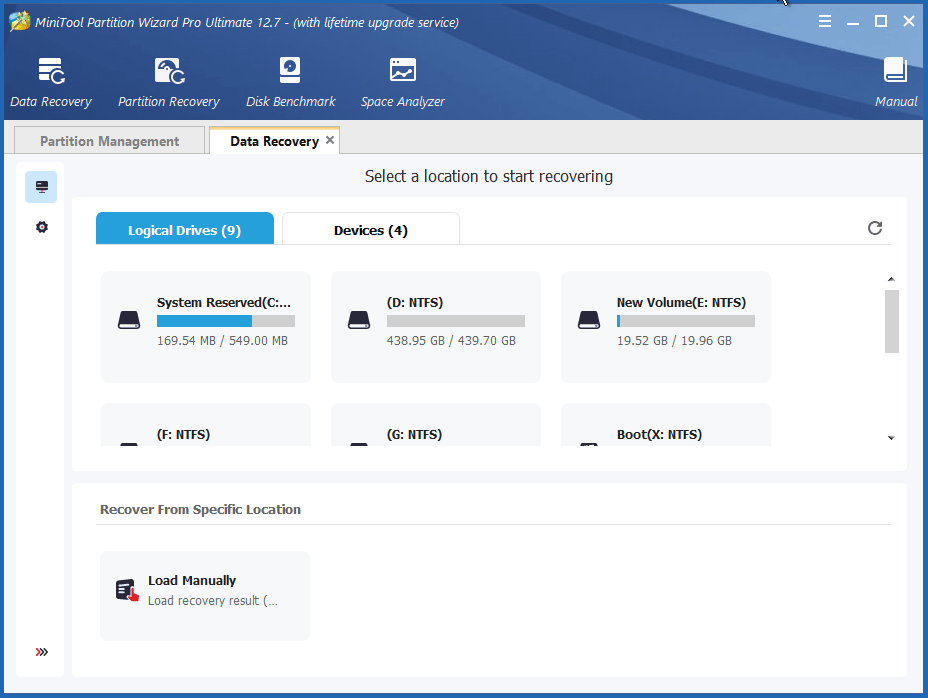
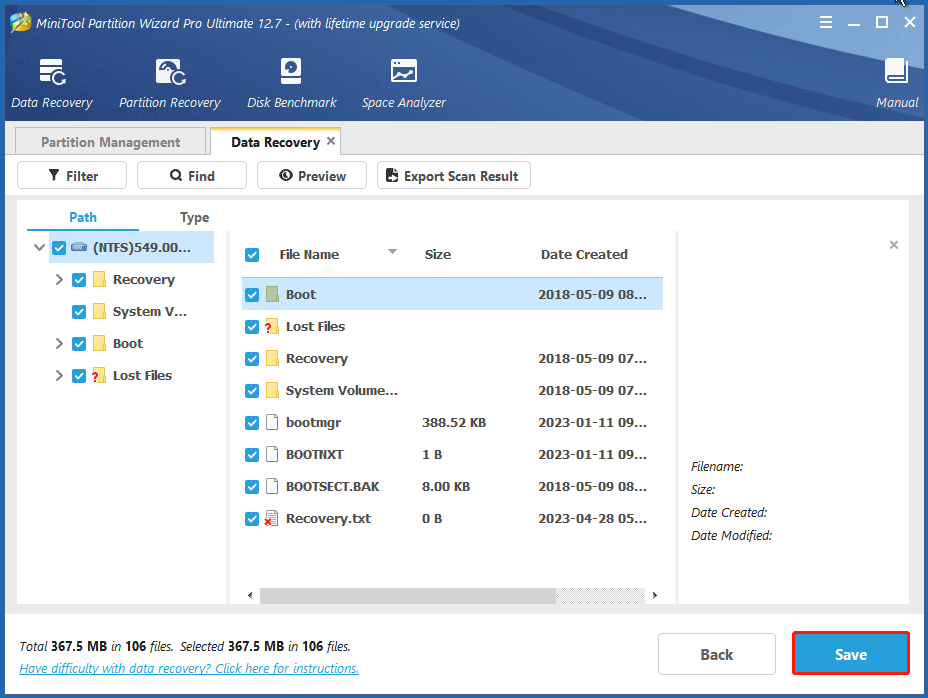
Step 7: Then wait for the scan to complete. Once the scan is complete, check all items that you need to recover and click on Save.
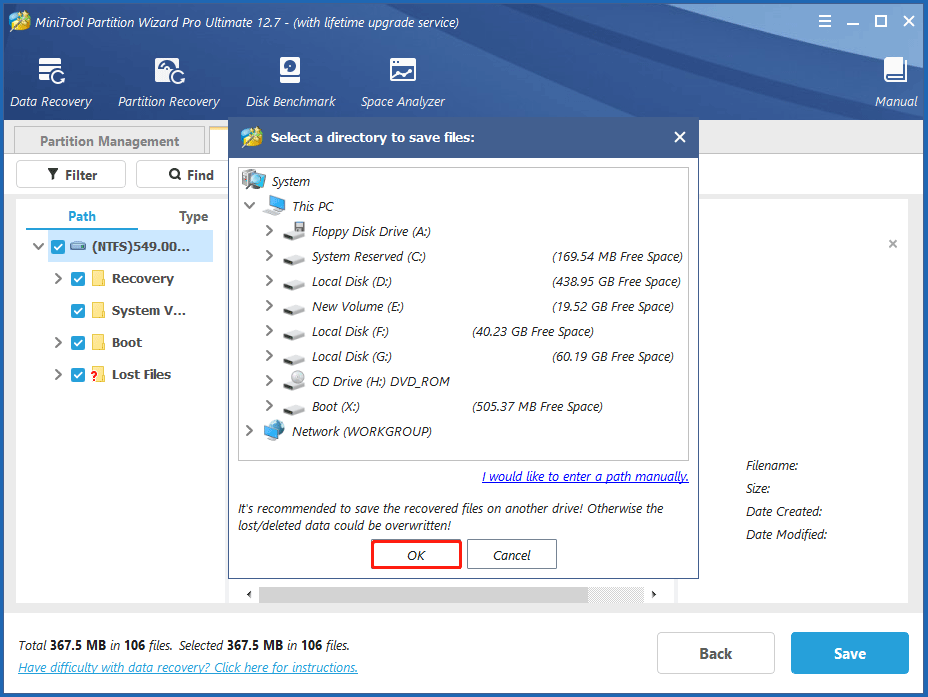
Step 8: In the pop-up window, select a directory to save the selected files and click on OK.
Note:
You’d better save the recovered files to another drive. Otherwise, the lost/deleted data could be overwritten.
If your computer can boot into Windows and you want to recover data, just launch MiniTool Partition Wizard and normally activate the Data Recovery feature.
Bottom Line
The SESSION1 INITIALIZATION FAILED error is annoying, but there is always a way to tackle it. 8 solutions to the BSOD error are displayed above and you can try them one by one. If you run into some problems during the fixing process, you can leave them in the following comment zone.
Certainly, if you have any questions about or suggestions for MiniTool Partition Wizard, please do not hesitate to contact us via [email protected].