Server refused our key putty ssh windows

Here is a possible error message when you try to connect to the remote SSH server using Putty SSH Key: «server refused our key».

PuTTY Server Refused Our Key

This is because you haven’t copied your public key to the remote server or haven’t done it properly.

Your public key should exist in the authorized_keys file of the user account you used to login to the remote server. The solution is to copy the public key from your Windows 10 PC to the user’s authorized_keys file.

Note that each user has their own authorized_keys file in the home directory. For example, If you log in as user root, you need to place the public key to the «/root/.ssh/authorized_keys».

To solve the «server refused our key» error, you can do the following steps:

Open PuTTYgen, Go to File > Load Private key and open your Private Key File.

Open PuTTYgen, Go to File data-lazy-src=

Highlight the Public key that was created in the text box and copy it to the clipboard.

server refused our key putty windows

Next, Log in to the Linux server and change to the home directory with the cd command:

cd ~/

Then, create the .ssh folder and the .ssh/authorized_keys file (if it doesn’t already exist):

mkdir ~/.ssh
touch ~/.ssh/authorized_keys

Open the authorized_keys file and paste the public key.

putty server refused our key

When you are finished, save the file exit the session.

To connect to the remote server. Open the PuTTY terminal and provide the IP address of the remote server. Then, Go to Connection > SSH > Auth and Load the private key after clicking on the Browse button.

Go to Connection data-lazy-src=

Click on Open to establish SSH connection to the Linux server. You should be able to connect to the server without getting «Server refused our key» error.

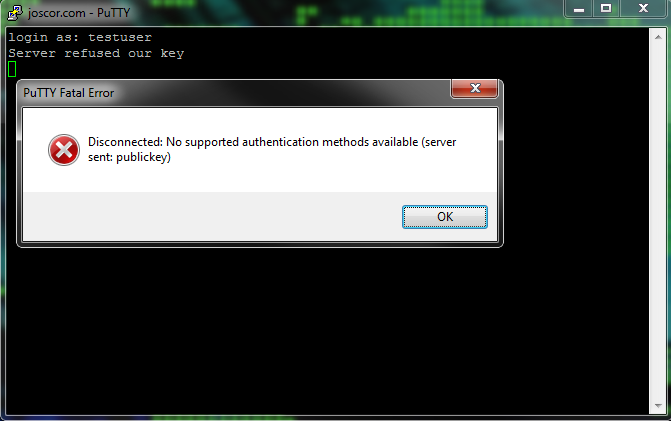
Recently, many users have complained the occurrence of an error that reads «Server refused our key» while using PuTTY. It happens when the server you’re trying to connect with a PuTTy public key refuses to accept the key provided.

So, without wasting any time, let us dive into practical tips and solutions to troubleshoot the «Server Refused Our Key» error.

A Snapshot of Solutions

Solutions Overview

Update PuTTy

Update the PuTTy client to the latest version on your machine.  

Check the SSH key format

To make sure the private key is in the required .ppk format.  

Re-Authorize SSH key

Remove the public key authorization and re-authorize it in the SSH session.   

Check SSH key permissions

Make sure all the required file and directory permissions are enabled.  

Check PuTTY server configuration

Ensure the SSH daemon is configured to allow public key authentication.  

Regenerate SSH key

Use PuTTYgen to regenerate the private key and add it to the server’s ~/.ssh/authorized_keys file.

Proven Ways to Fix «PuTTy SSH Server Refused Our Key»

Implement the below solutions in the same order in an attempt to resolve the «PuTTy via SSH: Server refused our key» error.

Solution 1: Update PuTTy

Not updating the PuTTY client is a leading cause of the refused key error. The first troubleshooting tip is to update the PuTTy to the latest edition. You have several options to update PuTTY.

  • Download its latest version from the official site to automatically replace the older one.
  • Run the command «Update-Help SSH» on Windows PowerShell to update SSH clients, like PuTTy.

Solution 2: Check SSH Key Format

If you are still getting the SSH server authentication error after updating PuTTy, confirm you’re using the right key format. Note that PuTTy, by default, uses the .ppk file format for private keys which is different from the .pem or .pub formats in the OpenSSH.

Thus, if the SSH key is not in the .ppk format, you first need to convert it to ensure successful SSH authentication with the key to the server. Here are the steps to do that:

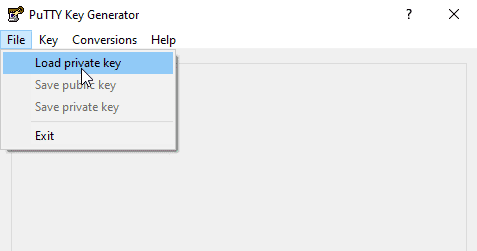
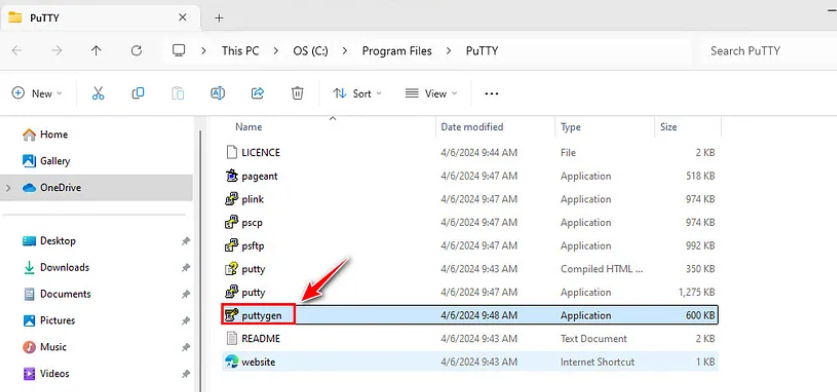
Step 1: Launch PuTTYgen and click Load.

open puttygen.jpg

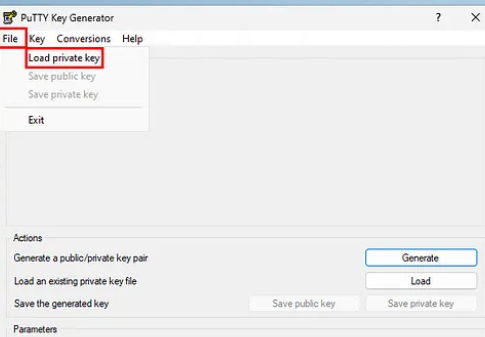
Step 2: Now, click File > Load Private Key. Browse and select the .pem private key that you’re currently using.

load private key.jpg

Step 3: When it loads, click «Save Public key» to generate a .ppk file. Use this key for authentication in SSH PuTTy to connect to Ubuntu.

When entering the key, make sure all the characters are on a single line, with no leading or trailing spaces.

Solution 3: Re-Authorize SSH Key  

This solution is very important to address the issue of the PuTTy key refused. It involves removing the key authorization and then, re-authorizing it inPuTTy on Windows server. While doing so, you also confirm the public key you’re using is installed on the server.

Follow the below steps to do that:

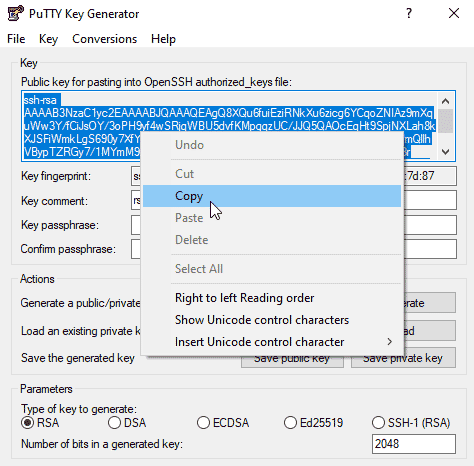
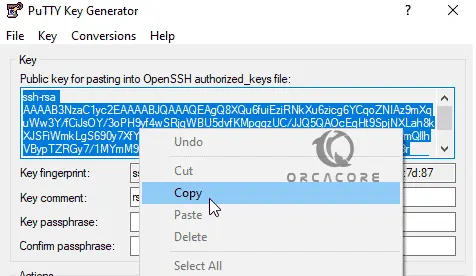
Step 1: Open PuTTYgen and load your private key.

Step 2: When it loads, copy the public information of the key as shown in the figure below.

copy key information.jpg

Step 3: Next, remove the key authentication in the SSH session using the below command:

copy Copied!

rm ~/.ssh/authorized_keys

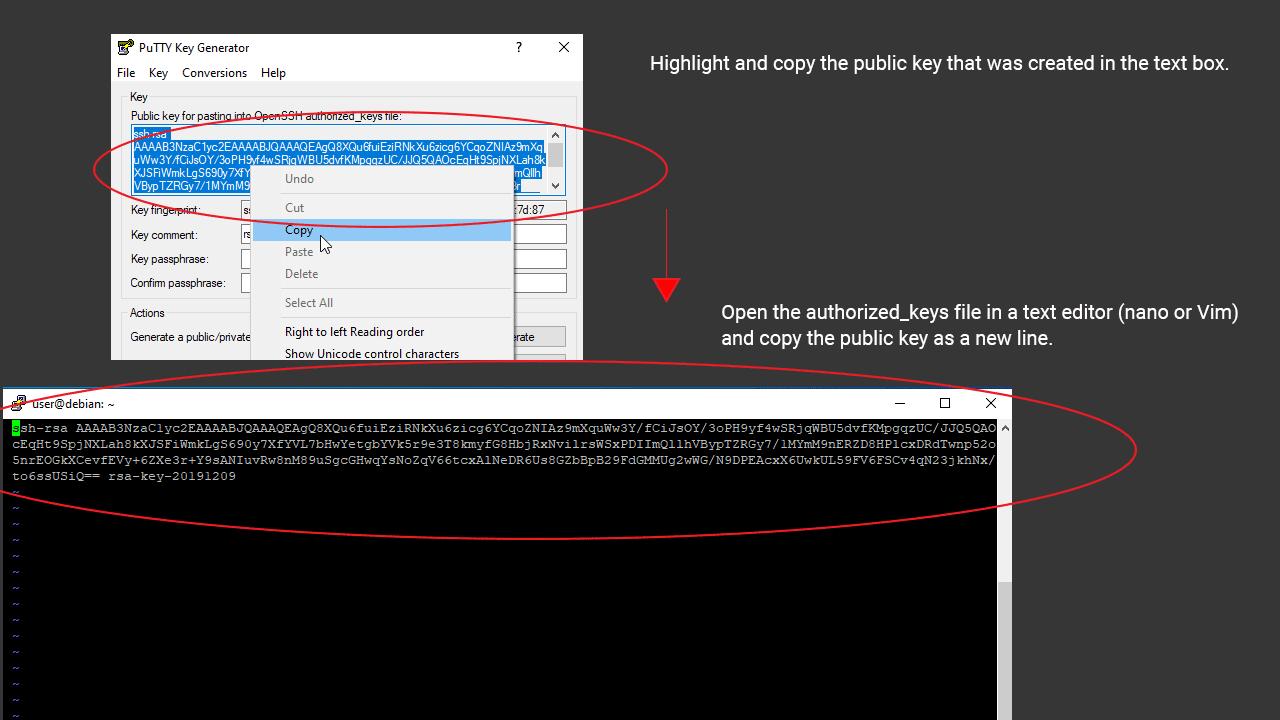
Step 4: After that, re-authenticate the key and paste the string you have just copied.

copy Copied!

nano ~/.ssh/authorized_keys

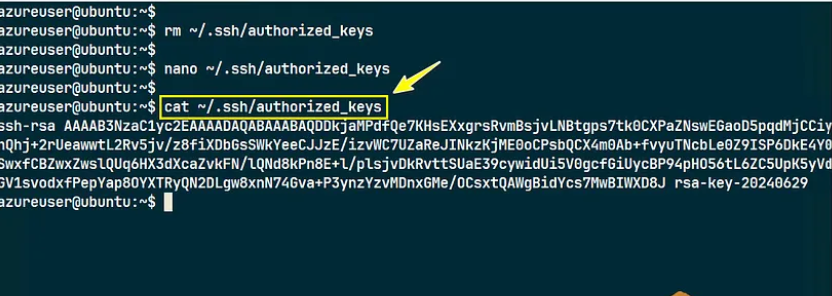
Step 5: Save the file and confirm if the key is authorized using the command:

copy Copied!

cat ~/.ssh/authorized_keys

reauthorize putty key.jpg

Now, close the session and confirm if you are still getting the «SSH: Server refused our key error.»

Solution 4: Check SSH Key Permissions

SSH is known for its strict permission mechanism on the .ssh directory and files. You need to enable permissions on both the file and directory of the users. To do that:

1. First enable the 700 permissions on the .ssh directory with the command:

copy Copied!

chmod 600 ~/.ssh/authorized_keys
chmod 755 ~

Solution 5: Check PuTTy SSH Server Configuration Issues

If the issue persists, you need to confirm the SSH daemon on the server is configured to allow public key authentication. It is a 3-step process as demonstrated in the steps below:

Step 1: First, allow for editing the SSH configuration file with the below cmdlet:

copy Copied!

sudo nano /etc/ssh/sshd_config;

sudo nano /etc/ssh/sshd_config

Step 2: Now, carefully type in and execute the commands to allow authorization:

copy Copied!

PubkeyAuthentication yes
AuthorizedKeysFile %h/.ssh/authorized_keys

Step 3: Restart the session for these modifications to take effect.

copy Copied!

sudo systemctl restart ssh

Solution 6: Regenerate SSH Key

It can occur that the SSH private key is corrupted, hindering the successful authentication with the PuTTy SSH server. In this scenario, it’s best to regenerate a new key pair using PuTTYgen.

Here are the steps to do that:

Step 1: Open PuTTYgen and click Generate to create a new private/public key pair.

Step 2: Now, copy the public key information and save the key as a .ppk file. 

Step 3: Finally, upload the public key to the server’s ~/.ssh/authorized_keys file.

Step 4: Execute the below command to check if the key is successfully integrated into the server:

copy Copied!

cat ~/.ssh/authorized_keys

Hopefully, the PuTTy Debian key will successfully authenticate the connection.

Possible Causes for the Server Refused Our Key Problem

As the name implies, this type of error happens when the attempt to access a server is denied. Generally, the error lies in the public-private key pair you using to authenticate the connection. Here are the major factors that often lead to the «PuTTy server refused our key» error:

  • Use the incorrect private key file when you try to connect.
  • Incorrect key format as PuTTy uses its own .ppk files.
  • The public key is not successfully authorized in ~/.ssh/authorized_keys. While adding the key, make sure it’s in a single line and doesn’t contain breaks or spaces.  
  • Issues in file and directory permissions. Enable the 700 permissions for Directory and 600 for File.
  • If the keys are corrupted, you’ll get the refuses our key error.

Bonus Tip: Boost Administrative Efficiency With Remote Desktop Software

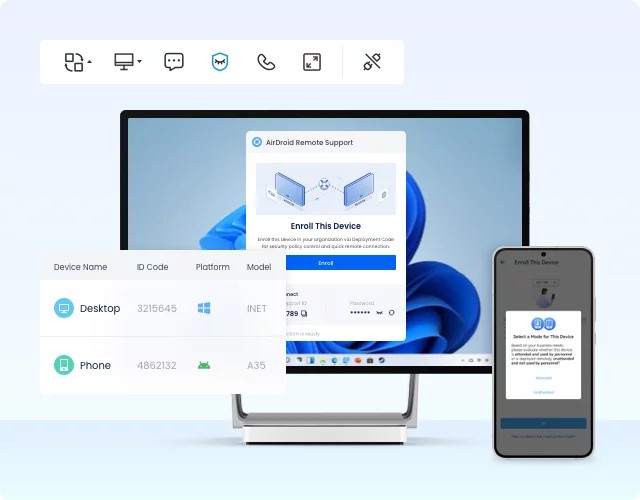
If you want a great tool for remote assistance, try AirDroid Remote Support. It comes loaded with all the necessary features to help you effectively control unattended devices, provide or receive remote assistance, and collaborate with your IT teams from anywhere.

AirDroid Remote Support

Its features like file transferring in bulk, device permission management, and voice chatting, help you increase productivity – and reduce the management costs. This tool is backed by advanced security algorithms and flexible premium plans.

The idea is to make it a go-to choice for both personal use and commercial enterprises.

FAQs

Q1: Can I convert my OpenSSH key to PuTTY’s format?

Yes, it’s possible to convert the SSH key, which is often in the .pem or .pub format, into PuTTy-supported .ppk format. For that:

  • Open PuTTYgen and click File > Load.
  • Browse to the path of the private key to load it.
  • Then, click the Save public key to save it as a .ppk file.

Q2: What permissions should the .ssh directory and files have?

For successful PuTTy in SSH key authentication, you must enable the following 2 permissions:

~/.ssh directory: 700

authorized_keys file: 600

Q3: How do you check the SSH server logs for key authentication?

To get additional information about why the PuTTy key was refused in Debian or Ubuntu, use the command:

copy Copied!

/var/log/auth.log

Final Remarks

This article provides various solutions to resolve the «Server refused our key in PuTTy SSH» problem.As it covers the issues of SSH key configuration, key format, and key permission, one of the solutions is likely to work for you.

Moreover, you must try AirDroid Remote Support as a one-stop solution to meet your personal and business remote management needs. Get uninterrupted access to all the Windows PCs in your organization from anywhere.


0

0

Всем привет, первый раз настраиваю SSH ключи и завис уже на 3 дня, хотя судя по всем гайдам работы там на 10 минут. Работаю на Виндовс 10 в Putty ключ беру через PuttyGen. Сначала создаю директорию .ssh и в ней authorized_keys (chmod 700 на папку .ssh и 600 на authorized_keys) Затем на PuttyGen генерирую код и через добавляю в authorized_keys. Открытый и личный ключ создаю в папку с самой Putty (C:\Program Files\PuTTY).В самом Putty провожу во кладке SSH путь к личному ключу. sshd_config выглядит так #AuthorizedKeysFile /.ssh/authorized_keys.
Подскажите пожалуйста в чем дело, есть сомнения, что совершаю банальные и неочевидные ошибки в силу неопытности, буду рад советам и подсказам

In this guide, we want to teach you how to Fix PuTTY Server Refused Our Key Error. PuTTY is a free implementation of  SSH (and telnet) for PCs running Microsoft Windows (it also includes a xterm terminal emulator). You will find PuTTY useful if you want to access an account on a Unix or other multi-user system from a PC (for example your own or one in an internet cafe).

You can now proceed to the guide steps below on the Orcacore website to resolve the PuTTY Server Refused Our Key Error.

Common Causes of PuTTY Key Error

This error can occur due to some reasons. Here are some common causes of this error:

  • Wrong Public Key
  • Incorrect Key Permissions
  • Key Not Added to Server
  • PuTTY Format Issue
  • Wrong SSH User
  • SSH Server Configuration Issues

In most cases, it is caused by the public key that isn’t copied correctly to your remote server. Follow the steps below to resolve the issue.

Table of Contents

It is a possible error message when you try to connect to the remote SSH server using PuTTY SSH Key: “Server refused our key“.

This happens because you haven’t copied your public key to the remote server or haven’t done it properly. In this guide, we want to show you how to troubleshoot PuTTY Key Error.

1. Open PuTTY Private key File

To resolve the PuTTY Server Refused Our Key Error, you need to open PuTTYgen, Go to File > Load Private key, and open your Private Key File.

PuTTYgen

At this point, you will see the Public key in the text box. Highlight it and copy it into your clipboard.

Putty Public key

Public key

Your public key should exist in the authorized_keys file of the user account you used to log in to the remote server. 

Log in to the Linux server and change to the home directory with the cd command:

cd ~/

Then, create the .ssh folder and the .ssh/authorized_keys file (if it doesn’t already exist):

# mkdir ~/.ssh
# touch ~/.ssh/authorized_keys

Open the authorized_keys file and paste the public key. Here we use vi editor:

vi ~/.ssh/authorized_keys

Paste your public key in the file. When you are done, save and close the file.

3. Connect to the Remote Server

To connect to the remote server. Open the PuTTY terminal and provide the IP address of the remote server. Then, Go to Connection > SSH > Auth and Load the private key after clicking on the Browse button.

Click on Open to establish an SSH connection to the Linux server. You should be able to connect to the server without getting the “Server refused our key” error.

Conclusion

The “PuTTY Server Refused Our Key” error occurs when trying to connect to a remote server using PuTTY with an SSH key, but the server rejects the key for authentication. This usually means the server does not recognize or accept the provided key. At this point, you have learned to troubleshoot, fix, or resolve Server Refused Our Key PuTTY SSH Key Error.

Hope you enjoy it. Please subscribe to us on Facebook, Twitter, and YouTube.

You may also like these articles:

Fix phpMyAdmin SSL Error Connection

Clear DNS Cache in Linux

Fix “apt-add-repository” Command Not Found on Debian 11

Resolve APT Error pkgproblemresolver Held Broken Packages

SMTP Can Not Find Mail Address in Ubuntu

CSF Error Path to iptables Not Set or Incorrect

When using Public Key authentication or trying to use SSH with your WWPass PassKey you may find yourself getting an error message Putty Fatal Error stating “Server refused our key” and “Disconnected: No supported authentication methods available (server sent: publickey)” after entering your username.  This is due to SSH not having read access to the “authorized_keys” file and, more often than not, it’s due to the user’s home directory being encrypted.  This error will display when the remote user is not logged in on the server (thus the SSH daemon/service can’t see the user’s home folder contents).

putty-refusal-message

The fix for this is pretty simple.  The steps are: Move the “authorized_keys” file to an always readable area, set proper user permissions and update the sshd_config file.

  1. Say the current “authorized_keys” file is in /home/joscor/.ssh/authorized_keys .  Since /home/joscor/ isn’t always readable, let’s move the keys file to something like /etc/ssh/keys/joscor/authorized_keys .  This can be done by executing (as root):

    # mkdir -p /etc/ssh/keys/joscor/
    # mv /home/joscor/.ssh/authorized_keys /etc/ssh/keys/joscor/

  2. Now that the files are in the right place, we need to set the proper user permissions for the folder and keys file.

    # chown -R joscor:joscor /etc/ssh/keys/joscor/
    # chmod 600 /etc/ssh/keys/joscor/

  3. Last, but definitely not least, we need to update the /etc/ssh/sshd_config file’s AuthorizedKeysFile variable to reflect our changes.

    # vi /etc/ssh/sshd_config
    AuthorizedKeysFile %h/.ssh/authorized_keys -> AuthorizedKeysFile /etc/ssh/keys/%u/authorized_keys

  4. All of the settings have been changed, now restart the SSH daemon and login using your SSH client!

    # service ssh restart

Понравилась статья? Поделить с друзьями:
0 0 голоса
Рейтинг статьи
Подписаться
Уведомить о
guest

0 комментариев
Старые
Новые Популярные
Межтекстовые Отзывы
Посмотреть все комментарии
  • Программа для просмотра камер по ip адресу для windows
  • Windows loader вин 7
  • Windows live bootable usb
  • Не устанавливается exe файл на windows 10
  • Как установить bluetooth на компьютер windows 10 без адаптера