
- Заметки
- Windows
01.08.2019
Добавление ролей и компонентов
Установка самой оси Microsoft Windows Server 2016 в рамках данной статьи рассматриваться не будет, только отдельно сама установка терминального сервера.
На будущем терминальном сервере открываем диспетчер сервера через Панель управления (Win + R Control) — Администрирование — Диспетчер серверов (Server Manager)
или через команду «Выполнить» (Win + R ServerManager). После чего переходим по вкладке Локальный сервер (Local Server)
Открываем мастер добавления ролей и компонентов, жмём далее, в типе установки отмечаем радиокнопкой пункт Установка ролей или компонентов (Role-based or feature-based installation),
выбираем сервер, жмём далее, чекбоксом отмечаем Службы удаленных рабочих столов. В службах ролей отмечаем для установки две службы: Лицензирование удаленных рабочих столов (Remote Desktop Licensing) и Узел сеансов удаленных рабочих столов (Remote Desktop Session Host),
жмём далее и потом установить. Дожидаемся конца установки и перезагружаем сервер, если это не было сделано автоматически по завершению установки.
Активация лицензии удалённых рабочих столов
Средства — Remote Desktop Services — Диспетчер лицензирования удаленных рабочих столов (RD Licensing Manager).
Раскрываем древо, правой кнопкой по нашему серверу вызываем выпадающее меню и выбираем пункт активировать сервер.
В мастер активации сервера вначале заполняем сведения об организации, а после устанавливаем саму лицензию. При выборе программы лицензии указываем Другое соглашение,
и указываем ключи активации купленной лицензии 6565792 (или любой другой. Для тестового сервера нагуглите за 2 минуты:»номер соглашения windows server 2016«. Ключ 6565792 — также является результатом выдачи поисковика google).
Выбираем версию продукта Windows Server 2016и тип лицензии Клиентская лицензия служб удаленных рабочих столов (на пользователя). Готово!
Но Средство диагностики лицензирования удаленных рабочих столов сообщает нам, что сервер лицензирования не включён. Чтож, поправим это дело через политики. Вызываем
командное меню «Выполнить» Win + R gpedit.msc. Переходим: Конфигурация компьютера (Computer Configuration) — Административные шаблоны (Administrative Templates) — Компоненты Windows (Windows Components) — Службы удаленных рабочих столов (Remote Desktop Services) — Узел сеансов удаленных рабочих столов (Remote Desktop Session Host) — Лицензирование (Licensing).
Тут поправим Использовать указанные серверы лицензирования удаленных рабочих столов (Use the specified Remote Desktop license servers) и Задать режим лицензирования удаленных рабочих столов (Set the Remote licensing mode).
Обновляем сведения в оснастке Средство диагностики лицинзирования удаленных рабочих столов (Win + R lsdiag.msc). Теперь всё ок!
Изменение стандартного порта подключения
Стандартный порт для RDP подключения: 3389
Открываем реестр (Win + R regedit), переходим по ветке:
HKEY_LOCAL_MACHINE\System\CurrentControlSet\Control\Terminal Server\WinStations\RDP-Tcp
Находим ключ PortNumber, меняем систему исчисления на Десятичную и задаем необходимый номер порта.
Так же это можно сделать через командную строу:
reg add "HKLM\System\CurrentControlSet\Control\Terminal Server\WinStations\RDP-Tcp" /v PortNumber /t REG_DWORD /d НОВЫЙ_НОМЕР_ПОРТА /f
А чтобы вы потом смогли подключиться по новому порту, то вам в фаервол нужно прописать правило
netsh advfirewall firewall add rule name="RDP PORT НОВЫЙ_НОМЕР_ПОРТА" dir=in action=allow protocol=TCP localport=НОВЫЙ_НОМЕР_ПОРТА
И перезапустить службу
net stop TermService && net start TermService
Возможные проблемы
Подключение было запрещено
Скорее всего вы при попытке подключиться увидите сообщение:»Подключение было запрещено, так как учетная запись пользователя не имеет прав для удаленного входа в систему«,
а всё из-за того, что 1 — терминальный сервер не настроен в домене на разрешение подключения к нему определённых пользователей; 2 — вы не добавили в группу Пользователи удаленного рабочего стола ни одного пользователя.
Возможно вам будет полезна статья о том как из Windows 10 сделать Терминальный сервер.
CredSSP
Ещё можете столкнуться с такой вот ошибкой: An authentication error has occurred. The function is not supported. This could be due to CredSSP encryption oracle remediation.
О ней я писал ранее в статье:»Ошибка RDP подключения: CredSSP encryption oracle remediation. Как исправить?».
А возникновение этой ошибки связано с тем, что на терминальном Windows сервере, на который идёт подключение, не установлены последние обновления безопасности (CredSSP обновления для CVE-2018-0886). После обновления система по умолчанию запрещает подключаться к удалённым серверам по RDP со старой версией протокола CredSSP.
Отсутствуют доступные серверы лицензирования удаленных рабочих столов
После настройки сервера всё шло хорошо, но только 120 дней. Потом случилось следущее:
Удаленный сеанс отключен, поскольку отсутствуют доступные серверы лицензирования удаленных рабочих столов.
Обратитесь к администратору сервера
А это означает что у вас установлен ключ льготного периода (grace period licensing), который необходимо удалить. Для этого вам нужно залогиниться на сервер локально.
Где удалять ключ льготного периода? В реестре под именем L$RTMTIMEBOMB. Идём по ветке реестра:
HKEY_LOCAL_MACHINE\SYSTEM\CurrentControlSet\Control\Terminal Server\RCM\GracePeriod
Но не тут то было! У вас недостаточно прав, но и это нас не остановит. Жмём правой кнопкой мыши и меняем владельца на ветку реестра и даём полные права самому себе, после чего спокойно удаляем эту гадость).
Если не поможет, то советую переустановить роли и компоненты.
Автору на кофе ☕ или просто поднять мотивацию писать больше статей для вас 😉 !
Отдельное спасибо всем, кто отправляет донатики 😀! Очень приятно и неожиданно. Благодаря вам сайт может и в дальнейшем обходиться без рекламных баннеров.
Для настройки терминального сервера к нему распространяются ниже представленные требования исходя из ПО, которое будет запускаться пользователями и количества пользователей:
- Процессор: от 4 ядер
- Оперативная память : 1 ГБ на каждого пользователя + 4 ГБ для работы ОС + 4 ГБ запас
- Дисковая система: для большей отказоустойчивости нужно настроить RAID-массив
Для установки выделить два диска: первый логический диск от 50 ГБ. До 100 ГБ выделить для установки ОС, второй логический диск выделить под пользовательские профили с расчетом минимум 1 ГБ на пользователя - Ширина канала для терминального сервера: 250 Кбит/с на пользователя
Бесплатный сервер 1С для подписчиков нашего telegram-канала !
У нас вы можете взять терминальный сервер 1С в аренду с бесплатными индивидуальными настройками.
Первоначальные настройки Windows Server 2016:
- Настроить статический IP-адрес сервера
- Проверить правильность настройки времени и часового пояса
- Установить все обновления системы
- Задать понятное имя для сервера и, при необходимости, ввести его в домен
- Включить доступ до сервера по удаленному рабочему столу для удаленного администрирования
- Настроить запись данных профилей пользователей на второй логический диск
- Активировать лицензию Windows Server 2016
Настройка терминального сервера
Начиная с Windows 2012 терминальный сервер должен работать в среде Active Directory.
Если в вашей локальной сети есть контроллер домена, просто присоединяйте к нему сервер терминалов, иначе установите на сервер роль контроллера домена.
Установка роли и компонентов
В панели быстрого запуска открываем Диспетчер серверов:
Нажимаем Управление – Добавить роли и компоненты:
Нажимаем Далее до «Выбор типа установки». Оставляем Установка ролей и компонентов и нажимаем Далее дважды:

В окне «Выбор ролей сервера» выбираем Службы удаленных рабочих столов:

Кликаем Далее, пока не появится окно «Выбор служб ролей» и выбираем следующие:
- Лицензирование удаленных рабочих столов
- Узел сеансов удаленных рабочих столов

Нажимаем Далее, при появлении запроса на установку дополнительных компонентов соглашаемся.
При необходимости, также выставляем остальные галочки:
- Веб-доступ к удаленным рабочим столам — возможность выбора терминальных приложений в браузере.
- Посредник подключений к удаленному рабочему столу — для кластера терминальных серверов посредник контролирует нагрузку каждой ноды и распределяет ее.
- Узел виртуализации удаленных рабочих столов — для виртуализации приложений и запуска их через терминал.
- Шлюз удаленных рабочих столов — центральный сервер для проверки подлинности подключения и шифрования трафика. Позволяет настроить RDP внутри HTTPS.
Нажимаем Далее и в следующем окне Установить. Дожидаемся окончания процесса установки и перезагружаем сервер.
Установка служб удаленных рабочих столов
После перезагрузки открываем Диспетчер серверов и нажимаем Управление – Добавить роли и компоненты:
В окне «Выбор типа установки» выбираем Установка служб удаленных рабочих столов и нажимаем Далее:

В окне «Выбор типа развертывания» выбираем Быстрый запуск и нажимаем Далее:

В «Выбор сценария развертывания» — Развертывание рабочих столов на основе сеансов — Далее:

Еще раз Далее — при необходимости, ставим галочку «Автоматически перезапускать конечный сервер, если это потребуется» и кликаем по Развернуть.
Настройка лицензирования удаленных рабочих столов
Для корректной работы сервера, необходимо настроить службу лицензирования. Для этого открываем диспетчер серверов и кликаем по Средства – Remote Desktop Services – Диспетчер лицензирования удаленных рабочих столов:

В открывшемся окне кликаем правой кнопкой мыши по нашему серверу и выбираем Активировать сервер:
В открывшемся окне дважды кликаем Далее – заполняем форму – Далее – Далее – Снимаем галочку «Запустить мастер установки лицензий» – Готово.
Снова открываем диспетчер серверов и переходим в «Службы удаленных рабочих столов»:
В «Обзоре развертывания» кликаем по Задачи – Изменить свойства развертывания:

В открывшемся окне переходим в Лицензирование – Выбираем тип лицензий – прописываем имя сервера лицензирования (в данном случае локальный сервер) и нажимаем Добавить:

Применяем настройки, нажав OK.
Добавление лицензий
Открываем диспетчер серверов и кликаем по Средства – Remote Desktop Services – Диспетчер лицензирования удаленных рабочих столов:
В открывшемся окне кликаем правой кнопкой мыши по нашему серверу и выбираем Установить лицензии:
В открывшемся окне нажимаем Далее:

Выбираем программу, по которой куплены лицензии, например, Enterprise Agreement:

Нажимаем Далее – вводим номер соглашения и данные лицензии – выбираем версию продукта, тип лицензии и их количество:

Нажимаем Далее – Готово.
Проверить статус лицензирования можно в диспетчере серверов: Средства – Remote Desktop Services – Средство диагностики лицензирования удаленных рабочих столов.

Мы также готовы оказать помощь в установке и настройке терминального сервера.
Нашим клиентам мы предлагаем реализацию данного проекта и его последующее обслуживание в рамках ИТ-аутсорсинга.
Remote Desktop Protocol (RDP) is an essential feature for system administrators and IT professionals managing Windows Server environments. It allows users to access and control a server remotely, streamlining administrative tasks and offering convenience for troubleshooting and system monitoring. In this article, we’ll walk you through the step-by-step process of how to configure RDP on Windows Server 2016.
Whether you’re new to Windows Server or looking to brush up your skills, this guide covers everything you need—from enabling RDP to securing your connection.
What Is Remote Desktop Protocol (RDP)?
RDP is a proprietary protocol developed by Microsoft that permits a user to log in to others computer over a network connection. It provides a graphical interface for remote administration & is widely used for managing servers, especially in enterprise conditions.
By default, RDP not enabled on Windows Server 2016 after installation, so you’ll need to manually configure it.
Prerequisites
Before you begin, ensure the following:
- You are logged into the server with administrative privileges.
- The server is connected to a network.
- Windows Firewall is set to permit RDP connections.
- The RDP port (default 3389) is not blocked by any external firewall or router.
Step-1: Enable Remote Desktop
Option 1: Enable via Server Manager
- Open Server Manager by clicking the icon on the taskbar or pressing Windows + S & searching for “Server Manager”.
- Click on Local Server in the left pane.
- Seeing for the Remote Desktop settings on the right.
- Press Disabled next to Remote Desktop Protocol to open the Method Properties window.
- Select the radio button: Allow RDP merger to this PC.
- (Optional but recommended) Check the box to permit connections only from personal desktops running Remote Desktop with Network Level Authentication (NLA) for added security.
- Click Apply, then OK.
Option 2: Enable via System Properties
- Press the Win + R buttons, write sysdm.cpl, & hit Submit.
- Navigate to the Remote tab.
- Under the Remote Desktop section, choose:
“Allow remote connections to this computer”. - (Optional) Enable NLA.
- Click Apply and then OK.
Step-2: Configure Firewall Rules
Windows Server 2016 comes with built-in firewall protection that may block RDP if not properly configured.
Enable RDP through Windows Firewall:
- Open Control Panel → System & Security → Win Firewall.
- Press the Permit button for an app or peculiarity through Windows Firewall.
- Scroll down to find RDP & make sure both Private & Public are checked.
- Click OK.
Or configure manually via PowerShell:
powershell   Copy
Enable-NetFirewallRule -DisplayGroup "Remote Desktop"
This order enables all firewall rules associated with Remote Desktop.
Step-3: Join Users to Remote Desktop Group
By default, only administrators can connect using RDP. If you want to allow non-admin users:
- Open Method Properties (Right-press on Start → System → Remote Settings).
- Under the Remote Desktop section, click Select Users.
- In the new window, click Add.
- Type the username of the user(s) you need to grant RDP permision to.
- Click Check Names to verify, then OK.
Step 4: Note the Server’s IP Address
To connect to the server remotely, you’ll needs its IP address:
- Open Command Prompt or PowerShell.
- Type:
bash   Copy
ipconfig
- Looks for IPv4 Address under the active network adapter.
Note down this IP; you’ll use it to connect via the RDP client.
Step-5: Connect to the Server via RDP
Once RDP enabled and firewall access is configured, you can connect from any Windows PC.
On the client machine:
- Open Remote Desktop Connection (search for mstsc.exe).
- Enter the Internet Protocol address or hostname of the Windows Server 2016 machine.
- Click Connect.
- Enter the username & password for a user authorized to merge.
- Once authenticated, you remotely connected to your server.
Bonus: Secure Your RDP Connection
RDP is powerful but can be a security risk if improperly configured. Here are tips to make your connection more secure:
1. Use Network Level Authentication (NLA)
This requires users to authenticate before a session established, reducing the risk of DDoS and brute-force attacks.
2. Change the Default RDP Port
By default, RDP runs on port 3389. Modifying the port can help avoid automated invasion.
To change the RDP port:
- Open Registry Editor (regedit).
- Navigate to:
pgsql   Copy
HKEY_LOCAL_MACHINE\System\CurrentControlSet\Control\Terminal Server\WinStations\RDP-Tcp
- Find PortNumber, change it (e.g., to 3390), and restart the server.
Don’t unlearn to permit the new ports in the firewall!
3. Use a VPN
Access the server via a Virtual Private Network (VPN) before using RDP. This adds a layer of encryption & keeps your server off the public internet.
4. Set Account Lockout Policies
This confines repeated login attempts & helps defend against brute-force attacks.
- Go to Group Policy Editor (gpedit.msc).
- Navigate to:
PC Settings → Windows Settings → Security Settings → AC Policies → Account Lockout Policy.
Troubleshooting Tips
If you’re unable to connect:
- Ensure RDP enabled.
- Verify firewall rules allow inbound RDP traffic.
- Check if the RDP service is running with:
powershell   Copy
Get-Service -Name TermService
Make sure the server isn’t behind a NAT or firewall that blocks port 3389.
Confirm user permissions.
Conclusion
Configuring RDP on Windows Server 2016 is a straightforward but essential task for anyone managing remote systems. Once on, it offers a powerful way to control your server from anywhere in the world. By following the steps in this guide and implementing the suggested security measures, you can use RDP with confidence and peace of mind.
Remote Desktop is a staple in server administration — learning how to set it up properly ensures you are prepared for modern IT demands.

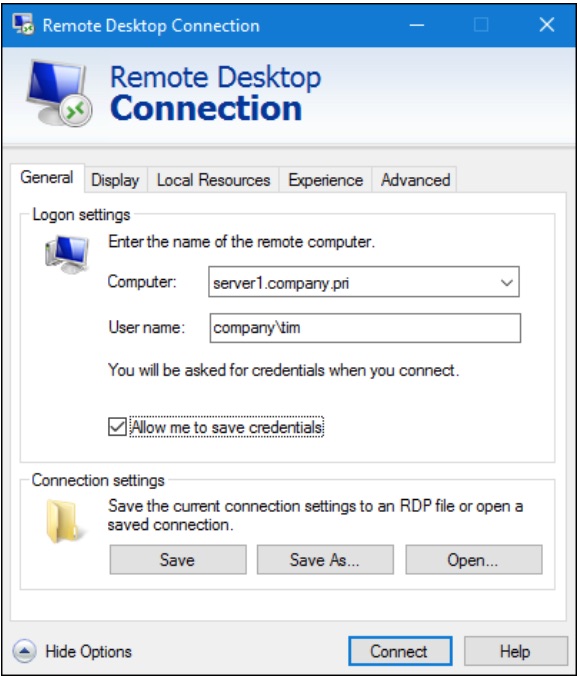
Remote Desktop Protocol (RDP) is a Microsoft-proprietary remote access protocol that is used by Windows systems administrators to manage Windows Server systems remotely. What sets RDP apart from, say, Windows PowerShell or Secure Shell (SSH) remoting is the presence of the full graphical desktop, as shown in Figure 1.
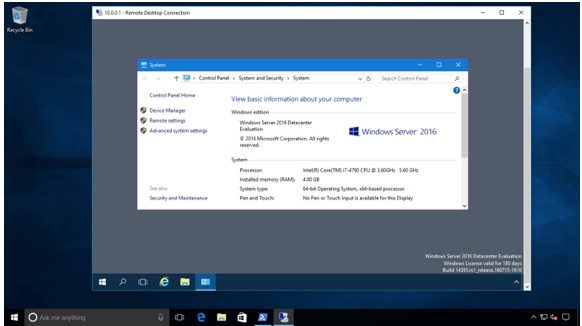
MORE: Best Remote Access Software and Solutions
By default, the RDP server component listens for incoming connections on TCP port 3389 by default, although this can be changed by the administrator for security reasons.
To be sure, Microsoft’s current push is for admins to reduce their reliance upon RDP and instead (a) deploy Windows Servers in Server Core or Nano mode; and (b) employ Windows PowerShell command-line remote administration instead of RDP.
Microsoft’s justification for this advice is two-fold:
- A GUI layer consumes unnecessary system resources
- A GUI layer broadens the attack surface of your servers
Regardless, many admins are accustomed to RDP-based remote administration, and seek to do so even in the newly released Windows Server 2016 operating system. Let’s learn how to enable RDP in Server 2016 (tl;dr: the process is identical to Windows Server 2012 R2).
Server Manager
Open the Server Manager console, navigate to the Local Server node, and click the Remote Desktop hyperlink as shown in Figure 2.
Get Tom’s Hardware’s best news and in-depth reviews, straight to your inbox.
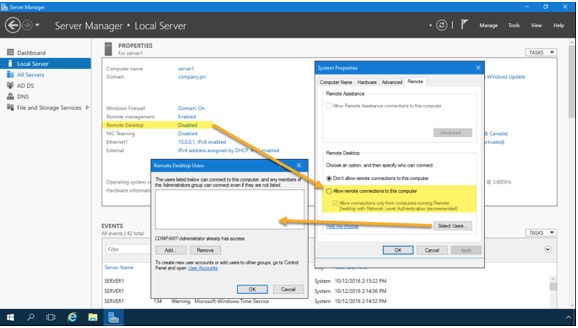
The Remote Desktop hyperlink is simply a shortcut to the System Properties sheet from the System Control Panel item. Select Allow remote connections to this computer, and optionally enable Allow connections only from computers running Remote Destkop with Network Level Authentication (recommended).
Network Level Authentication (NLA) protects Windows Server against denial-of-service (DoS) attacks by requiring authentication to take place before any graphical session is established by the server. NLA also conserves server system resources.
Windows PowerShell
From a lower-level perspective, incoming RDP connections are enabled on a server through two Registry values and a Windows Firewall rule.
Open an elevated Windows PowerShell session and run the following commands. This first one creates the fDenyTSConnections value and sets it to 0 (off). This makes sense, because we don’t want to deny Terminal Services (TS) connections.
New-ItemProperty -Path ‘HKLM:SystemCurrentControlSetControlTerminal Server’ -Name ‘fDenyTSConnections’ -Value 0 -PropertyType dword -Force
The next command creates and enables the UserAuthentication (Network Layer Authentication) value; NLA is a good idea and you should consider enabling it by default on your servers.
New-ItemProperty -Path ‘HKLM:SystemCurrentControlSetControlTerminal ServerWinStationsRDP-Tcp’ -Name ‘UserAuthentication’ -Value 1 -PropertyType dword -Force
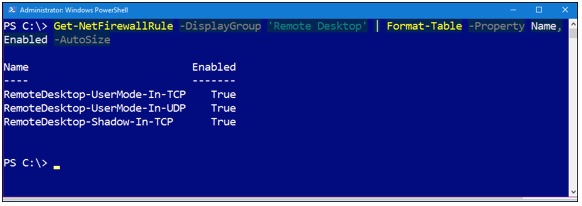
The next command enables the predefined «Remote Desktop» Windows Firewall rule. We can then invoke the Get-NetFirewallRule PowerShell cmdlet to verify as shown in Figure 3.
Enable-NetFirewallRule -DisplayGroup ‘Remote Desktop’
Group Policy
The chances are good that you want to standardize RDP behavior across all your infrastructure servers. Therefore, we turn to Group Policy to accomplish this goal.
Start by creating, linking and scoping a new Group Policy Object (GPO) that targets the servers that should share RDP server settings.
Next, navigate to the following Group Policy path and add a new Restricted Groups entry (shown in Figure 4):
Computer ConfigurationPoliciesWindows SettingsSecurity SettingsRestricted Groups
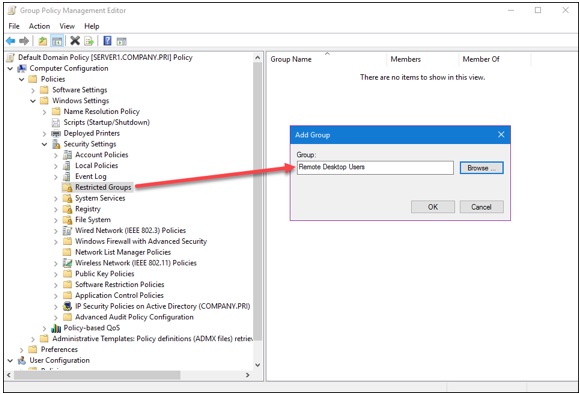
You can customize the membership in the servers’ built-in Remote Desktop Users group; members of this group can establish RDP sessions to the server. Note that the local Administrators group (and, by extension, the Domain Admins global group) is automatically granted this privilege in Active Directory.
The following three Group Policy settings govern:
- Windows Firewall incoming RDP exceptions
- User right to establish RDP sessions
- Requiring NLA
Computer ConfigurationAdministrative TemplatesNetworkNetwork ConnectionsWindows FirewallDomain ProfileWindows Firewall: Allow Inbound Remote Desktop exceptions
Computer ConfigurationAdministrative TemplatesWindows ComponentsRemote Desktop ServicesRemote Desktop Session HostConnectionsAllow user to connect remotely by using Remote Desktop Services
Computer ConfigurationAdministrative TemplatesWindows ComponentsRemote Desktop ServicesRemote Desktop Session HostSecurityRequire user authentication for remote connections by using NLA
Creating the Client Connection
Windows Client and Windows Server both include the Microsoft RDP client, called Remote Desktop Connection. My favorite way to invoke this tool is to:
Press WINDOWS KEY+R
Type mstsc (which stands for «Microsoft Terminal Services Client»)
Press ENTER
I show you the Remote Desktop Connection user interface in Figure 5.
What’s cool about RDP clients is that they are available for just about every desktop or mobile operating system. Here is a representative list:
- Android: Microsoft Remote Desktop
- iOS: Microsoft Remote Desktop
- Linux: rdesktop
- macOS: Microsoft Remote Desktop
- Windows Phone: Microsoft Remote Desktop
Note that Windows Server supports only two simultaneous RDP sessions at once. If you need more than that, then you’ll have to install the Remote Desktop Services (RDS) Session Host server role and purchase additional RDS connection licenses from Microsoft.
Final Thoughts
If you’ve configured RDP on previous Windows Server versions, then you’ll find that Windows Server 2016 behaves the exact same way. Keep in mind, however, that Microsoft’s ever-widening embrace of «assume breach» security posture and the hybrid cloud scenario and its accompanying «manage herds, not pets» philosophy means the emphasis is on command-line automation rather than on-off RDP GUI sessions.
- 10 Best New Features in Windows Server 2016
- Windows 10 for IT Pros: Tutorials, Tips and Tricks
- Top 6 Windows 10 Apps for IT Pros
,
This article contains step by step instructions on how to install and configure the Remote Desktop Services on a Windows Server 2016 or 2012. In Windows Server 2016 & 2012 the Terminal Services role has been replaced by the Remote Desktop Session Host (RDSH) role service and is part of Remote Desktop Services (RDS). A Remote Desktop Session Host (RDSH) server, provides to remote users the ability to access the applications on the RDS host server and the company resources from anywhere by using an RDP client.
In this tutorial you ‘ll learn how to setup and configure a Windows Server 2016 or 2012 as a Remote Desktop Session Host (Terminal) server, in order to provide remote desktop sessions, based on the number of Remote Desktop Services client access licenses (RDS CALs) installed on the RDSH server.
How to Setup and Configure a Windows Server 2016/2012 as a Remote Desktop Session Host Server (Terminal Server).
Notes:
1. The mentioned steps below, can be applied either on a Domain Controller or in a standalone server 2016/2012.
2. If the Terminal services are installed on a server that will act as a Domain Controller also, then first install the Active Directory Domain Service (AD DS) role service and promote the Server to a Domain Controller, before installing the Remote Desktop Session Host (RDSH) role service (Terminal Service).
3. Keep in mind that the below configuration does provide access to RemoteApp programs or the RDWeb site, because the Remote Desktop Connection Broker role service will not be installed.
Step 1. Install Remote Desktop Services on Server 2016/2012.
Step 2. Activate the Remote Desktop License Server.
Step 3. Install Licenses on the Remote Desktop License Server.
Step 4. Configure RD Session Host role to use the local Remote Desktop Licensing server & Set the Remote Desktop licensing mode.
Step 5. Add RD Clients (Users) to the Remote Desktop Users Group.
Step 6. Allow the log on through remote desktop Services.
Step 1. Install Remote Desktop Licensing and Remote Desktop Session Host role services.
1. Open ‘Server Manager’ and click on Add Roles and Features.

2. At the first screen of ‘Add Roles and Features wizard’ leave the Role-based or feature-based installation option and click Next.
 Server 2016/2012")
3. At the next screen, leave the default option «Select server from the server pool» and click Next.

4. Select the Remote Desktop Services and click Next.

5. Leave the default settings and click Next at Features and Remote Desktop Services screens.
6. At Role Services screen, select the Remote Desktop Licensing role service and then click Add Features.

7. Then select the Remote Desktop Session Host role service and click Add Features again.

8. When done, click Next to continue.

9. Finally click Install to install the Remote Desktop Services: Remote Desktop Licensing and Remote Desktop Session Host.

10. When the installation is completed close the ‘Add Roles and Features Wizard’ and restart your server.

Step 2. Activate the Remote Desktop License Server.
1. Simultaneously press the Windows + R keys to open run command box.
2. Type licmgr.exe and press Enter to open the RD Licensing Manager *
* Note: Alternately, you can launch the RD Licensing Manager, from Control Panel –> Administrative Tools –> Remote Desktop Services –> Remote Desktop Licensing Manager.

3. At the right pane, right click on the server name and select Activate Server.

4. Click Next at the Welcome screen and then click Next again at Connection method options.

5. At ‘Company Information’ window, fill the required fields and click Next twice to activate your License Server.

6. When the activation is completed, leave checked the ‘Start Install Licenses Wizard’ checkbox and click Next.

7. Continue to next step.
Step 3. Install Licenses on the Remote Desktop License Server.
1. At ‘Welcome to the install licenses wizard’, click Next

2. On the License Program page, select the appropriate program through which you purchased your RDS CALs, and then click Next.

3. According the License Program you selected on the previous page, type either the license code or the agreement number provided when you purchased your RDS CALs and then click Next.
4. On the Product Version and License Type page, select the appropriate product version, license type, and the quantity of the RDS CALs based on your RDS CAL purchase agreement, and then click Next.
5. When the RDS CALs installed on the server, click Finish. *
TIP: If you cannot activate the RDS Server automatically, then try to activate it using the Web Browser or via Telephone. To do that:
a. Right-click on the Server’s name and select Properties.
b. Change the Connection Method to Web Browser or to Telephone. When done, click OK.
c. Finally, right click on the server name, select Activate Server and follow the onscreen instructions to completed the activation.
Step 4. Configure RD Session Host role to use the local Remote Desktop Licensing server & Set the Remote Desktop licensing mode.
1. Open Group Policy Editor. To do that:
1. Simultaneously press the Windows + R keys to open run command box.
2. Type gpedit.msc and press Enter.
2. In Group Policy Editor navigate to:
- Computer Configuration\Administrative Templates\Windows Components\Remote Desktop Services\Remote Desktop Session Host\ Licensing
3. At the right pane, double click at Use the specified Remote License Servers.

4. Click Enabled, and then at ‘License server to use‘ field, type the RDS license server name and click OK.

5. Then open the Set the Remote Desktop licensing mode setting.

6. Click Enabled and then specify the licensing mode (Per User or Per Device) for the RDS host server and then click OK again.

7. Close Group Policy Editor.
8. Verify the RD Licensing configuration, by going to: Windows Control Panel –> Administrative Tools –> Remote Desktop Services –> RD Licensing Diagnoser.

Step 5. Add RD Clients (Users) to the Remote Desktop Users Group.
1. Open Server Manager.
2. From Tools menu, select Active Directory Users and Computers. *
* Note: If the RD Session Host Service is not installed on the Domain Controller, use the ‘Local Users and Groups’ snap-in or the ‘Remote’ tab in the ‘System Properties’ on the RDS host server, to add the remote desktop users.

3. Double click at your domain on the left and then select Builtin.
4. Open Remote Desktop Users on the right pane.

5. At Members tab, click Add.
6. Type the name(s) of the users that you want to give Remote access to the RDS Server and click OK.

7. After selecting the remote desktop users, click OK again to close the window.
8. Continue to step-6 below.
Step 6. Allow the log on through remote desktop Services.
1. Open the Local Group Policy Editor. To do that:
1. Simultaneously press the Windows + R keys to open run command box.
2. Type gpedit.msc and press Enter.
2. In Group Policy Editor navigate to: Computer Configuration > Windows Settings > Security Settings > Local Policies > User Rights Assignment.
3. At the right Pane: double click at Allow log on through Remote Desktop Services.

4. Click Add User or Group.
5. Click Object Types, check all the available objects (Users, Groups, & Built-in security principals) and then click OK.

6. Type remote desktop users and then click OK.

7. Finally click OK again and close Group Policy Editor.
8. Now you ‘re ready to connect to the Remote Desktop Session Host Server 2016/2012 from any Remote desktop client.
That’s it! Let me know if this guide has helped you by leaving your comment about your experience. Please like and share this guide to help others.
If this article was useful for you, please consider supporting us by making a donation. Even $1 can a make a huge difference for us in our effort to continue to help others while keeping this site free:
- Author
- Recent Posts
Konstantinos is the founder and administrator of Wintips.org. Since 1995 he works and provides IT support as a computer and network expert to individuals and large companies. He is specialized in solving problems related to Windows or other Microsoft products (Windows Server, Office, Microsoft 365, etc.).