
Все способы:
- Причины и характер ошибки
- Способ 1: Установка цветового профиля
- Способ 2: Управление драйвером монитора
- Замена драйвера на рекомендуемый системой
- Удаление текущего драйвера
- Скачивание драйвера от производителя монитора
- Использование CD с драйвером
- Способ 3: Проверка подключения
- Способ 4: Изменение режима работы монитора
- Способ 5: Изменение разрешения дисплея
- Способ 6: Обращение в поддержку производителя монитора
- Вопросы и ответы: 0
Причины и характер ошибки
HDR — метод цветопередачи, который позволяет монитору передавать более яркие и насыщенные цвета, улучшая тем самым качество отображения содержимого. Появление ошибки «Сертификация HDR: не найдено» при попытке использования данной технологии в Windows 11 может свидетельствовать о том, что монитор не поддерживает ее или необходимые обновления не были установлены.
В некоторых случаях проблема вызвана неправильными настройками операционной системы, из-за чего технология просто не включается там, где должна работать. Узнать, поддерживается ли вообще HDR на вашем мониторе, можно только в его документации или через информацию на официальном сайте.
Метод исправления ситуации зависит исключительно от того, чем была вызвана ошибка и доступен ли HDR на мониторе в принципе. Иногда помогает изменение некоторых настроек Windows 11, в других случаях устанавливаются специальные обновления для монитора или проверяется его подключение. Все это и будет разобрано в следующих разделах данного материала.
Способ 1: Установка цветового профиля
Если ваш монитор точно должен поддерживать HDR, возможно, для него выбран просто неправильный цветовой профиль и необходимый следует указать вручную. В большинстве случаев это осуществляется путем выбора подходящего профиля из существующих по умолчанию. Реже опытные пользователи самостоятельно находят файлы с профилями для поддержки HDR и выбирают их в качестве основных. Определение корректного профиля осуществляется следующим образом:
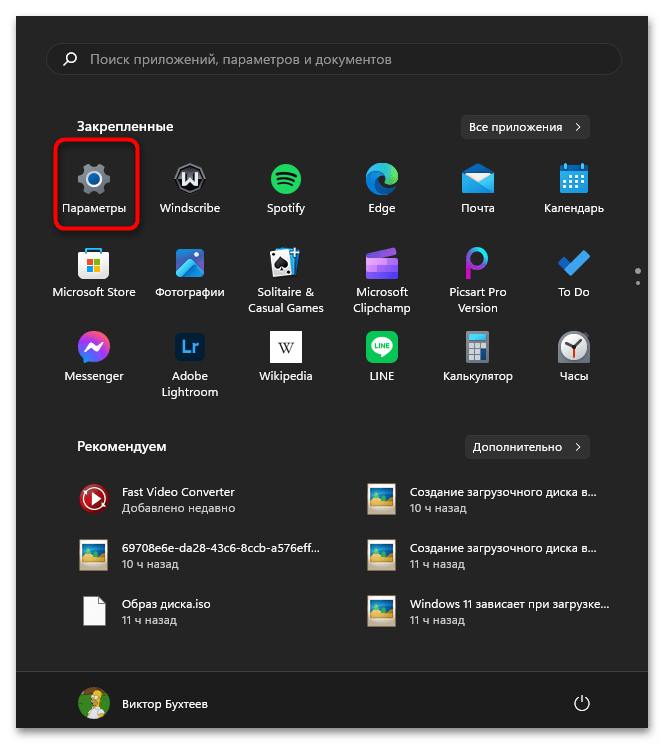
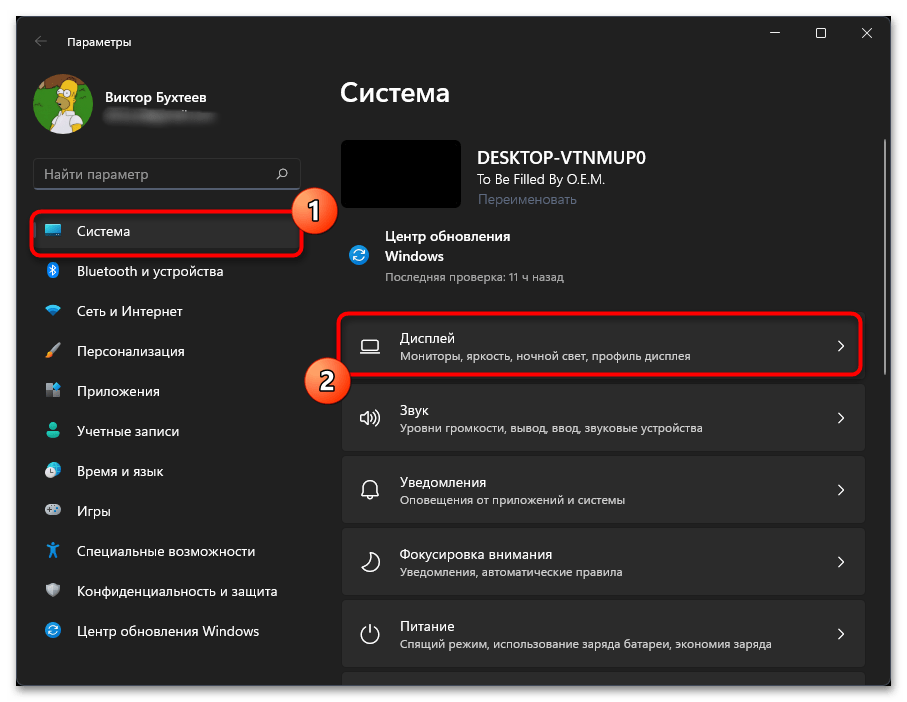
- Откройте «Пуск» и перейдите в «Параметры», кликнув по значку с изображением шестеренки в списке закрепленных.
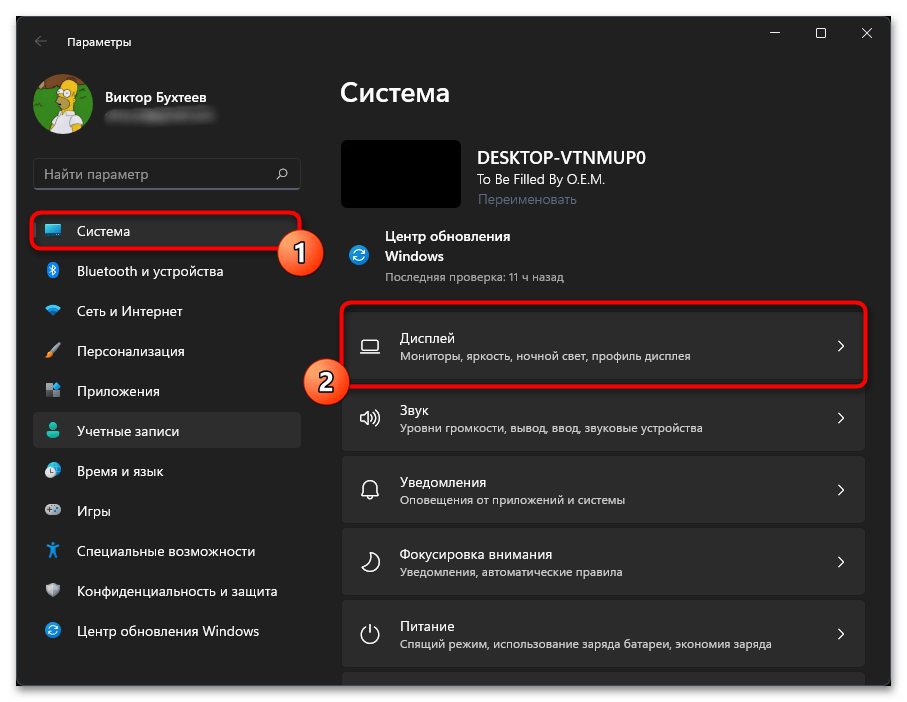
- На панели слева вас интересует раздел «Система» и категория «Дисплей».
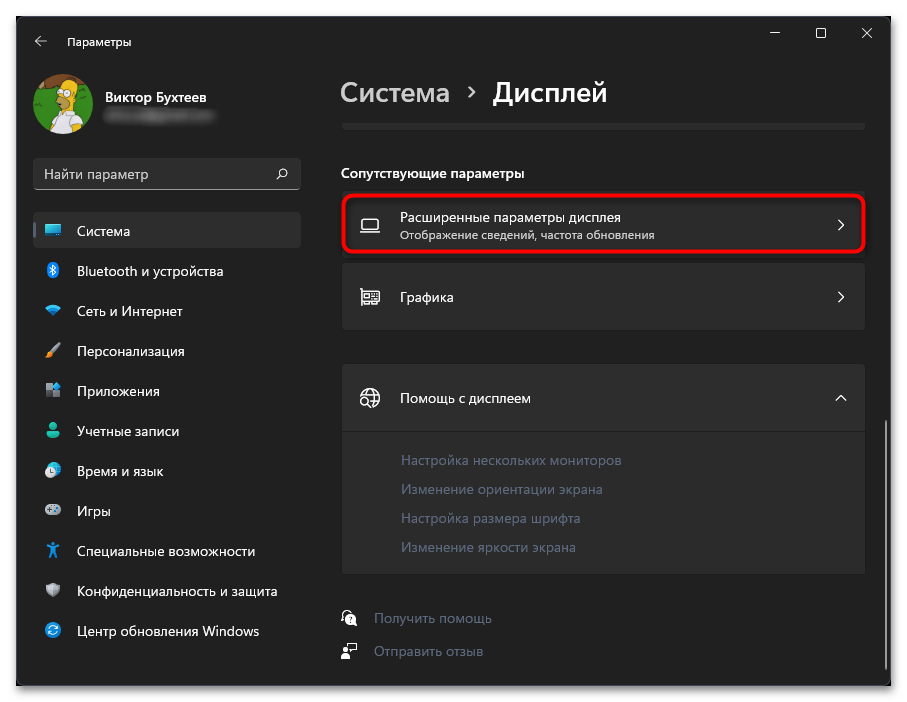
- Прокрутите список до блока «Сопутствующие параметры» и нажмите по плитке «Расширенные параметры дисплея».
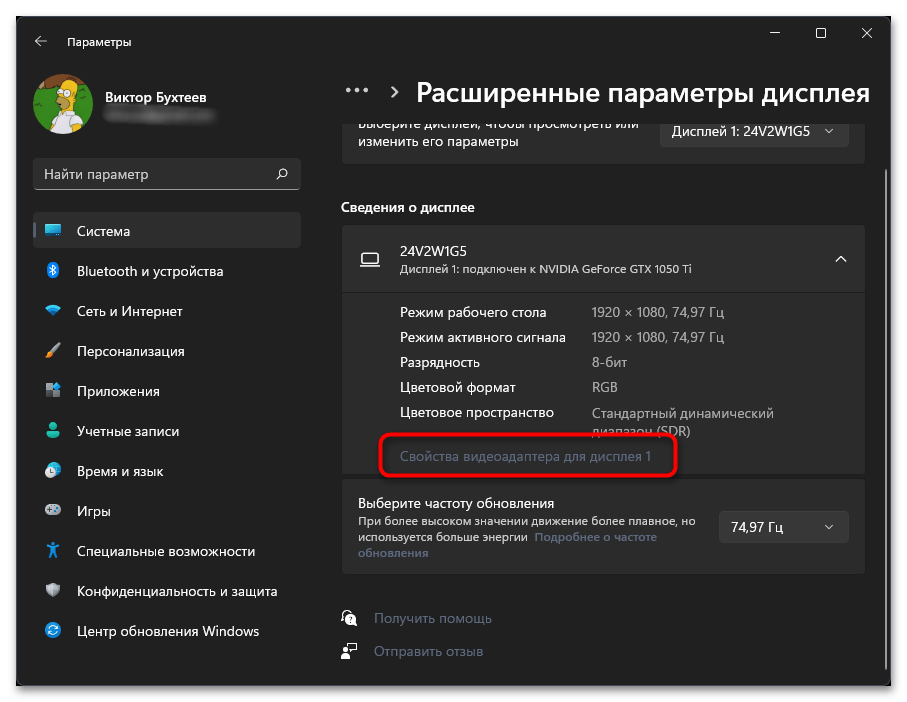
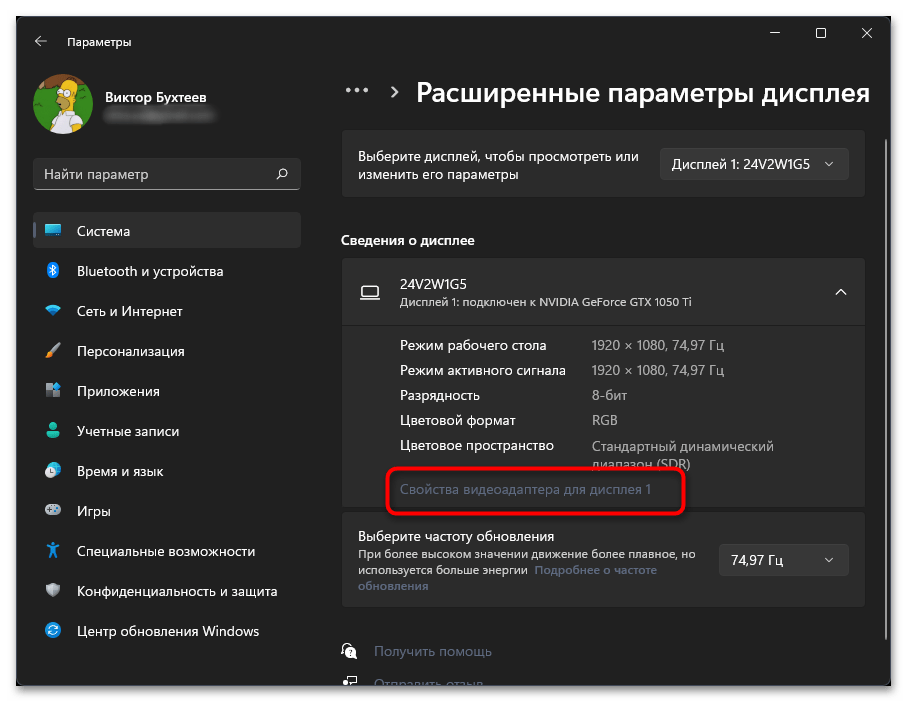
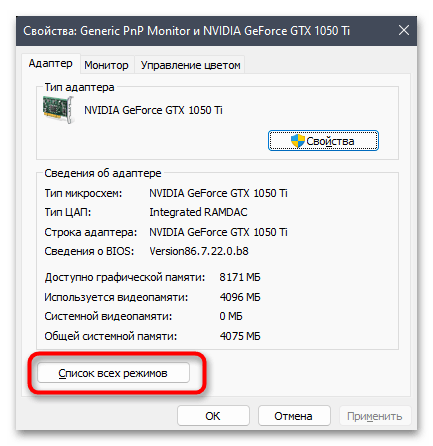
- В конце перечня сведений о дисплее будет ссылка «Свойства видеоадаптера для дисплея», по которой и нужно нажать для открытия следующего окна.
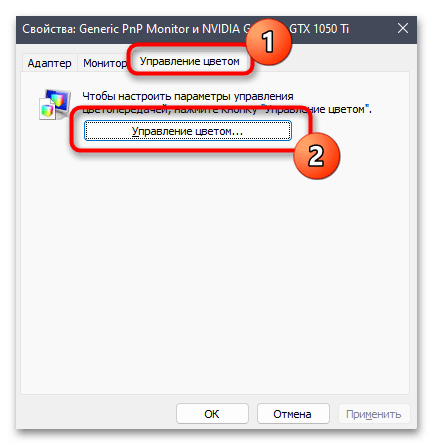
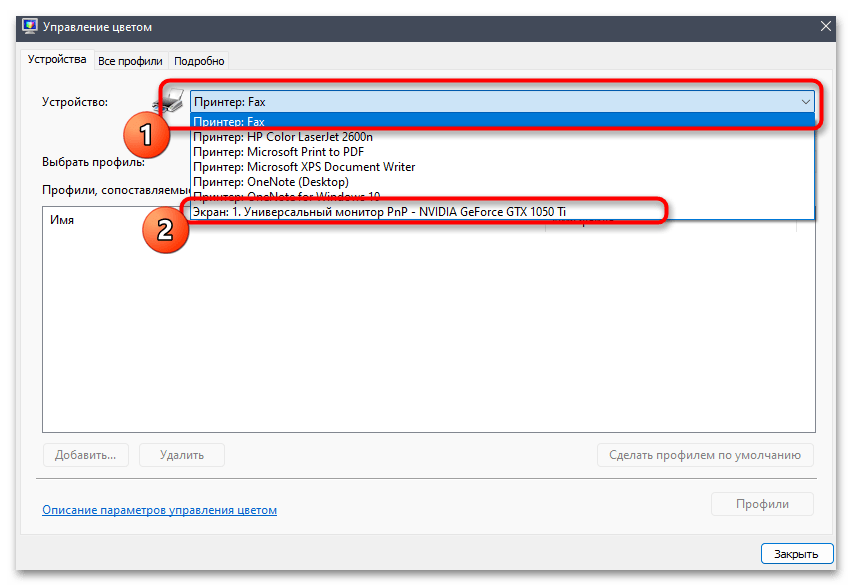
- В нем перейдите на вкладку «Управление цветом» и нажмите по кнопке с аналогичным названием.
- Изначально устройство, скорее всего, будет выбрано неправильно, поэтому разверните список и найдите там свой экран.
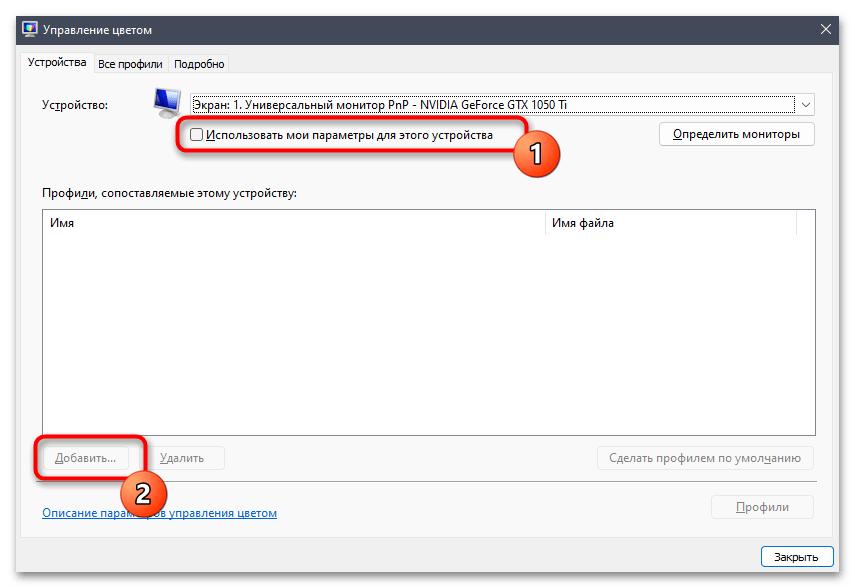
- Активируйте для него галочку «Использовать мои параметры для этого устройства» и щелкните по «Добавить», чтобы ознакомиться с доступными цветовыми профилями или установить свой.
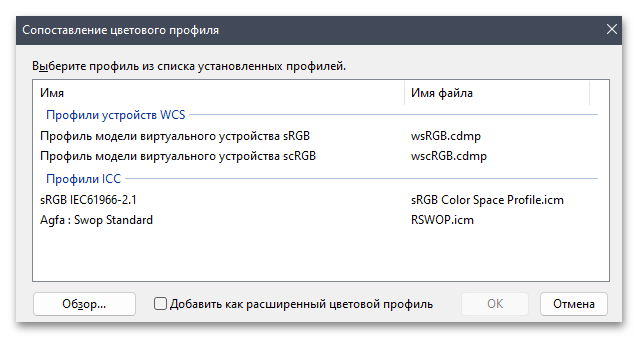
- Если в списке со стандартными цветовыми профилями есть те, которые поддерживают HDR, можете выбрать и попробовать проверить работу монитора. Для установки своих профилей щелкните по «Обзор» и выберите ранее полученный файл. Гарантировать работу пользовательских профилей мы не можем, поскольку все зависит от того, под какие цели они создавались и являются ли вообще корректными.

Способ 2: Управление драйвером монитора
Метод управления драйвером монитора можно считать комплексным, поскольку он подразумевает выполнение ряда различных действий, направленных на улучшение его работы, включение необходимых технологий, среди которых HDR, а также исправление возможных конфликтов. Мы расставим следующие рекомендации по сложности их реализации и общей действенности. Вы можете приступить к выполнению первой инструкции и переходить к следующим в том случае, если исправить ситуацию с работой HDR не получится.
Замена драйвера на рекомендуемый системой
Многие мониторы с поддержкой HDR не нуждаются в дополнительном драйвере от разработчиков и должны нормально функционировать с технологией сразу после подключения. Однако иногда может потребоваться замена драйвера на рекомендуемый системой, если он не установился по умолчанию. Данный метод прост в реализации и не требует использования сторонних программ или поиска подходящих файлов в сети, поскольку все происходит через системное меню Windows 11.
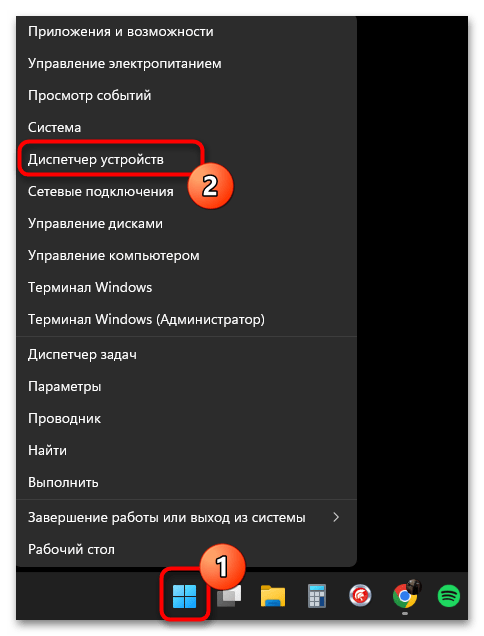
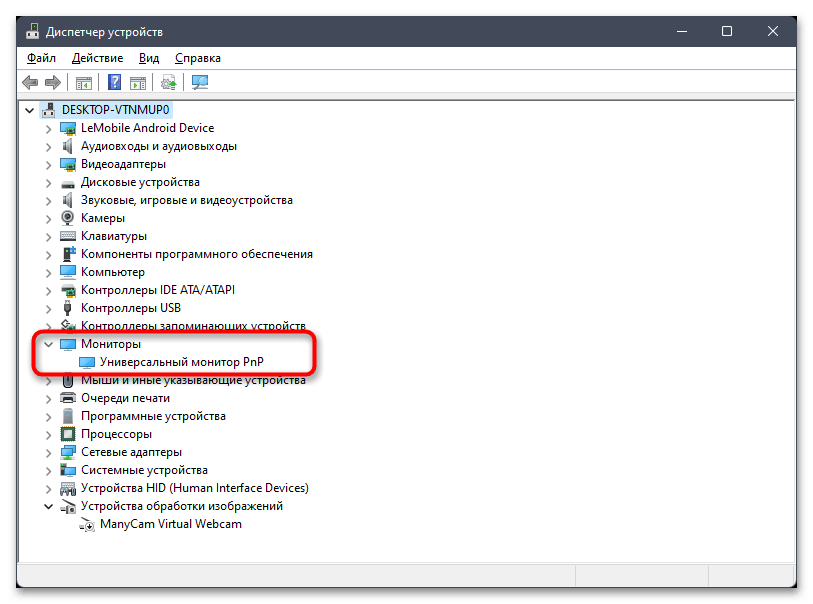
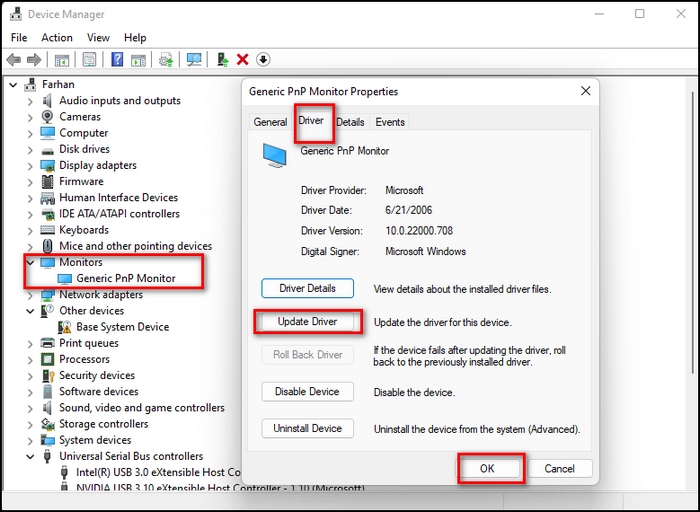
- Щелкните правой кнопкой мыши по «Пуску» и из появившегося контекстного меню выберите пункт «Диспетчер устройств».
- Разверните раздел «Мониторы» и дважды щелкните по названию используемого монитора для перехода в его свойства.
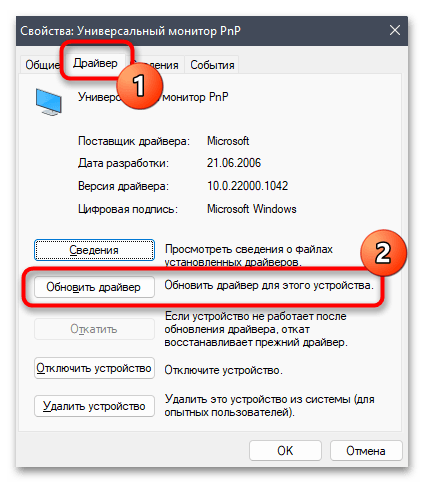
- Выберите вкладку «Драйвер» и нажмите кнопку «Обновить драйвер».
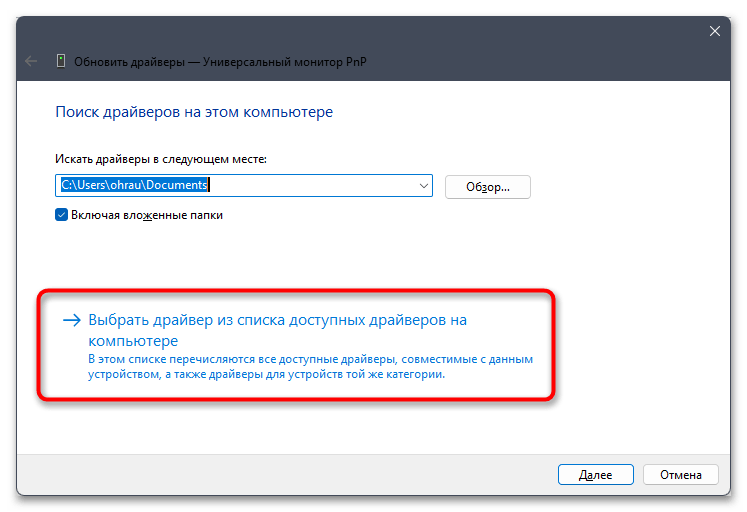
- В новом окне щелкните по «Найти драйверы на этом компьютере».
- Далее выберите «Выбрать драйвер из списка доступных драйверов на этом компьютере».
- Скорее всего, вы увидите только один драйвер для универсального монитора. Подтвердите его установку, по завершении перезагрузите компьютер и проверьте, сможете ли вы использовать HDR.

Удаление текущего драйвера
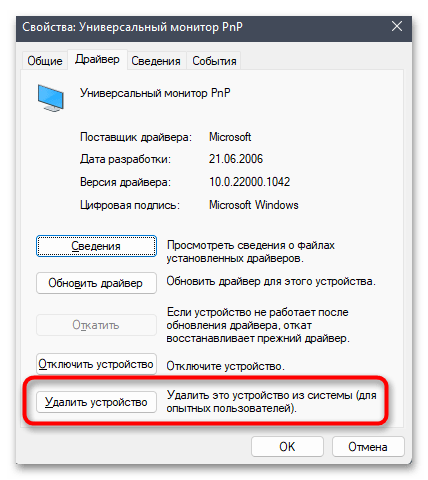
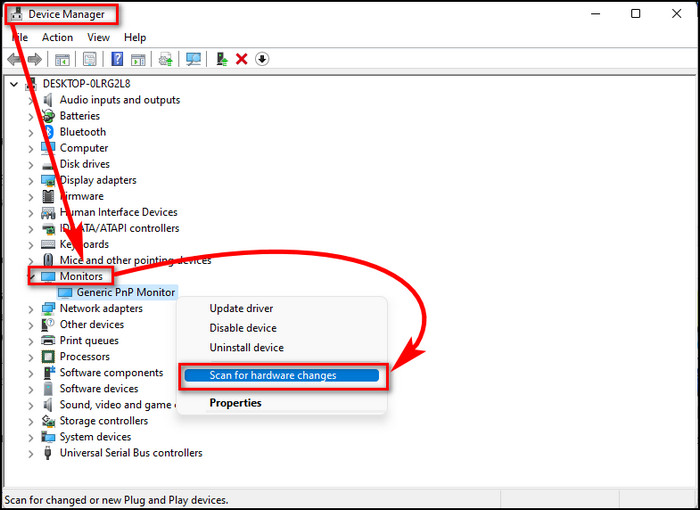
Вариант с удалением драйвера монитора можно использовать как сам по себе, чтобы вместо него установился стандартный, так и в связке со следующими рекомендациями, когда речь идет об инсталляции фирменного ПО от производителя устройства. Это действие не должно привести к пропаже изображения на экране, поскольку его вывод обеспечивается и без всяких драйверов. Удаление происходит через то же меню «Диспетчера устройств», о котором уже было сказано выше. В нем вам необходим пункт «Удалить устройство».
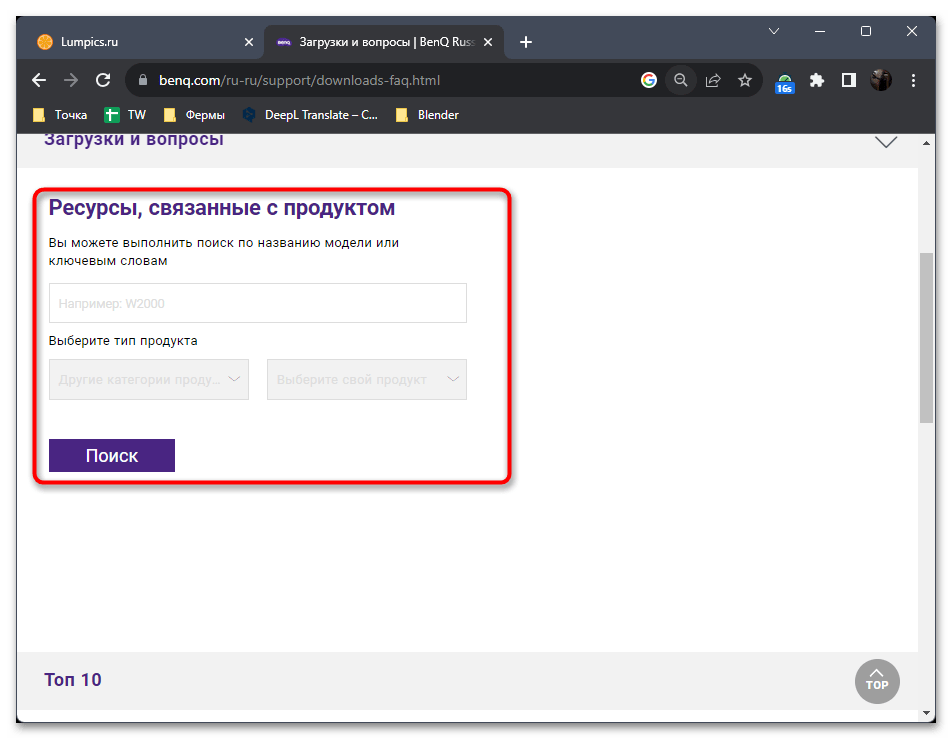
Скачивание драйвера от производителя монитора
Если монитор оснащен поддержкой HDR и дополнительными технологиями, скорее всего, производитель сделал для него специализированный драйвер, который обеспечивает корректную работу всех этих функций. Проще всего его найти на официальном сайте, введя название модели своего устройства. Однако есть и другие методы, более детальную информацию о которых вы найдете в другой статье на нашем сайте по ссылке ниже.
Подробнее: Поиск и инсталляция драйверов для монитора
Использование CD с драйвером
Предполагается, что сейчас во многих современных системных блоках и ноутбуках просто отсутствует слот для считывания CD и DVD, однако производители различного оборудования все еще часто выпускают файлы для устройств на таких дисках и поставляют их в комплектации. Относится это и к мониторам, в комплекте с которыми вполне может быть диск с драйвером. Его можно использовать в том случае, если предыдущий вариант поиска файлов не увенчался успехом или же предложенная версия ПО не подходит для включения HDR.

Способ 3: Проверка подключения
В большинстве случаев тип подключения монитора к компьютеру для работы HDR не важен, как и используемый видеоадаптер (дискретный или интегрированный) для вывода изображения. Однако иногда возникают конфликтные ситуации, из-за чего некоторые технологии становятся недоступными. Советуем подключить монитор к дискретной видеокарте, а не к материнской плате, а также проверить надежность соединения и по возможности выбрать другой свободный порт. Иногда решением станет замена HDMI на DisplayPort или наоборот, что зависит от текущего варианта подключения.
Подробнее: Подключение монитора к компьютеру

Способ 4: Изменение режима работы монитора
Если покопаться в настройках операционной системы, то в окне управления драйвером видеоадаптера можно найти список всех доступных режимов работы дисплея. Возможно, среди них как раз находится поддерживающий HDR, но по каким-то причинам не выбранный как активный. Давайте проверим это и изменим настройку, если таковая будет присутствовать в списке режимов.
- Находясь в «Параметрах», на панели слева выберите раздел «Система», затем переключитесь на категорию «Дисплей».
- Щелкните по «Расширенные параметры дисплея», чтобы перейти в следующее меню.
- В нем нажмите по ссылке «Свойства видеоадаптера для дисплея».
- Далее необходимо отобразить список всех доступных режимов, для чего внизу отведена кнопка с соответствующим названием.
- В списке режимов найдите, есть ли среди них подходящее разрешение экрана с поддержкой HDR. Если да, выберите его и посмотрите, получилось ли тем самым активировать технологию.
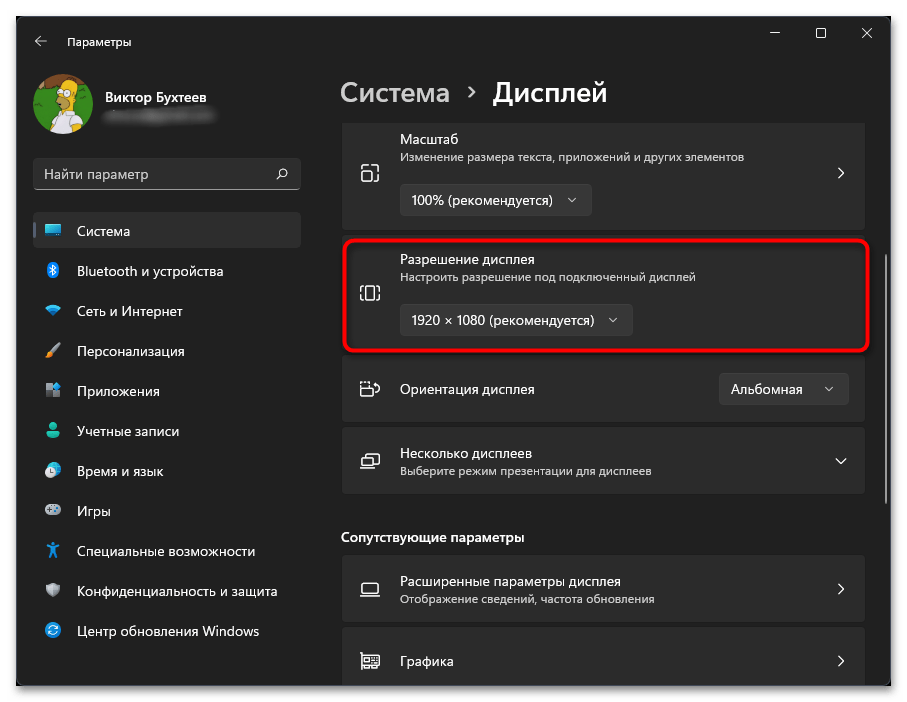
Способ 5: Изменение разрешения дисплея
По большей части данный метод исправления HDR подойдет для обладателей 4K-мониторов, которые не используют максимальное разрешение экрана. Дело в том, что на некоторых моделях устройств HDR перестает работать, если разрешение экрана понижается. Вам понадобится открыть параметры дисплея, что уже было показано выше, развернуть «Разрешение дисплея» и выбрать последний вариант из списка. Изменения вступают в силу сразу же, и вы можете проверить, пропадет ли ошибка с работой HDR.
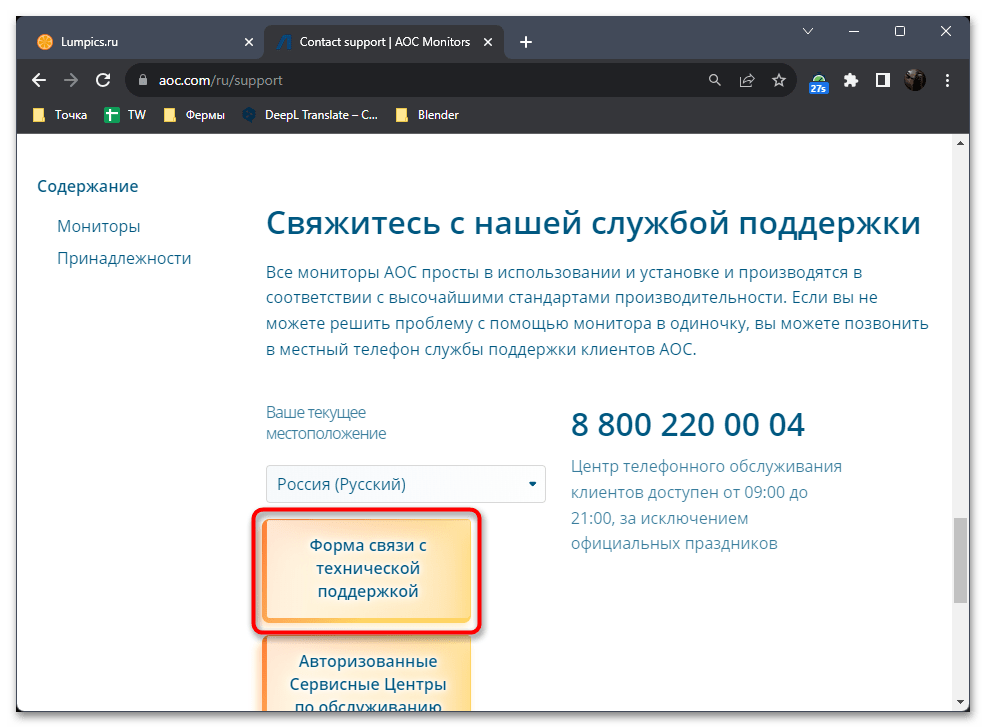
Способ 6: Обращение в поддержку производителя монитора
Если при помощи предложенных методов решения вам так и не удалось найти подходящее, возможно, проблема заключается в отсутствии поддержки HDR на вашем мониторе или неочевидных настройках, которые необходимо включить конкретно для этой модели. Для решения ситуации оптимальным выходом станет обращение в поддержку на официальном сайте производителя. Вам помогут разобраться с драйверами и требуемыми параметрами. Возможно, даже подскажут, совместим ли режим HRD с конкретными играми, если он не работает как раз в них.
Наша группа в TelegramПолезные советы и помощь
HDR technology is well-liked by consumers, and Windows users want their displays to support the latest technology. But Windows 11 may show that HDR certification is missing.
If your display supports HDR, but Windows shows you that HDR certification is missing, you might feel confused. But do not worry. I have you covered.
As a technology geek, I have studied many different operating systems. Windows is one of the most popular operating systems out there, so I want to help people solve their problems related to Windows.
If you face the HDR certification not found in Windows 11 problem, I will tell you all the fixes in this article.
So keep reading this article until the end to find out how to fix the HDR certification not found on Windows 11 problem.
What is HDR?
Before we tell you why HDR certification can be missing on Windows 11, it is better first to be clear about what HDR is and what HDR certification means.
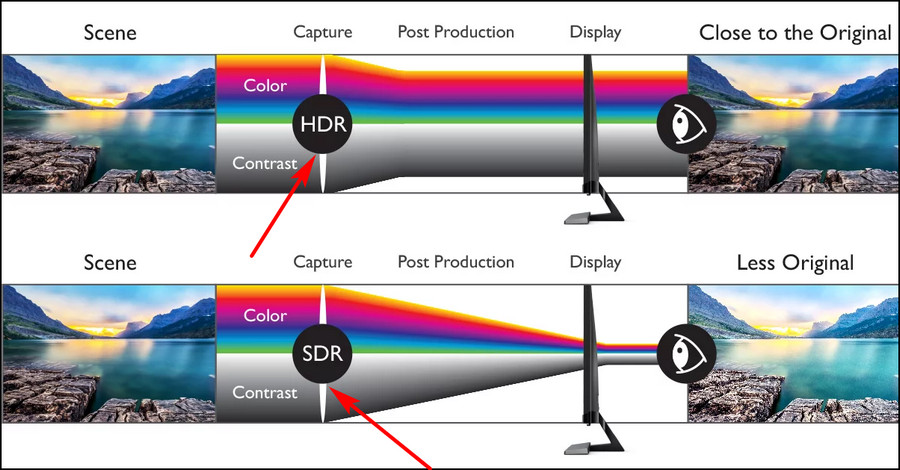
The high-dynamic-range (HDR) technique enhances the display signal quality. The retroactively labeled standard dynamic range is compared with it (SDR).
With HDR, the luminance and colors of movies and images are represented differently in the signal, allowing for the portrayal of brighter and more detailed highlights, darker and more detailed shadows, and a more comprehensive range of more intense colors.
Compatible screens can get a higher quality image source thanks to HDR. It doesn’t enhance a display’s inherent qualities (brightness, contrast, and color capabilities). Because not all HDR displays are created equal, HDR material will seem different on each device.
Prior to HDR, pixel number, density (resolution), and display frame rate increases were the most common ways to improve display fidelity. HDR, on the other hand, increases the perceived fidelity of the existing individual pixels.
Despite the enormous advancements in screen and display technology since the obsolescence of the earlier cathode ray tubes (CRT), standard dynamic range (SDR) is still dependent on and constrained by these features.
The greatest brightness level that SDR formats can depict is about 100 nits. This figure rises to somewhere between 1,000 and 10,000 nits for HDR. HDR isn’t usually utilized to its full potential in practice. Peak brightness limits for HDR content are frequently 1,000 or 4,000 nits.
Because of this technology, the brightest parts of an image can be brighter, and the darkest parts of an image can be darker. If a WCG is used, the colorful part of an image can be even more colorful.
HDR is often confused as being the same as WCG. WCG(Wide Color Gamuts) is a specific subset of colors. HDR displays usually have WCG. But it is not exclusive to HDR displays. Even SDR displays can have WCG.
Check out the easiest way to get Windows 10 for free as A student.
This article aims to provide you with the fix to the HDR certification not found in Windows 11 problem. But it is essential to know the cause of any problem before we try to solve it.
HDR Certification is not detected on Windows 11 because your display does not have an HDR certification or the upgrade has not been provided for your specific monitor.
You might not be able to use some display features because the driver for your monitor may be outdated or deactivated in Device Manager.
You can attempt to update your display drivers to resolve the problem if your specific display supports HDR, but the system is not showing it.
Hardware drivers are pieces of software that tell your operating system, programs, and apps how to communicate with your devices.
Imagine that your OS is in English while your hardware is in French. The language translators that translate from French to English and vice versa are hardware drivers.
As a result, monitor drivers are crucial to the efficient operation of your display. You may experience some issues if the drivers are old.
You can also experience the same problems if some driver files are corrupted. Corrupted driver files can force hardware not to function properly.
What Are the Different HDR Certifications?
When you are getting yourself a new display, it could be built like a laptop or tablet or an external monitor. In either case, you should get displays that are HDR certified.
There are different HDR certifications to look for when trying to buy a display capable of utilizing HDR technology.
Here are some of the certifications:
- AMD FreeSync Premium Pro
- NVIDIA G-SYNC ULTIMATE
- Dolby Vision
- VESA DisplayHDR
DisplayHDR certification has multiple tiers. You can find them on the DisplayHDR official website. A higher number indicates a higher tier.
If your display doesn’t appear as certified when you go to Settings > System > Display > Advanced Display, it may not have an HDR certification.
The other possibility is that the display manufacturer may not have publicly made HDR certification information for your display available.
Visit the website of the device’s manufacturer to determine whether your display is HDR-certified.
Follow our guide to fix blue screen on Windows 11.
How to Fix HDR Certification Not Found on Windows 11?
Now that we know the causes, the fixes are fairly simple. To deal with outdated monitor drivers, we need to update the monitor driver. We need to reinstall the monitor driver to deal with corrupted monitor driver files.
Fix 1: Update Monitor Driver
If your monitor driver is out of date, you may not be able to utilize HDR technology on your computer. You need to update your monitor drivers in this situation.
Follow these steps to update your monitor drivers on Windows 11:
- Right-click on the Windows Start Menu icon.
- Select the Device Manager afterward.
- Select the Monitors section to view the list of available monitors.
- Select and double-click on the Generic PnP Monitor. This should open the Generic PnP Monitor Properties.
- Select the Driver section and then select the Update Driver choice to start updating the driver.
- Follow the instructions on your screen to complete the process of updating your monitor driver.

Complete the driver update procedure by following the steps mentioned above. Check to see if your issue has been resolved. If not, move on to the next fix.
Fix 2: Reinstall Monitor Driver
If driver files get corrupted, you need first to remove all the corrupted files. Then you reinstall a fresh copy of the display driver. You can find the latest version of your display driver online. I will show you how to uninstall your already existing copy.
Follow these steps to uninstall your monitor driver:
- Right-click on the Windows Start Menu icon.
- Select the Device Manager afterward.
- Find the Monitors list in the Device Manager window and expand the list.
- Right-click on your Generic PnP Manager driver.
- Select Uninstall device from the drop-down menu.
- Select the Scan for Hardware Changes icon at the top of your screen.

You may have to wait a while, as the process may take some time. Once complete, you can get your display driver back by using the official website.
Check out the easiest way to install active directory users & computers on Windows 11.
Fix 3: Contact Your Display Manufacturer
Getting in touch with the monitor maker is the final, and certainly not least, easy way to fix the Windows 11 HDR certificate missing issue.
There may be issues with your display that are unrelated to the software side of things. In this case, the hardware may need specific modifications.
There could also be particular problems that manufacturers best understand. If standard solutions to a particular problem do not work, it is always best to contact support from the manufacturers.
Thus, if none of those mentioned above solutions appear to be able to fix the HDR certificate missing issue, you can try contacting the manufacturer of your monitor directly and explaining your exact issue in order to fix it.
Requirements for HDR Video in Windows 11
To find the specifications for a specific laptop or tablet, visit the device manufacturer’s website. Your display, computer, and graphics card must meet certain requirements in order to play HDR video in Windows 11.
These are the requirements for HDR Video in Windows 11:
Display Requirements
Your display may be an external monitor linked to your PC, or it may be a built-in display like the one found on a laptop, tablet, or 2-in-1 PC.
The built-in display must have a resolution of at least 1080p and a maximum brightness of at least 300 nits.
As for external displays, HDR10, DisplayPort 1.4, HDMI 2.0 or higher, USB-C, or Thunderbolt must all be supported by the HDR display or TV. Visit the website of the device’s manufacturer to learn the specifications for a particular PC or external display.
Regardless of your display type, make sure it is certified for HDR.
Windows 11 Requirements
A built-in graphics card that supports PlayReady hardware digital rights management is required for your Windows 11 device. This is required for HDR content to be protected.
It must have certain codecs installed for 10-bit video decoding. Some of them might already be installed on your computer.
Here are the common codecs required to play HDR video:
HEVC: To play HDR content on Netflix, you’ll need this codec and a premium membership. Open Settings, choose Apps > Apps & features, then look for video extension to see if this codec exists. If this codec isn’t already installed, you can get HEVC Video Extensions from the Microsoft Store.
VP9: This codec is required to play HDR videos on YouTube. Open the Microsoft Store application and type “VP9 Video Extensions” into the search bar to see if this codec is already installed.
AV1: Open the Microsoft Store application and type “AV1 Video Extension” into the search bar to see if this codec is already installed.
But before that, go through our epic guide on adjust page file in Windows 10.
Conclusion
If HDR certification is not found, verify if your display is certified for HDR technology utilization. If it is, try the 2 fixes mentioned above. Ensure your computer satisfies all the requirements for HDR technology to be used in Windows 11. You should be good to go.
If you are still having any issues, comment below. You should also contact your manufacturer, but I will also try my best to figure out where it is going wrong for you if it is possible to do so from my end.
High Dynamic Range (HDR) amplifies the visual experience on modern display systems by offering superior brightness, contrast, and color accuracy. With the release of Windows 11, users expect seamless integration of HDR capabilities to match the operating system’s high standards. However, encountering an “HDR certification not found” error can hinder the user experience by not allowing the system to utilize the full potential of an HDR-supported monitor.

In our experience with Windows 11, we’ve come to understand the importance of ensuring that all components of the system, including the display, are certified and properly recognized to take full advantage of HDR content. When the system fails to recognize the HDR certification, not only does it limit the display’s capabilities, but it can also impact content creation and consumption. Addressing this issue requires a thorough check of both hardware compatibility and software settings.
Contents
- 1 Understanding HDR on Windows 11
- 1.1 Core Concepts of High Dynamic Range
- 1.2 Compatibility and Hardware Requirements
- 2 Troubleshooting HDR Issues
- 2.1 Common HDR Errors and Solutions
- 2.2 Advanced Troubleshooting Techniques
- 3 Configuring HDR Settings in Windows 11
- 3.1 Adjusting HDR Video and Gaming Settings
- 3.2 Customizing Brightness and Color Calibration
- 4 Ensuring Future HDR Compatibility
- 4.1 Update and Maintenance Best Practices
- 4.2 Emerging HDR Standards and Technologies
Understanding HDR on Windows 11
To fully appreciate the visual enhancements that HDR technology brings to Windows 11, we must first establish the key concepts and understand the hardware that supports this feature. We’ll examine how HDR elevates the viewing experience on compatible devices and what is required to take full advantage of this technology.

Core Concepts of High Dynamic Range
High Dynamic Range (HDR) significantly enriches visual content, bringing out finer details in the darkest and brightest areas of an image. HDR technology allows displays to present a more vibrant and lifelike range of colors. One common standard for HDR content is HDR10, which provides a better contrast ratio and color accuracy. HDR content is increasingly prevalent, whether it’s streamed movies, video games, or photographs. To experience true HDR, both the content and the display need to support HDR technology.
Essentially, with HDR, we get brighter brights, darker darks, and a richer range of colors.
Compatibility and Hardware Requirements
Not all PCs and displays are capable of supporting HDR. For a PC or laptop to handle HDR, it must have the necessary hardware and graphics capabilities. A compatible graphics card that supports HDR10 is crucial. Additionally, the built-in or external display must be a true HDR10 display to represent HDR content accurately. Windows 11 has specific display requirements for HDR video, which include an HDR-certified monitor and connectivity that aligns with these standards, such as HDMI 2.0b or DisplayPort 1.4.
| Component | Requirement | Impact on HDR |
| Graphics Card | HDR10 support | Enables HDR processing |
| Monitor | True HDR10 display | Displays full HDR content |
| Connectivity | HDMI 2.0b/DisplayPort 1.4 | Ensures signal can carry HDR information |
We must recognize that hardware compatibility is just one part of the HDR puzzle. Software drivers and the operating system must work in tandem to recognize and utilize HDR technology. When these components align, the result is a remarkable, true-to-life visual experience offered by HDR on Windows 11.
Facing HDR certification errors can be frustrating, especially when you’re eager to enjoy high-quality video content. In this section, we equip you with the knowledge to tackle common HDR discrepancies and employ advanced troubleshooting methods effectively.
Common HDR Errors and Solutions
When the dreaded “HDR certification not found” message appears on Windows 11, there’s no need to panic. Here are some straightforward fixes that we’ve found effective:
Update Drivers: Outdated monitor or graphics drivers are some of the culprits behind HDR issues. To update, navigate to Device Manager, expand the display adapters, and right-click your graphics card to select Update driver. Repeat the process for your monitor driver.
PlayReady Hardware: Ensure your system supports PlayReady hardware, vital for proper HDR playback. If incompatible, consider hardware upgrades.
Brightness & Color Settings: In some cases, adjusting the brightness or color settings can help. Navigate to Windows Settings, select System, then Display, and tweak Brightness and color to improve HDR performance.
If after these steps HDR is still unavailable, checking for Windows Updates or troubleshooting PlayReady hardware may be necessary.
Advanced Troubleshooting Techniques
Advanced resolutions should be reserved for when initial attempts fail. We’ve discovered that the more technical methods can yield results:
Uninstall Recent Updates or Drivers: Occasionally, updates or new drivers introduce bugs. Uninstalling them can restore HDR functionality. Find the suspect update in Settings, under Update & Security, then View update history, and uninstall it.
Inspect for Bugs: Sometimes, Windows feature updates contain bugs that may affect HDR. If you suspect a bug, seek support from the Windows Feedback Hub or wait for patch updates.
As intensive users ourselves, we walk through these steps meticulously, ensuring that all possible solutions are exploited before resorting to advanced troubleshooting or considering hardware failure. Applying these measures correctly should help alleviate most HDR-related anomalies experienced in Windows 11.
Configuring HDR Settings in Windows 11
In Windows 11, to get the most out of your HDR-capable display, you need to ensure proper configuration. This involves adjusting video and gaming settings specific to HDR, as well as calibrating brightness and color to match your display’s capabilities. We’ll guide you through these steps to enhance your visual experience with HDR content.
Adjusting HDR Video and Gaming Settings
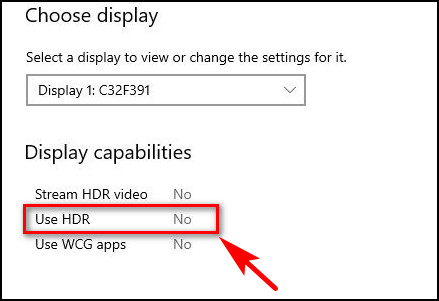
To engage HDR for games and video streaming, first verify your display supports HDR. Go to Settings > System > Display and ensure Use HDR is toggled on. If your display supports HDR, you will see a switch for ‘Play HDR games and apps’. For streaming HDR video, look for the toggle ‘Stream HDR video’ and enable it. This will allow you to watch content with richer colors and enhanced brightness, offering a more immersive viewing experience.
Customizing Brightness and Color Calibration
Adjusting your display’s HDR brightness to align with its color capabilities is essential. In the Windows HD Color settings, find the setting for max brightness; it reflects your display’s peak luminance. The correct brightness level helps ensure that HDR content is not too dim or overly exposed. Moreover, color calibration is crucial for accurate color reproduction. Use the built-in color calibration tool in Windows to fine-tune the color profile of your display, ensuring that the HDR content has accurate color representation and looks as the creators intended.
Ensuring Future HDR Compatibility
To maintain and ensure HDR compatibility on Windows 11, it’s imperative to keep abreast with system updates and emerging HDR standards. We’re diving into how we can apply best practices for system maintenance and stay updated with new HDR technologies.
Update and Maintenance Best Practices
Regular System Updates: We must diligently install Windows updates, which often include important fixes and features enhancements related to the Windows Display Driver Model (WDDM) and other display technologies. Regular updating ensures we’re running the most current drivers that support advanced display features like HDR.
Staying updated with Windows 11 is critical, not just for HDR compatibility but for overall system health and security. We ensure our display drivers are the latest, especially those from NVIDIA G-SYNC Ultimate or AMD FreeSync Premium Pro, as they often include support for new HDR formats like Dolby Vision. For connectivity, we use ports that meet modern standards like DisplayPort 1.4 or HDMI 2.0, as these will likely support future HDR content.
Emerging HDR Standards and Technologies
Understanding and adopting emerging HDR standards is key to future-proofing our systems. New codecs like HEVC, VP9, and especially AV1, are set to support a wide range of HDR content. We embrace Thunderbolt connections where available, for their high bandwidth capability, which is suitable for HDR video.
| Standard | Technology | Relevance to HDR |
| AV1 Codec | Video Encoding | Optimized for HDR content delivery |
| Thunderbolt | Connectivity | High bandwidth support for HDR video |
| DisplayPort 1.4 / HDMI 2.0 | Display Interfaces | Essential for connecting HDR-enabled displays |
We prioritize staying informed about advancements in display technology and industry standards, making sure our systems and peripherals are equipped to display the full spectrum of HDR content now and in the future.
- Author
- Recent Posts
I started writing code around 20 years ago, and throughout the years, I have gained a lot of expertise from hands-on experience as well as learning from others. This website has also grown with me and is now something that I am proud of.
High Dynamic Range (HDR) can greatly enhance your viewing experience on Windows 11, but running into the dreaded “HDR Certification Not Found” message can be a real downer. The quick fix is ensuring your display supports HDR and toggling the correct settings to enable it. Let’s dive into making sure your setup meets the necessary requirements and helps you enjoy HDR to its full potential.

First things first, head over to Settings > System > Display and check if your monitor is HDR-capable. If it is, you should see options like ‘Use HDR’ and ‘Stream HDR video’. Sometimes, the issue lies in overlooked settings. Did you know that enabling HDR for gaming and streaming involves a couple of extra steps, especially if you’re on battery power?
It’s also crucial to verify that your PC and graphics card support HDR. Often, an outdated driver can be the culprit. Make sure everything is up to date, and if you still see that annoying message, a calibration of your HDR settings might do the trick. Trust me, a well-calibrated display can make a massive difference. 💻✨
JUMP TO TOPIC
- Exploring HDR Technology in Windows 11
- Understanding HDR Video and Content
- HDR Certification and Display Capabilities
- Setting Up HDR on Your Devices
- Hardware and System Requirements
- Configuring Display and Brightness Settings
- Enabling HDR on Windows Systems
- Compatibility and Connectivity for HDR
- Graphics Cards and Display Interfaces
- Managing HDR on Different Device Types
- Troubleshooting and Optimizing HDR Experience
- Resolving Common HDR Issues
- Enhancing Video Playback Quality
Exploring HDR Technology in Windows 11
High Dynamic Range (HDR) technology enhances visual experience by offering a broader range of colors, higher contrast, and improved brightness. Let’s dive into how HDR works and how Windows 11 handles HDR certification and display capabilities.
Understanding HDR Video and Content
HDR video and content significantly increase the contrast and color range of visuals. Scenes in HDR will showcase brighter highlights and deeper shadows. With HDR10, a standard in HDR technology, more colors come into play, creating vibrant and lifelike imagery.
We can enjoy HDR content by:
- Checking if our display supports HDR.
- Turning on HDR in display settings.
- Spectating streaming services like Netflix and Amazon Prime Video that offer HDR content.
HDR brings scenes to life, whether it’s the sunlight in a movie or the details in a video game. The balance between light and dark areas creates a more immersive viewing experience.
HDR Certification and Display Capabilities
For a display to deliver true HDR10 performance, it must be certified. DisplayHDR certified displays meet strict criteria for brightness, contrast, and color accuracy. Built-in and external displays vary; some laptops have it built-in, but external monitors might need additional settings.
Here’s how to check HDR capabilities:
- Open Settings by pressing Win+I.
- Select System and then Display.
- Look for the HDR or Advanced display settings.
- Check if your display supports HDR or HDR10.
To enhance your visual experience, ensure your display can reach the maximum brightness levels needed for HDR content, typically around 400-1000 nits for true HDR10.
Overall, HDR certification ensures a display meets these standards, providing a richer and more immersive viewing experience.
Setting Up HDR on Your Devices
Setting up HDR can truly enhance your viewing experience. Let’s walk through the necessary hardware and software requirements and how to configure and enable HDR on your Windows devices.
Hardware and System Requirements
First things first, you need to ensure your PC, laptop, or tablet meets the hardware requirements. Modern devices with dedicated or integrated graphics cards are generally equipped for HDR. Ensure your display supports a resolution of at least 1080p and 10-bit video decoding.
If you’re using a desktop, the graphics card should support PlayReady hardware. Always keep graphics drivers updated to avoid compatibility issues. For monitors, check the specifications for maximum brightness and HDR support. Using compliant monitor drivers can also help optimize performance.
Configuring Display and Brightness Settings
Begin by accessing the Windows Settings. Hit the Win+I keys to open up settings. From there:
- Navigate to System and select Display.
- Go to Brightness & color and adjust your brightness settings. Ensure the max brightness is suitable for HDR content.
You might also find certain options like “Play HDR games and apps” or “Stream HDR video.” Ensure both are enabled if available. It’s essential to correctly configure these settings to get the full benefit of HDR.
Enabling HDR on Windows Systems
Right-click on the desktop and choose Display settings. Ensure you’ve selected the right monitor, especially if you have multiple displays. Scroll down and look for the option labeled “Use HDR” and toggle it on.
Once HDR is enabled, fine-tuning might be necessary. Tools like the Windows HDR Calibration app can assist in adjusting maximum and minimum levels for better visual quality. Always make sure that your display and content support HDR to avoid any unexpected issues.
Adjust these settings as per your needs and enjoy the enhanced clarity and richness that HDR brings to your viewing experience.
Compatibility and Connectivity for HDR
When addressing HDR on Windows 11, understanding the compatibility and connectivity aspects is crucial. These include ensuring your graphics card and display interfaces can handle HDR, and knowing how to manage HDR across various device types.
Graphics Cards and Display Interfaces
To enjoy HDR content, we need a graphics card compatible with HDR codecs like HEVC, VP9, or AV1. Modern GPUs, primarily from NVIDIA and AMD, meet this requirement. The NVIDIA GeForce GTX 10 series or later and the AMD Radeon RX 400 series or higher are good starting points.
Display interfaces matter as well. HDMI 2.0 or DisplayPort 1.4 are necessary for HDR signals. For the best experience, we should aim for HDMI 2.1 or DisplayPort 2.0, facilitating higher bandwidth and better color depth.
NVIDIA G-Sync Ultimate and AMD FreeSync Premium Pro standards also enhance HDR experience by reducing screen tearing and enhancing color and brightness.
| Graphics Card | Minimum Requirement | Ideal Requirement |
| NVIDIA | GTX 10 series | RTX 30 series |
| AMD | RX 400 series | RX 6000 series |
Managing HDR on Different Device Types
Recognizing how HDR performs across varied devices, from desktops to laptops and tablets, is equally vital. Desktops often provide the best HDR experience due to more powerful hardware. We need to ensure our monitor supports HDR10 or Dolby Vision for optimum performance.
Laptops can be tricky. Many budget and mid-tier laptops don’t support HDR. For those that do, it’s crucial to update the Windows Display Driver Model (WDDM) to leverage HDR capabilities fully.
With external displays, ensuring they’re connected via HDMI 2.0 or DisplayPort 1.4 is essential. Non-HDR laptops won’t benefit much from connecting to HDR monitors. For tablets, HDR support is rare, so checking the specific model’s specifications is necessary.
To streamline the HDR settings, go to Settings > System > Display, and enable HDR options. Adjust settings like the maximum and minimum brightness levels for better viewing quality.
Maintaining these practices ensures our HDR experience on Windows 11 is seamless and visually stunning.
Troubleshooting and Optimizing HDR Experience
To ensure a seamless HDR experience, it’s crucial to focus on resolving any common issues and enhancing your video playback quality. This will help fully utilize your display capabilities for an immersive visual experience.
Resolving Common HDR Issues
First, we need to check whether the display supports HDR. Navigate to Settings > System > Display, and ensure “Use HDR” is toggled on. If the display supports it, options like “Play HDR games and apps” and “Stream HDR video” should be visible.
If we encounter issues, such as HDR certification not found, it might be due to outdated monitor drivers. To resolve this, visit the manufacturer’s website to download the latest drivers.
Auto HDR might not always work perfectly. For a consistent experience, we might need to adjust the HDR settings manually. Launch the Windows HDR Calibration app from the Microsoft Store to fine-tune brightness and shadow details.
Pro Tip: Adjust brightness and contrast to suit different content types.
Enhancing Video Playback Quality
To improve video playback quality in HDR, verifying and configuring PlayReady DRM settings can be essential. PlayReady is Microsoft’s digital rights management technology, ensuring that HDR content streams seamlessly. Open your media player settings and confirm that PlayReady is enabled.
Some streaming platforms might require toggling “Stream HDR video” in Settings > Apps > Video Playback. This setting optimizes playback for HDR content.
For smoother video streaming, ensure that your internet connection is stable and fast. A slow connection can cause buffering or drop the quality from HDR to SDR.
In our experience, using a wired connection over Wi-Fi can make a significant difference. Also, double-check that your streaming service subscription supports HDR content streaming. Adjusting these settings can significantly enhance the HDR viewing experience, uncovering every detail and color.
| Steps to Enable HDR Playback | Possible Issues | Solutions |
| Enable “Stream HDR video” in settings | HDR content not streaming | Check PlayReady settings |
| Ensure stable internet connection | Buffering or quality drops | Use wired connection |
-
Windows Support Forums
-
Devices and Drivers
You should upgrade or use an alternative browser.
HDR Certification not found
-
Thread starter
Thread starterElisyan
-
Start date
Start date
- Local time
- 7:01 AM
- Posts
- 124
- Location
-
Hell on Earth
- OS
- Windows 11 Pro
-
-
#1
I bought a Samsung Odyssey G7 32" few months ago
I recently noticed Windows says HDR certification not found and shows 1499 peak brightness
I searched for possible solutions and learned that incorrect peak brightness might mess up HDR (is it true?)
I found a reddit post about my issue and some1 suggested to use a tool called CRU to fix it
I’m not expert at these things so I decided to ask u first:
Is it permanent change?
Is it dangerous?
What does it change exactly?
Should I do it?
link to post:
link to suggestion:
- Windows Build/Version
- 22621.1702
My Computer
-
- OS
- Windows 11 Pro
- Computer type
- PC/Desktop
- Manufacturer/Model
- Custom
- CPU
- Intel Core i9 9900K
- Motherboard
- MSI MPG Z390 Gaming Pro Carbon AC
- Memory
- Corsair Vengeance RGB Pro 32GB [ 4 x 8GB ] DDR4 3600MHz CL18
- Graphics Card(s)
- Zotac GeForce RTX 4070 Super Trinity
- Monitor(s) Displays
- Samsung Odyssey G7 , 32″ , 2560×1440 , VA , 240Hz , 1ms
- Screen Resolution
- QHD 2560×1440
- Hard Drives
- SSD: Samsung 980 Pro 250GB
HDD: 2x Western Digital Blue 4TB
- PSU
- MSI MPG A1000G PCIE5
- Case
- Cooler Master MasterCase H500P Mesh ARGB
- Cooling
- DeepCool Gammaxx L360 v2
- Keyboard
- Corsair K95 RGB Platinum ( MX Speed ) [ SteelSeries PrismCaps ]
- Mouse
- Corsair Dark Core RGB Pro SE
- Internet Speed
- 16 Mb/s | 1 Mb/s
- Browser
- Microsoft Edge
- Antivirus
- Windows Security
- Local time
- 11:31 PM
- Posts
- 3,181
- Location
-
Danbury, CT, USA
- OS
- Windows 11 26100.3915
-
-
#2
Do you mean that you are unable to enable HDR for your monitor?
My Computers
-
- OS
- Windows 11 26100.3915
- Computer type
- PC/Desktop
- Manufacturer/Model
- homebuilt
- CPU
- Amd Threadripper 7970X
- Motherboard
- Gigabyte TRX50 Aero D
- Memory
- 128GB (4 X 32) G.Skill DDR5 6400 (RDIMM)
- Graphics Card(s)
- Gigabyte RTX 4090 OC
- Sound Card
- none (USB to speakers), Realtek
- Monitor(s) Displays
- Philips 27E1N8900 OLED
- Screen Resolution
- 3840 X 2160 @ 60Hz
- Hard Drives
- Crucial T700 2TB M.2 NVME SSD
WD 4TB Blue SATA SSD
Seagate 18TB IronWolf Pro
- PSU
- BeQuiet! Straight Power 12 1500W
- Case
- Lian Li 011 Dynamic Evo XL
- Cooling
- SilverStone Technology XE360-TR5, with 3 Phanteks T30 fans
- Keyboard
- Cherry Streaming (wired)
- Mouse
- Logitech M500s (wired)
- Internet Speed
- 2000/300 Mbps (down/up)
- Other Info
- Arris G36 modem/router
-
- Operating System
- windows 11 26100.3915
- Computer type
- PC/Desktop
- Manufacturer/Model
- homebuilt
- CPU
- Intel I9-13900K
- Motherboard
- Asus RoG Strix Z690-E
- Memory
- 64GB G.Skill DDR5-6000
- Graphics card(s)
- Gigabyte RTX 3090 ti
- Sound Card
- built in Realtek
- Monitor(s) Displays
- Asus PA329C
- Screen Resolution
- 3840 X 2160 @60Hz
- Hard Drives
- WDC SN850 1TB
8TB Seagate Ironwolf
4TB Seagate Ironwolf
- PSU
- eVGA SuperNOVA 1300 GT
- Case
- Lian Li 011 Dynamic Evo
- Cooling
- Corsair iCUE H150i ELITE CAPELLIX Liquid CPU Cooler
- Mouse
- Logitech M500s (wired)
- Keyboard
- Logitech K120 (wired)
-
-
#3
My Computers
-
- OS
- Windows 11 Pro x64 23H2
- Computer type
- PC/Desktop
- CPU
- Ryzen 9 5900X
- Motherboard
- ASRock B550 PG Velocita (UEFI-BIOS P3.40)
- Memory
- 64 GB G.Skill RipJaws V F4-3200C16D-64GVK
- Graphics Card(s)
- Sparkle Titan Arc A770 16 GB
- Monitor(s) Displays
- Alienware AW3423DWF OLED ultrawide
- Hard Drives
- Western Digital Black SN850 1 TB NVMe SSD
- PSU
- eVGA Supernova 750 G3
- Case
- Corsair 275R
- Internet Speed
- VTel FTTH 1 Gb down and 1 Gb up
-
- Computer type
- PC/Desktop
- CPU
- Ryzen 7 5800X3D
- Motherboard
- Asus ROG Strix B550-F Gaming (UEFI-BIOS version 3607)
- Memory
- 32 GB (2×16 GB G.Skill TridentZ Neo)
- Graphics card(s)
- Sapphire Nitro+ Radeon RX 6750 XT
- Hard Drives
- Samsung 970 Pro 512 GB NVMe SSD
- PSU
- eVGA Supernova 650 GQ
- Case
- Fractal Focus G
- Local time
- 11:31 PM
- Posts
- 3,181
- Location
-
Danbury, CT, USA
- OS
- Windows 11 26100.3915
-
-
#4
You need to set the brightness and contrast to the maximum, manually.
Huh?
I just checked with my current monitor. In HDR mode, the brightness is not set to maximum.
My monitor appears in the advanced display settings as HDR 400 True Black (1.1).
My Computers
-
- OS
- Windows 11 26100.3915
- Computer type
- PC/Desktop
- Manufacturer/Model
- homebuilt
- CPU
- Amd Threadripper 7970X
- Motherboard
- Gigabyte TRX50 Aero D
- Memory
- 128GB (4 X 32) G.Skill DDR5 6400 (RDIMM)
- Graphics Card(s)
- Gigabyte RTX 4090 OC
- Sound Card
- none (USB to speakers), Realtek
- Monitor(s) Displays
- Philips 27E1N8900 OLED
- Screen Resolution
- 3840 X 2160 @ 60Hz
- Hard Drives
- Crucial T700 2TB M.2 NVME SSD
WD 4TB Blue SATA SSD
Seagate 18TB IronWolf Pro
- PSU
- BeQuiet! Straight Power 12 1500W
- Case
- Lian Li 011 Dynamic Evo XL
- Cooling
- SilverStone Technology XE360-TR5, with 3 Phanteks T30 fans
- Keyboard
- Cherry Streaming (wired)
- Mouse
- Logitech M500s (wired)
- Internet Speed
- 2000/300 Mbps (down/up)
- Other Info
- Arris G36 modem/router
-
- Operating System
- windows 11 26100.3915
- Computer type
- PC/Desktop
- Manufacturer/Model
- homebuilt
- CPU
- Intel I9-13900K
- Motherboard
- Asus RoG Strix Z690-E
- Memory
- 64GB G.Skill DDR5-6000
- Graphics card(s)
- Gigabyte RTX 3090 ti
- Sound Card
- built in Realtek
- Monitor(s) Displays
- Asus PA329C
- Screen Resolution
- 3840 X 2160 @60Hz
- Hard Drives
- WDC SN850 1TB
8TB Seagate Ironwolf
4TB Seagate Ironwolf
- PSU
- eVGA SuperNOVA 1300 GT
- Case
- Lian Li 011 Dynamic Evo
- Cooling
- Corsair iCUE H150i ELITE CAPELLIX Liquid CPU Cooler
- Mouse
- Logitech M500s (wired)
- Keyboard
- Logitech K120 (wired)
- Local time
- 7:01 AM
- Posts
- 124
- Location
-
Hell on Earth
- OS
- Windows 11 Pro
-
-
#5
Sorry, but I don’t follow your post.Do you mean that you are unable to enable HDR for your monitor?
HDR is already turned on
.png")
I wanted to know is there a problem if windows can’t find the HDR certification and should I use the method to fix it?
Last edited:
My Computer
-
- OS
- Windows 11 Pro
- Computer type
- PC/Desktop
- Manufacturer/Model
- Custom
- CPU
- Intel Core i9 9900K
- Motherboard
- MSI MPG Z390 Gaming Pro Carbon AC
- Memory
- Corsair Vengeance RGB Pro 32GB [ 4 x 8GB ] DDR4 3600MHz CL18
- Graphics Card(s)
- Zotac GeForce RTX 4070 Super Trinity
- Monitor(s) Displays
- Samsung Odyssey G7 , 32″ , 2560×1440 , VA , 240Hz , 1ms
- Screen Resolution
- QHD 2560×1440
- Hard Drives
- SSD: Samsung 980 Pro 250GB
HDD: 2x Western Digital Blue 4TB
- PSU
- MSI MPG A1000G PCIE5
- Case
- Cooler Master MasterCase H500P Mesh ARGB
- Cooling
- DeepCool Gammaxx L360 v2
- Keyboard
- Corsair K95 RGB Platinum ( MX Speed ) [ SteelSeries PrismCaps ]
- Mouse
- Corsair Dark Core RGB Pro SE
- Internet Speed
- 16 Mb/s | 1 Mb/s
- Browser
- Microsoft Edge
- Antivirus
- Windows Security
- Local time
- 7:01 AM
- Posts
- 124
- Location
-
Hell on Earth
- OS
- Windows 11 Pro
-
-
#6
You need to set the brightness and contrast to the maximum, manually.
You mean in monitor settings or nvidia control panel settings?
and you saying if windows detected correct certification, it would change these settings automatically?
My Computer
-
- OS
- Windows 11 Pro
- Computer type
- PC/Desktop
- Manufacturer/Model
- Custom
- CPU
- Intel Core i9 9900K
- Motherboard
- MSI MPG Z390 Gaming Pro Carbon AC
- Memory
- Corsair Vengeance RGB Pro 32GB [ 4 x 8GB ] DDR4 3600MHz CL18
- Graphics Card(s)
- Zotac GeForce RTX 4070 Super Trinity
- Monitor(s) Displays
- Samsung Odyssey G7 , 32″ , 2560×1440 , VA , 240Hz , 1ms
- Screen Resolution
- QHD 2560×1440
- Hard Drives
- SSD: Samsung 980 Pro 250GB
HDD: 2x Western Digital Blue 4TB
- PSU
- MSI MPG A1000G PCIE5
- Case
- Cooler Master MasterCase H500P Mesh ARGB
- Cooling
- DeepCool Gammaxx L360 v2
- Keyboard
- Corsair K95 RGB Platinum ( MX Speed ) [ SteelSeries PrismCaps ]
- Mouse
- Corsair Dark Core RGB Pro SE
- Internet Speed
- 16 Mb/s | 1 Mb/s
- Browser
- Microsoft Edge
- Antivirus
- Windows Security
-
-
#7
You mean in monitor settings or nvidia control panel settings?
and you saying if windows detected correct certification, it would change these settings automatically?
Monitor settings, if it looks like poop. Same to get maximum brightness. The OSD!
Also Windows 11 usually will claim it’s not even found.
My Computers
-
- OS
- Windows 11 Pro x64 23H2
- Computer type
- PC/Desktop
- CPU
- Ryzen 9 5900X
- Motherboard
- ASRock B550 PG Velocita (UEFI-BIOS P3.40)
- Memory
- 64 GB G.Skill RipJaws V F4-3200C16D-64GVK
- Graphics Card(s)
- Sparkle Titan Arc A770 16 GB
- Monitor(s) Displays
- Alienware AW3423DWF OLED ultrawide
- Hard Drives
- Western Digital Black SN850 1 TB NVMe SSD
- PSU
- eVGA Supernova 750 G3
- Case
- Corsair 275R
- Internet Speed
- VTel FTTH 1 Gb down and 1 Gb up
-
- Computer type
- PC/Desktop
- CPU
- Ryzen 7 5800X3D
- Motherboard
- Asus ROG Strix B550-F Gaming (UEFI-BIOS version 3607)
- Memory
- 32 GB (2×16 GB G.Skill TridentZ Neo)
- Graphics card(s)
- Sapphire Nitro+ Radeon RX 6750 XT
- Hard Drives
- Samsung 970 Pro 512 GB NVMe SSD
- PSU
- eVGA Supernova 650 GQ
- Case
- Fractal Focus G
- Local time
- 7:01 AM
- Posts
- 124
- Location
-
Hell on Earth
- OS
- Windows 11 Pro
-
-
#8
Monitor settings, if it looks like poop. Same to get maximum brightness. The OSD!
Also Windows 11 usually will claim it’s not even found.
Aha
I set it to 50% brightness and contrast when I bought the monitor ( suggested by hardware unboxed youtube channel )
I will try to test 100% for sometime to see differences
My Computer
-
- OS
- Windows 11 Pro
- Computer type
- PC/Desktop
- Manufacturer/Model
- Custom
- CPU
- Intel Core i9 9900K
- Motherboard
- MSI MPG Z390 Gaming Pro Carbon AC
- Memory
- Corsair Vengeance RGB Pro 32GB [ 4 x 8GB ] DDR4 3600MHz CL18
- Graphics Card(s)
- Zotac GeForce RTX 4070 Super Trinity
- Monitor(s) Displays
- Samsung Odyssey G7 , 32″ , 2560×1440 , VA , 240Hz , 1ms
- Screen Resolution
- QHD 2560×1440
- Hard Drives
- SSD: Samsung 980 Pro 250GB
HDD: 2x Western Digital Blue 4TB
- PSU
- MSI MPG A1000G PCIE5
- Case
- Cooler Master MasterCase H500P Mesh ARGB
- Cooling
- DeepCool Gammaxx L360 v2
- Keyboard
- Corsair K95 RGB Platinum ( MX Speed ) [ SteelSeries PrismCaps ]
- Mouse
- Corsair Dark Core RGB Pro SE
- Internet Speed
- 16 Mb/s | 1 Mb/s
- Browser
- Microsoft Edge
- Antivirus
- Windows Security
-
-
#9
My Computers
-
- OS
- Windows 11 Pro x64 23H2
- Computer type
- PC/Desktop
- CPU
- Ryzen 9 5900X
- Motherboard
- ASRock B550 PG Velocita (UEFI-BIOS P3.40)
- Memory
- 64 GB G.Skill RipJaws V F4-3200C16D-64GVK
- Graphics Card(s)
- Sparkle Titan Arc A770 16 GB
- Monitor(s) Displays
- Alienware AW3423DWF OLED ultrawide
- Hard Drives
- Western Digital Black SN850 1 TB NVMe SSD
- PSU
- eVGA Supernova 750 G3
- Case
- Corsair 275R
- Internet Speed
- VTel FTTH 1 Gb down and 1 Gb up
-
- Computer type
- PC/Desktop
- CPU
- Ryzen 7 5800X3D
- Motherboard
- Asus ROG Strix B550-F Gaming (UEFI-BIOS version 3607)
- Memory
- 32 GB (2×16 GB G.Skill TridentZ Neo)
- Graphics card(s)
- Sapphire Nitro+ Radeon RX 6750 XT
- Hard Drives
- Samsung 970 Pro 512 GB NVMe SSD
- PSU
- eVGA Supernova 650 GQ
- Case
- Fractal Focus G
- Local time
- 11:31 PM
- Posts
- 3,181
- Location
-
Danbury, CT, USA
- OS
- Windows 11 26100.3915
-
-
#10
Aha
I set it to 50% brightness and contrast when I bought the monitor ( suggested by hardware unboxed youtube channel )
I will try to test 100% for sometime to see differences
I expect that it will not help, but please let us know.
My Computers
-
- OS
- Windows 11 26100.3915
- Computer type
- PC/Desktop
- Manufacturer/Model
- homebuilt
- CPU
- Amd Threadripper 7970X
- Motherboard
- Gigabyte TRX50 Aero D
- Memory
- 128GB (4 X 32) G.Skill DDR5 6400 (RDIMM)
- Graphics Card(s)
- Gigabyte RTX 4090 OC
- Sound Card
- none (USB to speakers), Realtek
- Monitor(s) Displays
- Philips 27E1N8900 OLED
- Screen Resolution
- 3840 X 2160 @ 60Hz
- Hard Drives
- Crucial T700 2TB M.2 NVME SSD
WD 4TB Blue SATA SSD
Seagate 18TB IronWolf Pro
- PSU
- BeQuiet! Straight Power 12 1500W
- Case
- Lian Li 011 Dynamic Evo XL
- Cooling
- SilverStone Technology XE360-TR5, with 3 Phanteks T30 fans
- Keyboard
- Cherry Streaming (wired)
- Mouse
- Logitech M500s (wired)
- Internet Speed
- 2000/300 Mbps (down/up)
- Other Info
- Arris G36 modem/router
-
- Operating System
- windows 11 26100.3915
- Computer type
- PC/Desktop
- Manufacturer/Model
- homebuilt
- CPU
- Intel I9-13900K
- Motherboard
- Asus RoG Strix Z690-E
- Memory
- 64GB G.Skill DDR5-6000
- Graphics card(s)
- Gigabyte RTX 3090 ti
- Sound Card
- built in Realtek
- Monitor(s) Displays
- Asus PA329C
- Screen Resolution
- 3840 X 2160 @60Hz
- Hard Drives
- WDC SN850 1TB
8TB Seagate Ironwolf
4TB Seagate Ironwolf
- PSU
- eVGA SuperNOVA 1300 GT
- Case
- Lian Li 011 Dynamic Evo
- Cooling
- Corsair iCUE H150i ELITE CAPELLIX Liquid CPU Cooler
- Mouse
- Logitech M500s (wired)
- Keyboard
- Logitech K120 (wired)
-
-
#11
Windows HDR Calibration is for most things you’re doing, on a global level.
Then, if playing Halo Infinite, additionally use its HDR calibration tool to fine tune it further for Halo Infinite.
My Computers
-
- OS
- Windows 11 Pro x64 23H2
- Computer type
- PC/Desktop
- CPU
- Ryzen 9 5900X
- Motherboard
- ASRock B550 PG Velocita (UEFI-BIOS P3.40)
- Memory
- 64 GB G.Skill RipJaws V F4-3200C16D-64GVK
- Graphics Card(s)
- Sparkle Titan Arc A770 16 GB
- Monitor(s) Displays
- Alienware AW3423DWF OLED ultrawide
- Hard Drives
- Western Digital Black SN850 1 TB NVMe SSD
- PSU
- eVGA Supernova 750 G3
- Case
- Corsair 275R
- Internet Speed
- VTel FTTH 1 Gb down and 1 Gb up
-
- Computer type
- PC/Desktop
- CPU
- Ryzen 7 5800X3D
- Motherboard
- Asus ROG Strix B550-F Gaming (UEFI-BIOS version 3607)
- Memory
- 32 GB (2×16 GB G.Skill TridentZ Neo)
- Graphics card(s)
- Sapphire Nitro+ Radeon RX 6750 XT
- Hard Drives
- Samsung 970 Pro 512 GB NVMe SSD
- PSU
- eVGA Supernova 650 GQ
- Case
- Fractal Focus G
- Local time
- 7:01 AM
- Posts
- 124
- Location
-
Hell on Earth
- OS
- Windows 11 Pro
-
-
#12
After setting the mentioned values to 100, the Windows HDR Calibration app will allow you to tune the maximum and minimum levels for HDR. After setting that up correctly, it should also be a lot easier to see the GUI menus.Windows HDR Calibration is for most things you’re doing, on a global level.
Then, if playing Halo Infinite, additionally use its HDR calibration tool to fine tune it further for Halo Infinite.
Do I need to choose maximum of 600 nits?
My Computer
-
- OS
- Windows 11 Pro
- Computer type
- PC/Desktop
- Manufacturer/Model
- Custom
- CPU
- Intel Core i9 9900K
- Motherboard
- MSI MPG Z390 Gaming Pro Carbon AC
- Memory
- Corsair Vengeance RGB Pro 32GB [ 4 x 8GB ] DDR4 3600MHz CL18
- Graphics Card(s)
- Zotac GeForce RTX 4070 Super Trinity
- Monitor(s) Displays
- Samsung Odyssey G7 , 32″ , 2560×1440 , VA , 240Hz , 1ms
- Screen Resolution
- QHD 2560×1440
- Hard Drives
- SSD: Samsung 980 Pro 250GB
HDD: 2x Western Digital Blue 4TB
- PSU
- MSI MPG A1000G PCIE5
- Case
- Cooler Master MasterCase H500P Mesh ARGB
- Cooling
- DeepCool Gammaxx L360 v2
- Keyboard
- Corsair K95 RGB Platinum ( MX Speed ) [ SteelSeries PrismCaps ]
- Mouse
- Corsair Dark Core RGB Pro SE
- Internet Speed
- 16 Mb/s | 1 Mb/s
- Browser
- Microsoft Edge
- Antivirus
- Windows Security
-
-
#13
Do I need to choose maximum of 600 nits?
Just the maximum that looks right, without it looking washed out. And when asked for the minimum and it asks for the minimum brightness of a visible object, select where you can barely see it.
Yes, the maximum should be close to the maximum rating of nits, when you do so.
My Computers
-
- OS
- Windows 11 Pro x64 23H2
- Computer type
- PC/Desktop
- CPU
- Ryzen 9 5900X
- Motherboard
- ASRock B550 PG Velocita (UEFI-BIOS P3.40)
- Memory
- 64 GB G.Skill RipJaws V F4-3200C16D-64GVK
- Graphics Card(s)
- Sparkle Titan Arc A770 16 GB
- Monitor(s) Displays
- Alienware AW3423DWF OLED ultrawide
- Hard Drives
- Western Digital Black SN850 1 TB NVMe SSD
- PSU
- eVGA Supernova 750 G3
- Case
- Corsair 275R
- Internet Speed
- VTel FTTH 1 Gb down and 1 Gb up
-
- Computer type
- PC/Desktop
- CPU
- Ryzen 7 5800X3D
- Motherboard
- Asus ROG Strix B550-F Gaming (UEFI-BIOS version 3607)
- Memory
- 32 GB (2×16 GB G.Skill TridentZ Neo)
- Graphics card(s)
- Sapphire Nitro+ Radeon RX 6750 XT
- Hard Drives
- Samsung 970 Pro 512 GB NVMe SSD
- PSU
- eVGA Supernova 650 GQ
- Case
- Fractal Focus G
Similar threads
-
Windows Support Forums
-
Devices and Drivers