

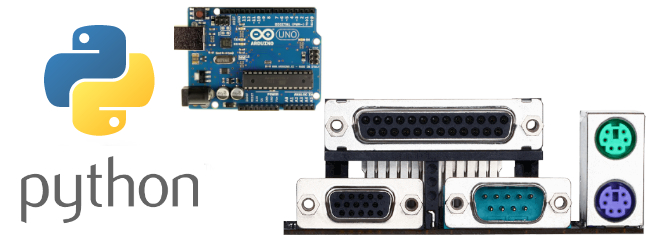
Работа с COM PORT / UART в Python на примере связи с платой Arduino
Введение
COM-порты до сих пор играют жизненно важную роль в установлении соединений между компьютерами и внешними устройствами. Не следует считать, что COM порт — это нечто безнадежно устаревшее и архаичное. Конечно, вы уже не встретите его в современных гаджетах общего назначения, таких как принтеры, сканеры и т.д. Однако COM порт широко используется до сих пор в промышленной технике, в различных световых рекламных табло. Также без работы с этим портом не обойтись если вы разрабатываете программы для микроконтроллеров, в частности для Arduino.
Python, будучи универсальным и мощным языком программирования, обеспечивает отличную поддержку работы с COM-портами. В этой статье мы рассмотрим, как использовать Python для эффективного взаимодействия с COM-портами, позволяя вам управлять различными устройствами и беспрепятственно собирать данные.
Установка библиотеки PySerial
Для работы с COM-портами в Python нам понадобится библиотека PySerial, предоставляющая удобный интерфейс для последовательной связи. PySerial можно легко установить с помощью pip, менеджера пакетов Python. Откройте терминал или командную строку и выполните следующую команду:
pip install pyserialПеред подключением к определенному COM-порту очень важно определить доступные порты в вашей системе. PySerial предлагает удобную функцию serial.tools.list_ports.comports(), которая возвращает список доступных COM-портов. Давайте посмотрим, как его использовать:
import serial.tools.list_ports

ports = serial.tools.list_ports.comports()

for port in ports:
    print(port.device)
Установка соединения
После того, как вы определили нужный COM-порт, вы можете создать соединение с помощью PySerial. Класс serial.Serial() предоставляет необходимые методы для настройки и управления подключением. Вот пример:
import serial

port = "COM1"  # Replace with the appropriate COM port name
baudrate = 9600  # Replace with the desired baud rate

ser = serial.Serial(port, baudrate=baudrate)

# Perform operations on the COM port

ser.close()  # Remember to close the connection when done
Чтение и запись данных:
Для связи с устройством, подключенным к COM-порту, нам нужно понять, как читать и записывать данные. PySerial предлагает для этой цели два основных метода: ser.read() и ser.write(). Давайте рассмотрим эти методы:
# Reading data
data = ser.read(10)  # Read 10 bytes from the COM port
print(data)

# Writing data
message = b"Hello, world!"  # Data to be sent, should be in bytes
ser.write(message)
Настройка параметров COM порта
PySerial предоставляет широкие возможности для настройки COM-портов в соответствии с конкретными требованиями. Вы можете настроить такие параметры, как биты данных, стоповые биты, четность, время ожидания и управление потоком. Вот пример:
ser = serial.Serial(port, baudrate=baudrate, bytesize=8, parity='N', stopbits=1, timeout=1, xonxoff=False, rtscts=False)
# Adjust the parameters as needed
Обработка ошибок
При работе с COM-портами очень важно корректно обрабатывать ошибки. PySerial вызывает исключения для различных сценариев ошибок, таких как ненайденный порт, отказ в доступе или тайм-ауты связи. Реализация соответствующей обработки ошибок обеспечивает надежность ваших приложений.
Вот пример обработки ошибок при работе с COM-портами в Python с помощью PySerial:
import serial
import serial.tools.list_ports

try:
    # Find and open the COM port
    ports = serial.tools.list_ports.comports()
    port = next((p.device for p in ports), None)
    if port is None:
        raise ValueError("No COM port found.")

    ser = serial.Serial(port, baudrate=9600)

    # Perform operations on the COM port

    ser.close()  # Close the connection when done

except ValueError as ve:
    print("Error:", str(ve))

except serial.SerialException as se:
    print("Serial port error:", str(se))

except Exception as e:
    print("An error occurred:", str(e))
В этом примере мы пытаемся найти и открыть COM-порт, используя serial.tools.list_ports.comports(). Если COM-порт не найден, возникает ошибка ValueError. Если существует исключение последовательного порта, например порт уже используется или недоступен, перехватывается SerialException. Любые другие общие исключения перехватываются блоком Exception, который обеспечивает сбор всех непредвиденных ошибок. Каждый блок ошибок обрабатывает определенный тип исключения и выводит соответствующее сообщение об ошибке.
Реализуя обработку ошибок таким образом, вы можете изящно обрабатывать различные сценарии ошибок, которые могут возникнуть при работе с COM-портами в Python.
Пример приложения для получения данных из платы Arduino
Вот пример приложения Python, которое считывает данные из платы Arduino с помощью PySerial
import serial

# Configure the COM port
port = "COM3"  # Replace with the appropriate COM port name
baudrate = 9600

try:
    # Open the COM port
    ser = serial.Serial(port, baudrate=baudrate)
    print("Serial connection established.")

    # Read data from the Arduino
    while True:
        # Read a line of data from the serial port
        line = ser.readline().decode().strip()

        if line:
            print("Received:", line)

except serial.SerialException as se:
    print("Serial port error:", str(se))

except KeyboardInterrupt:
    pass

finally:
    # Close the serial connection
    if ser.is_open:
        ser.close()
        print("Serial connection closed.")
В этом примере мы открываем указанный COM-порт с помощью serial.Serial(), а затем непрерывно считываем данные с Arduino с помощью цикла while. Функция ser.readline().decode().strip() считывает строку данных из последовательного порта, декодирует ее из байтов в строку и удаляет все начальные или конечные пробелы. Если есть доступные данные, они выводятся на консоль.
Приложение будет продолжать работать до тех пор, пока оно не будет прервано ошибкой последовательного порта (serial.SerialException) или нажатием Ctrl+C, чтобы вызвать прерывание клавиатуры. В блоке finally мы обеспечиваем правильное закрытие последовательного соединения с помощью ser.close().
Не забудьте заменить «COM3» на соответствующее имя COM-порта, чтобы оно соответствовало соединению вашего Arduino. Кроме того, настройте значение скорости передачи данных, если ваш Arduino использует другую скорость передачи данных.
Пример приложения для отправки данных в плату Arduino
Вот пример приложения Python, которое отправляет последовательные данные на Arduino для управления устройством на основе Arduino:
import serial

# Configure the COM port
port = "COM3"  # Replace with the appropriate COM port name
baudrate = 9600

try:
    # Open the COM port
    ser = serial.Serial(port, baudrate=baudrate)
    print("Serial connection established.")

    # Send commands to the Arduino
    while True:
        command = input("Enter a command (e.g., 'ON', 'OFF'): ")

        # Send the command to the Arduino
        ser.write(command.encode())

except serial.SerialException as se:
    print("Serial port error:", str(se))

except KeyboardInterrupt:
    pass

finally:
    # Close the serial connection
    if ser.is_open:
        ser.close()
        print("Serial connection closed.")
В этом примере мы открываем указанный COM-порт с помощью serial.Serial(), а затем постоянно запрашиваем у пользователя ввод команд. Команда считывается с помощью input(), а затем отправляется в Arduino с помощью ser.write(command.encode()), где command.encode() преобразует команду из строки в байты перед отправкой через последовательный порт. .
Приложение будет продолжать работать до тех пор, пока оно не будет прервано ошибкой последовательного порта (serial.SerialException) или нажатием Ctrl+C, чтобы вызвать прерывание клавиатуры. В блоке finally мы обеспечиваем правильное закрытие последовательного соединения с помощью ser.close().
Не забудьте заменить «COM3» на соответствующее имя COM-порта, чтобы оно соответствовало соединению вашего Arduino. Отрегулируйте значение скорости передачи данных, если ваш Arduino использует другую скорость передачи данных.
С помощью этого кода вы сможете отправлять команды из своего приложения Python на Arduino и соответствующим образом управлять своим устройством на базе Arduino.
Заключение
Python в сочетании с библиотекой PySerial обеспечивает надежный и простой способ работы с COM-портами. Поняв основы COM-портов, установив PySerial и используя его возможности, вы сможете без труда взаимодействовать с внешними устройствами, собирать данные и управлять аппаратными компонентами. Независимо от того, создаете ли вы проект IoT, работаете с датчиками или взаимодействуете с микроконтроллерами, Python предлагает универсальную платформу для достижения ваших целей.
Читать также:
Работа с COM-PORT в C#…
Работа с COM-PORT в Delphi…
Features
- Same class based interface on all supported platforms.
- Access to the port settings through Python properties.
- Support for different byte sizes, stop bits, parity and flow control with
RTS/CTS and/or Xon/Xoff. - Working with or without receive timeout.
- File like API with “read” and “write” (“readline” etc. also supported).
- The files in this package are 100% pure Python.
- The port is set up for binary transmission. No NULL byte stripping, CR-LF
translation etc. (which are many times enabled for POSIX.) This makes this
module universally useful. - Compatible with
iolibrary - RFC 2217 client (experimental), server provided in the examples.
Requirements
- Python 2.7 or Python 3.4 and newer
- If running on Windows: Windows 7 or newer
- If running on Jython: “Java Communications” (JavaComm) or compatible
extension for Java
For older installations (older Python versions or older operating systems), see
older versions below.
Installation
This installs a package that can be used from Python (import serial).
To install for all users on the system, administrator rights (root)
may be required.
From PyPI
pySerial can be installed from PyPI:
python -m pip install pyserial
Using the python/python3 executable of the desired version (2.7/3.x).
Developers also may be interested to get the source archive, because it
contains examples, tests and the this documentation.
From Conda
pySerial can be installed from Conda:
conda install pyserial

or

conda install -c conda-forge pyserial
Currently the default conda channel will provide version 3.4 whereas the
conda-forge channel provides the current 3.x version.
Conda: https://www.continuum.io/downloads
Packages
There are also packaged versions for some Linux distributions:
- Debian/Ubuntu: “python-serial”, “python3-serial”
- Fedora / RHEL / CentOS / EPEL: “pyserial”
- Arch Linux: “python-pyserial”
- Gentoo: “dev-python/pyserial”
Note that some distributions may package an older version of pySerial.
These packages are created and maintained by developers working on
these distributions.
Older Versions
Older versions are still available on the current download page or the old
download page. The last version of pySerial’s 2.x series was 2.7,
compatible with Python 2.3 and newer and partially with early Python 3.x
versions.
pySerial 1.21 is compatible with Python 2.0 on Windows, Linux and several
un*x like systems, MacOSX and Jython.
On Windows, releases older than 2.5 will depend on pywin32 (previously known as
win32all). WinXP is supported up to 3.0.1.
Overview
This module encapsulates the access for the serial port. It provides backends
for Python running on Windows, OSX, Linux, BSD (possibly any POSIX compliant
system) and IronPython. The module named «serial» automatically selects the
appropriate backend.
- Project Homepage: https://github.com/pyserial/pyserial
- Download Page: https://pypi.python.org/pypi/pyserial
BSD license, (C) 2001-2020 Chris Liechti <cliechti@gmx.net>
Documentation
For API documentation, usage and examples see files in the «documentation»
directory. The «.rst» files can be read in any text editor or being converted to
HTML or PDF using Sphinx. An HTML version is online at
https://pythonhosted.org/pyserial/
Examples
Examples and unit tests are in the directory examples.
Installation
pip install pyserial should work for most users.
Detailed information can be found in documentation/pyserial.rst.
The usual setup.py for Python libraries is used for the source distribution.
Windows installers are also available (see download link above).
or
To install this package with conda run:
conda install -c conda-forge pyserial
conda builds are available for linux, mac and windows.
Tutorial on How to connect an Arduino or Microcontroller like AVR ATmega328P,MSP430 ,PIC with a Windows/Linux PC using serial port (ViCP) and talking with it using Python and pySerial library.
This tutorial will concentrate on Python 3.x.x language and will use Pyserial 3.5 Library to communicate with Arduino
-
First section deals with Arduino to PC communication using Python
-
Second section deals with communicating to bare microcontrollers like AVR, Microchip using Python Serial Library
-
and Last section deals with Linux specific details for Python serial port programming.
Check this article if you are Looking to add a tkinter(ttkbootstrap) GUI for your Python Serial Communication program
Contents
- Introduction
- what is pySerial Module
- Sourcecodes
- Hardware used
- Installing PySerial on Windows
- Writing data to Serial Port using Python
- Running the Code on Windows
- pySerial Exceptions
- Reading Data from Serial port using Python
- Setting pySerial Read timeouts
- Interfacing Microcontroller with PC
- Interfacing MSP430 with PC
- Interfacing ATmega328P with PC
- DTR RTS Pin Control using pySerial
- Serial Programming on Linux using Python and pySerial
Introduction
Python is an open source, cross platform ,interpreted language that is easy to learn for beginners. One of the many advantages of Python is the sheer number of contributed modules for performing a wide variety of tasks.
It is widely used for building scripts/program to interact with real world objects like USB relays, USB data acquisition devices, USB data loggers and other embedded systems.
Easiest way to interact with serial port devices is over a Virtual Com Port using a USB to Serial Converter IC like
- FTDI FT232RL
- TUSB3410
- or CP2102
Once the necessary drivers are installed you can interact over VCP by reading and writing into it.
One problem with developing code that uses serial port is portability, you can’t use the same code in both Windows and Linux. For each operating system (Windows/Linux) you have to write custom codes using the native API’s as we have done below
- Win32 Serial Port Programming using Native APi’s
- Linux Serial Port programming using Native API’s.
pySerial Module
Python provides an easy way to do cross platform serial communication using pySerial module.
The modules hides all the OS specific peculiarities and presents a uniform simple interface for programming the serial port.
The code written with pySerial can run unmodified on Windows,Linux systems and Mac Systems.
Source codes
- Browse Python Serial Comm code from our Github Repo
- Download Python Serial Comm code as zip file
Please note that the source codes on the website show only the relevant sections to highlight the process of programming the serial port.
Please use the complete source codes from our github repo when building your own program.
Hardware Used
Here we will be using an Arduino to communicate with the python script running on the PC. You can use both Arduino UNO or Arduino Mega.
If you want to communicate with a bare microcontroller like ATmega32,ATmega32p,ESP32,Raspberry Pi Pico, MSP430 using Python ,You will need a USB to serial converter like USB2SERIAL.
Python on Windows
In Windows, Python is not installed by default, you can find python binary installers from python.org
After completing the installation you can type “python” on your command prompt to enter the python shell. (use CTRL + Z to exit from the shell).
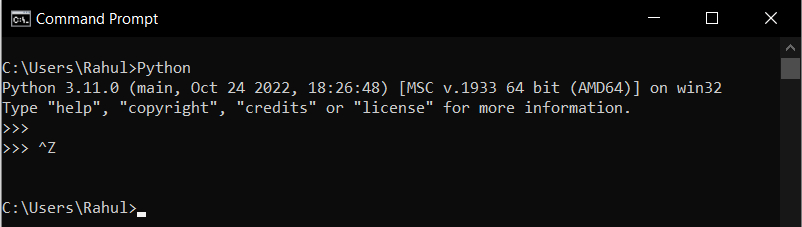
Or you can use the built in GUI shell called IDLE. Press CTR+Q to exit from IDLE.

Installing PySerial on Windows using pip
After you have installed the python interpreter, You can install PySerial using pip installer.
So open up your Windows Command prompt and type in the following command as shown below.
C:\>python -m pip install pyserial
You can also check the installed packages using pip list command.
C:\>python -m pip list 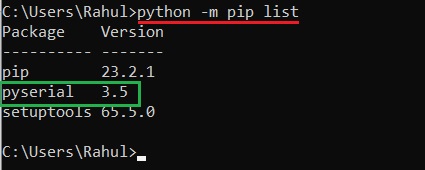
After installing pySerial, open the python shell and type “import serial”. If you are not getting any error messages, pySerial is installed properly.
Some IDE’s like Thonny has built in Python interpreters which work independently from the interpreter installed on your system. They come with pySerial preinstalled.
Writing data to Serial Port using Python and pySerial
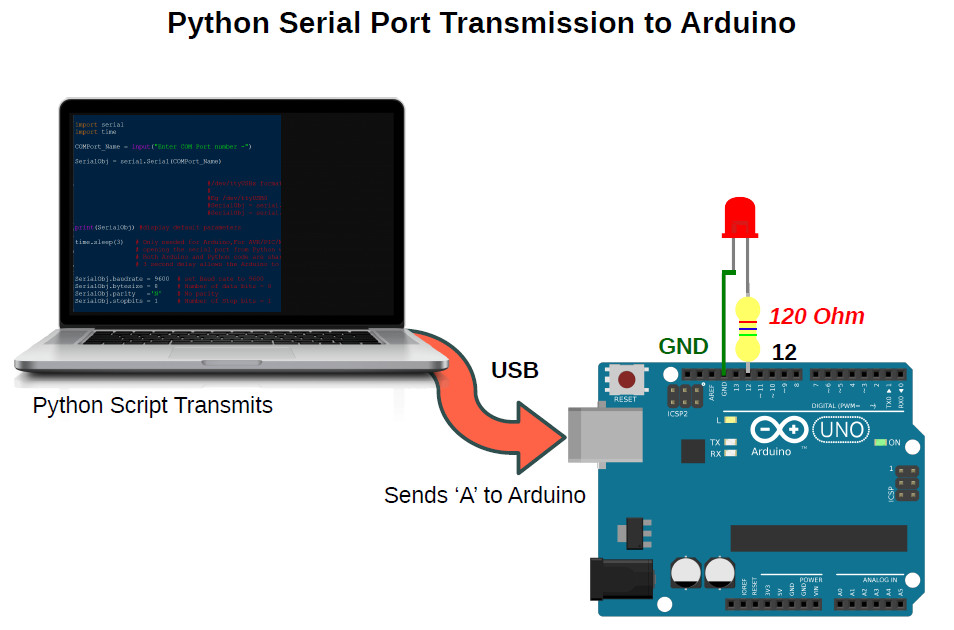
Here we will learn to communicate with an Arduino through Serial Port (Virtual COM Port) from a Windows or Linux PC using Python 3.x.x.
The PC will transmit some data (ASCII Characters) serially over Virtual COM port to the Arduino UNO using a Python Script running on a Windows 10 PC as shown in the above image. The Arduino will blink a LED connected to Pin12 on receiving the character ASCII ‘A’
PC Side Python Code
Now on the PC side
let’s open a serial port and write some values to it. The code in python is quite straight forward, you can just read it like plain English.
Open a text editor and type the following lines of code into it .Save the file with a ” .py” extension.
The Below code writes character ‘A’ to the serial port.
# Python code transmits a byte to Arduino /Microcontroller

import serial
import time

SerialObj = serial.Serial('COM24') # COMxx   format on Windows
                                  # ttyUSBx format on Linux

SerialObj.baudrate = 9600  # set Baud rate to 9600
SerialObj.bytesize = 8     # Number of data bits = 8
SerialObj.parity   ='N'    # No parity
SerialObj.stopbits = 1     # Number of Stop bits = 1
time.sleep(3)

SerialObj.write(b'A')      #transmit 'A' (8bit) to micro/Arduino
SerialObj.close()          # Close the port
Please make sure that you use the correct serial port number.
In the above code it is COM24,
Your serial port number may be different .You can find the correct port number using Device Manager on Windows as shown below .
Code Explanation
The first line import serial imports the pySerial module so that your program can use it.
ComPort = serial.Serial('COM24') opens the serial port named COM24.then we set the various parameters for the serial communication like baudrate, no of stop/start bits,parity etc. Here we will be using the default 9600bps, 8N1 format for communication.
SerialObj.baudrate = 9600  # set Baud rate to 9600
SerialObj.bytesize = 8     # Number of data bits = 8
SerialObj.parity   ='N'    # No parity
SerialObj.stopbits = 1     # Number of Stop bits = 1
Opening the serial port using pySerial will reset the Arduino connected on the port,(here COM24).This is specific to Arduino only .
This is because some of the serial port pins of the USB protocol chip (FT232/ATmega8U/16U) like RTS/DTR are used by the Arduino board to put the ATmega328P in boot mode during programming. When we open the serial port, the signal levels on the RTS/DTR pins of the USB IC may change.
time.sleep(3) # wait for some time ,so the Arduino is readySo you should wait some time (here 3 seconds) before transmitting the data to the Arduino board.
In the above code we are using time.sleep(3) function to create the delay.
Serial communication occurs in bytes (8 bits) while Python3+ handles strings in Unicode format which may consume up to 4 bytes.
So to make the characters suitable to send to a microcontroller we have to convert them to byte based chunks.
In the above Example we are sending a byte ‘A’.
Here A is defined as a byte by using b prefix.You can also use the bytearray() function.
SerialObj.write(b'A') #transmit 'A' (8bit) to micro/ArduinoSerialObj.write(b’A’) function then writes/sends data to your microcontroller /Arduino.
Arduino Side Code
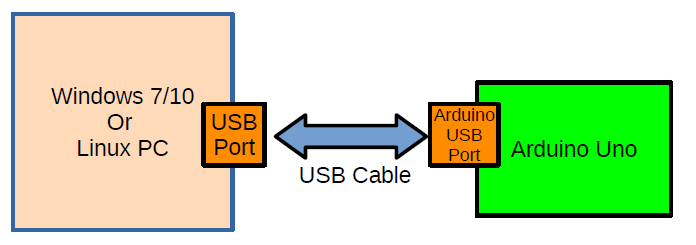
PC and Arduino are connected as shown below using a single USB cable.
On the Arduino side ,
we wait for the Character A and turns the LED connected to Pin12 ON for 2 seconds.
A switch() is used to select the required action.
The partial code is shown below.
if (Serial.available())
   {

     RxedByte = Serial.read();
     switch(RxedByte)
     {
       case 'A':  digitalWrite(12,HIGH);
                  delay(1000);
                  digitalWrite(12,LOW);
                  break;
       case 'B': //your code
                  break;
       default:
                  break;
     }//end of switch()
   }//endof if
Please visit our Github for the full code.
Running the Python Code
In Windows,
You can either run the code from command line,
D:\> python yourSerialTransmitCode.pyor
by using IDLE
From IDLE use “File → Open” to open your code file and from “Run → Run Module”. or press F5
Handling Pyserial Serial Port Exceptions
Some times opening the serial port may fail due to various conditions like port in use ,port not found etc .
pySerial comes with the exception serial.SerialException which can be used to identify the error and fail gracefully.
We also have a Video on How to use and handle pySerial Exceptions during serial port programming
The below partial code shows how to use exceptions
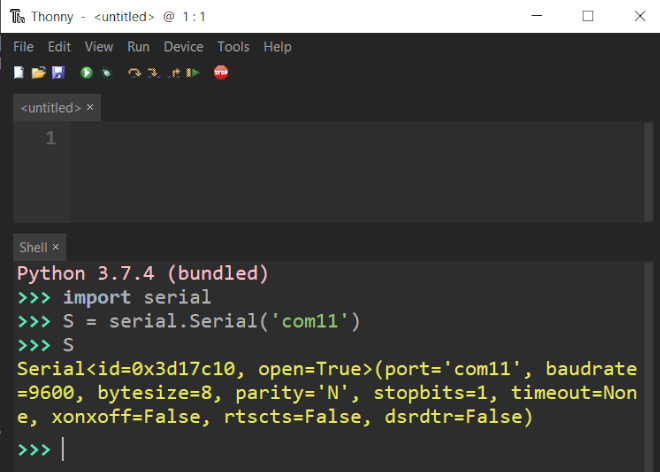
try:
   SerialObj = serial.Serial('COM11',9600) # open the Serial Port


except serial.SerialException as var : # var contains details of issue
   print('An Exception Occured')
   print('Exception Details-> ', var)

else:
   print('Serial Port Opened')
Here is an example of the error message you will get when some other process is using the port you are trying to access.
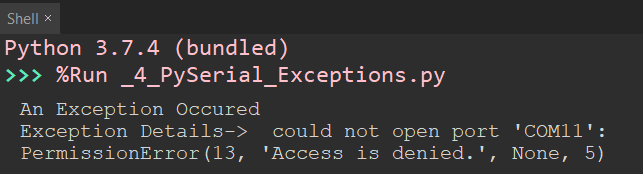
When Port number is wrong.
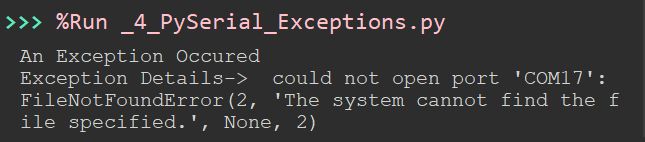
%Run is due to the IDE (here Thonny) running the code on the terminal.
Reading Data from Serial port using Python and Pyserial
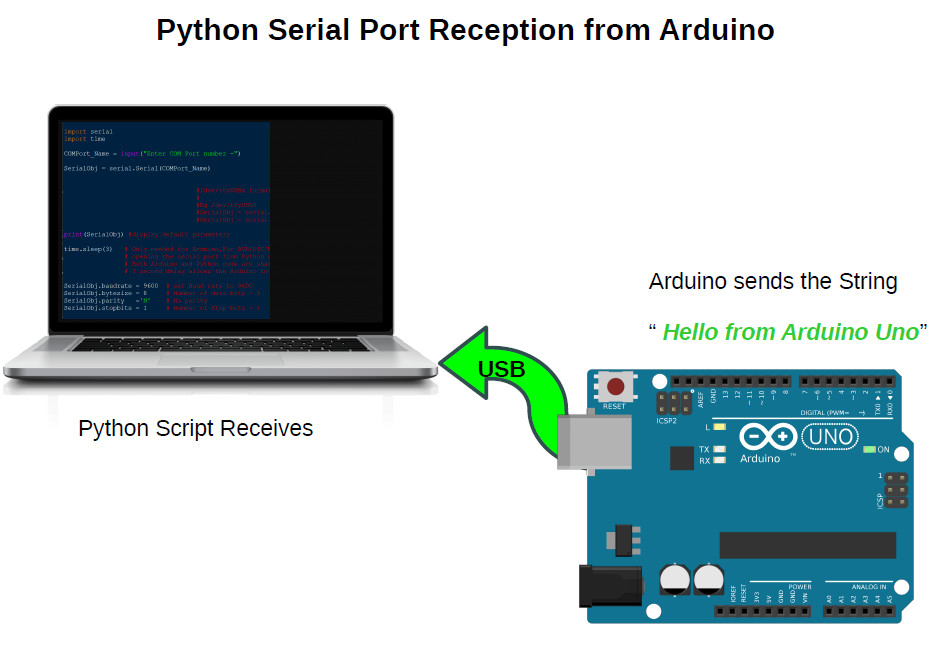
Here we will be sending a text string «Hello from Arduino» from Arduino to a Windows/Linux PC through serial port using Python.
The Python script running on the PC will receive data send by the Arduino using the readline() function of the pyserial library and display the text data on the command line.
PySerial provides two functions to read data from the serialport
- readline()
- read()
readline() reads till it encounters a newline character ‘\n’ and returns the bytes it has read.
If \n character is not encountered it will wait forever or until the read timeout expires.
ReceivedString = SerialObj.readline()
print(ReceivedString)
SerialObj.close()
Setting up pySerial read timeouts
When we are reading something from the serial port using Python and Pyserial library , the sender (Arduino) may fail to respond which will result in the Python script waiting forever.
To mitigate this issue we can set timeouts for the pySerial read() and readline() methods which forces these methods to return after a set time period, irrespective of whether data is received or not.
The code below shows how to set timeouts during a read call.
import serial
import time
SerialObj = serial.Serial('COM3') # COMxx   format on Windows
                                   # ttyUSBx format on Linux

SerialObj.baudrate = 9600  # set Baud rate to 9600
SerialObj.bytesize = 8     # Number of data bits = 8
SerialObj.parity   ='N'    # No parity
SerialObj.stopbits = 1     # Number of Stop bits = 1

SerialObj.timeout  = None  # Setting timeouts here No timeouts,waits forever

time.sleep(3)  #needed only for arduino

ReceivedString = SerialObj.readline()
print(ReceivedString)
SerialObj.close()
there are three values for the timeout parameter
SerialObj.timeout = None ,No timeouts,waits forever- timeout = None means that the code will wait forever
- timeout = 0 non-blocking mode, return immediately in any case
- timeout = seconds Return immediately if data is available else wait for specified seconds till the data arrives
SerialObj.timeout = 3 ,timeout set for 3 seconds,will return after 3secondsArduino Side Code
On the Arduino side ,the text string is stored in a char array as shown below and transmitted to the PC in a loop of about 1 second.
void setup() part not shown below, use the full code from GitHub repo.
void loop()
{
 char TextToSend[] = " Hello From Arduino Uno";
 Serial.println(TextToSend); // sends a \n with text
 delay(1000); //1 second delay
}
Make sure that you use the
Serial.println(TextToSend); // sends a \n with textas println() sends the \n character which helps the python readline() function to return.
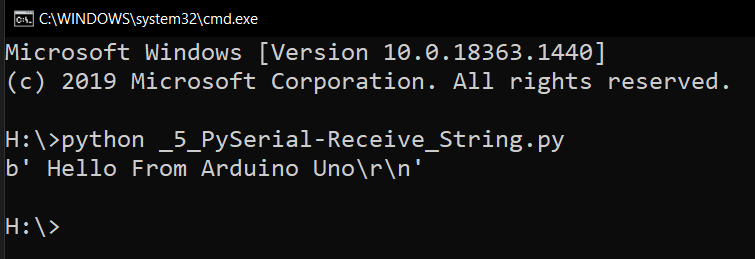
Once the string is received the data is displayed on command line as shown below.
Connecting a Bare Microcontroller to your PC ‘s Serial port
In the above tutorial we learned how to connect an Arduino board with a PC and communicate with it (Receive/Transmit data ) using a standard USB cable.
What if instead of an Arduino we just want to connect a bare microcontroller like ATmega328P,ATmega16,MSP430 or PIC18F4550 to your PC.
In the case of Arduino all the details of how ATmega328P connects with the USB section is abstracted away from the user, when you are building embedded systems you have to know which signals are connected to which.
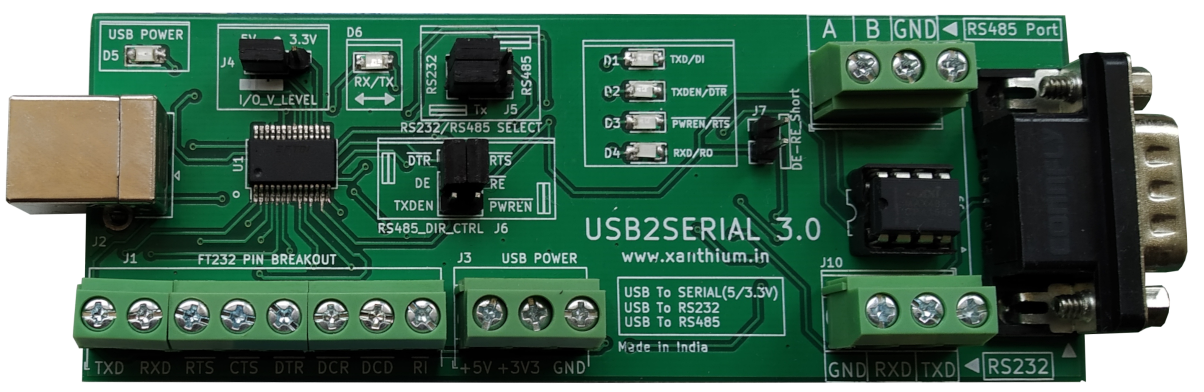
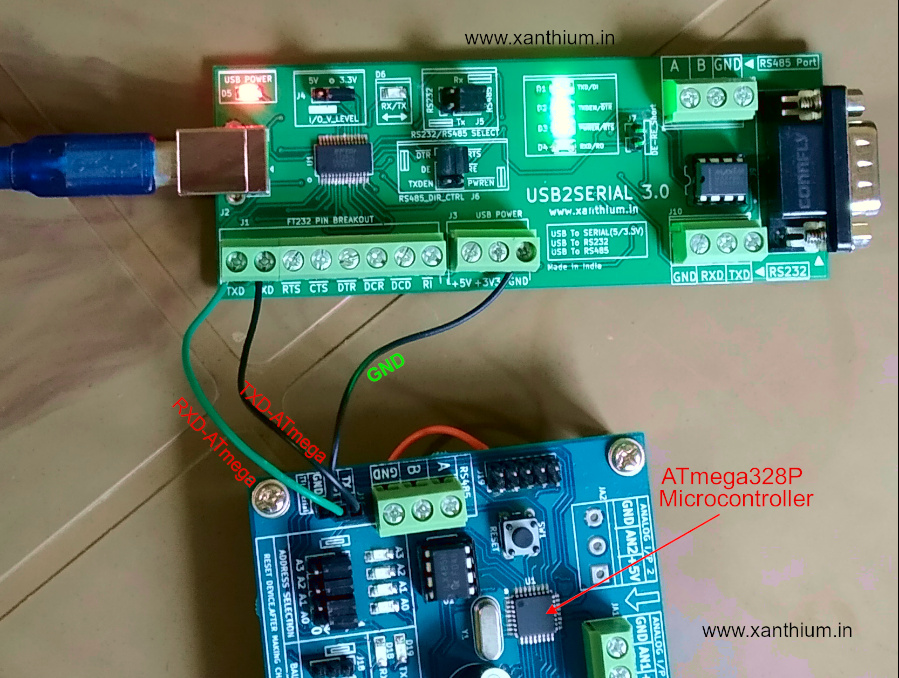
When you are using a microcontroller which do not have any built in USB controller like ATmega16 or MSP430G2553 ,you have to use a USB to Serial Converter chip like FT232RL or buy a standard USB to serial converter board like USB2SERIAL to convert serial signals to the USB ones.

The USB2SERIAL board shown can work as a USB to serial Converter ,USB to RS232 Converter or USB to RS485 converter
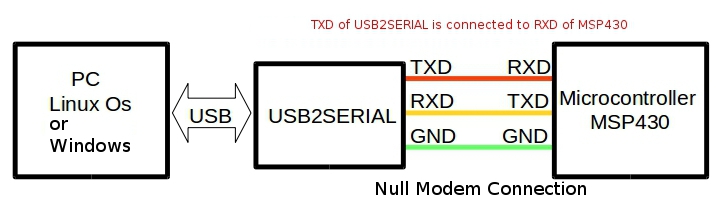
The below block diagram shows how to interface any microcontroller to a PC with a standard USB to serial converter.

Here the TXD of the serial port is connected to the RXD of the microcontroller UART and vice versa. So when microcontroller transmits a byte it goes to the receive buffer of the serial port on the PC side and vice versa.
Ground lines are made common to both PC and microcontroller.
Interfacing MSP430 Microcontroller with PC using Python
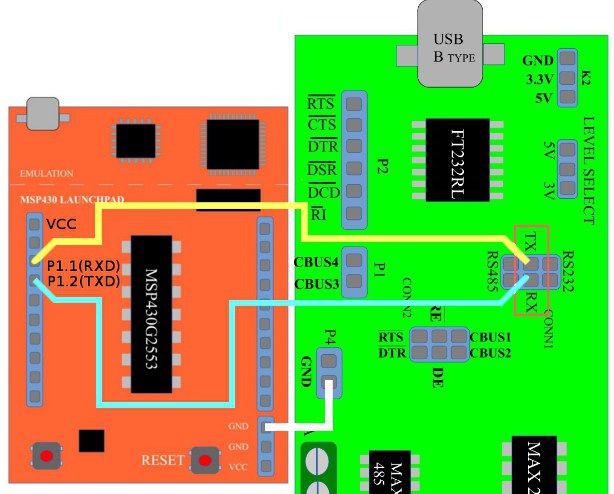
Above image shows how to hook up a launchpad board with PC using USB2SERIAL converter The Controller (MSP430G2553) is connected to the FT232’s Serial port using a null modem cable as shown in the above figure.
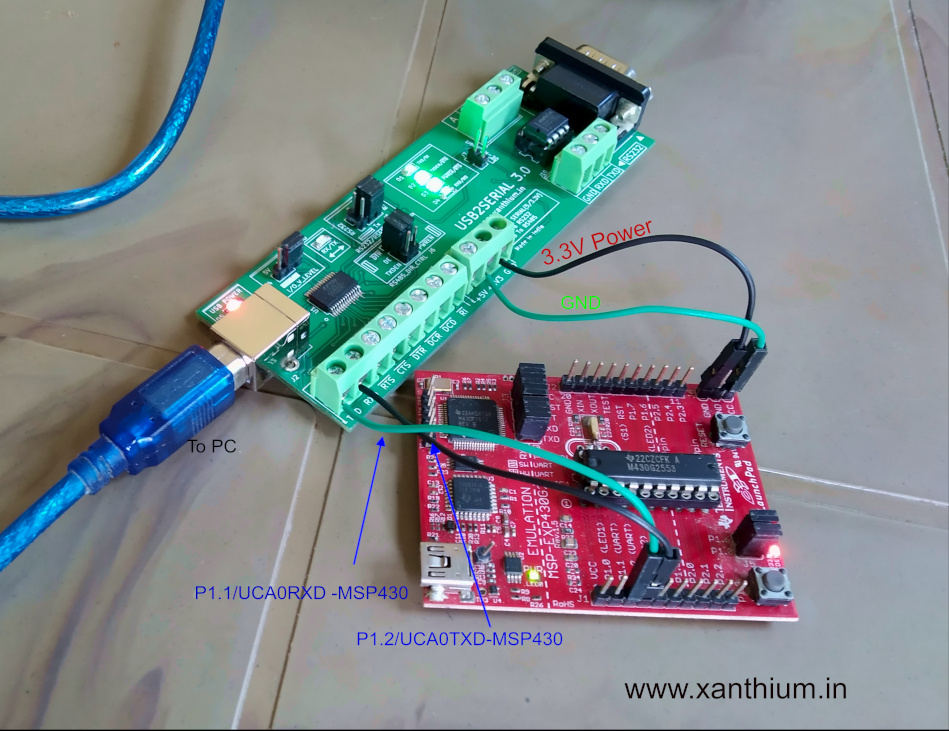
Please note that MSP430’s are 3.3V microcontrollers ,so please select the IO voltage levels of USB2SERIAL board as 3.3V.
In case you want to know more about MSP430’s,
- check this tutorial on How to configure MSP430G2553 UART for serial communication.
Interfacing bare ATmega328P microcontroller with PC using Python.
Yes, Arduino uno is ATmega328P
but here the code is written in AVR embedded C and compiled using AVR studio or Microchip Studio.
- Full tutorial on AVR ATmega to PC communication can be found here
Controlling RTS and DTR Serial Port pins in Python using PySerial
RTS and DTR pins are two extra lines available on most serial ports which are used for signaling purposes.They do not transmit serial data.
Using Pyserial, you can control the logic states of RTS and DTR pins ie make them HIGH or LOW to control a transistor switch or logic circuit.
Earlier, PySerial API used SerialObj.setRTS() and SerialObj.setDTR() which are now deprecated.
The new simplified API is just
- rts
- and dtr
which can be set or cleared by assigning a 1 or 0.
import serial

SerialObj = serial.Serial('COM6',9600)

SerialObj.rts = 1 #RTS HIGH
SerialObj.rts = 0 #RTS LOW
SerialObj.dtr = 1 #DTR HIGH
SerialObj.dtr = 0 #DTR LOW

SerialObj.close()
Please note that you need to add delay between HIGH and LOW to visualize the transition.
In some USB to Serial Converter chips like FT232RL the signals are Active LOW, so setting the pin=1 would make the signal LOW.
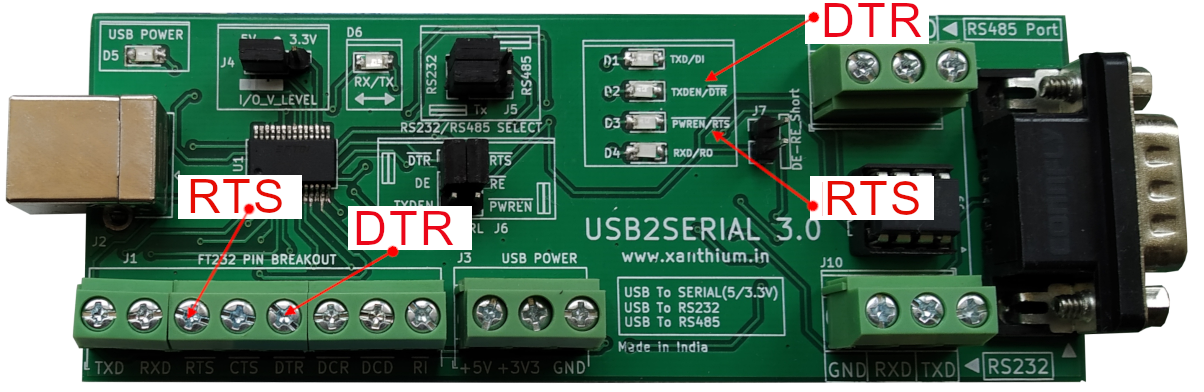
The USB2SERIAL converter shown above have LED’s that indicate the logic levels of the DTR and RTS Pins.The Pins are even brought out to screw terminal head’s as shown above.
Python Serial Port programming on Linux
- Linux specific parts of the Python Serial Port programming can be found here.
Введение
Работа с последовательными портами остаётся актуальной в индустриальных, IoT, робототехнических и микроконтроллерных системах. Управление устройствами через COM (RS-232/RS-485/USB-Serial) требует стабильного, кроссплатформенного и гибкого инструмента. В Python таким решением является библиотека PySerial.
PySerial обеспечивает простой и мощный интерфейс для подключения, конфигурации и передачи данных по последовательным линиям. Она используется для связи с Arduino, Raspberry Pi, модемами, GPS-приёмниками, контроллерами, сенсорами и многим другим оборудованием.
В этой статье рассмотрим устройство PySerial, все ключевые методы, практические примеры, настройки таймингов и протоколов, работу с буферами и продвинутую интеграцию.
Основная часть
Установка и подключение
pip install pyserialПодключение:
import serialБазовая структура работы
-
Открытие соединения
-
Отправка и приём данных
-
Закрытие соединения
ser = serial.Serial('COM3', baudrate=9600, timeout=1)
ser.write(b'command')
data = ser.readline()
ser.close()
Ключевые параметры соединения
-
port— имя устройства (COM1,/dev/ttyUSB0,/dev/ttyAMA0) -
baudrate— скорость (обычно 9600, 115200) -
bytesize— размер символа (5, 6, 7,
-
parity— чётность (N, E, O) -
stopbits— количество стоп-бит (1, 1.5, 2) -
timeout— таймаут чтения

Работа с методами Serial
Serial.write(data)
Отправка байтов.
ser.write(b'Hello\n')Serial.read(size=1)
Чтение указанного количества байтов.
Serial.readline()
Чтение строки до \n.
Serial.readlines()
Чтение всех строк в буфере.
Serial.read_all()
Полный буфер.
Serial.flush() / flushInput() / flushOutput()
Очистка буферов.
Управление соединением
Serial.open() / Serial.close()
Открытие/закрытие соединения.
Serial.isOpen()
Проверка, открыто ли соединение.
Serial.in_waiting
Сколько байтов ожидает чтения.
Serial.reset_input_buffer() / reset_output_buffer()
Очистка входящего/исходящего буфера.
Пример: обмен с Arduino
ser = serial.Serial('COM4', 9600, timeout=1)
ser.write(b'LED_ON\n')
response = ser.readline().decode('utf-8')
print(response)
ser.close()
Обработка ошибок
try:
    ser = serial.Serial('COM1', 9600)
except serial.SerialException as e:
    print(f"Ошибка: {e}")
Мониторинг портов
Список доступных портов
from serial.tools import list_ports
ports = list_ports.comports()
for port in ports:
    print(port.device)
Работа в фоне (треды)
import threading

def reader():
    while True:
        if ser.in_waiting:
            print(ser.readline().decode())

t = threading.Thread(target=reader)
t.start()
Тайминги и задержки
-
timeout— глобальный таймаут чтения -
write_timeout— таймаут записи -
inter_byte_timeout— тайминг между байтами
Используйте задержки time.sleep() между командами при необходимости.
PySerial и платформы
-
Windows:
COM1,COM2, и т.д. -
Linux:
/dev/ttyUSB0,/dev/ttyS0,/dev/ttyAMA0 -
macOS:
/dev/cu.usbserial,/dev/tty.*
Интеграции и расширения
-
PyFirmata — для Arduino через Firmata
-
MQTT — сбор данных с устройств в облако
-
pandas + matplotlib — логирование и визуализация
Преимущества и ограничения
Плюсы:
-
Простота
-
Кроссплатформенность
-
Гибкая конфигурация
Минусы:
-
Синхронность (нет встроенного asyncio)
-
Требует знаний работы с COM
Полный список функций и свойств библиотеки pyserial с описанием
1. serial.Serial(port=None, baudrate=9600, bytesize=EIGHTBITS, parity=PARITY_NONE, stopbits=STOPBITS_ONE, timeout=None, ...)
Создает и открывает последовательный порт.
Основные параметры:
-
port: имя порта ('COM3','/dev/ttyUSB0', и т.д.) -
baudrate: скорость передачи (обычно 9600, 115200) -
bytesize: размер байта (5, 6, 7, -
parity: проверка четности ('N','E','O') -
stopbits: количество стоп-битов (1,1.5,2) -
timeout: таймаут в секундах (None— бесконечное ожидание) -
xonxoff,rtscts,dsrdtr: управление потоком
Пример:
2. ser.open()
Открывает порт (если он был создан с port=None или предварительно закрыт).
3. ser.close()
Закрывает порт.
4. ser.is_open
Свойство: True, если порт открыт.
5. ser.read(size=1)
Читает size байт из порта. Блокирует выполнение до получения или истечения timeout.
Пример:
6. ser.read_all()
Читает все доступные данные из буфера (до конца).
7. ser.read_until(expected=b'\n', size=None)
Читает до указанного символа окончания (по умолчанию до новой строки \n).
8. ser.readline()
Читает строку (до \n). Очень удобно для обмена с Arduino.
9. ser.readlines()
Читает все строки (аналогично readline(), но до опустошения буфера).
10. ser.write(data)
Пишет байты в порт. Аргумент должен быть типа bytes.
Пример:
11. ser.flush()
Форсирует запись буфера передачи (вывод данных немедленно).
12. ser.flushInput() или ser.reset_input_buffer()
Очищает буфер входящих данных.
13. ser.flushOutput() или ser.reset_output_buffer()
Очищает буфер исходящих данных.
14. ser.in_waiting (или ser.inWaiting())
Количество байт, доступных в буфере для чтения.
15. ser.out_waiting (или ser.outWaiting())
Количество байт, ожидающих отправки.
16. ser.timeout
Устанавливает или возвращает таймаут на операции чтения (в секундах).
17. ser.write_timeout
Таймаут на операцию записи.
18. ser.baudrate
Получение или установка скорости порта.
19. ser.port
Имя порта. Можно установить до открытия.
20. ser.bytesize, ser.parity, ser.stopbits
Настройки кадра: размер байта, контроль четности, количество стоп-битов.
21. ser.setDTR(state)
Устанавливает или сбрасывает сигнал DTR (Data Terminal Ready).
22. ser.setRTS(state)
Управляет сигналом RTS (Request To Send).
23. ser.getCTS()
Проверяет состояние входного сигнала CTS (Clear To Send).
24. ser.getDSR()
Состояние DSR (Data Set Ready).
25. ser.getRI()
Состояние сигнала RI (Ring Indicator, используется модемами).
26. ser.getCD() (или ser.cd)
Состояние сигнала CD (Carrier Detect).
27. serial.serial_for_url(url, ...)
Позволяет использовать URL вместо порта (например, loop://, spy://, rfc2217://).
Полезно для отладки и тестов.
28. serial.tools.list_ports.comports()
Возвращает список доступных COM-портов.
Пример:
29. ser.inter_byte_timeout
Таймаут между байтами в потоке чтения. Используется для побайтного протокола.
30. ser.send_break(duration=0.25)
Отправляет break-сигнал (прерывистая линия) на указанное количество секунд.
31. ser.rts, ser.dtr
Свойства: установить состояние сигналов RTS и DTR:
Пример простого обмена с Arduino
Заключение
PySerial — это ключевой инструмент для всех, кто работает с COM-портами в Python. Благодаря своей простоте, стабильности и гибкости, он применяется во всех сферах от DIY-проектов до промышленных решений. Он незаменим при работе с Arduino, контроллерами, сетевыми шлюзами, модемами и другими устройствами, использующими последовательную передачу данных.