
Because Selenium cannot interact with the file upload dialog, it provides a way
to upload files without opening the dialog. If the element is an input element with type file,
you can use the send keys method to send the full path to the file that will be uploaded.
    WebElement fileInput = driver.findElement(By.cssSelector("input[type=file]"));
    fileInput.sendKeys(uploadFile.getAbsolutePath());
    driver.findElement(By.id("file-submit")).click();
file_input = driver.find_element(By.CSS_SELECTOR, "input[type='file']")
file_input.send_keys(upload_file)
driver.find_element(By.ID, "file-submit").click() IWebElement fileInput = driver.FindElement(By.CssSelector("input[type=file]"));
fileInput.SendKeys(uploadFile);
driver.FindElement(By.Id("file-submit")).Click(); file_input = driver.find_element(css: 'input[type=file]')
file_input.send_keys(upload_file)
driver.find_element(id: 'file-submit').click await driver.get('https://the-internet.herokuapp.com/upload');
// Upload snapshot
Move Code
«`java
import org.openqa.selenium.By
import org.openqa.selenium.chrome.ChromeDriver
fun main() {
val driver = ChromeDriver()
driver.get(«https://the-internet.herokuapp.com/upload»)
driver.findElement(By.id(«file-upload»)).sendKeys(«selenium-snapshot.jpg»)
driver.findElement(By.id(«file-submit»)).submit()
if(driver.pageSource.contains(«File Uploaded!»)) {
println(«file uploaded»)
}
else{
println(«file not uploaded»)
}
}
«`
Last Updated :
12 Sep, 2024
Handling file uploads in Selenium WebDriver is a common task in automation testing. In most web applications, uploading files is a critical feature that requires testing to ensure seamless functionality. Selenium WebDriver provides an easy and efficient way to automate file uploads. Unlike typical user interactions like clicks and text inputs, file upload automation in Selenium involves interacting with the file upload element, which can be handled directly using the sendKeys() method.
Prerequisite
We will be required 3 main things:
- Java Development Kit (JDK) installed.
- Browser Driver (e.g., ChromeDriver for Chrome).
- IDE like Eclipse or IntelliJ IDEA.
Steps to handle windows file upload using Selenium WebDriver
The sendKeys method can be used to directly interact with the file input element in the web page. This method does not require any external tool. For this, the steps are given below
- Identify the file input element: First, we will find the input element on the page where the file needs to be uploaded.
- Use the sendKeys method: Then we will use the sendKeys method to input the file’s absolute path to the file input element.
Dependencies
We will be required to have dependencies for selenium, for that, we will add dependencies in the XML file.
pom.xml
XML
<dependencies>
        <!-- Selenium Java Dependency -->
        <dependency>
            <groupId>org.seleniumhq.selenium</groupId>
            <artifactId>selenium-java</artifactId>
            <version>4.21.0</version>
        </dependency>

        <!-- WebDriverManager Dependency -->
        <dependency>
            <groupId>io.github.bonigarcia</groupId>
            <artifactId>webdrivermanager</artifactId>
            <version>5.5.1</version>
        </dependency>

        <!-- TestNG Dependency (optional, if you're using TestNG) -->
        <dependency>
            <groupId>org.testng</groupId>
            <artifactId>testng</artifactId>
            <version>7.8.0</version>
            <scope>test</scope>
        </dependency>
    </dependencies>
Example
Index.html
HTML
<!DOCTYPE html>
<html lang="en">
  <head>
    <meta charset="UTF-8" />
    <meta name="viewport" content="width=device-width, initial-scale=1.0" />
    <title>File Upload with Image Preview</title>
    <style>
      body {
        font-family: Arial, sans-serif;
        margin: 20px;
      }
      .upload-container {
        margin-bottom: 20px;
      }
      #preview {
        display: none;
        max-width: 300px;
        max-height: 300px;
        margin-top: 20px;
        border: 1px solid #ddd;
        padding: 5px;
      }
    </style>
  </head>
  <body>
    <div class="upload-container">
      <label for="file-upload">Upload an Image:</label>
      <input type="file" id="file-upload" accept="image/*" />
    </div>

    <div id="image-preview">
      <img id="preview" alt="Image Preview" />
    </div>

    <script>
      // JavaScript to handle image upload and display
      document
        .getElementById("file-upload")
        .addEventListener("change", function (event) {
          const file = event.target.files[0];
          if (file) {
            const reader = new FileReader();

            // Set image preview source once file is loaded
            reader.onload = function (e) {
              const preview = document.getElementById("preview");
              preview.src = e.target.result;
              preview.style.display = "block"; // Show the image
            };

            reader.readAsDataURL(file);
          }
        });
    </script>
  </body>
</html>
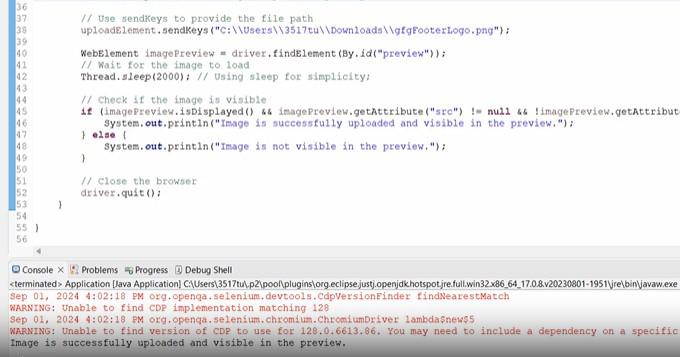
Application.java
Java
import java.time.Duration;
import java.util.HashMap;
import java.util.List;
import java.util.Map;
import java.util.Set;
import java.util.concurrent.TimeUnit;

import org.openqa.selenium.By;
import org.openqa.selenium.Cookie;
import org.openqa.selenium.JavascriptExecutor;
import org.openqa.selenium.WebDriver;
import org.openqa.selenium.WebElement;
import org.openqa.selenium.chrome.ChromeDriver;
import org.openqa.selenium.interactions.Actions;
import org.openqa.selenium.support.ui.ExpectedConditions;
import org.openqa.selenium.support.ui.Select;
import org.openqa.selenium.support.ui.WebDriverWait;

import com.google.errorprone.annotations.Var;

public class Application {
    public static void main(String[] args) throws InterruptedException {
        // Set the path to the ChromeDriver executable
        System.setProperty("webdriver.chrome.driver", "chromedriverpath");

        // Initialize WebDriver
        WebDriver driver = new ChromeDriver();
        driver.manage().timeouts().implicitlyWait(10, TimeUnit.SECONDS);

        driver.get("http://127.0.0.1:5500/htmlfile.html");
        driver.manage().window().maximize();

        // Locate the file input element
        WebElement uploadElement = driver.findElement(By.id("file-upload"));
        Thread.sleep(2000); // Using sleep for simplicity;

        // Use sendKeys to provide the file path
        uploadElement.sendKeys("C:\\Users\\3517tu\\Downloads\\gfgFooterLogo.png");

        WebElement imagePreview = driver.findElement(By.id("preview"));
        // Wait for the image to load
        Thread.sleep(2000); // Using sleep for simplicity;

        // Check if the image is visible
        if (imagePreview.isDisplayed() && imagePreview.getAttribute("src") != null && !imagePreview.getAttribute("src").isEmpty()) {
            System.out.println("Image is successfully uploaded and visible in the preview.");
        } else {
            System.out.println("Image is not visible in the preview.");
        }

        // Close the browser
        driver.quit();
    }

}
Output:
Conclusion
In conclusion, automating file uploads with Selenium WebDriver simplifies the process of testing web applications that involve file handling. By the sendKeys() method to upload files, you can ensure that your test scripts remain robust and easy to manage. File upload automation plays a significant role in enhancing the efficiency of testing workflows, especially for applications that frequently require file inputs.
Время на прочтение4 мин
Количество просмотров60K
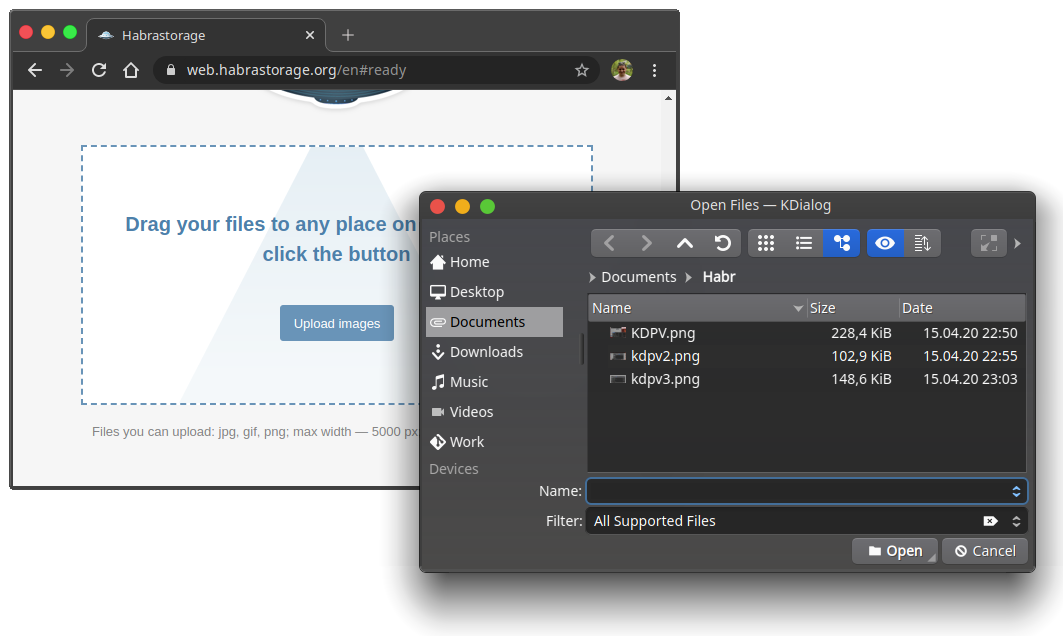
Selenium WebDriver создавался как кросс-платформенный инструмент для управления веб браузерами. И вот уже почти 14 лет он делает эту работу очень и очень хорошо. Впрочем, автотесты из реального мира создают ситуации, в которых Selenium бессилен. Например, по сценарию нужно загрузить или скачать какой-либо файл. После нажатия кнопки «Загрузить» или «Скачать», поверх окна браузера появляется окно файлового менеджера операционной системы к которому Selenium уже не имеет доступа. Тест останавливается.
Я слышал рекомендации использовать утилиты типа AutoIt или Sikuli для работы с такими системными окнами. Мой совет — никогда так не делайте, это порочная практика, которая приводит к нестабильным тестам:
- Такое решение не кросс-платформенное. Приходится изобретать свой велосипед для каждой новой операционной системы.
- Хрупкое. Нет гарантии, что скрипт будет работать корректно если на машине открыто несколько браузеров.
- Это делает невозможным использование headless режима браузера
Меня зовут Ярослав Пернеровский. Я уже 15 лет в тестировании и около 8 лет в автоматизации. Сейчас я расскажу как нужно правильно обрабатывать такие ситуации.
Если очень кратко
Все сложности с окнами операционной системы решаются довольно прямолинейно — надо сделать так, чтобы эти окна не появлялись и не мешали работе браузера.
Загрузка файла на сервер
В этом случае все просто, даже банально. Чтобы проблема не возникала — не нужно нажимать на кнопку «Загрузить». Вместо этого лучше поискать на странице элемент, который является файловым полем ввода (специальный input с типом file) и с помощью метода sendKeys() «напечатать» в него абсолютный путь к нужному файлу:
By fileInput = By.cssSelector("input[type=file]");
String filePath = "/home/selenium/files/upload.txt";

driver.findElement(fileInput).sendKeys(filePath);
Это все. Дальше Selenium все сделает за вас. В любой операционной системе. В любом режиме браузера. После выполнения этого метода, сразу же, без лишних вопросов, начнется загрузка файла.
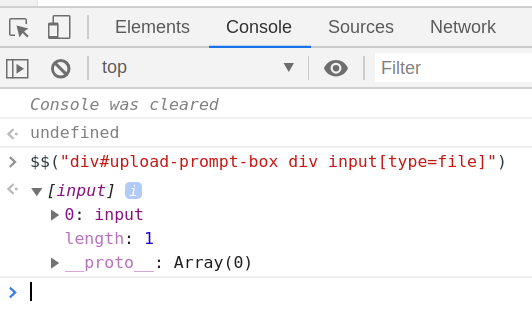
Что, если загрузка не началась? Возможно, вы пишите не в то поле, так как в DOM дереве присутствует несколько полей нужного типа. Это легко проверить в консоли браузера командой $$("input[type=file]")

Надо помнить, что метод findElement() возвращает самый первый элемент из найденных. Это не всегда может быть то что нужно. Следует более точно специфицировать локатор, чтобы он указывал на правильное поле. Тут надо поэкспериментировать, но в результате все заработает как надо.
Если Selenium продолжает ругаться
В угоду красивому дизайну, разработчики часто делают файловое поле скрытым. В таких случаях, Selenium ругается на то, что не может работать с невидимым элементом. Довольно прямолинейное решение — надо сделать поле видимым. Об этом хорошо написал Алексей Баранцев (barancev) в своем блоге. После таких манипуляций, никаких проблем с загрузкой быть не должно.
Скачивание файла с сервера
Если с загрузкой все абсолютно понятно, то скачивание файла уже не так однозначно. Современные браузеры по-умолчанию не спрашивают куда сохранять файл, а просто сохраняют в системную папку Downloads, а так как Selenium запускает браузеры с чистыми настройками и изолированными профилями (кроме Internet Explorer), то простое нажатие на «Скачать» начнет скачивание файла без открытия окна проводника.
Хотя, даже в таком случае, бывают внезапные уточняющие диалоги уже от самого браузера:
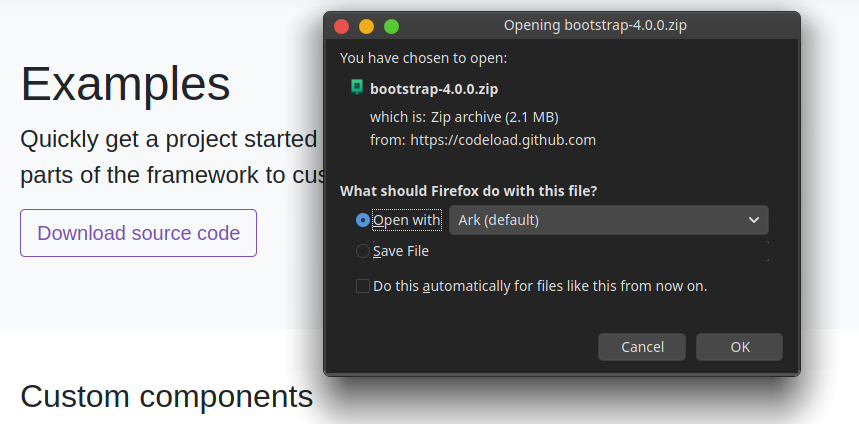
Это решается таким же способом, как и с загрузкой файла. Не надо нажимать никаких кнопок. Вместо этого давайте заглянем в код:
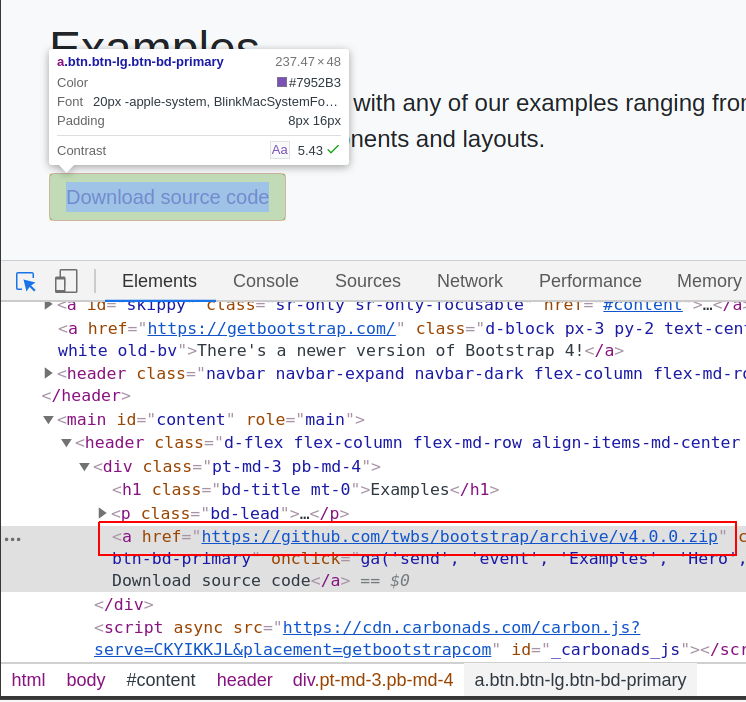
Как видно, кнопка реализована в виде ссылки. Атрибут href содержит путь к нужному файлу на сервере. Это идеальный вариант, так как все что нужно, это вытащить ссылку и скачать файл с помощью любого http клиента. Например для Java это выглядит следующим образом:
//Get download link
String downloadLink = driver
         .findElement(By.cssSelector("main#content a.btn"))
         .getAttribute("href");

//Set file to save
File fileToSave = new File("/path/to/file.zip");

//Download file using default org.apache.http client
CloseableHttpClient httpClient = HttpClients.createDefault();
HttpGet httpGet = new HttpGet(downloadLink);
HttpResponse response = httpClient.execute(httpGet, new BasicHttpContext());

//Save file on disk
copyInputStreamToFile(response.getEntity().getContent(), fileToSave);
Загрузка файла через http
Конечно, для корректной загрузки через http, надо написать чуть более сложный код. Ведь нужно передавать http заголовки и куки текущей сессии браузера, обрабатывать ошибки и прочее. Полный код реализации такого механизма можно подсмотреть в исходниках библиотеки Selenide. Нужный класс называется DownloadFileWithHttpRequest.
К сожалению, не всегда бывает так просто. Случается, что ссылка для скачивания генерируется с помощью JavaScript и ее сложно получить в чистом виде. Тогда, без нажатия на кнопку уже не обойтись. Хорошая новость в том, что окошки операционной системы открываются не после нажатия на кнопку, а уже когда браузер получает серверный ответ, в котором содержится информация для сохранения на диск. Все что нам нужно сделать, это перехватить этот ответ и подменить метод сохранения из браузера на свой. Звучит просто, но на деле это требует установки прокси-сервера между браузером и настоящим бекендом. К счастью, существуют специальные прокси, которые прекрасно работают в связке с Selenium. Например современный BrowserUpProxy или классический BrowserMobProxy.
Реализация этого метода довольно громоздкая, но работающий пример можно найти в уже знакомом проекте Selenide. За это отвечает класс DownloadFileWithProxyServer.
В целом, этот способ самый надежный, но и он не лишен недостатков. Установленный прокси нарушает работу https, а это может повлиять на поведение тестируемого приложения.
В общем случае, надо хорошо подумать, что именно тестируется и действительно ли для этого нужно скачивать файлы. Если можно обойтись без скачивания, то лучше обойтись. Если нет — выбирайте самый простой способ из вышеописанных.
Заключение
Чтобы тесты оставались стабильными, надо убирать факторы, которые делают их хрупкими. Диалоговые окна операционной системы, это один из таких факторов. В следующих статьях я планирую раскрыть другие важные аспекты, которые сильно влияют на стабильную работу Selenium тестов. Слушайте подкаст QA Guild и хорошей вам автоматизации.
You are here: Home / Advance Selenium / Upload file in Selenium webdriver using Robot class

Hello, Welcome to Selenium tutorials in this post we will see how to upload files in Selenium Webdriver using Robot class.
When you start automating web applications then you will get many scenarios where you need to upload a single file or multiple files in order to continue the flow.
If you click on file upload then the filer uploader model will appear which will ask to upload a file. The file uploader is windows control which Selenium cant handle so we need to take the help of another library or approach.
There are multiple ways to upload files in Selenium Webdriver
- You can directly use the sendKeys(“File path”) method but sometimes this method does not work. If the file uploader does not include an input tag.
- We can use the Robot class to upload files in Selenium, which we will discuss today.
- You can also take the help of Sikuli or a Robot class.
If you are new to Selenium and not aware of Robot class then check the below article which will describe you about robot class
Robot class in Selenium Webdriver
- We can upload files using AutoIT as well.
Robot class is not part of Selenium it comes with Java but we can use the same here. We have to use some keyboard events to perform this.
Step 1- We have to copy the file location in the system clipboard.
Step 2- We have to click on the upload button and use CTR+V and ENTER.
Note- Robot class each key has to press and release respectively
Scenario-
1-Open Firefox and Create a profile in monster.com
2- Click on the upload button and select the file and save
Lets implement the same
import java.awt.datatransfer.StringSelection;
import java.awt.event.KeyEvent;
import java.awt.*;
import org.openqa.selenium.By;
import org.openqa.selenium.JavascriptExecutor;
import org.openqa.selenium.WebDriver;
import org.openqa.selenium.firefox.FirefoxDriver;
import org.testng.annotations.Test;

public class FileUpload {

@Test
public void Fileupload() throws AWTException, InterruptedException{


// Start browser
 WebDriver driver = new FirefoxDriver();

// maximize browser
 driver.manage().window().maximize();

  // Specify the file location with extension
 StringSelection sel = new StringSelection("C:\\Users\\Desktop\\1.doc");

   // Copy to clipboard
 Toolkit.getDefaultToolkit().getSystemClipboard().setContents(sel,null);
 System.out.println("selection" +sel);


// Open Monster.com
 driver.get("http://my.monsterindia.com/create_account.html");
 Thread.sleep(2000);

 // This will scroll down the page
 JavascriptExecutor js = (JavascriptExecutor)driver;
 js.executeScript("scroll(0,350)");

// Wait for 5 seconds
 Thread.sleep(5000);

// This will click on Browse button
 driver.findElement(By.id("wordresume")).click();


 System.out.println("Browse button clicked");

 // Create object of Robot class
 Robot robot = new Robot();
 Thread.sleep(1000);

  // Press Enter
 robot.keyPress(KeyEvent.VK_ENTER);

// Release Enter
 robot.keyRelease(KeyEvent.VK_ENTER);

  // Press CTRL+V
 robot.keyPress(KeyEvent.VK_CONTROL);
 robot.keyPress(KeyEvent.VK_V);

// Release CTRL+V
 robot.keyRelease(KeyEvent.VK_CONTROL);
 robot.keyRelease(KeyEvent.VK_V);
 Thread.sleep(1000);

         Press Enter
 robot.keyPress(KeyEvent.VK_ENTER);
 robot.keyRelease(KeyEvent.VK_ENTER);

}

}
Please comment below you are facing any issue while uploading the file
Now if you are comfortable with Basic Selenium, you can check out Advance Selenium Tutorial as well. 🙂
For More updates Learn Automation page
For any query join Selenium group- Selenium Group
Reader Interactions
One of the most common online activities people undertake is uploading files. Selenium is one of the best tools for automation testing websites because it allows testers to automate valuable functions. This step-by-step guide will simplify how to upload file in Selenium using relevant code snippets and two examples.
Let’s begin by going over some fundamentals of Selenium WebDriver.
Table of Contents
- Introduction to Selenium WebDriver
- How to Upload a File Using Selenium?
- Uploading a profile picture into the GitHub account
- Uploading a File using Selenium to check plagiarized content
Introduction to Selenium WebDriver
Selenium is an open-source tool that is used for browser automation It provides a single interface that allows the writing of test scripts in programming languages like Ruby, Java, NodeJS, PHP, Perl, Python, and C#, among others.
- Selenium WebDriver is a web framework that permits the execution of cross browser tests. This tool automates web-based application testing to verify that it performs as expected.
- It is an advancement over Selenium RC and overcomes some of RC’s limitations.
- Selenium WebDriver cannot handle window components, but this drawback can be overcome using tools like Sikuli, Auto IT, etc.
- Like Selenium RC, Selenium WebDriver supports multiple programming platforms to provide more comprehensive flexibility and requires knowing any one programming language.
How to Upload a File Using Selenium?
While there are multiple approaches to upload a file in Selenium, this article will describe the action using SendKeys method. It is best to understand the process through a couple of real-world examples.
Uploading a profile picture into the GitHub account
Assume that you are setting up your GitHub account for the first time and wish to complete profile settings. One of the features is to upload your profile picture. Let’s see how to do that.
The snapshot below depicts the page to which the user must upload a picture.

Once you click the Edit button, the website will allow you to upload a picture, as shown below.

The task here is to locate both these elements using Selenium locators and a file upload method to upload a picture.
Code Example to Upload File in Selenium
import java.util.concurrent.TimeUnit;
import org.openqa.selenium.By;
import org.openqa.selenium.WebElement;
import org.openqa.selenium.chrome.ChromeDriver;
import org.openqa.selenium.remote.RemoteWebDriver;
import org.testng.annotations.AfterClass;
import org.testng.annotations.BeforeClass;
import org.testng.annotations.Test;

public class UploadFile {
private RemoteWebDriver driver;
@BeforeClass
public void setUp() throws Exception {
System.setProperty("webdriver.chrome.driver", "Path of the chrome driver");
driver = new ChromeDriver();
driver.manage().timeouts().implicitlyWait(30, TimeUnit.SECONDS);
}

@Test
public void UploadTest() throws Exception {
driver.get("https://github.com/settings/profile");
Thread.sleep(2000);// Xpath for Edit button

Web element file = driver.findElement(By.xpath("//div[@class='position-absolute bg-gray-dark rounded-2 text-white px-2 py-1 left-0 bottom-0 ml-2 mb-2']")).click(); //link text locator for uploading a photo..
WebElement addFile = driver.findElement(By.linkText("Upload a photo...")).click();
// Mention the own path of the file location

// Add file method
addFile.sendKeys("D:\Big Data on AWS\Images\caps.jpeg");// For setting a profile picture

driver.findElement(By.linkText("Set new profile picture")).click();
Thread.sleep(2000);// Image name can be of your choice

if(driver.findElement(By.xpath(".//a[text()='caps.jpeg']")).isDisplayed()) {
assertTrue(true, "Profile picture is Uploaded");
}else {
assertTrue(false, "Profile picture not Uploaded");
}
}
@AfterClass
public void tearDown() throws Exception {
driver.quit();
}
}
Talk to an Expert
On executing the code above, a profile picture will be uploaded into the GitHub account.
Uploading a File using Selenium to check plagiarized content
In this scenario, the user wants to upload a file to check whether the selected content is plagiarized.
Refer to the snapshot below to upload a document. This example uses a link text locator to locate the element and write the complete program.

Code Example
import java.io.IOException;
import org.openqa.selenium.By;
import org.openqa.selenium.WebDriver;
import org.openqa.selenium.WebElement;
import org.openqa.selenium.firefox.FirefoxDriver;
public class UploadFile {
public static void main(String[] args) throws IOException {

//Instantiation of driver object to launch Firefox browser
System.setProperty("webdriver.gecko.driver", "Path of the gecko driver");WebDriver driver = new FirefoxDriver();
driver.get("https://smallseotools.com/plagiarism-checker/");

//Locating upload filebutton
WebElement upload =driver.findElement(By.linkText("Upload a Document:( .tex, .txt, .doc, .docx, .odt, .pdf, .rtf )"));
upload.sendKeys("D:\\path\\File.txt");
driver.close();
}
}

On executing the above code, the contents of the file will be uploaded as shown below:

As demonstrated above, uploading a file with Selenium is relatively uncomplicated. Yet, since it is a standard user action, it must be tested repeatedly to ensure that the website offers a seamless user experience. Thus, testers require knowledge of this process as a fundamental part of their repertoire.
Note:
- Selenium testing must be run on real devices for accuracy.
- With access to 3000+ real browsers and devices on BrowserStack’s real device cloud, teams can also opt for parallel tests on a Cloud Selenium Grid to get faster results.
- Detect bugs before users do by testing software in real user conditions with BrowserStack Automate.
Test on BrowserStack