
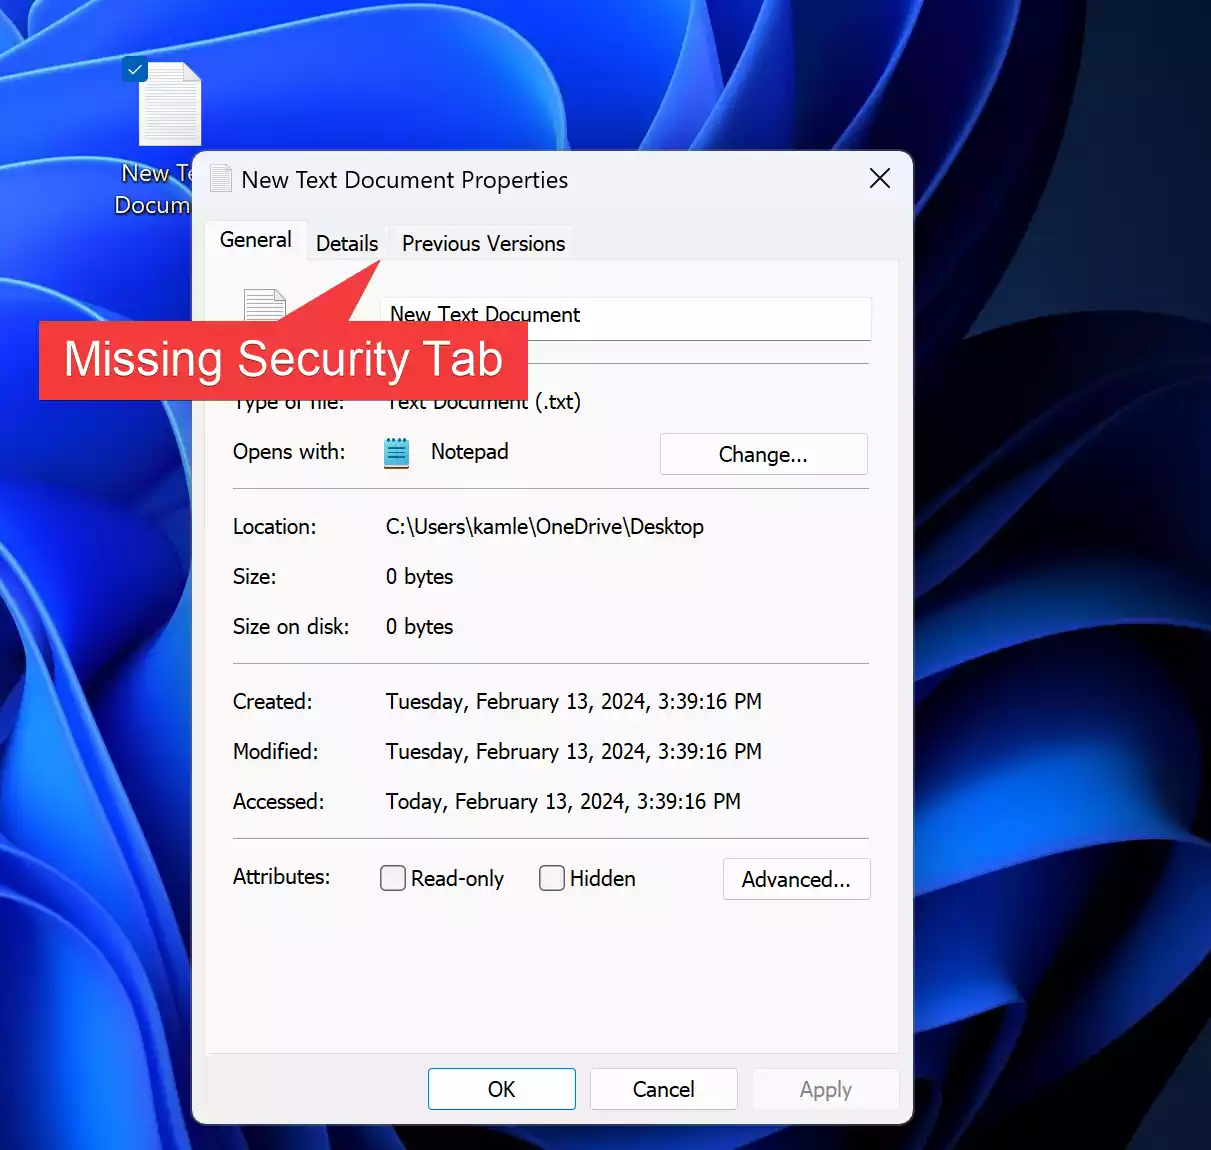
Folder Properties not showing the Security tab? Then this post will help you. The Security tab in File Properties helps to set different permissions for different groups and users to a file or folder. You can access it in the Properties window of a file or folder. In case you want to disable or remove the Security tab for some reason, you can do it easily, or if the Security tab is missing from the Properties window, then you can enable or add it again.
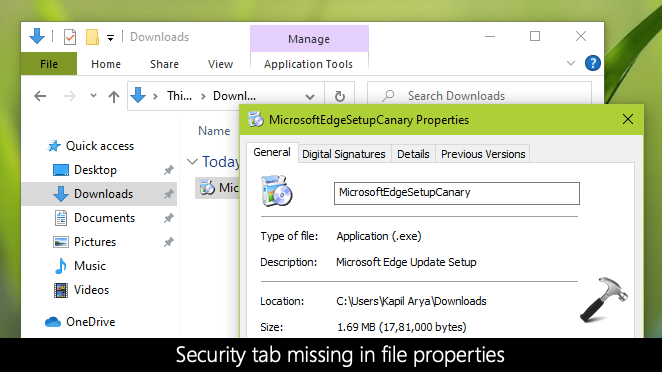
Security tab missing from File or Folder Properties
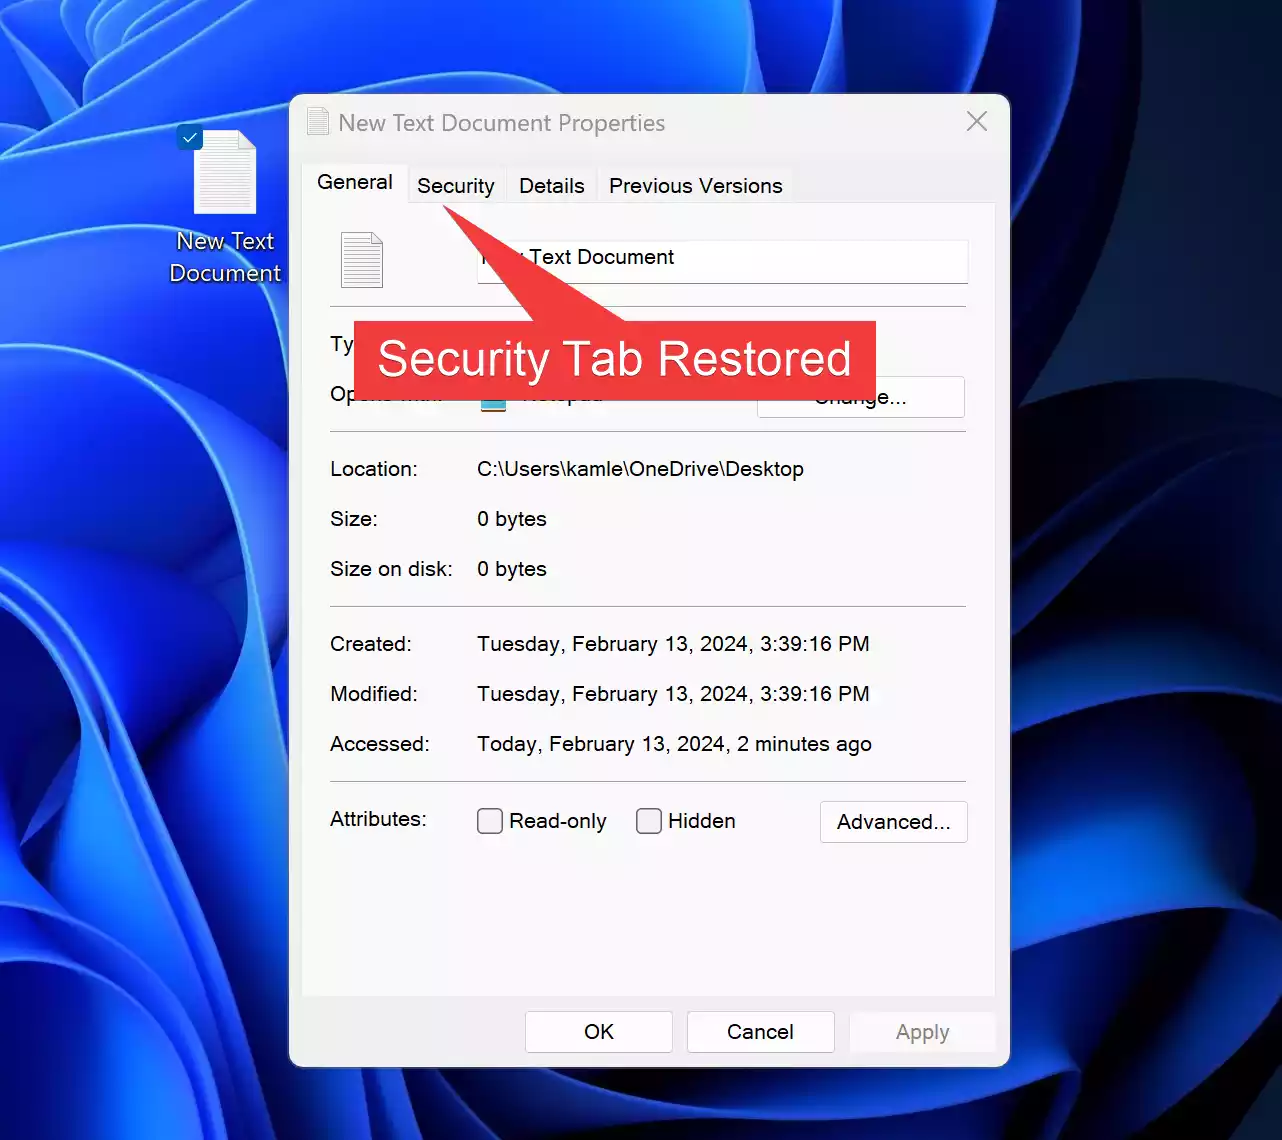
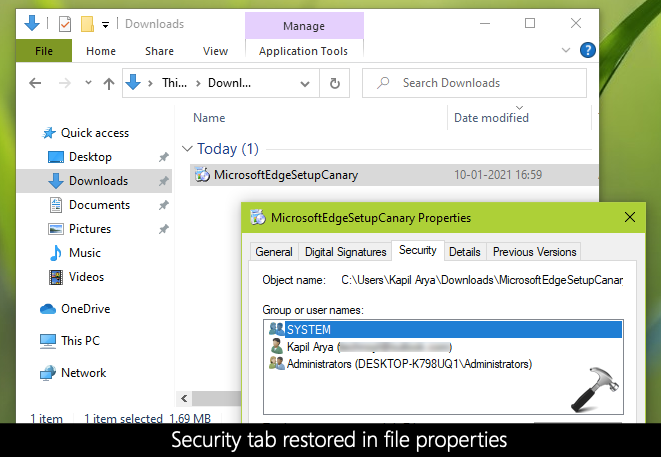
This post will help you add or remove the Security tab in Windows 11/10 with simple steps. The image below shows the Security tab first enabled and then disabled from the Properties window of a folder in Windows 11/10.

If you want to have some information before you make changes, open PowerShell as administrator and run the following command:
Get-ItemProperty -Path "HKCU:\Software\Microsoft\Windows\CurrentVersion\Policies\Explorer"|select NoSecurityTab
If, in the result, the NoSecurityTab is set to 1, it means that the Security tab is configured to be hidden. If it is 0 or blank, it means it is not. If it is hidden, you can use GPEDIT or REGEDIT to resolve the issue.
If the Security tab is missing from the File Properties window, then this post offers two ways to add or remove the Security Tab from Windows File Explorer:
- Using Group Policy Editor
- Registry Editor.
Before you try any of these options, it is advised to create system restore point. It will help you recover from unwanted changes when something gets wrong.
Folder Properties not showing Security tab
1] Using Group Policy Editor
This option is handy for those who are using Windows 11/10 Pro, Education, or Enterprise Edition. If you’re using Windows 11/10 Home, then either you should first add Group Policy to Windows Home edition or use the second option.
To use this option, you need to open the Local Group Policy Editor window.
When the window is opened, access File Explorer folder. The path is:
User Configuration > Administrative Templates > Windows Components > File Explorer

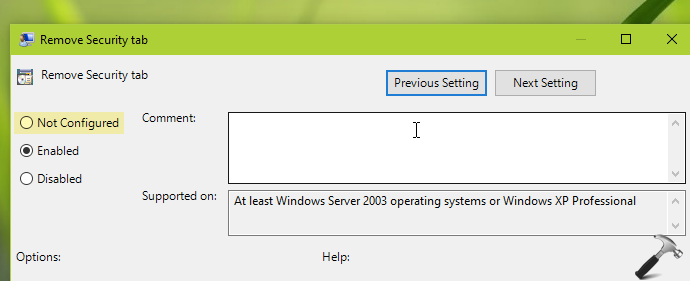
On the right-hand part, you will see the list of settings. Scroll down and double-click on Remove Security tab setting, as highlighted in the image above.
A new window is opened. There, select the Enabled radio button. After that, Apply the changes and save using OK button.

Now access the Properties window of some folder/file. You will find that Security tab is removed.
To add that tab again, just follow the above steps, use Not Configured/Disabled radio button in the Remove Security tab window, and save it.
TIP: You can always reset all Local Group Policy settings to default in Windows.
2] Using Registry Editor
Registry Editor applies similar settings (as the above method) to add or remove the Security tab.
First of all, open Registry Editor window.
After doing that, access Explorer key available under Policies key. The path is:
Computer\HKEY_CURRENT_USER\Software\Microsoft\Windows\CurrentVersion\Policies\Explorer

On the right-hand side of that Explorer key, create a DWORD (32-bit) Value using the right-click menu. Rename it as ‘NoSecurityTab’.
You can see the same in the image added below.

Now, double-click on that NoSecurityTab value. A small box is opened. In that box, set Value data to 1, and use the OK button to save this change.

It will remove the Security tab from File Explorer. To enable the Security tab again, you can set Value data to 0 or simply delete the same NoSecurityTab key.
That’s all.
So, these are two simple and effective options to add or remove or enable or disable the Security tab from File Explorer in Windows 11/10. Just follow the steps carefully, and you will get the output.
Related:
- Details Tab missing in the Properties window in Windows
- Sharing tab is missing in Folder Properties
- Shortcut Tab missing in Properties window in Windows 11
- No Location tab in Folder Properties.
No Security tab in Folder Properties
If you do not see the Security tab in Folder Properties then you need to configure the Remove Security tab Group Policy setting or tweak the value data of the NoSecurityTab Registry key as mentioned in this post.
Read: Policies tab missing for External Drive or USB drive on Windows 11
How do I get the Security tab in Folder Properties?
You need to Disable the Remove Security tab Group Policy setting or tweak the value data of the NoSecurityTab Registry key to 0 as mentioned in this post.
When it comes to navigating through the settings of Windows 10, finding the Security Tab can sometimes feel like searching for a needle in a haystack. With all the options and menus available, it’s easy to get lost. This makes it crucial to know the exact location of this tab to ensure the safety and protection of your system. So, where exactly is the Security Tab in Windows 10?
The Security Tab in Windows 10 can be found within the Properties menu of a file or folder. By right-clicking on the file or folder you want to secure, selecting «Properties,» and then navigating to the «Security» tab, you can manage and customize the security settings according to your preferences. This tab allows you to control access permissions, set user restrictions, and even designate different levels of security for different users or groups. With the Security Tab, you can ensure the confidentiality and integrity of your files and folders, protecting them from unauthorized access.
To find the Security tab in Windows 10, you can follow these steps:
1. Open the Control Panel by searching for it in the Start menu.
2. In the Control Panel, select «System and Security.»
3. Look for the «Security and Maintenance» option and click on it.
4. In the Security and Maintenance window, you will find the Security tab.
From the Security tab, you can access various security settings and configure them to your preference. Keep your system protected with Windows 10’s robust security features.
Understanding the Security Tab in Windows 10
The Security Tab in Windows 10 is an essential feature that allows users to manage and customize various security settings on their system. It serves as a central hub where users can configure measures to protect their files, network, and overall device security. However, locating the Security Tab can be a bit tricky for some users, especially those who have recently upgraded to Windows 10 or are using it for the first time. In this article, we will explore the different methods to find the Security Tab in Windows 10 and delve deeper into its functionality.
Method 1: Using the Control Panel
The Control Panel is a familiar and convenient tool for managing various settings on Windows systems. To access the Security Tab via the Control Panel:
- Open the Start menu and search for «Control Panel.»
- Click on the Control Panel app to open it.
- In the Control Panel window, locate and click on the «System and Security» category.
- Within the «System and Security» category, you will find the Security Tab.
Once you have accessed the Security Tab through the Control Panel, you can explore its various settings and options to ensure optimal security for your Windows 10 system.
Method 2: Using the Windows 10 Settings App
In addition to the Control Panel, Windows 10 also provides a dedicated Settings app that allows users to manage various system settings. To find the Security Tab using the Windows 10 Settings app:
- Open the Start menu and click on the «Settings» gear icon.
- In the Settings app, click on the «Update & Security» category.
- Within the «Update & Security» category, you will find the «Windows Security» option. Click on it.
- The Security Tab will be accessible within the Windows Security section.
By accessing the Security Tab through the Windows 10 Settings app, users can easily navigate through different security settings and make the necessary adjustments to enhance their device’s protection.
Customizing Security Settings
Once you have located the Security Tab in Windows 10, you can customize and manage various security settings to meet your specific requirements. Here are some key aspects and features you might encounter within the Security Tab:
User Account Control (UAC)
The Security Tab allows users to modify User Account Control (UAC) settings, which determine the level of security prompts and notifications you receive when making changes to your system.
Within the UAC settings, you can choose between different notification levels ranging from always notifying to never notifying, depending on your preference and security needs.
It’s important to strike a balance between security and convenience by selecting a UAC level that suits your usage patterns and risk tolerance.
Windows Defender
Windows Defender is the built-in antivirus and antimalware software for Windows 10. Within the Security Tab, users can manage Windows Defender settings, such as real-time protection, antivirus scanning options, firewall settings, and more.
You can configure Windows Defender to automatically scan downloaded files, block suspicious websites, and perform regular system scans to ensure your device’s security.
It’s advisable to keep Windows Defender enabled and up to date to provide a baseline level of protection against malware and other security threats.
Windows Firewall
The Security Tab also grants access to Windows Firewall settings. Windows Firewall acts as a barrier between your device and potentially harmful incoming network connections.
Within the firewall settings, you can customize inbound and outbound rules, block specific applications or ports, and adjust network profile settings based on your network environment.
Configuring Windows Firewall correctly is crucial for safeguarding your device against unauthorized network access and potential security breaches.
Device Encryption
The Security Tab also provides access to device encryption settings. Encrypting your device’s storage ensures that your files and data remain secure even if your device gets lost or stolen.
You can enable encryption and manage encryption settings for your Windows 10 device, protecting your sensitive information from unauthorized access.
It’s highly recommended to enable device encryption, especially if you handle sensitive data or use your device for work purposes.
Windows Update
Windows Update settings are also accessible through the Security Tab. Regularly updating your system is crucial for patching security vulnerabilities and ensuring you have the latest bug fixes and features.
You can configure Windows Update settings, such as automatic updates, notification preferences, and optional advanced settings, to ensure your device stays secure and up to date.
Method 3: Using the Windows Security App
In addition to the Control Panel and Settings app, Windows 10 also offers a dedicated Windows Security app that provides centralized access to various security-related features. Follow these steps to locate the Security Tab using the Windows Security app:
- Open the Start menu and search for «Windows Security.»
- Click on the Windows Security app to open it.
- In the Windows Security app, you will find different security options categorized under «Protection areas.»
- Click on each category to explore its specific settings and locate the Security Tab accordingly.
The Windows Security app offers a comprehensive interface to manage various security aspects of your Windows 10 system, making it easy to find and customize the Security Tab.
Exploring Other Dimensions of the Security Tab in Windows 10
Beyond the methods discussed earlier, there are additional ways to access and utilize the Security Tab in Windows 10. Let’s further explore some of these dimensions:
Method 4: Using the Run Command
Another way to locate the Security Tab is by using the Run command. Follow these steps:
- Press the Windows key + R on your keyboard to open the Run dialog box.
- Type «control sysdm.cpl» without the quotes and click «OK.»
- In the System Properties window that opens, click on the «Security» tab.
The Security Tab will now be visible, allowing you to make any necessary security adjustments.
Method 5: Using the Windows 10 Search Bar
If you prefer using the search bar in Windows 10 to locate features quickly, you can follow these steps:
- Click on the search bar located on the taskbar or press the Windows key + S to open the search utility.
- Type «Security» in the search bar and wait for Windows to display search results.
- From the search results, click on the «Security» option to access the Security Tab directly.
The search bar provides a convenient way to find and access the Security Tab without having to navigate through different settings categories.
Method 6: Using Command Prompt
If you’re comfortable using Command Prompt, you can use it to access the Security Tab. Follow these steps:
- Press the Windows key + X on your keyboard to open the Power User Menu.
- From the options presented, select «Command Prompt (Admin)» to open an elevated Command Prompt.
- In the Command Prompt window, type «control /name Microsoft.SecurityCenter» without the quotes and press Enter.
- The Security Tab will be displayed through Command Prompt, allowing you to manage security settings.
Using Command Prompt can be a quick and efficient method if you are already familiar with Command Prompt commands.
In Conclusion
The Security Tab in Windows 10 is a vital component for managing and customizing various security settings to protect your device, files, and network. While locating the Security Tab may initially seem challenging, using methods such as accessing it through the Control Panel, Windows 10 Settings app, Windows Security app, Run command, search bar, or Command Prompt can make the process simpler and more efficient. Once you have found the Security Tab, you have the flexibility to customize settings such as User Account Control, Windows Defender, Windows Firewall, Device Encryption, and Windows Update to enhance the security of your Windows 10 system. Take advantage of these features to establish a robust security posture and safeguard your device from potential threats.
Locating the Security Tab in Windows 10
If you are wondering where to find the Security tab in Windows 10, you’re in the right place. The Security tab in Windows 10 allows you to configure various security settings for your computer. However, finding it may not be as straightforward as it seems.
To access the Security tab, follow these steps:
- Click on the «Start» menu in the bottom left corner of your screen.
- Select «Settings» from the menu.
- Click on the «Update & Security» option.
- In the left-hand menu, click on «Windows Security.»
- This will open the Windows Security app. Now, click on «Virus & threat protection.»
- Finally, click on the «Manage settings» option under «Virus & threat protection settings». Here, you will find the Security tab.
By following these steps, you can easily access the Security tab in Windows 10 and customize your security settings according to your preferences.
Key Takeaways — Where Is the Security Tab in Windows 10
- The Security tab in Windows 10 can be found in the Properties window of a file or folder.
- To access the Security tab, right-click on the file or folder, select «Properties,» and then click on the «Security» tab.
- The Security tab allows you to manage the permissions and access control settings for the selected file or folder.
- You can view the list of users and groups that have permission to access the file or folder from the Security tab.
- From the Security tab, you can add or remove users or groups, change their permission levels, and modify other security settings.
Frequently Asked Questions
In this section, we will address some common questions related to the location of the Security Tab in Windows 10.
1. How can I find the Security Tab in Windows 10?
To locate the Security Tab in Windows 10, navigate to the Control Panel. Open the Control Panel by searching for it in the Start Menu or by pressing the Windows key + X on your keyboard and selecting Control Panel from the list. Once the Control Panel is open, you should see the Security Tab listed among the available options. Click on it to access the security settings for your Windows 10 system.
Alternatively, you can also access the Security Tab by right-clicking on the desktop and selecting Personalize. In the Personalization window, click on the «Change desktop icons» link on the left-hand side. In the Desktop Icon Settings window, you will find the Security Tab. Click on it to modify the security settings.
2. Why can’t I see the Security Tab in the Control Panel?
If you are unable to see the Security Tab in the Control Panel, it may be due to user account settings or group policy restrictions. In some cases, certain Windows editions or versions might not have the Security Tab available.
To check if your user account has the necessary permissions to access the Security Tab, follow these steps:
1. Open the Control Panel.
2. Click on «User Accounts» or «User Accounts and Family Safety.»
3. Select «User Accounts» again.
4. Click on «Change User Account Control settings.»
5. Drag the slider to the lowest position, which should be «Never notify.»
6. Click on «OK» and restart your computer.
If you are still unable to see the Security Tab, it is possible that your Windows edition or version does not include this feature. Check the specifications of your Windows 10 installation to determine if the Security Tab is available or contact your system administrator for further assistance.
3. How can I customize the security settings within the Security Tab?
To customize the security settings within the Security Tab, follow these steps:
1. Open the Control Panel.
2. Click on the Security Tab.
3. In the security settings window, you will find various options to customize the security settings for your Windows 10 system. These options may include adjusting user account control settings, configuring firewall settings, managing antivirus and malware protection, and more.
4. Select the specific option you want to modify and make the necessary changes to customize the security settings according to your preferences.
4. Can I access the Security Tab directly from the Windows 10 settings?
No, you cannot access the Security Tab directly from the Windows 10 settings. It is only available through the Control Panel or by right-clicking on the desktop and selecting Personalize.
5. Is it possible to hide or remove the Security Tab?
No, it is not possible to hide or remove the Security Tab in Windows 10. The Security Tab is a crucial component of Windows security settings and cannot be hidden or removed by users.
In conclusion, the Security tab in Windows 10 can be found within the Windows Defender Security Center, which is a built-in security tool. To access it, you can simply click on the Start menu and type ‘Windows Defender Security Center’ in the search bar.
Once you open the Windows Defender Security Center, you will see various tabs, including the Security tab. This tab allows you to manage and monitor the security settings of your Windows 10 system, such as firewall and network protection, virus and threat protection, device performance and health, and app and browser control.
In the realm of Windows operating systems, the Properties window for files and folders serves as a hub for accessing various attributes and settings. Among these, the Security tab stands as a crucial component, facilitating users to manage permissions and access control for their files and folders. However, encountering the absence of this tab can be perplexing and frustrating for users seeking to configure their security settings. In this gearupwindows article, we delve into the possible causes behind the missing Security tab and provide comprehensive solutions to rectify this issue on Windows 11 or 10 systems.
Understanding the Issue
Before delving into solutions, it’s essential to grasp the potential reasons behind the disappearance of the Security tab. Several factors could contribute to this issue, ranging from system configurations to software conflicts. Common causes include incorrect group policy settings, registry modifications, or even malware infections. Understanding these factors aids in devising targeted solutions for resolving the problem.
Method 1: Using Group Policy
Step 1. Press `Windows Key + R` to open the Run dialog, then type `gpedit.msc` and press Enter.
Step 2. Navigate to the following folder in the left sidebar:-
User Configuration > Administrative Templates > Windows Components > File Explorer
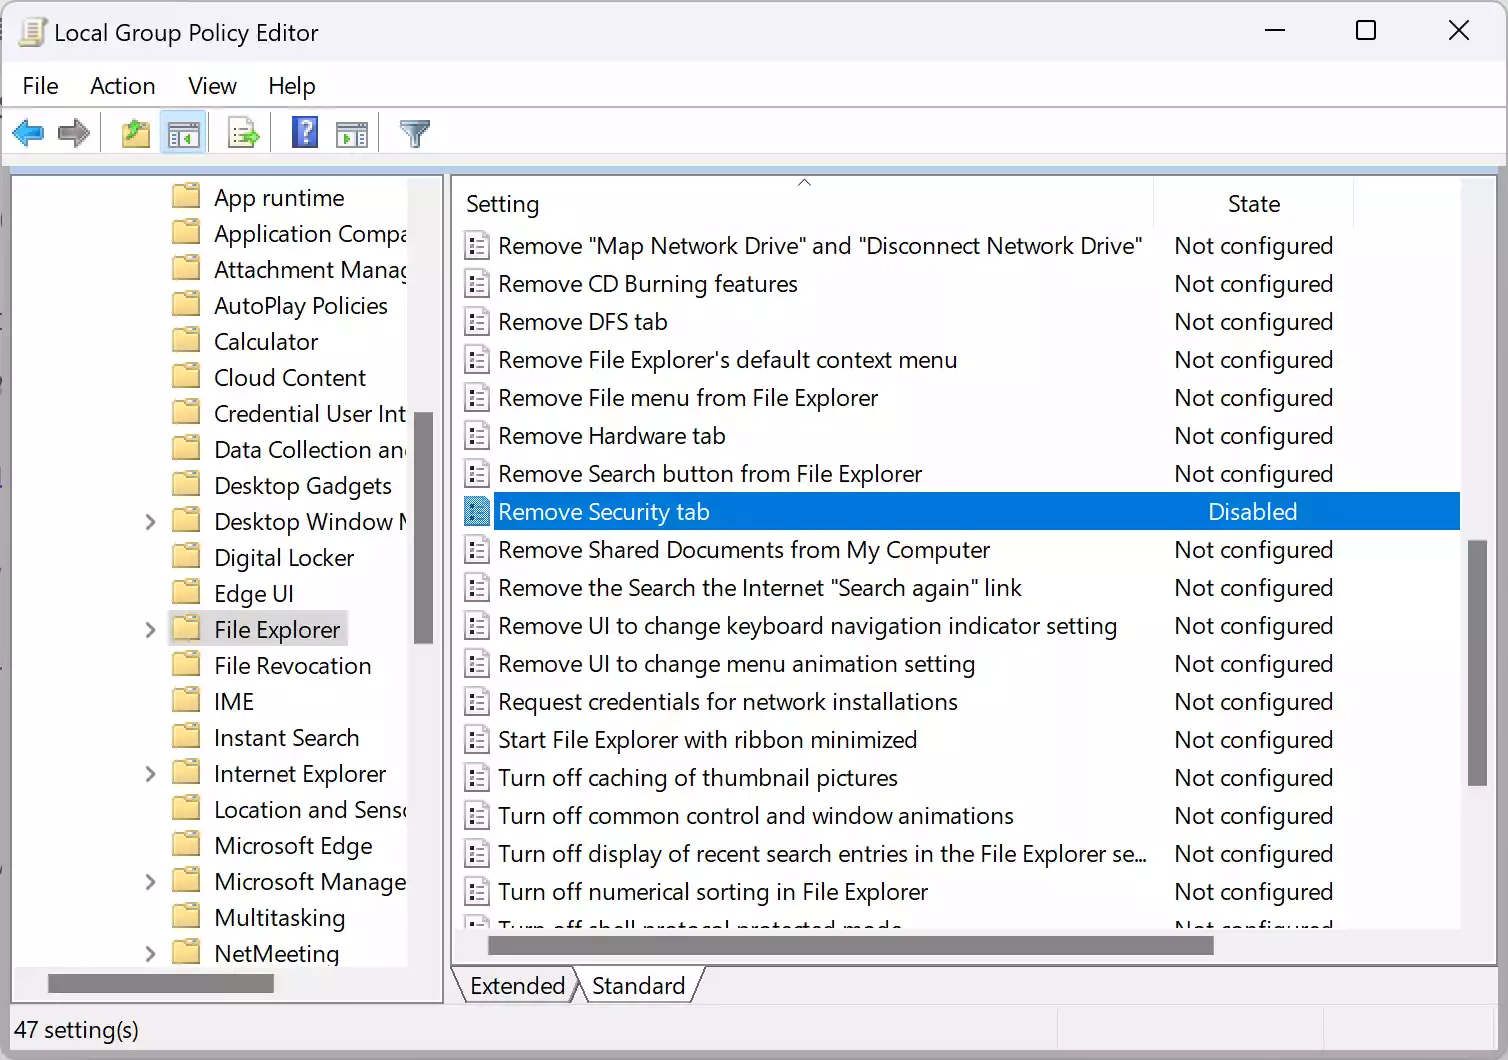
Step 3. On the right sidebar of the “File Explorer” folder, double-click on the policy “Remove Security Tab.” Ensure it is set to “Not Configured” or “Disabled“. If it’s enabled, change it accordingly and click on Apply and then the OK button.

Method 2: Through Registry Editor
Step 1. Press `Windows Key + R` to open the Run dialog, then type `regedit` and press Enter.
Step 2. Navigate to the following registry key:-
HKEY_CURRENT_USER\Software\Microsoft\Windows\CurrentVersion\Policies
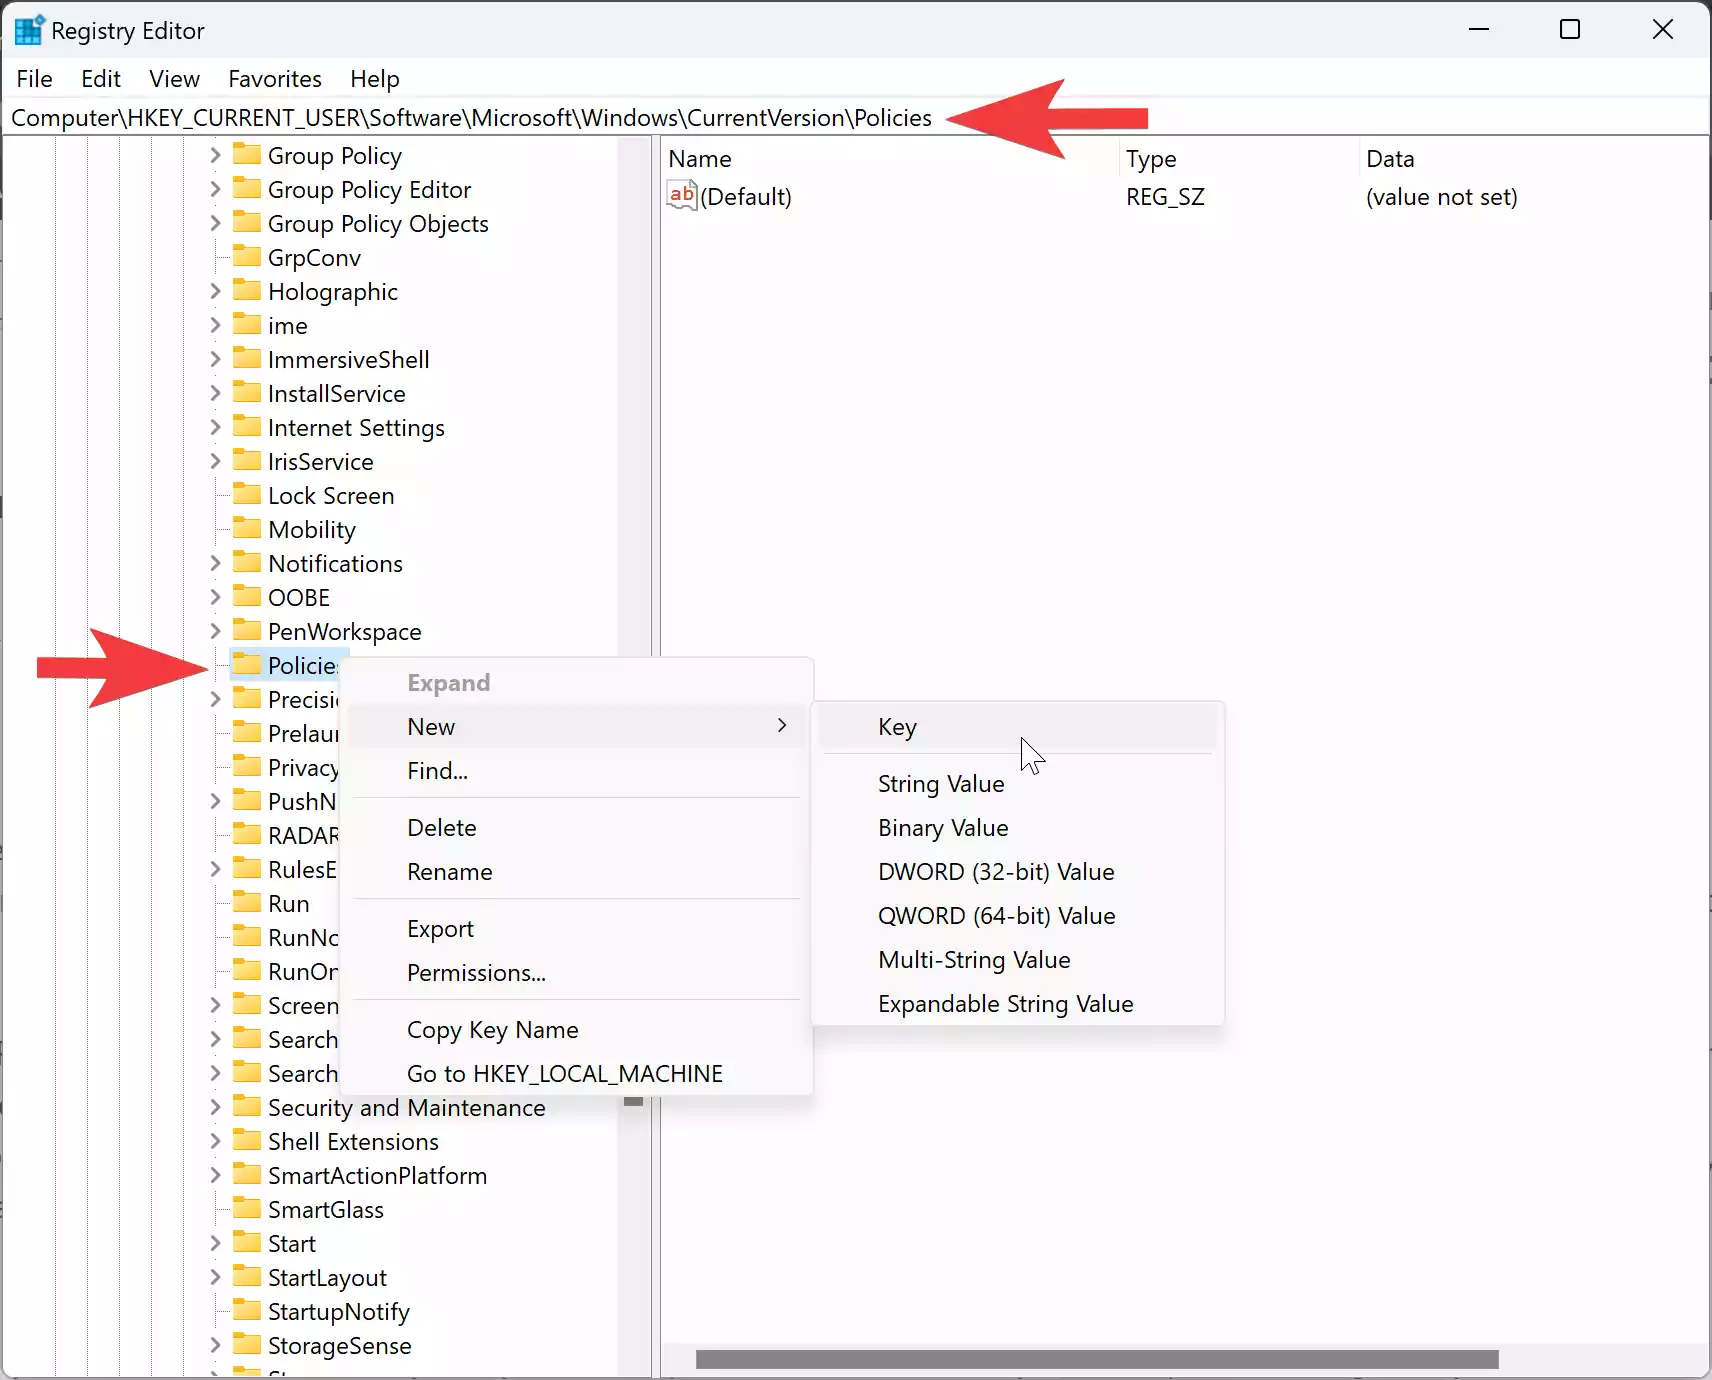
Step 3. Look for the Explorer subkey under the Policies key. If it does not exist, you need to create one. For this right-click on the Policies folder and select “New > Key.”
Step 4. Set the name to Explorer.
Step 5. Now, right-click on the Explorer folder and select “New > DWORD (32-bit) Value.”
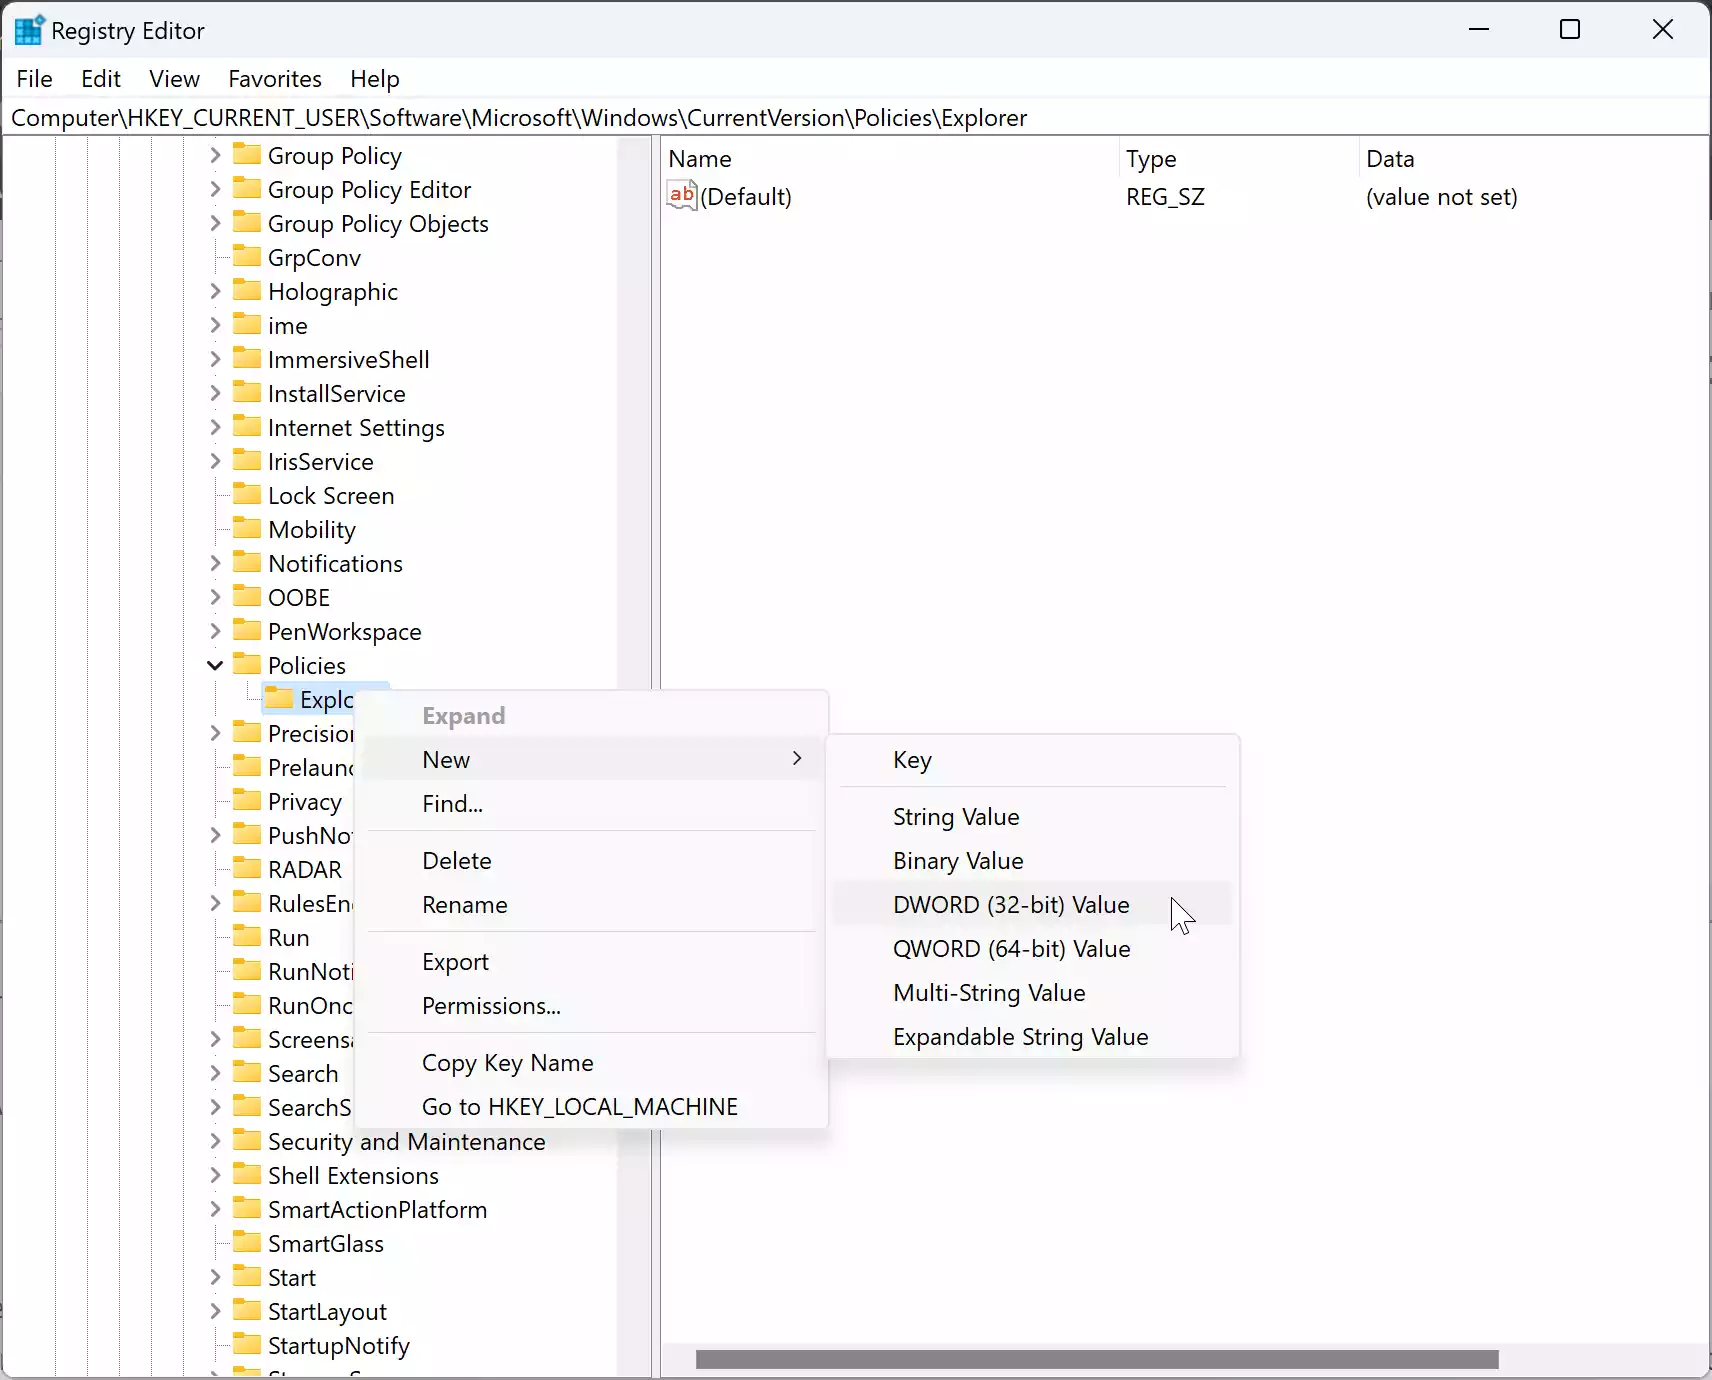
Step 6. Set the name to `NoSecurityTab`.
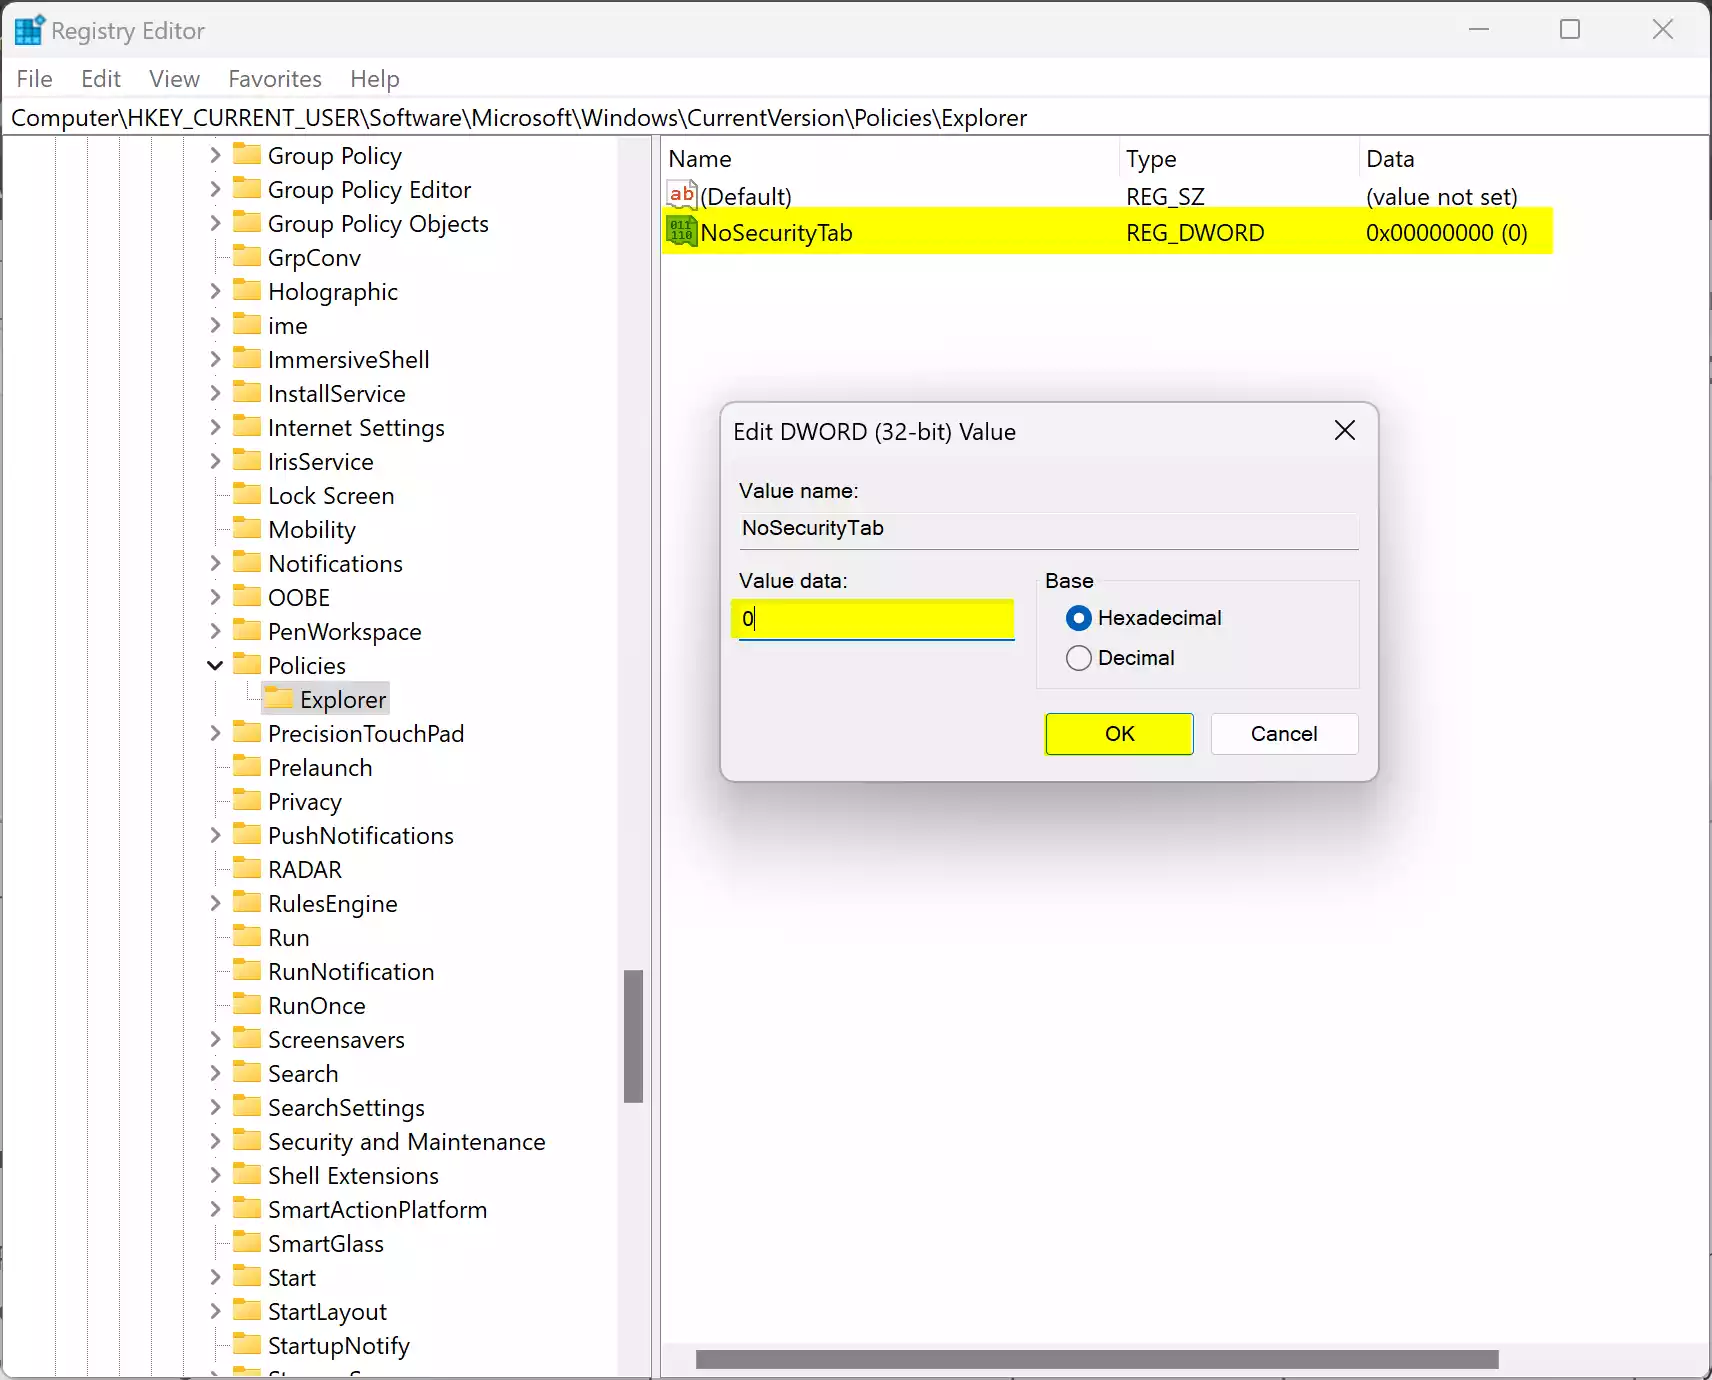
Step 7. Double-click on the `NoSecurityTab` REG_DWORD and set its “Value data” to `0`.
Step 8. Click OK to save the changes.
Method 3: Utilize Command Prompt
Step 1. Open Command Prompt as an administrator by searching for “cmd” in the Start menu, right-clicking on Command Prompt, and selecting “Run as administrator“.
Step 2. Type the following command and press Enter:-
sfc /scannow
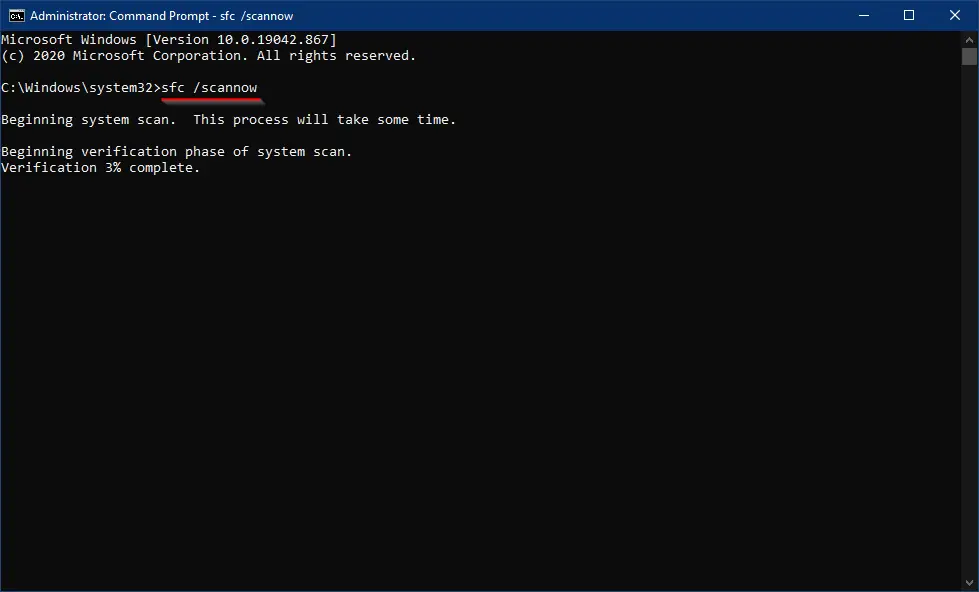
Wait for the System File Checker to scan and repair any corrupted system files. Restart your computer afterward.
Method 4: Perform Malware Scans
Use reputable antivirus software to perform a thorough scan of your system for any malware or viruses that could be causing the issue. Quarantine or remove any detected threats.
Method 5: Restore System to a Previous Point
If the issue occurred recently, you can try restoring your system to a previous restore point where the Security tab was functional. Search for “System Restore” in the Start menu to initiate the process.
Conclusion
Encountering the absence of the Security tab on Windows 11 or 10 file properties can impede users from managing access permissions effectively. However, armed with a deeper understanding of the underlying causes and the appropriate solutions outlined in this article, users can swiftly address this issue and regain control over their security settings. By meticulously following these steps, users can troubleshoot and resolve the missing Security tab, ensuring a seamless computing experience on their Windows systems.
When it comes to navigating the features of Windows 10, finding the Security Tab can sometimes feel like searching for a needle in a haystack. With its hidden location, users often find themselves in a state of confusion, wondering where it could possibly be. But fear not, because in this guide, we will unravel the mystery of the Security Tab in Windows 10 and provide you with the answers you’ve been looking for.
The Security Tab in Windows 10 plays a crucial role in safeguarding your device from threats and protecting your personal information. It is where you can adjust various security settings to enhance your computer’s defense against malware, viruses, and unauthorized access. By accessing this tab, you gain the power to manage firewall settings, control user account permissions, configure Windows Defender, and much more. Ensuring that your Security Tab is easily accessible is essential for maintaining the security and integrity of your Windows 10 system.
In Windows 10, the Security tab can be found in the properties of a file or folder. Here’s how to locate it:
- Right-click on the file or folder you want to secure.
- Select «Properties» from the context menu.
- In the Properties window, click on the «Security» tab.
From the Security tab, you can manage permissions, add or remove users, and set access levels to ensure the security of your files and folders in Windows 10.
Understanding the Security Tab in Windows 10
Windows 10 is a widely used operating system known for its advanced security features. The Security Tab in Windows 10 is an essential component that allows users to manage various security settings and permissions for files, folders, and system settings. It provides users with control over user accounts, access control lists, encryption, and much more.
Locating the Security Tab
To access the Security Tab in Windows 10, you need to follow a few simple steps:
Step 1: Right-click on the file, folder, or system setting you want to modify or manage.
Step 2: From the drop-down menu, select «Properties.»
Step 3: In the «Properties» window, click on the «Security» tab.
The Security Tab is located alongside other tabs like «General,» «Sharing,» and «Previous Versions.» Once you access the Security Tab, you can view and configure various security settings based on your requirements.
Understanding the Security Tab Options
Once you navigate to the Security Tab, you will find several options and settings that can be customized according to your preferences. Let’s explore some of the key options available under the Security Tab:
1. Group or User Names
The Group or User Names section displays a list of various user accounts and user groups associated with the file, folder, or system setting. This section allows you to manage permissions and access control for different users and groups.
You can add or remove users, modify their permissions, and even create new user groups. By clicking on each user or group, you can view and configure their individual permissions and security settings.
It’s important to note that certain settings may require administrator or elevated permissions to make changes.
2. Permissions and Advanced Options
The Permissions section allows you to define specific actions that users or groups can perform on the file, folder, or system setting. These actions include read, write, modify, execute, and various other permissions.
Within the Permissions section, you can also enable or disable inheritance, which determines whether the file or folder inherits permissions from its parent container.
Advanced options provide additional settings and configurations related to auditing, ownership, and effective permissions.
3. Auditing
The Auditing section allows you to monitor and track user actions and system events related to the file, folder, or system setting. By enabling auditing, you can generate audit logs that record specific activities performed by users or groups.
These audit logs can be useful for troubleshooting, security analysis, and compliance purposes.
Security Tab in System Settings
The Security Tab is not only limited to files and folders but also extends to system settings. When you access the Security Tab for system settings, such as Control Panel options or network settings, you can configure various security-related parameters.
For example, in the Security Tab of network settings, you can specify firewall rules, network access control, and other security measures to protect your system from unauthorized access.
Similarly, in the Security Tab of Control Panel options, you can modify security settings related to user accounts, password policies, and system updates.
These security settings ensure that your system is protected from potential threats and vulnerabilities.
Why is the Security Tab Important?
The Security Tab is crucial for maintaining a secure and protected computing environment. Here are a few reasons why the Security Tab is important:
- Access Control: The Security Tab allows you to control who can access files, folders, and system settings, ensuring that sensitive information is protected from unauthorized access.
- Permission Customization: With the Security Tab, you can customize permissions to restrict or grant specific actions to users or groups, enabling you to maintain strict control over your system.
- Auditing Capabilities: The Security Tab’s auditing feature helps you monitor user activities and system events, enabling you to identify any suspicious behavior or potential security breaches.
- System Protection: By accessing the Security Tab for system settings, you can configure security measures and parameters to safeguard your system from external threats.
The Security Tab empowers users to take control of their system’s security and ensure the confidentiality, integrity, and availability of their data and resources.
Alternative Ways to Access the Security Tab
In addition to the traditional method of accessing the Security Tab through the file or folder properties, there are alternative ways to access it:
Through Local Group Policy Editor
The Local Group Policy Editor is a powerful tool for managing various Windows settings and configurations. By using the Local Group Policy Editor, you can access the Security Tab for system-wide settings and make changes. Here’s how:
Step 1: Press the Windows key + R to open the Run dialog box.
Step 2: Type «gpedit.msc» and press Enter.
Step 3: In the Local Group Policy Editor window, navigate to the desired setting that requires modification.
Step 4: Double-click on the setting, and in the properties window, you can access the Security Tab.
Using Command Prompt or PowerShell
If you prefer using command-line tools, you can access the Security Tab through Command Prompt or PowerShell using the following steps:
Step 1: Open Command Prompt or PowerShell with administrative privileges.
Step 2: Type the command depending on your requirement:
— To access the Security Tab for files or folders, use the command «icacls» followed by the file or folder path.
— To access the Security Tab for system settings, use the command «secpol.msc» to open the Local Security Policy, and then navigate to the desired setting.
By using the command-line approach, you can quickly access the Security Tab without going through the graphical user interface.
Remote Access
If you need to access the Security Tab for a remote system, you can do so by following these steps:
Step 1: Open File Explorer on your local system.
Step 2: In the address bar, type «\\computername\C$» (replace «computername» with the name or IP address of the remote system).
Step 3: Press Enter, and you will be prompted to enter the credentials of the remote system.
Step 4: Once authenticated, you can right-click on the file or folder, select «Properties,» and access the Security Tab as you would for a local system.
Conclusion
The Security Tab in Windows 10 plays a critical role in managing and configuring security settings for files, folders, and system settings. By understanding how to locate the Security Tab and its various options, users can take control over their system’s security and ensure the protection of their valuable data and resources. Whether it’s managing user permissions, auditing activities, or securing system settings, the Security Tab empowers users to create a secure computing environment in Windows 10.
Where to Find the Security Tab in Windows 10
If you’re using Windows 10 and you’re wondering where to find the Security tab, we’ve got you covered. The Security tab in Windows 10 provides access to various settings related to your system’s security, including Windows Defender, Firewall, and more. However, the location of the Security tab may differ depending on whether you’re using the Windows Security app or the Control Panel.
If you’re using the Windows Security app, you can find the Security tab by following these steps:
- Click on the «Start» menu and go to «Settings»
- In the «Settings» window, click on «Update & Security»
- On the left side of the «Update & Security» window, you’ll find the «Windows Security» option. Click on it.
- In the Windows Security app, you will see several tabs at the top of the window, such as «Virus & threat protection,» «Firewall & network protection,» and more. One of these tabs is the «Security» tab.
On the other hand, if you prefer using the Control Panel, here’s how you can find the Security tab:
- Click on the «Start» menu and search for «Control Panel»
- In the Control Panel, click on «System and Security»
- Within the System and Security section, you will find the «Security» tab.
Now that you know where to find the Security tab in Windows 10, you can easily access and manage your system’s security settings.
Key Takeaways: Where Is the Security Tab in Windows 10
- The Security tab in Windows 10 can be found in the Properties window of a file or folder.
- To access the Security tab, right-click on the file or folder, select «Properties,» and then click on the «Security» tab.
- The Security tab allows you to view and modify the permissions and access control settings for a file or folder.
- On the Security tab, you can add or remove users and groups, and assign or change their permissions.
- It is important to be cautious when making changes in the Security tab, as modifying the wrong settings can impact the security and availability of your files and folders.
Frequently Asked Questions
Here are some frequently asked questions about the location of the Security tab in Windows 10:
1. How can I find the Security tab in Windows 10?
The Security tab in Windows 10 can be found in the Properties window of files, folders, and drives. To locate it, right-click on the file, folder, or drive that you want to view the security settings for. From the context menu, select «Properties.» In the Properties window, you will find the Security tab.
Alternatively, you can also access the Security tab by opening the Control Panel. Go to «System and Security» and click on «System.» From there, click on «Advanced system settings» on the left-hand side. In the System Properties window, go to the «Security» tab.
2. Is the Security tab available for all files and folders in Windows 10?
No, the Security tab is not available for all files and folders in Windows 10 by default. It is only available for files and folders that reside on NTFS-formatted drives. If you are not able to see the Security tab for a specific file or folder, it may be because it is located on a different file system or you do not have the necessary permissions to view the security settings.
To enable the Security tab for a specific file or folder, you can convert the drive to NTFS if it is currently using a different file system. Keep in mind that converting the file system will erase all data on the drive, so make sure to back up any important files before proceeding.
3. Can I change the security settings from the Security tab in Windows 10?
Yes, you can change the security settings from the Security tab in Windows 10. By default, only users with administrative privileges can modify the security settings. To make changes, click on the «Edit» or «Advanced» button, depending on the version of Windows 10 you are using.
From the Security tab, you can add or remove users and groups, modify permissions, and set special permissions. It is important to exercise caution when modifying security settings, as incorrect settings can potentially make your files, folders, or drives inaccessible or vulnerable to unauthorized access.
4. What should I do if I cannot see the Security tab in Windows 10?
If you are unable to see the Security tab in Windows 10, it may be because you do not have the necessary permissions to view or modify the security settings. To resolve this issue, you can try the following:
- Ensure that you are logged in with an account that has administrative privileges.
- Check if the file or folder is located on an NTFS-formatted drive.
- Verify that you are accessing the file, folder, or drive properties through the correct method, such as right-clicking and selecting «Properties».
- If you are using a different edition of Windows 10, such as Home edition, the Security tab may not be available.
If none of these solutions work, it is recommended to seek assistance from your system administrator or IT support team.
5. Can I customize the appearance of the Security tab in Windows 10?
No, the appearance of the Security tab in Windows 10 cannot be customized. The layout and options on the Security tab are predetermined by the operating system. However, you can customize the security settings within the tab to suit your specific needs.
It is worth noting that the Security tab may look slightly different depending on your version of Windows 10 and any installed updates. The options and functionality, however, remain largely the same across versions.
In Windows 10, the Security tab is an essential feature that allows you to manage and control various security settings for your computer. While the Security tab used to be easily accessible in older versions of Windows, it has been reorganized and moved in Windows 10 to provide a more streamlined and user-friendly experience.
To access the Security tab in Windows 10, you need to go through the updated Settings app. Simply click on the Start button and select the gear-shaped Settings icon. In the Settings window, navigate to the «Update & Security» option, usually located near the bottom of the list. Once you’re in the Update & Security section, you’ll find the Security tab on the left-hand side of the window.
When you right click on a file in File Explorer in Windows 11/10, on the property sheet, you have a Security tab. The Security tab is helpful to get information about the permissions which that file has. You can also click on Advanced button on that Security tab and take ownership of that file, if you can’t modify it. But all the operations are possible when you have the Security tab on file property sheet. In case if the Security tab missing from file properties, you won’t be able to modify the permission for that file. In this article, we will see how you can resolve this problem.
So it’s a common issue and anyone can face it on any of the Windows operating system. You can resolve this problem by simply modifying a registry entry as mentioned below in this article. You can also solve this problem with Group Policy. Both the methods are mentioned below. Try them as per your convenience and you should be able to get rid of this problem.
Page Contents
Method 1: Using Registry
1. Open Registry Editor by running regedit command.
2. Navigate to the following registry location:
HKEY_CURRENT_USER\Software\Microsoft\Windows\CurrentVersion\Policies\Explorer
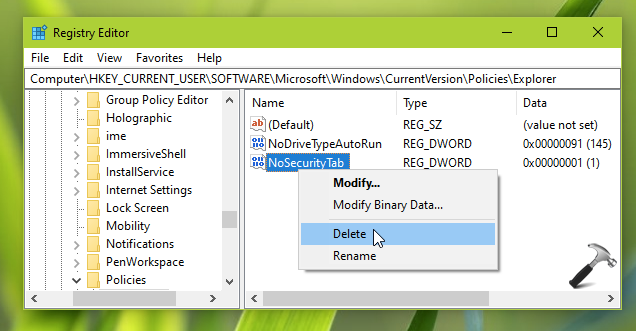
3. In the right pane of Explorer registry key, right click on NoSecurityTab named registry DWORD (REG_DWORD) and select Delete. Click Yes in the confirmation prompt appearing next.
4. Close Registry Editor and sign out, sign in back. The issue should be resolved after login back.
Method 2: Using Group Policy
1. Open Group Policy Editor snap-in.
2. Go to User Configuration > Windows Components > File Explorer.
3. In the right pane of File Explorer folder, look for the Remove Security tab policy setting. Double-click on the policy setting to modify its status.
4. In the policy configuration window, set its status to Not configured and click OK.
5. Close Group Policy Editor snap-in and update GP engine by running gpupdate /force command.
Video fix
Check this video to illustrate this:
Hope this helps!