
If you’re noticing that your computer is running slower than usual, and you do not know the reasons for this sluggish performance, then this article will give you the answers to this slow performance of your Windows computers.
If you’ve heard about the antimalware service executable in Windows then might be this service hogging your CPU or disk resources, which causes performance degradation. Basically, this component of Windows Defender is designed to offer real-time protection against threats, but it can sometimes consume more system resources than expected.
In this blog post, we’ll dive into why the Antimalware Service Executable can lead to high CPU and disk usage and provide you with step-by-step solutions on how to stop Antimalware Service Executable from high CPU Disk usage.
What is Antimalware Service Executable
The Antimalware Service Executable, also known as «msmpeng.exe", is a background process run by Windows Defender, which is now known as Microsoft Defender Antivirus in newer versions of Windows. This service is responsible for scanning files for malware when accessing them, performing background system scans to check for dangerous software and malware threats, and implementing real-time protection. It ensures that threats are identified and dealt with swiftly.
However, this service can sometimes use a large amount of CPU and disk resources, which might affect the overall performance of your computer. This is typically noticed during full system scans or when updates are being installed.
Why Does Antimalware Service Executable Use So Much CPU and Disk?
There are many reasons that this process can cause high CPU & Disk Usage and for better understanding reasons are mentioned below:-
- Full System Scan: When Windows Defender performs a system scan, it can use up a lot of resources.
- Frequent Updates: Windows Defender constantly checks for updates, which might cause brief spikes in CPU usage.
- Corrupted Files: If there are corrupted system files, the process may get stuck, consuming excessive resources.
Should You Disable the Antimalware Service Executable?
Deciding whether to disable the Antimalware Service Executable (MsMpEng.exe) is an important consideration that depends largely on your specific circumstances and the security measures you have in place. Here are some points to consider:
- Security Risk: Disabling it reduces your system’s defenses unless you have another robust antivirus.
- Alternative Antivirus: If another antivirus is installed, Windows Defender should turn off automatically.
- Performance Concerns: If the service is significantly slowing down your PC, consider disabling it temporarily during high-demand tasks.
- Caution: Generally, keep it enabled for continuous protection unless you’re sure of your alternative security measures.
Recommendation: Generally, it’s advisable not to disable core security features unless absolutely necessary, especially if no alternative security measures are in place. Regularly update your system and security software to minimize performance issues related to security scans and updates.
How to Stop Antimalware Service Executable — 3 Methods
In this article, we’ll explore three methods to stop or manage the Antimalware Service Executable process. Additionally, we’ll explain six more effective ways to fix this issue without compromising your device’s security. Whether you’re looking to temporarily stop the process or adjust settings to optimize your computer’s performance, we’ve got you covered.
Method 1. Disable Windows Defender Antivirus (Not Recommended for Users)
Disabling Windows Defender Antivirus will completely stop Antimalware Service Executable from running. However, doing so can make your computer more vulnerable to malware. It’s generally not recommended unless you have a third-party antivirus solution in place.
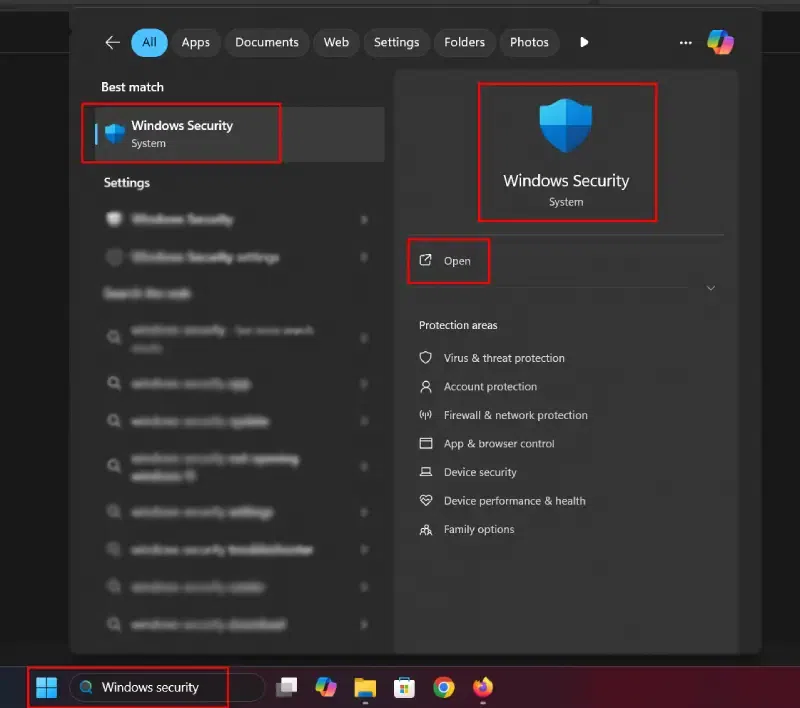
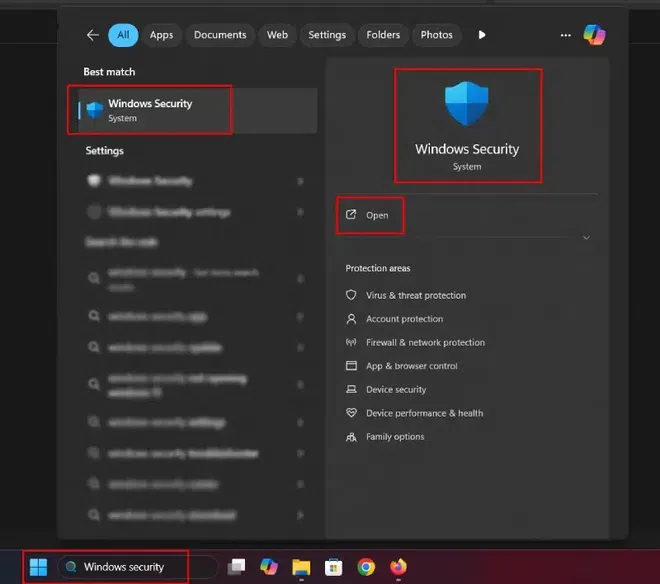
Step 1: Open Windows Security
- Press Start and type Windows Security, then click on it.
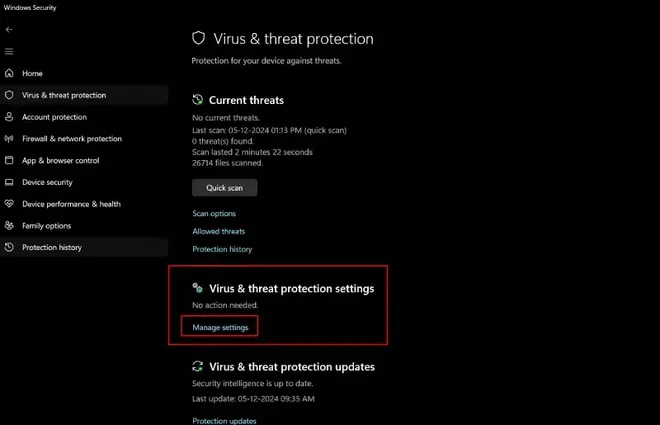
Step 2: Go to Virus & Threat Protection Settings > Manage Settings
- Click Virus & Threat Protection, then scroll down to Virus & Threat Protection Settings and click Manage Settings.
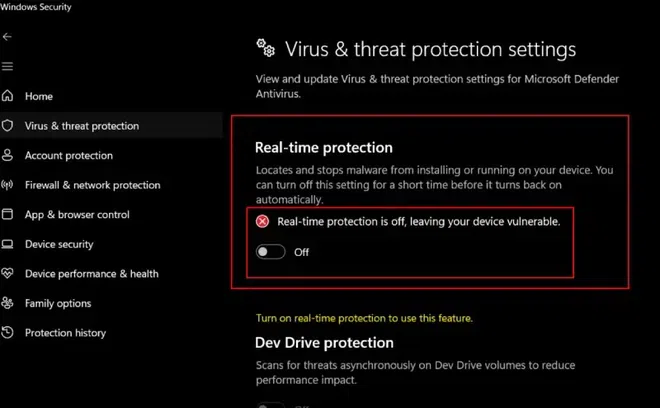
Step 3: Turn Off Real-Time Protection
- Windows will turn Real-Time Protection back on after a short period to keep your computer secure.
- Under Real-Time Protection, toggle the switch to Off. This will stop the Antimalware Service Executable process temporarily.
Note: When you’ll turning off the Real-Time protection an administration dialogue box will appear saying would you like to make the changes in your settings, click yes on it to turn real time protection off.
Step 4: Disable Windows Defender Permanently (Advanced)
- If you want to stop Antimalware Service Executable permanently, you’ll need to disable Windows Defender via the Group Policy Editor or Registry Editor.
Option 1: For Group Policy Editor
Step 1: Press Windows + R, type gpedit.msc, and press Enter.
Step 2: Navigate to Computer Configuration > Administrative Templates > Windows Components > Microsoft Defender Antivirus.
Step 3: Double-click Turn off Microsoft Defender Antivirus, select Enabled, and click Apply.
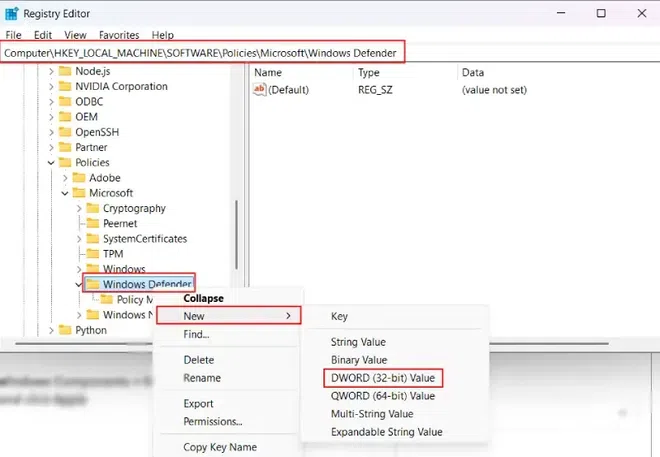
Option 2: For Registry Editor
Step 1: Press Windows + R, type regedit, and press Enter.
Note: When you’ll pressing Enter, an administration dialogue box will appear saying would you like to make the changes in your settings, click yes on it to turn real time protection off.
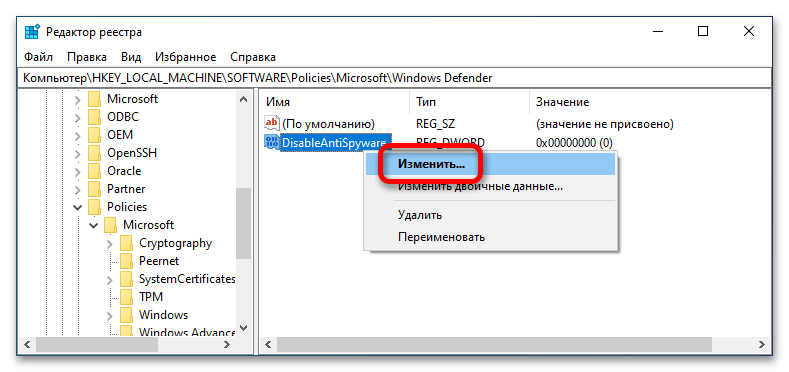
Step 2: Navigate to (HKEY_LOCAL_MACHINE\SOFTWARE\Policies\Microsoft\Windows Defender)
Step 3: Right-click on the Window Defender, select New > DWORD (32-bit) Value, and name it DisableAntiSpyware.
Step 4: Set the value to 1 to disable Windows Defender permanently.
Warning: Disabling Windows Defender entirely makes your system vulnerable, so it’s crucial to install and enable a third-party antivirus software before doing so.
Method 2. Disable Windows Defender Service (More Advanced)
If you want to stop Antimalware Service Executable but prefer not to disable Windows Defender entirely, you can stop the Windows Defender service via Services. This will prevent the service from running in the background, which in turn stops the process.
Step 1: Open Services
- Press Windows + R, type services.msc, and press Enter.
Step 2: Find Windows Defender Antivirus Service
- In the «Services» window, find and double-click on «Security Center» (or «Windows Defender Security Center» in newer versions).
Step 3: Stop the Service or Set the Service to Disabled
- In the «Properties» window, set the «Startup type» to «Disabled,» then click «Apply» and «OK.«
- Restart your computer to apply the changes.
Note: This method may be temporarily effective, but Windows Defender will often restart itself after a system reboot. You might need to repeat this process or combine it with other methods.
Method 3. Adjust Windows Defender’s Scheduled Scan Time
If you don’t want to completely disable Antimalware Service Executable, but you find its impact on your system during certain times annoying (such as during work or gaming hours), you can adjust the scheduled scan time. This prevents Antimalware Service Executable from running scans during specific periods, which can reduce its performance impact.
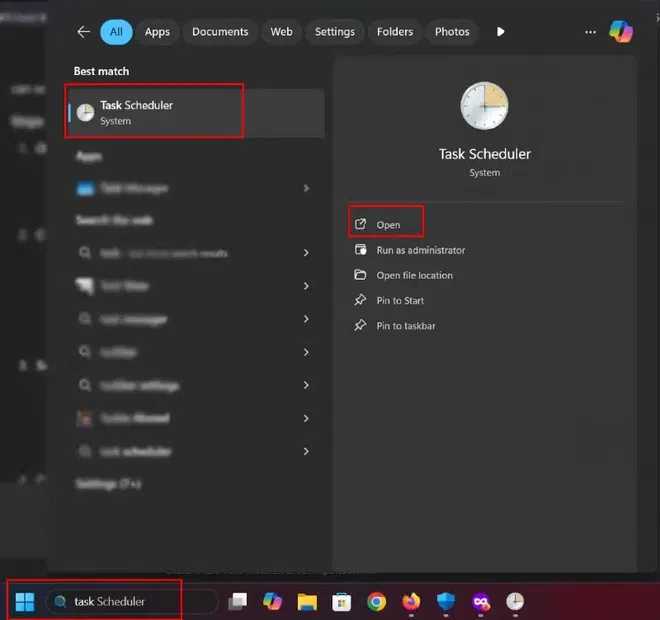
Step 1: Open Task Scheduler
- Press Windows + R, type taskschd.msc, and press Enter to open the Task Scheduler.
Step 2: Navigate to Windows Defender’s Tasks
- In the left-hand panel, expand the Task Scheduler Library.
- Navigate to:
Microsoft > Windows > Windows Defender
Step 3: Modify the Task for Windows Defender
- You will see several tasks related to Windows Defender. Right-click on Windows Defender and select Properties.
Step 4: Change the Trigger
- Go to the Triggers tab and click Edit.
- You can change the scheduled time for the scan to a time when you’re less likely to be using the computer, or disable the task entirely by unchecking the Enabled box.
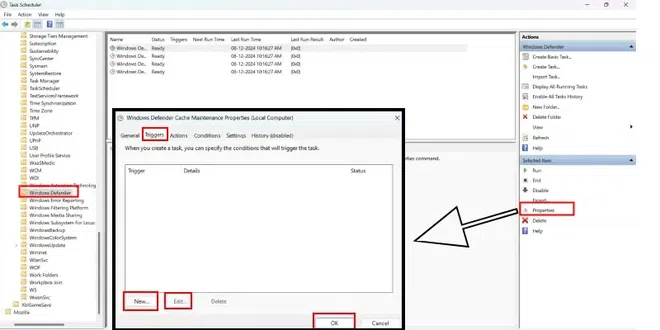
Step 5: Save Changes
- Click OK to save the changes. If you’ve disabled the task, Antimalware Service Executable will not perform scheduled scans.
How to Minimize the High CPU and Disk Usage from Antimalware Service Executable
Antimalware Service Executable is a key component of Windows Defender, the built-in antivirus tool designed to protect your system from malware and other security threats. However, under certain circumstances, it can consume a significant amount of system resources, leading to slower performance and longer load times. The good news is that you don’t have to disable your antivirus protection to resolve this issue. This process is the same for both Windows 10 and Windows 11, and there are several steps you can take to reduce the CPU and disk usage without compromising your system’s security.
1. Add Exclusions for High-Usage Files or Folders
One of the simplest ways to reduce high CPU and disk usage caused by the Antimalware Service Executable is to add exclusions. By excluding files or folders from being scanned, you can reduce the scanning load and minimize resource usage. To do this follow the given below steps:-
Step 1: Open Windows Security
- To begin, open the Start menu and typing Windows Security in the search box. Then, click on the Windows Security app from the search results.
Step 2: Navigate to Virus & Threat Protection Settings
- Once Windows Security is open, click on Virus & Threat Protection.
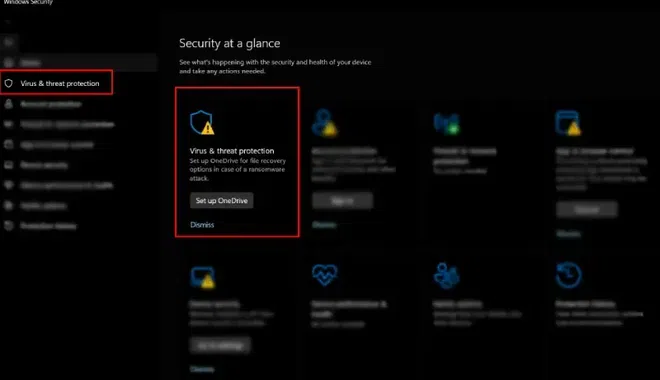
Step 3: Virus & Threat Protection > Manage Settings
- Then you’ll see Virus & Threat Protection settings under that there will be Manage Settings click on it.
Step 4: Manage Settings > Add Exclusions
- Scroll down until you see the Exclusions section. Click on Add or Remove Exclusions. Now, you can add files, folders, or even file types that you want Windows Defender to skip while scanning. This helps reduce the workload on the CPU by not scanning certain files or folders repeatedly.
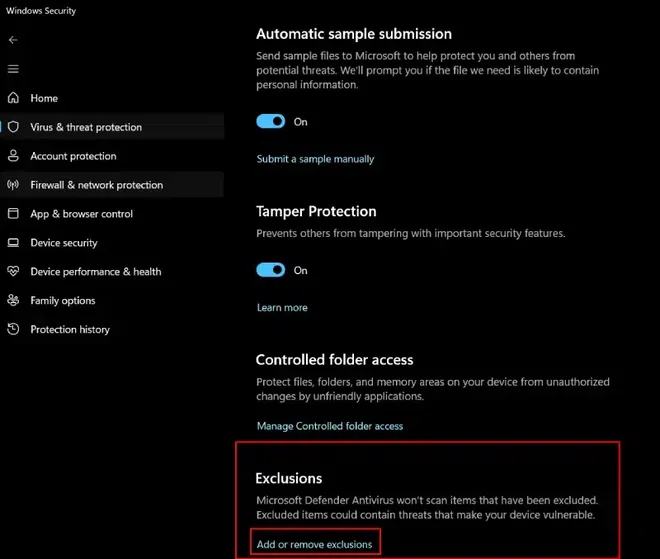
Note: When you’ll clicking on Add or Remove Exclusion an administration dialogue box will appear saying would you like to make the changes in your settings, click yes on it to turn real time protection off.
Step 5: Select File or Folder to Add or Remove Exclusion
- Add this MsMpEng.exe file in the exclusion (or the relevant path to MsMpEng.exe on your system).
Important Note: Excluding MsMpEng.exe may expose your system to risks, so it’s recommended to exclude it only for temporary troubleshooting purposes and to re-enable protection as soon as possible. Be cautious when excluding files. Only exclude those that you are sure are safe to prevent any security risks.
2. Adjust Windows Defender Scan Schedule
Scheduling Windows Defender to perform scans at times when you’re not using the computer can significantly reduce CPU usage. By adjusting the scan schedule, you can ensure the antivirus software doesn’t run during peak usage hours.
Step 1: Open Task Scheduler
- Press Windows Key + S, type Task Scheduler, and press Enter.
- This opens the Task Scheduler application.
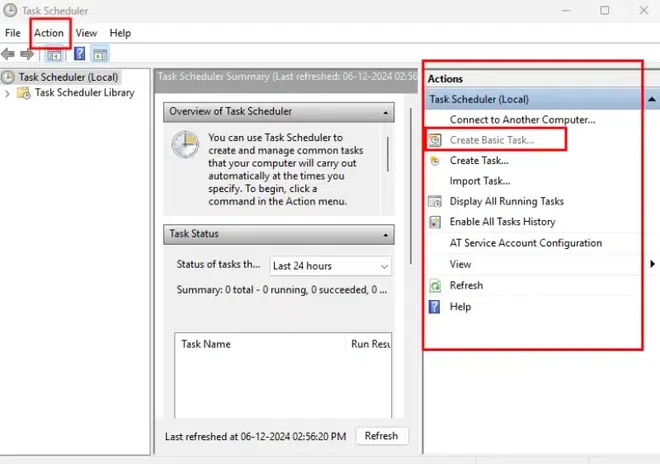
Step 2: Create a Basic Task
- In the Task Scheduler window, click on Action in the top menu, then choose Create Basic Task.
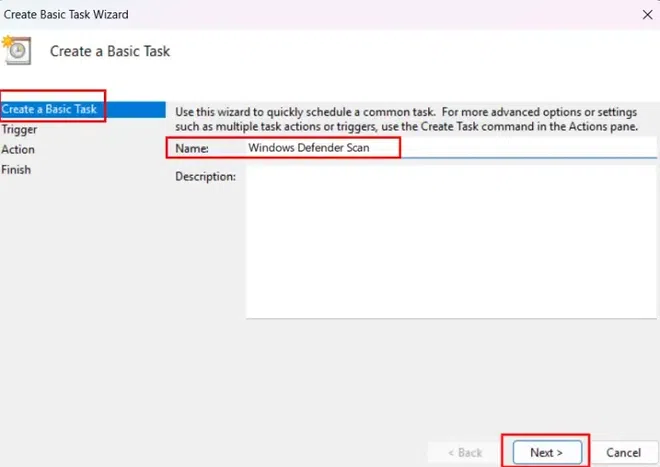
Step 3: Enter a name for the task
- Enter a name for the task (e.g., «Windows Defender Scan») and an optional description, then click Next.
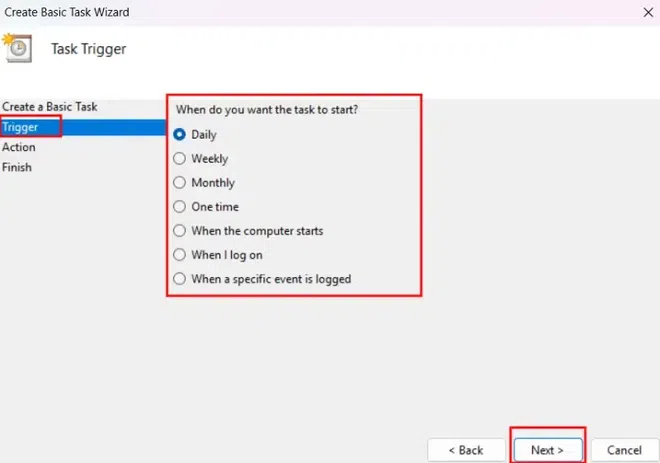
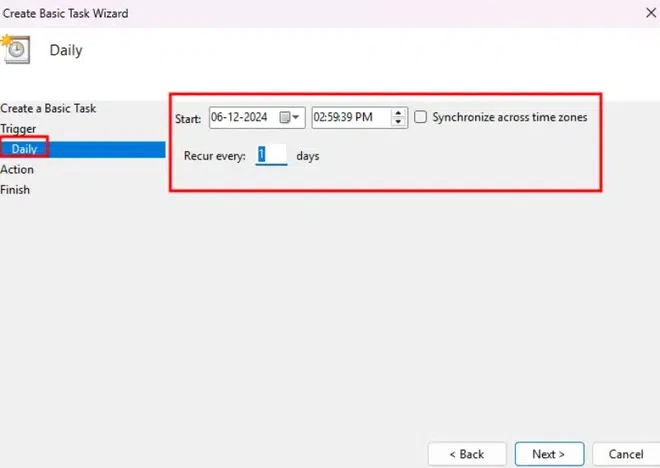
Step 4: Set the Trigger
- Choose Daily, Weekly, or Monthly based on when you want the scan to run. Click Next.
Step 5: Set the start date and time for the scan
- Set the start date and time for the scan. Also, how many times you want this to recur every days.
Step 6: Choose the Action
- Select Start a Program and click Next.
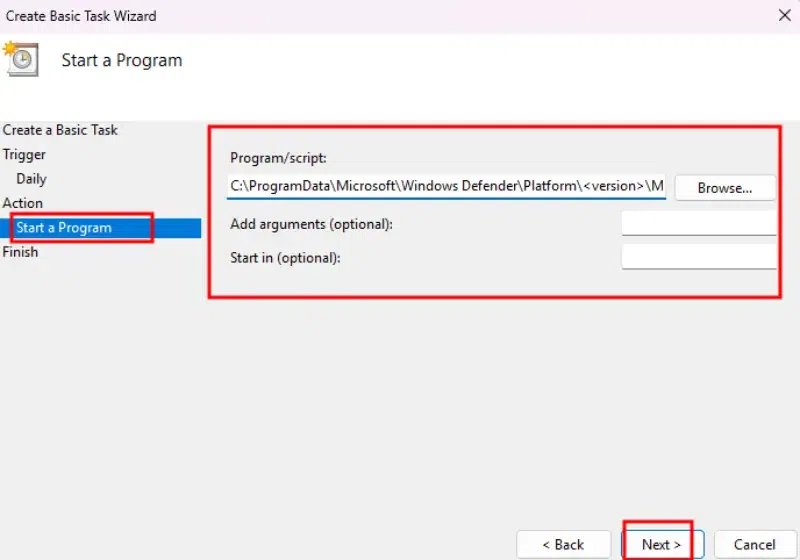
Step 7: Set the Program to Run
- Click Browse and go to the following path
C:\ProgramData\Microsoft\Windows Defender\Platform\<version>\MpCmdRun.exe
Note: Replace
<version>with the appropriate version number of the folder you have
- After selecting MpCmdRun.exe, click Open.
Step 8: Add Arguments for the Scan
- In the Add arguments (optional) field, enter the following arguments based on the type of scan you want:
- For a Quick Scan:
-scan -quick - For a Full Scan:
-scan -full - For a Custom Scan:
-scan -custom
- For a Quick Scan:
- Finish the Setup:
- Click Next, review your task settings, and click Finish.
Task Scheduler Configuration Example:-
- The task will now run at the scheduled time (e.g., daily or weekly) with the specified scan type.
Additional Tips
- Windows Update Scans: Windows Defender usually updates automatically with Windows Update. You can manually check for updates under Settings > Privacy & Security > Windows Security > Virus & Threat Protection > Check for Updates.
- Using PowerShell: You can also run a scan using PowerShell, but scheduling it through Task Scheduler is the most straightforward method.
3. Update Windows and Windows Defender
An outdated version of Windows Defender or the Windows operating system can sometimes cause performance issues. Keeping both up-to-date ensures that you are using the latest versions, which often include bug fixes and optimizations that improve performance.
Step 1: Open Settings and Check for Updates
- Click on the Start menu and select Settings. Navigate to Update & Security and click on Check for Updates. If there are any available updates, make sure to install them.
Step 2: Update Windows Defender
- To update Windows Defender specifically, go to Virus & Threat Protection in Windows Security and click Check for Updates under the Virus & Threat Protection Updates section.
- By keeping both Windows and Windows Defender up-to-date, you’ll prevent potential bugs that might cause the service to consume unnecessary system resources.
4. End Task the Antimalware Service Executable Process Using Task Manager
If you’re looking for a quick fix, ending the Antimalware Service Executable process from the Task Manager can temporarily stop it from consuming too much CPU. Keep in mind that this is only a temporary solution and the process will restart the next time you boot your system.
Step 1: Open Task Manager
- Press Ctrl + Shift + Esc simultaneously to open the Task Manager. Alternatively, right-click the Taskbar and select Task Manager.
Step 2: Locate the Antimalware Service Executable Process
- Under the Processes tab, scroll down and look for Antimalware Service Executable under the Background Processes section.
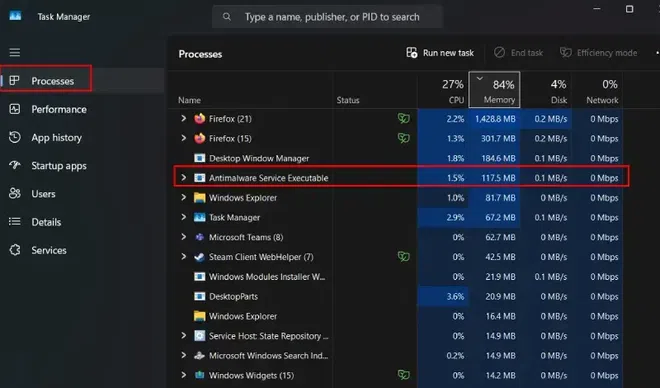
Step 3: End Task
- Right-click the Antimalware Service Executable process and select End Task.
Note: This will immediately stop the process from running, temporarily freeing up your system resources. Remember that it will restart once the system reboots.

5. Perform a Clean Boot
A clean boot starts Windows with only the essential system services and drivers, helping you troubleshoot the cause of the high CPU usage. By disabling non-essential services, you can identify if a third-party software or service is causing the issue.
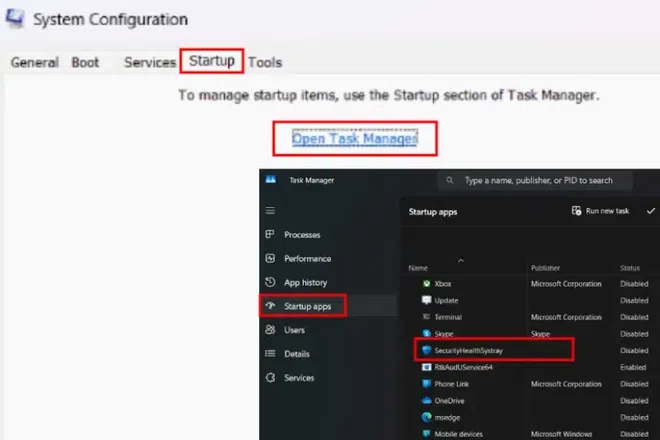
Step 1: Open System Configuration
- Press Windows + R, type
msconfigin the Run dialog, and press Enter. This will open the System Configuration window.
Step 2: Disable Non-Microsoft Services
- Go to the Services tab and check Hide all Microsoft services. Then click Disable All. This ensures that only essential services are running, preventing other services from using up CPU resources.

Step 3: Disable Startup Programs
- Next, click the Startup tab and select Open Task Manager. In the Task Manager, disable all unnecessary startup programs by right-clicking each one and selecting Disable.
Step 4: Restart the Computer
- Once you’ve completed these steps, restart your computer. A clean boot will help identify if a third-party program is causing the high CPU usage.
6. Check for Malware
Sometimes, malware can disguise itself as Antimalware Service Executable, consuming excessive CPU and disk resources. Running a full malware scan with Windows Defender or a trusted third-party antivirus can help identify and remove the issue.
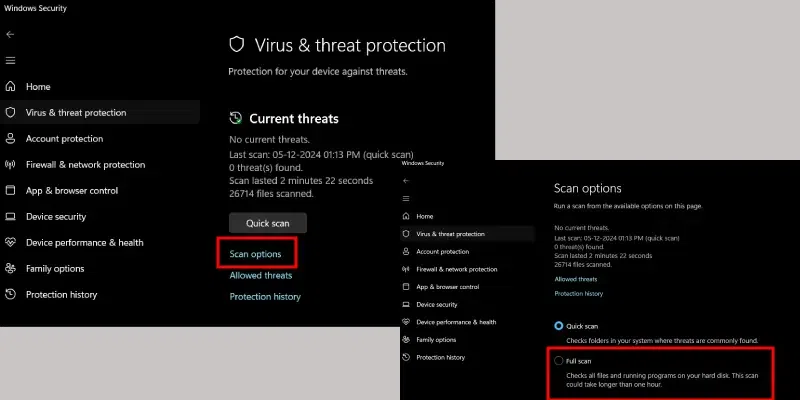
Step 1: Open Windows Security
Open Windows Security by typing it in the Start menu and selecting the app.
Step 2: Run a Full Scan
- Under Virus & Threat Protection. Click on Scan Options and select Full Scan. Then, click Scan Now. A full scan will take longer, but it will thoroughly check your system for malware or any other security threats.
Conclusion
To stop high CPU and disk usage by the Antimalware Service Executable, try updating Windows Defender and scheduling scans during off-peak hours. Adjust real-time protection settings or exclude specific folders to reduce strain. Perform a full system scan to check for malware, and consider adjusting power settings for better performance. If the issue persists, try resetting Windows Defender or using a third-party antivirus. These steps should help reduce resource usage while maintaining effective protection.
Malicious software can wreak havoc on your system and network, compromising personal information, slowing down your computer and even rendering your device unusable. You should have robust malware scanners and protection in place to protect your PC. One available tool is Windows Defender, a free built-in security feature in Windows operating systems.
Does Windows Defender scan for malware?
The short answer is yes. Windows Defender is a built-in solution for Windows 10 and Windows 11 that provides real-time protection for your Windows system. It runs in the background for continuous scanning and is a great tool for identifying malicious software types like viruses, spyware, ransomware, and more.
Windows Defender is updated regularly to guarantee its capability to detect the latest threats. It can also perform on-demand scans for specific areas of your system commonly targeted by threats. These capabilities make it a robust tool for safeguarding your device against potentially destructive malware.
How to enable Windows Defender
The first step to run the Windows virus scan command is to enable Windows Defender to scan for malware on your system. If you’re using Microsoft Defender on Windows 10, follow these steps to open the Windows Security Center:
- Click on the Start menu, then select the Settings icon.
- In the Settings window, click on “Update & Security.”
- From the left-hand menu, select “Windows Security.”
- In the Windows Security Center, click on “Virus & threat protection.”
- Here, you should see Windows Defender Antivirus. If it’s turned off, click on the “Manage settings” link and toggle the switch to turn it on.
The steps to open Windows Security in Windows 11 are slightly different:
- Click on the Start button and select the “Settings” icon.
- In the Settings window, click on “Privacy & security.”
- From the left-hand menu, select “Windows Security.”
- In the Windows Security window, click on “Virus & threat protection.”
- Similar to Windows 10, ensure that Windows Defender Antivirus is turned on. If not, click on the “Manage settings” link and enable it.
How to check for malware on Windows 11?
Malware is disruptive to IT operations and can be destructive to any organization. That’s why malware checking is essential to protecting your organization’s data, systems, and reputation. There are two common ways for checking malware in Windows 11 – manual and automated. Here’s the breakdown:
1. Manual. This method usually involves several ways of manually checking for malware, such as inspecting or observing system components or elements. Here are some factors to pay attention to:
- Slow performance – when it takes longer for a device to boot up or programs to load than usual.
- Unwanted failures – when unusual behaviors like application crashes, system freezes, unresponsive system, and anything that interferes with the normal operation of the device occur.
- Unfamiliar programs – when programs or applications you don’t remember installing or using previously suddenly appear in your computer system.
- Intrusive pop-ups – sudden pop-up windows, ads, or browser redirects are often signs of adware or malware.
2. Automated. Windows 11 offers built-in solutions such as antivirus tools to scan and remove malware:
- Windows Security – a built-in tool in Windows 11 that acts as a primary malware checker for the operating system. This includes Windows Defender Antivirus, which can automatically scan Windows 11 systems and detect malicious software.
- Third-party apps – these are IT security providers that offer additional protection layers, with features such as advanced malware detection, real-time threat monitoring, and enhanced scanning capabilities.
- Endpoint monitoring and management – organizations and enterprises that manage several computer systems may also use complete endpoint monitoring and management solutions like NinjaOne, which can integrate antivirus tools and automated malware scans into a broader security strategy.
Step-by-step: Performing a Windows Defender scan for malware
After enabling the Windows virus scan command, you have several ways to perform a Windows Defender scan for malware to detect and remove it from your system. This flexibility makes Windows Defender good for virus scans.
Quick scan
A quick scan is a fast check for common malware in the most vulnerable areas of your computer. Follow these steps to perform a quick scan using Windows Defender:
- Open Windows Security Center in Windows 10 or Windows Security in Windows 11 using the instructions provided earlier.
- In the Windows Security window, click on “Virus & threat protection.”
- Under the “Quick scan” section, click on the “Quick scan” button.
- Windows Defender will scan your system for malware. This may take a few minutes.
- Once the scan is complete, Windows Defender will display the results.
Full system scan
Perform a full system scan if you suspect a more extensive malware infection or want a comprehensive scan of your entire system. Here’s how to perform a full system scan using Windows Defender:
- Open Windows Security Center (Windows 10) or Windows Security (Windows 11).
- Click on “Virus & threat protection” in the Windows Security window.
- Under the “Virus & threat protection updates” section, click on the “Quick scan” button.
- In the drop-down menu, select “Full scan” instead of “Quick scan.”
- Windows Defender will now initiate a thorough scan of your entire system, including all files and folders.
- Be patient, as a full system scan can take a significant amount of time, depending on the size of your hard drive and the number of files on your system.
- Once the scan is complete, Windows Defender will present the results.
Custom scan with PowerShell
If you prefer more control over the process, you can use PowerShell to customize your Windows Defender scan for malware. Follow these steps to perform a custom scan using PowerShell:
- Press the Windows key + X on your keyboard and select “Windows PowerShell (Admin)” from the menu.
- In the PowerShell window, type the following command: Start-MpScan -ScanType Custom -ScanPath C:\Path\To\Custom\Folder
- Replace “C:\Path\To\Custom\Folder” with the actual path of the folder or file you want to scan.
- Press Enter to execute the command and initiate the custom scan.
- Windows Defender will scan the specified folder or file and display the results in the PowerShell window.
Using Command Prompt for malware scanning
You can also use Command Prompt to perform a malware scan with Windows Defender. Here’s how:
- Press the Windows key + X on your keyboard and select “Command Prompt (Admin)” from the menu.
- In the command prompt window, type the following command: MpCmdRun.exe -Scan protecting your computer against malware, giving you the flexibility to perform several different scans, schedule them in advance and interpret the results.
- Do I need anti-malware if I have Windows Defender? While Windows Defender offers comprehensive protection against malware, some users may prefer additional security measures. You can implement additional security software like NinjaOne and its built-in endpoint security tools. -ScanType 3
- Press Enter to execute the command and start the malware scan.
- Windows Defender will scan your system for malware and display the results in the command prompt window.
Interpreting Windows Defender scan results
After completing a scan, Windows Defender provides detailed information about any threats detected. Here are a few key elements to look at:
- Threat name: This identifies the specific malware detected on your system.
- Threat severity: Windows Defender categorizes threats as low, medium, high or severe based on their potential impact.
- Recommended action: Windows Defender suggests the appropriate action to take for each detected threat, such as quarantine, remove or allow.
- Scan history: Windows Defender keeps a record of previous scans and their results, allowing you to review past findings.
Carefully review the scan results and take appropriate action to remove or quarantine any detected malware. Windows Defender offers built-in tools to help you deal with these threats effectively.
How to schedule scans on Windows Defender?
You can schedule regular Windows Defender scans for malware to ensure continuous protection for your device. Follow these steps to set up a scan schedule:
- Open Windows Security Center (Windows 10) or Windows Security (Windows 11).
- Click on “Virus & threat protection” in the Windows Security window.
- Under the “Quick scan” section, click on the “Scan options” link.
- In the “Scan options” window, click on “Custom scan.”
- Select the desired scan type (quick scan, full scan or custom scan).
- Click on the “Advanced scan” link.
- In the “Advanced scan” window, click on “Configure scans.”
- Choose the frequency and time for your scheduled scans by selecting the options that suit your needs.
- Click on “Save” to apply the changes and set up your scan schedule.
Scheduling regular scans automates the process and ensures that your system is always protected against malware.
How to configure Windows Defender SmartScreen?
In addition to malware scanning, Windows Defender offers a feature called SmartScreen, which adds an extra layer of security by protecting against malicious websites and downloads when browsing. Here’s how to configure Windows Defender SmartScreen:
- Open Windows Security Center (Windows 10) or Windows Security (Windows 11).
- Click on “App & browser control” in the Windows Security window.
- Under the “Check apps and files” section, select “Block.”
- Under the “SmartScreen for Microsoft Edge” section, select “Block.”
- Under the “SmartScreen for Microsoft Store apps” section, select “Block.”
Endpoint security for Windows with NinjaOne
NinjaOne integrates with the top endpoint security solutions, including Bitdefender and SentinelOne, so that users can ensure the safety of their IT environments. Additionally, due NinjaOne’s endpoint monitoring, patch management, and RMM features, IT professionals are able to build the foundation for an efficient and secure IT infrastructure. Start protecting your IT environment today with NinjaOne.
If you suspect that your system may be infected with Windows Defender Malware, it’s crucial to take immediate action to protect your computer. Windows Defender Malware disguises itself as a legitimate security program and can wreak havoc on your system if left undetected. By learning to identify the signs of Windows Defender Malware, you can take the necessary steps to remove it and safeguard your computer from further harm.
Here are a few ways to detect Windows Defender Malware:
- Performance Issues: One of the most common signs of Windows Defender Malware is a sudden decrease in your system’s performance. If you notice a significant slowdown in your computer’s speed, frequent crashes, or sluggish response times, it could be a sign of malware infection.
- Unwanted Pop-ups and Advertisements: Another telltale sign of Windows Defender Malware is the presence of persistent pop-ups and intrusive advertisements on your computer screen. If you encounter an excessive amount of pop-ups, especially ones that are unrelated to the websites you visit, it’s likely that your system has been compromised.
- Unexpected Redirects: Malware often manipulates web browsers and redirects users to unfamiliar websites without their consent. If your browser redirects you to suspicious or unfamiliar websites, it’s a clear indication that your system has been infected with Windows Defender Malware.
- Disabled Security Programs: Windows Defender Malware is designed to disable or impair legitimate security programs, including antivirus software and firewalls. If you notice that your security programs are unexpectedly turned off or that you are unable to update them, it may be a sign of malware infiltration.
- Unusual Network Activity: Windows Defender Malware often communicates with remote servers to carry out malicious activities. If you observe high network usage or unexplained outbound connections, it could be an indicator of malware presence.
By keeping an eye out for these signs, you can effectively detect the presence of Windows Defender Malware on your system. Once identified, it’s crucial to take immediate action to remove the malware and protect your computer from further harm.
What is Windows Defender Malware?
Windows Defender Malware is a type of malicious software that disguises itself as a legitimate security program. It takes advantage of the reputation and trust associated with Windows Defender, which is a genuine antivirus program developed by Microsoft, to deceive users and gain unauthorized access to their systems. Once installed, it can cause a multitude of issues, including data theft, system instability, and privacy breaches.
This type of malware typically enters a computer through various means, such as deceptive email attachments, unsecure downloads, or by exploiting vulnerabilities in outdated software or operating systems. Once inside the system, Windows Defender Malware starts executing its malicious activities, often without the knowledge of the user.
Some of the common characteristics of Windows Defender Malware include:
- Fake Security Alerts: It displays false security alerts and warnings to convince users that their system is infected with malware. These alerts prompt users to take immediate action, such as downloading rogue software or entering sensitive information.
- Unauthorized System Modifications: Windows Defender Malware can modify system settings, disable legitimate security programs, change browser settings, or install additional malicious software without the user’s consent.
- Data Theft: It is capable of stealing sensitive information, such as login credentials, financial data, or personal details, which can then be used for identity theft or other malicious purposes.
- Browser Hijacking: Windows Defender Malware often hijacks web browsers to redirect users to malicious websites, inject unwanted advertisements, or track their online activities for targeted advertising or further exploitation.
- System Instability: It can cause system crashes, slow performance, and other issues that disrupt the normal functioning of the computer.
It is important to note that Windows Defender Malware is not associated with the genuine Windows Defender program developed by Microsoft. Genuine Windows Defender operates as a reliable antivirus software, providing protection against a wide range of threats.
To protect your system from Windows Defender Malware, it is vital to maintain updated antivirus software, regularly update your operating system and installed applications, exercise caution while downloading and opening email attachments, and practice safe browsing habits. If you suspect that your computer may be infected with Windows Defender Malware, it is recommended to take immediate action to remove the malware and protect your system from further harm.
Identifying Signs of Windows Defender Malware on Your System
Being able to identify the signs of Windows Defender Malware on your system is crucial for taking immediate action and preventing further damage. By recognizing these signs, you can effectively detect and remove the malware, ensuring the security and stability of your computer.
Here are some key indicators that may signal the presence of Windows Defender Malware:
- Unexpected System Behavior: Malware infections often lead to unusual system behavior. If you notice frequent crashes, freezes, or a sluggish response from your computer, it could indicate malware activity.
- Unwanted Pop-ups and Advertisements: Windows Defender Malware often displays persistent pop-ups and intrusive advertisements, even when you’re not browsing the internet. These pop-ups may contain malicious links or try to trick you into downloading further malware.
- Unexplained Program Installations: Malware can install unwanted programs or browser add-ons without your knowledge or consent. If you find unfamiliar programs, toolbars, or extensions on your system that you did not intentionally install, it could be a sign of malware.
- Changes to Browser Settings: Windows Defender Malware may alter your browser’s homepage, search engine, or default settings. If you notice any unauthorized modifications to these settings, it is likely that malware has infected your system.
- Disabling of Security Programs: Malware often attempts to disable or bypass your antivirus software, firewall, or other security programs in order to remain undetected. If you find that your security programs have been turned off or can’t be enabled, it may indicate a malware infection.
- Unusual Network Activity: Windows Defender Malware may generate excessive network traffic, making your internet connection slower than usual. Additionally, it may establish unauthorized connections or communicate with remote servers without your knowledge.
- Unauthorized Access or Modifications: Malware can gain unauthorized access to your files, folders, or settings. If you notice files being modified or deleted without your consent, or if you’re unable to access certain files, it could be a sign of malware presence.
It is important to note that the presence of one or more of these signs does not guarantee the presence of Windows Defender Malware. However, if you suspect that your system is infected, it is crucial to run a thorough scan using antivirus software or seek professional assistance to identify and remove the malware.
By staying vigilant and paying attention to these signs, you can effectively identify the presence of Windows Defender Malware on your system, enabling you to take immediate action and safeguard your computer and personal information from further harm.
Steps to Remove Windows Defender Malware Manually
If you suspect that your system has been infected with Windows Defender Malware, it’s essential to take immediate action to remove the malware and restore the security of your computer. While it’s recommended to use reputable antivirus software for malware removal, you can also try the following steps to manually remove Windows Defender Malware:
- Enter Safe Mode: Restart your computer and enter Safe Mode. This will help prevent the malware from running in the background and make it easier to remove.
- Identify Suspicious Processes: Open the Task Manager (Ctrl+Shift+Esc) and look for any processes that seem suspicious or unfamiliar. Take note of the process names or file locations for further investigation.
- End Malicious Processes: Right-click on the suspicious processes and select “End Task” to terminate them. Be careful not to end any essential system processes.
- Uninstall Suspicious Programs: Go to the Control Panel and navigate to “Programs” or “Programs and Features.” Look for any recently installed or suspicious programs, and uninstall them. Be vigilant and only remove programs that you confidently recognize as malware-related.
- Delete Malicious Files: Open File Explorer (Windows+E) and navigate to the locations of the suspicious files identified earlier. Select the files and permanently delete them by pressing Shift+Delete. Empty the Recycle Bin to ensure they are completely removed.
- Modify Browser Settings: If your web browser has been hijacked by Windows Defender Malware, restore the default settings. Go to the browser’s settings and reset the homepage, search engine, and other settings to their original state.
- Check Startup Programs: Open the Task Manager and go to the “Startup” tab. Disable any suspicious programs that are set to run on startup. This will help prevent malware from launching automatically when you boot your computer.
- Scan with Windows Defender: Once you have manually removed Windows Defender Malware, it’s recommended to run a full system scan using Windows Defender or other trusted antivirus software to ensure that any remaining malware is detected and removed.
- Update and Patch: Ensure that your operating system, software, and drivers are up to date with the latest security patches. This helps protect your system from known vulnerabilities that malware can exploit.
- Be Vigilant: To prevent future malware infections, exercise caution while downloading and opening files, keep your antivirus software up to date, and practice safe browsing habits.
Please note that manual removal of malware can be complex, and there is a risk of accidentally deleting important system files. If you are uncertain or uncomfortable with performing these steps manually, it is recommended to seek assistance from a professional or use reputable antivirus software for malware removal.
By following these steps and ensuring the complete removal of Windows Defender Malware, you can restore the security and functionality of your computer, protecting it from further harm.
Running a Windows Defender Scan to Remove the Malware
If you suspect that your system is infected with Windows Defender Malware, one effective way to remove it is by running a thorough scan using Windows Defender, the built-in antivirus program on Windows operating systems. Windows Defender provides real-time protection against malware and can help detect and remove malicious software, including Windows Defender Malware.
Here are the steps to run a Windows Defender scan and remove the malware:
- Open Windows Security: Click on the Windows Start button and type “Windows Security” in the search bar. Open the Windows Security app from the search results.
- Select Virus & Threat Protection: In the Windows Security app, select “Virus & Threat Protection” from the left-hand menu.
- Run a Quick Scan: Under the “Current Threats” section, click on “Quick Scan.” Windows Defender will scan common malware locations on your system and remove any detected threats. It’s recommended to perform a quick scan first, as it focuses on the most common areas where malware is found.
- Run a Full Scan: If the quick scan doesn’t detect anything or you suspect a more extensive infection, you can run a full scan. Under the “Virus & Threat Protection” section, click on “Scan Options” and select “Full Scan.” Windows Defender will conduct a comprehensive scan of your entire system, thoroughly checking all files and folders.
- Quarantine and Remove Detected Malware: After the scan is complete, Windows Defender will display the results. If any malware or Windows Defender Malware is detected, select the option to quarantine or remove the threats. Quarantine isolates the detected files, and removal permanently deletes them from your system.
- Follow Instructions and Reboot if Needed: Windows Defender may prompt you to follow additional instructions, such as rebooting your computer to complete the removal process. It’s important to follow these instructions to ensure that the malware is effectively removed and your computer is secure.
- Monitor and Update: After running the Windows Defender scan and removing the malware, it’s essential to monitor your system for any further signs of infection. Ensure that Windows Defender is regularly updated with the latest virus definitions to detect and protect against new threats.
While Windows Defender is a capable antivirus program, it’s important to note that some advanced and persistent malware may require specialized removal tools or professional assistance. If the Windows Defender scan does not detect or remove the malware, or if you suspect a severe infection, it’s advisable to seek professional help or use reputable antivirus software specifically designed for malware removal.
By running a Windows Defender scan and following these steps, you can effectively detect and remove Windows Defender Malware, restoring the security and integrity of your system.
Using Third-Party Antivirus Software to Remove Windows Defender Malware
If you suspect that your system is infected with Windows Defender Malware and the built-in Windows Defender program is unable to remove it, using third-party antivirus software can be an effective solution. Third-party antivirus software offers advanced malware detection and removal capabilities, providing an extra layer of protection for your computer.
Here are the steps to use third-party antivirus software to remove Windows Defender Malware:
- Choose a Reputable Antivirus Software: Research and select a reputable third-party antivirus software that is known for its malware detection and removal capabilities. There are many options available, such as Norton, McAfee, Avast, and Bitdefender.
- Download and Install the Software: Visit the official website of the chosen antivirus software and download the installer. Follow the prompts to install the software on your computer, ensuring that you choose the appropriate settings for your system.
- Update the Antivirus Software: Once installed, open the antivirus software and check for any available updates. Updating the antivirus software to the latest version ensures that it has the most up-to-date virus definitions and detection capabilities.
- Perform a Full System Scan: Start a full system scan using the third-party antivirus software. This scan will thoroughly examine all files, folders, and running processes on your computer, including those that may be infected with Windows Defender Malware or other malicious software.
- Follow the Software’s Instructions: During the scan, the antivirus software may prompt you to take additional actions, such as quarantining or removing detected threats. Follow the instructions provided by the software to effectively remove Windows Defender Malware from your system.
- Monitor and Schedule Scans: After removing the malware, it is important to monitor your system for any signs of reinfection. Schedule regular scans with the third-party antivirus software to ensure ongoing protection and detection of new threats.
- Stay Updated and Renew the License: Keep the third-party antivirus software updated by installing the latest updates and renew the license when necessary. Regularly updating the software ensures that it continues to provide strong protection against evolving malware threats.
Using third-party antivirus software can provide enhanced malware detection and removal capabilities, particularly when dealing with complex threats like Windows Defender Malware. These software solutions often offer additional features such as real-time scanning, firewall protection, and web browsing safety, further enhancing the security of your computer.
Remember to research and choose a reputable third-party antivirus software, and be cautious when downloading software from unknown sources. It’s also advisable to keep Windows Defender or any other built-in antivirus software disabled while using the third-party antivirus software to avoid conflicts between the two programs.
By leveraging the power of third-party antivirus software, you can effectively detect and remove Windows Defender Malware, safeguarding your system from further harm.
How to Prevent Future Infections of Windows Defender Malware
Preventing future infections of Windows Defender Malware is crucial for maintaining the security and integrity of your computer. By implementing the following preventive measures, you can reduce the risk of malware infiltrating your system:
- Use Reliable Antivirus Software: Install and regularly update reputable antivirus software, such as Windows Defender or third-party solutions, to detect and remove malware threats. Ensure that the software is set to automatically update and conduct regular system scans.
- Keep Operating System and Software Up to Date: Regularly update your operating system, software, and applications with the latest security patches and bug fixes. Security updates often address vulnerabilities that malware can exploit.
- Practice Safe Browsing: Avoid visiting suspicious websites and clicking on suspicious links or advertisements. Be cautious when downloading files and only use trusted sources. Enable pop-up blockers to prevent unwanted pop-ups.
- Be Wary of Email Attachments: Exercise caution when opening email attachments, even if they appear to be from trusted sources. Scan attachments with antivirus software before opening them, and do not open attachments from unknown or suspicious senders.
- Enable Firewall Protection: Activate the built-in firewall on your operating system or use a third-party firewall solution to monitor and control network traffic, preventing unauthorized access to your system.
- Use Strong and Unique Passwords: Create strong, unique passwords for your online accounts. Avoid using the same password for multiple accounts and consider using a password manager to securely store your login credentials.
- Exercise Caution with Removable Media: Scan USB drives, external hard drives, and other removable media for malware before connecting them to your computer. Be cautious of files or software obtained from unknown or untrustworthy sources.
- Enable User Account Control (UAC): Enable the User Account Control feature on your operating system to receive prompts for permission before making system changes. This adds an extra layer of protection against unauthorized actions.
- Educate Yourself on Phishing Attacks: Learn to recognize common signs of phishing attacks, such as suspicious emails, websites requesting personal information, or unexpected requests for login credentials. Be cautious and verify the authenticity of such requests before providing any information.
- Backup Your Data: Regularly backup your important files and data to an external hard drive, cloud storage, or another secure location. This will ensure that you have a copy of your data in case of a malware infection or system failure.
By following these preventive measures, you can significantly reduce the risk of future infections of Windows Defender Malware and other malicious software. Stay vigilant, practice safe online behavior, and keep your system and software up to date to maintain a secure and protected computing environment.
Safe Browsing Practices to Avoid Windows Defender Malware
Implementing safe browsing practices is crucial for protecting yourself from Windows Defender Malware and other types of malware. By following these practices, you can minimize the risk of encountering malicious websites and downloading infected files:
- Keep Software Updated: Regularly update your web browser, operating system, and plugins to ensure that you have the latest security patches. Often, these updates address vulnerabilities that malware can exploit.
- Be Wary of Unknown or Suspicious Websites: Avoid visiting unfamiliar or suspicious websites. Stick to reputable and trusted websites for your online activities.
- Verify Website Security: Look for the padlock symbol and “https” in the website address to ensure that the connection is encrypted and secure. This is especially important when entering sensitive information, such as passwords or credit card details.
- Use a Secure and Updated Web Browser: Opt for a well-regarded web browser and ensure that it is regularly updated with the latest security features and patches.
- Enable Pop-up Blockers: Enable pop-up blockers in your web browser to prevent pop-ups from displaying intrusive ads or leading you to malicious websites.
- Exercise Caution with Email Links and Attachments: Avoid clicking on links or downloading attachments from untrustworthy or unknown sources. Be suspicious of unexpected or unsolicited emails, especially if they contain links or attachments.
- Scan Downloads for Malware: Before opening or executing downloaded files, scan them using reliable antivirus software. This will help detect and remove any potential malware.
- Disable Auto-Run Feature: Disable the auto-run feature for USB drives and other external media to prevent the automatic execution of potentially malicious scripts or malware.
- Use a Virtual Private Network (VPN): Consider using a VPN when browsing the internet, especially when connected to public Wi-Fi networks. A VPN encrypts your connection, providing an extra layer of security and privacy.
- Enable Two-Factor Authentication (2FA): Enable two-factor authentication for your online accounts whenever possible. This adds an extra layer of security by requiring a secondary verification step, such as a unique code sent to your mobile device.
By implementing safe browsing practices, you can significantly reduce the risk of encountering Windows Defender Malware or falling victim to other types of online threats. The key is to be cautious, stay informed about current threats, and use reliable security measures to protect yourself and your digital assets.
Updating Your Operating System and Installed Software for Better Protection
Keeping your operating system and installed software up to date is crucial for maintaining optimal security and protection against Windows Defender Malware and other types of malware. Regular updates ensure that vulnerabilities are patched, security flaws are addressed, and new features and enhancements are implemented. Here’s why updating your operating system and installed software is so important:
1. Patching Vulnerabilities: Operating system and software updates often include security patches that fix vulnerabilities that can be exploited by malware. By applying these patches, you strengthen the defenses of your system and reduce the risk of malware infection.
2. Security Enhancements: Updates may introduce new security features and enhancements designed to protect your system from evolving threats. These features may include improved firewall settings, stronger encryption protocols, and advanced antivirus capabilities.
3. Bug Fixes: Updates not only address security issues but also fix bugs and glitches that could potentially be exploited by malware. By resolving these bugs, software developers remove potential entry points that cybercriminals could exploit to gain unauthorized access to your system.
4. Compatibility and Performance: Updates often improve compatibility with new technologies and software versions, ensuring that your system runs smoothly and can handle the latest security measures. Regular updates help maintain the performance and stability of your computer.
5. Protection Against Exploits: Malware often takes advantage of exploits in outdated software to gain access to systems. By keeping your operating system and software up to date, you reduce the risk of falling victim to these exploits and make it more difficult for malware to infiltrate your system.
6. Software Vendor Support: Operating system and software developers typically provide support and assistance to users who keep their systems updated. This includes prompt response to reported vulnerabilities and timely release of patches and updates.
To ensure that your system is properly updated, follow these best practices:
1. Enable Automatic Updates: Enable automatic updates for your operating system and installed software. This way, updates are downloaded and installed automatically, ensuring that you’re always up to date with the latest security patches.
2. Check for Updates Regularly: Periodically check for updates manually, especially for critical software such as your web browser, antivirus program, and other commonly targeted applications. Stay proactive in updating your system to stay protected.
3. Enable App Store Updates: If you’re using a mobile device or a software ecosystem that offers app stores, make sure to enable automatic updates for apps installed through these stores. Developers often release security updates to address vulnerabilities.
4. Remove Outdated Software: Regularly review the software installed on your system and remove any outdated or unsupported applications. Unsupported software may no longer receive security patches, leaving your system exposed to potential threats.
5. Be Cautious of Fake Updates: Only download software updates from official sources or trusted websites. Be cautious of pop-ups or emails claiming to offer updates and ensure that you are visiting the official website of the software vendor.
By prioritizing the updating of your operating system and software, you significantly enhance your system’s security and protection against Windows Defender Malware and other malware threats. Regular updates keep your computer resilient and capable of defending against evolving cyber threats.
Importance of Regular Backups for Recovering from Malware Attacks
Regular backups play a crucial role in recovering from malware attacks, including Windows Defender Malware. Malware infections can cause significant damage, leading to data loss, system corruption, and other disruptions. By regularly backing up your data, you can mitigate the impact of malware and quickly restore your system to a previous state. Here’s why regular backups are so important:
1. Data Recovery: Malware attacks can result in the loss, encryption, or corruption of your files. Regular backups enable you to restore your important data and files from a secure backup source, minimizing the impact of the malware attack and reducing downtime.
2. System Restoration: In the event of a severe malware infection, you may need to restore your entire system to a clean state. Regular backups allow you to restore your operating system, applications, and settings to a known good state, eliminating the malware and ensuring the integrity of your system.
3. Ransomware Protection: Ransomware attacks, including those disguised as Windows Defender Malware, can encrypt your files and demand a ransom for their release. By having recent backups, you can avoid paying the ransom and restore your files from a backup source, ensuring you regain access to your valuable data without funding cybercriminals.
4. Business Continuity: For businesses, regular backups are crucial for maintaining business continuity. In the event of a malware attack, backups allow businesses to quickly recover and resume operations, minimizing the financial and reputational impact of a system compromise.
5. Protection Against Data Loss: Malware attacks can result in data loss, whether through corruption, deletion, or theft. Regular backups protect against permanent data loss by ensuring you have duplicate copies of your important files, documents, and databases stored securely in a separate location.
6. Peace of Mind: Regular backups provide peace of mind, knowing that your valuable data is secure and recoverable. By having backups in place, you can navigate malware attacks with confidence, knowing that you have the ability to restore your systems and data even in the face of a severe infection.
To ensure the effectiveness of your backups, keep the following best practices in mind:
1. Choose Reliable Backup Solutions: Utilize reputable software or cloud-based backup services that offer encryption, redundancy, and secure storage options. These solutions provide an extra layer of protection for your backed-up data.
2. Automate the Backup Process: Set up automated backup schedules to ensure your data is backed up regularly without manual intervention. This minimizes the risk of human error and ensures the most up-to-date backups.
3. Test Restorations: Periodically test the restoration process to verify that your backups are functional and your data can be recovered successfully. Regular tests validate the integrity of your backups and ensure their reliability in real-world scenarios.
4. Adopt the 3-2-1 Backup Rule: Follow the 3-2-1 backup rule, which states that you should have at least three copies of your data, stored on two different media types, with one copy stored offsite. This significantly reduces the risk of data loss in the event of a malware attack or other disasters.
5. Educate Users: Educate yourself and others on the importance of backups and safe computing practices to minimize the risk of malware infections. Regularly remind users to back up their data and provide guidance on recognizing and reporting potential malware threats.
By following these backup best practices, you can ensure that your data remains secure and easily recoverable, providing peace of mind and effective recovery options in the event of a malware attack like Windows Defender Malware.
Все способы:
- Способ 1: Отключение «Защитника Windows»
- Способ 2: «Планировщик заданий»
- Способ 3: «Редактор локальной групповой политики»
- Способ 4: «Редактора реестр»
- Способ 5: Проверка компьютера на наличие вирусов
- Способ 6: Установка стороннего антивируса
- Вопросы и ответы: 5
Важно! Практически все способы, предоставленные в этой статье, подразумевают частичное или полное отключение «Защитника Windows» — предустановленной в операционной системе антивирусной программы. Следствием станет снижение безопасности Windows 10, учитывайте это при выполнении описываемых действий.
Способ 1: Отключение «Защитника Windows»
Процесс «Antimalware Service Executable», отображающийся в «Диспетчере задач», является одной из задач штатного антивируса под названием «Защитник Windows». Следовательно, если вы хотите убрать этот процесс из списка выполняемых, чтобы снизить нагрузку на процессор и оперативную память, одним из способов будет отключение антивируса. На нашем сайте есть отдельная статья, в которой перечислены все актуальные методы выполнения поставленной задачи, при необходимости ознакомьтесь с представленной в ней информацией, перейдя по ссылке ниже.
Подробнее: Как отключить «Защитник Windows» в Windows 10

Обратите внимание! Стандартными средствами отключить «Защитник Windows» полностью невозможно, он все равно через определенное время автоматически включится, а вместе с ним запустится процесс «Antimalware Service Executable». Если вы хотите навсегда отключить системный антивирус, потребуется удалить его исполняемый файл. Но сделать это можно только через среду восстановления. Эта процедура подробно описывается в другом материале на нашем сайте, при желании вы можете ознакомиться с ним, воспользовавшись ссылкой ниже.
Подробнее: Полное удаление «Защитника Windows» (MsMpEng.exe) в Windows 10

Способ 2: «Планировщик заданий»
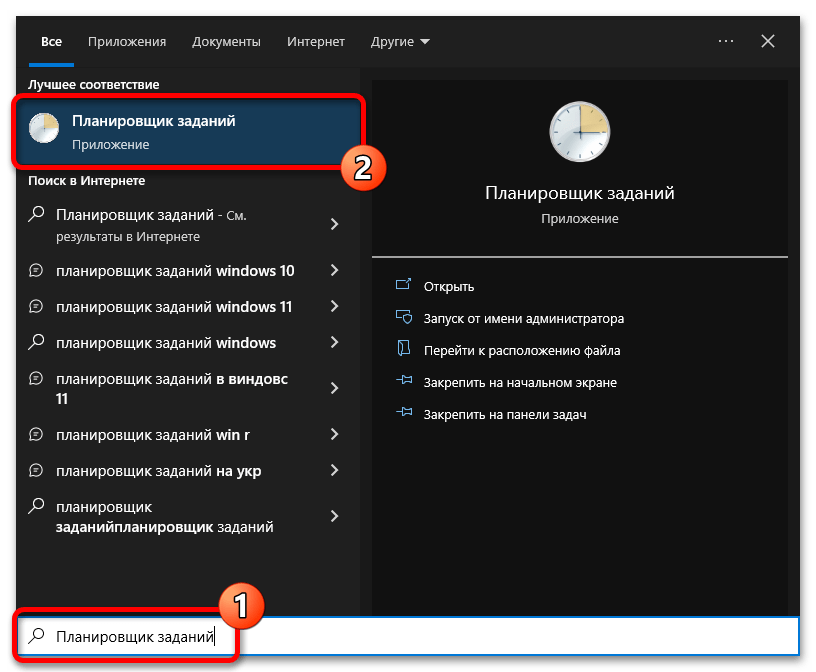
Отключить процесс «Antimalware Service Executable» можно посредством «Планировщика заданий» — предустановленной в операционной системе утилиты для работы с различными службами и приложениями. С ее помощью можно запретить выполнение процессов, принадлежащих «Защитнику Windows».
- Откройте «Планировщик заданий» любым доступным способом. Например, сделать это можно посредством системного поиска. Для этого установите курсор в соответствующее поле на панели задач, а затем введите запрос «Планировщик заданий». В результатах кликните по одноименному приложению.

Читайте также: Как отрыть «Планировщик задач» в Windows 10
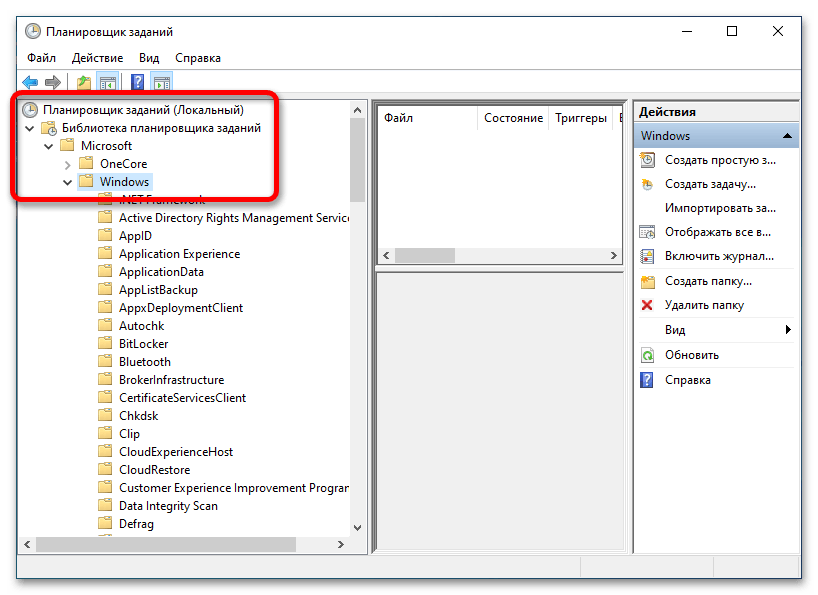
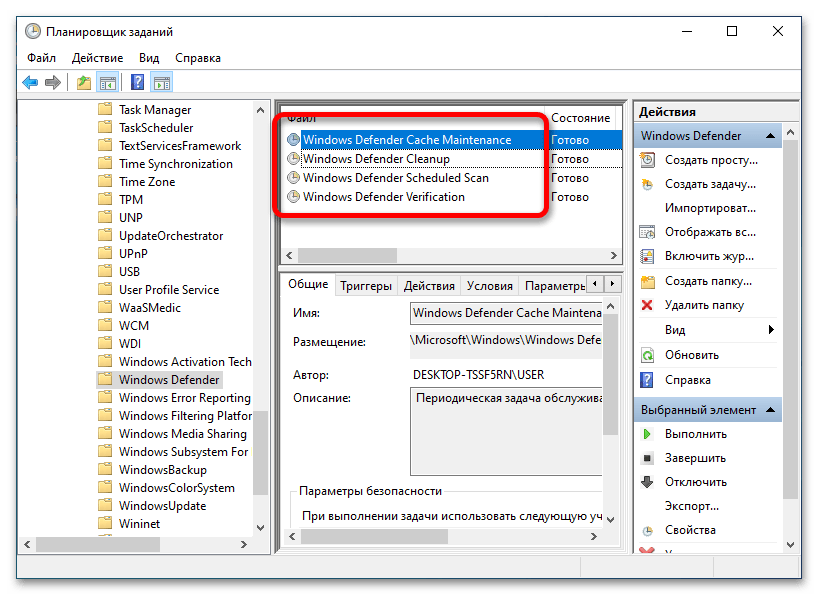
- В появившемся окне воспользуйтесь древовидной структурой каталогов в левой части интерфейса, чтобы перейдите по следующему пути:
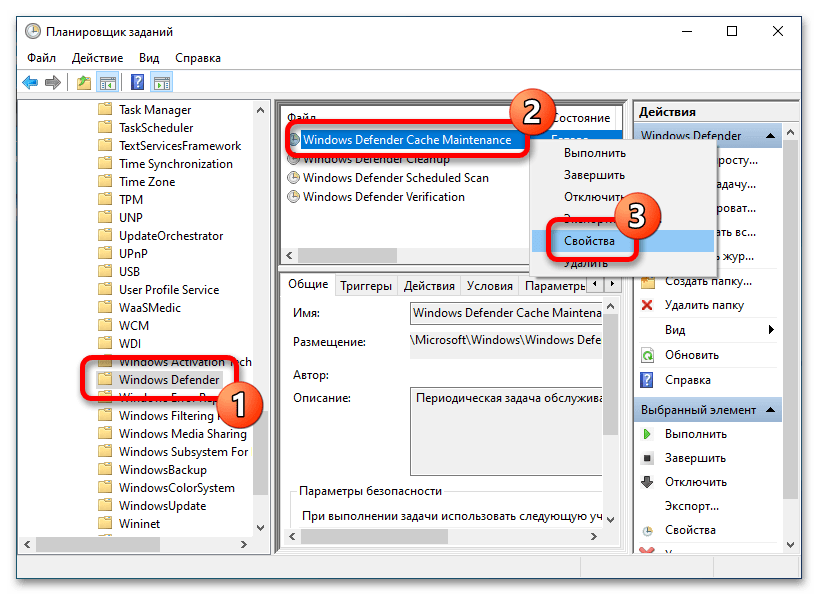
«Библиотека планировщика заданий» → «Microsoft» → «Windows» - Найдите в целевой директории папку под названием «Windows Defender» и перейдите в нее, кликнув левой кнопкой мыши. После этого в центральной верхней части окна откройте свойства первого файла. Для этого щелкните по нему правой кнопкой мыши и выберите в появившемся контекстном меню пункт «Свойства».
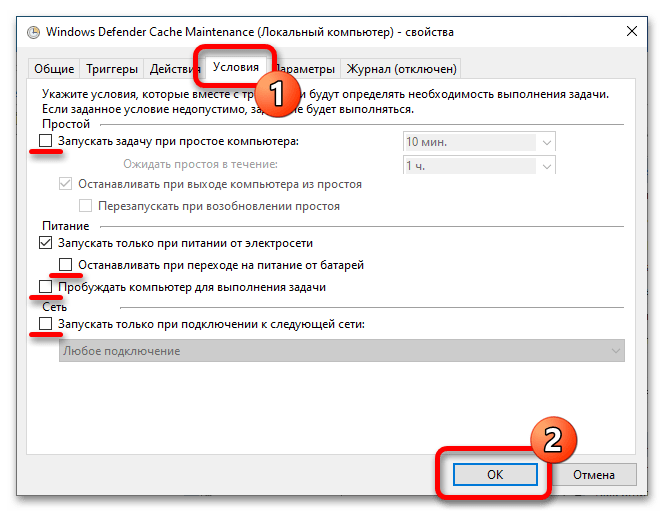
- В новом меню перейдите во вкладку «Условия» и уберите галочки со всех отмеченных на изображении ниже пунктов. В завершение сохраните внесенные изменения, кликнув по кнопке «ОК».
- Теперь проделайте аналогичные действия со всеми оставшимися в этой папке файлами, поочередно открывая их свойства и убирая нужные отметки на вкладке «Условия».
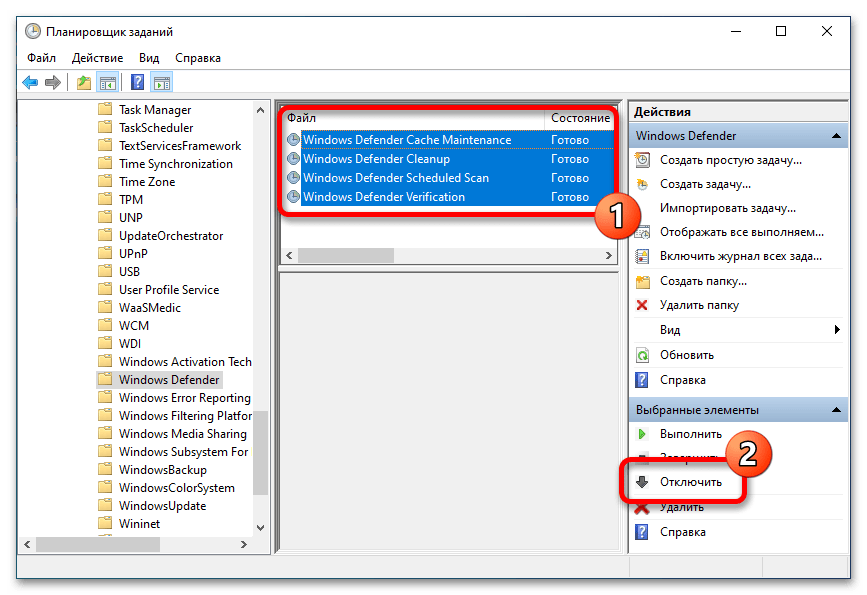
- Выделите все файлы в директории. Для этого можете воспользоваться мышкой с зажатой левой кнопкой или комбинацией клавиш Ctrl + A. Затем на боковой панели справа в блоке «Выбранные элементы» щелкните по пункту «Отключить».
- Перезапустите компьютер, чтобы внесенные изменения вступили в силу. После этого «Защитник Windows» перестанет инициализировать процесс «Antimalware Service Executable».
Способ 3: «Редактор локальной групповой политики»
Отключить запуск дочерних процессов «Защитника Windows» можно посредством «Редактора локальной групповой политики». Для этого потребуется открыть свойства определенного параметра и активировать его.
Важно! Воспользоваться этим способом получится, только если вы являетесь пользователем Windows 10 редакции «Профессиональная» или «Корпоративная». В противном случае «Редактора локальной групповой политики» в вашей операционной системе попросту не будет.
- Запустите «Редактор локальной групповой политики» любым доступным способом. Сделать это можно, например, посредством утилиты «Выполнить». Вызовите ее сочетанием клавиш Win + R, а затем вставьте в поле «Открыть» команду
gpedit.mscи нажмите Enter.
Читайте также: Как открыть «Редактор локальной групповой политики» в Windows 10
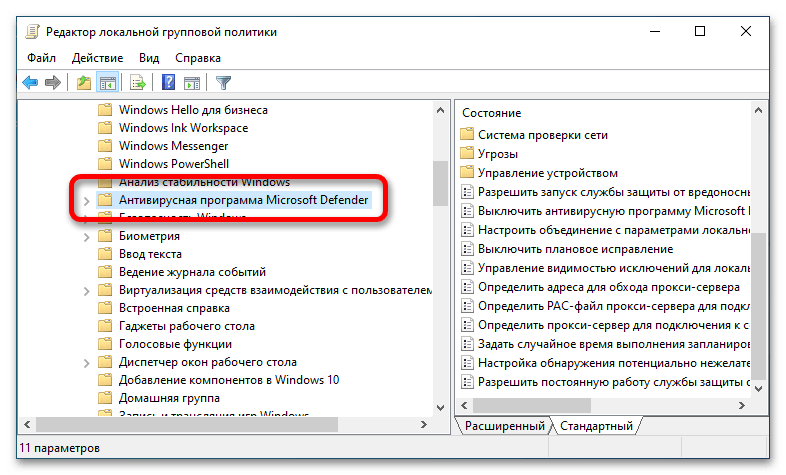
- В появившемся окне воспользуйтесь навигационной панелью слева, чтобы проследовать по следующему пути:
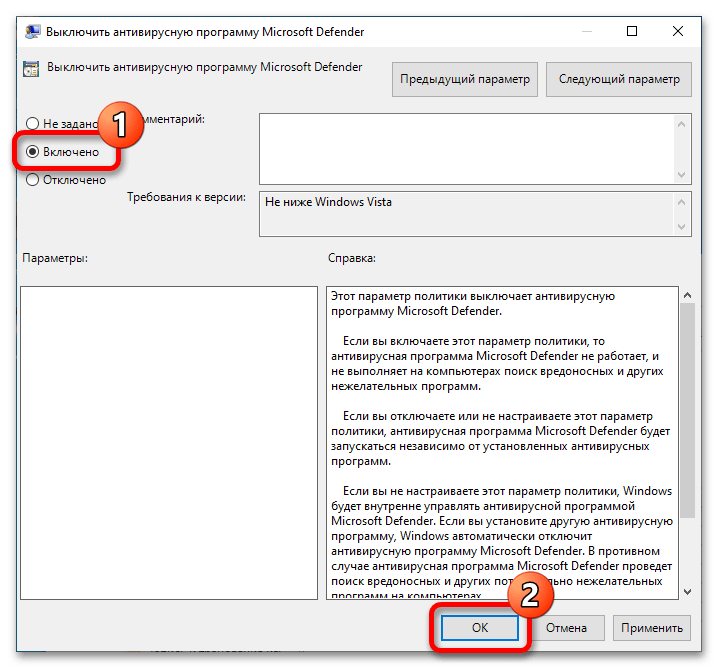
«Конфигурация компьютера» → «Административные шаблоны» → «Компоненты Windows» → «Антивирусная программа Microsoft Defender» - Находясь в целевой директории, откройте свойства параметра «Выключить антивирусную программу Microsoft Defender». Для этого достаточно дважды кликнуть левой кнопкой мыши по его названию.
- В открывшемся окне переведите переключатель, расположенный в верхнем левом углу, в положение «Включено». После этого щелкните по кнопке «ОК», чтобы сохранить внесенные изменения.
- Перезапустите компьютер, после чего дочерние процессы «Защитника Windows» перестанут запускаться, в частности, и «Antimalware Service Executable».


Способ 4: «Редактора реестр»
Если «Редактором локальной групповой политики» воспользоваться не получилось, аналогичную настройку можно выполнить через «Редактор реестра». Вам потребуется перейти в нужную директорию и создать специальный параметр, который по итогу будет блокировать запуск процесса «Antimalware Service Executable». Делается это следующим образом:
- Откройте «Редактор реестра» любым доступным способом. Проще всего это сделать посредством утилиты «Выполнить». Вызовите ее комбинацией клавиш Win + R, затем введите в поле «Открыть» команду
regeditи нажмите Enter.
Читайте также: Как открыть «Редактор реестра» в Windows 10
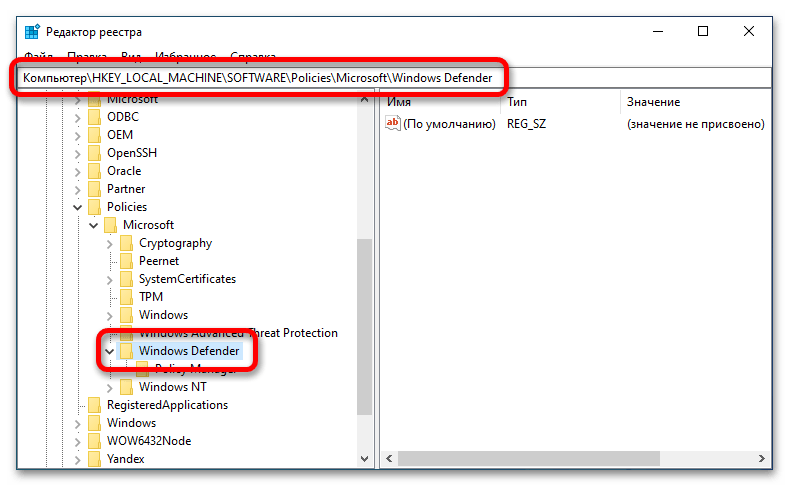
- В появившемся окне воспользуйтесь древовидной структурой каталогов в левой части интерфейса, чтобы проследовать по представленному ниже пути. Вы также можете скопировать этот адрес в адресную строку, расположенную в верхней части. После этого не забудьте нажать Enter, чтобы совершить мгновенный переход в целевую директорию.
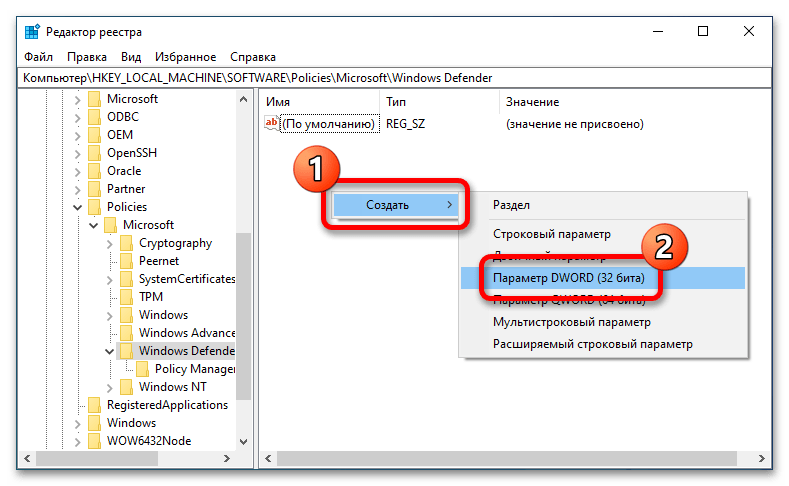
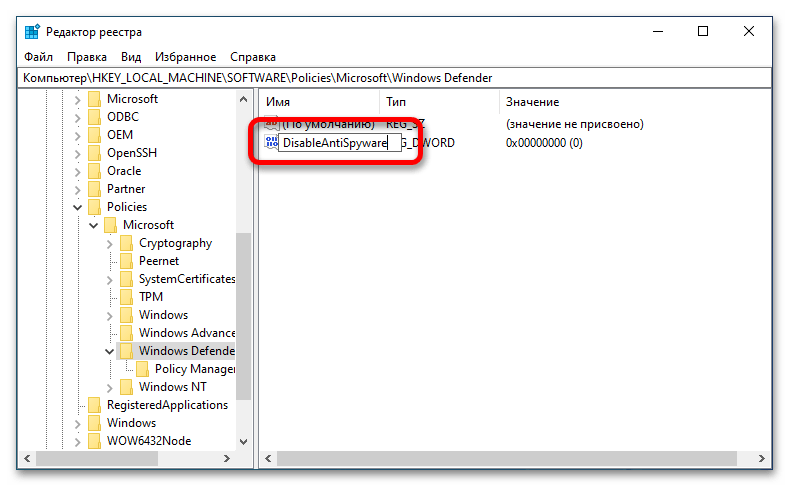
HKEY_LOCAL_MACHINE\SOFTWARE\Policies\Microsoft\Windows Defender - Находясь в папке «Windows Defender», создайте новый параметр с названием «DisableAntiSpyware». Для этого кликните в пустом месте правой кнопкой мыши, наведите курсор на пункт «Создать» и в появившемся подменю выберите опцию «Параметр DWORD (32 бита)».

В отобразившемся поле для ввода впишите название «DisableAntiSpyware» и нажмите по клавише Enter для сохранения нового имени.
- Откройте окно свойств только что созданного параметра. Для этого щелкните по нему правой кнопкой мыши и в появившемся контекстном меню выберите пункт «Изменить».
- В открывшемся окне впишите в поле «Значение» цифру «1» (без кавычек), после чего сохраните внесенные изменения нажатием по кнопке «ОК».
- Перезапустите компьютер, чтобы новая настройка зарегистрировалась операционной системой. После этого процесс «Antimalware Service Executable» перестанет запускаться в фоновом режиме.

Важно! Если в процессе редактирования реестра вы совершили ошибки, которые впоследствии негативно сказались на работе операционной системы, необходимо произвести его восстановление. Процедура может показаться сложной для неопытного пользователя, поэтому рекомендуется следовать подробному руководству, размещенному на нашем сайте. В нем предлагается три способа решения возникшей проблемы, начиная с замены файлов в файловом менеджере и заканчивая восстановлением заводских настроек компьютера. Воспользуйтесь ссылкой ниже, чтобы ознакомиться с изложенной там информацией.
Читайте также: Как восстановить системный реестр в Windows 10

Способ 5: Проверка компьютера на наличие вирусов
Причиной появления ошибки «Antimalware Service Executable» может быть вредоносный код, который вы случайно занесли в операционную систему. Чтобы его удалить, необходимо воспользоваться антивирусом. Есть также вероятность, что этот процесс изначально является вирусом, который замаскирован под системную службу.
Примечательно то, что для выполнения поставленной задачи не рекомендуется использовать штатное решение от Microsoft в виде «Защитника Windows». Он уже пропустил угрозу, поэтому есть вероятность, что распознать ее повторно не сможет. На нашем сайте есть отдельная статья, в которой рассказывается о том, как удалить вредоносное приложение с компьютера, работающего под управлением операционной системы Windows 10. При необходимости ознакомьтесь с изложенной в ней информацией, перейдя по ссылке ниже.
Подробнее: Как удалить вирус с компьютера на Windows 10

Обратите внимание! Проверить компьютер на наличие вирусов рекомендуется даже в том случае, если один из перечисленных выше способов помог устранить ошибку. Есть вероятность, что в системе остался вредоносный код, который в будущем снова может спровоцировать появление неполадки.
Способ 6: Установка стороннего антивируса
Как уже не раз упоминалось выше, «Antimalware Service Executable» является дочерним процессом «Защитника Windows». Соответственно, один из способов его отключения заключается в инсталляции на компьютер другого антивируса. Windows 10 устроена так, что установка защитного программного обеспечения от сторонних разработчиков блокирует работу штатного решения от Microsoft. Следовательно, «Защитник Windows» не будет запускаться в операционной системе и процесс «Antimalware Service Executable» не будет создаваться.
На нашем сайте есть отдельная статья с обзором популярных бесплатных антивирусов, в ней рассказывается не только об особенностях приложений, но и дана подробная инструкция по инсталляции. При необходимости ознакомьтесь с изложенной там информацией, перейдя по ссылке ниже.
Подробнее: Как установить бесплатный антивирус на компьютер

Читайте также:
Выбор антивируса для слабого ноутбука
Антивирусы для сервера
Наша группа в TelegramПолезные советы и помощь