
ReadyBoot is a mechanism to help you speed up your computer’s boot time. Each time you turn on your computer, Windows keeps track of the way your computer starts and the programs which are usually accessed in the startup process. Windows readily save this information in the form of small files in the “Prefetch” folder. The next time you turn on your computer, Windows refers to these files to speed up the startup process.
The Prefetch folder is located under the Windows system directory and is self-maintaining. There is no need to erase its contents as it will only slow down the boot process as Windows will not be able to access the files it saved and will boot in the traditional way.
What is the main Difference between ReadyBoot and ReadyBoost?
Let’s start by defining the mechanics of both the processes. On systems with more than 700MB of RAM, ReadyBoot uses information from 5 previous boots to create a plan for a boot-time memory cache. It will try to prefetch the files needed in the future onto the RAM beforehand. The memory used by ReadyBoot is freed up after around 90 seconds or immediately if another process needs the memory.
To put it in simple terms, if you have a system where your system is booted from an SSD, ReadyBoot may not improve the boot time by a lot. However, it will try to utilize your fast RAM so it can serve as a fast cache for the disk. At this moment, even the fastest SSD’s are slower than your RAM so it does improve the boot time by a little.
ReadyBoost, on the other hand, is meant for utilizing the flash memory for the swap file. If you have an SSD, there is no point in using the ReadyBoost utility as it will be slower. You may see a message pop-up whenever you plug in a fast USB flash into your computer about whether you want to use it for ReadyBoost or not.
What does the Error Condition under Discussion mean?
This error mainly occurs if the memory allocated to the ReadyBoot service is less than the service actually needs. Therefore it is unable to make the small files which we discussed earlier and your computer is forced into not using the service to its potential. The default size of ReadyBoot in most computers is 20MB which may prove to be less over time. We can try changing the allocation size and see if this solves the error message.
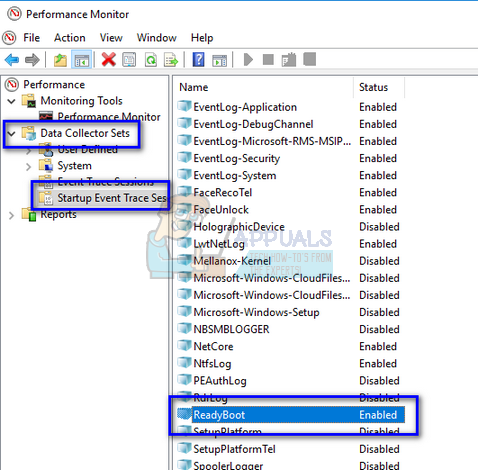
- Press Windows + S, type “performance monitor” in the dialogue box and open the application.
- Expand “Data Collector Sets” and click on “Startup Event Trace Sessions”. Look for “ReadyBoot” using the navigation pane present at the right-side of the screen and double-click it.
- Select the tab “Stop Condition”. Now increase the size located at the near bottom of the screen. The ideal size if 128 MB. It isn’t much space but it suffices for the application to function normally.
- Press Apply to save changes and exit.
Now restart your computer. To check if the error condition got fixed, follow the steps listed below.
- Press Windows + R, type “eventvwr.msc” in the dialogue box and press Enter.
- Now you can check in the event viewer if the error message happened recently. Furthermore, you can also navigate to the directory “C:\Windows\Prefetch\ReadyBoot” and check if space is more than the 20MB which we defined earlier.
What are the Side effects on my Computer if the Error Message is Still there?
According to an official statement by Microsoft:
The logging of this error will not affect the operation of your computer.
So to sum up, this error will not in any way affect the way your computer operates or will cause any loss of functionality. It is only used to speed up your computer by increasing its boot time. If Windows is unable to access this utility, it will switch to booting the traditional way and boot the operating system without consulting the memory table which was built because of this service. Do note it will slightly increase the boot time but that’s all there is.
Kevin Arrows
Kevin Arrows is a highly experienced and knowledgeable technology specialist with over a decade of industry experience. He holds a Microsoft Certified Technology Specialist (MCTS) certification and has a deep passion for staying up-to-date on the latest tech developments. Kevin has written extensively on a wide range of tech-related topics, showcasing his expertise and knowledge in areas such as software development, cybersecurity, and cloud computing. His contributions to the tech field have been widely recognized and respected by his peers, and he is highly regarded for his ability to explain complex technical concepts in a clear and concise manner.
Imagine, while restarting or turning on your PC, suddenly you experience a Blue of Death screen containing a message, Readyboot stopped due to 0xc0000188 error. This problem was first experienced by Windows 7 users and now it’s common in all versions of windows. Generally, you can see this problem when you start your pc or during restarting time.

It may cause a slow boot time when you turn on your PC. On the other hand, the operation of the device won’t be affected because it is just related to boosting the boot time of a computer. There is nothing to worry about this, by following some easy steps, this issue can be solved in a minute. So, without any further discussion let’s see the steps to solve this issue.
What Is ReadyBoot and Why Does The Error Happen?
Readyboot is a feature of Microsoft Windows which is implemented in Windows to boost the performance without embedding additional RAM. It boosts up the boot time of the computer. It is suggested according to users, that the maximum size should be set to 256 MB but not more than that. However, storage of 128 MB is inch perfect for avoiding any circumstances.
“ReadyBoot Stopped” or “Kernel Event Tracing- Error 3” this issue occurred when the allocated storage size is less than the required one. Default size of 20 MB is allocated for ReadyBoot, and when the file size exceeded more than the allocated storage, an error arises.
The one and only solution is to increase the allocated size of Readyboot. There are some easy steps by which you can fix this.
Step 1: Go to the search option manually or press Windows + S and type Performance Monitor.
Step 2: Open Performance Monitor and expand Data Collector Sets.
Step 3: After expanding, click on Startup Event Trace Sessions and look for ReadyBoot on the right side of the screen. Double click on ReadyBoot
Step 4: Select Stop Condition and set the allocated size to 128 to 256. At the bottom of near the screen, the option of increasing the can be found.
Step 5: Then apply the changes and click ok.
Now exit and restart the PC. If you want to check if the issue is solved or not then open the Run dialog box by pressing Windows + R then type “eventvwr.msc” and press enter.
Frequently Asked Questions
What Prefetch folder actually is?
Prefetch is known as a file that is used to help windows load faster. Readyboot system, a feature of Microsoft windows that traces boot time history and analyze boot time. It helps to speed up the booting time by tracing previous boot history and the programs while starting your computer. Windows save this information in a form of small files. These files are kept in the Prefetch folder.
Can the Prefetch files be deleted?
Yes, you can delete the files. But it is suggested to do not to delete them as it helps windows to speed up the boot time. Prefetch files take a little space and it won’t bother you unless you are running out of space and then you can delete them to regenerate the space.
Will there be any issue if ReadyBoot is disabled?
No, there will be no issue if you disable the ReadyBoot feature. It just helps to speed up the boot time and nothing else. If you want to disable it:
Step 1: Go to the search option manually or press Windows + S and type Performance Monitor.
Step 2: Open Performance Monitor and expand Data Collector Sets.
Step 3: After expanding, click on Startup Event Trace Sessions and look for ReadyBoot on the right side of the screen and disable it.
Conclusion
Without adding extra RAM, you can speed up the boot time just by using this feature of windows. When this feature crosses the allocated size then it stopped and the error arises. You can follow the mentioned steps by which you can solve this issue in a minute. After following the steps, if there arrive any questions or you face any issues then feel free to comment below.
Applies ToWindows XP Windows Vista Windows 7 Windows 8.1
Nepodprta različica sistema Windows od Microsofta ne prejema posodobitev programske opreme. Te posodobitve vključujejo varnostne posodobitve, ki ščitijo računalnik pred škodljivimi virusi, vohunsko programsko opremo in drugo zlonamerno programsko opremo, ki lahko ukrade vaše osebne podatke. Windows Update namesti tudi najnovejše posodobitve programske opreme za izboljšanje zanesljivosti sistema Windows, ki vključuje nove gonilnike za strojno opremo.
Če imate naprave z nepodprto različico sistema Windows, priporočamo, da jih nadgradite na novejšo, servisno in podprto izdajo sistema Windows. Če vaše naprave ne izpolnjujejo tehničnih zahtev za najnovejšo izdajo sistema Windows, priporočamo, da zamenjate napravo s tisto, ki podpira Windows 11. Če želite več informacij, glejte Windows 11 sistemskih zahtev.
Kdaj se moji različici sistema Windows konča podpora?
|
Različica sistema Windows |
Datum konca podpore |
|---|---|
|
Windows 8.1 |
10. januar 2023 |
|
Windows 10 Mobile |
14. januar 2020 |
|
Windows 7 |
14. januar 2020 |
|
Windows Vista |
11. april 2017 |
|
Windows 8 |
12. januar 2016 |
|
Windows XP |
08. april 2014 |
Če želite preveriti datume konca podpore za vse različice sistema Windows, glejte informacije o življenjskem ciklu za Windows.
Če je vaša različica sistema Windows še vedno podprta, vedno namestite najnovejše posodobitve za Windows. Če želite prenesti in namestiti te posodobitve, Windows Update v aplikaciji Nastavitve.
Naprave, v katerih se izvaja nepodprta različica sistema Windows, bodo še vedno delovale, vendar Microsoft ne zagotavlja tega:
-
Tehnična podpora za vse težave
-
Posodobitve programske opreme
-
Varnostne posodobitve ali popravki
Čeprav lahko še naprej uporabljate računalnik, je vaš računalnik brez neprekinjene programske in varnostne posodobitve bolj ogrožen za viruse in zlonamerno programsko opremo. Priporočamo nadgradnjo na različico sistema Windows, ki je še vedno podprta. Nova naprava, ki se lahko Windows 11 omogoča preprost prehod in odlično izkušnjo.
Da. Če še naprej uporabljate nepodprto različico sistema Windows, bo vaš računalnik še vedno deloval, vendar bo dovzetnejši za varnostna tveganja in viruse. Računalnik se bo še naprej zagnal in izvajal, vendar od Microsofta ne boste prejemali posodobitev programske opreme, vključno z varnostnimi posodobitvami.
Če želite več informacij o pravilniku o podpori, glejte pogosta vprašanja o pravilniku o življenjskem ciklu Microsoftove podpore.
Za uporabo podprte različice sistema Windows je na voljo nekaj možnosti:
-
Priporočeno: nov računalnik s sistemom Windows 11 – Windows 11 najnovejša različica sistema Windows. Če imate starejši računalnik, vam priporočamo, da začnete z Windows 11 računalnika z nakupom novega računalnika. Strojna in programska oprema sta se izboljšali veliko, današnji računalniki pa so hitrejši, zmogljivejši in varnejši. Prikaz Windows 11 računalnikov
-
Nameščanje Windows 11 v trenutni računalnik – preverite lahko tudi, ali vaš trenutni računalnik izpolnjuje minimalne sistemske zahteve za Windows 11. Računalniki, v katerih se izvaja nepodprta različica sistema Windows, najverjetneje ne bodo izpolnjujejo teh zahtev, toda če jih vaša zahteva, lahko kupite in prenesete polno različico sistema Windows 11 Home ali Windows 11 Pro ali kupite pri prodajalcu. Če izberete to pot, boste morali znova namestiti aplikacije. V nekaterih primerih bo morda potrebna novejša različica aplikacije. Poleg tega morate prenesti datoteke, podatke in nastavitve. Namestitev prepiše vsebino obstoječega trdega diska. Morda boste najprej lažje izvedli nadgradnjo na nadgradnjo, Windows 10 nato nadgradili na Windows 11.
-
Namestitev Windows 10 v trenutni računalnik – Windows 10 še vedno na voljo in bo podprta do 14. oktobra 2025. Preverite lahko, ali vaš trenutni računalnik izpolnjuje minimalne sistemske zahteve za Windows 10. Če jih, lahko pri prodajalcih preverite, ali še vedno Windows 10 naprodaj.
Do tega lahko končate na Windows 11:
-
Priporočeno: nov računalnik s sistemom Windows 11 – Windows 11 najnovejša različica sistema Windows. Če imate starejši računalnik, vam priporočamo, da začnete z Windows 11 računalnika z nakupom novega računalnika. Strojna in programska oprema sta se izboljšali veliko, današnji računalniki pa so hitrejši, zmogljivejši in varnejši. Prikaz Windows 11 računalnikov
-
Nameščanje Windows 11 v trenutni računalnik – preverite lahko tudi, ali vaš trenutni računalnik izpolnjuje minimalne sistemske zahteve za Windows 11. Če jo, lahko kupite in prenesete polno različico programske opreme Windows 11 Home ali Windows 11 Pro ali kupite pri prodajalcu. Če izberete to pot, boste morali znova namestiti aplikacije. V nekaterih primerih bo morda potrebna novejša različica aplikacije. Poleg tega morate prenesti datoteke, podatke in nastavitve. Namestitev prepiše vsebino obstoječega trdega diska. Morda boste najprej lažje izvedli nadgradnjo na nadgradnjo, Windows 10 nato nadgradili na Windows 11.
Trenutno ni na voljo poti za brezplačno nadgradnjo iz nepodprtih različic sistema Windows, ki bi jih lahko Windows 10 ali Windows 11. Če želite izvedeti več Windows 11 o tem, lahko kupite naročnino pri Microsoftu ali se obrnete na prodajalca. Nadgradite lahko z Windows 10 na Windows 11 brezplačno.
Datoteke in fotografije lahko preprosto prenesete v nov računalnik s storitvijo OneDrive, storitvijo za shranjevanje v oblaku. Datoteke lahko varnostno kopirate in zaščitite v spletu v oblaku, nato pa jih sinhronizirate z novim računalnikom. Sinhronizacija datotek med novim računalnikom in oblakom vam omogoča lokalno shranjevanje datoteke za uporabo brez povezave, ko nimate dostopa do interneta. Prav tako so shranjeni v storitvi OneDrive v oblaku, kjer jih lahko obnovite, če se kaj zgodi. OneDrive lahko samodejno sinhronizira dve različici, ko so narejene spremembe.
Naučite se premikati datoteke s storitvijo OneDrive
Če vam OneDrive ni najbolj podoben, lahko datoteke kopirate tudi z zunanjim trdim diskom ali ključem USB.
Ali potrebujete dodatno pomoč?
Ali želite več možnosti?
Raziščite ugodnosti naročnine, prebrskajte izobraževalne tečaje, preberite, kako zaščitite svojo napravo in še več.
Здравствуйте.
Перед Новым годом установил на ПК новый SSD (Goodram Iridium Pro), а вместе с этим в голове родилась идея установки долгожданной Windows 10 x64 (Корпоративная). Терабайтный жёсткий диск, разумеется, решил использовать для файлов.
На первый взгляд, всё было бы хорошо, если бы не одно НО. При нажатии на кнопку завершения работы, компьютер иногда выключался, а иногда перезагружался. Перечитав форумы, я настроил электропитание в ПУ, накатил последние обновления Windows, обновил BIOS, обновил драйверы, а также поменял значение в ветке: HKEY_LOCAL_MACHINE\SYSTEM\CurrentControlSet\Control\WMI\Autologger\ReadyBoot на «4».
Теперь при нажатии кнопки выключения, компьютер выключается, но недавно в журнале ошибок Windows увидел ежедневную ошибку: Сеанс «ReadyBoot» остановлен из-за следующей ошибки: 0xC0000188
- System

  - Provider

   [ Name]  Microsoft-Windows-Kernel-EventTracing
   [ Guid]  {B675EC37-BDB6-4648-BC92-F3FDC74D3CA2}

   EventID 3

   Version 1

   Level 2

   Task 2

   Opcode 14

   Keywords 0x8000000000000010

  - TimeCreated

   [ SystemTime]  2017-01-05T10:39:11.649771400Z

   EventRecordID 159

   Correlation

  - Execution

   [ ProcessID]  4
   [ ThreadID]  176

   Channel Microsoft-Windows-Kernel-EventTracing/Admin

   Computer pc-pavel

  - Security

   [ UserID]  S-1-5-18


- EventData

  SessionName ReadyBoot
  FileName C:\Windows\Prefetch\ReadyBoot\ReadyBoot.etl
  ErrorCode 3221225864
  LoggingMode 276824064
  FailureReason 0
Может быть кто-то с подобным уже сталкивался? Буду рад помощи от профессионалов! 
Readers help support Windows Report. We may get a commission if you buy through our links.
Read our disclosure page to find out how can you help Windows Report sustain the editorial team. Read more
Error 0xc0000188 is associated with an affected PC’s Event Viewer. The complete error message says Session Perfdiag Logger Stopped Due to the Following Error: 0xc0000188.
If you’re encountering this, we’ll explain why it’s happening and how to fix it, so stay with us.
Commonly, the error shows up if Superfetch is disabled, or if the max File Size of your Startup Event Trace Sessions is small. Follow the steps below to fix it.
How can I fix error 0xc0000188?
1. Enable the Superfetch Service
- Press the Windows + R keys on your PC’s desktop window to open the Run dialog box.
- In the box, type in services.msc and press Enter.
- Locate and right-click on the Superfetch service, and on the displayed options, select Properties.

- Go under the Startup type subsection and set it to Automatic.

- Click on Start to run the service (if it’s currently running, move to the next step), then click on Apply and OK.

- Exit the program and reboot your PC.


2. Expand the maximum file size for Startup Event Trace Sessions
- Click the Start button, type cmd, and click on Run as administrator to start Command Prompt with full privileges.
- Type the following command and press Enter to start the Performance Monitor app:
perfmon
- Double-click on the Data Collector Sets to expand it, then select Startup Event Trace Sessions.

- Now, double-click Ready Boot from the right pane.
- Go to the Stop Condition tab and replace the value in the Maximum Size field with 40.
- Hit the Apply and OK buttons to acknowledge the change, then restart your PC.


3. Run DISM and SFC scans
- On your desktop window, click the Windows icon, type cmd, and select Run as administrator.
- In the Command Prompt window, type the following command keys and hit Enter:
DISM.exe /Online /Cleanup-image /Scanhealth
- Now, type the following code and hit Enter:
sfc /scannow - Exit Command Prompt and reboot the PC.

If you want to try other methods for the above procedure, there is dedicated software to detect corrupt or missing OS files and automatically find healthy elements as replacements.
4. Run PC in Clean Boot State
- Press Windows + R to open the Run dialog, type msconfig, and press Enter.
- Navigate to the Services section, tich Hide all Microsoft services, and click on Disable all.

- Navigate to the Startup section; locate and click on Open Task Manager.
- Right-click on any task that is enabled, and select Disable.

- Click OK to finish up the process.
- Exit the program and restart your system.


That is as far as we will go with solutions to this error. If you have followed the guide, we hope you have successfully fixed it.
Some users have reported the error message Session perfdiag logger stopped due to the following error: 0xc0000188. You should note that the solutions we have given will also come in handy. If you also got a PerfDiag Logger 0xC0000188 error, you should try any of the above fixes.
Let us know in the comments what has worked for you.
Ivan Jenic
Windows Hardware Expert
Passionate about all elements related to Windows and combined with his innate curiosity, Ivan has delved deep into understanding this operating system, with a specialization in drivers and driver troubleshooting.
When he’s not tackling diverse driver-related problems, Ivan enjoys watching good movies and spending time hiking with his family and friends.