
The Microsoft Security client belongs to the Microsoft Security Essentials package. Microsoft Security Essentials is a free download from Microsoft that is simple to install, easy to use, and it often comes preinstalled on users’ computers.
Microsoft Security Essentials runs quietly and efficiently in the background so you’re free to use your Windows-based PC the way you want – until an error such as this one appears. Sometimes it’s simply viewable in the Event Viewer on your computer and sometimes it even causes a BSOD! Even though the culprit is this tool, there are various ways to solve this problem so make sure you follow the solutions below!
Solution 1: Delete a Certain File
Plenty of users were able to solve the problem simply by deleting a single file which can easily be located on your computer and they have recommended this solution to everyone. The question to ask is will something happen to your Microsoft Security Essentials installation. The great fact is that this file will be automatically regenerated and you will be able to keep the problem but without the error addition!
- Navigate to the following location on your computer by opening the Windows Explorer and clicking on This PC:
C:\ProgramData\Microsoft\Microsoft Security Client\Support\EppOobe.etl
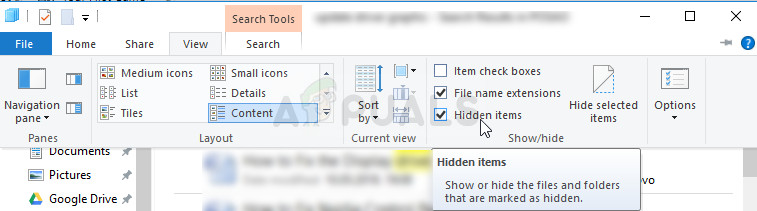
- If you are unable to see the ProgramData folder, you may need to turn on the option which enables you to view hidden files and folders. Click on the “View” tab on File Explorer’s menu and click on the “Hidden items” checkbox in the Show/hide section. File Explorer will show the hidden files and will remember this option until you change it again.
- Delete the EppOObe.etl file in the Support folder by right-clicking on it and choosing the Delete option. Restart your computer and check to see if the same problem still appears on your computer.
Solution 2: Uninstall Microsoft Security Essentials Completely
If you are not using this tool as it came preinstalled on your computer, you can uninstall it and that will probably get rid of the problem. However, sometimes simply uninstalling it won’t solve the problem as there are some remaining registry entries which need to be taken care of.
If you once had Microsoft Security Essentials installed on your computer, you should skip the first set of steps and go forward do deleting the registry files!
- First of all, make sure you have logged in with an admin account as you won’t be able to uninstall programs using any other type of account.
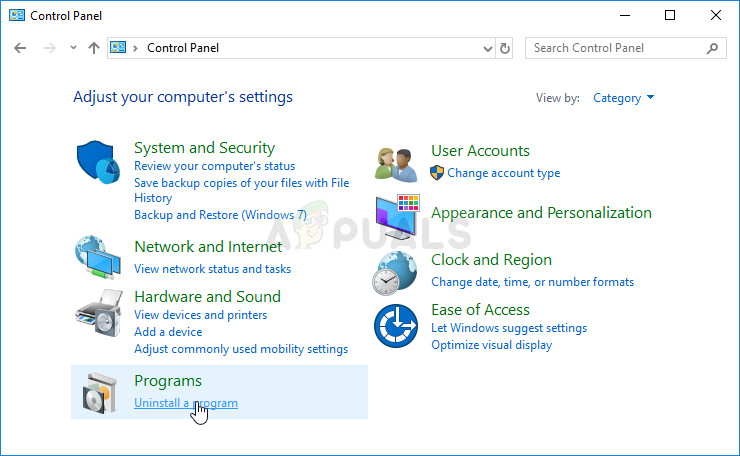
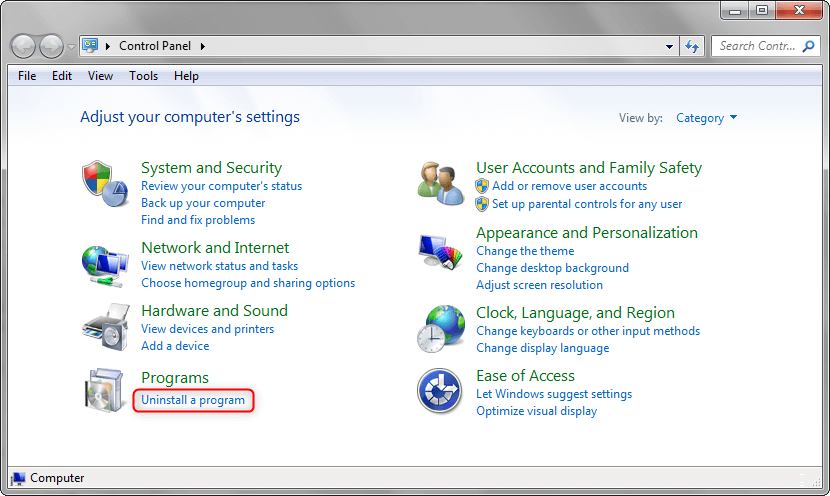
- Click on the Start menu and open Control Panel by searching for it. Alternatively, you can click on the gear icon in order to open settings if you are using Windows 10.
- In Control Panel, select to View as: Category at the top right corner and click on Uninstall a Program under the Programs section.
- If you are using the Settings app, clicking on Apps should immediately open a list of all installed programs on your PC.
- Locate the Microsoft Security Essentials entry on the list and click on it once. Click on the Uninstall button above the list and confirm any dialog boxes which may appear. Follow the instructions on-screen in order to uninstall Microsoft Security Essentials and restart your computer afterwards.
Now it’s time to get rid of the remaining stuff. First of all, check to see if the file from Solution 1 is still at the same folder and make sure you delete it along with other files which may have remained. Now, as registry goes, it’s enough to delete the registry keys related to the Microsoft Security Client OOBE in order to make the problem go away.
- Since you are going to edit the registry, we recommend you check out this article we have prepared in order to safely backup your registry to prevent further problems. Still, nothing wrong will occur if you follow the instructions carefully.
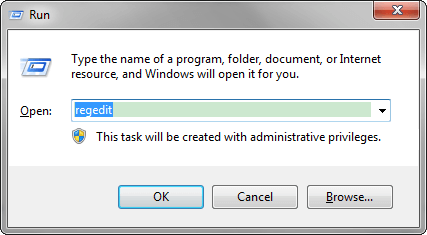
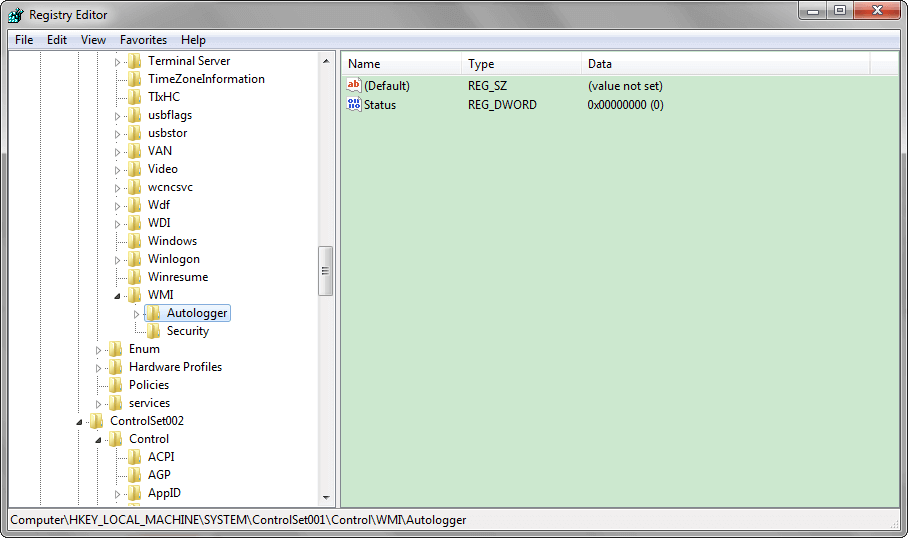
- Open the Registry Editor interface by typing “regedit” in either the search bar or the Run dialog box. Navigate to the following keys in Registry Editor by navigating in the left pane:
HKEY_LOCAL_MACHINE\SYSTEM\CurrentControlSet\Control\WMI\Autologger
HKEY_LOCAL_MACHINE\SYSTEM\ControlSet001\Control\WMI\Autologger
HKEY_LOCAL_MACHINE\SYSTEM\ControlSet002\Control\WMI\Autologger
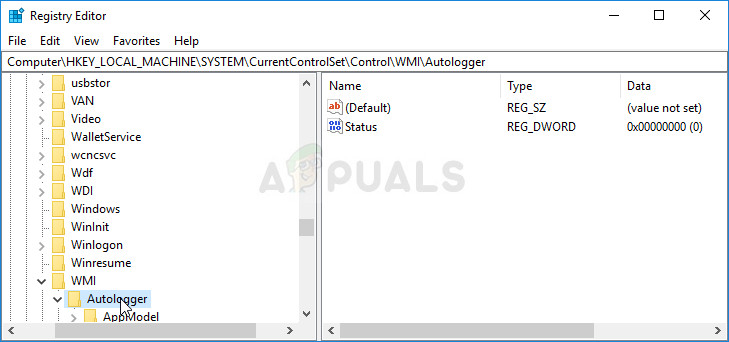
- In each of these registry keys, you should be able to locate the Microsoft Security Client OOBE key at the left navigation pane. Right-click on it for each CurrentControlSet and choose the Delete option. Make sure you confirm any confirmation dialogues and exit the registry. Check to see if the problem is gone after restarting your computer.
Solution 3: Disable the Microsoft Security Client in Computer Management
If you don’t want to uninstall Microsoft Security Essentials as you are using it to protect your computer against various threats, you can simply disable the OOBE as its purpose is not to keep you safe (other services and processes serve that process). OOBE stands for Out-of-box-experience and it involves setting up the core settings which you have already setup.
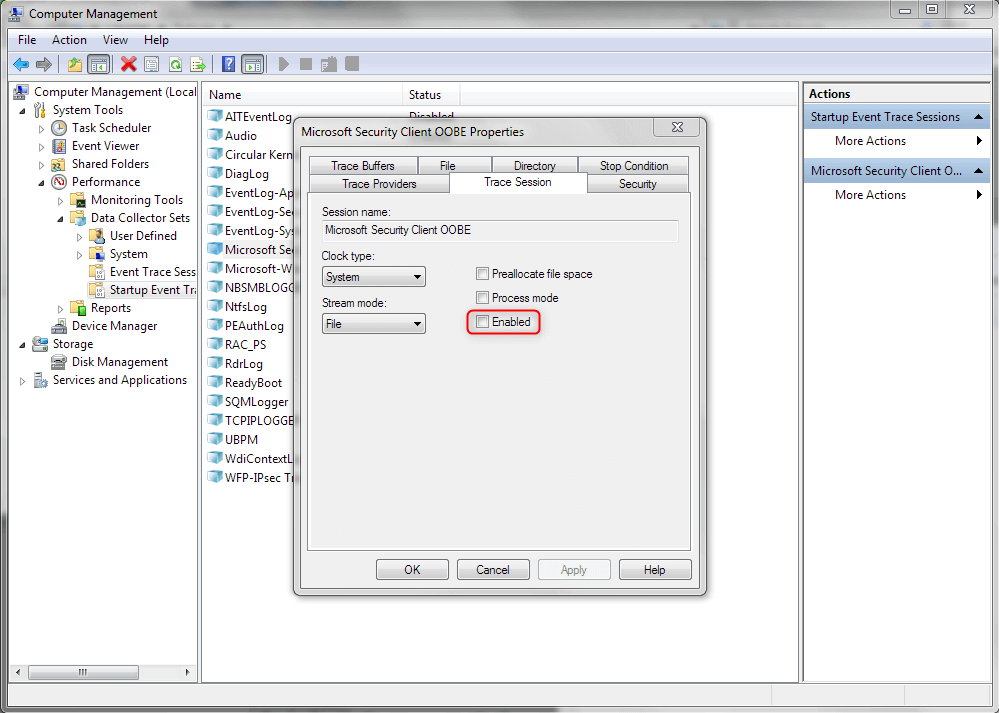
Here is how to disable Microsoft Security Client OOBE in Computer Management from starting up on your computer:
- Click the Start menu of your Windows 7 PC, locate the Computer entry at the right pane, right-click on it, and choose the Manage options. You will need administrator permissions in order to proceed.
- If you are using Windows 10, you can simply right-click the Start menu button and choose the Computer Management option.
- Navigate to Computer Management (Local) >> System Tools >> Performance >> Data Collector Sets >> Startup Event Trace Sessions by expanding these sessions clicking on the arrow icons left to their names.
- Right-click the Microsoft Security Client OOBE entry and choose the bolded Properties option. In the Properties window, navigate to the Trace Session tab and uncheck the Enabled option in order to disable it. Apply the changes and exit.

- Check to see if the problem still appears in the Event Viewer after you restart your computer.
Solution 4: Reinstall Microsoft Security Essentials and Enable Windows Defender
This is a somewhat more advanced fix and it involves reinstalling Microsoft Security Essentials which means you will be able to continue using this tool after this step is over but you hopefully won’t receive the error message. This method is aimed at Windows Vista or newer users.
- Follow the instructions from the Solution 2 in order to completely uninstall the Microsoft Security Essentials program. The next step would be to enable the Windows Defender feature which is automatically disabled when Microsoft Security Essentials is installed.
Windows 10 Users:
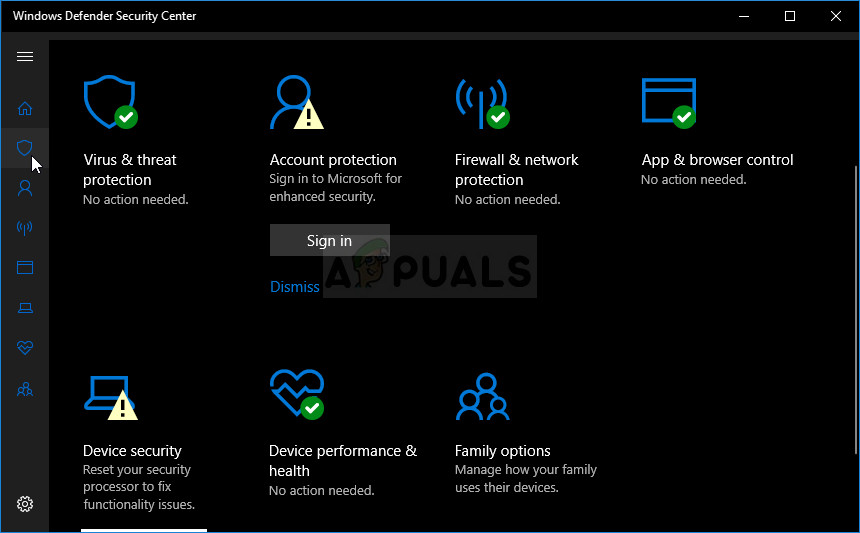
- Right-click on the shield icon on your taskbar and click on View Security Dashboard.
- When Windows Defender Security Center opens, click on the shield icon below the home button, open Virus & threat protection settings and turn off Real-time protection and Cloud-based protection.

- Navigate to the browser icon (second from the end) and turn on the Check apps and files option.
- You can also enable SmartScreen if you think it’s you should keep it during this process.
Other Versions of Windows:
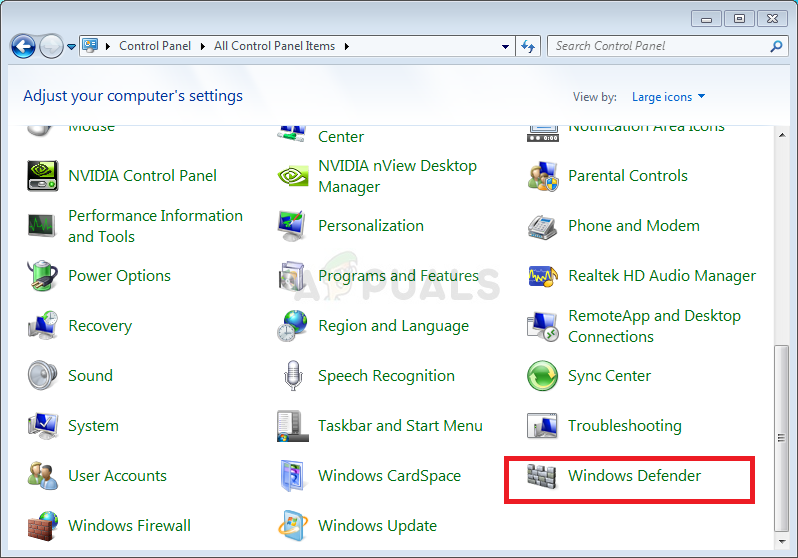
- Open Control Panel by searching for it in the Start menu. You can also use the Windows Key + R key combination, type in “control panel” in the Run dialog box and click OK.
- Switch the View by setting in Control Panel to Large Icons and locate the Windows Defender entry.
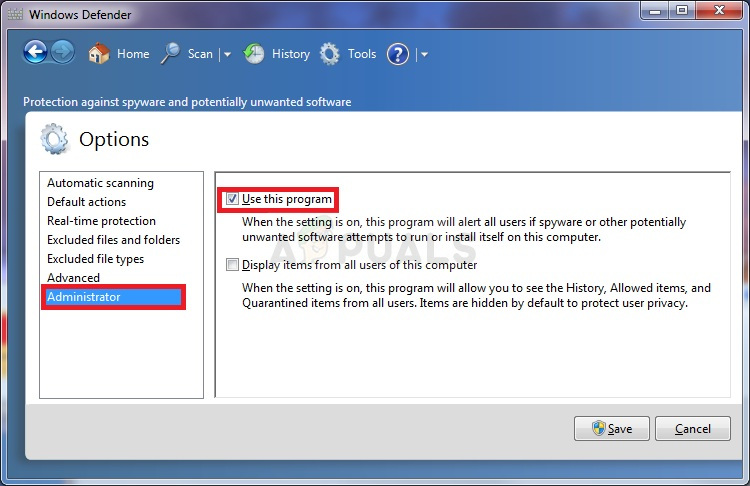
- Click on the Tools button at the very top of the window, next to the gear-like icon and click on Options under the Settings section which will appear.
- Navigate to the Administrator tab in the Options window and check the box next to the Use this Program option. Click on Save in order to apply the changes and confirm admin prompts.
- The next step is to download and install Microsoft Security Essentials again. Visit this link in order to locate the download link for the program and save it to your computer.
- Open it from the Downloads folder and follow the instructions on screen in order to install the program to your computer again.
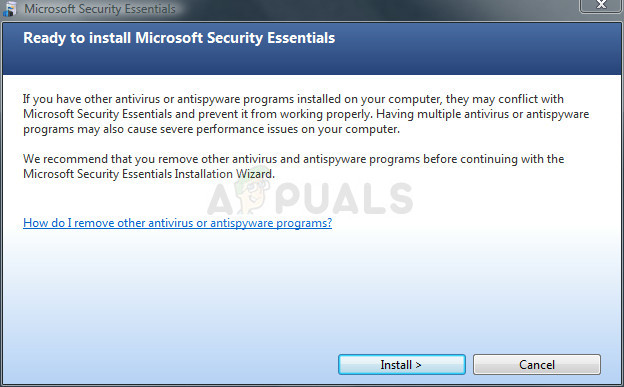
- Windows Defender should disable itself automatically and that is why enabling it was an important part of this solution. Check to see if the problem still appears.
Solution 5: Disable the Program Compatibility Assistant Service on Your Computer
This service and the Microsoft Security Client OOBE are apparently waging a war and users have reported that simply disabling this service on your computer has managed to solve their problem.
The Program Compatibility Assistant detects known compatibility issues in older applications. After you have run an older program in the new version of Windows, it notifies you if there is a problem and offers to fix it the next time you run the program. It’s not beneficial to your computer and you can disable by following the steps below:
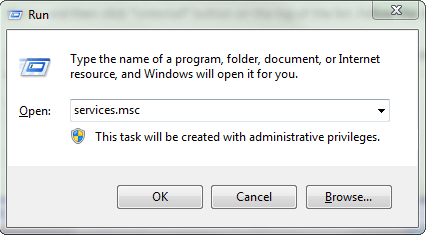
- Open the Run dialog box by using the Windows Key + R key combination. Type in services.msc in the Run dialog box and click OK in order to open services-related settings.
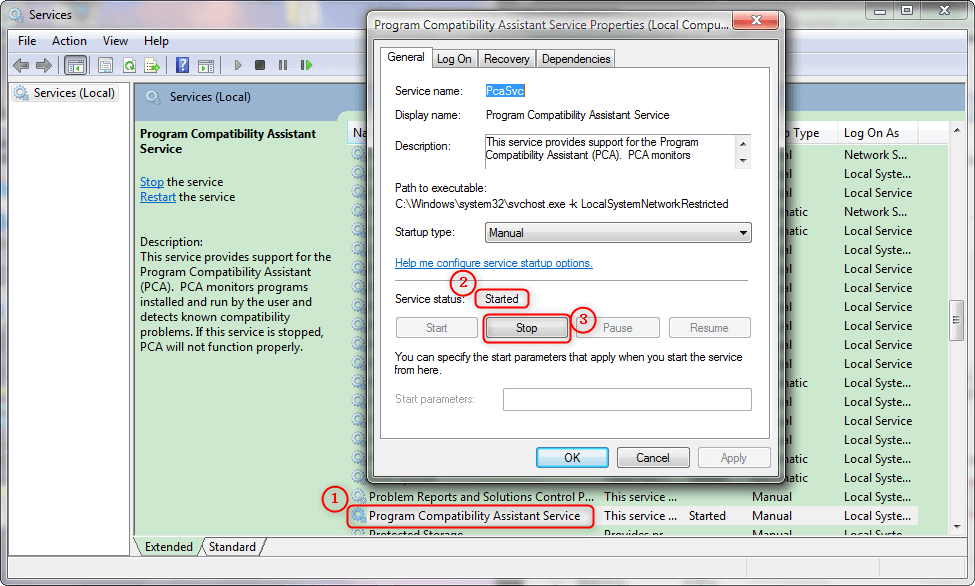
- Locate Program Compatibility Assistant Service, right-click on it and select Properties from the context menu which will appear.
- If the service is stopped (you can check that just next to the Service status message), you should leave it as it is. If it is running, click the Stop button and wait for the service to close down before proceeding.
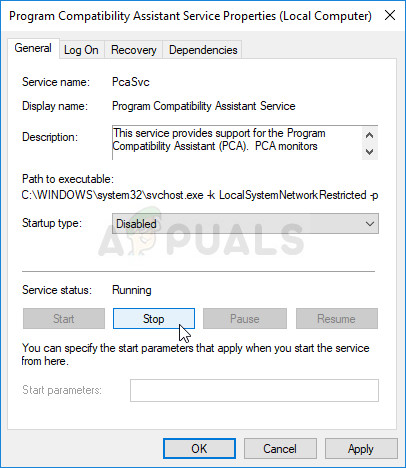
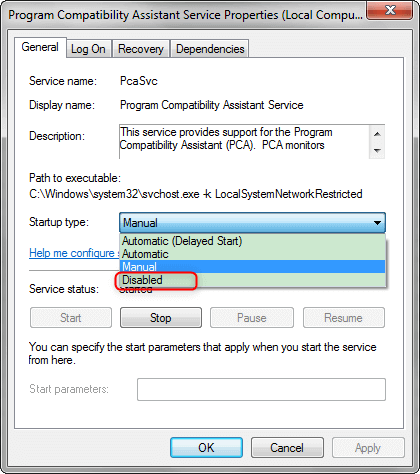
- Make sure that the option under the Startup type section in Program Compatibility Assistant Service’s Properties is set to Disabled before you exit Services.
- Check to see if the problem regarding the Microsoft Security Client has stopped is successfully gone forever.
You may receive the following error message when you click on Stop:
“Windows could not stop the Program Compatibility Assistant Service on Local Computer. Error 1079: The account specified for this service differs from the account specified for other services running in the same process.”
If this occurs, follow the instructions below to fix it.
- Follow the steps 1-3 from the instructions above in order to open Program Compatibility Assistant Service’s properties. Navigate to the Log On tab and click on the Browse… button.
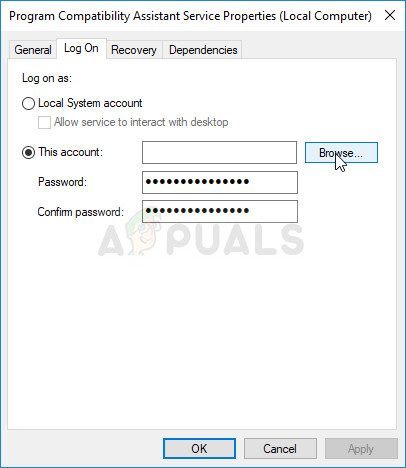
- Under the “Enter the object name to select” box, type in your account’s name, click on Check Names and wait for the name to become recognized.
- Click OK when you are finished and type in the password in the Password box when you are prompted with it, if you have setup a password.
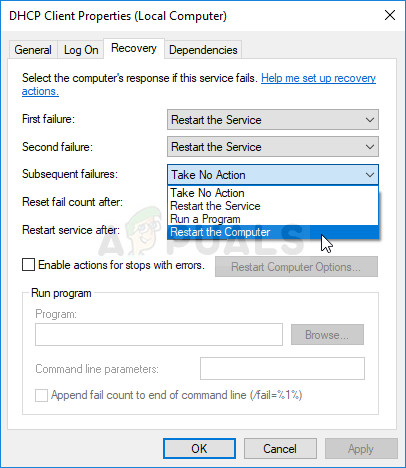
Note: If this does not solve your problem, there is one thing you could do while you are still in the Services window. There are some things which you can tweak with the DHCP Client in order to help you solve the problem, as suggested by a user.
- Locate the DHCP Client, right-click on it and select Properties from the context menu which will appear.
- Navigate to the Recovery tab in the Properties window and change the values for First, Second, and Subsequent failures to Restart the Service in the drop-down menu. Click on OK and check to see if the problem is gone.
Solution 6: Install the Latest Graphics Card Drivers
It appears that some people experienced the issue because of old graphics card drivers provided by Microsoft for their NVIDIA or AMD graphics card. No matter which card you are using, you should stick to drivers downloaded from their website and not the ones installed automatically by Windows.
- Select the Start button, type in Device Manager, and select it from the list of results at the top. You can also use the Windows Key + R key combination in order to bring up the Run dialog box. Type in “devmgmt.msc” in the box and click OK.
- Expand one of the categories to find the name of the device you want to update, then right-click on it, and select Update Driver. For graphics cards, expand the Display adapters category, right click your graphics card and select Uninstall Device.
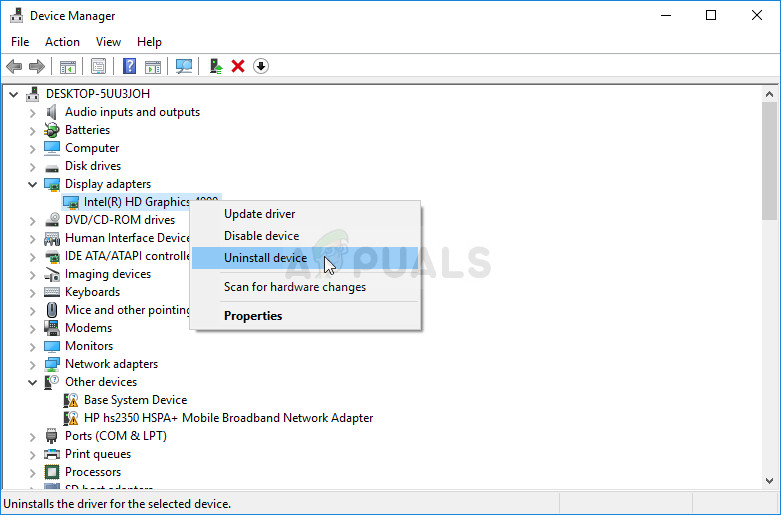
- Confirm any dialogues which may prompt you to confirm your choice and for the process to finish.
- Look for your graphics card driver on the device manufacturer’s website and follow their instructions. Save the installation file on your computer and run it from there. Your computer may restart several times during the installation.
Nvidia Drivers — Click Here!
AMD Drivers — Click Here!
Kevin Arrows
Kevin Arrows is a highly experienced and knowledgeable technology specialist with over a decade of industry experience. He holds a Microsoft Certified Technology Specialist (MCTS) certification and has a deep passion for staying up-to-date on the latest tech developments. Kevin has written extensively on a wide range of tech-related topics, showcasing his expertise and knowledge in areas such as software development, cybersecurity, and cloud computing. His contributions to the tech field have been widely recognized and respected by his peers, and he is highly regarded for his ability to explain complex technical concepts in a clear and concise manner.
-
Home
-
News
- Fix Microsoft Security Client OOBE Stopped Due to 0xC000000D
By Vera | Follow |
Last Updated
If you are a Windows 7 user, you may be similar to Microsoft Security Essentials (MSE). It is a free antivirus program offered by Microsoft. However, you may encounter the Microsoft Security Client OOBE stopped error 0xC000000D. Now, MiniTool will show you how to fix this error easily so it can continue keeping your system secure.
Microsoft Security Client OOBE Stopped Due to Error 0xC000000D
Microsoft Security Essentials (MSE) can scan your system for malware and external attacks. It is easy-to-use and comes preinstalled on your computer. The program works quietly and efficiently in the background to protect your system all the time.
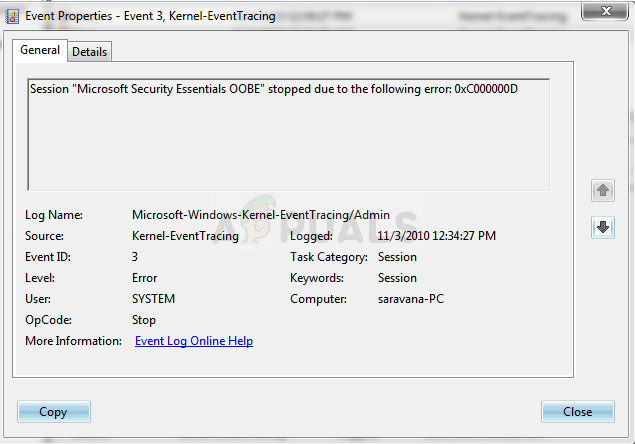
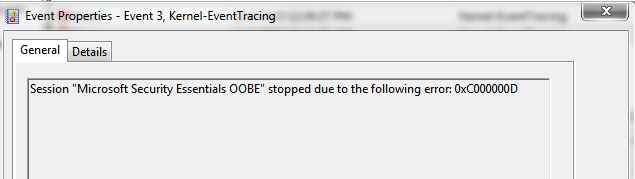
Nevertheless, sometimes it gives you the Microsoft Security Client OOBE stopped error. When you go to the Event Viewer, you see the Event ID 3 Kernel-EventTracing window, saying Session “Microsoft Security Essentials OOBE” stopped due to the following error: 0xC000000D.
This error may also cause a blue screen of death (BSoD) error. So, it is necessary to fix this issue as soon as possible so as to keep your Windows system secure.
How to Fix Microsoft Security Client Error Code 0xC000000D
Delete the EppOobe.etl File
Some users said deleting the EppOobe.el file of Microsoft Security Essentials could be helpful to fix session “Microsoft Security Client OOBE” stopped error 0xC000000D. This file can be regenerated automatically when you install MSE.
Tip: The ProgramData folder may not be found since it is set to be hidden. Firstly, you need to show hidden files, folders, and drives under the View tab of Folder Options.
- Go to Windows Explorer and navigate to C:\ProgramData\Microsoft\Microsoft Security Client\Support\EppOobe.etl.
- Delete it by right-clicking it to choose Delete.
- Restart your computer to see if the MSE error code 0xC000000D is fixed.
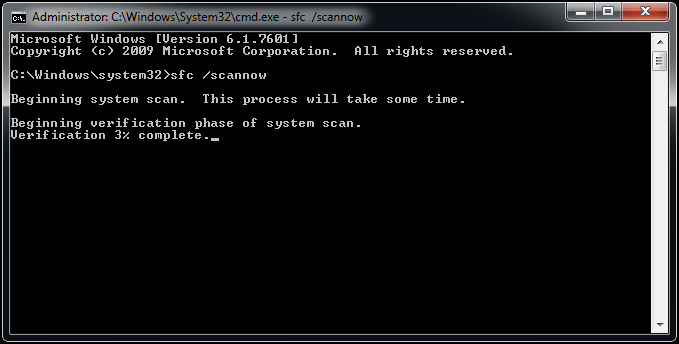
Run an SFC Scan
The OOBE issue may be caused by corrupted system files. To fix it, you can try System File Checker to scan for your system and repair the system corruption.
- Run Command Prompt with administrative rights.
- Type sfc /scannow in the pop-up window and hit Enter.
- Windows will perform a system scan and fix damaged system files.
Disable Program Compatibility Assistant Service
The issue – session “Microsoft Security Essentials OOBE” stopped due to the following error: 0xC000000D might be caused by incompatibility between OOBE and Program Compatibility Assistant Service. To fix this issue, you should disable this service.
Follow the guide below:
- Press Win + R, input services.msc to the Run box and click OK.
- Find Program Compatibility Assistant Service from the services list, double-click it, choose Disabled from Startup type and click Stop.
- Finally, save the changes by clicking Apply and OK.
Turn off OOBE in Computer Management
If the settings in the OOBE item are not correct, you may encounter the Microsoft Security Client error. OOBE isn’t related to key functions of MSE but other services and progresses. So, you can try disabling this item to the Microsoft Security Client OOBE stopped error, which won’t impact MSE.
- Right-click on Computer to choose Manage.
- Navigate to Computer Management > System Tools > Performance > Data Collector Sets > Startup Event Trace Sessions.
- Right-click the Microsoft Security OOBE item to choose Properties.
- Under the Trace Session tab, uncheck the box of Enabled.
- Save the change.
Restart your PC to check if the OOBE issue is fixed. If not, try another method.
Uninstall Microsoft Security Essentials Completely
Here is what you should do:
1. Open Control Panel to show items by Category.
2. Click the Uninstall a program link from the Programs section.
3. Choose Microsoft Security Essentials and click Uninstall to remove it.
4. After that, you need to remove some leftovers to thoroughly delete the software.
The End
Has been bothered by the issue – session “Microsoft Security Client OOBE” stopped due to the following error: 0xc000000D? Now, it is your turn to follow these methods above to fix it.
About The Author
Position: Columnist
Vera is an editor of the MiniTool Team since 2016 who has more than 7 years’ writing experiences in the field of technical articles. Her articles mainly focus on disk & partition management, PC data recovery, video conversion, as well as PC backup & restore, helping users to solve some errors and issues when using their computers. In her spare times, she likes shopping, playing games and reading some articles.
Все способы:
- Важная информация
- Способ 1: Восстановление системы
- Способ 2: «Командная строка»
- Способ 3: Переустановка ОС
- Вариант 1: Возврат к исходному состоянию
- Вариант 2: Загрузочный накопитель
- Вопросы и ответы: 0
Важная информация
Ошибка под кодом 0xc000000d при запуске операционной системы Windows 10 – довольно серьезная проблема, которая говорит о том, что файл конфигурации загрузки по каким-то причинам поврежден, изменен или вовсе удален. Для начала стоит воспользоваться встроенными средствами восстановления, а если не поможет, попытаться самостоятельно исправить BCD-файл.
Возможно, вы не сможете загрузить среду восстановления, необходимую для дальнейших действий. В Способе 1 есть информация о том, как попытаться запустить ее самостоятельно. Если сделать этого не выйдет, потребуется при помощи исправного компьютера создать установочный накопитель – флешку или оптический диск, — о чем детальнее написано в наших отдельных материалах по ссылкам ниже. Даже если ваш ПК через раз загружает операционную систему, создание загрузочной флешки на нем может закончиться ошибкой. Поэтому лучше использовать сторонний компьютер.
Подробнее: Создание загрузочной флешки / диска с Windows 10
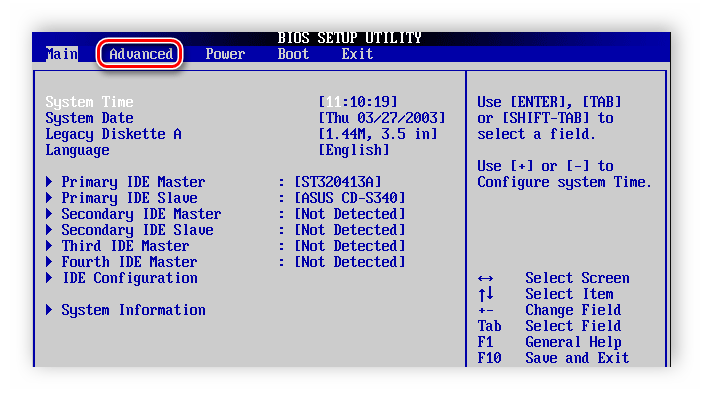
После создания подсоедините флеш-накопитель или вставьте диск в дисковод (USB-разъемы и привод должны работать даже при рассматриваемой неполадке), затем запуститесь с накопителя, выставив соответствующие параметры в BIOS.
Подробнее: Настраиваем BIOS для загрузки с флешки / с диска
Далее действуйте в соответствии с инструкциями из этой статьи.
Способ 1: Восстановление системы
В Windows 10 реализована среда восстановления, с помощью которой часто получается нормализовать работу операционной системы и восстановить поврежденные файлы, препятствующие запуску ОС. С ее помощью мы вернем состояние Windows 10 к точке восстановления, которая была создана автоматически или вручную ранее, когда все работало стабильно.
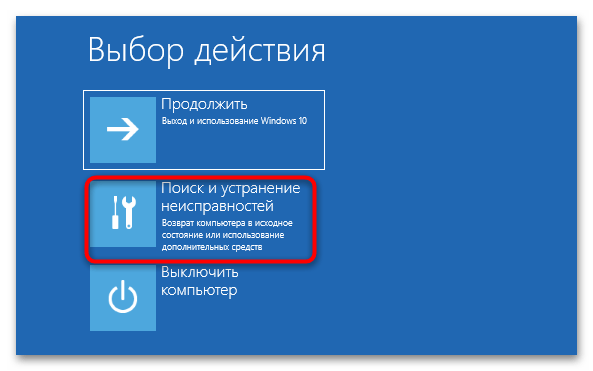
- Одним из способов запуска среды восстановления является прерывание загрузки: вручную проделайте это 2-3 раза, отключая питание ПК перед моментом, когда обычно отображается логотип Виндовс. Если вы все сделали правильно, должно появиться уведомление «Компьютер запущен некорректно», под которым нажмите кнопку «Дополнительные параметры».

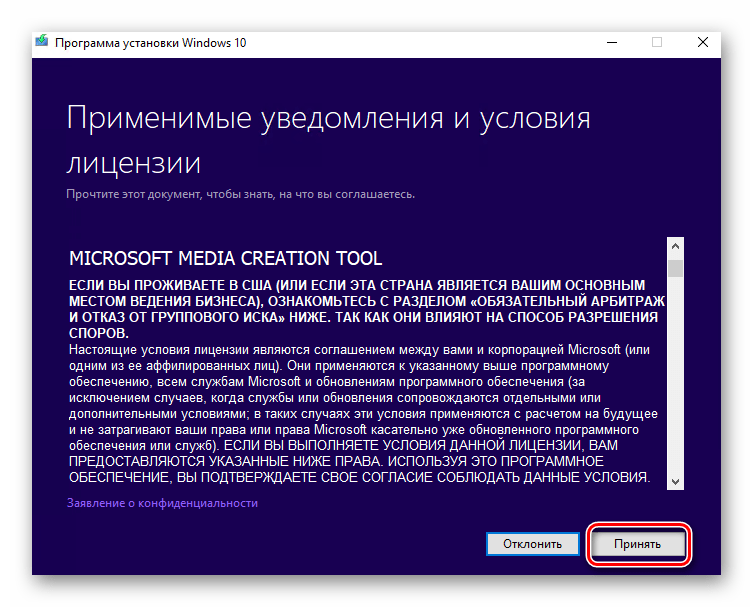
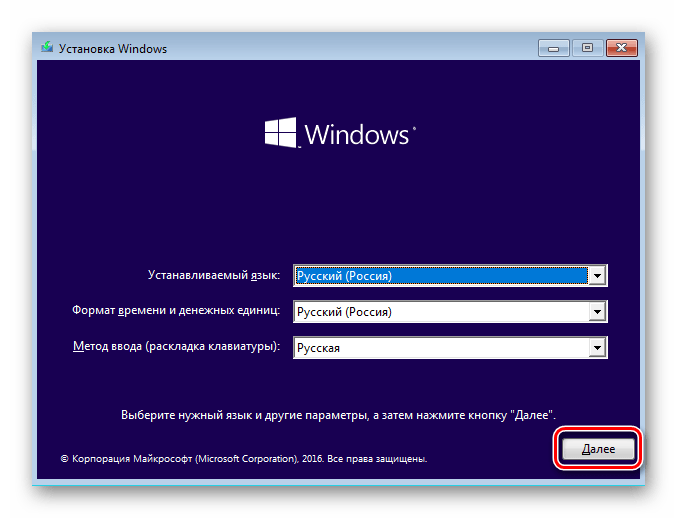
При невозможности зайти в среду восстановления используйте загрузочную флешку. На первом этапе выберите язык установки и нажмите кнопку «Далее».

В появившемся окне выберите строку «Восстановление системы», расположенную внизу.
- Перейдите в раздел «Поиск и устранение неисправностей».
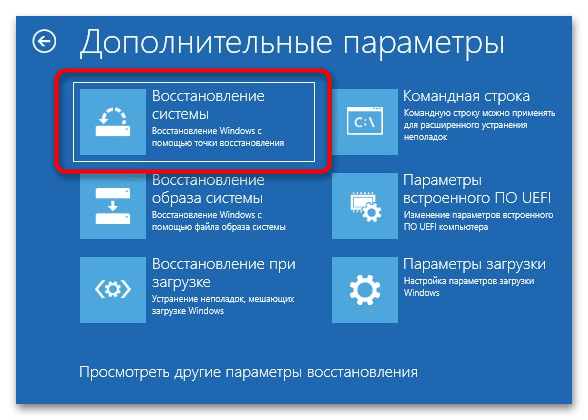
- Выберите строку «Восстановление системы».
- В среде восстановления откроется системное окно, где нужно кликнуть по «Далее».
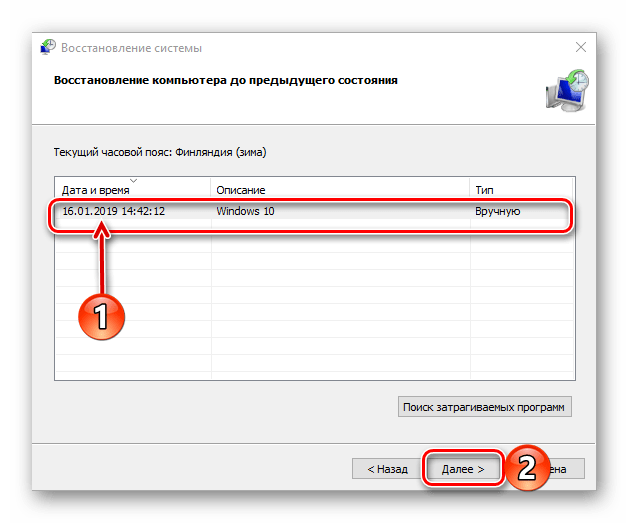
- Подберите подходящую точку восстановления, смотря на дату создания каждой. Вам нужна наиболее близкая к текущей дате, на момент которой ПК загружался и работал нормально. Выделите строчку с точкой и нажмите на «Далее».
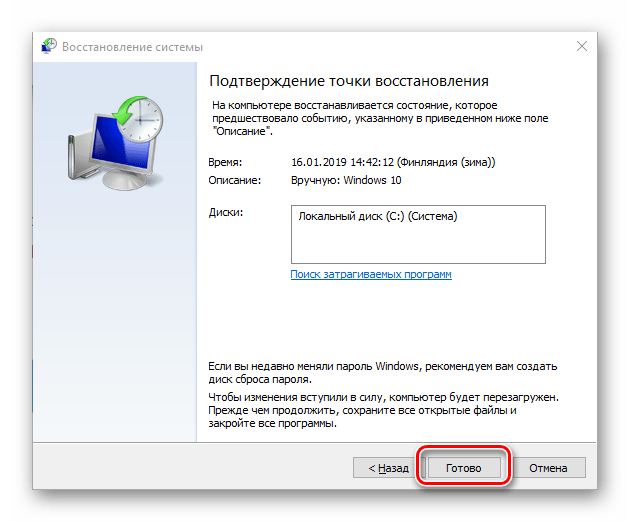
- Ознакомьтесь с информацией о восстановлении, убедившись, что все параметры выбраны правильно. Пункт «Поиск затрагиваемых программ» позволяет посмотреть, какой софт будет удален в процессе восстановления. После нажмите на кнопку «Готово», чтобы запустить процедуру отката к точке.


Эффективнее всего откат к точке восстановления через среду восстановления проходит в ситуациях, когда файл конфигурации загрузки повредился вследствие вмешательства стороннего ПО, которое было удалено в ходе операции.
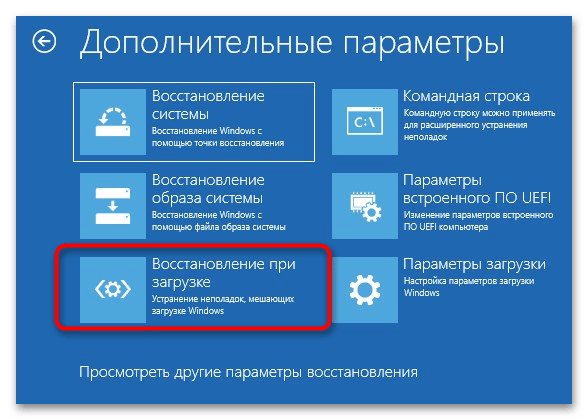
Также на этапе выбора дополнительных параметров ОС можно попробовать выбрать пункт «Восстановление при загрузке» для запуска штатных средств, которые просканируют систему на наличие проблем и попытаются устранить возможные неполадки, препятствующие корректному запуску операционки.
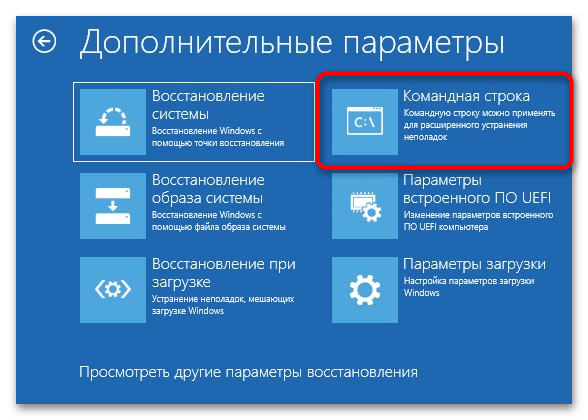
Способ 2: «Командная строка»
Если предыдущий способ с откатом состояния системы не дал результатов, тогда может потребоваться восстановление непосредственно файла конфигурации BCD вручную с помощью консоли «Командная строка».
- Выполните Шаги 1-2 из Способа 1. В окне «Дополнительные параметры» выберите запуск «Командной строки».
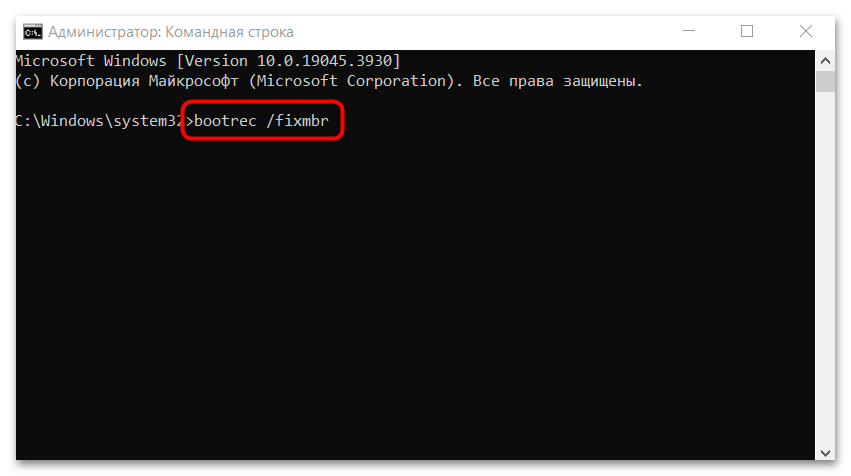
- Теперь можно приступать к непосредственной работе с файлом конфигурации запуска системы. Введите две команды, поочередно выполняя их нажатием клавиши «Enter»:
bootrec /fixmbr
bootrec /fixboot - Теперь выполните
bcdedit /export C:\BCD_Backup— таким образом вы экспортируете резервную копию. - Далее нужно использовать еще несколько команд для восстановления файла конфигурации запуска:
attrib c:\boot\bcd -h -r -s
ren c:\boot\bcd bcd.old
bootrec /RebuildBcd
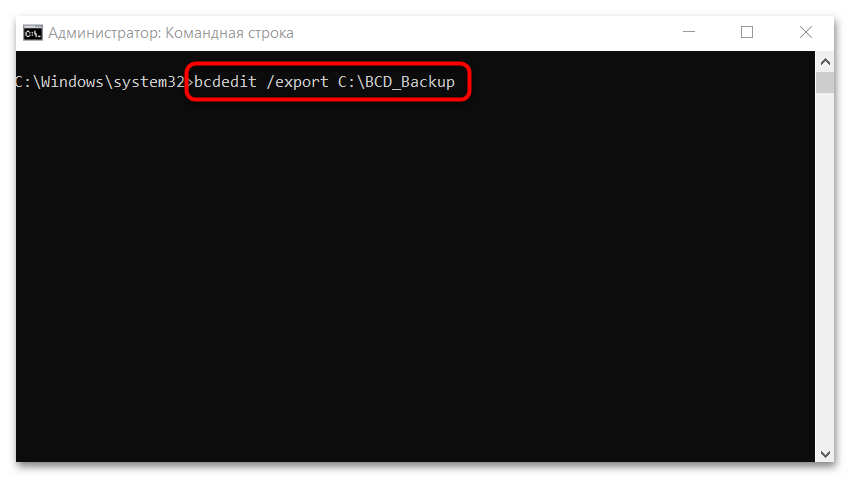
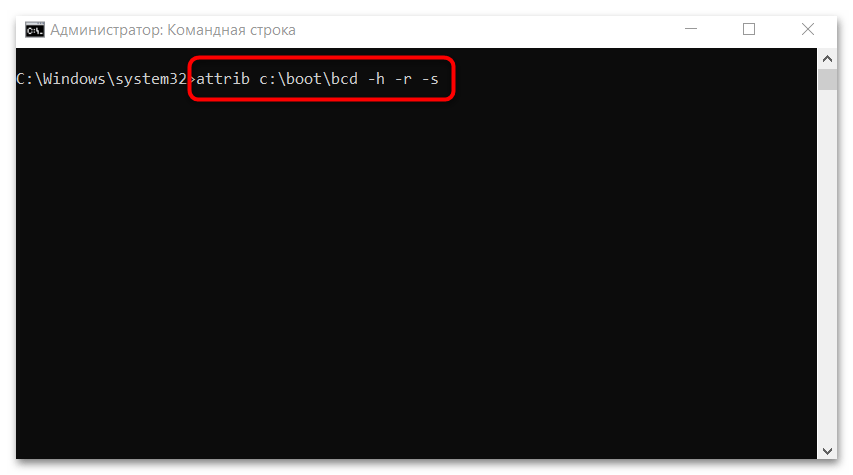
Если отобразится запрос на добавление системы в список загрузок, подтвердите действие, нажав клавишу «Y», затем «Enter».
После успешного выполнения операции закрывайте окно консоли. Выключите компьютер, извлеките флешку и запустите его как обычно.
Способ 3: Переустановка ОС
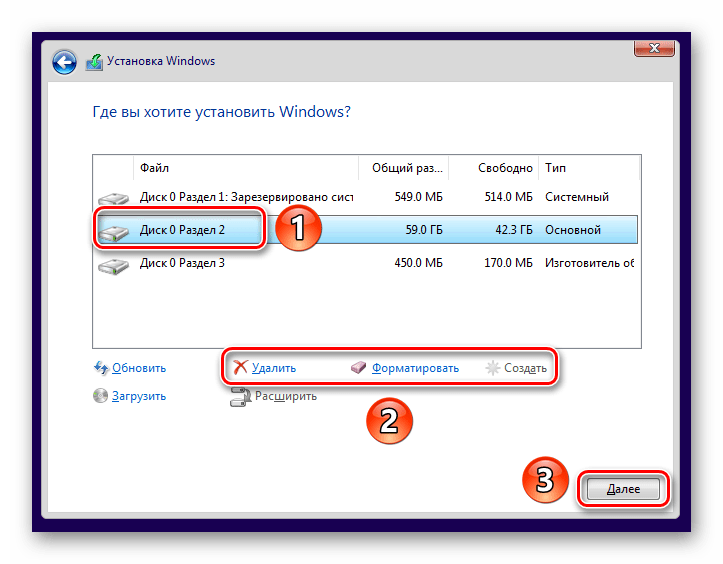
Если ничего не помогло либо использовать загрузочный накопитель для восстановления нет возможности, придется прибегнуть к радикальным мерам, а именно к переустановке ОС, поскольку рассматриваемая ошибка под кодом 0xc000000d, как уже говорилась, критическая. Но есть методы, позволяющие сохранить хотя бы пользовательские данные, которые хранились на системном диске.
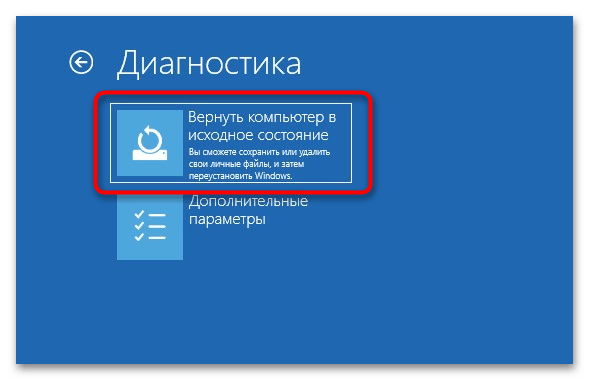
Вариант 1: Возврат к исходному состоянию
Через собственную среду восстановления Windows 10 (без подключенной загрузочной флешки) есть возможность вернуть систему в исходное состояние, то есть после процедуры вы получите «чистую» операционку без ошибок и с оригинальными системными файлами. Учтите, что при этом все пользовательские настройки и приложения будут безвозвратно удалены. За счет встроенного средства получится сохранить файлы и лицензию.
- Запустите среду восстановления так же, как мы писали в Способе 1, то есть прерыванием загрузки ОС. Далее перейдите в раздел «Поиск и устранение неисправностей», а после нажмите на кнопку «Вернуть компьютер в исходное состояние». Такая функция будет отсутствовать, если вы находитесь в среде восстановления, открытой через USB-flash или CD.
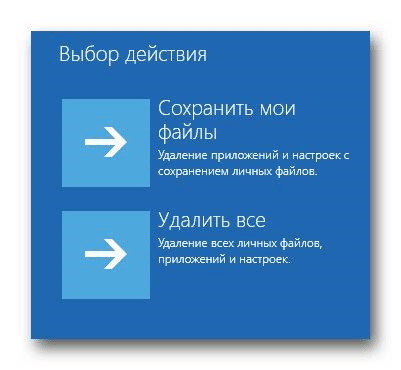
- Появится мастер по восстановлению системы до заводского состояния. На первом этапе потребуется выбрать, что делать с пользовательскими файлами (те, что находятся по адресу
C:\Users): полностью их удалить либо сохранить. После отобразится список приложений, которые будут удалены в процессе. Ознакомьтесь с информацией и нажмите на кнопку для запуска процедуры отката системы.
В ходе сброса система будет несколько раз перезагружаться, а сама операция может занять продолжительное время – все зависит от сохраняемого объема информации и комплектующих компьютера или ноутбука. Если все пройдет успешно, «десятка» запустится обычным образом, без рассматриваемой ошибки, а на рабочем столе появится HTML-файл со списком удаленных программ.
Вариант 2: Загрузочный накопитель
Если собственная среда восстановления «десятки» не открывается, но у вас есть накопитель с установочным ISO-образом Windows 10, переустановите систему с его помощью. Данный вариант предполагает использование аналогичной ОС по разрядности, и при этом будет создана папка «Windows.old» на системном диске, где сохранятся файлы из директории C:\, в том числе из пользовательских папок.
Значительный минус этого варианта в том, что при переустановке ОС можно потерять лицензию продукции. Если же вы будете использовать оригинальный ISO-образ, скачанный с официального сайта Microsoft, в последующем ключ активации можно будет восстановить. О некоторых действенных способах выполнения этой процедуры мы писали в руководстве по следующей ссылке.
Подробнее: Восстановление ключа активации Windows 10
Саму процедуру установки Windows 10 в этой статье мы рассматривать не будем, поскольку ранее она уже была разобрана на нашем сайте. Отметим то, что на Шаге 9 инструкции по ссылке ниже не следует удалять или форматировать раздел, куда устанавливается система. Просто выберите данный диск и продолжите инсталляцию операционной системы, и тогда все старые файлы сохранятся в каталог внутри C:\ под названием «Windows.old», откуда их легко извлечь или провести любую другую работу с ними.
Подробнее: Руководство по установке Windows 10 с USB-флешки или диска
Наша группа в TelegramПолезные советы и помощь
4 January 2021 Specialist of Customer Service Dept.
Summary
Microsoft Security Essentials should be familiar to Windows 7 users. This anti-virus freeware is developed and released by Microsoft. Taking the advantages of the simple interface and low system resource occupation, it is popular among Windows 7 users. However, parts of users may encounter the error 0xC000000D when using the Microsoft Security Essentials and result in this software failure. Sometimes, it may lead to system failure like blue screen. Here, we will focus on how to solve this problem.
Content
Approach 1: Delete EppOobe.etl file
EppOobe.etl is the running file created automatically when you installed Window Security Essentials. For many users, deleting this file can solve the 0xC000000D error.
Please navigate to the following path in Computer: C:\ProgramData\Microsoft\Microsoft Security Client\Support
Then please delete the EppOove.etl file and restart your computer to check whether the problem has been solved.
If the folder “ProgramData” was set to be hidden in default or you can not find the folder in the list, please check the item “Show hidden files, folders, and drive” in “View” tab of “Folder Options”.
Approach 2: Fix with sfc/scannow Command
sfc/scannow can help you scan all protected system files and try to fix problems. If you receive the error code 0xC000000D from Microsoft Security Essentials, please try to figure it out with sfc/scanow command.
Step 1: Press “Win+R” button and enter “cmd” in “Run”. Press OK to open CMD.
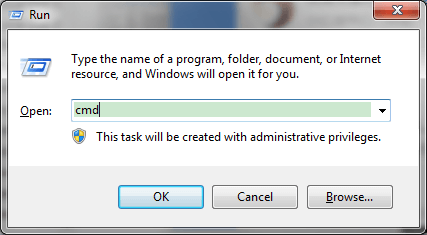
Step 2: Enter “sfc/scannow” in the pop-up window and press “Enter” to process the command.
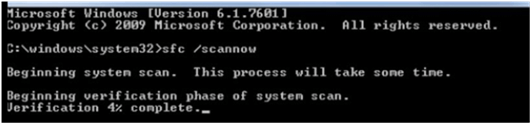
Step 3: Then it will process the system scan and fix the system files which have something wrong. Please restart the PC after the fix finishes.
Attention: This approach must be processed with Administrator privilege. If you do not have the account with administrator privilege, please contact with the administrator or you can also create a new administrator account with Renee Passnow here.
Step 1: Download and install Renee PassNow in any workable Windows computer.
Step 2: Choose creation method, USB or CD/DVD.
Select one option from [Crate a Live USB] and [Create a Live CD]. Then, select [x64] or [x86] according to your computer. Next, click on [Download Now] to download the licensed ISO. Remember to activate the software beforehand. After that, click on [Create USB] to create the boot media.

Step 3: Boot the target PC from the created password reset USB/CD/DVD.
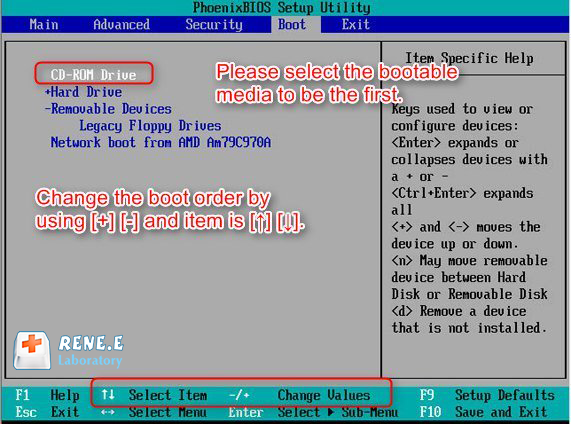
You will boot the target computer via a new created reset disk. Firstly, please hold a hot key to enter the BIOS menu and put CD-ROM or Removable Devices as the first choice. Please click here to know about how to change the boot order of your computer. After changing it successfully, please remember to save your setting and then restart your PC.
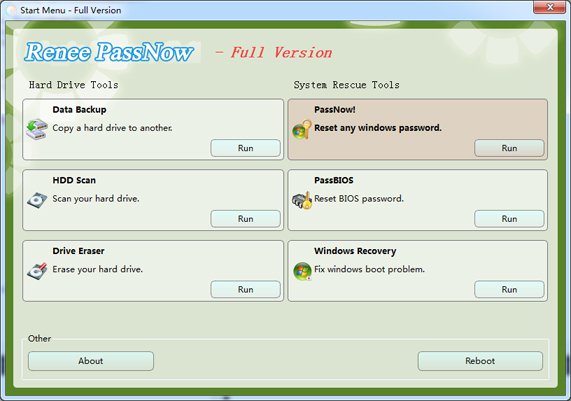
Step 4: Select “PassNow!”.
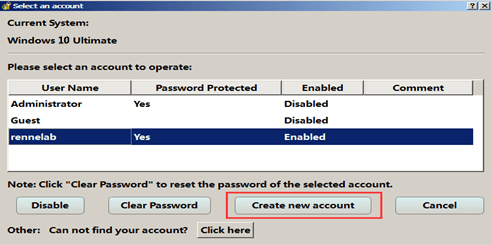
Step 5: Click “Create new account” to create a new administrator to quickly access your PC.
The created administrator account named “Reneelab” with administrator rights, and its default password is “123456789”. You are able to change the password of target account with this new created administrator.
Approach 3: Disable OOBE item of Microsoft Security Essentials in Computer Management
Sometimes, this error could be caused by the incorrect settings in OOBE item in Microsoft Security Essentials. OOBE does not relate to key functions of Microsoft Security Essentials but with the other progresses and services. So, disabling this item will not influence the Microsoft Essentials.
Step 1: Go to Start menu and right-click “Computer”. Select “Manage” in the menu.
Attention: This step requires administrator privilege. If you do not have such privilege, please click here for solution.
Step 2: Go to “Computer Management > System Tools > Performance > Data Collector Sets > Startup Event Trace Sessions”. And find Microsoft Security OOBE item.
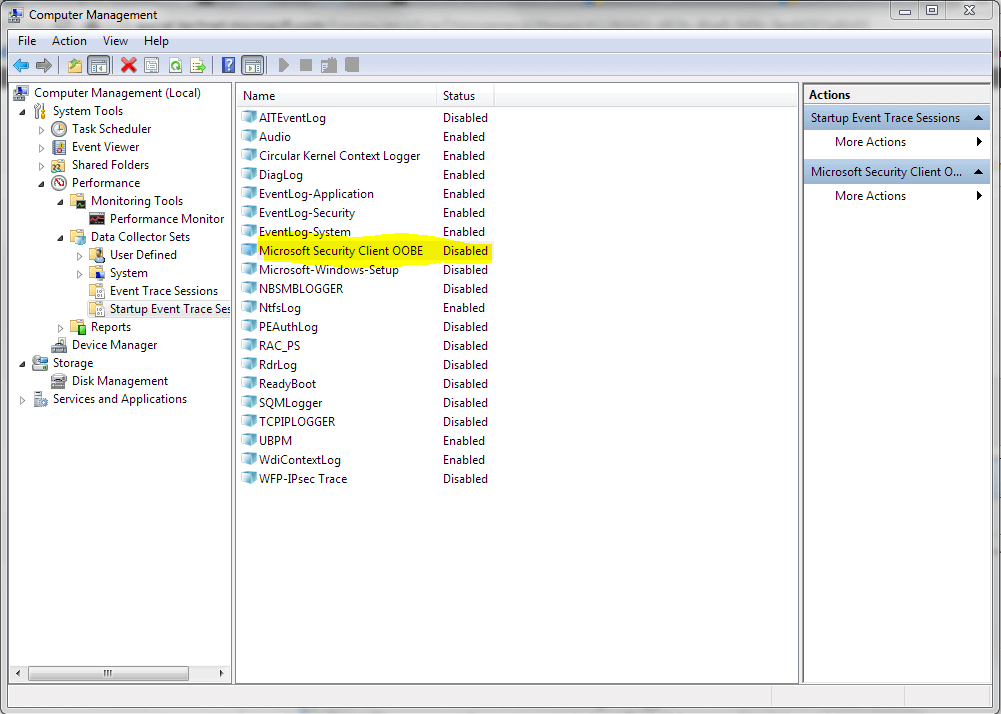
Step 3: Right click the Microsoft Security Client OOBE item and select “Properties” in the menu.Click “Trace Session” tab and uncheck the “Enable” selection. Finally, click “Apply” and “Save” before exiting.
Step 4: Restart the PC to check whether the error has been solved.
Approach 4: Disable Program Compatibility Assistant Service
Sometimes, error 0xC000000D could be caused by the incompatibility between OOBE and Program Compatibility Assistant Service. Please try to fix this problem with steps below:
Step 1: Press Win + R button and enter “service.msc” in the pop-up window. Click “OK” to launch related settings.
Step 2: Find and right click the “Program Compatibility Assistant Service“. Select “Properties” in the menu. Choose “General” tab. If the “Service status” shows “Started”, please click “Stop” to turn the service off.
Step 3: Select “Disabled” in “Startup Type”. Click “OK” and then exit. Finally, please check whether the problem the Microsoft Security Essentials fails to work has been solved.
Approach 5: Uninstall Microsoft Security Essentials Completely
If the error 0xC000000D still can not be solved with the methods above, it is recommended to uninstall Microsoft Security Essentials completely.
Step 1: Please make sure the account you are logging with has administrator privilege. Go to “Control Panel”. Find and click “Uninstall a program” item. Find and select “Microsoft Security Essentials” in the list and then click “Uninstall” button on the top of the list. Follow the steps to uninstall it.
Step 2: Please press Win + R and then enter “regedit” in the pop-up window. Launch the Registry Editor.
Step 3: Please locate to the following items in the left side:
HKEY_LOCAL_MACHINE\SYSTEM\CurrentControlSet\Control\WMI\Autologger
HKEY_LOCAL_MACHINE\SYSTEM\ControlSet001\Control\WMI\Autologger
HKEY_LOCAL_MACHINE\SYSTEM\ControlSet002\Control\WMI\Autologger
Delete all items inside. Restart your PC and check whether the problem has been solved.
Ошибка 0xc000000d может появляться при неправильных настройках запуска операционной системы вашего компьютера. Из-за этого он не может запустить Windows. Перед вами должен появиться синий экран со следующим сообщением: «Ваш ПК/Устройство требует починки. В конфигурационном файле запуска не хватает некоторой необходимой информации»
Давайте же теперь рассмотрим как избавиться от этой ошибки.
Решения для исправления ошибки

Метод №1 Диск восстановления
Если вы используете ПК и уже создали диск для восстановления, то сейчас самое время воспользоваться им. Даже в присутствии этой ошибки, ваша клавиатура, CD и USB драйвера должны быть работоспособны. Вставьте этот диск или флеш-носитель в системный блок и нажмите комбинацию клавиш Ctrl+Alt+Delete для перезагрузки компьютера.
Как только система начнет загружаться, нажмите клавишу F12 для загрузки CD или флешки. Выберите починку Windows. После этой операции, ваш компьютер должен запустится без ошибки 0xc000000d.
Метод №2 Восстановления на Microsoft Surface Device
Если вы получили данную ошибку у себя на Microsoft Surface Device, то выполнение восстановления Windows будет происходить немного по другому.
Первое, что вам необходимо будет сделать, то это найти место где вы расположили свой BitLocker Recovery, так как ваш планшет Surface вероятней всего зашифрован им.
Без этого ключа вы не сможете зайти в систему и выполнить какое-либо восстановления.
Для создания диска восстановления Surface на Windows 10 вы можете использовать другой компьютер с Windows 10. Просто подключите флэш-устройство к ПК и следуйте инструкциям мастера-установщика по созданию диска восстановления.
Далее вам необходимо выбрать запуск системы через USB-привод. Для этого следуйте следующим шагам:
- Нажмите и удерживайте кнопку питания до того момента, пока вы не убедитесь, что устройство отключилось.
- Нажмите и удерживайте + громкости, а после нажмите на кнопку Питания.
- Удерживайте кнопку + громкости пока не появится меню UEFI.
Потом перезапустите Surface с зажатой кнопкой — громкости и отожмите после исчезновения лого. Далее сделайте следующее:
- Пройдите путем «Диагностика проблем» -> «Продвинутые опции» -> «Командная строка».
- Выполните в ней следующие команды:
bootrec /fixmbr
bootrec /fixboot
bootrec /scanos
bootrec /rebuildbcd - Выйдете из командной строки и перезагрузите Surface.
После этого ваше устройство больше не должно получать ошибку 0xc000000d.