
SDR Software Download
Software Defined Radio Package (Change log)This package contains:
|
Download |
SDR# x64This is the 64-bit production build for higher performance on capable computers. Some older plugins may not work. |
Download |
SDR# Beta x86This is the development package. Current revision is 1922. |
Download |
SDR# Beta x64This is the 64-bit build with minimal driver and plugin support for stability checks. Current revision is 1922. |
Download |
SDR# SDK for Plugin DevelopersThis package contains a zero-setup Visual Studio 2022 solution with an empty plugin template. An integrated SDR# instance is configured as to host your plugins and is automatically launched by Visual Studio when debugging. For ample examples, check github. Pre-requisites: .NET 9 Windows x86 SDK and Visual Studio 2022 |
Download |
SDR# Big Book in English 2024This is the English version of the SDR# Big Book by Paolo Romani (IZ1MLL). |
Download |
SDR# Big Book en Français 2024This is the French translation of the SDR# Big Book by Philippe DIAZ and Michel CHERONT (F1AUX). |
Download |
SDR# Big Book in German v5.5This is the German translation of the SDR# Big Book by Gerhard Schweizer. |
Download |
SDR# Big Book in Ukrainian 2024This is the Ukrainian translation of the SDR# Big Book by Rostyslav “Rost” Iablonskyi (UT2YR). |
Download |
SDR# Big Book in Russian 2024This is the Russian translation of the SDR# Big Book by Дмитрий Мезин (UA4004SWL). |
Download |
SDR# Big Book in Italian 2024This is the Italian version of the SDR# Big Book by Paolo Romani (IZ1MLL). |
Download |
SDR# Big Book in Spanish v5.5This is the Spanish translation of the SDR# Big Book by Miguel Iborra (EA4BAS). |
Download |
SPY Server – SDR Server for WindowsAirspy R0, R2, Mini, Airspy HF+, RTL-SDR and AOR radios can be used as a high performance SDR receiver capable of streaming separate chunks of the spectrum to multiple clients over the LAN or the Internet. |
Download |
SPY Server – SDR Server for Linux ARMHFThis build can be used with Raspberry PI, Odroid and Orange PI single board computers. |
Download |
SPY Server – SDR Server for Linux ARM64This build can be used with AARCH64 ARM boards like Raspberry Pi 4 or Odroid. |
Download |
SPY Server – SDR Server for Linux x86_64This build can be used with 64-bit Intel/AMD CPU’s. |
Download |
ADS-B SPY – ADSB decoder for WindowsAirspy R0, R2 and Mini can be used as a high performance ADSB receiver capable of 12MHz, 20MHz and 24MHz MLAT. Our original algorithms compare favorably with the top range ADSB receivers. This executable turns your Airspy into an autonomous ADSB station with low power requirements. |
Download |
ADS-B SPY – ADSB decoder for Linux ARMHFThis build can be used with Raspberry PI and Odroid boards. |
Download |
ADS-B SPY – ADSB decoder for Linux ARM64This build can be used with AARCH64 ARM SBCs like the Raspberry Pi 4, Odroid or compatible. |
Download |
ADS-B SPY – ADSB decoder for Linux x86This build can be used with 32bit Intel/AMD CPU’s. |
Download |
ADS-B SPY – ADSB decoder for Linux x86_64This build can be used with 64bit Intel/AMD CPU’s. |
Download |
ExtIO for the Airspy One Series (R0, R2 and Mini)This build is provided by Andrea Montefusco and works with HDSDR, Studio1 and compatible software. |
Download |
ExtIO for the Airspy HF+ Series (Dual Port and Discovery)This build is provided by Andrea Montefusco and works with HDSDR, Studio1 and compatible software. |
Download |
WinUSB Compatibility DriverIf Windows fails to recognize your Airspy device automatically, unzip and install this driver. |
Download |
Cool SDR stuff from our friends
- SDR# Community Plugin Package (maintained by Rodrig Pérez)
- Linrad
- SDR-Console
- HDSDR
- GQRX
- SDR++
- Frequency Manager Suite for SDR#
- FM/AM Command Line receiver for Airspy and RTL-SDR by Kenji Rikitake JJ1BDX
- Welle.io DAB/DAB+ Receiver
- ACARS Decoder from Thierry Leconte
- Unitrunker
- GNU Radio Live DVD (AirSpy support based on Ubuntu Linux 14.04.4 LTS, 64-bit edition)
- SDRdaemon Utility to send I/Q samples read from a SDR device over the network via UDP
- GNU Radio Win64 binaries with airspy support see also build scripts on github
- SDR-J DAB, WFM and SDR programs with airspy support
- URH Universal Radio Hacker (The Ultimate Radio Hacker Tool with native AirSpy support since 21 April 2017)

Данным постом мы продолжаем серию статей, посвященную китайскому RTL-SDR приемнику на RTL2832U + R820. В прошлых публикациях мы уже познакомились с устройством и нашли временную антенну к нему. Теперь попробуем запустить приемник: установим драйвер и ПО для работы с донглом. Также опишем, как производится первоначальная настройка SDRSharp.
Для работы с SDR приемниками существует много программ. Большинство заточены под выполнение конкретных задач. Нам же нужно просто мониторить эфир. Данные задачи хорошо выполняют три наиболее популярные программы: SDRSharp, HDSDR и SDR Touch, которая написана под Andoid. Да, этот свисток и к планшету подключить можно, что не может не радовать.
Я решил поставить последнюю версию программы SDRSharp, так как она имеет наиболее привлекательный и простой внешний вид. К тому же, для нее написано множество плагинов, которые будут полезными в работе с донглом. Данную программу можно установить как на привычный рядовому пользователю Windows, так и на ОС с ядром Linux. Сейчас на моем стационарном компьютере установлена Windows 10, так что будем ставить программу на Windows. Относительно недавно SDRSharp получила обновление. Теперь для ее работы требуется .NET Framework 4.6, который уже предустановлен в Windows 10.
Шаг 1. Первым делом, подключаем к донглу антенну, а сам свисток к компьютеру. В области уведомлений должно показаться сообщение о том, что найдено новое устройство. Чтобы убедиться, что система видит наш свисток, нажимаем правой кнопкой мыши на «Мой компьютер» — «Свойства» — «Диспетчер устройств». В результате видим окошко, где должно отобразиться наше устройство. Опознать его легко, так как на нем «висит» желтый восклицательный знак. Это значит, что система нашла девайс, но драйверов к нему нет. Это хорошо, драйвера мы установим сами. Если ваш приемник определился с другим названием, не страшно. Конкретно в моем случае все выглядело так:

Шаг 2. Далее идем на официальный сайт разработчиков программы SDRSharp (www.airspy.com), переходим в раздел «Download» и качаем последнюю версию программы, нажав на синюю кнопку «Download».

Шаг 3. Разархивируем скачанный архив в любую папку. Программа не имеет привычного всем установщика, который автоматически установил бы ее в «Program Files», так что отправляйте файлы туда, куда вам будет удобно.
Далее в разархивированных файлах ищем BAT-файл с названием «install-rtlsdr.bat» и запускаем его двойным кликом. Должен на мгновение открыться терминал, который сам и закроется. После чего в папку добавится ряд новых файлов.
Шаг 4. Теперь нужно установить драйвер, который позволит программе SDRSharp работать с нашим RTL-SDR приемником. Для этого нужно два раза кликнуть на файл zadig.exe, который появился после выполнения второго шага.

Шаг 5. В открывшемся окне в верхнем меню кликаем на «Options» и ставим галочку на пункте «List All Devices».

Шаг 6. Теперь в выпадающем списке нужно выбрать наше устройство, название которого мы уже узнали на первом шаге. Далее кликаем на «Install Driver». Для второго определившегося устройства проделываем такую же операцию.

Шаг 7. Повторяем первый шаг. Открываем диспетчер устройств и видим, что драйвера успешно установлены.

Шаг 8. Пришло время запустить SDRSharp. Находим в папке с разархивированными файлами файл SDRSharp.exe и запускаем его. Также вы можете создать ярлык и поместить его на рабочий стол для удобства запуска программы.

Шаг 9. Самое скучное позади. Открылась программа SDRSharp. Во вкладке «Source» нужно выбрать источник сигнала. В нашем случае это «RTL-SDR (USB)».

Шаг 10. Запуск. Нажимаем иконку Play, после чего должен ожить анализатор спектра и визуальное представление сигнала в виде «водопада».


Только что мы выполнили установку драйвера USB RTL2832U и программы SDRSharp на windows 10, но для полноценного использования программы ее нужно еще настроить.
Настройка SDRSharp
Шаг 1. Нажимаем на шестеренку. Впоследствии откроется окошко настроек.
- Sample Rate — настройка частоты дискретизации (ширина полосы приемника). Чем больше значение, тем шире мы будем видеть полосу на анализаторе спектра. Выбор ширины полосы основывается, как правило, на производительности компьютера. Чем шире, тем больше ресурсов будет кушать программа. Пробуем переключать и останавливаемся на том значении, при котором звук не будет искажаться и периодически прерываться. Например, ширина пропускания на моем компьютере с процессором Core i7 и оперативной памятью в 16 гигабайт составила 2.8 MSPS.
- Ставим галочку на пункте RTL AGC. Он отвечает за автоматическую регулировку усиления на участке «Смеситель тюнера — АЦП RTL2832».
- Из-за плохого динамического диапазона нашего китайского SDR приемника, мы будем часто получать фантомы, которые разбрасывают мощные сигналы. Они будут паразитировать на довольно широком диапазоне. Чтобы их сократить или убрать вообще, можно воспользоваться ползунком RF Grain. Это ручная регулировка усиления тюнера. Значение, которое нужно установить индивидуально для каждого, в зависимости от условий, в которых вы находитесь. Например, от мощности окружающих излучаемых сигналов. В ходе работы с программой нужно экспериментировать с данным ползунком, ориентируясь на шумы, чтобы подобрать наиболее оптимальное значение конкретно для ваших условий. Пока лучше установить ползунок усиления на 25 — 37 дБ.

Шаг 2. Не закрывая окошко настроек SDRSharp, установите регулятор контраста «Contrast» в то значение, при котором на водопаде четко начнут просматриваться принимаемые сигналы.

Шаг 3. Калибровка. Как вы можете заметить на скрине выше, при четко установленной частоте 90.2 (при этом я знаю, что эта станция работает на 90.2) реальный сигнал смещен влево. Это происходит из-за некоторых особенностей используемых материалов при изготовлении микросхем. Чтобы все стало на свои места, нам нужно откалибровать наш приемник.
Для калибровки лучше всего использовать рацию. Это повысит точность калибровки. Если у вас нет даже портативной станции, можно настроить SDRSharp на заранее известную нам FM-станцию и произвести все действия на основе ее сигнала. Однако, FM станции вещают с широкой полосой частотной модуляции, из-за этого будет тяжелей попасть на точную частоту. У меня же есть портативные переносные рации и калибровку я буду производить с их помощью.
Примечание. Если вы калибруете на основе сигнала FM-станции, то во вкладке «Radio» включаем пункт «WFM». Если с помощью рации, включаем «NFM».
Итак. Приступим.
- Настраиваем свою рацию на передачу в какую-то частоту (естественно, PMR или LPD). Далее, настраиваемся на эту же частоту в программе SDRSharp и нажимаем на кнопку передачи PTT.
- Максимально зумируем полосу приема ползунком «Zoom» (находится над регулятором «Contrast»), чтобы максимально точно настроиться на частоту.
- В окне настроек в поле «Frequency correction PPM», которое отвечает за ручную коррекцию опорного генератора тюнера, начинаем постепенно увеличивать или уменьшать числовое значение до тех пор, пока сигнал, излучаемый радиостанцией, не установится на точную частоту.

Шаг 4. Дополнительные настройки. С SDRSharp уже можно полноценно работать, но с помощью предустановленных в программу плагинов мы можем сделать ее эксплуатацию более приятной.
- Переключаемся в режим NFM, если вы этого еще не сделали, и включаем шумодав, отметив галочкой пункт Squelch. Ниже вводим числовое значение уровня шума (в децибелах), при котором шумодав будет отключаться.
- По умолчанию в программе включена привязка к сетке. Ее можно выключить, сняв галочку с пункта «Snap To Greed» и сделать шаг в 1 Гц для более точной настройки на частоту.
- В этой же вкладке «Radio» ставим галочку на Correct IQ. Это уберет некоторые постоянные помехи со спектра.
- Во вкладке «FFT Display» можно поиграться с внешним видом спектра. Также для удобства рекомендую поставить галочки в пунктах: Time Markers — наносит время на водопад. Mark Peaks — выделяет пики сигналов на спектре.
- Устанавливаем галочку во вкладке «Audio» на пункте Filter Audio. Это улучшит обработку звука и уберет некоторый шум.
- Во вкладке Zoom FFT ставим галочки в пунктах «Enable IF» и «Enable Felter». Это добавит еще одну панель с максимально увеличенным спектром, что позволит точно настраиваться на частоту сигнала.
На этом все. Основная настройка SDRSharp завершена. Теперь можно смело использовать программу.
О частотной модуляции
Хотел бы рассказать начинающим о режимах частотной модуляции:
- NFM — узкополосная частотная модуляция. С такой модуляцией, как правило, работает большинство УКВ трансиверов. Думаю, это значение у вас будет установлено чаще всего.
- WFM — широкополосная частотная модуляция. С широкополосной модуляцией обычно вещают FM-станции.
- AM — амплитудная модуляция. С таким видом модуляции слушаем авиадиапазон.
- DSB — амплитудная модуляция с подавлением несущей.
- LSB — модуляция с нижней боковой полосой. Используется на КВ диапазоне.
- USB — модуляция с верхней боковой полосой. Также используется на КВ диапазоне.
- CW — телеграф.
- RAW — чистый сигнал без демодуляции.
Заключение
Итак. Мы настроили программу SDRSharp для работы с нашим китайским RTL-SDR приемником. Можно идти в бой. Хоть стандартных возможностей программы достаточно, мы можем также установить дополнительные плагины, которые способны значительно расширить функционал. Однако, многие написанные дополнения с новой версией шарпа отказываются работать. Многие из них постепенно адаптируют, а некоторые навсегда останутся заброшенными.
В следующей статье мы установим наиболее полезные плагины, так сказать «маст хэв». Те, без которых сейчас я не представляю полноценное использование программы. Подписывайтесь на наши группы в соц. сетях, чтобы не пропустить будущие интересные материалы.
comments powered by HyperComments
SDR++ (она же SDRPP) — это кроссплатформенная программа которая может работать в Windows, Linux, OSX и BSD с графическим интерфейсом на основе C++ для различных SDR приемников. Ранее были выпущены версии приложения, которые отличались нестабильной работой и глюками. В последней версии все недостатки исправлены.
Основные функции программы:
- полностью модульная архитектура, состоит из набора плагинов
- Мульти-VFO, несколько приемников в одном
- поддержка большинства SDR через расширения или SoapySDR
- запись как всей полосы, так и звука с измерителем уровня и регулировкой громкости
- доступно несколько планов частот (очень легко написать свой собственный)
- переключаемая палитра водопада
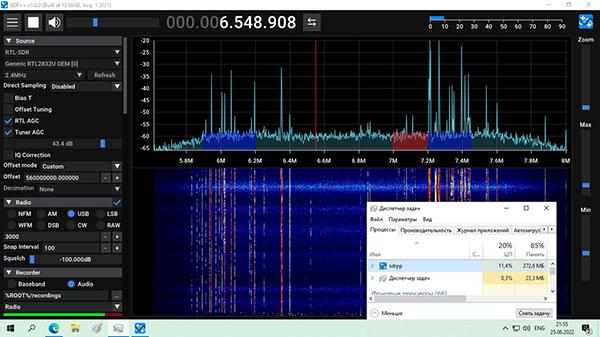
- низкая загрузка (ниже, чем у GQRX, CubicSDR, SDRConsole и даже ниже чем у SDRSharp)
- gолное обновление водопада при масштабировании или изменении минимального / максимального уровня.
Программа очень проста и не грузит систему. Графический интерфейс напоминает популярную прогрумму SDR Sharp, но с более лучшим обработчиком графики. Сам водопад в SDR++ более информативен.
В дальнейшем будут добавлены декодеры спутников NOAA
Для RTL-SDR есть собственный модуль с поддержкой bias-tee (включает инжектор питания для внешнего усилителя).
Скачать SDR++ под различные системы можно по ссылке https://github.com/AlexandreRouma/SDRPlusPlus/releases
Software Defined Radio (SDR) software is a type of application that processes and interprets radio signals using software rather than traditional hardware components.
SDR software works in conjunction with radio hardware to provide a flexible and versatile platform for a wide range of radio communication tasks, including signal analysis, demodulation, and spectrum monitoring.
In this post we present a comprehensive list of popular SDR software along with a brief description of each.
Table of Contents
List of SDR Software
SDR# (SDRSharp)
- Description: A widely-used SDR application known for its user-friendly interface and extensive plugin support.
- Website: SDRSharp

HDSDR
- Description: Versatile SDR software that supports a variety of hardware and offers powerful signal processing capabilities.
- Website: HDSDR
🏷️ Software-defined Radio Deals ⭐⭐⭐⭐⭐
GNU Radio
- Description: A powerful toolkit that provides signal processing blocks to implement software radios, supporting many SDR hardware platforms.
- Website: GNU Radio
")
CubicSDR
- Description: An open-source, cross-platform SDR application with a visually appealing interface, supporting multiple SDR devices.
- Website: CubicSDR
Gqrx
- Description: An open-source SDR receiver software with a simple and easy-to-use interface, available for Linux and macOS, and with a Windows version.
- Website: Gqrx
 Software Defined Radio. Premium RTLSDR w/ 0.5PPM TCXO, SMA Input & Aluminum Enclosure. RTL2832U & R820T2 (R860)-Based Radio")
SDR Console
- Description: A comprehensive SDR application with advanced features such as recording, playback, and remote operation.
- Website: SDR Console
Spectrum Lab
- Description: A powerful audio spectrum analyzer software that can be used with SDR hardware for advanced spectrum analysis.
- Website: Spectrum Lab
🏷️ Software-defined Radio Deals ⭐⭐⭐⭐⭐
Pothos
- Description: An open-source data-flow framework used for SDR applications, supporting various SDR hardware with a modular design.
- Website: Pothos
SDRUno
Description: A software suite developed by SDRplay for use with their SDR receivers, offering a highly integrated suite of tools.
Website: SDRUno
Quisk
Description: An open-source SDR application that supports many SDR platforms, offering flexible and powerful functionality.
Website: Quisk
🏷️ Software-defined Radio Deals ⭐⭐⭐⭐⭐
Linrad
Description: A highly flexible and powerful SDR software package that supports many different SDR hardware setups.
Website: Linrad
PowerSDR
Description: Originally designed for FlexRadio SDR hardware, it is now open-source and supports various SDR devices.
Website: PowerSDR
OpenWebRX
Description: An open-source SDR receiver software with a web-based interface, allowing remote access and control of SDR devices.
Website: OpenWebRX
Skywave Linux
Description: A Linux distribution specifically designed for SDR use, preloaded with a variety of SDR software.
Website: Skywave Linux

SDRangel
Description: An open-source SDR and signal analyzer with a comprehensive set of features for signal analysis and demodulation.
Website: SDRangel
These SDR software options cater to a wide range of needs, from basic spectrum analysis to advanced signal processing, and support various SDR hardware devices, making them suitable for both beginners and professionals
Hardware Compatibility
The table below shows SDR platform compatibility
| Software | Compatible SDR Hardware |
|---|---|
| SDR# (SDRSharp) | Airspy, RTL-SDR, HackRF, SDRplay, Funcube Dongle, QRP-2000, QRP-2000 and many more |
| HDSDR | RTL-SDR, Airspy, HackRF, Funcube Dongle, SDRplay, QS1R, Perseus, Elektor SDR, and more |
| GNU Radio | USRP (Universal Software Radio Peripheral), RTL-SDR, HackRF, BladeRF, LimeSDR, and many more |
| CubicSDR | RTL-SDR, HackRF, Airspy, SDRplay, Red Pitaya, and other SoapySDR supported devices |
| Gqrx | RTL-SDR, HackRF, Airspy, BladeRF, FunCube Dongle, SDRplay, USRP devices, and more |
| SDR Console | RTL-SDR, Airspy, HackRF, SDRplay, Funcube Dongle, Elad FDM-S1/S2/SW2, Afedri, and more |
| Spectrum Lab | Any SDR hardware that provides I/Q data stream including RTL-SDR, Funcube Dongle, and more |
| Touchstone Pro | USRP, RTL-SDR, HackRF, LimeSDR, BladeRF, and other commonly used SDR devices |
| Pothos | USRP, RTL-SDR, HackRF, BladeRF, LimeSDR, and other devices supported by SoapySDR |
| SDRUno | SDRplay RSP1, RSP1A, RSP2, RSPduo, RSPdx |
| Quisk | USRP, RTL-SDR, HackRF, Red Pitaya, and other SoapySDR supported devices |
| Linrad | RTL-SDR, FunCube Dongle, SoftRock, Peaberry, and other similar devices |
| PowerSDR | FlexRadio SDR hardware, RTL-SDR, HackRF, and more |
| OpenWebRX | RTL-SDR, HackRF, Airspy, USRP, Red Pitaya, and other SoapySDR supported devices |
| Skywave Linux | RTL-SDR, HackRF, Airspy, SDRplay, and other SDR hardware supported by the preloaded software |
| SDRangel | RTL-SDR, HackRF, Airspy, BladeRF, LimeSDR, PlutoSDR, and more |
What can you do with SDR Software?
Here is a lit of what the software is used for:
- Spectrum Analysis: Visualizes the frequency spectrum, allowing users to identify and analyze signals.
- Demodulation: Converts received radio signals into audio or data formats.
- Frequency Tuning: Adjusts the frequency of the SDR hardware to receive different signals.
- Signal Decoding: Interprets digital signals and protocols.
- Recording and Playback: Records radio signals for later analysis and playback.
- Plugin Support: Extends functionality with additional plugins and modules for specific tasks.
- Remote Operation: Allows remote access and control of SDR hardware over a network.
What are the applications of SDR Software?
- Amateur Radio: Allows radio enthusiasts to explore and experiment with different frequency bands and modulation techniques.
- Research and Development: Used in academia and industry for developing and testing new communication protocols and technologies.
- Military and Defense: Provides flexible and adaptive communication systems for various applications.
- Emergency Services: Ensures reliable communication in critical situations through adaptable and resilient systems.
- Spectrum Monitoring: Used by regulatory bodies to monitor and manage the radio spectrum.
Summary
SDR software enables our interaction with radio communications by leveraging the power of software to perform tasks traditionally handled by hardware.
Its flexibility, cost-effectiveness, and upgradability make it an invaluable tool for a wide range of applications, from amateur radio to advanced R&D. Whether you are a hobbyist, researcher, or professional, SDR software opens up a world of possibilities in the field of radio communication.
SDR++, The bloat-free SDR software

SDR++ is a cross-platform and open source SDR software with the aim of being bloat free and simple to use.
- Patreon
- Discord Server
- IRC:
#sdrpp(libera.chat) NO LONGER ACTIVE, JOIN DISCORD INSTEAD
Features
- Multi VFO
- Wide hardware support (both through SoapySDR and dedicated modules)
- SIMD accelerated DSP
- Cross-platform (Windows, Linux, MacOS and BSD)
- Full waterfall update when possible. Makes browsing signals easier and more pleasant
- Modular design (easily write your own plugins)
Installing
Nightly Builds
Nightly builds contain the very latest features and bugfixes. They are usually just stable as normal releases but are available basically minutes to hours after a change has been pushed to the code.
You can download them here. It’ll redirect you to the latest nightly on GitHub, scroll down to «Artifacts» and click on the version for your OS.
GitHub currently requires an account for the files to be downloadable so make sure you are logged in.
Windows
Download the latest release from the Releases page and extract to the directory of your choice.
To create a desktop shortcut, rightclick the exe and select Send to -> Desktop (create shortcut), then, rename the shortcut on the desktop to whatever you want.
Linux
Debian-based (Ubuntu, Mint, etc)
Download the latest release from the Releases page and extract to the directory of your choice.
Then, use apt to install it:
sudo apt install path/to/the/sdrpp_debian_amd64.deb
IMPORTANT: You must install the drivers for your SDR. Follow instructions from your manufacturer as to how to do this on your particular distro.
Arch-based
Install from source following the instructions below.
WARNING: The sdrpp-git AUR package is no longer official, it is not recommended to use it.
Other
There are currently no existing packages for other distributions, for these systems you’ll have to build from source.
MacOS
Download the app bundle from the latest nightly build
BSD
There are currently no BSD packages, refer to Building on Linux / BSD for instructions on building from source.
Building on Windows
The preferred IDE is VS Code in order to have similar development experience across platforms and to build with CMake using the command line.
Install dependencies
- cmake
- vcpkg
- PothosSDR (This will install libraries for most SDRs. You have to install it in
C:/Program Files/PothosSDR) - RtAudio (You have to build and install it in
C:/Program Files (x86)/RtAudio/)
After this, install the following dependencies using vcpkg:
- fftw3
- glfw3
- zstd
You are probably going to build in 64 bit so make sure vcpkg installs the correct versions using .\vcpkg.exe install <package>:x64-windows
Building using the command line
IMPORTANT: Replace <vcpkg install directory> with vcpkg’s install directory.
mkdir build
cd build
cmake .. "-DCMAKE_TOOLCHAIN_FILE=<vcpkg install directory>/scripts/buildsystems/vcpkg.cmake" -G "Visual Studio 16 2019"
cmake --build . --config Release
Running for development
Create a new configuration root directory
This will create the root_dev directory that will be used to save the configs of sdrpp and the modules.
You will next need to edit the root_dev/config.json file to point to the modules that were built. If the file is missing in your folder run the application once and it will create one with default value — see later on how to run the application.
Run SDR++ from the command line
From the top directory, you can simply run:
./build/Release/sdrpp.exe -r root_dev -c
Or, if you wish to run from the build directory e.g. build/Release and adapt the relative path to the root_dev folder:
./sdrpp.exe -r ../../root_dev -c
The optional -c argument is for keeping the console active in order to see the error messages.
Because all the paths are relative, for the rest of the command line instructions we are going to assume you are running from the top directory using the former command.
As mentioned previously you need to edit root_dev/config.json to add the modules that were built. From the default configuration file you need to add the paths in the modules section. Add to this list all the modules you wish to use.
...
"modules": [
    "./build/radio/Release/radio.dll",
    "./build/recorder/Release/recorder.dll",
    "./build/rtl_tcp_source/Release/rtl_tcp_source.dll",
    "./build/audio_sink/Release/audio_sink.dll"
]
...
You also need to change the location of the resource and module directories, for development, I recommend:
...
"modulesDirectory": "root_dev/modules",
...
"resourcesDirectory": "root_dev/res",
...
Remember that these paths will be relative to the run directory.
Installing SDR++
If you choose to run SDR++ for development, you do not need this step.
First, copy over the exe and DLLs from build/Release/ to root_dev.
Next you need to copy over all the modules that were compiled. To do so, copy the DLL file of the module (located in its build folder given below) to the root_dev/modules directory and other DLLs (that do not have the exact name of the module) to the root_dev directory.
The modules built will be some of the following (Repeat the instructions above for all you wish to use):
build/radio/Release/build/recorder/Release/build/rtl_tcp_source/Release/build/spyserver_source/Release/build/airspyhf_source/Release/build/plutosdr_source/Release/build/audio_sink/Release/
Building on Linux / BSD
Select which modules you wish to build
Depending on which module you want to build, you will need to install some additional dependencies.
Please refer to the module list table further down in this readme for the names, dependencies and build options of each module.
The build options are then passed to the cmake command as such cmake .. -DOPTION_NAME_HERE=ON -DANOTHER_OPTION_HERE=OFF etc…
Install dependencies
- cmake
- fftw3
- glfw
- libvolk
- zstd
Next install dependencies based on the modules you wish to build (See previous step)
Note: make sure you’re using GCC 8 or later as older versions do not have std::filesystem built-in.
Building
replace <N> with the number of threads you wish to use to build
mkdir build
cd build
cmake ..
make -j<N>
Create a new root directory
Running for development
If you wish to install SDR++, skip to the next step
First run SDR++ from the build directory to generate a default config file
Then, you will need to edit the root_dev/config.json file to point to the modules that were built. Here is an example of what it should look like:
...
"modules": [
    "./build/radio/radio.so",
    "./build/recorder/recorder.so",
    "./build/rtl_tcp_source/rtl_tcp_source.so",
    "./build/audio_sink/audio_sink.so"
]
...
Note: You can generate this list automatically by running find . | grep '\.so' | sed 's/^/"/' | sed 's/$/",/' | sed '/sdrpp_core.so/d' in the build directory.
You also need to change the location of the resource and module directories, for development, I recommend:
...
"modulesDirectory": "./root_dev/modules",
...
"resourcesDirectory": "./root_dev/res",
...
Remember that these paths will be relative to the run directory.
Of course, remember to add entries for all modules that were built and that you wish to use.
Next, from the top directory, you can simply run:
./build/sdrpp -r root_dev
Or, if you wish to run from the build directory, you will need to correct the directories in the config.json file, and then run:
Installing SDR++
To install SDR++, run the following command in your build folder:
Building on MacOS
Warning: This is not for the faint of heart and the instructions are mostly untested. It is recommended to use the nightly builds instead.
Install dependencies
The dependencies are exactly the same as for linux, see that section for the core dependencies as well as the module list for the per-module dependencies.
You will need to install the dependencies using Homebrew.
Make sure to install portaudio as it’ll be needed later.
An example install command would be:
brew install libusb fftw glfw airspy airspyhf portaudio hackrf rtl-sdr libbladerf codec2 zstd
pip3 install mako
Install volk
You will need to install volk from source. Follow the instructions on their repository. On M1 there are a few more manipulations needed.
Build
You will need a few special cmake argument on top of the linux ones. You will need to enable the portaudio sink modules -DOPT_BUILD_PORTAUDIO_SINK=ON -DOPT_BUILD_NEW_PORTAUDIO_SINK=ON and disable the usual rtaudio sink -DOPT_BUILD_AUDIO_SINK=OFF as well as the option to tell SDR++ that it will run as a MacOS bundle -DUSE_BUNDLE_DEFAULTS=ON. On MacOS versions older than Catalina (10.15), you will also need to use the internal std::filesystem as the OS can’t provide it -DOPT_OVERRIDE_STD_FILESYSTEM=ON.
Here is an example of build commands that will build almost all modules at the time of writing. You can always check the CI scripts for the latest arguments just in case but this should work. From the top of the SDRPlusPlus directory:
mkdir build
cd build
cmake .. -DOPT_BUILD_SOAPY_SOURCE=OFF -DOPT_BUILD_BLADERF_SOURCE=ON -DOPT_BUILD_AUDIO_SOURCE=OFF -DOPT_BUILD_AUDIO_SINK=OFF -DOPT_BUILD_PORTAUDIO_SINK=ON -DOPT_BUILD_NEW_PORTAUDIO_SINK=ON -DOPT_BUILD_M17_DECODER=ON -DUSE_BUNDLE_DEFAULTS=ON -DCMAKE_BUILD_TYPE=Release
make -j<N>
Create bundle and install
From the top of the SDRPlusPlus directory:
sh make_macos_bundle.sh ./build ./SDR++.app
This will create a SDR++.app bundle that you can instal like any other MacOS app by dragging it into Applications.
Module List
Not all modules are built by default. I decided to disable the build of those with large libraries, libraries that can’t be installed through the package manager (or pothos) and those that are still in beta.
Modules in beta are still included in releases for the most part but not enabled in SDR++ (need to be instantiated).
Sources
| Name | Stage | Dependencies | Option | Built by default | Built in Release | Enabled in SDR++ by default |
|---|---|---|---|---|---|---|
| airspy_source | Working | libairspy | OPT_BUILD_AIRSPY_SOURCE | ✅ | ✅ | ✅ |
| airspyhf_source | Working | libairspyhf | OPT_BUILD_AIRSPYHF_SOURCE | ✅ | ✅ | ✅ |
| audio_source | Working | rtaudio | OPT_BUILD_AUDIO_SOURCE | ✅ | ✅ | ✅ |
| bladerf_source | Working | libbladeRF | OPT_BUILD_BLADERF_SOURCE | ⛔ | ✅ (not Debian Buster) | ✅ |
| file_source | Working | — | OPT_BUILD_FILE_SOURCE | ✅ | ✅ | ✅ |
| fobossdr_source | Working | libfobos | OPT_BUILD_FOBOSSDR_SOURCE | ✅ | ✅ | ✅ |
| hackrf_source | Working | libhackrf | OPT_BUILD_HACKRF_SOURCE | ✅ | ✅ | ✅ |
| harogic_source | Beta | htra_api | OPT_BUILD_HAROGIC_SOURCE | ⛔ | ⛔ | ✅ |
| hermes_source | Beta | — | OPT_BUILD_HERMES_SOURCE | ✅ | ✅ | ✅ |
| kcsdr_source | Unfinished | libkcsdr | OPT_BUILD_KCSDR_SOURCE | ⛔ | ⛔ | ⛔ |
| limesdr_source | Working | liblimesuite | OPT_BUILD_LIMESDR_SOURCE | ⛔ | ✅ | ✅ |
| network_source | Beta | — | OPT_BUILD_NETWORK_SOURCE | ✅ | ✅ | ✅ |
| perseus_source | Beta | libperseus-sdr | OPT_BUILD_PERSEUS_SOURCE | ⛔ | ✅ | ✅ |
| plutosdr_source | Working | libiio, libad9361 | OPT_BUILD_PLUTOSDR_SOURCE | ✅ | ✅ | ✅ |
| rfnm_source | Beta | librfnm | OPT_BUILD_RFNM_SOURCE | ⛔ | ✅ | ✅ |
| rfspace_source | Working | — | OPT_BUILD_RFSPACE_SOURCE | ✅ | ✅ | ✅ |
| rtl_sdr_source | Working | librtlsdr | OPT_BUILD_RTL_SDR_SOURCE | ✅ | ✅ | ✅ |
| rtl_tcp_source | Working | — | OPT_BUILD_RTL_TCP_SOURCE | ✅ | ✅ | ✅ |
| sdrplay_source | Working | SDRplay API | OPT_BUILD_SDRPLAY_SOURCE | ⛔ | ✅ | ✅ |
| sdrpp_server_source | Working | — | OPT_BUILD_SDRPP_SERVER_SOURCE | ✅ | ✅ | ✅ |
| soapy_source | Deprecated | soapysdr | OPT_BUILD_SOAPY_SOURCE | ⛔ | ⛔ | ⛔ |
| spectran_source | Unfinished | RTSA Suite | OPT_BUILD_SPECTRAN_SOURCE | ⛔ | ⛔ | ⛔ |
| spectran_http_source | Beta | — | OPT_BUILD_SPECTRAN_HTTP_SOURCE | ✅ | ✅ | ✅ |
| spyserver_source | Working | — | OPT_BUILD_SPYSERVER_SOURCE | ✅ | ✅ | ✅ |
| usrp_source | Beta | libuhd | OPT_BUILD_USRP_SOURCE | ⛔ | ⛔ | ✅ |
Sinks
| Name | Stage | Dependencies | Option | Built by default | Built in Release | Enabled in SDR++ by default |
|---|---|---|---|---|---|---|
| android_audio_sink | Working | — | OPT_BUILD_ANDROID_AUDIO_SINK | ⛔ | ✅ | ✅ (Android only) |
| audio_sink | Working | rtaudio | OPT_BUILD_AUDIO_SINK | ✅ | ✅ | ✅ |
| network_sink | Working | — | OPT_BUILD_NETWORK_SINK | ✅ | ✅ | ✅ |
| new_portaudio_sink | Working | portaudio | OPT_BUILD_NEW_PORTAUDIO_SINK | ⛔ | ✅ | ⛔ |
| portaudio_sink | Working | portaudio | OPT_BUILD_PORTAUDIO_SINK | ⛔ | ✅ | ⛔ |
Decoders
| Name | Stage | Dependencies | Option | Built by default | Built in Release | Enabled in SDR++ by default |
|---|---|---|---|---|---|---|
| atv_decoder | Unfinished | — | OPT_BUILD_ATV_DECODER | ⛔ | ⛔ | ⛔ |
| dab_decoder | Unfinished | — | OPT_BUILD_DAB_DECODER | ⛔ | ⛔ | ⛔ |
| falcon9_decoder | Unfinished | ffplay | OPT_BUILD_FALCON9_DECODER | ⛔ | ⛔ | ⛔ |
| kgsstv_decoder | Unfinished | — | OPT_BUILD_KGSSTV_DECODER | ⛔ | ⛔ | ⛔ |
| m17_decoder | Working | — | OPT_BUILD_M17_DECODER | ⛔ | ✅ | ⛔ |
| meteor_demodulator | Working | — | OPT_BUILD_METEOR_DEMODULATOR | ✅ | ✅ | ⛔ |
| pager_decoder | Unfinished | — | OPT_BUILD_PAGER_DECODER | ⛔ | ⛔ | ⛔ |
| radio | Working | — | OPT_BUILD_RADIO | ✅ | ✅ | ✅ |
| radio | Unfinished | — | OPT_BUILD_VOR_RECEIVER | ⛔ | ⛔ | ⛔ |
| weather_sat_decoder | Unfinished | — | OPT_BUILD_WEATHER_SAT_DECODER | ⛔ | ⛔ | ⛔ |
Misc
| Name | Stage | Dependencies | Option | Built by default | Built in Release | Enabled in SDR++ by default |
|---|---|---|---|---|---|---|
| discord_integration | Working | — | OPT_BUILD_DISCORD_PRESENCE | ✅ | ✅ | ⛔ |
| frequency_manager | Working | — | OPT_BUILD_FREQUENCY_MANAGER | ✅ | ✅ | ✅ |
| iq_exporter | Working | — | OPT_BUILD_IQ_EXPORTER | ✅ | ✅ | ⛔ |
| recorder | Working | — | OPT_BUILD_RECORDER | ✅ | ✅ | ✅ |
| rigctl_client | Unfinished | — | OPT_BUILD_RIGCTL_CLIENT | ✅ | ✅ | ⛔ |
| rigctl_server | Working | — | OPT_BUILD_RIGCTL_SERVER | ✅ | ✅ | ✅ |
| scanner | Beta | — | OPT_BUILD_SCANNER | ✅ | ✅ | ⛔ |
| scheduler | Unfinished | — | OPT_BUILD_SCHEDULER | ⛔ | ⛔ | ⛔ |
Troubleshooting
First, please make sure you’re running the latest automated build. If your issue is linked to a bug it is likely that is has already been fixed in later releases
SDR++ crashes then it won’t start again no matter what
This is a bug in 1.0.0 that was fixed in 1.0.1
In some cases, if a crash happened while the config was being saved, the config file would be corrupted and SDR++ would refuse to start because of it.
This has now been fixed. If a config file is corrupted it’ll just reset it to its default state.
«hash collision» error when starting
You likely installed the soapysdr-module-all package on Ubuntu/Debian. If not it’s still a SoapySDR bug caused by multiple soapy modules coming in conflict. Uninstall anything related to SoapySDR then install soapysdr itself and only the soapy modules you actually need.
«I don’t see -insert module name here-, what’s going on?»
If the module was included in a later update, it’s not enabled in the config. The easiest way to fix this is just to delete the config.json file and let SDR++ recreate it (you will lose your setting relating to the main UI like VFO colors, zoom level and theme).
The best option however is to edit the config file to add an instance of the module you wish to have enabled (see the Module List).
SDR++ crashes when stopping a RTL-SDR
This is a bug recently introduced by libusb1.4
To solve, this, simply downgrade to libusb1.3
SDR++ crashes when starting a HackRF
If you also have the SoapySDR module enabled, this is a bug in libhackrf. It’s caused by libhackrf not checking if it’s already initialized.
The solution until a fixed libhackrf version is released is to disable the soapy_source module from SDR++. For this, go into the «Module Manager» menu and click the - button next to the row with «soapy_source». After that, restart SDR++.
Issue not listed here?
If you still have an issue, please open an issue about it or ask on the discord. I’ll try to respond as quickly as I can. Please avoid trying to contact me on every platform imaginable thinking I’ll respond faster though…
Contributing
Feel free to submit band plans via the GitHub issue tracker.
For code changes, please create a feature request instead.
Credits
Patrons
- Bob Logan
- Christian Häusler
- Croccydile
- Dale L Puckett (K0HYD)
- Daniele D’Agnelli
- David Taylor (GM8ARV)
- D. Jones
- Dexruus
- EB3FRN
- Eric Johnson
- Ernest Murphy (NH7L)
- Flinger Films
- Frank Werner (HB9FXQ)
- gringogrigio
- Jandro
- Jeff Moe
- Joe Cupano
- KD1SQ
- Kezza
- Krys Kamieniecki
- Lee Donaghy
- Lee (KD1SQ)
- .lozenge. (Hank Hill)
- Martin Herren (HB9FXX)
- NeoVilsonWong
- Nitin (VU2JEK)
- ON4MU
- Passion-Radio.com
- Paul Maine
- Peter Betz
- Scanner School
- Scott Palmer
- SignalsEverywhere
- Syne Ardwin (WI9SYN)
- W4IPA
- William Arcand (W1WRA)
- William Pitchford
- Yves Rougy
- Zipper
Contributors
- Aang23
- Alexsey Shestacov
- Aosync
- Benjamin Kyd
- Benjamin Vernoux
- Cropinghigh
- Fred F4EED
- Howard0su
- John Donkersley
- Joshua Kimsey
- Manawyrm
- Martin Hauke
- Marvin Sinister
- Maxime Biette
- Paulo Matias
- Raov
- Cam K.
- Shuyuan Liu
- Syne Ardwin (WI9SYN)
- Szymon Zakrent
- Youssef Touil
- Zimm
Libraries used
- SoapySDR (PothosWare)
- Dear ImGui (ocornut)
- json (nlohmann)
- rtaudio
- Portable File Dialogs