
Инструменты «platform-tools», «adb» и «fastboot» необходимы для установки кастомного рекавери, рутирования телефонов на Android и т.п.
В данной статье речь пойдет об установке инструментов командной строки «Android SDK» на Windows 10 (также доступно для MacOS и Linux) для последующей установки кастомного рекавери и рутирования телефона Xiaomi Redmi 4A.
Сначала скачайте «sdk-tools» на компьютер и распакуйте в любую удобную для Вас папку. В папке «sdk-tools-windows-xxxxxxx» (xxxxxxx — цифры) перейдите в подпапку «tools\bin», затем удерживая клавишу «Shift» нажмите в свободном месте проводника Windows правой кнопкой мыши и выберите пункт контекстного меню «Открыть окно команд».
Чтобы скачать необходимые файлы, введите команду:
sdkmanager "platform-tools" "platforms;android-23"
Число 23 означает версию SDK и соответствует Android 6, так как на телефоне Xiaomi Redmi 4A установлена именно эта версия системы. Вы же укажите версию SDK, соответствующую версии Android на Вашем телефоне.
Если получите warning (предупреждение), что файл «repositories.cfg» не может быть загружен, создайте файл с таким же именем в папке, путь на которую указывает предупреждение.
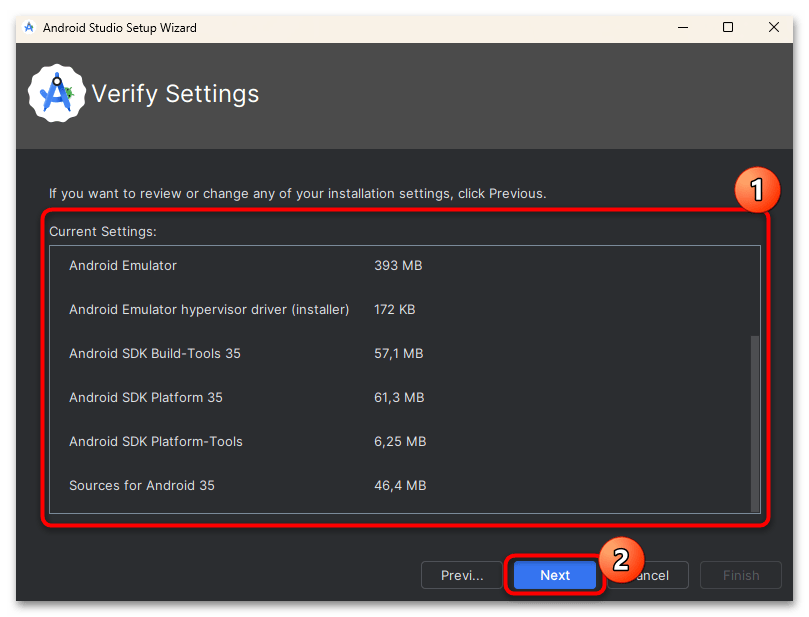
Если все правильно сделано, будет отображено пользовательское соглашение. Согласитесь с ним, напечатав «y» и нажав «Enter». Подождите несколько минут, по окончании установки средств разработки Вы увидите сообщение об успехе «done».
Закройте командную строку и поднимитесь на два уровня выше в родительскую папку «sdk-tools-windows-xxxxxxx» (xxxxxxx — цифры), там Вы увидите, что добавлено две папки «platform-tools» и «platforms». Войдите в папку «platform-tools» и посмотрите, среди файлов должны быть «adb.exe» и «fastboot.exe».
Все, на этом установка «platform-tools» завершена. Откройте окно команд в данной папке (см. выше) и приступайте к прошивке кастомного рекавери или других задач.
Все способы:
- Что такое Android SDK
- Установка
- Вариант 1: Установка Android Studio и инструментов Android SDK внутри среды
- Вариант 2: Скачивание компонентов Android SDK отдельно
- Решение возможных проблем
- Вопросы и ответы: 0
Что такое Android SDK
Программа Android SDK (Software Development Kit) – это набор инструментов, предназначенных для разработки, тестирования и отладки кода программного обеспечения для операционной системы Android. Софтом пользуются не только профессиональные разработчики, но и обычные пользователи для получения подробных сведений об ОС, удаления системных приложений, получения root-прав, создания резервных копий, поиска и анализа различных ошибок и просмотра логов. С помощью него есть возможность запустить восстановление программной оболочки девайса.
Для полноценной работы Android SDK дополнительно потребуется скачать и установить среду разработки Android Studio, но этот шаг можно пропустить, если предполагается пользоваться софтом напрямую из командной строки и без сторонних средств.
Если же нужно отображение графического интерфейса среды для удобства разработки, лучше предварительно инсталлировать Android Studio, затем внутри нее установить пакет платформы Android SDK, после чего запустить виртуальное устройство на базе Android.
Кроме того, следует упомянуть несколько важных требований к компьютеру для стабильной разработки и тестирования мобильных приложений:
- 64-разрядная операционная система Windows 7 (SP2), 8.1, 10 или 11 с последним пакетом обновлений (хотя софт мультиплатформенный — реализована поддержка таких ОС как Linux и MacOS, — но работает он со своими нюансами).
Например, при использовании Linux потребуется дополнительно установить несколько пакетов с помощью команды
sudo apt-get install lib32ncurses5 lib32stdc++6. Также может понадобиться найти подходящие пакеты «ncurses5» и «stdc++6». - Рекомендуется четырехъядерный ЦП с тактовой частотой 2,5 ГГц.
- ОЗУ – не менее 8 ГБ для оптимальной производительности, а для тестирования мобильного софта — от 2 ГБ.
- Не менее 4 ГБ свободного места на диске для файла подкачки.
- Для корректной и комфортной разработки рекомендуется использовать монитор с разрешением не менее 1280×800 и с частотой обновления 60 Гц.
Если же планируется создавать мобильный софт, тогда потребуется еще установить инструмент Java Development Kit, что мы более детально разобрали на Шаге 2.
Установка
Как уже говорилось, компоненты Android SDK можно скачать как по отдельности, так и для среды разработки Android Studio. В первом случае достаточно выбрать нужные программные элементы (инструменты для командной строки) и инсталлировать их вручную, а во втором – установить Android Studio и выбрать загрузку Android SDK в качестве дополнительного компонента при инсталляции.
Вариант 1: Установка Android Studio и инструментов Android SDK внутри среды
Программное обеспечение Android Studio представляет собой интегрированную среду разработки софта от компании Google для различных девайсов, работающих на базе Android (смартфонов, планшетов, умных часов, смарт-ТВ и других). С помощью нее есть возможность не только писать код (причем в упрощенном режиме), но и проектировать графический интерфейс, делать отладку и сборку приложений.
Шаг 1: Инсталляция софта и инструментов SDK
Повторимся, если вам не нужна программа Android Studio, а компоненты Android SDK будут использоваться исключительно через командную строку, пропустите этот вариант и сразу переходите к следующему, а именно к разделу со скачиванием и установкой отдельных инструментов.
Скачать Android Studio с официального сайта
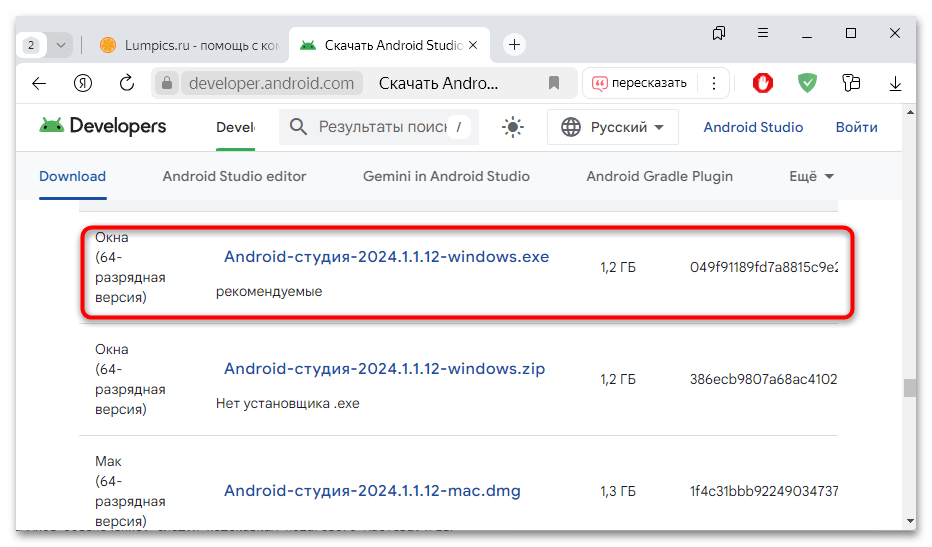
- Перейдите по ссылке выше и затем пролистайте страницу до раздела «Загрузки Android Studio» и выберите подходящую версию софта – в нашем примере для Windows. Лучше загружать установочный файл ПО.
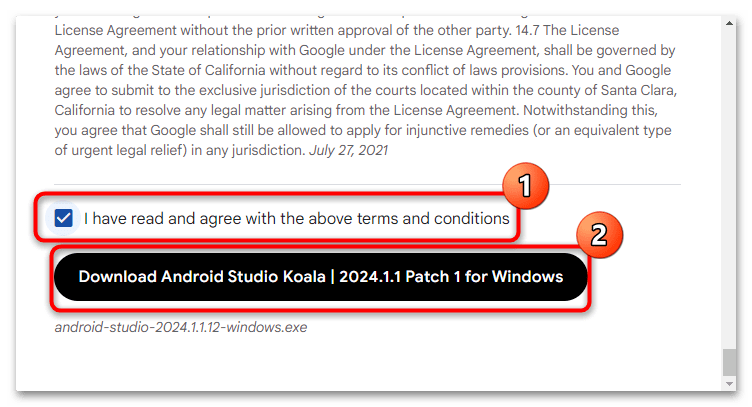
- Ознакомьтесь с условиями лицензионного соглашения, если требуется, затем отметьте соответствующий пункт внизу и нажмите на кнопку для старта скачивания.
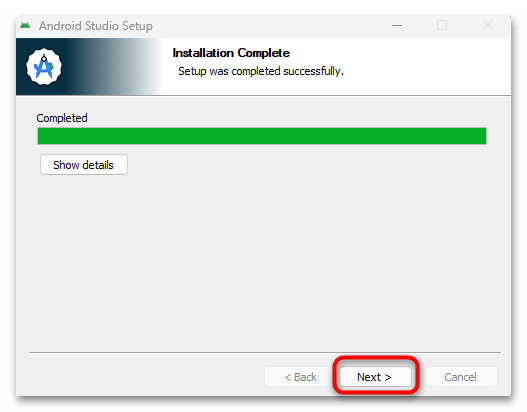
- Дождитесь окончания загрузки файла, после чего запустите его двойным нажатием левой кнопки мыши. Инсталлируйте программное обеспечение, следуя подсказкам пошагового мастера.
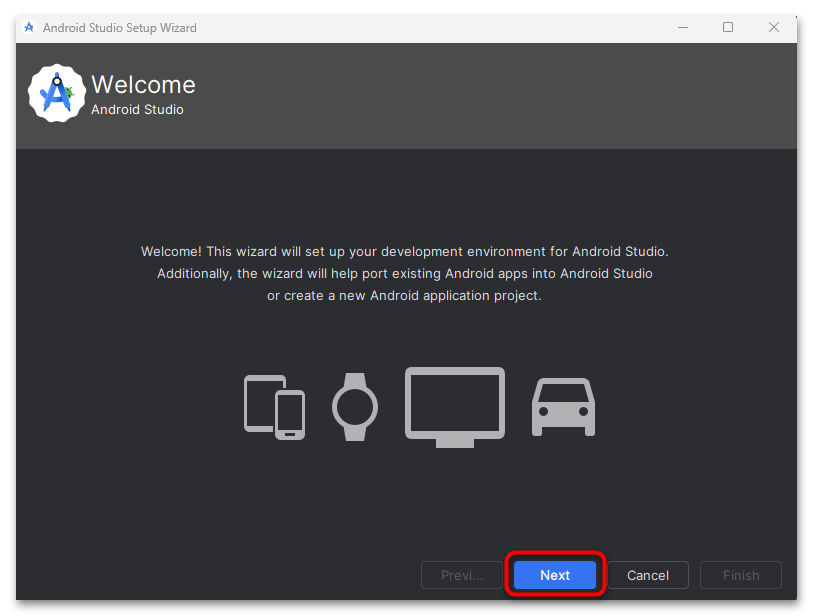
- Запустите софт. Должно отобразится приветственное окно с предварительной настройкой. Кликните по «Next».
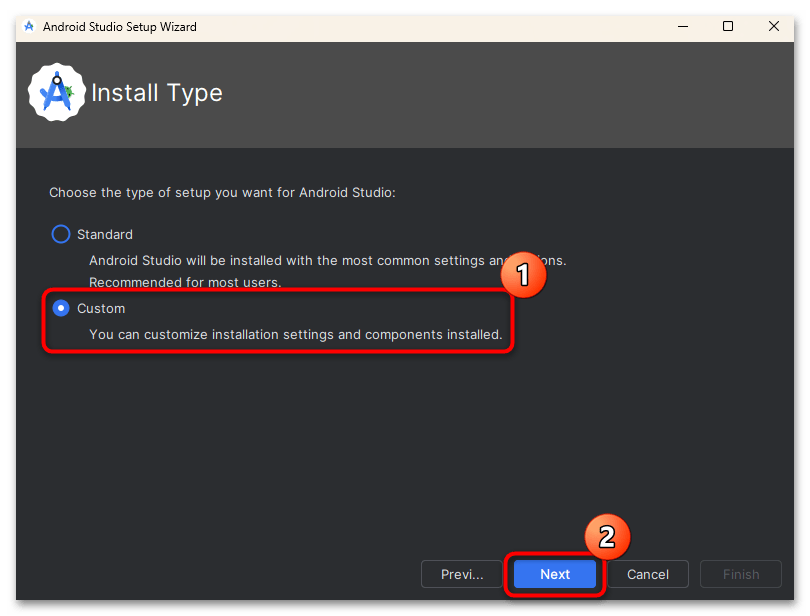
- Отметьте пункт «Custom» на следующем шаге – это позволит вручную выбрать компоненты, которые будут инсталлированы в среду разработки.
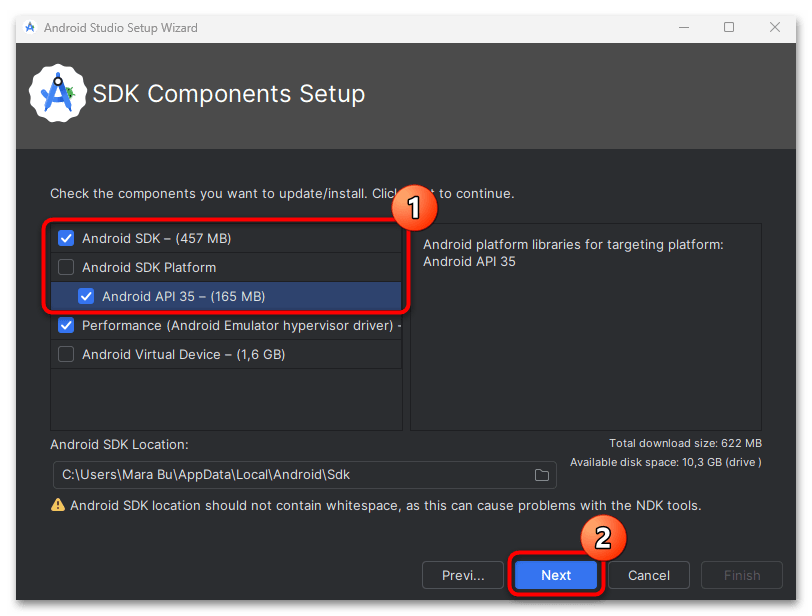
- Убедитесь, что отметка у пункта «Android SDK» установлена, а остальные параметры выставьте на свое усмотрение. Нажмите на кнопку «Next».
- Подтвердите действие, снова кликнув по кнопке продолжения.
- Отобразится окно со списком компонентов и инструментов, которые будут инсталлированы. Проверьте, все ли так, и нажмите на «Next».
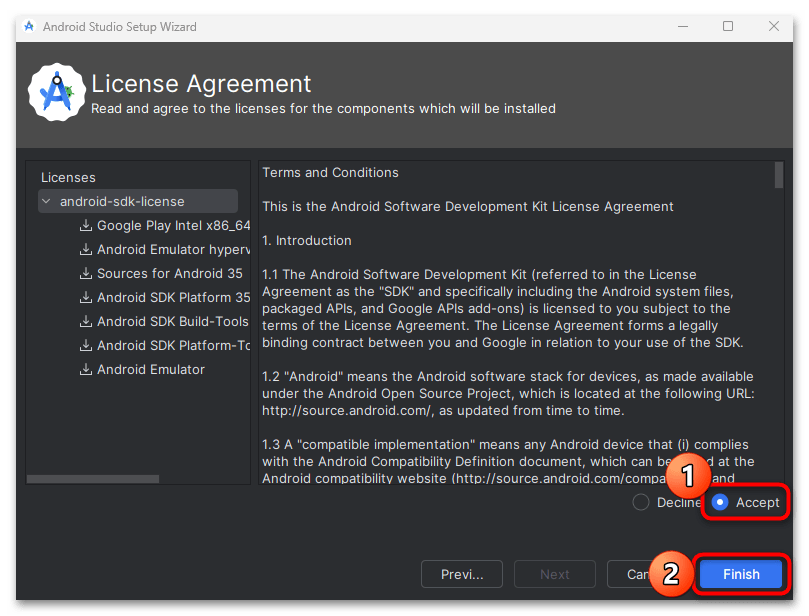
- В следующем окне отметьте «Accept», таким образом согласившись с условиями лицензионного использования, затем щелкните по «Finish» внизу.
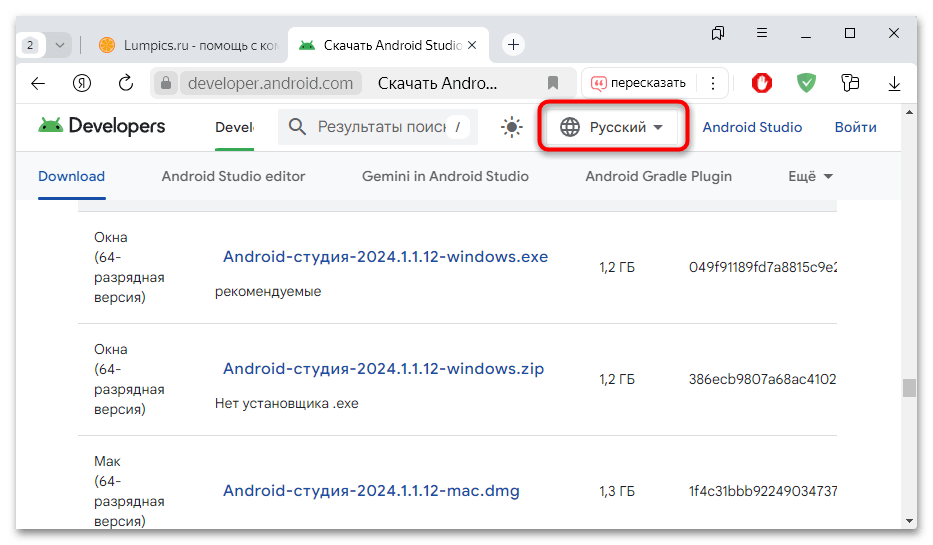
Выбрать русский язык страницы сайта можно из выпадающего меню вверху.
Останется дождаться окончания скачивания всех необходимых программных компонентов. При необходимости можно проследить за процессом, нажав на кнопку «Show Details».
Установить Android SDK в среде Android Studio можно и другим способом – уже после инсталляции софта. Перейдите в корневой каталог программы и выберите папку «Android», затем «bin», где нужно запустить утилиту «SDKManager». На панели слева выберите пункт «Android SDK» в разделе «System Settings», а в центральной части окна отметьте пункты «Android SDK Tools» и «Android SDK Platform-Tools» (если у вас Windows, рекомендуется также отметить «Google USB Driver»). После подтверждения условий соглашения начнется скачивание и инсталляция выбранных компонентов.
Для полноценной работы Android Studio потребуется дополнительно инсталлировать компоненты Java Development Kit – для этого переходите к Шагу 2.
Шаг 2: Инсталляция Java Development Kit
Инструмент Java Development Kit является ключевым, поскольку он необходим для создания приложений на платформе Android. Он нужен для работы с Android SDK и отвечает за графическое отображение исходного кода.
Скачать Java Development Kit с официального сайта
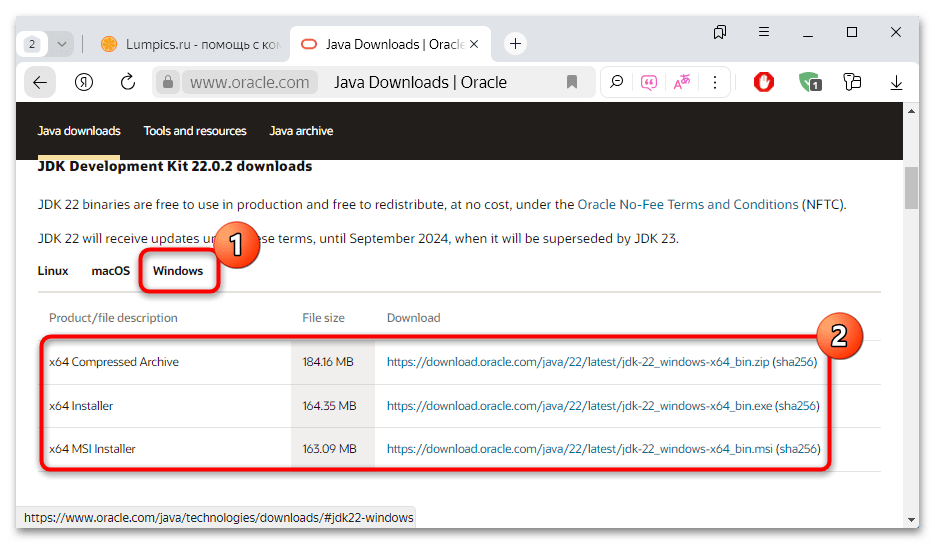
- Скачайте с официального сайта разработчика нужный вариант инсталляционного файла (доступен либо сжатый архив, либо установщик).

Обратите внимание, что последние версии софта совместимы только с 64-битными системами.
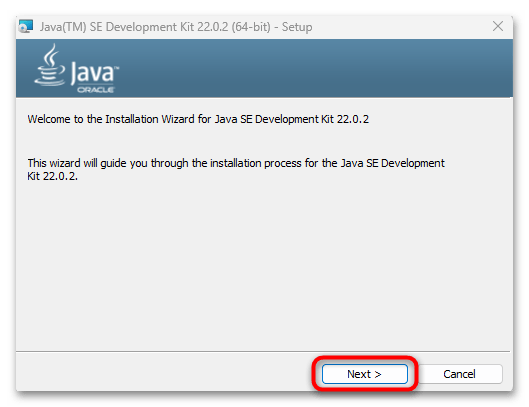
- Выполните установку пакета в соответствии с подсказками пошагового мастера.
После успешной установки обязательно выполните перезагрузку компьютера, чтобы новые параметры были зафиксированы, после чего можно приступать к первой настройке Android Studio или запуску инструментов Android SDK.
Вариант 2: Скачивание компонентов Android SDK отдельно
Возможностей команд в консоли вполне хватит для работы с некоторыми проектами при знании кода и языка программирования, создания файлов манифеста, а также взаимодействия с мобильным устройством на базе Android за счет набора библиотек API (например, для работы с камерой, модулем Bluetooth и другими компонентами, а также перезагрузки или выключения/включения девайса посредством подключения по USB и специальных команд).
Шаг 1: Загрузка компонентов
Теперь разберем ситуацию, которая предполагает инсталляцию инструментов Android SDK отдельно без среды разработки. В таком случае все действия будут выполняться через командную строку.
Перейти к скачиванию инструментов Android SDK
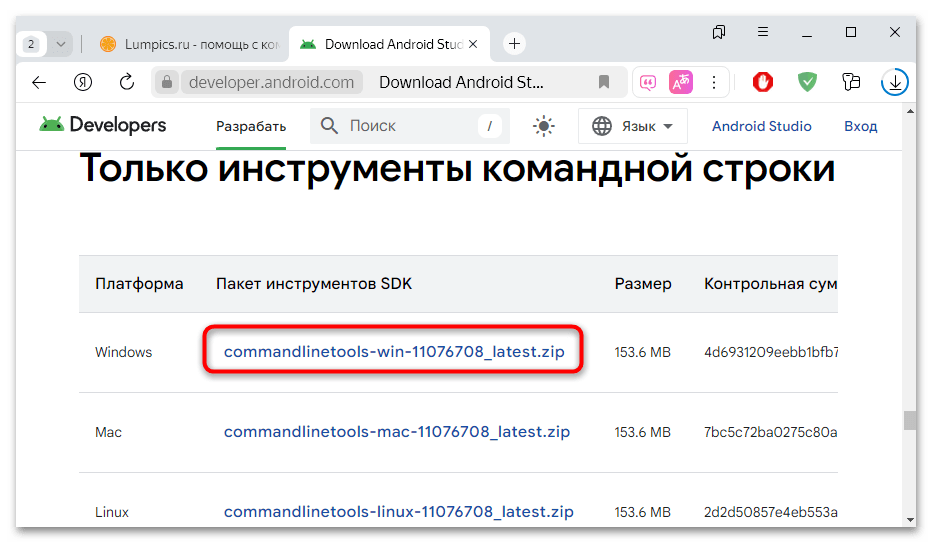
- Перейдите по ссылке выше (это та же ссылка, что была приведена в Варианте 1, но для удобства разместим ее еще раз), но для загрузки отдельных компонентов софта перейдите к разделу на сайте «Только инструменты командной строки» и выберите загрузку для вашей версии ОС на компьютере.
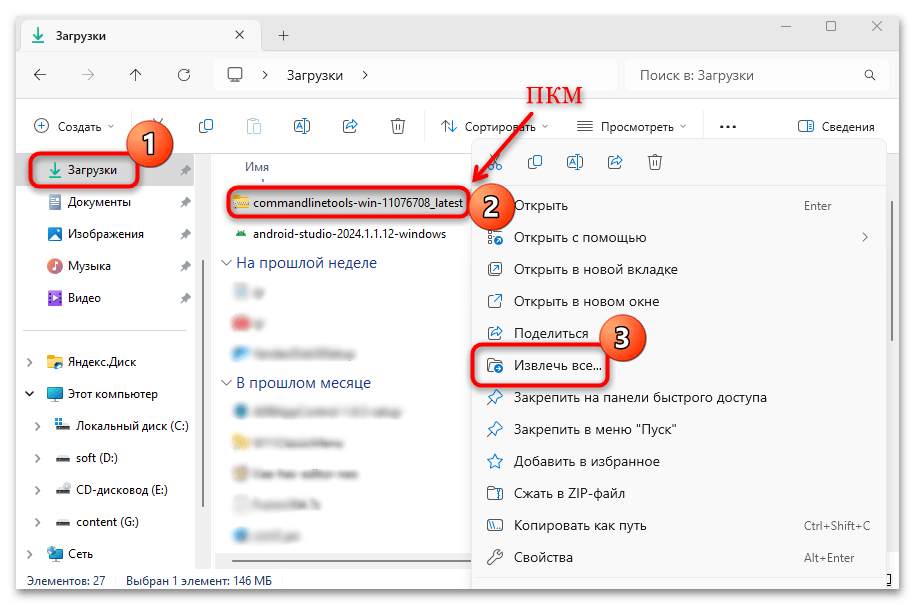
- После скачивания архива в формате ZIP извлеките данные в любое место на диске (адрес нужно будет запомнить для Шага 2).
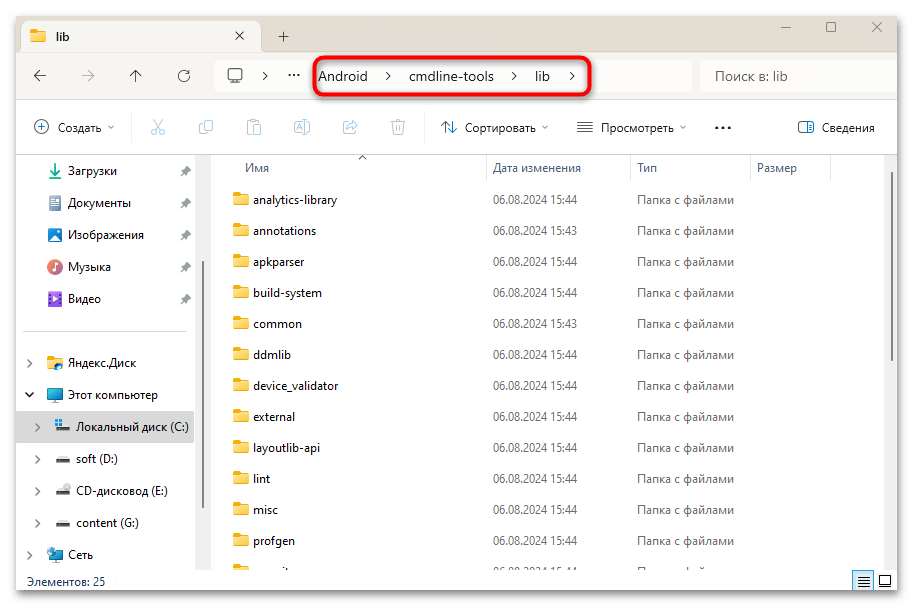
- Можете перейти в папку «cmdline-tools», где каталоге «lib» расположены другие инструменты для работы с Android-устройством через командную строку.
Для открытия компонентов и просмотра компонентов в графической среде, которые располагаются в архиве, потребуется Java Development Kit (Шаг 2 из Варианта 1). Чтобы узнать, как использовать инструменты через консоль, переходите к Шагу 2 данной инструкции.
Для загрузки других пакетов SDK можно воспользоваться специальным инструментом командной строки – SDKManager, позволяющим управлять компонентами для Android SDK. На официальном сайте разработчика предоставляется подробная инструкция по использованию и применению команд в утилите.
Перейти к инструкции на официальном сайте по использованию SDKManager
Шаг 2: Настройка ссылок
В качестве завершающего этапа следует создать символическую ссылку на папки с инструментами, чтобы можно было запустить их через консоль:
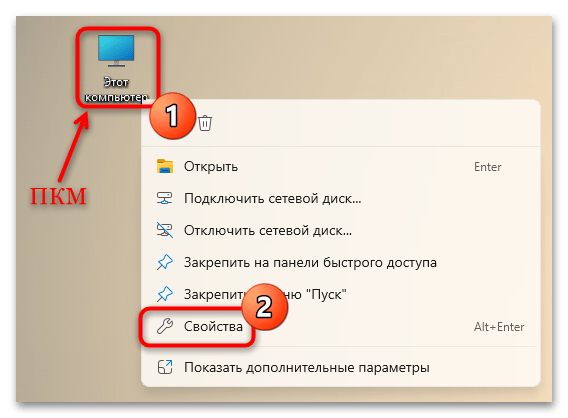
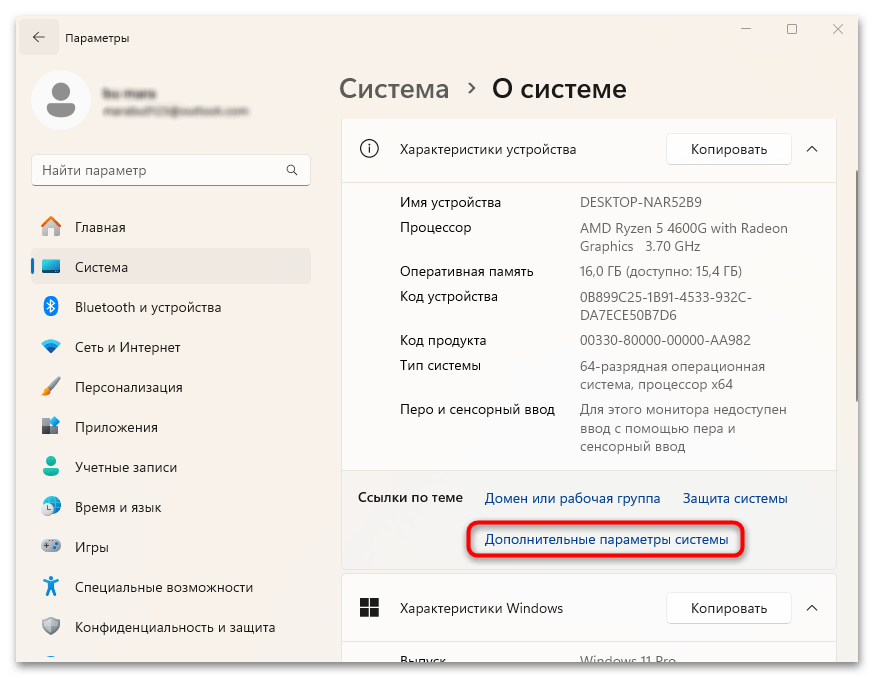
- Кликните правой кнопкой мыши по ярлыку «Этот компьютер» и выберите пункт «Свойства».
- В открывшемся окне с информацией о системе кликните по строке «Дополнительные параметры системы».
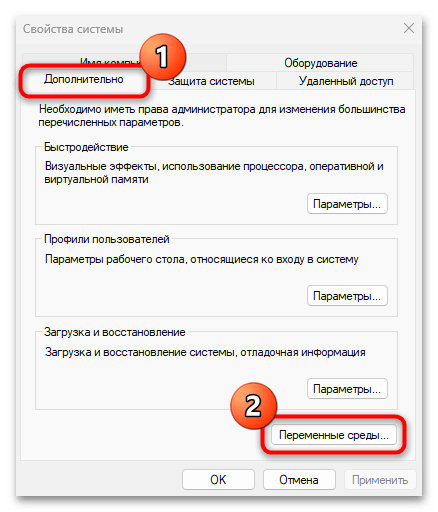
- Далее на вкладке «Дополнительно» выберите кнопку «Переменные среды».
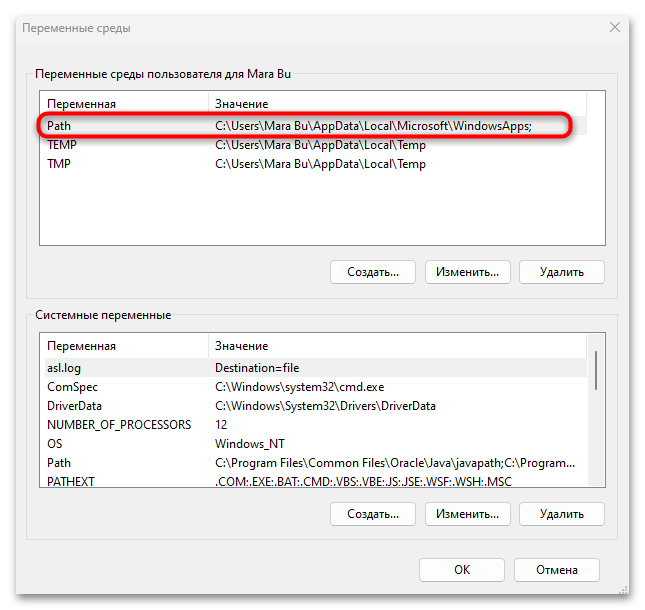
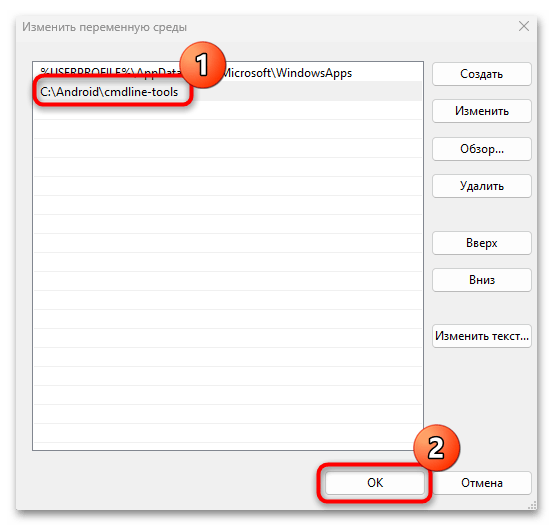
- В поле «Переменные среды для пользователя» дважды кликните левой кнопкой мыши по пункту «Path».
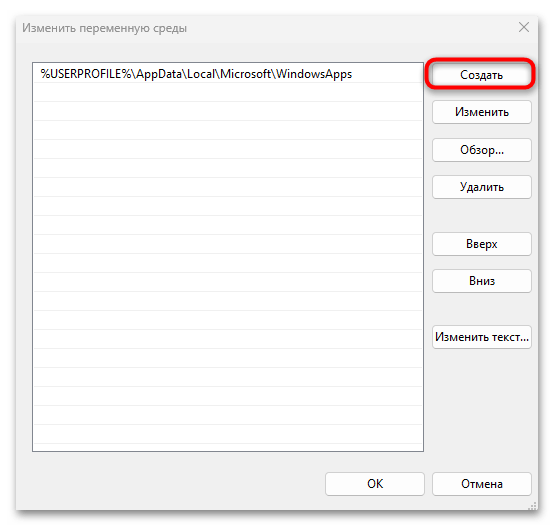
- Нажмите на «Создать» справа.
- В центральной части окна появится курсор в пустой строке – туда следует вставить полный путь к инструментам через точку с запятой, например
C:\Android\tools;C:\Android\cmdline-tools, и нажать на кнопку «ОК» для сохранения.
На этом установка Android SDK завершена. Теперь вы сможете с помощью специальных запросов в «Командной строке» взаимодействовать с мобильным устройством, например устанавливать образы или вручную обновлять ОС.
Решение возможных проблем
Иногда пользователи сталкиваются с проблемами при попытке установить или запустить Android SDK. Наиболее распространенные ошибки связаны с устаревшей версией Java Development Kit, когда после нее были инсталлированы инструменты Android SDK, а также из-за некорректных настроек системы.
В первом случае часто возникает ошибка «Skipping SDK Tools 11». Для ее устранения нужно полностью удалить Android SDK и Java Development Kit с компьютера, затем заново установить софт на компьютер, следуя нашим инструкциям из данной статьи. Лучше после деинсталляции программного обеспечения почистить кеш и реестровые ключи, которые были оставлены после ПО. Сделать это можно вручную либо с помощью специализированного софта, о чем более подробно мы писали в отдельном материале.
Подробнее: Очистка кеша в Windows 11 / Windows 10 / Windows 7
Ошибка «non-ASCII» говорит о том, что произошел конфликт между программным обеспечением и системой из-за имени пользователя – в нем не должно быть кириллических символов. Если такие буквы действительно есть, следует изменить имя учетной записи на латиницу. То, как это сделать, наш автор подробно разбирал в статье по ссылке ниже.
Подробнее: Переименование локальной учетной записи в Windows 11 / Windows 10 / Windows 7
Наша группа в TelegramПолезные советы и помощь
Android SDK Platform Tools provide essential command-line utilities for managing connected Android devices, running shell commands, flashing system images, and debugging applications. This toolkit is indispensable for developers working on app development, testing, and device management, offering a streamlined interface for low-level interactions with the Android operating system. These tools are included in the Android SDK and can be accessed through the command line. They are essential for developers working on Android apps and for those who need to interact with Android devices at a low level.
The Platform-Tools package provides a command-line interface (CLI) for tasks like:
- Managing connected Android devices
- Installing and uninstalling apps
- Running shell commands on devices
- Flashing device images (advanced users)
- Debugging apps
This blog post equips you with the Platform Tools, a developer’s toolkit for interacting with Android devices and the operating system.
Install using Homebrew (Recommended)
Homebrew is a package manager for macOs.
brew install --cask android-platform-toolsIf you don’t have Homebrew installed, you can install it by running the following command on your terminal:
/bin/bash -c "$(curl -fsSL https://raw.githubusercontent.com/Homebrew/install/HEAD/install.sh)"Manual Installation
- Visit the official Android Developer website and download the latest Platform Tools:
Download Android SDK Platform Tools.
2. Extract the Downloaded ZIP file.
3. Move the Platform Tools to a Convenient Directory
- Move the extracted
platform-toolsfolder to a location where you’d like to store it. For example, you can move it to/usr/localto make it globally accessible.
To do this via the terminal, run:
sudo mv ~/Downloads/platform-tools /usr/local/platform-tools4. Add Platform Tools to Your PATH
- To make
adband other platform tools commands globally accessible, you need to add them to your PATHenvironment variable.
If you’re using the zsh shell (default on modern macOS), open your ~/.zshrc file:
nano ~/.zshrcIf you’re using bash, open your ~/.bash_profile:
nano ~/.bash_profileAdd the following line at the bottom of the file:
export PATH=$PATH:/usr/local/platform-toolsSave the changes and apply the changes by running:
source ~/.zshrc   # For zsh users
source ~/.bash_profile   # For bash users
Setting Up Android SDK Platform Tools on Windows
Download the Android SDK Platform Tools from the official Android Developer website:
- Download Android Platform Tools
- Extract the downloaded ZIP file to a folder of your choice.
- Open a Command Prompt (or PowerShell) and navigate to the folder where the platform-tools were extracted.
- You can now run commands by navigating to this folder.
Optional: Add the platform-tools folder to your system’s PATH so you can run adb from any directory:
- Right-click This PC > Properties > Advanced System Settings > Environment Variables.
- In the System variables section, find Path, select it, and click Edit.
- Click New and paste the path to the platform-tools folder.Click OK to save.
Congratulations! You’ve successfully installed the Android SDK Platform Tools.
Additional Tips:
- Keep your platform tools updated for optimal performance and compatibility.
- Explore online resources for in-depth tutorials on utilizing the platform tools for Android development.
Bonus : This is your guide to enable developer option on Android.
Share this article with your friends

Are you looking to set up Android SDK Platform Tools but don’t know where to start? Whether you’re an app developer or just looking to interact with your Android device via the command line, this guide will help you install the tools on both macOS and Windows.
The Android SDK Platform Tools package provides essential command-line tools for managing Android devices, debugging applications, and more. Below is a quick guide to get you up and running.
Why Install Android SDK Platform Tools?
Before we dive into the steps, let’s briefly understand why these tools are crucial for anyone working with Android devices:
- Install and uninstall applications
- Run shell commands on Android devices
- Debug apps
- Flash device images (for advanced users)
Want to dive deeper into these features? Check out the full guide here.
Installing on macOS
Option 1: Homebrew Installation (Recommended)
For macOS users, Homebrew provides the easiest way to install Android SDK Platform Tools.
-
Install Homebrew if you don’t have it:
/bin/bash -c "$(curl -fsSL https://raw.githubusercontent.com/Homebrew/install/HEAD/install.sh)" -
Use Homebrew to install the tools:
brew install --cask android-platform-tools
For more detailed instructions, including how to verify installation, check out the full guide.
Option 2: Manual Installation
Prefer doing things manually? You can download and set up the tools directly from the official Android Developer website.
- Download the ZIP file.
- Extract the contents and move the folder to a directory like /usr/local.
Want the full step-by-step guide, including how to set the PATH variable? Click here to view the detailed process.
Installing on Windows
For Windows users, the process is straightforward. Here’s a quick overview:
- Download the Android SDK Platform Tools from the official site.
- Extract the ZIP file and open Command Prompt or PowerShell.
- Optionally, add the platform-tools folder to your system’s PATH for easier access.
Need more details on how to configure your system’s PATH? Head over to the complete guide for a full walkthrough.
Final Tips
Installing the Android SDK Platform Tools is just the first step. Keeping the tools updated and exploring advanced configurations can significantly enhance your Android development experience.
If you’re looking for advanced configurations, such as debugging or running shell commands, I’ve covered everything in the original post here.
Happy coding!
In this tutorial, we will discuss all the steps required to install Android Platform Tools and SDK Manager on Windows 10. This tutorial provides the steps for Windows 10, though the steps should be the same on other versions of Windows.
This post is useful for the developers using Android Platform Tools and SDK manager without installing Android Studio for the use cases including hybrid app development using Ionic. It also assumes that a valid JAVA_HOME environment variable exists pointing to the installation directory of Java.
You can follow How To Install Java 8 On Windows 10, How To Install Java 11 On Windows, How To Install Java 15 On Windows, or How To Install OpenJDK 15 On Windows to install Java on Windows. In case you are interested in developing Android applications using Android Studio, you can also follow How To Install Android Studio On Windows.
Step 1: Download SDK Tools
Open the download tab of Android Studio and scroll down to the Command line tools only section. This section shows various options for downloading the SDK tools, as shown in Figure 1.

Fig 1
Click the first link with the download option for Windows, as highlighted in Figure 1. It will ask you to accept the terms and conditions, as shown in Figure 2.

Fig 2
Go through the details, agree on the terms and conditions and click the Download Button to start the download.
Step 2: Install Command Line Tools
In this step, we will install the Android Command Line Tools on Windows 10. Create the directory android-sdk at your preferred location and extract the content of the downloaded SDK Tools zip to this directory. Make sure that the extracted content is available within the android-sdk directory created by us as shown in Fig 3.

Fig 3
Step 3: Install Platform Tools
In this step, we will install the Android Platform Tools on Windows 10. To do so, follow the same steps as for Android SDK Tools, using the download link shown in Figures 4, 5, and 6.

Fig 4

Fig 5

Fig 6
Step 4: Configure Environment Variable
Right-click the My Computer or This PC on the desktop and click the Properties Option. Now click the Advanced system settings. It will show the System Properties dialog having Advanced Tab options as shown in Fig 7.

Fig 7
Click the Environment Variables Button and click the New Button in the first section. Set the Variable Name field to ANDROID_HOME and Variable Value to the android-sdk directory created by us in the previous step.
Similarly, also configure the environment variable ANDROID_SDK_ROOT to the android-sdk directory.
AlsoMake sure that the JAVA_HOME environment variable is set to the JDK installation directory. It must not end with the bin as we do with the system path variable.

Fig 8
Step 5: Configure Commands
In previous steps, we have downloaded and extracted the Command Line Tools and Platform Tools to the android-sdk directory. Both the tools provide several command-line utilities which we need to run by going to the appropriate directory having the executable files.
We can make these commands available at the system level without going to these directories by adding the path to tools, tools\bin, and platform-tools to the system path as shown in Fig 9. Make sure that these executables do not break other commands having the same name before adding these paths to the PATH environment variable.

Fig 9
Now open the Command Prompt and check the ADB and SDK Manager versions as shown in Fig 10. You might be required to restart the system to apply the environment variables set by us.
# Check adb version
adb --version

# It must show the installed adb version
Android Debug Bridge version 1.0.41
Version 31.0.0-7110759
Installed as E:\tools\java\android-sdk\platform-tools\adb.exe

# Check sdkmanager version
sdkmanager --version

# It will show the error as shown below
Error: Could not determine SDK root.
Error: Either specify it explicitly with --sdk_root= or move this package into its expected location: <sdk>\cmdline-tools\latest\
We can see that the ADB command works well and shows the version details, but the sdkmanager shows an error — «error: could not determine sdk root. error: either specify it explicitly with —sdk_root= or move this package into its expected location: <sdk>\cmdline-tools\latest\» since it expects the Command Line Tools in a version-specific directory. Now open the source.properties file from the cmdline-tools directory to check the version. It will show the version details as shown below.
Pkg.Revision=3.0
Pkg.Path=cmdline-tools;3.0
Pkg.Desc=Android SDK Command-line Tools
Now move all the files to the directory cmdline-tools/3.0 as shown in Fig 10.

Fig 10
Also, update the system path as shown in Fig 11.

Fig 11
Now close and open the Command Prompt. Also, check the ADB and SDK Manager versions as shown in Fig 12.

Fig 12
Step 6: Using the SDK Manager
List — We can list the installed and available packages and images using the list command as shown below.
// List all the installed and available platforms, system images and other resources
sdkmanager --list

// Output should look like
Installed packages:=====================] 100% Computing updates...

  Path           | Version | Description                   | Location

  -------        | ------- | -------                       | -------

  platform-tools | 31.0.0  | Android SDK Platform-Tools 31 | platform-tools\


Available Packages:

  Path                                                                                     | Version      | Description

  -------                                                                                  | -------      | -------

  add-ons;addon-google_apis-google-15                                                      | 3            | Google APIs

...

...

// We can see that it shows the tools and platform-tools installed by us
Install Platform — Use the below-mentioned command to install the Android 10 (API level 30) using the SDK manager.
# Go to the SDK Tools bin directory to access sdkmanager
# Start download the most recent package
sdkmanager "platforms;android-30"
It will ask to accept the terms and conditions as shown in Fig 13. Enter y and hit Enter Key to accept the terms and conditions. This command creates the directory platforms within android-sdk and installs the package android-30 having all the required files to run the emulator for Android 10.

Fig 13
If we again check the installed packages, the list command shows the installed options as shown below.
sdkmanager --list
Installed packages:=====================] 100% Computing updates...
Path | Version | Description | Location
------- | ------- | ------- | -------
platform-tools | 31.0.0 | Android SDK Platform-Tools 31 | platform-tools\
platforms;android-30 | 3 | Android SDK Platform 30 | platforms\android-30\Available Packages:
Path | Version | Description
------- | ------- | -------
add-ons;addon-google_apis-google-15 | 3 | Google APIs
add-ons;addon-google_apis-google-16 | 4 | Google APIs
...
...
Update SDK Manager — Update the SDK manager using the below-mentioned command.
sdkmanager --updateAdd System Image — We can add system images from available images shown by the list command using the SDK manager as shown below. We are adding the most recent default 64-bit system image.
// Install default system image for platform android-30
sdkmanager "system-images;android-30;google_apis;x86_64"
Accept the License Agreement to complete the download.
Several projects need Google Play Services. We need system images specific to Google Play Services, as shown below.
// Install Google Play Services system image
sdkmanager "system-images;android-30;google_apis_playstore;x86_64"
Accept the License Agreement to complete the download.
Install Emulator — We need to install the emulator before creating the AVD using SDK Manager.
// Install Emulator
sdkmanager --channel=3 emulator
Accept the License Agreement to complete the download.
Install Build Tools — Install the most recent build tool listed by the listcommand.
// Install Build Tools
sdkmanager "<build tools version>"

// Example
sdkmanager "build-tools;30.0.3"
Step 7: Using the Emulator and AVD Manager
Create Android Emulator — Create the emulator using the system image downloaded in the previous step as shown below. Replace <emulator name> with the actual name preferred by you.
// Create the emulator using default system image
avdmanager create avd -n <emulator name> -k "system-images;android-30;google_apis;x86_64" -g "google_apis"

// Example:
avdmanager create avd -n emulator30 -k "system-images;android-30;google_apis;x86_64" -g "google_apis"

// Create emulator using Google Play Services system image
avdmanager create avd -n <emulator name> -k "system-images;android-30;google_apis_playstore;x86_64"

// Example:
avdmanager create avd -n emulator30ps -k "system-images;android-30;google_apis_playstore;x86_64"
The above commands ask a bunch of questions to configure the AVD if we choose the custom hardware profile option. We have excluded the details of these options from this tutorial since these configuration details depend on the actual needs. After completing all the configurations, it creates the AVD using the name provided by us while configuring it.
Similarly, we can also install the AVD of older versions as shown below.
// Create the emulator using default system image
avdmanager create avd -n <emulator name> -k "system-images;android-29;default;x86_64" -g "default"

// Example:
avdmanager create avd -n emulator29 -k "system-images;android-29;default;x86_64" -g "default"

// Create emulator using Google Play Services system image
avdmanager create avd -n <emulator name> -k "system-images;android-29;google_apis_playstore;x86_64"

// Example:
avdmanager create avd -n emulator29ps -k "system-images;android-29;google_apis_playstore;x86_64"
List Android Emulators — Now go to the tools directory on the command line and check the installed platform as shown below.
Notes: Add Emulator to the system path as shown in Fig 14.

Fig 14
Close and re-open the Command Prompt to check the AVDs created by us in the previous steps.
// List the available emulators
emulator -list-avds

// Output
default28
emulator30
emulator30ps
It will list all the AVDs installed by us.
Run Emulator — We can run the emulator created by us as shown below.
// Run Emulator
emulator -avd <emulator name>

// Example
emulator -avd emulator30
The emulator will take some time to completely launch the AVD. The final results should look similar to Fig 15.

Fig 15
Delete Emulator — We can also delete an existing emulator as shown below.
// Delete Emulator
avdmanager delete avd -n <emulator name>
Summary
This tutorial provided all the steps required to install Android Platform Tools and Android SDK Manager on Windows 10. It also provided the steps required to create and launch the AVDs using the Emulator.