
Время на прочтение4 мин
Количество просмотров211K
Данный пост написан не холивара ради, а просто, чтобы поделится опытом. Сразу отвечу на основную часть вопросов:
— Зачем это надо?
— Это просто надо!
— Есть же MacOS, зачем на Маке Windows?
— Каждый выбирает для себя, с чем ему удобнее работать! Мне нравятся железки от Apple, но привык я работать в Windows!
— Есть же виртуальные машины?
— Они работают медленно!
— Есть же Bootcamp!?
— На Air мало место, и только Windows занимает около 30-40Гб, со всем софтом!
Ответил на все вопросы?! Если вам все еще интересно как это провернуть, тогда добро пожаловать в пост…
Если у вас есть внешний CD привод, возможно этот пост не для вас, здесь я расскажу как установить Windows на MacBook Air без наличия привода.
Для того чтобы это все провернуть, нам понадобится:
- 2 USB флэшки (одна для Windows 7 (от 4Гб), другая для драйверов (от 1 Гб))
- 1 PC – с Windows 7
- Интернет
- и конечно же новенький Macbook Air 2010 Late
Этап 1. Подготовка загрузочной флэшки с Windows 7
Для начала займемся подготовкой флэшки и сделаем ее загрузочной. Для этого нам понадобится PC с Windows 7 и диск от Windows (желательно x64, так как ноутбук поддерживает x64).
Вставляем флэшку на 4Гб в USB, набираем в поиске CMD, правой клавишей «Запустить с правами Администратора».
Далее набирает diskpart (это системная утилита для разбивания дисков, аналог старого fdisk). Теперь по этапам, что делаем в diskpart:
- Набираем list disk (отобразится список дисков, в нем ищем нашу флэшку на 4Гб, у меня она disk 3)
- select disk 3 (выбираем нашу флэшку)
- clean (стираем с нее все)
- create partition primary (создаем на ней основной раздел)
- select partition 1 (заходим в созданный раздел)
- active (делаем раздел активным)
- format fs=fat32 quick (форматируем, можно отформатировать в NTFS)
- assign (подключаем диск, и назначаем ему букву)
- exit (выходим, cmd не закрываем, он нам еще понадобится)
Подробнее о diskpart: http://support.microsoft.com/kb/300415
Теперь у нас есть USB флэшка, отформатированная в FAT32, которая активная, т.е. может стать загрузочной.
Для того чтобы установить загрузчик, надо сделать так в CMD:
- F: (у меня CD-ROM обозначается буквой F:, у вас может быть другая)
- cd \boot\
- bootsect /nt60 E: (где E: это имя флэшки)
Все! Теперь наша флэшка является загрузочной с установленным загрузчиком Windows 7, осталось скопировать, все файлы с CD Windows 7 на эту флэшку, это можно сделать проводником, или любым другим удобным вам способом.
Этап 2. Подготовка Macbook Air
Если было бы так все просто, и можно было просто вставить флэшку в Macbook и установить Windows 7, этого бы поста не было.
И так по пунктам:
- Для начала нам потребуются драйвера для Windows 7, на флэшке, которая идет в комплекте с Air, драйверов нет (кстати, флэшка которая идет в комплекте, определяется как внешний CD-ROM).
- Возьмем вторую флэшку, отформатируем ее в Fat32 с помощью дисковой утилиты.
- Запустим bootcamp. И на вопрос, есть ли у нас подобная флэшка или диск с драйверами, ответим нет, и попросим скачать с интернета:

- После того как все скачается, запишем это на нашу флэшку выбрав пункт, записать на внешний диск:


На предложение разбить диск на разделы и вставить диск с Windows отвечаем отрицательно, и просто закрываем Bootcamp.
Подробнее о том как работать с Bootcamp: http://support.apple.com/kb/ht4407
Этап 3. Заставить Macbook видеть USB Flash с Windows
Все мои попытки заставить Macbook видеть загрузочную флэшку, завершились неудачей, поэтому пришлось воспользоваться Google.
Оказывается я не один, кому нужен чистый Windows/Linux на Macbook, и для этого есть программа rEFIt.
Скачиваем ее с официального сайта: http://refit.sourceforge.net/. Я установил себе последнею версию 0.14. Устанавливается она стандартно, как любое приложение в MacOS.
После установки надо перезагрузить компьютер 2 раза. На второй перезагрузке необходимо зажать правый-option и появится подобное меню (USB Flash с Windows должна быть в MacBook):

У вас по умолчанию будет значок MacOS и значок Windows. Нам надо выбрать Windows.
После запуска установщика, ввода ключа, выбираем «полная установка».
Будет выведен список разделов, на которые размечен SSD:

Удалям все разделы! И создаем новые, при создание Windows предложит, точнее прикажет, создать системный раздел на 100Мб.
Диск я разбил на 100Мб(), 40Гб (система), и остальное.
Как все установится, компьютер перезагрузится, и запустится виндовс, в начале, он возможно долго будет висеть на белом экране, и искать раздел MacOS, это вылечится после установки драйвером, и приложения Bootcamp в Windows, чтобы быстрее нашелся нужный раздел, зажимаем левый option и выбирает диск с Windows.
После того как установка завершится, устанавливаем драйвера со второй флэшки, перегружаем. После перезагрузки заходим в Bootcamp, выбираем диск для загрузки Windows и нажимаем перезагрузить сейчас. ВСЁ! Теперь вы не будете видеть белый экран включения Macbook около минуты.
Немного о том как все это работает
Поработав 2 дня, на новеньком MacBook, я оценил все преимущества SSD. Windows грузится 10-15 секунд (от нажатия кнопки включения, до того как все иконки в систреи загрузятся)
Word отскрывается за 1 секунду
Photoshop CS5 – первый раз за 4 секунды, если выключить и включить заново 2 секунды (связано скорее всего с ReadyBoost, и всякими новыми фичами в Windows 7)
Время отклика приложения мгновенное.
И все это с сочетание Core2Duo, DDR3, Multi-touchpad, 1440×900…
Одним словом, я очень доволен! И не имеет значение что стоит Windows или MacOS, потому что MacBook Air 2010 Late отличная железка!
Всем счастливого Нового Года и хороших подарков!
Проверил — точно работает. Как сделать загрузочную флешку с windows 7 / XP под Mac OS X. Если есть образ диска, например windows.iso то при попытке залить этот образ на флешку, Дисковая Утилита выдает ошибку «Не удается сканировать «windows.iso». (Неверный аргумент)». Поэтому я решил написать этот маленький туториал.
1. Открываем терминал (можно найти его в Программы/Утилиты)
Вводим:
diskutil list
Жмем ввод, и ищем название нашей флешки. После чего смотрим какой у нее номер. Например:
/dev/disk2#:
TYPE NAME SIZE
identifier0:
FDisk_partition_scheme *16.0 GB disk21:
Windows_FAT_32 QUMO 16.0 GB disk2s1
У моей флешки это disk2
Вводим в терминале:
diskutil unmountDisk /dev/diskX
Заменяя X на тот номер, который присвоен вашей флешке.
Далее вводим (или копируем) в терминал:
sudo dd if=/путь/к/образуДиска.iso of=/dev/diskX bs=1m
Меняем «/путь/к/образуДиска.iso» (напрмер можно открыть папку в которой лежит образ диска, и просто перетащить ее на окно терминала, в итоге в терминале появится путь до этого файла) на путь к образу который нужно залить на флешку и diskX на номер вашей флешке, в списке дисков.
Далее ждем, пока система перенесет все данные. У этого процесса нет никакого графического индикатора, просто наберитесь терпения.
Запись опубликована в блоге www.mainstreamo.ru
Для журнала
Как пользоваться Ассистентом Boot Camp, если он ругается на отсутствие DVD привода и не хочет переразмечать системный диск? Как стандартными средствами Mac OS X сделать установочный USB с Windows? В данной заметке мы рассмотрим решение данных вопросов.
Введение.
В Ассистенте Boot Camp 4, который к нам пришёл вместе с OS X Lion, появилась классная функция — автоматическое создание установочного USB-флеш накопителя для инсталляции Windows 7 или Windows 8 на BOOTCAMP раздел, но из-за #бн#той политики Apple (уж простите за скрытное сквернословие), данная функция доступна только для компьютеров Mac, которые лишены DVD привода: MacBook Air, Mac mini, MacBook Pro Retina…и то не всех поколений. Хочу зайти сразу немного вперёд чтоб огорчить владельцев устаревших моделей Mac: установка Windows с USB накопителя доступна на компьютерах Mac 2011 года выпуска и новее, старые модели просто-напросто на уровне прошивки EFI лишены данной возможности (хотя нужно проверять, возможно некоторые модели 2010 года тоже умеют устанавливать Windows с USB). Ну да ладно, речь сейчас не об этом. Возьмём, к примеру владельцев «тру» Mac’ов. Вот есть у человека Mac 2011 года выпуска, который поддерживает загрузку и установку Windows с USB-накопителя. К примеру, взял он и заменил стандартный DVD-привод на «оптибеей» с дополнительным HDD или SSD. Ну и…думаете Ассистент Boot Camp с пониманием отнесётся к такому маководу? — Отнюдь. Boot Camp будет «ругаться» на отсутствие DVD-привода, откажется «откусывать» раздел под Windows, и вообще всячески будет угнетать пользователя своими сообщениями. Разве это правильно? — Нет! И мы будем это исправлять 😉 Но для начала немного предыстории…
Предыстория.
Вобщем-то у меня MacBook Pro тоже не из новых, и о функции создания установочного USB накопителя с Windows 7/8 на борту, да при помощи стандартной утилиты Ассистент Boot Camp, я узнал абсолютно случайно, когда знакомым на MacBook Air 2011 года устанавливал «семёрку». После мне в руки попал MacBook Air 2010 года для той же цели, но Boot Camp уже отказался создавать для него USB накопитель. Вот тут я как раз и заинтересовался нашим «пациентом», полез в ресурсы Boot Camp Assistant.app и увидел несколько интересных для себя вещей…
- Во-первых это два файла: /Contents/Resources/applembr.bin и /Contents/Resources/applboot.bin. Первый (applembr.bin) — загрузочная MBR, второй (applboot.bin) — сам загрузчик, на который передаётся управление от MBR и который в последствии запускает загрузчик Windows — bootmgr.
- Во вторых меня заинтересовало содержимое файла /Contents/Info.plist, а точнее вот эти два участка кода. Вот этот:
<key>DARequiredROMVersions</key>
<array>
	<string>IM41.0055.B08</string>
	<string>IM42.0071.B03</string>
	<string>IM51.0090.B03</string>
	<string>IM52.0090.B03</string>
	<string>IM61.0093.B01</string>
	<string>MP11.005C.B04</string>
	<string>MB11.0061.B03</string>
	<string>MBP11.0055.B08</string>
	<string>MBP12.0061.B03</string>
	<string>MM11.0055.B08</string>
</array>
И вот этот:
<key>USBBootSupportedModels</key>
<array>
	<string>IM130</string>
	<string>MM50</string>
	<string>MP60</string>
	<string>MB80</string>
	<string>MBP90</string>
	<string>MBA40</string>
</array>
Первый участок отвечает, как я понимаю, за саму поддержку загрузки Windows с BOOTCAMP раздела на уровне прошивки EFI. Второй же участок более интересен. Как видно, в ключе USBBootSupportedModels прописаны модели Mac’ов, которые поддерживают (которым Apple разрешила поддерживать) загрузку и установку Windows не с DVD, а с USB. Из идентификаторов не трудно разобрать о чём идёт речь:
- IM130 — iMac 13-го поколения (конец 2012 года, те что тонкие и без DVD);
- MM50 — Mac mini 5-го поколения (конец 2012 года);
- MP60 — MacPro 6-го поколения;
- MB80 — MacBook 8-го поколения;
- MPB90 — MacBook Pro 9-го поколения (средина 2012 года);
- MBA — MacBook Air 4-го поколения (средина 2011 года).
Как видно, в списке поддерживаемых моделей, которые могут устанавливать Windows с USB флеш-драйвов, числятся модели начиная с 2011 года, но вот почему-то некоторые модели Mac не попали в список счастливчиков. Ну что ж, будем всё исправлять…
Введение.
- OS X 10.7 Lion, OS X 10.8 Mountain Lion или OS X 10.9 Mavericks;
- Ассистент Boot Camp 4, 5 (или новее);
- Mac, поддерживающий загрузку Windows с USB накопителя (обычно модели 2011 года или свежее).
Инструкция.
Переходим в меню Apple → Об этом Mac → Подробнее → Отчёт о системе…, в открывшемся приложении Информация о системе слева выбираем первый пункт — Аппаратные средства, а в основном окне находим пункт Идентификатор модели: МодельМакаX,Y, например MacBookPro8,1. ОК, запоминаем идентификатор своей модели. Теперь переходим в ресурсы приложения Ассистент Boot Camp (Boot Camp Assistant.app) → правый клик по приложению → Показать содержимое пакета → переходим в папку Contents и при помощи хорошего текстового редактора, например TextMate 2, открываем файл Info.plist. Находим уже показанный ранее мною кусок кода:
<key>USBBootSupportedModels</key>
<array>
	<string>IM130</string>
	<string>MM50</string>
	<string>MP60</string>
	<string>MB80</string>
	<string>MBP90</string>
	<string>MBA40</string>
</array>
И добавляем в него свой идентификатор, например:
<key>USBBootSupportedModels</key>
<array>
	<string>IM130</string>
	<string>MM50</string>
	<string>MP60</string>
	<string>MB80</string>
	<string>MBP80</string>
	<string>MBP90</string>
	<string>MBA40</string>
</array>
Обратите внимание на два момента:
- Идентификатору МодельМакаX,Y должно соответствовать сокращение, которое и должно использоваться в массиве, например: MacBook Air=MBA, MacBook Pro=MBP, iMac=IM, ну и так далее. Но поколение нужно использовать только мажорное, то есть для MacBookPro8,1 идентификатор будет MBP80, а не MBP81.
- В массиве поколений нужно строго соблюдать последовательность поколений. Так, например, нельзя указать MBP80 после MBP90. Пример правильного синтаксиса:
<key>USBBootSupportedModels</key>
<array>
	......................
	<string>MBP10</string>
	<string>MBP20</string>
	......................
	<string>MBP80</string>
	<string>MBP90</string>
	......................
</array>
После внесения в массив идентификатора своей модели Mac сохраняем изменения в файле Info.plist (нужны права администратора) и запускаем утилиту Ассистент Boot Camp. Если всё было проделано правильно, то появится дополнительный пункт:
Его активация позволяет создавать загрузочно-установочные USB накопители с Windows 7 или Windows 8 на любом компьютере Mac. Но учтите, что не все модели смогут с него загрузиться. Тестируйте и отписывайтесь в комментариях кому помогло, а кому нет (желательно с указанием идентификатора Mac). Удачи!
Внимание! В OS X Mavericks почти все системные приложения начали подписывать цифровой подписью. Изменение ресурсов приложения приведёт к тому, что вы больше не сможете запустить пропатченную программу. Для того, чтоб программа работала даже после правки ресурсов нужно удалить проверку цифровой подписи. Как это сделать подробно расписано вот в этой инструкции.
Creating a Bootable Window 8 ISO from Mac was quite easy back then where Mac OS X was in the trend. Later, Mac OS Mojave came into the picture, and the in-built Boot Camp Assistant is no longer supported.
Therefore the process to create Windows 10 bootable USB on Mac for pc from ISO became much more complex and tricky. However, irrespective of the process complexity, Since you are reading this guide, you don’t have to worry about the complexity of the process to burn ISO to USB windows 10 using Mac.
In this guide, I have listed 4 different ways to create a windows 10 bootable USB from ISO on a Mac device. Besides this, we have briefly explained why you should have a bootable windows 10/8 USB ready with you.
Let’s begin with the explanation first.
Part One: Why to Create Windows 10/8/7 Bootable USB on Mac is Tough?
There could be a situation where your Windows system is compromised due to some virus attack or sudden malware attack. Therefore, it’s always handy to have an extra bootable USB lying around so that in the future, if anything goes wrong, you have Windows available with you.
But the thing is, creating a windows bootable USB from ISO on mac is quite tough. If you are doing it for the first time, you might end up getting different unknown errors.
Because Mac Computers have a different architecture than Windows Computers. Mac computers have got some discrepancies that make them vulnerable while operating on different files especially, the files that are created for Windows OS in the first place.
Apart from this, an ISO Image file contains fragmented and archive files compressed from an optical disk. In order to burn them to a USB, i.e., creating a bootable USB from ISO, segregation of the image files is required.
Part Two: How to Create Windows 10/8/7 Bootable USB on Mac
Before you jump on the 4 ways to create a windows USB on Mac, Let me tell you that there are some pre-requisites of these methods.
All of them are listed below:
- Windows 10/8 ISO file.
- USB Flash Drive of at least 16 GB Memory
You can either ask a friend for the ISO file or instead, you can directly download the required ISO file from Microsoft’s portal.
Now, let’s move to the different ways to create windows bootable usb on mac:
Method 1: Create Windows 10/8/7 Bootable USB on Mac Using “Boot Camp Assistant”
Earlier, I have told you the after the release of macOS Mojave and later, Boot Camp Assistant is no longer supported but if you are using an older version of macOS on your Mac device, this method will be ideal for you.
Follow the below-mentioned steps carefully:
- Insert USB Flash Drive.
-
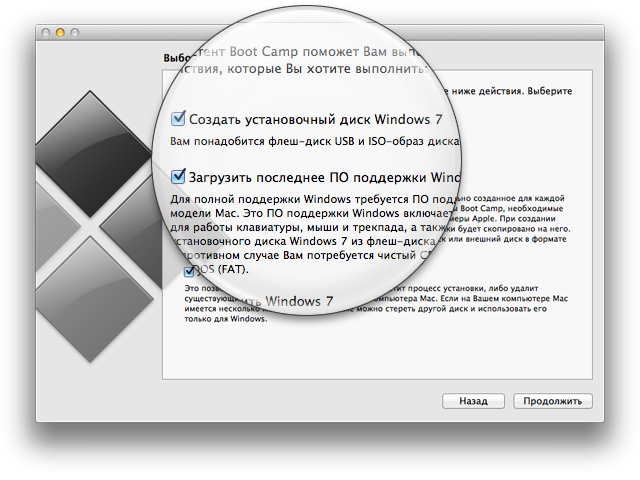
Now run Bootcamp Assistant, select the box for «Create a Windows 7 or later version install disk» and uncheck «Install Windows 7 or later version.» Click Continue to go for the next step.
- If you have the ISO file in your system, Boot Camp Assistant will automatically detect it, If it doesn’t then you can browse it.
-
Once the ISO file is located, you need to select the USB Flash Drive.
- Once the Destination Drive is selected, click on “Continue”.
-
A new process will begin, you have to wait until it terminates successfully.
- Once the process is completed, now click «Quit» to exit the app and then «Eject» the USB drive from your Mac.
That’s how you are going to create a bootable USB disk using Mac’s Boot Camp Assistant. Maybe you also want to know how to create windows 10 bootable usb on mac without bootcamp, Please read on, because the following three methods can help you to create bootable windows usb on mac effectively.
You may also like: How to Free Download Boot Camp and Install Windows 10 on Your Mac
Method 2: Create Windows 10/8/7 Bootable USB on Mac Using “PassFab 4Winkey”
If you are looking for a precise tool which can create windows 10 bootable usb on mac for pc without bootcamp, and it will reduce maximum hustle, PassFab 4Winkey is an incredible option for you. Though it’s paid, it is worth every penny spent.
Apart from creating Bootable USBs, PassFab 4WinKey has other features like using this tool, you can reset the Windows Admin Password. Overall, it’s a great package. Since we are only talking about Bootable USBs in this guide, we will strictly focus on it only. Before we begin with the steps, it is recommended to download and install the tool.
-
After installing the software on an accessible computer, launch it and insert a Windows password disc. It can be a CD/DVD or USB.
-
Click «Next» and wait for a minute until the password disk burned successfully.
That’s how you create a bootable USB from ISO using PassFab 4Winkey. The ISO image has been automatically downloaded from the tool itself. Therefore you don’t have to look around for the Windows ISO file.
Video Tutorial about How to Create Bootable Windows USB on Mac
Method 3: Create Windows 10/8/7 Bootable USB on Mac Using “UNetbootin”
Before jumping on into the process, let me explain to you the UNetBootin tool. It is a free, open-source utility application that enables you to create boot windows USB from Mac in just a few clicks.
Before we begin with steps, you must Download and Install UNetBootin from its official website.
Follow the steps to avoid random/ unwanted errors:
- Insert a USB drive that is empty.
-
Navigate to “Disk Utility” on your Mac Device.
- In the disk utility dialogue, select the “USB stick” and click on the “info” (i) button on the top right corner of the dialogue.
- Remember the “Device Name”, as you have to use it in the future.
-
Launch the “UNetBootin” Application”.
-
Click on the “DiskImage” option, and select the ISO file.
- Click on the “Type List” option, and select “USB Drive”.
-
In Drive: Column, enter the “Drive Name” that you had remembered in Step 4.
Warning:
Make sure you have entered the correct Drive Name, otherwise you’ll end up getting errors or formatting one your local drive.
-
At last, Click on the “OK” button.
The process of creating a bootable USB will automatically start and it will take a few minutes to terminate successfully.
Though UNetBootin is one of the best utility tools for Mac, but we can’t say it’s the perfect tool. There could be situations where the tool might throw some error without any actual issue.
If you want to create a windows 10 bootable USB on Mac without any errors and don’t want to pay for any tools, you could go with the 4th Method i.e using Terminal. But it also has few disadvantages.
Method 4: Create Windows 10/8/7 Bootable USB on Mac Using “using Terminal”
In this process, you have to write a few lines of code to complete the process successfully.
Don’t worry, you don’t have to go through different internet guides to find the code. I have it all here for you.
- Connect the USB Drive to the Machine.
-
Launch “Terminal” and Hit the following command:“diskutil list”
- You’ll see a list of drives that are connected to your Mac device, find the USB, and remember its “IDENTIFIER” Value aka Device Name.
-
Hit the following Query, just change the device_name with your Device’s Name.
diskutil eraseDisk MS-DOS «WIN10» GPT device_name
-
In this step, you need to have the address of your ISO file. Once you have it, hit the following command to mount the ISO file.
hdiutil mount ~filelocation
- Don’t get confused with the location, otherwise Terminal will throw an error.
-
Once you have mounted the ISO file, hit the following.
cp — rp /Volumnes/ESD-ISO/* /Volumes/WIN10
-
The above step could take a couple of minutes, once it is completed, you have to unmount the ISO Image. Run the following command:
hdiutil unmount /Volumes/ESD-ISO
Here, you are formatting the USB drive and naming it «WIN10». Be very careful with the device name. The wrong entry could format your Mac’s local drive.
In the above command, replace “filelocation” with the actual location of your file include the name of the extension. For instance, if your file is located in the downloads folder then your file location will be :/Download/Windows-10.iso
With this command, you are telling the terminal to copy the ISO file in the USB drive and it will automatically make it executable.
That’s all, you have successfully created a bootable USB drive and you can use it for installing windows on any device now.
Teminal is very suitable for making Windows 10 bootable USB on Mac, but if you enter the wrong command, all data on the selected drive will be erased and all data will disappear within a few seconds. Therefore, this is not an ideal solution for beginners who are not familiar with the technical staff.
Part Three: Additional Tips
Apart from these methods, I wanted to discuss a few most asked questions here.
Q1: Is it safe to Install Windows on a Macbook?
The majority of the readers ask me this question and I want to tell all of them that it is completely safe to install Windows on a Macbook. Actually, I have seen people using Windows on a Macbook. Most developers use Windows in Virtual Machine on their Macbook.
Q2: Is it possible to create a bootable USB using Disk Utility?
Yes, it was possible back in the days when MacOS X was used. In the latest macOS versions, this feature of the Disk Utility application is removed due to security reasons. Therefore if you are using an older version of Mac, you can use Disk Utility as well.
Final Notes
So, these were the 4 Best methods to create a bootable USB drive using a Mac device. All these methods are tried and tested, therefore each of them is reliable.
You can pick any of these at your convenience and desire. But if you want to the easiest method to create Windows USB on Mac, PassFab 4winkey is your ideal choice! Certainly if you came across some error that is bothering you, do let us know in the comments below. We will solve it together.
COMMENT
-
Star
(6)
You must be signed in to star a gist -
Fork
(0)
You must be signed in to fork a gist
-
Clone this repository at <script src="https://gist.github.com/mackankowski/234956522119e98dac0647c96154cfe2.js"></script>
- Save mackankowski/234956522119e98dac0647c96154cfe2 to your computer and use it in GitHub Desktop.
Clone this repository at <script src="https://gist.github.com/mackankowski/234956522119e98dac0647c96154cfe2.js"></script>
How to create a bootable Windows 7, 8, 10, 11 installer USB on macOS
Run in Terminal:
brew install wimlib— run, ifwimlibis not installed yet (required for splitting large files)- To identify target USB device, run:
diskutil list - Format USB drive:
diskutil eraseDisk MS-DOS "$WIN_USB_NAME" MBR /dev/$DISKwhere$WIN_USB_NAMEis a new volume name (e.g. WIN) and$DISKis a target disk identificator (e.g. disk5). Alternatively, you can tryGTPpartititon style instead ofMBR(recommended for UEFI = newer Windows distributions) - To mount Windows installer image, run:
hdiutil mount ~/Desktop/$WIN_INSTALLER_IMAGE.isowhere $WIN_INSTALLER_IMAGE is installer image name. - Copy all files to the USB drive, beside the «install» file (if it’s over 4GB size):
rsync -vha --exclude=sources/install.$EXT /Volumes/$WIN_INSTALLER_NAME/ /Volumes/$WIN_USB_NAMEwhere $EXT iswimoresd, $WIN_INSTALLER_NAME is the mounted Windows installer volume name and $WIN_USB_NAME is target disk name. Forinstallfile with less than 4GB size, run:rsync -vha /Volumes/$WIN_INSTALLER_NAME/ /Volumes/$WIN_USB_NAME(if so, skip steps no. 5 and 6) - (Applicable for
installfile withesdextension when it’s over 4GB size): Export the file to the local machine by:wimexport /Volumes/$WIN_INSTALLER_NAME/sources/install.esd all ~/Desktop/install.wim --compress=LZXwhere $WIN_INSTALLER_NAME is mounted Windows installer volume name. Remember to remove local copy ofinstallfile at the end of these steps. - (Applicable when
installfile (both extensions) is over 4GB size): Copy remaining «install» file (splitted) onto the installer USB drive:wimlib-imagex split /Volumes/$WIN_INSTALLER_NAME/sources/install.wim /Volumes/$WIN_USB_NAME/sources/install.swm 4000where $WIN_INSTALLER_NAME is mounted Windows installer volume name and $WIN_USB_NAME is target USB disk name. If Step 5 was executed, notice that the «install.wim» source directory will be different (e.g.wimlib-imagex split ~/Desktop/install.wim /Volumes/$WIN_USB_NAME/sources/install.swm 4000). - Unmount installer volumes (local and physical).
- You USB drive is bootable now! 🚀
References
- http://gallinar.blogspot.com/2020/08/macos-create-bootable-windows-10-usb.html
- https://appuals.com/create-bootable-windows-11-usb-installer-mac/