
Конфигурация SD Connect C4 Wifi в основном зависит от версии C4 и какой операционной системы компьютера (win10 или win7 или XP). MB SD C4 Plus DoIP Wifi Настройка очень проста, После того как компьютер выполнит поиск сигнала WiFi, Введите пароль 123456789, Больше ничего настраивать не нужно, и вам не нужно устанавливать IP-адрес WIFI.
Как настроить подключение MB SD C4 DoIP WiFi?
https://www.youtube.com/shorts/vn7KrkWwcv8
Для другой версии SD Connect C4,Вам необходимо настроить WiFi подключение SDConnect «WORKSHOP» для Windows 8, 10.
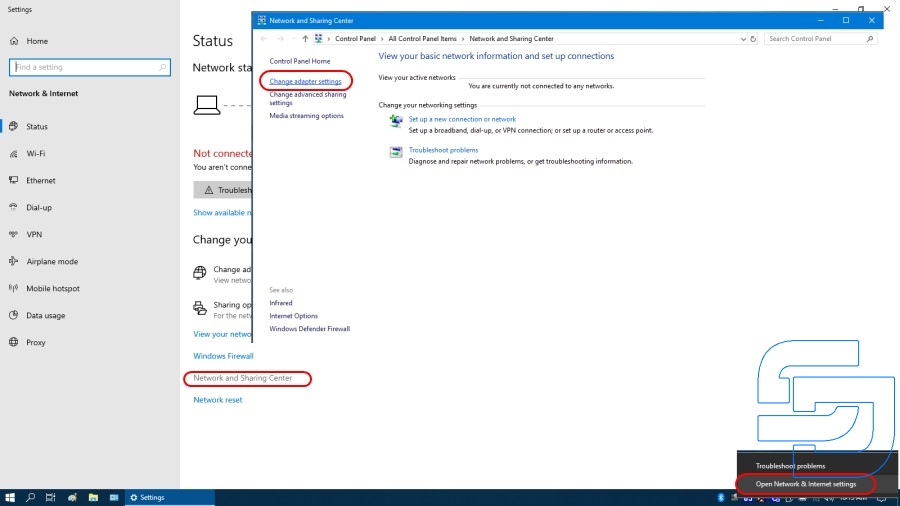
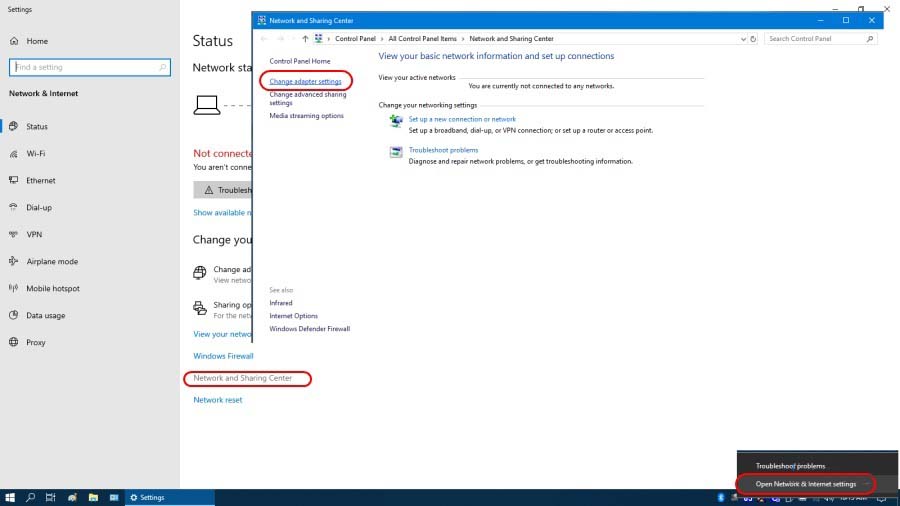
Виндоус 8 и Windows 10, в отличие от Windows 7, не позволяют создать прямой компьютер – к-компьютеру (Дорога24) связь. Однако, есть возможность создать Ad-hoc сеть «WORKSHOP» между компьютером и мультиплексором SDConnect в режиме командной строки. Не все Wi-Fi адаптеры поддерживают этот тип подключения. Вот почему в первую очередь нужно убедиться, что адаптер для ноутбука позволяет создать сеть Ad-hoc.
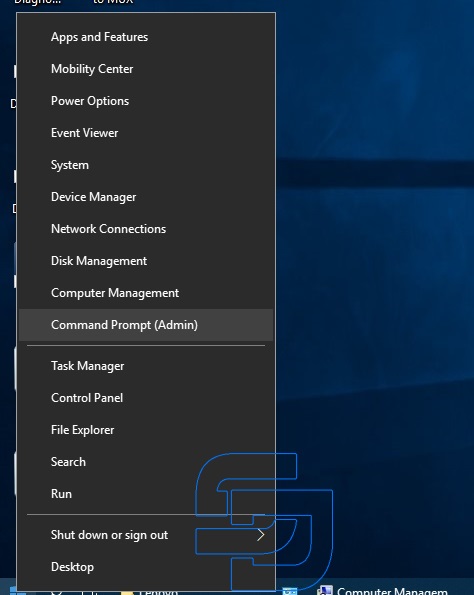
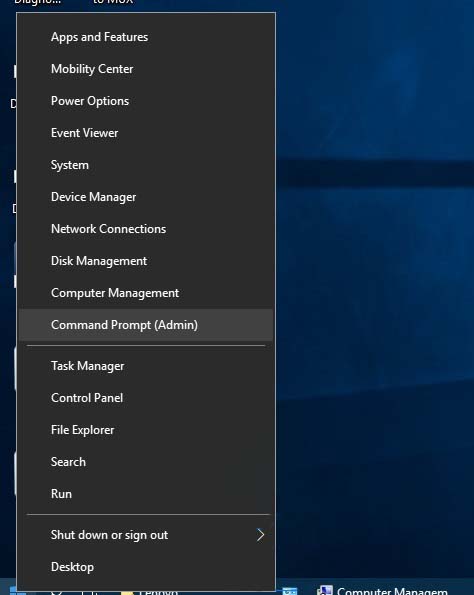
Откройте командную строку от имени администратора: нажмите Win+X, Командная строка (Администратора).

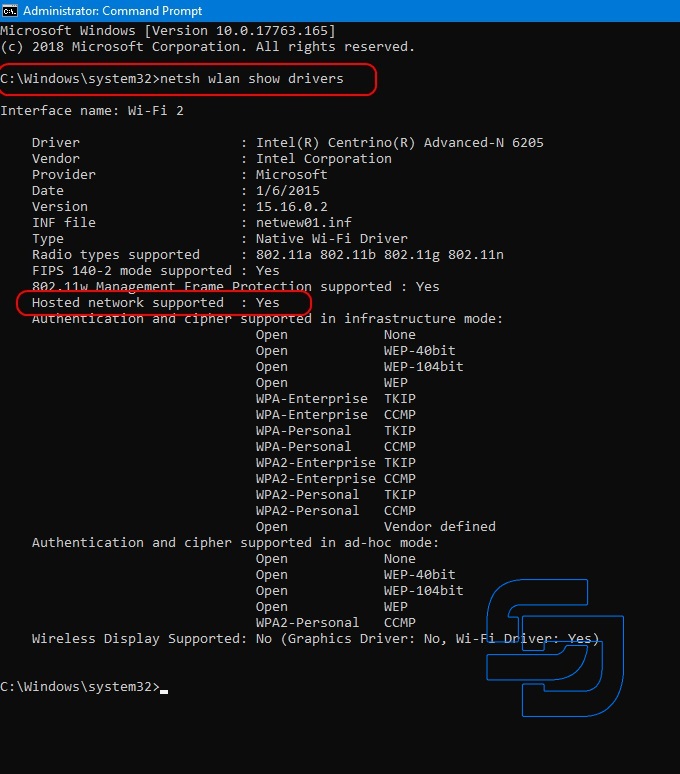
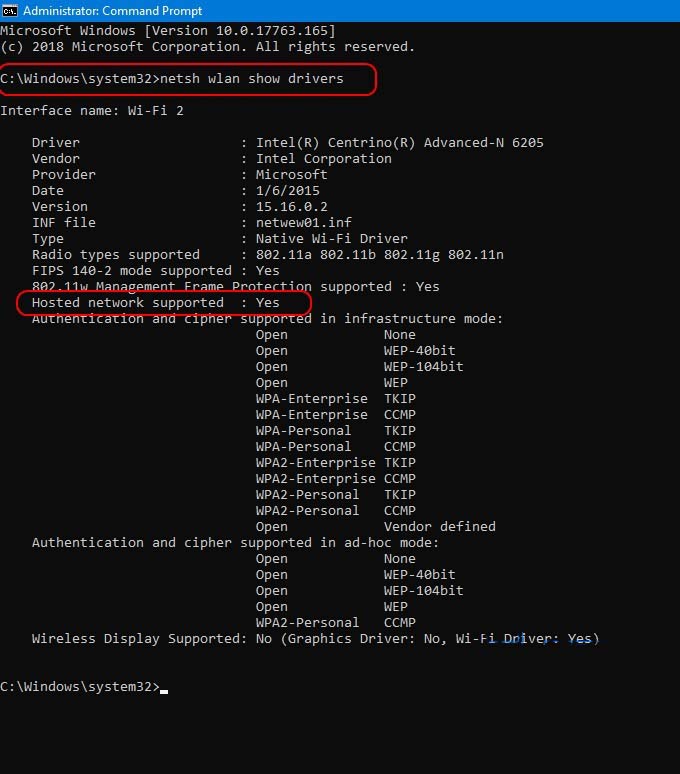
Введите команду netsh wlan show drivers и нажмите enter. В открывшемся списке, ищите пункт «Поддерживается размещенная сеть», который должен иметь параметр «Yes».

Если у этой функции есть опция «нет», Тогда либо установлен неправильный драйвер WiFi адаптера, или данный адаптер не поддерживает данный тип подключения.
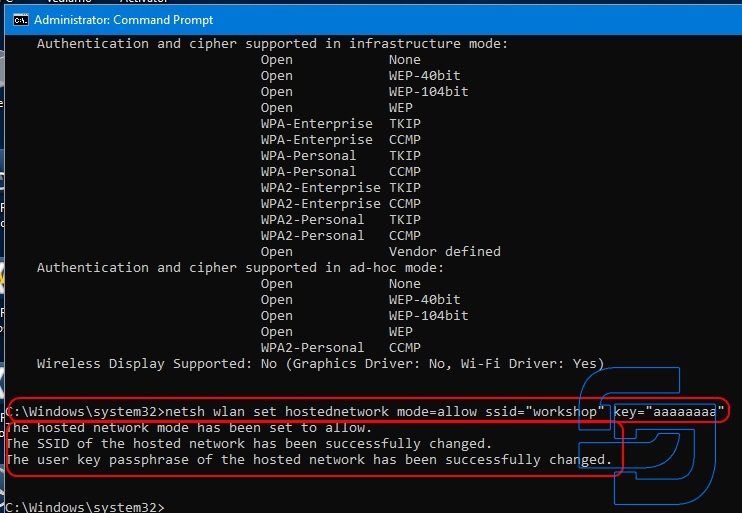
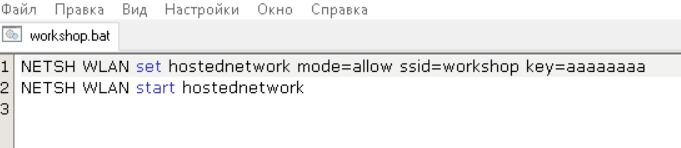
Следующий, Создайте сеть «Мастерская» с помощью команды: netsh wlan set hostednetwork mode=allow ssid=»workshop» key=»aaaa». Где «workshop» — это имя сети, «aaaaaaaa» — это пароль. Сеть создана.

Сеть создается один раз. Команды для создания сети больше не нужны. В будущем, Используются только команды для запуска и остановки сети.
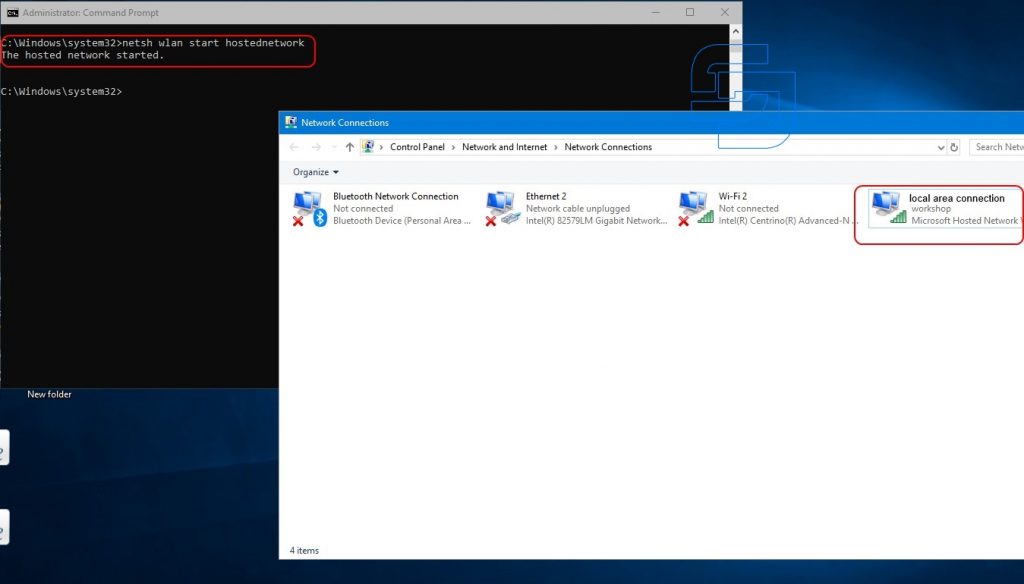
Запустите сетевую команду «workshop»: netsh wlan start hostednetwork. Сеть работает.
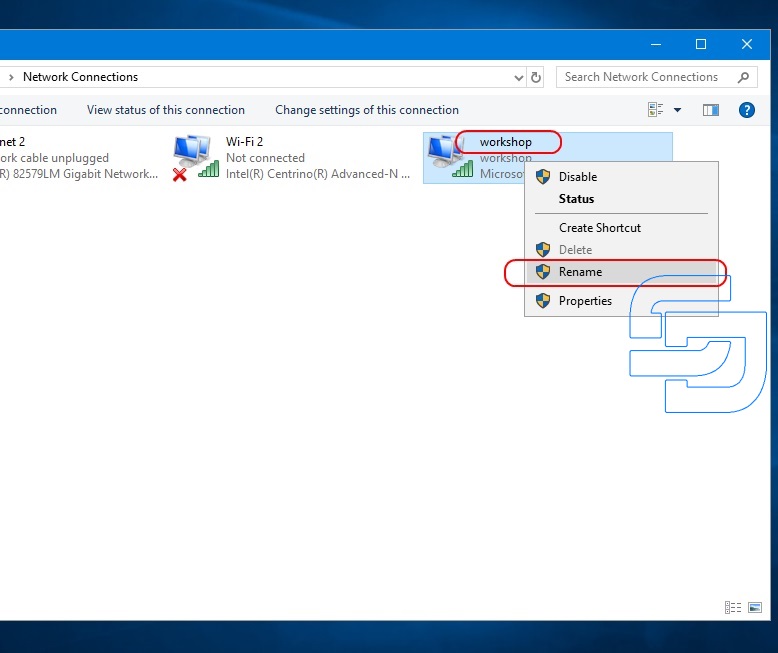
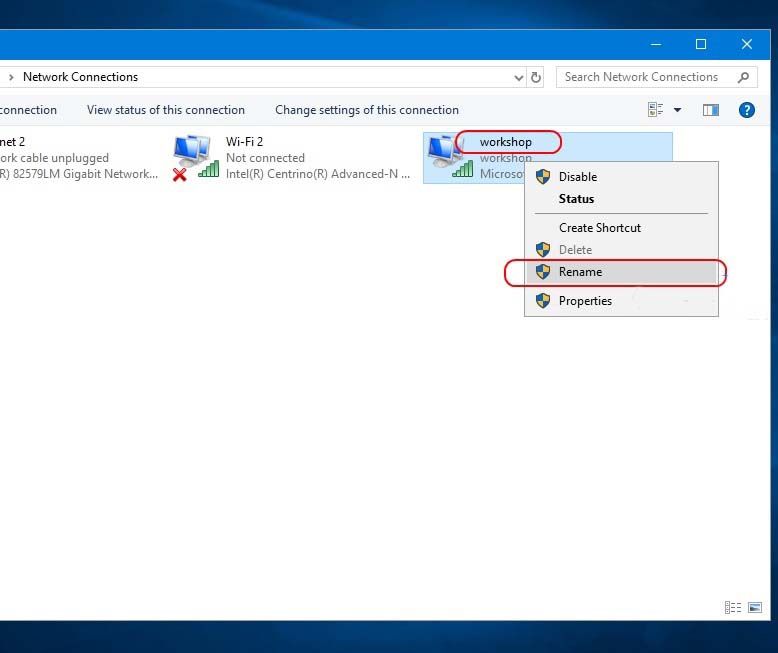
Откройте папку «Сетевые подключения». Видим, что есть подключение к локальной сети виртуального адаптера **.


Для удобства, Желательно переименовать виртуальный адаптер в «Workshop».


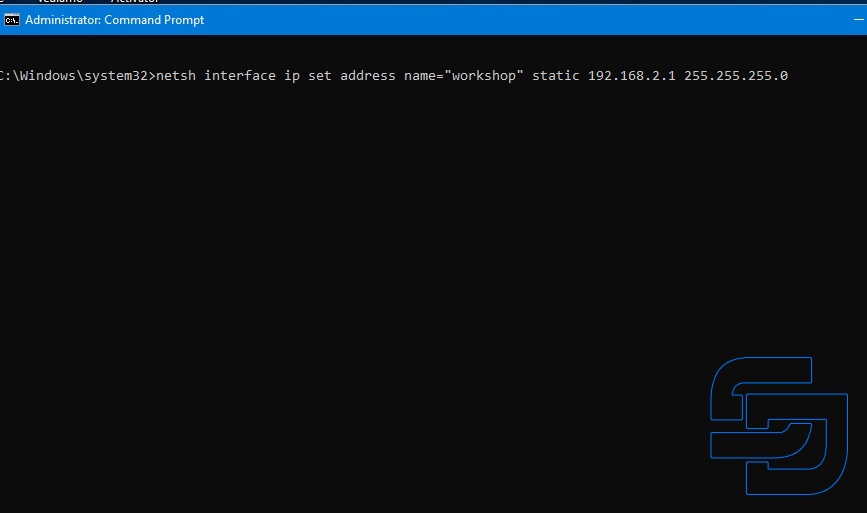
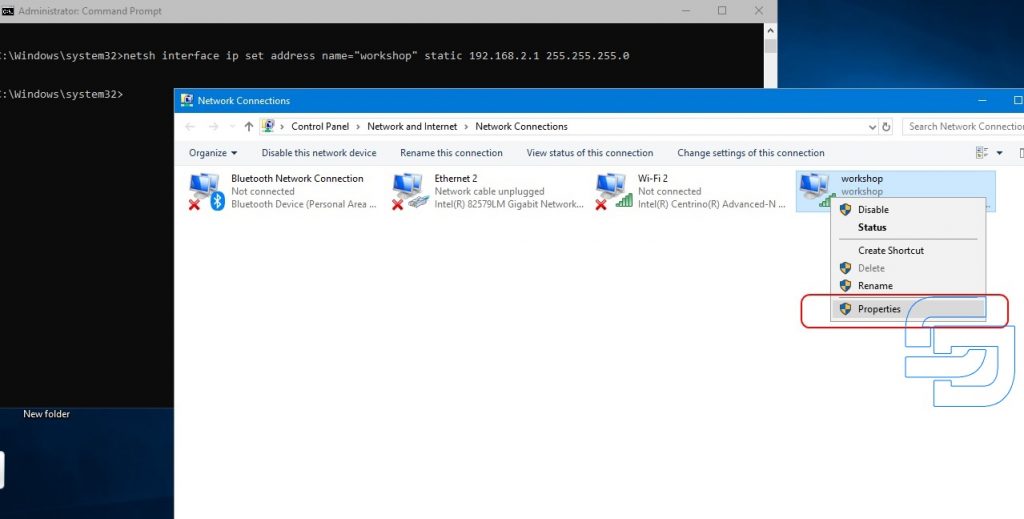
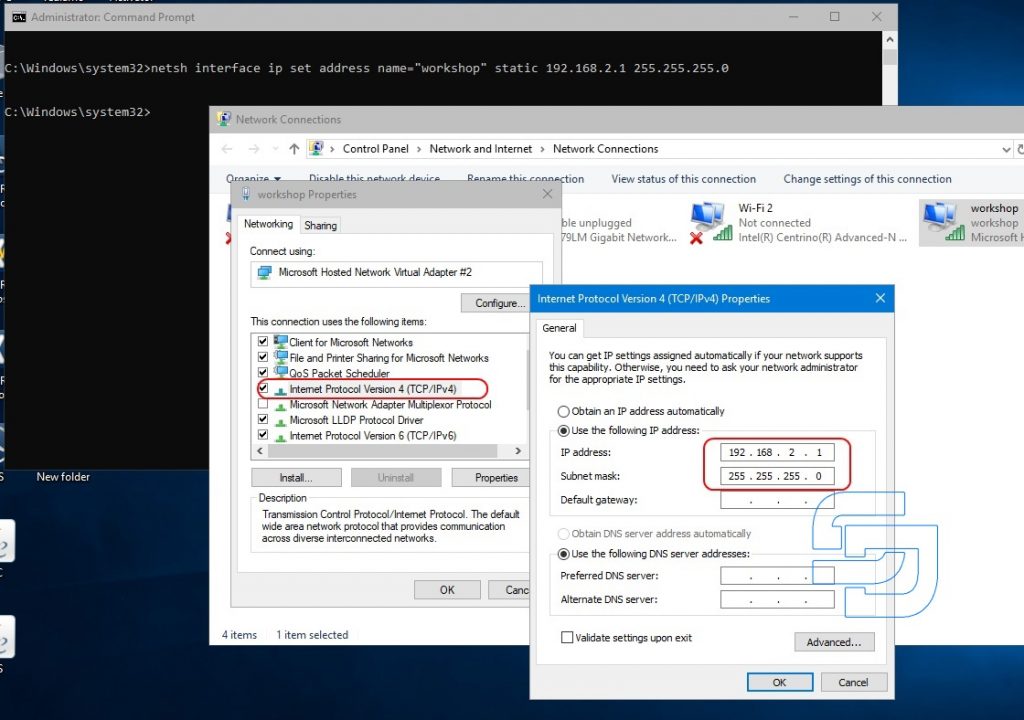
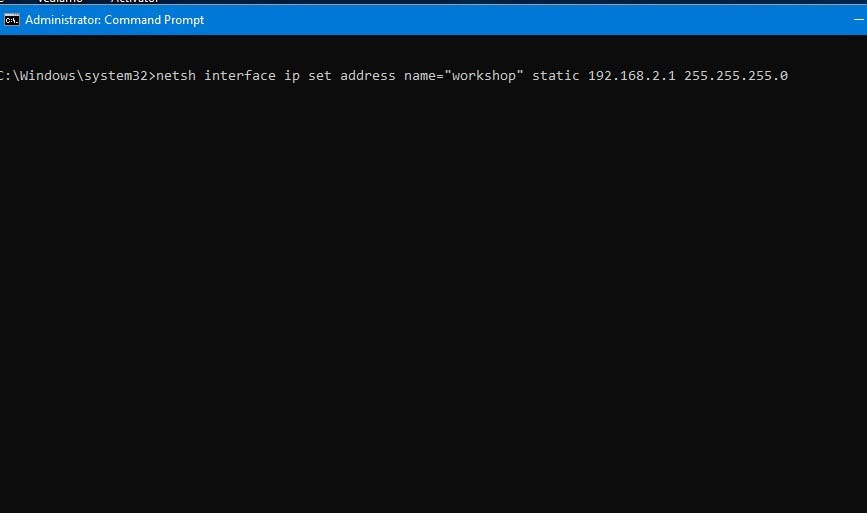
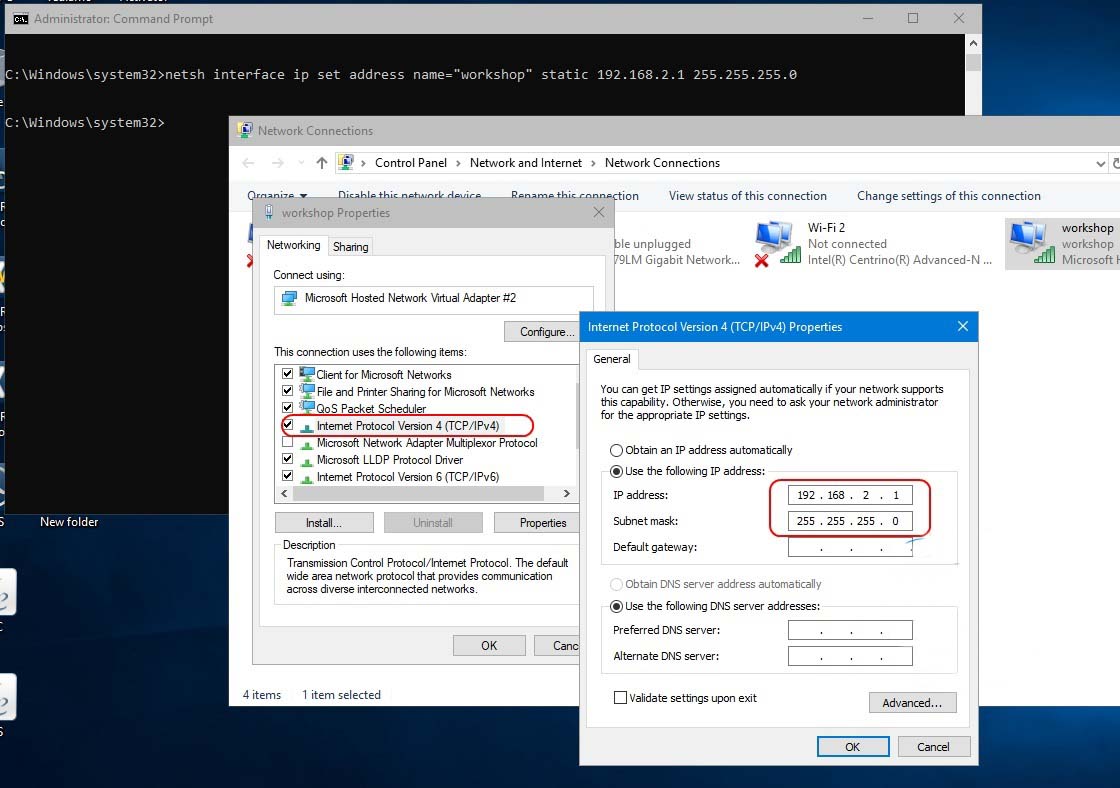
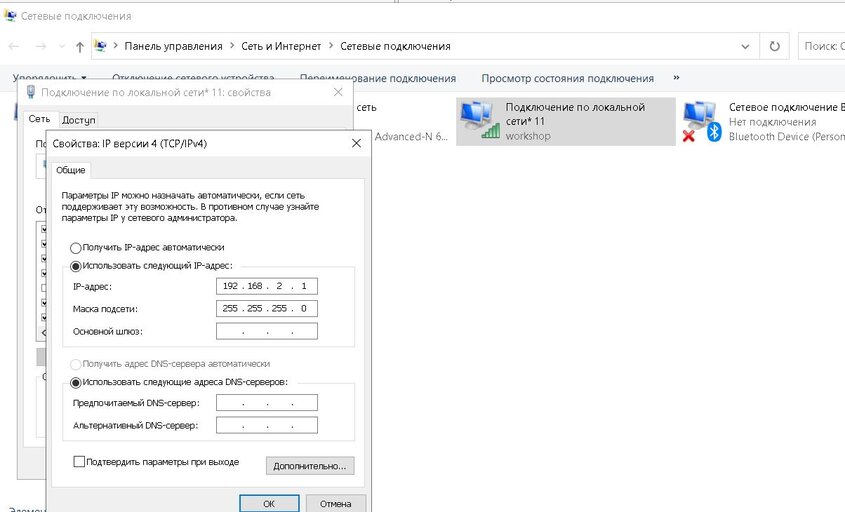
Следующий, необходимо назначить виртуальный адаптеру статический IP-адрес и маску подсети. Это делается с помощью команды: Адрес IP-адреса интерфейса NETSH name=»workshop» static 192.168.2.1 255.255.255.0
Нажмите Enter. Не должно быть сообщения об ошибке. Проверьте, сохраняются ли настройки адаптера в свойствах адаптера.


На данный момент, настройка виртуального сетевого адаптера завершена и ноутбук ожидает подключения мультиплексора SD Connect.
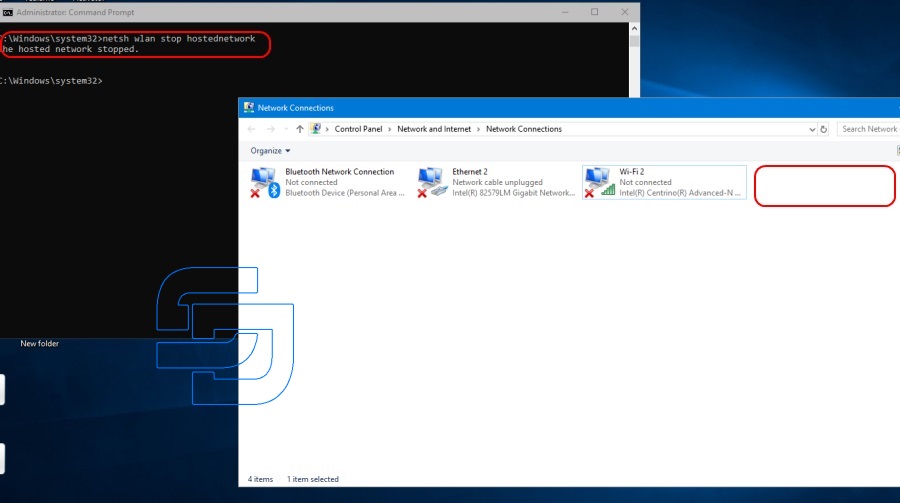
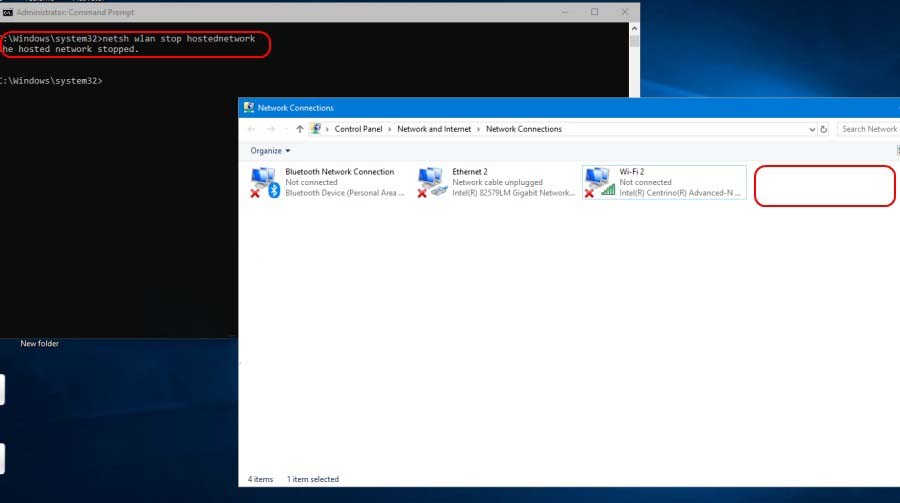
Чтобы остановить сеть, Используйте команду: netsh wlan stop hostednetwork. Виртуальный адаптер исчезает в папке «Сетевые подключения» .

Для удобства, чтобы не вводить команды вручную, Вы можете создавать bat-файлы с помощью соответствующих команд. Файлы создаются в любом текстовом редакторе с любым именем. Затем, Им присваивается расширение BAT.
Файл создания сети имеет следующее содержимое:
netsh wlan set hostednetwork mode=allow ssid=»workshop» key=»aaaa»
Стартовый файл сети и присвоение IP-адреса:
netsh wlan start hostednetwork
Адрес IP-адреса интерфейса NETSH name=»workshop» static 192.168.2.1 255.255.255.0
Сетевой стоп-файл:
netsh wlan stop hostednetwork
Файл создания сети используется только один раз. Файлы запуска и остановки сети могут быть удобно расположены на рабочем столе.
Следующий, вам необходимо настроить мультиплексор SD Connect.
Подключение мультиплексора к ноутбуку с помощью кабеля. Настройки адаптера локальной сети должны быть уже установлены.


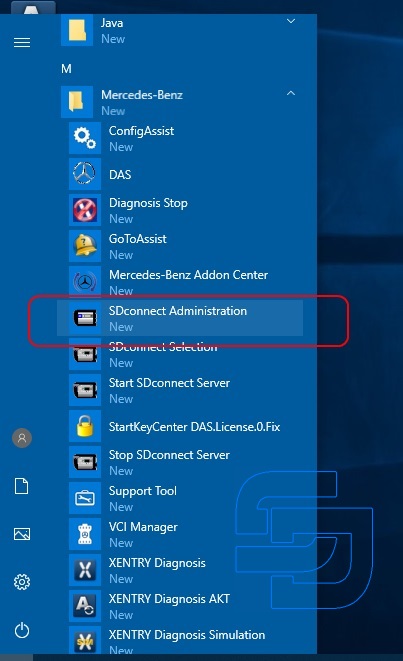
Запустить «Администрирование SDConnect».

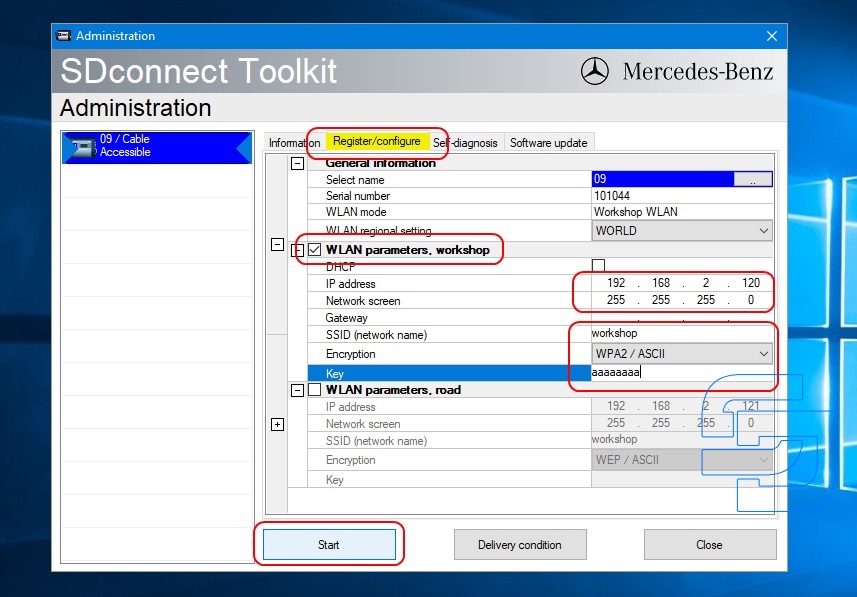
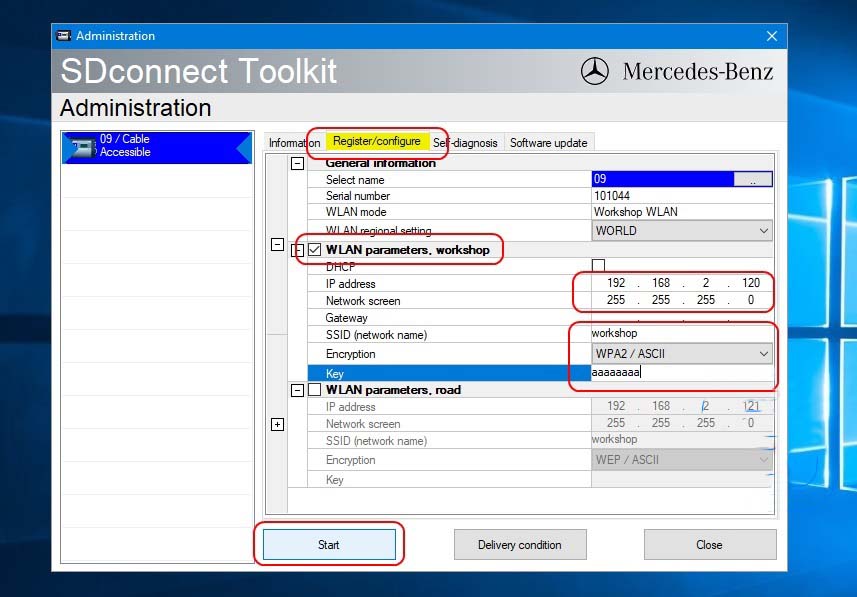
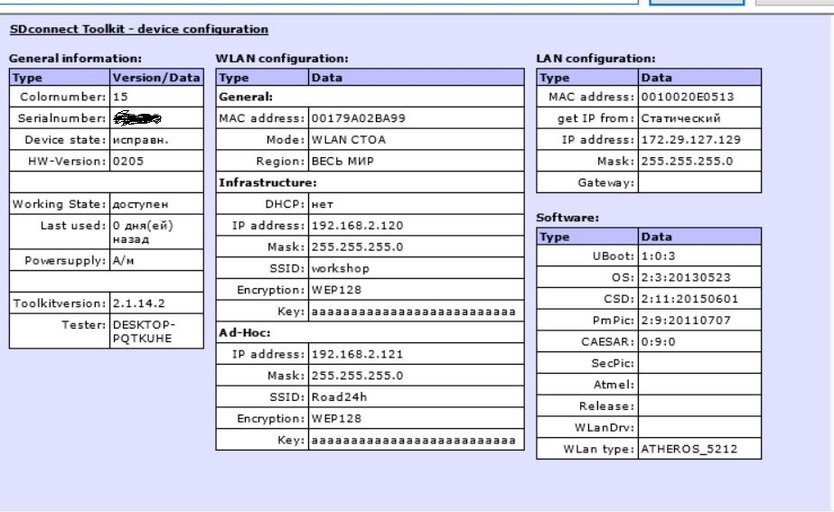
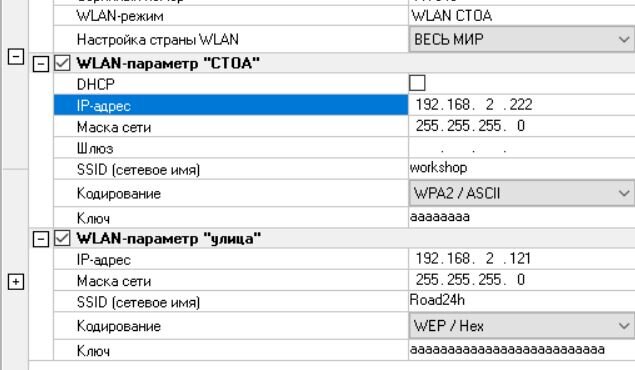
Перейдите во вкладку «Регистрация/настройка». Вводим данные согласно скриншоту и нажимаем Пуск


Настройка мультиплексора завершена.
Если на мультиплексоре уже настроен режим Road24h, Теперь добавлен второй режим «Мастерская» и возможность переключения режимов беспроводного подключения. На мультиплексоре, Переключение режимов беспроводного соединения производится кнопками панели дисплея.
В режиме «мастерская» , постоянно мигает, Красный светодиод означает, что устройство ожидает подключения к ноутбуку. Как только вы запустите bat файл «network start» на ноутбуке, Соединение будет установлено автоматически и светодиод перестанет мигать. Порядок запуска сети в ноутбуке и включения мультиплексора в режиме «мастерская» не имеет значения.
Остановка сети выполняется в виде bat-файла. В этом случае, Мультиплексор снова переходит в режим ожидания подключения к сети.
Заключение
1. На Win7 / Опыт
Чтобы изменить подключение Road24h на вашу обычную сеть, Некоторые старые адаптеры необходимо отключить и включить сетевой адаптер в .bat.
2. На WIN10
Нет необходимости отключать и включать старые адаптеры.
Побеждать 10 Отчет об испытаниях: Запуск пакетных файлов с правами администратора на моей Windows 10 и отлично работает. Имя Wifi соединения должно совпадать в пакете и в разделе сети в панели управления.
***Опыт для обмена: В моей старой Toshiba с Intel PRO Wireless 3945ABG необходимо отключать и включать старые адаптеры, в противном случае он не сможет перейти от стандартной сети к сети adhoc. А я использую WIN10.
Таким образом, он будет включать и отключать карту перед применением нового IP, Независимо от того, старый или новый ПК!!!

Windows 8 and Windows 10, unlike Windows 7, do not allow you to create a direct computer – to-computer (Road24) connection. However, it is possible to create an Ad-hoc “WORKSHOP” network between the computer and the SDConnect multiplexer in the command line mode.
Not all Wi-Fi adapters support this type of connection. This is why you first need to make sure that the laptop adapter allows you to create an Ad-hoc network.
Open the command prompt as administrator: press Win+X, Command prompt (Admin).
Enter the command netsh wlan show drivers and press enter. In the list that opens, look for the item “Hosted network supported”, which should have the parameter “Yes”.
If this function has the “no” option, then either the wrong wifi adapter driver is installed, or this adapter does not support this type of connection.
Next, create the network “workshop” with the command: netsh wlan set hostednetwork mode=allow ssid=”workshop” key=”aaaaaaaa”. Where “workshop” is the network name, “aaaaaaaa” is the password. The network is created.
The network is created once. The command to create the network do not need more. In the future, only the commands to start and stop the network are used.
Start the network “workshop” command: netsh wlan start hostednetwork. The network is up.
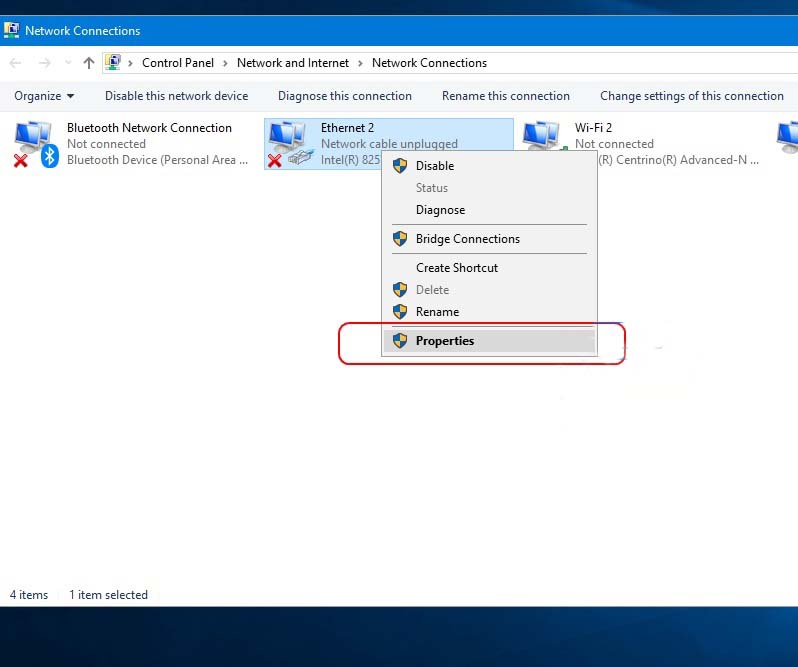
Open the folder “Network connections”. We see that there is a virtual adapter Local area connection **.

For convenience, it is desirable to rename the virtual adapter to “workshop”.
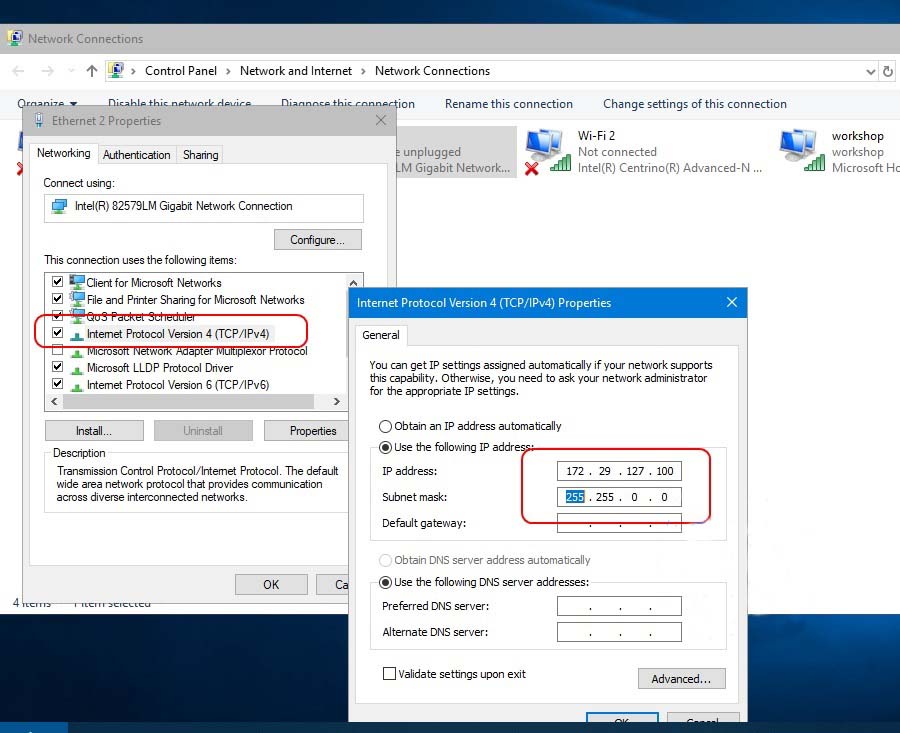
Next, you need to assign a static IP address and subnet mask to the virtual adapter. This is done with the command: netsh interface ip set address name=”workshop” static 192.168.2.1 255.255.255.0
Press enter. There should be no error message. Check if the adapter settings are saved in the adapter properties.
At this point, the virtual network adapter configuration is complete and the laptop is waiting for the SD Connect multiplexer to connect.
To stop the network, use the command: netsh wlan stop hostednetwork. The virtual adapter disappears in the Network connections folder .
For convenience, so as not to enter commands manually, you can create bat files with the appropriate commands. Files are created in any text editor with any name. After that, its are assigned the extension bat.
The network creation file has the following contents:
netsh wlan set hostednetwork mode=allow ssid=”workshop” key=”aaaaaaaa”
The startup file of the network and assign an IP address:
netsh wlan start hostednetwork
netsh interface ip set address name=”workshop” static 192.168.2.1 255.255.255.0
Network stop file:
netsh wlan stop hostednetwork
The network creation file is used only once. Network start and stop files can be conveniently located on the desktop.
Next, you need to configure the SD Connect multiplexer.
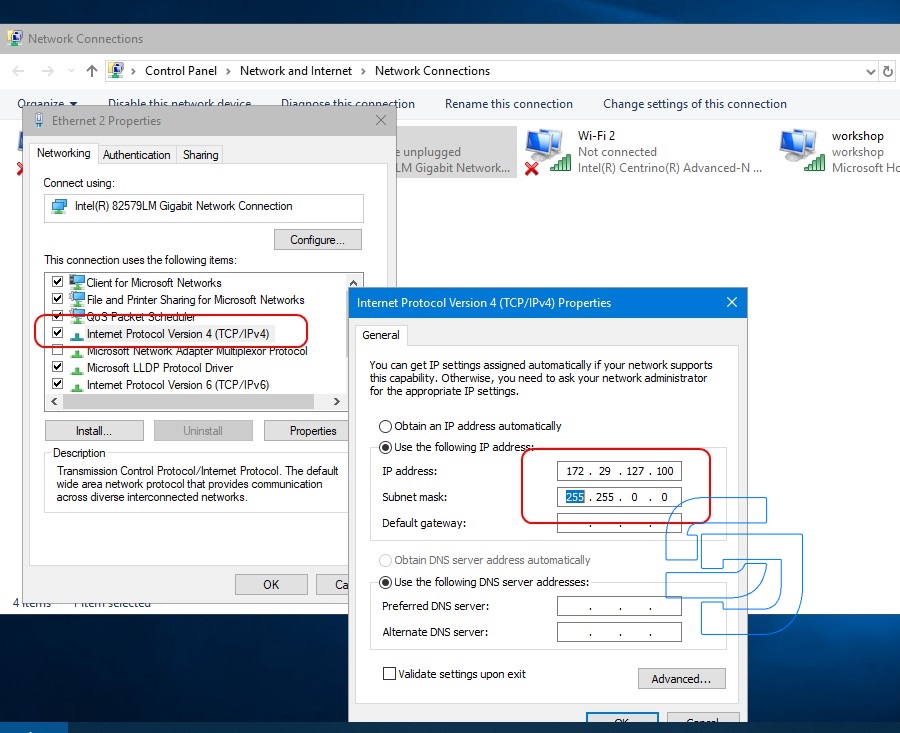
Connect the multiplexer to the laptop by cable. The lan adapter settings must already be installed.
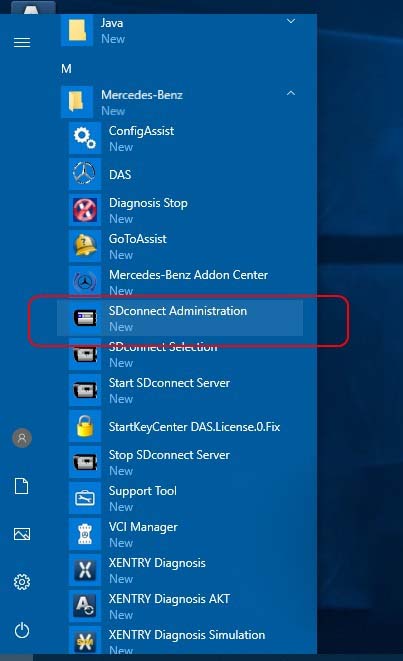
Run” SDConnect Administration”.
Go to the tab “Registration/configuration”. Enter the data according to the screenshot and click Start
The multiplexer configuration is complete.
If the multiplexer has already been configured mode Road24h, now added the second mode is a “workshop” and have the opportunity to switch modes wireless connection. On the multiplexer, the switching of wireless connection modes is performed by the buttons of the display panel.
In the ” workshop” mode , constantly flashing, red led means that the device is waiting for connection with the laptop. As soon as you run the bat file “network start” on the laptop, the connection will be established automatically and the led will stop flashing. The order of starting the network in the laptop and turning on the multiplexer in the ” workshop” mode does not matter.
Stopping the network is performed as a bat file. In this case, the multiplexer again goes into the network connection wait.

SD Connect C4 Wifi Configuration mainly depend on which version of C4 and what the computer operation system (win10 or win7 or XP). MB SD C4 Plus DoIP wifi Configuration is very simple, after the computer searches for the wifi signal, enter the password 123456789, you don’t need to set anything else, and you don’t need to set the WIFI IP address.
How to configure MB SD C4 DoIP WiFi connection?
For the other version of SD Connect C4,you need set up WiFi connection SDConnect “WORKSHOP” for Windows 8, 10.
Windows 8 and Windows 10, unlike Windows 7, do not allow you to create a direct computer – to-computer (Road24) connection. However, it is possible to create an Ad-hoc “WORKSHOP” network between the computer and the SDConnect multiplexer in the command line mode. Not all Wi-Fi adapters support this type of connection. This is why you first need to make sure that the laptop adapter allows you to create an Ad-hoc network.
Open the command prompt as administrator: press Win+X, Command prompt (Admin).
Enter the command netsh wlan show drivers and press enter. In the list that opens, look for the item “Hosted network supported”, which should have the parameter “Yes”.
If this function has the “no” option, then either the wrong wifi adapter driver is installed, or this adapter does not support this type of connection.
Next, create the network “workshop” with the command: netsh wlan set hostednetwork mode=allow ssid=”workshop” key=”aaaaaaaa”. Where “workshop” is the network name, “aaaaaaaa” is the password. The network is created.
The network is created once. The command to create the network do not need more. In the future, only the commands to start and stop the network are used.
Start the network “workshop” command: netsh wlan start hostednetwork. The network is up.
Open the folder “Network connections”. We see that there is a virtual adapter Local area connection **.


For convenience, it is desirable to rename the virtual adapter to “workshop”.
Next, you need to assign a static IP address and subnet mask to the virtual adapter. This is done with the command: netsh interface ip set address name=”workshop” static 192.168.2.1 255.255.255.0
Press enter. There should be no error message. Check if the adapter settings are saved in the adapter properties.

At this point, the virtual network adapter configuration is complete and the laptop is waiting for the SD Connect multiplexer to connect.
To stop the network, use the command: netsh wlan stop hostednetwork. The virtual adapter disappears in the Network connections folder .
For convenience, so as not to enter commands manually, you can create bat files with the appropriate commands. Files are created in any text editor with any name. After that, its are assigned the extension bat.
The network creation file has the following contents:
netsh wlan set hostednetwork mode=allow ssid=”workshop” key=”aaaaaaaa”
The startup file of the network and assign an IP address:
netsh wlan start hostednetwork
netsh interface ip set address name=”workshop” static 192.168.2.1 255.255.255.0
Network stop file:
netsh wlan stop hostednetwork
The network creation file is used only once. Network start and stop files can be conveniently located on the desktop.
Next, you need to configure the SD Connect multiplexer.
Connect the multiplexer to the laptop by cable. The lan adapter settings must already be installed.
Run” SDConnect Administration”.
Go to the tab “Registration/configuration”. Enter the data according to the screenshot and click Start
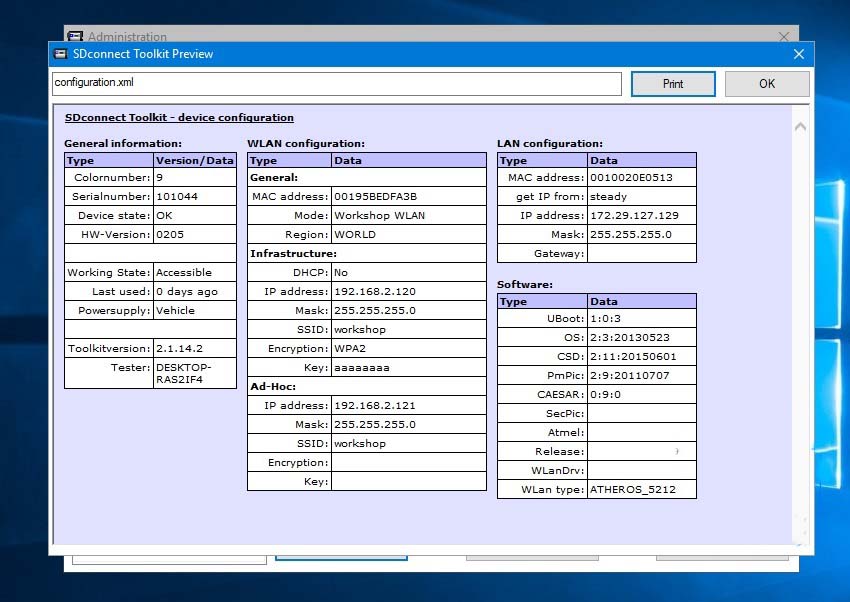
The multiplexer configuration is complete.
If the multiplexer has already been configured mode Road24h, now added the second mode is a “workshop” and have the opportunity to switch modes wireless connection. On the multiplexer, the switching of wireless connection modes is performed by the buttons of the display panel.
In the ” workshop” mode , constantly flashing, red led means that the device is waiting for connection with the laptop. As soon as you run the bat file “network start” on the laptop, the connection will be established automatically and the led will stop flashing. The order of starting the network in the laptop and turning on the multiplexer in the ” workshop” mode does not matter.
Stopping the network is performed as a bat file. In this case, the multiplexer again goes into the network connection wait.
Conclusion
1. On Win7 / XP
To change the Road24h connection to your usual network, some old adapters need to disable and enable the network adapter in the .bat.
2. On WIN10
no need to disable and enable old adapters.
Win 10 Test report: Run batch files with administrator rights on my Windows 10 and works fine. Name of wifi connection must be the same in batch and in network section in control panel.
***Experience for sharing: In my old Toshiba with Intel PRO Wireless 3945ABG it is necessary to disable and enable old adapters, otherwise it is not able to change from the standard network to the adhoc network. And I am using WIN10.
So it will enable and disable the card before apply new IP, no matter old or new pc!!!
-
#61
В чем проблема?
не подключается?
Подключается, но не получает адрес?
Получает адрес, но не пингуется?
как раньше писали — softap?
-
#62
сеть создается на компе — и даже куда то подключена
а коннект в гробу видит такое решение
-
#63
парни, это полный песец
Я бы этог8о муудака который убрал подключение точка- точка в 10 винде — 3 раза бы убил, потом два раз а утопил
сука -я просто 2 дня потерял, настраивая эту виртуальную точку, я ее уже раз 200 создавла и удалял
с разными именами, разными паролями
ЕЩЕ ПАРУ ДНЕЙ — И НАХЕР ПОШЛЮ ВИНДУ №10 — и прокляну ее создателей
Попробуй через штатный хот-спот создай подключение без смд у меня писало что вифи не поддерживается, но работает все
-
#64
сеть создается на компе — и даже куда то подключена
а коннект в гробу видит такое решение
такое может быть когда он сеть создаёт в диапазоне не поддерживамом сд-коннекте.
netsh wlan show all
Код:
Имя интерфейса: Ac-Wlan

    Драйвер                   : Dell Wireless 1560 802.11ac
    Производитель             : Broadcom
    Поставщик                 : Broadcom
    Дата                      : 22.11.2016
    Версия                    : 7.35.352.0
    INF-файл                  : oem43.inf
    Тип                       : Собственный драйвер Wi-Fi
    Поддерживаемые типы
    радиомодулей              : 802.11ac 802.11a 802.11n 802.11g 802.11b
    Поддерживается режим FIPS 140-2: Yes
    Защита кадров управления 802.11w поддерживается: да
    Поддержка размещенной сети  : нет
    Методы проверки подлинности и шифрования, поддерживаемые в режиме инфраструктуры (infrastructure):
                                Открыть         Нет
                                Открыть         WEP
                                WPA-Enterprise  TKIP
                                WPA-Enterprise  CCMP
                                WPA-Personal    TKIP
                                WPA-Personal    CCMP
                                WPA2-Enterprise TKIP
                                WPA2-Enterprise CCMP
                                WPA2-Personal   TKIP
                                WPA2-Personal   CCMP
-
#65
и потом руками через своства оборудования выставить.
-
#66
Счас скринеы сделаю
покажу что и как делал
сообщение автоматически приклеено:
выкладываю бат файл созданный
так же скрин со свойствами виртуальной сети
и скрин из настроек коннекта
сообщение автоматически приклеено:
тока счас не цепляйтесь к длине пароля, ф бате 6 с раз, а в коннекте 26
пробовал и так и так
просто счас в таком состоянии
-

1.JPG
19.7 KB
· Просмотров: 259
-

2.JPG
94.7 KB
· Просмотров: 296
-

3.JPG
86.7 KB
· Просмотров: 301
Последние изменения:
-
#67
рекомендуются указывать ip адреса так — 196.168.2.221 — конфиг карты сд конекта, в настройках карты ноута — 196.168.2.222
-
#68
196.168.2.221 — конфиг карты сд конекта, в настройках карты ноута — 196.168.2.222
поможет?
счас проверю
может кто по удаленке поможет?
реально уже нервы кончаются — ноут выкину
-
#69
сеть создается на компе — и даже куда то подключена
а коннект в гробу видит такое решение
ну как бы должно…
те же сд тулсы видят сд если в настройках получение адреса автоматически, только не работает… попробуй, может и тут так.
-
#70
делается просто.
сначала сделай точку доступа, и используя заданные данные попробуй подключиться к ней телефоном или другим компом.
как только это получится — эти данные внеси в тулкит, в настройки.
убедиться, что имя сети правильно, поиграть с шифрованием (один-другой вариант, я выше писал как проверить поддерживаемые у тебя wep стоит, и скорей всего не поддерживается), использовать только ASCII пароль!
-
#71
сделал пока так, прислушался к кархелпу и к романову
сообщение автоматически приклеено:
телефоном к сети подключился
сообщение автоматически приклеено:
Парни спасибо не дали начудить — после того как телефон подключил к сети — попробовал перегрузить коннект — и он сука заработал
УРАААААА
ложусь спать
-

4.JPG
44.5 KB
· Просмотров: 394
Последние изменения:
-
#72
wpa2 поставил-же
-
#73
да Макс WPA
по советам ставил пароль из 26 букв А — WPA не пропускал такой пароль.
Сделал на 8 знаков А — и все пошло
Спасибо за подсказки — и тебе и Кархелпу
зы. на машине проверил, достаточно быстро сканирует короткий
Последние изменения:
-
#75
Добрый вечер. Пытаюсь подключить SD connect по wifi. Имеем SD connect китай, создал виртуальную сетевую карту (назвал C4) на ноуте 192.168.2.221, телефон видит подключается. SD connect настроил на режим улицу 192.168.2.222 код (26 а). После включения SD connect сеть Road24h ноутбук не видит с списке возможных сетей. На экране SD connect WLANStatus : 2. mac адрес есть. После нажатия кнопки(ключ) на sd connect предлагает сменить WLAN. Меняет. На экране с4 WLANStatus : 1. mac адрес есть. бесконечный поиск. Опять нажатие кнопки(ключ) на sd connect предлагает сменить WLAN. Меняет. На экране SD connect WLANIp : 192.168.2.222. mac адрес есть. Обнаруживается ноутбуком сеть Road24h. На 5 минут далее пропадает. При попытке подключится, не подключается. Куда копать ?
-
#77
вин10про включить мобильную точку (хот спот) изменить имя на «любое ровное» типа «stardiag» пароль «12345678»
все данные вводить без ковычек! я в примерах ставлю ковычки, так как данные для примера.
подключить кабелем сд, в конфигурации сброс до состояния поставки.
после перезагрузки, в конфигурации выьрать сд номер, отметить чекбокс сеть «стоа»,
отметить чекбокс «DHCP» айпи адрес не указывать, указать имя сети, например «stardiag» указать пароль выбрав wpa «12345678»,
ничего больше не трогать, улицу чек бокс не ставить, ничего там не писать. записать конфиг. после перезагрузки прибора он должен подключится к мобильной точке.
точка хотспот стартует при наличие подключения к сети (логично)… хоть от жпс мобильного, потом мобильный можно выключить, точка продолжит работу…
-
#79
да? я бы сказал наоборот… главное отключить «экономию енергии» и в реестре запись найти и редактировать, где автоотключение прописано 10 минут, там легко влазит 2 часа.
а вот роад24 действительно не стабилен… если уж раньше даже софтово требовали гринкейбл =)
-
#80
а вот роад24 действительно не стабилен… если уж раньше даже софтово требовали гринкейбл =)
и в 10ой винде его нет.
что и написано в теме!
Set up WiFi connection SDConnect “WORKSHOP” for Windows 8, 10.
Windows 8 and Windows 10, unlike Windows 7, do not allow you to create a direct computer – to-computer (Road24) connection. However, it is possible to create an Ad-hoc “WORKSHOP” network between the computer and the SDConnect multiplexer in the command line mode.
Not all Wi-Fi adapters support this type of connection. This is why you first need to make sure that the laptop adapter allows you to create an Ad-hoc network.
Open the command prompt as administrator: press Win+X, Command prompt (Admin).
Enter the command netsh wlan show drivers and press enter. In the list that opens, look for the item “Hosted network supported”, which should have the parameter “Yes”.
If this function has the “no” option, then either the wrong wifi adapter driver is installed, or this adapter does not support this type of connection.
Next, create the network “workshop” with the command: netsh wlan set hostednetwork mode=allow ssid=”workshop” key=”aaaaaaaa”. Where “workshop” is the network name, “aaaaaaaa” is the password. The network is created.
The network is created once. The command to create the network do not need more. In the future, only the commands to start and stop the network are used.
Start the network “workshop” command: netsh wlan start hostednetwork. The network is up.
Open the folder “Network connections”. We see that there is a virtual adapter Local area connection **.
For convenience, it is desirable to rename the virtual adapter to “workshop”.
Next, you need to assign a static IP address and subnet mask to the virtual adapter. This is done with the command: netsh interface ip set address name=”workshop” static 192.168.2.1 255.255.255.0
Press enter. There should be no error message. Check if the adapter settings are saved in the adapter properties.
At this point, the virtual network adapter configuration is complete and the laptop is waiting for the SD Connect multiplexer to connect.
To stop the network, use the command: netsh wlan stop hostednetwork. The virtual adapter disappears in the Network connections folder .
For convenience, so as not to enter commands manually, you can create bat files with the appropriate commands. Files are created in any text editor with any name. After that, its are assigned the extension bat.
The network creation file has the following contents:
netsh wlan set hostednetwork mode=allow ssid=”workshop” key=”aaaaaaaa”
The startup file of the network and assign an IP address:
netsh wlan start hostednetwork
netsh interface ip set address name=”workshop” static 192.168.2.1 255.255.255.0
Network stop file:
netsh wlan stop hostednetwork
The network creation file is used only once. Network start and stop files can be conveniently located on the desktop.
Next, you need to configure the SD Connect multiplexer.
Connect the multiplexer to the laptop by cable. The lan adapter settings must already be installed.
Run” SDConnect Administration”.
Go to the tab “Registration/configuration”. Enter the data according to the screenshot and click Start
The multiplexer configuration is complete.
If the multiplexer has already been configured mode Road24h, now added the second mode is a “workshop” and have the opportunity to switch modes wireless connection. On the multiplexer, the switching of wireless connection modes is performed by the buttons of the display panel.
In the ” workshop” mode , constantly flashing, red led means that the device is waiting for connection with the laptop. As soon as you run the bat file “network start” on the laptop, the connection will be established automatically and the led will stop flashing. The order of starting the network in the laptop and turning on the multiplexer in the ” workshop” mode does not matter.
Stopping the network is performed as a bat file. In this case, the multiplexer again goes into the network connection wait.