

Security or convenience? It seems like we can’t have both, so we must decide what’s most important to us. If convenience wins out and Windows is reasonably secured, then being able to auto-login to Windows can be helpful. It’s also more secure than using Windows without a password. We can configure auto-login for Windows 10 computers joined to a domain or stand-alone units.
Enable Auto-Login for Windows 10 Using SysInternals Autologon
Using SysInternals Autologon is the simplest, easiest way to enable auto-login in Windows 10. SysInternals Autologon is a small application provided by Microsoft. There’s a suite of SysInternals tools to help with many things, including troubleshooting Windows. Head to the Autologon download page, download the file, and unzip the folder.
- Select the correct Autologon version for the computer. Plain Autologon is for 32-bit Windows and Autologon64 is for 64-bit windows.

- A User Access Control (UAC) window will open asking for permission to run the app. Select Yes.

- The Autologon License Agreement window opens. Read and select Agree to continue.

- Autologon will already be filled in with the Username and Domain. Enter the Password for the user and select Enable.
To disable auto-login later, just open Autologon and select Disable.
Enable Auto-Login for Windows 10 Workgroup PC Through Settings
Maybe we don’t want to use an app to enable auto-login for some reason. That’s okay, this can be done manually, too.
- Press Windows Key + R to open the Run panel.
- Type <pre>netplwiz</pre> and press Enter. The User Accounts window will open.
- Uncheck the box that reads Users must enter a user name and password to use this computer. Select OK.

- The Automatically sign in window will open, pre-filled with the user name. Enter the Password and Confirm Password.

Once we’re back in the User Accounts window, select the Advanced tab. Find Require users to press Ctrl + Alt + Delete to login and make sure it’s unchecked. Select OK and on the next login, Windows won’t ask for a password.

How to Enable Require Users Checkbox
What if the checkbox isn’t there? That’s common in Windows 10. There are a few ways to get the checkbox back, but only one way guaranteed to work. It requires editing Windows Registry. Always make a backup of the registry before making any changes.
- Press Windows Key + R to open the Run panel.
- Type regedit and press Enter.
A User Account Control (UAC) window opens asking, Do you want to allow this app to make changes to your device? Select Yes.

- When the Registry Editor window opens, navigate to HKEY_LOCAL_MACHINE > SOFTWARE > Microsoft > Windows NT > CurrentVersion > PasswordLess > Device.

- Double-click on the DevicePasswordLessBuildVersion key and change the Value data from 2 to 0. Select OK.

Close the Registry Editor and restart the computer.
If the registry key doesn’t exist, it can be created. Open the CMD prompt or PowerShell as Administrator.
Enter the command reg ADD “HKLMSOFTWAREMicrosoftWindows NTCurrentVersionPasswordLessDevice” /v DevicePasswordLessBuildVersion /t REG_DWORD /d 0 /f and press Enter.

When the response The operation completed successfully appears, restart the computer.

- Once the computer has restarted, go through the steps related to using the netplwiz command above. The Users must enter a user name and password to use this computer checkbox is now there.
This isn’t recommended for everyday use. Enabling auto-login without the proper security precautions can compromise the domain. It might be useful for a display system though, like in fast-food restaurants or airports.
In case of a power outage, the devices would automatically log back in when restarted. The ideal situation is to have an uninterruptible power supply (UPS) on the devices.
The changes we’ll make can be done as a Group Policy Object (GPO) that can be applied as needed within the domain.
- On the domain controller, open Group Policy Management and navigate to Domains > YourDomain > Group Policy Objects. Once there, right-click on Group Policy Objects and select New.

- Enter a descriptive name, like Auto Login, for the new GPO and select OK.
- Right-click on the Auto Login GPO and select Edit…
- The Group Policy Management Editor opens. Navigate to Computer Configuration > Preferences > Windows Settings > Registry.
- Right-click on Registry and select New > Registry Item. We’ll create 5 registry keys with this part of the process. We’ll go through the first one. Repeat the steps accordingly for the other 4 registry keys with the properties provided below.

- In New Registry Properties, leave Action as Update and Hive as HKEY_LOCAL_MACHINE (HKLM). Select the ellipses or three-dots (…) next to the Key Path field. The Registry Item Browser window opens.
Navigate to HKLM > SOFTWARE > Microsoft > Windows NT > CurrentVersion > Winlogon then choose Select to set that as the path for the key.

- Back in the New Registry Properties window, enter AutoAdminLogon in the Value Name field. Leave Value type defaulted to REG_SZ and enter 1 in the Value data field. The 1 means enable AutoAdminLogon. If we wanted to disable it, we’d change that to zero (0). Select OK to set the registry setting in the GPO.
Repeat steps 5 to 7 using the following values:
To set the domain name to be used by autologon:
Key Path: HKLMSOFTWAREMicrosoftWindows NTCurrentVersionWinlogon
Value type: REG_SZ
Value Name: DefaultDomainName
Value data: YourDomainName – in this example, it’s CORP
To set the default username used by autologon:
Key Path: HKLMSOFTWAREMicrosoftWindows NTCurrentVersionWinlogon
Value type: REG_SZ
Value Name: DefaultUserName
Value data: YourUsername – in this example, it’s AutoLogonSvc
To set the default password used by autologon:
Key Path: HKLMSOFTWAREMicrosoftWindows NTCurrentVersionWinlogon
Value type: REG_SZ
Value Name: DefaultPassword
Value data: The password of the user set in the previous key
To prevent the username from being shown on reboot:
Key Path: HKLMSOFTWAREMicrosoftWindows NTCurrentVersionWinlogon
Value type: REG_SZ
Value Name: DontDisplayLastUserName
Value data: 1
- Once the keys are created and in the order shown below, apply the GPO in the Group Policy Management window by dragging and dropping it on the desired groups.

The next time the devices are restarted, they’ll pick up the GPO and apply it within their registry.
Notice that the password was stored in plain text. Be tremendously cautious about using autologon in a domain. If anyone can open the Registry Editor, they can read the password and username. They will now have access to anything accessible with those credentials. Two precautions can be taken; prevent anyone from accessing the registry editor and use a service account with limited permissions for the autologon.
Will You Use Auto-Login?
Now that you know how to configure auto-login, what are you going to use it on? Do you already use auto-login? If so, in what scenario and have you come across anything we should be aware of? We’d love to hear about it in the comments below.
Related Posts
- How to Fix a “This file does not have an app associated with it” Error on Windows
- How to Fix an Update Error 0x800705b4 on Windows
- How to Resolve “A JavaScript error occured in the main process” Error on Windows
- How to Fix the Network Discovery Is Turned Off Error on Windows
- How to Change Folder Icons in Windows
Вы можете использовать групповые политики Windows для выполнения файлов различных скриптов при загрузке/выключении компьютера или входе/выходе пользователя. С помощью GPO вы можете исполнять на компьютерах домена не только классические файлы скриптов (.bat, .cmd, ,vbs), но и Startup/Shutdown/Logon/Logoff скрипты PowerShell (.ps1)
В современных версиях Windows вы можете настроить запуск логон/логоф скриптов PowerShell напрямую из редактора групповых политик (ранее приходилось вызывать ps1 скрипты из bat файлов через параметр исполняемого файла powershell.exe).
Содержание:
- Запуск PowerShell скрипта при загрузке компьютера с помощью групповой политики
- Выполнить PowerShell скрипт при входе пользователя в Windows
Запустите консоль управления доменными политиками GPMC.msc (Group Policy Management сonsole). Создайте новую политику (GPO) и назначьте ее на нужный контейнер с пользователями или компьютерами (можно использовать WMI фильтры GPO для более тонкого нацеливания политики). Перейдите в режим редактирования политики.
Вы должны выбрать раздел GPO для запуска PowerShell скрипта в зависимости от того, когда вы хотите выполнить ваш скрипт.
- Если PS скрипт должен быть запущен при входе пользователя на компьютер (настройка параметров окружения пользователя, программ, например: вы хотите при входе пользователя автоматическое создавать подпись в Outlook на основе данных из пользователя AD, настроить параметры экранной заставки или стартового экрана) или при выходе пользователя, вам нужно перейти в раздел GPO: User Configuration -> Policies -> Windows Settings -> Scripts (Logon / Logoff);
- Если вы хотите запускать скрипт PowerShell при загрузке компьютера (отключение устаревших протоколов: NetBIOS, SMBv1, настройка параметров безопасности компьютера и т.д.) или перед корректным выключением компьютера, вам нужно перейти в секцию GPO с настройками компьютера: Computer Configuration -> Policies -> Windows Settings -> Scripts (Startup / Shutdown).
Запуск PowerShell скрипта при загрузке компьютера с помощью групповой политики
Допустим, нам нужно запускать PowerShell скрипт при загрузке Windows. Для этого нужно выбрать Startup и в открывшемся окне перейди на вкладку PowerShell Scripts.
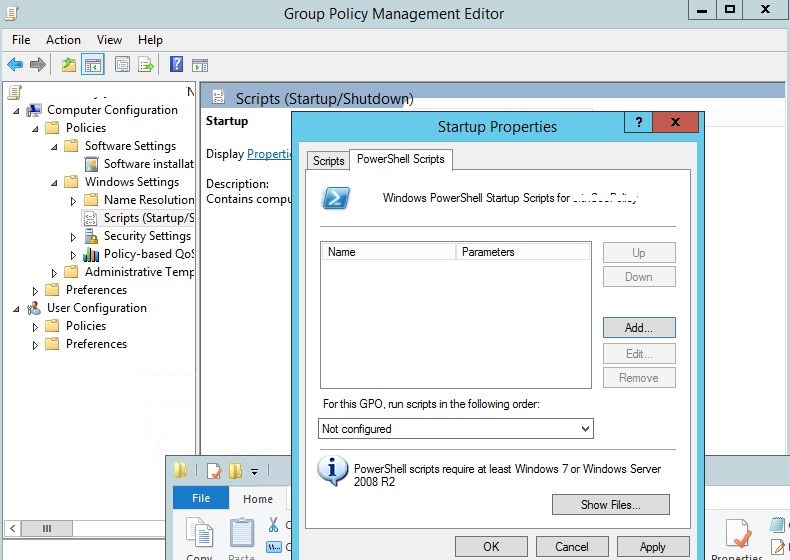
Теперь нужно скопировать файл с вашим PowerShell скриптом на контроллер домена. Скопируйте ваш файл ps1 в каталог Netlogon на контроллере домена (например,
\\winitpro.ru\netlogon
).
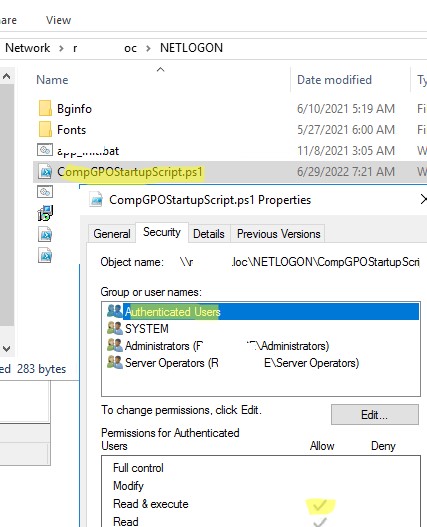
Т.к. мы настраиваем запуск Startup скрипта PowerShell, нужно в разрешениях ps1 файла (или всего каталога Machine\Scripts\Startup) проверить NTFS права доступа на чтение и выполнение (Read & Execute) для группы Domain Computers и/или Authenticated Users .
Теперь нужно нажать кнопку Add и укажите UNC путь к вашему файлу скрипта ps1 в Netlogon.
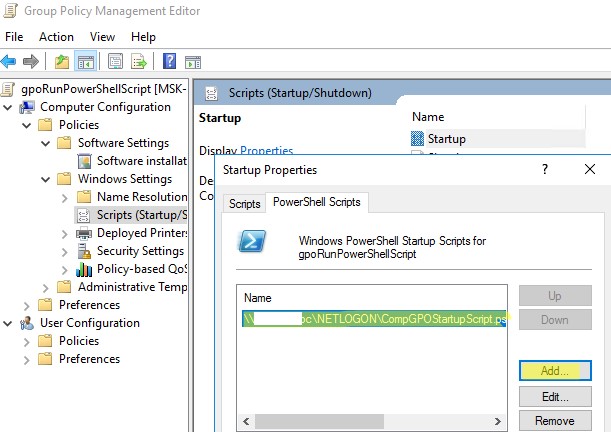
Если вы запускаете несколько PowerShell скриптов через GPO, вы можете управлять порядком из запуска с помощью кнопок Up/Down.
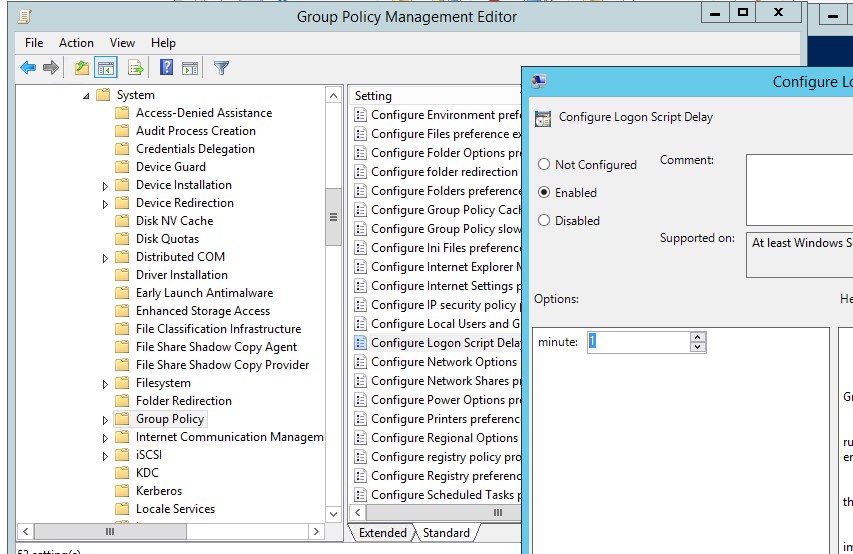
Для корректного выполнения скриптов PowerShell при загрузке компьютера нужно настроить время задержки перед запуском с помощью политики в разделе Computer Configuration -> Administrative Templates -> System -> Group Policy. Включите политику Configure Logon Script Delay (Настроить задержку сценария входа в систему) и укажите задержку в минутах перед запуском логон-скриптов (достаточное для окончания инициализации и загрузки всех необходимых служб). Обычно достаточно поставить здесь 1-2 минуты.
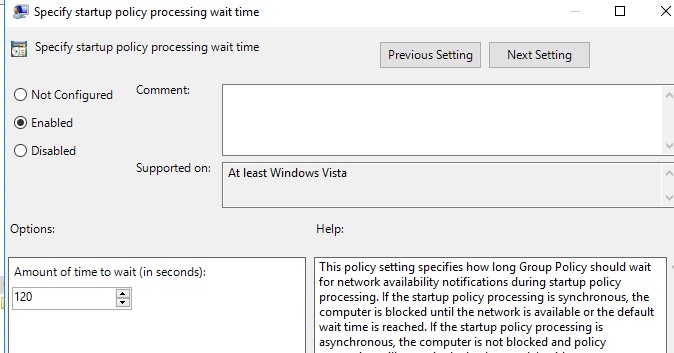
Если в вашем PowerShell скрипте используются сетевые инструменты Windows, для некоторых GPO нужно включить политику “Specify startup policy processing wait time” в разделе Computer Configuration -> Policies -> Administrative Templates -> System -> Group Policy. Попробуйте начать со значения 60 сек. После включения этой политики компьютер будет ждать 60 секунд прежде, чем начать применять стартап скрипты. Обычно этого достаточно для инициализации сетевой подсистемы Windows.
В Windows Server 2012R2 и Windows 8.1 и выше PowerShell скрипты в GPO запускаются из каталога NetLogon в режиме Bypass. Это означает, что настройки политики запуска сценариев PowerShell игнорируются. Если вы хотите запустить скрипт из другого каталога, или в вашей сети остались клиенты с Windows 7 или Windows Server 2008R2, вам нужно настроить политику выполнения PowerShell скриптов.
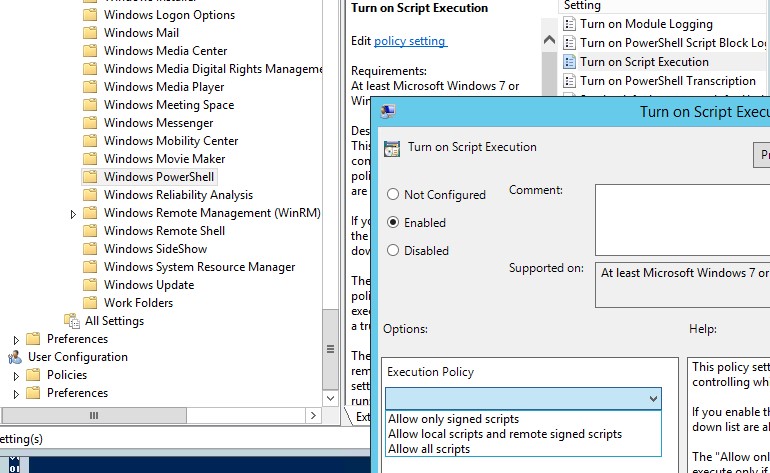
По умолчанию в настройках безопасности Windows запрещен запуск PowerShell скриптов. Значение текущей настройки политики запуска сценариев PowerShell можно получить командой Get-ExecutionPolicy. Если политика не настроена, команда вернет Restricted (блокируются любые скрипты). Параметры безопасности запуска PowerShell скриптов можно настроить через политику “Включить выполнение сценариев” / “Turn On Script Execution” (в разделе GPO Computer Configuration -> Administrative Templates -> Windows Components -> Windows PowerShell). Возможные значения политики:
- Allow only signed scripts (AllSigned)– можно запускать только подписанные скрипты PowerShell (“Как подписать скрипт PowerShell?”) –самый лучший сценарий с точки зрения безопасности;
- Allow local scripts and remote signed scripts (RemoteSigned)– можно запускать любые локальные и подписанные удаленные скрипты;
- Allow all scripts (unrestricted) – самый небезопасный вариант, т.к. разрешает запуск любых PowerShell скриптов.
Если вам не подходит не один из предложенных сценариев настройки политики запуска PowerShell скриптов, вы можете запускать PowerShell скрипты в режиме Bypass (скрипты не блокируются, предупреждения не появляются).
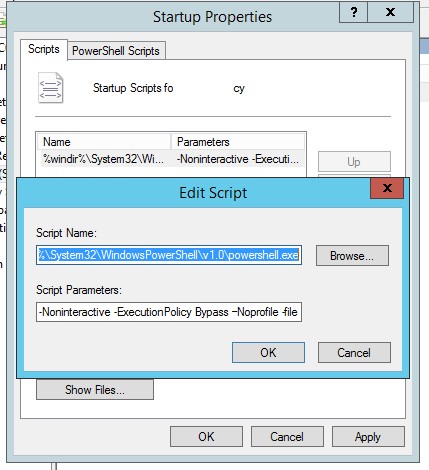
Для этого PowerShell скрипт нужно запускать из секции Startup -> Scripts. В этой секции вы можете настроить запуск ps1 сценария с помощью создания обычного Startup скрипта, запускающего исполняемый файл powershell.exe (по аналогии со сценарием, описанным в статье). Укажите:
- Script name:
%windir%\System32\WindowsPowerShell\v1.0\powershell.exe - Script Parameters:
-Noninteractive -ExecutionPolicy Bypass –Noprofile -file %~dp0MyPSScript.ps1
Символы
%~dp0
при запуске на клиенте автоматически преобразуются в UNC путь до каталога со скриптом на SYSVOL.
В данном случае вы принудительно разрешили запуск любого (даже ненадежного) скрипта PowerShell с помощью параметра Bypass.
Перезагрузите компьютер, чтобы обновить настройки GPO и проверьте, что ваш PowerShell скрипт запустился после загрузки.
Выполнить PowerShell скрипт при входе пользователя в Windows
Рассмотрим сценарий автоматического запуска PowerShell скрипта при входе пользователя в Windows (или при выходе).
Если вам нужно запустить скрипт не при загрузке компьютера, а после входа пользователя в Windows (для каждого пользователя компьютера), вам нужно привязать GPO к OU Active Directory с пользователями. В этом случае PowerShell нужно настроить в следующем разделе User Configuration вашей GPO
Если вы хотите, чтобы политика выполнялась для всех пользователей определенного компьютера, нужно привязать политику к OU с компьютерами и включить режим замыкания групповой политики (параметр Configure User Group Policy Loopback Processing mode в разделе Computer Configuration -> Administrative Templates -> System -> Group Policy). Если не включать режим замыкания, то параметры из раздела User Configuration не будут применены к пользователю. Подробнее об этом в статье Почему GPO не применяется к пользователю или компьютеру?
В этом примере для теста я буду использовать простой PowerShell скрипт, который пишет в текстовый лог файл время входа пользователя.
- Скопируйте файл скрипта PowerShell в каталог
\\winitpro.ru\NETLOGON\
на контроллере домена AD - Перейдите в раздел User Configuration -> Policies -> Windows Settings -> Scripts -> Logon;
- Перейдите на вкладку PowerShell Scripts и добавьте ваш PS1 файл скрипта (используйте UNC путь, например
\\winitpro.ru\NETLOGON\UserLog.ps1
);
- Выполните логофф пользователя на целевом компьютере и выполните вход;
- Ваш PowerShell скрипт будет запущен автоматически через GPO при входе пользователя;
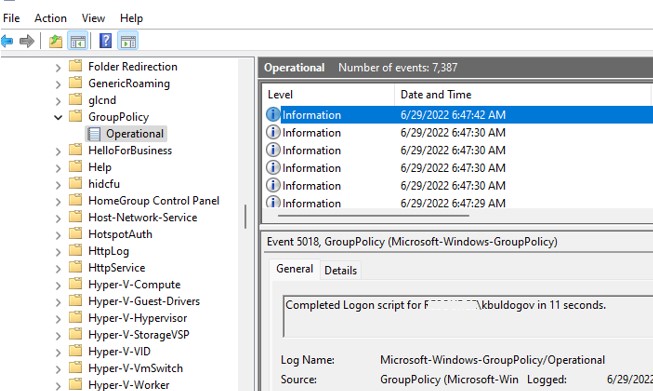
- Вы можете убедится, что логон скрипт выполнен успешно под пользователем по событию с Event ID 5018 в журнале Microsoft-Windows-GroupPolicy/Operational Event Viewer:
Completed Logon script for winitpro\kbuldogov in 11 seconds.


Если вы хотите, чтобы пользователь не мог получить доступ к своему рабочему столу до окончания работы скрипта, нужно включить параметр Run logon scripts synchronously = Enable (Computer Configuration\Administrative Templates\System\Logon). В этом случае explorer не закончится, пока не отработают все политики и логон скрипты (это увеличивает время входа!).
Обратите внимание, что скрипт выполняется с правами текущего пользователя. Если у пользователя есть права администратора на компьютере и на него действуют политики User Account Control (UAC), PowerShell скрипт не сможет внести изменения, требующие повышенных привилегий.
Для запуска PowerShell скриптов с привилегированными правами при входе простых пользователей, можно использовать назначенные задания планировщика. Для этого нужно:
- Создать задание Task Scheduler в разделе User Configuration -> Preferences -> Control Panel Settings -> Scheduled Task;
- На вкладке General указать что задание запускается от имени пользователя
%LogonDomain%\%LogonUser
и включите опцию
Run with highest privileges
;
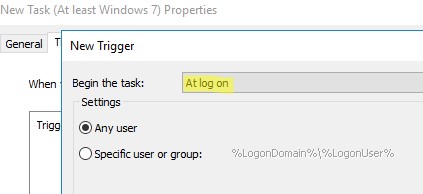
- На вкладке Trigger укажите, что задание должно запускаться At log on;

- И на вкладке Actions укажите путь к вашему PowerShell скрипту:
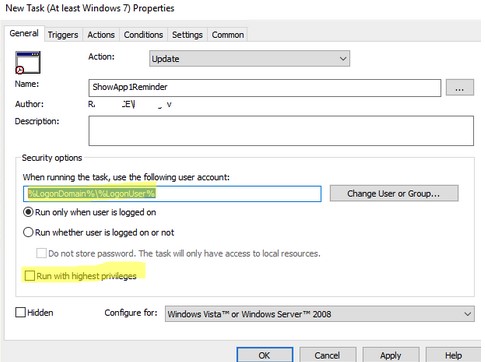
Action: Start a program
Program/Script:
C:\WINDOWS\system32\WindowsPowerShell\v1.0\powershell.exe
Add Arguments (optional):
-ExecutionPolicy Bypass -command "& \\winitpro.ru\Netlogon\yourscript.ps1"
Такой PowerShell скрипт будет запускаться с правами администратора (если пользователь добавлен в группу локальных администраторов Windows).
Некоторые скрипты нужно запускать для каждого пользователя только один раз при первом входе на компьютер (инициализация рабочего окружения, копирование папок или конфигурационных файлов, создание ярлыков и т.д.). В одной из статей мы рассматривали cпособ запуска логон скрипт через GPO только один раз.
Назначение сценариев входа учетным записям пользователей и групп
Для того чтобы назначить сценарий входа учетным записям пользователей и групп, с помощью оснастки Локальные пользователи и группы (или Active
Directory — пользователи и компьютеры — если компьютер входит в домен) указывается путь к сценарию. Если при регистрации пользователя с помощью определенной учетной записи среди ее параметров указан путь к сценарию входа, соответствующий файл сценария открывается и выполняется.
На вкладке Профиль окна свойств учетной записи вы можете назначить сценарий входа, введя в поле Сценарий входа (Logon Script) имя файла (и, возможно, относительный путь к нему). При регистрации сервер, аутентифицирующий пользователя, находит файл сценария (если таковой существует) с помощью указанного в учетной записи имени и пути (на контроллерах домена, как правило, сценарии хранятся в общей папке NETLOGON — %SystemRoot%\SYSVOL\sysvol\DNS-имя-домена\scripts). Если перед именем файла указан относительный путь, сервер ищет сценарий входа в подкаталоге основного локального пути сценариев.
Данные поля Сценарий входа определяют только имя файла и относительный путь, но не содержат сам сценарий входа. После создания файл сценария с определенным именем помещается в соответствующий реплицируемый (если компьютеры объединены в домен) каталог.
Сценарий входа можно поместить в локальный каталог компьютера пользователя. Но подобный подход, как правило, применяется только при администрировании учетных записей, существующих на одиночном компьютере, а не в домене. В этом случае вы должны поместить файл сценария в соответствии с локальным путем к сценариям входа в компьютер.
Помимо оснастки Локальные пользователи и группы, сценарии входа могут быть назначены пользователям или компьютерам и с помощью оснастки Групповая политика (Group Policy).
Как написать сценарий входа в систему?
Помогите написать максимально простой сценарий входа в систему (*.bat *.vbs или на PowerShell)
Алгоритм такой :
1.) Он должен создать один раз текстовый файл на шаре с именем пользователя из AD
2.) В этот файл он должен добавлять каждый раз при входе в систему пользователя — имя компьютера
и время входа (исключая терминалки , нужны только локальные компьютеры в домене)
-
Вопрос задан
-
2116 просмотров
Пригласить эксперта
echo %computername% %date% %time% >>\\server\share\%username%.txtДумаю, проще уже некуда.
Подвесте на логог/логоф скрипт, и смотрите в AD пользователь ходил онзаходил:
Param(
[Parameter(Position=0)]
[ValidateSet("Logon","Logoff","Unknown")]
[string]$Status="Unknown"
)

#no spaces in the filter
[adsisearcher]$searcher="samaccountname=$env:username"
#find the current user
$find = $searcher.FindOne()
#get the user object
[adsi]$user = $find.Path
#define a string to indicate status
$note= @("{0} {1} to {2}" -f (Get-Date),$status.ToUpper(),$env:computername)
[array]$NewVals = @()
$NewVals = try {
    ($user.GetEx('url'))[0..10]
}
catch {
    @()
}
$newVals += $note
#DEBUG, output values in ISE
#$NewVals |  out-host
#update the user property
$user.PutEx(2, 'url', $NewVals )
#commit the change
$user.SetInfo()
#DEBUG, output values in ISE
#$user.GetEx('url')
Написать можно хоть на vbs, хоть на ps — что знаете, на том и пишите. Задача несложная, решается что там что там. Читать документацию соответствующего языка и MSDN — вот что-то, а MSDN у M$ сделан офигительно.
Войдите, чтобы написать ответ
-
Показать ещё
Загружается…
Минуточку внимания
Introduction Logon Scripts
In this section I will give you examples of how to build the VBScript to use in your logon script. I will help you chose which methods to use and which variables to change. There are two sections; one section specialises in mapped network drives, while the other section deals with scripts for printers. Please choose a Windows Logon Script to suit your particular task.
Map Network Drive Logon Scripts
- MapNetworkDrive (Basic) – Getting started
- MapNetworkDrive (Adv) – 5 Arguments e.g. bForce
- Multiple Network Drives – Map to more than one UNC
- Mapping to UserName – Map one level further down
- RemoveNetworkDrive – Prevent script failing
- Rename Network Drive – Rename, Share Server (W:)
- EnumNetworkDrives – Get a ‘handle’ on the drives
- Drives already connected – Logic if drive exists
- Map First Available Drive Letter – See 2 Loops
- Troubleshooting Logon Scripts – Assign logon script
- Add Error Correcting Code – On Error
- Troubleshooting Logon Scripts – Assign logon script
♦
Connect to Printers Logon Scripts
- AddWindowsPrinterConnection – Join to UNC path
- SetDefaultPrinter – Which printer will be the default
- Add Multiple Printers – Add a second printer
- EnumPrinterConnections – Extends other methods
- RemovePrinterConnection – Deleting printer icons
- Connect a Printer to a Computer – Policy Loopback
- PowerShell Logon Script – Windows 7 Techniques
- Troubleshooting Logon Scripts – VBScript or AD?
Introduction to Logon Scripts with VBScript
When I first saw Windows 2003, I investigated the new features. I wondered: ‘How do I assign logon scripts to users?’ I came up with two methods; the traditional NT 4.0 style or assigning VBScripts via Active Directory Group Policies. (The traditional method was via the User’s Properties, Profile tab.)
I even took a I step back and asked the more fundamental question: ‘What am I trying to achieve here?’ The answer was, ‘To provide users with the best environment for their work’. This lead me to investigate VBScript methods for providing mapped network drives and connecting to shared printers.
Good news. Scripting possibilities improve dramatically when you progress from the old DOS batch files, to the new WSH with its rich VBScript verbs. When you survey the big picture, you realize that Logon Scripts are only one of many jobs for WSH and VBScript. My point is that knowledge of these scripting objects, syntax and methods will help you automate other computer tasks. As a bonus, if you master assigning Logon Scripts by Group Policy, then you will see how to apply other settings using Group Policy (GPMC).
Guy Recommends: A Free Trial of the Network Performance Monitor (NPM) v11.5
SolarWinds’ Orion performance monitor will help you discover what’s happening on your network. This utility will also guide you through troubleshooting; the dashboard will indicate whether the root cause is a broken link, faulty equipment or resource overload.
What I like best is the way NPM suggests solutions to network problems. Its also has the ability to monitor the health of individual VMware virtual machines. If you are interested in troubleshooting, and creating network maps, then I recommend that you try NPM now.
Download a free trial of Solarwinds’ Network Performance Monitor
Example of a Logon Script
VBScript to map a network drive. Here are step-by-step instructions to create this logon script.
‘ MNDUserName.vbs
‘ VBScript to map a network drive to the UserName.
‘ Author Guy Thomas https://computerperformance.co.uk/
‘ Version 1.3 – April 24th 2010
‘ —————————————————-‘
Option Explicit
Dim objNetwork
Dim strDriveLetter, strRemotePath, strUserName
strDriveLetter = «J:»
strRemotePath = «\\grand\home»
‘ Purpose of script to create a network object. (objNetwork)
‘ Then to apply the MapNetworkDrive method. Result J: drive
Set objNetwork = WScript.CreateObject(«WScript.Network»)
‘ Here is where we extract the UserName
strUserName = objNetwork.UserName
objNetwork.MapNetworkDrive strDriveLetter, strRemotePath _
& «\» & strUserName
‘ Extra code just to add a message box
WScript.Echo » Launch Explorer, check: «& strDriveLetter
WScript.Quit
‘ End of MapNetworkDrive Example logon script.
More Tasks for VBScript
WSH provides the objects, which our scripts then manipulate. Here are examples of the tasks that these objects and services can do for you:
- Map network drives (Then assign to Logon Script)
- Connect to printers (Then assign to Logon Script)
- Manipulate Active Directory objects, e.g. Users passwords
- Run basic functions such as CreateObject and GetObject
- Modify environment variables e.g. Temp
- Modify keys and values in the registry
- Print a message to a Message Box on screen
- Combine with WMI to measure and automate the operating system
Guy Recommends: SolarWinds’ Free Bulk Import Tool
Import users from a spreadsheet. Just provide a list of the users with their fields in the top row, and save as .csv file. Then launch this FREE utility and match your fields with AD’s attributes, click and import the users.
Optionally, you can provide the name of the OU where the new accounts will be born. Download your FREE bulk import tool.
If you need more comprehensive software, download a free trial of SAM (Server & Application Monitor)
What is WSH? (Windows Scripting Host)
Windows Scripting Host is aptly named; think of WSH as a butler who pampers their guests. When a logon script arrives from the dedicated server,WSH makes sure that all the objects and services that the script needs are available. It alsochecks discretely for security and passes the script to the appropriate script engine, for example, ActiveX.
WSH is ideal for non-interactive scripting jobs, such as logon configuration, administrative scripting, or machine automation. Let me take you on a journey where you create mapped network drives or printers. Together we will study examples of VBScripts, object, method and properties model.
Try PowerShell for Logon Scripts
You may have noticed that VBScript is being phased out in favour of PowerShell. Although PowerShell is used primarily for interrogating the OS, it’s possible to employ cmdlets to configure the users’ environment. The best method is to create a ComObject, which acts as a wrapper for familiar VBScript commands. Here is example of PowerShell’s New-Object cmdlet manipulating MapNetworkDrive:
# PowerShell Logon 3 Script Example
Clear-Host
$Net = $(New-Object -ComObject WScript.Network)
$Net.MapNetworkDrive(«X:», «\\alan\home»)
$Net.objNetwork.EnumNetworkDrives
$Net
You could save the above commands into a .ps1 file. However, the tricky part is executing this .ps1 file as a logon script. I have more information here: PowerShell logon script and Group Policy.
»
Window 8 Group Policy Drive Maps
The modern group policy method of drive mapping does not require any scripting. In Windows Server 2008 you can launch the Group Policy Management Console and configure Drive Maps by clicking with a mouse. See more on Windows 8 Group Policy Drive Maps.
If you like this page then please share it with your friends
See more logon scripts examples
• Logon Script Home •EnumNetworkDrives • Map Network Drive Group • Free Import CSV Tool
• Map Network Drive Script • Vbscript Map Network Drive Username • Map Multiple Network Drives
• ObjNetwork.MapNetworkDrive • Disconnect Network Drives • Logon script group policy