

Те, кто обновляется с Windows 7, впервые откроют для себя многие новые функции, реализованные еще в Windows 8, – от нового диалога копирования файлов и нового Диспетчера задач (Task Manager) с менеджером автозагрузки до улучшенных средств защиты.
PDF-принтер
Способ «напечатать» документ в файл существует еще со времен Windows Vista, но до сих пор Microsoft активно продвигала для этого собственный формат XPS. Однако теперь в Windows 10 есть встроенный принтер Microsoft Print to PDF. С его помощью можно сохранить любой документ из любого приложения в формате PDF без установки стороннего ПО.

Запись игр и видео с экрана
В Windows 10 есть функция «DVR для игр» (Game DVR), которая активируется с «игровой панели» (Game Bar). Настроить эту функцию можно в приложении Xbox, а предназначена она для видеосъемки игрового процесса на компьютере.
Тем не менее «DVR для игр» можно использовать и для записи на видео любых действий на рабочем столе. Другими словами, это встроенное средство записи экрана, которое можно вызвать простой клавишной комбинацией.

Удаленный доступ к файлам через OneDrive
Клиент OneDrive заметно изменился по сравнению с Windows 8.1. От системы с «заглушками» файлов отказались, вернув классический клиент OneDrive из Windows 7. Вместе с ним вернулась и возможность удаленного доступа к файлам. Включив ее в настройках, можно получить доступ к файлам, хранящимся на компьютере, из любого места через сайт OneDrive – главное, чтобы компьютер был включен и подсоединен к Интернету. Таким способом можно удаленно открывать файлы, не добавленные в OneDrive.

Отложенные снимки экрана с помощью «Ножниц»
В «Ножницах» (Snipping Tool), встроенной утилите для создания снимков экрана, появилась возможность делать отложенные скриншоты. Таймер позволяет отложить создание снимка на время от 1 до 5 секунд. Раньше для этого приходилось использовать сторонние утилиты.
В Windows 10 также сохранилась клавишная комбинация для быстрого создания скриншотов, добавленная в Windows 8. Клавишами [Windows]+[Print Screen] можно сделать снимок и сохранить его в папке «Изображения\Снимки экрана» (Pictures\Screenshots).

Клавишные комбинации в командной строке
Командная строка в Windows 10 обзавелась массой новых полезных функций, включая поддержку клавишных комбинаций типа [Ctrl]+[V] для вставки текста. В окончательной версии Windows 10 эти новые функции включены по умолчанию.
Одно время об улучшениях в командной строке писали очень активно, но потом их заслонили собой Cortana, «Просмотр задач» (Task View) и другие громкие нововведения.

Нативные настройки тачпада
Множество новых настроек для тачпадов в ноутбуках появилось в приложении «Параметры» (Settings), раздел «Устройства > Мышь и сенсорная панель» (Devices > Mouse and touchpad). Раньше эти настройки были доступны только фирменных утилитах от производителей.
Можно отключить реагирование на прикосновения ладонью, настроить жесты тремя пальцами и сделать так, чтобы тачпад отключался при подключении мыши. Некоторые из этих опций появились еще в Windows 8, но в Windows 10 набор более исчерпывающий.

Прокрутка в фоновых изображениях
В настройках мыши в Windows 10 появилась новая опция «Прокручивать неактивные окна при наведении на них» (Scroll inactive windows when I hover over them). Она включена по умолчанию и позволяет прокручивать фоновые изображения. Благодаря этой опции можно навести курсор на приложение, находящееся на заднем плане, и прокручивать его колесиком мыши или тачпадом. Прокрутка работает в любых областях, на которые наведен курсор. В Mac OS X такая функция тоже включена по умолчанию.

Улучшенное масштабирование экрана
В Windows 10 по сравнению с Windows 8.1 заметно улучшилось масштабирование экрана. Теперь можно задать разные уровни DPI для каждого подключенного монитора. Например, при подключении устройства с высоким разрешением, типа Microsoft Surface, к внешнему монитору с низким разрешением можно задать для каждого дисплея особый уровень DPI, чтобы изображение выводилось корректно. Раньше все подключенные мониторы имели одинаковое разрешение.
Настроить это можно в приложении «Параметры», раздел «Система > Экраны» (System > Displays). Если подключено несколько мониторов, для каждого из них можно задать свое разрешение. Уровень масштабирования можно выбирать с шагом 25%. Если нужна более тонкая настройка, надо нажать ссылку «Дополнительные параметры экрана» (Advanced display settings), затем «Дополнительные изменения размера текста и других элементов» (Advanced sizing of text and other items) и наконец «Пользовательские параметры размера» (Set a custom scaling level) в старой Панели управления, чтобы задать уровень масштабирования более точно.

Установка неопубликованных приложений
Windows 10 – уже не закрытая система в духе iPad. Да, Магазин Windows никуда не делся и при стандартных настройках это единственный источник новых «универсальных» приложений. Но можно разрешить загрузку неопубликованных приложений, включив всего одну опцию в «Параметрах». После этого можно устанавливать приложения из любых других источников. Ну и разумеется, традиционные настольные программы, как и в Windows 8, можно устанавливать откуда угодно безо всяких предварительных настроек.
Это не просто приятное нововведение для любителей устанавливать неопубликованные приложения – это дает бизнесу возможность ставить специализированные приложения на устройства сотрудников легко и просто, без утомительной подготовки. Компания может установить свои бизнес-приложения на любое устройство с Windows 10, в то время как раньше для этого требовалась версия Windows 8 Professional, подключение к домену и специальный ключ для установки неопубликованных приложений, доступный только по контракту для организаций.

Панель быстрого доступа в Проводнике
Проводник (File Explorer) тоже заметно обновился. Он теперь по умолчанию открывает панель быстрого доступа (Quick Access), где собраны часто используемые папки и недавно открытые файлы. Часто используемые папки всегда отображаются и в боковой панели, так что к ним можно получить доступ из любого места. Это поможет неопытным пользователям быстрее находить нужные файлы, избавив их от необходимости рыскать по всей файловой системе.
Ну а те, кому не нравится это нововведение, могут просто отключить панель быстрого доступа и настроить Проводник так, чтобы он при запуске открывал окно «Этот компьютер» (This PC).

Есть и менее заметные изменения. Например, функция создания точек восстановления в Windows 10 по умолчанию отключена, что позволяет сэкономить место на диске. Теоретически, новая функция восстановления исходного состояния системы (Reset) в сочетании с командами SFC и DISM должна обеспечить быстрое восстановление работоспособности Windows 10 в случае повреждения. Но точки восстановления создавать по-прежнему можно, так что если хочется дополнительной защиты, можно включить эту опцию в Панели управления.
Автор: Chris Hoffman
Перевод
SVET
Оцените статью: Голосов
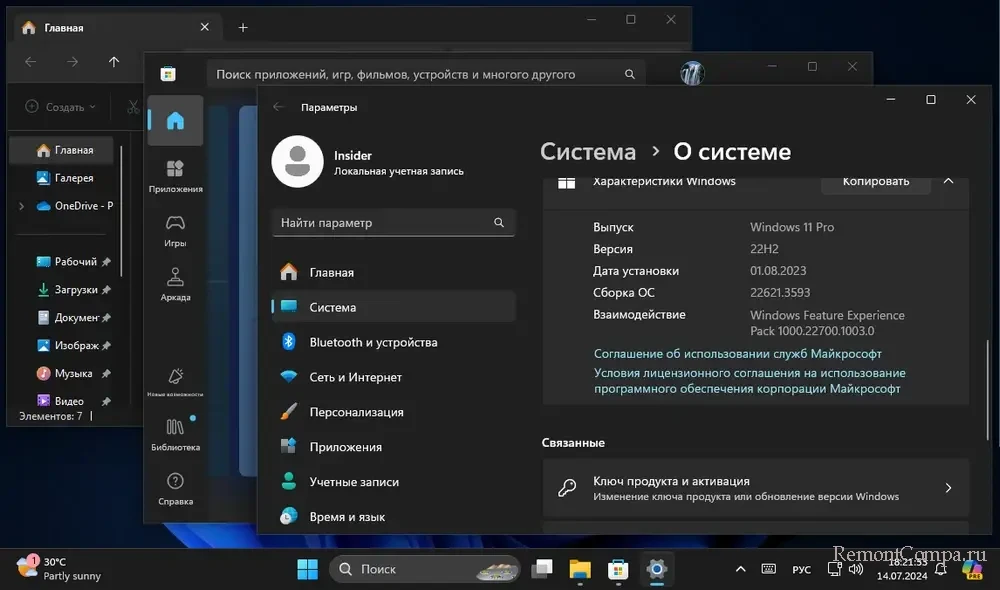
В этой публикации, друзья, рассмотрим, как активировать окна Windows лишь по наведению курсора. По умолчанию Windows фокусируется по клику: окно становится активным и попадает в фокус, только если мы кликнем на нём мышью. Куда мы бы ни перемещали указатель мыши, ни одно неактивное окно не станет активным, пока мы на него не кликнем. Это стандартное поведение Windows, к которому мы привыкли. Но операционная система может вести себя в этом плане иначе – окно под указателем мыши может становиться активным без клика по нему, просто по наведению курсора. Такое поведение окон менее предсказуемо, но позволит быстрее переключаться между окнами. Какое поведение окон больше подойдёт каждому из нас – привычное предсказуемое или непривычное более быстрое – можно решить, элементарно попробовав оба эти поведения.
Альтернативное поведение окон с активацией при наведении курсора присутствует в Windows давно, в числе специальных возможностей операционной системы, но наверняка многие о нём и не подозревали.
Такое поведение окон может ускорить работу с компьютером благодаря снижению количества кликов и упреждению ошибок ввода. Не нужно кликать, чтобы активировать окно, достаточно просто навести на него курсор, и оно само станет активным. Многие часто, не глядя на экран, набирают текст, а потом с досадой обнаруживают, что набирали этот текст не в том окне, что нужно, просто забыв сделать клик на нужном окне. Это труд, пропавший зря. Меньше кликов – это не только увеличение нашей производительности за компьютером, это также снижение напряжения мышц, а, соответственно, снижение их усталости, что особенно важно при длительной работе за компьютером. Ну и, друзья, такое поведение окон в целом сделает процесс работы с компьютером более плавным.
Безусловно, поведение окон с активацией при наведении курсора – это решение не для всех подряд случаев использования компьютера. Например, при работе с сенсорным экраном или тачпадом активация по клику может быть более точной, чем наведение курсора, и предотвратить случайную активацию не того окна.
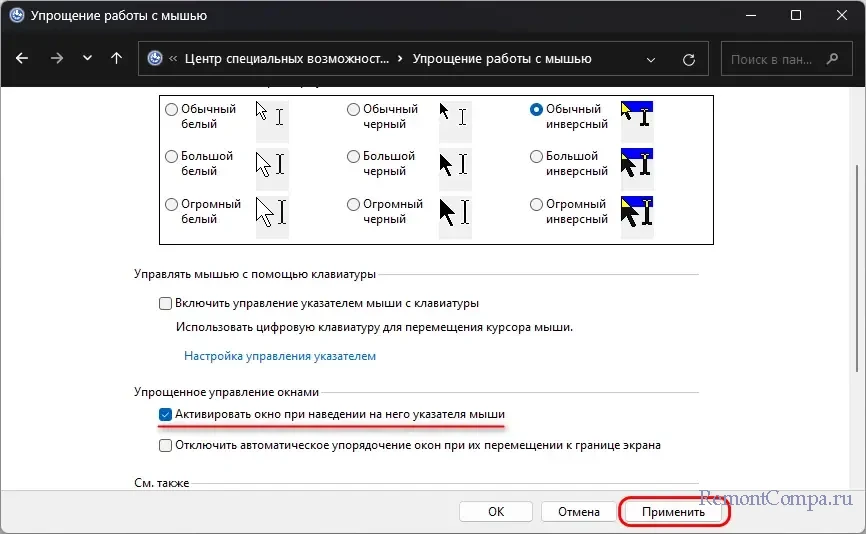
Для настройки активации окон при наведении курсора в любой Windows открываем классическую панель управления. Проходим в ней путь:
Панель управления → Специальные возможности → Центр специальных возможностей → Упрощение работы с мышью
Смотрим блок настроек упрощённого управления окнами. Устанавливаем галочку настройки «Активировать окно при наведении на него указателя мыши». Нажимаем «Применить».
Другая нативная возможность Windows, на которую наверняка также мало кто обращал внимание – прокрутка неактивных окон. Благодаря ей можем не смещать фокус с активного окна, но прокрутить неактивное окно, наведя на его область прокрутки. Такая возможность может сделать удобной одновременную работу с программами, предусматривающими ввод данных, и программами, отображающими данные. Скроля информацию в последних, не будем терять фокус в первых и сможем выполнять ввод без задержек и отвлечений.
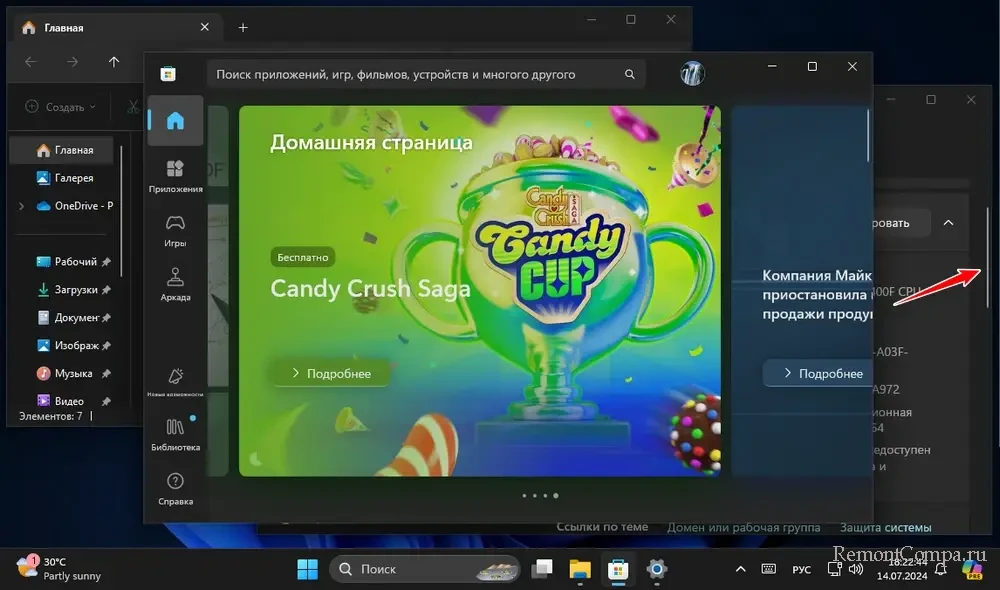
Правда, в таком случае от активации окон при наведении на них курсора придётся отказаться, поскольку скроллинг неактивного окна будет переключать нас на него.
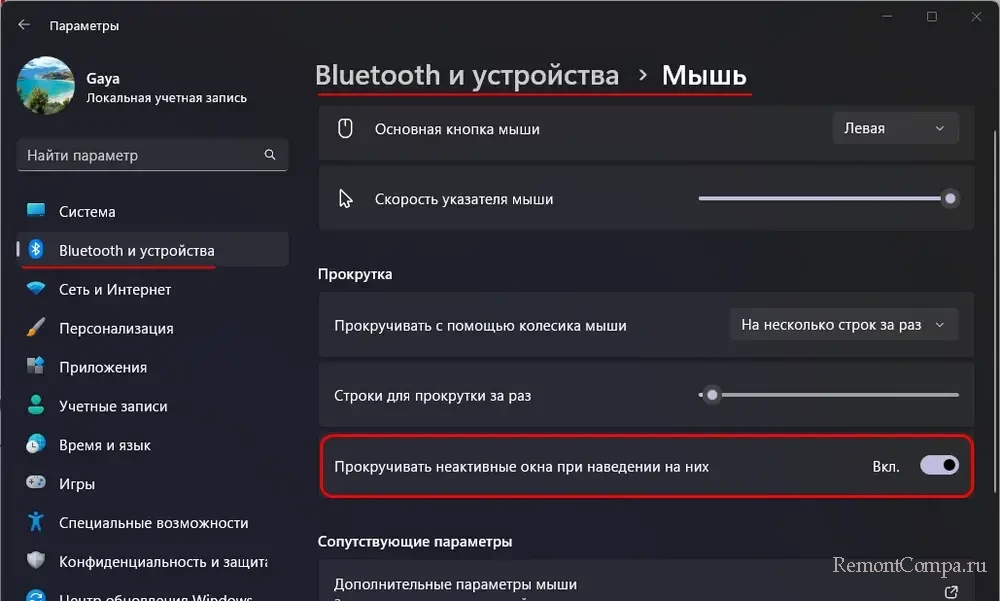
Настраивается эта возможность в современных настройках Windows 10 и 11. В приложении «Параметры» идём по пути:
- Устройства → Мышь — в Windows 10;
- Bluetooth и устройства → Мышь — в Windows 11.
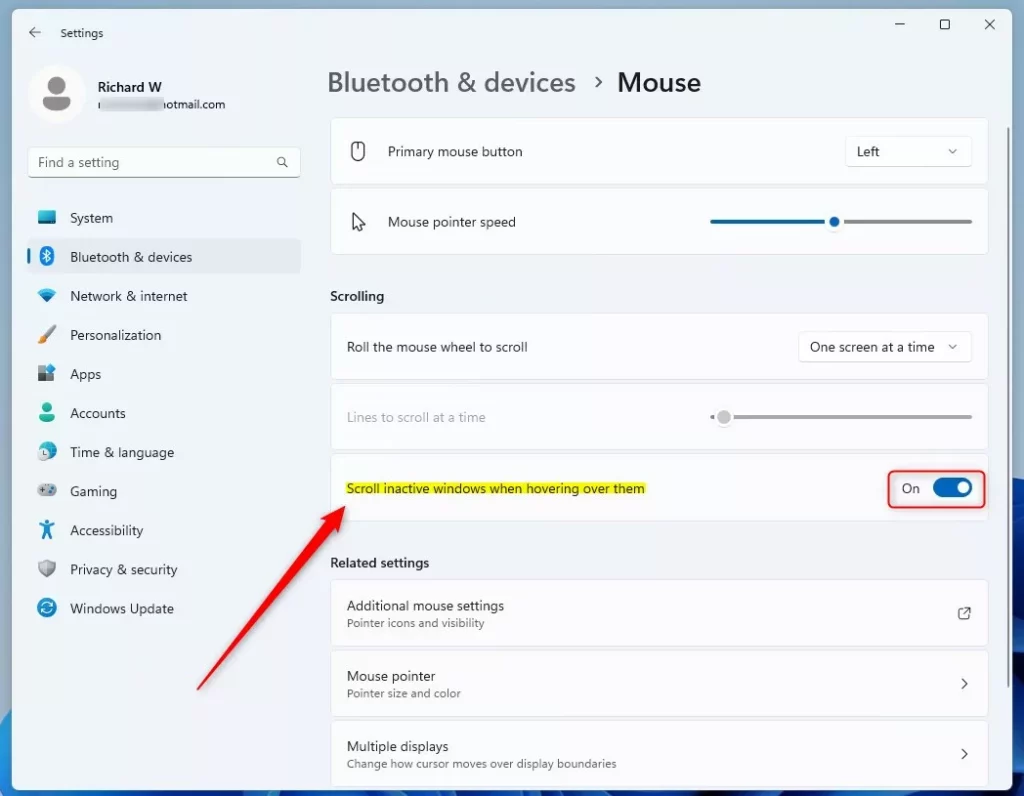
Включаем настройку «Прокручивать неактивные окна при наведении на них», если она отключена.
При задействовании обоих рассмотренных функций с помощью бесплатной программы-твикера Winaero Tweaker получим дополнительно возможности по их настройке. Которые могут улучшить работу с окнами и предотвратить случайные переключения на не те окна. В программе Winaero Tweaker проходим путь:
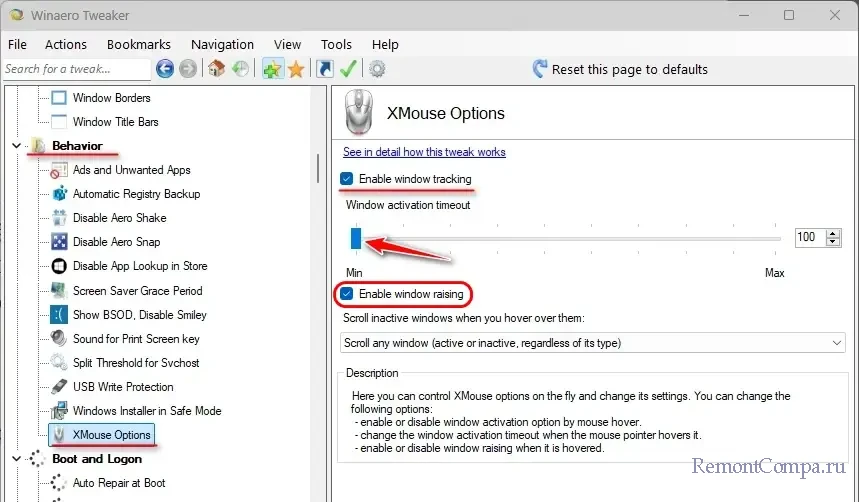
Это настройки XMouse — собственно, системной функции управления поведением окон при взаимодействии с мышью. Устанавливаем галочку «Enable window tracking», это включение отслеживания окна, т.е. та самая, что и предлагаемая нативно Windows, автоматическая активация окон при подведении к ним курсора мыши, без клика.
Ниже нам предлагается настройка «Window activation timeout», она позволяет настроить задержку такой активации для предотвращения случайной активации окон. На шкале можем выбрать то или иное значение задержки. Чем больше значение, тем больше задержка.
Ещё ниже есть настройка «Enable window raising», это выдвижение на передний план активного окна при подведении к нему курсора, и это, собственно, то, как работает системная эта функция Windows. Если же не установить галочку этой настройки, окно при подведении к нему курсора будет активно, но не будет выдвигаться на передний план. Это нечто золотой середины между привычным поведением окон, когда нужен клик для их активации и когда окна переключаются при подведении курсора. При таком раскладе сможем сохранять фокус на нужном окне и работать в фоновых окнах. Это может быть удобно при работе с наложенными окнами, да и вообще в принципе.
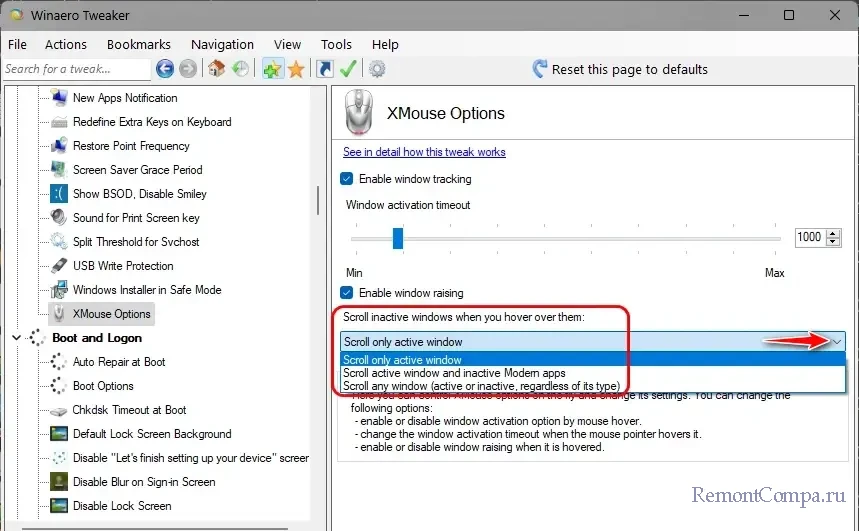
В самом низу есть настройка «Scroll inactive windows when you hover over them», это прокрутка неактивных окон, но, в отличие от системной реализации, чуть гибче настраиваемая:
- Scroll only active window – прокрутка только активного окна;
- Scroll active window and inactive Modern apps — прокрутка активного окна и неактивных современных приложений;
- Scroll any window (active or inactive, regardless of its type) – прокрутка любого окна (активного или неактивного, независимо от его типа).
Для применения внесённых программой изменений может понадобится перезаход в Windows.
Друзья, по теме улучшения личной производительности работы с компьютером смотрите также возможности окон Windows 11.
“Scroll inactive windows” is an ability to scroll windows that are not active, or in other words, not in the foreground at the moment. In Windows 11, there is an option that allows you to set whether you want to have this feature enabled or not. When turned on, you will be able to scroll inactive windows when you hover your mouse cursor over them.
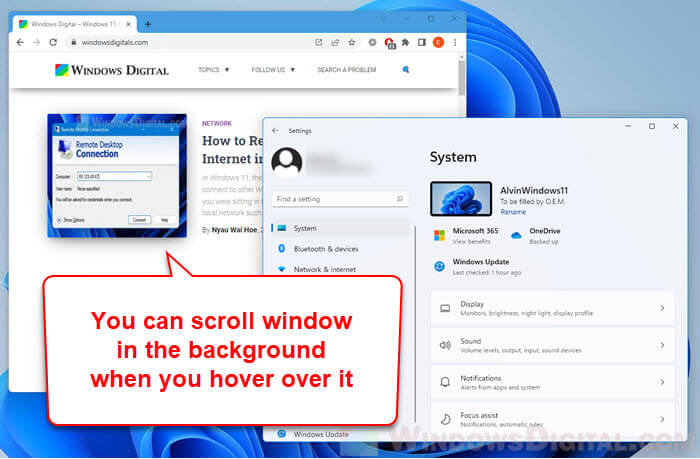
This feature can be very useful when you are multitasking or having multiple windows opened at a same time. You can scroll whichever window in the background without needing to select the window first.
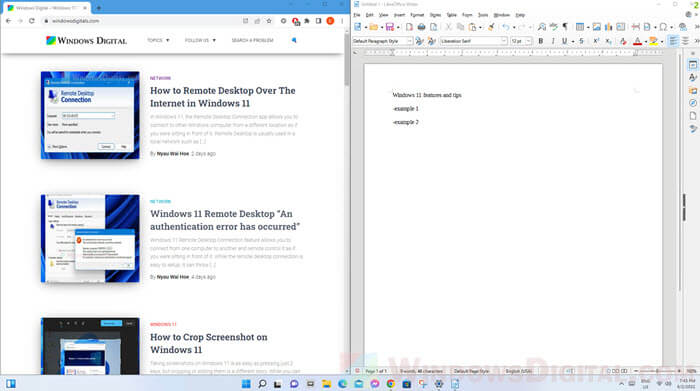
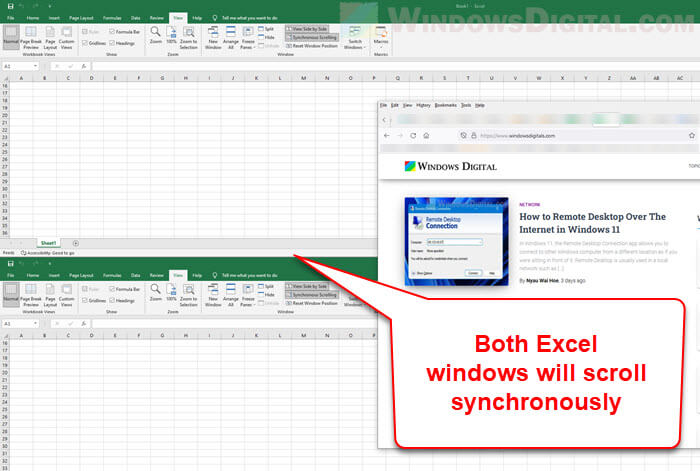
An example would be when you have two windows opened side-by-side while you are actively working in one of the windows, e.g. writing an article, you might need to scroll the other window for information. With this feature enabled, you can scroll the other non-active window without selecting it first.
Although the ability to scroll inactive windows can come in handy in most cases, some people may not like it. In some situations, accidentally scrolling unwanted windows even when they are not active can be annoying. Since the “Scroll inactive windows when I hover over them” option is enabled by default, you can follow the same steps below to turn if off instead if you don’t like the feature.
How does scrolling inactive windows work?
If you have an office window active in the foreground while having another Chrome’s window in the background, when you hover your mouse cursor over the Chrome’s window and spin the scroll wheel, the Chrome’s window will scrolls even when it is inactive (not in the foreground).
This is when the “Scroll inactive windows when hovering over them” option is enabled in Windows 11. If you can’t scroll any window in the background, it means the option is disabled.
How to enable or disable “Scroll inactive windows” in Windows 11
To turn on or off the “Scroll inactive windows when I hover over them” option in Windows 11, follow the steps below. Note that this feature is enabled by default in Windows 11.
- Press Win + i keys to open Settings.
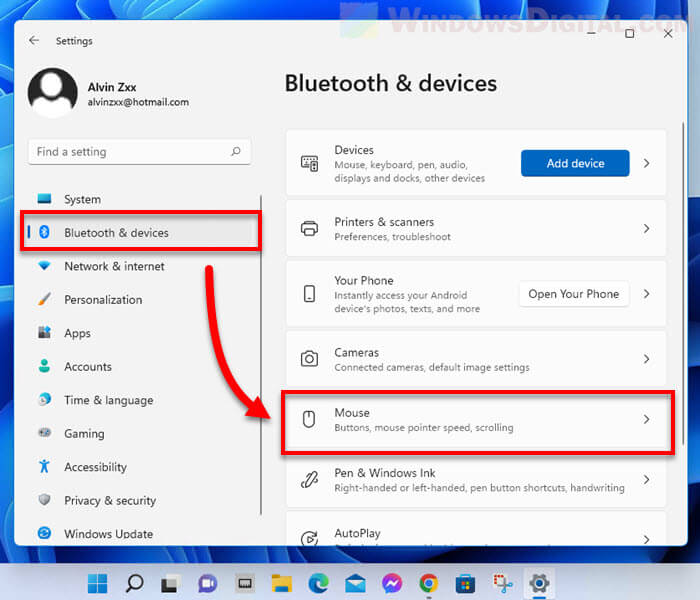
- On the left pane, select Bluetooth & devices, then on the right, select Mouse.

- Under the “Scrolling” section, click the toggle button next to “Scroll inactive windows when hovering over them” option to turn it on or off.


Also see: How to Move a Window That is Off-Screen in Windows 11
Scroll inactive windows not working
Excel issue
If there are multiple excel windows in the background while another window active in the foreground, when you hover your mouse over one of the Excel windows, it will only scroll the last active Excel window. This has been a common issue since Windows 10 where users cannot scroll some of the Excel windows that are not active.
There is no clear fix to this issue yet as of now. If you really need to use the scroll inactive windows feature while working with your spreadsheets, you may want to consider trying another spreadsheet program such as LibreOffice – an alternative to Microsoft Office.
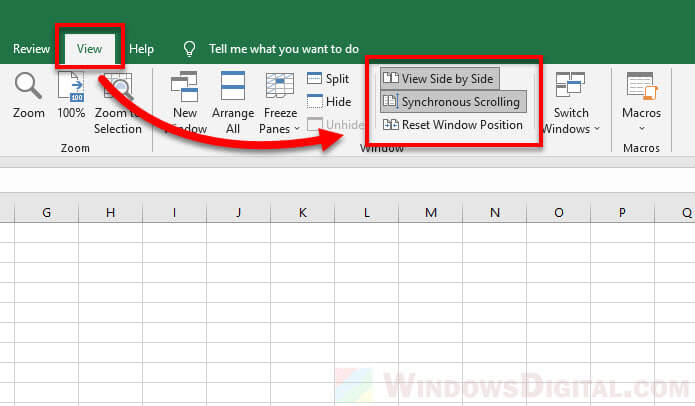
Another workaround to this would be to turn on synchronous scrolling from the View tab in Excel. When this option is turned on, scrolling in one excel window will also scroll other Excel windows synchronously (simultaneously). Though this doesn’t fix the root of the issue, but it can be useful in some situations.
You can enable this option from the View tab in Microsoft Excel. First, enable the View Side by Side option, then select Synchronous Scrolling. Note that these options will only be available when you have two or more Excel windows opened, otherwise the options will be greyed-out.
Mouse and touchpad
If you are using a touchpad to scroll inactive windows, there is a chance that it won’t work when you scroll with a touchpad instead of a mouse. In that case, you can try to install Precision Driver for the touchpad and see if you can scroll inactive windows after that.
This article describes steps to enable or disable “Scroll inactive windows when hovering over them” in Windows 11.
Windows has a built-in feature that will let you scroll inactive windows simply by hovering over them using your mouse pointer without your active window losing focus.
This can come in handy when you don’t want to lose your active window on the screen but also want to view data on background windows.
Below is how to enable or disable that feature in Windows 11.
Scroll inactive windows when hovering over them in Windows 11
As described above, Windows has a built-in feature that will let you scroll inactive windows simply by hovering over them using your mouse pointer without your active window losing focus.
Here’s how to turn it on or off.
First, open the Windows Settings app.
You can do that by clicking on the Start menu and selecting Settings. Alternatively, use the keyboard shortcut (Windows key + I) to launch the Settings app.

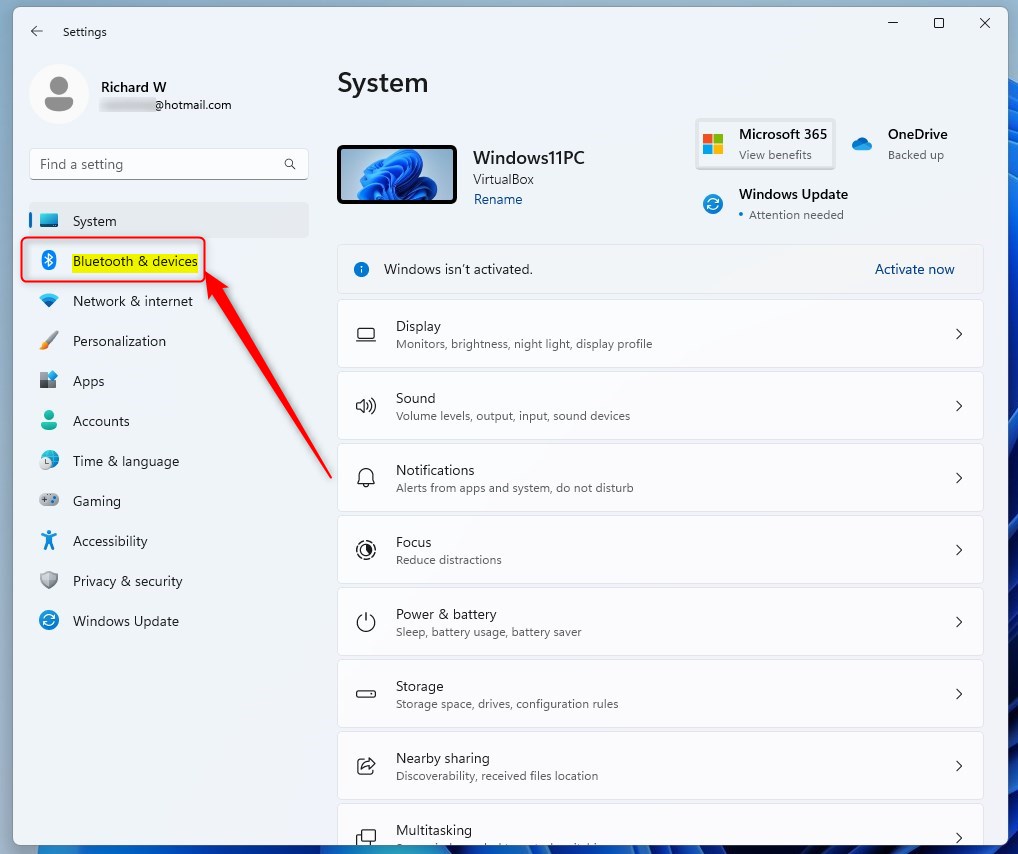
When the Settings app opens, click the Bluetooth & devices button on the left.
On the right, select the Mouse tile to expand.
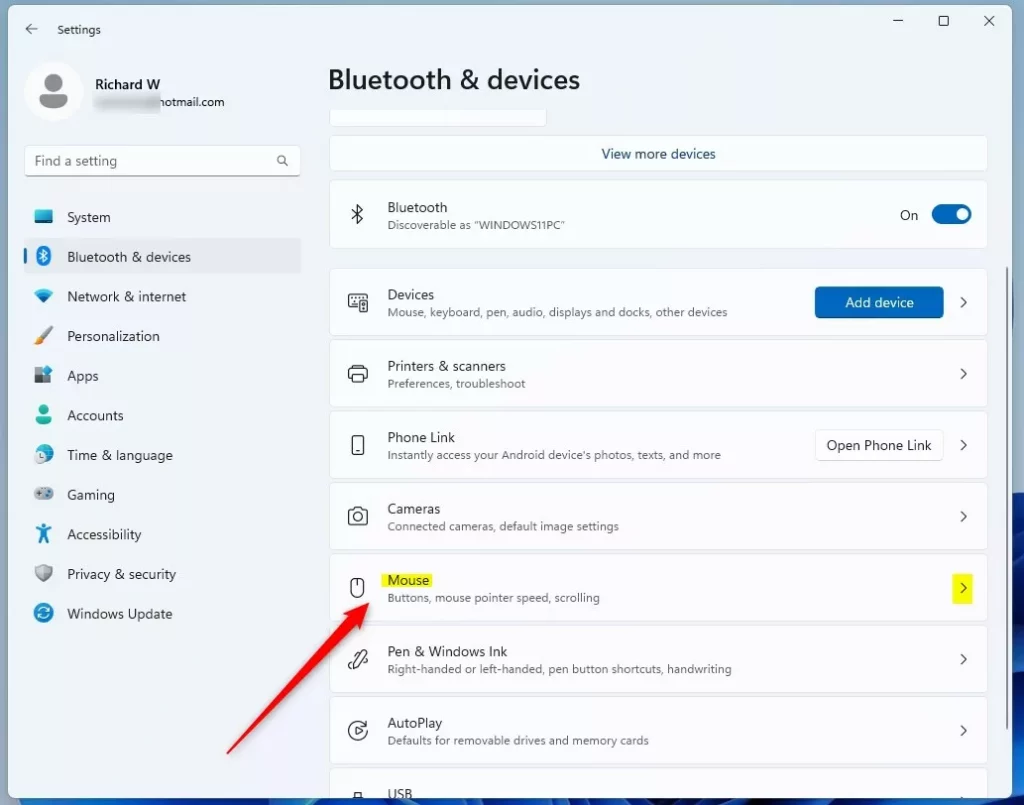
On the Bluetooth & devices -> Mouse settings pane, under the Scrolling section, select the tile that reads “Scroll inactive windows when hovering over them.”
Toggle the button to the On position to enable. To disable it, toggle the button back to the Off position.
Close the Settings app.
Change inactive scroll windows when hovering over them via the Registry Editor.
Another way to change this setting is to use the Windows Registry app.
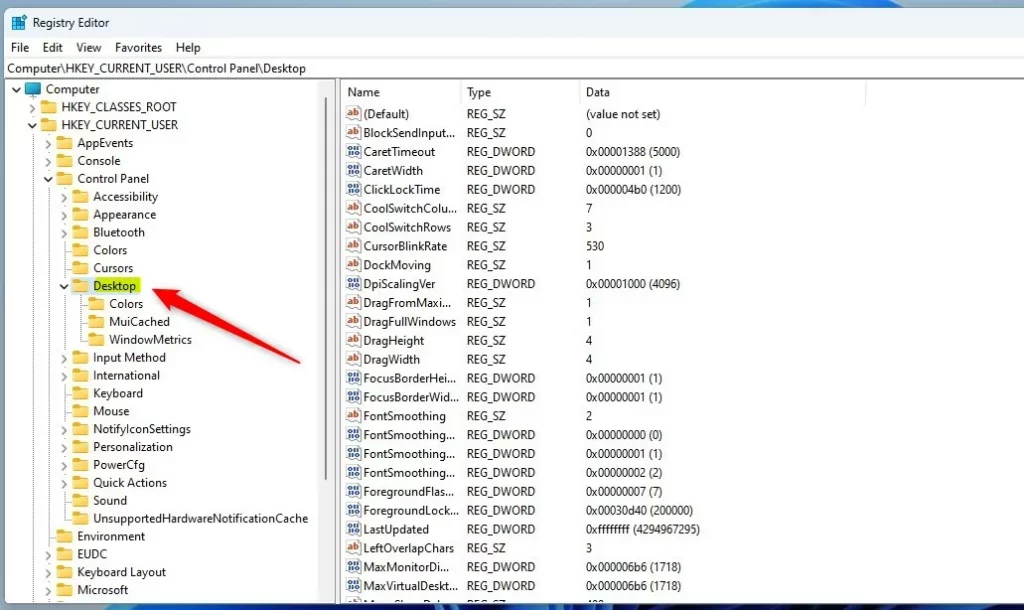
Open the Windows Registry, and navigate to the folder key path as listed below.
HKEY_CURRENT_USER\Control Panel\Desktop
If you don’t see the Desktop folder key, right-click on the Control Panel parent key, then create the subkey (Desktop) folder.
Right-click on the Desktop folder key’s right pane and select New -> DWORD (32-bit) Value. Type a new key named MouseWheelRouting.
Double-click the new value name (MouseWheelRouting) and enter the Value data of 2 to enable inactive scrolling windows when hovering over them.
A Value data of 0 will disable scrolling active windows when hovering over them.
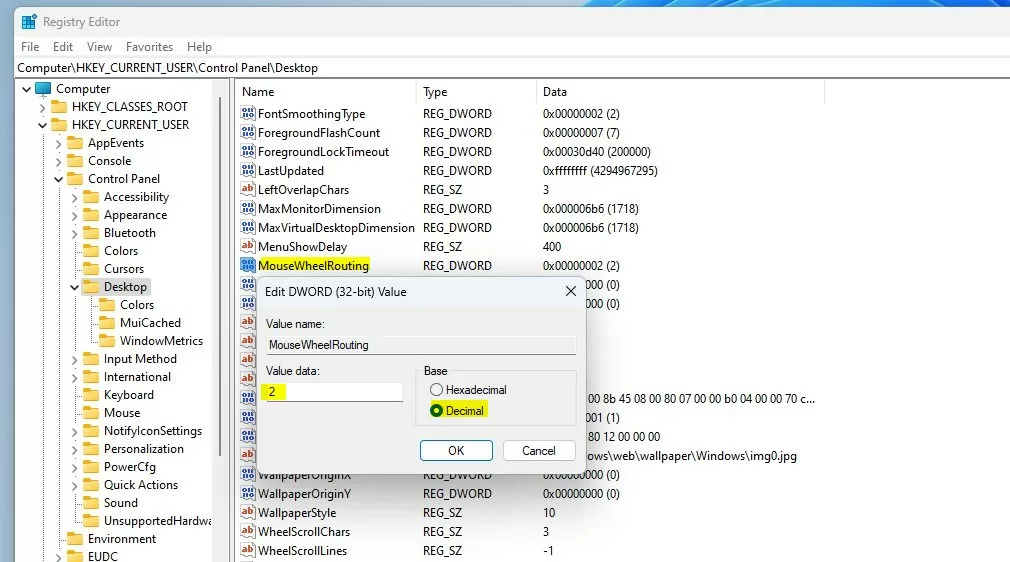
That should do it! Restart your computer to apply your changes.
Conclusion:
- Windows 11 provides the convenient feature to scroll inactive windows when hovering over them, allowing users to view data on background windows without losing focus on the active window.
- Users can enable or disable this feature through the Windows Settings app or by modifying the relevant registry entry.
- Whether through the Settings app or Registry Editor, controlling this feature gives users more flexibility in managing their window focus and multitasking experience.
Often you may be wondering whether or not you should turn on “Scroll Inactive Windows When I Hover Over Them” on your Windows 10 computer. While the feature is incredibly useful, it can also be annoying in some circumstances. Read on to discover whether you should turn on this feature and why. Scroll Inactive Windows When I Hover Over Them
You can enable this feature in Windows 10 by visiting the Settings App and finding the option “Scroll inactive windows when I hover over them”. This setting can be found under the Devices section, Mouse & touchpad. When you have it enabled, you’ll be able to scroll inactive windows as you hover over them. If you’re not using it, simply disable it. It will still be available in Windows 11.
To turn on inactive scrolling in Windows 10, click the “Mouse Wheel” icon. Then, select the corresponding DWORD value. In the resulting dialog box, type “inactive” and hit the Enter key. You should now notice that the Windows 10 desktop will automatically scroll inactive windows when you hover over them. Once you’ve done this, you can use the mouse wheel to move the window or tabs that you’re hovering over.
Why is Windows 10 Scrolling Not Working?
You may have noticed that your mouse cursor is not scrolling inactive windows when you are using the mouse. While this feature is useful for many situations, it is annoying in others. To make the mouse cursor scroll inactive windows, you need to enable this feature. Navigate to the Settings > Devices > Mouse & Touchpad. From there, click on the Scroll inactive windows toggle. Once enabled, you can begin to scroll inactive windows without losing focus.
Another way to fix this issue is to enable the feature in the mouse’s settings. The “Scroll inactive windows” setting in the mouse’s settings is related to the All Apps list. Unlike in previous versions of Windows, you have to enable this setting manually. This will result in your mouse not automatically focusing on the box control when you hover over an inactive window.
How Do I Fix Windows Scrolling?
If you are having trouble with your Windows PC, you may have discovered that your windows are scrolling when you hover your mouse over them. This problem is generally caused by a software bug or a misconfigured mouse or scroll wheel. If this happens to you, don’t panic, there are many ways to fix the issue. This article explains the most popular solutions to this problem. If you can’t find an appropriate solution for your particular problem, you may need to try a system restore.
If you’re using Windows 10, you can enable the feature “Scroll inactive windows when you hover over them.” To enable this feature, navigate to the Settings window and click on Mouse. Under Mouse, select the “Scrolling” tab. There, click on the toggle to enable this feature. If you enable it, the inactive window will scroll once you’ve pressed the ‘Scroll’ key on your keyboard. If you enable this option, the problem will go away, and you’ll be able to use your mouse to scroll your windows again.
What is an Inactive Window?
You have probably heard of inactive windows, or the windows that don’t receive any attention at all. You see them on the taskbar – an active window is the one being used by the user, and an inactive window is one that isn’t. But what is the difference between them? How can you improve the content of your inactive windows? Here are some suggestions. Let’s look at a few of them.
Scroll Inactive Windows: This feature is included in Windows 10 and has been carried over to Windows 11. In order to enable it, you have to hover your mouse pointer over an inactive window. You can disable it by clicking the mouse wheel. Scrolling inactive windows is very useful if you are writing a document or researching a website. You can even use it when you snap multiple screens side by side. Just be sure to enable the option in your Mouse and Touchpad settings.
Why Does My Screen Scroll Down by Itself?
If you’re wondering, “Why does my screen scroll down by itself when I hover over inactive windows?”, you’re not alone. The problem can be distracting and can even slow down your computer if it happens frequently. Here’s how to solve it and prevent the problem from happening again. Firstly, you need to know what is causing the problem. Some users have reported that it’s a mouse issue or a touchpad issue. You can fix this by enabling the Windows Safe Mode option.
To enable the feature, go to Settings > Devices > Mouse and Touchpad. From there, look for the “Scroll inactive windows” setting and toggle it to “On.” This feature can be useful when you want to research the web, write a document, or even snap multiple screens side-by-side. Simply hover your mouse over the window that you want to scroll down and it’ll scroll.
How Do I Enable Two Finger Scrolling on Windows?
To enable two-finger scrolling on Windows when hovering over them, you can access the mouse properties window and go to the touchpad tab. There, you can enable the function, or you can check for empty Value Data fields. If this doesn’t work, you can try changing the pointer in Control Panel. Then, restart your computer and you should be good to go.
First, you need to open the Registry Editor. Press Windows and R on your keyboard to launch the Registry Editor. After a few seconds, you should see the Registry Editor window. Locate the entry named “3FingerTapPluginID” and change its value to empty. This should enable two finger scrolling. If it doesn’t work, try changing the mouse pointer and see if it helps.
Next, open Device Manager. Expand the category labelled “Mices and other pointing devices”. From there, select the mouse device and click the driver tab. Once inside, click the Update Driver button. If the update is still failing, you can go back to the previous driver. You can choose a driver from the history to fix the problem. You should now be able to scroll with two fingers on Windows.
How Do I Enable Scroll Wheel?
Windows has a new feature called “Scroll inactive windows when I hover over them” and by default, this feature is enabled. While this feature is handy in most cases, there are situations where it can be distracting. To disable it, follow these steps:
Inactive window scrolling is a new feature in Windows 10. This feature allows you to use the mouse wheel to scroll inactive windows without selecting the window. You’ll find this feature useful when multitasking because you don’t have to switch between windows to navigate through the content of one. Simply hover over an inactive window and use the scroll wheel to move the window up and down.
To enable scroll wheel on inactive windows when hover over them, go to Settings, Devices, Mouse, and click the Scroll inactive window toggle button. Scrolling inactive windows is useful for many purposes, including writing documents, researching the web, and snapping multiple screens side-by-side. Hovering over an active window allows you to scroll it. If an inactive window isn’t scrolled, you’ll see a white bar on the screen.
How Do I Turn Off Auto Scroll in Windows 10?
Inactive window scrolling is an excellent way to get more done in multitasking. Simply hovering over an inactive window makes it scroll up or down automatically. While it can be handy, you may find it annoying. To turn off auto scrolling in Windows 10, simply go to the Settings app and uncheck the box labeled “Scroll inactive windows when I hover over them.”
To enable the Inactive Scrolling feature, click the MouseWheelRouting value in the Registry. To do this, simply change the Value data from 0 to 2. You can also enable or disable it in the Control Panel. To enable or disable this feature, repeat the process for Windows 11.
Another way to disable auto scrolling is by changing the settings for the Mouse. Usually, it is enabled by default, but you can turn it off in the Control Panel by clicking the “Scroll inactive windows” toggle. If you need to scroll inactive windows, you can scroll to the last window by hovering over the window. Just make sure you don’t enable this option while you are working, or it may become ineffective.
Learn More Here:
1.) Windows Help Center
2.) Windows – Wikipedia
3.) Windows Blog
4.) Windows Central